LS502 - Speaker MARANTZ - Free user manual and instructions
Find the device manual for free LS502 MARANTZ in PDF.

User questions about LS502 MARANTZ
0 question about this device. Answer the ones you know or ask your own.
Ask a new question about this device
Download the instructions for your Speaker in PDF format for free! Find your manual LS502 - MARANTZ and take your electronic device back in hand. On this page are published all the documents necessary for the use of your device. LS502 by MARANTZ.
USER MANUAL LS502 MARANTZ
Handheld Solid State Recorder

CAUTION
RISK OF ELECTRIC SHOCK DO NOT OPEN

CAUTION: TO REDUCE THE RISK OF ELECTRIC SHOCK, DO NOT REMOVE COVER (OR BACK). NO USER-SERVICEABLE PARTS INSIDE.
REFER SERVICING TO QUALIFIED SERVICE PERSONNEL.

The lightning flash with arrowhead symbol within an equilateral triangle is intended to alert the user to the presence of uninsulated "dangerous voltage" within the product's enclosure that may be of sufficient magnitude to constitute a risk of electric shock to persons.

The exclamation point within an equilateral triangle is intended to alert the user to the presence of important operating and maintenance (servicing) instructions in the literature accompanying the product.
WARNING
TO REDUCE THE RISK OF FIRE OR ELECTRIC SHOCK, DO NOT EXPOSE THIS APPLIANCE TO RAIN OR MOISTURE.
CAUTION:
USE OF CONTROLS OR ADJUSTMENTS OR PERFORMANCE OF PROCEDURE OTHER THAN THOSE SPECIFIED HEREIN MAY RESULT IN HAZARDOUS RADIATION EXPOSURE.
Copyright
Recording and playback of any material may require consent. For further information refer to the following US ordinances:
• Copyright act of 1956
• Dramatic and Musical Performance Act 1958
• Performers Protection Acts 1963 and 1972
• Any subsequent statutory enactments and orders
IMPORTANT SAFETY INSTRUCTIONS
READ BEFORE OPERATING EQUIPMENT
This product was designed and manufactured to meet strict quality and safety standards. There are, however, some installation and operation precautions which you should be particularly aware of.
- Read these instructions.
- Keep these instructions.
- Heed all warnings.
- Follow all instructions.
- Do not use this apparatus near water.
- Clean only with dry cloth.
- Do not block any ventilation openings. Install in accordance with the manufacture's instructions.
-
Do not install near any heat sources such as radiators, heat registers, stoves, or other apparatus (including amplifiers) that produce heat.
-
Do not defeat the safety purpose of the polarized or grounding-type plug. A polarized plug has two blades with one wider than the other. A grounding type plug has two blades and a third grounding prong. The wide blade or the third prong are provided for your safety. If the provided plug does not fit into your outlet, consult an electrician for replacement of the ob

-
Protect the power cord from being walked on or pinched particularly at plugs, convenience receptacles, and the point where they exit from the apparatus.
-
Only use attachments/accessories specified by the manufacturer.
- Use only with the cart, stand, tripod, bracket, or table specified by the manufacturer, or sold with the apparatus. When a cart is used, use caution when moving the cart/apparatus combination to avoid injury from tip-over.
- Unplug this apparatus during lightning storms or when unused for long periods of time.
- Refer all servicing to qualified service personnel. Servicing is required when the apparatus has been damaged in any way, such as power-supply cord or plug is damaged, liquid has been spilled or objects have fallen into the apparatus, the apparatus has been exposed to rain or moisture, does not operate normally, or has been dropped.
Additional Safety Information!
- This product should not be placed in a built-in installation such as a bookcase or rack unless proper ventilation is provided or the manufacturer's instructions have been adhered to.
- Apparatus shall not be exposed to dripping or splashing and that no objects filled with liquids, such as vases, shall be placed on the apparatus.
- The AC adaptor shall be installed near the Socket-Outlet and shall be easily accessible.
NOTE:
This equipment has been tested and found to comply with the limits for a Class B digital device, pursuant to Part 15 of the FCC Rules. These limits are designed to provide reasonable protection against harmful interference in a residential installation. This equipment generates, uses and can radiate radio frequency energy and, if not installed and used in accordance with the instructions, may cause harmful interference to radio communications. However, there is no guarantee that interference will not occur in a particular installation. If this equipment does cause harmful interference to radio or television reception, which can be determined by turning the equipment off and on, the user is encouraged to try to correct the interference by one or more of the following measures:
- Reorient or relocate the receiving antenna.
- Increase the separation between the equipment and receiver.
- Connect the equipment into an outlet on a circuit different from that to which the receiver is connected.
- Consult the dealer or an experienced radio/TV technician for help.
NOTE:
Changes or modifications may cause this unit to fail to comply with Part 15 of the FCC Rules and may void the user's authority to operate the equipment.
This Class B digital apparatus complies with Canadian ICES-003.
Declaration of Conformity

English
We declare under our sole responsibility that this product, to which this declaration relates, is in conformity with the following standards: EN55022, EN55024, EN61000-3-2 and EN61000-3-3 Following the provisions of 2004/108/EC Directive.

Français
Kingsbridge House, Padbury Oaks Longford Middlesex UB7 0EH UK
English
WARNINGS
Do not handle the AC adaptor with wet hands.
Do not cover the ventilation with any items such as tablecloths, newspapers, curtains, etc.
No naked flame sources, such as lighted candles, should be placed on the equipment.
When disposing of used batteries, please comply with governmental regulations or environmental public instruction's rules that apply in your country or area.
Make a space of about 0.1 meter around the unit.
No objects filled with liquids, such as vases, shall be placed on the apparatus.
When the switch is in the OFF position, the equipment is not completely switched off from MAINS.
To completely disconnect this product from the mains, disconnect the plug from the wall socket outlet.
When setting up this product, make sure that the AC outlet you are using is easily acceptable.
Do not expose batteries to excessive heat such as sunshine, fire or the like.
Français
AVERTISSEMENTS
A NOTE ABOUT RECYCLING:
English
This product's packaging materials are recyclable and can be reused. Please dispose of any materials in accordance with the local recycling regulations.
When discarding the unit, comply with local rules or regulations.
Batteries should never be thrown away or incinerated but disposed of in accordance with the local regulations concerning chemical waste.
This product and the accessories packed together constitute the applicable product according to the WEEE directive except batteries.
UNE REMARQUE CONCERNANT LE RECYCLAGE:
Français
UMA NOTA SOBRE A RECICLAGEM:
Português
Names and Functions ......6
Top 6
Right Side 8
Left Side 8
Front....9
Back....9
Bottom....10
Display 10
Preparation Before Use ....11
Installing the carry strap 11
Installing batteries 11
Removing batteries ....12
Installing a memory card ....13
Removing a memory card ....13
Clock Setting 14
Language 15
Basic Recording Operation .....16
Connection Diagram ......16
Recording Procedure ......16
Audio Input for Recording ....18
Recording Time Chart ......19
Recording Level Control 20
Basic Playback Operation .....21
Connection Diagram ......21
Playback Procedure 21
Access from File List 22
Search......23
Skip Back 23
Advanced Features ......24
Microphone(s) 24
Pre Record 25
Audio Filter 25
Silent Skip 25
Manual Track 25
Auto Track 26
Copy Segment 26
File Divide 27
Marking 28
Pitch Control 28
Additional Features ......29
Key Lock 29
Remote 30
Extended Remote Jack 31
Display Control 32
USB Mode 35
Computer compatible ....35
How to connect via the USB port ....35
Diagram of file structure ......36
Menu 37
Menu Structure ....37
Top Menu 38
Preset Menu 39
Display Menu 48
Utility Menu ....50
File List Menu ....56
Folder List Menu ....59
Troubleshooting 62
Error Message 63
Specifications....64
Limited Warranty ......65
Package Contents
- PMD661

natural_image
Line drawing of a portable electronic device with ports and buttons (no text or symbols)- Audio cable

- USB cable
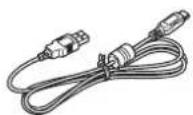
- AC adapter
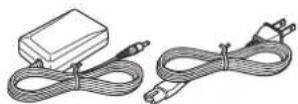
- User guide
- CD-ROM
- Carry strap

- Customer registration document (US only)
- SD card

Introduction
Thank you for selecting the Marantz Professional PMD661 Portable Solid State Recorder.
The PMD661 is an audio recorder that records in digital audio formats onto an SD (Secure Digital) card.
SD cards, also used in digital cameras, are widely available at consumer electronics retailers and computer resellers.
Features
- Stereo (2 channels) and mono (1 channel) audio recording and playback.
• Audio inputs maybe from :
- the built-in microphone(s),
- condenser or dynamic microphone(s) connected to the XLR stereo jacks, or
– line level audio sources connected to the XLR jacks or LINE 2 jack.
• Audio outputs may be from :
- the built-in speakers,
– headphones connected to the PHONES jack, or
– analog audio devices such as an amplifier or other devices connected to the LINE OUT jack.
• Records onto various types of SD cards.
- Computer compatible
The PMD661 records directly onto SD cards.
Recordings can be transferred to your desktop or laptop computer by removing the SD card from the PMD661 or by connecting the PMD661 to your computer via the USB port. Audio recorded in the
popular MP3 compression format is directly available for intranet or internet file sharing.
- Easy one control recording Simply push the REC button.
- Automatic recording The PMD661 can be set to stop recording when there is silence (Silent Skip) and automatically start when sound resumes.
- Manual and automatic record level control (ALC).
- Two different recording formats :
- Compressed recording using MP3 (MPEG1 Layer III) mono and stereo. MP3 compressed at 64/128/192/256/320 kbps.
- Uncompressed recording using 16/24-bit linear Pulse Code Modulation (PCM).
- Copy Segment
Copy Segment works just like the copy and paste function of your standard word processing program. It allows you to "highlight" a section of a file by setting an in point and an out point, and then paste that section into a new file without destroying the original file(s).
- Timer Recording/Playback
Record start time and duration can be scheduled. Playback start time can be scheduled. (P.51)
- Data secured
The recorded audio data until the recording stops is kept even if the power is interrupted suddenly during recording.
Quick Start Guide
Follow the instructions on this page to Quick Start your new PMD661 Solid State Recorder and begin recording.
The PMD661 comes with factory preset defaults for MP3 recording using internal microphones.
-
Unpack the AC adapter and the PMD661.
-
Setup the power supply.
-
Use either the provided AC adapter or batteries.
- You can use 4 AA type batteries of Alkaline, or Nickel-Metal Hydride.

natural_image
Diagram of an electronic testing setup with a device connected to a power supply and cable (no text or symbols visible)- Slide and hold the POWER switch.

text_image
marantz PROFESSIONAL ↓ TOTAL REMAIN 12:34:56 INT MIC 023 files MENU T B STOP LIST- Press the REC button to start recording.
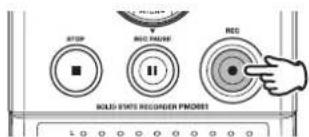
text_image
STOP RED PAUSE REG SOLID SMT3 RECORDER PMOSET
-
Press the STOP button to stop recording.
-
Press the ▶/II/ENTER button to play the just recorded file via headphones or speaker.

text_image
SKIP BACK A RPG10+ DISPLAY H- REC-
Press the ▶/II/ENTER button again to pause playback.
-
Press the STOP button to stop playback.
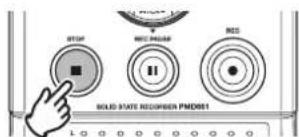
text_image
STOP RMS DIP/REF RMS SOLID STATE RECORDER PMDB1- For other recording condition, P.41.
- For the clock setting, P.14.
Names and Functions
Top
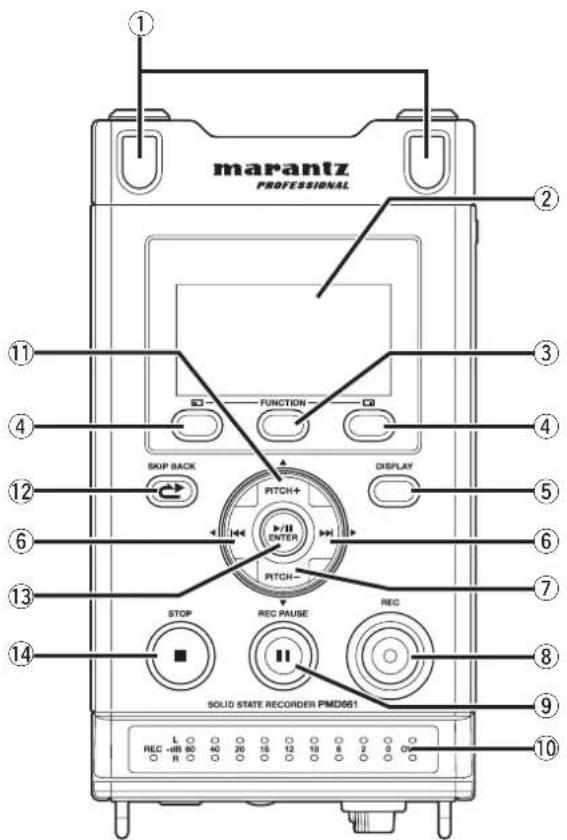
① Internal Microphones
Stereo condenser microphones.
② DISPLAY
The display shows the information of the PMD661. (P.10)
③ FUNCTION button
Press the FUNCTION button to change the functions on ☐(F1) and ☐(F2) buttons with toggle operation. The functions are different depending on each operation mode.
④ (1) / (2) buttons
The functions of the ☐ (F1) and ☐ (F2) buttons depend on each operation mode and the FUNCTION button. Function (F1/F2) is indicated on the bottom corner of the display. The functions change automatically when the status changes. The 2nd or 3rd function in the same status can be selected by pressing the FUNCTION button.
Functions of ☐ (F1) /☐ F2) buttons
| Operation mode | (F1) function (F2) | function |
| Stop 1. MENU 1. LIST ( File List ) | ||
| Record or Rec-Pause | 1. TR (Manual Track) 1. MARK | |
| 2. UNDO ( Record Undo) | 2. MARK | |
| Stop after Record or Playback | 1. MENU 1. LIST ( File List ) | |
| 2. MK- (Mark Search - ) | 2. MK+ (Mark Search + ) | |
| Playback or Play-Pause | 1. COPY (Copy Segment ) | 1. MARK |
| 2. DIV (Divide ) | 2. LIST ( File List) | |
| 3. MK- (Mark Search - ) | 3. MK+ (Mark Search + ) | |
⑤ DISPLAY button
Press the DISPLAY button to change the display contents like the time information with toggle operation. The content is different depending on each operation mode.
⑥ |◀◀/▶▶| button
- While in Stop, Playback, or Play-Pause mode, press this button to choose the file (Jump to previous/next file).
- In Play-Pause mode, press and hold this for high speed Reverse/Forward searching without audio. (Search -/Search +)
- In Playback mode, press and hold this to "rewind"/"fast forward" and do a 2X speed search. (Audible Search -/Search +)
⑦ PITCH- button
Press this button to make a speed down of playback. During menu mode, this button is used to change item.
⑧ REC button
Press this button to start recording from Stop or Rec-Pause mode.
⑨ REC PAUSE button
Press this button to enter the Rec-Pause mode from Stop or Record mode.
⑩ Level LED (Green, Orange, Red)
When a sound is input during Record, Rec-Pause or Playabck mode, it turns on.
⑪ PITCH+ button
Press this button to make a speed up of playback. During menu mode, this button is used to change item.
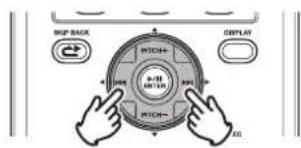
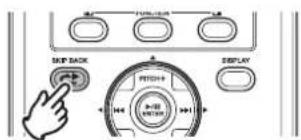
⑫ SKIP BACK button
Press the SKIP BACK button to skip back during playback or Play-Pause.
⑬ ▶/11/ENTER button
Toggles Playback and Play Pause. During Menu mode, this is used to decide the choice.
⑭ STOP button
Press this button to stop the playback or recording and to release the Play-Pause or Rec-Pause mode. During menu mode, press this button to exit menu mode without to store memory.
Right Side
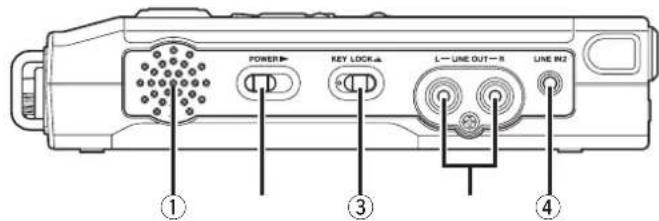
text_image
POWER KEY LOCK LINE OUT - R LINE IN2 ① ③ ④① Speaker
Internal speaker of R channel.
② POWER slide switch
Slide and hold for a little time to turn power On.
Slide to turn power Off. During Record and Rec-Pause mode, the POWER switch is invalid.
③ KEY LOCK slide switch
Slide switch for the Key Lock On and Off control.
④ LINE OUT Jacks
Insert an audio cable plug connected to an external audio device into these jacks to output audio signals to an external device (amp, etc.)
⑤ LINE IN 2 Jack
Insert an audio cable plug connected to an external audio device into this jack to input the signals output from the external device into the recorder.
Left Side

text_image
DC IN DIGITAL IN ② ① ② ⑤ ③ ④ ⑤① DC IN Jack
Insert the provided AC adapter plug.
If the AC adapter plug is inserted while using the recorder on battery power, the recorder will automatically switch to adapter power. Also, if the AC adapter plug is removed, the recorder will automatically switch to battery power.
② DIGITAL IN Jack
Connect a digital audio cable with an RCA jack from an external device providing SPDIF digital output.
③ USB port (mini-B)
The USB mode is started by connecting a USB cable while stopped.
④ Card compartment
Pull the lid to access an SD card.
⑤ Speaker
Internal speaker of L channel.
Front

text_image
PHONES HP/SPK VOL REC LEVEL L-R ① ② ③① PHONES Jack
For monitoring and private listening, you can connect your headphones to this jack.
② HP/SPK VOL Control
Use this to adjust the output level of the headphones or internal speakers.
Warning!
When using headphones, take care not to turn the volume too high. Listening at high volumes for extended periods of time may result in permanent hearing damage.
③ REC LEVEL Control
Turn to adjust the record level when the "Level Cont." of preset menu is "Manual".
The inside control (Right channel) and outside control (Left channel) turn together, unless you hold one while turning the other.
The optimum record level is when the level meter goes as close to 0dB as possible but does not go OVER.
Back

text_image
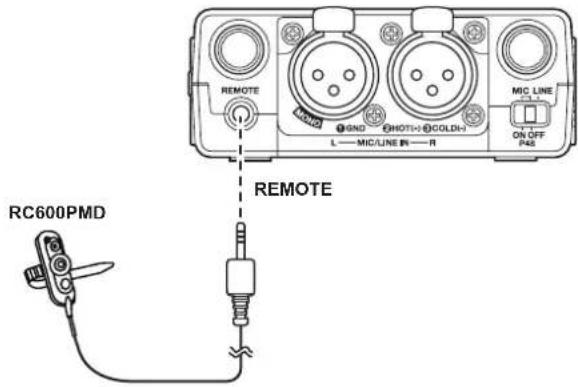
REMOTE ② GND GHOH+ GOLD+ L—MIC/LINE IN—R MIC LINE ON/OFF PAS ① ③① REMOTE Control Jack
The Jack for the optional remote RC600PMD and the external remote controller.
② MIC/LINE IN Jacks
XLR stereo for MIC/LINE level.
③ PHANTOM/MIC slide switch
3 position slide switch. Phantom on, off or line. Phantom works to supply +48V to external microphones.
Bottom
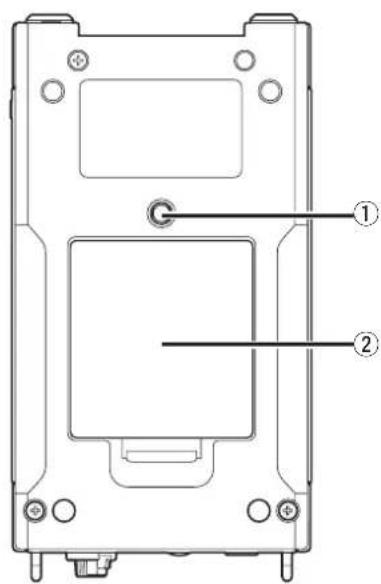
text_image
Technical diagram of a device casing with labeled components and mounting points① Tripod Hole
Threaded screw hole for Tripod mount.
② Battery compartment
For 4 AA alkaline or rechargeable Ni-MH batteries.
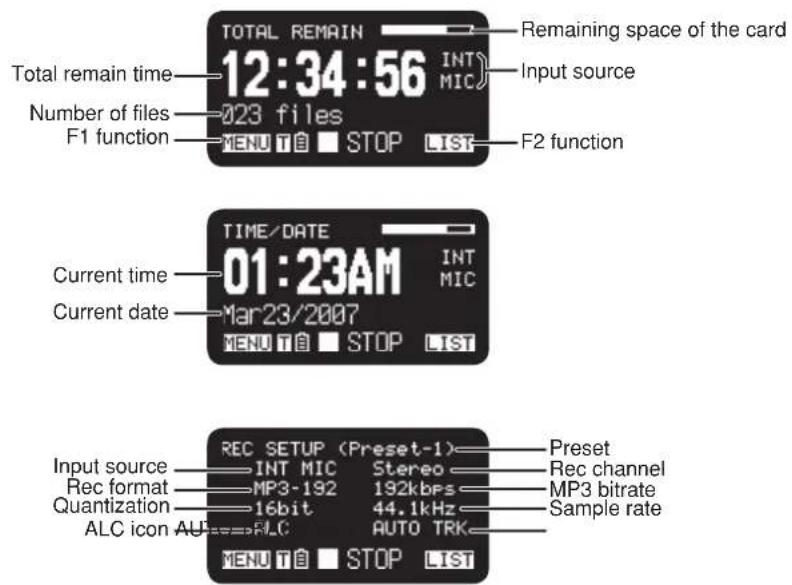
Display
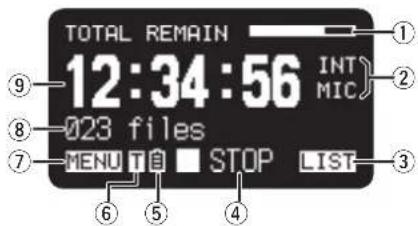
text_image
TOTAL REMAIN 12:34:56 INT MIC 023 files MENU T 自 STOP LIST ⑨ ⑧ ⑦ ⑥ ⑤ ④① Remaining space of the card
② Input source
③ F2 function
④ Status
⑤ Battery icon
⑥ Timer icon
This icon appears if the Timer Record/Playback is set. During the Timer Record/Playback, it blinks.
⑦ F1 function
⑧ Number of files
⑨ Total remain time
Preparation Before Use
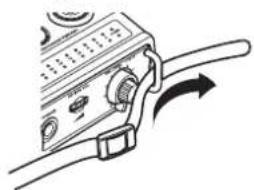
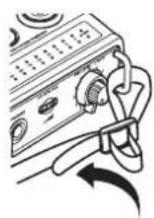
Installing the carry strap
- Put the carry strap through the shaft of the PMD661.
natural_image
Line drawing of a device with a scroll and directional arrow (no text or symbols)- Put the carry strap through the stopper of the PMD661.
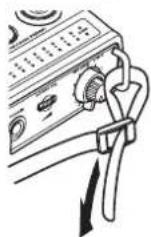
- Secure the carry strap by putting it through the second stopper.
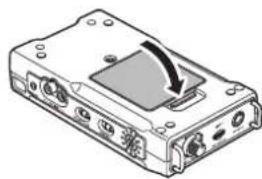
Installing batteries
- Remove the battery compartment cover.

natural_image
Diagram of a device rear panel with a highlighted component and arrow indicating motion (no text or symbols)- Insert the new batteries (AA type) with correct +/- polarity.

natural_image
Diagram of an electronic device with battery, coils, and a magnified inset showing internal components (no text or symbols)- Close the battery compartment.
natural_image
Diagram of a device rear panel with a highlighted internal component and an arrow indicating rotation (no text or symbols)Removing batteries
Battery compartment is located in the bottom of the unit.
- Remove the battery compartment door.
- Remove four AA type batteries.
- Close the battery compartment door.
Safety cautions on handling batteries
Always follow the points below when using batteries to avoid electrolyte leakage, overheating, fire, rupturing, ingestion, etc.
- Electrolyte leakage or corrosion may occur if batteries are kept inside the recorder for prolonged periods of time. If the recorder is not to be used for a prolonged period, remove the batteries to prevent electrolyte leakage.
- Make sure that the + and - markings on the batteries are aligned with the corresponding markings in the battery case and the battery holder.
- Do not insert old or exhausted batteries into the recorder.
- Do not mix the type of battery, and do not use both old and new batteries together.
- If the recorder does not operate correctly, replace the old batteries with new ones.
- If electrolyte has leaked, thoroughly wipe the inside of the battery holder, and then insert new batteries.
Battery remaining indicator
The recorder operates using commercially available AA size alkaline or Ni-MH batteries. During operation, the battery remaining indicator is as follows.
| Indicator | Meaning |
| [0.857] | There is still ample battery power remaining. |
| [0.9478] | The amount of battery power remaining has decreased to approximately half. |
| [0.9629] | Only a small amount of battery power remaining. |
| [0.977] | There is not enough battery power remaining to record or playback. Either replace the batteries with new ones, or recharge the rechargeable batteries.If you continue recording while this indicator is flashing, recording/playback will stop, and the recorder will shut down. |
| [0.9832] | The AC adapter is being used. The adapter power supply is valid. |
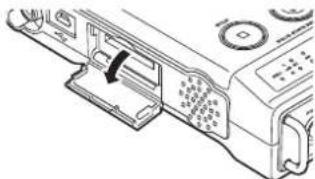
Installing a memory card
The PMD661 records onto various types of SD cards.
-
Check that the power is turned off.
-
Pull the SD card lid.
natural_image
Technical line drawing of a mechanical component with no visible text or symbols- Fully insert the SD card.
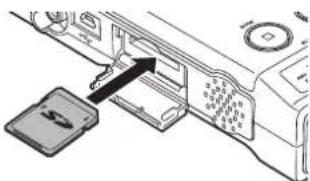
natural_image
Diagram of a device panel with an arrow pointing to a component, no visible text or symbols- Close the SD card lid.
Removing a memory card
-
Check that the power is turned off.
-
Pull the SD card lid.
-
Push the card, then pull it to remove it.

natural_image
Technical line drawing of a mechanical component with a highlighted section (no text or symbols)- Close the SD card lid.
Note:
If the SD card lid opens while the power is on, "Door Open" message is displayed.
While recording is in progress, opening the SD card lid automatically stops recording and writes critical file information to properly close the file.
Clock Setting
The date and time are written on each audio track (file) when the track is started. When an audio track is viewed on a computer, this date and time appears as when the file was 'modified'.
text_image
FUNCTION A DISPLAY PITCH+- Press the PITCH + or PITCH - button to select "Time/Date".

- Press the ▶/II/ENTER button to enter the Time/Date setting.
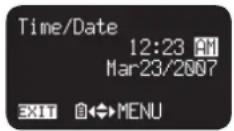
- Press the STOP button to cancel.
- Press the ◀◀◀ or ▶▶◀ button to select the item.
- When the hour is set, press the ◀◀ button to return to the Top Menu.
- When the year is selected, the ▶▶ button is invalid.
-
Press the PITCH + or PITCH – button to select the value.
-
Press the ☐1: EXIT) button.
-
"Store?" appears on the display.
- Select "Yes" and press the ▶/II/ENTER button to write on the Real Time Clock.
Note:
If it happens to be the date which does not exist such as Feb. 31, it gets revised as back to Feb. 28.
Language
The Language menu item allows you to choose a display language (English, French, Spanish, German, Italian and Swedish).
text_image
FUNCTION A DISPLAY PITCH+- Press the PITCH + or PITCH - button to select "Language".
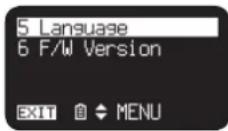
- Press the ▶/Ⅱ/ENTER button to enter the Language setting.

- Press the STOP button to cancel.
- Press the PITCH + or PITCH – button to select the item.
- When "English" is selected, press the PITCH + button to select "Swedish".
- When "Swedish" is selected, press the PITCH – button to select "English".
-
Press the ◀◀◀ button to return to the Top Menu.
-
Press the FB1: EXIT) button.
-
"Store?" appears on the display.
- Select "Yes" and press the ▶/□/ENTER button to store the change.
Basic Recording Operation
Connection Diagram
text_image
REMOTE L—MIC/LINE IN—R MIC LINE ON/EXP PAB MIC IN MICROPHONE POWER+ KEY LOCKA L—LINE OUT—R LINE IN2 AMPLIFIER LINE OUT LINE INRecording Procedure
- Slide and hold the POWER switch to turn on.

- Press the REC button to begin recording.
text_image
STOP REC DRAIN REC SOLID STATE RESORDER PMOSB1- The Rec indicator will be lit and steady while recording.
- The display will show the information display of recording.

- Press the REC PAUSE button to pause recording.
- Press the STOP button to stop recording and end the file (close the audio file).

text_image
STOP RED NAVE RAG BOLD STAVE RECORDER PMOENYou can press the ▶/II/ENTER button to play the just recorded file or press the STOP button again to enter the Stop mode. Then pressing the ▶/II/ENTER button will play the beginning of the first audio file.
Audio Input for Recording
The audio input for recording can be set from the "Input" menu. (P.43)
Set the "Rec Channel" menu to "stereo" to create a stereo (2-channel) sound file. Or set it to "D.Mono" to create a stereo sound file. The left channel input is recorded in both left and right channels. Or set it to "mono" to create a monaural (1-channel) sound file. The monaural file will be almost half the size of the stereo file.
Set the PHANTOM/MIC switch to "ON" to select the microphone level sensitivity with phantom power 48 volts. Or set it to "OFF" to select the microphone level sensitivity without phantom power. Or set it to "LINE" to select the line level sensitivity.
| # | INPUT Rec | Channel | PHANTOM/MIC switch | Description |
| 1 | INT MIC Stereo | eo Invalid Left/Right channel stereo recording. | ||
| 2 | D.Mono Left/ | Left channel stereo recording. The Right channel is attenuated by 20dB. | ||
| The Left channel input is recorded in both Left and Right channels. | ||||
| 3 | Mono Left channel monaural recording. | |||
| 4 | MIC/LINE Stereo ON Left/Right channel microphone level stereo recording. | |||
| 48 volt phantom power is supplied for XLR inputs. | ||||
| 5 | OFF Left/Right channel microphone level stereo recording. | |||
| 6 | LINE | Left/Right channel line level stereo recording. | ||
| 7 | D.Mono | ON Left/Left channel microphone level stereo recording. | ||
| The Left channel input is recorded in both Left and Right channels. The Right channel is attenuated by 20dB. | ||||
| 48 volt phantom power is supplied for XLR inputs. | ||||
| 8 | OFF Left/Left channel microphone level stereo recording. | |||
| The Left channel input is recorded in both Left and Right channels. The Right channel is attenuated by 20dB. | ||||
| 9 | LINE | Left/Left channel line level stereo recording. | ||
| The Left channel input is recorded in both Left and Right channels. The Right channel is attenuated by 20dB. | ||||
| 10 | Mono | ON Left channel microphone level monaural recording. | ||
| OFF Left channel microphone level stereo recording. | ||||
| 11 | OFF Left channel microphone level stereo recording. | |||
| 12 | LINE | Left channel line level monaural recording. | ||
| 13 | LINE2 | Stereo Invalid Left /Right channel stereo recording. | ||
| 14 | D.Mono Left/Left channel stereo recording. The Right channel is attenuated by 20dB. | |||
| The Left channel input is recorded in both Left and Right channels. | ||||
| 15 | Mono Left channel monaural recording. | |||
| 16 | D.IN | Stereo Invalid Left/Right channel stereo recording. | ||
| 17 | D.Mono Left/Left channel stereo recording. | |||
| 18 | Mono Left channel monaural recording. | |||
Recording Time Chart
All times are approximated record times.
Different media manufacturers allow more or less space for error correction and the like on their respective products.
Recording Time
Stereo channel
| Settings Bitrates | Recording Times (hours : minutes) | ||||
| 256MB 512MB 1GB 2GB 4GB | |||||
| PCM-16 (44.1KHz) 1411 kbps 0:24 0:48 1:36 3:12 6:24 | |||||
| PCM-16 (48KHz) 1536 kbps 0:22 0:44 1:28 2:56 5:52 | |||||
| PCM-16 (96kHz) 3072 kbps 0:11 0:22 0:44 1:28 2:56 | |||||
| PCM-24 (44.1KHz) 2117 kbps 0:16 0:32 1:04 2:08 4:16 | |||||
| PCM-24 (48KHz) 2304 kbps 0:14 0:28 0:56 1:52 3:44 | |||||
| PCM-24 (96KHz) 4608 kbps 0:07 0:14 0:28 0:56 1:52 | |||||
| MP3-320 320 kbps 1:46 3:33 7:06 14:12 28:24 | |||||
| MP3-256 256 kbps 2:13 4:26 8:52 17:44 35:28 | |||||
| MP3-192 192 kbps 2:57 5:54 11:48 23:36 47:12 | |||||
| MP3-128 128 kbps 4:26 8:52 17:44 35:28 70:58 | |||||
| MP3-64 64 kbps 8:52 17:44 35:28 70:56 141:52 | |||||
Monaural channel
| Settings Bitrates | Recording Times (hours : minutes) | |||||
| 256MB 512MB 1GB 2GB 4GB | ||||||
| PCM-16 (44.1KHz) | 705 kbps | 0:48 1:36 3:12 6:24 12:48 | ||||
| PCM-16 (48KHz) | 768 kbps | 0:44 1:28 2:56 5:52 11:04 | ||||
| PCM-16 (96kHz) | 1536 kbps | 0:22 0:44 1:28 2:56 5:52 | ||||
| PCM-24 (44.1KHz) | 1058 kbps | 0:32 1:04 2:08 4:16 8:32 | ||||
| PCM-24 (48KHz) | 1152 kbps | 0:28 0:56 1:52 3:44 7:28 | ||||
| PCM-24 (96KHz) | 2304 kbps | 0:14 0:28 0:56 1:52 3:44 | ||||
| MP3-320 | 160 kpbs | 3:33 7:06 14:12 28:24 56:48 | ||||
| MP3-256 | 128 kpbs | 4:26 8:52 17:44 35:28 70:56 | ||||
| MP3-192 | 96 kpbs | 5:54 11:48 23:36 47:12 94:24 | ||||
| MP3-128 | 64 kbps | 8:52 | 17:44 | 35:28 | 70:56 | 141:52 |
| MP3-64 | 32 kbps | 17:44 | 35:28 | 70:56 | 141:52 | 283:44 |
Recording Level Control
The recording level control lets you select the type of input level Control.
- At the Manual Level Control
When Manual is set in the Level Control setting, adjust the REC LEVEL Control on the front panel of the PMD661 to control the audio input level. The optimum record level is when the level meter goes as close to 0dB as possible but does not go OVER.

text_image
HSPN VOL REC LEVEL L-4-R L -dB 60 40 20 12 6 0.0V R TR REC MARK- At ALC (Automatic Level Control)
The PMD661 automatically responds to changes in input level. The REC LEVEL control does not work when the ALC is selected. Set the Level Control of the preset menu "ALC" (P.44).
Basic Playback Operation
Connection Diagram
text_image
POWER KEY LOCK LINE OUT LINE OUT AMPLIFIER LINE IN
text_image
PHONES RIP/IN VOL. REG LEVEL PHONES HEADPHONEPlayback Procedure
- Slide and hold the POWER switch to turn on.
- Press the ◀◀ or ▶▶ button to choose the file you wish to play.

text_image
SKIP BACK DISPLAY R-125 OUTPUT R-125 R-125 R-125 R-125 R-125 R-125 R-125 R-125 R-125 R-125 R-125 R-125 R-125 R-125 R-125 R-125 R-125 R-60 R-60 R-60 R-60 R-60 R-60 R-60 R-60 R-60 R-60 R-60 R-60 R-60 R-60 R-60 R-60 R-60 R-60 R-60 R-60 R-6- Press the ▶/II/ENTER button to begin playback.

text_image
SKIP BACK POTCH DISPLAY RIP-
Press the ▶/II/ENTER button again to pause playback.
-
Press the STOP button to stop playback.

text_image
STOP RED FRAME RED SOLD STATE RECORDER FROODERYou can press the ▶/II/ENTER button to play the just played file, or press the STOP button again to enter the Stop mode. Then pressing the ▶/II/ENTER button will play the beginning of the first audio file.
Note:
The file sort order can be changed using the preset "File Sort", (P.49) When set to Alphabet, files are sorted in order of symbol, number, and alphabet. When set to "Time/Date", audio files are sorted into the order in which they were created.
Access from File List
There are two ways to select the file you want to play. Either use the ◀◀ or ▶▶I buttons during Stop mode, or select the files from the File List.
The file list appears on the display.
- Press the PITCH + or PITCH - button to select the audio file. Then press the ▶/II/ENTER button to enter the File list Menu.

- Press the PITCH + or PITCH - button to select "Play". Then press the ▶/II/ENTER button to begin playback.
- During playback, press the STOP button to return to the File list. For accessing the files of other folder. (P.59)
Search
text_image
SNP BACK RITCH+ RICH- DISPLAY 100 100 100 100 100In Play-Pause mode, press and hold the ◀◀ or ▶▶I button for high speed searching without audio. 10X searching speed from 1 second to 4 seconds, and 140X speed over 4 seconds until release the button. When you release the button, the recorder returns to playback paused.
If the end of the file is passed with ▶▶ button still held down, search moves to the next file and continues searching in the forward direction.
If the tip of the file is passed with ◀◀ button still held down, search moves to the previous file and continues searching in the reverse direction.
During playback, press and hold the ◀◀◀ button to "rewind" and do a 2X speed audible search in the reverse direction. During playback, press and hold the ▶▶▶I button to "fast forward" and do a 2X speed audible search in the forward direction. Release to return to normal forward playback.
Skip Back
text_image
SKIP BACK PITCH DISPLAYPress the SKIP BACK button during playback or pause to return the amount of time set in the preset Skip Back from the current playback or pause point. (P.45)
Microphone(s)
- Attenuator
The microphone attenuation switch permits the direct use of microphones that differ in sensitivity.
- 0dB : No microphone attenuation.
- -6dB : Input from a microphone(s) connected to the MIC jack is cut by 6dB.
- -12dB : Input from a microphone(s) connected to the MIC jack is cut by 12dB.
- -18dB : Input from a microphone(s) connected to the MIC jack is cut by 18dB.
Setup the "Mic Atten." of the preset menu. (P.45)
- Phantom Power
Slide the PHANTOM/MIC switch to on to provide +48V of power for a condenser microphone(s).
ON : +48V is supplied to power condenser microphone(s).
OFF : No microphone power is supplied.
Microphone recommendations
Professional condenser microphone(s) (which require additional power from either the PMD661's phantom power or from another source) are recommended because they provide greater sensitivity and higher quality audio recording.
Dynamic microphone(s) can be used, but they do not yield optimum audio quality recordings in some applications.
Consult with your local dealer to select the appropriate microphone(s) for your specific application. In many cases, they can demonstrate the various performances and characteristics of microphones for your use.
Pre Record
When PreRecord is on and the PMD661 is in record pause, it listens to the selected audio input(s) and continuously buffers 2 seconds of audio. Then, when record is started, the PMD661 writes the previously buffered 2 seconds of audio to the card and continues to record from there.
Setup the "PreRecord" of the preset menu. (P.44)
Audio Filter
Low Cut Filter
The bass region of the input audio is cut as the audio is recorded. Set to On to reduce noise, such as the sound of the wind when recording outdoors.
Setup the "Low Cut" of the preset menu. (P.45)
High Cut Filter
The treble region of the input audio is cut as the audio is recorded. Set to On to reduce high frequency noise from the ambient environment.
Setup the "High Cut" of the preset menu. (P.45)
Silent Skip
The Silent Skip automatically pauses recording when there is a period of silence and resumes recording when sound resumes.
"Silent Skip" menu setting permits:
- Adjusting the margin sound level that defines silence in Off, -60dB, -54dB, -38dB, -20dB.
Setup the "Silent Skip" of the preset menu. (P.45)
Manual Track
When the Manual Track (Manual Track incrementing) is on during recording, press the FUNCTION button until "TR" appears on the display, then press the ☐(F1: TR) button to increment the audio file. A new audio file is created at that point. The continuity of sound is not guaranteed and depends on the speed of a card or the audio file size.
Auto Track
With the Auto Track (Automatic Track incrementing) On, a new audio file is begun automatically at specified intervals of recording time. The Auto Track can be set to increment every 1, 5, 10, 15 or 30 minutes, or every 1, 2, 6, 8, 12 or 24 hours. The Auto Track makes finding a particular point in a recording easier. For example, if a new audio file begins every minute during playback, the Auto Track makes finding a particular passage easier because of the relationship between file numbers and time. During playback, you can select file number 3 to play approximately the 3rd minute of recording. To go directly to the beginning of the 10th minute, select file number 10, etc.
| Recording | time | |
| # | minutes | : |
| 001 | 0:00 – 0:59 | |
| 002 | 1:00 – 1:59 | |
| 003 | 2:00 – 2:59 |
The continuity of sound is not guaranteed and depends on the speed of a card or the file size.
Setup the "Auto Track" of the preset menu. (P.44)
Note:
New audio file starts automatically when the recorded file size reaches 4GB.
Copy Segment
Copy Segment physically turns your "highlighted" section into a new and separate file, without destroying the original source file(s).
- "COPY" is displayed during playback. Press the ☐ (F1: COPY) button when the audio reaches your desired IN-point.

text_image
FUNCTION A POTCH+ DISPLAY"Set as IN?" is displayed.
- Press the ▶/II/ENTER button to store the IN-point. "IN-" will flash on the display to indicate the IN-point has been stored and playback of the file resumes.

text_image
SKIP BACK POTIONA DISPLAY RED
- Continue to let the PMD661 play to your desired OUT-point, or use the standard transport controls like the ◀◀◀ or ▶▶▶ button to span greater time lengths.
- When you have reached your desired OUT-point, press the ☐1: COPY) button.

text_image
FUNCTION A DISPLAY PITCH+"Set as OUT?" is displayed.
- Press the ▶/II/ENTER button to store the OUT-point.
"Copy Segment?" is displayed.
- Press the ▶/II/ENTER button to start the Copy process.
"Executing..." will be shown on the display. When the copy procedure is completed, the display will show "Completed" for one second and then returns to stop mode with your new file as the current file.
Notes:
- When a copy area spans across two or more files, a file is connected and copied.
- When the copy area spans across files of different “Rec Format” or “Rec Channel” setting, it cannot be copied.
• The copy area cannot exceed 80 minutes.
File Divide
The File divide allows you to divide a file at the position you want to divide.
-
During playback, press the FUNCTION button until "DIV" appears on the display. Then press the ☐(F1: DIV) button.
-
"Divide?" appears on the display.
-
Select "No" and press the ▶/II/ENTER button to pause the playback.
-
Select "Yes" and press the ▶/II/ENTER button to start Divide process.
"Executing..." will be shown on the display. When the divide process is completed, the display will show "Completed" for one second and the unit stops at the beginning of the second file of the divided files.
Notes:
- “_A” is added to the end of the file name of the first new file.
(For example; the original file="aaa.mp3", the first new file="aaa_A.mp3") - “_B” is added to the end of the file name of the second new file.
- If the length of the file name with extension is already 63 or more, Divide process cannot be executed. "Long Title" message appears on the display and the playback is paused at the position you press the ▶/□/ENTER button.
Marking
Marks can be added during recording or playback manually or automatically. The marking information is stored as an ID3 tag (Ver 2) in MP3 file or chunk in WAVE file. Marks help you find specific points in the recording.
- During playback, you can instantly locate marks.
- Up to 30 marks can be added to a file.
- Marks are numbered consecutively starting at one.
- During recording or playback, you can manually add a mark by pressing the ☐ (F2: MARK) button.
Add a mark manually
During recording or playback, press the FUNCTION button until "MARK" appears on the display. Then press the ☐ (F2: MARK) button to add a mark manually.
Add a mark automatically
The Auto Mark Menu item turns the automatic marking feature off or on. (P.44)
- If Auto Mark is on and the machine is in Rec - Pause, when recording is resumed a mark will be added.
- If Auto Mark is on and the PMD661 is recording audio below the sound threshold for more than three seconds, audio that crosses the threshold will cause a mark to be added.
The Auto Mark Menu setting permits:
- Turning Auto Mark on or off.
- Adjusting the margin sound level that defines silence in -60dB, -54dB, -38dB or -20dB.
Setup the "Auto Mark" of the preset menu. (P.44)
Search the marks
During play-pause or playback, press the FUNCTION button until "MK-" and "MK+" appear on the display. Then press the ☐(F1: MK-) or ☐(F2: MK+) button to select the mark you wish to access. The PMD661 is paused at the mark you selected. To start playback, press the ▶/II/ENTER button.
Pitch Control
The Pitch Control enables the playback speed (pitch) to be varied over a -40% to +20% ranges.

During playback, press the PITCH + button to increase the playback speed by 5%. The playback speed is increased up to +20%. Or press the PITCH – button to reduce the playback speed by 5%. The playback speed is reduced to -40%.
Additional Features
Key Lock
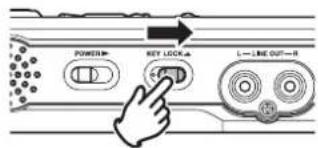
Slide the KEY LOCK switch to lock the keys.
The key lock secures the PMD661 in the state it is in during recording, playback or stop.
During Record and Rec-Pause mode, the POWER switch is always invalid.
text_image
POWER> KEY LOCK LINE OUT-RNotes:
- If "Key Lock" setting is "All", only the optional remote controller RC600PMD is accepted.
- If "Key Lock" setting is "Partial", the REC, REC PAUSE and STOP buttons on the panel, and RC600PMD are accepted.
Setup the "Key Lock" of the preset menu. (P.45)
- "Key Locked" is displayed for one second when the key is pressed during key lock.

Remote
The PMD661 allows you to use an optional remote controller RC600PMD. (sold separately). The RC600PMD is designed for microphone interviews. It attaches to your microphone.
The remote's five feet cord with a four contact mini plug, plugs into the PMD661. The RC600PMD does not require any menu changes for use.
text_image
REMOTE RC600PMD REMOTE L—MIC/LINE IN—R ON OFF P45The RC600PMD includes:

a An indicator light:
• (green) lit and steady during standby or stop
• (red) lit and steady while recording
• (flashing red) during Rec-Pause mode
- (orange) flashes for 1/2 second when an over peak level signal is input during Record or Rec-Pause mode, then it goes back to red.
b Press to pause recording
c Press to start/resume recording and to manually increment files
d Press to add a marking while Record or Playback.
Extended Remote Jack
The PLAY, FF and REW keys can be added to the remote control functions by using the equivalent circuit showing below.
Circuit diagram:
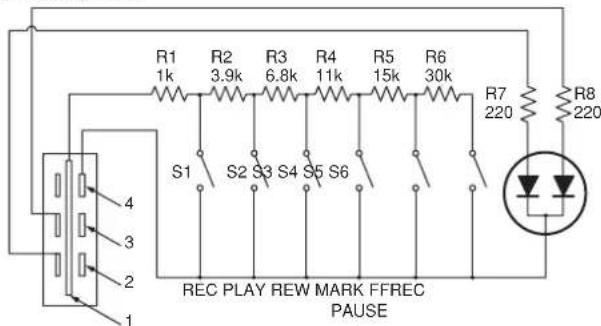
text_image
R1 1k R2 3.9k R3 6.8k R4 11k R5 15k R6 30k R7 220 R8 220 S1 S2 S3 S4 S5 S6 REC PLAY REW MARK FFREC PAUSENotes:
- The PMD661 plays during closing and holding the PLAY switch, and skip back then pause at the point when It opened.
• Resistance error - Within 5%. - Never apply external voltage. Doing so will result in malfunction.
- Insulate the circuit so that it cannot be touched directly. Use a structure that protects the circuit from static electricity, which will cause malfunction.
- Do not operate the switches at the same time as the buttons on the unit.
• D&M professional accepts no responsibility whatsoever for any damages or infringements of patents or other rights resulting from the use of the circuits. - This does not sanction patents or other rights of D&M professional or third parties.
- It is strictly forbidden to reprint or reproduce the circuit diagrams in part or in whole.
Plug Type (1/8" T-R-R-S Mini Plug)
∅3.5/4P (TMP-B66)
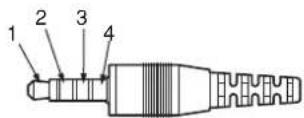
1: Tip
2: Ring
3: Ring
4: Sleeve
Display Control
Press the DISPLAY button to alternate information displays. Displays are slightly different in Stop, Record and Playback mode.

text_image
SKIP BACK PITCH+ DISPLAY RASSDuring Stop mode:

flowchart
graph TD
    A["① Total Remain"] --> B["② Current Time/Date"]
    B --> C["③ Record Setup"]
    C --> D["① Total Remain (Default display)"]
text_image
TOTAL REMAIN Remaining space of the card 12:34:56 INT MIC Input source Number of files 023 files F1 function MENU T ☐ STOP LIST F2 function TIME/DATE 01:23AM INT MIC Current time Mar23/2007 Current date MENU T ☐ STOP LIST REC SETUP (Preset-1) Input source — INT MIC Stereo — Preset Rec format — MP3-192 192kbps — Rec channel Quantization — 16bit 44.1kHz — MP3 bitrate ALC icon AU — AUTO TRK — Sample rate MENU T ☐ STOP LISTDuring Record mode:
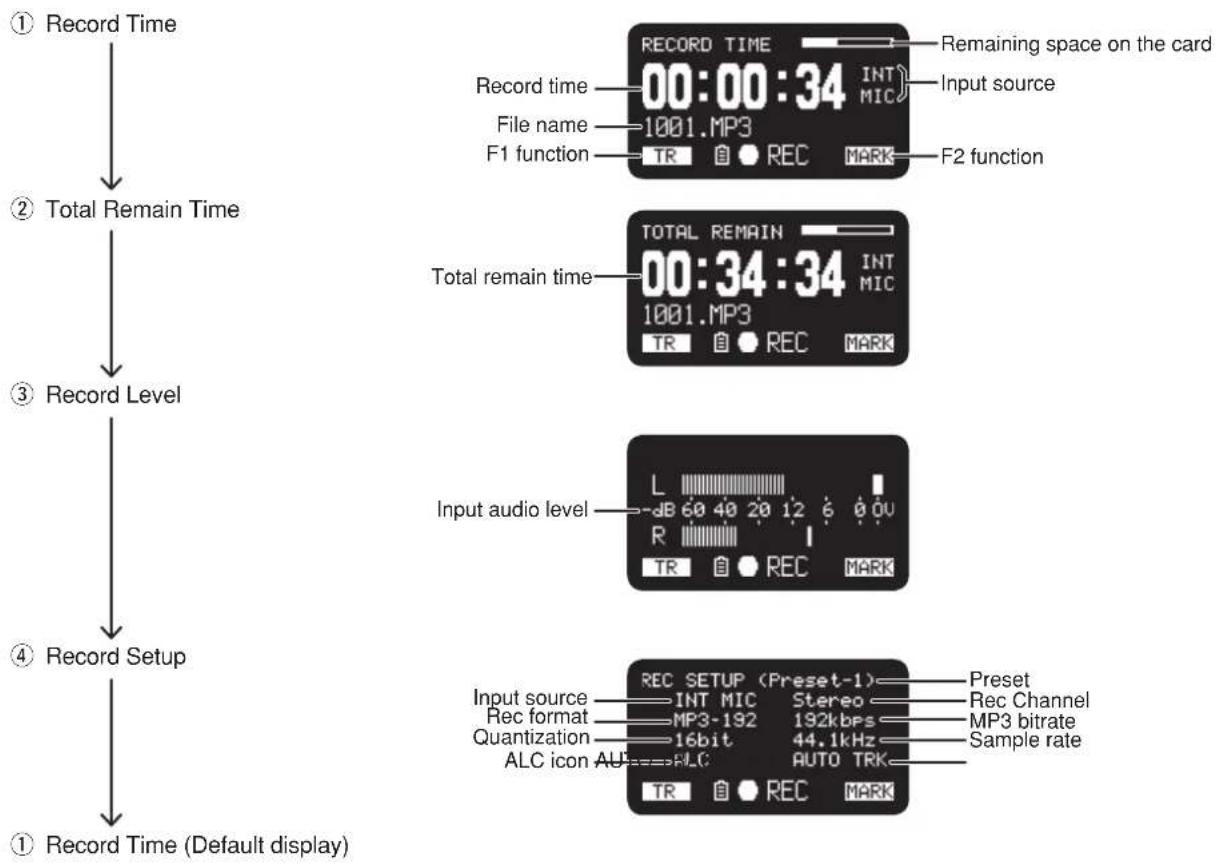
flowchart
graph TD
    A["Record Time"] --> B["Total Remain Time"]
    B --> C["Record Level"]
    C --> D["Record Setup"]
    D --> E["Record Time (Default display)"]

    subgraph Record Time
        F["RECORD TIME 00:00:34 INT MIC"] --> G["Remaining space on the card"]
        H["File name 1001.MP3"] --> I["F1 function TR 自 REC MARK"]
        J["Total Remain Time 00:34:34 INT MIC"] --> K["Total remain time"]
        L["Input audio level"] --> M["L dB 60 40 20 12 6 0 0V R TR 自 REC MARK"]
    end

    subgraph Setup
        N["REC SETUP (Preset-1) INT MIC Stereo Rec Channel"]
        O["Input source MP3-192 192kbps MP3 bitrate"]
        P["Quantization 16bit 44.1kHz Sample rate"]
        Q["ALC icon AUTO TRK"]
        R["TR 自 REC MARK"]
    end
During Playback mode:
flowchart
graph TD
    A["① Elapsed Time"] --> B["② Remain Time"]
    B --> C["③ Output Level"]
    C --> D["④ File Properties"]
    D --> E["① Elapsed Time (Default display)"]

    subgraph Elapsed Time
        F["ELAPSED TIME 00:00:34 IN-1001.MP3 COPY 自 ▶ PLAY MARK"] --> G["Current position on the file"]
    end

    subgraph Remain Time
        H["REMAIN TIME 00:12:34 1001.MP3 COPY 自 ▶ PLAY MARK"] --> I["Remaining time"]
    end

    subgraph Output Level
        J["Output audio level L dB 60 40 20 12 6 0.0V R COPY 自 ▶ PLAY MARK"] --> K["Output Level"]
    end

    subgraph File Properties
        L["FILE PROPERTIES 12:34AM Mar23/2007 Stereo 44.1kHz 128kbps 16bit 1001.MP3 COPY 自 ▶ PLAY MARK"] --> M["Created time"]
        M --> N["Rec channel"]
        M --> O["MP3 bitrate"]
        M --> P["Sample rate"]
        M --> Q["Quantization"]
    end
USB Mode
The PMD661 records directly onto SD cards.
Recordings can then be transferred to your desktop or laptop computer by removing the SD card from the PMD661, or by connecting the PMD661 to your computer via the USB port.
Audio recorded in the popular MP3 compression format is directly available for intranet or internet file sharing.
Computer compatible
On your computer you can then:
- log and archive audio files
- play audio files
- save audio files to your drive
How to connect via the USB port
The SD card in the PMD661 appears as an external drive on a connected computer.
- Power up the computer.
- Insert an SD card.
- Power up the PMD661.
- During Stop mode, connect the cable to the PMD661 and your computer.

text_image
Diagram of an electronic testing setup with labeled components including power input, computer, and connected devices- While USB is on, a set screen is displayed.

- The SD card in the PMD661 appears as a removable device on your computer.
Notes:
- Check the operating system of your computer.
Windows Me, 2000, XP, Vista, MAC OS 10 - USB Bus Power activates this function even no service of AC adapter or batteries.
- No buttons other than the POWER switch function.
Caution:
- Do not remove the SD card during USB mode. The Data and the SD card may be damaged.
- During recording and playback, do not connect the cable to the PMD661 and your computer. The PMD661 may turn itself off or stop, by the USB Bus Power condition.
Diagram of file structure
A folder (directory) titled MPGLANG1 (Default) will appear on your computer. Files within the MPGLANG1 folder are numbered from aaaaaa001 through the number of files recorded to a maximum of aaaaaa999. ("aaaaa" depends on the Machine ID parameter.)
The default setting of the Machine ID is "1". The file extension will be .MP3 or .WAV depending on the "Rec Format" parameter that is set for the recording.
Root
Changes made to file names or structures on your computer will prevent file recognition and playback in the PMD661.
Machine ID
An audio file created by the PMD661 has Machine ID information. The information is included in a file name. For example, if the Machine ID is "1", the first file is numbered "1001.WAV" or "1001.MP3". Setup the "Machine ID" of the preset menu. (P.47)
Menu
Menu Structure
| 1 Presets ......Preset-1 ...... 1 Select | |||
| 2 Display......01 Brightness | Preset-2 | 2 Edit......01 Input | |
| 3 Time/Date 02 Timer Preset-3 3 Rename 02 Rec Format | |||
| 4 Utility ......1 Record Timer 03 LED 03 Rec Channel | |||
| 5 Language 2 Play Timer1 04 Time Form 04 Sample Rate | |||
| 6 F/W Version 3 Play Timer2 05 Date Form 05 PreRecord | |||
| 4 Play Timer3 06 File Sort 06 Level Cont. | |||
| 5 Load Settings 07 Default | 07 Auto Track | ||
| 6 Save Settings 08 Auto Mark | |||
| 7 Card Format 09 Silent Skip | |||
10 Mic Atten.
11 Low Cut
12 High Cut
13 Skip Back
14 Key Lock
15 Battery
16 Auto Power Off
17 Beep
18 SP Mute
19 Play Mode
20 Machine ID
21 Preset Default
Top Menu
- The menu list appears on the display.
- The selected item is highlighted.
- When the first item is selected, press the PITCH + button to jump to the last item.
-
When the last item is selected, press the PITCH – button to jump to the first item.
-
Press the PITCH + or PITCH - button to select the item.
-
Press the ▶/II/ENTER button to confirm or execute the selected item.
Items and functions
| # | Display | Description | |
| 1 | Presets Go to the Preset Menu. | ||
| 2 | Display Go to the Display Menu. | ||
| 3 | Time/Date Adjust the date and time. | ||
| 4 | Utility Go to the Utility Menu. | ||
| 5 | Language Choose the display language. | ||
| 6 | F/W Version Display the software version. | ||
Preset Menu
You can stores 3 detailed presets on the recorder for such settings as recording input, recording format, playback mode, etc. There are 20 setting items in the preset menu, and 3 presets can be set with the desired conditions.
"Preset Select" allows you to select a preset number.
-
From Stop, press the ☐1: MENU) button.
-
Press the PITCH + or PITCH - button to select "Presets". Then press the ▶/□/ENTER button.
-
Press the PITCH + or PITCH - button to select Preset 1, 2, 3 or renamed Preset.
-
Press the ▶/II/ENTER button to accept the selected Preset.

• Action Menu appears on the display.
- Select "Select" item and press the ▶/II/ENTER button to store the settings of the selected preset.
- Select "Edit" item and press the ▶/II/ENTER button to set or change the selected preset.
- Select "Rename" item and press the ▶/II/ENTER button to change the name of the selected preset.
Action Menu Functions
| # Display Description | |
| 1 Select Store the settings of the selected preset. | |
| 2 Edit Set or change the selected preset. | |
| 3 Rename Change the title of the selected preset. | |
Preset Rename
- From Stop, press the ☑1: MENU) button.
- Press the PITCH + or PITCH - button to select Preset Menu. Then press the ▶/II/ENTER button to accept.
- Press the PITCH + or PITCH - button to select Preset 1, 2, 3 or renamed Preset. Then press the ▶/II/ENTER button to accept the selected Preset.
- Press the PITCH + or PITCH - button to select "Rename" and press the ▶/II/ENTER button to accept.

- Rename the preset title.
Text can be changed and deleted. Press the ◀◀◀ or ▶▶◀ button to move the cursor to the place you wish to change text or delete text from.
To change the letter
Press the PITCH + or PITCH - button to select the character you want to change.
To insert a letter
Press the ☐(F1: INS) button. A character is inserted into the left of the highlighted character and then it will be highlighted.
To delete the letter
Press the ☐(F2: DEL) button to delete the selected character.
- Press the ▶/II/ENTER button to store the changes.
Press the ◀◀ button to go back the previous page without store the changes when the first letter of the preset title is highlighted.
Notes:
- If the last letter of the preset title is Space(SP) character, the changed title does not include the last letter.
- The maximum length of a preset title is limited to 8 letters. When the 9th letter is inserted the last letter is deleted.
- The characters which you can insert are ABCDEFGHIJKLMNOPQ RSTUVWXYZabcdefghijklmnopqrstuvwxyz (Space) ! “#\$% & ’() +, -; =@ [ ]^_^ {} \~0123456789.
Preset Menu List
| # | Display Selectable Value | |
| 1 | Input INT MIC / MIC/LINE / LINE2 / D.IN | |
| 2 | Rec Format MP3-320 | / MP3-256 / MP3-192 / MP3-128 / MP3-64 / PCM-16 / PCM-24 |
| 3 | Rec Channel Stereo / | Mono / D.Mono |
| 4 | Sample Rate 44.1k / | 48k / 96k |
| 5 | PreRecord On / Off | |
| 6 | Level Cont. Manual / | ALC |
| 7 | Auto Track Off / 1min | / 5min / 10min / 15min / 30min / 1hour / 2hour / 6hour / 8hour / 12hour / 24hour |
| 8 | Auto Mark Off / -60dB | / -54dB / -38dB / -20dB |
| 9 | Silent Skip Off / -60dB | / -54dB / -38dB / -20dB |
| 10 | Mic Atten. 0dB / -6dB | / -12dB / -18dB |
| 11 | Low Cut On / Off | |
| 12 | High Cut | On / Off |
| 13 | Skip Back | 0.5sec / 1sec / 1.5sec / 2sec / 2.5sec / 3sec / 3.5sec / 4sec/ 4.5sec / 5sec / 5.5sec / 6sec / 6.5sec / 7sec / 7.5sec / 8sec / 8.5sec / 9sec / 9.5sec / 10sec / 15sec / 20sec / 25sec / 30sec / 35sec / 40sec / 45sec / 50sec / 55sec/ 60sec |
| 14 | Key Lock | All / Partial |
| 15 | Battery | Alkaline / Ni-MH |
| 16 | Auto Power Off | Off / 5m / 15m / 30m / 60m |
| 17 | Beep | On / Off |
| 18 | SP Mute | On / Off |
| 19 | Play Mode Single / Cont. | |
| 20 | MachineID | Max 8 letters |
| 21 | Preset Default | |
Default Value List
| # Display Preset-1 Preset-2 Preset-3 | ||||
| 1 Input INT MIC INT MIC INT MIC | ||||
| 2 Rec Format MP3-128 MP3-320 | PCM-24 | |||
| 3 Rec Channel Stereo Stereo Stereo | Stereo | |||
| 4 Sample Rate 44.1k 44.1k 96k | ||||
| 5 PreRecord On | Off | Off | ||
| 6 Level Cont. | ALC | Manual | Manual | |
| 7 Auto Track Off | Off | Off | ||
| 8 Auto Mark | Off | Off | Off | |
| 9 Silent Skip | Off | Off | Off | |
| 10 Mic Atten. | 0dB | 0dB | 0dB | |
| 11 Low Cut | On | Off | Off | |
| 12 High Cut | On | Off | Off | |
| 13 Skip Back | 3sec | 3sec | 3sec | |
| 14 Key Lock | All | All | All | |
| 15 Battery | Alkaline | Alkaline | Alkaline | |
| 16 Auto Power Off | 15m | 15m | 15m | |
| 17 Beep | On | On | On | |
| 18 SP Mute | Off | Off | Off | |
| 19 Play Mode Cont. | Cont. | Cont. | ||
| 20 MachineID | 1 | 1 | 1 | |
| 21 Preset Default | Meeting Compressed | Music Compressed | Highest Quality Uncompressed | |
General Procedure in the edit mode
- In the Preset Action Menu, press the PITCH+ or PITCH- button to select "Edit" then press the ▶/II/ENTER button.
• Action Menu list appears on the display. - Press the PITCH+ or PITCH- button to select the menu item. Then press the ◀◀◀ or ▶▶◀ button to select the input choices.
- When changing the preset is completed, press the ☐F1: EXIT) button.
- "Store?" appears on the display.
- Select "Yes" and press the ▶/II/ENTER button to store the changes or select "No" and press the ▶/II/ENTER button to exit Menu Mode without storing any changes.
1) Input
Use this menu to select the audio input for recording.
| Set Value Description | |
| INT MIC Internal stereo | microphones |
| MIC/LINE External microphone(s) (MIC/LINE Jack) | |
| LINE2 Line Level Input | (LINE 2 Jack) |
| D.IN Digital Input | |
2) Rec Format
The “Rec Format” allows you to select the record audio format MP3 compression or high-fidelity PCM, the bitrate of the MP3 (320, 256, 192, 128 or 64 kbps) and the quantization of the PCM (16-bits or 24-bits).
| Set Value Description | |
| MP3-320 / MP3-256 / MP3-192 / MP3-128 / MP3-64 | (MP3)Mono : 160, 128, 96, 64, 32kbpsStereo: 320, 256, 192, 128, 64kbps |
| PCM-16 / PCM-24 | (PCM)Quantization: 16bits, 24bits |
3) Rec Channel
The "Rec channel" allows you to select the record channel(s) from stereo 2-channel or monaural 1-channel or stereo 2-channel with dual mono.
| Set Value Description | |
| Stereo Stereo 2-channel audio file | |
| Mono Monaural audio file | |
| D.Mono | Stereo 2-channel audio file. The left channel input is recorded in both channels. |
4) Sample Rate
The "Sample Rate" allows you to select the sampling frequency of the recording.
| Set Value Description |
| 44.1k Sampling frequency for both PCM and MP3. |
| 48k Sampling frequency for both PCM and MP3. |
| 96k Sampling frequency for PCM. |
5) PreRecord
The "PreRecord" allows you to turn on or off the pre record function.
| Set Value Description |
| On Set the PreRecord on. |
| Off Set the PreRecord off. |
6) Level Cont. (Level Control)
The "Level Cont." allows you to select the type of recording level control, Manual or ALC.
| Set Value Description |
| Manual Manual Level Control |
| ALC Automatic Level Control |
7) Auto Track
The "Auto Track" allows you to set the Auto Track function off or on and select a time interval to create a new track automatically.
| Set Value Description | |
| Off Set the Auto Track function off. | |
| 1min / 5min / 10min /15min / 30min / 1hour /2hour / 6hour / 8hour /12hour / 24hour | Set the Auto Track function on and the timeinterval to create a new file. |
8) Auto Mark
The "Auto Mark" menu item allows you to turn the auto mark function on and set the silent level or turn the auto mark feature Off. The Mark is automatically added after the end of the silent period of which the input level is below the preset value -60, -54, -38 or -20 (dB) for more than 3 seconds.
| Set Value Description | |
| Off Auto mark function off. | |
| -60dB / -54dB / -38dB / -20dB | Silent level |
9) Silent Skip
The “Silent Skip” menu item allows you to turn the silent skip feature on and set the silent level or turn the silent skip feature Off. While the silent skip feature is on, the record is automatically paused when the input level is below the preset value -60, -54, -38 or -20 (dB) for more than 3 seconds.
| Set Value Description | |
| Off Set the Silent Skip feature off. | |
| -60dB / -54dB / -38dB / -20dB | Set the Silent Skip feature on and select the silent level. |
10) Mic Atten. (Mic Attenuator)
The "Mic Atten." menu item allows you to select the level of the Microphone Attenuator.
| Set Value Description |
| 0dB Set the Mic Attenuator feature off. |
| -6dB / -12dB / -18dB Set the Mic Attenuator. |
11) Low Cut
The "Low Cut" menu item turns the low cut feature Off or On.
| Set Value Description | |
| Off Low cut filter off. | |
| On Low cut filter on. | |
12) High Cut
The "High Cut" menu item turns the high cut feature Off or On.
| Set Value Description | |
| Off | High cut filter off. |
| On | High cut filter on. |
13) Skip Back
The "Skip Back" menu item allows you to select the skip back time from 0.5 second to 60 seconds.
| Set Value |
| 0.5sec / 1sec / 1.5sec / 2sec / 2.5sec / 3sec / 3.5sec / 4sec/ 4.5sec / 5sec / 5.5sec / 6sec / 6.5sec / 7sec / 7.5sec / 8sec / 8.5sec / 9sec / 9.5sec / 10sec / 15sec / 20sec / 25sec / 30sec / 35sec / 40sec / 45sec / 50sec / 55sec/ 60sec |
14) Key Lock
The key lock secures the PMD661 in the state it is in during Record, Playback or Stop.
| Set Value Description | |
| All All buttons are invalid. | |
| Partial | All buttons are invalid. But the REC, REC PAUSE and STOP/CANCEL buttons are accepted. |
15) Battery
The "Battery" menu item allows you to set the battery type. The PMD661 operates on 4 standard AA sizes Alkaline or Ni-MH batteries. The Battery setting is used for the battery remaining indicator in the display and "Low Battery" warning. If the setting does not match installed batteries the PMD661 will not show the appropriate battery status.
| Set Value Description | |
| Alkaline Set the battery | type to Alkaline battery. |
| Ni-MH | Set the battery type to Nickel-Metal Hydride battery. |
16) Auto Power Off
If the PMD661 is not operated for a long period of time during Stop or Play-Pause mode, the power can be automatically shut off to conserve battery life.
| Set Value Description | |
| Off Set the auto power | off feature off. |
| 5m / 15m / 30m / 60m | Set the feature on and select the time until the PMD661 turns power off automatically. |
17) Beep
The “Beep” menu item allows you to turn the Beep alarm feature On or Off. While the feature is on, the unit beeps when the battery power becomes low (low battery) or recording space is not remained in the SD card.
| Set Value Description |
| On Set the Beep feature on. |
| Off Set the Beep feature off. |
18) SP Mute
The "SP Mute" allows you to select speaker mute function On or Off. When "SP Mute" is set to On, the sound being recorded is not output from the speaker. When set to Off, the sound is output from the speaker except when the sound is being recorded by the built-in microphone.
| Set Value Description | |
| On Speaker Mute On. | |
| Off Speaker Mute Off. | |
19) Play Mode
The "Play Mode" menu item allows you to select the single playback mode or continuous playback mode.
| Set Value Description |
| Single Single playback mode |
| Cont. Continuous playback mode |
20) Machine ID
An audio file created by the PMD661 has Machine ID information. The information is included in the file name.
For example, if the Machine ID is "aaaaa", the first file is numbered "aaaaa001.wav" or "aaaaa001.mp3".
The Machine ID setting applies to all three presets.
-
In the preset edit mode, press the PITCH + or PITCH - button to select the "MachineID" item. Then press the ▶/II/ENTER button to rename.
-
Rename the Machine ID.
Refer to the procedure of the "Preset Rename" (P. 40).
- Press the ▶/II/ENTER button to return to the preset select menu then press the ☐ (F1: EXIT) button to store the changes.
Notes:
- If Last letter of the Machine ID is Space(SP) character, the changed ID does not include the last letter.
- If number of letter is more than 8, last letter is deleted when a new letter is added.
21) Preset Default
The "Preset Default" allows you to return the settings of the selected preset to default.
Page 42 for a table of menu defaults.
- In the preset edit mode, press the PITCH + or PITCH - button to select the "Preset Default" item. Then press the ▶/II/ENTER button to initialize.
- While "Default?" message is displayed, select "Yes" and then press the ▶/II/ENTER button. Preset value returns to the default and the PMD661 starts writing on non-volatile memory.
Display Menu
You can store presets on the display menu for such settings as Brightness, Timer, LED, Time form, Date form and File sort.
1. From Stop, press the ☐(F1: MENU) button.
- Menu list appears on the display.
• The selected item is highlighted. - When the first item is selected, press the PITCH + button to jump to the last item.
- When the last item is selected, press the PITCH – button to jump to the first item.
2. Press the PITCH + or PITCH - button to select "Display".

3. Press the ▶/II/ENTER button.
- The number of a selected item blinks.
- The choice of the selected item is highlighted.
-
During display menu mode, press the STOP button to return to the stop mode.
-
Press the PITCH + or PITCH - button to select an item.
Then press the ◀◀◀ or ▶▶◀ button to tab through the choices. -
Press the PITCH + or PITCH – button to select other menu choices. When changing the display menu is complete, press the ☐ (F1: EXIT) button to store the changes, or press the STOP button to exit menu mode without storing any changes.
-
While "Store?" is displayed, select "Yes" and press the ▶/II/ENTER button to store the changes or select "No" and press the ▶/II/ENTER button to return to top menu without storing any changes.
Display Menu Functions
| # | Display Selection | items Default | |
| 1 | Brightness 1 to 8 | 5 | |
| 2 | Timer Off/30sec/60sec/90sec Off | ||
| 3 | LED On/Off On | ||
| 4 | Time Form | 12H/24H | 12H |
| 5 | Date Form | M/D/Y, D/M/Y | M/D/Y |
| 6 | File Sort | Alphabet, Time/Date | Time/Date |
| 7 | Default | -- | -- |
* Factory default of "Date Form" setting for Europe is "D/M/Y".
1) Brightness
The "Brightness" menu choice allows you to adjust the brightness of the OLED (Organic Light-Emitting Diode) display on the PMD661.
| Set Value Description |
| 1, 2, 3, 4, 5, 6, 7, 8 (Dark) 1 - 8 (Bright) |
2) Timer
The "Timer" menu item allows you to set the timer function off or on with preset time. While the Timer is on, the part of display items will be turned off automatically when no button is pressed for preset time (30, 60 or 90 seconds). The battery life will be extended if it is on.
| Set Value Description | |
| Off Set the Timer Off. | |
| 30sec/60sec/90sec Set | the Timer On and time. |
3) LED
The "LED" menu choice allows you to turn on or off the light of all LEDs.
| Set Value Description | |
| On Turn the LED On. | |
| Off Turn the LED Off. | |
4) Time Form
The "Time Form" item allows you to select the format of the current time, 12-hour format with AM/PM (12H) or 24-hour format (24H).
| Set Value Description |
| 12H 12-hour format (12:00AM – 11:59PM) |
| 24H 24-hour format (00:00 – 23:59) |
5) Date Form
The "Date Form" item allows you to set the date order month/day/year (M/D/Y) or day/month/year (D/M/Y).
| Set Value Description |
| M/D/Y Month /Day /Year |
| D/M/Y Day /Month /Year |
6) File Sort
The "File Sort" menu choice allows you to select the file order in the list by name (Alphabet) or time (Time/Date).
| Set Value Description | |
| Alphabet | |
| Time/Date | |
7) Default
The "Default" menu item allows you to return the settings of the Display Menu to the default. See the table of Display Menu Functions.
- From Stop, press the ☐#1: MENU) button.
- Press the PITCH + or PITCH – button to select Display Menu. Then press the ▶/II/ENTER button to accept.
- Press the PITCH + or PITCH - button to select the Default item. Then press the ▶/II/ENTER button to initialize.
- While "Default?" message is displayed, select "Yes" and then press the ▶/□/ENTER button, then preset value returns to the default and to start writing on non-volatile memory.
Utility Menu
The "Utility" menu lets you set the time of recording or playback, load settings, save settings and format an SD Card.
- From Stop, press the ☐1: MENU) button.
- Press the PITCH + or PITCH – button to select "Utility".

- Press the ▶/□/ENTER button.
- During Utility menu mode, press the STOP button to return to the stop mode.
- Press the PITCH + or PITCH - button to select the menu item. Press the ▶/□/ENTER button to enter the menu item.
Utility Functions
| # Display Description | ||
| 1 | Record Timer | Set a start time and the duration for recording. |
| 2 | Play Timer 1 Set a start time of playback 1. | |
| 3 | Play Timer 2 Set a start time of playback 2. | |
| 4 | Play Timer 3 Set a start time of playback 3. | |
| 5 | Load Settings Load setting data from an SD card | |
| 6 | Save Settings Save setting data to an SD card | |
| 7 | Card Format Delete all files. | |
1) Record Timer
The Record Timer menu allows you to set or change a recording start time and the duration.
1. Select the Record Timer menu.
- When in stop, press the ☐ (F1: MENU) button.
- Press the PITCH + or PITCH – button until "Utility" appears, then press the ▶/II/ENTER button.
- Press the PITCH + or PITCH – button until "Record Timer" appears, then press the ▶/II/ENTER button.

2. Set the Record Timer On or Off.
- Press the PITCH + or PITCH – button until "On" or "Off" is highlighted. Then press the ◀◀◀ or ▶▶◀ button until "On" is highlighted to turn on the Record Timer function. Press the ◀◀◀ or ▶▶◀ button until "Off" is highlighted to turn off the Record Timer function.
- Press the PITCH + or PITCH – button to move to the other item. The selected item is highlighted.
3. Set the start time.
- While the "Start Time" is highlighted, press the ▶/II/ENTER button.
- Press the ◀◀◀ or ▶▶◀ button to select the item.
- Press the PITCH + or PITCH – button to select the value.
- Press the ENTER button to finish setting the time.
4. Set the duration.
- While the "Duration" is highlighted, press the ▶/II/ENTER button.
- Press the ◀◀◀ or ▶▶◀ button to select the hour or minute.
- While the hour is highlighted press the PITCH+ or PITCH-button to select the hour from 000 to 999.
- While the minute is highlighted press the PITCH+ or PITCH-button to select the minute from 00 to 59.
5. Store the changes.
- During setting, press the ☐(F1: EXIT) button. "Store?" appears on the display. Select "Yes" to store the setting and return to Utility menu. Or select "No" to return to the Utility menu without storing any changes.
- During setting, press the STOP button to return to the stop mode without storing any changes.
- While the timer is set, "T" icon appears on the display.
2/3/4) Play Timer (1/2/3)
The "Play Timer" menu allows you to set or change a start time for playback and the filename of the playback file.
1. Select the Play Timer menu.
- When in stop, press the ☐ (F1: MENU) button.
- Press the PITCH + or PITCH - button until "Utility" appears, then press the ▶/II/ENTER button.
- Press the PITCH + or PITCH – button until "Play Timer 1 (or 2 or 3)" appears and then press the ▶/II/ENTER button.
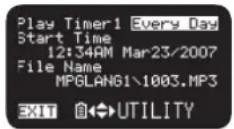
2. Set the Play Timer.
- Press the PITCH + or PITCH – button until “Everyday”, “Weekday” or “Weekend” is highlighted.
- Press the ◀◀◀ or ▶▶◀ button until "Weekday" is highlighted to set the playback from Monday to Friday.
- Press the ◀◀◀ or ▶▶▶ button until "Weekend" is highlighted to set the playback on Saturday and Sunday.
- Press the PITCH + or PITCH – button to move to the other item. The selected item is highlighted.
3. Set the start time.
- While the "Start Time" is highlighted, press the ▶/II/ENTER button.
- Press the ◀◀◀ or ▶▶◀ button to select AM/PM, hour or minute.
- Press the ◀◀ or ▶▶ button to select the item.
- Press the PITCH + or PITCH – button to select the value.
- Press the ENTER button to finish setting the time.
4. Select the file.
- While the "File Name" is highlighted, press the ▶/II/ENTER button.
- The file list appears on the display.
- Press the PITCH + or PITCH – button to select the file you wish to play. Then press the ▶/□/ENTER button.
5. Store the changes.
- During setting, press the ☐(F1: EXIT) button. "Store?" appears on the display. Select "Yes" to store the setting and return to Utility menu. Or select "No" to return to the Utility menu without storing any changes.
- During setting, press the STOP button to return to the stop mode without storing any changes.
5) Load Settings
The "Load Settings" menu allows you to load all of the preset value from an SD card in the PMD661.
When performing load settings, use an SD card in which the preset contents from Save Settings are stored.
This function is particularly useful when setting multiple PMD661s with the same settings.

flowchart
graph TD
    A["PSMD661"] -->|Preset Save| B["SD Card"]
    B -->|Preset Load| C["PSMD661"]
- From Stop, press the ☐1: MENU) button.
- Press the PITCH + or PITCH - button to select "Utility". Then press the ▶/II/ENTER button to accept.
- Press the PITCH + or PITCH – button to select "Load Settings".
- Press the ▶/II/ENTER button. "Load?" message is displayed.
- Press the STOP button to cancel loading items and return to the stop mode.
- While "Load?" message is displayed, select "Yes" and press the ▶/II/ENTER button to load the setting value in text format from the file in a route folder on card. The title of the file load is "661preset.txt". During load settings, it displays "Executing...". After the file load is completed, "Completed" is displayed for one second and returns to Stop mode.
6) Save Settings
"Save Settings" saves all of the preset values onto the SD card. To set the saved files onto the PMD661, perform Load Settings.
- From Stop, press the ☐H1: MENU) button.
- Press the PITCH + or PITCH - button to select "Utility". Then press the ▶/II/ENTER button to accept.
-
Press the PITCH + or PITCH - button to select "Save Settings".
-
Press the ▶/II/ENTER button. "Save?" message is displayed.
-
Press the STOP/CANCEL button to cancel saving item and return to the stop mode.
-
While "Save?" message is displayed, select "Yes" and press ▶/□/ ENTER button to output preset value in text format into the file in a route folder on card. The title of the file output is "661preset.txt". During preset output, "Executing..." is displayed. After the file output is completed, "Completed" is displayed for one second and returns to Stop mode.
7) Card Format
- From Stop, press the ☑1: MENU) button.
- Press the PITCH + or PITCH - button to select "Utility". Then press the ▶/II/ENTER button.
- Press the PITCH + or PITCH - button to select "Card Format". Then press the ▶/II/ENTER button.
- "Card Format?" message is displayed.
- Press the STOP button to cancel a Card Format item and return to STOP.
- While "Card Format?" message is displayed, select "Yes" and press the ▶/II/ENTER button to format the SD card.
During formatting, "Executing..." is displayed. After displaying "Completed" for a second, PMD661 return to the stop mode.
File format of the 661preset.txt
| Item Separator Set Value Break | |||
| [Preset-1] Fixed value 0D0Ah | |||
| Name = 0D0Ah | |||
| Input = 0D0Ah | |||
| ⋮ | ⋮ | ⋮ | ⋮ |
| Play Mode = 0D0A0D0A h | |||
| [Preset-2] Fixed value 0D0Ah | |||
| Name | 0D0Ah | ||
| Input = 0D0Ah | |||
| ⋮ | ⋮ | ⋮ | ⋮ |
| Play Mode = 0D0A0D0A h | |||
| [Preset-3] Fixed value 0D0Ah | |||
| Name | 0D0Ah | ||
| Input = 0D0Ah | |||
| ⋮ | ⋮ | ⋮ | ⋮ |
| Play Mode = 0D0A0D0A h | |||
| [Display] | Fixed value 0D0Ah | ||
| Brightness | 0D0Ah | ||
| ⋮ | ⋮ | ⋮ | ⋮ |
| File Sort | 0D0A0D0A h | ||
| [Common] | Fixed value 0D0Ah | ||
| Machine ID | = 0D0Ah | ||
| Version | = 0D0Ah | ||
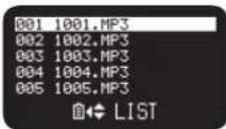
File List Menu
The file list displays a list of file titles, MP3 and WAV in 'MPGLANG1' or other folders. The list can be used to play, rename or delete the selected file or check the information of the file.
1. From Stop, press the ☐2: LIST) button.
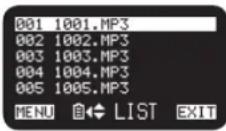
- The file list appears on the display.
- The selected item is highlighted.
- When the first item is selected, press the PITCH + button to jump to the last item.
- When the last item is selected, press the PITCH – button to jump to the first item.
-
Press the ◀◀◀ button to enter the Folder list.
-
Press the PITCH + or PITCH - button to select the file you want to access. Then press the ▶/II/ENTER button to enter the File list Menu.

- During file list menu mode, press the STOP button to return to the stop mode.
File List Menu Functions
| # Display Description | |
| 1 Play Play the file. | |
| 2 Information Display information of the file. | |
| 3 Rename Rename the file title. | |
| 4 Delete Delete the file. | |
| 5 Copy Make a copy of a file in another folder. | |
| 6 Move | Move the from the current folder to another folder. |
| 7 Delete Marks Delete mark(s) in the selected file. | |
1) Play
The "Play" menu item allows you to play the selected file.
- In the file list menu, press the PITCH + or PITCH - button to select "Play".
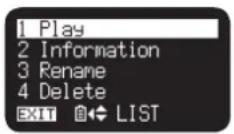
- Press the ▶/II/ENTER button to start playback.
- Press the STOP button to stop playback and return to File List.
2) Information
The “Information” menu item allows you to display the information of the selected file.
- In the file list menu, press the PITCH + or PITCH - button to select "Information".

- Press the ▶/II/ENTER button to display the information.

- Press the ◀◀ button to return to the File list Menu.
- Press the STOP button to return to the stop mode.
3) File Rename
The "Rename" menu item allows you to change the file name of the selected file.
- In the file list menu, press the PITCH + or PITCH - button to select "Rename".

-
Press the ▶/II/ENTER button to access the rename window.
-
Rename the file title.
Refer to the procedure of the "Preset Rename (P. 40).
- Press the ▶/II/ENTER button to store the changes.
Press the ◀◀ button to go back the previous page without store the changes when the first letter of the file title is highlighted.
Notes:
- If the last letter of the file name is Space(SP) character, the file name does not include the last letter.
- If number of letter is more than 60, last letter is deleted when a new letter is added.
4) Delete
The "Delete" menu item allows you to delete the selected file.
-
In the file list menu, press the PITCH + or PITCH - button to select "Delete". Then press the ▶/II/ENTER button.
-
"File Delete?" appears on the display.
- Select "Yes" and press the ▶/II/ENTER button to delete the file.
- Select "No" and press the ▶/II/ENTER button to return to File List Menu.
- Press the STOP button to return to the stop mode.
5) Copy
The "Copy" menu item allows you to make a copy of a file from the current folder to another folder.
- In the file list menu, press the PITCH + or PITCH - button to select "Copy". Then press the ▶/II/ENTER button.
- The folder list appears on the display.
-
Press the PITCH + or PITCH - button to select the folder you wish to copy to. Then press the ▶/II/ENTER button.
-
The copy starts. "Executing..." appear during copy process.
- Press the STOP button to return to the stop mode.
6) Move
The "Move" menu item allows you to move a file from the current folder to another folder.
- In the file list menu, press the PITCH + or PITCH - button to select "Move". Then press the ▶/II/ENTER button.
- The folder list appears on the display.
-
Press the PITCH + or PITCH - button to select the folder you wish to move to. Then press the ▶/II/ENTER button.
-
The move starts. "Executing..." appear during moving.
- Press the STOP button to return to the stop mode.
7) Delete Marks
The "Delete Marks" menu item allows you to delete all marks in the selected file.
-
In the file list menu, press the PITCH + or PITCH - button to select "Delete Marks". Then press the ▶/II/ENTER button.
-
"MARK Delete?" message appears on the display.
- Select "Yes" and press the ▶/□/ENTER button to delete marks.
- Select "No" and press the ▶/II/ENTER button to return to the File List Menu.
- Press the STOP button to return to the stop mode.
Folder List Menu
The folder list menu item allows you to display a list of folder titles. And you can set the selected folder as a current directory, change the folder title, delete the folder and create a new folder.
- While the file list is displayed in the "LIST" status, press the ◀◀◀ button.

- The folder list appears on the display.
• The selected item is highlighted. - When the first item is selected, press the PITCH + button to jump to the last item.
-
When the last item is selected, press the PITCH – button to jump to the first item.
-
Press the PITCH + or PITCH - button to select the folder you want to access. Then press the ▶/II/ENTER button or the ☐ (F1: MENU) button to enter the Folder list Menu.

- Press the ◀◀ or □ (F1: EXIT) button to return to the Folder list.
-
During Folder list Menu mode, press the STOP button to return to the stop mode.
-
Press the PITCH + or PITCH - button to select the item to access. Then press the ▶/II/ENTER button to jump to the item or execute.
Folder list Menu Functions
| # Display Description | |
| 1 Select Set the selected folder as the current folder. | |
| 2 Make Folder Create a new folder. | |
| 3 Rename Change the selected folder title. | |
| 4 Delete Delete the selected folder. | |
1) Select
The "Select" menu item allows you to set the selected folder as the current folder.
- In the folder list menu, press the PITCH + or PITCH - button to choose "Select".
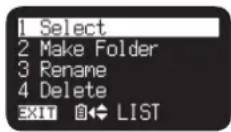
- Press the ▶/II/ENTER button to set the selected folder to the current folder.
2) Make Folder
The "Make Folder" menu item allows you to create a new folder.
-
In the folder list menu, press the PITCH + or PITCH - button to select "Make Folder". Then press the ▶/II/ENTER button.
-
A new folder titled "NewFolder" is created.
- The folder list appears and the new folder is highlighted.
Notes:
- If the "NewFolder" already exists, "Already Exists" message appears for one second.
- If the number of folders is already 32, "Full Folder" message appears for one second.
3) Rename
- In the folder list menu, press the PITCH + or PITCH - button to select "Rename".
- Press the ▶/II/ENTER button to access the rename window.
- Rename the file title.
Refer to the procedure of the "Preset Rename" (P. 40). - Press the ▶/II/ENTER button to return to the folder list menu. Press the ◀◀ button to go back to the previous page without store the changes when the first letter of the folder title is highlighted.
Notes:
- If the Last letter of the folder name is Space(SP) character, the folder name does not include the last letter.
- If the number of letter exceeds the limit of 32, last letter is deleted when a new letter is added.
4) Delete
The "Delete" menu item allows you to delete the selected folder.
-
In the folder list menu, press the PITCH + or PITCH - button to select "Delete". Then press the ▶/II/ENTER button.
-
"Delete?" message appears on the display.
- Select "Yes" and press the ▶/II/ENTER button to delete the folder.
- Select "No" and press the ▶/II/ENTER button to return to the folder list menu.
- Press the STOP button to return to the stop mode.
Note:
You cannot delete the last folder remained in an SD card. When the last folder remains, "Can not..." appears for one second.
Troubleshooting
Should problems occur, it is often unnecessary to consult your dealer or technical service department. On the basis of the following checks, you may be able to rectify a number of conditions yourself without difficulty. If the condition cannot be remedied after the following check, please consult your dealer.
The PMD661 does not turn on.
• Install fresh batteries.
- Check AC adapter connections.
The PMD661 turns on then turns itself off.
• Install fresh batteries.
The PMD661 seems to record, but there is no sound on playback.
- Check input settings.
(For example, if LINE input is selected and no input is connected to the LINE jack, the PMD661 will record silence. The PMD661 will not playback.)
There is no audio playback through headphones or internal speaker.
- Check VOL+/- control setting.
- Check a different audio file or the card.
The PMD661 will not record.
- Check that the maximum of 999 files have not been recorded.
- Check that the PMD661 acknowledges the card.
No signal from microphone input.
- Check input selection.
- Check REC LEVEL control settings.
- Check if microphone(s) require(s) Phantom power.
There is excessive noise on the PMD661.
- Check cable connections and/or replace cable.
- Check for proper gain levels.
Playback on a PC results in poor sound.
- Check quality of PC sound card and program.
- Check frequency conversion program.*
* The PMD661 records audio files with a sampling frequency of 48kHz. Some PC programs convert the files to 44.1kHz (using a sample rate converter). Only high quality sample rate converters should be used.
PC cannot read files
- Check the capability of the PC program. Some playback and editing programs do not support MP3 or Broadcast Wave (.wav) formats.
If the PMD661 exhibits erratic behavior, the microprocessor can be reset by powering off, disconnecting AC power and removing batteries.
Care and Maintenance
Use a soft cloth slightly moistened with mild detergent solution.
Media cards that are heavily used should be occasionally reformatted to avoid audio problems due to fragmentation.
Error Message
Details of error processing
| Display | Description |
| No Card Card cannot be found | |
| Unformat Format other than FAT16/32, or card format error | |
| Full Card Memory is not enough | |
| Full 999 Number of files is already 999 (maximum) | |
| Full MARK Number of marks in the current file is already 30 (maximum) | |
| No File No file found | |
| Key Locked Operation during Key Lock | |
| Card Locked Prohibition of writing into the card | |
| VBR FWD or RWD of VBR file | |
| Can not... Command is invalid | |
| Need DC IN No DC input | |
| Low Battery (flashing highlighted) Remaining battery is below set value | |
| Low Battery Automatic power down in low battery level last time. | |
| No PresetFile No preset setting file is found | |
| ErrPresetFile | File contents of preset setting has errors |
| ErrUpdateFile | Version up file or file system does not function normally |
| Door Open | SD card door is open |
| Err Format Error in file format of MP3 or PCM | |
| Already Exists | Same file title is found |
| Limit 80m Over 80 minutes in copy segment process | |
| Long Title | File title exceeds 64 Bytes |
| Err Card Error is found in the card | |
| Err RTC Error is found in RTC | |
| Err SRAM Error is found in SRAM | |
| Err FlashROM | Error is found in Flash ROM |
| Need Update | Update is not completed |
| Unmatched | Setting of the preset is not correct |
Specifications
Digital Audio System
System Solid State Recorder
Usable media SD/SDHC cards
Recording format
MP3......MPEG1 Layer III Compression
WAV 16/24 bit linear PCM
Recording MP3 bit-rate 320/256/192/128/64 kbps
Sample rate 44.1/48/96 kHz
Number of channels.... 2 (Stereo)/1 (Mono)
Audio Performance
Frequency response 20 Hz - 24 kHz (±1dB)
S/N ratio IEC-A weighted
MIC 65 dB
LINE 85 dB
Total harmonic distortion at 0 VU
MIC 0.08%
LINE 0.02%
Dynamic range....85 dB
Inputs
External MIC Type ....XLR stereo jack Input sensitivity ....1.2 mVrms/4.2 kohms
LINE
Type .... XLR stereo jack
Input sensitivity 0 dBu/4.2 kohms
LINE2
Type 1/8" stereo jack
Input sensitivity ....500 mVrms/20 kohms
Outputs
LINE Type ....RCA stereo jack Standard level ....2.0 V/10 kohms
Headphone Type ....1/4" stereo jack Standard level .... 16 mW/32 ohms
Speaker Standard level 450 mW/8 ohms
General
Power consumption Recording/Playback .... 4.2 W (DC) Battery life (Alkaline) .... 5 hours (Typical) Phantom power .... 48V, 10mA (Max.)
Power AC adaptor .... DA620PMD included Batteries.... 4 × AA type alkaline dry cell batteries or 4 × AA type Ni-MH rechargeable batteries Backup battery .... Lithium battery for real-time clock
Environmental conditions Operational temperature ....0 - 40°C (32 - 104°F) Operational humidity ....25 - 85% (no condensation) Storage temperature ....-20 - 60°C (-4 - 140°F)
Dimensions Width ....93 mm (3.7") Height ....165 mm (6.5") Depth ....36 mm (1.4") Weight (Excl. batteries) ....410 g (14 oz)
Included Accessories
Audio cable (RCA - 1/8" stereo type)
USB cable (Type mini-B - Type A)
AC adapter (DA620PMD)
User guide
CD-ROM
Carry strap
Customer Registration Document (US only)
SD card
- Specifications are subject to change without notice.
Limited Warranty
Your Marantz Professional product is warranted against manufacturer defects in material and workmanship for a period of one year parts and labor.
Except as specified below, this warranty covers defects in material and workmanship. The following are not covered under warranty:
- Damage, deterioration, malfunction or failure to meet performance specifications resulting from:
a) Accidents, acts of nature, misuse, abuse, neglect or unauthorized product modification.
b) Improper installation, removal or maintenance, or failure to follow supplied instructions.
c) Repair or attempted repair by a non-Marantz authorized agent.
d) Any shipment (claims must be presented to the carrier).
e) Any cause other than a defect of manufacturing. - Cleaning, check-ups with no fault found or changes incurred for installation, removal or reinstallation of the product.
- Any serialized product on which the serial number has been defaced, modified or removed.
- Batteries and battery chargers.
- Accessories, including but not limited to: cables, mounting hardware and brackets, cleaning accessories, power cords and adapters, and carry cases.
Non-transferable warranty
This Warranty may be enforced only by the original purchaser.
What We Will Pay For
We will pay for all labor and material expenses for items covered by the warranty.
How You Can Get Service (Americas only)
- If your unit needs service in the USA, contact our service referral at the appropriate telephone number indicated below. We will advise you of the name and location of one or more authorized service centers from which service may be obtained. Please do not return the unit directly to us.
- You must pay any shipping charges if it is necessary to ship the product for service. If the necessary repairs are covered by the warranty, we will pay return shipping charges to your location anywhere in the United States or its territories.
- Whenever warranty service is required, you must present the original dated sales receipt or other proof of date purchased.
Limitation of Implied Warranties
All implied warranties, including warranties of merchantability and fitness for a particular purpose, are limited in duration to the length of this warranty.
Exclusion of Damages (Americas only)
Liability for any defective product is limited to repair or replacement of the product at manufacturer's option. Manufacturer shall not be liable for damage to other products caused by any defects in Marantz products, damages based on inconvenience or loss of use of the product, or any other damages, whether incidental, consequential, or otherwise.
Some States do not allow limitations on how long an implied warranty lasts and/or do not allow the exclusion or limitation of incidental or consequential damages, so the above limitations and exclusions may not apply to you.
How State Law Relates to the Warranty (Americas only)
This warranty gives you specific legal rights, and you may have other rights which may vary from State to State.
Marantz Professional Service Number (Americas only):
Marantz Professional Factory Service (630) 741-0330
Products purchased outside of the United States, its possessions or territories.
This warranty is enforceable only in the United States and its possessions or territories.
Marantz Professional products Sales Office Site:
For inquiries or information on repair service of Marantz Professional Products, please contact our Sales Office or Tech Support Centre near you which are listed in D&M Professional website below.
AMERICA
D&M Professional America http://www.d-mpro.com
EUROPE
D&M Professional Europe http://www.d-mpro.eu.com
ASIA/OTHERS
D&M Professional Asia http://www.d-mproasia.com
D&M Holdings Inc.
PROFESSIONAL BUSINESS COMPANY

Printed in Japan 2008/11 541510209003P ecmn-g