LC-50LE652 - TV SHARP - Free user manual and instructions
Find the device manual for free LC-50LE652 SHARP in PDF.

User questions about LC-50LE652 SHARP
0 question about this device. Answer the ones you know or ask your own.
Ask a new question about this device
Download the instructions for your TV in PDF format for free! Find your manual LC-50LE652 - SHARP and take your electronic device back in hand. On this page are published all the documents necessary for the use of your device. LC-50LE652 by SHARP.
USER MANUAL LC-50LE652 SHARP
natural_image
Front view of a modern flat-screen monitor with a blank display stand (no text or symbols visible)


Digital Video Broadcasting

1080p

HD


HIGH-DEFINITION MULTIMEDIA INTERFACE

DIGITAL PLUS


READY
C€
DivX®
DivX Certified® to play DivX® video up to HD 1080p, including premium content.
ABOUT DIVX VIDEO: DivX® is a digital video format created by DivX, LLC, a subsidiary of Rovi Corporation. This is an official DivX Certified® device that plays DivX video. Visit divx.com for more information and software tools to convert your files into DivX videos.
ABOUT DIVX VIDEO-ON-DEMAND: This DivX Certified® device must be registered in order to play purchased DivX Video-on-Demand (VOD) movies. To obtain your registration code, locate the DivX VOD section in your device setup menu. Go to vod.divx.com for more information on how to complete your registration.
Covered by one or more of the following U.S. Patents:
7,295,673; 7,460,668; 7,515,710; 7,519,274
- YouTube and the YouTube logo are trademarks of Google Inc.
SPECIAL NOTE FOR USERS IN THE U.K.
The mains lead of this product is fitted with a non-rewireable (moulded) plug incorporating a 13A fuse. Should the fuse need to be replaced, a BSI or ASTA approved BS 1362 fuse marked ☑ or ☒ and of the same rating as above, which is also indicated on the pin face of the plug, must be used.
Always refit the fuse cover after replacing the fuse. Never use the plug without the fuse cover fitted.
In the unlikely event of the socket outlet in your home not being compatible with the plug supplied, cut off the mains plug and fit an appropriate type.
DANGER:
The fuse from the cut-off plug should be removed and the cut-off plug destroyed immediately and disposed of in a safe manner.
Under no circumstances should the cut-off plug be inserted elsewhere into a 13A socket outlet, as a serious electric shock may occur.
To fit an appropriate plug to the mains lead, follow the instructions below:
IMPORTANT:
The wires in the mains lead are coloured in accordance with the following code:
Blue: Neutral
Brown: Live
As the colours of the wires in the mains lead of this product may not correspond with the coloured markings identifying the terminals in your plug, proceed as follows:
- The wire which is coloured blue must be connected to the plug terminal which is marked N or coloured black.
- The wire which is coloured brown must be connected to the plug terminal which is marked L or coloured red.
Ensure that neither the brown nor the blue wire is connected to the earth terminal in your three-pin plug.
Before replacing the plug cover make sure that:
- If the new fitted plug contains a fuse, its value is the same as that removed from the cut-off plug.
- The cord grip is clamped over the sheath of the mains lead, and not simply over the lead wires.
IF YOU HAVE ANY DOUBT, CONSULT A QUALIFIED ELECTRICIAN.
OPERATION MANUAL
ENGLISH
- The illustrations and the OSD in this operation manual are for explanation purposes and may vary slightly from the actual operations.
- The examples used throughout this manual are based on the LC-39LE650E model.
- The LC-39LE650E, LC-39LE651E/K, LC-39LE652E, LC-39LE654E, LC-50LE650E, LC-50LE651E/K, LC-50LE652E, LC-50LE654E, LC-60LE650E, LC-60LE651E/K, LC-60LE652E and LC-60LE654Emodels are compatible with high definition broadcasts, H.264 compressed (MPEG4 H.264, MPEG4 AVC, MPEG4 AVC/H.264).
Contents
Contents ...... 1
Introduction 2
Dear SHARP customer 2
Important Safety Precautions 2
Remote Control unit 3
TV (Front view) 4
TV (Side and rear view) 4
Preparation 5
Supplied accessories 5
Attaching the stand unit 5
Optional accessory 5
Fixing the TV on a wall 5
Inserting the batteries 6
Using the remote control unit 6
Cautions regarding the remote control unit 6
Quick guide 7
Initial installation overview 7
Before turning on the power 8
Inserting a CA Card 8
Initial auto installation 9
Positioning / aligning DVB-T antenna 14
Menu Operation 15
What is the menu? 15
Common operations 15
About the Guide Display 15
Info display 15
Operation with the TV panel control keys.... 16
Favourites....16
Watching TV 17
Daily operation 17
Switching on/off 17
Switching between digital, satellite and analogue broadcasts 17
Changing channels 17
Selecting an external video source 17
Selecting audio language.... 17
Subtitles 17
EPG 18
EPG operation.... 18
Other EPG functions 19
Teletext 20
Using MHEG-5 application (UK only) 20
Basic adjustment 21
TV set adjustments 21
Picture settings 21
Sound settings 21
Stations settings 22
Control settings 24
Software update via USB 27
Software update via Internet 27
Multimedia/Network settings 28
Connections settings....28
Channel list 29
Useful viewing options.... 31
Selecting the picture format 31
Setting when using external devices 31
Connecting a USB device 31
TV menu options 32
TV/List function 32
Video function 34
Audio/Radio function.... 35
Photo function.... 36
USB/HOME MEDIA device compatibility 36
AQUOS NET+ function 37
Extras function 39
Setup function 40
Connecting external devices.... 41
Introduction to connections 41
HDMI connection 42
Component connection 42
VIDEO connection 42
SCART connection 43
Speaker/amplifier connector 43
HDMI devices 44
Controlling HDMI devices using HDMI CEC 44
HDMI CEC connection 44
HDMI CEC menu 44
Operating a HDMI CEC device 44
Connecting a PC 45
PC connection 45
HDMI (DVI) connection.... 45
Analogue connection....45
Adjusting the PC image automatically 46
Adjusting the PC image manually 46
Multimedia/Network setup 47
Network Setup 47
Connecting to the network 47
Wired installation 47
Wireless installation 47
USB REC function 49
USB REC function 49
USB REC (Video Recorder) 49
Archive playback 49
USB REC settings 49
Archive playback settings 51
TV viewing with time shift 53
Enjoying 3D Image Viewing 54
Enjoying 3D image viewing 54
Viewing 3D images 54
Recharging the 3D glasses battery 55
Display format for 3D and 2D images 56
Troubleshooting - 3D images 56
Appendix 58
Troubleshooting 58
Information on the software license for this product .... 58
Environmental Specifications 58
Specifications 59
End of life disposal 60
Trademarks 60
Dear SHARP customer
Thank you for your purchase of the SHARP LCD colour TV product. To ensure safety and many years of trouble-free operation of your product, please read the Important Safety Precautions carefully before using this product.
Important Safety Precautions
- Cleaning—Unplug the AC cord from the AC outlet before cleaning the product. Use a damp cloth to clean the product. Do not use liquid cleaners or aerosol cleaners.
- Use a soft damp cloth to gently wipe the panel when it is dirty. To protect the panel, do not use a chemical cloth to clean it. Chemicals may cause damage or cracks in the cabinet of the TV.
- Water and moisture—Do not use the product near water, such as a bathtub, washbasin, kitchen sink, laundry tub, swimming pool or in a wet basement.
- Do not place vases or any other water-filled containers on this product. The water may spill onto the product causing fire or electric shock.
- Stand—Do not place the product on an unstable trolley, stand, tripod or table. Doing so can cause the product to fall, resulting in serious personal injuries as well as damage to the product. Use only a trolley, stand, tripod, bracket or table recommended by the manufacturer or sold with the product. When mounting the product on a wall, be sure to follow the manufacturer's instructions. Use only the mounting hardware recommended by the manufacturer.
- When relocating the product placed on a trolley, it must be moved with utmost care. Sudden stops, excessive force and uneven floor surface can cause the product to fall from the trolley.
- Ventilation—The vents and other openings in the cabinet are designed for ventilation. Do not cover or block these vents and openings since insufficient ventilation can cause overheating and/or shorten the life of the product. Do not place the product on a bed, sofa, rug or other similar surface, since they can block ventilation openings. This product is not designed for built-in installation; do not place the product in an enclosed place such as a bookcase or rack, unless proper ventilation is provided or the manufacturer's instructions are followed.
- The LCD panel used in this product is made of glass. Therefore, it can break when the product is dropped or impact applied. If the LCD panel is broken, be careful not to be injured by broken glass.
- Heat sources—Keep the product away from heat sources such as radiators, heaters, stoves and other heat-generating products (including amplifiers).
- Headphones—Do not set the volume at a high level. Hearing experts advise against extended listening at high volume levels.
- To prevent fire, never place any type of candle or naked flames on the top or near the TV set.
- To prevent fire or shock hazard, do not place the AC cord under the TV set or other heavy items.
- Do not display a still picture for a long time, as this could damage the LCD screen.
- There is always power consumption if main plug is connected. Be aware that only way to disconnect mains power from your TV is to unplug mains plug from the wall, it shall remain readily operable during use of your product.
- Servicing—Do not attempt to service the product yourself. Removing covers can expose you to high voltage and other dangerous conditions. Request a qualified person to perform servicing.


The LCD panel is a high technology product, giving you fine picture details.
Due to the very large number of pixels, occasionally a few non-active pixels may appear on the screen as a fixed point of blue, green or red. This is within product specifications and does not constitute a fault.
Precautions when transporting the TV
When transporting the TV, never carry it by holding onto the speakers. Be sure to always carry the TV by two people holding it with two hands—one hand on each side of the TV.
Cautions regarding use in high and low temperature environments
- When the TV is used in a low temperature space (e.g. room, office), the picture may leave trails or appear slightly delayed. This is not a malfunction, and the TV will recover when the temperature returns to normal.
- Do not leave the TV in a hot or cold location. Also, do not leave the TV in a location exposed to direct sunlight or near a heater, as this may cause the cabinet to deform and the LCD panel to malfunction.
Storage temperature: -20 °C to +60 °C.

Caution : DANGEROUS VOLTAGE INSIDE !
TO PREVENT ELECTRIC SHOCK, DO NOT REMOVE COVER. NO-USER SERVICEABLE PARTS INSIDE. REFER SERVICING TO QUALIFIED SERVICE PERSONAL.
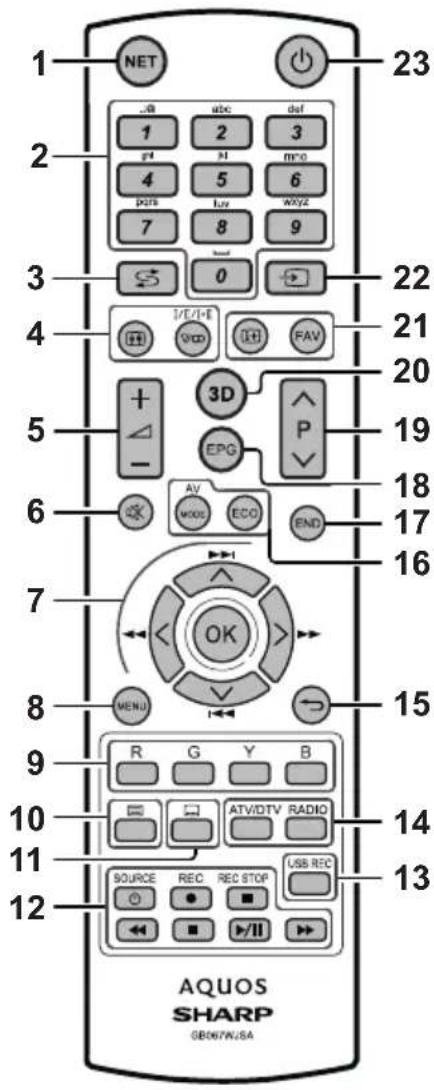
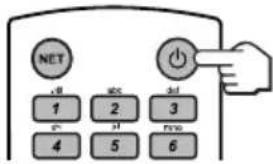
Remote control unit
1 NET (Page 37)
Access "AQUOS NET+" mode.
2 Alphanumeric buttons 0–9
Set the channel. Enter desired numbers. Set the page in teletext mode.
- When the five Nordic countries (Sweden, Norway, Finland, Denmark or Iceland) are selected in the country setting from initial auto installation (Page 9), DTV services are four digits. When another country is selected, DTV services are three digits.
3 ⇌ (Flashback)
Return to the previously selected channel or external input.
4 //I+/ (Sound mode) (Page17)
Select a sound multiplex mode.
Picture format (Page 31)
Change between different picture formats.
5 +/- (Volume)
Increase/decrease TV volume.
6 (Mute)
TV sound on/off.
7 ▲/▼/◄/► (Cursor)
Select a desired item.
OK
Execute a command.
ATV/DTV/SAT: Display "CH list" when no other "MENU" screen is running.

Not used.
8 MENU
Main menu screen on.
Come back to last option selected within MENU screen.
9 R/G/Y/B Colour buttons
The coloured buttons are correspondingly used to select the coloured items on the screen (e.g., EPG, MHEG-5, teletext).
10 ☐ Teletext (Page 20)
ATV: Display analogue teletext.
DTV/SAT: Select MHEG-5 or teletext for DTV/SAT.
11 📄 Subtitle (Pages 17 and 20)
Switch subtitle languages on/off.
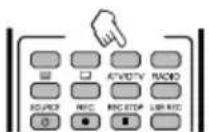
text_image
1 23 NET abc def 1 2 3 r4 M m/o 4 5 6 pns Iuv wxyz 7 8 9 S 0 4 1/E/I-F FAV + 3D - EPG P 6 AV END MUS ECO 7 OK 8 MENU 9 R G Y B 10 ATV/DTV RADIO 11 SOURCE REC REC STOP USB REC 12 AQUOS SHARP GB067W/SA12 ◀◀/▶/▶▶/●/■ (Pages 49 and 53)
Video/Music/USB REC files reproduction buttons.
SOURCE (Page 44)
Operating HDMI-CEC device.
Record a programme you are watching.
14 ATV/DTV
Access TV mode.
RADIO
DTV/SAT: Switch between radio and data mode.
- When only data broadcasting (no radio broadcasting) is transmitted by DVB, the radio broadcasting will be skipped.
15 ≅ Back
ATV/DTV/SAT: Return to the previous "Menu" screen.
NET: Return to the previous page (This may not function for some services).
16 Picture adjustment (Page 21)
Select picture settings.
ECO (Page 21)
Activate/deactivate low consumption mode (ECO).
17 END
ATV/DTV/SAT: Exit the "Menu" screen.
18 EPG (Page 18)
DTV/SAT: Display the EPG screen.
19 PΛ/V
ATV/DTV/SAT: Select the TV channel.
NET: Scrolls pages up/down.
20 3D (Page 54)
Select between 3D and 2D image viewing.
21 i+ Channel information (Page 15)
Display the station information (channel number, signal, etc.) on the screen.
Within MENU screen shows a hint about item selected.
FAV
Define active station as favourite.
22 → (AV selection) (Page 17)
Select an input source.
23 ⏻ (Standby/On) (Page 17)
Important information:
Satellite services are only available for the LE652/654 model series.
Introduction
TV (Front view)
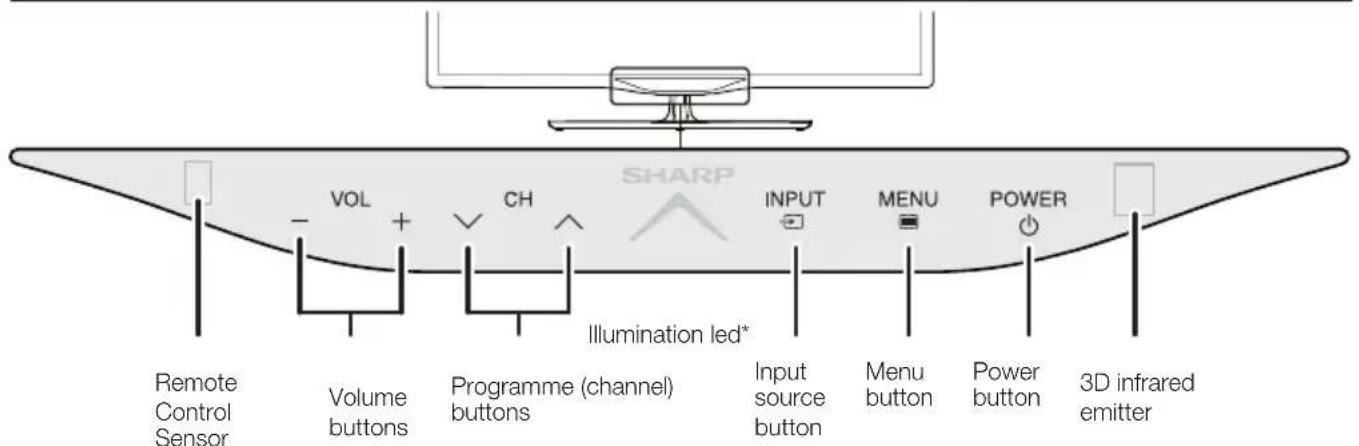
text_image
VOL CH SHARP INPUT MENU POWER Remote Control Sensor Volume buttons Programme (channel) buttons Illumination led* Input source button Menu button Power button 3D infrared emitter*TV indicator status (Page 17)
TV (Side and rear view)
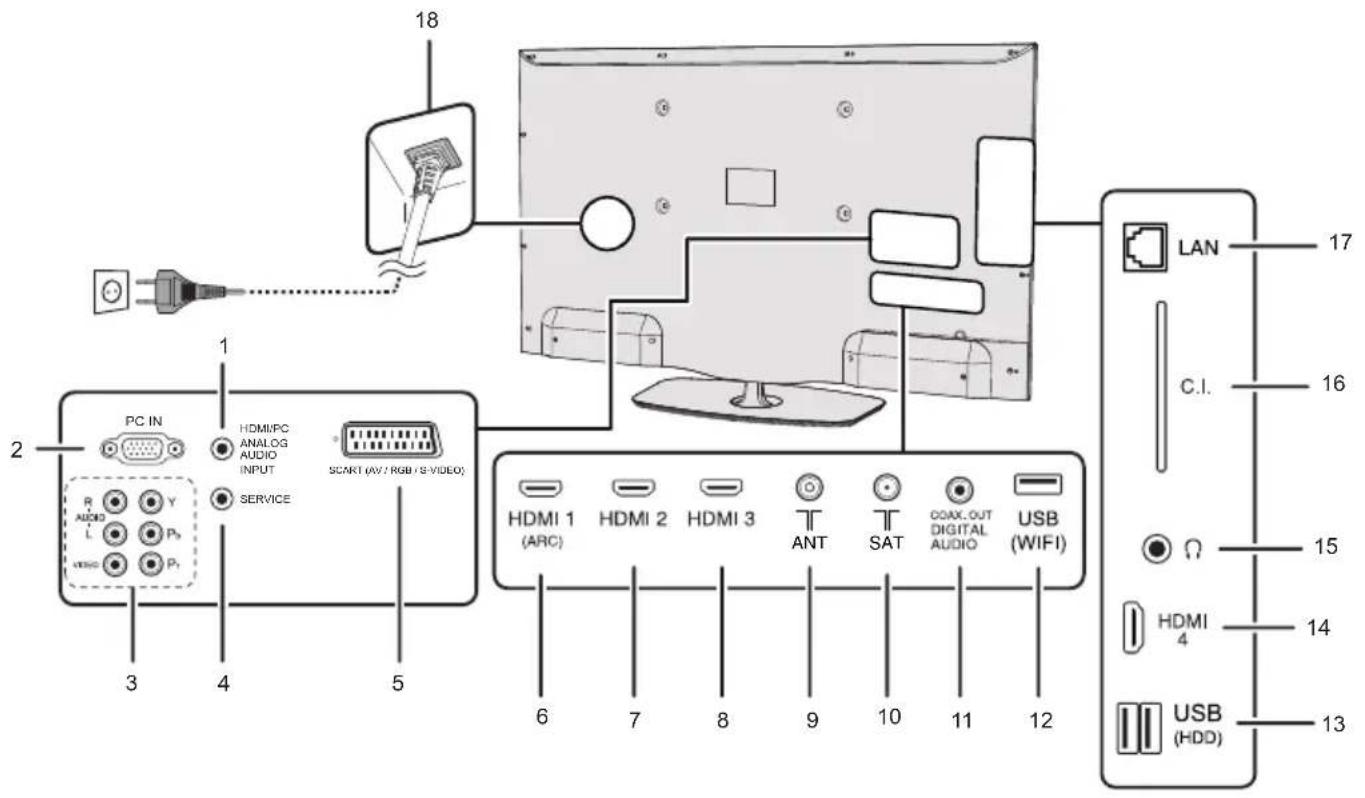
text_image
18 PC IN HDMI/PC ANALOG AUDIO INPUT SCART (AV / RGB / S-VIDEO) SERVICE R AUDIO L Y P0 VISO P1 3 4 5 6 7 8 9 10 11 12 HDMI 1 (ARC) HDMI 2 HDMI 3 ANT SAT COAX, OUT DIGITAL AUDIO USB (WIFI) LAN C.I. 17 16 15 14 13 HDMI 4 USB (HDD)1 Analog AUDIO input for DVI and PC (Jack 3.5mm connector)
2 PC Input
3 COMPONENTS / AV terminals
4 SERVICE connector (jack 3.5 mm)
5 SCART (AV/RGB, Y/C Input) terminal
6 HDMI 1 (HDMI/DVI/ARC)
7 HDMI 2 (HDMI/DVI)
8 HDMI 3 (HDMI/DVI)
9 Antenna input terminal
10 SAT (Satellite antenna input) (Only L*652 series)
11 Digital Audio Output terminal (SPDIF)
12 USB terminal (Wi-Fi use only)
13 USB terminal (USB REC / MEDIA PLAYER / SOFTWARE / HDD READY / 3D GLASSES BATTERY)
14 HDMI 4 (HDMI/DVI)
15 HEADPHONES jack
16 COMMON INTERFACE slot
17 LAN terminal
18 AC INPUT terminal
WARNING
- Excessive sound pressure from earphones and headphones can cause hearing loss.
- Do not set the volume at a high level. Hearing experts advise against extended listening at high volume levels.
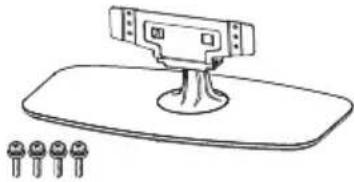
Supplied accessories
Remote control unit (×1)

- “AAA” size battery (×2)

- Cable tie (x1)

• Operation manual (This publication)
- Stand unit (x1)
natural_image
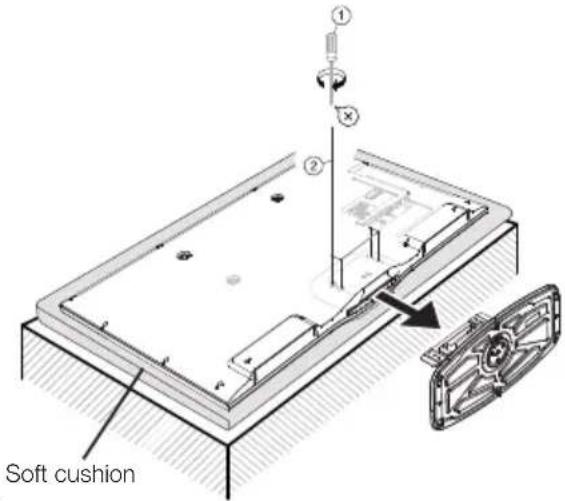
Simple line drawing of a device with a top and base plate, accompanied by three small circular components below (no text or symbols)Attaching the stand unit
- Before attaching (or detaching) the stand, unplug the AC cord.
- Before performing work, spread cushioning over the surface on which you will be laying the TV. This will prevent it from being damaged.
CAUTION
- Attach the stand in the correct direction.
- Be sure to follow the instructions. Incorrect installation of the stand may result in the TV falling over.
Inserting the stand
① Insert the stand into the openings on the bottom of the TV (Hold the stand so it will not drop from the edge of the base area).
② Insert and tighten the four screws into the four holes on the rear of the TV.
text_image
Soft cushionNOTE
- To detach the stand unit, perform the above steps in reverse order.
Optional accessory
The listed optional accessories are available for this LCD colour TV. Please purchase them at your nearest shop.
- Additional optional accessories may be available in the near future. When purchasing, please read the newest catalogue for compatibility and check the availability.
| No. | Part name Part number | |
| 1 | Wall mount bracket AN-52AG4 | |
| 2 | Wi-Fi adapter AN-WUD630 | |
| 3 | 3D glasses AN-3DG35 | |
| 4 | 3D glasses AN-3DG20-B |
Fixing the TV on a wall
- This TV should be fixed on a wall only with the wall fix bracket available from SHARP (above table). The use of other wall fix brackets may result in an unstable installation and may cause serious injuries.
- Fixing the LCD colour TV requires special skills and should only be performed by qualified service personnel. Customers should not attempt to do the work themselves. SHARP bears no responsibility for improper fixing or fixing that results in accident or injury.
- You can ask qualified service personnel about using an optional bracket to fix the TV on a wall.
- To use this TV fixed on a wall, first remove the adhesive tape at the two locations on the rear of the TV, and then use the screws supplied with the wall fix bracket to secure the bracket to the rear of the TV.
- When you fix the TV on a wall, you should attach the supporting post.
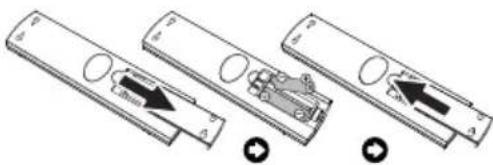
Inserting the batteries
Before using the TV for the first time, insert the two supplied "AAA" size batteries. When the batteries become depleted and the remote control unit fails to operate, replace the batteries with new "AAA" size batteries.
1 Open battery cover.
2 Insert two supplied "AAA" size batteries.
- Place batteries with their terminals corresponding to the (+) and (-) indicators in the battery compartment.
3 Close the battery cover.
natural_image
Diagram showing three views of a remote control panel with arrows indicating movement or change (no text or symbols present)CAUTION
Improper use of batteries can result in chemical leakage or explosion. Be sure to follow the instructions below.
- Do not mix batteries of different types. Different types of batteries have different characteristics.
- Do not mix old and new batteries. Mixing old and new batteries can shorten the life of new batteries or cause chemical leakage in old batteries.
- Remove batteries as soon as they have worn out. Chemicals that leak from batteries can cause a rash. If you find any chemical leakage, wipe thoroughly with a cloth.
• The batteries supplied with this product may have a shorter life expectancy due to storage conditions. - If you will not be using the remote control unit for an extended period of time, remove the batteries from it.
- When replacing the batteries, use zinc-carbon batteries instead of alkaline ones.
Note on disposing batteries:
The batteries provided contain no harmful materials such as cadmium, lead or mercury.
Regulations concerning used batteries stipulate that batteries may no longer be thrown out with the household rubbish. Deposit any used batteries free of charge into the designated collection containers set up at commercial businesses.
Using the remote control unit
Use the remote control unit by pointing it towards the remote control sensor. Objects between the remote control unit and sensor may prevent proper operation.

text_image
5 m 30° 30° Remote control sensorCautions regarding the remote control unit
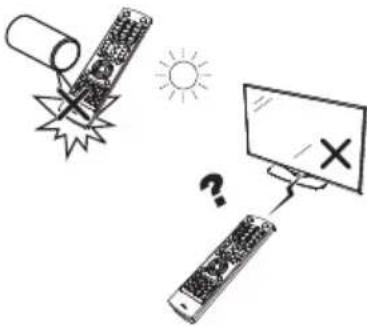
- Do not expose the remote control unit to shock. In addition, do not expose the remote control unit to liquids, and do not place in an area with high humidity.
- Do not install or place the remote control unit under direct sunlight. The heat may cause deformation of the unit.
- The remote control unit may not work properly if the remote control sensor of the TV is under direct sunlight or strong lighting. In such cases, change the angle of the lighting or the TV, or operate the remote control unit closer to the remote control sensor.
text_image
Illustration showing a battery and two remote devices with a sun symbol, one marked with an X and the other with a cross, connected to a monitor.Initial installation overview
Follow the steps below one by one when using the TV for the first time. Some steps may not be necessary depending on your TV installation and connection.

text_image
1 2 3 Preparation1 Connect an antenna cable to the antenna terminal (Page 8).

text_image
Diagram illustrating satellite communication system with antenna, signal processing unit, and satellite dish② If necessary, insert a CA card into the CI slot to watch scrambled broadcasts (Page 8.)

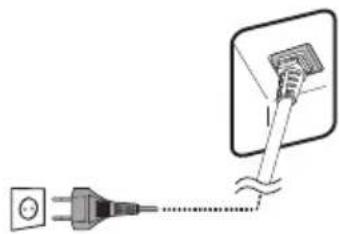
3 Plug in the AC cord (Page 8).
Product shape varies in some countries.
natural_image
Pure electrical circuit lines without any symbolsPower on and run the auto installation
1 Turn on the power using ⏻ on the TV (Page 17).

text_image
POWER② Run the initial auto installat (Page 9).
√ Language, Energy Efficiency, country, antenna type settings, etc.

text_image
INITIAL INSTALLATION -Menu language Which menu language is you want to use the application? English (64) Spanish (65) French (66) Italian (67) English (68) Netherlands (69) Czech (70) English (71) Spanish (72) Chinese (73) English (74) Spanish (75) Chinese (76) English (77) Spanish (78) Chinese (79) English (80) Spanish (81) Chinese (82) English (83) Spanish (84) Chinese (85) English (86) Spanish (87) Chinese (88) English (89) Spanish (90) Chinese (91) English (92) Spanish (93) Chinese (94) English (95) Spanish (96) Chinese (97) English (98) Spanish (99) Chinese (100)√ Go to Next. ↓
Start searching channels
Watch TV
1 Congratulations! Now you can watch TV.
② If necessary, adjust the antenna to attain maximum signal reception (Page 14).
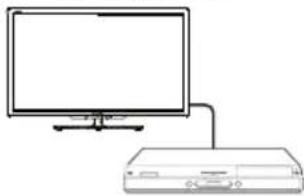
Connect external devices
Connect external devices such as a DVD player/recorder as instructed (Pages 41, 42 and 43).
natural_image
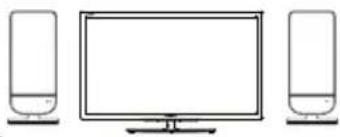
Line drawing of a monitor connected to a rectangular device (no text or symbols)② Connect external audio devices such as speakers/amplifier as instructed (Pages 41, 42 and 43).
natural_image
Line drawing of three electronic devices: a front-mounted monitor, two side-mounted speakers, and a flat-screen TV (no text or symbols)Before turning on the power

text_image
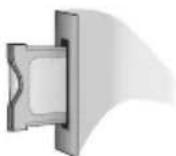
1 Carefully insert the CI Module in the CI slot with the contact side forward. 2 The logo on the CI Module must be facing outward from the rear of the TV. Product shape varies in some countries. Place the TV close to the AC outlet, and keep the power plug within reach. Standard DIN45325 plug (IEC 169-2) 75Ω coaxial cable.Inserting a CA Card
In order to receive coded digital stations, a Common Interface Module (CI Module) and a CA Card must be inserted in the CI slot of the TV.
The CI Module and the CA Card are not supplied accessories. They are usually available from your dealers.
Inserting the CA Card into the CI Module
1 With the side with the gold coloured contact chip facing the side of the CI Module marked with the provider's logo, push the CA Car into the CI Module as f direction of the arrow p

Inserting the CI Module in the CI slot
2 Carefully insert the CI Module in the CI slot with the contact side forward. The logo on the CI Module must be facing outward from the rear of the TV. Do not use excessive force. Make sure the module is not bent in the process.
Checking CI Module information
1 Press MENU and the "MENU" screen is shown.
2 Press ◀/▶ to select "Extras" menu.
3 Press ◀/▶ to select "CA module", and then press OK.
- The content of this menu depends on the provider of the CI Module.
Module
General information on CI Module displays.
- Menu
Adjustment parameters of each CA Card displays.
Enquiry
You can input numerical values such as passwords here.
NOTE
The content of each screen depends on the provider of the CI Module.
NOTE
• Make sure that the CI module is properly inserted.
• This menu is only available for digital stations.
- It takes about 30 seconds to certify the license key when you insert a CA card into the Cl+ compatible Cl module for the first time. This process may fail when there is no antenna input or you have never run "Auto installation".
- The CI+ compatible CI module sometimes upgrades its firmware. You may not receive any TV images before upgrading. You can only use the power button during upgrading.
- The CI+ compatible CI module does not allow you to output any copy protected programmes using monitor out.
- If the TV displays an update confirmation message for the CA card while receiving CI+ compatible broadcasts, follow the screen prompts.
Initial auto installation
When the TV is powered on for the first time after purchase, the initial auto installation wizard appears. Follow the menus and make the necessary settings one after another.
Confirm the following before turning on the power
● Is the antenna cable connected?
● Is the AC cord plugged in?
1 Press ⏻ on the TV.
- The initial auto installation wizard appears.
- The auto installation can also be called in the TV menu, see Repeat initial installation on page 40.
- The routine of the first installation wizard depends on the selected settings.

text_image
SOURCE REC REC STOP USB REC AQUOS OK2 Setting the menu language.
Press ▲/▼/◄/► to select the desired language.
text_image
INITIAL INSTALLATION -Menu language Which menu language do you want to use for question? Gazalock (M) English (m) English (f) English (h) Espany (A) Espany (m) Netherlands (f) Cotany (a) EX:Myxia (M) Romatic (P) Mayyar (M) Suzuki (h) Stoverindustri (h) CovemOne (M) Turkpe (R) Swannska (M) Darnak (M) Portugues (P) Russian (n) Noruk (M) Latvien (H) Umsuenan (H) Extrian (M) Lonesian (M) Ramanian (M) Bydansian (M) Sprakil Hravastal Proceed with →Proceed with ▶▶ button.
3 Setting Energy Efficiency.
Decide how efficiently you want to operate your TV set.
text_image
Energy efficiency Here you define how energy efficiently you serve your TV. With the "Home Mode" setting you put the focus on low energy consumptions for Home Use. The "Shop Mode" is designed for operation in a showroom. Note: If you select "Home mode" here, the TV set will automatically switch off to save energy after no longer being operated for 4 hours. Home Mode Shop Mode Back with << Proceed with >>•Home Mode:
The emphasis for home use is on low energy consumption.
•Shop Mode:
The picture settings are aligned to operate in the presentation room. If the ambient brightness diminishes, the energy consumption is not reduced.
This setting can be changed later in the MENU
Extras→Energy Efficiency.
Proceed with ▶▶ button.
4 Selecting the TV location.
Press ▲/▼/◄/► to select your country or area.
- This setting screen only appears during the initial auto installation.
Proceed with ▶▶ button.
5 Select broadcast settings.
Press ▲/▼ to move between different tune type. Press OK to select the desired antenna.
text_image
Connect antenna cable(s) Your TV news base searches and sends all the status. Want ▼, highlight which accounts cable are available for your TV set and connect them to the correct accounts broadband, which are specified here in the right-limited column. Attenua cable(s) for to account sub(s): Cable encoding ANT TV DVB-T ANT TV DVB-C ANT TV Back with ▼ Proceed with ▼Cable analogue: analogue broadcast via cable/antenna.
DVB-T: Digital broadcast.
DVB-C: Cable digital broadcast.
DVB-S: Satellite broadcast.
Proceed with ▶ button.
(Only 652/654 series)
6 Select subtitles and audio languages.
Press ▲/▼/◄/► and OK to select the desired languages and alternative languages for subtitles and audio for DVB programmes.
text_image
Substitute and audio Languages (2009) How can you use any specific language and use an emoji for substitute and audio for 2009 programmes, etc. Total: The most selected languages should be confirmed and the 2009 languages. Substitute (2009) Audio (2008) Audio supplementary Functional Language German English Chinese European Asian Latin American Caucasian African American Asian American American American American American American American American American American American American American American American American American American American American American American American American American American American American American American American American American American American American American American American American American American American American American American American American American American AmericaProceed with ▶▶ button.
•To set up audio commentary for the visually impaired, please see Audio commentary on page 25.
Setting options for DVB-T reception
If you have not selected DVB-T antenna in the antenna selection, continue with Setting options for DVB-C reception on page 10.
7 Selecting tuner settings.

text_image
OVB-T settings Please specify what you can be processed by the installed versions box. Note: The installed versions are only available with 100% or 100% mode each additional unit. Converted versions Search Method Archet Lograph/ Dsquare Number Back with Prepaid with Next- Scrambled stations
You can specify if coded stations are to be searched for in the search/update.
Select yes to save all scrambled stations.
• These stations can only be received in connection with a CI module and the appropriate CA Card.
- If a CI module with a CA Card is already inserted for the station search, all the stations which this module can descramble are also saved when no is selected.
- Search method
Select Frequency search if you want to run the station search independently of the channel grid.
- Accept logical channel number
In various countries, digital stations are transmitted with a preset channel number per station, known as "Logical Channel Numbers" (LCN).
If you select yes, these default channel numbers will be used and the channels will be sorted as per LCN.
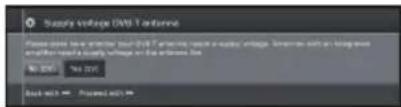
8 Supplying power to the antenna.
If you use a DVB-T antenna that requires a supply voltage and which is not supplied via a power adapter, then select yes (5V) for the antenna's power supply.
text_image
Supply Voltage (V/V) antenna Please note that the voltage test (V/V) antenna, unless a power vintage, cannot be used to monitor any other device. Please note that the voltage test is the hardware line. No 2015 No 2015 Back with Prepared withPress ▶▶ button.
How to align your DVB-T antenna is described on page 14.
9 Continue with Settings for all types of reception (See page 13).
Setting options for DVB-C reception
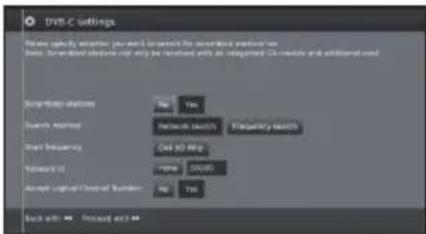
If you have not selected DVB-C antenna in the antenna selection, continue with Setting options for DVB-S reception below.
The normal DVB-C settings are derived from the selection of the location and do not need to be changed.
text_image
DVB-C settings Where specify another user can be accessed for broadband network bus Sub: Standard device can only be returned with an integrated DC module and additional used. Standard options No Yes Search required: Network switch Frequency switch Start frequency: 048.50 MHz Network ID: Name: 50000 Accept logical channel number: No Yes Back with: Present andPress ▲/▼/◄/► to change each item to the appropriate settings:
• Network selection
If several networks are available via DVB-C, you can decide which network you want to receive your channels from.
• Scrambled stations
You can specify if coded stations are to be searched for in the search/update.
Select yes to save all scrambled stations.
•These stations can only be received in connection with a CI module and the appropriate CA Card.
• If a CI module with a CA Card is already inserted for the station search, all the stations which this module can descramble are also saved when no is selected.
- Search method
If you select Frequency Search, a search is performed for all receivable stations. With Network Search, only the stations which the networks supply are searched, either for all receivable networks or only for the particular network specified under Network ID.
- Start Frequency
The DVB stations are only searched for in the frequency range above the start frequency.
• Network ID
Change this setting to register only the specified network ID.
- Accept logical channel number
In various countries, digital stations are transmitted with a preset channel number per station, known as "Logical Channel Numbers" (LCN).
If you select yes, these default channel numbers will be used and the channels will be sorted as per LCN.
NOTE
- The value of Frequency and Network ID should be set to the value specified by the cable provider. Press ▶▶ to continue.
Setting options for DVB-S reception
If you have not selected a DVB-S antenna in the antenna selection, continue with Settings for all types of reception on page 13.
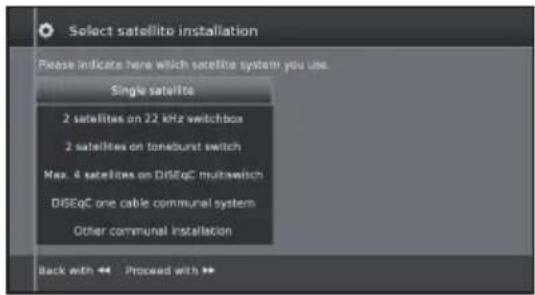
Select the satellite system.
text_image
Select satellite installation Please indicate here which satellite system you use. Single satellite 2 satellites on 22 kHz switchbox 2 satellites on toneburst switch Max. 4 satellites on DISEqC multiswitch DISEqC one cable communal system Other communal installation Back with << Proceed with >>Specify how you receive which satellite(s) (single satellite or type of satellite system). Ask your dealer in this regard.
The normal DVB-S settings are derived from the selection of the location and do not need to be changed in most cases.
- Single satellite
Reception of a single satellite via a connected LNC (LNB). See page 11 for settings.
• 2 satellites on 22kHz switchbox
Reception of two different satellites with two LNCs (LNBs) which are connected to the TV set by a 22 kHz switchbox. See page 11 for settings.
• 2 satellites on Toneburst switch
Reception of two different satellites with two LNCs (LNBs) which are connected to the TV set by a toneburst switch. See page 11 for settings.
• Max. 4 satellites on DiSEqC multiswitch
The TV set controls a DiSEqC multiswitch to which up to four LNCs (LNBs) for different satellites are connected. See page 11 for settings.
• DiSEqC one cable communal system
Select setting if the TV set is connected to a DiSEqC single cable system (according to EN50494). Several satellite receivers can be connected to one satellite cable. See page 12 for settings.
• Other communal installation
Select this setting if the TV set is connected to a single-cable system (without DiSEqC). Several satellite receivers can be connected to one satellite cable. As opposed to a DiSEqC one cable system there are restrictions in the range of certain reception frequencies in common single-cable community systems. See page 13 for settings.
Press ▶▶ to continue
Setting options for Single satellite
Reception of a single satellite via a connected LNC (LNB).
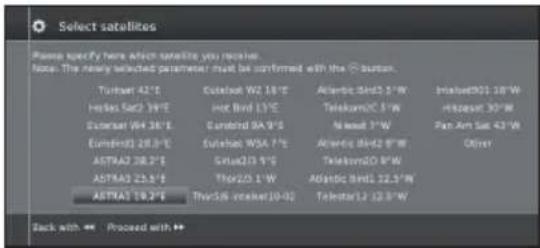
1 Select satellite.
text_image
Select satellites Please specify here which satellite you receive. Note: The newly selected parameter must be confirmed with the C button. Turboat 42°E Hellas Star 39°E Extinger 64°38' E Euromini 28.0° E ASTRA2 28.2° E ASTRA3 22.5° E ASTRA3 19.2° E Catalak W2 18° E Hot Band 13° E Catalak WA 9° E Catalak WSA 7° E Sria23.9° E Thor23.1° E Thy538 interket 10-02 Atlantic Band 3.5° E Telekom 20° E/W Midwest 3° E Atlantic Band 8° E Telekom 20° E/W Atlantic Band 12.5° E Telestar L2 12.5° E Inbetel01 18° E Hikazeast 30° E Pan Am Sat 43° E Other Back with ** Proceed with **Press ▶▶ to continue.
2 Select Dual Band (low/high) or Single Band. Here you specify if you use a Dual Band (Universal) LBN or Single LBN.

text_image
High (ASTRA1 19,2*E) Here, please specify whether you are using a Dual Band (Universal) LNB or a Single Band LNB. Dual band (low/high) Single band Back with ** Proceed with **Press ▶▶ to continue.
3 Specify here the oscillator frequency for your LNB.
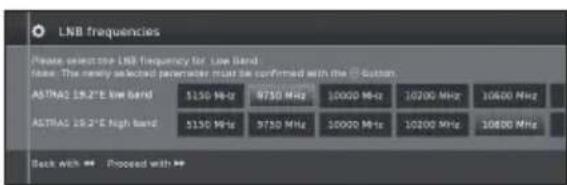
text_image
LNB frequencies Please select the LNB frequency for: Live Band lass. The newly selected parameter must be confirmed with the C button. ASTRA2 19.2°E low band 5150 MHz 9750 MHz 10000 MHz 10200 MHz 10600 MHz ASTRA2 19.2°E high band 5150 MHz 9750 MHz 10000 MHz 10200 MHz 10800 MHz Back with ▼ Proceed with ▼Normally you do not need to change the values for high and low band, unless the LNB of your satellite system uses a different oscillator frequency (important for the frequency display).
If you use the setting Single Band in step Dual/Single Band, you only have to define the LNB frequency for the Low Band.
4 Press ▶▶ to continue.
See Setting options for all DVB-S reception on page 13 to continue.
Setting options for 2 satellites on 22kHz switchbox / 2 satellites on Toneburst switch
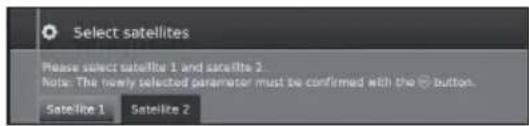
1 Select Satellite1/Satellite2
text_image
Select satellites Please select satellite 1 and satellite 2. Note: The newly selected parameter must be confirmed with the button. Satellite 1 Satellite 22 Select satellite name from list and press OK.
Press ▶▶ to continue.

text_image
Select satellites Please select satellite 1 and satellite 2 Note: The newly selected parameter must be confirmed with the E button. Satellite 1 Satellite 2 Name ASTRA1 19.3°E Thor50 Intel(ISO-G) Telestar12 12.5°W Turkish 42°E Europa W0 16°E Atlantic 8N03 5°W Invast301 20°W Inhaler Sat2 39°E Hot Bird 13°E Telecom2C 5°W Higpanel 30°W Eurolact W4 36°E Eurobird BA 5°E Nisnet 7°W Fan Am Sat 43°W Eurolacti 39.5°C Europa W0A 5°E Atlantic 8N02 8°W Other ASTRA2 28.2°E Sirius23 5°S Telecom2D 8°W ASTRA3 23.5°E Thor20 3°W Atlantic 8nll 12.5°W Back with ** Proceed with **3 Specify here the oscillator frequency for your LNB.
text_image
LNB frequencies Please select the LNB frequency for: Low band. Time: The newly selected parameter must be confirmed after the LNB boxers. ASTRAL 19.2" low band $150 MHz MPSD MHz 10000 MHz 3000 MHz 10000 MHz not fixed LNB low band $150 MHz 9750 MHz 10000 MHz 3000 MHz 10000 MHz Back 411.46: Proced all.Normally you do not need to change the values for high and low band, unless the LNB of your satellite system uses a different oscillator frequency (important for the frequency display).
4 Press OK to select frequency and press ▶▶ to continue.
See Setting options for all DVB-S reception on page 13 to continue.
Setting options for Max. 4 satellites on DiSEqC multiswitch
Select DiSEqC multiswitch and adpat settings for this selection.
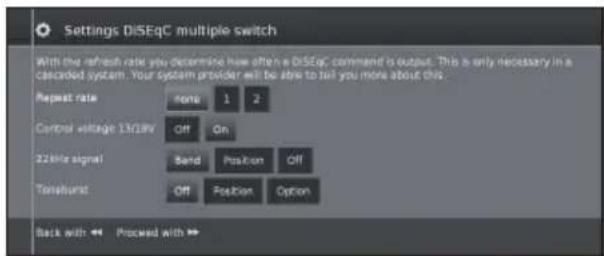
text_image
Settings DiSEqc multiple switch With the refresh rate you determine how often a DiSEqc command is output. This is only necessary in a cascaded system. Your system provider will be able to tell you more about this. Repeat rate none 1 2 Control voltage 13/28V Off On 22kHz signal Band Position Off Totalburst Off Position Option Back with ←→ Proceed with →→- Repeat rate
The refresh rate determines how often a DiSEqC command is output. A refresh is only necessary with cascaded system.
• Control voltage
The control voltage controls the switch of the polarisation level (horizontal/vertical) in non-DiSEqC capable components (e.g., control of single LNBs via DiSEqC multiswitch).
- 22kHz signal
The 22kHz signal controls the switching between high and low band in the Band setting. The Position setting controls the selection of the satellites in non-DiSEqC capable components.
- Toneburst
The Toneburst controls the selection of the satellites in non-DiSEqC but Toneburst capable components with the Position and Option settings.
Press OK to adopt settings and press ▶▶ to continue.
1 Select Satellite1 to Satellite4.

text_image
Select satellites Please select satellites 1 to satellite 4. Note: The newly selected parameters must be confirmed with the 5 buttons. Satellite 1 Satellite 2 Satellite 3 Satellite 42 Select satellite name from list and press OK. Press ▶▶ to continue.

text_image
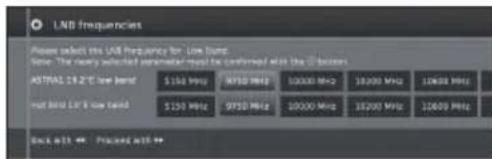
Select satellites Please select sell the 1 to sell the 4. Note: The newly selected parameter must be confirmed with the 5 buttons. Satellite 1 Satellite 2 Satellite 3 Satellite 4 None Turbus 42.1# Iberias 26.2 P# Echelber 96.1 P# Gundorfer 28.1 P# ASTRAO 23.2 P# ASTRAO 23.3 P# ASTRAO 19.3 P# Echelber WG 18.1# Hot Bid 19.1# Enquest NA 8 P# Echelber WSA 7 P# Sprout 5 P# Thursis 1 P# Thursis 10 P# Thursis 12.3 P# Thursis 12.5 P# Thursis 12.7 P# Thursis 12.9 P# Thursis 13.1 P# Thursis 13.3 P# Thursis 13.5 P# Thursis 13.7 P# Thursis 13.9 P# Thursis 14.1 P# Thursis 14.3 P# Thursis 14.5 P# Thursis 14.7 P# Thursis 14.9 P# Thursis 15.1 P# Thursis 15.3 P# Thursis 15.5 P# Thursis 15.7 P# Thursis 15.9 P# Thursis 16.1 P# Thursis 16.3 P# Thursis 16.5 P# Thursis 16.7 P# Thursis 16.9 P# Thursis 17.1 P# Thursis 17.3 P# Thursis 17.5 P# Thursis 17.7 P# Thursis 17.9 P# Thursis 18.1 P# Thursis 18.3 P# Thursis 18.5 P# Thursis 18.7 P# Thursis 18.9 P# Thursis 19.1 P# Thursis 19.3 P# Thursis 19.5 P# Thursis 19.7 P# Thursis 19.9 P# Thursis 20.1 P# Thursis 20.3 P# Thursis 20.5 P# Thursis 20.7 P# Thursis 20.9 P# Thursis 21.1 P# Thursis 21.3 P# Thursis 21.5 P# Thursis 21.7 P# Thursis 21.9 P# Thursis 22.1 P# Thursis 22.3 P# Thursis 22.5 P# Thursis 22.7 P# Thursis 22.9 P# Thursis 23.1 P# Thursis 23.3 P# Thursis 23.5 P# Thursis 23.7 P# Thursis 23.9 P# Thursis 24.1 P# Thursis 24.3 P# Thursis 24.5 P# Thursis 24.7 P# Thursis 24.9 P# Thursis 25.1 P# Thursis 25.3 P# Thursis 25.5 P# Thursis 25.7 P# Thursis 25.9 P# Thursis 26.1 P# Thursis 26.3 P# Thursis 26.5 P# Thursis 26.7 P# Thursis 26.9 P# Thursis 27.1 P# Thursis 27.3 P# Thursis 27.5 P# Thursis 27.7 P# Thursis 27.9 P# Thursis 28.1 P# Thursis 28.3 P# Thursis 28.5 P# Thursis 28.7 P# Thursis 28.9 P# Thursis 29.1 P# Thursis 29.3 P# Thursis 29.5 P# Thursis 29.7 P# Thursis 29.9 P# Thursis 30.1 P# Thursis 30.3 P# Thursis 30.5 P# Thursis 30.7 P# Thursis 30.9 P# Thursis 31.1 P# Thursis 31.3 P# Thursis 31.5 P# Thursis 31.7 P# Thursis 31.9 P# Thursis 32.1 P# Thursis 32.3 P# Thursis 32.5 P# Thursis 32.7 P# Thursis 32.9 P# Thursis 33.1 P# Thursis 33.3 P# Thursis 33.5 P# Thursis 33.7 P# Thursis 33.9 P# Thursis 34.1 P# Thursis 34.3 P# Thursis 34.5 P# Thursis 34.7 P# Thursis 34.9 P# Thursis 35.1 P# Thursis 35.3 P# Thursis 35.5 P# Thursis 35.7 P# Thursis 35.9 P# Thursis 36.1 P## Thursis 36.3 P## Thursis 36.5 P## Thursis 36.7 P## Thursis 36.9 P## Thursis 37.1 P## Thursis 37.3 P## Thursis 37.5 P## Thursis 37.7 P## Thursis 37.9 P## Thursis 38.1 P## Thursis 38.3 P## Thursis 38.5 P## Thursis 38.7 P## Thursis 38.9 P## Thursis 39.1 P## Thursis 39.3 P## Thursis 39.5 P## Thursis 39.7 P## Thursis 39.9 P## Thursis 40.1 P## Thursis 40.3 P## Thursis 40.5 P## Thursis 40.7 P## Thursis 40.9 P## Thursis 41.1 P## Tharsius BZP AstraZen AstraZen AstraZen AstraZen AstraZen AstraZen AstraZen AstraZen AstraZen AstraZen AstraZen AstraZen AstraZen AstraZen AstraZen AstraZen AstraZen AstraZen AstraZen AstraZen AstraZen AstraZen AstraZen AstraZen AstraZen Astra Zen Astra Zen Astra Zen Astra Zen Astra Zen Astra Zen Astra Zen Astra Zen Astra Zen Astra Zen Astra Zen Astra Zen Astra Zen Astra Zen Astra Zen Astra Zen Astra Zen Astra Zen Astra Zen Astra Zen Astra Zen Astra Zen Astra Zen Astra Zen Astra Zen Astra Zeta AstraZen AstraZen AstraZen AstraZen AstraZen AstraZen AstraZen AstraZen AstraZen AstraZen AstraZen AstraZen AstraZen AstraZen AstraZen AstraZen AstraZen AstraZen AstraZen AstraZen AstraZen AstraZen AstraZen AstraZen AstraZeta AstraZen AstraZen AstraZen AstraZen AstraZen AstraZen AstraZen AstraZen AstraZen AstraZen AstraZen AstraZen AstraZen AstraZen AstraZen AstraZen AstraZen AstraZen AstraZen AstraZen AstraZen AstraZen AstraZen AstraZen Aistra Zen Aistra Zen Aistra Zen Aistra Zen Aistra Zen Aistra Zen Aistra Zen Aistra Zen Aistra Zen3 Specify here the oscillator frequency for your LNB.
text_image
LNB frequencies Please select the LNB frequency for Low Band. Note: The newly selected parameter must be confirmed with the 5 button ASTRAI 19.2°E low band 5150 MHz 9750 MHz 10000 MHz 10200 MHz 10600 MHz ASTRAI 19.2°E high band 5150 MHz 9750 MHz 10000 MHz 10200 MHz 10600 MHz Hot Bird 13°E low band 5150 MHz 9750 MHz 10000 MHz 10200 MHz 10600 MHz Hot Bird 13°E high band 5150 MHz 9750 MHz 10000 MHz 10200 MHz 10600 MHz Back with ** Proceed with **Normally you do not need to change the values for high and low band, unless the LNB of your satellite system uses a different oscillator frequency (important for the frequency display).
See Setting options for all DVB-S reception on page 13 to continue.
Setting options for DiSEqC one cable communal system
1 Select which DiSEqC single cable system you are using and press OK.
text_image
Select DISEqC single cable communal installation Please enter here which DISEqC single cable system you are using. The following setting parameters of your system are then adopted accordingly. User define: DELTA SUM-514 DELTA SUM-516 DELTA SUM-518 DELTA SUM-520 DELTA SUM-522 DELTA SUM-524 DELTA SUM-526 DELTA SUM-528 DELTA SUM-530 DELTA SUM-532 DELTA SUM-534 DELTA SUM-536 DELTA SUM-538 DELTA SUM-540 DELTA SUM-542 DELTA SUM-544 DELTA SUM-546 DELTA SUM-548 DELTA SUM-550 DELTA SUM-552 DELTA SUM-554 DELTA SUM-556 DELTA SUM-558 DELTA SUM-560 DELTA SUM-562 DELTA SUM-564 DELTA SUM-566 DELTA SUM-568 DELTA SUM-570 DELTA SUM-572 DELTA SUM-574 DELTA SUM-576 DELTA SUM-578 DELTA SUM-580 DELTA SUM-582 DELTA SUM-584 DELTA SUM-586 DELTA SUM-588 DELTA SUM-590 DELTA SUM-592 DELTA SUM-594 DELTA SUM-596 DELTA SUM-598 DELTA SUM-600 DELTA SUM-602 DELTA SUM-604 DELTA SUM-606 DELTA SUM-608 DELTA SUM-610 DELTA SUM-612 DELTA SUM-614 DELTA SUM-616 DELTA SUM-618 DELTA SUM-620 DELTA SUM-622 DELTA SUM-624 DELTA SUM-626 DELTA SUM-628 DELTA SUM-630 DELTA SUM-632 DELTA SUM-634 DELTA SUM-636 DELTA SUM-638 DELTA SUM-640 DELTA SUM-642 DELTA SUM-644 DELTA SUM-646 DELTA SUM-648 DELTA SUM-650 DELTA SUM-652 DELTA SUM-654 DELTA SUM-656 DELTA SUM-658 DELTA SUM-660 DELTA SUM-662 DELTA SUM-664 DELTA SUM-666 DELTA SUM-668 DELTA SUM-670 DELTA SUM-672 DELTA SUM-674 DELTA SUM-676 DELTA SUM-678 DELTA SUM-680 DELTA SUM-682 DELTA SUM-684 DELTA SUM-686 DELTA SUM-688 DELTA SUM-690 DELTA SUM-692 DELTA SUM-694 DELTA SUM-696 DELTA SUM-698 DELTA SUM-700 DELTA SUM-702 DELTA SUM-704 DELTA SUM-706 DELTA SUM-708 DELTA SUM-710 DELTA SUM-712 DELTA SUM-714 DELTA SUM-716 DELTA SUM-718 DELTA SUM-720 DELTA SUM-722 DELTA SUM-724 DELTA SUM-726 DELTA SUM-728 DELTA SUM-730 DELTA SUM-732 DELTA SUM-734 DELTA SUM-736 DELTA SUM-738 DELTA SUM-740 DELTA SUM-742 DELTA SUM-744 DELTA SUM-746 DELTA SUM-748 DELTA SUM-750 DELTA SUM-752 DELTA SUM-754 DELTA SUM-756 DELTA SUM-758 DELTA SUM-760 DELTA SUM-762 DELTA SUM-764 DELTA SUM-766 DELTA SUM-768 DELTA SUM-770 DELTA SUM-772 DELTA SUM-774 DELTA SUM-776 DELTA SUM-778 DELTA SUM-780 DELTA SUM-782 DELTA SUM-784 DELTA SUM-786 DELTA SUM-788 DELTA SUM-790 DELTA SUM-792 DELTA SUM-794 DELTA SUM-796 DELTA SUM-798 DELTA SUM-8002 Select satellite name from list and press OK. Press ▶▶ to continue.

text_image
Select satellites Please specify how strictly verify you, please. Access: The having custom printed device will be confirmed with the Web buttons. Name: A07402 16-23 Address: 100 KB Address: 50 KB Address: 10 KB Address: 10 KB Address: 10 KB Address: 10 KB Address: 10 KB Address: 10 KB Address: 10 KB Address: 10 KB Address: 10 KB Address: 10 KB Address: 10 KB Address: 10 KB Address: 10 KB Address: 10 KB Address: 10KB Address: 10KB Address: 10KB Address: 10KB Address: 10KB Address: 10KB Address: 10KB Address: 10KB Address: 10KB Address: 10KB Address: 10KB Address: 10KB Address: 10KB Address: 10KB Address: 10KB 地址: 10 KB Back with ▼ Processed with ▼3 Specify here the oscillator frequency for your LNB and press OK. Press ▶▶ to continue.
text_image
LNR frequencies Please select the LNR frequency for the Low Band Auto: The very selected parameter must be confirmed with the PMI Station. AUTRAL 18.2% the band 5150 MHz 9750 MHz 10000 MHz 12000 MHz 13600 MHz AUTRAL 18.2% high band 5150 MHz 9750 MHz 10000 MHz 12000 MHz 13600 MHz Back with ** Process with **Normally you do not need to change the values for high and low band, unless the LNB of your satellite system uses a different oscillator frequency (important for the frequency display).
4 Select and adjust settings for DiSEqC single cable communal installation.

text_image
Manual registration (for socket ANT SAT) Please log on to your OTC at single-state system that is connected to the internal input ANT SAT and specify the required transmission channel and associated transmission frequency. Please note that this parameter is required to be a fixed frequency level of 100 MHz or 500 MHz if your respective parameters are designed for this, it is possible to protect your used transmission data from being used by other participants by linking a PIN. Note: The newly selected parameter must be confirmed with the ID button. Transmission channel 1284 MHz 1400 MHz 1516 MHz 1632 MHz Transmission Frequency Back with Processed withSelect the desired transmission channel and the corresponding transmission frequency.
PIN protection
If your system is designed for it, it is possible to protect your used transmission data from use by other subscribers with a PIN.
Define/change PIN
Here you can determine and change the PIN for PIN protection. Only possible when yes has been selected for PIN protection.
Continue with Setting options for all types of reception on page 13.
Setting options for Other communal installation
1 Select satellite.
text_image
Select satellites Please specify here which satellites you receive Note: The newly selected parameter must be confirmed with the O button. Turnset 42°C Euronet WD 18°C Hot Bend 13°E Euronet WD 30°E Euronet WD 26.5°E ASTRA2 28.2°E ASTRA3 22.5°E ASTRA1 19.2°E Euronet WD 18°C Hot Bend 13°E Euronet WD 30°E Euronet WD 26.5°E Sinhaz 27.5°E Thiaz 26.5°E Procellis Intran 10-CL Atlantic Bend 3.5"W Telekom 2.5"W Mileau 7.5"W Atlantic Bend 8.5"W Telekom 2.5"W Atlantic Bend 12.5"W Terastar 12.5"W Intake 501 18"W Hispanet 30"W Pan Am Sat 43"W Other Back with ** Process with **Press ▶▶ to continue.
2 Specify here the oscillator frequency for your LNB.
If your set is connected to a single-cable system without external voltage supply, you can connect the antenna supply (13V or 18V / max. 450mA) with 13V or 18V.

text_image
LNB frequency, supply voltage Please specify the oscillator frequency for your cdb. If your TV set is connected to a drug cable system without an external power supply, you can connect the antenna supply (11 or 10V/Max. 350 mW with "13V" or "18V") ASTRA1 19.2V low band 5150 MHz 9730 MHz 10000 MHz 10200 MHz 10600 MHz Supply voltage ON 13V 18V Back with: 44 Proceed with: 44Continue with Setting options for DVB-S reception below.
Setting options for DVB-S reception
• Network selection
If several networks are available via DVB-S, you can decide which network you want to receive your channels from.
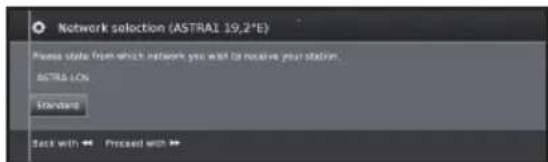
text_image
Network selection (ASTRA1 19.2°E) Please state from which network you want to receive your station. ASTRA1.CN Standard Back with ▶ Proceed with ▶- Settings
If several satellites are received, the following settings must be made for every satellite. The type of settings available may differ depending on the selected satellite or network.

text_image
OVB-S settings (ASTRA1 19.2*E) Please specify whether you want to search for screened stations from Note: Scramified stations can only be received with an integrated CA module and additional card. Screened stations No Yes Search method Network search Frequency search Symbol rate 22000 Accept Capital Channel Number No Yes Back with → Proceed with →- Scrambled stations
Select yes to save all scrambled stations.
• These stations can only be received in connection with a CI module and the appropriate CA Card.
- If a CI module with a CA Card is already inserted for the station search, all the stations which this module can descramble are also saved when no is selected.
- Search method
If you select Frequency Search here, a search is performed for all receivable stations. With Network Search, from all receivable networks all the stations are searched which are supplied by these networks.
- Symbol rate
The symbol rate is specified by the satellite provider and normally does not need to be changed.
- Accept Logical Channel Number
This setting allows you to decide whether you want to accept the Logical Channel Number (LCN).
Press ▶▶ to continue.
Continue with Setting options for all types of reception below.
Setting options for all types of reception
• Age related lock
Allows you to restrict programmes depending on the age classification.

text_image
Age-related lock If you enter an age restriction here, all DVD programmes are locked which have an appropriate age code and can only be watched by entering the access code. No age-related lock Special security level Proceed with **The information about age classification is provided by the broadcasting station.
The stations locked can only be watched after entering the access code (see page 24).
• Time and date
Enter the correct values with the numeric buttons here.

text_image
Time and date Please enter the date and time if none has been entered or if they are incorrect. Date $1.08.2009 Time 09:13:00• Network configuration
Here you can now specify if you wish to configure a network "Configure now" (see page 47) or you wish to configure it later "Do not configure or configure later".
Positioning / aligning DVB-T antenna
If you install a DVB-T/T2/S/S2 antenna for the first time or relocate it, you should adjust the alignment of the antenna to receive a good reception while checking the antenna setup screen.
In normal TV mode, without other displays, a DVB-T station is received and selected.
1 Select Setup.
2 Select Stations.
3 Select Manual Scan TV.

text_image
Manual Scan TV Signal Source Cable encoding DV-B-F DV-B-C CAMS Channel F00 10k T00 F00 F00 G00 R00 X0 Y00 Z00 Y00 T00 F00 F00 S00 S00 489 51 52 Frequency D13.83 MHz Balance 125 V/Hz GND Level Level SearchPosition and align the antenna in such a manner that maximum values for C/N and Level are obtained.
The value for BER should be as low as possible.
4 Select Search and press OK to start search.
What is the menu?
- The MENU view is the central overview page for all of your TV's operating modes.
• The list of options on the bottom of MENU view gives you access to TV, Video, Audio/Radio, Photo and AQUOS NET+. - By means of Extras and Setup you have access to more functions and you can configure your TV set.
- On the top of the screen you will find all stations marked as favourites.
- The number of selectable items varies depending on the TV equipment, network connection, available media servers and connected devices.
- The MENU can be operated with the remote control unit and with the TV panel control keys.
Common operations

flowchart
graph TD
    A["1: Display the menu screen"] --> B["2: Select an item"]
    B --> C["3: Exit the menu screen"]
    C --> D["4: Select to switch to menu screen"]
    D --> E["5: Select to adjust desired menu to desired level, then press OK. Press → to return to previous MENU page. Selecting in the menu"]
    E --> F["6: Select to switch to next menu screen"]
    F --> G["7: Select to adjust 3D button, then press OK. Press → to return to previous MENU page. Selecting options"]
    G --> H["8: Select to switch to next menu screen"]
    H --> I["9: Select to adjust 3D button, then press OK. Press → to return to previous MENU page. Selecting options"]
NOTE
- MENU options differ in the selected input modes, but the operating procedures are the same.
- The screens in the operation manual are for explanation purposes (some are enlarged, others cropped) and may vary slightly from the actual screens.
About the Guide Display
The Guide Display at the bottom of the screen shows the menu bar.
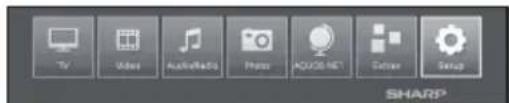
text_image
TV Video Audio/Redo Photo ADO/NET Setup SHARPIn the initial installation you will see an info text for operations with the OSD.
Info display
The info display provides an info text appropriate to the on-screen display that can assist you further with the operation of your TV set.
Temporary info display (i+)
The factory setting is that the info display is hidden. It can be displayed temporarily by pressing ⓘ+ key.
Permanently display or hide the automatic info display
The automatic info display can be hidden/shown via a menu setting.
1 Press MENU to call menu view.
2 With ▲/▼/◄/► select Setup and press OK to call settings.
3 With ◀/▶ select Control and press OK.
4 With ◀/▶ select more and press OK.
5 With ◀/▶ select On-screen displays and press OK to call settings.

text_image
On-screen displays On-screen displays Display time Volume displaying Automatic only Permanent clock display Automatic HDMI port6 With ▲/▼ select Automatic info and select Off/On to hide/show the info display.
7 Press OK to adopt settings.
Operation with the TV panel control keys
This function is useful when there is no remote control unit within your reach.

text_image
MENU1 Press MENU to show/hide a menu for direct control on TV.
2 Press CH∧∨ to scroll left/right.
3 Press →(INPUT) to open a new menu level or accept the settings
NOTE
- The "MENU" screen will disappear if left unattended for several seconds.
Favourites
You will find your favourites on the top of the MENU screen.
You can create favourites in the operating modes of the TV set. In this way you get your preferred stations on a single overview page.
After an initial installation, TV stations will already be automatically created as favourites independent of the installation site of the TV set.
Creating favourites
You can define the current station as favourite by means of your remote control.
The favourite will be added to MENU view and placed at the end.
1 Press FAV to create a favourite.
If there are more favourites than can be shown on one page, this will be indicated by rectangular symbols below favourites in the MENU view.

text_image
EN: The Dog Hang Training USB1 Golf Web and Stage 200 MyPlayList Steps 1 Users Private Fox iPad Bob Maclay AMD Sprout online New ProScanien Internet Spokemian Tages/All Value Matched TV Video Audio/Video Phono AGI-2004 MT Camera SnapManage favourites
You can edit the existing favourites in MENU view. Change the sequence of your favourites as you wish or delete favourites you do not need any more.
2 Press MENU to call MENU view.
3 With ▲/▼/◄/► select the favourite to be changed.
4 Press FAV to move or delete.
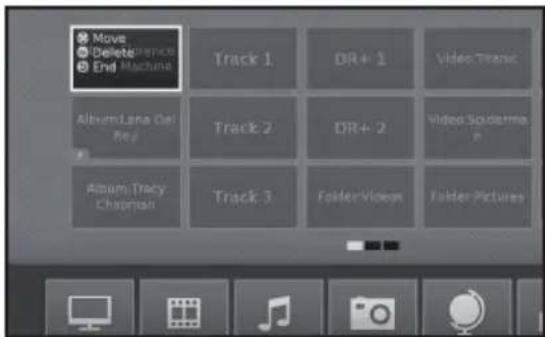
text_image
Move Delete End Machine Track 1 DR+ 1 Video:Titanic Album Lane Del Rev Track 2 DR+ 2 Video Spiderma Album Tracy Chaptan Track 3 Folder:Video Folder Pictures5 Press to end.
Daily operation
Switching on/off
Turning on/off the power
Press ⏻ on the TV to switch it on. Switch it off by pressing ⏻ on the TV.
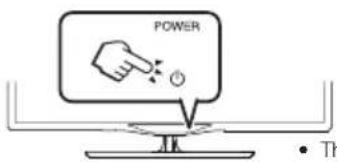
text_image
POWER ThNOTE
- When turning off the power using ⏻ on the TV, EPG data will be lost.
- The terminal layout may differ depending on the model.
Standby mode
- Switching to standby mode
If the TV is switched on (BLUE LED), you can switch it to standby by pressing ⏻ on the remote control unit.
- Switching on from standby
From standby (RED LED), press ⏻ on the remote control unit.
text_image
NET 1 2 3 4 5 6TV indicator status
| LED indicator Status | |
| Off | Power off |
| Blue | Power on |
| Red | Standby |
| Violet | StandBy with USB REC programmed |
NOTE
- If you are not going to use this TV for a long period of time, be sure to remove the AC cord from the AC outlet.
- A small amount of electric power is still consumed even when ⏻ is turned off.
- Switching off the TV and connected additional devices
By long pressing on ⏻ the TV and all CEC capable devices connected to the HDMI interfaces switch to standby mode. See page 44 for more information.
Switching between digital, satellite and analogue broadcasts
- Press “ATV/DTV” or “RADIO” to change between modes.
Changing channels
With P∧∨:

With 0-9:

Selecting an external video source
Once the connection is made, press → to display the "AV selection" screen, and then press ◀/▶ to switch over to the appropriate external source with OK.

text_image
AV value (0x) HDMI 1 HDMI 2 HDMI 3 HDMI 4 PC 56 AVS AVSelecting audio language
DTV/CADTV/SAT mode:
Each time you press 1//1+ the audio language switches between audio sources available.
NOTE
- Selectable languages vary depending on the received broadcasts.
ATV mode:
Each time you press 1/1/1+1 , the mode switches as shown in the following tables.
| NICAM TV broadcasts selection | |
| Signal Selectable items | |
| Stereo | NICAM STEREO, MONO |
| Bilingual | NICAM CH A, NICAM CH B, NICAM CH AB, MONO |
| Monaural | NICAM MONO, MONO |
| A2 TV broadcasts selection | |
| Signal Selectable items | |
| Stereo | STEREO, MONO |
| Bilingual | CH A, CH B, CH AB |
| Monaural | MONO |
NOTE
- When no signal is received, the audio mode will display "MONO".
Subtitles
DTV/CADTV/SAT mode:
Press ⚙ button to enable/disable the subtitles.
To see how to change between different languages go to Control settings on page 24.
- ATV mode:
The available subtitles according to the broadcasting will be enabled or disabled by pressing 🔊 button.
EPG
EPG is a programme list that is displayed on the screen. With the EPG, you can check the schedule of digital channels, view detailed information about it, tune to an event currently on-air and set a timer for future events.
The first time you press EPG, a wizard will start that guides you through the necessary presettings.
You can find the EPG settings in the MENU Setup→Control→more...→EPG
EPG operation
- Display/Close the EPG screen
Press EPG button. Switch EPG on/off.
- The first time you press EPG, a wizard will start that guides you through the necessary presettings. In the EPG wizard you decide for which station EPG data should be collected and displayed. We recommend to select only those stations which you receive regularly.
- You can find the EPG settings in the Setup.

text_image
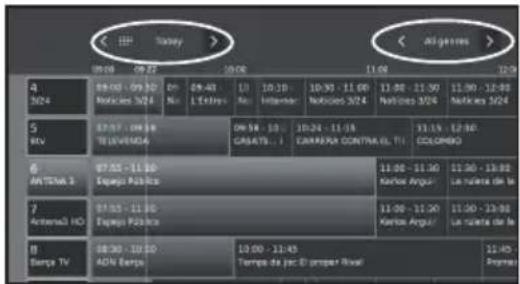
+ - 3D EPG AV MODE ECD ENGIn the left column of the screen there is a list of stations of your currently active station list (personal list, overall station list). With the on-screen buttons in the header of the EPG you can select the day of the programme preview and filter the programmes as to their genre.
Select a program
- Select the time span
-Press ◀/▶ to select the time span you want to search, press OK.
- Continue to press ▶ to display programs in the next time span.
- Select the desired program
-Press ▲/▼ to select the desired program, press OK.
- If ▲ or ▼ are displayed on the left of the programs, continue to press ▲/▼ to display next or previous screen.
-Press END to exit out of EPG.

text_image
4 1/24 5 Rev 6 ANTESA 3 7 Antaresa HC 8 Europa TV 9:00 - 10:00 10:00 - 11:00 11:00 - 11:30 11:30 - 11:30 11:30 - 11:30 11:30 - 11:30 11:30 - 11:30 11:30 - 11:30 11:30 - 11:30 11:30 - 11:30 11:30 - 11:30Adapting the EPG overview
The options to be selected are in the header. If not, press BLUE key.
You can filter the programmes with genre selection in the header. The programme of the selected genre will be highlighted:
| Movies | Arts |
| News | Social |
| Show | Education |
| Sports | Hobby |
| Child | Series |
| Music |
- Press ◀/▶ to select day or genre.
- Press OK to confirm selection
text_image
< Off Today > 9:00 09:22 10:08 11:00 4 3/24 09:00 - 09:30 Notices 3/24 On No 09:40 1st No 10:10 Intermed 10:30 - 11:00 Notices 3/24 11:00 - 11:30 Notices 3/24 11:30 - 12:00 Notices 3/24 5 Mv 07:37 - 09:38 TELEVERMOA 09:38 - 10: GARSATI...- 10:24 - 11:15 CANRAPER CONTRA EL TI... 11:15 - 12:00 COLOMBO 6 ANTENA 3 07:55 - 11:30 Espajo Pública 11:00 - 11:30 Kartos Argus... 11:30 - 13:00 La nuieta de la 7 Antenna3 HO 07:55 - 11:30 Espajo Pública 11:00 - 11:30 Kartos Argus... 11:30 - 13:00 La nuieta de la 8 Sampa TV 08:30 - 10:30 ADN Europa 10:00 - 11:45 Tempe de joc El proper Rival... 12:45 EspinoaOther EPG functions
- Calling additional information about the programmes
1 Press ▲/▼/◄/► to select the programmes.
2 Press i+.
If there is more information on the selected programme, it will be indicated here.
Programme information

text_image
Detailed Info E:\WINDOWS\ 97.13 - 11.68 Topyer Publics SPS-03View: Watch selected programme.
The menu item is only available when the selected programme is on the air.
Memorise: Memorise the programme for later watching/listening.
This menu is only available when the selected programme has not yet started.
Delete memo: For programmes being memorised you can also delete the memo.
Timer: Call up the overview of the timer services.
●(Recording): Schedule the recording of the selected programme for a time.
3 Press to return to EPG.
● Memorising a programme via the EPG
For memorised programmes, the TV set will ask at the beginning of a programme if it should change the channel accordingly or switch on from the standby mode if this is activated in the Setup→Control→more→EPG→TV on when memorised.
1 Select the program which you want to memorise.
2 Press ⓘ+.
3 With ▲/▼/◄/► select Memorise, and press OK.
4 Press to return to EPG.
In the EPG a memorise symbol is placed avobe the title of the programme.
Timer programming
You can programme timer recordings of TV programmes.
1 Press ▲/▼/◄/► to select the programme.
2 Press USB REC button to programme timer recording for the TV programme. Timer data dialogue is opened.
3 Check the timer data and update it if necessary.
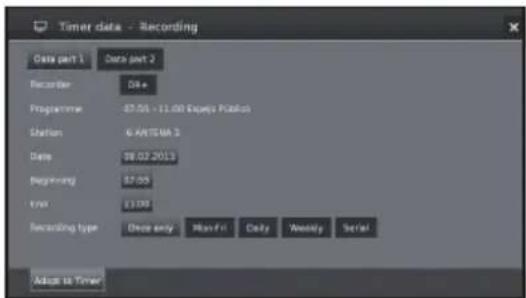
text_image
Timer data - Recording Data part 1 Data part 2 Recorder Date Programme 07.05 - 11.00 Espeja Public Station 6 ANTEUR 3 Date 08.02.2013 Beginning 07:05 Time £1.00 Recording type Once only Mon-Fil Daily Weekly Serial Adapt to TimerIn the EPG a recording symbol ● is placed avobe the title of the programme.
Teletext
What is Teletext?
Standard teletext
Teletext broadcasts pages of information and entertainment to specially equipped TVs. Your TV receives teletext signals broadcast by a TV network, and decodes them into graphical format for viewing. News, weather and sports information, stock exchange prices and programme previews are among the many services available.
Turning Teletext on/off
1 Select a TV channel or external source providing a teletext programme.
2 Press ☐ to display the Teletext.
- Many stations use the TOP operating system, while some use FLOF (e.g. CNN). Your TV supports both these systems. The pages are divided into topic groups and topics. After switching on the teletext, up to 2,000 pages are stored for fast access.
- Select the screen and press OK, the screen switches as shown below.
- If you select a programme with no teletext signal, "No Teletext available" is displayed.
- The same message is displayed during other modes if no teletext signal is available.

flowchart
graph TD
    A["Teletext"] --> B["Teletext"]
    B --> C["Image: Lion"]
HbbTV Text
Pressing ☐ twice will display the HbbTV-Text.
HbbTV text is offered by the selected channel.
Navigation within the HbbTV text and how the coloured buttons are assigned may vary depending on the provider.
NOTE
- Teletext will not work if the selected signal type is RGB.
- If HbbTV is offered by the channel, then the Media Text/HbbTV text opens up. In this case, pressing 📄 again opens the "standard" teletext/videotext.
- Teletext will not work if the selected signal type is RGB.
- If HbbTV is offered by the channel, then the Media Text/HbbTV text opens up. In this case, pressing 📄 again opens the "standard" teletext/videotext.
Buttons for standard teletext operations
| Buttons Description | |
| P / | Increase or decrease the page number. |
| Colour (R/G/Y/B) | Page selection:Red: Back to the previously viewed page.Green: On to next page.Yellow: To next topic.Blue: To next range of topics.The coloured bars (for TOP) or the coloured text (for FLOF) in the second last line indicate which coloured buttons you can use to page through topic areas and topics. |
| 0-9 | Teletext page displays:0: Stop updating teletext pages automatically or release the hold mode.9: Enlarge page (press several times).Additional page selection:Directly select any page from 100 to 899 by using the numeric buttons. |
| ▲/▼/OK | Mark desired page number.With OK call the page. |
| i+ | Call overview page 100. |
| Select it on the screen and press OK to update the teletext page. | |
| Show hidden information on the TXT page. | |
| Hide information on the TXT page again. | |
| Call Standard Teletext menu | |
Other teletext menu functions
Select 🎨 on the screen and press OK.
- Special pages
- Preview pages
Input of the first teletext programme preview page if this deviates from the factory setting.
- Sub-title pages
Input of the teletext subtitle pages for every station if this deviates from the factory setting.
- Character set
Teletext character set can be switched to other languages (Russian, Greek, Polish and Turkish).
Using the MHEG-5 application (UK only)
Some services bring you programmes with the MHEG application encoded, letting you experience DTV/CADTV interactively.
When provided, the MHEG-5 application will start when you press Ⓤ.
NOTE
- MHEG may not be displayed in 3D mode.
TV set adjustments
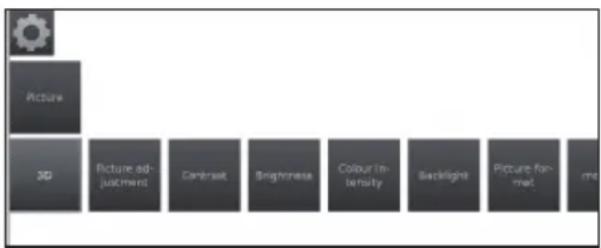
Picture settings
1 Press MENU.
2 Select Setup→Picture, the next screen appears:
flowchart
graph TD
    A["Picture"] --> B["3D"]
    B --> C["Picture adjustment"]
    C --> D["Contrast"]
    D --> E["Brightness"]
    E --> F["Colour Intensity"]
    F --> G["Backlight"]
    G --> H["Picture format"]
3 Select the picture adjustment you want to adjust:
3D
You can enjoy 3D-supported images on the TV when you wear 3D glasses (AN-3DG20-B or AN-3DG35), sold separately.
See more details on page 54.
• Picture adjustment
You can switch between three fixed picture setting variants and the three personal picture values:
Standard→ECO→Dynamic→User
- Contrast
The brighter the environment the higher the contrast should be set.
- Brightness
Set the brightness until the black areas of the picture appear just black.
- Colour intensity
Set the colour intensity to suit your personal taste. The colours should appear natural.
- Backlight
Adjusts the screen brightness. You can dim or brighten the screen.
• Picture format
Changes between different picture format:
16:9, 4:3, Panorama1, Panorama 2, Zoom
See page 31.
- more...
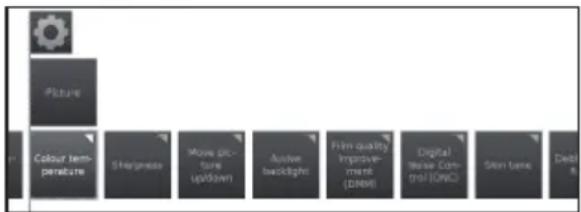
text_image
Picture Colour temperature Sharpness Mouse picture upsown Ajuster backlight Film quality Improvement (DMM) Digital MSE Control (DNC) Skin tone Desi• Colour temperature
Adjusts the colour temperature to give the best white image:
Intensive → Normal → Soft
- Sharpness
Adjusts the picture sharpness to obtain the best definition.
- Move Picture up/down
With some picture formats the text or graphic displays at the bottom or on top are not (or only partially) visible. At this adjust you can move the picture up or down with cursor keys to make the displays visible.
• Active backlight
Automatic backlight adjustment according to the video content in order to improve the image contrast.
• Film quality improvement (DMM)
Reduces jolt in rapid picture object movements and rolling txt displays. It especially applies for movies. Choose among different options.
• Digital Noise Control (DNC)
With this adjustment you can eliminate or reduce picture noise.
Choose among different options.
- Skin tone
Adjusts the skin tones between purple and greenish.
text_image
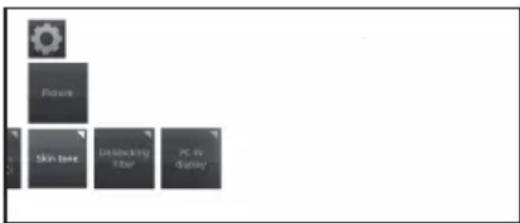
Picture Skin tone Unlocking Timer PC by Display- Deblocking filter
To minimise the visible interference to the picture caused by modern compression methods this adjustment can be activated. It counteracts this interference.
• PC IN display
For some PC Image formats, horizontal as well as vertical position and the phase position of the image can be corrected. See page 45.
This menu appears only when a PC is connected via PC-IN terminal.
Sound settings
1 Press MENU.
2 Select Setup→Sound, the next screen appears:

flowchart
graph TD
    A["Sound"] --> B["Sound adjustment"]
    B --> C["Loudness"]
    C --> D["Stound sound"]
    D --> E["more ..."]
3 Select the sound adjustment you want to adjust:
• Sound adjustment
You can adapt preset sound characteristics of the respective broadcast:
Off, Speech, Classical, Pop, Custom music sound and Custom film sound.
- Loudness
Proper boost of bass and treble tones at low volume.
- Surround sound
Allows you to enjoy surround sound.
- more...

text_image
Sound Audio/peer sound Headphone volume Auto volume AV output signal Maximum volume Maximum switch on volume Balance Clear• Headphone volume
Adjust the headphone volume.
• Auto volume
Reduces volume differences (for advertisements that are too loud)
• AV output signal
Allows you to indicate which sound is output via the AV socket for dual sound programs: Sound1 (e.g. main language), sound 2 (e.g. foreign language) or sound 1+2 (both simultaneously).
NOTE
- Selectable items vary depending on the received broadcasts.
• Maximum volume
Determines the maximum volume that can be set.
• Maximum switch on volume
Allows you to specify the volume that the TV is set when switched on with the mains switch.
Balance
Set stereo balance so that the volume impression is identical on the left and right.
- Clear Voice
If Clear Voice is activated, the sound of the current programme is automatically output with optimum comprehensibility when speech is detected.
- SPDIF mode
Allows you to choose between PCM or Dolby Digital audio output.
Stations settings
In this item you can find all settings concerned with station search for TV and DVB radio as well as functions for creating and editing the various stations list.
1 Press MENU.
2 Select Setup→Stations, the next screen appears:

flowchart
graph LR
    A["Stations"] --> B["Automatic scan TVeRadio"]
    B --> C["Manual Scan TV"]
    C --> D["Manual scan Radio"]
    D --> E["Station Rate TV"]
    E --> F["Station Rate Radio"]
    F --> G["Update station for automatically"]
3 Select the station adjustment you want to adjust:
• Automatic scan TV+Radio
In this adjustment, with the search wizard, you can search/update new stations.
The current search settings will be displayed. If you want to change these search settings:
Select Change search settings, press OK and wizard will ask you for search settings.
If you agree with these settings, select Start search/update and press OK to start scan.
NOTE
- You have to repeat the initial installation (see page 9) and automatically search new ones, if you want to delete all existing stations.
• Manual Scan TV
If you want to adapt the parameters of an existing station, first select the appropriate station.
1 Select Manual Scan TV and press OK, the next screen appears:

text_image
Media Player Track 100% Track 100% Track 100% Track 100% Track 100% Track 100% Track 100% Track 100% Track 100% Track 100% Track 100% Track 100% Track 100% Track 100% Track 100% Track 100% Track 100% Track 1 Track 1 Track 1 Track 1 Track 1 Track 1 Track 1 Track 1 Track 1 Track 1 Track 1 Track 1 Track 1 Track 1 Track 1 Track 1 Track 1 Track 1 Track 1 Track 1 Track 1 Track 1 Track 1 Track 1 Track 1 Track 12 Select the menu item Signal source to decide in which area you want to search for stations.
Depending on the selected source, various setting possibilities will be available.
3 Select Search to start search for next station.
4 Select Store to save station.
NOTE
- Only stations for the selected signal source can be saved, which do not already exist in the station list.
Status bar for manual search
Status bars are displayed for manual search, which show the reception quality of the individual stations during the station scan. The markers in all bars should preferably be in the green area.

text_image
CIN Level BERC/N: (Carrier/Noise) The bar shows the signal to noise ratio. The value indicated in dB should be preferably high.
Level: The bar shows the receiving level of the station. The value displayed in dBμV should be preferably high.
BER: (Bit Error Rate) The bar shows the bit error rate of the station. The value for BER should be as low as possible.
Explanations of some search settings
Signal source: Selection of range in which you want to search for the station.
TV stand: If necessary, ask your dealer which standard to select for specific channels or AV equipment.
Colour standard: If necessary, ask your dealer which standard to select for specific channels or AV equipment.
Channel: Direct entry of channel.
Frequency: DVB-T/C: Direct input of station frequency. Range for entry: 044.75 MHz - 859.25 MHz. DVB-S: Direct input of LNC frequency.
Name: the name of the found station is displayed. You can change the name of the station.
Symbol rate: You can specify the symbol rate. DVB-S: Range: 1000-45000.
• Manual Scan Radio
The manual search for radio stations is similar to TV stations search. Please see Manual Scan TV explanation.
• Station lists TV
In this menu you can edit (delete block, move block) various lists. You can also create and edit new personal lists.
• Overall station list
You can delete and move station blocks.

text_image
DVB-T Overall station list AV New personal list Change whole list Delete block Move blocks Restore stations 0 20AT 1 ARD 2 ARFE 3 OR 4 OVA 5 DSP 6 ESP 7 FIP 8 20AT 9 ARD 10 ARF 11 ARD 12 FIA 13 ESP 14 FIP 15 FIP 16 ARD 17 ARD 18 ARF 19 ARF 20 ARF 21 ARF 22 ARF 23 ARF 24 ARF 25 ARF 26 ARF 27 ARF 28 ARF 29 ARF 30 ARF 31 ARF-Delete Block
1 With ▲/▼/◄/► select the beginning of block. Press OK to mark.
2 With ▲/▼/◄/► select the end of block. Press OK to mark.
3 Select Execute delete and press OK to delete block. (Select Cancel process to cancel delete).
-Move block
1 With ▲/▼/◄/► select the beginning of block. Press OK to mark.
2 With ▲/▼/◄/► select the end of block. Press OK to mark.
3 With ▲/▼/◄/► select insert position. Press OK to confirm insert position.
4 With ▲/▼/◄/► select Execute move and press OK to move block. (Select Cancel process to cancel move).
-Restore stations
1 With ▲/▼/◄/► select the beginning of block. Press OK to mark.
2 With ▲/▼/◄/► select the end of block. Press OK to mark.
3 With ▲/▼/◄/► select Restore stations and press OK to restore block. (Select Cancel process to cancel restore).
• DVB-T
Shows available stations to move, delete and rename stations in the (all) list:
-Add/remove stations
-Move stations
-Delete list
-Rename list
- New personal list
It is possible to compose personal lists to suit your convenience. It is possible to create up to six personal lists.
-Adding stations to Personal list
1 Select New personal list and press OK. A new personal list (x) will be created.
- x number depends on how many lists were already created.
2 With◀/▶ select Personal list x and press OK to open (list does not contain any station yet).
3 Press ▼ to open function list.
4 With ◀/▶ select Add/Delete Stations in the function list and press OK to activate.
5 With ▲/▼/◄/► select the stations you want to add to the favourite list and press OK.
The new stations will be added at the end of the favourite list.
6 Press END to close station list.
-Deleting stations from Personal list
1 With◀/▶ select Personal list x and press OK to open.
2 With ◀/▶ select Add/Delete Stations in the function list and press OK to activate.
3 With ▲/▼/◄/► select the station to be deleted and press OK to delete.
4 Press END to close station list.
-Move/reorder stations in Personal list
1 With◀/▶ select Personal list x and press OK to open.
2 With ◀/▶ select Move stations in the function list and press OK to activate.
3 With ▲/▼/◄/► select the station to be moved and press OK to mark.
4 With ▲/▼/◄/► select insert position and press OK to move.
5 Press END to close station list.
-Renaming Personal list
1 With ◀/▶ select the personal list you want to rename and press OK to open.
2 With ◀/▶ select Rename list in the function list and press OK to activate.
3 Enter new name using an on-screen keyboard or remote control (as with keypad of a mobile phone).
4 Press OK to confirm new name.
-Delete Personal list
1 With ◀/▶ select the personal list you want to delete and press OK to open.
2 With ▲/▼/◄/► select Delete list and press OK to confirm.
List deletion is irrevocable.
• Station lists Radio
The Stations list Radio procedure is the same as that of Stations list TV. Please see Station List TV explanation.
- Update station list automatically
The channel list will be updated automatically if Allow is selected.
Control settings
1 Press MENU.
2 Select Setup→Control, the next screen appears:
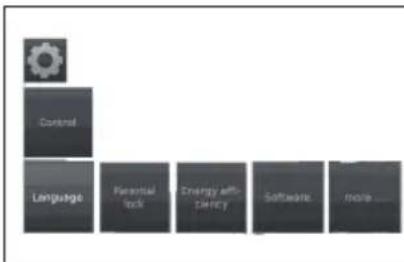
flowchart
graph LR
    A["Control"] --> B["Language"]
    B --> C["Potential Lock"]
    C --> D["Energy off-cherry"]
    D --> E["Software"]
    E --> F["More ..."]
3 Select the control adjustment you want to adjust:
- Language
Allows you to specify the language for all menus in the TV set. Also the language can be set for DVB subtitles and the film language.
- Menu
You can change the menu language. - Subtitle (DVB)
If subtitles are provided by DVB station, you can set here your desired language. If it is available in the station, it will be shown automatically.
You can also specify an alternative language in case your chosen language is not offered by the station.
• Audio (DVB)
Select your desired film language. If it is available in the station, it will be shown automatically.
You can also specify an alternative language in case your chosen language is not offered by the station.
- Parental lock
This function allows you to use a password to lock certain programmes and adjustments.
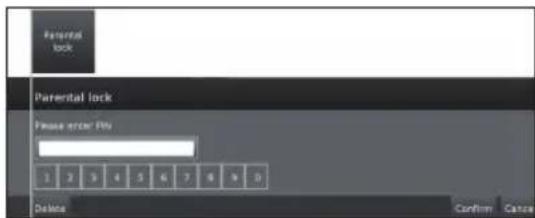
text_image
Parental lock Parental lock Please enter FPs 1 2 3 4 5 6 7 8 9 0 Delete Confirm Cancel1 Define a four digit access code (PIN) the first time you open it.
2 Select Confirm and press OK to activate.
3 The new PIN must be entered and confirmed again.
The Parental lock menu will be opened:

text_image
Parental lock Lock all stations Lock single stations Age-related lock Change access-code Deactivation Immediately Yes Yes Daily Yes yes. from 02-48 until 06:35- Lock all stations
The TV set is locked immediately. All programmes can only be watched after entering the access code. The lock can be activated Immediately or for a Daily defined period.
The lock remains active until it is deactivated.
- Lock single stations
You can lock/unlock individual or all the stations in the station list.
The lock remains active until it is deactivated.
• Age-related lock
Some broadcasting stations provide information about age classification. If the age set here is below the broadcast age limit, the programme can only be watched after entering the access code.
• Change access code
You can change the access code at any moment. Enter the new access code in place of the old one.
- Deactivate
All set parental locks are cancelled. The current secret code is deleted. When the parental lock is reactivated, all the previous parental locks are set again automatically.
- Reset
All currently set parental locks are finally cancelled. The secret code is deleted.
• Energy efficiency
Determine how energy efficient your TV set shall be by choosing between: Home Mode → Shop Mode. See pages 9 and 21.
- Software
This option allows you to have the TV software version always updated. You can download new software from different sources:
- Software update
- Via USB
Current software version can be downloaded from the SHARP Internet site and installed on your TV using a USB memory.
- Via Internet
The software update wizard appears.
See page 27 for more information.
- Via antenna
The software update wizard appear.
NOTE
- The file system of USB memory must be FAT32.
- The USB memory must have only one partition.
- If in doubt, the USB memory should be formatted as "FAT32" without "extended attributes".
- A broadband connection and Network setup are required to update the software using the internet.
- more...
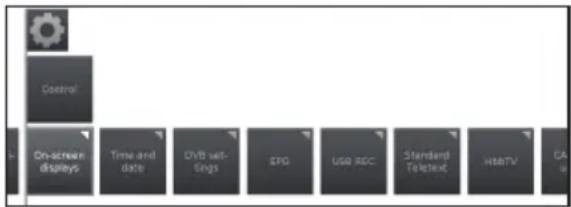
text_image
Control On-screen displays Time and date DVD set- ings ESP USB REC Standard Textext WebTV CA- On-screen displays
You can select different settings which affect the on-screen displays.
- Display time
You can adjust the duration of the display.
• Volume display
You can set whether or not the change in the volume should be displayed visually on the screen.
• Automatic info
Here you can activate/deactivate the additional help in the screen while navigating the menu.
• Permanent clock display
The time can be displayed permanently. It is always visible as long as no other display is activated.
If this option is activated, a message about the adapted function of the remote control is shown whenever you switch over to an HDMI port position to which a HDMI-CEC compliant device is connected.
• Time and date
Allows you to enter the time and date manually.
• Time
Enter the time with the numeric buttons of the remote control.
• Deviation from Universal Time
The current time at the Greenwich Meridian 0^ is to be understood as world time. The time shift in relation to this time must be given in hours (with the ◀/▶ in the TV and OK button of the remote control).
- Date
Enter the date with the numeric buttons of the remote control.
- Summer/winter
Set it to yes if you want to activate automatically summer time.
• Beginning of daylight-saving time
Enter the date on which the time is switched over to summer time if it deviates from the automatically calculated date.
• End of daylight-saving time
Enter the date on which the summer time ends if it deviates from the automatically calculated date.
• DVB settings
You can make general presettings for DVB stations.
- Subtitle mode
You can preset whether a subtitle is always to be displayed as soon as it is offered by the station. A special subtitle for impaired hearing can also be selected.
NOTE
- Subtitles are not offered by all stations. Many stations only broadcast subtitles by teletext.
• DVB character set
Select the DVB character set so that the title of the broadcast of your favourite received station or the texts of your CI module are displayed correctly.
• Audio commentary
You can activate a special sound for viewer with impaired vision.
• EPG
EPG is a programme list that is displayed on the screen. With the EPG, you can check the schedule of digital channels, view detailed information about it, tune to an event currently on-air and set a timer for future events. Also recordings can be programmed.
• Station selection
Here you can determine for which station in the programme guide information is to be displayed.
- Data capture
Here you can switch the data entry for the electronic program guide (EPG) on or off.
If the data capture is switched on, your TV set tries to update the data base overnight or, if required, two minutes after switching to stand-by mode. The TV set must be on stand-by for this and not switched off at the mains switch.
The indicator on the TV set lights violet during data capture in stand-by mode.
The data is also updated while you are watching the EPG station.
• TV on when memorised
When yes is selected, the switched off TV switches on automatically in standby mode at the beginning of a memorised programme. A screen message appears when switching on. If this is not confirmed within 5 minutes with the OK button, the TV switches off again automatically for safety reasons.
- USB REC
Is possible to adjust the USB REC to your requirements.
- Notify hidden sections
If an entry has been hidden in an archive recording (see page 52) you can be informed by a screen message when skipping a hidden area, by selecting yes.
- Jump distance
Set the standard jump distance (in minutes) used for jumping forwards or backwards in the recording.
- Smart jump
Activate or deactivate Smart Jump function (see page 52).
- Recording subtitles
Allows you to select whether subtitles are to be recorded in continuous operation for DVB stations. See page 50 for more information.
• Standard Teletext
This TV set supports the two operating systems TOP Text and FLOF. Up to 2,000 pages are stored so that you have quick access.
- Special pages
Preview pages: You can input the first teletext programme preview page if this deviates from the factory setting.
Subtitle pages: Input of the teletext subtitle pages for each station if this deviates from the factory setting.
- Character set
Teletext character set can be switched to other languages: Russian, Greek, Polish and Turkish.
• HbbTV (Hybrid Broadcast Broadband TV)
Some broadcasters bring you access to new services from entertainment providers such as broadcasters, online providers, including catch-up TV, video on demand (VoD), interactive advertising, personalisation, voting, games and social networking.
This function requires internet connection through the ETHERNET or the Wi-Fi adapter AN-WUD630.
See Multimedia/Network on page 47 for more information.
• HbbTV mode
Enable/disable this function.
If this item is enabled, when a selected programme offers HbbTV service it will be seen on screen. Just press the requested key to activate.
Then, the picture list of available services will appear. Follow the broadcaster instructions.
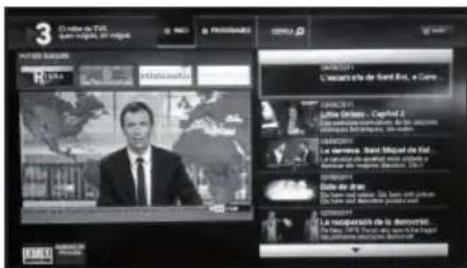
• Start behaviour of HbbTV stations
If HbbTV mode is activated you can specify if a available HbbTV application should be loaded automatically(√) after the channel has been changed or if this should only occur manually(?). After loading the HbbTV application, an on screen instruction is displayed (depending on the channel that is being viewed).
You can also choose between Start all automatically or Start all manually.
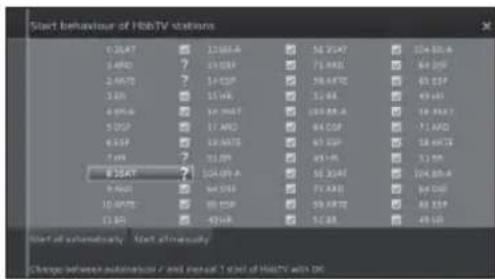
text_image
Start behaviour of HohTV stations 0.25AT 12.68A 52.25AT 104.88.A 3.49D ? 13.03P 71.49E 84.05F 2.647E ? 14.05P 58.49T 65.05P 3.8N ? 15.4K 51.6B 49.40I 4.99A ? 16.96T 105.88.A 18.99A? 5.05P ? 17.40D 84.05P 71.40D 6.55P ? 18.96T 65.05P 58.49T 7.4W ? 19.8P 49.40I 31.8M 8.25AT ? 104.88.A 56.39A 104.88.A 9.46D ? 64.05P 71.49E 84.05F 10.49T ? 80.05P 59.49T 82.05P 11.3G ? 93.49A 51.6B 49.40I Use all automatically Start automatically Change between automatics and non-cut T set of HohTV with OK• Functions of the ☐ key
It is possible to choose between watch Standard teletext or HbbTV.
See page 20 for more information.
• Standard teletext first
If this option is selected, with HbbTV function enabled, it will show standard teletext.
• HbbTV first
If this option is selected, with HbbTV function enabled, it will show HbbTV text.
HbbTV text is offered by the selected channel.
Navigation within the HbbTV text and how the coloured buttons are assigned may vary depending on the provider.
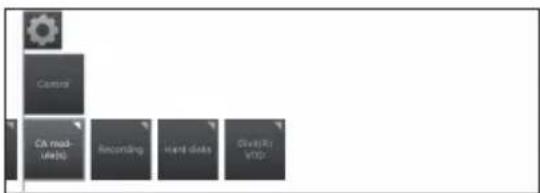
text_image
Control CA module Recording Hand data DriveTo VDD- Recording
It is possible to set a pre-record and post-record time for timer recordings made without auto time control (DVB).
This minimises the risk that a part of broadcast is not recorded due to the broadcast starting earlier and/or finishing later.
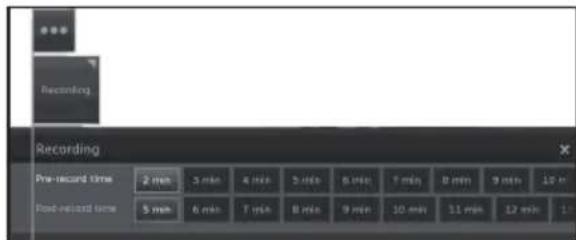
text_image
Recording Recording Pre-record time 2 min 3 min 4 min 5 min 6 min 7 min 8 min 9 min 10 min Post-record time 5 min 6 min 7 min 8 min 9 min 10 min 11 min 12 min 13- Hard disks
- Format external one
It is possible to re-format the hard disk in order to solve some problems or to delete all data stored on it. Select this option to start formatting.
Formatting the hard disk will erase all data stored on it.
• DivX® VOD
• DivX® VOD Register
To activated this option you need to register the code at www.divx.com/vod, download the VOD log file and reproduce it in TV.
• DivX® VOD Deregister
Displays the deactivation code necessary to write off this TV at www.divx.com/vod.
Software update via USB
It is possible to update the software on your SHARP TV.
1 Add the binary file to USB memory root.
2 Insert the memory in any USB side TV set socket.
3 Press MENU button.
4 With ◀/▶ select Setup and press OK.
5 Select Control → Software → Software Update → Via USB.
The next screen will appear:
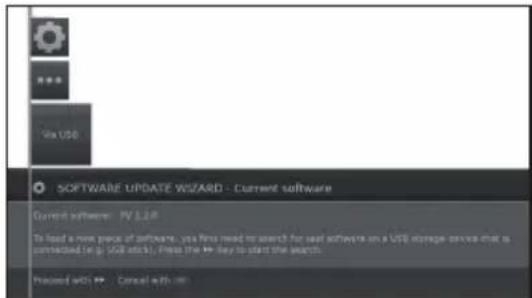
text_image
Software UPDATE WIZARD - Current software Current software: PV 5.2.6 To lead a new price of software, you first need to search for real software on a USB mortgage service that is corrected (e.g. USB stick1). Press the key to start the search. Proceed with: Cancel with: OKThe software version that is currently installed is displayed.
6 Press ▶ button to proceed. The TV searches for a new software file on the USB stick.
If a new software version is available after the search, a message appears:
New software Vx.xx
7 Press ▶ button to start loading the new software. Or press END to end the wizard (the software will not be updated).
•The updated percentage appears.
8 To make your TV completely ready for use again, please switch it off and on with the mains switch.
Software update via Internet
If an Internet connection is available, new software can be downloaded directly and installed in the TV set.
1 Press MENU button.
2 With ◀/▶ select Setup and press OK.
3 Select Control → Software → Software Update → Via Internet.
A message regarding data protection will be displayed.
4 If you do not agree with data protection message, please press ◀◀ to exit. If you agree, please press ▶▶ to continue.
The version of the software that is currently installed will be displayed.
5 By pressing ▶ the TV connects to the Internet and scans the update server for new software.
If a new software version is available, a message appears.
6 Press ▶▶ to start loading the new software.
If you want to end the wizard, please press END.
7 To make your TV completely ready for use again, please switch it off and on with the mains switch.
NOTES
- Please do not switch off the TV by the mains switch during software updating.
- The total programming process can take up to 50 minutes in total.
Multimedia / Network settings
1 Press MENU.
2 Select Setup→Multimedia/Network, the next screen appears:
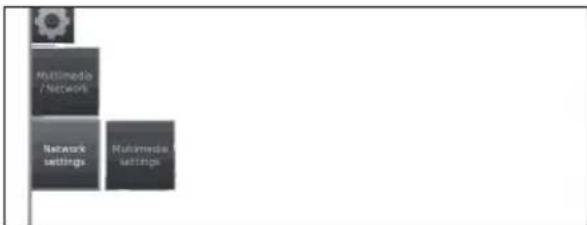
flowchart
graph TD
    A["Wireless"] --> B["Multimedia / Network"]
    B --> C["Network settings"]
    C --> D["Multimedia settings"]
3 Select the option you want to adjust:
• Network settings
With this option you can make settings to your network adapters and the various types of media.
- Networking
The network wizard starts that guides you through all necessary settings to your network.

text_image
NETWORK WIZARD - network status Current settings Networking Configuration Additions information IP address Subnet mask Server DNS server 1 DNS server 2 MAC address (36.1) Network (0.0) LTP status LTP width Proposed with: Cancel with: 8 channels 4 channels 2 channels 1 channelSee page 47 for more information.
- Reset to factory settings
All network settings are reset to factory defaults.
- Host name
Give your TV set a name so that it can be identified in the network.
- Proxy server
Do the settings for using a proxy server. The proxy server wizard will be shown.
See page 47 for more information.
• Multimedia settings
Here you find some settings for Audio.
• Auto return to music player
The music player will reappear whenever another dialogue, e.g., music selection is called during play-back, and no keys are pressed for the set time period. You can specify when and after which time the music player reappears (selection options are: no, after 1 min, after 5 min).
Connections settings
1 Press MENU.
2 Select Setup→Connections, the next screen appears:
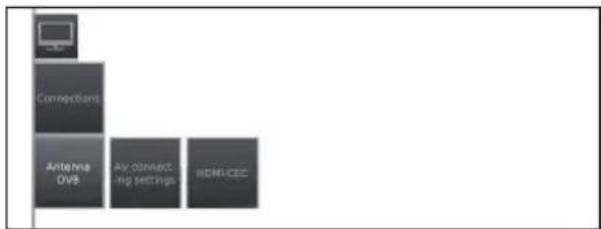
flowchart
graph TD
    A["Monitor Icon"] --> B["Connections"]
    B --> C["Antenna DVD"]
    C --> D["AV CONNECTING SETTINGS"]
    D --> E["I/O Connection Settings"]
3 Select the connection you want to adjust:
- Antenna DVB
Allows you to make settings for DVB-T antenna and call the antenna wizard for the DVB-S antenna.
- Antenna DVB-S
The antenna wizard starts guiding you through all the settings relevant to the DVB-S antenna. The settings of the DVB-S antenna wizard are explained in the procedure of initial installation (see page 10).
- Antenna DVB-T
Allows you to set whether your DVB-T antenna needs a supply voltage.
Antennas with an integrated amplifier need a supply voltage on the antenna line. In this case select Supply voltage 5V and confirm with OK.
Otherwise, select No supply voltage and confirm also with OK.
• AV connecting settings
In this menu the parameters for the AV and AVS connection sockets can be adapted.
• Device at connection AV
Indicate here whether a device is connected and, if so, which one is connected to the AV socket.
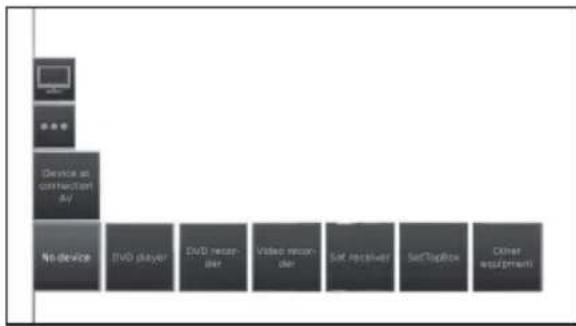
flowchart
graph TD
    A["Device at construction AV"] --> B["No device"]
    B --> C["BVD player"]
    C --> D["BVD receiver"]
    D --> E["Video receiver"]
    E --> F["Sat receiver"]
    F --> G["SatTopBox"]
    G --> H["Other equipment"]
Choose between: No device, DVD player, DVD recorder, Video recorder, Sat receiver, SetTopBox and Other equipment.
• AV standard
Allows you to set the AV standard of the connected device to AV or AVS.
Normally you leave the setting to Automatic. If the standard of the connected device is not detected automatically, you can select the correct standard.
NOTE
- Ask your dealer or consult the operating manual of the connected device if necessary.
- Signal type
Allows you to set the signal type of the device connected to AV or AVS.
- Allow switching voltage
If this function is activated, the video and audio of an external device connected to the AV connector (not in AVS) will be automatically reproduced on all TV broadcast sites when reproduction is started up, provided that the external unit supplies a switching voltage.
• HDMI-CEC
Here you can make further settings for comfortably linking external devices to the TV sets.
• Remote TV switch on via HDMI-CEC
Here you can select whether the TV set is to switch on automatically from standby mode, if HDMI-CEC capable devices connected to a HDMI input start playback or display a screen menu.
• HDMI-CEC functionality
You can allow or forbid the automatic communication between the TV set and linked external devices.
Channel list
Selecting the channel you want to watch
1 Press OK and the list of tuned channels will be displayed.
2 Use ◀/▶ to select the channel you want to watch and press OK.

text_image
0 3SAT 09:00-09:55 E刊登 - Das Magazom 1. ARD 09:00-09:55 RTL Abburi 2. ARTE 09:00-09:55 Die Schnaturwider 3. BR 09:00-09:55 Leptation - Das Magazom 4. BR-A 09:00-09:55 RTL Abburi 5. DLF 09:00-09:55 Leptation - Das Magazom 6. EGF 09:00-09:55 Die Schulden (R)ter 7. IVA 09:00-09:55 RTL AYou can watch overall station list or a personal list of channels by pressing ▲.

text_image
DVB-T Overall station list AV New personal list 2 ARTE 09:00 - 09:1 One Schulderm Hitter 3 BR 09:00 - 09:1 Exploxy - Das Plagnien 4 BR-A 09:00 - 09:1 RTL Aktuell 5 DSF 09:00 - 09:1 Exploxy - Das Plagnien 6 ESP 09:00 - 09:1 One Schulderm Hitter 7 HR 09:00 - 09:1 RTL Aktuell 8 3SAT 09:00 - 09:1 Exploxy - Das Plagnien 9 , 09 RTLChannel information display (DVB-T /DVB-C only)
You can display the channel information that you are watching at this moment by pressing ⓘ+ on the remote control unit.

text_image
09:12 11.08.2009 09:35AT 08:00-09:55 Explore - Data PlayboxIn the left lower corner you can see the number and name of the channel, the transmission time and (if available) the title of the current programme. The bar (if available) indicates the progress of the current programme.
In the right lower corner, the programme info is displayed additionally for DVB channels.
Symbol explanations in the channel info
General symbols:
| Language/sound selection available | |
| Subtitles available | |
| Channel selection for multi-channel providers | |
| 3D mode | |
| HDTV programme | |
| HbbTV mode available from this station |
Transmitted audio signal:
| Mono | Mono audio transmission analogue |
| Dual channel | Dual channel sound transmission (Sound1 /Sound2) analogue |
| 1+1 | Dual channel sound transmission (Sound1 /Sound2) digital |
| Stereo | Stereo sound transmission analogue |
| Stereo (AAC+) | Stereo sound transmission (HEAAC) |
| ∅ | Stereo sound transmission digital (PCM) |
| ☐ Digital | Dolby digital sound transmission (DD) |
| ☐ Digital+ | Dolby digital sound transmission (DD+) |
| ☐ Digital (AAC+) | Dolby digital AAC+ sound transmission (HEAAC) |
| MPEG | MPEG sound transmission |
Transmitted audio channels:
| DD | mono | |
| DD | MPEG 2.0 | |
| DD | ||
| DD | ||
| DD | ||
| DD | ||
| DD | ||
| DD | ||
| DD | ||
| DD |
Selecting the picture format
Selecting the picture format manually
You can select the picture format. The selected picture format varies depending on the type of signal received.
1 Press 🎨 on the remote control unit to change between different kinds of pictures.
Sizes for SD Signal (Standard Definition)
16:9: Proportionally correct display of 16:9 broadcasts.
4:3: Proportionally correct display of 4:3 broadcasts.
Panorama 1: Proportionally correct display of 4:3 broadcasts on the 16:9 screen. Station logo and subtitles remain visible.
Panorama 2: Format filling display (factory default) of 4:3 broadcasts on the 16:9 screen. Station logo and subtitles remain visible.
Zoom: Proportionally correct display. Maximum picture zoom. Displayed text may get lost.
Sizes for HD Signal (High Definition) HDMI
4:3 TV: Proportionally correct display of 4:3 or 16:9 TV: 16:9 broadcasts. You select this mode when the signal is not supplied by a PC (normal case). A small part of the picture is truncated. This may be necessary to hide possible interference at the edge of the picture, which arises from the signal supplied.
4:3 PC: Proportionally correct display of 4:3 or 16:9 broadcasts without loss of information. Select this mode when the signal is supplied by a PC.
4:3 Zoom: Proportionally correct display. Maximum 16:9 Zoom: picture zoom. Displayed text may get lost.
NOTE
- Some items do not appear depending on the type of received signal.
Setting when using external devices
Source list
For selecting the input type of external equipment.
- If no (colour) image is displayed, try changing to another signal type.
- Check the operations manual of the external equipment for the signal type.
Connecting a USB device
Connect a USB or hard disk device to the TV as shown below.
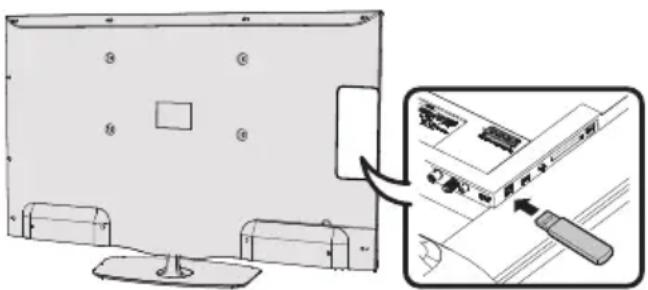
text_image
Diagram showing a computer monitor with labeled ports and an inset view of the internal components being inserted into a device.- Depending on the USB device, the TV may not be able to recognise the contained data.
- Use only alphanumeric characters for naming files.
- File names over 80 characters (may vary depending on character set) may not be displayed.
- Do not disconnect a USB device or memory card from the TV while transferring files, using the slide show function, when a screen is switching to another or before you exit Video, Music or Photo menus.
- Do not connect and disconnect a USB device from the TV repeatedly.

TV/List function
This function contains settings and additional options. The function list can be opened directly in TV mode or via the station list.
Via station list:
1 Press OK on R/C.
2 Select station and press OK.
3 Press▲. The next screen appears:
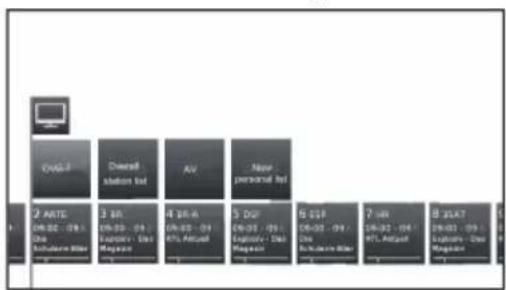
flowchart
graph TD
    A["DAS-1"] --> B["2 ARTE (04.02 - 09) : Die Euthelene Witter"]
    A --> C["3 BR (08.00 - 09) : Explorry - Die Regulator"]
    A --> D["4 BR-A (08.00 - 09) : FTL Antiquit"]
    A --> E["5 DBF (08.00 - 09) : Explorry - Die Regulator"]
    A --> F["6 ESP (08.00 - 09) : Die Substrate Witter"]
    A --> G["7 BR (08.00 - 09) : FTL Antiquit"]
    A --> H["8 JXAT (08.00 - 09) : Explorry - Die Regulator"]
4 Select the station you want to adjust through Overall station list or Personal list and press ▼. In TV mode:
1 Press MENU on R/C.
2 Select TV and press OK.
3 Select the station you want to adjust and press ▼. The next screen appears:
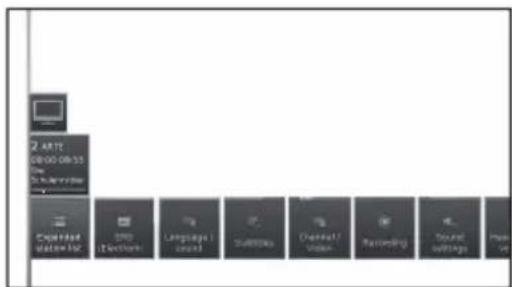
text_image
2 ART 08:00 08:35 Date Range C:\Program Files\10\2\Software\Language\I\warel\Subdivisions\Channel\Video\Recording\Sound subdrugs\Pro4 Select the adjustment you want to adjust.
- Expanded station list
Open expanded station list.

text_image
Expanded station list 0 364T 1 MBD 2 MTTE 3 98 4 88-4 5 95T 6 85P 7 45T 8 364T 9 MBD 10 MTTE 11 88 12 364T 13 98 14 88-4 15 95T 16 85P 17 88 18 364T 19 98 20 364T 21 98 22 364T 23 98 24 364T 25 98 26 364T 27 98 28 364T 29 98 30 364T 31 98 32 364T 33 98 34 364T 35 98 36 364T 37 98 38 364T 39 98 40 364T 41 98 42 364T 43 98 44 364T 45 98 46 364T 47 98 48 364T 49 98 50 364T 51 98 52 364T 53 98 54 364T 55 98 56 364T 57 98 58 364T 59 98 60 364T 61 98 62 364T 63 98 64 364T 65 98 66 364T 67 98 68 364T 69 98 70 364T 71 98 72 364T 73 98 74 364T 75 98 76 364T 77 98 78 364T 79 98 80 364T 81 98 82 364T 83 98 84 364T 85 98 86 364T 87 98 88 364T 89 98 90 364T 91 98 92 364T 93 98 94 364T 95 98 96 364T 97 98 98 364TUsing the on-screen buttons on the bottom line of the expanded station list it is possible to filter and sort the station list by various combinations of options.
• 0..9 Allows you to sort stations numerically.
• A..Z Allows you to sort stations alphabetically.
- Search
This allows you to do targeted searches for stations. The station name is to be entered via the on-screen keyboard.
- All sources
You can specify whether the stations from all sources or only from individual sources/reception networks (DVB-C, DVB-S, DVB-T, analogue) shall be indicated.
- All stations
You can specify if all stations, only HD stations, locked stations, scrambled stations, unscrambled stations, Cl+ protected stations, newly found stations or stations that cannot be found from selected sources shall be indicated.
• Language/sound
Language/ sound selection.
The sound formats on offer and their designations depend on the programme being broadcast.
- Subtitles
Subtitle selection.
The subtitles available depend on the programme being broadcast.
• Channel/Video
This option only appears if there are more than one video components available.
- Recording
You can programme timer recordings on the TV set for USB Recording, or for recorders that are otherwise connected. The recording wizard is integrated for programming a recording.

flowchart
graph TD
    A["Monitor"] --> B["Recording"]
    B --> C["Manual recording"]
    C --> D["10.23 Control Programming 2 Channel 21 CMTC iPhone"]
    C --> E["Following programming 2 Channel 21 following an"]
    C --> F["Recording via GPS"]
    C --> G["Open USB REC Archive"]
• Manual recording:
Programme the recording manually.
• Current programme:
Record currently watched programme.
Menu item will only be indicated when EPG data is available for the current station.
• Following programme:
Record following programme.
Menu item will only be indicated when EPG data is available for the current station.
• Recording via EPG:
Programme recording of a programme via the electronic programme guide (EPG).
- Open USB REC archive
Opens the USB REC archive. See USB REC explanation.
See page 49 for more information.
• Sound Settings
See Sound adjustments on page 21.

text_image
0 x 0x1 09:00-09:55 Demonix - Das Regione 1 Day 09:00-09:55 #1 Actual 2 Day 09:00-09:11 Das Lecture in the 3 Day 09:00-09:11 Capture - Das Regione 4 Day 09:00-09:55 #1 Actual 5 Day 09:00-09:25 Current - Das Regione 6 Day 09:00-09:17 Use Lecture in the 7 Day 09:00-09:55 #1 Actual• Headphone volume
Adjust the headphone volume for current station.
• Picture settings
See Picture adjustments on page 21.
- Move picture up/down
With some picture formats the text or graphic displays at the bottom or on top are not (or only partially) visible. At this adjust you can move the picture up or down with cursor keys to make the displays visible.
- Favourite
Press OK on R/C to add current station as favourite to MENU view.
- Sorting
Allows you to sort stations numerically or alphabetically.
- Edit station list
In this menu you can edit (delete block, move block) various list. For more information see Stations list TV on page 23.
Detailed information
When you are watching TV, pressing ⓘ+ button twice, the next screen will appear:
• Detailed info
Shows detailed info of current station.
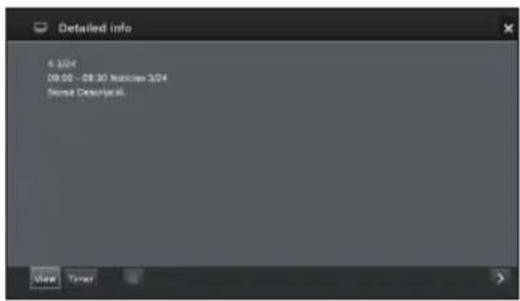
text_image
Detailed Info 4.12/4 09:05 - 09:30 Notice 3/24 Named Descriptive New TimerIf there is more information on the selected programme, it will be indicated here. You find further information on the indicated programme in the bottom line.
• View
Watch selected TV programme/ listen to selected radio programme.
The menu item is only available when the selected programme is on the air.
- Memorise
Memorise the programme for later watching/listening.
This menu is only available when the selected programme has not yet started.
- Delete memo
For programmes being memorised you can delete the memo.
This menu is only available when there are programmes memorised.
Timer
Shows the overview of Timer Services (See page 50).
• (Recording)
Schedule the recording of the selected programme for a time.
TV menu options
This TV allows you to playback multimedia contents (photos, music files, videos) that are saved on a USB stick and on your home network and are made available via a media server. You may also access the internet and reproduce photos, music and video files.
You can connect your TV to your home network via wired Ethernet or by a Wireless connection.
See page 47 for TV Network setup.

Video function
Press MENU button on the R/C and select Video, to access the video files.

text_image
AlbumParsons + The Movie Track 1 DR + 1 Video Tracks Image1 Coldplay AlbumLabs Del Key Track 2 DR + 2 Video Splenmo Volume AlbumTerry Chapman Track 3 Folder Videos Folder Pictures ZDF HD Boston TV Video AudioRadio Photo APOS mini Extra Setup SHARPVideo mode
Reproduces films and videos.
1 Select Video menu and press OK.
2 Pressing ◀/▶ buttons you can change between different reproduction sources: USB REC archive, or USB/DLNA.
USB REC archive: recordings made with USB REC.
USB/DLNA: files from USB or your home network Press OK to select the device from which you want to reproduce the files.
3 Select the file you want to reproduce with ◀/▶ buttons and press OK to start the reproduction.
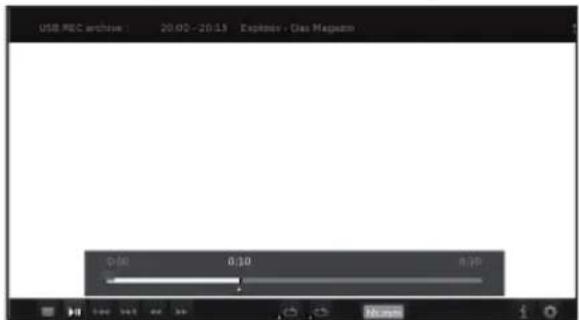
text_image
USB REC archive : 20.00 - 20.13 Explosion - Gas Mapscan 0:40 0:30 0:254 Press ■ to finish the reproduction.
5 Press END to exit the Video mode.
Buttons for video reproduction mode

text_image
SOURCE REC REC STOP USB REC AQUOS SHARP| Buttons Description | |
| ◀◀/▶▶ (short) | Jump backwards/forward. |
| ■ button | When playing videos from MediaHome: Stop playback and return to the media browser.From time-shifted television: time offset finish and switch back to the live image.In archive playback: Stop playback and return to the USB archive. |
| ▶ button | Play the reproduction. |
| ◀◀ | Backwards. Pressing again changes the speed. |
| ▶▶ | Fast forwards. Pressing again changes the speed. |
| ■ button | Play / Pause the reproduction. |
| MENU button | Shows the menu to adjust the video image during reproduction. |
| ⊕ button | Performs ZOOM operation in films and videos. |
Symbols on the screen for video reproduction
| Symbols Description | |
| Repetition (continuous playback) all video files of the current folder/directory. | |
| Continuous playback of the current file. | |
| Shows information about current playback. | |
| Call function list video settings. | |
| Change video playback formats. | |
| hh:mm | Skip to desired position in the reproduction. |
Symbols on the screen for USB REC archive reproduction
| Symbols Description | |
| Activate/deactivate current playback file repetition. | |
| Set/delete manual bookmarks. | |
| Jump to next/previous bookmark. | |
| Shows information about current playback | |
| Call function list video settings. | |
| Call video edit menu. | |

Audio/Radio function
Music files from your local servers and USB storage media as well as DVB and Internet radio, can be found in the section Audio/Radio. The individual sub-items are described below.
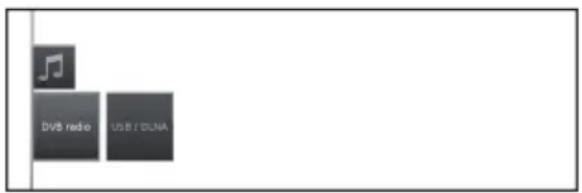
text_image
DV8 radio USB / DNADVB/Online radio
The TV set can receive digital radio stations via DVB.
USB/DLNA
This option gives you access to music files from your personal storage media, e.g. from storage media connected via USB, and from media servers in your home network to which your TV set is connected.
text_image
SOURCE REC REC STOP USB REC AQUOSButtons for audio reproduction
| Buttons Description | |
| ■ button | End reproduction and return to the music selection. |
| ■ button | Play / Pause the reproduction. |
| ▶ (short) button | Play / Stops the reproduction. |
| ◀◀ (short) button | DVB radio:Select the previous channel.USB storage or Home network:Go to the top of the track being played, jump/select previous track. |
| ▶▶ (short) | Select next station/track. |
| ◀◀ (long) | Only USB storage or Home network:Backwards. Pressing again changes the speed. |
| ▶▶ (long) | Only USB storage or Home network:Forwards. Pressing again changes the speed. |
| EPG | Only DVB radio:Shows DVB radio programme guide. |
Radio mode
1 Press MENU button on the R/C, select Audio/Radio on the menu and press OK.
2 Pressing ◀/▶ buttons select DVB radio and press OK.
Symbols on the screen for radio reproduction
| Symbols Description | |
| Shows the EPG details for current programme. | |
| Call function list audio settings. | |
| Switch off the screen. | |
Audio mode
1 Press MENU button on the R/C, select Audio/Radio on the menu and press OK.
2 Pressing ◀/▶ buttons select USB/DLNA and press OK.
Symbols on the screen for audio file reproduction
| Symbols Description | |
| Activate/deactivate current playback file repetition. | |
| Repetition (continuous playback) all audio files of the current folder/directory. | |
| Random playback of the audio files of a folder. | |
| Access detailed information about the file being played. | |
| Call function list audio settings. | |
| Switch off the screen. | |

Photo function
Photo mode
You can reproduce photos with JPEG (*.JPE, *.JPG), and PNG format on your TV.
Several kinds of reproduction are possible.
1 Select Photo menu and press OK.
2 Pressing ▼ button select USB/DLNA.
Press OK to select the device from which you want to reproduce the files.
3 Select the file you want to display on full screen with ◀/▶ buttons and press OK to start the viewing.
There is a function list for the selected photo:

text_image
Full screen Slide show Sorting SettingsFull screen
Display the photo on full screen.
- Slide show
Start photo slideshow in the selected directory.
- Sorting
Sort photos in alphabetical order, file size or date.
- Settings
Shows audio settings.
4 Select the desired option and press OK.
| Symbols Description | |
| Rotate photo 90° to the left. | |
| Rotate photo 90° to the right. | |
| Start slideshow. | |
| Pause slideshow | |
| Detailed information on the displayed photo. | |
| Shows function list with photo settings. | |
| Stop full screen/slideshow photo and return to photo selection. | |
| Previous photo display. | |
| Next photo display. | |
USB / HOME MEDIA device compatibility
| USB 2.0/3.0 device | USB Memory, USB card reader, USB HDD (Mass Storage class) |
| File system USB Media Player: FAT / FAT32 / NTFS | |
| Home Media (DLNA) | DLNA 1.5 DMP(Digital Media Player certified) |
| Photo file format | JPEG, PNG |
| Music file format | Mpeg 1 (Layer 1 & L2), MP3Sampling frequency: 8Khz, 11.025 Khz, 12Khz, 16Khz, 22.050Khz, 32Khz, 44.1 Khz, 48 Khz |
| AAC (MP4), WAV (PCM), WMA, AC3Sampling frequency:32Khz, 44.1 Khz, 48 Khz | |
| Multimedia Container | TS (Transport Stream), MOV, MP4, MKV, MPG (MPEG2 Programme Stream), WMV, ASF, AVI, DivX, FLV, VOB |
| Video file format | MPEG1, MPEG2, MPEG4, DivX, XVid, AVC/H.264, VC-1, Divx311 (SD Only) |
NOTE
- Progressive format jpeg files are not supported.
• Music files in USB 1.1 devices may not be played properly.
• Operation using USB hubs is not guaranteed. - The external hard disc with capacity exceeding 1TB cannot be detected correctly.
- Cables used to prolong the USB device must be certified as USB 2.0.
- In USB devices, video files may not be played properly if there is not enough speed.
- Playing non-standard encoded files is not guaranteed.
- The file extension does not uniquely specify a file's contents. It is very common for Internet files to have a mismatch between the file extension and its contents; for this reason some files could not be played on this TV set.

AQUOS NET+ function

text_image
Album/Lane Del Key Album/Lane Del Track 1 DR+ 1 Video Titanic Image1 Coldp Track 2 DR+ 2 Video Spiderma n Image2 Home Album Tracy Chapman Track 3 Folder Videos Folder Pictures ZDF HD Bost TV Video Audio/Radio Photo AQUOS NET Extras Setup SHARPAQUOS NET+ option allows you to access to AQUOS NET+ feature and Internet browser.
For this option it is necessary that the TV set is connected to Internet (See page 47).
1 Press MENU button, select AQUOS NET+ and press OK. The next screen appears:
text_image
SHARP AQUOS NET+ Search Search Search Search Search Search Search Search Search Search Search Search Search Search Search Search Search Search Search Search Search Search Search Search Search Search Search Search Search Search Search Search Search Search Search Search Search Search Search Search Search Search Search Search Search Search Search Search Search Search Search2 Press END to exit.
What is AQUOS NET+?
AQUOS NET+ is the feature that allows our Internet connected TV sets to easily reproduce digital media content coming from the Network. It provides access to Internet services (Internet browser, YouTube, Facebook and much more)
AQUOS NET+ provides a variety of services for each country.
NOTES
- As AQUOS NET+ is an online system, it can be modified over time to better serve its purpose.
- Some AQUOS NET + services may be added, changed or discontinued after some time.
- Even in opern web-mode, users cannot download and save files or install plugins.
DISCLAIMERS
- SHARP Corporation bears no responsibility regarding the content and quality of the content provided by the content service provider.
Operations in AQUOS NET+
Basic Operation
The illustrations on this page are for explanation purposes. They are subject to change without notice.
● Display the AQUOS NET screen
Press NET on remote control or select AQUOS NET+ on main menu to open AQUOS NET+ home page.

text_image
SHARP 1 AQUOS NEC 4 5 6 22/06/2013 12:40 Favorites 2 Recommended Apps 3 vivstar kicker vimeo 4 CineTrailer vimeoAQUOS NET+ screen is organised into 8 areas:
① AQUOS NET+ title banner
② User-defined Favorites
③ Recommended Apps
4 Interactive windows for direct brand communications or maintenance functions
⑤ Media window
⑥ Widget Area-real-time functions like date and time or similar
7 Sharp Service Center
8 Interactive Search window
- Select a service
On AQUOS NET+ screen use ▲/▼/◄/► to select the desired service, and then press OK to start it.
- Press to return to the previous page.
You can also use "Search" utility to find specific services, related to a search term.
- Select "Search" and press OK to access the search page or start typing to directly search to specific terms.
- To search for a specific keyword, the word is entered using the virtual keyboard (1). The search is executed by clicking Start Search (2). The history of the last search terms can be found on the right side (3).
text_image
search n 1 2 3 START SEARCHAfter searching for a specific term, the results are categorized by their type (1), including the number of search results. Categories can be hidden and expanded on request by selecting the close button (2) in the results overview.
Resting the cursor on a search result will bring up a preview overlay (3) with information of the selected content.
text_image
search Search Bar 10/1 De bilanziar Jardini, Inne Jardini. Aftt every battle that you want, pas make another De Galbitalik, Sartifast. A mit meristem at home clock gets caught up in a scheme De Bilgualter Angi, Bilgualter Angi. Jardini is a traveler without any movement. He has De Passport to Lira, Passport to Lira. A romantic comedy will be made in the last 50 days. He is the Search. No Passor: Are not Jennifer as their mother, other members and get more. Bonnig Bolling, Starfel 3: Fugge 20. D'Anschaffung und Bonnig Bolling, Starfel 3: Fugge 20. D'Anschaffung und Bonnig Bolling, Starfel 3: Fugge 20. D'Anschaffung und Bonnig Bolling, Starfel 3: Fugge 20. D'Anschaffung und Bonnig Bolling, Starfel 3: Fugge 20. Bonnig Bolling, Starfel 3: Fugge 20. D'Anschaffung und Bonnig Bolling, Starfel 3: Fugge 20. D'Anschaffung und Bonnig Bolling, Starfel 3: Fugge 20. D'Anschaffung und Bonnig Bolling, Starfel 3: Fugge 21. D'Anschaffung und Bonnig Bolling, Starfel 3: Fugge 21. D'Anschaffung und Bonnig Bolling, Starfel 3: Fugge 21. D'Anschaffung und Bonnig Bolling, Starfel 3: Fugge 21. D'Anschaffung und Bonnig Bolling, Starfel II: Fugge II. De Röchka-Börsen. Bonnig Bolling, Starfel II: Fugge II. De Röchka-Börsen. Bonnig Bolling, Starfel II: Fugge II. De Röchka-Börsen. Bonnig Bolling, Starfel II: Fugge II. De Röchka-Börsen. Bonnig Bolling, Starfel II: Fugge II. De Röchka- und Bonnig Bolling, Starfel II: Fugge II. De Röchka- und Bonnig Bolling, Starfel II: Fugge II. De Röchka- und Bonnig Bolling, Starfel II: Fugge II. De Röchka- und Bonnig Bolling, Starfel II: Fugge II. De Röchka- und Bonnig Baris, Baris, Baris, Baris, Baris, Baris, Baris, Baris, Baris, Baris, Baris, Baris, Baris, Baris, Baris, Baris, Baris, Baris, Baris, Baris, Baris, Baris, Baris, Baris, Baris, Baris, Baris, Baris, Baris, Baris, Baris, Baris, Baris, Baris, Bolling Baris, Baris, Baris, Baris, Baris, Baris, Baris, Baris, Baris, Baris, Baris, Baris, Baris, Baris, Baris, Baris, Baris, Baris, Baris, Baris, Baris, Baris, Baris, BollingUser sections
The Home Screen is devided in 3 functional areas:

text_image
SHARP AQUDS NET+ 1 22/06/2013 13:49 Favorite 2 Recommended Apps 3 CineTrailer vimeo CineTrailer vimeo1 Interactive Media Area
This segment is used for the audio-visual presentation of various types of content.
2 Favorite Apps Area
This area presents the top 8 apps of the user-defi ned favorite applications, including a link to all user-defi ned favorite applications.
3 Recommended Apps Area
This area presents a selection of recommended apps and also includes a link to the "all apps" screen as described below.
In Area 2 and 3, please use ◀/▶/▲/▼ to select a service you want to access and press OK, direction arrows appear around the service logo.
● Favorite Apps Screen
This screen gives an overview of all user-defi ned favorites. Favorites can be selected in the all-apps screen, as described below. The Top row of apps is presented on the home-screen. The fi rst row (1) is automatically presented in the favorite apps section on the home screen.
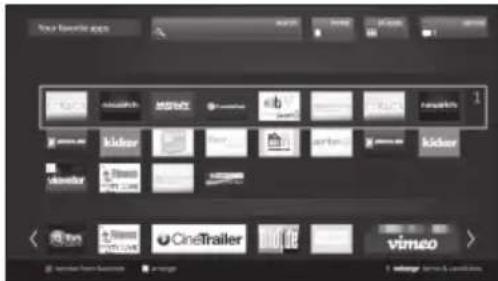
text_image
New favorite apps CineTrailer CineTrailer vimeoApps can be re-arranged by the user:
1 Move the cursor to the application that shall be moved. 2 Use Yellow color key to enter arrange-mode. 3 Move selected service to the desired position and press the yellow color key again to confirm the new position.
To dismiss an application from the favorite Apps, place the cursor on the respective app and press the RED color-key on the remote control.
● Exit AQUOS NET+ screen
Press MENU button and select TV to return to tv mode. You can also press ATV, DTV, SAT or RADIO button to exit.
NOTES
- When connecting the TV to the Internet, a message which requests a software update may be displayed in some cases.
- Some services can request to the user to Login or create a personal account. In this case, please follow the indication on the screen.
- PREMIUM Video-on-Demand (VOD) services are available in some countries.
- The illustrations on this page are for explanation purposes. They are subject to change without notice.
- AQUOS NET+ screen language is adapted to the TV set language previously selected.
- While AQUOS NET+ is active some TV menus or options could be disabled.
Advance Operation
AQUOS NET+ uses alphanumerical characters within some services, which can be introduced using the remote numerical keys, in a similar way that people use a mobile phone keypad. In order to make this task easier, the LE650 is ready to use an external USB keyboard (USB wired, USB-to-Wireless or USB-to-Bluetooth ready) to work only inside AQUOS NET+. When an external keyboard is installed on TV set and the user select AQUOS NET+, then the keyboard mapping is:
1 ←(ENTER)/INTRO = OK (R/C). Used to enter inside any service or to fix data once inside.
2 ◀/▶/▲/▼ (U/O/I/K, or u/o/i/k for not extended keyboard). Used to move between services or scroll pages on Left/Right direction.
3 ESCape = (Return R/C). Return to previous page on services.
4 ← (Backspace). Erase last character entered.
5 A..Z,a..z,0..9, and some US symbols (period or dot, commercial at @, underscore, hyphen, exclamation, question, colon, opening parenthesis, closing parenthesis, number, slash, backslash, space). Used for Login, Passwords, Date, and so.
NOTES
- The TV does not support hot plug connection of USB devices like a keyboard. If you wish to connect any other device, please do it when the TV is Power Off or in Standby.
- Inside AQUOS NET+ services, please use standard US characters only (Not extended characters or Special Country Language dependent), in order to avoid problems with the applications.
- Using external USB keyboard is not possible to exit from AQUOS NET+. If necessary, use the END remote key.
- Some types of keyboard could show incompatibilities or try to use functions not supported by the TV.

Extras function
Extras option contains additional functions and settings:
flowchart
graph LR
    A["Computer"] --> B["Software"]
    B --> C["LNG-NEC 3D-learning"]
    C --> D["Energy off-chivery"]
    D --> E["Module CARE"]
    E --> F["Special Advanced"]
    F --> G["AI/Internet"]
Timer
In this option you can find your saved Timer Instructions.
- Timer Instructions
All programmed recordings, programmed reminders and copies are listed in this screen. Also it is possible to programme new recordings.
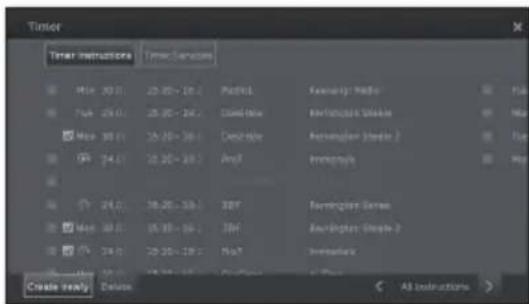
text_image
Timer Timer Instructions Media Services 1 Max 20.0 (1) 25.00 - 26.0 (1) Podcasts 2 Max 25.0 (1) 25.00 - 26.0 (1) Audio Time 3 Max 30.0 (1) 25.00 - 26.0 (1) Audio Time 4 Max 34.0 (1) 25.00 - 26.0 (1) Anyt 5 Max 24.0 (1) 25.00 - 26.0 (1) Anyt 6 Max 30.0 (1) 25.00 - 26.0 (1) Anyt 7 Max 34.0 (1) 25.00 - 26.0 (1) Anyt Create ready: Delete Femeralty Radio Femeralty Video Femeralty Stream Femeralty Stream 2 Femeralty Femeralty Series Femeralty Stream 3 Femeralty All instructions >- Create newly
Create new timer instruction.
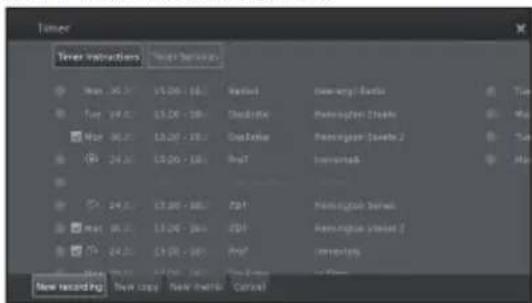
text_image
Timer Timer instructions New Settings Max: 30.00 - 16.00 Temp: 24.00 - 15.00 - 18.00 Max: 30.00 - 15.00 - 18.00 Min: 24.00 - 15.00 - 18.00 Max: 24.00 - 15.00 - 18.00 Max: 24.00 - 15.00 - 18.00 Max: 24.00 - 15.00 - 18.00 Max: 24.00 - 15.00 - 18.00 Max: 24.00 New recording New time New details CurrentNew recording
1 With ▲/▼/◄/► select Create newly and press OK.
2 With ▲/▼/◄/► select New recording and press OK. The function list for recording will be opened:

flowchart
graph TD
    A["Manual recording"] --> B["2"]
    B --> C["Recording"]
    C --> D["Manual recording"]
    D --> E["3.0 Current (programme) / 3.0 Channel 1 / Online (Press)"]
    D --> F["Following (programme) / 2.0 Channel 2 / Reporting to"]
    D --> G["Recording via EPO"]
    D --> H["Open LSR REC Archive"]
• Manual recording:
Programme the recording manually. See page 51.
• Current programme:
Record currently watched programme.
Menu item will only be indicated when EPG data is available for the current station. See page 50.
• Following programme:
Record following programme.
Menu item will only be indicated when EPG data is available for the current station. See page 50.
• Recording via EPG:
Programme recording of a programme via the electronic programme guide (EPG). See page 50.
- Open USB REC archive
Opens the USB REC archive. See page 51.
3 With ▲/▼/◄/► select the desired option and press OK to proceed.
-New copy
You should copy recordings that you want to save permanently on an external USB hard disk.
1 With ▲/▼/◄/► select Create newly and press OK.
2 With ▲/▼/◄/► select New copy and press OK. The function list for USB REC archive will be opened. See page 49.
3 With ▲/▼/◄/► select the desired option and press OK to proceed.
-New memo (EPG event)
You can set a timer as a reminder for programmes which have not yet started.
1 With ▲/▼/◄/► select Create newly and press OK.
2 With ▲/▼/◄/► select New memo and press OK. The EPG will be called.
The TV will ask at the beginning of a programme if it should change the channel accordingly.
-Delete
Use this function in the overview of timer instructions if you want to delete recordings already programmed or end a running timer recording.
1 With ▲/▼/◄/► select Delete and press OK.
2 With ▲/▼ select the timer instruction to be deleted and press OK. Ahead of the entry appears a delete icon 📄.
3 With ▲/▼/◄/► select Confirm delete option and press OK to delete timer instructions.
Select Cancel to return to Timer Instructions.
NOTE
- When you have programmed timer recordings, the TV can only be switched off in the standby mode.
- Software
This option allows you to have the TV software version always updated. You can download new software from different sources:
- Software update
• Via USB
Current software version can be downloaded from the SHARP Internet site and installed on your TV using a USB memory.
- Via Internet
The software update wizard appear.
See page 27 for more information.
- Via antenna
The software update wizard appear.
• Energy Efficiency
Decide how energy efficient the TV shall be.
•Home Mode:
The emphasis for home use is on low energy consumption.
The automatic dimmer is activated.
- Shop Mode:
The picture settings are aligned to operate in the presentation room. The automatic dimmer is deactivated. If the ambient brightness diminishes, the energy consumption is not reduced.
- CA module(s)
In order to receive coded digital stations, a Common Interface Module (CI Module) and a CA Card must be inserted in the CI slot of the TV.
See page 8 for more information.
- Special functions
flowchart
graph TD
    A["Special Functions"] --> B["Interpreformed Features"]
    B --> C["Repeat Initial Implementation"]
    C --> D["Result to History Settings"]
- Integrated features
Shows information about TV's integrated features.
- Repeat initial installation
This option allows you to repeat all steps for initial installation. See the procedure at page 9.
NOTE
- All stored stations and all personal lists will be deleted.
- Reset to factory settings
Allows you to reset Picture/Sound and Network settings.
- AV selection
Allows you to select the AV source.
If the selected AV source provides a signal it should be visible now.

Setup function
Here you can find all settings and adaptabilities of the TV set.

text_image
Picture Sound Stalone Control Multimedia & Network ConnectionsPicture
Allows you to adjust the settings according to the representation of the picture signal on the TV.
See page 21 for more information.
• Sound
Allows you to find the settings for sound playback.
The sub-items of the menu depend on the currently selected sound component.
See page 21 for more information.
- Stations
Move and delete TV and radio stations. In addition to that you can automatically and manually update the complete station list. The stations can also be arranged and optionally sorted in personal lists.
See page 22 for more information.
• Control
In this menu you find settings for additional functions of the TV set such as digital recorder (USB REC) as well as interfucional settings like time and date, parental lock or software update.
See page 24 for more information.
• Multimedia/Network
In this menu you can configure your network adapter and network access. Also you can make settings for video and music playback here.
See pages 28 and 47 for more information.
- Connections
In this menu you can configure external devices that are connected to the TV.
See page 28 for more information.

Before connecting ...
- Be sure to turn off the TV and any devices before making any connections.
- Firmly connect a cable to a terminal or terminals.
- Carefully read the operation manual of each external device for possible connection types. This also helps you get the best possible audiovisual quality to maximise the potential of the TV and the connected device.
Introduction to connections
The TV is equipped with the terminals as shown below. Find the cable corresponding the TV's terminal and connect the device.
NOTE
- The cables illustrated in pages 41, 42 and 43 are commercially available items.
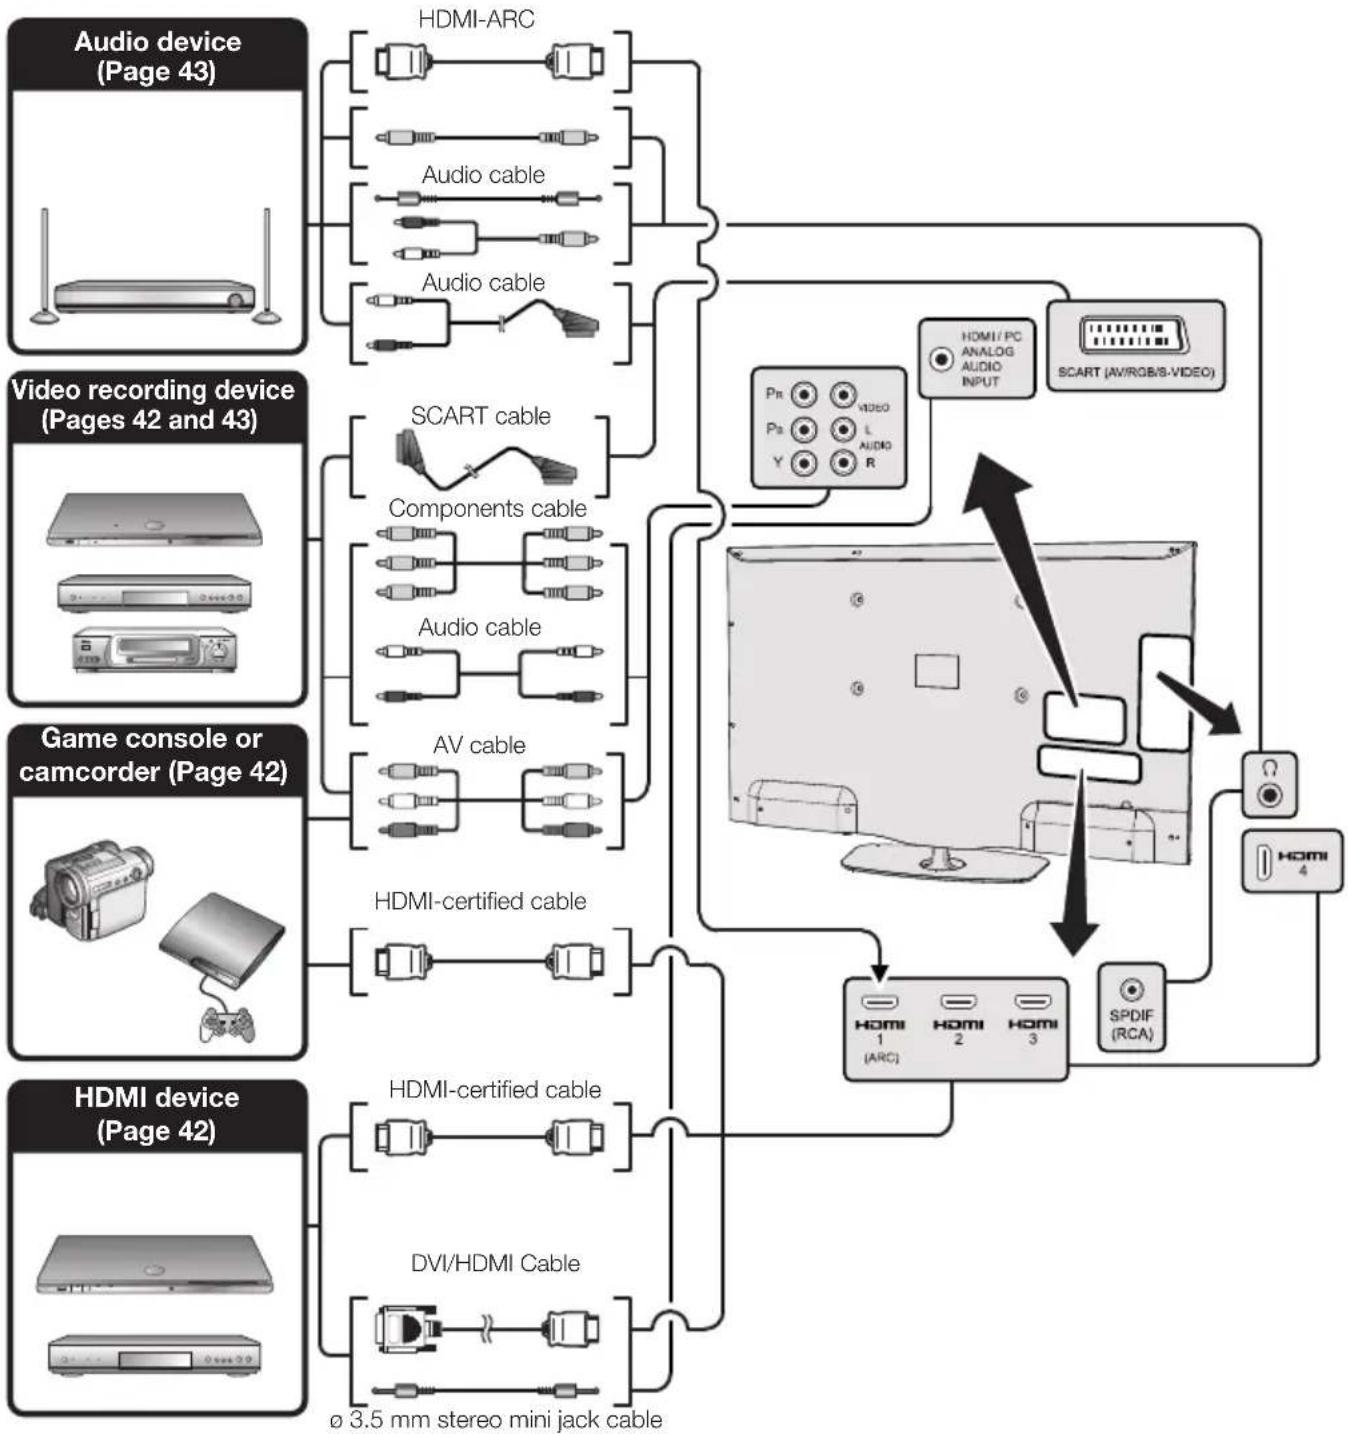
flowchart
graph TD
    A["Audio device (Page 43)"] --> B["HDMI-ARC"]
    A --> C["Audio cable"]
    A --> D["Audio cable"]
    E["Video recording device (Pages 42 and 43)"] --> F["SCART cable"]
    G["Game console or camcorder (Page 42)"] --> H["Components cable"]
    I["HDMI device (Page 42)"] --> J["HDMI-certified cable"]
    K["DVI/HDMI Cable"] --> L["∅ 3.5 mm stereo mini jack cable"]
    M["ScART (AV/RGB/B-VIDEO)"] --> N["HDMI/PC ANALOG AUDIO INPUT"]
    O["SpDIF (RCA)"] --> P["HDMI 1 ARC"]
    O --> Q["HDMI 2"]
    O --> R["HDMI 3"]
    S["Pr"] --> N
    T["Ps"] --> N
    U["Y"] --> N
    V["R"] --> N
    W["Diode"] --> N
    X["Radio"] --> N
    Y["Radio"] --> N
    Z["Radio"] --> N
    AA["Radio"] --> N
    AB["Radio"] --> N
    AC["Radio"] --> N

HDMI connection
Example of connectable devices
• DVD player/recorder • Blu-ray player/recorder
- Game console
The HDMI connections permit digital video and audio transmission via a connection cable from a player/recorder. The digital picture and sound data are transmitted without data compression and therefore lose none of their quality. Analogue/digital conversion is no longer necessary in the connected devices, which also would result in quality losses.

text_image
HDMI 1 (ARC) HDMI 2 HDMI 3 HDMI 4 HDMI-certified cable DVI/HDMI cable RCA / ø 3.5 mm stereo mini jack cable HDMI / PC ANALOG AUDIO INPUTDVI/HDMI conversion
Using a cable DVI/HDMI, the digital signals of a DVD video, can also be reproduced through a compatible HDMI connection. The sound should be supplied additionally.
- On connecting a DVI/HDMI cable to the HDMI terminal, the picture may not be visualised clearly.
- Both HDMI and DVI use the same method of HDCP protection against copy.
- For connecting a DVI cable, a commercially available adaptor (not supplied) is necessary.
NOTE
- Depending on the type of HDMI cable used, a video noise may appear. Be sure to use a certified HDMI cable.
- On reproducing HDMI picture, the best format is automatically detected and adjusted for the picture.
Compatible video signal
576i, 576p, 480i, 480p, 1080i, 720p, 1080p

Component connection
Example of connectable devices
• VCR • DVD player/recorder
- Blu-ray player/recorder
You will enjoy accurate colour reproduction and high quality images through the INPUT COMPONENTS / AV terminal when connecting a DVD player/recorder or other device.
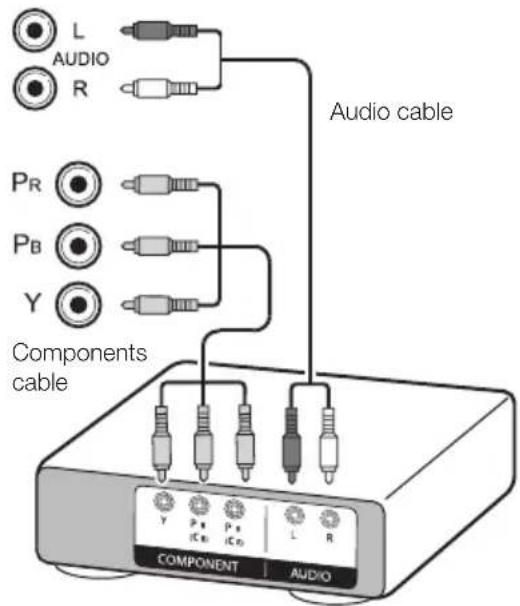
text_image
L AUDIO R PR PB Y Audio cable Components cable Y P# IC0 P# IC0 L R COMPONENT AUDIO
VIDEO connection
Example of connectable devices
• VCR • DVD player/recorder
- Blu-ray player/recorder
- Game console
- Camcorder
You can use the COMPONENTS/AV terminal when connecting to a game console, camcorder, a DVD player / recorder or other device.
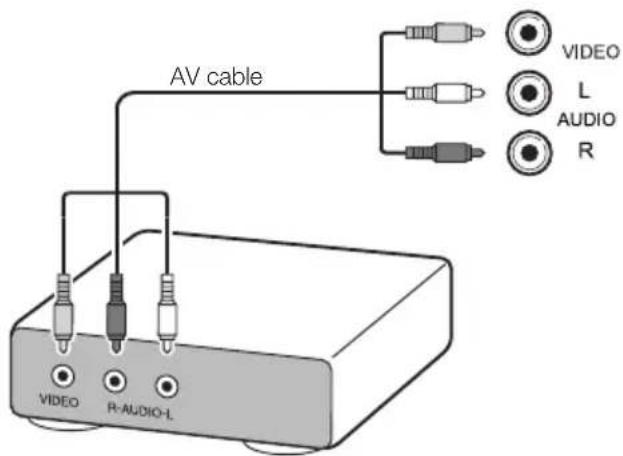
text_image
AV cable VIDEO L AUDIO R VIDEO R-AUDIO-L
SCART connection
Example of connectable devices
- VCR - Decoder
• DVD player/recorder
SCART cable
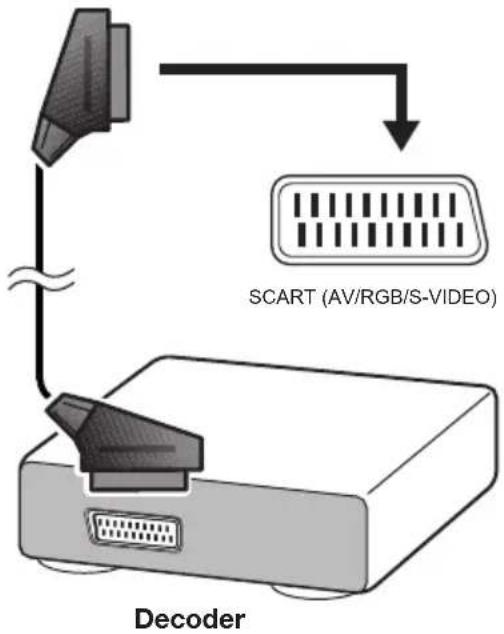
text_image
SCART (AV/RGB/S-VIDEO) DecoderNOTE
- In cases when the decoder needs to receive a signal from the TV, make sure you select the appropriate input terminal to which the decoder is connected in "AV selection" (Page 17).
Speaker/amplifier connector
Example of connectable devices
- Connecting an amplifier with digital audio input
Connect an amplifier with external speakers as shown below.
RCA Audio cable
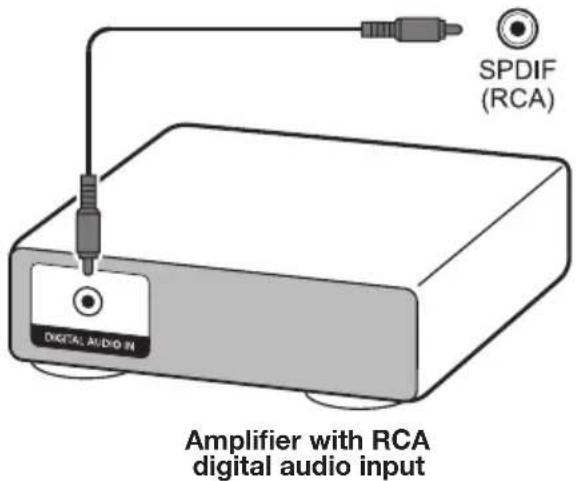
text_image
SPDIF (RCA) Amplifier with RCA digital audio input DIGITAL AUDIO IN• After connecting
Digital audio output setting
After connecting an amplifier with RCA digital audio input as shown, you should set an audio output format compatible with the programme you are watching or the device connected.
Press MENU and go to Setup → Sound → SPDIF mode → select PCM or Dolby Digital.
NOTE
- When you set this to Dolby Digital, and you receive the Dolby Digital or Dolby Digital Plus audio formats, Dolby Digital audio is output. Otherwise, PCM audio is output. When you set this to PCM, PCM audio is output no matter what audio formats you receive.
Controlling HDMI devices using HDMI CEC
What is HDMI CEC?
Using the HDMI CEC protocol, you can interactively operate compatible system devices (AV amplifier, DVD player/recorder, Blu-ray player/recorder) using a single remote control unit.
NOTE
- HDMI CEC does not work while using USB REC functions.
What you can do with HDMI CEC
- One touch play
When the TV is in standby mode, it will automatically turn on and play back the image from the HDMI source.
● Single remote control operation
HDMI CEC automatically recognises connected HDMI devices and you can control the TV and the devices as if using a universal remote control unit.
● Operating title list of external devices
In addition to displaying the TV's own timer list (Page 36), you can also call up the external player's top menu or player's / recorder's title list provided that the devices support HDMI CEC.
NOTE
- When you use HDMI CEC, be sure to use a certified HDMI cable.
- Point the remote control unit towards the TV, not to the connected HDMI device.
- Video noise may occur depending on the type of HDMI cable used. Be sure to use a certified HDMI cable.
- Up to three HDMI recording devices, one AV amplifier and three players can be connected using this system.
- These operations affect the HDMI device selected as the current external source. If the device does not operate, turn on the device and select the appropriate external source using →.
- When you insert/remove HDMI cables or change connections, turn on all connected HDMI devices before turning on the TV. Confirm that picture and audio are correctly displayed/output by selecting "HDMI 1", "HDMI 2", "HDMI 3" or "HDMI 4" from the "AV selection" menu.
HDMI CEC connection
First connect the speaker system or a player/recorder that supports the HDMI CEC protocol.
NOTE
- Refer to the operation manual of the device to be connected for further details.
- After unplugging connection cables or changing the connection pattern, turn on the power of the TV after all the power of relevant devices has been turned on. Change the external input source by pressing →, select the appropriate external source and verify the audiovisual output.
- The cables illustrated in the following explanation are commercially available items.
Connecting a player/recorder via the speaker system
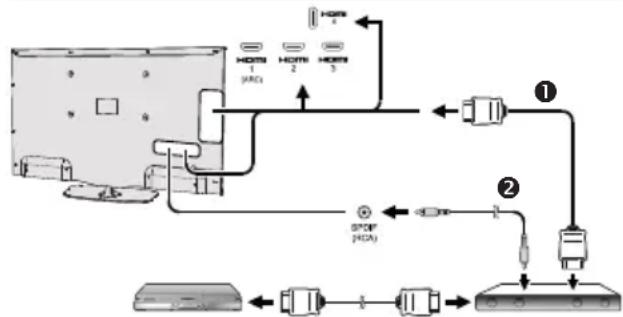
flowchart
graph TD
    A["Monitor"] -->|HOURS 1| B["Switch"]
    A -->|HOURS 2| C["Switch"]
    A -->|HOURS 3| D["Switch"]
    B --> E["Network Port ①"]
    C --> F["Network Port ②"]
    D --> G["Network Port ③"]
    E --> H["External Control Unit"]
    F --> H
    G --> H
    H --> I["External Control Unit"]
Player / Recorder Speaker
system
① HDMI-certified cable (commercially available)
② RCA audio cable (commercially available)
Connecting a player/recorder only
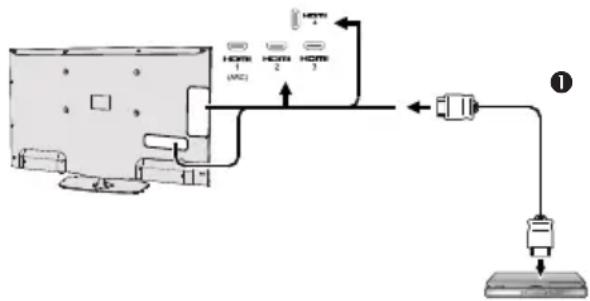
flowchart
graph TD
    A["Device"] -->|HOURS| B["1"]
    A -->|HOURS| C["2"]
    A -->|HOURS| D["3"]
    A -->|HOURS| E["4"]
    A -->|HOURS| F["5"]
    A -->|HOURS| G["6"]
    A -->|HOURS| H["7"]
    A -->|HOURS| I["8"]
    A -->|HOURS| J["9"]
    A -->|HOURS| K["10"]
    A -->|HOURS| L["11"]
    A -->|HOURS| M["12"]
    A -->|HOURS| N["13"]
    A -->|HOURS| O["14"]
    A -->|HOURS| P["15"]
    A -->|HOURS| Q["16"]
    A -->|HOURS| R["17"]
    A -->|HOURS| S["18"]
    A -->|HOURS| T["19"]
    A -->|HOURS| U["20"]
Player/Recorder
① HDMI-certified cable (commercially available)
HDMI CEC (Consumer Electronics Control) menu
Basic operation
Go to Menu→Setup→Connections→HDMI CEC and select the menu you want to set.
HDMI CEC functionality
Set to On to enable HDMI CEC functions.
Remote TV switch on via HDMI-CEC (One-touch play)
If this is activated, the one touch play function is enabled. While the TV is in standby mode, it automatically turns on and plays back the image from the HDMI source.
NOTE
- The factory default for this item is "Off".
Operating a HDMI CEC device
When a device that supports HDMI CEC is connected, the R/C of TV does not work.
By short pressing of SOURCE button the R/C will be operational again and TV goes to TV mode.
By long pressing of SOURCE button the TV return to HDMI-CEC mode.
PC connection
HDMI (DVI) Connection
HDMI 1, 2, 3 or 4
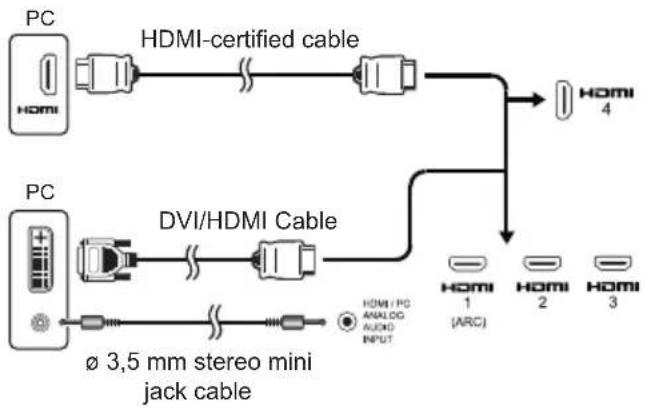
flowchart
graph LR
    PC1["PC HDMI"] -->|HDMI-certified cable| PC2["PC HDMI"]
    PC2 -->|DVI/HDMI Cable| PC3["PC HDMI"]
    PC3 -->|Audio INPUT| PC4["PC HDMI 1 (ARC)"]
    PC3 -->|Audio INPUT| PC5["PC HDMI 2"]
    PC3 -->|Audio INPUT| PC6["PC HDMI 3"]
    PC1 -->|HDMI certified cable| PC2
    PC2 -->|HDMI certified cable| PC4
    PC3 -->|HDMI certified cable| PC5
    PC3 -->|HDMI certified cable| PC6
• After connection
- If after connecting a PC to the TV through a HDMI cable, the audio does not run, connect a mini stereo connector of 3.5mm between TV and PC as indicated in the previous drawing.
- When a PC is connected to the TV with a DVI cable, it will be necessary to connect a mini stereo connector of 3.5mm of the TV to PC as indicated in the previous drawing.
Analogue Connection

text_image
DVI/VGA Conversion cable PC PC IN ø 3,5 mm stereo mini jack cable HDMI / PC ANALOG AUDIO INPUT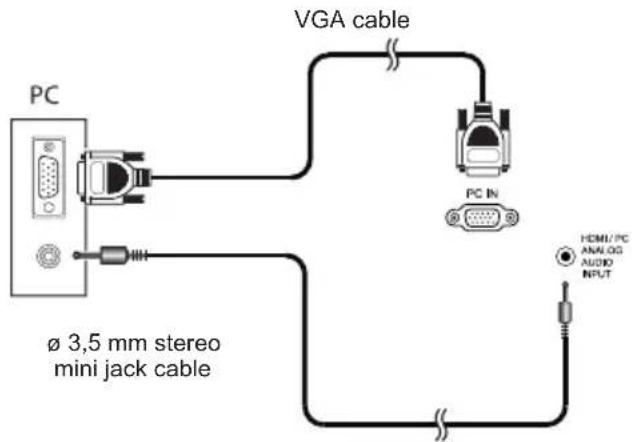
text_image
PC VGA cable PC IN HEMI/PC ANALOG AUDIO INPUT Ø 3,5 mm stereo mini jack cableNOTE
- When using the PC-IN terminal it is necessary to connect an audio cable.
Selecting the picture size
You can select the picture size.
1 Press MENU on the remote control.
2 Select Setup → Picture → Picture format, then press OK.
3 Press ◀/▶ key to select the desired item, then press OK.

flowchart
graph TD
    A[" "] --> B["4:3 PC"]
    A --> C["16:9 PC"]
| Item | |
| 16:9 PC | Proportionally correct display of 16:9 |
| 4:3 PC | Proportionally correct display of 4:3 |
NOTE
- You can also select an item by pressing 🎨 on the remote control unit.
- Connect the PC before making adjustments.
- Selectable picture size may vary with input signal type.
Adjusting the PC image automatically
This function enables the screen to be automatically adjusted to its best possible condition when the analogue terminals of the TV and PC are connected with a commercially available DVI/VGA conversion cable, etc.
1 Press → to select PC-IN from AV selection, and then press OK.
2 Press MENU key.
3 Press ▶ key to select Setup and press OK.
4 Press ▼ key to select Picture→more... and press OK.
5 Press ▶ key to select PC IN display and press OK.
6 Press ▼ key to select Auto Adjustment and press OK.
NOTE
- When connecting a PC and select PC-IN source, the "Auto adjustment" is executed automatically.
- "Auto adjustment" may fail if the PC image has low resolution, has unclear (black) edges, or is moved while executing "Auto adjustment".
- Be sure to connect the PC to the TV and switch it on before starting "Auto adjustment".
- "Auto adjustment" can be executed only when inputting analogue signals through the "PC IN" terminal.
Adjusting the PC image manually
Ordinarily you can easily adjust the picture as necessary to change image position using "Auto Adjustment". In some cases, however, manual adjustment is needed to optimise the image.
1 Press → to select PC-IN from AV selection, and then press OK.
2 Press MENU on the remote control.
3 Select Setup → Picture → more..., then press OK.
4 Press ▶ key to select "PC IN display", then press OK.
5 Press ▲/▼ key to select the desired item, then press OK.
6 Press ◀/▶ to adjust the item to the desired position.

text_image
PC IN display PC IN display Horizontal picture position 30 9 +20 Vertical picture position -20 -1.0 +20 Phase position -20 -420 Auto adjustment| Item | |
| Horizontal picture position. | Centres the image by moving it to the left or right. |
| Vertical picture position | Centres the image by moving it up or down. |
| Phase position | Adjusts when characters have low contrast or when the image fl ickers. |
| Auto Adjustment | Automatically adjusts the image |
NOTE
- The "PC IN display" options in the "Picture" menu can be adjusted only when inputting analogue signals through the "PC IN" terminal.
- Depending on resolution, the vertical/horizontal manual range can be different.
PC compatibility chart
| Resolution | Horizontal Frequency | Vertical Frequency | |
| VGA | 640 × 480 | 31,5 kHz 60 Hz | |
| SVGA | 800 × 600 | 37,9 kHz 60 Hz | |
| XGA | 1.024 × 768 | 48,4 kHz 60 Hz | |
| WXGA | 1.360 × 768 | 47,7 kHz 60 Hz | |
| SXGA | 1.280 × 1.024 | 64,0 kHz 60 Hz | |
| SXGA+ | 1.400 × 1.050 | 65,3 kHz 60 Hz | |
| UXGA | 1.600 × 1.200 | 75,0 kHz 60 Hz | |
| 1080p | 1.920 × 1.080 | 67,5 kHz 60 Hz | |
VGA, SVGA, XGA, WXGA, SXGA, SXGA+ and UXGA are registered trademarks of International Business Machines Corporation.
NOTE
- This TV has only limited PC compatibility, correct operation can only be guaranteed if the video card conforms exactly to the VESA 60 Hz standard. Any variations from this standard may result in picture distortions.
Network Setup
Connecting to the network
To enjoy internet services, you need to connect the TV to a router with a high speed connection to the internet. You can also connect the TV to your Home network server through a router or access point.
The TV connection to the router can either be wired or wireless.
To access the TV internet configuration go to Setup→Multimedia/Network→Network settings→Networking. The next screen is shown:
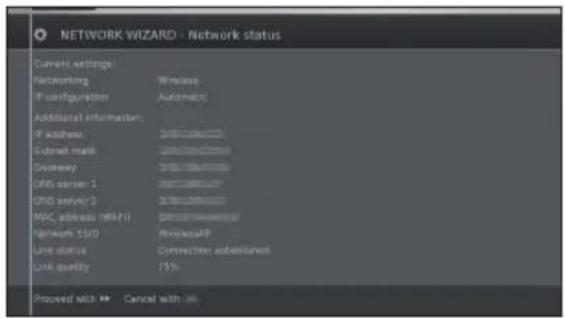
text_image
NETWORK WIZARD - Network status Current settings Factkeeping Wireless IP configuration Automatic Additional information: IP address 2000000000000000000000000000000000000000000000000000000000000000000000000000000000000 Subnet mask 15876888888888888888888888888888888888888888888888888888888888888888888888888888888888888888888 Downway 395156455555555555555555555555555555555555555555555555555555555555555555 DNS server 1 222222222222222222222222222222222222222222222222222222222222222 DNS server 3 39999999999999999999999999999999999999999999999999999999999999999999999999999999999999999999999999999 MAC address (MIFI) 1331111111111111111111111111111111111111111111111111111111111111111111111111111111111111111111111111111 Network SISD WirelessAPP Line status Connection subutilized Link quality 75% Proceed with ** Cancel with ##Press ▶▶ to continue the installation.
Choose between Wired or Wireless connection.
NOTE
- If you choose a wired connection to the router, you need an ETHERNET cable (not included, commercially available).
- If you do not have a broadband internet connection, consult the store where you purchased your TV or ask your internet service provider or telephone company.
- Wired and wireless connection cannot be used at the same time. Use only one of the connection types.
- A wireless LAN connection and performance cannot be guaranteed for all residential environments. In the following cases, the wireless LAN signal may be poor or drop, or the connection speed may become slower.
- When used in buildings made with concrete, reinforced steel, or metal.
- When placed near objects that obstruct the signal.
- When used with other wireless devices that emit the same frequency.
- When used in the vicinity of microwave ovens and other devices that emit a magnetic field, electrostatic charge, or electromagnetic interference.
- A stable connection speed is required to play back streaming content. Use a wired LAN connection if the wireless LAN speed is unstable.
Wired installation
Use an ETHERNET cable to connect the LAN terminal on the TV to your broadcast router as shown below. This is recommended when enjoying services which require stable connection speeds, such as streaming media.
• Wired connection overview
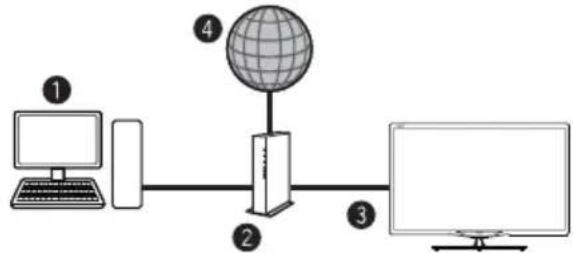
flowchart
graph LR
    A["Computer"] --> B["Desktop"]
    B --> C["Global"]
    C --> D["Monitor"]
    style A fill:#f9f,stroke:#333
    style B fill:#ccf,stroke:#333
    style C fill:#cfc,stroke:#333
    style D fill:#fcc,stroke:#333
① PC (Home Media Server)
② Router (commercially available)
③ ETHERNET cable (commercially available)
④ Network (Internet)
• How to connect
lanimret NALretuoR

① ETHERNET cable
1 Switch on the router (commercially available). Refer to the router's operation manual for switching on.
2 Connect the LAN terminal on the TV to the router (commercially available) with an ETHERNET cable (commercially available).
3 Go to Setup→Multimedia/Network→Network settings→Networking.
4 Press OK and ▲/▼ to select "wired", and then press OK.
5 Select type of IP configuration:
Automatic: Automatic configuration of the IP address via DHCP server or via multiple protocols according to UPnP specification.
Manual: Enter your fixed static IP addresses manually. (Ask your internet service provider).
6 Press OK.
Wireless installation
Use the SHARP (AN-WUD630) USB adapter with the TV.
• Wireless connection overview
text_image
Diagram showing three connected devices: a desktop computer, a globe with signal waves, and a monitor with wireless signals.① PC (Home Media Server)
② Wireless LAN router/access point
③ Wireless AN-WUD630 LAN USB adapter (Sold separately)
④ Network (Internet)
NOTE
- When using the SHARP wireless LAN adapter, try to provide as much free space around the device for best performance.
-
Make sure the firewalls in your network allow access to the TV wireless connection.
-
Operations cannot be guaranteed when used with access points that do not have Wi-Fi® certification.
- A wireless LAN access point is required to connect the TV to the Internet using a wireless LAN. See the operation manual of your access point for setup.
• How to connect
text_image
Diagram showing a computer monitor with labeled ports and an attached device, likely illustrating a system or installation process.1 Switch on your router/access point before starting the network installation.
2 Connect the AN-WUD630 USB adapter to the USB Wi-Fi port on the TV.
- Do not use a wireless LAN adapter other than the AN-WUD630 Sharp wireless LAN adapter, as operations cannot be guaranteed.
- If your wireless network is secured, have the encryption key ready to enter on screen.
3 Go to Setup→Multimedia/Network→Network settings→Networking.
4 Press OK and ▲/▼ to select "wireless", and then press OK.
The "Wireless" connection will be automatically selected if the TV detects only the wireless USB adapter.
The TV starts to search for wireless routers/access points.
text_image
Networking Search access points The wR adapter is scanning for base stations available within its reception range. This may take several minutes. Please wait... Proceed with Cancel with life5 Select required router/access point and press OK. As soon as ◀ is displayed, you can go back one installation step by pressing this button.
6 If your network has an access code, it is necessary to enter the code that allows access to the network. A screen keyboard will appear to enter the password.
Press OK.
7 Select IP address assignment method. You can choose between: Automatic (DHCP) or Manual (Input Static IP Address).
Automatic (DHCP): IP address is automatically issued by a DHCP server on your home network.
- A DHCP server has to be set up on a device on the network (WLAN router/access point).
Input Static IP Address: IP address is entered manually. Use the RC alphanumeric buttons, to input digits of IP address.
Press ▶▶ to continue.
Afterwards you will see a summary of the settings.
8 Press ▶▶ to confirm settings.
NOTES
• To connect your TV to the internet, you must have a broadband internet connection.
- If you do not have a broadband internet connection, consult the store where you purchased your TV or ask your internet service provider or telephone company.
- There is no need to enter the security key for subsequent connections to the wireless network.
If your access point is set to a stealth mode (Hidden SSID, that prevents detection by other devices), you need to use manual method to enter the SSID name for desired access point.
text_image
Access point selection Please choose the access point to which the TO should be checked. [ ] The code selected algorithm must be confirmed with the F button. Settings (Signal strength (%)) heights (Signal strength (%)) threshold (Signal strength (%)) Terror (Signal strength (%)) Inertypes (Signal strength (%)) Incentypes (Signal strength (%)) Flow Options (Signal strength (%)) Search again: Enter access point normally Back with <>1 Select Enter access point manually and press OK. Introduce the SSID name using the on-screen keyboard.
2 Select Adopt and press OK to fix the name.
3 Select Encryption method and press OK.
Only if your access point is secured a WEP key or a WAP password will be required.
4 Repeat the process from point 7 of previous explanation.
To change wireless LAN connection settings, go to Setup → Multimedia/Network → Network settings → Networking.
NOTES
- Any low bandwidth adapter (router, hub, wireless access point,...) will show poor network connection and then, poor streaming quality. It is recommended 56 Mbps or higher bandwidth for full feature.
- Working in close proximity to other Wireless/Bluetooth networks, may cause some trouble using a Wi-Fi adapter on the internet connected TV. Because the wireless link cannot be guaranteed, please try to change the Wi-Fi channel on the Access Point (AP) to avoid interference. Please refer to Access Point User Manual.
- Home Media (DLNA) requires external streaming media software installed on a PC, inside the HOME Network, that is not included with AQUOS NFT+.
- Home Media (DLNA) server software as Windows Media Player 11 (Windows Vista included) or Windows Media Player 12 (Windows 7 included), TVersity (www.tversity.com), Nero Media Home (www.nero.com), or Twonky Media Manager (www.twonky.com) are preferred but others can also be used. Visit the DLNA website (www.dlna.org) to see the certifi ed media server list. Follow the server software's user manual for setup, share and stream media contents.
- Home Media (DLNA) (Video, Music and Photo) data is organised in folders depending on the Server hierarchy; options such as Artist, Genre, Composer, Ratings, Playlist or Watch Folders may be present for sorting content, but can be different depending on the selected Media Server.
- The "Play To" function of some PC Media Players may result in very compressed video quality. For best video quality please use the USB Media Player function of the TV.
USB REC function
USB REC (Video Recorder)
USB REC function allows you to record a TV programme and watch it later. It also allows you to schedule one or more recordings and they will be available to view later on.
If EPG or teletext data are available, the USB REC stores the title and additional information about each programme.
If additional languages are being transmitted for a DVB broadcast, these are also recorded. DVB subtitles or teletext subtitles are recorded if the recording of subtitles has been activated in the USB REC settings.
USB REC requires an external USB 2.0 memory or a hard disk, always connected and previously configured to record the information.
The first USB device connected appears as USB1 terminal.
The USB memory must be formatted before first use for USB REC function.

text_image
SOURCE REC REC STOP USB REC AQUOSManual recording
Record interesting programmes directly into USB memory with the USB REC button. When viewing time-shift broadcasts the current broadcast can be saved to the USB memory. The programme is recorded from the beginning to the end of the time offset recording or to the end of the set recording time.
Timer-controlled recording
Select your favourite programme for recording, from the EPG. The timer overview has room for 50 entries. Watch the programmes later from the USB memory.
Serial recording
You can conveniently programme series broadcast with alternating start times.
Time shift viewing with archive recording
If you are recording a programme and would like to watch it before it has finished, you can watch the movie with a time shift while the rest is still being recorded.
Archive playback
Select ▶▶ on the screen during playback to fast forward. By selecting ▶▶ repeatedly, allows you to increase the fast forwards speed.
Select ▶ on the screen and press OK button to restore the normal speed.
By selecting ▶▶▶ on the screen the recording fast forwards in intervals of two minutes.
Select ◀ on the screen during playback to rewind. By selecting ◀ repeatedly, it allows you to increase the rewind speed.
Select ▶ on the screen and press OK button to restore the normal speed.
By selecting ◀◀ on the screen the recording rewinds in intervals of two minutes.
USB REC settings
You can make a few settings in the USB REC menu to adapt it to your requirements.
Go to MENU→Setup→Control→more→USB REC, then press OK:
flowchart
graph TD
    A["User-MSG"] --> B["Modify user accounts"]
    B --> C["Lunch menu"]
    B --> D["Smart home"]
    B --> E["Eventing subfields"]
    B --> F["Eventing subfields"]
- Notify hidden sections
If an entry has been hidden in an archive recording, you can be informed by a screen message when skipping a hidden area. The factory default is set to yes.
- Jump distance
Set the standard jump width (in minutes) used from jumping forwards or backwards in the film by pressing ◀◀ or ▶▶. Use the numeric buttons on the remote control to enter the time.
- If Smart jump is activated, the jump width can only be set between 1 and 4 minutes.
- Smart Jump
If Smart Jump is activated, the jump width is halved every time you change the jump direction. The jump width is doubled if you jump more than three times in the same direction (max. 8 min.).
- Serial recording tolerance
A broadcast programmed with the recording type Serial is recorded if it begins within the programmed start time ± series recording tolerance. Use the numeric buttons on the remote control to enter the time (always two-digit for 01 to 60 min.).
- Recording subtitles
Select here whether subtitles are to be recorded for DVB stations.
Manual recording
With USB REC button, the recording starts immediately at the press of a button. You only need to specify the recording time.
1 Press USB REC button. The Recording duration screen is called.

text_image
USB REC 4 300 18:00 29:00 Newmax 305 Recording duration Current programme 30 min 60 min 80 min 120 min 180 min 240 Configuration: with: You can select a fixed record log time a format 30 to 248 in bytes or water pool over recording time flow in the input box on the file right. With "current programming" the rest of the programming and the already recorded port line can be directed in any line.• Current programme
The broadcast being watched is recorded on to a USB memory or on to a hard disk.
- 30 min/ 60 min/ 90 min/ 120 min/ 180min /240min Allows you to choose the recording duration.
• ???
Manually enter the recording duration with the numeric buttons of the remote control.
2 Select desired recording time with ◀/▶ buttons. Press OK to confirm.
3 The Timer data screen appears.
Check the timer data, change if necessary and confirm with OK. The recording will start and the recording progress bar will be displayed for a moment.
While recording is activated, the status indicator (AQUOS pyramid) lights up violet.
You can end a current recording prematurely by pressing ■ button and OK button.
NOTE
If there is no teletext or EPG programme information, the recording duration menu will appear the first time you press the ▶ button. Select the desired recording duration and confirm using OK.
Programming a timer recording with EPG
You can programme timer recordings for USB REC using the EPG.
When you have programmed timer recordings, the TV set can only be switched off to the standby mode.
If you switch the TV set off by the mains, no timer recordings will be made.
1 Press EPG button.
2 Select the broadcast to be recorded.
3 Press REC(●) button. Recording screen is opened.

flowchart
graph TD
    A["Manual recording"] --> B["16.12 Current programme 1 Channel 2: CMSC / Phase"]
    B --> C["Following programme 2 Channel 3: Following an"]
    C --> D["Recording via SPIG"]
    D --> E["Open USB RISC Archive"]
See Recording in page 32 for more information.
Programming a timer recording manually
You can programme timer recordings for USB REC manually.
Set the TV to TV mode, select the station to be recorded.
1 Press OK button and select Recording→Manual recording.
bar
| Category | Value | |---|---| | Annual recording | 30 min | | 60 min | 60 min | | 90 min | 90 min | | 120 min | 120 min | | 160 min | 160 min | | 240 min | 240 min | | 777 min | 777 min | | Any 2 min | Any 2 min |2 Choose between 30 min- 240 min and press OK. The Timer Data menu is displayed. Check the timer data and change if necessary.
3 With ▲/▼/◄/► select the station or connection socket to be recorded.
4 Select Adopt to timer and press OK. The broadcast is entered into the timer overview.
If a DVD recorder was selected as a recording source, start playing the connected device manually from the beginning of the entered recording time.
If you switch the TV set off by the mains, no timer recordings will be made.
Delete programmed timer entries
Use this function in the timer overview if you want to delete recordings already programmed or end a running timer recording.
1 Press MENU button and go to Extras→Timer, press OK and the recordings already programmed are displayed.
text_image
Timer Time instructions Time comparisons Movie 20.0 13:00 - 16:00 KuR1 KuR1 70 Tues 24.0 13:00 - 16:00 Certificate Registration Studio Video 90.0 13:00 - 16:00 Certificate Registration Studio 2 Video 28.0 13:00 - 16:00 Post Registration Video 2 Video 24.0 13:00 - 16:00 2019 Registration Studio Video 90.0 13:00 - 16:00 2024 Registration Studio 2 Video 24.0 13:00 - 16:00 Post Registration Custom delay Custom delay All instructions2 With ▲/▼ select the timer entry to be deleted and press OK.
3 With ▲/▼ select Confirm delete.
4 Press OK to confirm.
The letters of a timer currently active are red. If you delete this timer, the recording is stopped.
Archive playback settings
text_image
USB NET: 2017.08 20:00 - 20:13 Exposure / Core Pages29 5:00 D:10 D:20 100 100 100 100 100 100 100 100 100 100 100 100 100 100 100 100 100 100 100 100 100 100 100 100 100 1 播放器 播放器 播放器Playing from the archive
1 Press MENU button and go to Video→USB REC archive.
2 With ◀/▶ select the recording.
3 Press OK to start playback.
Setting bookmarks
While playing an archive recording, you can set bookmarks.
1 By pressing ▲/▼ button the play progress bar will be displayed.
2 Press ▶ (PLAY) button for a little longer to set bookmark. Every time the ▶ (PLAY) button is pressed down again a little longer, a new bookmark is set.
3 You will see the message: A bookmark was set!
You can set up to 15 bookmarks per recording.
Jumping to bookmarks
1 Press ⓘ button and progress bar display appears.
2 Press Blue button to next bookmark.
Delete individual bookmarks
1 Press ⓘ button and progress bar display appears.
2 With 📄 / 📋 select the bookmark you want to delete.
3 Select 📄 and press OK to delete selected bookmark.
Jumping
1 Press ⓘ button and progress bar display appears.
2 With ▶▶/◀◀ you can jump forwards and backwards through the recording archive.
Smart Jump
Allows you to search quickly for certain scenes of a recording.
For more information see page 49.
Fast forward and rewind
During time shift viewing you can fast forward and rewind at different speeds. Sound is not audible during winding.
1 Press ⓘ button and progress bar display appears.
2 With ▶▶/◀◀ you can fast forwards/backwards.
For more information see Archive playback on page 49.
Pause (freeze picture)
1 Press || button to switch to freeze picture.
2 Press || button again to continue playback.
Deleting parts of the recording
You can delete sections of a recording from the current position within the film to the beginning or to the end.
1 During the archive playback press ■ button at the point from which the archive recording is to be deleted.
2 Select t → on the progress bar and press OK to call Delete/Hide menu.
3 With ◀/▶ buttons select Delete to start or select Delete to end.
4 Select Confirm delete and press OK.
5 Select Cancel and press OK to abort delete.
Hiding sections of the recording
You can hide sections of an archive recording. The hidden parts are skipped in the future playback and when copying to a connected recorder.
1 During the archive playback press || button at the point of the recording where the hide is to begin.
2 Select on the progress bar and press OK to call Delete/Hide menu.
3 With ◀/▶ buttons select Hide to set the start of the section to be hidden.
4 Press || to continue playback or ◀◀/▶◀ skip/wind to the point where the hide is to end.
5 Press Yellow button to set hiding end.
The hidden area of the recording is shown red in the bar. In future it will be skipped during playing.
If in the settings of theControl → USB REC → Notify hidden sections → yes is set, you will see a screen message, if the hidden area has been reached during playback.
6 Press Blue button during the screen message to show hidden area again permanently.
Slow motion
At an active pause (freeze frame) you can select from four slow motion speeds (for wind/rewind). There is no sound during slow motion replay.
1 Press ⓘ+ button and progress bar display appears.
2 Press ■ button to switch to freeze picture.
3 Select ▶▶/◀◀ and press OK to start slow motion.
4 Press ■ button again to continue playback.
The speed increases every time you press the button until eventually switching back to the initial speed.
USB REC archive function list
The function list of USB REC archive contains individual functions for its archive entries.
1 Press MENU button and go to Video → USB REC archive.
2 With ▲/▼ buttons select the archive.
3 Press ▼ button to open the functions list for the archive selected.

text_image
F01.2 Folder Movies View Detailed Info Sorting Rename Delete Copy Delete protection• View
Start or continue replaying the selected archive entry.
• Detailed info
Show detailed information on the marked archive entry.
- Sorting
Sort archive entries in alphabetical order or according to recording date (newest first).
- Rename
Change title or archive entry.
- Delete
Delete archive entry from USB memory or hard disk.
• Copy
Copying an archive entry to another hard disk or USB memory.
- Repeat
Play archive repeatedly (in a loop) when the archive entry is replayed in the future.
- Settings
Opens the video settings.
Further information can be found on page 33.
TV viewing with time shift
The USB REC continuous operation is switched on as the factory default setting. In this case the TV broadcast that you wish to view is automatically recorded in the background.

text_image
Time shift 10:05 19:05 25:05 minNOTES:
- Recommend that you use a hard disk (HDD) for this function.
- Is necessary to have 8Gb free minimum for a correct functionality of TimeShift.
- The TimeShift recording has a durability of maximum 3 hours.
Pause
Press ■ button. The TV images becomes a freeze frame and TimeShift status display appears.
Continue time shift viewing
Press ■ button. You can now watch the TV programme with a time shift from the time you pressed the ■ button for the first time. The ▶ symbol appears in place of the ■ symbol.
Switch to live picture
Press ■ button. You see the station's live picture again.
Setting bookmarks
To retrieve interesting scenes later, you can manually set the bookmarks.
With ▲/▼/◄/► select on screen and press OK.
In addition, there are also automatically set bookmarks every time the broadcast is changed.
Jump to automatically set bookmarks
With time-shift television, and with the progress bar display showing, you can skip to automatically set bookmarks.
With ▲/▼/◄/► select on screen:

: Jump back

: Jump forward
Jumping
You can jump during time shift viewing by selecting on screen ◀◀/▶▶.
Smart Jump
If Smart Jump is activated, the jump width is halved every time you change the jump direction. The jump width is doubled if you jump more than three times in the same direction (max. 8 min.).
Fast forward and rewind
During time shift viewing you can fast forward and rewind at three different speeds. Sound is not audible during winding.
Select on screen ◀◀ or ▶▶ and press OK.
Every time you press OK, the speed will increase. Select ▶ to return to normal view.
Delete bookmarks
Press || button and TimeShift display appears.
With 📁 / 📅 select the bookmark you want to delete.
Select bookmark. and press OK to delete selected
Enjoying 3D image viewing
You can enjoy 3D-supported images on the TV when you wear 3D glasses (AN-3DG20-B or AN-3DG35), sold separately.
Confir rm how to use the 3D glasses before watching 3D-supported images. These 3D glasses are only for use with SHARP LCD TVs supporting 3D.
Explanation of 3D settings
- 2D->3D
If you set this adjust to on, all 2D images will be displayed in 3D. You will need to wear the 3D glasses to view it properly.
- 3D mode
• Off
Here you can deactivate the 3D mode of the TV. The TV shows the 2D/3D images in the same way as it is provided by the station or external player.
• Automatic
If the TV is set to this setting (factory setting), then the TV automatically switches over to the correct 3D mode if it is possible.
Only change the setting if the 3D content is not displayed correctly.
- Side by side
To display 3D content in side by side format. When viewing 3D content with this setting, two almost identical images are displayed next to each other and are put together correctly by the TV set.
- Top/bottom
To display 3D content in top/bottom format. When viewing 3D content with this setting, two almost identical images are displayed one above the other and are put together correctly by the TV set.
Viewing 3D images
1 Select the 3D source (HDMI).
2 Press 3D button on remote control.
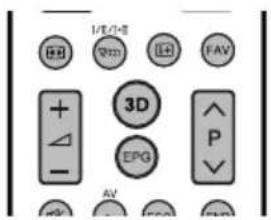
text_image
I/E/D-E FAV + 3D - EPG P AVNOTE
- The TV screen may temporarily become black when the TV is trying to detect a 3D image signal and when switching from 3D to 2D mode.
Receiving a 3D image signal that can be detected automatically
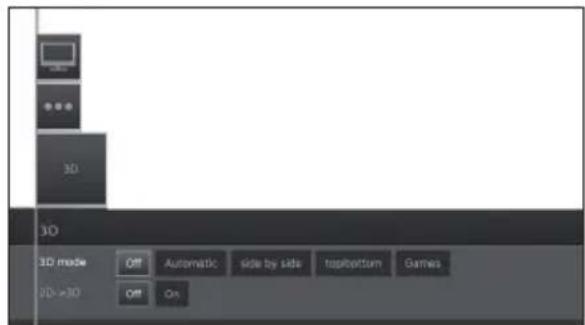
text_image
3D 3D mode Off Automatic side by side topbottom Games 3D >3D Off OnThe image signal may contain a 3D identification signal. You can enable the TV to automatically detect the 3D image type.
• After pressing 3D button a screen appears prompting you to select between the following options.
When "3D mode" is set to "Automatic"
The 3D display format is detected automatically and the appropriate 3D image is displayed.

natural_image
White 3D sunglasses icon on gray background, labeled '3D' below (no text or symbols on the objects)When "3D mode" is set to "off"
The image is displayed as 2D format.
Receiving a 3D image signal that cannot be detected automatically
When the TV receives a 3D image signal that cannot be detected automatically, you can select between 3D and 2D image viewing.
1 Select the 3D source (HDMI).
2 Press 3D button on remote control. The following screen appears.
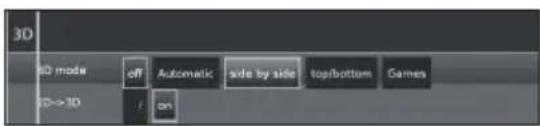
text_image
3D 3D mode off Automatic side by side top/bottom Games 10->3D on3 Press ◀/▶ to select "side by side", "top/bottom" or "Games", and then press OK.
To view in 3D mode ("side by side" or "top-bottom")
Press ◀/▶ to select the 3D signal type ("side by side" or "top/bottom"), and then press OK.
- If you select the same system as that of the input signal, 3D images are displayed.
② Turn on the 3D glasses switching them to "3D" and then wear the 3D glasses.
• The LED lights up green.
To view in 2D mode
To view 2D mode without glasses:
① Press ▲/▼ to select "off", and then press OK.
To view 2D mode some of you at the same time than other people are viewing 3D mode (only with AN-3DG20-B glasses):
① Follow up the step ① of previously described in "To view in 3D mode ("side by side" or "top-bottom")". ② Turn on the 3D glasses switching to "2D" and then wear the 3D glasses.
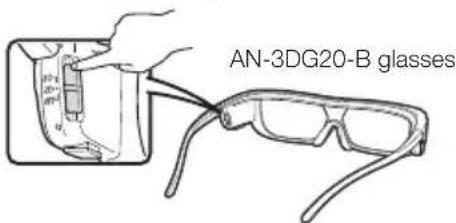
text_image
AN-3DG20-B glasses• The LED lights up green.
NOTES
• After approximately 10 minutes without receiving 3D signal the 3D glasses turn off automatically.
- To power off the power of 3D glasses, switch them to Off. The LED will also turn off.
Watching 2D images in 3D
You can convert normal 2D images into 3D images (3D effect).
1 Press 3D button on remote control.
2 Press ▲/▼ to select "2D->3D"→"on", and then press OK.
3 Turn on the power of the 3D glasses, and then wear the 3D glasses.
NOTE
- If the input signal switches to 2D, 2D images are displayed automatically.
- 3D mode is cancelled automatically when: the setting is changed, the input source is changed, the input signal resolution is changed or the power is turned off.
Recharging the 3D glasses battery (AN-3DG20-B glasses)
When the battery power is low, the LED light blinks one time per second. If the 3D glasses battery runs out, you can recharge the 3D glasses battery by connecting the USB-mini USB cable, supplied with glasses, to any of the TV set side USB terminals or any other proper source.
When the LED light goes off, the recharge is complete.

text_image
AN-3DG20-B glasses USB (HDD)Display format for 3D and 2D images
| Image for input signals Selectable mode Description | |||
| 3D mode(using the 3D glasses) |  | 2D→3D | • Converts normal 2D images into 3D images. |
 | Side by Side | • Creates 3D images from 3D images displayed side by side. The image is split into a left and right image, and then the images are stretched and displayed sequentially to create a 3D image. | |
 | Top and Bottom | • Creates 3D images from 3D images displayed on the top and bottom. The image is split into a top and bottom image, and then the images are stretched and displayed sequentially to create a 3D image. | |
| 2D mode(without using the 3D glasses) |  | Side by Side → 2D | • Creates 2D images from 3D images displayed side by side. Only the left image is stretched and displayed. The image does not appear in 3D. |
 | Top and Bottom → 2D | • Creates 2D images from 3D images displayed on the top and bottom. Only the top image is stretched and displayed. The image does not appear in 3D. | |
NOTE
• These 3D glasses are only for use with SHARP LCD TVs supporting 3D.
Troubleshooting - 3D Images
| Problem Possible solution | |
| 3D images are not displayed. | Is 3D mode set to “Automatic”? Press 3D to switch to 3D mode "Automatic".If 3D mode is set to “Automatic” but no 3D images are displayed, check the display format of the content being viewed. Some 3D image signals may not be recognised as 3D images automatically. Press 3D to select the appropriate display format for the 3D image.Are the 3D glasses set to 3D mode?Is there an obstacle between the 3D glasses and the TV, or is something covering the infrared receiver on the 3D glasses? The 3D glasses operate by receiving a signal from the TV. Do not place anything between the 3D infrared emitter on the TV and the infrared receiver on the 3D glasses. |
| The 3D glasses turn off automatically. | Is there an obstacle between the 3D glasses and the TV, or is something covering the infrared receiver on the 3D glasses? The 3D glasses turn off automatically after three minutes if no signal is received from the TV. Do not place anything between the 3D infrared emitter on the TV and the infrared receiver on the 3D glasses. |
| Switching the 3D glasses button to 2D or 3D does not cause the LED to light up green. | Is the battery in the 3D glasses exhausted? If the LED light does not light after pressing the power button for more than one second, the battery is exhausted. Recharge the battery via mini USB connector. |
3D glasses lenses
- Do not apply pressure to the lenses of the 3D glasses. Also, do not drop or bend the 3D glasses.
- Do not scratch the surface of the lenses of the 3D glasses with a pointed instrument or other object. Doing so may damage the 3D glasses and reduce the quality of 3D images.
- Use only the cloth provided with the 3D glasses to clean the lenses.
- Do not allow the infrared receiver to become dirty, and do not attach stickers to or otherwise cover the infrared receiver. Doing so may prevent the receiver from operating normally.
- If the 3D glasses are affected by other infrared data communication equipment, 3D images may not be displayed correctly.
3D glasses infrared receiver
Caution during viewing
- Do not use devices that emit strong electromagnetic waves (such as cellular phones or wireless transceivers) near the 3D glasses. Doing so may cause the 3D glasses to malfunction.
- The 3D glasses cannot operate fully at extreme high or low temperatures. Use them within the specified usage temperature range.
- If the 3D glasses are used in a room with fluorescent lighting (50/60 Hz), the light within the room may appear to flicker. In this case, either darken or turn off the fluorescent lights when using the 3D glasses.
- Wear the 3D glasses correctly. 3D images will not be correctly visible if the 3D glasses are worn upside down or back-to-front.
- Other displays (such as computer screens, digital clocks, and calculators) may appear dark and difficult to view while wearing the 3D glasses. Do not wear the 3D glasses when watching anything other than 3D images.
- If you lie on your side while watching the TV with 3D glasses, the picture may look dark or may not be visible.
- Be sure to stay within the viewing angle and optimum TV viewing distance when watching 3D images. Otherwise, you may not be able to enjoy the full 3D effect.
- The 3D glasses may not work properly if there is any other 3D product or electronic device turned on near the glasses or TV. If this occurs, turn off the other 3D product or electronic device or keep the device as far away as possible from the 3D glasses.
- Stop using this product in any of the following situations:
- When images consistently appear doubled while you are wearing the 3D glasses.
- When you have difficultly perceiving the 3D effect.
- If the 3D glasses are faulty or damaged, stop using them immediately. Continued use of the 3D glasses may cause eye fatigue, headaches and illness.
- If you have any abnormal skin reaction, stop using the 3D glasses. In very rare instances, such reactions may be due to an allergic reaction to the coating or materials used.
- If your nose or temples become red or you experience any pain or itchiness, stop using the 3D glasses. Pressure caused by long periods of use may lead to such reactions and may result in skin irritation.
- You may not be able to use several menu items while you are watching the TV in 3D mode.
- You cannot use the 3D function in radio or data mode.
DISCLAIMERS
- This Sharp device facilitates the access to content and services provided by third parties. The content and services accessible via this device belong to and may be proprietary to third parties. Therefore, any use of such third party content and services must be in accordance with any authorisation or terms of use provided by such content or service provider. Sharp shall not be liable to you or any third party for your failure to abide by such authorisation or terms of use. Unless otherwise specifically authorised by the applicable content or service provider, all third party content and services provided are for personal and non-comercial use; you may not modify, copy, distribute, transmit, display, perform, reproduce, upload, publish, license, create derivative works from, transfer or sell in any manner or medium any content or services available via this device.
- Sharp is not responsible, nor liable, for customer service-related issues related to the third party content or services. Any questions, comments or service-related inquires relating to the third party content or service should be made directly to the applicable content or service provider.
- You may not be able to access content or services from the device for a variety of reasons which may be unrelated to the device itself, including, but not limited to, power failure, other Internet connection, or failure to configure your device properly. Sharp, its directors, officers, employees, agents, contractors and affiliates shall not be liable to you or any third party with respect to such failures or maintenance outages, regardless of cause or whether or not it could have been avoided.
- ALL THIRD PARTY CONTENT OR SERVICES ACCESSIBLE VIA THIS DEVICE IS PROVIDED TO YOU ON AN "AS-IS" AND "AS AVAILABLE" BASIS AND SHARP AND ITS AFFILIATES MAKE NO WARRANTY OR REPRESENTATION OF ANY KIND TO YOU, EITHER EXPRESS OR IMPLIED, INCLUDING, WITHOUT LIMITATION, ANY WARRANTIES OF MERCHANTABILITY, NON-INFRINGEMENT, FITNESS FOR A PARTICULAR PURPOSE OR ANY WARRANTIES OF SUITABILITY, AVAILABILITY, ACCURACY, COMPLETENESS, SECURITY, TITLE, USEFULNESS, LACK OF NEGLIGENCE OR ERROR: FREE OR UNINTERRUPTED OPERATION OR USE OF THE CONTENT OR SERVICES PROVIDED TO YOU OR THAT THE CONTENT OR SERVICES WILL MEET YOUR REQUIREMENTS OR EXPECTATIONS.
- SHARP IS NOT AN AGENT OF AND ASSUMES NO RESPONSIBILITY FOR THE ACTS OR OMISSIONS OF THIRD PARTY CONTENT OR SERVICE PROVIDERS, NOR ANY ASPECT OF THE CONTENT OR SERVICE RELATED TO SUCH THIRD PARTY PROVIDERS.
- IN NO EVENT WILL SHARP AND/OR ITS AFFILIATES BE LIABLE TO YOU OR ANY THIRD PARTY FOR ANY DIRECT, INDIRECT, SPECIAL, INCIDENTAL, PUNITIVE, CONSEQUENTIAL OR OTHER DAMAGES. WHETHER THE THEORY OF LIABILITY IS BASED ON CONTRACT, TORT, NEGLIGENCE, BREACH OF WARRANTY, STRICT LIABILITY OR OTHERWISE AND WHETHER OR NOT SHARP AND/OR ITS AFFILIATES HAVE BEEN ADVISED OF THE POSSIBILITY OF SUCH DAMAGES.
Troubleshooting
| Problem Possible Solution | |
| No power. | Check if you pressed ⏻ on the remote control unit.If the indicator on the TV lights up red, press ⏻.Is the AC cord disconnected?Check if you pressed ⏻ on the TV. |
| The TV cannot be operated. | External influences such as lightning, static electricity, etc., may cause improper operation. In this case, operate the TV after first turning off the power, or unplugging the AC cord and re-plugging it in after one or two minutes. |
| Remote control unit does not operate. | Are batteries inserted with polarity (+, -) aligned?Are batteries worn out? (Replace with new batteries.)Are you using it under strong or fluorescent lighting?Is a fluorescent light illuminating the remote control sensor? |
| Picture is cut off. Is the image position correct? | Are screen mode adjustments (Picture format) such as picture size made correctly? (Page 31.) |
| Strange colour, light colour, or dark colour, or colour misalignment. | Adjust the picture tone.Is the room too bright? The picture may look dark in a room that is too bright.Check the “Picture” settings (Page 21). |
| Power is suddenly turned off. The TV’s internal temperature has increased.Clean or remove any objects blocking the vent. | |
| No picture. Are connections to external equipment correct? (Pages 41, 42 and 43)Is the input signal type selected correctly after connection? (Page 14)Is the correct input source selected? (Page 31)Is the picture adjustment correct? (Pages 21)Is the antenna connected properly? (Pages 7 and 14) | |
| No sound. Is the volume too low? | Make sure that headphones are not connected.Check if you pressed ⏻ on the remote control unit. |
| The TV sometimes makes a cracking sound. | This is not a malfunction. This happens when the cabinet slightly expands and contracts according to changes in temperature. This does not affect the TV’s performance. |
Information on the software license for this product
Software composition
The software included in this product is comprised of various software components whose individual copyrights are held by SHARP or by third parties.
Software developed by SHARP and/or third part
The copyrights for the software components and various relevant documents included with this product that were developed or written by SHARP are owned by SHARP and are protected by the Copyright Act, international treaties, and other relevant laws. This product also makes use of freely distributed software and software components whose copyrights are held by third parties.
Environmental Specifications
| 39" 50" | 60" | |||
| *1 On-Mode (W) (HOME MODE) 45 W 70 W 100 | W | |||
| *2 Standby-Mode (W) 0.24 W 0.24 W 0.24 W | ||||
| *3 Off Mode (W) | 0.16 W | 0.16 W | 0.16 W | |
| *4 Annual Energy Consumption (kWh) | 66 kWh | 102 kWh | 146 kWh | |
*1 Measured according to IEC 62087 Ed. 2.
*2 Measured according to IEC 62301 Ed. 1.
*3 Measured according to IEC 62301 Ed. 1.
*4 Annual energy consumption is calculated on the basis of the On-Mode (HOME MODE) power consumption, watching TV 4 hours a day, 365 days a year.
EC Declaration of Conformity for AN-WUD630 dongle
Hereby, SHARP Electronics (Europe) GmbH declares that the wireless LAN USB adapter (AN-WUD630) is in compliance with the essential requirements and other relevant provisions of Directive 1999/5/EC. The declaration of conformity may be consulted at: http://www.sharp.de/doc/AN-WUD630.pdf
Important note
As a part of our policy of continuous improvement, SHARP reserves the right to make design and specification changes for product improvement without prior notice. The performance specification figures indicated are nominal values of production units. There may be some deviations from these values in individual units.
Specifications
| Item | 39" LCD COLOUR TV,Models:LC-39LE650E/RU/VLC-39LE651E/K/RU/VLC-39LE652E/RU/VLC-39LE654E/RU/VLC-39LU651ELC-39LM652EVLC-39LK652ELC-39LX652E | 50" LCD COLOUR TV,Models:LC-50LE650E/RU/VLC-50LE651E/K/RU/VLC-50LE652E/RU/VLC-50LE654E/RU/VLC-50LU651ELC-50LM652EVLC-50LK652ELC-50LX652E | 60" LCD COLOUR TV,Models:LC-60LE650E/RU/LC-60LE651E/K/RU/LC-60LE652E/RU/LC-60LE654E/RU/LC-60LU651ELC-60LM652ELC-60LK652ELC-60LX652E | ||
| LCD Panel (LED TV) 39" BLACK TFT 50" BLACK TFT 60" BLACK TFT | |||||
| Resolution 6.220.800 dots (1.920 x 1.080 pixels) | |||||
| Video Colour System PAL/SECAM/NTSC 3.58/NTSC 4.43/PAL 60 | |||||
| TV Functions | TV Standard Analogue CCIR (B/G, D/K, L/L') | ||||
| Receiving Channel | VHF/UHF E2-E69ch, F2-F10 ch, I21-I69 ch, IR A-IR J ch (Digital: IR A ch-E69 ch) | ||||
| CATV Hyper-band, S1-S41 ch | |||||
| TV-Tuning System | Auto Preset 999 ch: non-Nordic / 9999 ch: Nordic (ATV: 99 ch), Auto Label, Auto Sort | ||||
| STEREO / BILINGUAL NICAM/A2 | |||||
| Viewing angles H: 176°, V: 176° | |||||
| Audio Amplifier 15 W + 15 W (Music power) | |||||
| Speaker (96 mm x 30mm) x 2 | |||||
| Terminals | TV Antenna | VHF/UHF | UHF/VHF 75 Ω Din type (Analogue & Digital) | ||
| Satellite (652/654 series only) | 75 Ω F type (DVB-S/S2) | ||||
| SERVICE | ∅ 3.5 mm jack | ||||
| SCART | SCART (AV input, RGB input, TV output, Y/C input) | ||||
| PC INPUT | VGA (D-Sub 15pin), ∅ 3.5 mm jack (shared with HDMI) | ||||
| COMPONENTS | COMPONENT IN: Y/PB(CB)/PR(CR), RCA (AUDIO R/L) | ||||
| HDMI1 | HDMI, ∅ 3.5 mm jack (shared with PC INPUT), ARC, 3D. | ||||
| HDMI2 | HDMI, ∅ 3.5 mm jack (shared with PC INPUT), 3D. | ||||
| HDMI3 | HDMI, ∅ 3.5 mm jack (shared with PC INPUT), 3D. | ||||
| HDMI4 | HDMI, ∅ 3.5 mm jack (shared with PC INPUT), 3D. | ||||
| USB 1 | USB 2.0 HOST (A Type) | ||||
| USB 2 | USB 2.0 HOST (A type) | ||||
| USB 3 (WIFI) | USB 2.0 HOST (A type) (Wi-Fi use only) | ||||
| ETHERNET (10/100) | Network connector | ||||
| AV | RCA connector (AV input) | ||||
| S/PDIF OUT | RCA S/PDIF digital audio output. | ||||
| C. I. (Common Interface) | EN50221, R206001, CI+ specification | ||||
| Headphones | ∅ 3.5 mm jack (Audio output) | ||||
| OSD language | Czech, Danish, Dutch, English, Estonian, Finnish, French, German, Greek, Hungarian, Italian, Latvian, Lithuanian, Norwegian, Polish, Portuguese, Russian, Slovak, Slovene, Spanish, Swedish, Turkish, Ukrainian, Byelorussian, Romanian, Croatian, Serbian. | ||||
| Power Requirement | AC 220-240 V, 50 Hz | ||||
| Power Consumption (IEC62087 Method) | 99W(0.24W Stby) | 121W(0.24W Stby) | 175W(0.24W Stby) | ||
| Weight | 10.7Kg (Without stand)13.3 Kg (With stand) | 16.7Kg (Without stand)20.1Kg (With stand) | 24.3Kg (Without stand)29.6 Kg (With stand) | ||
| Operating Temperature | 0 °C to +40 °C | ||||
End of life disposal

Attention: Your product is marked with this symbol. It means that used electrical and electronic products should not be mixed with general household waste. There is a separate collection system for these products.
A. Information on Disposal for Users (private households)
1. In the European Union
Attention: If you want to dispose of this equipment, please do not use the ordinary dust bin!
Used electrical and electronic equipment must be treated separately and in accordance with legislation that requires proper treatment, recovery and recycling of used electrical and electronic equipment.
Following the implementation by member states, private households within the EU states may return their used electrical and electronic equipment to designated collection facilities free of charge*. In some countries* your local retailer may also take back your old product free of charge if you purchase a similar new one.
*) Please contact your local authority for further details.
If your used electrical or electronic equipment has batteries or accumulators, please dispose of these separately beforehand according to local requirements.
By disposing of this product correctly you will help ensure that the waste undergoes the necessary treatment, recovery and recycling and thus prevent potential negative effects on the environment and human health which could otherwise arise due to inappropriate waste handling.
2. In other Countries outside the EU
If you wish to discard this product, please contact your local authorities and ask for the correct method of disposal.
For Switzerland: Used electrical or electronic equipment can be returned free of charge to the dealer, even if you don't purchase a new product. Further collection facilities are listed on the homepage of www.swico.ch or www.sens.ch.
B. Information on Disposal for Business Users
1. In the European Union
If the product is used for business purposes and you want to discard it:
Please contact your SHARP dealer who will inform you about the take-back of the product. You might be charged for the costs arising from take-back and recycling. Small products (and small amounts) might be taken back by your local collection facilities.
For Spain: Please contact the established collection system or your local authority for take-back of your used products.
2. In other Countries outside the EU
If you wish to discard of this product, please contact your local authorities and ask for the correct method of disposal.

The battery supplied with this product contains traces of Lead.
For EU: The crossed-out wheeled bin implies that used batteries should not be put to the general household waste! There is a separate collection system for used batteries, to allow proper treatment and recycling in accordance with legislation. Please contact your local authority for details on the collection and recycling schemes.
For Switzerland: The used battery is to be returned to the selling point.
For other non-EU countries: Please contact your local authority for correct method of disposal of the used battery.
Trademarks
- “HDMI, the HDMI logo and High-Definition Multimedia Interface are trademarks or registered trademarks of HDMI Licensing LLC.”
• Manufactured under license from Dolby Laboratories.
- “Dolby” and the double-D symbol are trademarks of Dolby Laboratories.
- The "HD TV 1080p" Logo is trademark of DIGITALEUROPE.
- The DVB logo is the registered trademark of the Digital Video Broadcasting—DVB—project.
- DivX®, DivX Certified® and associated logos are trademarks of Rovi Corporation or its subsidiaries and are used under license.
- The "CI Plus" Logo is a trademark of CI Plus LLP.
- DLNA®, the DLNA Logo and DLNA CERTIFIED™ are trademarks, service marks, or certification marks of the Digital Living Network Alliance.
- All other company or product names are trademarks or registered trademarks of their respective companies.
LC-39LE650E/V LC-50LE650E/V
LC-39LE651E/K/V
LC-50LE651E/K/V
LC-60LE651E/K
LC-39LU651E
LC-50LU651E
LC-60LU651E
LC-39LE652E/V
LC-50LE652E/V
LC-60LE652E
LC-39LM652E/V
LC-50LM652E
LC-60LM652E
LC-39LK652E
LC-50LK652E
LC-60LK652E
LC-39LX652E
LC-50LX652E
LC-60LX652E
LC-39LE654E/V
LC-50LE654E/V
LC-60LE654E
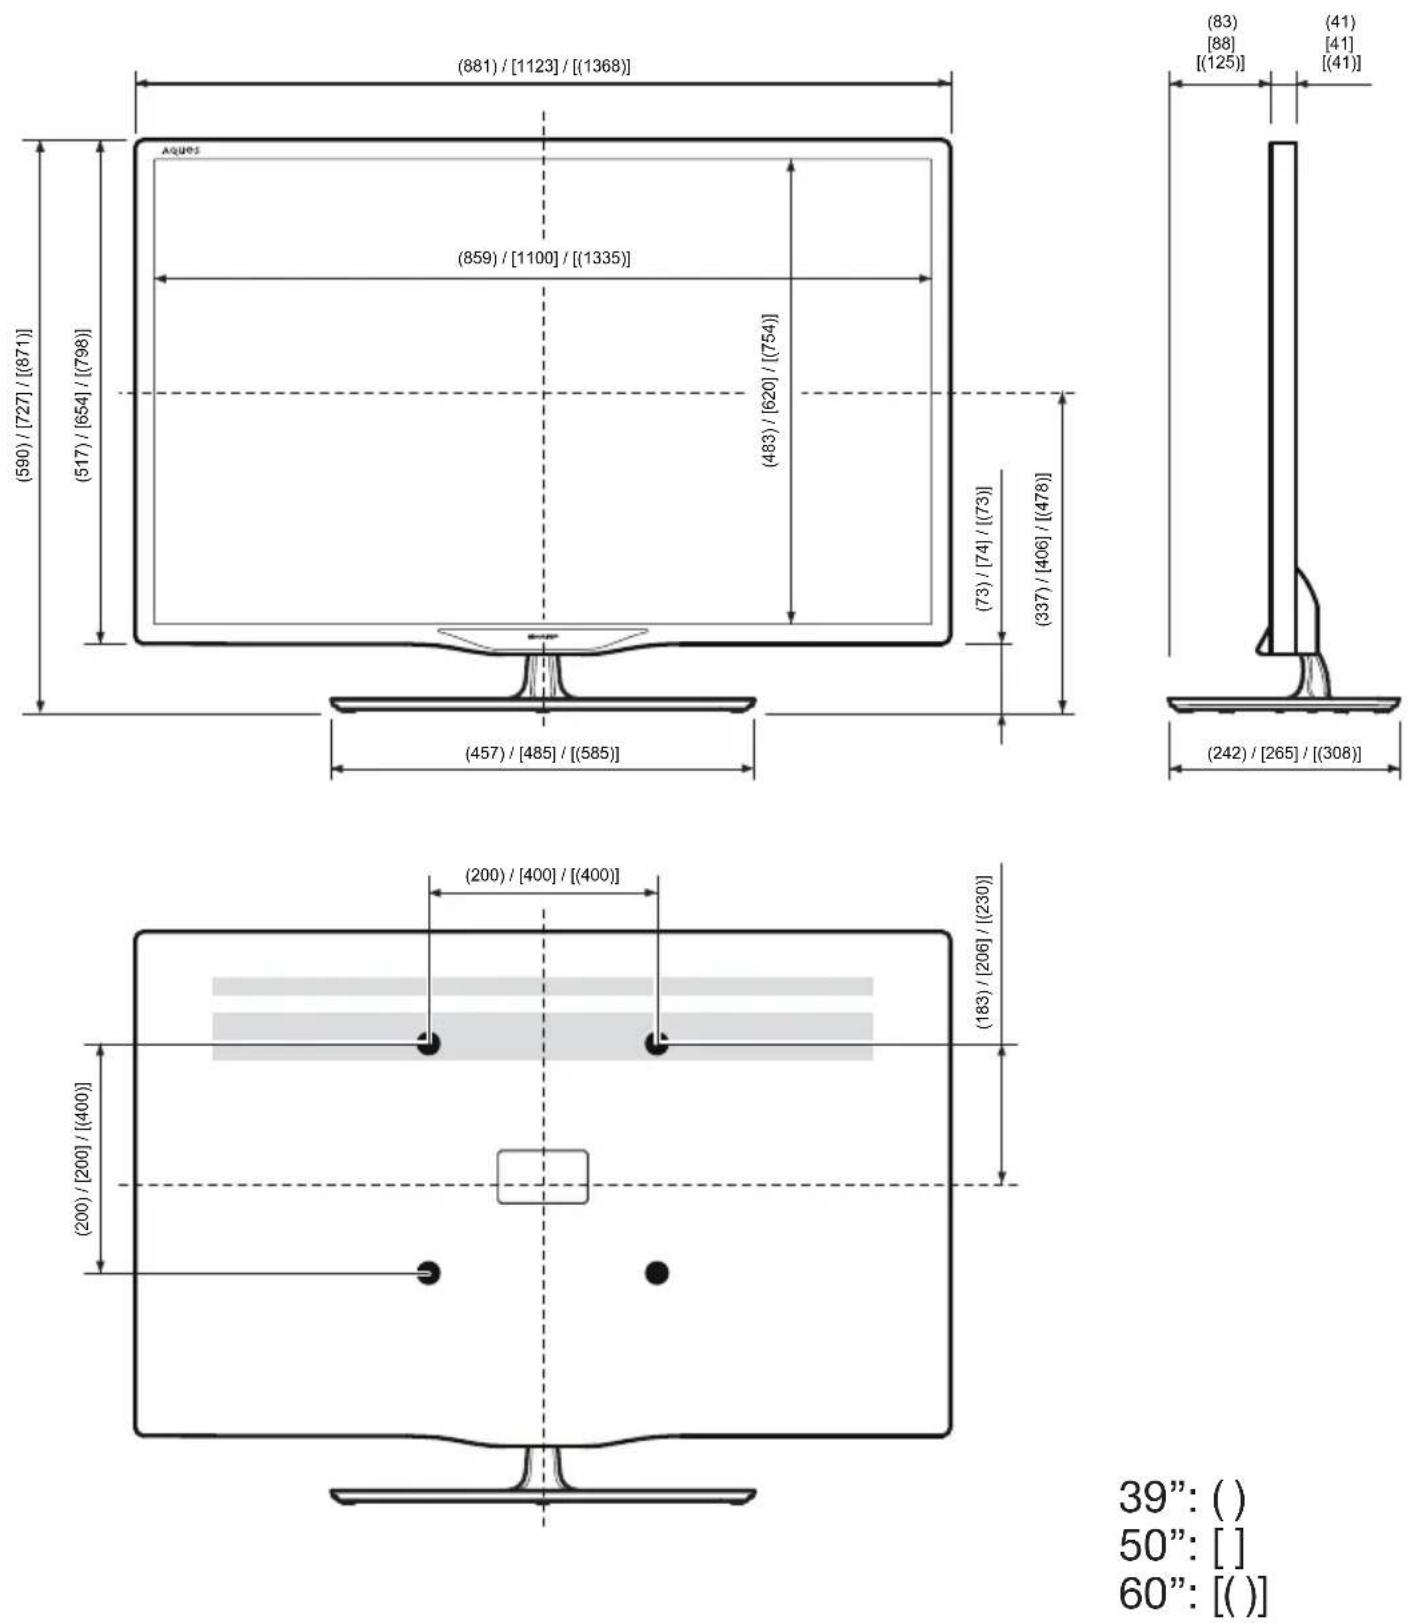
39": ()
50": [ ]
60": [()]
SHARP®
SHARP CORPORATION
http://www.sharp.eu
Sharp Electronics Europe Ltd. 4 Furzeground Way, Stockley Park Uxbridge, Middlesex, UB11 1EZ, UK
text_image
PINPrinted in Poland Gedruckt in Polen Imprimé en Pologne Stampato in Polonia Gedrukt in Polen Impreso en Polonia Impresso na Polónia

text_image
Black and white barcode image with vertical lines and a central dotTINS-F675WJZZ
13P04-PL-NG