N300A IP - Phone Gigaset Pro - Free user manual and instructions
Find the device manual for free N300A IP Gigaset Pro in PDF.

User questions about N300A IP Gigaset Pro
0 question about this device. Answer the ones you know or ask your own.
Ask a new question about this device
Download the instructions for your Phone in PDF format for free! Find your manual N300A IP - Gigaset Pro and take your electronic device back in hand. On this page are published all the documents necessary for the use of your device. N300A IP by Gigaset Pro.
USER MANUAL N300A IP Gigaset Pro
By purchasing a Gigaset, you have chosen a brand that is fully committed to sustainability. This product's packaging is eco-friendly!
To learn more, visit www.gigaset.com.

text_image
green home SUSTAINABLE PACKAGINGGIGASET. INSPIRING CONVERSATION.
MADE IN GERMANY
Safety precautions
Warning:
Read the safety precautions and the user guide before use.
Explain their content and the potential hazards associated with using the telephone to your children.
Use only the power adapter supplied, as indicated on the rear of the base.
Use only the cables supplied for fixed line and LAN connection and connect these to the intended port only.
Using your telephone may affect nearby medical equipment. Be aware of the technical conditions in your particular environment, e.g., doctor's surgery.
If you use a medical device (e.g. a pacemaker), please contact the device manufacturer. They will be able to advise you regarding the susceptibility of the device to external sources of high frequency energy.
Please refer to the "Appendix" chapter in the long user guide (see enclosed CD) for the specifications of this Gigaset product.
Do not install the base and charger in bathrooms or shower rooms. The base is not splashproof.
The base is designed for use in dry rooms in a temperature range of +5°C to +45°C.
Do not use the phone in environments with a potential explosion hazard, e.g., paint shops.
Never expose the telephone to heat sources, direct sunlight or other electrical appliances.
Protect your Gigaset from moisture, dust, corrosive liquids and fumes.
If you give your phone to a third party, make sure you also give them the user guide.
Remove faulty bases from use or have them repaired by our Service team, as they could interfere with other wireless services.
All electrical and electronic products should be disposed of separately from general household waste using designated local authority sites.

natural_image
Symbol of a trash bin crossed with no visible text or numbers, enclosed in a square frame (no text or numbers present)If a product displays this symbol of a crossed-out rubbish bin, the product is subject to European Directive 2002/96/EC.
Correct disposal and separate collection of used equipment will help to prevent potential negative consequences for the environment and human health. They are a prerequisite for the re-use and recycling of used electrical and electronic equipment.
For further information on disposing of your used equipment, please contact your local authority, your refuse collection service or the dealer you purchased the product from.
Please note that only terminals that are operated in-house (inside buildings) may be connected to the analogue TAE connection.
Gigaset service contact numbers:
For personal advice on our range of products and for repairs or guarantee/warranty claims call:
Service Centre UK: 08453 6708 12
(local call cost charge)
Please have your proof of purchase ready when calling.
Package contents

1 Base: Gigaset N300 IP or N300A IP
2 Power adapter for connecting the base to the mains power supply
3 Phone cord (flattened) for connecting the base to the analogue fixed line network
4 Ethernet (LAN) cable for connecting the base to the router (LAN/Internet)
5 This quick guide and CD with installation wizard for your telephone, licence texts, warranty agreement, links to the long user guide and to key websites.
If the firmware for your base is updated, the user guide will also be updated and made available for download on the Internet at www.gigaset.com.
Connection overview
text_image
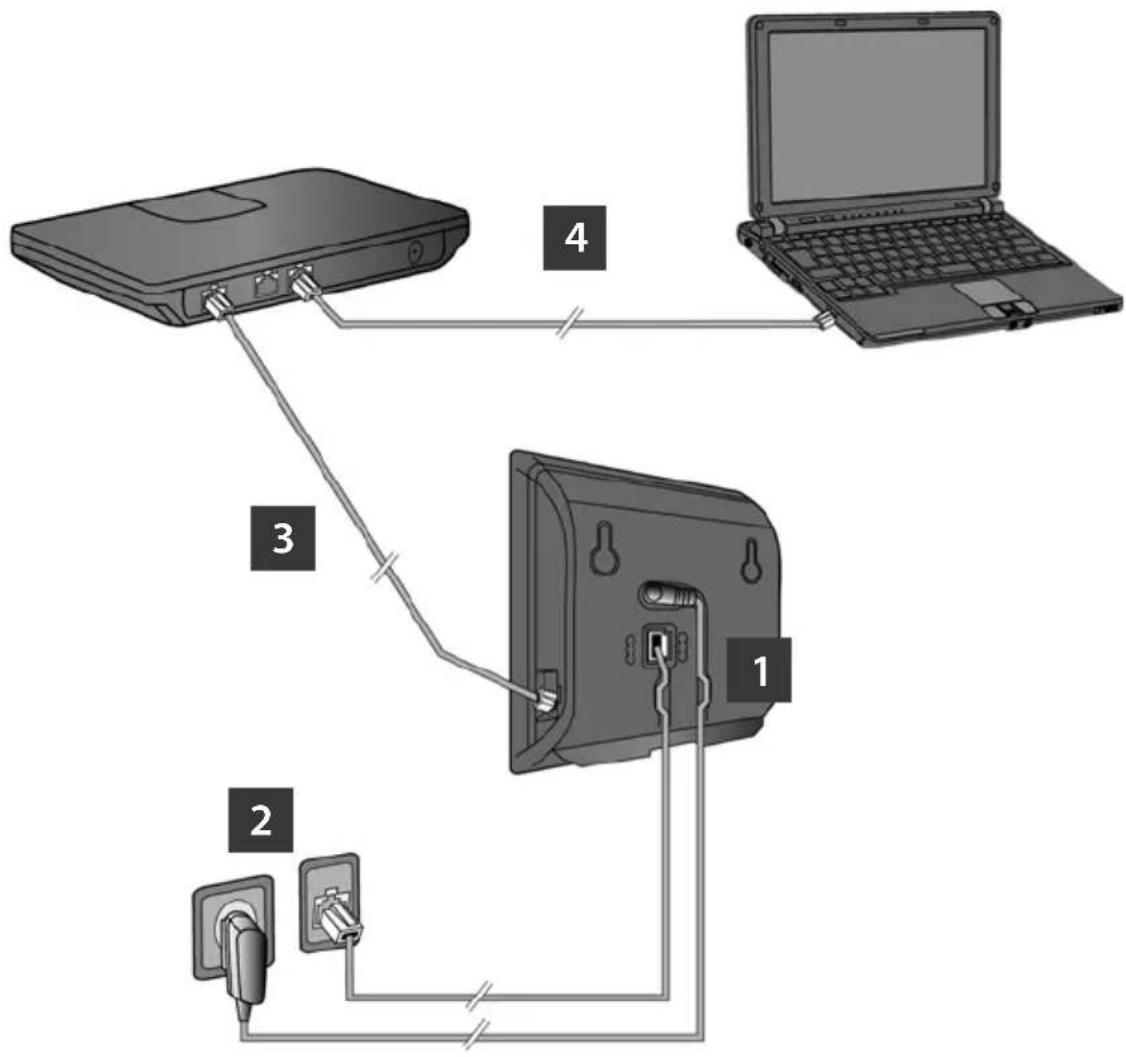
Diagram showing connections between a laptop, switch, and power plug with labeled parts 1, 2, 3, and 4.1 Connect the phone cord and power lead to the base
2 Connect the base to the fixed line network and the mains power supply
3 Connect the base to the router in order to connect the base to the Internet (connection via router and modem or via router with integrated modem)
4 Connect the PC to the LAN (optional) – for advanced configuration of the Gigaset N300/N300A IP base
You can operate, set up and use all the telephone functions on your base with a Gigaset C59H, SL78H, SL400H or S79H handset, for example.
Connecting the base
1 Connecting the phone cord and power lead to the base

text_image
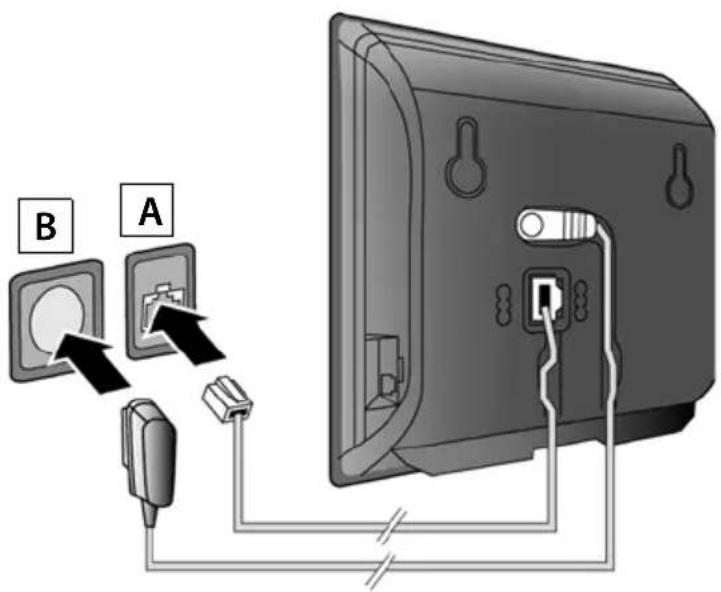
A B CA Insert the (flattened) phone cord into the lower connection socket at the rear of the base.
B Insert the power lead of the power adapter into the upper connection socket at the rear of the base.
C Insert both cables into their respective cable recesses.
Use only the supplied phone cord and the supplied power adapter.
2 Connecting the base to the fixed line network and mains power supply
A Insert the phone cord into the fixed line network connection socket.
B Then insert the power adapter into the mains socket.
Keep the power adapter plugged in at all times for operation, as the phone does not work without a mains connection.
text_image
B AIf there is already a handset registered to the base, you can now make calls via the fixed line network:
Enter the number using the handset, and then press the accept key.
Gigaset N300A IP:
The integrated answering machine Answer Mach. 1 starts in answer and record mode.
Connecting the base
3 Connecting the base to the router (Internet)
text_image
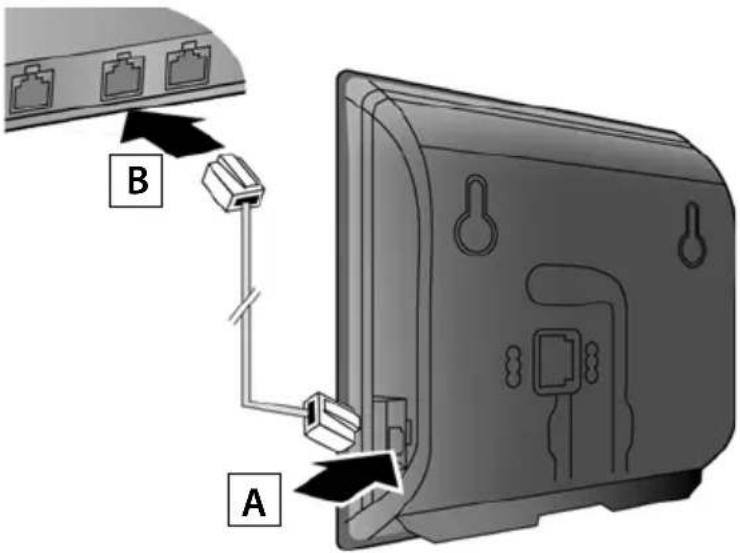
B AA Connect one Ethernet cable plug to the LAN socket at the side of the base.
B Insert the second Ethernet cable plug into a LAN socket on the router.
To do this, use only the Ethernet cable supplied.
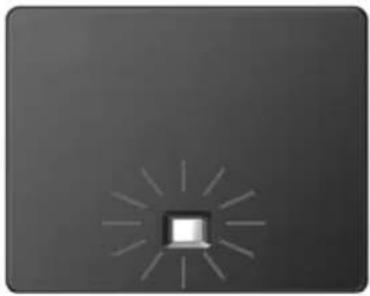
As soon as the cable connecting the phone and router is plugged in and the router is switched on, the key lights up on the front of the base (paging key).
natural_image
Simple icon of a laptop with radiating lines, no text or symbols presentData protection notice:
Further information about saving Gigaset.net service data can be found at
www.gigaset.net/privacy-policy
Connecting the base
4 Connecting the PC to the router
You can change the settings on the phone's base using a PC connected to your phone via the router.
PC system requirements:
Ethernet port
Web browser, such as Microsoft Internet Explorer version 6.0 or higher, or Mozilla Firefox version 1.0.4 or higher
DHCP must be activated (e.g. Windows XP):
Click on Start – Settings – Network connections.
Double-click on the entry for the LAN connection with which your PC is connected to the base.
On the General tab, click on Properties.
Select Internet protocol (TCP/IP) and click on the Properties button.
In the General tab, activate the Obtain IP address automatically and Obtain DNS server address automatically options.
Click on OK or Close.
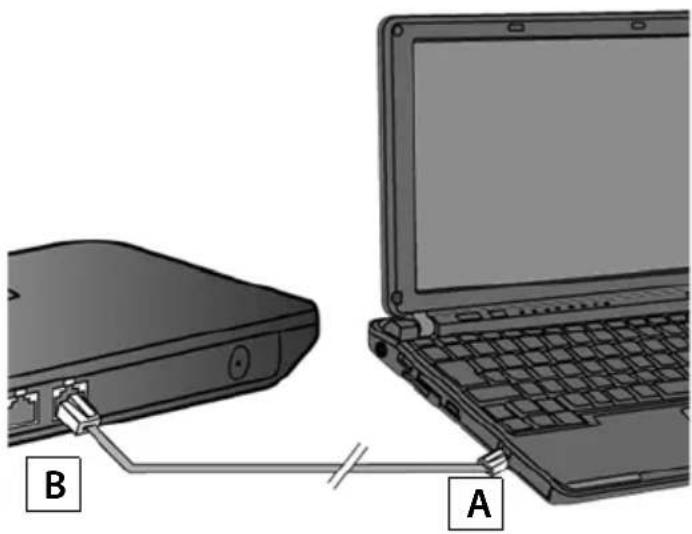
Connect the PC Ethernet connection A to a free LAN socket on your router B
You will need an Ethernet cable Cat 5 with RJ45 modular jacks.
natural_image
Diagram showing a laptop connected to a USB port, labeled A and B (no text or symbols beyond labels)The procedure below requires that your phone is automatically assigned an IP address by the router (i.e. DHCP is enabled on router and phone).
In exceptional cases (e.g. if DHCP is not enabled on the router), you will have to assign a static IP address to the base for LAN access. You must enter this IP address on the handset before carrying out the following steps. Further information on this can be found in the long user guide (see enclosed CD).
The following handset menu can be used to make the entry:
(Press right on the control key) → 📁 → System → Local Network → (enter system PIN if required)
Configuring the VoIP connection
Prerequisites for the following steps:
You have opened an account with a VoIP provider.
The phone and PC are connected to the router and the router is connected to the Internet.
A web browser is installed on the PC (Internet Explorer from V7.0, Firefox from V3.5).
Any existing firewall allows the PC and the phone to communicate.
You need the VoIP account to be able to make calls to any other subscribers on the Internet, the fixed line network or the mobile phone network via VoIP.
Set up a VoIP account with a VoIP provider.
Have your VoIP account data you received from your VoIP provider to hand. You need to save this data in the phone, e.g. using the Web configurator on your phone.
You will need:
Your registration name (login ID), your password and, if applicable (provider-dependent), a user name (often this is your VoIP phone number).
Or
Your personal auto-configuration code (activation code), if your provider supports "automatic configuration".
Instead of using the following procedure, you can also enter the VoIP access data and assign the VoIP connection as a send and receive connection via a Gigaset C59H, SL78H, SL400H or S79H handset registered to the base.
A description of the Web configurator can be found in the long user guide (see enclosed CD) and in the Web configurator online help document.
Configuring the VoIP connection
5 Establishing the connection to the Web configurator
Launch the web browser on your PC.
Enter the URL www.gigaset-config.com in the address field of the web browser and press the return key.
Alternatively, if a handset is already registered to the base, you can enter the local IP address of your telephone in the address field (e.g., http://192.168.1.4). You can see the IP address on the handset display by briefly pressing the paging/registration key on the front of the base.
You are connected to your base's Web configurator.
The following Web configurator page is displayed.

text_image
Login Welcome You can use this interface to administer your device. For your security, the configuration program is protected with the system pin. Please choose your language for menus and dialogs. English Please enter your system PIN OKThe connection between the PC and the Web configurator is a local connection (LAN connection).
Configuring the VoIP connection
6 Registering with the Web configurator

text_image
English English Deutsch Français Nederlands Italiano Русский Español Portugues (BR) system PIN OKIf you want to change the interface language of the Web configurator, click on the list icon.
Select the appropriate language from the list of available languages.
The Web page is reloaded in the selected language. This may take some time as the web pages for the required language are loaded onto the base from the configuration server.
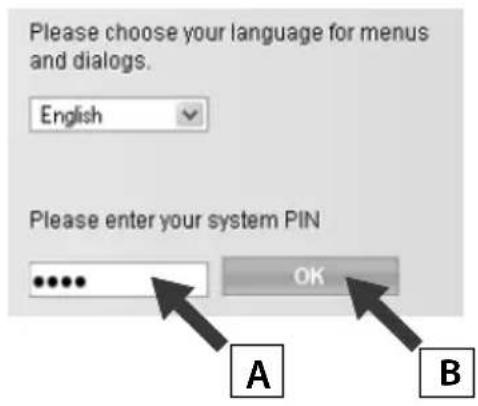
To log in to the Web configurator you will need the system PIN for the phone (default setting: 0000).
text_image
Please choose your language for menus and dialogs. English Please enter your system PIN OK A BA Enter your phone's four-digit system PIN in the bottom field.
B Select the OK button.
The PIN is still set to 0000:
In the next window containing the security information, click on OK.
Configuring the VoIP connection
7 Entering VoIP data

text_image
Home Settings Status Settings In Changing the Settings, you can fully adapt all features and needs. It is recommended to consult the user manual on the on each setting. Status In the Status section, you can review important information a network.The following web page is displayed:
Select Settings.
text_image
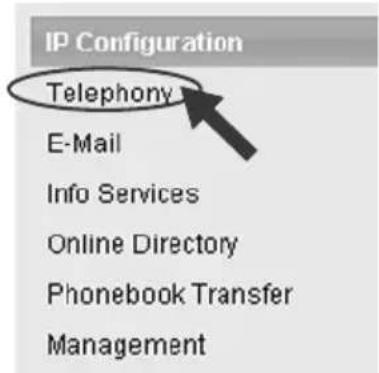
IP Configuration Telephony E-Mail Info Services Online Directory Phonebook Transfer ManagementAfter the following web page has loaded:
Click on Telephony in the navigation area (to the left of the web page).
A list is opened containing all connections that you can assign or configure to your phone.
text_image
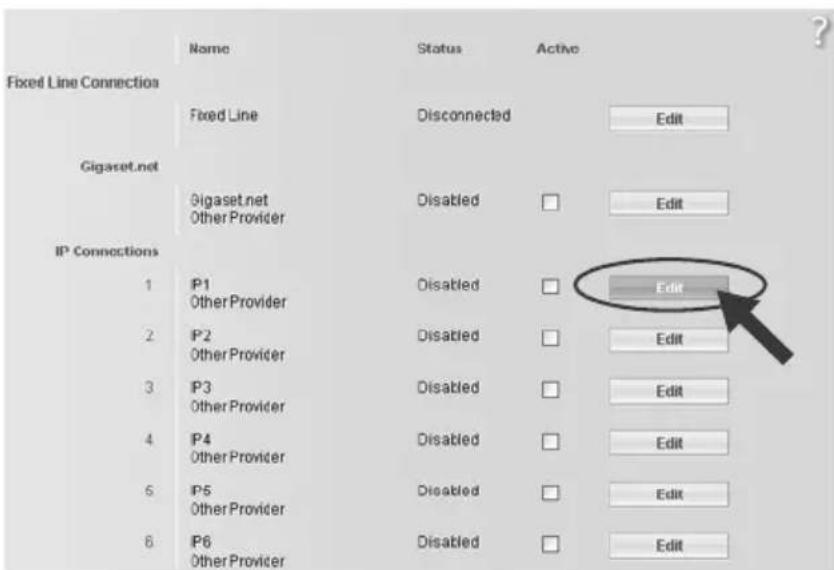
Fixed Line Connection Fixed Line Gigaset.net Gigaset.net Other Provider IP Connections 1 IP1 Other Provider 2 IP2 Other Provider 3 IP3 Other Provider 4 IP4 Other Provider 5 IP5 Other Provider 6 IP6 Other Provider Status Disconnected Disabled Disabled Disabled Disabled Active Edit Edit Edit Edit Edit EditClick on the Edit button for the first IP1 VoIP connection.
For further information on the web pages currently displayed, please consult the online help document.
This will open when you click on the question mark to the top right of the web page.
Configuring the VoIP connection
A web page for configuring the first VoIP connection is displayed. ^*

text_image
1. IP Connection Assign a connection name or actual phone number for identification. Connection Name or Number: IP1 Profile Download Provider: Other Provider Select VoIP Provider Profile Version Personal Provider Data SIP-ID: SIP-Password:First load the general provider data onto your base.
To do this, click on the Select VoIP Provider button and then on the Next> button on the following web page.
text_image
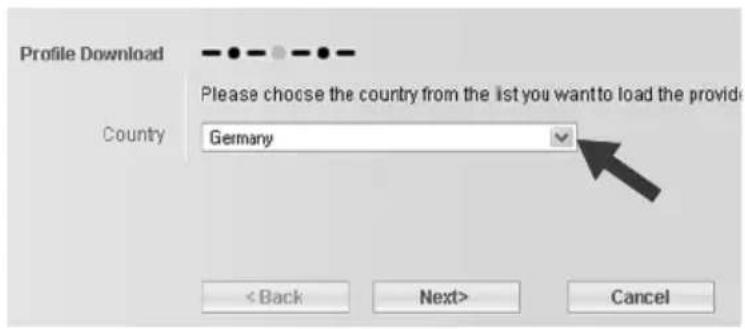
Profile Download Country Please choose the country from the list you want to load the provider Germany < Back Next> CancelClick on the list icon and select the country in which you are using your phone from the list.
Click on the Next> button

text_image
Profile Download Provider Please choose the provider from the list you need the configuration Other Provider < Back FinishClick on the list icon and select your VoIP provider from the list.
Select the Finish button.
If your VoIP provider is not included in the list, you need to select Other Provider.
Configuring the VoIP connection
If the provider data has loaded successfully, the message Provider data has been downloaded. is displayed.
Select OK.

text_image
Provider: Other Provider Select VoIP Provider Profile Version Personal Provider Data SIP-ID: SIP-Password: SIP-ID: Display name: Show Advanced Settings Set Cancel Delete ConnectionEnter the access data you received from your VoIP provider in the Personal Provider Data fields.
Select the Set button.
If you specified Other Provider when selecting your provider, you need to enter the provider data yourself before saving.
To do this, click on the Show Advanced Settings button.
If you require assistance in filling in the information, please consult the online help document. This will open when you click on the question mark ? to the top right of the web page.
Configuring the VoIP connection
8 Completing configuration
The list of all possible connections for your phone is displayed again.
text_image
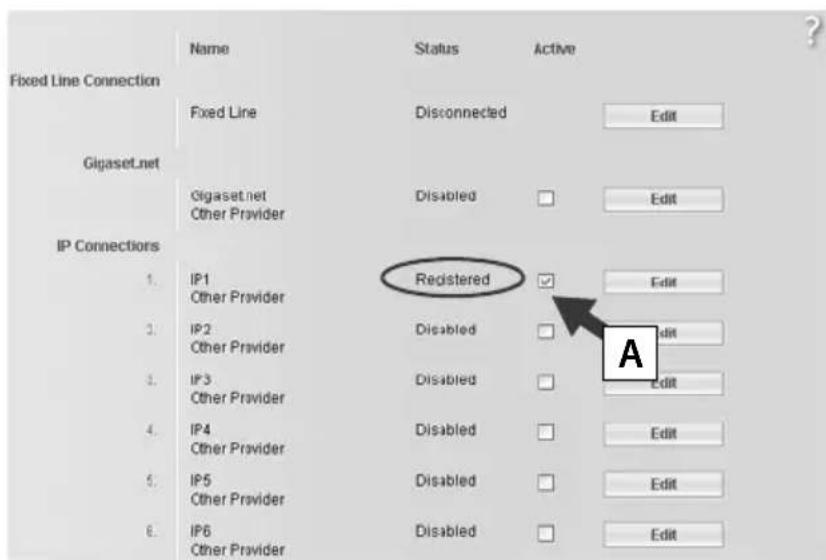
Fixed Line Connection Gigaset.net IP Connections 1. IP1 Other Provider 2. IP2 Other Provider 3. IP3 Other Provider 4. IP4 Other Provider 5. IP5 Other Provider 6. IP6 Other Provider Name Status Active Fixed Line Disconnected Edit Gigaset.net Gigaset.net Other Provider Disabled Edit Registered Edit Disabled Edit Disabled Edit Disabled Edit EditIf the Active option next to IP1 is still not activated (you do not see a t i c k):
Click on the option.
Pressto refresh the page.
If the Status column is showing as Registered, you have successfully completed the configuration.
If this is not showing as Registered, check your entries (upper/lower case) and the cable connection to the Internet. Please also refer to the information in the online help document.
Gigaset N300A IP:
Depending on the configuration of the VoIP connection, the local answering machine Answer Mach. 1 may accept calls made on this connection.
In order to make calls via the configured VoIP and fixed line connections, you will need to register at least one handset to the base.
You can only make calls via the VoIP connection if it has been assigned to a registered handset as a send connection. You will be able to receive calls via the VoIP connection as soon as a handset has been registered to the base.
You can use the full range of base functions with all Gigaset C59H, SL78H, SL400H or S79H handsets.
Registering the handset
9 Registering the handset
You must register the handset on both the handset (a) and the base (b).
a) On the handset
Start the registration procedure on the handset in accordance with the handset's user guide. A message usually appears on the display stating that the handset is searching for a base that is ready for registration.
b) On the base
Press and hold the registration/paging key on the base (approx. 3 seconds) within 60 seconds.
Once the handset has located the base, you will be asked to enter the base's system PIN.
Enter the four-digit system PIN for your base on the handset (default is 0000).
Once registration is complete, the handset returns to idle status. The handset's internal number is shown in the display, e.g., INT 1. If not, repeat the procedure.
All base connections are assigned to the handset as receive connections as soon as registration is complete (incoming calls are signalled on the handset and can be answered).
The fixed line connection is assigned to the handset as a send connection.
You can change this assignment.
Assigning the send/receive connection
10 Changing the assignment of a connection to the handset
Assign the VoIP connection (or the corresponding phone number) to a handset as a send and/or receive connection.
To do this in the Web configurator:

text_image
IP Configuration Telephony Connections Audio Number Assignment Call Divert Dialling Plans Network Mailboxes Security Advanced VoIP Settings E-MailClick on Number Assignment in the navigation area (to the left of the web page).
A list of all base connections for each registered handset is displayed on the following web page. The active options indicate which connections are assigned to each handset as a send and receive connection.

text_image
Select the line for outgoing calls and also one or more lines for incoming calls for the desk phone and each handset. Handsets INT 1 Name INT 1 Connection for outgoing calls for incoming calls IP1 Gigaset.net Fixed Line Select line for each outgoing call A BA Activate the connection option that the handset is to use for outgoing calls (send connection).
B Deactivate the connection options that are not to be used as receive connections by the handset.
Instead of a fixed send connection, you can also activate the Select line for each outgoing call option. You will then be able to select the send connection for each call from the list of base connections on the handset.
Assigning the send/receive connection
11 On the Gigaset N300A IP: Changing the assignment of a connection to the answering machine
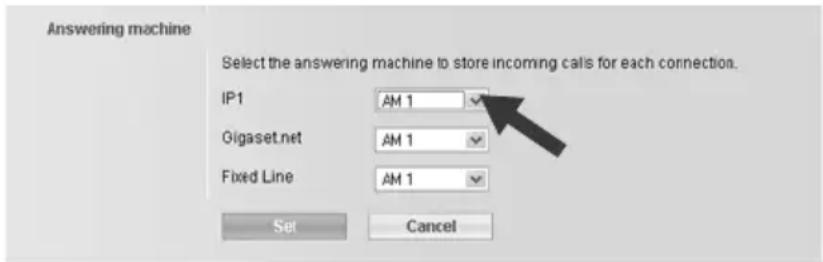
On the Answering Machine section of the web page, specify which of the three integrated answering machines should accept calls for each of the base connections.
text_image
Answering machine Select the answering machine to store incoming calls for each connection. IP1 AM 1 Gigaset.net AM 1 Fixed Line AM 1 Set CancelClick on the list icon next to the connection and select one of the three answering machines (AM 1, AM 2, AM 3) from the list or None (= no answering machine).
Select the Set button.
12 Completing the configuration and number assignment
Click on Set to complete the number assignment.
Click on Log Off (top right-hand side of the web page) to log out of the Web configurator.

You can configure five additional VoIP connections (VoIP phone numbers) on your Gigaset.
The long user guide for your phone (see enclosed CD) contains detailed information on setting up the device, configuring new connections and operating the phone, as well as possible solutions to frequently asked questions and common problems.
To ensure that you can always be reached via the Internet, the router must be permanently connected to the Internet.
Making calls
Making calls
Enter a phone number using your handset's number keys.
Please note that, even with local calls, you must always dial the area code for calls via VoIP (provider-dependent).
Press the accept key.
If you have assigned the handset a fixed send connection (default assignment: fixed line connection), the number will be dialled via this send connection.
Or
If you have assigned the handset Select line for each outgoing call, the list of connections for your phone will be displayed (Fixed Line, IP 1 etc.).
Select a send connection and press the accept key; the number will be dialled via the selected send connection.
Making calls via Gigaset.net
Gigaset.net ^* is a VoIP service provided by Gigaset Communications GmbH, which you can use to make free calls to other Gigaset VoIP users.
Your phone is already assigned a Gigaset.net phone number by default.
All subscribers are included in the Gigaset.net directory. When a handset is registered on the base, an entry is created automatically in the handset's local directory; you can use this entry to open the Gigaset.net directory.
Gigaset.net also offers an echo service with which you can check your VoIP connection.
To use this service, enter one of the following phone numbers on the handset:
12341#9 (English)
12342#9 (Dutch)
12343#9 (Italian)
12344#9 (French)
12345#9 (German)
12346#9 (Spanish)
Press the accept key.
When prompted, speak into the microphone on the handset.
If you hear your own voice, your base is connected to the Internet.
If you do not hear your voice, check your phone and router settings.
Customer Service & Assistance
You have questions? As a Gigaset customer, you can take advantage of our comprehensive service offerings. You can find help quickly in the comprehensive User Manual on the supplied product CD and in the service pages of our Gigaset online portal.
Please register your phone right after purchase on www.gigaset.com/uk/service
thus enabling us to provide you even with better service in case of questions or in case of a warranty claim. Your personal user account enables you to directly contact our customer service by email.
In our constantly updated online service on www.gigaset.com/uk/service you can find:
Extensive information about our products
FAQ compilations
Keyword search to help find topics quickly
Compatibility database: Find out which base stations and handsets can be combined.
Product comparison: Compare the features of several products with each other.
Downloads for user manuals and current software updates
E-mail contact form for customer service
Our service representatives are available on the telephone for more advanced questions or in-person consultation.
Here you can get competent advice on questions regarding installation, operation and configuration:
UK: 08453 6708 12
(local call cost charge)
Please note that if the Gigaset product is not sold by authorised dealers in the national territory the product may not be fully compatible with the national telephone network. It is clearly specified on the box near the CE mark as well as on the bottom of the base station for which country/countries the equipment has been developed. If the equipment is used in a manner inconsistent with this advice or with the instructions of the manual and on the product itself, this may have implications on the conditions for warranty or guarantee claims (repair or exchange of product).
In order to make use of the warranty, the product purchaser is asked to submit a receipt which proves the date of purchase (date from which the warranty period starts) and the type of goods that have been purchased.
For questions about VoIP access, please contact the respective service provider.
Authorisation
This device is intended for analogue phone lines in the UK.
Voice over IP telephony is possible via the LAN interface if an additional modem has been connected.
Country-specific requirements have been taken into consideration.
We, Gigaset Communications GmbH, declare that this device meets the essential requirements and other relevant regulations laid down in Directive 1999/5/EC.
A copy of the 1999/5/EC Declaration of Conformity is available at this Internet address: www.gigaset.com/docs
CE 0682
Issued by
Gigaset Communications GmbH
Frankenstr. 2a, D-46395 Bocholt
© Gigaset Communications GmbH 2011
All rights reserved. Subject to availability.
Rights of modification reserved.
www.gigaset.com
This user guide is made from 100% recycled paper.
Version: 02.05.2011
