ScanSnap S1500M - To scan FUJITSU - Free user manual and instructions
Find the device manual for free ScanSnap S1500M FUJITSU in PDF.

User questions about ScanSnap S1500M FUJITSU
0 question about this device. Answer the ones you know or ask your own.
Ask a new question about this device
Download the instructions for your To scan in PDF format for free! Find your manual ScanSnap S1500M - FUJITSU and take your electronic device back in hand. On this page are published all the documents necessary for the use of your device. ScanSnap S1500M by FUJITSU.
USER MANUAL ScanSnap S1500M FUJITSU
ScanSnap Color Image Scanner
S1500/S1500M
natural_image
Exterior view of a modern office building (no signage)Operator's Guide
Introduction

natural_image
A zigzag black line pattern on white background (no text or symbols)Thank you for purchasing our Color Image Scanner, ScanSnap S1500/S1500M (hereinafter referred to as "the ScanSnap").
This Operator's Guide describes how to handle and operate the ScanSnap.
Before using the ScanSnap, be sure to read this manual, "Safety Precautions" and "Getting Started" thoroughly for proper operation.
If you are using a Microsoft ^® Windows ^® operating system, either Adobe ^® Acrobat ^® (7.0 or later) or Adobe ^® Reader ^® (7.0 or later) is required to display or print this manual.
Microsoft, Windows, Windows Vista, PowerPoint, SharePoint, and Entourage are either registered trademarks or trademarks of Microsoft Corporation in the United States and/or other countries.
Word and Excel are the products of Microsoft Corporation in the United States.
Apple, the Apple logo, Mac, Mac OS, iPhoto and Rosetta are trademarks of Apple Inc.
Adobe, the Adobe logo, Acrobat, Adobe Reader, and Acrobat Reader are either registered trademarks or tradenames of Adobe Systems Incorporated in the United States and/or other countries.
Intel, Pentium, and Intel Core are trademarks or registered trademarks of Intel Corporation in the United States and other countries.
PowerPC is a trademark of International Business Machines Corporation in the United States, other countries, or both.
Cardiris is a trademark of I.R.I.S.
ABBYY, FineReader are trademarks of ABBYY.
ScanSnap, the ScanSnap logo, CardMinder, and Rack2-Filer are registered trademarks or trademarks of PFU LIMITED in Japan.
Other company names and product names are the trademarks or registered trademarks of the respective companies.
Manufacturer
PFU LIMITED
International Sales Dept., Imaging Business Division, Products Group
Solid Square East Tower
580 Horikawa-cho, Saiwai-ku, Kawasaki-shi, Kanagawa 212-8563, Japan
Phone:(81-44) 540-4538
All Rights Reserved, Copyright © PFU LIMITED 2008-2009
Disclaimer
• Reproducibility of the scanned image data
Confirm that the image data scanned with the ScanSnap meets your requirements (e.g. image reproducibility in size accuracy, information amount, fidelity, content and color).
- Disposing of the original document
Check the image data using the application where you transferred the image data to make sure that there are no missing parts before disposing of the original document scanned with the ScanSnap.
It is the responsibility of the customer to store and manage the scanned image data, and dispose of the original document scanned with the ScanSnap.
Description of Each Manual
When using the ScanSnap, read the following manuals as required.
| Manual Description | Reference Method | |
| Safety Precautions This manual | ual contains important information about the safe use of the ScanSnap.Make sure to read this manual before using the ScanSnap. | Included in the package. |
| ScanSnap S1500/S1500M Getting Started | This manual describes how to install and connect the Scan-Snap. | Included in the package. |
| ScanSnap S1500/S1500M Operator's Guide (this manual) | This manual describes basic operations of ScanSnap, the scanning methods, various settings, troubleshooting, and handling of the ScanSnap. | Windows Select [Operator's Guide] from the [Start] menu → [All Programs] → [ScanSnap Manager]. MacOS With Finder, select [Operator's Guide.pdf] from [Applications] → [ScanSnap] → [Manual]. |
| Windows ScanSnap OrganizerUser's Guide (*1) | Read this manual when using this product for the first time, or when details about the product features, windows, operating environment and functions are required. | Windows Select [User's Guide] from the [Start] menu → [All Programs] → [ScanSnap Organizer]. |
| Windows CardMinder User's Guide (*1) | Windows Select [User's Guide] from the [Start] menu → [All Programs] → [CardMinder]. | |
| MacOS CardirisGETTING STARTED (*2) | MacOS With Finder, select [User's Manual.pdf] from [Applications] → [Cardiris 3.6 for ScanSnap]. | |
| WindowsABBYY FineReader for ScanSnap User's Guide (*1) | Read this manual when using this product for the first time, or when details about the product features, windows, operating environment and functions are required. | WindowsSelect [User's Guide] from the [Start] menu, select [All Programs] → [ABBYY FineReader for ScanSnap(TM) 4.1]→ [User's Guide]. |
| WindowsScan to Microsoft SharePoint User Guide (*1) | WindowsSelect [Scan to Microsoft SharePoint User Guide] from the [Start] menu → [All Programs] → [KnowledgeLake]. | |
| ScanSnap Manager Help | Use this Help when questions or problems regarding operations (e.g. when setting items) arise.This provides an explanation of every operation, dialog box/window, and message. | Refer to this by either of the following methods:WindowsRight-click the [ScanSnap Manager] taskbar iconand then select [Help] → [Help].In Windows 7, the ScanSnap Manager icon is displayed in the menu that appears when you click in the taskbar.Click the Help button () for ScanSnap Manager.Press the [F1] key on the keyboard while a dialog box is displayed.Click the [Help] button on each dialog box.MacOSClick the ScanSnap Manager iconin the Dock while pressing the [control] key on the keyboard, and then select [Help] → [Help].Click the Help button () for ScanSnap Manager.From the menu bar, select [Help] → [ScanSnap Manager Help]. |
| WindowsScanSnap Organizer Help (*1) | For details about how to start up help, refer to the User's Guide for each product. | |
| WindowsCardMinder Help (*1) | ||
| MacOSCardiris Help (*2) From the menu bar, select [Help] → | MacOS[Cardiris Help]. | |
| MacOSABBYY FineReader for ScanSnap Help (*2) | MacOSFrom the menu bar, select [Help] → [FineReader for ScanSnap Help]. | |
| Adobe Acrobat Help | From the menu bar, select [Help] → [Acrobat Help]. |
*1: Supplied with S1500.
*2: Supplied with S1500M.
■ About This Manual
Structure of This Manual
This manual consists of the following:
ScanSnap Overview
This chapter describes the features, the names of parts and their functions, the system requirements, and basic operation of the ScanSnap.
Installing the Software
This chapter gives an overview and describes the installation procedure of the software supplied with the ScanSnap.
Using the ScanSnap (for Windows Users)/ Using the ScanSnap (for Mac OS Users)
This chapter describes how to perform a scan with the ScanSnap, change or save scanning settings, and other various functions of the ScanSnap.
Troubleshooting
This chapter describes how to remove jammed documents and resolve other problems.
Daily Care
This chapter describes how to clean the ScanSnap.
Consumables
This chapter describes how to replace consumables such as pad assy and pick roller.
Appendix
This appendix describes how to update ScanSnap Manager, how to uninstall software, scan settings, and ScanSnap installation conditions.
For details about ScanSnap operations, read this manual in order from "ScanSnap Overview" through "Using the ScanSnap".
Symbols Used In This Manual
The following indications are used in this manual to obviate any chance of accident or damage to you and people near you, and your property. Warning indications consist of the indicating warning level and warning statements. The following table shows signs indicating warning levels and their meanings.
| Warning Indication Description | |
 | This indication alerts operators to an operation that, if not strictly observed, may result in severe injury or death. |
 | This indication alerts operators to an operation that, if not strictly observed, may result in safety hazards to personnel or damage to the product. |
In this manual, the following symbols are used to describe operations as well as indicate warnings.
| Symbol Description | |
 | This symbol alerts particularly important information.Be sure to read this information. |
 | This symbol alerts operators to helpful advice regarding operations. |
 | This symbol indicates operations using Windows. |
 | This symbol indicates operations using Mac OS. |
Description of Successive Operations
In the procedures described in this manual, successive operations are connected with in-between.
Example: Select the [Start] menu → [Computer].
Screen Examples in This Manual
- Windows screen
The screen examples in this manual are created according to Microsoft Corporation's Guideline.
The screenshots used in this manual are of Windows Vista.
Depending on the operating systems you are using, the screen examples and operations may differ from the actual ones.
- Mac OS screen
The screenshots used in this manual are of Mac OS X v10.5.
Depending on the Mac OS you are using, the screen examples and operations may differ from the actual ones.
The screen examples in this manual are subject to change without notice in the interest of product improvement.
If the screen examples in this manual differ from actual ones, operate according to the actual screen displayed.
Abbreviations Used in This Manual
The following abbreviated terms used in this manual are described.
| Windows 7 : Microsoft | ^® Windows ^® 7 Starter operating system, English VersionMicrosoft ^® Windows ^® 7 Home Premium operating system, English VersionMicrosoft ^® Windows ^® 7 Professional operating system, English VersionMicrosoft ^® Windows ^® 7 Enterprise operating system, English VersionMicrosoft ^® Windows ^® 7 Ultimate operating system, English Version |
| Windows Vista : | Microsoft ^® Windows Vista ^® Home Basic operating system, English VersionMicrosoft ^® Windows Vista ^® Home Premium operating system, English VersionMicrosoft ^® Windows Vista ^® Business operating system, English VersionMicrosoft ^® Windows Vista ^® Enterprise operating system, English VersionMicrosoft ^® Windows Vista ^® Ultimate operating system, English Version |
| Windows XP : | Microsoft ^® Windows ^® XP Professional operating system, English VersionMicrosoft ^® Windows ^® XP Home Edition operating system, English Version |
| Windows 2000 : | Microsoft ^® Windows ^® 2000 Professional operating system, English Version |
Windows : Windows 7, Windows Vista, Windows XP, and Windows 2000
Word : Microsoft® Office Word
Excel : Microsoft® Office Excel
PowerPoint : Microsoft® Office PowerPoint®
SharePoint : Microsoft® Office SharePoint® Server 2007, English Version Microsoft® SharePoint® Portal Server 2003, English Version Microsoft® Windows SharePoint Services 2.0/3.0, English Version
Office Live : Microsoft® Office Live
Internet Explorer : Windows® Internet Explorer Microsoft® Internet Explorer
Microsoft Live Mail : Microsoft ^® Live Mail
Microsoft Windows Mail : Microsoft® Windows® Mail
Microsoft Office Outlook : Microsoft® Office Outlook®
Microsoft Outlook Express : Microsoft® Outlook Express
| .NET Framework : | Microsoft® .NET Framework |
| Microsoft Entourage : | Microsoft® Entourage® |
| Mac OS : Mac OS X v10.6 | Mac OS X v10.5Mac OS X v10.4 |
| Adobe Reader : | Adobe® Reader® |
| Adobe Acrobat : | Adobe® Acrobat®In this manual, explanations are given on the precondition that Adobe Acrobat provided with this product is installed on the computer to be used. Unless otherwise specified, the term Adobe Acrobat refers to Adobe Acrobat provided with this product.Note that Adobe Acrobat, provided with this product, is subject to update without notice.If there are any discrepancies between those descriptions provided in this manual and the actual screen, refer to the Help for Adobe Acrobat. |
| ABBYY FineReader for ScanSnap | : ABBYY FineReader for ScanSnapTMIn this manual, explanations are given on the precondition that ABBYY FineReader for ScanSnap provided with this product is installed on the computer to be used. Unless otherwise specified, the term ABBYY FineReader for ScanSnap refers to the ABBYY FineReader for ScanSnap provided with this product.Note that ABBYY FineReader for ScanSnap, provided with this product, is subject to update without notice.If there are any discrepancies between those descriptions provided in this manual and the actual screen, refer to the Help for ABBYY FineReader for ScanSnap. |
Cardiris : Cardiris™ for ScanSnap
S1500 : Color Image Scanner ScanSnap S1500
S1500M : Color Image Scanner ScanSnap S1500M
ScanSnap : S1500 and S1500M
Contents

natural_image
A zigzag black line pattern on white background (no text or symbols)Introduction 2
About This Manual .... 5
ScanSnap Overview.... 15
Features of the ScanSnap 16
Names and Functions of Components .... 19
Front View....19
Rear View 20
System Requirements 21
Windows 21
Mac OS 24
Turning the ScanSnap On/Off 26
Paper Sizes of Documents to Be Scanned 27
Loading Documents 29
Basic Flow of Operations 33
Installing the Software.... 35
For S1500 36
Supplied Software....36
Installing Adobe Acrobat 37
Installing Scan to Microsoft SharePoint 39
Installing ScanSnap Manager on Mac OS 41
Installing Trial Version Software 45
For S1500M 47
Supplied Software....47
Installing Adobe Acrobat....48
Installing ScanSnap Manager on Windows 50
Using the ScanSnap (for Windows Users) 53
ScanSnap Manager Icon and Operations 54
Right-Click Menu....55
Left-Click Menu 56
How to Perform a Scan .... 57
Preparation 57
Using the Quick Menu....59
Without Using the Quick Menu 64
Finishing ScanSnap Operation 67
Setting the ScanSnap 68
Changing Scanning Settings....68
Saving Scanning Settings....71
Automatic Linkage with Applications....85
Showing the Scan Progress Status 88
About the ScanSnap's Communication Status 90
About Actions 92
Saving Data in the Specified Folder....93
Sending Files by E-Mail 101
Using the ScanSnap as a Copy Machine 111
Saving Files to Picture Folder 118
Converting into Word/Excel/PowerPoint Documents.... 125
Scanning Business Cards....132
Saving Data in SharePoint.... 138
Saving to Rack2-Filer.... 148
Using the ScanSnap in Various Ways 154
Scanning Only One Side of a Document 154
Scanning Color Documents in Black and White or Gray Mode .... 156
Scanning Color Documents in High Compression Mode.... 158
Removing Blank Pages from the Scanned Image Data.... 160
Correcting Skewed Character Strings.... 162
Correcting the Orientation of Scanned Images 164
Scanning Documents of Differing Widths or Sizes at the Same Time ... 166
Scanning Documents Larger Than A4/Letter Size.... 169
Scanning Photographs and Irregular-shaped Documents 173
Scanning Long Pages....177
Saving Scanned Images in Multiple PDF Files 179
Creating Searchable PDF Files 181
Automatically Setting Keywords to PDF Files....184
Setting Document Open Passwords for PDF Files 189
Using the ScanSnap (for Mac OS Users) 193
ScanSnap Manager Icon and Operations 194
ScanSnap Manager Menu 195
[Profile] Menu....196
How to Perform a Scan 197
Preparation 197
Using the Quick Menu.... 199
Without Using the Quick Menu 204
Finishing ScanSnap Operation 207
Setting the ScanSnap 208
Changing Scanning Settings....208
Saving Scanning Settings 211
Automatic Linkage with Applications.... 223
Showing the Scan Progress Status 224
About Actions 226
Saving Data in the Specified Folder....227
Sending Files by E-Mail 234
Using the ScanSnap as a Copy Machine 242
Converting into Word/Excel Documents 248
Scanning Business Cards....254
Saving Data in iPhoto 262
Using the ScanSnap in Various Ways 267
Scanning Only One Side of a Document 267
Scanning Color Documents in Black and White or Gray Mode 269
Removing Blank Pages from the Scanned Image Data....271
Correcting Skewed Character Strings....274
Correcting the Orientation of Scanned Images 277
Scanning Documents of Differing Widths or Sizes at the Same Time ... 280
Scanning Documents Larger Than A4/Letter Size....284
Scanning Photographs and Irregular-shaped Documents 289
Scanning Long Pages....294
Saving Scanned Images in Multiple PDF Files 296
Creating Searchable PDF Files 298
Automatically Setting Keywords to PDF Files....301
Troubleshooting.... 306
Clearing Document Jams 307
Troubleshooting for Multifeed 309
When a Multifeed Is Detected....311
Troubleshooting Checklist 317
Daily Care 330
Cleaning Materials 331
Cleaning the ScanSnap Exterior 332
Cleaning the Inside of the ScanSnap 333
Cleaning Carrier Sheet 336
Consumables.... 337
Part Numbers and Replacement Cycle of Consumables .... 338
Replacing the Pad Assy 341
Replacing the Pick Roller 345
Purchasing the Carrier Sheet 353
Appendix 354
Updating ScanSnap Manager 355
Updating on a Windows OS.... 355
Updating on a Mac OS.... 357
Uninstalling the Software 359
Uninstalling on a Windows OS....359
Uninstalling on a Mac OS 361
Setting Items With/Without Quick Menu 365
Installation Specifications 368
About Maintenance 369
Index.... 370
ScanSnap Overview

natural_image
A zigzag black line on a white background, no text or symbols present.This chapter describes the features, the names of parts and their functions, the system requirements, and basic operations of the ScanSnap.
Features of the ScanSnap.... 16
Names and Functions of Components 19
System Requirements 21
Turning the ScanSnap On/Off 26
Paper Sizes of Documents to Be Scanned 27
Loading Documents....29
Basic Flow of Operations....33
Features of the ScanSnap
The ScanSnap is a scanner that is capable of double-sided scanning in both monochrome and color.
The ScanSnap contains the following features:
- You can turn documents into data by just pressing the [Scan] button!
You can turn documents cluttering up your desk into PDF or JPEG files so that you can view, edit, manage, and archive them on your computer in a convenient manner.
Digitized documents are easy to print and attach to e-mail messages.
In addition, the ScanSnap can automatically recognize the type of documents, color, gray or black-and-white, so that you do not have to set the color mode for each document to be scanned.
- You can scan documents with speed and efficiency!
(Automatic Resolution Function and Intelligent Auto Color Detection)
Double-sided color documents of A4 or letter size paper can be scanned at a speed of about 20 sheets per minute. (When [Image quality] is set to [Auto] (*1), [Color mode] to [Auto Color Detection], [Compression rate] to [3], and other settings to defaults) (*2)
*1 : The documents are scanned at 300 dpi. If the paper size is 148 mm or smaller, image files are output at 300 dpi. Otherwise, image files are output at 200 dpi. You can scan image data with a high resolution without changing settings, when interacting with text recognition software (for example, for business cards).
*2 : - Depending on the document, scanning speed may become slower in [B&W] (Black&White) mode.
Example: Scanning color brochures in [B&W] mode (converting a color image to black-and-white)
- Scanning speed may become slower, when [Correct skewed character strings automatically.] and/or [Convert to Searchable PDF] is enabled.
- You can scan different sized documents together! (Mixed Size Scanning + Carrier Sheet Scanning)
Paper sizes are automatically recognized at scan time, allowing documents containing a mixture of different paper sizes to be scanned in one go.
Documents containing photographs, irregular-shaped and delicate papers, and paper sizes larger than the normal A4/Letter size may also be scanned using the Carrier Sheet provided. Multiple Carrier Sheets can be scanned together, either with or without regular paper sheets.
- The small size saves desktop space!
Smaller than a sheet of A4 or letter size paper, the ScanSnap never requires much desktop space.
- The Quick Menu lets even beginners to operate the ScanSnap with automatic ease!
The Quick Menu is simple enough for first-time use by complete beginners. When the [Scan] button is pressed to scan a document, the Quick Menu is displayed so that you can just select the action you want to perform on the Quick Menu.
- You can create searchable PDF files!
You can create searchable PDF files by automatically performing text recognition for scanned PDF files.
You can also text-recognize only sections defined by a highlight pen and add these as keywords for the PDF file.
- You can e-mail a scanned image or output the scanned image to a printer immediately after scanning!
You can attach the scanned image to an e-mail or print out the scanned image without having to start applications.
- You can convert paper documents into Word/Excel/PowerPoint files!
Use ABBYY FineReader for ScanSnap supplied with the ScanSnap to convert the scanned image data directly into the Word/Excel/PowerPoint file.
For Mac OS, you can convert only into Word/Excel files.
Windows
- You can arrange and manage image data by using with ScanSnap Organizer!
- Setting a keyword (Intelligent Indexing)
You can set a keyword using the following methods.
- Recognize a character string on a page (OCR process) and set as a keyword (Zone OCR)
- Set a character string as a keyword
- Set a marked character string as a keyword (Marker Index)
- Drag and drop a keyword onto the keyword list (Keyword Addition by Drag&Drop)
You can view set keywords on thumbnails. (Keyword Overlay)
- Distributing files by keyword (Automatic Keyword Sort)
Files can also be distributed into a folder according to the keyword set for files as a distribution condition.
- Search a variety of files (Search Engine Selection)
Files can be found quickly by searching by file name, keyword, text, or date.
- Cropping marked sections (Intelligent Cropping)
Sections on a page that are marked with a highlight pen can be cut and pasted elsewhere.
- You can file business cards with ease!
With the provided business card application, business cards can be easily converted into data using the text recognition function.
With CardMinder, you can recognize characters on a business card, and create a database to facilitate card data management and searches.
The provided business card application is as follows.
Windows
CardMinder (can only be used if S1500 is purchased)
Mac OS
Cardiris (can only be used if S1500M is purchased)
- Multifeed can be automatically detected!
If a multifeed (*) should occur while a document is scanned, an ultrasonic sensor automatically detects the multifeed. With the recovery function, you can easily check the location of a multifeed and restore the data.
* : Multifeed is an error that occurs when two or more sheets are fed into the ScanSnap simultaneously.
- The ScanSnap is available both for Windows and Mac OS!
The ScanSnap is supplied with both Windows and Mac OS (*) versions. For either OS, you can use the ScanSnap in a manner that best suits your office environment.
* : The following functions are not available for Mac OS.
- Color high compression
- Set the document with its face up
- Set a password for PDF file
Note: The ScanSnap does not conform to TWAIN, ISIS, and WIA standards.
Names and Functions of Components
This section describes the names of parts and their functions.
■ Front View
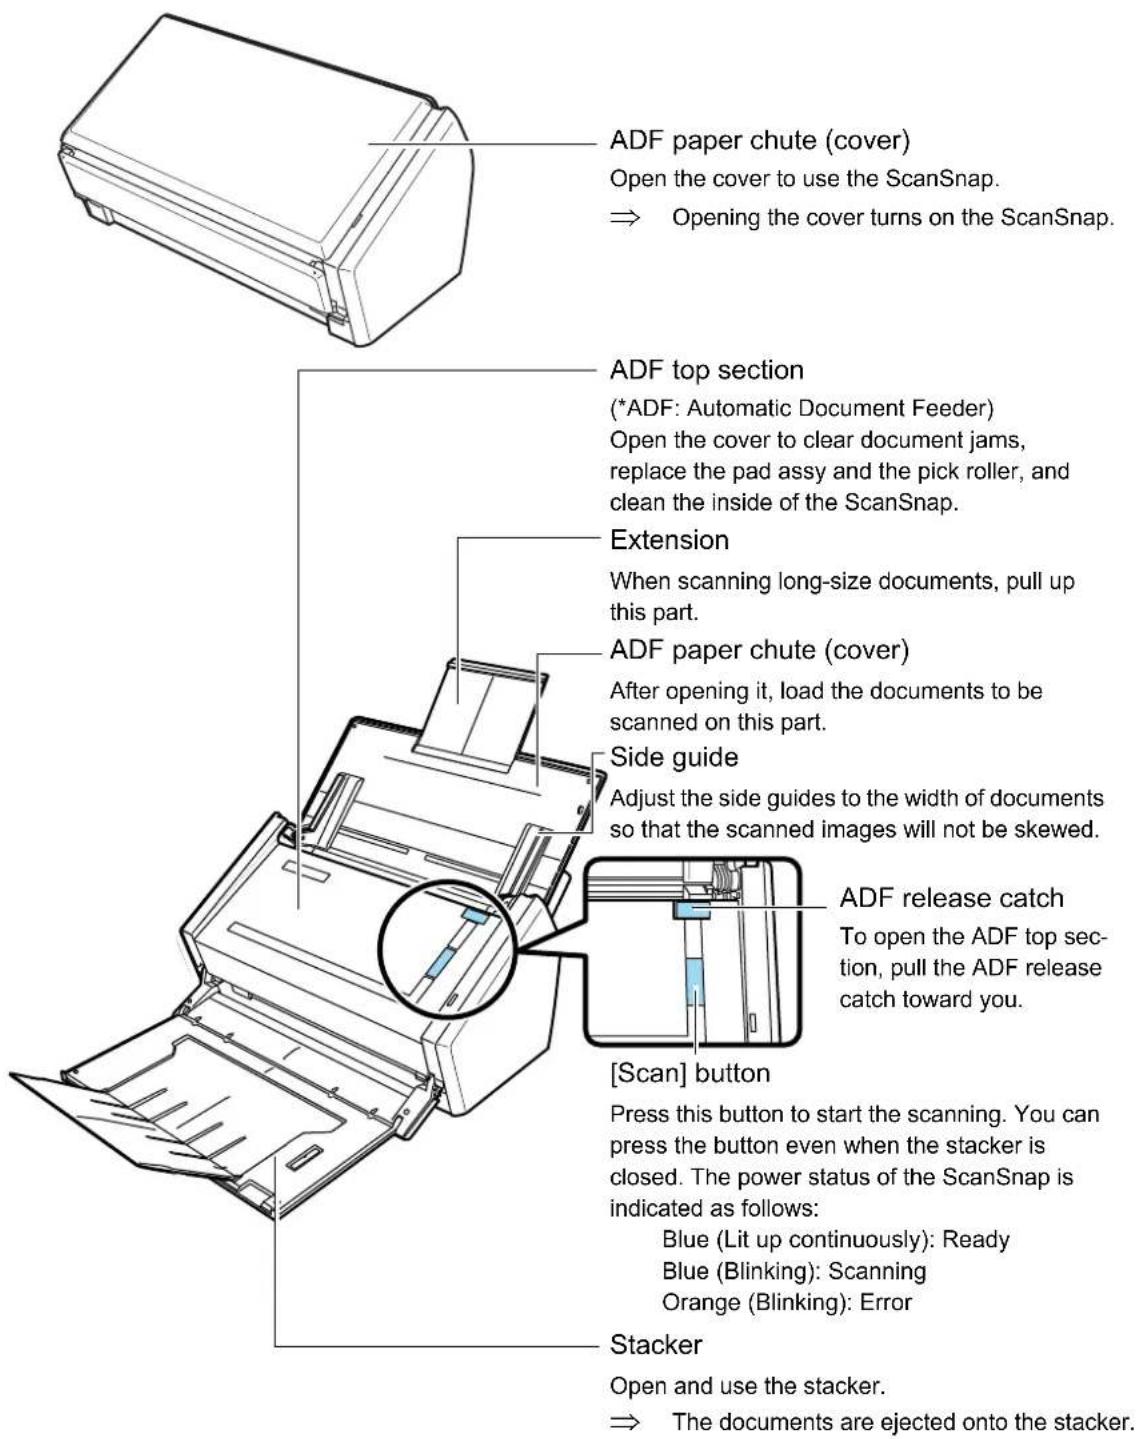
text_image
ADF paper chute (cover) Open the cover to use the ScanSnap. ⇒ Opening the cover turns on the ScanSnap. ADF top section (*ADF: Automatic Document Feeder) Open the cover to clear document jams, replace the pad assy and the pick roller, and clean the inside of the ScanSnap. Extension When scanning long-size documents, pull up this part. ADF paper chute (cover) After opening it, load the documents to be scanned on this part. Side guide Adjust the side guides to the width of documents so that the scanned images will not be skewed. ADF release catch To open the ADF top sec- tion, pull the ADF release catch toward you. [Scan] button Press this button to start the scanning. You can press the button even when the stacker is closed. The power status of the ScanSnap is indicated as follows: Blue (Lit up continuously): Ready Blue (Blinking): Scanning Orange (Blinking): Error Stacker Open and use the stacker. ⇒ The documents are ejected onto the stacker.■ Rear View
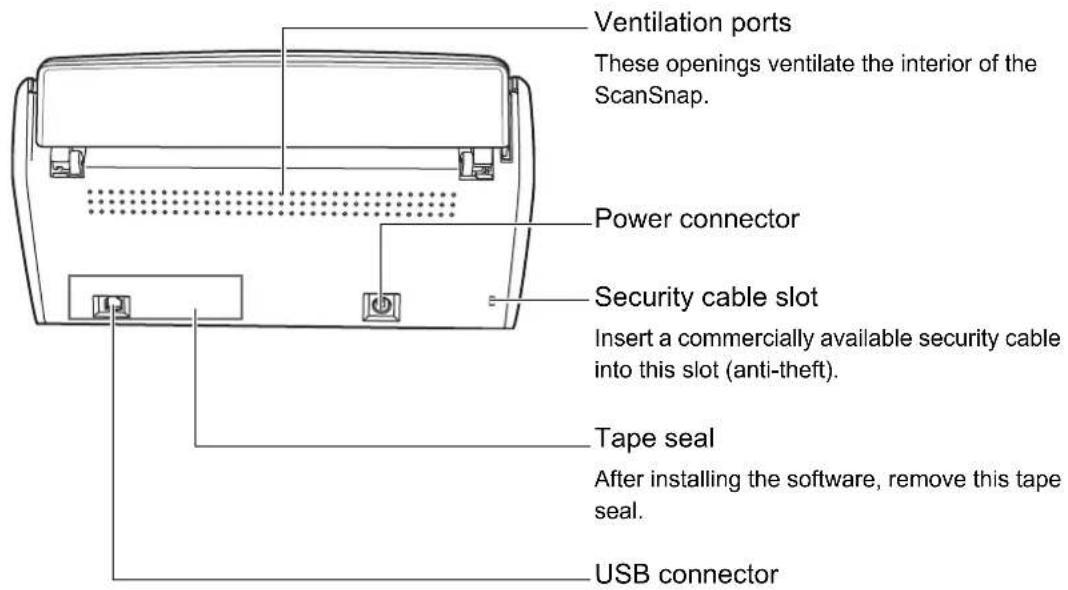
text_image
Ventilation ports These openings ventilate the interior of the ScanSnap. Power connector Security cable slot Insert a commercially available security cable into this slot (anti-theft). Tape seal After installing the software, remove this tape seal. USB connectorSystem Requirements
The system requirements for the ScanSnap are as follows:
Windows
- Operating system
- Windows 7
- Windows Vista
- Windows XP
- Windows 2000
| Supplied software Windows 7 | Windows Vista | Windows XP (*1) | Windows 2000 (*2) | |
| ScanSnap Manager OK OK OK OK | ||||
| ScanSnap Organizer OK OK OK OK | ||||
| CardMinder | OK | OK | ||
| ABBYY FineReader for ScanSnap OK OK OK OK | ||||
| Scan to Microsoft SharePoint OK OK OK | ||||
| Adobe Acrobat 9 Standard — (*3) OK OK — | ||||
OK: Supported —: Not supported
*1 : Service Pack 2 or later must be applied
*2 : Service Pack 4 or later must be applied
*3 : To use Windows 7, the version of Adobe Acrobat needs to be compliant with Windows 7.
Otherwise, the search function of Adobe Acrobat is not guaranteed.
For more information, refer to the Adobe Systems Incorporated Web site.
- Computer
Recommended: Intel® Core™ 2 Duo 2.2 GHz or higher
Minimum: Intel® Pentium® 4 1.8 GHz
- Memory
- Windows 7 32 bit
1 GB or more - Windows 7 64 bit
2 GB or more - Windows Vista/Windows XP/Windows 2000
512 MB or more (1 GB or more recommended)
- Display resolution
800 × 600 or higher is required.

When the font size is large, some screens may not be displayed properly. In that case, use a smaller font size.
- Hard disk space
- ScanSnap Manager: 480 MB
- ScanSnap Organizer: 690 MB
- CardMinder: 280 MB
- ABBYY FineReader for ScanSnap: 600 MB
- Scan to Microsoft SharePoint: 40 MB
– Adobe Acrobat 9 Standard: 830 MB

When installing ScanSnap Organizer or Scan to Microsoft SharePoint in Windows XP/Windows 2000, the following software is also installed.
For Windows XP:
If .NET Framework 3.0 (or later) is not installed, the following software is installed at the same time when installing ScanSnap Organizer or Scan to Microsoft SharePoint.
• .NET Framework 3.0 (500 MB free disk space required)
For Windows 2000:
If .NET Framework 2.0 (or later) is not installed, the following software are installed at the same time when installing Scan to Microsoft SharePoint.
- Windows Installer 3.1 (15 MB free disk space required)
• .NET Framework 2.0 (280 MB free disk space required)

- The ScanSnap may not function if it is connected to the USB port on the keyboard or the monitor.
- Use a powered hub equipped with an AC adapter if you are using a commercially available USB hub.
- To connect the ScanSnap with USB 2.0, it is required that the USB port and the USB hub be compliant with USB 2.0. The scanning speed might be reduced if the ScanSnap is connected with USB 1.1. Therefore, use the USB 2.0 compatible one if your computer has the USB 2.0 compatible port.
- If the CPU and memory do not meet the required specifications, scanning speed will be reduced.
- According to your Windows system disk management, the actual increase in used disk space after installation may differ from the required disk space.
- Disk space approximately three times as large as the resulting scanned file is required when scanning documents.
The following shows the image data size criteria when scanning a one-sheet color document in simplex mode.
| File format Compression rate Paper size | ||
| PDF 3 A4 (general catalog) |  | |
Image data size criteria (KB)
| Color mode | Auto | Normal | Better | Best | Excellent |
| Color 438.4 295.1 442.4 859.3 2921.4 | |||||
| Gray 393.4 264.3 390.0 753.1 2500.4 | |||||
| B&W 175.8 112.0 183.5 352.1 1630.2 | |||||
| Color high compression | 209.8 164.2 222.5 156.8 | — |
■ Mac OS
- Operating system
- Mac OS X v10.6
- Mac OS X v10.5
- Mac OS X v10.4
| Supplied software | Mac OS X v10.6 (*1) | Mac OS X v10.5 (*1) | Mac OS X v10.4 (*1) |
| ScanSnap Manager OK OK | OK | ||
| Cardiris OK (*2) OK OK | |||
| ABBYY FineReader for ScanSnap | OK OK OK | ||
| Adobe Acrobat 8 Professional | — (*3) OK (*4) | OK (*5) |
OK: Supported —: Not supported
*1 : It is recommended to apply the latest updates to Mac OS.
*2 : Rosetta must be installed to use Cardiris.
You can install Rosetta from the [Optional Installs] package on the Mac OS installation disk.
*3 : To use Mac OS X v10.6, the version of Adobe Acrobat needs to be compliant with Mac OS X v10.6.
For more information, refer to the Adobe System Incorporated Web site.
*4 : When the provided Adobe Acrobat 8 Professional has been updated
*5 : Mac OS X v10.4.3 or later is required
- Computer
Recommended: Intel ^® Core ^TM 2 Duo 2.4 GHz or higher
Minimum: Intel® Core™ Duo 1.83 GHz
PowerPC G5 1.6 GHz
- Memory
- Mac OS X v10.6
1 GB or more - Mac OS X v10.5/Mac OS v10.4
512 MB or more (1 GB or more recommended)
- Display resolution
1024 × 768 or higher is required.
- Hard disk space
- ScanSnap Manager: 600 MB
- Cardiris: 150 MB
- ABBYY FineReader for ScanSnap: 570 MB
– Adobe Acrobat 8 Professional: 1,120 MB

- It is recommended to apply the latest updates to the Mac OS.
- The ScanSnap may not function if it is connected to the USB port on the keyboard or the monitor.
- Use a powered hub equipped with an AC adapter if you are using a commercially available USB hub.
- To connect the ScanSnap with USB 2.0, it is required that the USB port and the USB hub be compliant with USB 2.0. The scanning speed might be reduced if the ScanSnap is connected with USB 1.1. Therefore, use the USB 2.0 compatible one if your computer has the USB 2.0 compatible port.
- If the CPU and memory do not meet the required specifications, scanning speed will be reduced.
- Disk space approximately three times as large as the resulting scanned file is required when scanning documents.
The following shows the image data size criteria when scanning a one-sheet color document in simplex mode.
| File format Compression rate Paper size | ||
| PDF 3 A4 (general catalog) |  | |
Image data size criteria (KB)
| Color mode | Auto | Normal | Better | Best | Excellent |
| Color 438.4 295.1 | 442.4 859.3 292 | 21.4 | |||
| Gray | 393.4 264.3 | 390.0 753.1 250 | 0.4 | ||
| B&W | 175.8 112.0 | 183.5 352.1 163 | 0.2 |
Turning the ScanSnap On/Off
This section describes how to turn the ScanSnap on/off.
The ScanSnap is turned on/off in conjunction with the computer. Ordinarily, you do not need to manually turn the ScanSnap on/off if it is connected to a computer.
- Turning the ScanSnap on
With the computer power on, open the ADF paper chute (cover).
⇒ The [Scan] button blinks blue, indicating the ScanSnap is turning on.

The ScanSnap might perform initialization several times during startup.
- Turning the ScanSnap off
Turn off the computer or close the ADF paper chute (cover).

• After putting the Extension away, close the ADF paper chute (cover).
- When stowing away the stacker, make sure that it does not become lose. If the ADF paper chute (cover) is closed when the stacker is lose, the ScanSnap will not be turned off.
- It may take 2 to 3 minutes until the [Scan] button goes off after the computer is turned off.
- ScanSnap Sleep state
When the ScanSnap is left open, it enters a "sleep" mode after 15 minutes without use.
⇒ In the sleep state, the ScanSnap internal lamps blink slowly.
Paper Sizes of Documents to Be Scanned
Paper sizes of documents to be scanned are as follows:
Without Using the Carrier Sheet
| Paper type | Standard office paper, post cards, business cards |
| Weight | 52 to 127 g/m ^2 (14 to 21 lb) |
| Size | Width: 50.8 to 216 [mm] (2 to 8.5 [in])Length: 50.8 to 360 [mm] (2 to 14.17 [in])Maximum of long page scanning (*1)216 × 863 [mm] (8.5 × 34 [in]) |
*1 : Long page scanning is available only when the [Scan] button on the ScanSnap is pressed for 3 seconds.

- Documents hand-written with a pencil may be smeared during a scan. It is recommended that you use the Carrier Sheet. If you scan such documents without using the Carrier Sheet, clean the rollers as often as possible. If not, the rollers of the ScanSnap get dirty and multi-feeding may be caused. For details about how to clean rollers, refer to "Cleaning the Inside of the ScanSnap" (page 333).
-
Do not scan the following types of documents:
-
Documents with paper clips or staples (remove clips and staples to scan these documents)
- Documents with wet ink (scan documents after the ink dries)
- Documents larger than 216 × 863 mm (width: 8.5 [in] length: 34 [in])
- Materials other than paper such as the fabric, metal foil, transparency, or plastic card
- Scanning the following types of documents without using the Carrier Sheet can result in the documents being damaged or scanned incorrectly: It is recommended that you use the Carrier Sheet.
- Documents smaller than 50.8 × 50.8 mm (width: 2 [in] Length: 2 [in])
- Documents thinner than 52 g/m ^2 (14 lb)
- Documents of nonuniform thickness (e.g. envelopes and paper sheets with other paper sheets attached)
- Wrinkled or curled documents
- Folded or torn documents
- Tracing paper
- Coated paper
- Photographs (printing paper)
- Perforated or punched documents
- Documents of odd shape (not square or rectangular)
- Documents of different widths
- Carbon paper or thermal paper
- Documents with photographs or sticky notes attached
- Carbonless paper may contain chemicals that can damage the pad assy or rollers.
For best use of your ScanSnap, when scanning carbonless paper, note the following.
- It is recommended to scan with a Carrier Sheet
- Multiple sheets of carbonless paper can be directly scanned. However, to preserve the efficiency of the scanner, make sure to clean it regularly. According to the type of carbonless paper, the life span of the scanner may become shorter when compared to scanners used to scan only general office paper.
With the Carrier Sheet
| Paper type | Standard office paper, post cards, business cards, photograph, clipping |
| Weight | Up to 127 g/m ^2 (Up to 34 lb)Up to 63.5 g/m ^2 (Up to 17 lb) (*) |
| Size | Carrier Sheet Size (216 × 297 mm)Letter (8.5 × 11 in (216 × 279.4 mm))11 × 17 in (279.4 × 431.8 mm) (*)A3 (297 × 420 mm) (*)A4 (210 × 297 mm)A5 (148 × 210 mm)A6 (105 × 148 mm)B4 (JIS) (257 × 364 mm) (*)B5 (JIS) (182 × 257 mm)B6 (JIS) (128 × 182 mm)Post card (100 × 148 mm)Business card (90 × 55 mm, 55 × 90 mm)CustomWidth: 50.8 to 216 mm (2 to 8.5 in)Length: 50.8 to 297 mm (2 to 11.69 in) |
*: Fold in half when scanning.

- Do not write on, color, stain, or cut the portion striped in black and white on the Carrier Sheet. Doing so may prevent the document from being correctly scanned with the Carrier Sheet.
- Do not place the Carrier Sheet upside-down on the ScanSnap. Doing so can cause a paper jam, or damage the Carrier Sheet.
- Do not leave a document on the Carrier Sheet for an extended period of time. The ink on the document might be transferred onto the Carrier Sheet.
- Do not leave the Carrier Sheet in locations that are exposed to elevated temperatures; for example, locations exposed to direct sunlight or near a heating apparatus, for an extended period of time. Do not use the Carrier Sheet under high-temperature conditions. If used under such a condition, it may be deformed.
- Do not bend or forcefully pull the Carrier Sheet.
- Do not use a damaged Carrier Sheet. Doing so can damage the ScanSnap or cause a malfunction.
- To avoid deformation of the Carrier Sheet, do not put anything heavy on it and keep it on a level surface when not in use.
- Be careful not to cut your fingers when touching the edge of the Carrier Sheet.
- Do not insert more than one small-size material such as pictures and post cards in the Carrier Sheet per scan. Doing so can cause a paper jam. It is recommended to scan small-size materials one at a time.
- If a paper jam occurs frequently, feed about 50 sheets of Plain Paper Copier (PPC) or recycled paper, and then scan the document by using the Carrier Sheet. You can use either unused or used PPC/recycled paper.
Loading Documents
Load documents onto the ScanSnap as follows:
1. Check the number of sheets in the document stack.
The maximum number of sheets that can be loaded on the ScanSnap is as follows:
For A4-size paper or smaller: A document stack of 5 mm or less
(50 sheets at 80 g/m ^2 or at 20 lb)

If you try to scan more sheets that can be loaded, the following problems may occur.
- A file may be improperly created due to an excessive file size.
- A paper jam or other irregular feeding may occur.
2. To prevent paper jams, fan the document.
- Hold the document with both hands and fan it out as shown in the figure below.

natural_image
Illustration showing two hands folding a rope or cable, with a blue arrow indicating the process (no text or symbols present)- Turn the document by 90 degrees, and then fan it in the different orientation again.
3. Straighten the edges of the document, and load it onto the ScanSnap so that the top edges of the paper form a step-like pattern.

text_image
Step-like Scanning direction
If the document is scanned with its both edges not straightened, the document might be jammed or be damaged.
4. Open the ADF paper chute (cover) of the ScanSnap.

text_image
ADF paper chute (cover)5. Pull the stacker on the ADF top section towards you.

text_image
Stacker6. Pull out the extension of the ADF paper chute (cover), and open the stacker.
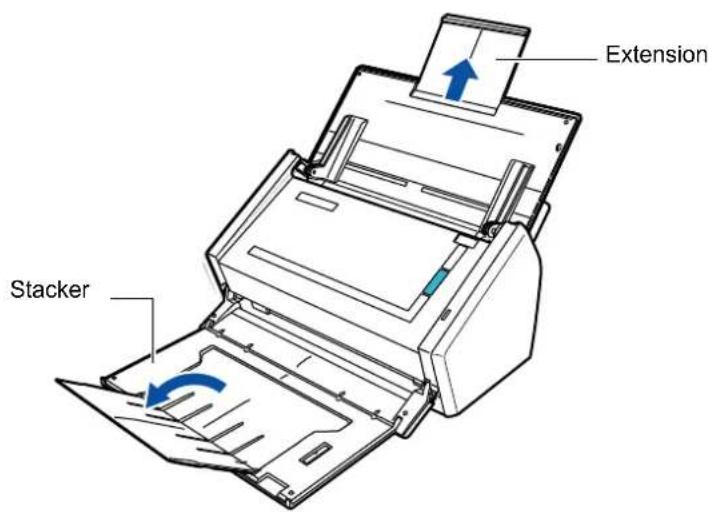
text_image
Extension Stacker7. Load the document onto the ADF paper chute (cover).
Load the document face-down (so that you are looking at the back of the last page) and top-first onto the ADF paper chute (cover). Do not load the document beyond the reference marks on the side guide.
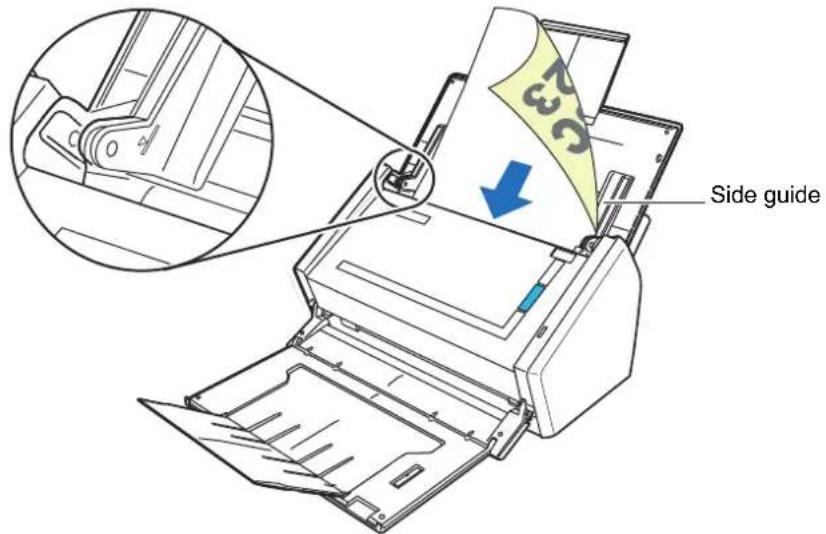
text_image
Side guide
- Do not load the documents of more than 50 sheets (80 g/m ^2 or 20 lb).

- Right-click the ScanSnap Manager taskbar icon
5, select [Scan Button Settings]. In the ScanSnap setup dialog box that appears, click the [Detail] button, select the [Scanning] tab, and then click the [Option] button. In the [Read mode option] dialog box, check whether the [Set the document with its face up] check box is selected. If selected, load the documents face-up and bottom-first.
In Windows 7, the ScanSnap Manager icon is displayed in the menu that appears when you
click in the taskbar.
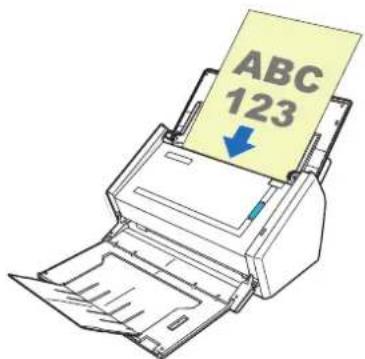
text_image
ABC 1238. Adjust the side guides to the document width.
Move the side guides so that there is no gap between the document edge and side guide on both sides.
Doing so reduces skewing of the document during scanning.

text_image
PaperBasic Flow of Operations
This section describes the flow of operations for scanning documents.
You can scan documents in two different ways. Use either way according to your preference.
• Using the Quick Menu
After the scanning of a document is complete, select an action to be performed from the Quick Menu.
Beginners can use the Quick Menu to easily operate the ScanSnap.
For Windows (page 59)
For Mac OS (page 199)
- Without using the Quick Menu
Before scanning a document, select the desired profile.
For Windows (page 64)
For Mac OS (page 204)

You can specify whether to use the Quick Menu to scan documents, by using the [Use Quick Menu] check box, on the ScanSnap setup dialog box/window.
Open the ScanSnap setup dialog box/window by the following procedure:

Right-click the [ScanSnap Manager] icon 📁 on the taskbar, and select [Scan Button Settings]. In Windows 7, the ScanSnap Manager icon is displayed in the menu that appears when you click in the taskbar.

Click the ScanSnap Manager icon in the Dock while pressing the [control] key on the keyboard, and select [Settings].
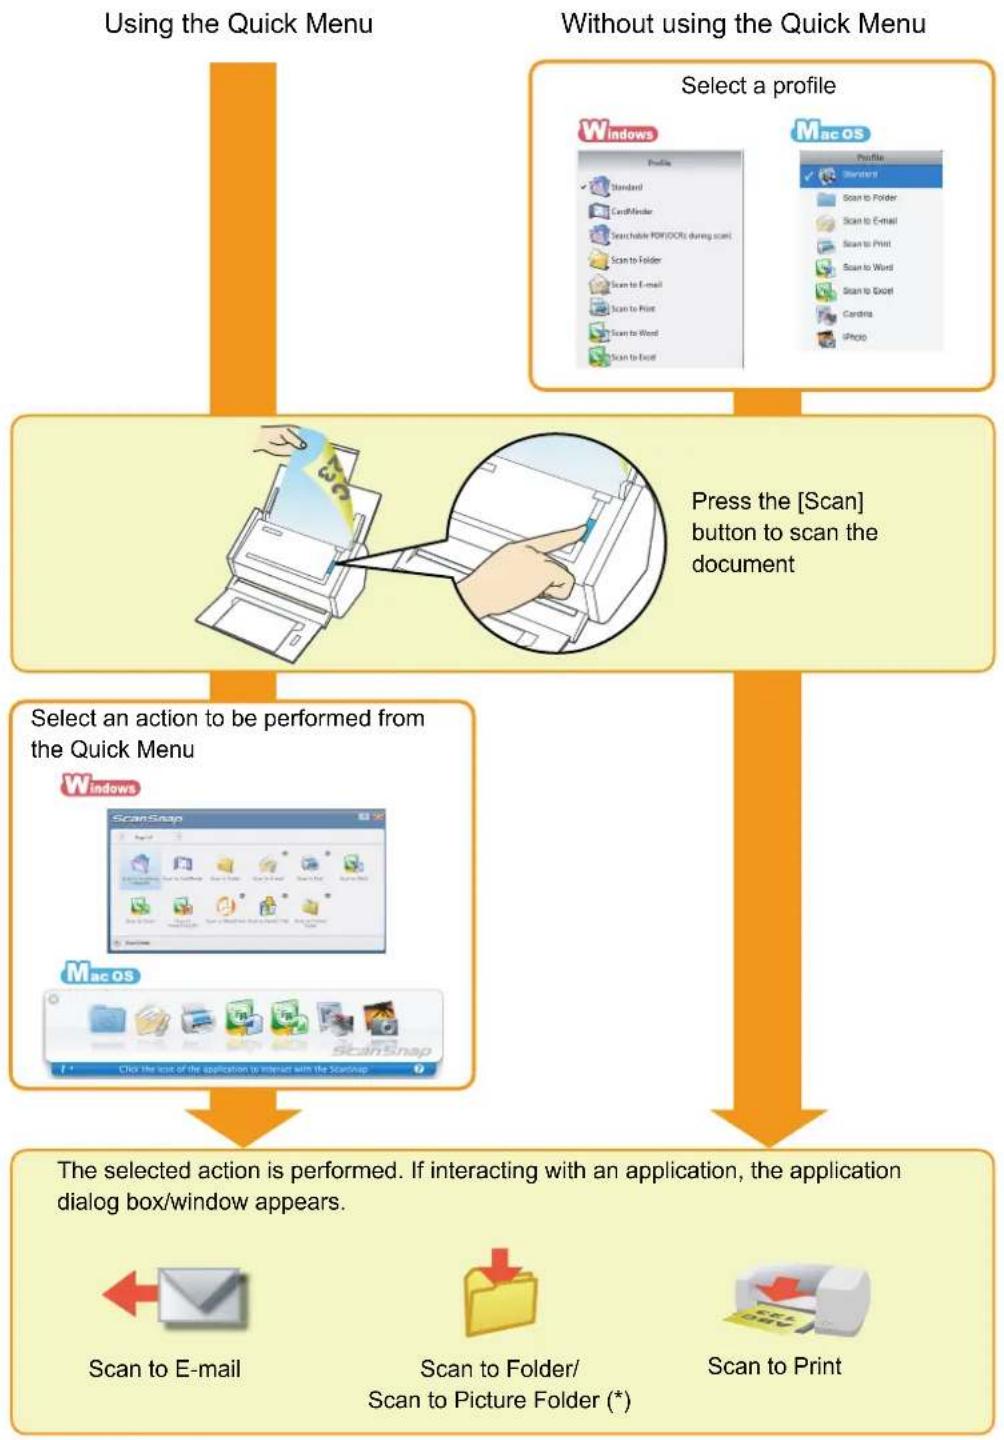
flowchart
graph TD
    A["Using the Quick Menu"] --> B["Select a profile"]
    C["Without using the Quick Menu"] --> B
    D["Press the [Scan"] button to scan the document] --> B
    E["Select an action to be performed from the Quick Menu"] --> F["The selected action is performed. If interacting with an application, the application dialog box/window appears."]
    G["Scan to E-mail"] --> F
    H["Scan to Folder/ Scan to Picture Folder (*)"] --> F
    I["Scan to Print"] --> F
*: Windows only
Installing the Software

natural_image
A zigzag black line on a white background, no text or symbols present.This chapter describes the outline of the software supplied with the ScanSnap, the installation procedure of Adobe Acrobat, Scan to Microsoft SharePoint and trial programs, and the installation procedure of ScanSnap Manager for S1500 used on Mac OS and S1500M used on Windows.
For details about how to install the software on the ScanSnap Setup DVD-ROM, refer to "Getting Started".
For S1500 36
For S1500M....47
For S1500
This section describes the case for S1500.
■ Supplied Software
The following describes the overview and functions of each software application. Using these software applications, you can edit, manage, and organize the image data scanned.
- ScanSnap Manager
This software is required to scan documents with the ScanSnap. The scanned image data can be converted to a PDF or JPEG file to be saved.
- ScanSnap Organizer Windows
This software can be used to display image data (PDF and JPEG files) without opening them and to sort the files in the folders created according to the purpose.
- CardMinder Windows
This software can be used to efficiently digitalize a large number of business cards. You can recognize characters on a business card, and create a database to facilitate card data management and searches.
The data in the database can be printed or used with various applications.
- Rack2-Filer V5.0 Trial Version Windows
This is a document filing software that can provide integrated management of digitalized paper documents (electronic documents) and digital data created with computer. You can use these functions with ease as if you file paper documents in actual binders.
For Rack2-Filer supported languages, refer to the Rack2-Filer "Readme".
- ABBYY FineReader for ScanSnap Windows
This software can be used to text-recognize the image data scanned using OCR (Optical Character Recognition) and to covert the data to Word, Excel, or PowerPoint files that can be edited.
- Scan to Microsoft SharePoint Windows
You can save files in SharePoint and Office Live using the ScanSnap with simple steps.
- Adobe Acrobat 9 Standard Windows
This is an industry standard application to create, edit, manage, and utilize electronic documents in PDF format.
■ Installing Adobe Acrobat
Follow the procedure to install Adobe Acrobat from the Setup DVD-ROM supplied with the ScanSnap.

You can use Adobe Acrobat on the following operating systems:
- Windows Vista
- Windows XP (Service Pack 2 or later must be applied)
Additional requirements are as follows:
- Internet Explorer 6.0 or later
• 1024 × 768 or higher resolution

In Adobe Acrobat, you can view the scanned image data with the ScanSnap. You do not have to install Adobe Acrobat if the latest version is already installed on your computer.
Prepare the Adobe Acrobat DVD-ROM.
- Insert the Adobe Acrobat DVD-ROM into the DVD-ROM drive.
⇒ The [AutoPlay] window appears.
- Select [US English] in the [Select The Language] pop-up menu and click the [OK] button.

text_image
Adobe Acrobat 9 Standard ADOBE® ACROBAT® 9 STANDARD Select The Language... US English OK Cancel3. Click the [Install Adobe® Acrobat® 9] button.
![FUJITSU ScanSnap S1500M - Click the [Install Adobe® Acrobat® 9] button. - 1](/content/2026/06/1236416/images/13fe252454ae3701c56d4746dfe0c11bcb1d9b60a1b3466fecfeeb1d11ca0aba.jpg)
text_image
Adobe Acrobat 9 Standard ADOBE® ACROBAT® 9 STANDARD Install Adobe® Acrobat® 9 Read Me.html >> Browse DVD Contents >> Read License Agreement⇒ The [Adobe Acrobat 9 Standard - English, Français, Deutsch - Setup] window appears.
4. Click the [Next] button.
![FUJITSU ScanSnap S1500M - Click the [Next] button. - 1](/content/2026/06/1236416/images/bb20ad8d9511bdaff95b0d0fe749963c990d5270fa59425ceeac8f84ff720022.jpg)
text_image
Adobe Acrobat: 9 Standard - English, Français, Deutsch - Setup ADOBE® ACROBAT® 9 STANDARD Adobe < Back Next > Cancel5. Follow the instructions on the screen to install.

- For more details about installing Adobe Acrobat, click [Read Me.html] on the [Adobe Acrobat 9 Standard] dialog box in Step 3. to read its procedure.
- For details about using Adobe Acrobat, refer to Adobe Acrobat Help.
■ Installing Scan to Microsoft SharePoint
Follow the procedure below to install Scan to Microsoft SharePoint.

Refer to "Readme" of Scan to Microsoft SharePoint for more details about system requirements. You can display the "Readme" by clicking the [Readme] button on the [Scan to Microsoft SharePoint] dialog box.
- Turn on the computer and log on as a user with Administrator privileges.
- Insert the Setup DVD-ROM into the DVD-ROM drive.
⇒ The [ScanSnap Setup] dialog box appears.

If the [ScanSnap Setup] dialog box does not appear, double-click "ScanSnap.exe" in the DVD-ROM via [Explore] or [My Computer].
- Click the [Scan to Microsoft SharePoint] button.
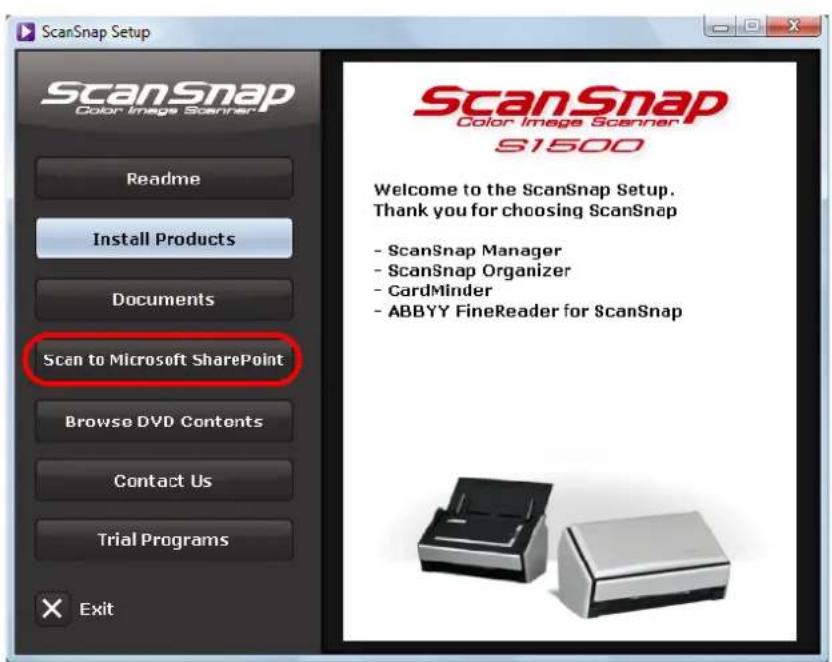
text_image
ScanSnap Setup ScanSnap Color Image Scanner S1500 Welcome to the ScanSnap Setup. Thank you for choosing ScanSnap - ScanSnap Manager - ScanSnap Organizer - CardMinder - ABBYY FineReader for ScanSnap⇒ The [Scan to Microsoft SharePoint] dialog box appears.
4. Click the [Install] button.
![FUJITSU ScanSnap S1500M - Click the [Install] button. - 1](/content/2026/06/1236416/images/3a61c936bebdc7133e7df88d8a2754a77bc71548588909090bbdd7dac5c73b18.jpg)
text_image
Scan to Microsoft SharePoint Scan to Microsoft SharePoint (Powered by KnowledgeLake(R)) Welcome to Scan to Microsoft SharePoint Setup Readme Install Manual Setup Menu⇒ Installation starts.
5. Follow the instructions on the screen to complete the installation.

- Refer to "Readme" of Scan to Microsoft SharePoint for more details about the installation. You can display the "Readme" by clicking the [Readme] button on the [Scan to Microsoft SharePoint] dialog box.
- For information on how to use Scan to Microsoft SharePoint, refer to the Scan to Microsoft SharePoint User Guide. You can display the Scan to Microsoft SharePoint User Guide by clicking on the [Manual] button on the [Scan to Microsoft SharePoint] dialog box.
6. Click the [Finish] button when the "InstallShield Wizard Complete" notification dialog box appears.
7. Remove the Setup DVD-ROM from the DVD-ROM drive.
■ Installing ScanSnap Manager on Mac OS
Follow the procedure to install ScanSnap Manager from the Setup DVD-ROM supplied with the ScanSnap. For details about system requirements, refer to "System Requirements" (page 21).

- After installing ScanSnap Manager, connect the ScanSnap to the computer. If you connect the ScanSnap to your computer before installing ScanSnap Manager, ScanSnap Manager may not running properly.
-
Only one ScanSnap can be connected to a computer at a time.
-
Check that the ScanSnap is not connected to your computer.
- Turn your computer on, and log in with an account that has admin rights.
- Insert the Setup DVD-ROM into the DVD-ROM drive.
⇒ The [ScanSnap] window appears.
- Double-click the [ScanSnap Manager] icon.

text_image
ScanSnap Color Image Scanner ScanSnap Manager Readme Operator's Guide5. Click the [Continue] button.
![FUJITSU ScanSnap S1500M - Click the [Continue] button. - 1](/content/2026/06/1236416/images/80544e8097ec13f6e271536beddf528adcee142d282812c71210f7a61f37ab1d.jpg)
text_image
This package contains a program that determines if the software can be installed. Are you sure you want to continue? If you're not sure about the source of this package, click Cancel to prevent it from running the program and installing the software. Cancel Continue⇒ The [Welcome to the ScanSnap Installer] window appears.
6. Click the [Continue] button.
![FUJITSU ScanSnap S1500M - Click the [Continue] button. - 1](/content/2026/06/1236416/images/2ccf833b2e83110f5a920e6f1210c0664db4ac0d81eb81643b7b7485b2b47789.jpg)
text_image
Install ScanSnap Welcome to the ScanSnap Installer Introduction Read Me License Destination Select Installation Type Installation Summary You will be guided through the steps necessary to install this software. Go Back Continue⇒ The [Important Information] window appears.
7. Read the "Important Information", then click the [Continue] button.
⇒ The [Software License Agreement] window appears.
8. Read the "Software License Agreement", then click the [Continue] button.
9. To accept the agreement, click the [Agree] button.
![FUJITSU ScanSnap S1500M - To accept the agreement, click the [Agree] button. - 1](/content/2026/06/1236416/images/1a46b6585a31d1adfb0423f6007ae30063bbcb30e07b11ab54b732a6438c3301.jpg)
text_image
To continue installing the software you must agree to the terms of the software license agreement. Click Agree to continue or click Disagree to cancel the installation and quit the Installer. Read License Disagree Agree⇒ The [Standard Install on "(volume_name)"] window appears.
10. Click the [Install] button.
![FUJITSU ScanSnap S1500M - Click the [Install] button. - 1](/content/2026/06/1236416/images/5fae1c3ff90db06ecee6f49dd35225d3cd718858225df92cfe7988e3e7bf6677.jpg)
text_image
Install ScanSnap Standard Install on Introduction Read Me License Destination Select Installation Type Installation Summary This will take MB of space on your computer. Click Install to perform a standard installation of this software on the volume Change Install Location... Customize Go Back Install⇒ The installation is started.
The [Startup item registration] window appears.
11. Click the [OK] button.
![FUJITSU ScanSnap S1500M - Click the [OK] button. - 1](/content/2026/06/1236416/images/86a3f90eb347b1a6c34bb2f9cd28baad98437c0a48d2053d7208acbf6812ef4f.jpg)
text_image
Startup item registration ScanSnap was successfully registered as a startup item. If there is no action, this message will close automatically in ten seconds.⇒ When the installation is complete, the [Installation completed successfully] window appears.
12. Click the [Close] button.
![FUJITSU ScanSnap S1500M - Click the [Close] button. - 1](/content/2026/06/1236416/images/3392088c8175e42db697861abd367e56be75d472ccec2696929ea151f219fbea.jpg)
text_image
Install ScanSnap Installation completed successfully Introduction Read Me License Destination Select Installation Type Installation Summary Install Succeeded The software was successfully installed. Go Back Close13. Remove the Setup DVD-ROM from the DVD-ROM drive.
■ Installing Trial Version Software
The following describes how to install trial version software.

For details about the required operating environment, refer to the trial version software "Readme". The "Readme" can be displayed by clicking the [Readme] button on the trial version program setup dialog box.
- Turn your computer on, and log on as a user with "Administrators" privileges.
- Insert the Setup DVD-ROM into the DVD-ROM drive.
⇒ The [ScanSnap Setup] dialog box appears.

If the [ScanSnap Setup] dialog box does not appear, double-click "ScanSnap.exe" in the DVD-ROM, using "Explorer" or "My Computer".
- Click the [Trial Programs] button.
⇒ The [Trials] dialog box appears.
- Click the button of the trial version software that you want to install.

text_image
ScanSnap Color Image Sublayer Rack2-Filer ABBYY PDF Transformer Setup Menu Trial Programs Select a trial program. * For the trial programs, read the individual use conditions carefully. You may use them only when you have fully agreed with the use conditions. Note we are not liable for supporting or guaranteeing the trial programs. For information about the software products and how to purchase them, please go to the related webpages or directly contact the respective manufacturers.⇒ The trial version program setup dialog box appears.
5. Click the [Install Products] button.
⇒ The installation starts.
6. Follow the instructions on the screen to complete the installation.

- For more details about installation, refer to the trial version software "Readme". The "Readme" can be displayed by clicking the [Readme] button on the trial version program setup dialog box.
- For details about how to use the trial version software, refer to the software manual. The software manual can be displayed by clicking the [Manual] button on the trial version program setup dialog box.
7. When the "InstallShield Wizard Complete" notification dialog box appears, click the [Finish] button.
8. Remove the Setup DVD-ROM from the DVD-ROM drive.
For S1500M
This section describes the case for S1500M.
■ Supplied Software
The following describes the overview and functions of each software application. Using these software applications, you can edit, manage, and organize the image data.
- ScanSnap Manager
This software is required to scan documents with the ScanSnap. The scanned image data can be converted to a PDF or JPEG file to be saved.
- Cardiris Macos
This software can be used to efficiently digitalize a large number of business cards by performing text recognition on them.
- ABBYY FineReader for ScanSnap MacOS
This software can be used to text-recognize the image data scanned with the ScanSnap using OCR (Optical Character Recognition) and to covert the data to Word or Excel files that can be edited.
- Adobe Acrobat 8 Professional Mac OS
This is an industry standard application to create, edit, manage, and utilize electronic documents in PDF format.
■ Installing Adobe Acrobat
Follow the procedure to install Adobe Acrobat from the Setup DVD-ROM supplied with the ScanSnap.

You can use Adobe Acrobat on the following operating systems:
- Mac OS X v10.5
• Mac OS X v10.4.3 or later
Additional requirements are as follows:
• 1024 × 768 or higher resolution

In Adobe Acrobat, you can view the scanned image data with the ScanSnap. You do not have to install Adobe Acrobat if the latest version is already installed on your computer.
Prepare the Adobe Acrobat DVD-ROM.
1. Insert the Adobe Acrobat DVD-ROM into the DVD-ROM drive.
⇒ The DVD-ROM is detected automatically, the [Adobe Acrobat 8 Professional] window is displayed.

- To remove the DVD-ROM, press the [△] button or [F12] key on the keyboard.
- If the [Adobe Acrobat 8 Professional] window is not displayed, double-click the [Adobe Acrobat 8 Professional] icon in the desktop.
2. Drag and drop the [Adobe Acrobat 8 Professional] icon to the [Applications] icon.
![FUJITSU ScanSnap S1500M - Drag and drop the [Adobe Acrobat 8 Professional] icon to the [Applications] icon. - 1](/content/2026/06/1236416/images/1541b451ebe7a8f1ac0c4809cbd4bb4dfb5c2e39d13358b40a95910201e152f4.jpg)
flowchart
graph TD
    A["Read Me"] --> B["Applications"]
    C["Extras"] --> B
    D["Adobe Acrobat 8 Professional"] --> E["Applications"]
    style D fill:#f9f,stroke:#333
    style E fill:#ccf,stroke:#333
⇒ [Adobe Acrobat 8 Professional] is copied to the [Applications] folder.
3. When the copying is complete, follow the procedure to install Adobe Acrobat.
- Double-click the [Applications] icon.
- Double-click [Adobe Acrobat 8 Professional] in the [Applications] folder.
- Double-click the [Adobe Acrobat Professional] icon and follow the instructions on the screen to install.

- For more details about installing Adobe Acrobat, click [Read Me] on the [Adobe Acrobat 8 Professional] window in Step 2. to read its procedure.
- For details about using Adobe Acrobat, refer to Adobe Acrobat Help.
4. When the installation is complete, remove the Adobe Acrobat DVD-ROM from the DVD-ROM drive.
■ Installing ScanSnap Manager on Windows
Follow the procedure to install ScanSnap Manager from the Setup DVD-ROM supplied with the ScanSnap. For details about system requirements, refer to "System Requirements" (page 21).

- After installing ScanSnap Manager, connect the ScanSnap to the computer. If you connect the ScanSnap to your computer before installing ScanSnap Manager, ScanSnap Manager may not running properly.
- Only one ScanSnap can be connected to a computer at a time.
- Check that the ScanSnap is not connected to your computer.
- Turn your computer on, and log on as a user with "Administrators" privileges.
- Insert the Setup DVD-ROM into the DVD-ROM drive.
⇒ The [ScanSnap Setup] dialog box appears.

If the [ScanSnap Setup] dialog box is not displayed, find "ScanSnap.exe" in the DVD-ROM drive by using "Explore" or "My Computer", and then double-click "ScanSnap.exe".
- Click the [Install Products] button.

text_image
ScanSnap Setup ScanSnap Color Image Scanner S1500 Welcome to the ScanSnap Setup. Thank you for choosing ScanSnap - ScanSnap Manager Readme Install Products Documents Browse DVD Contents⇒ The [Welcome to the InstallShield Wizard for ScanSnap] dialog box appears.
- Click the [Next] button.
⇒ The [ScanSnap Setup] dialog box appears.
- Check the contents of the message regarding anti-virus software, and click the [OK] button.
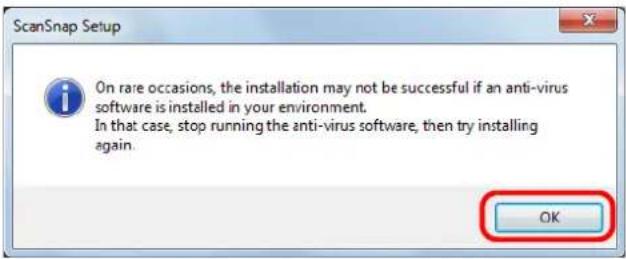
text_image
ScanSnap Setup On rare occasions, the installation may not be successful if an anti-virus software is installed in your environment. In that case, stop running the anti-virus software, then try installing again. OK⇒ The [Select Features] dialog box appears.
- Click the [Next] button.

text_image
ScanSnap Select Features Select the options you want to install. Select the features you want to install, and deselect the features you do not want to install. ScanSnap Manager ( MB ) Select All Clear All InstallShield < Back Next > Cancel⇒ The [Choose Destination Location] dialog box appears.
- Check the destination folder and click the [Next] button.
⇒ The [ScanSnap License Agreement] dialog box appears.
- Read the full text of the [ScanSnap License Agreement]. If you agree to the terms of this license, select [I accept the terms of the license agreement] and click the [Next] button.
⇒ The [Start Copying Files] dialog box appears.
- Check the settings contents, and click the [Next] button.
⇒ The installation is started.
When the installation is complete, the [InstallShield Wizard Complete] dialog box appears.
11. Click the [Finish] button.
![FUJITSU ScanSnap S1500M - Click the [Finish] button. - 1](/content/2026/06/1236416/images/60602f53cdd1b7c0bf93b273f34a4489dbad544fe8ca95856bcee8f891c87529.jpg)
text_image
ScanSnap InstallShield Wizard Complete Setup has finished installing ScanSnap on your computer. < Back Finish Cancel⇒ The [ScanSnap Setup] dialog box appears.
12. Remove the Setup DVD-ROM from the DVD-ROM drive.
Using the ScanSnap (for Windows Users)

natural_image
A zigzag black line on a white background, no text or symbols present.This chapter describes how to perform a scan with the ScanSnap, change or save scanning settings, and other various functions of the ScanSnap.
ScanSnap Manager Icon and Operations 54
How to Perform a Scan....57
Setting the ScanSnap 68
About Actions 92
Using the ScanSnap in Various Ways.... 154
ScanSnap Manager Icon and Operations
All operations on the ScanSnap are managed in ScanSnap Manager.
Ordinarily, the [ScanSnap Manager] icon is added to the taskbar at the lower right on the Windows desktop. The icon appears automatically on the taskbar when Windows starts.
The icon also indicates whether ScanSnap Manager is successfully communicating with the ScanSnap or not. The appearance of the icon changes according to the status of communication, as shown below.
| Communication Status Icon | on the Taskbar |
| Communication is active |  |
| Communication is not active |  |
Clicking this icon shows menus which you can use to start scanning, change scanning settings, and check the status of consumables.

In Windows 7, the ScanSnap Manager icon is displayed in the menu that appears when you click in the taskbar.
To have the ScanSnap Manager icon always displayed in the taskbar, drag the icon and drop it onto the taskbar.

text_image
Customize... /2009■ Right-Click Menu
This menu appears when you right-click the [ScanSnap Manager] icon

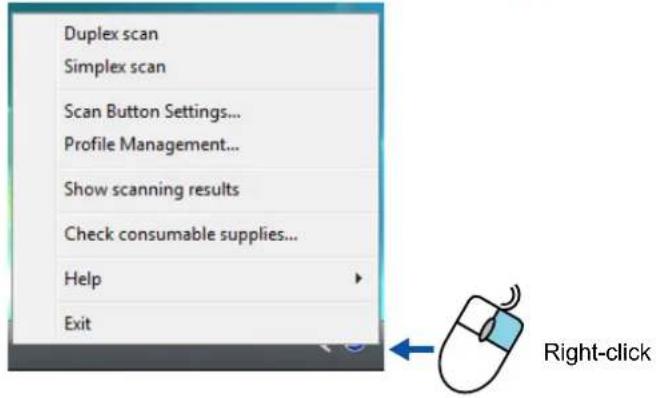
text_image
Duplex scan Simplex scan Scan Button Settings... Profile Management... Show scanning results Check consumable supplies... Help Exit Right-click| Item Function | |
| Duplex scan Both the front and back | of the document are scanned at the same time. Scanning is performed according to the settings configured in [Scan Button Settings]. |
| Simplex scan Only one side of the document | document is scanned at one time. Scanning is performed according to the settings configured in [Scan Button Settings]. |
| Scan Button Settings The ScanSnap | setup dialog box appears.Scanning settings are configured in this dialog box. "Changing Scanning Settings" (page 68) |
| Profile Management The [ScanSnap | Manager - Profile Management] dialog box appears. "Saving Scanning Settings" (page 71) |
| Show scanning results A message | appears after scanning to inform you of the scanning results, whether blank pages were removed, and whether the orientation was changed.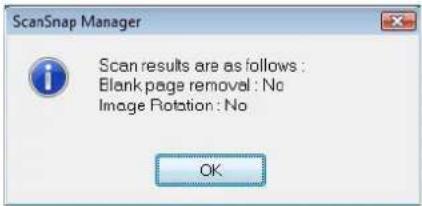 |
| Check consumable supplies The [ScanSnap Manager - Check consumable status] dialog box appears.Reset consumable counters to 0 after you replace consumables. "Consumables" (page 337) | |
| Help You can view the Help topics, the version information of ScanSnap Manager, and the [Online Update] (page 355) and [Preferences] dialog boxes. | |
| Exit You can exit ScanSnap Manager. | "Finishing ScanSnap Operation" (page 67) |
■ Left-Click Menu
This menu appears when you left-click the [ScanSnap Manager] icon

Selectable profiles are listed on the Left-Click Menu.
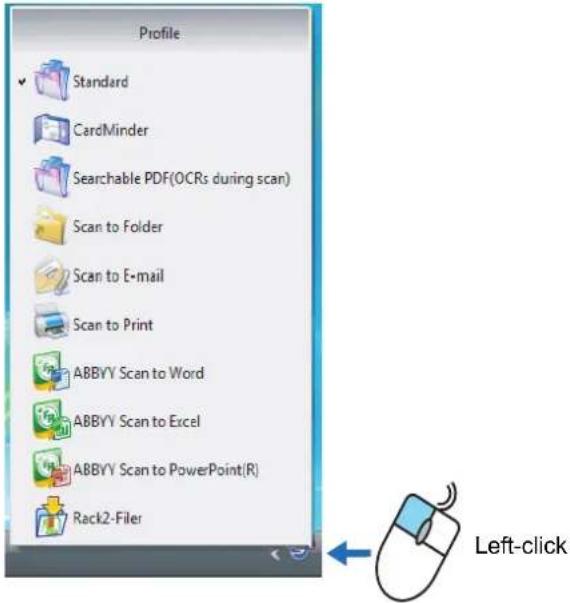
text_image
Profile Standard CardMinder Searchable PDF(OCRs during scan) Scan to Folder Scan to E-mail Scan to Print ABBYV Scan to Word ABBYV Scan to Excel ABBYV Scan to PowerPoint(R) Rack2-Filer Left-clickBy selecting a profile on the Left-Click Menu, you can switch to the previously saved scanning settings.
When you are not using the Quick Menu, you can select a profile from the Left-Click Menu. For details about how to save and manage profiles, refer to "Saving Scanning Settings" (page 71).

To show the Left-Click Menu, clear the [Use Quick Menu] check box on the ScanSnap setup dialog box. The Left-Click Menu does not appear when this check box is selected.
How to Perform a Scan
This section describes how to perform a scan with the ScanSnap.
■ Preparation
- Make sure that the power cable is connected to the ScanSnap properly.
- Make sure that the ScanSnap is connected to your computer properly.

You can turn the computer on before connecting the ScanSnap.
When the ScanSnap is already connected to your computer, you do not have to disconnect and reconnect.
- Turn your computer on.
⇒ The [ScanSnap Manager] icon appears on the taskbar when Windows starts up.


In Windows 7, the ScanSnap Manager icon is displayed in the menu that appears when you click in the taskbar.
For information on how to display the ScanSnap Manager icon in the taskbar, refer to "ScanSnap Manager Icon and Operations" (page 54).
4. Open the ADF paper chute (cover) of the ScanSnap.

text_image
ADF paper chute (cover)⇒ The ScanSnap is turned on and the [ScanSnap Manager] icon changes from 📋 to


There may be a slight delay before the [ScanSnap Manager] icon changes to depending on the computer load, performance, and operating environment, such as when there are many programs running on the computer.
■ Using the Quick Menu
The scanning method described below is for the case when you use the Quick Menu.
- Check for the [ScanSnap Manager] icon on the taskbar as shown below.


- When the [ScanSnap Manager] icon is not displayed, select the [Start] menu → [All Programs] → [ScanSnap Manager] → [ScanSnap Manager] to start up ScanSnap Manager. Generally, ScanSnap Manager is registered under [Startup] when installed, so that its icon is displayed on the taskbar when Windows starts. When it is not registered under [Startup], select the [Start] menu → [All Programs] → [ScanSnap Manager] → [Startup Register] to register ScanSnap Manager.
- In Windows 7, the ScanSnap Manager icon is displayed in the menu that appears when you click in the taskbar. For information on how to display the ScanSnap Manager icon in the taskbar, refer to "ScanSnap Manager Icon and Operations" (page 54)
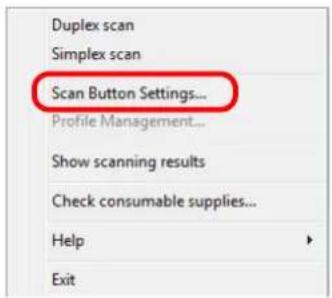
- From the Right-Click Menu, select [Scan Button Settings].

text_image
Duplex scan Simplex scan Scan Button Settings... Profile Management... Show scanning results Check consumable supplies... Help Exit⇒ The ScanSnap setup dialog box appears.
- Select the [Use Quick Menu] check box.
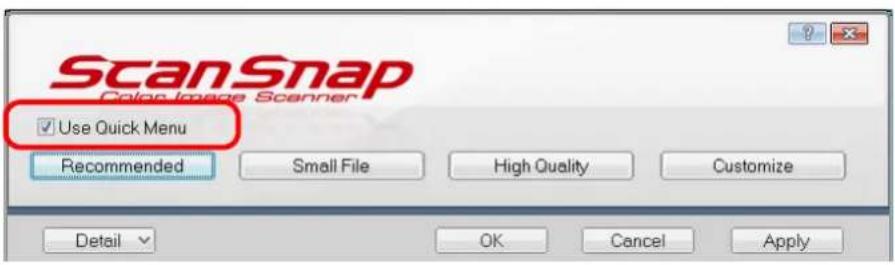
text_image
ScanSnap Color Image Scanner ✓ Use Quick Menu Recommended Small File High Quality Customize Detail OK Cancel Apply
For details about scanning documents without using the Quick Menu, refer to "Without Using the Quick Menu" (page 64).
4. Click one of the profile buttons.

text_image
ScanSnap Color Image Scanner Use Quick Menu Recommended Small File High Quality Customize Detail OK Cancel Apply| Profile Buttons Description | |
| [Recommended] button | The settings are [Auto] for image quality and default for other settings.It is recommended to select this button when you want a high-quality scan of standard documents, and a higher quality scan of business cards, requiring a high level of text recognition. |
| [Small File] button The settings are | [Normal] (color/gray: 150 dpi, black and white: 300 dpi) for image quality and default for other settings.It is recommended to select this button when you wish to reduce the scanned file size. |
| [High Quality] button The settings | are [Best] (color/gray: 300 dpi, black and white: 600 dpi) for image quality and default for other settings.It is recommended to select this button when you want a high-quality scan. |
| [Customize] button The default settings are same as the [Recommended] settings. Settings can be changed at your choice. | |

- By default, the [Recommended] button is selected.
- You cannot change the settings for the [Recommended], [Small File], and [High Quality] buttons. When you change the scanning settings, the button automatically switches to the [Customize] button.
For details about how to change the scanning settings, file names, or save destinations, refer to "Changing Scanning Settings" (page 68).
5. Click the [OK] button to close the ScanSnap setup dialog box.
6. Load the document into the ScanSnap.
For details about how to load a document into the ScanSnap, refer to "Loading Documents" (page 29).
7. Press the [Scan] button on the ScanSnap.
Scanning is started.
![FUJITSU ScanSnap S1500M - Press the [Scan] button on the ScanSnap. - 1](/content/2026/06/1236416/images/cc3db36dceeee2b8a76bcba791e14b642385085248e802a9a8d4091e0a881958.jpg)
- By default, the [Scan] button settings are set to [Duplex Scan (Double-sided)]. With ScanSnap Manager, you can switch the [Scan] button settings to [Simplex Scan (Single-sided)] mode. For details, refer to "Changing Scanning Settings" (page 68).
- You can start scanning from the Right-Click Menu. For details, refer to "Right-Click Menu" (page 55).
![FUJITSU ScanSnap S1500M - Press the [Scan] button on the ScanSnap. - 2](/content/2026/06/1236416/images/2a5cbb7c07cdabe908806fb7d5c0ef271d619df7895c15c3e675bca628b69152.jpg)
- Do not connect or disconnect the ScanSnap and other USB devices during the scanning operation.
- Do not close the ADF paper chute (cover) during the scanning operation.
- Do not switch users during the scanning operation. Doing so cancels scanning.
⇒ The [Scan] button on the ScanSnap blinks blue during the scanning operation.
The following dialog box appears to indicate the scanning status.
![FUJITSU ScanSnap S1500M - Press the [Scan] button on the ScanSnap. - 3](/content/2026/06/1236416/images/4de5b3f0f57380305d39c55ee96cb430e09d80a70b61bc113439289d74cd3942.jpg)
text_image
ScanSnap Manager - Image scanning and file saving Scanning Image from ScanSnap Scanning completed: Page Stop(p) Duplex, Auto Color, Auto Quality, PDF, Auto size Skip blank page, Rotation, Compression 3⇒ When the scanning is complete, the Quick Menu appears.
8. From the Quick Menu, click an icon for the item to be performed.
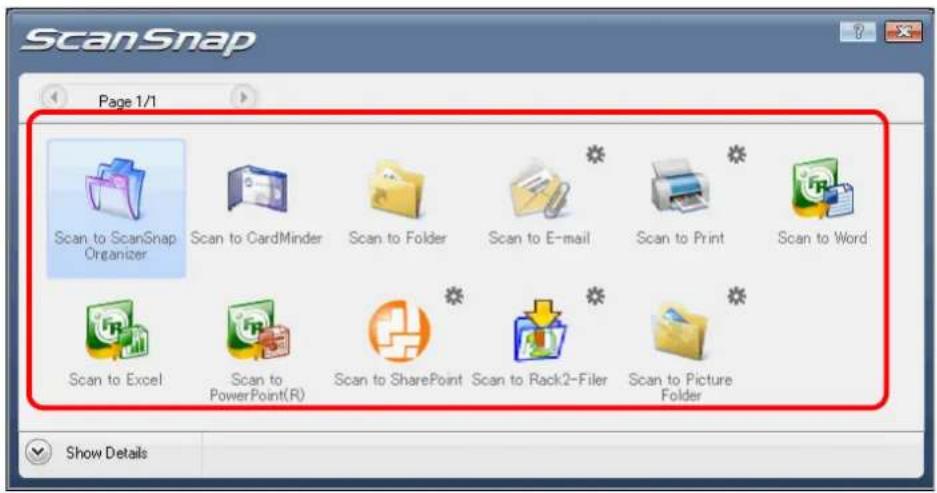
text_image
ScanSnap Page 1/1 Scan to ScanSnap Organizer Scan to CardMinder Scan to Folder Scan to E-mail Scan to Print Scan to Word Scan to Excel Scan to PowerPoint(R) Scan to SharePoint Scan to Rack2-Filer Scan to Picture Folder Show Details⇒ The corresponding action of the selected item is performed.
| Item Description | ||
 | Scan to ScanSnap Organizer (*1) | PDF or JPEG files are created from the scanned image data, and ScanSnap Organizer is started to display the scanned images. Those files are saved in a folder (on your computer) specified in ScanSnap Organizer.For details about how to operate ScanSnap Organizer, refer to the ScanSnap Organizer User's Guide. |
 | Scan to CardMinder (*2) Scanned card image data are text-recognized and managed in the card database.For details about how to operate after this button is selected, refer to "Scanning Business Cards" (page 132). | |
 | Scan to Folder | PDF or JPEG files are created from the scanned image data and saved in a specified folder (shared folder).For details about how to operate after this button is selected, refer to "Saving Data in the Specified Folder" (page 93). |
 | Scan to E-mail | PDF or JPEG files are created from the scanned image data, and an e-mail program is started with the PDF or JPEG files attached to an e-mail message.For details about how to operate after this button is selected, refer to "Sending Files by E-Mail" (page 101). |
 | Scan to Print Scanned image data are printed with the printer.For details about how to operate after this button is selected, refer to "Using the ScanSnap as a Copy Machine" (page 111). | |
 | Scan to Word (*3) Scanned image data are text-recognized and converted into Word files.For details about how to operate after this button is selected, refer to "Converting into Word/Excel/PowerPoint Documents" (page 125). | |
 | Scan to Excel (*3) Scanned | image data are text-recognized and converted into Excel files.For details about how to operate after this button is selected, refer to "Converting into Word/Excel/PowerPoint Documents" (page 125). |
 | Scan to PowerPoint(R) (*3) | Scanned image data are text-recognized and converted into PowerPoint files.For details about how to operate after this button is selected, refer to "Converting into Word/Excel/PowerPoint Documents" (page 125). |
 | Scan to SharePoint (*4) Scanned | anned image data are saved in SharePoint or Office Live.For details about how to operate after this button is selected, refer to "Saving Data in SharePoint" (page 138). |
 | Scan to Rack2-Filer (*5) PDF | F files are created from the scanned image data and saved in a binder in Rack2-Filer.For details about how to operate after this button is selected, refer to "Saving to Rack2-Filer" (page 148). |
 | Scan to Picture Folder Scanned | anned image data are saved in the pictures folder.For details about how to operate after this button is selected, refer to "Saving Files to Picture Folder" (page 118). |
*1 : The icon for this item is displayed only when ScanSnap Organizer is installed.
*2 : The icon for this item is displayed only when CardMinder is installed.
*3 : The icon for this item is displayed only when ABBYY FineReader for ScanSnap is installed.
*4 : The icon for this item is displayed only when Scan to Microsoft SharePoint is installed.
*5 : The icon for this item is displayed only when Rack2-Filer trial version (supplied with the Scan-Snap) or Rack2-Filer (v5.0 recommended) (bundled or sold separately) is installed.

- Before scanning documents of printed or handwritten text, on the ScanSnap setup dialog box, select the [Scanning] tab → the [Option] button → the [Setting for text only document] check box. For details on how to change scanning settings, refer to "Changing Scanning Settings" (page 68).
- The scaling factor of the scanned image data may vary slightly from the document size.
- When either ScanSnap Organizer, CardMinder, Rack2-Filer trial version supplied with the ScanSnap, or Rack2-Filer (V5.0 recommended) (bundled or sold separately) is started and becomes active, the ScanSnap automatically interacts with the active application, and the settings for the application are used for scanning. Automatic linkage is disabled when the application is not active or exited. For details about automatic linkage, refer to "Automatic Linkage with Applications" (page 85).

- When the Quick Menu is displayed, scanning cannot be performed with the ScanSnap. Before scanning another document, you have to select the action from the Quick Menu and complete it, complete an interaction with an application, or close the Quick Menu.
- Do not move, delete, or rename the scanned image data in other applications while the Quick Menu is displayed.
■ Without Using the Quick Menu
The scanning method described below is for the case when you are not using the Quick Menu.
- Check for the [ScanSnap Manager] icon on the taskbar as shown below.


- When the [ScanSnap Manager] icon is not displayed, select the [Start] menu → [All Programs] → [ScanSnap Manager] → [ScanSnap Manager] to start up ScanSnap Manager. Generally, ScanSnap Manager is registered under [Startup] when installed, so that its icon is displayed on the taskbar when Windows starts.
When it is not registered under [Startup], select the [Start] menu → [All Programs] → [ScanSnap Manager] → [Startup Register] to register ScanSnap Manager. -
In Windows 7, the ScanSnap Manager icon is displayed in the menu that appears when you click in the taskbar.
For information on how to display the ScanSnap Manager icon in the taskbar, refer to "ScanSnap Manager Icon and Operations" (page 54) -
From the Right-Click Menu, select [Scan Button Settings].
text_image
Duplex scan Simplex scan Scan Button Settings... Profile Management... Show scanning results Check consumable supplies... Help Exit⇒ The ScanSnap setup dialog box appears.
- Clear the [Use Quick Menu] check box.
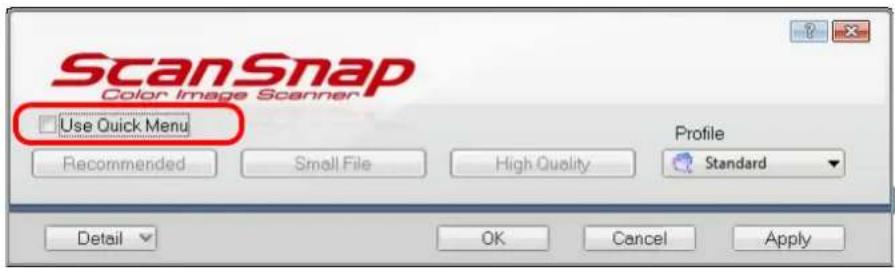
text_image
ScanSnap Color Image Scanner Use Quick Menu Recommended Small File High Quality Standard Detail OK Cancel Apply
When the [Use Quick Menu] check box is selected, an action to be executed after scanning and an interacting application cannot be specified.
Refer to "Using the Quick Menu" (page 59) to select an action from the Quick Menu after documents are scanned.
4. Select a profile to be executed after scanning.
Select a profile using either of the following:
- [Profile] drop-down list in the ScanSnap setup dialog box
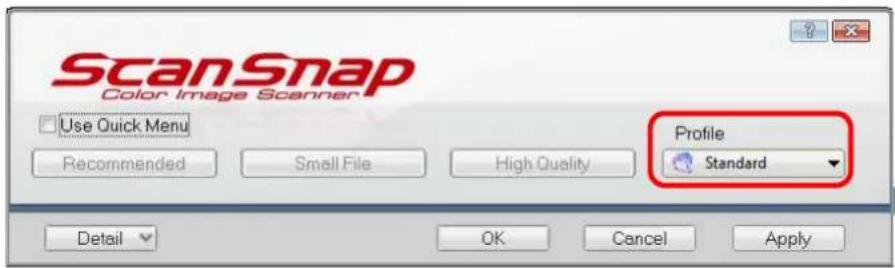
text_image
ScanSnap Color Image Scanner Use Quick Menu Recommended Small File High Quality Profile Standard Detail OK Cancel Apply- Left-Click menu
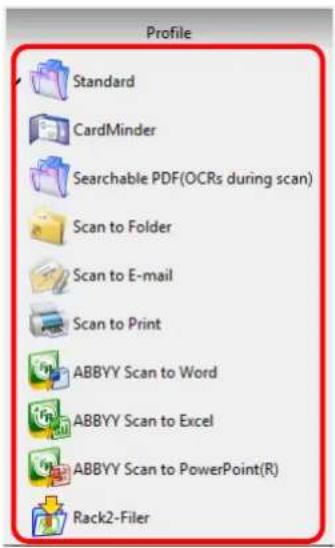
text_image
Profile Standard CardMinder Searchable PDF(OCRs during scan) Scan to Folder Scan to E-mail Scan to Print ABBYY Scan to Word ABBYY Scan to Excel ABBYY Scan to PowerPoint(R) Rack2-Filer5. Load the document into the ScanSnap.
For details about how to load the document into the ScanSnap, refer to "Loading Documents" (page 29).
6. Press the [Scan] button on the ScanSnap.
Scanning is started.
![FUJITSU ScanSnap S1500M - Press the [Scan] button on the ScanSnap. - 1](/content/2026/06/1236416/images/cbd657f52ad31054cdeea038e0c711e0ed7e2565265ae1d95e3b974202c863ad.jpg)
- By default, the [Scan] button settings are set to [Duplex Scan (Double-sided)]. With ScanSnap Manager, you can switch the [Scan] button settings to [Simplex Scan (Single-sided)] mode. For details, refer to "Changing Scanning Settings" (page 68).
- You can start scanning from the Right-Click Menu. For details, refer to "Right-Click Menu" (page 55).
![FUJITSU ScanSnap S1500M - Press the [Scan] button on the ScanSnap. - 2](/content/2026/06/1236416/images/b68073e13f288e6fe2fa65d21eda5e1967c85f5208e7a1811d1fc310ba613438.jpg)
- Do not connect or disconnect the ScanSnap and other USB devices during the scanning operation.
- Do not close the ADF paper chute (cover) during the scanning operation.
- Do not switch users during the scanning operation. Doing so cancels scanning.
⇒ The [Scan] button on the ScanSnap blinks blue during the scanning operation. The following dialog box appears to indicate the scanning status.
![FUJITSU ScanSnap S1500M - Press the [Scan] button on the ScanSnap. - 3](/content/2026/06/1236416/images/488a2e5104594a53da66b944792bf5e2a12c75cc103885174685a4b792fb4709.jpg)
text_image
ScanSnap Manager - Image scanning and file saving Scanning Image from ScanSnap Scanning completed: Page Stop(p) Duplex, Auto Color, Auto Quality, PDF, Auto size Skip blank page, Rotation, Compression 3⇒ When scanning is complete, a selected action or interaction with another application starts.
![FUJITSU ScanSnap S1500M - Press the [Scan] button on the ScanSnap. - 4](/content/2026/06/1236416/images/fff1a1654e1ae9dfb7b2326de6dcd8d39823c7d27d84f9c8f86df4f47fcd45c1.jpg)
- By default, documents are scanned on the following settings: [Image quality: Auto], [Color mode: Auto Color Detection], [Scanning side: Duplex Scan]. For details about how to change the settings of scanning, refer to "Changing Scanning Settings" (page 68).
- Before scanning documents of printed or handwritten text, on the ScanSnap setup dialog box, select the [Scanning] tab → the [Option] button → the [Setting for text only document] check box.
- Application that starts after scanning varies depending on which option is selected on the [Application] tab in the ScanSnap setup dialog box. For more information, refer to the ScanSnap Manager Help.
- The scaling factor of the scanned image data may vary slightly from the document size.
- When either ScanSnap Organizer, CardMinder, or Rack2-Filer (bundled or sold separately) is started and becomes active, the ScanSnap automatically interacts with the active application, and the settings for the application are used for scanning. Automatic linkage is disabled when the application is not active or exited.
For details about automatic linkage, refer to "Automatic Linkage with Applications" (page 85).
■ Finishing ScanSnap Operation
Exiting ScanSnap Manager
Select [Exit] from the Right-Click Menu.
In most cases, ScanSnap Manager does not need to be exited.

You can no longer use the ScanSnap after exiting ScanSnap Manager.
Select the [Start] menu → [All Programs] → [ScanSnap Manager] → [ScanSnap
[Manager] to start up ScanSnap Manager.
Disconnecting the ScanSnap
- Close the ADF paper chute (cover) to turn off the ScanSnap.
⇒ The [ScanSnap Manager] icon on the taskbar changes from to . - Disconnect the USB cable from your computer.
- Disconnect the power cable from the AC outlet.

The ScanSnap is turned on/off in conjunction with the computer or opening/closing of the ADF paper chute (cover). Ordinarily, you can forget about turning on/off the ScanSnap being connected to the computer.
Setting the ScanSnap
This section describes how to change and save scanning settings, automatically interact with applications, and about dialog boxes displayed during scanning.
■ Changing Scanning Settings
To change scanning settings for the ScanSnap, use the Right-Click Menu. The following describes how to change the settings.
1. Open the ScanSnap setup dialog box.
Select [Scan Button Settings] from the Right-Click Menu.

text_image
Duplex scan Simplex scan Scan Button Settings... Profile Management... Show scanning results Check consumable supplies... Help Exit⇒ The ScanSnap setup dialog box appears.

You can also display the ScanSnap setup dialog box by double-clicking the [ScanSnap Manager] icon or simultaneously pressing the [Ctrl], [Shift] and [Space] keys on the keyboard.
2. Click the [Detail] button to switch to the detail view mode.
Outline view
![FUJITSU ScanSnap S1500M - Click the [Detail] button to switch to the detail view mode. - 1](/content/2026/06/1236416/images/1c43a4f4a3729c7c46533204e0837b31f1fdb104761abd02dcd686a59848e531.jpg)
text_image
ScanSnap Color Image Scanner Use Quick Menu Recommended Small Files High Quality Profile Standard Detail OK Cancel ApplyDetail view
![FUJITSU ScanSnap S1500M - Click the [Detail] button to switch to the detail view mode. - 2](/content/2026/06/1236416/images/b66c0bee4ba4eaad67974dac82ee1f930dc22eb9b83214ffff2875ca1ea7a4ce.jpg)
text_image
ScanSnap Colon Image Scanner Use Quick Menu Recommended Save Scanning File option Paper Compression Profile Standard Application Save Scanning File option Paper Compression Specify the scanning mode you would like to use Image quality: Auto Color mode: Color Scanning side: Duplex Scan (Double-sided) Continue scanning after current scan is finished Options... Hide OK Cancel Apply![FUJITSU ScanSnap S1500M - Click the [Detail] button to switch to the detail view mode. - 3](/content/2026/06/1236416/images/d759eadc39e3ed90e0b5ec7754eb42e80b1a99e5a6b362c6f9cb892c072ba098.jpg)
The display status of the ScanSnap setup dialog box when previously opened is saved. For example, if it was closed in detail view mode, the dialog box is displayed in detail mode the next time you open it.
3. Change scanning settings on each tab on the ScanSnap setup dialog box.
The following items can be changed on each tab:
For details, refer to ScanSnap Manager Help.
- [Application] tab
- Application to be used with the ScanSnap
- [Save] tab
– Folder in which scanned image data are saved - File name used for saving scanned image data
- [Scanning] tab
- Scan mode
(Which image quality to scan with, color, gray or black-and-white, simplex or duplex, enable or disable [Setting for text only document], [Allow automatic blank page removal], [Correct skewed character strings automatically], [Allow automatic image rotation], [Set the document with its face up], and [Continue scanning after current scan is finished].)
- [File option] tab
- File format of a scanned image data (*.pdf, *.jpg).
- Whether to text recognize a marked character string on the scanned image data and set the character string as a keyword for the PDF file.
(Whether to text recognize only the first marked section or all marked sections to be added as keywords, and in which language to text recognize.)
- Whether to text recognize character strings in the scanned image data to convert the PDF file to a searchable PDF file.
(Whether to convert all pages or the first page only, and in which language to text recognize.)
- Whether to include all scanned image data in a single PDF file, or create PDF files, each of which includes a preset number of pages.
- Whether to password-protect the created PDF files.
• [Paper] tab
– Paper size of the document to be scanned.
([Paper size] and [Carrier Sheet Settings])
– Whether to detect multifeed.
• [Compression] tab
– File size of scanned image data (compression rate).
![FUJITSU ScanSnap S1500M - • [Compression] tab - 1](/content/2026/06/1236416/images/3556bddb86414da1931cc75100f3bdda5425cedb4cbf04881c6e0c0a0ad466c7.jpg)
Settings for scanning vary depending on the scanning method.
For details about items that can be set, refer to "Setting Items With/Without Quick Menu" (page 365).
4. Click the [OK] or [Apply] button.
⇒ Scanning settings are changed.
![FUJITSU ScanSnap S1500M - Click the [OK] or [Apply] button. - 1](/content/2026/06/1236416/images/1b90c8bf30bc9d1493792160e1fe470f898f2c72090153369c79962a6d6678fb.jpg)
If the [Scan] button on the ScanSnap is pressed while the ScanSnap setup dialog box is displayed, the dialog box is closed and scanning is started. In this case the contents being set are saved, and used for scanning.
However, if the [Scan] button on the ScanSnap is pressed while dialog boxes other than the ScanSnap setup dialog box are displayed, scanning will not start.
■ Saving Scanning Settings
You can define up to 20 sets of preferences called profiles for scanning in the Left-Click Menu. Only by clicking the [ScanSnap Manager] icon ,you can easily retrieve and use the saved profiles.
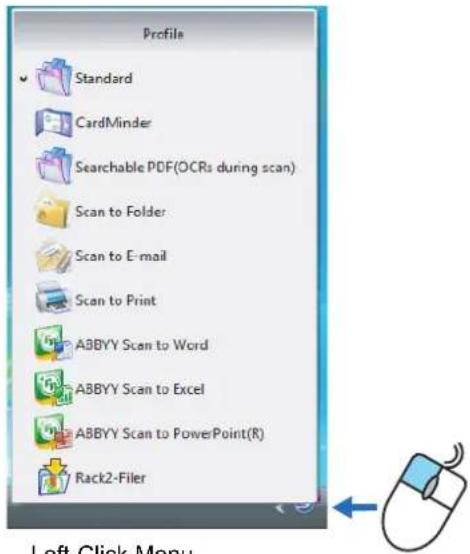
text_image
Profile Standard CardMinder Searchable PDF(OCRs during scan) Scan to Folder Scan to E-mail Scan to Print ABBYY Scan to Word ABBYY Scan to Excel ABBYY Scan to PowerPoint(R) Rack2-FilerLeft-Click Menu
Once the frequently used scanning settings are saved as profiles, you do not have to open the ScanSnap setup dialog box to change settings every time you scan documents. You can switch to an appropriate profile with simple point and click operations.

The descriptions below apply to scanning operations when the Quick Menu is not used. Only a single profile can be saved for the case when the Quick Menu is used for scanning. For details about how to change profiles, refer to "Changing Scanning Settings" (page 68).
The following explains the operations.
Saving Profiles
1. From the Right-Click Menu, select [Scan Button Settings].
![FUJITSU ScanSnap S1500M - From the Right-Click Menu, select [Scan Button Settings]. - 1](/content/2026/06/1236416/images/eeed95ec9324f513766321ec75f568ffeee6fb401c67937190004a501cb274e4.jpg)
text_image
Duplex scan Simplex scan Scan Button Settings... Profile Management... Show scanning results Check consumable supplies... Help Exit⇒ The ScanSnap setup dialog box appears.
2. Clear the [Use Quick Menu] check box.
![FUJITSU ScanSnap S1500M - Clear the [Use Quick Menu] check box. - 1](/content/2026/06/1236416/images/fb2f33ad03d2714d8649e04bc7e80863205df5ead2763e62035ff87344a13917.jpg)
text_image
ScanSnap Color Image Scanner Use Quick Menu Recommended Small File High Quality Standard Application Save Scanning File option Paper Compression![FUJITSU ScanSnap S1500M - Clear the [Use Quick Menu] check box. - 2](/content/2026/06/1236416/images/e7cd2651b2ba1a56ffe8877dd5ebc75af6401bbf6332b69c34fec23458495cd5.jpg)
This function is not available when the [Use Quick Menu] check box is selected.
3. Change scanning settings on each tab on the ScanSnap setup dialog box.
For details about each tab, refer to ScanSnap Manager Help.

text_image
ScanSnap Color Image Scanner Use Quick Menu Recommended Small File High Quality Profile Standard Application Save Scanning File option Paper Compression Specify the scanning mode you would like to use. Image quality: Auto Color mode: Color Scanning side: Duplex Scan (Double-sided) Continue scanning after current scan is finished Option ... Hide OK Cancel Apply4. Select [Add Profile] from the [Profile] drop-down list.
![FUJITSU ScanSnap S1500M - Select [Add Profile] from the [Profile] drop-down list. - 1](/content/2026/06/1236416/images/5d26f28149085bd1ee8bbfe895047ac368dbd0a05a478db492c8629e18b98ed2.jpg)
text_image
ScanSnap Color Image Scanner Use Quick Menu Recommended Small File High Quality Application Save Scanning File option Paper Com Specify the scanning mode you would like to use. Image quality: Auto Color mode: Color Scanning side: Duplex Scan (Double-sided) Continue scanning after current scan is finished Profile Standard Standard CardMinder Searchable PDF(OCRs during scan) Scan to Folder Scan to E-mail Scan to Print Scan to Word Scan to Excel Rack2-Filer Add Profile... Profile Management...⇒ The [Add new profile] dialog box appears.
5. Type in a profile name, and then click the [OK] button.
![FUJITSU ScanSnap S1500M - Type in a profile name, and then click the [OK] button. - 1](/content/2026/06/1236416/images/7c42af5c67cb76a67bb028ea88f358ff50053536f625a49aaee7c18e5405c086.jpg)
text_image
Add new profile New profile name A4 Color OK Cancel Help⇒ The new profile name appears in the [Profile] drop-down list.
![FUJITSU ScanSnap S1500M - Type in a profile name, and then click the [OK] button. - 2](/content/2026/06/1236416/images/9d55b2cf1fe7dd3a2a9ecdb9d3acea7cd6fbf1d00356e9d6fb1006a1128c9669.jpg)
text_image
ScanSnap Color Image Scanner Use Quick Menu Recommended Small File High Quality Application Save Scanning File option Paper Com Specify the scanning mode you would like to use. Image quality: Auto Color mode: Color Scanning side: Duplex Scan (Double-sided) Continue scanning after current scan is finished Profile A4 Color Standard CardMinder Searchable PDF(OCRs during scan) Scan to Folder Scan to E-mail Scan to Print Scan to Word Scan to Excel Back2 Files A4 Color Add Profile... Profile Management...6. Click the [OK] button to close the ScanSnap setup dialog box.
→ Now, you have finished saving a new profile.
![FUJITSU ScanSnap S1500M - Click the [OK] button to close the ScanSnap setup dialog box. - 1](/content/2026/06/1236416/images/9ffab63a3bb4de663214e5978dcbef74655112bd86462c0972a450df22b036ef.jpg)
- You can save up to 20 profiles, including the [Standard] profile.
-
You can change the displayed sequence of profiles except for the [Standard] profile.
-
Select [Profile Management] from the [Profile] drop-down list in the ScanSnap setup dialog box or from the Right-Click Menu.
⇒ The [ScanSnap Manager - Profile Management] dialog box appears.
- Select a profile from the list to arrange profiles in a different sequence.
- Click the [Up] or [Down] button to move the profile up or down.
![FUJITSU ScanSnap S1500M - Click the [OK] button to close the ScanSnap setup dialog box. - 2](/content/2026/06/1236416/images/c43520463c9bc1f3e509b66d393de822eb35dd58ad3e9cd32a7bb94363236128.jpg)
text_image
ScanSnap Manager - Profile Management CardMinder Searchable PDF(OCRs during scan) Scan to Folder Scan to E-mail Scan to Print Scan to Word Scan to Excel Scan to PowerPoint Rack2-Filer A4 Color Rename ... Delete Up Down Help Close- Click the [Close] button.
Changing Settings for Saved Profiles
1. From the Right-Click Menu, select [Scan Button Settings].
![FUJITSU ScanSnap S1500M - From the Right-Click Menu, select [Scan Button Settings]. - 1](/content/2026/06/1236416/images/27f55d49af8def7b0581d829b9693f7270aeb9f838738ad36c40331e7d107a14.jpg)
text_image
Duplex scan Simplex scan Scan Button Settings... Profile Management... Show scanning results Check consumable supplies... Help Exit⇒ The ScanSnap setup dialog box appears.
2. Clear the [Use Quick Menu] check box.
![FUJITSU ScanSnap S1500M - Clear the [Use Quick Menu] check box. - 1](/content/2026/06/1236416/images/941007a90de86d3f954e4921249f0579e0749d733e02baffe09731ea76d9cbb7.jpg)
text_image
ScanSnap Color Image Scanner Use Quick Menu Recommended Small File High Quality Standard Application Save Scanning File option Paper Compression Specify the scanning mode you would like to use.![FUJITSU ScanSnap S1500M - Clear the [Use Quick Menu] check box. - 2](/content/2026/06/1236416/images/0dbb5598b00d8e7a0403c122ff1dcaf07d206730db6f6105a821086dfa88db2f.jpg)
This function is not available when the [Use Quick Menu] check box is selected.
3. Select the profile you want to change from the [Profile] drop-down list.
![FUJITSU ScanSnap S1500M - Select the profile you want to change from the [Profile] drop-down list. - 1](/content/2026/06/1236416/images/bf1ccd769d2ff0040ec85a30315c6272f60279825dc8f2b390ee8b289f25acd3.jpg)
text_image
ScanSnap Color Image Scanner Use Quick Menu Recommended Small File High Quality Application Save Scanning File option Paper Com Specify the scanning mode you would like to use. Image quality: Auto Color mode: Color Scanning side: Duplex Scan (Double-sided) Continue scanning after current scan is finished Profile A4 Color Standard CardMinder Searchable PDF(OCRs during scan) Scan to Folder Scan to E-mail Scan to Print Scan to Word Scan to Excel Rack2-Filer A4 Color Add Profile... Profile Management...- Change scanning settings on each tab on the ScanSnap setup dialog box.
For details about each tab, refer to ScanSnap Manager Help.
- When you finish changing the settings for the selected profile, click the [OK] button.
![FUJITSU ScanSnap S1500M - Select the profile you want to change from the [Profile] drop-down list. - 2](/content/2026/06/1236416/images/392945c91e3b5338275372c97f6369502bedf026ca8ff7f92c59e1ece34254c2.jpg)
text_image
ScanSnap Color Image Scanner Use Quick Menu Recommended Small File High Quality Profile A4 Color Application Save Scanning File option Paper Compression Specify the scanning mode you would like to use. Image quality: Auto Color mode: Color Scanning side: Duplex Scan (Double-sided) Continue scanning after current scan is finished Option ... OK Hide Cancel Apply⇒ A confirmation message appears to ask whether you want to overwrite the profile with the new settings.
![FUJITSU ScanSnap S1500M - Select the profile you want to change from the [Profile] drop-down list. - 3](/content/2026/06/1236416/images/d7b00d19db8146e5b5da2614d1c53547bcd732c983e0ceed761d0e779421b3c5.jpg)
If you select another profile from the [Profile] drop-down list before clicking the [OK] button, the following message appears.
![FUJITSU ScanSnap S1500M - Select the profile you want to change from the [Profile] drop-down list. - 4](/content/2026/06/1236416/images/b4ae3f48cb330347829332805a0f130fc157d329729e2576bbca65b6e948831f.jpg)
text_image
ScanSnap Manager To change "A4 Color" profile setting, select "Yes". To keep current setting, select "No". Yes No CancelWhen the [Yes] button is clicked, the new settings made to the profile take effect, and the profile is switched to another one. When the [No] button is clicked, the modified settings are canceled, and the profile is switched to another one.
- To overwrite the profile, select the [Yes] button. When the [No] button is clicked, changes are saved to the [Standard] profile.
![FUJITSU ScanSnap S1500M - Select the profile you want to change from the [Profile] drop-down list. - 5](/content/2026/06/1236416/images/eab688393e4c0b01ea6c9127c87186bb2040b6616ce855d5010b83c54d73e4a4.jpg)
text_image
ScanSnap Manager The settings of the profile "A4 Color" have been changed. Select [Yes] to save the new settings, and select [No] to save settings as "Standard". Yes No Cancel![FUJITSU ScanSnap S1500M - Select the profile you want to change from the [Profile] drop-down list. - 6](/content/2026/06/1236416/images/8bb6a2d71ef9ace765b0619a614574ae333b156b76e811dffeb6fc9f8069d33e.jpg)
When you have selected the [Standard] profile in Step 3., the confirmation message does not appear.
Renaming Profiles
1. From the Right-Click Menu, select [Scan Button Settings].
![FUJITSU ScanSnap S1500M - From the Right-Click Menu, select [Scan Button Settings]. - 1](/content/2026/06/1236416/images/01eb5a692cdd96c551631c6919e02953de96383a4b4e884332faa1abfc937a07.jpg)
text_image
Duplex scan Simplex scan Scan Button Settings... Profile Management... Show scanning results Check consumable supplies... Help Exit⇒ The ScanSnap setup dialog box appears.
2. Clear the [Use Quick Menu] check box.
![FUJITSU ScanSnap S1500M - Clear the [Use Quick Menu] check box. - 1](/content/2026/06/1236416/images/319b1d1fccfcfc3041d1df2ed625797db3fe212b325d0f550a846a67ba99cfa4.jpg)
text_image
ScanSnap Color Image Scanner Use Quick Menu Recommended Small File High Quality Profile Standard Application Save Scanning File option Paper Compression Specify the scanning mode you would like to use.![FUJITSU ScanSnap S1500M - Clear the [Use Quick Menu] check box. - 2](/content/2026/06/1236416/images/36f6f495ae5fa099ce20f2bc622108b4203a80a18a0d138086948229d2042b95.jpg)
This function is not available when the [Use Quick Menu] check box is selected.
3. Select [Profile Management] from the [Profile] drop-down list.
![FUJITSU ScanSnap S1500M - Select [Profile Management] from the [Profile] drop-down list. - 1](/content/2026/06/1236416/images/d82645a1d3ee02be6fc6281e2d928b8f69df445a27a7304b7456d698497ae556.jpg)
text_image
ScanSnap Color Image Scanner Use Quick Menu Recommended Small File High Quality Application Save Scanning File option Paper Com Profile A4 Color Standard CardMinder Searchable PDF(OCRs during scan) Scan to Folder Scan to E-mail Scan to Print Scan to Word Scan to Excel Rack2-Filer A4 Color Specify the scanning mode you would like to use Image quality: Auto Color mode: B&W Scanning side: Duplex Scan (Double-sided) Continue scanning after current scan is finished Add Profile... Profile Management...![FUJITSU ScanSnap S1500M - Select [Profile Management] from the [Profile] drop-down list. - 2](/content/2026/06/1236416/images/a49bf8847c7a495a755521ae03b140f164d264dd0f363b08d013146ee5e021c5.jpg)
You can also select [Profile Management] from the Right-Click Menu to open the [ScanSnap Manager - Profile Management] dialog box.
![FUJITSU ScanSnap S1500M - Select [Profile Management] from the [Profile] drop-down list. - 3](/content/2026/06/1236416/images/28e1e1969eb2b27f4b25f332bca8adb1cce4f85d508dd3aa09bed3b5ca66ff7a.jpg)
text_image
Duplex scan Simplex scan Scan Button Settings... Profile Management... Show scanning results Check consumable supplies... Help Exit⇒ The [ScanSnap Manager - Profile Management] dialog box appears.
4. Select the profile you want to rename, and then click the [Rename] button.
![FUJITSU ScanSnap S1500M - Select the profile you want to rename, and then click the [Rename] button. - 1](/content/2026/06/1236416/images/33b593126189602c104200bd7644d64ebce49ad55967e078f2252fefad7b86f4.jpg)
text_image
ScanSnap Manager - Profile Management CardMinder Searchable PDF(OCRs during scan) Scan to Folder Scan to E-mail Scan to Print Scan to Word Scan to Excel Scan to PowerPoint Rack2-Filer A4 Color Rename ... Delete Up Down Help Close⇒ The [Rename] dialog box appears.
5. Type in a new name, and then click the [OK] button.
![FUJITSU ScanSnap S1500M - Type in a new name, and then click the [OK] button. - 1](/content/2026/06/1236416/images/8dac4f281bbbb63ca5dede1bbee54dac77d6a6dba71189019060356178e10311.jpg)
text_image
Rename Name: Letter Black and White OK Cancel⇒ The selected profile is renamed.
![FUJITSU ScanSnap S1500M - Type in a new name, and then click the [OK] button. - 2](/content/2026/06/1236416/images/f56f44c27adaa6e185a106a5ab1b799e050cae3d4a47a2bb7ba58a0d41988ff2.jpg)
text_image
ScanSnap Manager - Profile Management CardMinder Searchable PDF(OCRs during scan) Scan to Folder Scan to E-mail Scan to Print Scan to Word Scan to Excel Scan to PowerPoint Back2-Filer Letter Black and White Rename ... Delete Up Down Help Close6. Click the [Close] button to close the [ScanSnap Manager - Profile Management] dialog box.
Deleting Profiles
1. From the Right-Click Menu, select [Scan Button Settings].
![FUJITSU ScanSnap S1500M - From the Right-Click Menu, select [Scan Button Settings]. - 1](/content/2026/06/1236416/images/9af6b9555a8c4941a9ad5e542df13f24cfea8b2e83168a8551ef0fd6a0eca8ec.jpg)
text_image
Duplex scan Simplex scan Scan Button Settings... Profile Management... Show scanning results Check consumable supplies... Help Exit⇒ The ScanSnap setup dialog box appears.
2. Clear the [Use Quick Menu] check box.
![FUJITSU ScanSnap S1500M - Clear the [Use Quick Menu] check box. - 1](/content/2026/06/1236416/images/2b29d1d7d566d057340d1fd4252823f875de718127624bfcd5911308c659351d.jpg)
text_image
ScanSnap Color Image Scanner Use Quick Menu Recommended Small File High Quality Profile Standard Application Save Scanning File option Paper Compression Specify the scanning mode you would like to use.![FUJITSU ScanSnap S1500M - Clear the [Use Quick Menu] check box. - 2](/content/2026/06/1236416/images/ffe695e74bf6e2ddf44110587ae1a849767a144f601807216c7b4b59a1307225.jpg)
This function is not available when the [Use Quick Menu] check box is selected.
3. Select [Profile Management] from the [Profile] drop-down list.
![FUJITSU ScanSnap S1500M - Select [Profile Management] from the [Profile] drop-down list. - 1](/content/2026/06/1236416/images/05d9e0cd7510d44f3d298c81d4c2ab8f96a90d760944ba97ba7226fdf337aa3a.jpg)
text_image
ScanSnap Color Image Scanner Use Quick Menu Recommended Small File High Quality Application Save Scanning File option Paper Comp Select the application you would like to use. Application: ScanSnap Organizer Add or Remove... Profile Standard Standard CardMinder Searchable PDF(OCRs during scan) Scan to Folder Scan to E-mail Scan to Print Scan to Word Scan to Excel Rack2-Filer Letter Black and White Add Profile Profile Management...![FUJITSU ScanSnap S1500M - Select [Profile Management] from the [Profile] drop-down list. - 2](/content/2026/06/1236416/images/c37a2179677a096bd26b2ef859482b1ed985e03570d73a4e3123cd9bb28f61db.jpg)
You can also select [Profile Management] from the Right-Click Menu to open the [ScanSnap Manager - Profile Management] dialog box.
Duplex scan
Simplex scan
Scan Button Settings.
Profile Management.
Show scanning results
Check consumable supplies...
Help
Exit
⇒ The [ScanSnap Manager - Profile Management] dialog box appears.
- Select the profile you want to delete from the list, and then click the [Delete] button.
![FUJITSU ScanSnap S1500M - Select [Profile Management] from the [Profile] drop-down list. - 3](/content/2026/06/1236416/images/ffe9ce50dbe3886e1487a34c2475688eb609cb21498e4f931b802d769af634d6.jpg)
text_image
ScanSnap Manager - Profile Management CordMinder Searchable PDF(OCRs during scan) Scan to Folder Scan to E-mail Scan to Print Scan to Word Scan to Excel Scan to PowerPoint Rack2-Filer Letter Black and White Rename ... Delete Up Down Help Close![FUJITSU ScanSnap S1500M - Select [Profile Management] from the [Profile] drop-down list. - 4](/content/2026/06/1236416/images/963f50f5c077671d23c2013df64987de1a1cb8f8f8aab1490b1003d71c715471.jpg)
The [Standard] profile cannot be deleted.
⇒ The [Delete Profile] dialog box appears.
- Click the [Yes] button.
![FUJITSU ScanSnap S1500M - Select [Profile Management] from the [Profile] drop-down list. - 5](/content/2026/06/1236416/images/40a3e6220cc576792abeb1e1018660976db14ad6ff7bc490158aab5adc2edfe4.jpg)
text_image
Delete Profile Remove [Letter Black and White] from the profile list. This operation cannot be undone. OK to delete? Yes No⇒ The selected profile is deleted.
- Click the [Close] button to close the [ScanSnap Manager - Profile Management] dialog box.
■ Automatic Linkage with Applications
ScanSnap Organizer, CardMinder, Rack2-Filer trial version (bundled with the ScanSnap), and Rack2-Filer (V5.0 or later recommended) (bundled model or sold separately) automatically link with the ScanSnap upon startup.
Automatic Linkage Mode
There are two modes for automatic linkage.
- Link when one of the above applications is active (recommended)
When ScanSnap Organizer, CardMinder or Rack2-Filer becomes active (with the application's dialog box brought to front and selected in taskbar), performing a scan by pressing the [Scan] button automatically starts the linkage between ScanSnap Manager and the active application in which the scan result is displayed.
Even when the ScanSnap is in Quick Menu mode, ScanSnap Manager automatically links with the active application in which the scan result is displayed without the Quick Menu appearing after scanning.
The interaction between the application and ScanSnap Manager ends once the application is no longer active.
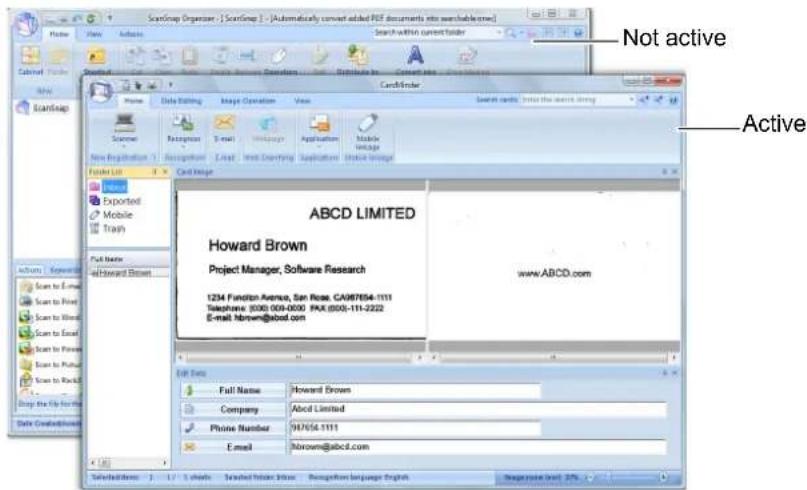
text_image
Not active Active ABCD LIMITED Howard Brown Project Manager, Software Research 1234 Function Avenue, San Jose, CA987654-1111 Telephone (030) 009-0000 PAX (000)-111-2222 E-mail: hbrown@abcd.com www.ABCD.com Full Name Howard Brown Company Abcd Limited Phone Number 987654.1111 E-mail hbrown@abcd.com Selected items 1 / 2 . 1 sheets Scattered folder status Recognised language English Regularize level 27%The example above shows ScanSnap Manager automatically linking with CardMinder when CardMinder dialog box is in front (active).
• Always link when one of the above applications is running
When ScanSnap Organizer, CardMinder, or Rack2-Filer is started, the application specified for [Application] in the ScanSnap dialog box automatically switches to the running application. In this case, when you perform a scan by pressing the [Scan] button, ScanSnap Manager automatically links with the active application in which the scan result is displayed.
Even when the ScanSnap is in Quick Menu mode, ScanSnap Manager automatically links with the active application in which the scan result is displayed without the Quick Menu appearing after scanning.
The interaction continues until you exit the application.
When more than one application is running at the same time, priority will be given in the following order: CardMinder, ScanSnap Organizer, and Rack2-Filer.
When the Quick Menu is disabled, the name of the interacting application on the Left-Click Menu is followed by "is interacting".

text_image
Profile ScanSnap Organizer is interacting Standard CardMinder Searchable PDF(OCRs during scan) Scan to Folder Scan to E-mail Scan to Print ABBYY Scan to Word ABBYY Scan to Excel ABBYY Scan to PowerPoint(R) Rack2-Filer Letter Black and WhiteWhen ScanSnap Organizer is automatically interacting with ScanSnap Manager
Changing Automatic Linkage Mode
Follow the procedure below to change automatic linkage mode options.
1. Select [Help] → [Preferences] from the Right-Click Menu.
![FUJITSU ScanSnap S1500M - Select [Help] → [Preferences] from the Right-Click Menu. - 1](/content/2026/06/1236416/images/725c57c3616ed56cd5b2c2cf590866542e887d447f948413d8529ff06394e297.jpg)
text_image
Help About ScanSnap Manager ... Preferences... Online Update ... Duplex scan Simplex scan Scan Button Settings... Profile Management... Show scanning results Check consumable supplies... Help Exit⇒ The [ScanSnap Manager - Preferences] dialog box appears.
2. In the [Automatic Linkage] tab, select the automatic linkage mode and click the [OK] button.
![FUJITSU ScanSnap S1500M - In the [Automatic Linkage] tab, select the automatic linkage mode and click the [OK] button. - 1](/content/2026/06/1236416/images/417d86c133be8163df5054e3edc4208d1f13faca141943719b0454673bbe4ca4.jpg)
text_image
ScanSnap Manager - Preferences Automatic Linkage Status Display When you launch ScanSnap Organizer, CardMinder or Reck2-Filer, the ScanSnap automatically links with the application Condition Link when one of the above applications is active (recommended) Always link when one of the above applications is running DK Cancel Help- Link when one of the above applications is active (recommended)
When ScanSnap Organizer, CardMinder, or Rack2-Filer becomes active, with the application's dialog box brought to front and selected in taskbar, the active application automatically starts interacting with ScanSnap Manager.
• Always link when one of the above applications is running
When ScanSnap Organizer, CardMinder, or Rack2-Filer is running, the application specified for [Application] in the ScanSnap dialog box automatically switches to the running application.
■ Showing the Scan Progress Status
When scanning starts, the [ScanSnap Manager - Image scanning and file saving] dialog box appears on the computer screen.
This dialog box shows the current processing status, the number of pages of the file that have been saved, and overview of the current settings for scanning. You can also stop scanning with the ScanSnap by clicking the [Stop] button.
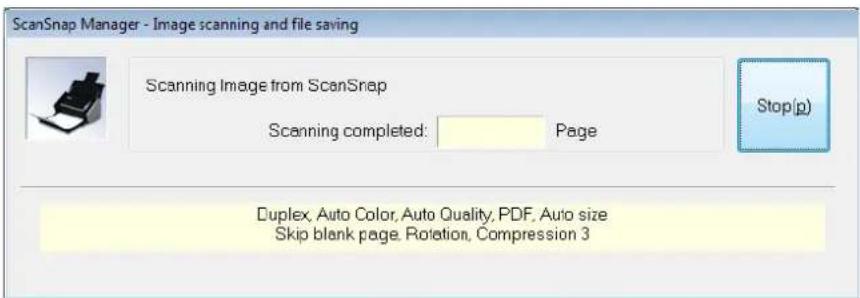
text_image
ScanSnap Manager - Image scanning and file saving Scanning Image from ScanSnap Scanning completed: Page Stop(p) Duplex, Auto Color, Auto Quality, PDF, Auto size Skip blank page, Rotation, Compression 3After the image data of the document scanned last is saved, the [ScanSnap Manager - Image scanning and file saving] dialog box automatically closes.
Hiding the Scan Progress Status
You can hide the [ScanSnap Manager - Image scanning and file saving] dialog box. Perform this setting as follows.
1. From the Right-Click Menu, select [Help] → [Preferences].
![FUJITSU ScanSnap S1500M - From the Right-Click Menu, select [Help] → [Preferences]. - 1](/content/2026/06/1236416/images/ae5985aa9b9a94b3c3098f39004afac6af603f4b1ad892e1282da1f9abe926bd.jpg)
text_image
Help About ScanSnap Manager ... Preferences... Online Update ... Duplex scan Simplex scan Scan Button Settings... Profile Management... Show scanning results Check consumable supplies... Help Exit⇒ The [ScanSnap Manager - Preferences] dialog box appears.
2. In the [Status Display] tab, clear the [Show the scan progress status (recommended)] check box and click the [OK] button.
![FUJITSU ScanSnap S1500M - In the [Status Display] tab, clear the [Show the scan progress status (recommended)] check box and click the [OK] button. - 1](/content/2026/06/1236416/images/0b5967a9693df5e5f46a3cb51b8597cd8ea3a6cae278a371a245190dabe80cac.jpg)
text_image
ScanSnap Manager - Preferences Automatic Linkage Status Display Notice of communication status Select whether to notify of the ScanSnap's communication status with a pop-up balloon Notify of the communication status Show scan progress status Select whether to show the scan progress status. ✓ Show the scan progress status (recommended) OK Cancel Help⇒ The [ScanSnap Manager - Image scanning and file saving] dialog box is hidden from the next scanning.
![FUJITSU ScanSnap S1500M - In the [Status Display] tab, clear the [Show the scan progress status (recommended)] check box and click the [OK] button. - 2](/content/2026/06/1236416/images/f3e3d99cf5348ce334e6b1639e4af06bc6a4aee1894185442c39a4a434d07ac3.jpg)
When the scanning progress status dialog box is hidden, the ScanSnap Manager icon alter-
nates
![FUJITSU ScanSnap S1500M - In the [Status Display] tab, clear the [Show the scan progress status (recommended)] check box and click the [OK] button. - 3](/content/2026/06/1236416/images/c326bc65451a87ef2ff1f9ef1520af0110065ff250b8c13ff6ebe769bf0af960.jpg)
![FUJITSU ScanSnap S1500M - In the [Status Display] tab, clear the [Show the scan progress status (recommended)] check box and click the [OK] button. - 4](/content/2026/06/1236416/images/b571b03cfedf0b3aeea0a0626f34864c46fd58b503cb198ee3d2537cbf402fe8.jpg)
and
■ About the ScanSnap's Communication Status
If you turn the ScanSnap ON/OFF when ScanSnap Manager is running, the pop-up balloon appearing from the taskbar icon notifies you of the communication status of the ScanSnap.
- When the ScanSnap is on

text_image
ScanSnap is ready to scan Click here to disable this notification.- When the ScanSnap is turned off

text_image
ScanSnap is disconnected Click here to disable this notification. EN
You can disable notifications of the ScanSnap's communication status by clicking the pop-up balloon. For more information on how to disable the notifications, refer to Step 2. of "Receiving or hiding the ScanSnap's communication status notifications" (page 90). In Windows 2000, you cannot disable this notification by clicking the pop-up balloon.
Receiving or hiding the ScanSnap's communication status notifications
You can specify whether or not to receive notifications of the ScanSnap's communication status with a pop-up balloon.
Configure the setting following the procedure below.
- From the Right-Click Menu, select [Help] → [Preferences].

text_image
Help About ScanSnap Manager ... Preferences... Online Update ... Duplex scan Simplex scan Scan Button Settings... Profile Management... Show scanning results Check consumable supplies... Help Exit⇒ The [ScanSnap Manager - Preferences] dialog box appears.
2. In the [Status Display] tab, either select or clear the [Notify of the communication status] check box and click the [OK] button.
![FUJITSU ScanSnap S1500M - In the [Status Display] tab, either select or clear the [Notify of the communication status] check box and click the [OK] button. - 1](/content/2026/06/1236416/images/96ba1c579219a5151cc08b2339d0692204e3fa8efc9d709ab0723f343e6bf1c0.jpg)
text_image
ScanSnap Manager - Preferences Automatic Linkage Status Display Notice of communication status Select whether to notify of the ScanSnap's communication status with a pop-up balloon ✓ Notify of the communication status Show scan progress status Select whether to show the scan progress status. ✓ Show the scan progress status (recommended) OK Cancel Help⇒ When you select the [Notify of the communication status] check box, you will be notified of the communication status in conjunction with the ScanSnap being turned ON/OFF.
⇒ When you clear the [Notify of the communication status] check box, you will not be notified of the communication status.
About Actions
The ScanSnap has frequently-used functions at the ready as Actions to help you make efficient use of your time at your office.
Actions are helpful when:
- you want to share the scanned document files with other members.
⇒ You can save document files directly in a shared folder on a network upon scanning. In addition, all members are informed of the destination folder path by an e-mail message automatically created with the path stated.
- you want to send document files used in a meeting about to start to all persons concerned.
⇒ Simply press the [Scan] button, and you can quickly send an e-mail message with document files attached.
- you want to use a printer, rather than a copy machine, to make copies of documents.
⇒ Simply press the [Scan] button, and you can print documents with a printer.
- you want to convert catalogs and pamphlets into digital data and save them.
⇒ Simply press the [Scan] button to save the catalogs and pamphlets converted into digital data directly in pictures folder.
- you want to use text in your paper documents but do not want to type it manually.
⇒ Simply press the [Scan] button, and you can get the scanned image data text recognized and converted into a Word, Excel, or PowerPoint document.
- you want to file and organize a large number of business cards.
⇒ Simply press the [Scan] button, and you can manage business card information with CardMinder.
- you want to share the scanned document files through linkage with SharePoint.
⇒ Simply press the [Scan] button, and you can save the scanned image data in SharePoint and Office Live.
- you want to turn your paper documents into digital data to conveniently manage and organize the documents.
⇒ Simply press the [Scan] button, and you can save the scanned data directly to Rack2-Filer to manage and organize the data.
The following are explanations on how to use Actions.
■ Saving Data in the Specified Folder
This section describes how to save the scanned image data in a shared folder. By using this action, you can save the scanned image data in a networked folder to share information among group members. In addition, all members are informed of the destination folder path by an e-mail message automatically created with the path stated.

text_image
Screenshot illustrating the process of inserting a printer into a new message file, with Chinese annotations and file list.
For an e-mail program, an application set in Internet Explorer is used.
Even if you use an e-mail program selected in Internet Explorer, the e-mail program may not interact with the ScanSnap properly. In this case, contact the manufacturer of that e-mail program.
Windows 7/Windows Vista
- In Internet Explorer, select the [Tools] menu → [Internet Options] → the [Programs] tab → the [Set programs] button → [Set your default programs].
⇒ The [Set default programs] dialog box appears.
- From [Programs], select an e-mail program you want to use.
- Select [Set this program as default] and click the [OK] button.
Windows XP/Windows 2000
An e-mail program selected in the Internet Explorer [Tools] menu → [Internet Options] → [Programs] tab → [E-mail] drop-down list is used.
If no e-mail program is selected, select an e-mail program you want to use in the [E-mail] drop-down list. E-mail programs that cannot be selected here cannot be used.
E-mail programs that have been verified:
- Windows Live Mail (Windows XP or later)
- Microsoft Windows Mail (for Windows Vista)
- Microsoft Office Outlook 2003 / 2007
- Microsoft Outlook Express V6.0
- Thunderbird version 2.0.0.16
Using the Quick Menu
1. Load the document into the ScanSnap.
For details, refer to "Paper Sizes of Documents to Be Scanned" (page 27) and "Loading Documents" (page 29).
2. Press the [Scan] button on the ScanSnap.
Scanning is started.
⇒ When scanning is complete, the Quick Menu appears.
3. Click the [Scan to Folder] icon.
![FUJITSU ScanSnap S1500M - Click the [Scan to Folder] icon. - 1](/content/2026/06/1236416/images/bcc6de4362ec3bfb4b3f56b5217bbfbdb5e7046e8f34ea28d68f59a470802b90.jpg)
text_image
ScanSnap Page 1/1 Scan to ScanSnap Organizer Scan to CardMinder Scan to Folder Scan to E-mail Scan to Print Scan to Word Scan to Excel Scan to PowerPoint(R) Scan to SharePoint Scan to Rack2-Filer Scan to Picture Folder Show Details⇒ The [Scan to Folder] dialog box appears.
4. Check the scanned image in the [Scan to Folder] dialog box.
You can also change file names and destination folders and specify whether to state a path to a destination folder in an e-mail message to notify other members.
For details about the [Scan to Folder] dialog box, refer to ScanSnap Manager Help.
![FUJITSU ScanSnap S1500M - Check the scanned image in the [Scan to Folder] dialog box. - 1](/content/2026/06/1236416/images/3979698bf931dbaed377b0c89a17192f10b995611a457ed9513bdaff8f2c49f7.jpg)
text_image
Scan to Folder Specify file name File name: 1/ 2 File PDF 2008 10.21 09.20 52 History Serialize... Combined file size 0.39 MB Specify destination folder Save in: C:\Users\scansnap\Documents History Browse... ✓ State a path to a destination folder in an E-mail message Save Cancel HelpPreview area
5. Click the [Save] button.
⇒ The scanned image data is saved in a specified folder.
⇒ When you select the [State a path to a destination folder in an E-mail message] check box in the [Scan to Folder] dialog box, an e-mail program starts, and an e-mail message is created with the path to the destination folder automatically stated.
![FUJITSU ScanSnap S1500M - Click the [Save] button. - 1](/content/2026/06/1236416/images/023e3f0d341994bebda12480761f20ec036af03d4a4efef18f39c7310e525ca0.jpg)
text_image
New Message File Edit View Insert Format Tools Message Help Send To: Cc: Subject: Times New Roman 12 B I U A C:\Users\Documents\2008_10_15_10_34_17.pdf C:\Users\Documents\2008_10_15_10_34_18.pdf![FUJITSU ScanSnap S1500M - Click the [Save] button. - 2](/content/2026/06/1236416/images/75d663006ab1f0578c0e4af6251f8d9818aa86b330d129d207ee815ea7c28245.jpg)
- When the Quick Menu is displayed, the ScanSnap does not perform a scan even if you press the [Scan] button, unless the [Scan to Folder] dialog box is closed. Close the [Scan to Folder] dialog box before scanning another document.
- Do not move, delete, or rename scanned image data in other applications after the Quick Menu is displayed and before the [Scan to Folder] dialog box is closed.
Without using the Quick Menu
1. Select [Scan Button Settings] from the Right-Click Menu.
![FUJITSU ScanSnap S1500M - Select [Scan Button Settings] from the Right-Click Menu. - 1](/content/2026/06/1236416/images/b552e28c94072fc6de012a6dd45a8b0523983eac617bc15722c9e600f2c0bb86.jpg)
text_image
Duplex scan Simplex scan Scan Button Settings... Profile Management... Show scanning results Check consumable supplies... Help Exit⇒ The ScanSnap setup dialog box appears.
2. In the [Application] drop-down list on the [Application] tab, select [Scan to Folder].
![FUJITSU ScanSnap S1500M - In the [Application] drop-down list on the [Application] tab, select [Scan to Folder]. - 1](/content/2026/06/1236416/images/8fd4134c0d533ce23d7cb28c8081339f669b3d52c5ae85f48b61690c90ec3c32.jpg)
text_image
Application Save Scanning File option Paper Compression Select the application you would like to use. Application: Scan to Folder Add or Remove... Hide OK Cancel Apply![FUJITSU ScanSnap S1500M - In the [Application] drop-down list on the [Application] tab, select [Scan to Folder]. - 2](/content/2026/06/1236416/images/fe910808d3adede91559ccbd9f06ceac8f44b59e0b4a7d845cba257bce34732d.jpg)
- You can set a desired settings profile by selecting [Save to Folder] from the [Profiles] drop-down list, or [Profile] menu.
- Finishing the procedure above, you can save desired settings as profiles. The profiles can be selected in the Left-Click Menu from the next time you scan documents. For details about how to save scanning settings, refer to "Saving Scanning Settings" (page 71).
3. Click the [OK] button to close the ScanSnap setup dialog box.
![FUJITSU ScanSnap S1500M - Click the [OK] button to close the ScanSnap setup dialog box. - 1](/content/2026/06/1236416/images/3d75d1e22ff1ba4a98f541e0e4c4aaf1847eb9c1c9821e97118e7faeeffeeafc.jpg)
Even if the [Scan] button on the ScanSnap is pressed, the ScanSnap setup dialog box closes.
4. Load the document into the ScanSnap.
For details, refer to "Paper Sizes of Documents to Be Scanned" (page 27) and "Loading Documents" (page 29).
5. Press the [Scan] button on the ScanSnap.
→ Scanning is started.
⇒ When scanning is complete, the [Scan to Folder] dialog box appears.
6. Check the scanned image in the [Scan to Folder] dialog box.
You can also change file names and destination folders and specify whether to state a path to a destination folder in an e-mail message to notify other members.
For details about the [Scan to Folder] dialog box, refer to ScanSnap Manager Help.
![FUJITSU ScanSnap S1500M - Check the scanned image in the [Scan to Folder] dialog box. - 1](/content/2026/06/1236416/images/aaaf33ad196bbd272eb52d56066ed93b54dd613c2e6950484b09abb897566df2.jpg)
text_image
Scan to Folder Specify file name File name: 1/ 2 File PDF 2008 10 21 03 20 52 History 5snalg... Combined file size 0.39 MB Specify destination folder Save in: C:\Users\scansnap\Documents History Browse... ✓ State a path to a destination folder in an E-mail message Save Cancel HelpPreview area
7. Click the [Save] button.
⇒ The scanned image data is saved in a specified folder.
⇒ When you select the [State a path to a destination folder in an E-mail message] check box in the [Scan to Folder] dialog box, an e-mail program starts, and an e-mail message is created with the path to the destination folder stated.
![FUJITSU ScanSnap S1500M - Click the [Save] button. - 1](/content/2026/06/1236416/images/19022a3f2327bcf39ef05a42018f018ebddf9be962605bf1c3a0ebf7dd65027e.jpg)
text_image
New Message File Edit View Insert Format Tools Message Help Send To: Cc: Subject: Times New Roman 12 B / U ▲ C:\Users\Documents\2008_10_15_10_34_17.pdf C:\Users\Documents\2008_10_15_10_34_18.pdf![FUJITSU ScanSnap S1500M - Click the [Save] button. - 2](/content/2026/06/1236416/images/fe2537aacd0d8c286777a1b9f0f3b92f56686c145c02701b8ba9b1b981b787bb.jpg)
- When the [Scan to Folder] dialog box is displayed, scanning cannot be performed with the ScanSnap. Close the [Scan to Folder] dialog box before scanning another document.
- Do not move, delete, or rename the scanned image data in other applications when the [Scan to Folder] dialog box is displayed.
■ Sending Files by E-Mail
This section describes how to send the scanned image data by e-mail.
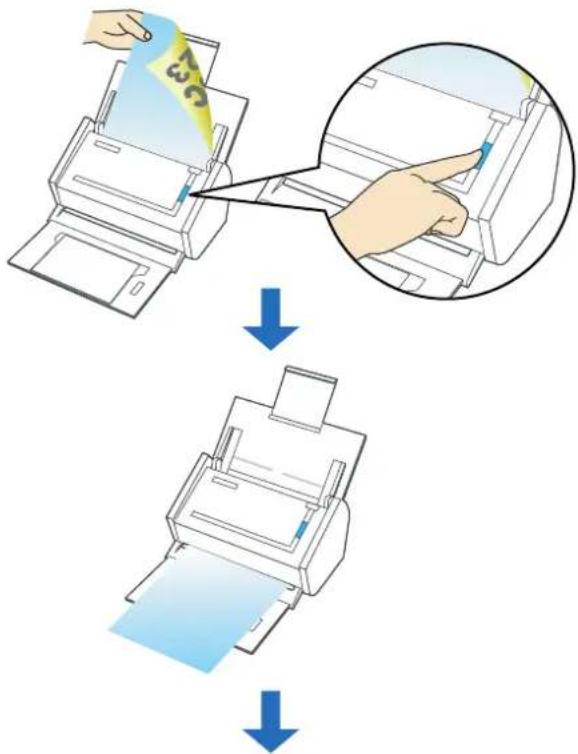
text_image
Diagram illustrating the process of printer printing and quality inspection, showing steps from receipt to print output.
text_image
NewMessage File Edit View Insert Format Tools Message Info Send 1 2 3 4 5 6 7 8 9 10 11 12 13 14 15 16 17 18 19 20 21 22 23 24 25 26 27 28 29 30 31 32 33 34 35 36 37 38 39 40 41 42 43 44 45 46 47 48 49 50 51 52 53 54 55 56 57 58 59 60 61 62 63 64 65 66 67 68 69 70 71 72 73 74 75 76 77 78 79 80 Subs: After: [2008.10.13_01_42.p#(534)]
For an e-mail program, the application set in Internet Explorer is used.
Even if you use an e-mail program selected in Internet Explorer, the e-mail program may not interact with the ScanSnap properly. In this case, contact the manufacturer of that e-mail program.
Windows 7/Windows Vista
- In Internet Explorer, select the [Tools] menu → [Internet Options] → the [Programs] tab → the [Set programs] button → [Set your default programs].
⇒ The [Set default programs] dialog box appears.
- From [Programs], select an e-mail program you want to use.
- Select [Set this program as default] and click the [OK] button.
Windows XP/Windows 2000
An e-mail program selected in the Internet Explorer [Tools] menu → [Internet Options] → [Programs] tab → [E-mail] drop-down list is used.
If no e-mail program is selected, select an e-mail program you want to use in the [E-mail] drop-down list. E-mail programs that cannot be selected here cannot be used.
E-mail programs that have been verified:
- Windows Live Mail (Windows XP or later)
- Microsoft Windows Mail (for Windows Vista)
- Microsoft Office Outlook 2003 / 2007
- Microsoft Outlook Express V6.0
- Thunderbird version 2.0.0.16
Using the Quick Menu
1. Load the document into the ScanSnap.
For details, refer to "Paper Sizes of Documents to Be Scanned" (page 27) and "Loading Documents" (page 29).

Up to ten files can be sent by e-mail.
Scanning multiple sheets of documents with the scanning settings shown below creates multiple files. Pay attention to the number of sheets of the loaded document.
- File format: JPEG(*.jpg)
- [Generate one PDF file per (n) page(s)] check box is selected
2. Press the [Scan] button on the ScanSnap.
⇒ Scanning is started.
⇒ When scanning is complete, the Quick Menu appears.
3. Change settings for the [Scan to E-mail] action (If you do not want to change settings, go to Step 4.).
- Move the mouse pointer to the mark on the [Scan to E-mail] icon, and then select the [Settings] menu.
![FUJITSU ScanSnap S1500M - Change settings for the [Scan to E-mail] action (If you do not want to change settings, go to Step 4.). - 1](/content/2026/06/1236416/images/2d604b92def21550e7c70fb7dc31ff54c22348c945e1cdd7e0951783e1752ed8.jpg)
text_image
ScanSnap Page 1/1 Scan to ScanSnap Organizer Scan to CardMinder Scan to Folder Scan to E-mail Scan to Print Scan to Word Scan to Excel Scan to PowerPoint(R) Scan to SharePoint Scan to Rack2-Filer Scan to Picture Folder Settings... Show Details⇒ The [Scan to E-mail - Options] dialog box appears.
2. Change settings.
For details about the [Scan to E-mail - Options] dialog box, refer to ScanSnap Manager Help.
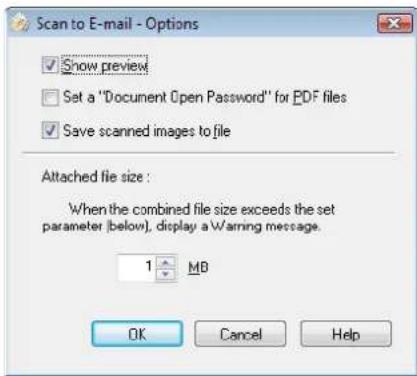
text_image
Scan to E-mail - Options ✓ Show preview □ Set a "Document Open Password" for PDF files ✓ Save scanned images to file Attached file size : When the combined file size exceeds the set parameter (below), display a Warning message. 1 MB OK Cancel Help- Click the [OK] button to close the [Scan to E-mail -Options] dialog box.
4. Click the [Scan to E-mail] icon.
![FUJITSU ScanSnap S1500M - Click the [Scan to E-mail] icon. - 1](/content/2026/06/1236416/images/5e93852ccd8c0ee103f1f40941bf66864ce7f3749080b80e9a4a219e1bbaf6eb.jpg)
text_image
ScanSnap Page 1/1 Scan to ScanSnap Organizer Scan to CardMinder Scan to Folder Scan to E-mail Scan to Print Scan to Word Scan to Excel Scan to PowerPoint(R) Scan to SharePoint Scan to Rack2-Filer Scan to Picture Folder Show Details⇒ The [Scan to E-mail] dialog box appears.
When you have cleared the [Show preview] check box in Step 3., an e-mail program starts, and the files are attached to an e-mail message.
5. Check the scanned image on the [Scan to E-mail] dialog box.
You can also change file names, specify whether to set a "Document Open Password", and specify whether to save scanned files attached to an e-mail message after scanning.
For details about the [Scan to E-mail] dialog box, refer to ScanSnap Manager Help.
![FUJITSU ScanSnap S1500M - Check the scanned image on the [Scan to E-mail] dialog box. - 1](/content/2026/06/1236416/images/04591cef9ebc85e4b11ce3fa2d5503411a57613b5b4f6ae96bafd711746f238a.jpg)
text_image
Scan to E-mail Specify file name File name: 1/ 2 File PDF 2008 11 07 15 29 32 History Serialize... Combined file size 0.07 MB Set a "Document Open password" for PDF files Save scanned images to file Attach Cancel Do not show this dialog again HelpPreview area
6. Click the [Attach] button.
⇒ When the [Set a "Document Open password" for PDF files] check box is selected in the [Scan to E-mail - Options] dialog box or [Scan to E-mail] dialog box, the [Scan to E-mail - Set a password] dialog box appears.
![FUJITSU ScanSnap S1500M - Click the [Attach] button. - 1](/content/2026/06/1236416/images/e899b59e1cc6ec9f4c7e0824115c5b7479fbece74443b76ab3c9fb162fa190cb.jpg)
text_image
Scan to E-mail - Set a password Set a password for PDF files. Password: 1 Confirm password: OK Cancel HelpEnter a password, and then click the [OK] button.
⇒ An e-mail program is started with the selected files being attached to an e-mail message.
![FUJITSU ScanSnap S1500M - Click the [Attach] button. - 2](/content/2026/06/1236416/images/cb29b394581f5f476135d6ea3f9251d244dd306636927112645dd63afa7bcd9f.jpg)
text_image
New Message File Edit View Insert Format Tools Message Help Send To: Cc: Subject: Attack: 2008_10_15_10_44_42.pdf (153 KB)![FUJITSU ScanSnap S1500M - Click the [Attach] button. - 3](/content/2026/06/1236416/images/35405528ca0f57b1e55f0f0033f4ec3e5ea9e9de34db59b79afab797c915f578.jpg)
- When the Quick Menu is displayed, the ScanSnap does not perform a scan even if you press the [Scan] button, unless the [Scan to E-mail] dialog box is closed. Close the [Scan to E-mail] dialog box before scanning another document.
- Do not move, delete, or rename the scanned image data in other applications after the Quick Menu is displayed and before the [Scan to E-mail] dialog box is closed.
Without using the Quick Menu
1. Select [Scan Button Settings] from the Right-Click Menu.
![FUJITSU ScanSnap S1500M - Select [Scan Button Settings] from the Right-Click Menu. - 1](/content/2026/06/1236416/images/ad642a3c07bbadfbfc4869d7808c943a0330d8a82fa938e2e22bfdf10ff49b24.jpg)
text_image
Duplex scan Simplex scan Scan Button Settings... Profile Management... Show scanning results Check consumable supplies... Help Exit⇒ The ScanSnap setup dialog box appears.
2. In the [Application] drop-down list on the [Application] tab, select [Scan to E-mail].
![FUJITSU ScanSnap S1500M - In the [Application] drop-down list on the [Application] tab, select [Scan to E-mail]. - 1](/content/2026/06/1236416/images/a13059a7fc307d4807d6140eb8c8dcfbb02e50a6c202ef514043144d0ea6def3.jpg)
text_image
ScanSnap Color Image Scanner Use Quick Menu Recommended Small File High Quality Profile Standard Application Save Scanning File option Paper Compression Select the application you would like to use. Application: Scan to E-mail Add or Remove... Application Settings... Hide OK Cancel Apply![FUJITSU ScanSnap S1500M - In the [Application] drop-down list on the [Application] tab, select [Scan to E-mail]. - 2](/content/2026/06/1236416/images/064b62eb3e28a6a6960a6dd04fdb620a90e40bb7a8383687f244984991c07689.jpg)
- The profiles can also be set by selecting [Scan to E-mail] from the [Profile] drop-down list or from the Left-Click Menu.
- Finishing the procedure above, you can save desired settings as profiles. The profiles can be selected in the Left-Click Menu from the next time you scan documents. For details about how to save scanning settings, refer to "Saving Scanning Settings" (page 71).
3. Change settings for the [Scan to E-mail] action (If you do not want to change settings, go to Step 4.).
- Click the [Application Settings] button.
![FUJITSU ScanSnap S1500M - Change settings for the [Scan to E-mail] action (If you do not want to change settings, go to Step 4.). - 1](/content/2026/06/1236416/images/445792c397756486b5e98767ed2466c627a9282ea4dc8705e583d6f9549108d9.jpg)
text_image
ScanSnap Color Image Scanner Use Quick Menu Recommended Small File High Quality Profile Standard Application Save Scanning File option Paper Compression Select the application you would like to use. Application: Scan to E-mail Add or Remove... Application Settings... Hide OK Cancel Apply⇒ The [Scan to E-mail - Options] dialog box appears.
- Change settings.
For details about the [Scan to E-mail - Options] dialog box, refer to ScanSnap Manager Help.
![FUJITSU ScanSnap S1500M - Change settings for the [Scan to E-mail] action (If you do not want to change settings, go to Step 4.). - 2](/content/2026/06/1236416/images/ece275c94679ca84cf0fbceb46b5def3cbf992c5754f9d6f86999c7102912a35.jpg)
text_image
Scan to E-mail - Options Show preview Set a "Document Open Password" for PDF files Save scanned images to file Attached file size: When the combined file size exceeds the set parameter (below), display a Waning message. 1 MB OK Cancel Help- Click the [OK] button to close the [Scan to E-mail -Options] dialog box.
4. Click the [OK] button to close the ScanSnap setup dialog box.
![FUJITSU ScanSnap S1500M - Click the [OK] button to close the ScanSnap setup dialog box. - 1](/content/2026/06/1236416/images/b246be9bbf8b051cf8a35cffe5eb413d1adf6719149ba4896d993abdc400f24d.jpg)
Even if the [Scan] button on the ScanSnap is pressed, the ScanSnap setup dialog box closes.
5. Load the document into the ScanSnap.
For details, refer to "Paper Sizes of Documents to Be Scanned" (page 27) and "Loading Documents" (page 29).

Up to ten files can be sent by e-mail.
Scanning multiple sheets of documents with the scanning settings shown below creates multiple files. Pay attention to the number of sheets of the loaded document.
- File format: JPEG(*.jpg)
- [Generate one PDF file per (n) page(s)] check box is selected
6. Press the [Scan] button on the ScanSnap.
⇒ Scanning is started.
⇒ When scanning is complete, the [Scan to E-mail] dialog box appears.
When you have cleared the [Show preview] check box in Step 3., an e-mail program starts, and the files are attached to an e-mail message.
7. Check the scanned image on the [Scan to E-mail] dialog box.
You can also change file names, specify whether to set a "Document Open Password", and specify whether to save scanned files attached to an e-mail message after scanning.
For details about the [Scan to E-mail] dialog box, refer to ScanSnap Manager Help.
![FUJITSU ScanSnap S1500M - Check the scanned image on the [Scan to E-mail] dialog box. - 1](/content/2026/06/1236416/images/423b20dda8d00d83158c25a412dec0d12091d6f6443498e609b47f8bc4aaa232.jpg)
text_image
Scan to E-mail Spotify file name File name: 1/ 2 File PDF 2008 11 07 15 29.32 History Serialize... Combined file size 0.07 MB ✓ Set a "Document Open password" for PDF files ✓ Save scanned images to file Attach Cancel Do not show this dialog again HelpPreview area
8. Click the [Attach] button.
⇒ When the [Set a "Document Open password" for PDF files] check box is selected in the [Scan to E-mail - Options] dialog box or [Scan to E-mail] dialog box, the [Scan to E-mail - Set a password] dialog box appears.
![FUJITSU ScanSnap S1500M - Click the [Attach] button. - 1](/content/2026/06/1236416/images/26db71fd7053e525bb07ae42535063ce0166019ad2d29931545cabbd96eef750.jpg)
text_image
Scan to E-mail - Set a password Set a password for PDF files: Password: 1 Confirm password: OK Cancel HebEnter a password, and then click the [OK] button.
⇒ An e-mail program is started with the selected files being attached to an e-mail message.
![FUJITSU ScanSnap S1500M - Click the [Attach] button. - 2](/content/2026/06/1236416/images/3b36bdce64f70631e70f7e02c4f8c77d2239dceda896a3104eaae555df472eaa.jpg)
text_image
New Message File Edit View Insert Format Tools Message Help Send To: Cc: Subject: Attach: 2008_10_15_10_44_42.pdf (153 KB)![FUJITSU ScanSnap S1500M - Click the [Attach] button. - 3](/content/2026/06/1236416/images/eefde88d6dee863f4605f4940731ec1ca87c8e0f0a12cf8a36fc28a7e201007b.jpg)
- When the [Scan to E-mail] dialog box is displayed, scanning cannot be performed with the ScanSnap. Close the [Scan to E-mail] dialog box before scanning another document.
- Do not move, delete, or rename the scanned image data in other applications when the [Scan to E-mail] dialog box is displayed.
■ Using the ScanSnap as a Copy Machine
This section describes how to print scanned image data with a printer.
By printing scanned image data directly from the ScanSnap, you can use the ScanSnap as a copy machine.

flowchart
graph TD
    A["Receipts from printer"] --> B["Printing process"]
    B --> C["Printed printer with yellow paper and red arrow pointing to print paper, labeled 'ABC 123'."]

- By default, a printer that is [Set as Default Printer] in Windows Control Panel is used. You may also change settings so that a printer can be changed after scanning.
- Depending on the document conditions and scanning settings, the printed image data may contain shadows (which appear as lines) on its edges.
Using the Quick Menu
1. Load the document into the ScanSnap.
For details, refer to "Paper Sizes of Documents to Be Scanned" (page 27) and "Loading Documents" (page 29).
2. Press the [Scan] button on the ScanSnap.
⇒ Scanning is started.
⇒ When scanning is complete, the Quick Menu appears.
3. Change settings for the [Scan to Print] action (If you do not want to change settings, go to Step 4.).
- Move the mouse pointer to the mark on the [Scan to Print] icon, and then select the [Settings] menu.
![FUJITSU ScanSnap S1500M - Change settings for the [Scan to Print] action (If you do not want to change settings, go to Step 4.). - 1](/content/2026/06/1236416/images/401ad52a3c3599dc13d29050c90f79172c53aa3b54ea5470864e84315a15090e.jpg)
text_image
ScanSnap Page 1/1 Scan to ScanSnap Organizer Scan to CardMinder Scan to Folder Scan to E-mail Scan to Print Scan to Word Scan to Excel Scan to PowerPoint(R) Scan to SharePoint Scan to Rack2-Filer Scan to Picture Folder Settings... ShowDetails⇒The [Scan to Print - Options] dialog box appears.
- Change settings.
For details about the [Scan to Print - Options] dialog box, refer to ScanSnap Manager Help.
![FUJITSU ScanSnap S1500M - Change settings for the [Scan to Print] action (If you do not want to change settings, go to Step 4.). - 2](/content/2026/06/1236416/images/ed8c936f83f4694bba97f68b4eeae7fb3ca5dac245f5be73e70f33d316ca5500.jpg)
text_image
Scan to Print - Options ✓ Keep data used for printing as files ✓ Show "Print" dialog OK Cancel Help- Click the [OK] button to close the [Scan to Print - Options] dialog box.
4. Click the [Scan to Print] icon.
![FUJITSU ScanSnap S1500M - Click the [Scan to Print] icon. - 1](/content/2026/06/1236416/images/ca81290724fcaae849061ec2a6497d9974e036987c8e3ef2b1212013ef936c24.jpg)
text_image
ScanSnap Page 1/1 Scan to ScanSnap Organizer Scan to CardMinder Scan to Folder Scan to E-mail Scan to Print Scan to Word Scan to Excel Scan to PowerPoint(R) Scan to SharePoint Scan to Rack2-Filer Scan to Picture Folder Show Details⇒ The [Scan to Print] dialog box appears.
If the [Show "Print" dialog] check box is cleared in Step 3., printing is immediately performed.
5. Check the scanned image on the [Scan to Print] dialog box.
You can select the printer to be used and specify the number of copies and size of the scanned image data to be printed.
For details about the [Scan to Print] dialog box, refer to ScanSnap Manager Help.
![FUJITSU ScanSnap S1500M - Check the scanned image on the [Scan to Print] dialog box. - 1](/content/2026/06/1236416/images/cf7cadbbff10c0c810e074dff2ee48ac5d4ec75da4b168a888d0850365dc5d17.jpg)
text_image
Scan to Print Find printer Name: Microsoft XPS Document White Properties... Print options Copies: 1 Same size/Scaling down: Same size Allow automatic rotation Center the image and print Keep data used for printing as files Print Cancel Do not show this dialog again 1/1 HelpPreview area
6. Click the [Print] button.
⇒ Printing is performed.
![FUJITSU ScanSnap S1500M - Click the [Print] button. - 1](/content/2026/06/1236416/images/70e87bc3be57655a05fbd8199e0d22be3f2927c176544e80a0defa4f87b256b1.jpg)
- When the Quick Menu is displayed, the ScanSnap does not perform a scan even if you press the [Scan] button, unless the [Scan to Print] dialog box is closed. Close the [Scan to Print] dialog box before scanning another document.
- Do not move, delete, or rename the scanned image data in other applications after the Quick Menu is displayed and before the [Scan to Print] dialog box is closed.
Without using the Quick Menu
1. Select [Scan Button Settings] from the Right-Click Menu.
![FUJITSU ScanSnap S1500M - Select [Scan Button Settings] from the Right-Click Menu. - 1](/content/2026/06/1236416/images/3460fd59bbc51d73d74680308bf7e855b861d3fd6a78cdbe3a16ff83c2df2e74.jpg)
text_image
Duplex scan Simplex scan Scan Button Settings... Profile Management... Show scanning results Check consumable supplies... Help Exit⇒ The ScanSnap setup dialog box appears.
2. In the [Application] drop-down list on the [Application] tab, select [Scan to Print].
![FUJITSU ScanSnap S1500M - In the [Application] drop-down list on the [Application] tab, select [Scan to Print]. - 1](/content/2026/06/1236416/images/ad851621918a4d4ca62cc4a2010be7aed2265462f0e41d46c2a68ed73e4ccc4e.jpg)
text_image
ScanSnap Color Image Scanner Use Quick Menu Recommended Small File High Quality Profile Standard Application Save Scanning File option Paper Compression Select the application you would like to use. Application: Scan to Print Add or Remove... Application Settings... Hide OK Cancel Apply![FUJITSU ScanSnap S1500M - In the [Application] drop-down list on the [Application] tab, select [Scan to Print]. - 2](/content/2026/06/1236416/images/aa1180d321ee19fbbdece5a077c2857099973bba3ef3a13b5de2ab36534b04b1.jpg)
- The profiles can also be set by selecting [Scan to Print] from the [Profile] drop-down list or from the Left-Click Menu.
- Finishing the procedure above, you can save desired settings as profiles. The profiles can be selected in the Left-Click Menu from the next time you scan documents. For details about how to save scanning settings, refer to "Saving Scanning Settings" (page 71).
3. Change settings for the [Scan to Print] action (If you do not want to change settings, go to Step 4.).
- Click the [Application Settings] button.
![FUJITSU ScanSnap S1500M - Change settings for the [Scan to Print] action (If you do not want to change settings, go to Step 4.). - 1](/content/2026/06/1236416/images/6192e7301da6c8437505677da22f8ee6184c868e282b6cc110af28ca827cfdf6.jpg)
text_image
ScanSnap Color Image Scanner Use Quick Menu Recommended Small File High Quality Profile Standard Application Save Scanning File option Paper Compression Select the application you would like to use. Application: Scan to Print Add or Remove... Application Settings... Hide OK Cancel Apply⇒ The [Scan to Print - Options] dialog box appears.
- Change settings.
For details about the [Scan to Print - Options] dialog box, refer to ScanSnap Manager Help.
![FUJITSU ScanSnap S1500M - Change settings for the [Scan to Print] action (If you do not want to change settings, go to Step 4.). - 2](/content/2026/06/1236416/images/1fe04e2d5e72cb6edb57dc04593ebcd35b4cd790e5be0c60cb1d65bae887c6bb.jpg)
text_image
Scan to Print - Options ✓ Keep data used for printing as files ✓ Show "Print" dialog OK Cancel Help- Click the [OK] button to close the [Scan to Print - Options] dialog box.
4. Click the [OK] button to close the ScanSnap setup dialog box.
![FUJITSU ScanSnap S1500M - Click the [OK] button to close the ScanSnap setup dialog box. - 1](/content/2026/06/1236416/images/0c43b4d72644ec630d336947e65bc5cea8359983cf260b5fa15c934bc77bf48b.jpg)
Even if the [Scan] button on the ScanSnap is pressed, the ScanSnap setup dialog box closes.
5. Load the document into the ScanSnap.
For details, refer to "Paper Sizes of Documents to Be Scanned" (page 27) and "Loading Documents" (page 29).
6. Press the [Scan] button on the ScanSnap.
⇒ Scanning is started.
⇒ When scanning is complete, the [Scan to Print] dialog box appears.
If the [Show "Print" dialog] check box is cleared in Step 3., printing is immediately performed.
7. Check the scanned image on the [Scan to Print] dialog box.
You can select the printer to be used and specify the number of copies and size of the scanned image data to be printed.
For details about the [Scan to Print] dialog box, refer to ScanSnap Manager Help.
![FUJITSU ScanSnap S1500M - Check the scanned image on the [Scan to Print] dialog box. - 1](/content/2026/06/1236416/images/c6d75489f1d6193932f27a143edae1b33ca0344b34bcb47d37ace0f1fa0f1696.jpg)
text_image
Scan to Print Find printer Name: Microsoft XPS Document Manager Properties Print options Copies: 1 Same size/Scaling down: Same size Allow automatic rotation Center the image and print Keep data used for printing as files Print Cancel Do not show this dialog again PDF 2008_10_15_10_53_12 1/1Preview area
8. Click the [Print] button.
⇒ Printing is performed.
![FUJITSU ScanSnap S1500M - Click the [Print] button. - 1](/content/2026/06/1236416/images/8b6bcea1aa3930ab64610471a786e7f54e84753216c8c52a6054e463cc319917.jpg)
- When the [Scan to Print] dialog box is displayed, scanning cannot be performed with the ScanSnap. Close the [Scan to Print] dialog box before scanning another document.
- Do not move, delete, or rename the scanned image data in other applications when the [Scan to Print] dialog box is displayed.
■ Saving Files to Picture Folder
This section describes how to save scanned image data in the pictures folder.
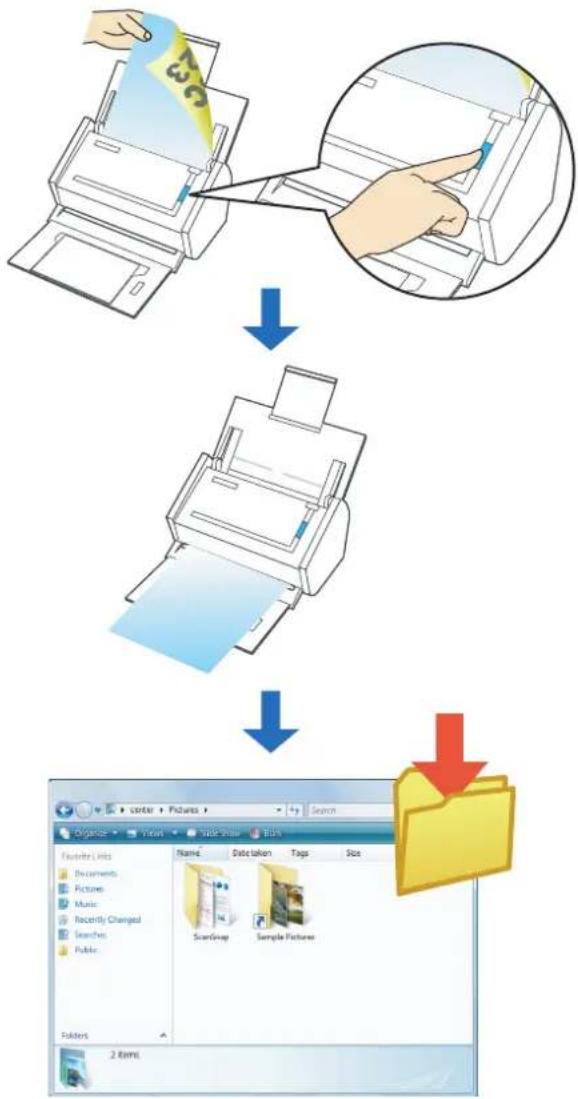
flowchart
graph TD
    A["Receipts"] --> B["Image Processing"]
    B --> C["File Selection"]
    C --> D["File Layout"]
    D --> E["File History"]
    style A fill:#f9f,stroke:#333
    style B fill:#ccf,stroke:#333
    style C fill:#cfc,stroke:#333
    style D fill:#fcc,stroke:#333
    style E fill:#ffc,stroke:#333

By default, the following folder is set as the "Pictures folder".
• Windows 7/Windows Vista
Drive name (such as C):\Users _name \Pictures\ScanSnap
• Windows XP/Windows 2000
Drive name (such as C):\Documents and Settings _name \My Documents\
My Pictures\ScanSnap
Using the Quick Menu
1. Load the document into the ScanSnap.
For details, refer to "Paper Sizes of Documents to Be Scanned" (page 27) and "Loading Documents" (page 29).
2. Press the [Scan] button on the ScanSnap.
Scanning is started.
⇒ When scanning is complete, the Quick Menu appears.
3. Change settings for the [Scan to Picture Folder] action (If you do not want to change settings, go to Step 4.).
- Move the mouse pointer to the mark on the [Scan to Picture Folder] icon, and then select the [Settings] menu.
![FUJITSU ScanSnap S1500M - Change settings for the [Scan to Picture Folder] action (If you do not want to change settings, go to Step 4.). - 1](/content/2026/06/1236416/images/b32108f1c0d1a410509a9c8212c0bcdcfc2b1246be7e6b31aebf52a1108c66d2.jpg)
text_image
ScanSnap Page 1/1 Scan to ScanSnap Organizer Scan to CardMinder Scan to Folder Scan to E-mail Scan to Print Scan to Word Scan to Excel Scan to PowerPoint(R) Scan to SharePoint Scan to Pack2-Filer Scan to Picture Folder Settings... Show Details⇒The [Scan to Picture Folder - Options] dialog box appears.
- Change settings.
For details about the [Scan to Picture Folder - Options] dialog box, refer to ScanSnap Manager Help.
![FUJITSU ScanSnap S1500M - Change settings for the [Scan to Picture Folder] action (If you do not want to change settings, go to Step 4.). - 2](/content/2026/06/1236416/images/af5b8547f44d66f4016546a8c460499dfaac314b01043580914100c5311007be.jpg)
text_image
Scan to Picture Folder - Options Save scanned images to file Show preview OK Cancel Help- Click the [OK] button to close the [Scan to Picture Folder - Options] dialog box.
4. Click the [Scan to Picture Folder] icon.
![FUJITSU ScanSnap S1500M - Click the [Scan to Picture Folder] icon. - 1](/content/2026/06/1236416/images/3f51d45e8b1293bac5a7ec9491cb52a01aaa9c83506eba001051f4d1b68433ce.jpg)
text_image
ScanSnap Page 1/1 Scan to ScanSnap Organizer Scan to CardMinder Scan to Folder Scan to E-mail Scan to Print Scan to Word Scan to Excel Scan to PowerPoint(R) Scan to SharePoint Scan to Rack2-Files Scan to Picture Folder Show Details⇒ The [Scan to Picture Folder] dialog box appears.
When you have cleared the [Show preview] check box in Step 3., the scanned image data is saved in the pictures folder.
5. Check the scanned image on the [Scan to Picture Folder] dialog box.
You can rename files.
For details about the [Scan to Picture Folder] dialog box, refer to ScanSnap Manager Help.
![FUJITSU ScanSnap S1500M - Check the scanned image on the [Scan to Picture Folder] dialog box. - 1](/content/2026/06/1236416/images/14d6b666b1b53d660a9d316ff2bc1e6b9be6aabc04eba4d4c0129cb752065553.jpg)
text_image
Scan to Picture Folder Specify file name File name: 1/ 2 File JPG 2008.10.21.09.20.520001 History Serialize... Combined file size 1.19 MB Specify destination folder Save in : C:\Users\Pictures\ScanSnap History Browse... Save scanned images to file Save Cancel Do not show this dialog again Preview area![FUJITSU ScanSnap S1500M - Check the scanned image on the [Scan to Picture Folder] dialog box. - 2](/content/2026/06/1236416/images/d84a531a07247a6bc0f7cea43d9fc64ca11ebfaebdffce0bfc9c0fb9a0ce4ff7.jpg)
In [Specify destination folder], you can change the destination folder to a folder other than the pictures folder.
6. Click the [Save] button.
⇒ The scanned image data is saved in the pictures folder.
![FUJITSU ScanSnap S1500M - Click the [Save] button. - 1](/content/2026/06/1236416/images/5335bc469be7dcb64eee118214e4ef616324782e7bb5c557dcb6b06570469e69.jpg)
- When the Quick Menu is displayed, the ScanSnap does not perform a scan even if you press the [Scan] button, unless the [Scan to Picture Folder] dialog box is closed. Close the [Scan to Picture Folder] dialog box before scanning another document.
- Do not move, delete, or rename the scanned image data in other applications after the Quick Menu is displayed and before the [Scan to Picture Folder] dialog box is closed.
Without using the Quick Menu
1. Select [Scan Button Settings] from the Right-Click Menu.
![FUJITSU ScanSnap S1500M - Select [Scan Button Settings] from the Right-Click Menu. - 1](/content/2026/06/1236416/images/cce86bc5f829548880bc21e0a9b4c441a9dc02b9dba9168118e43afbf89e0733.jpg)
text_image
Duplex scan Simplex scan Scan Button Settings... Profile Management... Show scanning results Check consumable supplies... Help Exit⇒ The ScanSnap setup dialog box appears.
2. In the [Application] drop-down list on the [Application] tab, select [Scan to Picture Folder].
![FUJITSU ScanSnap S1500M - In the [Application] drop-down list on the [Application] tab, select [Scan to Picture Folder]. - 1](/content/2026/06/1236416/images/4c36f15c808bf6d5b1a5f753345a125d7d96f7dc1fc36ed963e5effbaceaccfb.jpg)
text_image
ScanSnap Color Image Scanner Use Quick Menu Recommended Small File High Quality Profile Standard Application Save Scanning File option Paper Compression Select the application you would like to use. Application: Scan to Picture Folder Add or Remove... Application Settings... Hide OK Cancel Apply![FUJITSU ScanSnap S1500M - In the [Application] drop-down list on the [Application] tab, select [Scan to Picture Folder]. - 2](/content/2026/06/1236416/images/f00b1fc9a53a4ab61f5e05df767bc80e140eb0d29693675925ee553628129de0.jpg)
Finishing the procedure above, you can save desired settings as profiles. The profiles can be selected in the Left-Click Menu from the next time you scan documents. For details about how to save scanning settings, refer to "Saving Scanning Settings" (page 71).
3. Change settings for the [Scan to Picture Folder] action (If you do not want to change settings, go to Step 4.).
- Click the [Application Settings] button.
![FUJITSU ScanSnap S1500M - Change settings for the [Scan to Picture Folder] action (If you do not want to change settings, go to Step 4.). - 1](/content/2026/06/1236416/images/ecb2fc273f6eb72c6fa3bc259f038bbc6e6d9f02e1dadc90adb1a3f37d73becf.jpg)
text_image
ScanSnap Color Image Scanner Use Quick Menu Recommended Small File High Quality Profile Standard Application Save Scanning File option Paper Compression Select the application you would like to use. Application: Scan to Picture Folder Add or Remove... Application Settings... Hide OK Cancel Apply⇒The [Scan to Picture Folder - Options] dialog box appears.
- Change settings.
For details about the [Scan to Picture Folder - Options] dialog box, refer to ScanSnap Manager Help.
![FUJITSU ScanSnap S1500M - Change settings for the [Scan to Picture Folder] action (If you do not want to change settings, go to Step 4.). - 2](/content/2026/06/1236416/images/64b4ae2f3c0f5525bc1075fe443b2e4406023847431cc91118f006ce13ad1327.jpg)
text_image
Scan to Picture Folder - Options Save scanned images to file Show preview OK Cancel Help- Click the [OK] button to close the [Scan to Picture Folder - Options] dialog box.
4. Click the [OK] button to close the ScanSnap setup dialog box.
![FUJITSU ScanSnap S1500M - Click the [OK] button to close the ScanSnap setup dialog box. - 1](/content/2026/06/1236416/images/7a77aa23d620b8a044272e68361f56a5b208c1d519ce25dda5161d02a9c4627d.jpg)
Even if the [Scan] button on the ScanSnap is pressed, the ScanSnap setup dialog box closes.
5. Load the document into the ScanSnap.
For details, refer to "Paper Sizes of Documents to Be Scanned" (page 27) and "Loading Documents" (page 29).
6. Press the [Scan] button on the ScanSnap.
Scanning is started.
⇒ When scanning is complete, the [Scan to Picture Folder] dialog box appears.
When you have cleared the [Show preview] check box in Step 3., the scanned image data is saved in the pictures folder.
7. Check the scanned image on the [Scan to Picture Folder] dialog box.
You can rename the file.
For details about the [Scan to Picture Folder] dialog box, refer to ScanSnap Manager Help.
![FUJITSU ScanSnap S1500M - Check the scanned image on the [Scan to Picture Folder] dialog box. - 1](/content/2026/06/1236416/images/f84c013fce5dd02766262dd8fca71695fdd80d692ae3085a79005e4d461b8711.jpg)
text_image
Scan to Picture Folder Specify file name File name: 1/ 2 File JPG 2008 10 21 03 20 520001 History Serialize... Combined file size 1.19 MB Specify destination folder Save in: C:\Users\Pictures\ScanSnap History Browse... Save scanned images to file Save Cancel Do not show the dialog again Preview area![FUJITSU ScanSnap S1500M - Check the scanned image on the [Scan to Picture Folder] dialog box. - 2](/content/2026/06/1236416/images/d677492005c924d8d3cc5bd118a10c2276abbd24ee297200d0345052c6746d35.jpg)
In [Specify destination folder], you can change the destination folder to a folder other than the pictures folder.
8. Click the [Save] button.
⇒ The scanned image data is saved in the pictures folder.
![FUJITSU ScanSnap S1500M - Click the [Save] button. - 1](/content/2026/06/1236416/images/65a1c79371f315e36489df845873ed697ee44af0e9bf1504252625777927a94b.jpg)
- When the [Scan to Picture Folder] dialog box is displayed, scanning cannot be performed with the ScanSnap. Close the [Scan to Picture Folder] dialog box before scanning another document.
- Do not move, delete, or rename the scanned image data in other applications when the [Scan to Picture Folder] dialog box is displayed.
■ Converting into Word/Excel/PowerPoint Documents
This section describes how to convert the scanned image data into Word/Excel/PowerPoint files through ABBYY FineReader for ScanSnap, which is supplied with the ScanSnap.
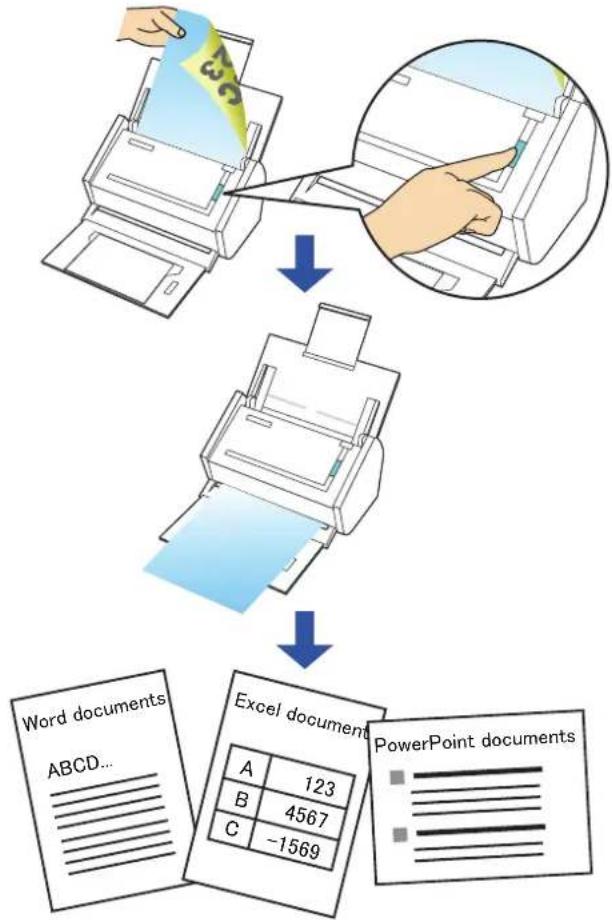
flowchart
graph TD
    A["Receipts"] --> B["Processing"]
    B --> C["Excel Documents"]
    C --> D["PowerPoint Documents"]

- ABBYY FineReader for ScanSnap must be installed in your computer in order to perform text-recognition.
- Use this function in a computer environment where Word, Excel and PowerPoint are installed. You cannot view the documents converted into Word, Excel, or PowerPoint files unless Word, Excel, or PowerPoint is installed or you have completed user registration to use these applications. Install those applications and complete user registration to view the converted documents on your computer.
Other than Word, Excel and PowerPoint, Visual Basic for Applications of Office Shared Features is required (Visual Basic for Applications of Office Shared Features is installed at the same time when you perform a standard installation of Microsoft Office.).
- ABBYY FineReader for ScanSnap can be used with the following versions of Word, Excel, and PowerPoint.
- Word: 2000 / 2002 / 2003 / 2007
- Excel: 2000 / 2002 / 2003 / 2007
- PowerPoint: 2002 / 2003 / 2007
- Do not scan Word/Excel/PowerPoint files while you are working on Word, Excel or PowerPoint. In addition, do not operate Word, Excel, or PowerPoint while this function is executing. A message such as "Call is rejected by callee" may appear and the resulting document may not be displayed.

About the OCR (Optical Character Recognition) function of ABBYY FineReader for ScanSnap
- ABBYY FineReader for ScanSnap is an application used exclusively with the ScanSnap. This program can text-recognize only PDF files that are created by using the ScanSnap. It cannot text-recognize PDF files created by using Adobe Acrobat or other applications.
- Some types of documents are occasionally misrecognized. Before recognition, check whether the documents you want to convert are suitable for conversion according to the following guidelines.
Scan to Word
- Documents suitable for conversion
Documents created by using simple page layout with one or two columns
- Documents not suitable for conversion
Documents created by using complex page layout comprised of diagrams, tables, and letters, such as a brochure, magazine, and newspaper
Scan to Excel
- Documents suitable for conversion
Simple tables in which every border line connects to the outside borders - Documents not suitable for conversion
Documents containing tables without borders, complex tables with too many borders, convoluted tables containing sub-tables, diagrams, graphs and charts, photographs, and characters written in vertical direction
(Diagrams, graphs and charts, photographs, and characters written in vertical direction are not converted.)
Scan to PowerPoint(R)
- Documents suitable for conversion
Documents consisting of only characters and simple graphs or tables with the white or light monocolor background - Documents not suitable for conversion
Documents with complex page layout comprised of characters, diagrams, and illustrations, documents that have characters on the photograph or patterned background, and documents that have lightly colored characters on the deeper colored background.
- The following parameters may not be inherited from the originals during conversion. It is recommended that the converted documents be opened with Word, Excel, or PowerPoint to correct or edit misrecognized letters.
- Font and size of characters
- Character spacing and line spacing
- Underline, bold, and Italic
- Superscript/subscript
- The following types of documents may be misrecognized.
In such a case, recognition may be corrected by changing the [Color mode] to [Color] and/or improving the resolution (Image quality).
- Documents containing handwritten characters
- Text including small characters (smaller than 10 points)
- Skewed documents
- Documents written in languages other than the specified language for text recognition
- Documents with characters on an unevenly colored background e.g. Shaded characters
- Documents with many decorated characters e.g. Decorated characters (embossed/outlined)
- Documents with characters on a patterned background e.g. Characters overlapping illustrations and diagrams
- Documents with many characters contacting underlines or borders
- Documents of complex layout as well as documents including unreadable characters (It may take an extended period of time to convert these documents.)

- The following message appears when you convert a long page document into a Word file, and the conversion result may be divided into more than one page.
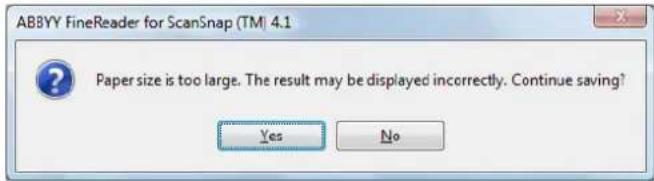
text_image
ABBYY FineReader for ScanSnap (TM) 4.1 Paper size is too large. The result may be displayed incorrectly. Continue saving? Yes No- A converted Excel worksheet can contain up to 65,536 rows.
- When converting to Excel files, information for the layout of the entire document, diagrams, and height/width of graphs and tables is not reproduced. Only tables and character strings are reproduced.
- A converted PowerPoint document will not contain the original background color and patterns.
- Documents upside down or in landscape orientation cannot be recognized properly. Select the [Allow automatic image rotation] check box (page 165), or load documents face down in portrait orientation.
- On the ScanSnap setup dialog box, even if the [Generate one PDF file per (n) page(s)] check box is selected on the [File option] tab → [Option], the conversion result will be saved as one file.

You can change the scanning settings applied during conversion to Word, Excel, or PowerPoint documents in the ABBYY FineReader for ScanSnap setup dialog box.
Select the [Start] menu → [All Programs] → [ABBYY FineReader for ScanSnap(TM) 4.1] → [ABBYY FineReader for ScanSnap(TM) 4.1] to show the following dialog box.
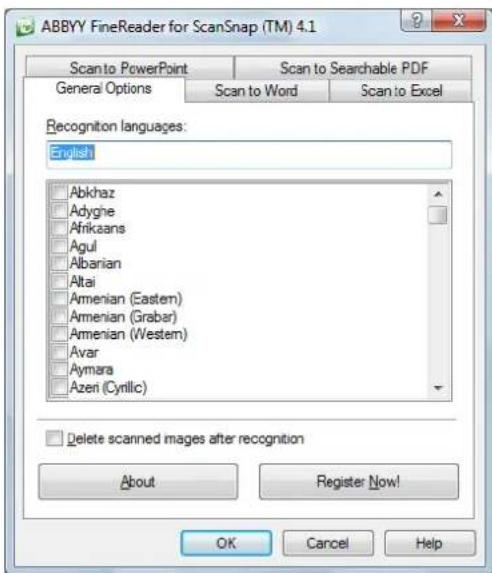
text_image
ABBYY FineReader for ScanSnap (TM) 4.1 Scan to PowerPoint Scan to Searchable PDF General Options Scan to Word Scan to Excel Recognition languages: English Abkhaz Adygne Afrikaans Agul Albanian Altai Amenian (Eastern) Amenian (Grabar) Amenian (Western) Avar Aymara Azeri (Cyrilic) Delete scanned images after recognition About Register Now! OK Cancel HelpFor details about how to set, refer to the ABBYY FineReader for ScanSnap User's Guide.
Using the Quick Menu
1. Load the document into the ScanSnap.
For details, refer to "Paper Sizes of Documents to Be Scanned" (page 27) and "Loading Documents" (page 29).
2. Press the [Scan] button on the ScanSnap.
Scanning is started.
⇒ When scanning is complete, the Quick Menu appears.
3. Click the [Scan to Word], [Scan to Excel], or [Scan to PowerPoint(R)] icon.
![FUJITSU ScanSnap S1500M - Click the [Scan to Word], [Scan to Excel], or [Scan to PowerPoint(R)] icon. - 1](/content/2026/06/1236416/images/3f3294be1a33d8828ed7f7965df15a3d66e8b4b8166316f00ffb77d160cb8556.jpg)
text_image
ScanSnap Page 1/1 Scan to ScanSnap Organizer Scan to CardMinder Scan to Folder Scan to E-mail Scan to Print Scan to Word Scan to Excel Scan to PowerPoint(R) Scan to SharePoint Scan to Pack2-File Scan to Picture Folder Show Details![FUJITSU ScanSnap S1500M - Click the [Scan to Word], [Scan to Excel], or [Scan to PowerPoint(R)] icon. - 2](/content/2026/06/1236416/images/012997c7931e2e63af9c4ed9474f5a40bd07ca883b1973283191867fe4d59ff1.jpg)
When [JPEG(*.jpg)] is selected for [File format] in the [File option] tab on the ScanSnap setup dialog box, the [Scan to Word], [Scan to Excel], and [Scan to PowerPoint(R)] icons are grayed out and cannot be selected.
⇒ The following dialog box appears, and the image data conversion to Word, Excel or PowerPoint files starts.
![FUJITSU ScanSnap S1500M - Click the [Scan to Word], [Scan to Excel], or [Scan to PowerPoint(R)] icon. - 3](/content/2026/06/1236416/images/fdc20695e94431dd1b078cf5122bb97d5657d5493c6ce778c88262de4930b9d8.jpg)
text_image
ABBYY FineReader for ScanSnap (TM) 4.1 Register your copy of ABBYY FineReader and receive the following benefits: - Free technical support; - Information about new versions of ABBYY products Register Now! Reading images: 0 image(s) processed, 2 image(s) left Stop⇒ When the conversion is complete, Word, Excel, or PowerPoint starts up, and the conversion result is displayed.
![FUJITSU ScanSnap S1500M - Click the [Scan to Word], [Scan to Excel], or [Scan to PowerPoint(R)] icon. - 4](/content/2026/06/1236416/images/76f62415b9d79eeac9bd0cc45e2059fa7ba2327ee6e68794d61b3557544f0bbc.jpg)
- It is recommended to select [Better (Color/Gray: 200 dpi, B&W: 400 dpi)] or higher resolution for [Image quality] in the [Scanning] tab on the ScanSnap setup dialog box.
- Word documents are saved in RTF format (.rtf), Excel documents, in XLS format (.xls), and PowerPoint documents, in PPT format (.ppt).
![FUJITSU ScanSnap S1500M - Click the [Scan to Word], [Scan to Excel], or [Scan to PowerPoint(R)] icon. - 5](/content/2026/06/1236416/images/fdc423c33e141b10286035e70d488ce802fd70581b49eb721d9181c4e21a0815.jpg)
- When the Quick Menu is displayed, scanning cannot be performed with the ScanSnap. Complete the action before scanning another document.
- Do not move, delete, or rename the scanned image data in other applications while the Quick Menu is displayed.
Without using the Quick Menu
1. Select [Scan Button Settings] from the Right-Click Menu.
![FUJITSU ScanSnap S1500M - Select [Scan Button Settings] from the Right-Click Menu. - 1](/content/2026/06/1236416/images/b505215a1b777a5c4e9ea561640c6e9f0fc9ed6a5dd24ae2e0bbfef0e3657cd6.jpg)
text_image
Duplex scan Simplex scan Scan Button Settings... Profile Management... Show scanning results Check consumable supplies... Help Exit⇒ The ScanSnap setup dialog box appears.
2. In the [Application] drop-down list on the [Application] tab, select [ABBYY Scan to Word], [ABBYY Scan to Excel], or [ABBYY Scan to PowerPoint(R)].
![FUJITSU ScanSnap S1500M - In the [Application] drop-down list on the [Application] tab, select [ABBYY Scan to Word], [ABBYY Scan to Excel], or [ABBYY Scan to PowerPoint(R)]. - 1](/content/2026/06/1236416/images/d2bac88030ac85c2662a42a5c2a9ce5a148f31c76a6d349656488b4ff1a080c7.jpg)
text_image
ScanSnap Color Image Scanner Use Quick Menu Recommended Small File High Quality Profile Standard Application Save Scanning File option Paper Compression Select the application you would like to use. Application: ABBYY Scan to Word Add or Remove... Hide OK Cancel Apply![FUJITSU ScanSnap S1500M - In the [Application] drop-down list on the [Application] tab, select [ABBYY Scan to Word], [ABBYY Scan to Excel], or [ABBYY Scan to PowerPoint(R)]. - 2](/content/2026/06/1236416/images/7443616bcacdba45a416e73568b6ef2302ba02c02d4b99bf6ddac09ab2c9c00d.jpg)
- The profiles can also be set by selecting [ABBYY Scan to Word], [ABBYY Scan to Excel], or [ABBYY Scan to PowerPoint(R)] from the [Profile] drop-down list or from the Left-Click Menu.
- Finishing the procedure above, you can save desired settings as profiles. The profiles can be selected in the Left-Click Menu from the next time you scan documents. For details about how to save scanning settings, refer to "Saving Scanning Settings" (page 71).
3. Click the [OK] button to close the ScanSnap setup dialog box.
![FUJITSU ScanSnap S1500M - Click the [OK] button to close the ScanSnap setup dialog box. - 1](/content/2026/06/1236416/images/d975b4206d42ba2c8cba44b516c26f019c440f4a8d9341b211d16b865450d445.jpg)
Even if the [Scan] button on the ScanSnap is pressed, the ScanSnap setup dialog box closes.
4. Load the document into the ScanSnap.
For details, refer to "Paper Sizes of Documents to Be Scanned" (page 27) and "Loading Documents" (page 29).
5. Press the [Scan] button on the ScanSnap.
⇒ Scanning is started.
⇒ After scanning is completed, the following dialog box appears, and the image data conversion to Word, Excel or PowerPoint files starts.
![FUJITSU ScanSnap S1500M - Press the [Scan] button on the ScanSnap. - 1](/content/2026/06/1236416/images/36b752713ca7ea1dc5f348d2c80a252d76d0c87ac0779e48390ddc7091ba0075.jpg)
text_image
ABBYY FineReader for ScanSnap (TM) 4.1 Register your copy of ABBYY FineReader and receive the following benefits: - Free technical support; - Information about new versions of ABBYY products Register Now! Reading images: 0 image(a) processed, 2 image(a) left: Stop⇒ When the conversion is complete, Word, Excel, or PowerPoint starts up, and the conversion result is displayed.
![FUJITSU ScanSnap S1500M - Press the [Scan] button on the ScanSnap. - 2](/content/2026/06/1236416/images/bf7ac1c8d1a1e17cf6ea634ae07948215f636d80bf7b1129ea3d8b65da0133d5.jpg)
- It is recommended to select [Better (Color/Gray: 200 dpi, B&W: 400 dpi)] or higher resolution for [Image quality] in the [Scanning] tab on the ScanSnap setup dialog box.
- Word documents are saved in RTF format (.rtf), Excel documents, in XLS format (.xls), and PowerPoint documents, in PPT format (.ppt).
■ Scanning Business Cards
This section describes how to use scanned image data of business cards in CardMinder.
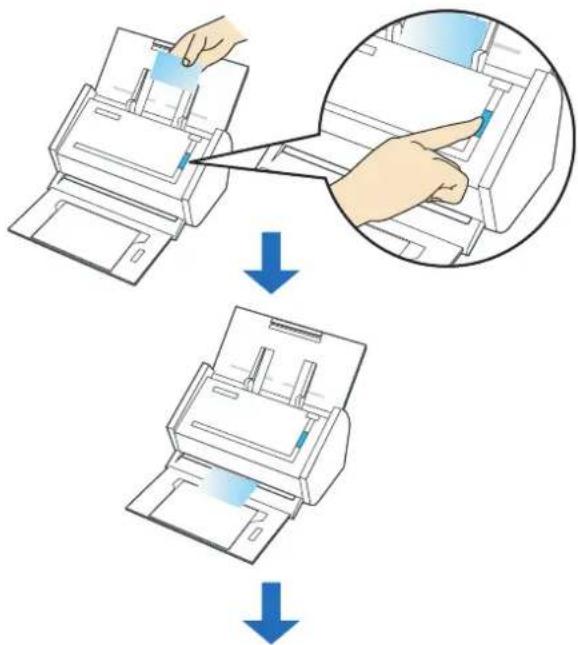
text_image
Diagram illustrating the process of printer printing and filtering, showing steps from printer to printer with blue arrows indicating removal.
text_image
ABCD LIMITED Howard Brown Project Manager, Software Research www.ABCO.com 1234 Funckin Avenue, San Jose, CA087654-1111 Telephone: (030) 600-000, PA: (030)-11-2222 E-mail: hbrown@abcd.com
- When interacting with CardMinder, blank pages are not removed, regardless of the [Allow automatic blank page removal] setting.
- Up to 500 sheets (1,000 pages), including blank pages, can be exported to CardMinder at once.
Using the Quick Menu
1. Load the business card into the ScanSnap.
- Load the business card so that the front side of the two-sided business card faces the ADF paper chute (cover).
- To scan multiple business cards, load business cards in a pile.
- Move the side guides so that there is no gap between the business cards edge and the side guide on both sides.
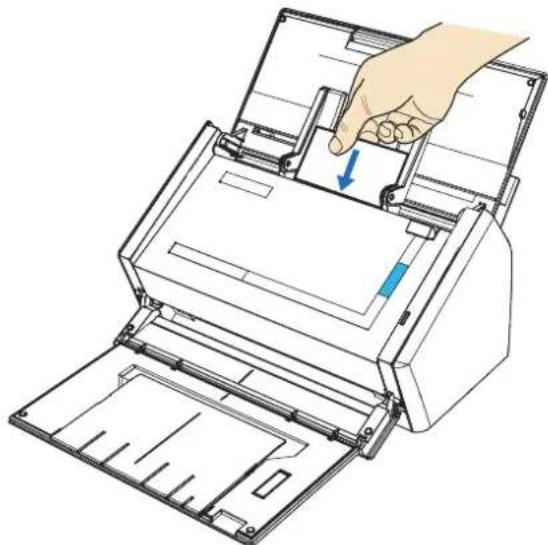
natural_image
Illustration of a hand inserting a paper into a scanner, showing the printer's internal structure and handle (no text or symbols present)2. Press the [Scan] button on the ScanSnap.
Scanning is started.
⇒ When scanning is complete, the Quick Menu appears.
![FUJITSU ScanSnap S1500M - Press the [Scan] button on the ScanSnap. - 1](/content/2026/06/1236416/images/f08591d1e91c008bc8e44932ec131764d61d30c1ade91dfe73f7dc5c15f8b4a4.jpg)
It is recommended to select [Auto] or [Best] for [Image quality] in the [Scanning] tab in the ScanSnap setup dialog box when you scan business cards. The ScanSnap cannot link with CardMinder when [Image quality] is set to [Excellent].
3. Click the [Scan to CardMinder] icon.
![FUJITSU ScanSnap S1500M - Click the [Scan to CardMinder] icon. - 1](/content/2026/06/1236416/images/531c6cffc839322f440c3456cd40633720d332286e41e7b8207312ef86f4f770.jpg)
text_image
ScanSnap Page 1/1 Scan to ScarSnap Organizer Scan to CardMinder Scan to Folder Scan to E-mail Scan to Print Scan to Word Scan to Excel Scan to PowerPoint(R) Scan to SharePoint Scan to Rack2-Filer Scan to Picture Folder Show Details⇒ CardMinder starts up.
![FUJITSU ScanSnap S1500M - Click the [Scan to CardMinder] icon. - 2](/content/2026/06/1236416/images/526d9fa4d513169523ff990a5c65363f64b535eabe44a3b81829377afe860009.jpg)
- When the Quick Menu is displayed, scanning cannot be performed with the ScanSnap. Complete the interaction with CardMinder before scanning another document.
- Do not move, delete, or rename the scanned image data in other applications while the Quick Menu is displayed.
4. Check the scanned card image and text recognition result.
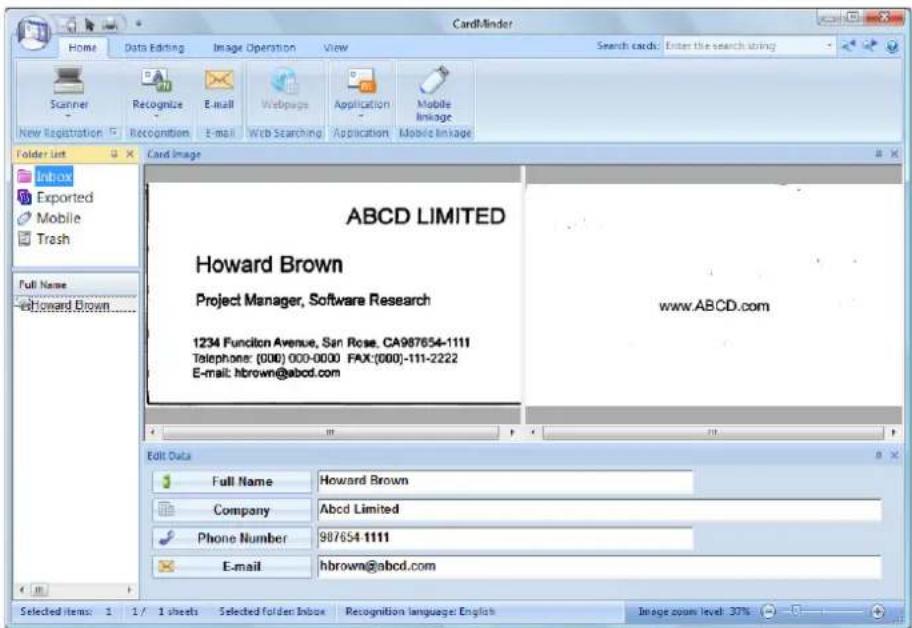
text_image
CardMinder Home Data Editing Image Operation View Search cards: Enter the search string Scanner Recognize E-mail Webpage Application Mobile New Registration Recognition E-mail Web Searching Application Mobile linkage Folder List Card Image Inbox Exported Mobile Trash Full Name EdHoward Brown ..... ABCD LIMITED Howard Brown Project Manager, Software Research 1234 Functon Avenue, San Rose, CA987654-1111 Telephone: (000) 000-0000 FAX:(000)-111-2222 E-mail: hbrown@abcd.com www.ABCD.com Edit Data Full Name Howard Brown Company Abcd Limited Phone Number 987654 1111 E-mail hbrown@abcd.com Selected items: 1 1/1 sheets Selected folder: Inbox Recognition language: English Image count level: 30%
For details about the functions of and how to use CardMinder, refer to CardMinder User's Guide and CardMinder Help.
Without using the Quick Menu
1. Select [Scan Button Settings] from the Right-Click Menu.
![FUJITSU ScanSnap S1500M - Select [Scan Button Settings] from the Right-Click Menu. - 1](/content/2026/06/1236416/images/6d6d314c799a399afb67cade4c11f40cea7ffc42f48c397181b5bda4e0e9679e.jpg)
text_image
Duplex scan Simplex scan Scan Button Settings... Profile Management... Show scanning results Check consumable supplies... Help Exit⇒ The ScanSnap setup dialog box appears.
2. In the [Application] drop-down list on the [Application] tab, select [Card-Minder].
![FUJITSU ScanSnap S1500M - In the [Application] drop-down list on the [Application] tab, select [Card-Minder]. - 1](/content/2026/06/1236416/images/e44d6c03d76bca3535f6de766660082e4443b76f3734033cdc313423bb87b5b0.jpg)
text_image
ScanSnap Color Image Scanner Use Quick Menu Recommended Small File High Quality Profile Standard Application Save Scanning File option Paper Compression Select the application you would like to use. Application: CardMinder Add or Remove... Hide OK Cancel Apply![FUJITSU ScanSnap S1500M - In the [Application] drop-down list on the [Application] tab, select [Card-Minder]. - 2](/content/2026/06/1236416/images/d505500c715d37843f2e55ef6b1715e879303ba5b9cb4d886a23e2cd8682132a.jpg)
It is recommended to select [Auto] or [Best] for [Image quality] in the [Scanning] tab in the ScanSnap setup dialog box when you scan business cards. The ScanSnap cannot link with CardMinder when [Image quality] is set to [Excellent].
![FUJITSU ScanSnap S1500M - In the [Application] drop-down list on the [Application] tab, select [Card-Minder]. - 3](/content/2026/06/1236416/images/1dd3db64f2ce7481dd29616a8af6c1f1d36fac2fefa88ad57212d857607709c4.jpg)
- You can also configure the profile by selecting [CardMinder] from the [Profile] drop-down list or from the Left-Click Menu.
- When you save the desired settings as profiles, they can be selected from the Left-Click Menu next time you perform a scan.
For more details about how to save scan settings, refer to "Saving Scanning Settings" (page 71).
3. Click the [OK] button to close the ScanSnap setup dialog box.
![FUJITSU ScanSnap S1500M - Click the [OK] button to close the ScanSnap setup dialog box. - 1](/content/2026/06/1236416/images/7c513afaacbb0b56b61ebb6d4d5428ddb2fafb8e5dddf32a88a29d679900a133.jpg)
Even if the [Scan] button on the ScanSnap is pressed, the ScanSnap setup dialog box closes.
4. Load the business card into the ScanSnap.
- Load the business card so that the front side of the two-sided business card faces the ADF paper chute (cover).
• To scan multiple business cards, load business cards in a pile. - Move the side guides so that there is no gap between the business cards edge and the side guide on both sides.
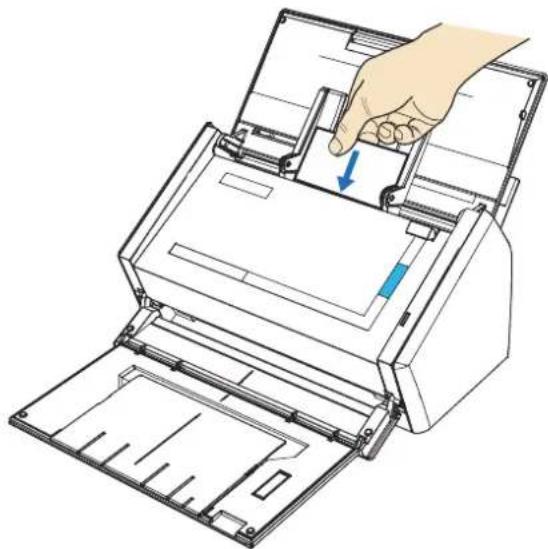
natural_image
Illustration of a hand inserting a paper into a printer, showing the printer's internal structure and handle (no text or symbols present)5. Press the [Scan] button on the ScanSnap.
→ Scanning is started.
⇒ When scanning is complete, CardMinder starts up.
6. Check the scanned card image and text recognition result.

text_image
CardFinder Home Data Editing Image Operation View Search cards: Enter the search string Scanner Recognize E-mail Webpage Application Mobile New Registration Recognition E-mail Web Searching Application Mobile Image Folder List Card Image Inbox Exported Mobile Trash Full Name Edward Brown ..... ABCD LIMITED Howard Brown Project Manager, Software Research www.ABCD.com 1234 Function Avenue, San Rose, CA987654-1111 Telephone: (000) 000-0000 FAX:(000)-111-2222 E-mail: hbrown@abcd.com Edit Data Full Name Howard Brown Company Abcd Limited Phone Number 987654 1111 E-mail hbrown@abcd.com Selected items: 1 1/1 sheets Selected folder: Inbox Recognition language: English Image zoom level: 37%
For details about the functions of and how to use CardMinder, refer to CardMinder User's Guide and CardMinder Help.
■ Saving Data in SharePoint
You can easily save the scanned image data in SharePoint and Office Live.

text_image
File by Microsoft SharePoint product documentation Budget 2007 Budget 2008 Deadline Schedule 2007 Schedule 2008 Training Content Type Document Title: 901 Accept Close Cancel Ready to Design: 901.pdfUsing the Quick Menu
1. Load the document into the ScanSnap.
For details, refer to "Paper Sizes of Documents to Be Scanned" (page 27) and "Loading Documents" (page 29).
2. Press the [Scan] button on the ScanSnap.
⇒ Scanning is started.
⇒ When scanning is complete, the Quick Menu appears.
3. Change settings for the [Scan to SharePoint] action (If you do not want to change settings, go to Step 4.).
- Move the mouse pointer to the mark on the [Scan to SharePoint] icon, and then select the [Settings] menu.
![FUJITSU ScanSnap S1500M - Change settings for the [Scan to SharePoint] action (If you do not want to change settings, go to Step 4.). - 1](/content/2026/06/1236416/images/742d8ce69091ae92f9afe8cf23132360dd88f8a33bd3515940f0e6ef3e7702f0.jpg)
text_image
ScanSnap Page 1/1 Scan to ScanSnap Organizer Scan to CardMinder Scan to Folder Scan to E-mail Scan to Print Scan to Word Scan to Excel Scan to PowerPoint(R) Scan to SharePoint Scan to Rack2-Filer Scan to Picture Folder Settings... Show Details⇒The [Scan to SharePoint - Options] dialog box appears.
- Select the [Save scanned images to file] check box.
![FUJITSU ScanSnap S1500M - Change settings for the [Scan to SharePoint] action (If you do not want to change settings, go to Step 4.). - 2](/content/2026/06/1236416/images/facbc4ccc24b889d3220acdebb4e3379a68fd07e3419b39321cac3eadf7f345c.jpg)
text_image
Scan to SharePoint - Options ✓ Save scanned images to file OK Cancel- Click the [OK] button to close the [Scan to SharePoint - Options] dialog box.
4. Click the [Scan to SharePoint] icon.
![FUJITSU ScanSnap S1500M - Click the [Scan to SharePoint] icon. - 1](/content/2026/06/1236416/images/e04a9dd74e6c5a3ed7d3fb9d67fd73103c82dd456defa12717e11ae9afd563e0.jpg)
text_image
ScanSnap Page 1/1 Scan to ScanSnap Organizer Scan to CardMinder Scan to Folder Scan to E-mail Scan to Print Scan to Word Scan to Excel Scan to PowerPoint(R) Scan to SharePoint Scan to Rack2-Filer Scan to Picture Folder Show DetailsScan to Microsoft SharePoint starts up.

- When the Quick Menu is displayed, scanning cannot be performed with the ScanSnap. Complete the interaction with Scan to Microsoft SharePoint before scanning another document.
- Do not move, delete, or rename the scanned image data in other applications while the Quick Menu is displayed.
5. Save the scanned image data.

- You can save up to 100 files (the maximum size of a file is 150 MB) in Scan to Microsoft SharePoint.
Select [Delete file from cache after upload] in the Cache Options, and then upload your file(s) as needed. - You need to save a SharePoint site at the initial startup of Scan to Microsoft SharePoint. Once you save a SharePoint site, the ScanSnap is automatically connected with Scan to Microsoft SharePoint from the next startup.
For details about Scan to Microsoft SharePoint, refer to the Scan to Microsoft SharePoint User Guide.
- Connecting to SharePoint
- Select a folder in which you want to save the scanned image data.
- Enter necessary information such as a title in the Index pane of Scan to Microsoft SharePoint, and click the [Accept] button.

text_image
Scan to Microsoft SharePoint product documentation Budget 2007 Budget 2008 Document Schedule 2007 Schedule 2008 Training Ready to Index: 001.pdf Content Type: Document Title: 001 Accept Clear Cancel⇒ The scanned image data is saved in the specified folder.
- Connecting to Office Live

Support for Office Live varies according to country. For more details, refer to the Office Live Web site.
- Select [Connect to Office Live] from the menu.

text_image
Scan to Microsoft SharePoint Index a File Add SharePoint Site Connect to Office Live Cecho Options Exit⇒The Office Live logon dialog box appears.
- Enter the ID and password in the Office Live logon dialog box, and then click the [Sign In] button.

text_image
Windows Live Sign In To: Microsoft Office Live Windows Live ID Password Email your account? Remember me on this computer Remember my Password Sign In You are logging into (Microsoft Office Live) which is not a Microsoft developed application. Sign up for a Windows Live ID Windows Live ID Works with MSN, Office Live and Passport sites⇒ After the ScanSnap is connected with Office Live, the [Scan to Microsoft SharePoint] dialog box appears.
-
Select a folder in which you want to save the scanned image data.
-
Enter necessary information such as a title in the Index pane, and click the [Accept] button.
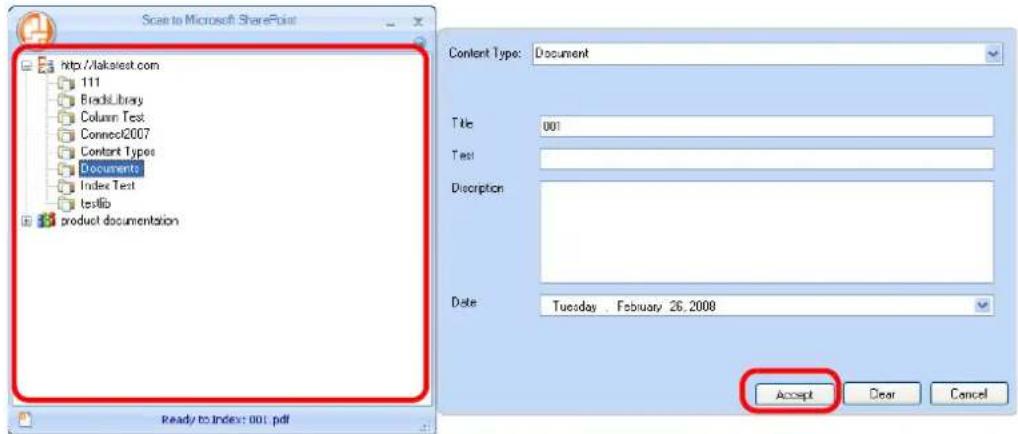
text_image
Scan to Microsoft SharePoint http://lakast.com 111 BrackLibrary Column Test Connect2007 Constant Types Documents Index Test testlib product documentation Content Type: Document Title 001 Test Description Date Tuesday . February 26, 2008 Accept Dear Cancel Ready to Index: 001.pdf⇒ The scanned image data is saved in the specified folder.

For details, refer to the Scan to Microsoft SharePoint User Guide.
Without using the Quick Menu
1. Select [Scan Button Settings] from the Right-Click Menu.
![FUJITSU ScanSnap S1500M - Select [Scan Button Settings] from the Right-Click Menu. - 1](/content/2026/06/1236416/images/26df4cdf30dfb9575fcc81a20fc6525e253acf166c131d2d6064ac3c8cb4e84d.jpg)
text_image
Duplex scan Simplex scan Scan Button Settings... Profile Management... Show scanning results Check consumable supplies... Help Exit⇒ The ScanSnap setup dialog box appears.
2. In the [Application] drop-down list on the [Application] tab, select [Scan to SharePoint].
![FUJITSU ScanSnap S1500M - In the [Application] drop-down list on the [Application] tab, select [Scan to SharePoint]. - 1](/content/2026/06/1236416/images/c2d6ee4a12ccb229426897bb0457c9aafe4b64fc04b3fa040c42e64fe380a77b.jpg)
text_image
ScanSnap Color Image Scanner Use Quick Menu Recommended Small File High Quality Profile Standard Application Save Scanning File option Paper Compression Select the application you would like to use. Application: Scan to SharePoint Add or Remove... Application Settings... Hide OK Cancel Apply![FUJITSU ScanSnap S1500M - In the [Application] drop-down list on the [Application] tab, select [Scan to SharePoint]. - 2](/content/2026/06/1236416/images/bcf4a786115ad0c7aaf6b72dfb538796695efefc761d08c8dc7b6971be09c3cf.jpg)
Finishing the procedure above, you can save desired settings as profiles. The profiles can be selected in the Left-Click Menu from the next time you scan documents. For details about how to save scanning settings, refer to "Saving Scanning Settings" (page 71).
3. Change settings for the [Scan to SharePoint] action (If you do not want to change settings, go to Step 4.).
- Click the [Application Settings] button.
![FUJITSU ScanSnap S1500M - Change settings for the [Scan to SharePoint] action (If you do not want to change settings, go to Step 4.). - 1](/content/2026/06/1236416/images/a45b26ad8606b0cfeb42d5366a2e2accaa2818f1dc8b119366c3e3c8949619db.jpg)
text_image
ScanSnap Color Image Scanner Use Quick Menu Recommended Small File High Quality Profile Standard Application Save Scanning File option Paper Compression Select the application you would like to use. Application: Scan to SharePoint Add or Remove... Application Settings... Hide OK Cancel Apply⇒ The [Scan to SharePoint - Options] dialog box appears.
- Select the [Save scanned images to file] check box.
![FUJITSU ScanSnap S1500M - Change settings for the [Scan to SharePoint] action (If you do not want to change settings, go to Step 4.). - 2](/content/2026/06/1236416/images/7e9883b3aeea2e3744754f5acf3d4d03d46d62eb160a906fa256177531f3984a.jpg)
text_image
Scan to SharePoint - Options ✓ Save scanned images to file OK Cancel- Click the [OK] button to close the [Scan to SharePoint - Options] dialog box.
4. Click the [OK] button to close the ScanSnap setup dialog box.
![FUJITSU ScanSnap S1500M - Click the [OK] button to close the ScanSnap setup dialog box. - 1](/content/2026/06/1236416/images/0cb90d1d12dbcf7b36e47f0c782c5a330c47ac9e011ec63a443e96781a104a0b.jpg)
Even if the [Scan] button on the ScanSnap is pressed, the ScanSnap setup dialog box closes.
5. Load the document into the ScanSnap.
For details, refer to "Paper Sizes of Documents to Be Scanned" (page 27) and "Loading Documents" (page 29).
6. Press the [Scan] button on the ScanSnap.
⇒ Scanning is started.
⇒ When scanning is complete, Scan to Microsoft SharePoint starts up.
7. Save the scanned image data.

- You can save up to 100 files (the maximum size of a file is 150 MB) in Scan to Microsoft SharePoint. Select [Delete file from cache after upload] in the Cache Options, and then upload your file(s) as needed.
- You need to save a SharePoint site at the initial startup of Scan to Microsoft SharePoint. Once you save a SharePoint site, the ScanSnap is automatically connected with Scan to Microsoft SharePoint from the next startup. For details about Scan to Microsoft SharePoint, refer to the Scan to Microsoft SharePoint User Guide.
- Connecting to SharePoint
- Select a folder in which you want to save the scanned image data.
- Enter necessary information such as a title in the Index pane of Scan to Microsoft SharePoint, and click the [Accept] button.

text_image
Scan to Microsoft SharePoint product documentation Budget 2007 Budget 2008 Document Schedule 2007 Schedule 2008 Training Ready to Index: 001.pdf Content Type: Document Title: 001 Accept Clear Cancel⇒ The scanned image data is saved in the specified folder.
- Connecting to Office Live

Support for Office Live varies according to country. For more details, refer to the Office Live Web site.
- Select [Connect to Office Live] from the menu.

text_image
Scan to Microsoft SharePoint Index a File Add SharePoint Site Connect to Office Live Cache Options Exit⇒The Office Live logon dialog box appears.
- Enter the ID and password in the Office Live logon dialog box, and then click the [Sign In] button.
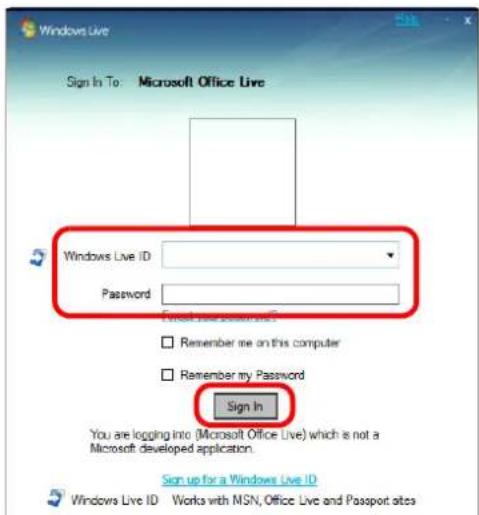
text_image
Windows Live Sign In To: Microsoft Office Live Windows Live ID Password Email your account? Remember me on this computer Remember my Password Sign In You are logging into (Microsoft Office Live) which is not a Microsoft developed application. Sign up for a Windows Live ID Windows Live ID Works with MSN, Office Live and Passport sites⇒After the ScanSnap is connected with Office Live, the [Scan to Microsoft SharePoint] dialog box appears.
-
Select a folder in which you want to save the scanned image data.
-
Enter necessary information such as a title in the Index pane, and click the [Accept] button.

text_image
Scan to Microsoft SharePoint http://laketest.com 111 BrocksLibrary Column Text Connect2007 Content Types Documents Index Text textb product documentation Ready to Index: 001.pdf Content Type Document Title 001 Test Disciplion: Date Tuesday .. February 28, 2008 Accept Clear Cancel⇒The scanned image data is saved in the specified folder.

For details, refer to the Scan to Microsoft SharePoint User Guide.
■ Saving to Rack2-Filer
This section describes how to save PDF files created with the ScanSnap, in Rack2-Filer Trial Version supplied with the ScanSnap or Rack2-Filer (V5.0 recommended) (bundled or sold separately).
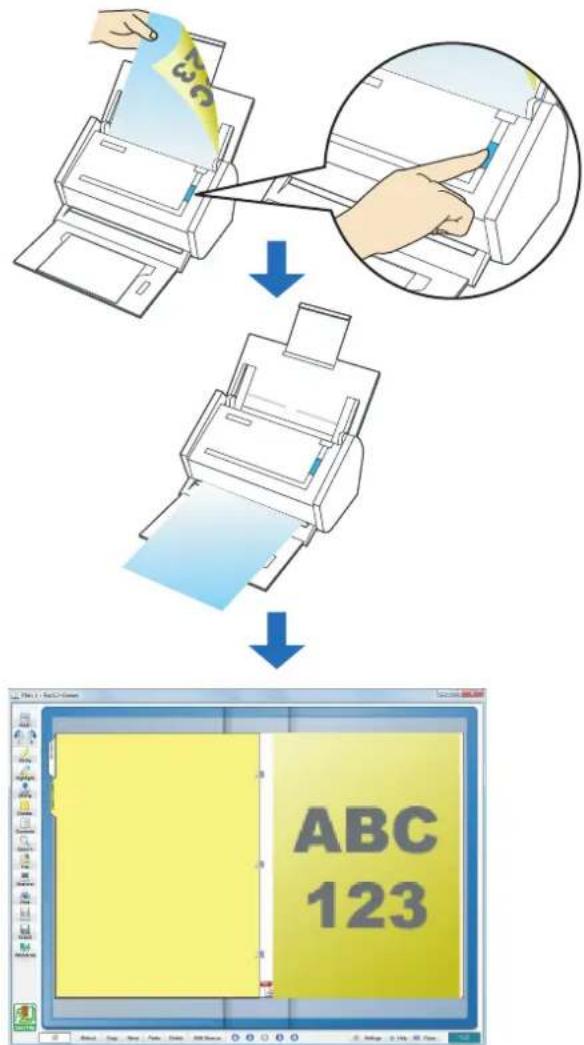
text_image
ABC 123
- Rack2-Filer trial version supplied with the ScanSnap or Rack2-Filer (V5.0 recommended) (bundled or sold separately) is required to use this function.
Rack2-Filer is a software program that converts paper documents and electronic documents into PDF files and manages them in a computer. You can manage documents in such a manner that you just bind your paper documents in binders and store them on a cabinet shelf and can browse documents as if you flip through a book. - The following settings are disabled when the scanned image data is saved to Rack2-Filer.
- Rename file after scanning
- Color high compression
- For details about how to use Rack2-Filer, refer to the Rack2-Filer User's Guide.
Using the Quick Menu
1. Load the document into the ScanSnap.
For details, refer to "Paper Sizes of Documents to Be Scanned" (page 27) and "Loading Documents" (page 29).
2. Press the [Scan] button on the ScanSnap.
⇒ Scanning is started.
⇒ When scanning is complete, the Quick Menu appears.
3. Change settings for the [Scan to Rack2-Filer] action (If you do not want to change settings, go to Step 4.).
- Move the mouse pointer to the mark on the [Scan to Rack2-Filer] icon, and then select the [Settings] menu.
![FUJITSU ScanSnap S1500M - Change settings for the [Scan to Rack2-Filer] action (If you do not want to change settings, go to Step 4.). - 1](/content/2026/06/1236416/images/ee4d218ece3bfd8833ed967fd63c9b92543bd5f6c69b78b0f7fc2f95ecb408bd.jpg)
text_image
ScanSnap Page 1/1 Scan to ScanSnap Organizer Scan to CardMinder Scan to Folder Scan to E-mail Scan to Print Scan to Word Scan to Excel Scan to PowerPoint(R) Scan to SharePoint Scan to Rack2-Filer Scan to Picture Folder Settings... Show Details⇒The [ScanSnap -> Rack2] dialog box appears.
![FUJITSU ScanSnap S1500M - Change settings for the [Scan to Rack2-Filer] action (If you do not want to change settings, go to Step 4.). - 2](/content/2026/06/1236416/images/29266bdb35d65d6cd1840bd984ef2b7de7161c154484d09af9e97304b96e5dc4.jpg)
When [JPEG(*.jpg)] is selected for [File format] in the [File option] tab on the ScanSnap setup dialog box, the [Scan to Rack2-Filer] icon is grayed out and cannot be selected.
2. Change settings.
In this dialog box, specify the destination to save the scanned image data.
For details about the [ScanSnap -> Rack2] dialog box, refer to Rack2-Filer Help.
Click the [Help] button in the [ScanSnap -> Rack2] dialog box to display Rack2-Filer Help.

text_image
ScanSnap -> Rack2 ScanSnap data save location (when Rack2-Viewer or WorkArea is not open) WorkArea Request confirmation each time Binder currently selected in the Rack2-File window (or binder selection dialog if no binder is selected) Binder selection dialog for individual assignment every time OK Cancel Help- Click the [OK] button to close the [ScanSnap -> Rack2] dialog box.
4. Click the [Scan to Rack2-Filer] icon.
![FUJITSU ScanSnap S1500M - Click the [Scan to Rack2-Filer] icon. - 1](/content/2026/06/1236416/images/c18e95f069927886bd10bc067106304ebd3fcfb8662391abb9304a26f73b0e10.jpg)
text_image
ScanSnap Page 1/1 Scan to ScanSnap Organizer Scan to CardMinder Scan to Folder Scan to E-mail Scan to Print Scan to Word Scan to Excel Scan to PowerPoint(R) Scan to SharePoint Scan to Racl.2-Filer Scan to Picture Folder Show Details⇒ Rack2-Filer starts up, and the PDF file created by the ScanSnap is saved to Rack2-Filer according to the settings specified in Step 3..
![FUJITSU ScanSnap S1500M - Click the [Scan to Rack2-Filer] icon. - 2](/content/2026/06/1236416/images/d0158190980071648f0cc6e992ad593d51b7d64a3c78cc4e22bb05d94c5aa435.jpg)
- When [JPEG(*.jpg)] is selected for [File format] in the [File option] tab on the ScanSnap setup dialog box, the [Scan to Rack2-Filer] icon is grayed out and cannot be selected.
- When the Quick Menu is displayed, scanning cannot be performed with the ScanSnap. Complete the interaction with Rack2-Filer before scanning another document.
- Do not move, delete, or rename the scanned image data in other applications while the Quick Menu is displayed.
Without using the Quick Menu
1. Select [Scan Button Settings] from the Right-Click Menu.
![FUJITSU ScanSnap S1500M - Select [Scan Button Settings] from the Right-Click Menu. - 1](/content/2026/06/1236416/images/95a97b76ba11a56c241da9d25e7b9130a9c6a9abf65780e6e5a648e451852e58.jpg)
text_image
Duplex scan Simplex scan Scan Button Settings... Profile Management... Show scanning results Check consumable supplies... Help Exit⇒ The ScanSnap setup dialog box appears.
2. In the [Application] drop-down list on the [Application] tab, select [Rack2-Filer].
![FUJITSU ScanSnap S1500M - In the [Application] drop-down list on the [Application] tab, select [Rack2-Filer]. - 1](/content/2026/06/1236416/images/f057ba72b1af6afa8445ade7182c52734a88c61667af4b059a0039fb37ef78a1.jpg)
text_image
ScanSnap Color Image Scanner Use Quick Menu Recommended Small File High Quality Profile Standard Application Save Scanning File option Paper Compression Select the application you would like to use. Application: Rack2-Filer Add or Remove... Application Settings... Hide OK Cancel Apply![FUJITSU ScanSnap S1500M - In the [Application] drop-down list on the [Application] tab, select [Rack2-Filer]. - 2](/content/2026/06/1236416/images/2cfb0216ad5c4b64c40d301c0dde9b2f9746733ce8e7162f74698c5da65d0959.jpg)
- You can set the profile by selecting Rack2-Filer from the [Profile] drop-down list or [Profile] menu.
- Finishing the procedure above, you can save desired settings as profiles. The profiles can be selected in the Left-Click Menu from the next time you scan documents. For details about how to save scanning settings, refer to "Saving Scanning Settings" (page 71).
3. Change settings for the [Rack2-Filer] action (If you do not want to change settings, go to Step 4.).
- Click the [Application Settings] button.
![FUJITSU ScanSnap S1500M - Change settings for the [Rack2-Filer] action (If you do not want to change settings, go to Step 4.). - 1](/content/2026/06/1236416/images/3e2fd8aae6a1bb9c4c52c66fddd1b0ef1cf0f9c9f8dc182c20b9554e141a3774.jpg)
text_image
ScanSnap Color Image Scanner Use Quick Menu Recommended Small File High Quality Profile Standard Application Save Scanning File option Paper Compression Select the application you would like to use. Application: Rack2-Filer Add or Remove... Application Settings... Hide OK Cancel Apply⇒The [ScanSnap -> Rack2] dialog box appears.
- Change settings.
In this dialog box, specify the destination to save the scanned image data.
For details about the [ScanSnap -> Rack2] dialog box, refer to Rack2-Filer Help.
Click the [Help] button in the [ScanSnap -> Rack2] dialog box to display Rack2-Filer Help.
![FUJITSU ScanSnap S1500M - Change settings for the [Rack2-Filer] action (If you do not want to change settings, go to Step 4.). - 2](/content/2026/06/1236416/images/0084e35b3264cb7a85ae56ec865593a9239775d46e89da83ca4917c7b03b863d.jpg)
text_image
ScanSnap -> Rack2 ScanSnap data save location (when Rack2-Viewer or WorkArea is not open) WorkArea Request confirmation each time Binder currently selected in the Rack2-Filter window (or binder selection dialog if no binder is selected) Binder selection dialog for individual assignment every time OK Cancel Help- Click the [OK] button to close the [ScanSnap -> Rack2] dialog box.
4. Click the [OK] button to close the ScanSnap setup dialog box.
![FUJITSU ScanSnap S1500M - Click the [OK] button to close the ScanSnap setup dialog box. - 1](/content/2026/06/1236416/images/4c6f5c9119840a7dd4b1e2272842cd1e90864dbc3fba0ecd1b209ed4848c0cbf.jpg)
Even if the [Scan] button on the ScanSnap is pressed, the ScanSnap setup dialog box closes.
5. Load the document into the ScanSnap.
For details, refer to "Paper Sizes of Documents to Be Scanned" (page 27) and "Loading Documents" (page 29).
6. Press the [Scan] button on the ScanSnap.
Scanning is started.
⇒ When scanning is complete, Rack2-Filer starts up, and the PDF file created by the ScanSnap is saved to Rack2-Filer according to the settings specified in Step 3.
Using the ScanSnap in Various Ways
This section describes a variety of ways you can use the ScanSnap.
■ Scanning Only One Side of a Document
By default, pressing the [Scan] button starts scanning in Duplex mode.
When you wish to scan in Simplex mode, change the settings by following the procedure below.
1. Select [Scan Button Settings] from the Right-Click Menu.
![FUJITSU ScanSnap S1500M - Select [Scan Button Settings] from the Right-Click Menu. - 1](/content/2026/06/1236416/images/7383f37d8224ae8f16596ad9769bf2763eaea6cf1f4355223cc728e416e39a6a.jpg)
text_image
Duplex scan Simplex scan Scan Button Settings... Profile Management... Show scanning results Check consumable supplies... Help Exit⇒ The ScanSnap setup dialog box appears.
2. Select [Simplex Scan (Single-sided)] in the [Scanning side] drop-down list on the [Scanning] tab.
![FUJITSU ScanSnap S1500M - Select [Simplex Scan (Single-sided)] in the [Scanning side] drop-down list on the [Scanning] tab. - 1](/content/2026/06/1236416/images/3ca93217052547e4282cf6a69b65470fe8c956dc150ca38522263ccd333ecdab.jpg)
text_image
Application Save Scanning File option Paper Compression Specify the scanning mode you would like to use. Image quality: Auto Color mode: Auto Color Detection Scanning side: Duplex Scan (Double-sided) Duplex Scan (Double-sided) Simplex Scan (Single-sided) Option... Hide OK Cancel Apply3. Click the [OK] button to close the ScanSnap setup dialog box.
4. Load the document into the ScanSnap.
For details, refer to "Paper Sizes of Documents to Be Scanned" (page 27) and "Loading Documents" (page 29).
5. Press the [Scan] button on the ScanSnap.
![FUJITSU ScanSnap S1500M - Press the [Scan] button on the ScanSnap. - 1](/content/2026/06/1236416/images/aad80cf146952a5338e47590a09174608ab0c6564f5285c673637bc42a22f20f.jpg)
If you select [Simplex scan] from the Right-Click Menu, even if [Duplex Scan (Double-sided)] is set in [Scanning side] on the [Scanning] tab, the scan will be performed in Simplex mode.
⇒ The document is scanned in Simplex mode.
■ Scanning Color Documents in Black and White or Gray Mode
By default, the ScanSnap automatically recognizes whether scanned documents are color, gray or black-and-white, and outputs color documents in color mode, gray documents in gray mode, and black-and-white documents in black-and-white mode.
If you wish to scan color documents in gray or black-and-white mode, change the settings by following the procedure below.
1. Select [Scan Button Settings] from the Right-Click Menu.
![FUJITSU ScanSnap S1500M - Select [Scan Button Settings] from the Right-Click Menu. - 1](/content/2026/06/1236416/images/3698479564f0d65a8090ca5dfcc504c263d80a36369e846e32d27fa86f4ed5b2.jpg)
text_image
Duplex scan Simplex scan Scan Button Settings... Profile Management... Show scanning results Check consumable supplies... Help Exit⇒ The ScanSnap setup dialog box appears.
2. In the [Color mode] drop-down list on the [Scanning] tab, select [Gray] or [B&W].
To scan color documents in color, select [Color].
![FUJITSU ScanSnap S1500M - In the [Color mode] drop-down list on the [Scanning] tab, select [Gray] or [B&W]. - 1](/content/2026/06/1236416/images/4d9ec30be1bd5ef4260a69fb30177ae28e25bfd46b57b446a34bb09e053c29cf.jpg)
text_image
Application Save Scanning File option Paper Compression Specify the scanning mode you would like to use. Image quality: Auto Color mode: Auto Color Detection Auto Color Detection Color Scanning side: Gray B&W Color High Compression Hide OK Cancel Apply3. Click the [OK] button to close the ScanSnap setup dialog box.
4. Load the document into the ScanSnap.
For details, refer to "Paper Sizes of Documents to Be Scanned" (page 27) and "Loading Documents" (page 29).
5. Press the [Scan] button on the ScanSnap.
Scanned image data is output in gray or in black-and-white.
■ Scanning Color Documents in High Compression Mode
The ScanSnap can save image data of scanned color documents in high compression mode. You can scan an large quantity of documents in high compression mode and save them as a space-saving PDF file.
To scan color documents in high compression mode, perform the following steps to change the setting.

In [Color high compression] mode, characters and background on the document are compressed separately, and thus, the file size of the document that mostly contains text characters becomes smaller, while the quality of the characters is kept high. On the other hand, photographs and figures are highly compressed because they are regarded as a background, so the image data deteriorates. Therefore, this mode is not appropriate for scanning photographs and images.
- Select [Scan Button Settings] from the Right-Click Menu.

text_image
Duplex scan Simplex scan Scan Button Settings... Profile Management... Show scanning results Check consumable supplies... Help Exit⇒ The ScanSnap setup dialog box appears.
- In the [Color mode] drop-down list on the [Scanning] tab, select [Color high compression].

text_image
Application Save Scanning File option Paper Compression Specify the scanning mode you would like to use. Image quality: Auto Color mode: Auto Color Detection Auto Color Detection Color Gray Scanning side: B&W Color high compression Hide OK Cancel Apply- Click the [OK] button to close the ScanSnap setup dialog box.
4. Load the document into the ScanSnap.
For details, refer to "Paper Sizes of Documents to Be Scanned" (page 27) and "Loading Documents" (page 29).
5. Press the [Scan] button on the ScanSnap.
⇒ The scanned document is output as highly compressed color image data.
■ Removing Blank Pages from the Scanned Image Data
The ScanSnap is able to recognize and remove blank pages automatically from the scanned image data. When you scan documents in Duplex mode, both sides of the documents are scanned regardless if the back is printed or not. If a blank side is scanned, it is recognized as "blank" and the image data is automatically removed.
To remove blank pages, change the settings by following the procedure below.

- The following types of documents may be recognized as blank pages:
- Almost blank documents containing only a few characters - Documents of only one color (including black) and without any patterns, lines, or characters
When you scan such documents, clear the [Allow automatic blank page removal] check box. When discarding the scanned image data, check the image data for pages accidentally removed.
- When the ScanSnap is used with CardMinder, blank pages are not removed.
1. Select [Scan Button Settings] from the Right-Click Menu.
![FUJITSU ScanSnap S1500M - Select [Scan Button Settings] from the Right-Click Menu. - 1](/content/2026/06/1236416/images/80aa367f669b0f9148d77753740c53078c34588c34c5e07ebd43598a024e2343.jpg)
text_image
Duplex scan Simplex scan Scan Button Settings... Profile Management... Show scanning results Check consumable supplies... Help Exit⇒ The ScanSnap setup dialog box appears.
2. Click the [Option] button on the [Scanning] tab.
![FUJITSU ScanSnap S1500M - Click the [Option] button on the [Scanning] tab. - 1](/content/2026/06/1236416/images/e2e16c58f4235f72d05012bdd39d4c7132e0a27dc72e3dad98f6a9ce54025d84.jpg)
text_image
Application Save Scanning File option Paper Compression Specify the scanning mode you would like to use. Image quality: Auto Color mode: Auto Color Detection Scanning side: Duplex Scan (Double-sided) Continue scanning after current scan is finished Option... Hide OK Cancel Apply⇒ The [Read mode option] dialog box appears.
3. Select the [Allow automatic blank page removal] check box.
![FUJITSU ScanSnap S1500M - Select the [Allow automatic blank page removal] check box. - 1](/content/2026/06/1236416/images/fcecab95fda2e98c07f7f4d147fb3aea542f33abceeb85566f6f2fb17c8d1975.jpg)
text_image
Read mode option Brightness (Black and White scanning only) Light Normal Dark Setting for text only document Allow automatic blank page removal Correct skewed character strings automatically Allow automatic image rotation Set the document with its face up OK Cancel Help4. Click the [OK] button to close all the open dialog boxes.
5. Load the document into the ScanSnap.
For details, refer to "Paper Sizes of Documents to Be Scanned" (page 27) and "Loading Documents" (page 29).
6. Press the [Scan] button on the ScanSnap.
⇒ Image data without blank pages is output.
■ Correcting Skewed Character Strings
The ScanSnap is able to detect skewed character strings on the document and correct the skew. This function is available when characters printed on the document are skewed.
To correct skewed character strings, change the settings by following the procedure below.

- Up to +/-5 degrees of skews can be corrected.
This function determines a document skew based on the character strings printed on the document, so it may not work properly for the following image data:
- Documents on which pitches of lines or characters are extremely narrow, or characters are overlapped
- Documents that have many outlined or decorated characters
- Documents that have many photographs or figures but only a few characters
- Documents that have characters on patterned background e.g. Characters overlapping illustrations and diagrams
- Documents that have characters printed in various directions (e.g. drawings)
- Documents that have long diagonal lines
- Documents with handwritten characters
When you scan such documents, clear the [Correct skewed character strings automatically] check box.
- When scanning with the Carrier Sheet, skewed character strings are not corrected.

For documents skewed while being scanned, the skew is always corrected regardless of whether [Correct skewed character strings automatically] is enabled or not.
1. Select [Scan Button Settings] from the Right-Click Menu.
![FUJITSU ScanSnap S1500M - Select [Scan Button Settings] from the Right-Click Menu. - 1](/content/2026/06/1236416/images/e872cbe3b894aefd45053f248814e906dc1d120328b1d91372f503f315449f47.jpg)
text_image
Duplex scan Simplex scan Scan Button Settings... Profile Management... Show scanning results Check consumable supplies... Help Exit⇒ The ScanSnap setup dialog box appears.
2. Click the [Option] button on the [Scanning] tab.
![FUJITSU ScanSnap S1500M - Click the [Option] button on the [Scanning] tab. - 1](/content/2026/06/1236416/images/88cb2c49fd2b4c6eb9fce5c822f183e945bb3bb7b07545d924badea27f238430.jpg)
text_image
ScanSnap Color Image Scanner Use Quick Menu Recommended Small File High Quality Profile Standard Application Save Scanning File option Paper Compression Specify the scanning mode you would like to use. Image quality: Auto Color mode: Auto Color Detection Scanning side: Duplex Scan (Double-sided) Continue scanning after current scan is finished Option... Hide OK Cancel Apply⇒ The [Read mode option] dialog box appears.
3. Select the [Correct skewed character strings automatically] check box.
![FUJITSU ScanSnap S1500M - Select the [Correct skewed character strings automatically] check box. - 1](/content/2026/06/1236416/images/00c96ebf44f0b92d7d6e00586d8cd197f28e2b41d272e40d03d564176d329d88.jpg)
text_image
Read mode option Brightness (Black and White scanning only) Light Normal Dark Setting for text only document Allow automatic blank page removal Correct skewed character strings automatically Allow automatic image rotation Set the document with its face up OK Cancel Help4. Click the [OK] button to close all the open dialog boxes.
5. Load the document into the ScanSnap.
For details, refer to "Paper Sizes of Documents to Be Scanned" (page 27) and "Loading Documents" (page 29).
6. Press the [Scan] button on the ScanSnap.
⇒ All image data are output with skewed character strings corrected.
■ Correcting the Orientation of Scanned Images
In an office environment, it is often the case that a single batch contains documents of different page orientations, even if the paper sizes are the same.
For the case of double-sided documents in calendar style, the reverse sides are printed upside down.
The ScanSnap is able to automatically correct the orientation of scanned images for such sets of pages.
To correct the orientation of scanned documents, change the settings by following the procedure below.

This function determines a document orientation based on the characters printed on the document. It may not work properly for the following kinds of documents:
- Documents with many extremely large or small characters
- Documents on which pitches of lines or characters are extremely narrow, or characters are overlapped
- Documents with many photographs or figures and few characters
- Documents with characters on an unevenly colored background e.g. Shaded characters
- Documents with many decorated characters e.g. Decorated characters (embossed/outlined)
- Documents with characters on a patterned background e.g. Characters overlapping illustrations and diagrams
- Documents with many characters contacting underlines or borders
- Documents that have characters printed in various directions (e.g. drawings)
- Documents that have only capital letters
- Documents with handwritten characters
- Skewed documents
- Documents with characters of an unsupported language (Language other than Japanese/English/French/German/Italian/Spanish/Chinese (simplified)/Chinese (traditional)/Korean/Russian/Portuguese)
- Documents with complex layouts
- Documents with a lot of noise
- Documents with pale characters
- Documents with faded characters
When you scan such documents, clear the [Allow automatic image rotation] check box.
1. Select [Scan Button Settings] from the Right-Click Menu.
![FUJITSU ScanSnap S1500M - Select [Scan Button Settings] from the Right-Click Menu. - 1](/content/2026/06/1236416/images/f918321f9afbf71360b0744c3b313056efe4739caa7ecaa5fffdece36577eac7.jpg)
text_image
Duplex scan Simplex scan Scan Button Settings... Profile Management... Show scanning results Check consumable supplies... Help Exit⇒ The ScanSnap setup dialog box appears.
2. Click the [Option] button on the [Scanning] tab.
![FUJITSU ScanSnap S1500M - Click the [Option] button on the [Scanning] tab. - 1](/content/2026/06/1236416/images/7c9f9f1cd69730bda4b82d6ec3cda10b81f9b6d85f0e1cbe7a0d9e7ea5d3ecee.jpg)
text_image
Application Save Scanning File option Paper Compression Specify the scanning mode you would like to use. Image quality: Auto Color mode: Auto Color Detection Scanning side: Duplex Scan (Double-sided) Continue scanning after current scan is finished Option ... Hide OK Cancel Apply⇒ The [Read mode option] dialog box appears.
3. Select the [Allow automatic image rotation] check box.
![FUJITSU ScanSnap S1500M - Select the [Allow automatic image rotation] check box. - 1](/content/2026/06/1236416/images/3c4b0dc8f4eaf55b67b47df11c72b60f1c9fc27e1ee019b7c18bdc1c8dad1894.jpg)
text_image
Read mode option Brightness (Black and White scanning only) Light Normal Dark Setting for text only document Allow automatic blank page removal Correct skewed character strings automatically Allow automatic image rotation Set the document with its face up OK Cancel Help- Click the [OK] button to close all the open dialog boxes.
- Load the document into the ScanSnap.
For details, refer to "Paper Sizes of Documents to Be Scanned" (page 27) and "Loading Documents" (page 29).
- Press the [Scan] button on the ScanSnap.
⇒ All image data are output in the same orientation.
■ Scanning Documents of Differing Widths or Sizes at the Same Time
The ScanSnap is able to scan documents of different widths or sizes in one batch.
To scan documents of different widths or sizes in one batch, change the settings by following the procedure below.
1. Select [Scan Button Settings] from the Right-Click Menu.
![FUJITSU ScanSnap S1500M - Select [Scan Button Settings] from the Right-Click Menu. - 1](/content/2026/06/1236416/images/80a48c9dbe5f645c34dcb2b8732b92c6c857367970441751f4f987bdf4c50388.jpg)
text_image
Duplex scan Simplex scan Scan Button Settings... Profile Management... Show scanning results Check consumable supplies... Help Exit⇒ The ScanSnap setup dialog box appears.
2. On the [Paper] tab, select [Automatic detection] in [Paper size].
![FUJITSU ScanSnap S1500M - On the [Paper] tab, select [Automatic detection] in [Paper size]. - 1](/content/2026/06/1236416/images/703436f84dcbacbef7c447ece9ab2c05087965ae2d4a51d621eadd7be3333327.jpg)
text_image
Application Save Scanning File option Paper Compression Select paper. Paper size: Automatic detection Carrier Sheet Settings... Custom... Multifeed Detection: Check Overlapping [Ultrasonic] Hide OK Cancel Apply3. Select an option other than [Check Length] in [Multifeed Detection].
![FUJITSU ScanSnap S1500M - Select an option other than [Check Length] in [Multifeed Detection]. - 1](/content/2026/06/1236416/images/a744d75593e747be23e15dc299e0543313bf699f29519478606c299b174113ae.jpg)
text_image
Application Save Scanning File option Paper Compression Select paper. Paper size: Automatic detection Carrier Shoot Settings... Custom... Multifeed Detection: Check Overlapping [Ultrasonic] Hide OK Cancel Apply![FUJITSU ScanSnap S1500M - Select an option other than [Check Length] in [Multifeed Detection]. - 2](/content/2026/06/1236416/images/776864b678d74373c20f34707472f467b22a36acd8dfbfb99e2b90c506062977.jpg)
Scanning documents of different widths or sizes at the same time with [Check Length] selected, results in a scanning failure due to a multifeed error detection.
4. Click the [OK] button to close the ScanSnap setup dialog box.
5. Load the document into the ScanSnap.
- Align the edge of all documents.

flowchart
graph TD
    A["ABC"] --> B["ABC"]
    C["ABC"] --> B
    B --> D["→"]
    D --> E["A"]
    D --> F["AI"]
    D --> G["ABC"]
    G -.-> H["→"]
- Place the document on the center of the ADF paper chute (cover).

text_image
A0 ABO
- Place all documents under the pick roller (center). Documents that are not under the pick roller cannot be fed.

text_image
Width of the pick roller ABC ABC- Adjust the side guides to the widest document to be scanned.
- For smaller documents which cannot contact the side guide, carefully load them straight into the ADF paper chute (cover). If the documents are skewed during a scan, the quality of scanned image data may be degraded (partly lost image data/slant lines produced) or scanned image data may be output in different size from the original. If you have difficulties in feeding documents straight, it is recommended to scan documents in several batches and enable continuous scanning; scan documents of about the same width in one batch.
Note that smaller documents that cannot be guided by the side guide may cause a jam.
6. Press the [Scan] button on the ScanSnap.
⇒ The size of all output image data conforms to the respective documents.
![FUJITSU ScanSnap S1500M - Press the [Scan] button on the ScanSnap. - 1](/content/2026/06/1236416/images/9dca47c9f0422d99343daa7de606aec981f8bfc55c89dbe6f9091dd3893fa1a6.jpg)
flowchart
graph LR
    A["ABC"] --> B["ABC"]
    B --> C["ABC"]
    C --> D["ABC"]
    D --> E["ABC"]
![FUJITSU ScanSnap S1500M - Press the [Scan] button on the ScanSnap. - 2](/content/2026/06/1236416/images/ce19ccf67ea67f42025e035f14e1baf953a842bed48542015b7eb1ba3415f442.jpg)
If a document is scanned at an angle, an image may be output that does not match the document size.
■ Scanning Documents Larger Than A4/Letter Size
The ScanSnap is able to scan documents larger than A4/Letter size, such as A3, Double Letter, and B4 sizes, using the Carrier Sheet. Fold the document in half, scan it in Duplex mode, and then merge both front and back images to make a double-page spread image data. You can also scan and merge both front and back images of a document smaller than A4/Letter size to output a double-page spread image data.
To scan documents larger than A4/Letter size, change the settings by following the procedure below.

- When you scan documents using a Carrier Sheet, a detection error may occur in the folded portion, and some parts of the image data may be lost. Therefore, it is not recommended for scanning where accuracy is crucial.
- The [Correct skewed character strings automatically] check box in the [Read mode option] dialog box displayed by pressing the [Option] button on the [Scanning] tab, is disabled.
1. From the Right-Click Menu, select [Scan Button Settings].
![FUJITSU ScanSnap S1500M - From the Right-Click Menu, select [Scan Button Settings]. - 1](/content/2026/06/1236416/images/bfab62a03ecd49dc0a7e3c19514335565c6c17223853cc94a73a6cb7f642e446.jpg)
text_image
Duplex scan Simplex scan Scan Button Settings... Profile Management... Show scanning results Check consumable supplies... Help Exit⇒ The ScanSnap setup dialog box appears.
2. Click the [Carrier Sheet Settings] button on the [Paper] tab.
![FUJITSU ScanSnap S1500M - Click the [Carrier Sheet Settings] button on the [Paper] tab. - 1](/content/2026/06/1236416/images/2b11de7e6a37f242eb6758bdcb32faed19e8a379c74c82b94a007c1931a960cf.jpg)
text_image
Application Save Scanning File option Paper Compression Select paper. Paper size: Automatic detection Carrier Sheet Settings... Custom... Multifeed Detection: Check Overlapping [Ultrasonic] Hide OK Cancel Apply⇒ The [Carrier Sheet Settings] dialog box appears.
3. Select [Create facing pages in one image] in the [Mode] drop-down list, and then click the [OK] button.
For details about Carrier Sheet settings, refer to the ScanSnap Manager Help.
![FUJITSU ScanSnap S1500M - Select [Create facing pages in one image] in the [Mode] drop-down list, and then click the [OK] button. - 1](/content/2026/06/1236416/images/87febfac47a6cb3e449eb2a62c8ee8ada5d339b799aa25d38fdb69e5c28d39d5.jpg)
text_image
Carrier Sheet Settings Mode Create facing pages in one image Output image size Automatic detection Custom... In this Mode, the front and back pages are set in a facing page state and is output as a 1-page image. Use this mode when scanning documents such as A3 size. When inserting a document into Carrier Sheet, take notes of the following: - Set the document so that it touches the top of the sheet - Align the folded edge of the document along the thick vertical line - Select "Duplex Scan (Double-sided)" in ScarSnap Manager setting. The setting can be changed in the [Scanning side] of the [Scanning] tab. ABC ABC OK Cancel Help4. Select [Automatic detection] in the [Paper size] drop-down list on the [Paper] tab.
![FUJITSU ScanSnap S1500M - Select [Automatic detection] in the [Paper size] drop-down list on the [Paper] tab. - 1](/content/2026/06/1236416/images/ab7865631fc7075f9a1c65e1aaba41721731c2925f3f20cd9d3962069b807dc4.jpg)
text_image
ScanSnap Color Image Scanner Use Quick Menu Recommended Small File High Quality Profile Standard Application Save Scanning File option Paper Compression Select paper. Paper size: Automatic detection Carrier Sheet Settings... Custom... Multifood Detection: Check Overlapping [Ultrasonic] Hide OK Cancel Apply5. Select [Duplex Scan (Double-sided)] in the [Scanning side] drop-down list on the [Scanning] tab.
![FUJITSU ScanSnap S1500M - Select [Duplex Scan (Double-sided)] in the [Scanning side] drop-down list on the [Scanning] tab. - 1](/content/2026/06/1236416/images/537be6b971fdfc61031260962b87453c700d851b3b9dadb03b33961bbce6b502.jpg)
text_image
Application Save Scanning File option Paper Compression Specify the scanning mode you would like to use. Image quality: Auto Color mode: Auto Color Detection Scanning side: Duplex Scan (Double-sided) Continue scanning after current scan is finished Option... Hide OK Cancel Apply![FUJITSU ScanSnap S1500M - Select [Duplex Scan (Double-sided)] in the [Scanning side] drop-down list on the [Scanning] tab. - 2](/content/2026/06/1236416/images/3625fa8592b3bf1e15c9a05ab44c8a281acdd40ba93a9c79c42a46a5c68585a2.jpg)
Selecting [Simplex Scan (Single-sided)] results in the same output as selecting [Create front and back images separately].
6. Click the [OK] button to close the ScanSnap setup dialog box.
7. Load the document into the ScanSnap.
- Fold the document in half so that the side to be scanned is on the external side. Fold the sheet tightly and smooth out the crease. Otherwise, the sheet may be skewed during scanning.
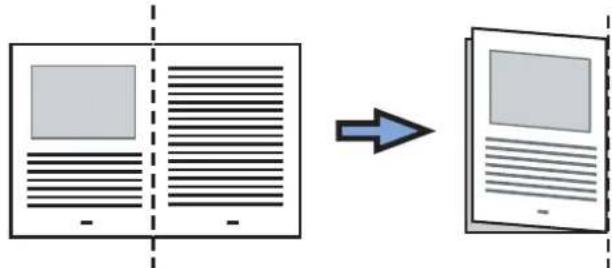
text_image
Diagram showing document processing transformation from a blank image to a template with an arrow indicating direction.- Open the Carrier Sheet and insert the document.
Align the fold with the right edge of the Carrier Sheet so that the document fits into the Carrier Sheet at the upper corner.

text_image
Diagram illustrating a document with a magnified inset showing a grid layout and directional arrow, likely illustrating a technical or engineering concept.3. Load the Carrier Sheet into the ScanSnap.
- Load the Carrier Sheet with the portion striped in black and white as the top edge.
- Place the document so that the back is face up.
- Adjust the side guides to the width of the Carrier Sheet to avoid skewing.
- When scanning the Carrier Sheet mixed with regular size and shape documents, select an option other than [Check Length] in the [Multifeed Detection] drop-down list on the [Paper] tab in the ScanSnap setup dialog box.
For details on how to set, refer to "Scanning Documents of Differing Widths or Sizes at the Same Time" (page 166).
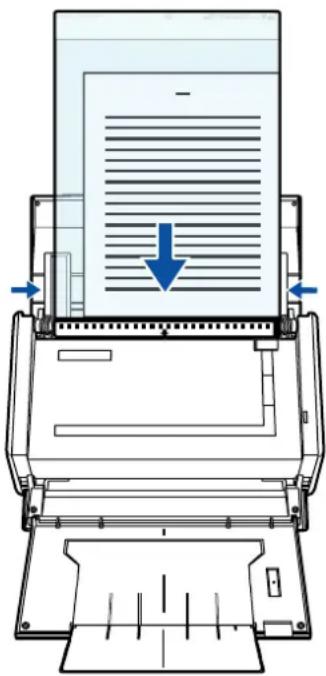
text_image
Diagram of a printer with paper feed and downward arrow indicating compression or write operation8. Press the [Scan] button on the ScanSnap.
⇒ When a duplex scan is performed, image data on the front and back sides are merged into a double-page spread image.
![FUJITSU ScanSnap S1500M - Press the [Scan] button on the ScanSnap. - 1](/content/2026/06/1236416/images/b3ca7baa47b19246d274dae7f6d596ad83b1899bd886da78989f06f2c8f6a794.jpg)
natural_image
Abstract diagram with a gray rectangle and horizontal lines, no text or symbols present![FUJITSU ScanSnap S1500M - Press the [Scan] button on the ScanSnap. - 2](/content/2026/06/1236416/images/25f1db267a752745b9641a10e30f9f6092bb2597a722ce1ed2ad271fe0461323.jpg)
- There may be a gap, misalignment, or a line between the front and back images on the output image data.
When a sheet of thick paper is scanned, image data on both the right and left sides may be skewed to a trapezoidal shape.
The degree of skewing varies depending on the condition of the document (how it is folded or loaded).
Troubleshoot the problem as follows, and the situation may be improved.
- Is the document neatly folded? If not, fold it neatly.
- Is the edge of the document aligned with the edge of the Carrier Sheet? If not, align the document with the Carrier Sheet edge.
- Try scanning the document with the back and front sides reversed.
- When [Automatic detection] is selected from the [Output image size] drop-down list on the [Carrier Sheet Settings] dialog box, the size of the produced image data may be smaller than the original, or parts may be lost.
(The image is output in A3, B4, or 11 × 17 inches size, whichever the smallest, so that all elements on the image are included.)
Example: When you scan the A4 size image printed at the center of an A3 size paper, B4 size image is output.
To output image data in the original size, specify the document size in the [Output image size] drop-down list.
- A detection error in the folded portion may cause some parts of the image data to be lost. In this case, set the document so its edge will be about 1 mm inside of the Carrier Sheet frame.
■ Scanning Photographs and Irregular-shaped Documents
When you do not want to get scratches on a photograph, or want to scan an irregular-shaped document such as a clipping of an article that is difficult to scan as it is, you can use the Carrier Sheet to scan with the ScanSnap.
To scan photographs and irregular-shaped documents, change the settings by following the procedure below.

The [Correct skewed character strings automatically] check box in the [Read mode option] dialog box displayed by pressing the [Option] button on the [Scanning] tab, is disabled.
1. Select [Scan Button Settings] from the Right-Click Menu.
![FUJITSU ScanSnap S1500M - Select [Scan Button Settings] from the Right-Click Menu. - 1](/content/2026/06/1236416/images/514d03054add7926b6dbdbfdd3a28652be2f81fe4f4767432ad0e539bd0f7c7f.jpg)
text_image
Duplex scan Simplex scan Scan Button Settings... Profile Management... Show scanning results Check consumable supplies... Help Exit⇒ The ScanSnap setup dialog box appears.
2. Click the [Carrier Sheet Settings] button on the [Paper] tab.
![FUJITSU ScanSnap S1500M - Click the [Carrier Sheet Settings] button on the [Paper] tab. - 1](/content/2026/06/1236416/images/190b9136530c40e93a6e1c61f53934213447a6e550aca86a5401e2615c5960fe.jpg)
text_image
ScanSnap Color Image Scanner Use Quick Menu Recommended Small File High Quality Profile Standard Application Save Scanning File option Paper Compression Select paper. Paper size: Automatic detection Carrier Sheet Settings... Custom... Multifeed Detection: Check Overlapping [Ultrasonic] Hide OK Cancel Apply⇒ The [Carrier Sheet Settings] dialog box appears.
3. Select [Create front and back images separately] in the [Mode] dropdown list, and then click the [OK] button.
For details about Carrier Sheet settings, refer to the ScanSnap Manager Help.
![FUJITSU ScanSnap S1500M - Select [Create front and back images separately] in the [Mode] dropdown list, and then click the [OK] button. - 1](/content/2026/06/1236416/images/c84ba328c2648ef80e05df26871bd6ce1598bc47aa50dfc1ac10876caf1395cc.jpg)
text_image
Carrier Sheet Settings Mode Create front and back images separately Output image size Automatic detection Custom... In this mode, the scanned document image is posted on the specified size of a sheet. Use this mode to scan photographs and clippings. This mode is intended for scanning the following originals. Documents such as photographs that you do not want to damage. Wrinkled or creased documents that are easily jammed. Please observe the following instructions when loading documents in Carrier Sheet Align the original document to the top edge of the Carrier Sheet. Position the document in the center of the Sheet. Be aware that the scanned image size is the size of the Sheet when Carrier Sheet size is specified. By trimming the scanned image using an application such as Aorcbet(R), you can clip out the image with the sizes of your preference. This mode, scanning sides depends on ScanSnap settings. With simplex setting, only single sided images are generated and with duplex setting, double sided images are generated. When scanning documents of non-standard sizes such as photographs, add a custom size definition and specify it for output size to get the correctly trimmed image. OK Cancel Help4. Select [Automatic detection] in the [Paper size] drop-down list on the [Paper] tab.
![FUJITSU ScanSnap S1500M - Select [Automatic detection] in the [Paper size] drop-down list on the [Paper] tab. - 1](/content/2026/06/1236416/images/5ec66a6d160e69929090b3e758459412f39c5735c728eef5be712682b90809bf.jpg)
text_image
ScanSnap Color Image Scanner Use Quick Menu Recommended Small File High Quality Profile Standard Application Save Scanning File option Paper Compression Select paper Paper size: Automatic detection Carrier Sheet Settings... Custom... Multifeed Detection: Check Overlapping [Ultrasonic] Hide OK Cancel Apply5. Click the [OK] button to close the ScanSnap setup dialog box.
6. Load the document into the ScanSnap.
- Open the Carrier Sheet and insert the document. Neatly align the top of the document with the top of the Carrier Sheet. Center the material so that it is entirely contained in the Carrier Sheet.
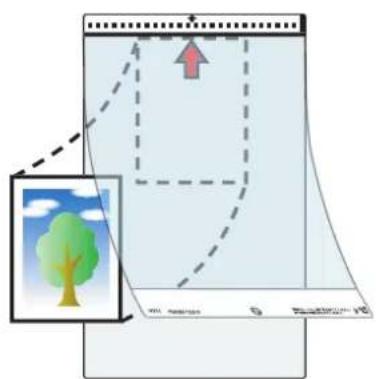
text_image
Diagram illustrating a tree planting process with labeled parts and directional arrows, including a magnified inset showing the tree.- Load the Carrier Sheet into the ScanSnap.
- Load the Carrier Sheet with the portion striped in black and white as the top edge.
- Place the document so that the back of it faces up.
- Adjust the side guides to the width of the Carrier Sheet to avoid skewing.
- When scanning the Carrier Sheet mixed with regular size and shape documents, select an option other than [Check Length] in the [Multifeed Detection] drop-down list on the [Paper] tab in the ScanSnap setup dialog box.
For details on how to set, refer to "Scanning Documents of Differing Widths or Sizes at the Same Time" (page 166).

text_image
Back
From the Right-Click Menu, select [Scan Button Settings] → the [Scanning] tab → the [Option] button. When the [Set the document with its face up] check box is selected in the [Read mode option] dialog box, load the document in the Carrier Sheet so that its front side faces up in the correct orientation.
7. Press the [Scan] button on the ScanSnap.
Scanning is started and the image data is output.
![FUJITSU ScanSnap S1500M - Press the [Scan] button on the ScanSnap. - 1](/content/2026/06/1236416/images/ce89269cbbce0981e81818287eb18a5960d4d49f9a60a4faaca4e52cf103c105.jpg)
- The image data scanned by using the [Scan] button is centered and output in the size specified in [Output image size].
When [Automatic detection] is selected from the [Output image size] drop-down list on the [Carrier Sheet Settings] dialog box, an optimal size is selected automatically from the available standard sizes.
- When [Automatic detection] is selected from the [Output image size] drop-down list on the [Carrier Sheet Settings] dialog box, the size of the produced image data may be smaller than the original, or parts may be lost.
Example: When you scan the A5 size image printed at the center of an A4 size paper, A5 size image is output.
To output image data in the original size, specify the document size in the [Output image size] drop-down list.
![FUJITSU ScanSnap S1500M - Press the [Scan] button on the ScanSnap. - 2](/content/2026/06/1236416/images/4c0bb2d872fcac4e0113ddbc1424f46a813ea8dcb9c6cb3c63c6191373d9f260.jpg)
If the following symptoms are observed, lay the material over a piece of white paper to scan.
- The output image data is not in a suitable size (when [Automatic detection] is selected).
- The outline of the document is shaded.
- Black lines appear around the document cut out in an indefinite shape.
![FUJITSU ScanSnap S1500M - Press the [Scan] button on the ScanSnap. - 3](/content/2026/06/1236416/images/6d1518d1b1910069b408a64e2b7fa9b5dc38fd2ad6c74a81da9ff6a2c75cedd0.jpg)
text_image
Blank Page■ Scanning Long Pages
Up to 863-mm-long (34 inches) documents can be scanned.
The following describes how to scan long pages.
1. Load the document into the ScanSnap.
For details about document types that can be loaded, refer to "Paper Sizes of Documents to Be Scanned" (page 27).

- Long page documents should be loaded one sheet at a time in the ADF paper chute (cover).
• Take note of the following when scanning long page documents:
When loading
Hold the document with your hands to prevent it from falling off the ADF paper chute (cover).

natural_image
Illustration of a hand printing a printer with paper being placed (no text or symbols visible)When removing
Make sure there is enough space on the stacker side and guide the scanned document with your hands so that it does not fall off the stacker.
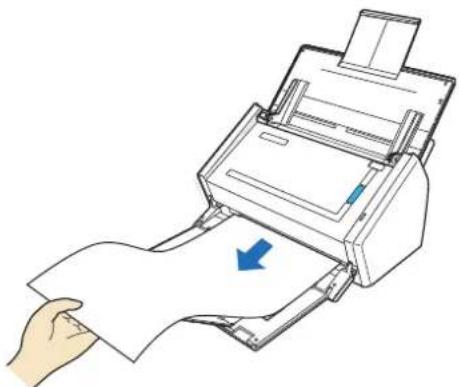
natural_image
Illustration of a hand pressing down on a printer with a blue arrow indicating print direction (no text or symbols present)2. Press the [Scan] button on the ScanSnap until it blinks blue for 3 seconds or longer.
⇒ Scanning is started.
![FUJITSU ScanSnap S1500M - Press the [Scan] button on the ScanSnap until it blinks blue for 3 seconds or longer. - 1](/content/2026/06/1236416/images/dcd0605771f4ce932d783a985387c1c8760861a48e249d052792463951cc0603.jpg)
If the first sheet scanned is scanned a long page, and scanning is continued, subsequent sheets will also be scanned as long pages.
![FUJITSU ScanSnap S1500M - Press the [Scan] button on the ScanSnap until it blinks blue for 3 seconds or longer. - 2](/content/2026/06/1236416/images/c0754d03ba1aa0ff9cd49c7f1d20fa07043724f35c25178d875e03197b9e1887.jpg)
- When [Image quality: Excellent] is specified, the error message as shown below appears indicating that long document scanning is not available.
![FUJITSU ScanSnap S1500M - Press the [Scan] button on the ScanSnap until it blinks blue for 3 seconds or longer. - 3](/content/2026/06/1236416/images/89dcbcf7625d6cd7a8ad7e78e2c0839e7d8f159de4a47acbbb4f8febad5b1ad5.jpg)
text_image
ScanSnap Manager Long page scanning is not available when [Excellent] is specified for [Image quality]. Select a different item in [Image quality] and try again. OK- Long document scanning is performed not on the current settings, but on the following settings:
- Multifeed Detection: None
- Paper size: Automatic detection
■ Saving Scanned Images in Multiple PDF Files
The ScanSnap is able to save scanned image data in multiple PDF files based on the selected number of pages. For example, you can scan a batch of slips, and save each slip as a PDF file.
To save image data in multiple PDF files, change the settings by following the procedure below.
1. Select [Scan Button Settings] from the Right-Click Menu.
![FUJITSU ScanSnap S1500M - Select [Scan Button Settings] from the Right-Click Menu. - 1](/content/2026/06/1236416/images/55fcf44c79988efd2ae9738c9261e426e2cb4a4853f7722f82d754ee893d5113.jpg)
text_image
Duplex scan Simplex scan Scan Button Settings... Profile Management... Show scanning results Check consumable supplies... Help Exit⇒ The ScanSnap setup dialog box appears.
2. Click the [Option] button on the [File option] tab.
![FUJITSU ScanSnap S1500M - Click the [Option] button on the [File option] tab. - 1](/content/2026/06/1236416/images/c294e8825cbf3612e1abc2f65926535879ab1ca412660ebc3232edb471ca0f4a.jpg)
text_image
Application Save Scanning File option Paper Compression Specify the file options you would like to use. File format: PDF(*.pdf) JPEG is available only when "Color" or "Gray" is selected at [Color mode]. Select OCR Set the marked text as a keyword for the PDF file Target marked sections: First marked section All marked sections Convert to Searchable PDF OCR options Language: EN English Target pages: First page All pages Option... Hide OK Cancel Apply⇒ The [PDF file format option] dialog box appears.
![FUJITSU ScanSnap S1500M - Click the [Option] button on the [File option] tab. - 2](/content/2026/06/1236416/images/4d03d88965c0afb5194f62ea09eaa3fe6f983355a16e2073904763e1392aa47d.jpg)
Check that [PDF(*.pdf)] is selected in the [File format] drop-down list.
3. Select [Generate one PDF file per (n) page(s)] and enter a number.
One PDF file is created every time the number of pages specified here have been scanned.
![FUJITSU ScanSnap S1500M - Select [Generate one PDF file per (n) page(s)] and enter a number. - 1](/content/2026/06/1236416/images/dcf9ab5844eeadf01a77e582740a26d016464d2f4138ac0b4d3bd80b2215d880.jpg)
text_image
PDF file format option Split PDF pages ○ Multipage PDF(whole batch in one PDF) ● Generate one PDF file per 1 page(s) Password □ Set a password for PDF file □ Use a fixed password Password: Confirm: OK Cancel Help![FUJITSU ScanSnap S1500M - Select [Generate one PDF file per (n) page(s)] and enter a number. - 2](/content/2026/06/1236416/images/b35f69f3076f33073b7890804575b6555df4def49fe9c8350fd285703fd47840.jpg)
In Duplex mode, two pages (front/back) are created per document sheet.
It is recommended that you clear the [Allow automatic blank page removal] check box on the [Read mode option] dialog box, which is displayed when you select the [Scanning] tab → [Option] button. If this check box is selected, there may be a discrepancy between the page numbers of the original document and the scanned document in which blank pages may be deleted.
4. Click the [OK] button to close all the open dialog boxes.
5. Load the document into the ScanSnap.
For details, refer to "Paper Sizes of Documents to Be Scanned" (page 27) and "Loading Documents" (page 29).
6. Press the [Scan] button on the ScanSnap.
⇒ One PDF file is created every time the number of pages specified in Step 3. have been scanned.
■ Creating Searchable PDF Files
The ScanSnap is able to text-recognize the scanned image data automatically and create a searchable PDF file.
To create searchable PDF files, change the settings by following the procedure below.
1. Select [Scan Button Settings] from the Right-Click Menu.
![FUJITSU ScanSnap S1500M - Select [Scan Button Settings] from the Right-Click Menu. - 1](/content/2026/06/1236416/images/7964cf75d9b0def54d832576e0995cf236ac98a734b642dfd7fd4c8395d7c5fe.jpg)
text_image
Duplex scan Simplex scan Scan Button Settings... Profile Management... Show scanning results Check consumable supplies... Help Exit⇒ The ScanSnap setup dialog box appears.
2. In the [File format] drop-down list on the [File option] tab, select [PDF (\*.pdf)].
![FUJITSU ScanSnap S1500M - In the [File format] drop-down list on the [File option] tab, select [PDF (\*.pdf)]. - 1](/content/2026/06/1236416/images/dc0c84d3a1ab69ad60e04980d63b9a59a4d23a093a56cc2f546f9566d9e7e155.jpg)
text_image
ScanSnap Color Image Scanner Use Quick Menu Recommended Small File High Quality Profile Standard Application Save Scanning File option Paper Compression Specify the file options you would like to use File format: PDF(* pdf) JPEG is available only when "Color" or "Gray" is selected at [Color mode]. Select OCR Set the marked text as a keyword for the PDF file Target marked sections: First marked section All marked sections Convert to Searchable PDF OCR options Language: EN English Target pages: First page All pages Option... Hide OK Cancel Apply3. Select the [Convert to Searchable PDF] check box.
⇒ The following message appears:
![FUJITSU ScanSnap S1500M - Select the [Convert to Searchable PDF] check box. - 1](/content/2026/06/1236416/images/8a1da5e0f8d48008f795d5bade56d4fdc2b405c925c06dd2de86c1e761a533e5.jpg)
text_image
ScanSnap Manager It will slow your scanner if you do Text Recognition at scan. OK⇒ Click the [Yes] button to close the dialog box.
- Language
Select the language. Japanese, English, French, German, Italian, Spanish, Chinese (simplified), Chinese (traditional), Korean, Russian, and Portuguese can be selected.
- Target pages
To perform text recognition for the first page, select [First page]; for all pages, select [All pages].
![FUJITSU ScanSnap S1500M - Select the [Convert to Searchable PDF] check box. - 2](/content/2026/06/1236416/images/a533d0b872bb62f5ce07fd924216f0c24d218f5d2cc21fc21d70ada07877c227.jpg)
text_image
ScanSnap Color Image Scanner Use Quick Menu Recommended Small File High Quality Profile Standard Application Save Scanning File option Paper Compression Specify the file options you would like to use. File format: PDF(*.pdf) JPEG is available only when "Color" or "Gray" is selected at [Color mode]. Select OCP Set the marked text as a keyword for the PDF file Target marked sections Convert to Searchable PDF All marked sections Language: EN English Target pages: First page All pages Option... Hide OK Cancel Apply- Click the [OK] button to close the ScanSnap setup dialog box.
- Load the document into the ScanSnap.
For details, refer to "Paper Sizes of Documents to Be Scanned" (page 27) and "Loading Documents" (page 29).
6. Press the [Scan] button on the ScanSnap.
Scanning is started.
The image data is text-recognized, and a searchable PDF file is created from the scanned document and saved in a folder.
![FUJITSU ScanSnap S1500M - Press the [Scan] button on the ScanSnap. - 1](/content/2026/06/1236416/images/3a610153f00f2944356b46eada1abd953e3f671aaa459a6a30fbc09acca84f89.jpg)
- Enabling this setting may require an extended period of processing depending on your computer operating environment.
- The ScanSnap may fail to correctly text recognize the following types of documents (characters) as text. However, by changing [Color mode] and/or increasing [Image quality] for scanning, such documents may be successfully text-recognized.
- Documents with handwritten characters
- Documents scanned in low quality, including smaller characters
- Skewed documents
- Documents written in languages other than the specified language for text recognition
- Documents including texts written in Italic characters
- Superscript/subscript letters and complex mathematical formulas
- Documents with characters on an unevenly colored background e.g. Shaded characters
- Documents with many decorated characters e.g. Decorated characters (embossed/outlined)
- Documents with characters on a patterned background e.g. Characters overlapping illustrations and diagrams
- Documents with many characters contacting underlines or borders
- It may take an extended period of time to scan documents with complex layouts, or smudged documents where characters are unreadable.
■ Automatically Setting Keywords to PDF Files
Character strings such as those in titles in black-and-white documents can be set as keywords and used for a PDF file search.
Mark a character string to be set as a keyword with a water-based highlight pen so that the character string is completely covered. When you perform a scan, the marked character strings are recognized and set as keywords for the PDF file.
Hereinafter, a line drawn with a water-based highlight pen is referred to as a "marked section", and a water-based highlight pen as a "highlight pen".

flowchart
graph TD
    A["ScanSnap"] -->|Convert a character string in a marked section into text| B["Scan"]
    C["Image"] -->|Set text as a keyword for the PDF file| D["ScanSnap"]
    D --> E["Scan Keyword"]
    style A fill:#f9f,stroke:#333
    style B fill:#bbf,stroke:#333
    style C fill:#f9f,stroke:#333
    style D fill:#bbf,stroke:#333
    style E fill:#f9f,stroke:#333
Mark black-and-white documents in the following way.
- Any regular highlight pen can be used.
The recommended highlight pen colors are shown below.
| Pink Yellow Blue Green | |||
| ScanSnap | ScanSnap | ScanSnap | ScanSnap |
- Mark a line straightly.
- The supported range of marked sections is as follows.
Minimum: 10 mm (width) × 3 mm (length)
Maximum: 150 mm (width) × 20 mm (length) - Use only one color for marking a page.
- Mark a character string to be set as a keyword so that the entire string is covered. Mark sections so that the entire section is the same color.
| Good example | Bad example 1 (entire section is not covered) | Bad example 2 (color is uneven) |
| ScanSnap | ScanSnap | ScanSnap |
- Mark up to ten sections on a page.

- For the following types of documents, marked sections cannot be recognized and set as keywords.
- Color documents such as catalogues or pamphlets
- Documents in which two or more colors are used for marking
- Documents containing colors other than for marking (pens other than highlight pens are used, or the document is stained)
- Documents containing too many marked sections
- The following types of marked character strings cannot be set as keywords.
- The size of marked sections is outside the supported range
- Character strings framed by highlight pen

- The marking is irregular (for example, skewed)
- Multiple marked sections are too close to each other
- The color of the highlight pen is too pale or the color has faded
ScanSnap
- When you mark more than one character string, make sure to leave a gap of at least 5 mm between the marked sections. Marked sections that are too close to each other may be detected as one marked section.
- In the following cases, character strings surrounding marked sections may be set as keywords.
- Lines of marked sections cross
- In the following cases, unmarked character strings may be set as keywords.
- Color documents such as catalogues or pamphlets
- Documents with color text, diagrams, pictures, tables and lines
- Documents containing sections framed by highlight pen
- Stained documents

- Increase the resolution when you have trouble setting the keywords correctly.
- Keywords set for a PDF file can be checked in the ScanSnap Organizer Main Window (thumbnail view), or in [Document Properties] of Adobe Acrobat / Adobe Reader.
To automatically set keywords to PDF files, change the settings by following the procedure below.
1. Select [Scan Button Settings] from the Right-Click Menu.
![FUJITSU ScanSnap S1500M - Select [Scan Button Settings] from the Right-Click Menu. - 1](/content/2026/06/1236416/images/57a9d07eaf670c41ece451c5974675877ea28423123d601875b807c34f10fceb.jpg)
text_image
Duplex scan Simplex scan Scan Button Settings... Profile Management... Show scanning results Check consumable supplies... Help Exit⇒ The ScanSnap setup dialog box appears.
2. In the [File format] drop-down list on the [File option] tab, select [PDF (\*.pdf)].
![FUJITSU ScanSnap S1500M - In the [File format] drop-down list on the [File option] tab, select [PDF (\*.pdf)]. - 1](/content/2026/06/1236416/images/90828b1a39566db9b392f26a48188768e3c104f6b883f2690c5ca157389b4c09.jpg)
text_image
ScanSnap Color Image Scanner Use Quick Menu Recommended Small File High Quality Profile Standard Application Save Scanning File option Paper Compression Specify the file options you would like to use File format: PDF(*.pdf) JPEG is available only when "Color" or "Gray" is selected at [Color mode]. Select OCR Set the marked text as a keyword for the PDF file Target marked sections: First marked section All marked sections Convert to Searchable PDF OCR options Language: EN English Target pages: First page All pages Option... Hide OK Cancel Apply3. Select the [Set the marked text as a keyword for the PDF file] check box.
• Target marked sections
Select [First marked section] to recognize only the first marked section, and select [All marked sections] to text-recognize all marked sections.
![FUJITSU ScanSnap S1500M - Select the [Set the marked text as a keyword for the PDF file] check box. - 1](/content/2026/06/1236416/images/598bc4ec46cf0b04f1429c9c6efe52b58713bb72eac3e0f3f0f0bfa0b20b6dc2.jpg)
The following description is for [First marked section].
- Select this button to set a character string such as a title of a document as a keyword for the PDF file.
Example: When only a title of a document is marked, the marked character string is set as a keyword for the PDF file, and the PDF file becomes searchable by the title character string.
![FUJITSU ScanSnap S1500M - Select the [Set the marked text as a keyword for the PDF file] check box. - 2](/content/2026/06/1236416/images/36bdbb42350671846570049f0874c9f3f9f2fd39dbe9fcfd3fb459f89075ba57.jpg)
text_image
3. How to Use ScanSnap This chapter describes basic operations of ScanSnap. 3.1. Scanning Documents Web "ScanSnap", you can turn paper office documents on your desk into digital files, save them, attach them to e-mail, print them, and convert them into Word/Text/PowerPoint data just by pressing a single button. The scanned images can be viewed on the screen using the supplied applications (Adobe Acrobat)- When multiple marked sections exist in line, the marked character string closest to the top of the document is set as a keyword.
Example: In the following case, the character string in marked section B, which is higher than marked section A, is set as a keyword.
![FUJITSU ScanSnap S1500M - Select the [Set the marked text as a keyword for the PDF file] check box. - 3](/content/2026/06/1236416/images/63ae4e1a1f39dc8d2ec61dace016169c583a303e2e9d318e7130b74f658a148d.jpg)
flowchart
graph LR
    A["1. ScanSnap"] --> B["2. Image Scanner"]
    B --> C["Marked Section A"]
    B --> D["Marked Section B"]
- Language
Select the language. Japanese, English, French, German, Italian, Spanish, Chinese (simplified), Chinese (traditional), Korean, Russian, and Portuguese can be selected.
- Target pages
To perform text recognition for all pages, select [All pages]; for the first page, select [First page].
![FUJITSU ScanSnap S1500M - Select the [Set the marked text as a keyword for the PDF file] check box. - 4](/content/2026/06/1236416/images/be68c72c23c0c02d2e8cb857870e898bf0c24ed68bb37d7ced808dde0d484d50.jpg)
text_image
File format: PDF(*.pdf) JPEG is available only when "Color" or "Gray" is selected at [Color mode] Select OCR ✓ Set the marked text as a keyword for the PDF file Target marked sections: ✓ Convert to Searchable PDF First marked section ○ All marked sections OCR options Language: EN English Target pages: ● First page ○ All pages Option... Hide ↑ OK Cancel Apply4. Click the [OK] button to close the ScanSnap setup dialog box.
5. Load the document into the ScanSnap.
For details, refer to "Paper Sizes of Documents to Be Scanned" (page 27) and "Loading Documents" (page 29).
6. Press the [Scan] button on the ScanSnap.
Scanning is started.
Marked character strings are text-recognized and the PDF file with keywords is saved.
![FUJITSU ScanSnap S1500M - Press the [Scan] button on the ScanSnap. - 1](/content/2026/06/1236416/images/cf49ea99969dc367e18e391476db8cc0ff8ffc78b8308d035c680676c3de2d44.jpg)
- Enabling this setting may require an extended period of processing depending on your computer operating environment.
-
The ScanSnap may fail to correctly text recognize the following types of documents (characters) as text. However, by increasing [Image quality] for scanning, such documents may be successfully text-recognized.
-
Documents with handwritten characters
- Documents scanned in low quality, including smaller characters
- Skewed documents
- Documents written in languages other than the specified language for text recognition
- Documents including texts written in Italic characters
- Superscript/subscript letters and complex mathematical formulas
- Documents with characters on an unevenly colored background e.g. Shaded characters
- Documents with many decorated characters e.g. Decorated characters (embossed/outlined)
- Documents with characters on a patterned background e.g. Characters overlapping illustrations and diagrams
-
Documents with many characters contacting underlines or borders
-
It may take an extended period of time to scan documents with complex layouts, or smudged documents where characters are unreadable.
- If the same character string is marked several times in a document, it will be set as the same keyword several times for the PDF file.
- Up to 255 characters can be set for keywords to be added, including punctuation marks in between keywords.
- Quotation marks (") may sometimes be shown before and after the added keywords when you check keywords using Adobe Acrobat or Adobe Reader.
■ Setting Document Open Passwords for PDF Files
When saving the scanned image data as PDF files, you can set Document Open passwords for the PDF files.
The password-protected PDF files cannot be opened unless a Document Open password is entered. If you set a password for private documents or confidential documents, adequate security of information can be provided.
To set passwords to PDF files, change the settings by following the procedure below.

When you use the Quick Menu, you cannot set passwords to scanned documents.
1. Select [Scan Button Settings] from the Right-Click Menu.
![FUJITSU ScanSnap S1500M - Select [Scan Button Settings] from the Right-Click Menu. - 1](/content/2026/06/1236416/images/607b894f46d4332de0300cdbfe46a0142ba13ebb6fa81e5bbe4a07d26ca390fd.jpg)
text_image
Duplex scan Simplex scan Scan Button Settings... Profile Management... Show scanning results Check consumable supplies... Help Exit⇒ The ScanSnap setup dialog box appears.
2. Click the [Option] button on the [File option] tab.
![FUJITSU ScanSnap S1500M - Click the [Option] button on the [File option] tab. - 1](/content/2026/06/1236416/images/3dfb0045da5f3403357182d4fd76b122bc7938857d8ef708afbb97232de23d13.jpg)
text_image
File option File format: PDF(*.pdf) JPEG is available only when "Color" or "Gray" is selected at [Color mode]. Select OCR Set the marked text as a keyword for the PDF file Target marked sections: First marked section All marked sections Convert to Searchable PDF OCR options Language: EN English Target pages: First page All pages Option ...⇒The [PDF file format option] dialog box appears.
![FUJITSU ScanSnap S1500M - Click the [Option] button on the [File option] tab. - 2](/content/2026/06/1236416/images/d64da9688f92feb8984442bfaeb5a4cbe332f6130170ceae22cf11313f0749d4.jpg)
Check that [PDF (*.pdf)] is selected in the [File format] drop-down list.
3. Select the [Set a password for PDF file] check box.
![FUJITSU ScanSnap S1500M - Select the [Set a password for PDF file] check box. - 1](/content/2026/06/1236416/images/32a310fe98a8a0af4a123e8cb4e20284aae40c3ce11db950b6288b07aac10e44.jpg)
text_image
PDF file format option Split PDF pages • Multipage PDF(whole batch in one PDF) • Generate one PDF file per 1 page(s) Password ✓ Set a password for PDF file □ Use a fixed password Password: Confirm: OK Cancel Help- To set a different password per scan
Clear the [Use a fixed password] check box.
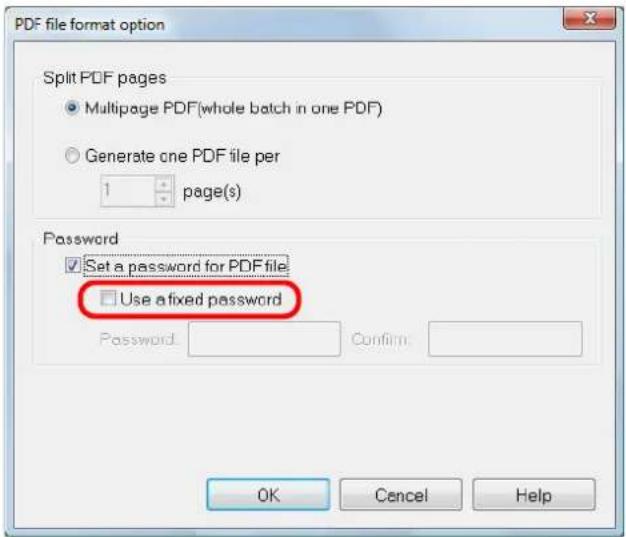
text_image
PDF file format option Split PDF pages • Multipage PDF(whole batch in one PDF) • Generate one PDF file per 1 page(s) Password ✓ Set a password for PDF file. □ Use a fixed password Password: Confirm: OK Cancel HelpYou can set a different password per scan.
- To use a preset password
- Select the [Use a fixed password] check box.
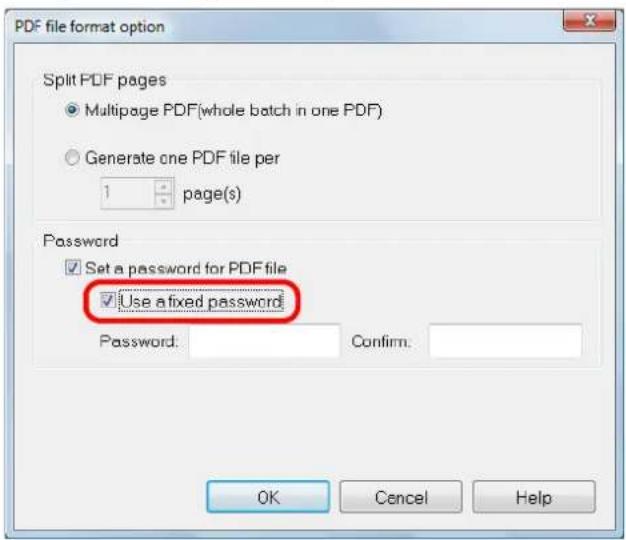
text_image
PDF file format option Split PDF pages ● Multipage PDF(whole batch in one PDF) ○ Generate one PDF file per 1 page(s) Password ✓ Set a password for PDF file ✓ Use a fixed password Password: Confirm: OK Cancel Help⇒The same password is used for all PDF files.
You do not have to type in a password every time a document is scanned.
- Type in the same password in the [Password] and [Confirm] fields.
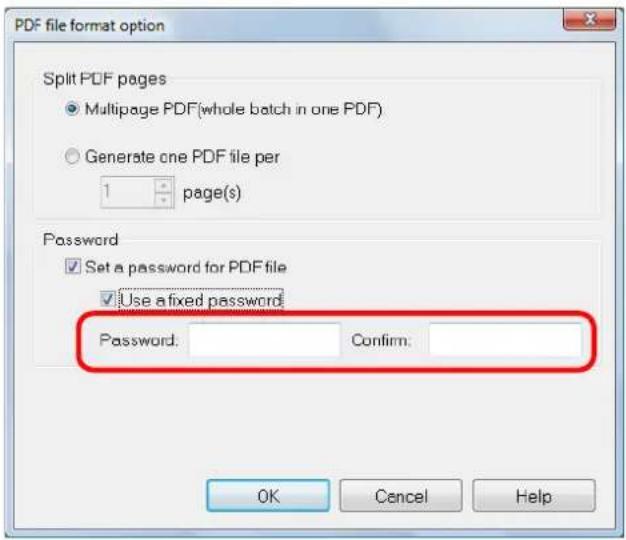
text_image
PDF file format option Split PDF pages ● Multipage PDF(whole batch in one PDF) ○ Generate one PDF file per 1 page(s) Password ✓ Set a password for PDF file ✓ Use a fixed password Password: Confirm: OK Cancel Help
The following characters can be used to set passwords:
Up to 16 characters
Alphanumeric characters: A-Z, a-z, 0-9
Symbols: ! " # \$ % & ' ( ) * + , - . / : ; <= > ? @ [ \ ] ^ _ ' { | } \~
- Click the [OK] button to close all the open dialog boxes.
- Load the document into the ScanSnap.
For details, refer to "Paper Sizes of Documents to Be Scanned" (page 27) and "Loading Documents" (page 29).
6. Press the [Scan] button on the ScanSnap.
Scanning is started.
⇒ When the [Use a fixed password] check box is cleared in Step 3., the following dialog box appears.
![FUJITSU ScanSnap S1500M - Press the [Scan] button on the ScanSnap. - 1](/content/2026/06/1236416/images/1b668240b27b3a95494d4e15cfe837c3d8cd2025d2a2f266ea67b1d33ac98840.jpg)
text_image
ScanSnap Manager (Enter password) Enter password for PDF file Password: Confirm: OK CancelIn the [Password] and [Confirm] fields, type in the same password, and then click the [OK] button.
![FUJITSU ScanSnap S1500M - Press the [Scan] button on the ScanSnap. - 2](/content/2026/06/1236416/images/a1603d49bb79d03e8b832d41d0577e495d6b8c8663663f137151a1f28e6e64c2.jpg)
- The following characters can be used to set passwords:
Up to 16 characters
Alphanumeric characters: A-Z, a-z, 0-9
Symbols: ! " # \$ % & ' ( ) * + , - . / : ; <= > ? @ [ \ ] ^ _ ' { | } \~
- If you click the [Cancel] button, the PDF file is saved without a password.
⇒ The scanned image data is saved as a password-protected PDF file.
![FUJITSU ScanSnap S1500M - Press the [Scan] button on the ScanSnap. - 3](/content/2026/06/1236416/images/eaab592985154c2d82d6ec7976484ce159b7cc9c4ce10f7890dee6be75f62cf1.jpg)
If you forget a password, there is no way to open the PDF file. It is a good idea to store passwords in another secure location in case you forget them.
Using the ScanSnap (for Mac OS Users)

natural_image
A zigzag black line on a white background, no text or symbols present.This chapter describes how to perform a scan with the ScanSnap, change or save scanning settings, and other various functions of the ScanSnap.
ScanSnap Manager Icon and Operations 194
How to Perform a Scan....197
Setting the ScanSnap 208
About Actions 226
Using the ScanSnap in Various Ways....267
ScanSnap Manager Icon and Operations
All operations on the ScanSnap are managed in ScanSnap Manager.
Ordinarily, the [ScanSnap Manager] icon is added to the Dock. The icon appears automatically in the Dock when Mac OS starts.
The icon also indicates whether ScanSnap Manager is successfully communicating with the ScanSnap or not. The appearance of the icon changes according to the status of communication, as shown below.
| Communication Status Icon in the Dock | |
| Communication is active |  |
| Communication is not active |  |
Click this icon while pressing the [control] key on the keyboard to display the menu where you can start scanning, change the scan settings, or check the status of the consumables.
■ ScanSnap Manager Menu
This menu appears when you click the ScanSnap Manager icon while pressing the [control] key on the keyboard.
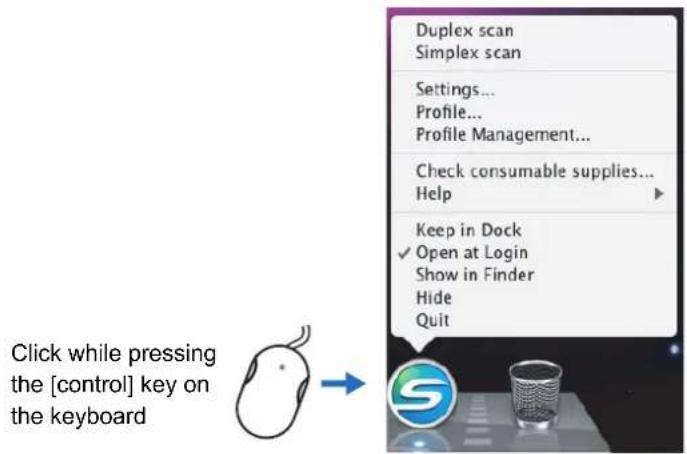
text_image
Duplex scan Simplex scan Settings... Profile... Profile Management... Check consumable supplies... Help Keep in Dock ✓ Open at Login Show in Finder Hide Quit Click while pressing the [control] key on the keyboard| Item Function | |
| Duplex scan Both the front and back of the document are scanned at the same time. Scanning is performed according to the settings configured in [Settings]. | |
| Simplex scan Only one side of the document is scanned at a time. Scanning is performed according to the settings configured in [Settings]. | |
| Settings The ScanSnap setup window appears.Scanning settings are configured on this window. "Changing Scanning Settings" (page 208) | |
| Profile The [Profile] menu appears. "[Profile] Menu" (page 196) | |
| Profile Management The [ScanSnap Manager - Profile Management] window appears. "Saving Scanning Settings" (page 211) | |
| Check consumable supplies The [ScanSnap Manager - Check consumable status] window appears.Reset consumable counters to 0 after you replace consumables. "Consumables" (page 337) | |
| Help You can view the Help topics, the version information of ScanSnap Manager,and the [Online Update] (page 357) and [Preferences] window. | |
| Keep in Dock (*) You can add the [ScanSnap Manager] icon to the Dock. | |
| Open at Login (*) You can set ScanSnap Manager to automatically start up when Mac OS is started up. | |
| Show in Finder (*) You can view the contents of the [ScanSnap] folder using Finder. | |
| Hide/Show You can hide and re-show all ScanSnap Manager windows on the desktop. | |
| Quit You can exit ScanSnap Manager. "Finishing ScanSnap Operation" (page 207) | |
* : In Mac OS X v10.6, select the [Options] sub-menu to display these items.
■ [Profile] Menu
This window appears when the [ScanSnap Manager] icon is clicked.
The currently saved profiles are shown as a list.
![FUJITSU ScanSnap S1500M - ■ [Profile] Menu - 1](/content/2026/06/1236416/images/77a1021da9560949cd41566a61502b858ad61c6d0b95c154c12d3b56cc037c26.jpg)
text_image
Profile Standard Scan to Folder Scan to E-mail Scan to Print Scan to Word Scan to Excel Cardiris iPhoto ClickBy selecting a profile on the [Profile] menu, you can switch to the previously saved scanning settings.
When you are not using the Quick Menu, you can select a profile from the [Profile] menu.
For details about how to save and manage profiles, refer to "Saving Scanning Settings" (page 211).
![FUJITSU ScanSnap S1500M - ■ [Profile] Menu - 2](/content/2026/06/1236416/images/d10bc19d98a2a223ede1c799d41b00135c25fa752c0fc958cd4a72cf03589709.jpg)
- To show the [Profile] menu, clear the [Use Quick Menu] checkbox on the ScanSnap setup window. The [Profile] menu does not appear when this checkbox is selected.
- You can also show the Profile menu by selecting [Profile] from the ScanSnap Manager menu.
How to Perform a Scan
This section describes how to perform a scan with the ScanSnap.
■ Preparation
- Make sure that the power cable is connected to the ScanSnap properly.
- Make sure that the ScanSnap is connected to your computer properly.

You can turn the computer on before connecting the ScanSnap.
When the ScanSnap is already connected to your computer, you do not have to disconnect and reconnect.
- Turn your computer on.
⇒ The [ScanSnap Manager] icon 5 appears in the Dock when Mac OS starts up.
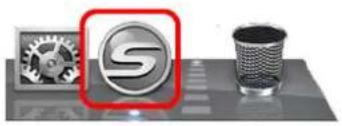
natural_image
Three electronic devices on a keyboard: a gear icon, a stylized S logo, and a perforated cup (no visible text or symbols)4. Open the ADF paper chute (cover) of the ScanSnap.
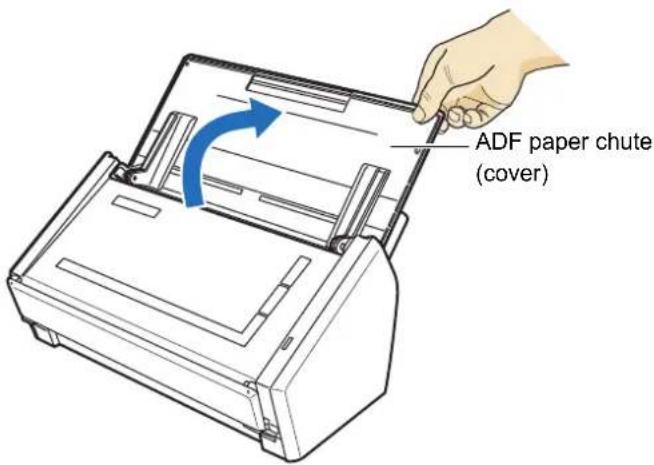
text_image
ADF paper chute (cover)⇒ The ScanSnap is turned on and the [ScanSnap Manager] icon changes from 50


There may be a slight delay before the [ScanSnap Manager] icon changes to depending on the computer load, performance, and operating environment, such as when there are many programs running on the computer.
■ Using the Quick Menu
The scanning method described below is for the case when you use the Quick Menu.
- Check for the [ScanSnap Manager] icon in the Dock as shown below.

natural_image
Three abstract icons: gear, a stylized 'S' logo, and a trash can on a gray surface (no text or symbols)
When the [ScanSnap Manager] icon is not displayed, from the Finder, select [Applications] → [ScanSnap] → [ScanSnap Manager] to start up ScanSnap Manager. If the [ScanSnap Manager] is not shown in the Dock when Mac OS starts up, from the [System Preferences] window, select [Accounts] → [My Account] → [Login Items] → [+] → [ScanSnap Manager] to register ScanSnap Manager.
- From the ScanSnap Manager menu, select [Settings].

text_image
Duplex scan Simplex scan Settings... Profile... Profile Management... Check consumable supplies... Help Keep in Dock ✓ Open at Login Show in Finder Hide Quit⇒ The ScanSnap setup window appears.
- Select the [Use Quick Menu] checkbox.
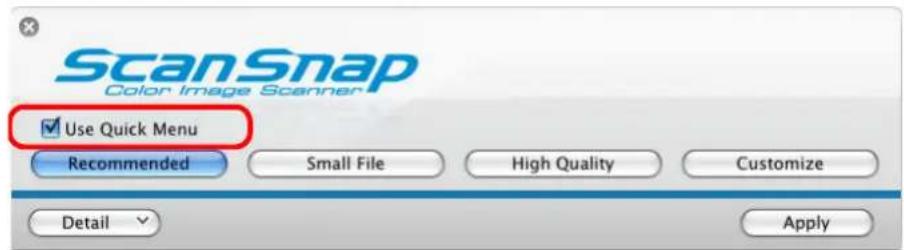
text_image
ScanSnap Color Image Scanner ✓ Use Quick Menu Recommended Small File High Quality Customize Detail Apply
For details about scanning documents without using the Quick Menu, refer to "Without Using the Quick Menu" (page 204).
4. Click one of the profile buttons.
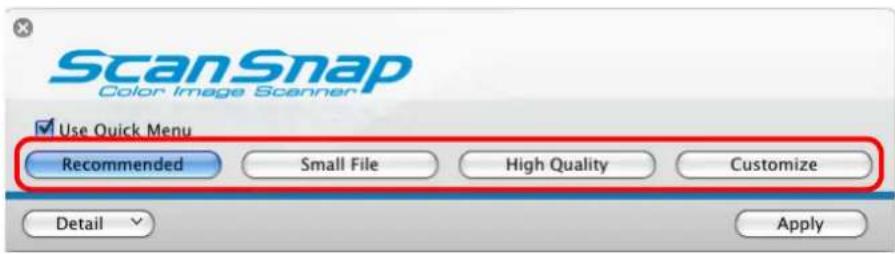
text_image
ScanSnap Color Image Scanner Use Quick Menu Recommended Small File High Quality Customize Detail Apply| Profile Buttons Description | |
| [Recommended] button | The settings are [Auto] for image quality and default for other settings.It is recommended to select this button when you want a high-quality scan of standard documents, and a higher quality scan of business cards, requiring a high level of text recognition. |
| [Small File] button The settings are | [Normal] (Color/Gray: 150 dpi, B&W: 300 dpi)for image quality, and default for other settings.It is recommended to select this button when you wish to reduce the scanned file size. |
| [High Quality] button The settings | are [Best] (Color/Gray: 300 dpi, B&W: 600 dpi)for image quality, and default for other settings.It is recommended to select this button when you want a high-quality scan. |
| [Customize] button The default settings are same as the [Recommended] settings. Settings can be changed at your choice. | |

- By default, the [Recommended] button is selected.
- You cannot change the settings for the [Recommended], [Small File], and [High Quality] buttons. When you change the scanning settings, the button automatically switches to the [Customize] button.
For details about how to change the scanning settings, refer to "Changing Scanning Settings" (page 208).
- Click the [Apply] button in the ScanSnap setup window.
- Click the [×] button in the upper left corner of the window or press the [esc] key to close the ScanSnap setup window.
- Load the document into the ScanSnap.
For details about how to load the document into the ScanSnap, refer to "Loading Documents" (page 29).
8. Press the [Scan] button on the ScanSnap.
Scanning is started.
![FUJITSU ScanSnap S1500M - Press the [Scan] button on the ScanSnap. - 1](/content/2026/06/1236416/images/813e1fe402f2b5d49f4d4b396bf173150bb011fe0a8ceeb58e42877250c2b610.jpg)
- By default, the [Scan] button settings are set to [Duplex Scan (Double-sided)]. With ScanSnap Manager, you can switch the [Scan] button settings to [Simplex Scan (Single-sided)] mode. For details, refer to "Changing Scanning Settings" (page 208).
- Scanning can also be started from the ScanSnap Manager menu. For details, refer to "ScanSnap Manager Menu" (page 195).
![FUJITSU ScanSnap S1500M - Press the [Scan] button on the ScanSnap. - 2](/content/2026/06/1236416/images/a364b2286b95caea06e21b0344485f272750ceda6d2b47f9127269839b194935.jpg)
- Do not connect or disconnect the ScanSnap and other USB devices during the scanning operation.
- Do not close the ADF paper chute (cover) during the scanning operation.
- Do not switch users during the scanning operation.
⇒ The [Scan] button on the ScanSnap blinks blue during the scanning operation.
The following window appears to indicate the scanning status.
![FUJITSU ScanSnap S1500M - Press the [Scan] button on the ScanSnap. - 3](/content/2026/06/1236416/images/1b29176c826a851b485b126ad26027dcbd7e34b2cb7e09d15b1ab12e7ca3258c.jpg)
text_image
ScanSnap Manager - Image scanning and file saving Scanning Image from ScanSnap. Scanning completed: Page Stop Duplex,Auto Color,Auto Quality,PDF,Automatic detection, Skip blank page,Rotation,Compression 3⇒ When the scanning is complete, the Quick Menu appears.
9. From the Quick Menu, click an icon for the item to be performed.
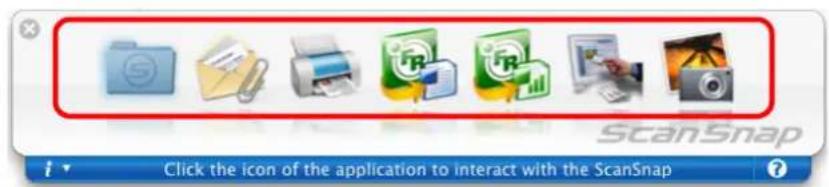
text_image
ScanSnap Click the icon of the application to interact with the ScanSnap⇒ The corresponding action of the selected item is performed.
| Item Description | ||
 | Scan to Folder | PDF or JPEG files are created from the scanned image data and saved in a specified folder.For details about how to operate after this button is selected, refer to "Saving Data in the Specified Folder" (page 227). |
 | Scan to E-mail | PDF or JPEG files are created from the scanned image data, and an e-mail program is started with the PDF or JPEG files attached to an e-mail message.For details about how to operate after this button is selected, refer to "Sending Files by E-Mail" (page 234). |
 | Scan to Print Scanned image data are printed with the printer.For details about how to operate after this button is selected, refer to "Using the ScanSnap as a Copy Machine" (page 242). | |
 | Scan to Word (*1) Scanned image data are text-recognized and converted into Word files.For details about how to operate after this button is selected, refer to "Converting into Word/Excel Documents" (page 248). | |
 | Scan to Excel (*1) Scanned image data are text-recognized and converted into Excel files.For details about how to operate after this button is selected, refer to "Converting into Word/Excel Documents" (page 248). | |
 | Cardiris (*2) Scanned card image data are text-recognized and saved in Cardiris.For details about how to operate after this button is selected, refer to "Scanning Business Cards" (page 254). | |
 | iPhoto (*3) Scanned image is saved in iPhoto.For details about how to operate after this button is selected, refer to "Saving Data in iPhoto" (page 262). | |
*1: The icon for this item is displayed only when ABBYY FineReader for ScanSnap is installed.
*2: The icon for this item is displayed only when Cardiris is installed.
*3: The icon for this item is displayed only when iPhoto 5 or later is installed.

- Before scanning documents of printed or handwritten text, on the ScanSnap setup window, select the [Scanning] tab → the [Option] button → the [Setting for text only document] checkbox. For details on how to change scanning settings, refer to "Changing Scanning Settings" (page 208).
- The scaling factor of the scanned image data may vary slightly from the document size.
- When Cardiris is started and becomes active (when the menu is Cardiris), the ScanSnap automatically interacts with the active application, and the settings for the application are used for scanning. Automatic linkage is disabled when the application is not active.
For details about automatic linkage, refer to "Automatic Linkage with Applications" (page 223).

- When the Quick Menu is displayed, scanning cannot be performed with the ScanSnap. Close the Quick Menu, or select an action from the Quick Menu and complete the action before scanning another document.
- Do not move, delete, or rename scanned image data in other applications while the Quick Menu is displayed.
■ Without Using the Quick Menu
The scanning method described below is for the case when you are not using the Quick Menu.
- Check for the [ScanSnap Manager] icon in the Dock as shown below.
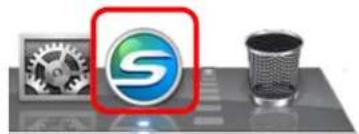
natural_image
Three electronic devices on a table: a gear with a 'S' logo, a metallic finisher, and a trash can (no visible text or symbols)
When the [ScanSnap Manager] icon is not displayed, from the Finder, select [Applications] → [ScanSnap] → [ScanSnap Manager] to start up ScanSnap Manager. If the [ScanSnap Manager] is not shown in the Dock when Mac OS starts up, from the [System Preferences] window, select [Accounts] → [My Account] → [Login Items] → [+] → [ScanSnap Manager] to register ScanSnap Manager.
- From the ScanSnap Manager menu, select [Settings].
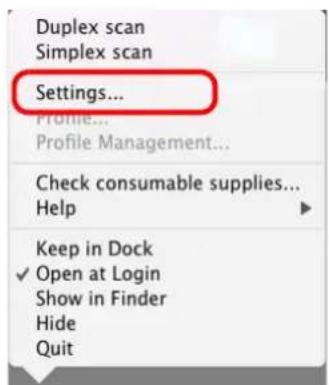
text_image
Duplex scan Simplex scan Settings... Profile... Profile Management... Check consumable supplies... Help Keep in Dock ✓ Open at Login Show in Finder Hide Quit⇒ The ScanSnap setup window appears.
3. Clear the [Use Quick Menu] checkbox.
![FUJITSU ScanSnap S1500M - Clear the [Use Quick Menu] checkbox. - 1](/content/2026/06/1236416/images/2d684d88a6d36d31d802e52700ad8121a6ecd5637709160c5475b1afd13d6460.jpg)
text_image
ScanSnap Color Image Scanner Use Quick Menu Recommended Small File High Quality Profile Standard Detail Apply![FUJITSU ScanSnap S1500M - Clear the [Use Quick Menu] checkbox. - 2](/content/2026/06/1236416/images/0895626ab8fc2f2152a47c773459c605d680a19da05edc3ca2f1deb3b86efd22.jpg)
When the [Use Quick Menu] checkbox is selected, an action to be executed after scanning and an interacting application cannot be specified.
Refer to "Using the Quick Menu" (page 199) to select an action from the Quick Menu after documents are scanned.
4. Select a profile to be executed after scanning.
Select a profile using either of the following:
- [Profile] pop-up menu in the ScanSnap setup window
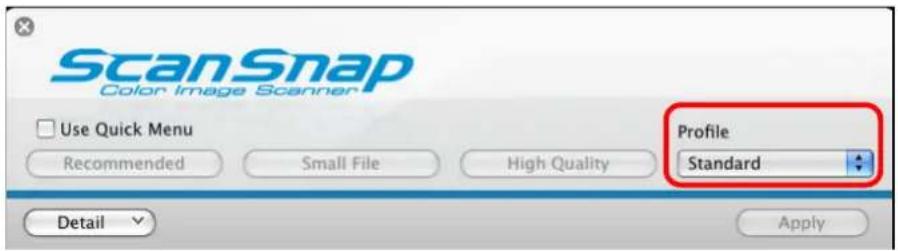
text_image
ScanSnap Color Image Scanner Use Quick Menu Recommended Small File High Quality Profile Standard Detail Apply- [Profile] menu
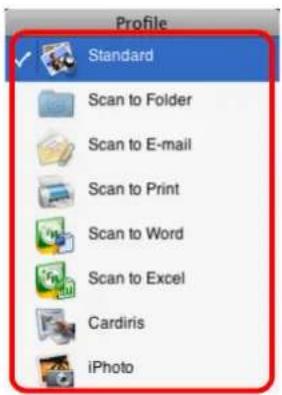
text_image
Profile Standard Scan to Folder Scan to E-mail Scan to Print Scan to Word Scan to Excel Cardiris iPhoto5. Load the document into the ScanSnap.
For details about how to load a document into the ScanSnap, refer to "Loading Documents" (page 29).
6. Press the [Scan] button on the ScanSnap.
Scanning is started.
![FUJITSU ScanSnap S1500M - Press the [Scan] button on the ScanSnap. - 1](/content/2026/06/1236416/images/cc8780c93ce3841be41ec6e2546c65bde4d88e11de29fcd90383029940602bd9.jpg)
- By default, the [Scan] button settings are set to [Duplex Scan (Double-sided)]. With ScanSnap Manager, you can switch the [Scan] button settings to [Simplex Scan (Single-sided)] mode. For details, refer to "Changing Scanning Settings" (page 208).
- Scanning can also be started from the ScanSnap Manager menu. For details, refer to "ScanSnap Manager Menu" (page 195).
![FUJITSU ScanSnap S1500M - Press the [Scan] button on the ScanSnap. - 2](/content/2026/06/1236416/images/107694fea12ee439ca221c9d1bc87626d4c5f34868855027aff3827847a7d879.jpg)
- Do not connect or disconnect the ScanSnap and other USB devices during the scanning operation.
- Do not close the ADF paper chute (cover) during the scanning operation.
- Do not switch users during the scanning operation.
⇒ The [Scan] button on the ScanSnap blinks blue during the scanning operation. The following window appears to indicate the scanning status.
![FUJITSU ScanSnap S1500M - Press the [Scan] button on the ScanSnap. - 3](/content/2026/06/1236416/images/08d0bbf8be05e156787cc992356a283ad2949c13d7233b893b4f623b1dec77ed.jpg)
text_image
ScanSnap Manager - Image scanning and file saving Scanning Image from ScanSnap. Scanning completed: Page Stop Duplex,Auto Color,Auto Quality,PDF,Automatic detection, Skip blank page,Rotation,Compression 3⇒ When scanning is complete, a selected action or interaction with another application starts.
![FUJITSU ScanSnap S1500M - Press the [Scan] button on the ScanSnap. - 4](/content/2026/06/1236416/images/0c0c90d5c5f8889d1910eecae224f08f92a875ced99585586e998a6db03214b2.jpg)
- By default, documents are scanned on the following settings: [Image quality: Auto], [Color mode: Auto Color Detection], [Scanning side: Duplex Scan]. For details about how to change settings, refer to "Changing Scanning Settings" (page 208).
- Before scanning documents of printed or handwritten text, on the ScanSnap setup window, select the [Scanning] tab → the [Option] button → the [Setting for text only document] checkbox.
- The application that starts after scanning varies depending on which option is selected on the [Application] tab in the ScanSnap setup window. For more information, refer to the ScanSnap Manager Help.
- The scaling factor of the scanned image data may vary slightly.
- When Cardiris is started and becomes active (when the menu is Cardiris), the Scan-Snap automatically interacts with the active application, and the settings for the application are used for scanning. Automatic linkage is disabled when the application is not active.
For details about automatic linkage, refer to "Automatic Linkage with Applications" (page 223).
■ Finishing ScanSnap Operation
Exiting ScanSnap Manager
From the ScanSnap Manager menu, select [Quit].
In most cases, ScanSnap Manager does not need to be exited.

You can no longer use the ScanSnap after exiting ScanSnap Manager.
To start up ScanSnap Manager, from the Finder, select [Applications] → [ScanSnap] → [ScanSnap Manager].
Disconnecting the ScanSnap
- Close the ADF paper chute (cover) to turn off the ScanSnap.
⇒ The [ScanSnap Manager] icon in the Dock changes from


- Disconnect the USB cable from your computer.
- Disconnect the power cable from the AC outlet.

The ScanSnap is turned on/off in conjunction with the computer or opening/closing of the ADF paper chute (cover). Ordinarily, you can forget about turning on/off the ScanSnap being connected to the computer.
Setting the ScanSnap
This section describes how to change and save scanning settings, automatically interact with applications, and about windows displayed during scanning.
■ Changing Scanning Settings
To change scanning settings for the ScanSnap, use the ScanSnap Manager menu. The following describes how to change the settings.
1. From the ScanSnap Manager menu, select [Settings].
![FUJITSU ScanSnap S1500M - From the ScanSnap Manager menu, select [Settings]. - 1](/content/2026/06/1236416/images/16b22d9449c11ec7826f511438ed9fe61a68e72fb314bd5603f4a8e4b76ab0d6.jpg)
text_image
Duplex scan Simplex scan Settings... Profile... Profile Management... Check consumable supplies... Help Keep in Dock ✓ Open at Login Show in Finder Hide Quit⇒ The ScanSnap setup window appears.
![FUJITSU ScanSnap S1500M - From the ScanSnap Manager menu, select [Settings]. - 2](/content/2026/06/1236416/images/7c368de00d849c7a19147d205a7e1001c0cb68c701dc205c01891fc0a7ffd6b6.jpg)
You can also open the ScanSnap setup window by simultaneously pressing the [command (key and [S] key on the keyboard. This can be used only when ScanSnap Manager is active (when the menu is ScanSnap Manager).
2. Click the [Detail] button to switch to the detail view mode.
Outline view Detail view
![FUJITSU ScanSnap S1500M - Click the [Detail] button to switch to the detail view mode. - 1](/content/2026/06/1236416/images/e03016ead052554c5296821a19fc0a17a3fc52ef2d8b56c7c4650c56d29961e2.jpg)
text_image
ScanSnap Color Image Browser Use Quick Menu Recommended Small File High Quality Profile Standard Detail Apply![FUJITSU ScanSnap S1500M - Click the [Detail] button to switch to the detail view mode. - 2](/content/2026/06/1236416/images/1260aa7bbcafa5059a308ccaa215ccbb986157f56ee78c464bcc54fe1490be1d.jpg)
text_image
ScanSnap Color Image Scanner Use Quick Menu Recommended Small File High Quality Profile Standard Application Save Scanning File option Paper Compression Specify the scanning mode you would like to use. Image quality: Auto Color mode: Color Scanning side: Duplex Scan(Double-sided) Continue scanning after current scan is finished Option... Hide Apply![FUJITSU ScanSnap S1500M - Click the [Detail] button to switch to the detail view mode. - 3](/content/2026/06/1236416/images/c1dac2b02d7e2491a8ab3c2e53e09b6da7b384ffb1da79b011e38d60d9f074f6.jpg)
The display status of the ScanSnap setup window when previously opened is saved. For example, if it was closed in detail view mode, the window is displayed in detail mode the next time you open it.
3. Change scanning settings on each tab on the ScanSnap setup window.
The following items can be changed on each tab:
For details, refer to ScanSnap Manager Help.
- [Application] tab
- Application to be used with the ScanSnap
- [Save] tab
– Folder in which scanned image data are saved
- File name used for saving scanned image data
- [Scanning] tab
- Scan mode
(Which image quality to scan with, color, gray or black-and-white, simplex or duplex, enable or disable [Setting for text only document], [Allow automatic blank page removal], [Correct skewed character strings automatically], [Allow automatic image rotation], and [Continue scanning after current scan is finished])
- [File option] tab
- File format of a scanned image data (*.pdf, *.jpg)
- Whether to text recognize a marked character string on the scanned image data and set the character string as a keyword for the PDF file
(Whether to text recognize only the first marked section or all marked sections to be added as keywords, and in which language to text recognize)
- Whether to text recognize character strings in the scanned image data to convert the PDF file to a searchable PDF file
(Whether to convert all pages or the first page only, and in which language to text recognize)
- Whether to include all scanned image data in a single PDF file, or create PDF files, each of which includes a preset number of pages
• [Paper] tab
- Size of a document to be scanned ([Paper size] and [Carrier Sheet Settings])
– Whether to detect multifeed
- [Compression] tab
– File size of scanned image data (compression rate)

Settings for scanning vary depending on the scanning method For details about items that can be set, refer to "Setting Items With/Without Quick Menu" (page 365).
4. Click the [Apply] button.
⇒ Scanning settings are changed.
![FUJITSU ScanSnap S1500M - Click the [Apply] button. - 1](/content/2026/06/1236416/images/064abd0e618765243d84f87b9e7d13a9bab7cc169b7206fbf92dc943a38bdbba.jpg)
If the [Scan] button on the ScanSnap is pressed while the ScanSnap setup window is displayed, the window is closed and scanning is started. In this case the contents being set are saved, and used for scanning.
However, if the [Scan] button on the ScanSnap is pressed while windows other than the ScanSnap setup window are displayed, scanning will not start.
■ Saving Scanning Settings
You can define up to 20 sets of preferences called profiles for scanning in the [Profile] menu.
Only by clicking the [ScanSnap Manager] icon, you can easily retrieve and use the saved profiles.
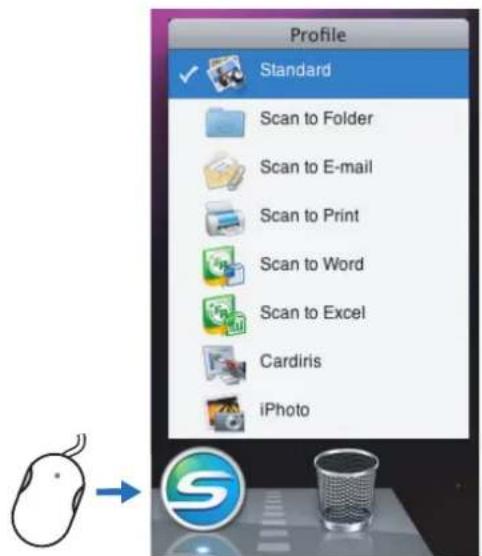
text_image
Profile Standard Scan to Folder Scan to E-mail Scan to Print Scan to Word Scan to Excel Cardiris iPhoto[Profile] menu
Once the frequently used scanning settings are saved as profiles you do not have to open the ScanSnap Manager window to change settings every time you scan documents. You can switch to an appropriate profile with simple point and click operations.

The descriptions below apply only when the Quick Menu is not used.
Only a single profile can be saved for the case when the Quick Menu is used for scanning. For details about how to change profiles, refer to "Changing Scanning Settings" (page 208).
The following explains the operations.
Saving Profiles
1. From the ScanSnap Manager menu, select [Settings].
![FUJITSU ScanSnap S1500M - From the ScanSnap Manager menu, select [Settings]. - 1](/content/2026/06/1236416/images/f90a95c21dae6a6e5db064dd696a0593b6d689557254c002a530a16427a89c9b.jpg)
text_image
Duplex scan Simplex scan Settings... Profile... Profile Management... Check consumable supplies... Help Keep in Dock ✓ Open at Login Show in Finder Hide Quit⇒ The ScanSnap setup window appears.
2. Clear the [Use Quick Menu] checkbox.
![FUJITSU ScanSnap S1500M - Clear the [Use Quick Menu] checkbox. - 1](/content/2026/06/1236416/images/834ae433c4a174fcf4bb2f604c5121173444c71b28583f7ac144e832cdab0f35.jpg)
text_image
ScanSnap Color Image Scanner Use Quick Menu Recommended Small File High Quality Profile Standard Application Save Scanning File option Paper Compression Specify the scanning mode you would like to use.![FUJITSU ScanSnap S1500M - Clear the [Use Quick Menu] checkbox. - 2](/content/2026/06/1236416/images/184e7117df21fc1467ff4eab40225ea0b25d8883c89134571456aa48b9aba884.jpg)
This function is not available when the [Use Quick Menu] checkbox is selected.
3. Change scanning setting on each tab on the ScanSnap setup window.
For details about each tab, refer to ScanSnap Manager Help.

text_image
ScanSnap Color Image Scanner Use Quick Menu Recommended Small File High Quality Profile Standard Application Save Scanning File option Paper Compression Specify the scanning mode you would like to use. Image quality: Auto Color mode: Color Scanning side: Duplex Scan(Double-sided) Continue scanning after current scan is finished Option... Hide Apply4. Select [Add Profile] from the [Profile] pop-up menu.
![FUJITSU ScanSnap S1500M - Select [Add Profile] from the [Profile] pop-up menu. - 1](/content/2026/06/1236416/images/b3bdfa71736c2edf3e5c875dafa0959b6a79c9288ffe42fd232f78a5495baef6.jpg)
text_image
ScanSnap Color Image Scanner Use Quick Menu Recommended Small File High Quality Application Save Scanning File option Paper Specify the scanning mode you would like to use. Image quality: Auto Color mode: Color Scanning side: Duplex Scan(Double-sided) Add Profile... Profile Management... Continue scanning after current scan is finished Option... Hide Apply Profile ✓ Standard Scan to Folder Scan to E-mail Scan to Print Scan to Word Scan to Excel Cardiris iPhoto Add Profile...⇒ The [Add new profile] window appears.
5. Type in a profile name, and then click the [OK] button.
![FUJITSU ScanSnap S1500M - Type in a profile name, and then click the [OK] button. - 1](/content/2026/06/1236416/images/6c90addd15082e72ea94fd77bbee00a8454ac2885fd94d6de79cb9d4af702e1e.jpg)
text_image
Add new profile New profile name: A4 Color Cancel OK⇒ The new profile appears in the [Profile] pop-up menu.
![FUJITSU ScanSnap S1500M - Type in a profile name, and then click the [OK] button. - 2](/content/2026/06/1236416/images/25bc6c5406260e78d9490aff08b8f859f220299bd62dedfd8fee6745455b5aa4.jpg)
text_image
ScanSnap Color Image Scanner Use Quick Menu Recommended Small File High Quality Application Save Scanning File option Paper Standard Scan to Folder Scan to E-mail Scan to Print Scan to Word Scan to Excel Cardiris iPhoto ✓ A4 Color Add Profile... Profile Management... Specify the scanning mode you would like to use. Image quality: Auto6. Click the [Apply] button.
⇒ Now, you have finished saving a new profile.
![FUJITSU ScanSnap S1500M - Click the [Apply] button. - 1](/content/2026/06/1236416/images/0eb70e16bc22b00f9f317a3349f7047c5ea25d7007bbe9879716fc540fe2be73.jpg)
- You can save up to 20 profiles, including the [Standard] profile.
- You can change the displayed sequence of profiles except for the [Standard] profile.
- Select [Profile Management] from the [Profile] pop-up menu in the ScanSnap setup window or from the ScanSnap Manager menu.
⇒ The [ScanSnap Manager - Profile Management] window appears. - Drag the profile you want to move to arrange profiles in a different sequence.
![FUJITSU ScanSnap S1500M - Click the [Apply] button. - 2](/content/2026/06/1236416/images/33fb0e56bf51f60e94ce6fc08480fe3ee1549c6f96cbffd5c70910f67b762409.jpg)
text_image
ScanSnap Manager - Profile Management Change the listing order of profiles by dragging them. Standard Scan to Folder Scan to E-mail Scan to Print Scan to Word Scan to Excel Cardiris iPhoto A4 Color- Click the [] button in the upper left corner of the window or press the [esc] key to close the [ScanSnap Manager - Profile Management] window.
Changing Settings for Saved Profiles
1. From the ScanSnap Manager menu, select [Settings].
![FUJITSU ScanSnap S1500M - From the ScanSnap Manager menu, select [Settings]. - 1](/content/2026/06/1236416/images/44d25df5ec58855e07290b322137d4518c8b1d61f511f40249918a1cccf95c2f.jpg)
text_image
Duplex scan Simplex scan Settings... Profile... Profile Management... Check consumable supplies... Help Keep in Dock ✓ Open at Login Show in Finder Hide Quit⇒ The ScanSnap setup window appears.
2. Clear the [Use Quick Menu] checkbox.
![FUJITSU ScanSnap S1500M - Clear the [Use Quick Menu] checkbox. - 1](/content/2026/06/1236416/images/2d9f084f09a968ef3bd2df3e66a3fb771cb1512ea5eac0a7af3010417f3b9933.jpg)
text_image
ScanSnap Color Image Scanner Use Quick Menu Recommended Small File High Quality Profile Standard Application Save Scanning File option Paper Compression Specify the scanning mode you would like to use. Image quality: Auto Color mode: Color Scanning side: Duplex Scan(Double-sided) Continue scanning after current scan is finished Option... Hide Apply![FUJITSU ScanSnap S1500M - Clear the [Use Quick Menu] checkbox. - 2](/content/2026/06/1236416/images/ffe555c225834abcaf951d0ac07504ffb9507aa74777faea61ed9a2ff3ad90ca.jpg)
This function is not available when the [Use Quick Menu] checkbox is selected.
3. Select the profile you want to change from the [Profile] pop-up menu.
![FUJITSU ScanSnap S1500M - Select the profile you want to change from the [Profile] pop-up menu. - 1](/content/2026/06/1236416/images/97e5af0b43b69273b3df695ec68907ced217d0998fe0f73c242b9a980358ff8e.jpg)
text_image
ScanSnap Color Image Scanner Use Quick Menu Recommended Small File High Quality Application Save Scanning File option Paper A4 Color Add Profile... Profile Management... Specify the scanning mode you would like to use. Image quality: Auto4. Change scanning settings on each tab on the ScanSnap setup window.
For details about each tab, refer to ScanSnap Manager Help.
5. When you finish changing the settings for the selected profile, click the [Apply] button.
![FUJITSU ScanSnap S1500M - When you finish changing the settings for the selected profile, click the [Apply] button. - 1](/content/2026/06/1236416/images/93569e972fb46730499bd971f542700e6bc67eb83531bdeada680e4e48011cb5.jpg)
text_image
ScanSnap Color Image Scanner Use Quick Menu Recommended Small File High Quality Profile A4 Color Application Save Scanning File option Paper Compression Specify the scanning mode you would like to use. Image quality: Auto Color mode: Color Scanning side: Duplex Scan(Double-sided) Continue scanning after current scan is finished Option... Hide Apply⇒ Now, you have finished changing the scanning settings.
Renaming Profiles
1. From the ScanSnap Manager menu, select [Settings].
![FUJITSU ScanSnap S1500M - From the ScanSnap Manager menu, select [Settings]. - 1](/content/2026/06/1236416/images/3073749ec7ff945268253d60eb63e48cabb621d0f1edb41f7bc73dacc15ed9cd.jpg)
text_image
Duplex scan Simplex scan Settings... Profile... Profile Management... Check consumable supplies... Help Keep in Dock ✓ Open at Login Show in Finder Hide Quit⇒ The ScanSnap setup window appears.
2. Clear the [Use Quick Menu] checkbox.
![FUJITSU ScanSnap S1500M - Clear the [Use Quick Menu] checkbox. - 1](/content/2026/06/1236416/images/8f6a75ba0ef083271fa9cd76bb180cec769b67ec2de5a9ba9525ea8205f3c6cf.jpg)
text_image
ScanSnap Color Image Scanner Use Quick Menu Recommended Small File High Quality Profile Standard Application Save Scanning File option Paper Compression Specify the scanning mode you would like to use.![FUJITSU ScanSnap S1500M - Clear the [Use Quick Menu] checkbox. - 2](/content/2026/06/1236416/images/7c845e290949a078cb43940eac193e7f038376288f7b11306fe2aa963883dd1b.jpg)
This function is not available when the [Use Quick Menu] checkbox is selected.
3. Select [Profile Management] from the [Profile] pop-up menu.
![FUJITSU ScanSnap S1500M - Select [Profile Management] from the [Profile] pop-up menu. - 1](/content/2026/06/1236416/images/b4f2da76e7f9458db298592e4cc7f0504a9566226326eb5057f16f95652c7a56.jpg)
text_image
ScanSnap Color Image Scannen Use Quick Menu Recommended Small File High Quality Application Save Scanning File option Paper Profile ✓ Standard Scan to Folder Scan to E-mail Scan to Print Scan to Word Scan to Excel Cardiris iPhoto A4 Color Specify the scanning mode you would like to use. Image quality: Auto Color mode: Color Scanning side: Duplex Scan(Double-sided) Add Profile... Profile Management... Continue scanning after current scan is finished![FUJITSU ScanSnap S1500M - Select [Profile Management] from the [Profile] pop-up menu. - 2](/content/2026/06/1236416/images/bc45649b1397c93a15ea76f820d61a6b2d1703b73be16a7232f50049b3815a43.jpg)
You can also select [Profile Management] from the ScanSnap Manager menu to open the [ScanSnap Manager - Profile Management] window.
![FUJITSU ScanSnap S1500M - Select [Profile Management] from the [Profile] pop-up menu. - 3](/content/2026/06/1236416/images/c0ee3d238d0ac2caf5f85b87e99946e16e5b127398d95702140d5da7f2bab41e.jpg)
text_image
Duplex scan Simplex scan Settings... Profile Profile Management... Check consumable supplies... Help Keep in Dock ✓ Open at Login Show in Finder Hide Quit⇒ The [ScanSnap Manager - Profile Management] window appears.
4. Select the profile you want to rename, click the [⚙️] button in the lower left corner of the window, and select [Rename].
![FUJITSU ScanSnap S1500M - Select the profile you want to rename, click the [⚙️] button in the lower left corner of the window, and select [Rename]. - 1](/content/2026/06/1236416/images/e3ef07b1ca1ce0c10a57d4ade898ac15b61de4e5313324877c207d1bc7cab9c3.jpg)
text_image
ScanSnap Manager - Profile Management Change the listing order of profiles by dragging them. Standard Scan to Folder Scan to E-mail Scan to Print Scan to Word Scan to Excel Cardiris iPhoto A4 Color Rename⇒ The name field of the profile becomes editable.
5. Type in a new name.
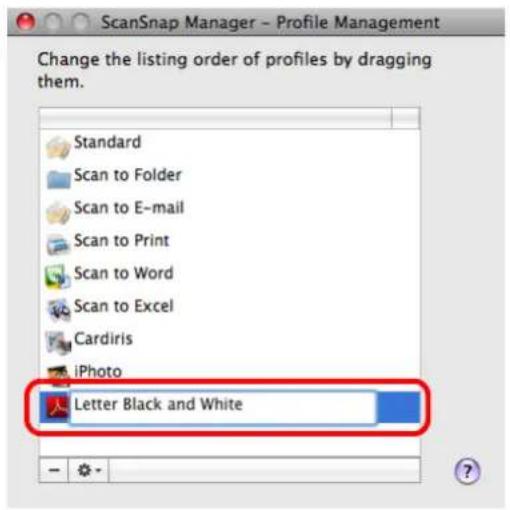
text_image
ScanSnap Manager - Profile Management Change the listing order of profiles by dragging them. Standard Scan to Folder Scan to E-mail Scan to Print Scan to Word Scan to Excel Cardiris iPhoto Letter Black and White⇒ The selected profile is renamed.
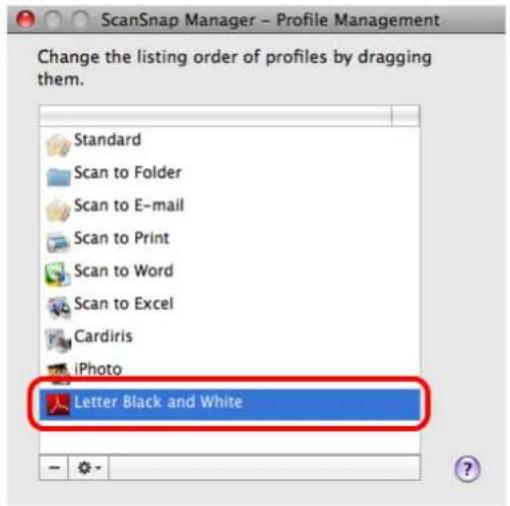
text_image
ScanSnap Manager - Profile Management Change the listing order of profiles by dragging them. Standard Scan to Folder Scan to E-mail Scan to Print Scan to Word Scan to Excel Cardiris iPhoto Letter Black and White- Click the [●] button in the upper left corner of the window or press the [esc] key to close the [ScanSnap Manager - Profile Management] window.
Deleting Profiles
1. From the ScanSnap Manager menu, select [Settings].
![FUJITSU ScanSnap S1500M - From the ScanSnap Manager menu, select [Settings]. - 1](/content/2026/06/1236416/images/8f0131e5d63adf9ce5eae601b716670eae31a6d497fc6cd7db3857943dbba8b8.jpg)
text_image
Duplex scan Simplex scan Settings... Profile... Profile Management... Check consumable supplies... Help Keep in Dock ✓ Open at Login Show in Finder Hide Quit⇒ The ScanSnap setup window appears.
2. Clear the [Use Quick Menu] checkbox.
![FUJITSU ScanSnap S1500M - Clear the [Use Quick Menu] checkbox. - 1](/content/2026/06/1236416/images/a8ab0072d7eddeaf23d7266c2cd565ad686b0a0b272a91de3db1a696393dc206.jpg)
text_image
ScanSnap Color Image Scanner Use Quick Menu Recommended Small File Profile High Quality Standard Application Save Scanning File option Paper Compression Specify the scanning mode you would like to use.![FUJITSU ScanSnap S1500M - Clear the [Use Quick Menu] checkbox. - 2](/content/2026/06/1236416/images/f10b2f81b0595bfc0d48389a71fc66c2ee6d4218f7c5abcebf4b21bc647ce692.jpg)
This function is not available when the [Use Quick Menu] checkbox is selected.
3. Select [Profile Management] from the [Profile] pop-up menu.
![FUJITSU ScanSnap S1500M - Select [Profile Management] from the [Profile] pop-up menu. - 1](/content/2026/06/1236416/images/38219b7118cd8be4ff8f37088c0c14cc1be278785b302280946cd93fd97764d5.jpg)
text_image
ScanSnap Color Image Scanner Use Quick Menu Recommended Small File High Quality Application Save Scanning File option Paper Profile ✓ Standard Scan to Folder Scan to E-mail Scan to Print Scan to Word Scan to Excel Cardiris iPhoto A4 Color Specify the scanning mode you would like to use. Image quality: Auto Color mode: Color Scanning side: Duplex Scan(Double-sided) Add Profile... Profile Management... Continue scanning after current scan is finished![FUJITSU ScanSnap S1500M - Select [Profile Management] from the [Profile] pop-up menu. - 2](/content/2026/06/1236416/images/2c59d36f9354f020f0af71ac086e5a991ea5cc8806049fb6c2a5883d01703f2e.jpg)
You can also select [Profile Management] from the ScanSnap Manager menu to open the [ScanSnap Manager - Profile Management] window.
![FUJITSU ScanSnap S1500M - Select [Profile Management] from the [Profile] pop-up menu. - 3](/content/2026/06/1236416/images/9bba4202d64cc71c593632e6acc9495240d6b71b1e77a056d75969081fb076b3.jpg)
text_image
Duplex scan Simplex scan Settings... Profile Profile Management... Check consumable supplies... Help Keep in Dock ✓ Open at Login Show in Finder Hide Quit⇒ The [ScanSnap Manager - Profile Management] window appears.
- Select the profile you want to delete from the list, and then click the [ - ] button.
![FUJITSU ScanSnap S1500M - Select [Profile Management] from the [Profile] pop-up menu. - 4](/content/2026/06/1236416/images/cc11f40b4f158f28717c692b22790c03e2f3de409b5ba1458e7fde82356439be.jpg)
text_image
ScanSnap Manager - Profile Management Change the listing order of profiles by dragging them. Standard Scan to Folder Scan to E-mail Scan to Print Scan to Word Scan to Excel Cardiris iPhoto Letter Black and White - 0 +![FUJITSU ScanSnap S1500M - Select [Profile Management] from the [Profile] pop-up menu. - 5](/content/2026/06/1236416/images/9af90603f11196b30e6ba66f4bccfc476377093f640588805359086757ecdabe.jpg)
The [Standard] profile cannot be deleted.
⇒ The selected profile is deleted.
- Click the [●] button in the upper left corner of the window or press the [esc] key to close the [ScanSnap Manager - Profile Management] window.
■ Automatic Linkage with Applications
Cardiris automatically links with ScanSnap Manager upon startup.
When you scan business cards by pressing the [Scan] button when Cardiris is active (when the menu is Cardiris), ScanSnap Manager automatically links with Cardiris, in which the scanned card image is displayed.
Even when the ScanSnap is in Quick Menu mode, ScanSnap Manager automatically links with Cardiris in which the scanned card image is displayed without the Quick Menu appearing after scanning.
The interaction between Cardiris and ScanSnap Manager ends once Cardiris is no longer active.
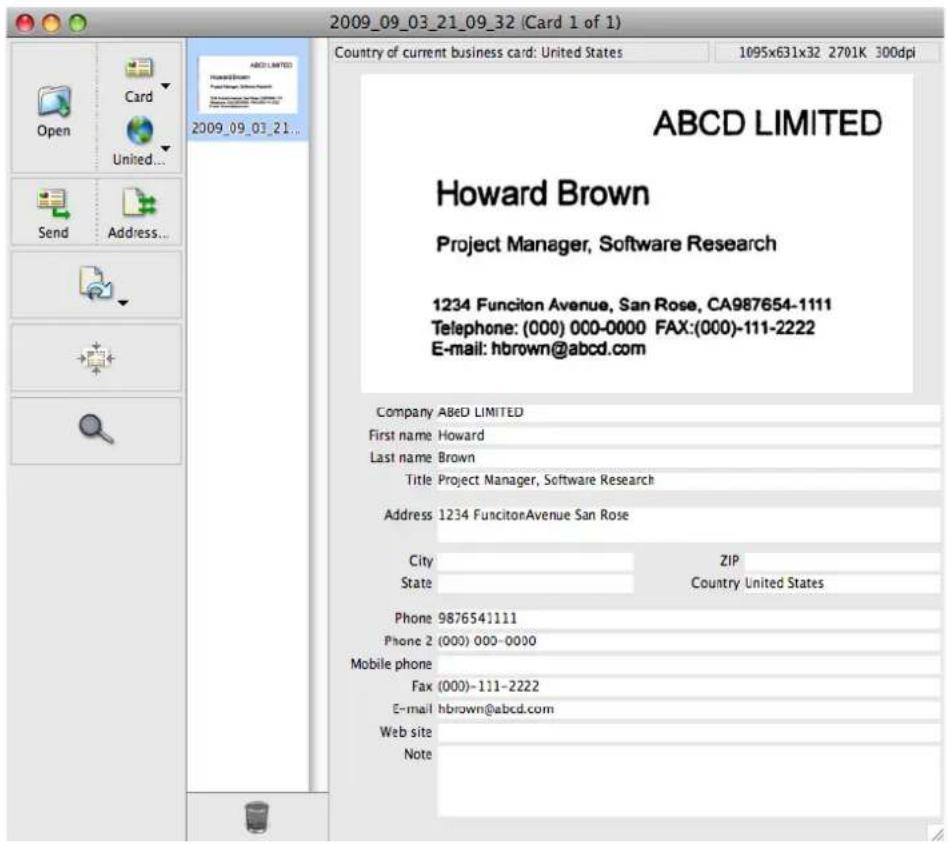
text_image
2009_09_03_21_09_32 (Card 1 of 1) Country of current business card: United States 1095x631x32 2701K 300dpi ABCD LIMITED Howard Brown Project Manager, Software Research 1234 Funciton Avenue, San Rose, CA987654-1111 Telephone: (000) 000-0000 FAX:(000)-111-2222 E-mail: hbrown@abcd.com Company ABeD LIMITED First name Howard Last name Brown Title Project Manager, Software Research Address 1234 Funciton Avenue San Rose City ZIP State Country United States Phone 9876541111 Phone 2 (000) 000-0000 Mobile phone Fax (000)-111-2222 E-mail hbrown@abcd.com Web site Note
Business cards are scanned with the current scan settings except when the following is set in the [Scanning] tab:
- Image quality: Auto
■ Showing the Scan Progress Status
When scanning starts, the [ScanSnap Manager - Image scanning and file saving] window appears on the computer screen.
This window shows the current processing status, the number of pages of the file that have been saved, and overview of the current settings for scanning. You can also stop scanning with the ScanSnap by clicking the [Stop] button.
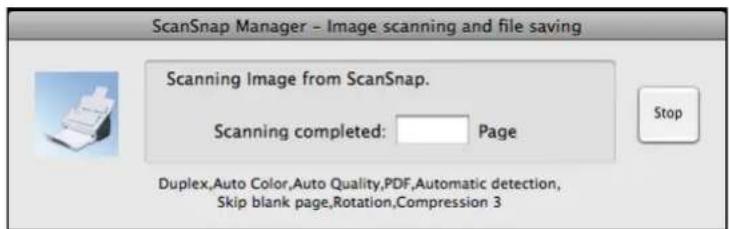
text_image
ScanSnap Manager - Image scanning and file saving Scanning Image from ScanSnap. Scanning completed: Page Stop Duplex,Auto Color,Auto Quality,PDF,Automatic detection, Skip blank page,Rotation,Compression 3After the image data of the document scanned last is saved, the [ScanSnap Manager - Image scanning and file saving] window automatically closes.
Hiding the Scan Progress Status
You can hide the [ScanSnap Manager - Image scanning and file saving] window. Perform this setting as follows.
1. From the ScanSnap Manager menu, select [Help] → [Preferences].
![FUJITSU ScanSnap S1500M - From the ScanSnap Manager menu, select [Help] → [Preferences]. - 1](/content/2026/06/1236416/images/4ab28ff98e27b430c4f004d43872df6723a25b097fced369bde5b3271ce7323f.jpg)
text_image
Help About ScanSnap Manager... Online Update... Preferences... Duplex scan Simplex scan Settings... Profile... Profile Management... Check consumable supplies... Help Keep in Dock Open at Login Show in Finder Hide Quit⇒ The [ScanSnap Manager - Preferences] window appears.
2. Clear the [Show the scan progress status (recommended)] checkbox.
![FUJITSU ScanSnap S1500M - Clear the [Show the scan progress status (recommended)] checkbox. - 1](/content/2026/06/1236416/images/29a4d19a0589ffaa5ba088aea4bb81910a69aca7461a16e0433fe96b00c4d486.jpg)
text_image
ScanSnap Manager - Preferences Show Scan Progress Status Select whether to show the scan progress status. ✓ Show the scan progress status (recommended)3. Click the [●] button in the upper left corner of the window or press the [esc] key to close the [ScanSnap Manager - Preferences] window.
⇒ The [ScanSnap Manager - Image scanning and file saving] window is hidden from the next scanning.
![FUJITSU ScanSnap S1500M - Click the [●] button in the upper left corner of the window or press the [esc] key to close the [ScanSnap Manager - Preferences] window. - 1](/content/2026/06/1236416/images/e028351737e8ea720ad20fd37a03d62de188dd06cc1f7a3a98a3304234307223.jpg)
When the scanning progress status window is not displayed, the current number of pages saved is indicated on the ScanSnap Manager icon in the Dock.
![FUJITSU ScanSnap S1500M - Click the [●] button in the upper left corner of the window or press the [esc] key to close the [ScanSnap Manager - Preferences] window. - 2](/content/2026/06/1236416/images/2949aba89e43955b7756659782f64c661bf5ae3640cdc2bf7c416afc285b283c.jpg)
About Actions
The ScanSnap has frequently-used functions at the ready as Actions to help you make efficient use of your time at your office.
Actions are helpful when:
- you want to share the scanned document files with other members.
⇒ You can save the scanned image data directly in a shared folder on a network upon scanning. In addition, all members are informed of the destination folder path by an e-mail message automatically created with the path stated.
- you want to send document files used in a meeting about to start to all persons concerned.
⇒ Simply press the [Scan] button, and you can quickly send an e-mail message with document files attached.
- you want to use a printer, rather than a copy machine, to make copies of documents.
⇒ Simply press the [Scan] button, and you can print documents with a printer.
- you want to use text in your paper documents but do not want to type it manually.
⇒ Simply press the [Scan] button, and you can get the scanned image data text recognized and converted into a Word or Excel document.
- you want to scan, edit, and save a large number of business cards.
⇒ Simply press the [Scan] button, and you can add business card information to your Address Book.
- you want to convert catalogs and pamphlets into digital data and save them.
⇒ Simply press the [Scan] button to save, manage and browse the catalogs and pamphlets converted into digital data directly in iPhoto.
The following are explanations on how to use Actions.
■ Saving Data in the Specified Folder
This section describes how to save the scanned image data in a shared folder. By using this action, you can save the scanned image data in a networked folder to share information among group members. In addition, all members are informed of the destination folder path by an e-mail message automatically created with the path stated.
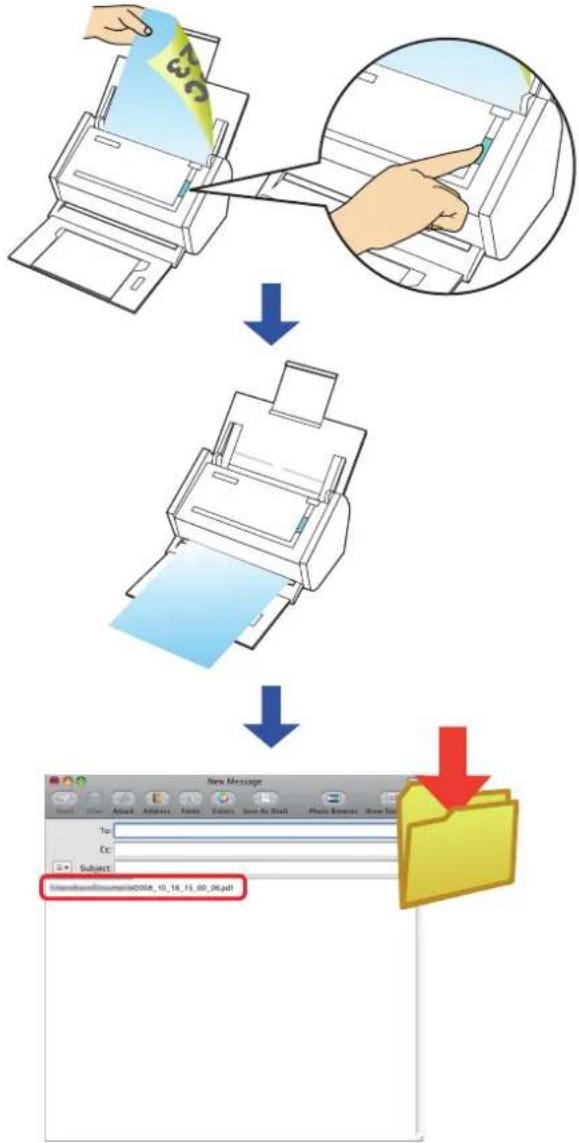
flowchart
graph TD
    A["Printer with 3D color code"] --> B["Printer with green color code"]
    B --> C["Email with color code 'COSR_10_16_11_09_06.pdf' and a red arrow pointing to the final document box"]

The e-mail program used for this action is the application specified in [Default email reader] in the [General] pane, which is displayed by starting up [Mail] and selecting the [Mail] menu → [Preferences].
Only the following e-mail programs are supported:
- Mail
• Microsoft Entourage 2004 for Mac
• Microsoft Entourage 2008 for Mac
Using the Quick Menu
1. Load the document into the ScanSnap.
For details, refer to "Paper Sizes of Documents to Be Scanned" (page 27) and "Loading Documents" (page 29).
2. Press the [Scan] button on the ScanSnap.
Scanning is started.
⇒ When scanning is complete, the Quick Menu appears.
3. Click the [Scan to Folder] icon.
![FUJITSU ScanSnap S1500M - Click the [Scan to Folder] icon. - 1](/content/2026/06/1236416/images/20a2070de132db203788e8ae9d56c0afbacce9054b2ecabe0e7a93cda94458e5.jpg)
text_image
Scan to Folder i Click the icon of the application to interact with the ScanSnap⇒ The [Scan to Folder] window appears.
4. Check the scanned image in the [Scan to Folder] window.
You can also change file names and destination folders and specify whether to state a path to a destination folder in an e-mail message to notify other members.
For details about the [Scan to Folder] window, refer to ScanSnap Manager Help.
![FUJITSU ScanSnap S1500M - Check the scanned image in the [Scan to Folder] window. - 1](/content/2026/06/1236416/images/d04537cceb0148e8aa2e7c747768c2a37ac0b0ad9621c80172ea4ef7f5c6e890.jpg)
text_image
Scan to Folder Preview Specify file name File List: No. File name 1 2 Serialize... Name history File size: M3 Combined file size: M8 Local Folder Network Folder MobileMe Folder Save in. /Users/ Browse... History State a path to a destination folder in an E-mail message Cancel SavePreview area
5. Click the [Save] button.
⇒ The scanned image data is saved in a specified folder.
When you select the [State a path to a destination folder in an E-mail message] checkbox on the [Scan to Folder] window, an e-mail program starts, and an e-mail message is created with the path to the destination folder automatically stated.
![FUJITSU ScanSnap S1500M - Click the [Save] button. - 1](/content/2026/06/1236416/images/d84dfa0ab29ab45156dfdb1b2639580d195302920d0344c0ded5fc72bedeb17f.jpg)
text_image
New Message Send Chat Attach Address Fonts Colors Save As Draft Photo Browser Show Stationery To: Cc: Subject: Always Share Document 2008_10_16_15_00_06.pdf![FUJITSU ScanSnap S1500M - Click the [Save] button. - 2](/content/2026/06/1236416/images/1cc57fe553f10c368c8dfb19fd8a022696580dede4c071056565f762805ac3cb.jpg)
- When the Quick Menu is displayed, the ScanSnap does not perform a scan even if you press the [Scan] button, unless the [Scan to Folder] window is closed. Close the [Scan to Folder] window before scanning another document.
- Do not move, delete, or rename the scanned image data in other applications after the Quick Menu is displayed and before the [Scan to Folder] window is closed.
Without using the Quick Menu
1. From the ScanSnap Manager menu, select [Settings].
![FUJITSU ScanSnap S1500M - From the ScanSnap Manager menu, select [Settings]. - 1](/content/2026/06/1236416/images/362e7b5d95a0f47bab51a62ba103d3f856fa25688e1180362ad96544be919ca4.jpg)
text_image
Duplex scan Simplex scan Settings... Profile... Profile Management... Check consumable supplies... Help Keep in Dock ✓ Open at Login Show in Finder Hide Quit⇒ The ScanSnap setup window appears.
2. In the [Application] pop-up menu on the [Application] tab, select [Scan to Folder].
![FUJITSU ScanSnap S1500M - In the [Application] pop-up menu on the [Application] tab, select [Scan to Folder]. - 1](/content/2026/06/1236416/images/80560595c4f1ecb4f2801154ab722d2674ccdc11893b054463c63b44b6dc3c4f.jpg)
text_image
ScanSnap Color Image Scanner Use Quick Menu Recommended Small File High Quality Profile Standard Application Save Scanning File option Paper Compression Select the application you would like to use. Application: Scan to Folder Add or Remove... Hide Apply![FUJITSU ScanSnap S1500M - In the [Application] pop-up menu on the [Application] tab, select [Scan to Folder]. - 2](/content/2026/06/1236416/images/7d97871e24a3f1aacbae76f8b210f628aa9f17419c208216141f99776c24398f.jpg)
- The profiles can also be set by selecting [Scan to Folder] from the [Profile] pop-up menu or the [Profile] menu.
-
Finishing the procedure above, you can save desired settings as profiles. The profiles can be selected in the [Profile] menu from the next time you scan documents.
For details about how to save scanning settings, refer to "Saving Scanning Settings" (page 211). -
Click the [Apply] button in the ScanSnap setup window.
- Click the [×] button in the upper left corner of the window or press the [esc] key to close the ScanSnap setup window.
![FUJITSU ScanSnap S1500M - In the [Application] pop-up menu on the [Application] tab, select [Scan to Folder]. - 3](/content/2026/06/1236416/images/f1fe8b90e7f7a62ac7b3b2654b5cabfce32078b70bdec18c563a731c40b58de9.jpg)
Even if the [Scan] button on the ScanSnap is pressed, the ScanSnap setup window closes.
- Load the document into the ScanSnap.
For details, refer to "Paper Sizes of Documents to Be Scanned" (page 27) and "Loading Documents" (page 29).
- Press the [Scan] button on the ScanSnap.
⇒ Scanning is started.
⇒ When scanning is complete, the [Scan to Folder] window appears.
- Check the scanned image on the [Scan to Folder] window.
You can also change file names and destination folders and specify whether to state a path to a destination folder in an e-mail message to notify other members.
For details about the [Scan to Folder] window, refer to ScanSnap Manager Help.
![FUJITSU ScanSnap S1500M - In the [Application] pop-up menu on the [Application] tab, select [Scan to Folder]. - 4](/content/2026/06/1236416/images/bfc2cda2fdd7c99ff67eb5ef1847076a306a201341a7f6c8c3bf2ebff67af833.jpg)
text_image
Scan to Folder Preview Specify file name File List: No. File name 1 2 File size: M3 Combined file size: M8 Local Folder Network Folder MobileMe Folder Save in: /Users/ Browse... History State a path to a destination folder in an E-mail message Cancel SavePreview area
8. Click the [Save] button.
⇒ The scanned image data is saved in a specified folder.
When you select the [State a path to a destination folder in an E-mail message] checkbox on the [Scan to Folder] window, an e-mail program starts, and an e-mail message is created with the path to the destination folder stated.
![FUJITSU ScanSnap S1500M - Click the [Save] button. - 1](/content/2026/06/1236416/images/b43dbe6e0f43f4bb3e3d03d04ab596c215ee30c44bb3ae331f5040a2e916f222.jpg)
text_image
New Message Send Chat Attach Address Fonts Colors Save As Draft Photo Browser Show Stationery To: Cc: Subject: @UsersSharesDocuments/2008_10_16_15_00_06.pdf![FUJITSU ScanSnap S1500M - Click the [Save] button. - 2](/content/2026/06/1236416/images/524edc4695d299b9a40f4537246d56925953992cb7ffd38a017d047e358208dd.jpg)
- When the [Scan to Folder] window is displayed, scanning cannot be performed with the ScanSnap. Close the [Scan to Folder] window before scanning another document.
- Do not move, delete, or rename the scanned image data in other applications when the [Scan to Folder] window is displayed.
■ Sending Files by E-Mail
This section describes how to send scanned image data by e-mail.
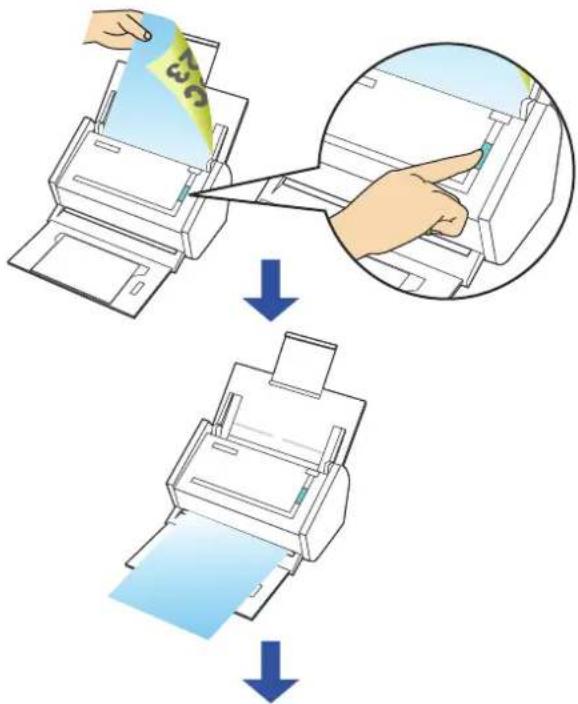
text_image
Diagram illustrating the process of printer printing and paper handling, showing steps from receipt to print.
text_image
New Message To: C6: Subject: ABC
The e-mail program used for this action is the application specified in [Default email reader] in the [General] pane, which is displayed by starting up [Mail] and selecting the [Mail] menu → [Preferences].
Only the following e-mail programs are supported:
- Mail
• Microsoft Entourage 2004 for Mac
• Microsoft Entourage 2008 for Mac
Using the Quick Menu
1. Load the document into the ScanSnap.
For details, refer to "Paper Sizes of Documents to Be Scanned" (page 27) and "Loading Documents" (page 29).

Up to ten files can be sent by e-mail.
Scanning multiple sheets of documents with the scanning settings shown below creates multiple files. Pay attention to the number of sheets of the loaded document.
- File format: JPEG(*.jpg)
- [Generate one PDF file per (n) page(s)] checkbox is selected
2. Press the [Scan] button on the ScanSnap.
⇒ Scanning is started.
⇒ When scanning is complete, the Quick Menu appears.
3. Change settings for the [Scan to E-mail] action (If you do not want to change settings, go to Step 4.).
- Click [Settings] under the [Scan to E-mail] icon.
![FUJITSU ScanSnap S1500M - Change settings for the [Scan to E-mail] action (If you do not want to change settings, go to Step 4.). - 1](/content/2026/06/1236416/images/e7152bca62355b2e7394c18408d88901598cfb76fd39b768a120cf3097c65da2.jpg)
text_image
Scan to E-mail Settings... i Click the icon of the application to interact with the ScanSnap⇒The [Scan to E-mail - Options] window appears.
- Change settings.
For details about the [Scan to E-mail - Options] window, refer to ScanSnap Manager Help.
![FUJITSU ScanSnap S1500M - Change settings for the [Scan to E-mail] action (If you do not want to change settings, go to Step 4.). - 2](/content/2026/06/1236416/images/ab0d152c09781406507c5671c3729e7a7b3cf56a62061b898f630cab915b5cdb.jpg)
text_image
Scan to E-mail - Options ✓ Show preview ✓ Save scanned images to file Attached file size: When the combined file size exceeds the set parameter(below), display a Warning message. 1 MB ? Cancel OK- Click the [OK] button to close the [Scan to E-mail - Options] window.
4. Click the [Scan to E-mail] icon.
![FUJITSU ScanSnap S1500M - Click the [Scan to E-mail] icon. - 1](/content/2026/06/1236416/images/216afaa65196de444a53e4a8bee8abe670edc4cde7ab7bd60794414dab7c9725.jpg)
text_image
Scan to E-mail Settings... ScanSnap Click the icon of the application to interact with the ScanSnap⇒ The [Scan to E-mail] window appears.
When you have cleared the [Show preview] checkbox in Step 3., an e-mail program starts, and the files are attached to an e-mail message.
5. Check the scanned image on the [Scan to E-mail] window.
You can also change file names, specify whether to save scanned files after sending them by e-mail.
For details about the [Scan to E-mail] window, refer to ScanSnap Manager Help.
![FUJITSU ScanSnap S1500M - Check the scanned image on the [Scan to E-mail] window. - 1](/content/2026/06/1236416/images/938e67f15ce0c9e2d8717535671b4b0e84f855b88ceaeb9da7a0d239de0649e1.jpg)
text_image
Scan to E-mail Preview Specify file name File List: No. File name 1 2 Combine file size: MB Save scanned images to file Do not show this window again Cancel Attach to E-mailPreview area
6. Click the [Attach to E-mail] button.
⇒ An e-mail program is started with the selected files being attached to an e-mail message.
![FUJITSU ScanSnap S1500M - Click the [Attach to E-mail] button. - 1](/content/2026/06/1236416/images/031454793d6fc8ca448874065e3ab9bd3b11cffcea8d4363fd6cbaaae222e366.jpg)
pie
| Year | Category 1 | Category 2 | Category 3 | Category 4 | |---|---|---|---|---| | 1995 | 100 | 0 | 0 | 0 | | 2000 | 0 | 100 | 0 | 0 | | 2005 | 100 | 0 | 100 | 0 | | 2010 | 100 | 0 | 100 | 0 |![FUJITSU ScanSnap S1500M - Click the [Attach to E-mail] button. - 2](/content/2026/06/1236416/images/2aca32b1ba87c8f29d1243b9e21ad2f50866cb009da7f3ef5e7afbfad7cf1122.jpg)
- When the Quick Menu is displayed, the ScanSnap does not perform a scan even if you press the [Scan] button, unless the [Scan to E-mail] window is closed. Close the [Scan to E-mail] window before scanning another document.
- Do not move, delete, or rename the scanned image data in other applications after the Quick Menu is displayed and before the [Scan to E-mail] window is closed.
Without using the Quick Menu
1. From the ScanSnap Manager menu, select [Settings].
![FUJITSU ScanSnap S1500M - From the ScanSnap Manager menu, select [Settings]. - 1](/content/2026/06/1236416/images/14b79e5ae8119bdab520e382ab33b8f664e3948fc7d5d8802c0b1bcdf4369e27.jpg)
text_image
Duplex scan Simplex scan Settings... Profile... Profile Management... Check consumable supplies... Help Keep in Dock ✓ Open at Login Show in Finder Hide Quit⇒ The ScanSnap setup window appears.
2. In the [Application] pop-up menu on the [Application] tab, select [Scan to E-mail].
![FUJITSU ScanSnap S1500M - In the [Application] pop-up menu on the [Application] tab, select [Scan to E-mail]. - 1](/content/2026/06/1236416/images/4dbae33622fb2765d4324c350ace1382c3ba9bbee769765ada9a09590d4955a3.jpg)
text_image
ScanSnap Color Image Scanner Use Quick Menu Recommended Small File High Quality Profile Standard Application Save Scanning File option Paper Compression Select the application you would like to use. Application: Scan to E-mail Application Setting... Add or Remove... Hide Apply![FUJITSU ScanSnap S1500M - In the [Application] pop-up menu on the [Application] tab, select [Scan to E-mail]. - 2](/content/2026/06/1236416/images/2e0407cb27d4423ead1a0c439ee6b7db3907482d428052f323797cba1445058c.jpg)
- The profiles can also be set by selecting [Scan to E-mail] from the [Profile] pop-up menu or the [Profile] menu.
- Finishing the procedure above, you can save desired settings as profiles. The profiles can be selected in the [Profile] menu from the next time you scan documents.
For details about how to save scanning settings, refer to "Saving Scanning Settings" (page 211).
3. Change settings for the [Scan to E-mail] action (If you do not want to change settings, go to Step 4.).
- Click the [Application Setting] button.
![FUJITSU ScanSnap S1500M - Change settings for the [Scan to E-mail] action (If you do not want to change settings, go to Step 4.). - 1](/content/2026/06/1236416/images/3f6117effda61f20887fd3a504dba9827a69f3102ccac7c145416fa533848424.jpg)
text_image
ScanSnap Color Image Scanner Use Quick Menu Recommended Small File High Quality Profile Standard Application Save Scanning File option Paper Compression Select the application you would like to use. Application: Scan to E-mail Application Setting... Add or Remove... Hide Apply⇒The [Scan to E-mail - Options] window appears.
- Change settings.
For details about the [Scan to E-mail - Options] window, refer to ScanSnap Manager Help.
![FUJITSU ScanSnap S1500M - Change settings for the [Scan to E-mail] action (If you do not want to change settings, go to Step 4.). - 2](/content/2026/06/1236416/images/a0f96e269d3fd26830367d2da0b23480466e74916b2007d1062cc14d1b76ac35.jpg)
text_image
Scan to E-mail - Options Show preview Save scanned images to file Attached file size: When the combined file size exceeds the set parameter(below), display a Warning message. 1 MB Cancel OK- Click the [OK] button to close the [Scan to E-mail - Options] window.
4. Click the [Apply] button in the ScanSnap setup window.
5. Click the [×] button in the upper left corner of the window or press the [esc] key to close the ScanSnap setup window.
![FUJITSU ScanSnap S1500M - Click the [×] button in the upper left corner of the window or press the [esc] key to close the ScanSnap setup window. - 1](/content/2026/06/1236416/images/29532dfd99b4799c8788e83f078d2f5ee856e1d13eaae42dca80dba462b481ae.jpg)
Even if the [Scan] button on the ScanSnap is pressed, the ScanSnap setup window closes.
6. Load the document into the ScanSnap.
For details, refer to "Paper Sizes of Documents to Be Scanned" (page 27) and "Loading Documents" (page 29).

Up to ten files can be sent by e-mail.
Scanning multiple sheets of documents with the scanning settings shown below creates multiple files. Pay attention to the number of sheets of the loaded document.
- File format: JPEG(*.jpg)
- [Generate one PDF file per (n) page(s)] checkbox is selected
7. Press the [Scan] button on the ScanSnap.
⇒ Scanning is started.
⇒ When scanning is complete, the [Scan to E-mail] window appears.
When you have cleared the [Show preview] checkbox in Step 3., an e-mail program starts, and the files are attached to an e-mail message.
8. Check the scanned image on the [Scan to E-mail] window.
You can also change file names, specify whether to save scanned files after sending them by e-mail.
For details about the [Scan to E-mail] window, refer to ScanSnap Manager Help.
![FUJITSU ScanSnap S1500M - Check the scanned image on the [Scan to E-mail] window. - 1](/content/2026/06/1236416/images/0e6b799b5fe95d18231ec728af61bf01be0cf610ac42f527198edf95f849d20c.jpg)
text_image
Scan to E-mail Preview Specify file name File List: No. File name 1 2 Combine file size: MB Save scanned images to file Do not show this window again Cancel Attach to E-mailPreview area
9. Click the [Attach to E-mail] button.
⇒ An e-mail program is started with the selected files being attached to an e-mail message.
![FUJITSU ScanSnap S1500M - Click the [Attach to E-mail] button. - 1](/content/2026/06/1236416/images/9a5a8e6f01b0fdb993731a2a99489e24551ebd09e5c4ad5c5b849de65efefbe2.jpg)
pie
| Year | Category 1 | Category 2 | Category 3 | Category 4 | |---|---|---|---|---| | 1995 | 100 | 80 | 60 | 40 | | 2000 | 100 | 80 | 60 | 40 | | 2005 | 100 | 80 | 60 | 40 | | 2010 | 100 | 80 | 60 | 40 |![FUJITSU ScanSnap S1500M - Click the [Attach to E-mail] button. - 2](/content/2026/06/1236416/images/b223e547d7ea4485bcacc7e023a26833b49b2f98ad4769554768aa770701ffb4.jpg)
- When the [Scan to E-mail] window is displayed, scanning cannot be performed with the ScanSnap. Close the [Scan to E-mail] window before scanning another document.
- Do not move, delete, or rename the scanned image data in other applications when the [Scan to E-mail] window is displayed.
■ Using the ScanSnap as a Copy Machine
This section describes how to print scanned image data with a printer.
By printing scanned image data directly from the ScanSnap, you can use the ScanSnap as a copy machine.
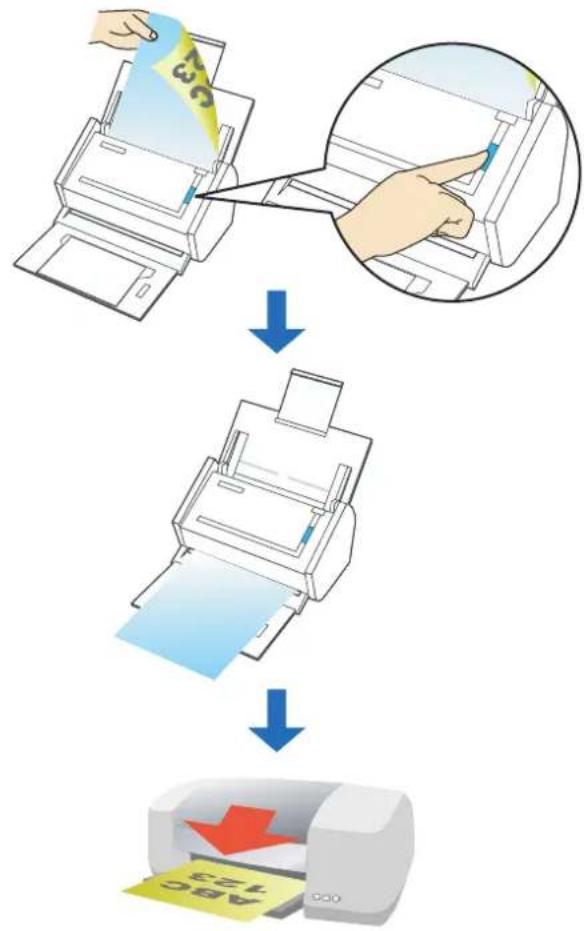
flowchart
graph TD
    A["Receipts from printer"] --> B["Printing Paper"]
    B --> C["After printing: Screen is being cut out"]

- By default, a printer that is set as [Default Printer] in the Mac OS is used. After a document is scanned, you can change the printer to be used.
- Depending on the document conditions and scanning settings, the printed image data might contain shadows (which appear as lines) on its edges.
- To print a scanned document with data very close to the edges, save it to file first, and then print from that using Preview, Adobe Acrobat, or Adobe Reader.
Using the Quick Menu
1. Load the document into the ScanSnap.
For details, refer to "Paper Sizes of Documents to Be Scanned" (page 27) and "Loading Documents" (page 29).
2. Press the [Scan] button on the ScanSnap.
⇒ Scanning is started.
⇒ When scanning is complete, the Quick Menu appears.
3. Change settings for the [Scan to Print] action (If you do not want to change settings, go to Step 4.).
- Click [Settings] under the [Scan to Print] icon.
![FUJITSU ScanSnap S1500M - Change settings for the [Scan to Print] action (If you do not want to change settings, go to Step 4.). - 1](/content/2026/06/1236416/images/1e9a860eac82e50d008e3def2f3628e32a4a4cb6b1f8794fde38c492bcd2f719.jpg)
text_image
Scan to Print Settings... i Click the icon of the application to interact with the ScanSnap⇒The [Scan to Print - Options] window appears.
- Change settings.
For details about the [Scan to Print - Options] window, refer to ScanSnap Manager Help.
![FUJITSU ScanSnap S1500M - Change settings for the [Scan to Print] action (If you do not want to change settings, go to Step 4.). - 2](/content/2026/06/1236416/images/06ab680f7bffdf94fcfd394972abaa3d3b543d10c578124b3345fbb3944f4ce2.jpg)
text_image
Scan to Print – Options ✓ Save scanned image Cancel OK- Click the [OK] button to close the [Scan to Print - Options] window.
4. Click the [Scan to Print] icon.
![FUJITSU ScanSnap S1500M - Click the [Scan to Print] icon. - 1](/content/2026/06/1236416/images/7d73f0444453f277c3b807f21eb14ee0b9840440929008e9f9ca2fdb468a9045.jpg)
text_image
Scan to Print Settings... ScanSnap Click the icon of the application to interact with the ScanSnap⇒ The [Print] window appears.
5. Configure print setup options in the [Print] window.
You can select the printer to be used and specify the number of copies and size of the scanned image data to be printed.
For details about the [Print] window, refer to ScanSnap Manager Help.
![FUJITSU ScanSnap S1500M - Configure print setup options in the [Print] window. - 1](/content/2026/06/1236416/images/19982b8d6ee3b5fa33760a12789f780cd019d79d6ba0f1aa6213f67f7ce53524.jpg)
text_image
Print Printer: Presets: Standard Copies: 1 Collated Pages: All From: 1 to: 1 Paper Size: A4 21.00 by 29.69 cm Orientation: Scan to Print Shrink to paper size Allow automatic rotation Center the image and print Save scanned image PDF Cancel Print6. Click the [Print] button.
⇒ Printing is performed.
![FUJITSU ScanSnap S1500M - Click the [Print] button. - 1](/content/2026/06/1236416/images/5f1ee161e456f875a156ce6c9816a29d6b5a343e6df8b65ab148ed5db5456e23.jpg)
- When the Quick Menu is displayed, the ScanSnap does not perform a scan even if you press the [Scan] button, unless the [Print] window is closed. Close the [Print] window before scanning another document.
- Do not move, delete, or rename the scanned image data in other applications after the Quick Menu is displayed and before the [Print] window is closed.
Without using the Quick Menu
1. From the ScanSnap Manager menu, select [Settings].
![FUJITSU ScanSnap S1500M - From the ScanSnap Manager menu, select [Settings]. - 1](/content/2026/06/1236416/images/c8255a764afa7aa93b68a283500dc38bc29482d088cd682ed7d40d5c15b9318b.jpg)
text_image
Duplex scan Simplex scan Settings... Profile... Profile Management... Check consumable supplies... Help Keep in Dock ✓ Open at Login Show in Finder Hide Quit⇒ The ScanSnap setup window appears.
2. In the [Application] pop-up menu on the [Application] tab, select [Scan to Print].
![FUJITSU ScanSnap S1500M - In the [Application] pop-up menu on the [Application] tab, select [Scan to Print]. - 1](/content/2026/06/1236416/images/5e50c27c37d61660760736d4140ebe7667cc0d56ecda63d16ea23cd73469f5c1.jpg)
text_image
ScanSnap Color Image Scanner Use Quick Menu Recommended Small File High Quality Profile Standard Application Save Scanning File option Paper Compression Select the application you would like to use. Application: Scan to Print Application Setting... Add or Remove... Hide Apply![FUJITSU ScanSnap S1500M - In the [Application] pop-up menu on the [Application] tab, select [Scan to Print]. - 2](/content/2026/06/1236416/images/930e778d41de9901ff5e42a31bfe31405ea6e6cb6bace2cb2e64e9a40b7c7d08.jpg)
- The profiles can also be set by selecting [Scan to Print] from the [Profile] pop-up menu or the [Profile] menu.
- Finishing the procedure above, you can save desired settings as profiles. The profiles can be selected in the [Profile] menu from the next time you scan documents.
For details about how to save scanning settings, refer to "Saving Scanning Settings" (page 211).
3. Change settings for the [Scan to Print] action (If you do not want to change settings, go to Step 4.).
- Click the [Application Setting] button.
![FUJITSU ScanSnap S1500M - Change settings for the [Scan to Print] action (If you do not want to change settings, go to Step 4.). - 1](/content/2026/06/1236416/images/34e70ef2594403282a7f2e1858c7af04e937669fc6edd0eb0eb626aa5aea4b50.jpg)
text_image
ScanSnap Color Image Scanner Use Quick Menu Recommended Small File High Quality Profile Standard Application Save Scanning File option Paper Compression Select the application you would like to use. Application: Scan to Print Application Setting... Add or Remove... Hide Apply⇒The [Scan to Print - Options] window appears.
- Change settings.
For details about the [Scan to Print - Options] window, refer to ScanSnap Manager Help.
![FUJITSU ScanSnap S1500M - Change settings for the [Scan to Print] action (If you do not want to change settings, go to Step 4.). - 2](/content/2026/06/1236416/images/eb2425de4c767e9db80031ba6b07114e9fddfceca34c22f88c97b04eb30634b2.jpg)
text_image
Scan to Print - Options ✓ Save scanned image ? Cancel OK-
Click the [OK] button to close the [Scan to Print - Options] window.
-
Click the [Apply] button in the ScanSnap setup window.
- Click the [×] button in the upper left corner of the window or press the [esc] key to close the ScanSnap setup window.
![FUJITSU ScanSnap S1500M - Change settings for the [Scan to Print] action (If you do not want to change settings, go to Step 4.). - 3](/content/2026/06/1236416/images/978ffeda72934b539482336d9e1b7fa6068c15c1c614373070045c57a9ed33fb.jpg)
Even if the [Scan] button on the ScanSnap is pressed, the ScanSnap setup window closes.
6. Load the document into the ScanSnap.
For details, refer to "Paper Sizes of Documents to Be Scanned" (page 27) and "Loading Documents" (page 29).
7. Press the [Scan] button on the ScanSnap.
→ Scanning is started.
⇒ When scanning is complete, the [Print] window appears.
8. Configure print setup options in the [Print] window.
You can select the printer to be used and specify the number of copies and size of the scanned image data to be printed.
For details about the [Print] window, refer to ScanSnap Manager Help.
![FUJITSU ScanSnap S1500M - Configure print setup options in the [Print] window. - 1](/content/2026/06/1236416/images/d46150483607bcc4149ee7f81c50e0e6a9652bc188a46579c4e1b98bd198279c.jpg)
text_image
Print Printer: Presets: Standard Copies: 1 Collated Pages: All From: 1 to: 1 Paper Size: A4 21.00 by 29.69 cm Orientation: Scan to Print Shrink to paper size Allow automatic rotation Center the image and print Save scanned image PDF Cancel Print9. Click the [Print] button.
⇒ Printing is performed.
![FUJITSU ScanSnap S1500M - Click the [Print] button. - 1](/content/2026/06/1236416/images/0fdd55e3c371c3e0592af9c7ce2a35a31bbaccb544444e7c69bcc6ea73b2acfa.jpg)
- When the [Print] window is displayed, scanning cannot be performed with the ScanSnap. Close the [Print] window before scanning another document.
- Do not move, delete, or rename the scanned image data in other applications when the [Print] window is displayed.
■ Converting into Word/Excel Documents
This section describes how to convert the documents scanned with the ScanSnap into Word/Excel files through ABBYY FineReader for ScanSnap, which is supplied with the ScanSnap.
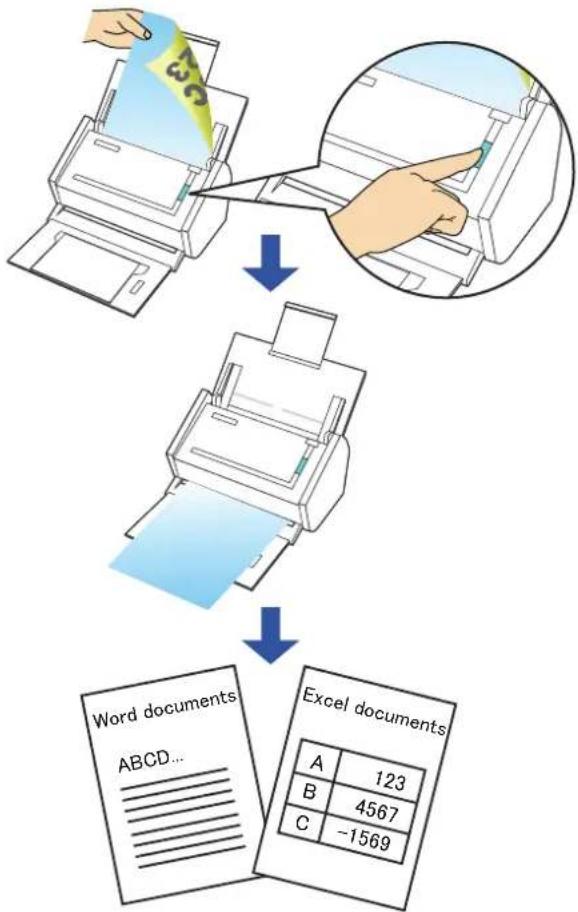
flowchart
graph TD
    A["Receipts"] --> B["Transfer to Paper"]
    B --> C["Word Documents ABCD..."]
    C --> D["Excel Documents"]
    D --> E["A 123, B 4567, C -1569"]

- ABBYY FineReader for ScanSnap must be installed in your computer in order to perform text-recognition.
- Use this function in an environment where Word and Excel are installed. If Word is not installed in the computer being used, the text-only result of documents converted to Word files are shown with TextEdit. If Excel is not installed in the computer being used, documents converted to Excel files cannot be viewed. To view and check converted documents on your computer, install these software.
- ABBYY FineReader for ScanSnap can be used with the following versions of Word and Excel.
- Word: 2004 / 2008 - Excel: 2004 / 2008
- Do not scan Word/Excel files while you are working on Word or Excel. In addition, do not operate Word or Excel while this function is executed. If operated at the same time, the conversion result is saved to a file, but even if the [Open file after recognition] checkbox is selected on the [FineReader for ScanSnap Preferences] window, the conversion result may not be displayed.

About the OCR (Optical Character Recognition) function of ABBYY FineReader for ScanSnap
- ABBYY FineReader for ScanSnap is an application used exclusively with the ScanSnap. This program can text-recognize only PDF files that are created by using the ScanSnap. It cannot text-recognize PDF files created by using Adobe Acrobat or other applications.
- Some types of documents are occasionally misrecognized. Before recognition, check whether the documents you want to convert are suitable for conversion according to the following guidelines.
Scan to Word
- Documents suitable for conversion Documents created by using simple page layout with one or two columns
- Documents not suitable for conversion Documents created by using complex page layout comprised of diagrams, tables, and letters, such as a brochure, magazine, and newspaper
Scan to Excel
- Documents suitable for conversion Simple tables in which every border line connects to the outside borders
- Documents not suitable for conversion Documents containing tables without borders, complex tables with too many borders, convoluted tables containing sub-tables, diagrams, graphs and charts, photographs, and characters written in vertical direction (Diagrams, graphs and charts, photographs, and characters written in vertical direction are not converted.)
- The following parameters may not be inherited from the originals during conversion. It is recommended that the converted documents be opened with Word or Excel to correct or edit misrecognized letters.
- Font and size of characters
- Character spacing and line spacing
- Underline, bold, and Italic
- Superscript/subscript
- The following types of documents may be misrecognized. In such a case, recognition may be corrected by changing the [Color mode] to [Color] and/or improving the resolution (Image quality).
- Documents containing handwritten characters
- Text including small characters (smaller than 10 points)
- Skewed documents
- Documents written in languages other than the specified language for text recognition
- Documents with characters on an unevenly colored background e.g. Shaded characters
- Documents with many decorated characters e.g. Decorated characters (embossed/outlined)
- Documents with characters on a patterned background e.g. Characters overlapping illustrations and diagrams
- Documents with many characters contacting underlines or borders
- Documents of complex layout as well as documents including unreadable characters (It may take an extended period of time to convert these documents.)
- A converted Excel worksheet can contain up to 65,536 rows.
- When converting to Excel files, information for the layout of the entire document, diagrams, and height/width of graphs and tables is not reproduced. Only tables and character strings are reproduced.
- Documents upside down or in landscape orientation cannot be recognized properly. Select the [Allow automatic image rotation] checkbox (page 278), or load documents face down in portrait orientation.
- On the ScanSnap setup window, if the [Generate one PDF file per (n) page(s)] checkbox is selected on the [File option] tab → [Option], the conversion result for each PDF file will be saved as separate files.

You can change the scanning settings applied during conversion to Word or Excel documents in the ABBYY FineReader for ScanSnap setup window.
Select the [Applications] → [ABBYY FineReader for ScanSnap] → [FineReader for ScanSnap Preferences]. Then, on the menu bar, select [FineReader for ScanSnap] → [Preferences] to show the following window.

text_image
FineReader for ScanSnap Preferences General Scan to Searchable PDF Scan to Excel Scan to Word Recognition Languages (select one or more*): English Abkhaz Adyghe Afrikaans Agul Albanian Altai Armenian (Eastern) Armenian (Grabar) Armenian (Western) *It is not recommended to select more than 3 languages. ✓ Open file after recognition Ask for file name before save Delete scanned images after recognition Quit ABBYY FineReader for ScanSnap after recognitionFor details about how to set, refer to the ABBYY FineReader for ScanSnap Help.
Using the Quick Menu
1. Load the document into the ScanSnap.
For details, refer to "Paper Sizes of Documents to Be Scanned" (page 27) and "Loading Documents" (page 29).
2. Press the [Scan] button on the ScanSnap.
Scanning is started.
⇒ When scanning is complete, the Quick Menu appears.
3. Click the [Scan to Word] or [Scan to Excel] icon.
![FUJITSU ScanSnap S1500M - Click the [Scan to Word] or [Scan to Excel] icon. - 1](/content/2026/06/1236416/images/237de006c2d190e1d81c76b535c5fb79b52869e61381f5ef8b8e781637430077.jpg)
text_image
ScanSnap Click the icon of the application to interact with the ScanSnap![FUJITSU ScanSnap S1500M - Click the [Scan to Word] or [Scan to Excel] icon. - 2](/content/2026/06/1236416/images/824b71198a6a40991f46e54fb0884278d67a4bda3bc5f25a0f9796d2028d7976.jpg)
When [JPEG(*.jpg)] is selected for [File format] in the [File option] tab on the ScanSnap setup window, the [Scan to Word] and [Scan to Excel] actions cannot be used. If you click either of these icons, an error message will appear.
⇒ The following window appears and conversion is started.
![FUJITSU ScanSnap S1500M - Click the [Scan to Word] or [Scan to Excel] icon. - 3](/content/2026/06/1236416/images/7ade1b53d23c067dcaaac2d5f9ce32e6a041f7de01b58b90966d032882df42f1.jpg)
text_image
Converting the document Extracting the PDF page images: 1 of 2 pages processed Cancel⇒ When the conversion is complete, Word or Excel starts up, displaying the converted document in the applicable format.
![FUJITSU ScanSnap S1500M - Click the [Scan to Word] or [Scan to Excel] icon. - 4](/content/2026/06/1236416/images/54389d5b768b0ae310b07397538e2c8270520e2128633311453ae9de6d44c6d8.jpg)
- It is recommended to select [Better (Color/Gray: 200 dpi, B&W: 400 dpi)] or higher resolution for [Image quality] in the [Scanning] tab on the ScanSnap setup window.
- Word documents are saved in RTF format (.rtf) and Excel documents, in XLS format (.xls).
![FUJITSU ScanSnap S1500M - Click the [Scan to Word] or [Scan to Excel] icon. - 5](/content/2026/06/1236416/images/55aa3a3dd268e6399325f0fb2cd626efc167cd15fd8d5246d694b7ded1af8fd1.jpg)
- When the Quick Menu is displayed, scanning cannot be performed with the ScanSnap. Complete the action before scanning another document.
- Do not move, delete, or rename the scanned image data in other applications while the Quick Menu is displayed.
Without using the Quick Menu
1. From the ScanSnap Manager menu, select [Settings].
![FUJITSU ScanSnap S1500M - From the ScanSnap Manager menu, select [Settings]. - 1](/content/2026/06/1236416/images/ff2c8ad64334a3971a47b9a4986095a289df8dd555947b586a2be6e58098012e.jpg)
text_image
Duplex scan Simplex scan Settings... Profile... Profile Management... Check consumable supplies... Help Keep in Dock ✓ Open at Login Show in Finder Hide Quit⇒ The ScanSnap setup window appears.
2. In the [Application] pop-up menu on the [Application] tab, select [Scan to Word] or [Scan to Excel].
![FUJITSU ScanSnap S1500M - In the [Application] pop-up menu on the [Application] tab, select [Scan to Word] or [Scan to Excel]. - 1](/content/2026/06/1236416/images/e2e870cd694c04066833bd28c4939e7a5643d495a97250e2ab3aae46e1c766c0.jpg)
text_image
ScanSnap Color Image Scanner Use Quick Menu Recommended Small File High Quality Profile Standard Application Save Scanning File option Paper Compression Select the application you would like to use. Application: Scan to Word Add or Remove... Hide Apply![FUJITSU ScanSnap S1500M - In the [Application] pop-up menu on the [Application] tab, select [Scan to Word] or [Scan to Excel]. - 2](/content/2026/06/1236416/images/582ff93628b419bc367b7d991d0db019c16d1ae0cfb2f27d033f20cced474db2.jpg)
- The profiles can also be set by selecting [Scan to Word] or [Scan to Excel] from the [Profile] pop-up menu or from the [Profile] menu.
- Finishing the procedure above, you can save desired settings as profiles. The profiles can be selected in the [Profile] menu from the next time you scan documents. For details about how to save scanning settings, refer to "Saving Scanning Settings" (page 211).
3. Click the [Apply] button in the ScanSnap setup window.
4. Click the [×] button in the upper left corner of the window or press the [esc] key to close the ScanSnap setup window.
![FUJITSU ScanSnap S1500M - Click the [×] button in the upper left corner of the window or press the [esc] key to close the ScanSnap setup window. - 1](/content/2026/06/1236416/images/8244468623502d58bbf1b52d05cf4e8e95a0be062c2252855fe1e852ad87ead6.jpg)
Even if the [Scan] button on the ScanSnap is pressed, the ScanSnap setup window closes.
5. Load the document into the ScanSnap.
For details, refer to "Paper Sizes of Documents to Be Scanned" (page 27) and "Loading Documents" (page 29).
6. Press the [Scan] button on the ScanSnap.
⇒ Scanning is started.
⇒ The following window appears and conversion is started.
![FUJITSU ScanSnap S1500M - Press the [Scan] button on the ScanSnap. - 1](/content/2026/06/1236416/images/b34903a60dceacb8377415df61ab2519f7b6b5dad6b00f4a1d3bc96826c20aca.jpg)
text_image
Converting the document Extracting the PDF page images: 1 of 2 pages processed Cancel⇒ When the conversion is complete, Word or Excel starts up, displaying the converted document in the applicable format.
![FUJITSU ScanSnap S1500M - Press the [Scan] button on the ScanSnap. - 2](/content/2026/06/1236416/images/5e1926dbf72463559c68d590646d7f31871b2e687420eebd8bce1b61ed5c8cf4.jpg)
- It is recommended to select [Better (Color/Gray: 200 dpi, B&W: 400 dpi)] or higher resolution for [Image quality] in the [Scanning] tab on the ScanSnap setup window.
- Word documents are saved in RTF format (.rtf) and Excel documents, in XLS format (.xls).
■ Scanning Business Cards
This section describes how to use scanned image data of business cards in Cardiris.
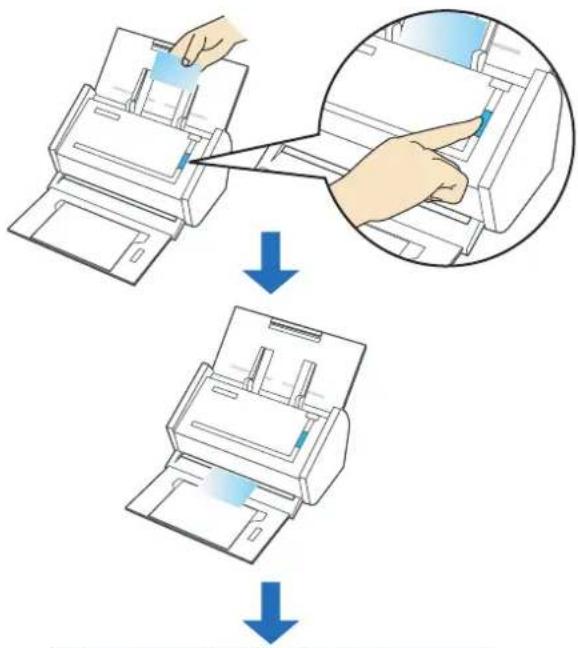
text_image
Diagram illustrating the process of printer press application, showing steps from receipt to print and backfill.
text_image
2006.18.18, 14:44, 04:31 (S&P 500 Index) ABCD LIMITED Howard Brown Project Manager, Software Research 226 Airport Parkway, Suite 0305San, JOSE, CA 95110 Phone: (408) 453-0000 Fax: (408) 453-0001 e-mail: howert@abcd.com Company: Abcd UNITED Email: Abcd.edu Contact: Abcd.edu Project Manager, Software Research Address: ABCD Airport Parkway Suite 0305San, JOSE Co. Email: abcd.edu Contact: Abcd.edu Phone: 81110 Phone: 2400-473-2002 Contact: phone Phone: 413-0002 Contact: kowand@abcd.com Contact: kowand@abcd.comUsing the Quick Menu
1. Load the business card into the ScanSnap.
- Load the business card so that the front side of the two-sided business card faces the ADF paper chute (cover).
• To scan multiple business cards, load business cards in a pile. - Move the side guides so that there is no gap between the business cards edge and the side guide on both sides.

natural_image
Illustration of a hand inserting a paper into a scanner, showing the printer's handle and internal structure (no text or symbols)2. Press the [Scan] button on the ScanSnap.
→ Scanning is started.
⇒ When scanning is complete, the Quick Menu appears.
![FUJITSU ScanSnap S1500M - Press the [Scan] button on the ScanSnap. - 1](/content/2026/06/1236416/images/fd1c511e2185c988204e9b75815d484f900d25dd741f68b46b243f0bf0c3f642.jpg)
It is recommended to select [Auto] or [Best] for [Image quality] in the [Scanning] tab in the ScanSnap setup window when you scan business cards.
3. Click the [Cardiris] icon.
![FUJITSU ScanSnap S1500M - Click the [Cardiris] icon. - 1](/content/2026/06/1236416/images/8c465b9f9e94ace9f46d78146c2f3b0c43aaa7103fdcc512e0b8c948b86593e5.jpg)
text_image
Cardiris ScanSnap Click the icon of the application to interact with the ScanSnap⇒ The Cardiris window appears.
![FUJITSU ScanSnap S1500M - Click the [Cardiris] icon. - 2](/content/2026/06/1236416/images/046ec030518a03430372cf22f920ffa87bef5ff8d2a897b49f79fa17ca50d8cd.jpg)
- When the Quick Menu is displayed, scanning cannot be performed with the ScanSnap. Complete the interaction with Cardiris before scanning another document.
- Do not move, delete, or rename the scanned image data in other applications while the Quick Menu is displayed.
4. Check whether the scanned card image and text recognition result.

text_image
[Card Style] button [Format] button [Send] button vCard 2008_10_24_10... 2008_10_24_10... ABCD LIMITED Howard Brown Project Manager. Software Research 226 Airport Parkway, Suite 030San JOSE, CA 95110 Phone: (408) 453-0000 Fax: (408) 453-0001 e-mail: howard@abcd.com Company ABoD LIMITED First name Howard Last name Brown Title Project Manager. Software Research Address 226 Airport Parkway, Suite 030San JOSE, CA 95110 City ZIP State CA Country United States Phone (408) 453-0000 Phone 2 Mobile phone Fax (408) 453-0001 E-mail: howard@abcd.com Web site Note Recognition resultThe current card image is displayed on the top-right.
A list of already scanned business cards is displayed in the card toolbar.
The recognition result is displayed under the card image.

Do not exit Cardiris while setup or message windows are open.

- To recognize a business card of a different language from the one currently set in Cardiris, click the [Card Style] button and change the country setting.
- For details about the functions of and how to use Cardiris, refer to Cardiris GETTING STARTED and Cardiris Help.
Without using the Quick Menu
1. From the ScanSnap Manager menu, select [Settings].
![FUJITSU ScanSnap S1500M - From the ScanSnap Manager menu, select [Settings]. - 1](/content/2026/06/1236416/images/5fb95fbd237e8a77b8b505008fb79fa6f750fd20a06e77d785e0a5a68fe64f45.jpg)
text_image
Duplex scan Simplex scan Settings... Profile... Profile Management... Check consumable supplies... Help Keep in Dock ✓ Open at Login Show in Finder Hide Quit⇒ The ScanSnap setup window appears.
2. In the [Application] pop-up menu on the [Application] tab, select [Cardiris].
![FUJITSU ScanSnap S1500M - In the [Application] pop-up menu on the [Application] tab, select [Cardiris]. - 1](/content/2026/06/1236416/images/19b4141318f942ea6f2ca8ea1a8476e1446a9e2c96cbcee0595297849886768c.jpg)
text_image
ScanSnap Color Image Scanner Use Quick Menu Recommended Small File High Quality Profile Standard Application Save Scanning File option Paper Compression Select the application you would like to use. Application: Cardiris Add or Remove... Hide Apply![FUJITSU ScanSnap S1500M - In the [Application] pop-up menu on the [Application] tab, select [Cardiris]. - 2](/content/2026/06/1236416/images/8d0ac4a57b39173f2c7ff381f456a4804ebb92523b14333344b487b5bd08bc6a.jpg)
It is recommended to select [Auto] or [Best] for [Image quality] in the [Scanning] tab in the ScanSnap setup window when you scan business cards.
![FUJITSU ScanSnap S1500M - In the [Application] pop-up menu on the [Application] tab, select [Cardiris]. - 3](/content/2026/06/1236416/images/a17fd56d6c9054b3a26ecf1db08b95b25f8caf3bfa207a0df4c7b8c326bca3b3.jpg)
- You can also configure the profile by selecting [Cardiris] from the [Profile] pop-up menu or the Profile menu.
- When you save the desired settings as profiles, they can be selected from the Profile menu next time you perform a scan.
For more details about how to save scan settings, refer to "Saving Scanning Settings" (page 211).
3. Click the [Apply] button in the ScanSnap setup window.
4. Click the [×] button in the upper left corner of the window or press the [esc] key to close the ScanSnap setup window.
![FUJITSU ScanSnap S1500M - Click the [×] button in the upper left corner of the window or press the [esc] key to close the ScanSnap setup window. - 1](/content/2026/06/1236416/images/a270de597ff6769c5d365548787a3fd654758aeeb2d4ad0067f906fb635084b6.jpg)
Even if the [Scan] button on the ScanSnap is pressed, the ScanSnap setup window closes.
5. Load the business card into the ScanSnap.
- Load the business card so that the front side of the two-sided business card faces the ADF paper chute (cover).
- To scan multiple business cards, load business cards in a pile.
- Move the side guides so that there is no gap between the business cards edge and the side guide on both sides.

natural_image
Illustration of a hand inserting a paper into a scanner, showing the printer's handle and internal structure (no text or symbols)6. Press the [Scan] button on the ScanSnap.
→ Scanning is started.
⇒ When scanning is complete, the Cardiris window appears.
7. Check whether the scanned card image and text recognition result.
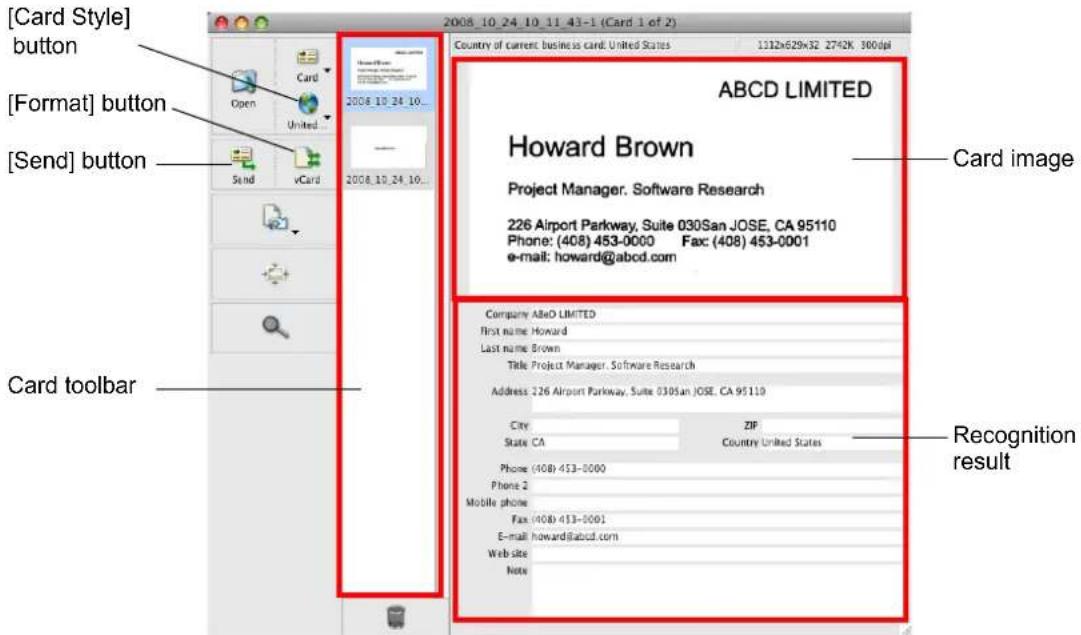
text_image
[Card Style] button [Format] button [Send] button 2008.10.24.16... 2008.10.24.16... Country of current business card: United States 1312x629x32 2742K 300dpi ABCD LIMITED Howard Brown Project Manager, Software Research 226 Airport Parkway, Suite 030San JOSE, CA 95110 Phone: (408) 453-0000 Fax: (408) 453-0001 e-mail: howard@abcd.com Company: AlloD LIMITED First name: Howard Last name: Brown Title: Project Manager, Software Research Address: 226 Airport Parkway, Suite 030san JOSE, CA 95110 City ZIP State CA Country United States Phone (408) 453-0000 Phone 2 Mobile phone Fax (408) 453-0001 E-mail: howard@abcd.com Web site Note Card toolbar Recognition resultThe current card image is displayed on the top-right.
A list of already scanned business cards is displayed in the card toolbar.
The recognition result is displayed under the card image.

Do not exit Cardiris while setup or message windows are open.

- To recognize a business card of a different language from the one currently set in Cardiris, click the [Card Style] button and change the country setting.
- For details about the functions of and how to use Cardiris, refer to Cardiris GETTING STARTED and Cardiris Help.
Using Cardiris and Address Book
To register the recognized characters of a scanned business cards in the Address Book, perform the following procedure.

Do not exit Cardiris while setup or message windows are open.
1. Click the [Format] button or select [Settings] → [Output Format] on the menu bar.
⇒ The following window appears.
![FUJITSU ScanSnap S1500M - Click the [Format] button or select [Settings] → [Output Format] on the menu bar. - 1](/content/2026/06/1236416/images/af01267e0d3ef6487023dd5615d49b3cc69f9b9dfdbf25785313d78ac9569f3b.jpg)
text_image
Business Cards Format: vCard Layout Field delimiter: Tab Include field names Include card images Output Ask file name and location Send to: None Use iSync to synchronize now Cancel OK2. On the [Format] pop-up menu, select [Address Book].
![FUJITSU ScanSnap S1500M - On the [Format] pop-up menu, select [Address Book]. - 1](/content/2026/06/1236416/images/cb17fb1c9aceb555c833b2a05d8d23096d1c595ae8d2d312ada4822a17313a65.jpg)
text_image
TEXT HTML vCard Format: ✓ Address Book Layout Field: Include field names Include card images Output Ask file name and location Send to: None Use iSync to synchronize now Cancel OK3. Click the [OK] button.
4. Click the [Send] button or select [Process] → [Send] on the menu bar.
⇒ The Address Book window appears, and the recognized characters of all scanned business cards in the card toolbar are registered in the Address Book.
![FUJITSU ScanSnap S1500M - Click the [Send] button or select [Process] → [Send] on the menu bar. - 1](/content/2026/06/1236416/images/f43d5bc4df53bbc445acaa1231c6683ebb706d9012c051afa35b62a084329bab.jpg)
text_image
Address Book Group Name All Directories Brown Howard Brown Howard Project Manager. Software Research ABeD LIMITED work (408) 453-0000 work fax (408) 453-0001 work howard@abcd.com work CA 226 Airport Parkway, Suite Edit 6 cards5. On the menu bar, select [Cardiris] → [Quit Cardiris] to quit Cardiris.
![FUJITSU ScanSnap S1500M - On the menu bar, select [Cardiris] → [Quit Cardiris] to quit Cardiris. - 1](/content/2026/06/1236416/images/2b682efffc2e5670d050a320ebc704dc915dad86a9dc4569a7a1999b56279e7e.jpg)
- The recognition result of scanned business cards can be output in text or vCard format.
- For more details, refer to Cardiris GETTING STARTED and Cardiris Help.
■ Saving Data in iPhoto
This section describes how to save scanned image data in iPhoto.
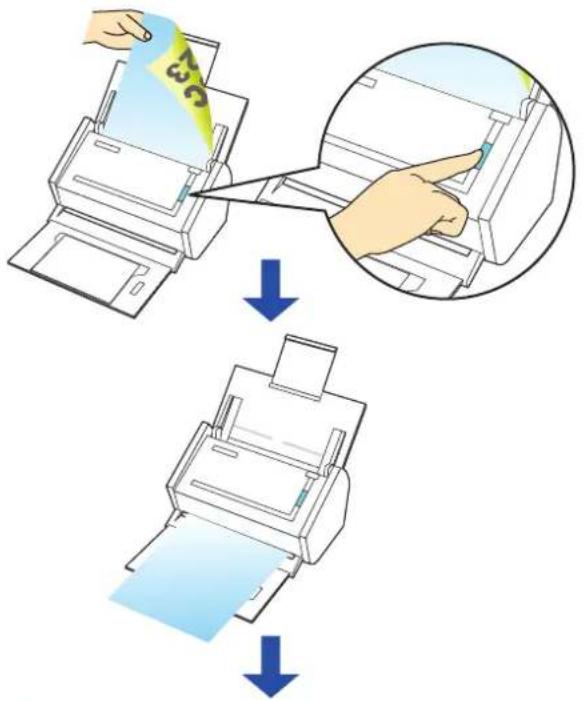
text_image
Diagram illustrating the process of printer printing and quality inspection, showing steps from receipt to print output.
text_image
V untitled event SINTEL 2008 - 6 minutesUsing the Quick Menu
1. Load the document into the ScanSnap.
For details, refer to "Paper Sizes of Documents to Be Scanned" (page 27) and "Loading Documents" (page 29).
2. Press the [Scan] button on the ScanSnap.
Scanning is started.
⇒ When scanning is complete, the Quick Menu appears.
3. Click the [iPhoto] icon.
![FUJITSU ScanSnap S1500M - Click the [iPhoto] icon. - 1](/content/2026/06/1236416/images/6b28d66db295d9cf3cadfcccbc4fafa23160505303965424e785f93b1c61c1b0.jpg)
text_image
iPhoto ScanSnap Click the icon of the application to interact with the ScanSnap⇒ iPhoto starts up.
![FUJITSU ScanSnap S1500M - Click the [iPhoto] icon. - 2](/content/2026/06/1236416/images/ec3952f01c2c1c666074eac854973469a727c6424d8870a9714cf00734902371.jpg)
- When the Quick Menu is displayed, scanning cannot be performed with the ScanSnap. Complete the action before scanning another document.
- Do not move, delete, or rename the scanned image data in other applications while the Quick Menu is displayed.
4. Check the scanned image data.
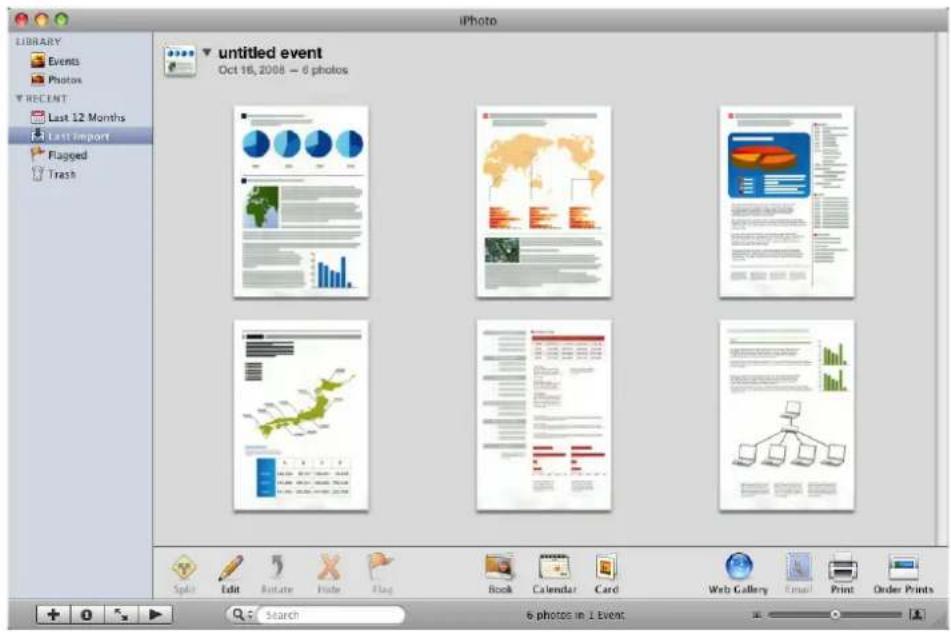
text_image
iPhoto LIBRARY Events Photons RECENT: Last 12 Months Last import Flagged Trash untitled event Oct 16, 2008 - 6 photos Split Edit Rotate Hide Flag Book Calendar Card Web Gallery Email Print Order Prints Search 6 photos in 1 EventWithout using the Quick Menu
1. From the ScanSnap Manager menu, select [Settings].
![FUJITSU ScanSnap S1500M - From the ScanSnap Manager menu, select [Settings]. - 1](/content/2026/06/1236416/images/da35194554a600f290f971b5ea6987537ae843e2db0e0eae373edc42d23a3d7f.jpg)
text_image
Duplex scan Simplex scan Settings... Profile... Profile Management... Check consumable supplies... Help Keep in Dock ✓ Open at Login Show in Finder Hide Quit⇒ The ScanSnap setup window appears.
2. In the [Application] pop-up menu on the [Application] tab, select [iPhoto].
![FUJITSU ScanSnap S1500M - In the [Application] pop-up menu on the [Application] tab, select [iPhoto]. - 1](/content/2026/06/1236416/images/55733c42a7f4d8db7737b5a0931c79f14f83f638609bf90ddb44bffe06df6480.jpg)
text_image
ScanSnap Color Image Scanner Use Quick Menu Recommended Small File High Quality Profile Standard Application Save Scanning File option Paper Compression Select the application you would like to use. Application: iPhoto Add or Remove... Hide Apply![FUJITSU ScanSnap S1500M - In the [Application] pop-up menu on the [Application] tab, select [iPhoto]. - 2](/content/2026/06/1236416/images/e09656d6440a88bc1906eb38f6b7260697562905b08a4286fb32b3ff830c8f20.jpg)
- The profiles can also be set by selecting [iPhoto] from the [Profile] pop-up menu or the [Profile] menu.
-
Finishing the procedure above, you can save desired settings as profiles. The profiles can be selected in the [Profile] menu from the next time you scan documents. For details about how to save scanning settings, refer to "Saving Scanning Settings" (page 211).
-
Click the [Apply] button in the ScanSnap setup window.
- Click the [×] button in the upper left corner of the window or press the [esc] key to close the ScanSnap setup window.
![FUJITSU ScanSnap S1500M - In the [Application] pop-up menu on the [Application] tab, select [iPhoto]. - 3](/content/2026/06/1236416/images/e10ee84ae3b37f5a8075c1c94acc59ab044abe10ed789ef74543144f0010b291.jpg)
Even if the [Scan] button on the ScanSnap is pressed, the ScanSnap setup window closes.
- Load the document into the ScanSnap.
For details, refer to "Paper Sizes of Documents to Be Scanned" (page 27) and "Loading Documents" (page 29).
- Press the [Scan] button on the ScanSnap.
⇒ Scanning is started.
⇒ When scanning is complete, iPhoto starts up.
- Check the scanned image data.
![FUJITSU ScanSnap S1500M - In the [Application] pop-up menu on the [Application] tab, select [iPhoto]. - 4](/content/2026/06/1236416/images/ed8de5be49dccc8d342d9a82887f467f3a1f16c41a2c7f7d711494b19cbc43fa.jpg)
text_image
iPhoto LIBRARY Events Photos RECENT Last 12 Months Last Import Flagged Trash untitled event Oct 16, 2008 - 6 photos Split Edit Rotate Hide Flag Book Calendar Card Web Gallery Email Print Order Pints Search 6 photos in 1 EventUsing the ScanSnap in Various Ways
This section describes a variety of ways you can use the ScanSnap.
■ Scanning Only One Side of a Document
By default, pressing the [Scan] button starts scanning in Duplex mode.
When you wish to scan in Simplex mode, change the settings by following the procedure below.
1. From the ScanSnap Manager menu, select [Settings].
![FUJITSU ScanSnap S1500M - From the ScanSnap Manager menu, select [Settings]. - 1](/content/2026/06/1236416/images/80cad2758b56fb8b2fbd48be1a308f8f1803a9655f56c92822005d6381ee18ed.jpg)
text_image
Duplex scan Simplex scan Settings... Profile... Profile Management... Check consumable supplies... Help Keep in Dock ✓ Open at Login Show in Finder Hide Quit⇒ The ScanSnap setup window appears.
2. Select [Simplex Scan (Single-sided)] in the [Scanning side] pop-up menu on the [Scanning] tab.
![FUJITSU ScanSnap S1500M - Select [Simplex Scan (Single-sided)] in the [Scanning side] pop-up menu on the [Scanning] tab. - 1](/content/2026/06/1236416/images/6aa6ef0bb3d21bda38006f6a0d26a15a87391bb6a3413bb1c86868e0b337347b.jpg)
text_image
Application Save Scanning File option Paper Compression Specify the scanning mode you would like to use. Image quality: Auto Color mode: Auto Color Detection Scanning side: Duplex Scan(Double-sided) Simplex Scan(Single-sided) Option...- Click the [Apply] button in the ScanSnap setup window.
- Click the [×] button in the upper left corner of the window or press the [esc] key to close the ScanSnap setup window.
- Load the document into the ScanSnap.
For details, refer to "Paper Sizes of Documents to Be Scanned" (page 27) and "Loading Documents" (page 29).
- Press the [Scan] button on the ScanSnap.
![FUJITSU ScanSnap S1500M - Select [Simplex Scan (Single-sided)] in the [Scanning side] pop-up menu on the [Scanning] tab. - 2](/content/2026/06/1236416/images/6d0c6a8fa8eb755a19d659dfe67608df0704b0d484a27bd7df8baa15fb06b878.jpg)
If you select [Simplex scan] from the ScanSnap Manager menu, even if [Duplex Scan (Double-sided)] is set in [Scanning side] on the [Scanning] tab, the scan will be performed in Simplex mode.
⇒ The document is scanned in Simplex mode.
■ Scanning Color Documents in Black and White or Gray Mode
By default, the ScanSnap automatically recognizes whether scanned documents are color, gray or black-and-white, and outputs color documents in color mode, gray documents in gray mode, and black-and-white documents in black-and-white mode.
If you wish to scan color documents in gray or black-and-white mode, change the settings by following the procedure below.
1. From the ScanSnap Manager menu, select [Settings].
![FUJITSU ScanSnap S1500M - From the ScanSnap Manager menu, select [Settings]. - 1](/content/2026/06/1236416/images/966be492498c3c33d99725c3646677db9f52a7e401e10ebc2bacad77759235b5.jpg)
text_image
Duplex scan Simplex scan Settings... Profile... Profile Management... Check consumable supplies... Help Keep in Dock ✓ Open at Login Show in Finder Hide Quit⇒ The ScanSnap setup window appears.
2. In the [Color mode] pop-up menu on the [Scanning] tab, select [Gray] or [B&W].
![FUJITSU ScanSnap S1500M - In the [Color mode] pop-up menu on the [Scanning] tab, select [Gray] or [B&W]. - 1](/content/2026/06/1236416/images/e4d72be98dd371a342a09d1cdb4b24a79a9210f23cb1783ebfeafc9849d81406.jpg)
text_image
Application Save Scanning File option Paper Compression Specify the scanning mode you would like to use. Image quality: Auto Color mode ✓ Auto Color Detection Color Scanning side Gray B&W Option... Hide Apply- Click the [Apply] button in the ScanSnap setup window.
- Click the [×] button in the upper left corner of the window or press the [esc] key to close the ScanSnap setup window.
- Load the document into the ScanSnap.
For details, refer to "Paper Sizes of Documents to Be Scanned" (page 27) and "Loading Documents" (page 29).
- Press the [Scan] button on the ScanSnap.
⇒ Scanned image data is output in gray or in black-and-white.
■ Removing Blank Pages from the Scanned Image Data
The ScanSnap is able to recognize and remove blank pages automatically from the scanned image data. When you scan documents in Duplex mode, both sides of the documents are scanned regardless if the back is printed or not. If a blank side is scanned, it is recognized as "blank" and the image data is automatically removed.
To remove blank pages, change the settings by following the procedure below.

The following types of documents may be recognized as blank pages:
- Almost blank documents containing only a few characters
- Documents of only one color (including black) and without any patterns, lines, or characters. When you scan such documents, clear the [Allow automatic blank page removal] checkbox. When discarding the original documents, check the image data for pages accidentally removed.
1. From the ScanSnap Manager menu, select [Settings].
![FUJITSU ScanSnap S1500M - From the ScanSnap Manager menu, select [Settings]. - 1](/content/2026/06/1236416/images/de1274f22bbd536932b943c1af3d995795b5af5e1412b9aabe9b07f59517d131.jpg)
text_image
Duplex scan Simplex scan Settings... Profile... Profile Management... Check consumable supplies... Help Keep in Dock ✓ Open at Login Show in Finder Hide Quit⇒ The ScanSnap setup window appears.
2. Click the [Option] button on the [Scanning] tab.
![FUJITSU ScanSnap S1500M - Click the [Option] button on the [Scanning] tab. - 1](/content/2026/06/1236416/images/b47d669f62594dcf303ddfc5c8272cf4b6449109e16f0762a2ee36784a1dd704.jpg)
text_image
Application Save Scanning File option Paper Compression Specify the scanning mode you would like to use. Image quality: Auto Color mode: Auto Color Detection Scanning side: Duplex Scan(Double-sided) Continue scanning after current scan is finished Option... Hide Apply⇒ The [Read mode option] window appears.
3. Select the [Allow automatic blank page removal] checkbox.
![FUJITSU ScanSnap S1500M - Select the [Allow automatic blank page removal] checkbox. - 1](/content/2026/06/1236416/images/f73c0e32fc9798c87f015b72e95c3b786bda9b011e10f0940b7f84a2789c9da1.jpg)
text_image
Read mode option Brightness (Black and White scanning only) Light Normal Dark Setting for text only document. ✓ Allow automatic blank page removal. ✓ Correct skewed character strings automatically. ✓ Allow automatic image rotation. Cancel OK- Click the [OK] button to close the [Read mode option] window.
- Click the [Apply] button in the ScanSnap setup window.
- Click the [×] button in the upper left corner of the window or press the [esc] key to close the ScanSnap setup window.
7. Load the document into the ScanSnap.
For details, refer to "Paper Sizes of Documents to Be Scanned" (page 27) and "Loading Documents" (page 29).
8. Press the [Scan] button on the ScanSnap.
⇒ Image data without blank pages are output.
■ Correcting Skewed Character Strings
The ScanSnap is able to detect skewed character strings on the document and correct the skew. This function is available when characters printed on the document are skewed.
To correct skewed character strings, change the settings by following the procedure below.

- Up to +/-5 degrees of skews can be corrected.
This function determines a document skew based on the character strings printed on the document, so it may not work properly for the following document: - Documents on which pitches of lines or characters are extremely narrow, or characters are overlapped
- Documents that have many outlined or decorated characters
- Documents that have many photographs or figures but only a few characters
- Documents that have characters on patterned background e.g. Characters overlapping illustrations and diagrams
- Documents that have characters printed in various directions (e.g. drawings)
- Documents that have long diagonal lines
- Documents with handwritten characters
When you scan such documents, clear the [Correct skewed character strings automatically] checkbox. - When scanning with the Carrier Sheet, skewed character strings are not corrected.

For documents skewed while being scanned, the skew is always corrected regardless of whether [Correct skewed character strings automatically] is enabled or not.
1. From the ScanSnap Manager menu, select [Settings].
![FUJITSU ScanSnap S1500M - From the ScanSnap Manager menu, select [Settings]. - 1](/content/2026/06/1236416/images/b42559e763ab85b86b76d257825bac48c77b9026c87952ae7f3e34a1e2c480d7.jpg)
text_image
Duplex scan Simplex scan Settings... Profile... Profile Management... Check consumable supplies... Help Keep in Dock ✓ Open at Login Show in Finder Hide Quit⇒ The ScanSnap setup window appears.
2. Click the [Option] button on the [Scanning] tab.
![FUJITSU ScanSnap S1500M - Click the [Option] button on the [Scanning] tab. - 1](/content/2026/06/1236416/images/d30bb28559f2bb8aff1202d1c34a311537c0d81acb404e9d5abd73c8e5d26a18.jpg)
text_image
Application Save Scanning File option Paper Compression Specify the scanning mode you would like to use. Image quality: Auto Color mode: Auto Color Detection Scanning side: Duplex Scan(Double-sided) Continue scanning after current scan is finished Option... Hide Apply⇒ The [Read mode option] window appears.
3. Select the [Correct skewed character strings automatically] checkbox.
![FUJITSU ScanSnap S1500M - Select the [Correct skewed character strings automatically] checkbox. - 1](/content/2026/06/1236416/images/fdf935742ff51c4804498c85d0f2dd2ccee1b0e0e46ce199cb2fe227020fe55e.jpg)
text_image
Read mode option Brightness (Black and White scanning only) Light Normal Dark Setting for text only document. Allow automatic blank page removal. Correct skewed character strings automatically. Allow automatic image rotation. Cancel OK- Click the [OK] button to close the [Read mode option] window.
- Click the [Apply] button in the ScanSnap setup window.
- Click the [×] button in the upper left corner of the window or press the [esc] key to close the ScanSnap setup window.
7. Load the document into the ScanSnap.
For details, refer to "Paper Sizes of Documents to Be Scanned" (page 27) and "Loading Documents" (page 29).
8. Press the [Scan] button on the ScanSnap.
⇒ All image data are output with skewed character strings corrected.
■ Correcting the Orientation of Scanned Images
In an office environment, it is often the case that a single batch contains documents of different page orientations, even if the paper sizes are the same.
For the case of double-sided documents in calendar style, the reverse sides are printed upside down.
The ScanSnap is able to automatically correct the orientation of scanned images for such sets of pages.
To correct the orientation of scanned documents, change the settings by following the procedure below.

This function determines a document orientation based on the characters printed on the document. It may not work properly for the following kinds of documents:
- Documents with many extremely large or small characters
- Documents on which pitches of lines or characters are extremely narrow, or characters are overlapped
- Documents with many photographs or figures and few characters
- Documents with characters on an unevenly colored background e.g. Shaded characters
- Documents with many decorated characters e.g. Decorated characters (embossed/outlined)
- Documents with characters on a patterned background e.g. Characters overlapping illustrations and diagrams
- Documents with many characters contacting underlines or borders
- Documents that have characters printed in various directions (e.g. drawings)
- Documents that have only capital letters
- Documents with handwritten characters
- Skewed documents
- Documents with characters of an unsupported language (Language other than English/French/German/Italian/Spanish/Russian/Portuguese)
- Documents with complex layouts
- Documents with a lot of noise
- Documents with pale characters
- Documents with faded characters
When you scan such documents, clear the [Allow automatic image rotation] checkbox.
1. From the ScanSnap Manager menu, select [Settings].
![FUJITSU ScanSnap S1500M - From the ScanSnap Manager menu, select [Settings]. - 1](/content/2026/06/1236416/images/183d7d3a0ca5edf8fff1ea64839021e4321a1fe221895d081a1d6b6c1e706edc.jpg)
text_image
Duplex scan Simplex scan Settings... Profile... Profile Management... Check consumable supplies... Help Keep in Dock ✓ Open at Login Show in Finder Hide Quit⇒ The ScanSnap setup window appears.
2. Click the [Option] button on the [Scanning] tab.
![FUJITSU ScanSnap S1500M - Click the [Option] button on the [Scanning] tab. - 1](/content/2026/06/1236416/images/b04d234a279658b9c3c0f78158c8cd54992d4ea2b9a4cc134c023be35667284a.jpg)
text_image
Application Save Scanning File option Paper Compression Specify the scanning mode you would like to use. Image quality: Auto Color mode: Auto Color Detection Scanning side: Duplex Scan(Double-sided) Continue scanning after current scan is finished Option... Hide Apply⇒ The [Read mode option] window appears.
3. Select the [Allow automatic image rotation] checkbox.
![FUJITSU ScanSnap S1500M - Select the [Allow automatic image rotation] checkbox. - 1](/content/2026/06/1236416/images/af46af485e22dcffe0a7dbfed3f47eeb82b18677e40a1c08f1e31d3c5e7b8d31.jpg)
text_image
Read mode option Brightness (Black and White scanning only) Light Normal Dark Setting for text only document. Allow automatic blank page removal. Correct skewed character strings automatically. Allow automatic image rotation. Cancel OK- Click the [OK] button to close the [Read mode option] window.
- Click the [Apply] button in the ScanSnap setup window.
- Click the [×] button in the upper left corner of the window or press the [esc] key to close the ScanSnap setup window.
7. Load the document into the ScanSnap.
For details, refer to "Paper Sizes of Documents to Be Scanned" (page 27) and "Loading Documents" (page 29).
8. Press the [Scan] button on the ScanSnap.
⇒ All image data are output in the same orientation.
■ Scanning Documents of Differing Widths or Sizes at the Same Time
The ScanSnap is able to scan documents of different widths or sizes in one batch.
To scan documents of different widths or sizes in one batch, change the settings by following the procedure below.
1. From the ScanSnap Manager menu, select [Settings].
![FUJITSU ScanSnap S1500M - From the ScanSnap Manager menu, select [Settings]. - 1](/content/2026/06/1236416/images/b6e81094270897b99f9a501ba25a643e573e43eddf8ecad7bfe0989dcc30c9ce.jpg)
text_image
Duplex scan Simplex scan Settings... Profile... Profile Management... Check consumable supplies... Help Keep in Dock ✓ Open at Login Show in Finder Hide Quit⇒ The ScanSnap setup window appears.
2. On the [Paper] tab, select [Automatic detection] in [Paper size].
![FUJITSU ScanSnap S1500M - On the [Paper] tab, select [Automatic detection] in [Paper size]. - 1](/content/2026/06/1236416/images/8d2a9c3775b896a3fe86c8e17406bfb11756d60846207ec8de88a39c93859464.jpg)
text_image
ScanSnap Color Image Scanner Use Quick Menu Recommended Small File High Quality Profile Standard Application Save Scanning File option Paper Compression Select paper. Paper size: Automatic detection Carrier Sheet Settings... Custom... Multifeed Detection: Check Overlapping [Ultrasonic] Hide Apply3. Select a setting other than [Check Length] in [Multifeed Detection].
![FUJITSU ScanSnap S1500M - Select a setting other than [Check Length] in [Multifeed Detection]. - 1](/content/2026/06/1236416/images/7aa7bf9aeee83e357386c615676f98c8d80f9d6e18566d94e919d1e29ceba960.jpg)
text_image
Application Save Scanning File option Paper Compression Select paper. Paper size: Automatic detection Carrier Sheet Settings... Custom... Multifeed Detection: Check Overlapping [Ultrasonic] Hide Apply![FUJITSU ScanSnap S1500M - Select a setting other than [Check Length] in [Multifeed Detection]. - 2](/content/2026/06/1236416/images/a988b6c7cc04c998a71db00c4ebe8a1a6d21cebfa52a9f4605f992f5216b5a5e.jpg)
Scanning documents of different widths or sizes at the same time with [Check Length] selected, results in a scanning failure due to a multifeed error detection.
- Click the [Apply] button in the ScanSnap setup window.
- Click the [×] button in the upper left corner of the window or press the [esc] key to close the ScanSnap setup window.
-
Load the document into the ScanSnap.
-
Align the edge of all documents.
![FUJITSU ScanSnap S1500M - Select a setting other than [Check Length] in [Multifeed Detection]. - 3](/content/2026/06/1236416/images/3d53658c6f3e56774469bb82965b4a9528d25e2a8036e3b7a4edbf46bf21b245.jpg)
flowchart
graph TD
    A["ABC"] --> B["ABC"]
    C["ABC"] --> B
    B --> D["→"]
    D --> E["A"]
    D --> F["AI"]
    D --> G["ABC"]
- Place the document on the center of the ADF paper chute (cover).
![FUJITSU ScanSnap S1500M - Select a setting other than [Check Length] in [Multifeed Detection]. - 4](/content/2026/06/1236416/images/0a0f183775d86d1d9818e23896876d4f77be348b405d46b3d0dfa4f1bd054624.jpg)
text_image
AB ABO![FUJITSU ScanSnap S1500M - Select a setting other than [Check Length] in [Multifeed Detection]. - 5](/content/2026/06/1236416/images/e423d1aee15528df6bc2a83db25483a72111ffc983f7820842a450090a96c1a8.jpg)
- Place all documents under the pick roller (center). Documents that are not under the pick roller cannot be fed.
![FUJITSU ScanSnap S1500M - Select a setting other than [Check Length] in [Multifeed Detection]. - 6](/content/2026/06/1236416/images/7a89d1b27e4ae7187d51bf89f6687f2f0b7ca28472e9f660091e55177a54e995.jpg)
text_image
Width of the pick roller ABC ABC- Adjust the side guides to the widest document to be scanned.
- For smaller documents which cannot contact the side guide, carefully load them straight into the ADF paper chute (cover). If the documents are skewed during a scan, the quality of scanned image data may be degraded (partly lost image data/slant lines produced) or scanned image data may be output in different size from the original. If you have difficulties in feeding documents straight, it is recommended to scan documents in several batches and enable continuous scanning; scan documents of about the same width in one batch.
Note that smaller documents that cannot be guided by the side guide may cause a jam.
7. Press the [Scan] button on the ScanSnap.
⇒ The size of all output image data conforms to the respective documents.
![FUJITSU ScanSnap S1500M - Press the [Scan] button on the ScanSnap. - 1](/content/2026/06/1236416/images/2da606359dec51eb43a6fd4be636ee6dd9b35d11b5bff61a7ebe0f3f5e26e7df.jpg)
flowchart
graph LR
    A["ABC"] --> B["ABC"]
    B --> C["ABC"]
    C --> D["ABC"]
    D --> E["ABC"]
![FUJITSU ScanSnap S1500M - Press the [Scan] button on the ScanSnap. - 2](/content/2026/06/1236416/images/a5582d1e2a9e1bf10dc587630f7b5625133f89139e4113115dd59536ab8666eb.jpg)
If a document is scanned at an angle, an image may be output that does not match the document size.
■ Scanning Documents Larger Than A4/Letter Size
The ScanSnap is able to scan documents larger than A4/Letter size, such as A3, Double Letter, and B4 sizes, using the Carrier Sheet. Fold the document in half, scan it in Duplex mode, and then merge both front and back images to make a double-page spread image data. You can also scan and merge both front and back images of a document smaller than A4/Letter size to output a double-page spread image data.
To scan documents larger than A4/Letter size, change the settings by following the procedure below.

- When you scan documents using a Carrier Sheet, a detection error may occur in the folded portion, and some parts of the image data may be lost. Therefore, it is not recommended for scanning where accuracy is crucial.
- The [Correct skewed character strings automatically] checkbox in the [Read mode option] window displayed by pressing the [Option] button on the [Scanning] tab, is disabled.
1. From the ScanSnap Manager menu, select [Settings].
![FUJITSU ScanSnap S1500M - From the ScanSnap Manager menu, select [Settings]. - 1](/content/2026/06/1236416/images/dba42b66dd6c138c705a3bdca56ee7e5df5420c0f3b322bfc97b09b79fc451c9.jpg)
text_image
Duplex scan Simplex scan Settings... Profile... Profile Management... Check consumable supplies... Help Keep in Dock ✓ Open at Login Show in Finder Hide Quit⇒ The ScanSnap setup window appears.
2. Click the [Carrier Sheet Settings] button on the [Paper] tab.
![FUJITSU ScanSnap S1500M - Click the [Carrier Sheet Settings] button on the [Paper] tab. - 1](/content/2026/06/1236416/images/3362796a96ef32372babf09fa4e06da6c225ad0bf3510f82f5815dde2bd0906d.jpg)
text_image
Application Save Scanning File option Paper Compression Select paper. Paper size: Automatic detection Carrier Sheet Settings... Custom... Multifeed Detection: Check Overlapping [Ultrasonic]⇒ The [Carrier Sheet Settings] window appears.
3. Select [Create facing pages in one image] in the [Mode] pop-up menu, and then click the [OK] button.
For details about the Carrier Sheet settings, refer to the ScanSnap Manager Help.
![FUJITSU ScanSnap S1500M - Select [Create facing pages in one image] in the [Mode] pop-up menu, and then click the [OK] button. - 1](/content/2026/06/1236416/images/1602e1bb9ba8a0f9eddc5bda3b9496a71f0b65c761107efaed5ebdf4a63a2058.jpg)
text_image
Carrier Sheet Settings Mode Create facing pages in one image Output image size Automatic detection Custom... In this Mode, the front and back pages are set in a facing-page state and is output as a 1-page image. Use this mode when scanning documents such as A3 size. When inserting a document into Carrier Sheet, take note of the following. - Set the document so that it touches the top of the sheet. - Align the folded edge of the document along the thick vertical line Select "Duplex Scan (Double-sided)" in ScanSnap Manager Settings. The setting can be changed in the (Scanning side) of the (Scanning) tab. ABC ABC Cancel OK4. Select [Automatic detection] in the [Paper size] pop-up menu on the [Paper] tab.
![FUJITSU ScanSnap S1500M - Select [Automatic detection] in the [Paper size] pop-up menu on the [Paper] tab. - 1](/content/2026/06/1236416/images/a306107bfd4312cdb801db7ec4860d625ac3b08045c53af5bbb2f65a4e628124.jpg)
text_image
ScanSnap Color Image Scanner Use Quick Menu Recommended Small File High Quality Profile Standard Application Save Scanning File option Paper Compression Select paper. Paper size: Automatic detection Carrier Sheet Settings... Custom... Multifeed Detection: Check Overlapping [Ultrasonic] Hide Apply- Select [Duplex Scan (Double-sided)] in the [Scanning side] pop-up menu on the [Scanning] tab.
![FUJITSU ScanSnap S1500M - Select [Automatic detection] in the [Paper size] pop-up menu on the [Paper] tab. - 2](/content/2026/06/1236416/images/6aea6d436583e370471f0dee8b5d64a21d4450b40bf82bdbcb9ad71103ee2b48.jpg)
text_image
Application Save Scanning File option Paper Compression Specify the scanning mode you would like to use. Image quality: Auto Color mode: Auto Color Detection Scanning side: Duplex Scan(Double-sided) Continue scanning after current scan is finished Option... Hide Apply![FUJITSU ScanSnap S1500M - Select [Automatic detection] in the [Paper size] pop-up menu on the [Paper] tab. - 3](/content/2026/06/1236416/images/98cd0ff302a0be313f52a86e4624f95a6b50e19344c585b855ee21e3820c46aa.jpg)
Selecting [Simplex Scan (Single-sided)] results in the same output as selecting [Create front and back images separately].
- Click the [Apply] button in the ScanSnap setup window.
- Click the [×] button in the upper left corner of the window or press the [esc] key to close the ScanSnap setup window.
-
Load the document into the ScanSnap.
-
Fold the document in half so that the side to be scanned is on the external side. Fold the sheet tightly and smooth out the crease. Otherwise, the sheet may be skewed during scanning.
![FUJITSU ScanSnap S1500M - Select [Automatic detection] in the [Paper size] pop-up menu on the [Paper] tab. - 4](/content/2026/06/1236416/images/8325313f4e54d0c52d5a6137a62ef0806d2b5ede56a3350587d33d65c6e2d950.jpg)
text_image
Diagram showing document layout transformation from left to right, with a blue arrow indicating the process.- Open the Carrier Sheet and insert the document.
Align the fold with the right edge of the Carrier Sheet so that the document fits into the Carrier Sheet at the upper corner.
![FUJITSU ScanSnap S1500M - Select [Automatic detection] in the [Paper size] pop-up menu on the [Paper] tab. - 5](/content/2026/06/1236416/images/fad2f9a056a2f1c7d34fd61b08429b8b7536a5452a97ec118cc84eeaae2d4a58.jpg)
text_image
Diagram illustrating a document with a magnified inset showing a zoomed-in section and directional arrow, likely illustrating a technical or instructional view.- Load the Carrier Sheet into the ScanSnap.
- Load the Carrier Sheet with the portion striped in black and white as the top edge.
- Place the document so that the back is face up.
- Adjust the side guides to the width of the Carrier Sheet to avoid skewing.
- When scanning the Carrier Sheet mixed with regular size and shape documents, select an option other than [Check Length] in the [Multifeed Detection] popup menu on the [Paper] tab in the ScanSnap setup window.
For details on how to set, refer to "Scanning Documents of Differing Widths or Sizes at the Same Time" (page 280).
![FUJITSU ScanSnap S1500M - Select [Automatic detection] in the [Paper size] pop-up menu on the [Paper] tab. - 6](/content/2026/06/1236416/images/8b3faffac5d072ab0850a286fe20ae0c765819a48054fec35ad8806ca9a760f7.jpg)
text_image
Diagram of a printer with paper feed and paper roll, showing text layout and directional arrows indicating orientation.9. Press the [Scan] button on the ScanSnap.
⇒ When a duplex scan is performed, image data on the front and back sides are merged into a double-page spread image.
![FUJITSU ScanSnap S1500M - Press the [Scan] button on the ScanSnap. - 1](/content/2026/06/1236416/images/3ee6266833f61547b47b67ebcd0f01e6b30e7a613790c538a77ecddce97ea0a2.jpg)
natural_image
Abstract diagram with a gray rectangle and horizontal lines, no text or symbols present![FUJITSU ScanSnap S1500M - Press the [Scan] button on the ScanSnap. - 2](/content/2026/06/1236416/images/0a51cf47980c73aecff1ff63a0ccf24955a514dd4e8b5bb13c610432341de6f4.jpg)
- There may be a gap, misalignment, or a line between the front and back images on the output image data.
When a sheet of thick paper is scanned, image data on both the right and left sides may be skewed to a trapezoidal shape.
The degree of skewing varies depending on the condition of the document (how it is folded or loaded).
Troubleshoot the problem as follows, and the situation may be improved.
- Is the document neatly folded? If not, fold it neatly.
- Is the edge of the document aligned with the edge of the Carrier Sheet? If not, align the document with the Carrier Sheet edge.
- Try scanning the document with the back and front sides reversed.
- When [Automatic detection] is selected from the [Output image size] pop-up menu in the [Carrier Sheet Settings] window, the size of the produced image data may be smaller than the original, or parts may be lost.
(The image is output in A3, B4, or 11 × 17 inches size, whichever the smallest, so that all elements on the image are included.)
Example: When you scan the A4 size image printed at the center of an A3 size paper, B4 size image is output.
To output image data in the original size, specify the document size in the [Output image size] pop-up menu.
- A detection error in the folded portion may cause some parts of the image data to be lost. In this case, set the document so its edge will be about 1 mm inside of the Carrier Sheet frame.
■ Scanning Photographs and Irregular-shaped Documents
When you do not want to get scratches on a photograph, or want to scan an irregular-shaped document such as a clipping of an article that is difficult to scan as it is, you can use the Carrier Sheet to scan with the ScanSnap.
To scan photographs and irregular-shaped documents, change the settings by following the procedure below.

The [Correct skewed character strings automatically] checkbox in the [Read mode option] window displayed by pressing the [Option] button on the [Scanning] tab, is disabled.
1. From the ScanSnap Manager menu, select [Settings].
![FUJITSU ScanSnap S1500M - From the ScanSnap Manager menu, select [Settings]. - 1](/content/2026/06/1236416/images/3f812a98b8e340153e163dbce592dee2b663de7d6903f0e33d74916aceb3ed17.jpg)
text_image
Duplex scan Simplex scan Settings... Profile... Profile Management... Check consumable supplies... Help Keep in Dock ✓ Open at Login Show in Finder Hide Quit⇒ The ScanSnap setup window appears.
2. Click the [Carrier Sheet Settings] button on the [Paper] tab.
![FUJITSU ScanSnap S1500M - Click the [Carrier Sheet Settings] button on the [Paper] tab. - 1](/content/2026/06/1236416/images/29a463a1f7368b1d815c1f833ce0cea06c16dab02f54acd32c34d3f3131f3931.jpg)
text_image
ScanSnap Color Image Scanner Use Quick Menu Recommended Small File High Quality Profile Standard Application Save Scanning File option Paper Compression Select paper. Paper size: Automatic detection Carrier Sheet Settings... Custom... Multifeed Detection: Check Overlapping [Ultrasonic] Hide Apply⇒ The [Carrier Sheet Settings] window appears.
3. Select [Create front and back images separately] in the [Mode] pop-up menu, and then click the [OK] button.
For details about Carrier Sheet settings, refer to the ScanSnap Manager Help.
![FUJITSU ScanSnap S1500M - Select [Create front and back images separately] in the [Mode] pop-up menu, and then click the [OK] button. - 1](/content/2026/06/1236416/images/5e3a5ae2e01f3c3603c19c8304b069015bc9c6f769d99c82e12c625d430c779c.jpg)
text_image
Carrier Sheet Settings Mode Create front and back images separately Output image size Automatic detection Custom... In this mode, the scanned document image is pasted on the specified size of a sheet. Use this mode to scan photographs and clippings. This mode is intended for scanning the following originals. - Documents such as photographs that you do not want to damage. - Wrinkled or creased documents that are easily jammed. Please observe the following instructions when loading documents in Carrier Sheet: - Align the original document to the top edge of the Carrier Sheet. - Position the document in the center of the Carrier Sheet. Be aware that the scanned image size is the size of the Carrier Sheet when Carrier Sheet size is specified. By trimming the scanned image using an application such as Acrobat(R), you can clip out the image with the size of your preference. This mode, scanning sides depends on ScanSnap Manager settings. With simplex setting, only single-sided images are generated and with duplex setting, double-sided images are generated. When scanning documents of non-standard sizes such as photographs, add a custom size definition and specify it for output size to get the correctly trimmed image. Cancel OK- Select [Automatic detection] in the [Paper size] pop-up menu on the [Paper] tab.
![FUJITSU ScanSnap S1500M - Select [Create front and back images separately] in the [Mode] pop-up menu, and then click the [OK] button. - 2](/content/2026/06/1236416/images/566366c87370fd45d97292657403b90bbd6bd709a7cbd0b312b2546ac903eea1.jpg)
text_image
ScanSnap Color Image Scanner Use Quick Menu Recommended Small File High Quality Profile Standard Application Save Scanning File option Paper Compression Select paper. Paper size: Automatic detection Carrier Sheet Settings... Custom... Multifeed Detection: Check Overlapping [Ultrasonic] Hide Apply- Click the [Apply] button in the ScanSnap setup window.
- Click the [×] button in the upper left corner of the window or press the [esc] key to close the ScanSnap setup window.
7. Load the document into the ScanSnap.
- Open the Carrier Sheet and insert the document. Neatly align the top of the document with the top of the Carrier Sheet. Center the material so that it is entirely contained in the Carrier Sheet.

text_image
Diagram illustrating a tree planting process with labeled arrows and a magnified inset showing the tree's position.- Load the Carrier Sheet into the ScanSnap.
- Load the Carrier Sheet with the portion striped in black and white as the top edge.
- Place the document so that the back of it faces up.
- Adjust the side guides to the width of the Carrier Sheet to avoid skewing.
- When scanning the Carrier Sheet mixed with regular size and shape documents, select an option other than [Check Length] in the [Multifeed Detection] popup menu on the [Paper] tab in the ScanSnap setup window.
For details on how to set, refer to "Scanning Documents of Differing Widths or Sizes at the Same Time" (page 280).
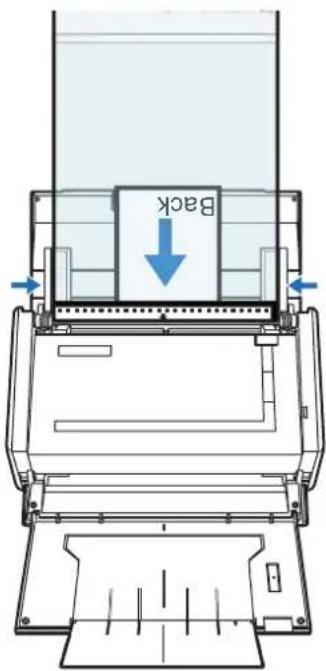
text_image
Back8. Press the [Scan] button on the ScanSnap.
⇒ Scanning starts and the image data is output.
![FUJITSU ScanSnap S1500M - Press the [Scan] button on the ScanSnap. - 1](/content/2026/06/1236416/images/3a4acf995f3e2aeb06dd6127a0f2264cb030ef75d84f7ff0a0a1858093ada629.jpg)
- The image data scanned by using the [Scan] button is centered and output in the size specified in [Output image size].
When [Automatic detection] is selected from the [Output image size] pop-up menu on the [Carrier Sheet Settings] window, an optimal size is selected automatically from the available standard sizes.
- When [Automatic detection] is selected from the [Output image size] pop-up menu on the [Carrier Sheet Settings] window, the size of the produced image data may be smaller than the original, or parts may be lost.
Example: When you scan the A5 size image printed at the center of an A4 size paper, A5 size image is output.
To output image data in the original size, specify the document size in the [Output image size] pop-up menu.
![FUJITSU ScanSnap S1500M - Press the [Scan] button on the ScanSnap. - 2](/content/2026/06/1236416/images/6aa14da5b7baabce1c6c863a327ed72d3a56ef550d1da437bfe558664701d652.jpg)
If the following symptoms are observed, lay the material over a piece of white paper to scan.
- The output image data is not in a suitable size (when [Automatic detection] is selected).
- The outline of the document is shaded.
- Black lines appear around the document cut out in an indefinite shape.
![FUJITSU ScanSnap S1500M - Press the [Scan] button on the ScanSnap. - 3](/content/2026/06/1236416/images/84b1b013461904ab3caba91682764b9fa86c367ca50fe21288f547c952b3a6bc.jpg)
text_image
Blank Page■ Scanning Long Pages
Up to 863-mm-long (34 inches) documents can be scanned.
The following describes how to scan long pages.
1. Load the document into the ScanSnap.
For details about document types that can be loaded, refer to "Paper Sizes of Documents to Be Scanned" (page 27).

- Long page documents should be loaded one sheet at a time in the ADF paper chute (cover).
• Take note of the following when scanning long page documents:
When loading
Hold the document with your hands to prevent it from falling off the ADF paper chute (cover).
When removing
Make sure there is enough space on the stacker side and guide the scanned document with your hands so that it does not fall off the stacker.

text_image
event it er).2. Press the [Scan] button on the ScanSnap until it blinks blue for 3 seconds or longer.
Scanning is started.
![FUJITSU ScanSnap S1500M - Press the [Scan] button on the ScanSnap until it blinks blue for 3 seconds or longer. - 1](/content/2026/06/1236416/images/70d584e774ff4a52f0c436c21f9e8c7521110218835ab7d42bc97082eb95d812.jpg)
If the first sheet scanned is scanned a long page, and scanning is continued, subsequent sheets will also be scanned as long pages.
![FUJITSU ScanSnap S1500M - Press the [Scan] button on the ScanSnap until it blinks blue for 3 seconds or longer. - 2](/content/2026/06/1236416/images/2f0f329db221efd0987d0c127273a5f388ef17c5085b12f600b956d3c960450b.jpg)
- When [Excellent] is specified for the [Image quality] in the [Scanning] tab, the error message as shown below appears indicating that long document scanning is not available.
![FUJITSU ScanSnap S1500M - Press the [Scan] button on the ScanSnap until it blinks blue for 3 seconds or longer. - 3](/content/2026/06/1236416/images/17ac3c0ba5408fc6499a7823dc89dfc2d4a8459979bda4a57c70464ffde1ed0a.jpg)
ScanSnap Manager
Long document scanning (with [Long Page] specified) is not available if [Excellent] has been selected for [Image quality:]. Select an item other than [Excellent] for [Image quality:], and try again.

When [Image quality: Excellent] is specified
- Long document scanning is performed not on the current settings, but on the following settings:
- Multifeed Detection: None
- Paper size: Automatic detection
■ Saving Scanned Images in Multiple PDF Files
The ScanSnap is able to save scanned image data in multiple PDF files based on the selected number of pages. For example, you can scan a batch of slips, and save each slip as a PDF file.
To save image data in multiple PDF files, change the settings by following the procedure below.
1. From the ScanSnap Manager menu, select [Settings].
![FUJITSU ScanSnap S1500M - From the ScanSnap Manager menu, select [Settings]. - 1](/content/2026/06/1236416/images/1dd40616ae7ca87d4a1febf2898376053f66dec76c1ab1d4d7b7b07f51d16774.jpg)
text_image
Duplex scan Simplex scan Settings... Profile... Profile Management... Check consumable supplies... Help Keep in Dock ✓ Open at Login Show in Finder Hide Quit⇒ The ScanSnap setup window appears.
2. Click the [Option] button on the [File option] tab.
![FUJITSU ScanSnap S1500M - Click the [Option] button on the [File option] tab. - 1](/content/2026/06/1236416/images/69f067511b735a62fdd2ebb471d47043d3ad5f0ccbfc4b19e933fe2662f57189.jpg)
text_image
Application Save Scanning File option Paper Compression Specify the file options you would like to use. File format: PDF PDF (*.pdf) JPEG is available only when "Color" or "Gray" is selected at [Color mode]. Select OCR Set the marked text as a keyword for the PDF file Target marked sections: First marked section All marked sections Convert to Searchable PDF OCR options Language: English Target pages: First page All pages Option... Hide Apply⇒ The [PDF file format option] window appears.
![FUJITSU ScanSnap S1500M - Click the [Option] button on the [File option] tab. - 2](/content/2026/06/1236416/images/3fe5a003bfb013febe6e77850d72962fc445b8b5c5ce3bd649729978dbe4a34f.jpg)
Check that [PDF(*.pdf)] is selected in the [File format] pop-up menu.
3. Select [Generate one PDF file per (n) page(s)] and enter a number.
One PDF file is created every time the number of pages specified here have been scanned.
![FUJITSU ScanSnap S1500M - Select [Generate one PDF file per (n) page(s)] and enter a number. - 1](/content/2026/06/1236416/images/634d1b66ae57fef014e3df225a07823bfe94ce3c41180e6b4ff0370821bae757.jpg)
text_image
PDF file format option PDF File Option Multipage PDF (whole batch in one PDF) Generate one PDF file per 1 page(s) Cancel OK![FUJITSU ScanSnap S1500M - Select [Generate one PDF file per (n) page(s)] and enter a number. - 2](/content/2026/06/1236416/images/0000cda574a11d9343ba38af7cd7dbe64c83aae625519fc007ea1187a18ce26c.jpg)
In Duplex mode, two pages (front/back) are created per document sheet. It is recommended that you clear [Allow automatic blank page removal] checkbox on the [Read mode option] window, which is displayed when you select the [Scanning] tab → [Option] button. If this checkbox is selected, there may be a discrepancy between the page numbers of the original document and the scanned document in which blank pages may be deleted.
- Click the [OK] button to close the [PDF file format option] window.
- Click the [Apply] button in the ScanSnap setup window.
- Click the [×] button in the upper left corner of the window or press the [esc] key to close the ScanSnap setup window.
- Load the document into the ScanSnap.
For details, refer to "Paper Sizes of Documents to Be Scanned" (page 27) and "Loading Documents" (page 29).
- Press the [Scan] button on the ScanSnap.
⇒ One PDF file is created every time the number of pages specified in Step 3. have been scanned.
■ Creating Searchable PDF Files
The ScanSnap is able to text-recognize the scanned image data automatically and create a searchable PDF file.
To create searchable PDF files, change the settings by following the procedure below.
1. From the ScanSnap Manager menu, select [Settings].
![FUJITSU ScanSnap S1500M - From the ScanSnap Manager menu, select [Settings]. - 1](/content/2026/06/1236416/images/312428fe9261a4799a7a8c56a7661d5d4ad00ae8de86f6605f7f0241d674318a.jpg)
text_image
Duplex scan Simplex scan Settings... Profile... Profile Management... Check consumable supplies... Help Keep in Dock ✓ Open at Login Show in Finder Hide Quit⇒ The ScanSnap setup window appears.
2. In the [File format] pop-up menu on the [File option] tab, select [PDF(\*.pdf)].
![FUJITSU ScanSnap S1500M - In the [File format] pop-up menu on the [File option] tab, select [PDF(\*.pdf)]. - 1](/content/2026/06/1236416/images/b16854bc8736552d7515b2eaf22a7ab11c51f76511438066075c4287d4d9a73c.jpg)
text_image
ScanSnap Color Image Scanner Use Quick Menu Recommended Small File High Quality Profile Standard Application Save Scanning File option Paper Compression Specify the file options you would like to use. File format: PDF (*.pdf) JPEG is available only when Color or Gray is selected at [Color mode]. Select OCR Set the marked text as a keyword for the PDF file Target marked sections: First marked section All marked sections Convert to Searchable PDF OCR options Language: English Target pages: First page All pages Option... Hide Apply3. Select the [Convert to Searchable PDF] checkbox.
⇒ The following message appears:
![FUJITSU ScanSnap S1500M - Select the [Convert to Searchable PDF] checkbox. - 1](/content/2026/06/1236416/images/6cb3fa0eedb87c4bc662e5577ce9de7c9f9ece49a190ef369d4a5eb00fc3a772.jpg)
text_image
It may take extra time to process text recognition. OK⇒ Click the [OK] button to close the window.
- Language
Select the language. English, French, German, Italian, Spanish, Russian, and Portuguese can be selected.
- Target pages
To perform text recognition for the first page, select [First page]; for all pages, select [All pages].
![FUJITSU ScanSnap S1500M - Select the [Convert to Searchable PDF] checkbox. - 2](/content/2026/06/1236416/images/8584a9ea6d1e0d1006abdab09de0afa27ac3ab42797bd907a5e7968321fb055c.jpg)
text_image
ScanSnap Color Image Scanner Use Quick Menu Recommended Small File High Quality Profile Standard Application Save Scanning File option Paper Compression Specify the file options you would like to use. File format: PDF (*.pdf) JPEG is available only when "Color" or "Gray" is selected at [Color mode]. Select OCR Set the marked text as a keyword for the PDF file Target marked sections: First marked section All marked sections Convert to Searchable PDF OCR options Language: English Target pages: First page All pages Option... Hide Apply-
Click the [Apply] button in the ScanSnap setup window.
-
Click the [×] button in the upper left corner of the window or press the [esc] key to close the ScanSnap setup window.
6. Load the document into the ScanSnap.
For details, refer to "Paper Sizes of Documents to Be Scanned" (page 27) and "Loading Documents" (page 29).
7. Press the [Scan] button on the ScanSnap.
Scanning is started.
The image data is text-recognized, and a searchable PDF file is created and saved in a folder.
![FUJITSU ScanSnap S1500M - Press the [Scan] button on the ScanSnap. - 1](/content/2026/06/1236416/images/5835c9a6d49d46cb3689af5aa14a19318b490e1e1a64cdea574b82f3d30dff2f.jpg)
- Enabling this setting may require an extended period of processing depending on your computer operating environment.
- The ScanSnap may fail to correctly text recognize the following types of documents (characters) as text. However, by changing [Color mode] and/or increasing [Image quality] for scanning, such documents may be successfully text-recognized.
- Documents with handwritten characters
- Documents scanned in low quality, including smaller characters
- Skewed documents
- Documents written in languages other than the specified language for text recognition
- Documents including texts written in Italic characters
- Superscript/subscript letters and complex mathematical formulas
- Documents with characters on an unevenly colored background e.g. Shaded characters
- Documents with many decorated characters e.g. Decorated characters (embossed/outlined)
- Documents with characters on a patterned background e.g. Characters overlapping illustrations and diagrams
- Documents with many characters contacting underlines or borders
- It may take an extended period of time to scan documents with complex layouts, or smudged documents where characters are unreadable.
■ Automatically Setting Keywords to PDF Files
Character strings such as those in titles in black-and-white documents can be set as keywords and used for a PDF file search.
Mark a character string to be set as a keyword with a water-based highlight pen so that the character string is completely covered. When you perform a scan, the marked character strings are recognized and set as keywords for the PDF file.
Hereinafter, a line drawn with a water-based highlight pen is referred to as a "marked section", and a water-based highlight pen as a "highlight pen".

flowchart
graph TD
    A["ScanSnap"] -->|Convert a character string in a marked section into text| B["Scan"]
    C["Image"] -->|Set text as a keyword for the PDF file| D["ScanSnap"]
    D --> E["Scan Keyword"]
    style A fill:#f9f,stroke:#333
    style B fill:#bbf,stroke:#333
    style C fill:#f9f,stroke:#333
    style D fill:#bbf,stroke:#333
    style E fill:#f9f,stroke:#333
Mark black-and-white documents in the following way.
- Any regular highlight pen can be used.
The recommended highlight pen colors are shown below.
| Pink Yellow Blue Green | |||
| ScanSnap | ScanSnap | ScanSnap | ScanSnap |
- Mark a line straightly.
- The supported range of marked sections is as follows.
Minimum: 10 mm (width) × 3 mm (length)
Maximum: 150 mm (width) × 20 mm (length) - Use only one color for marking a page.
- Mark a character string to be set as a keyword so that the entire string is covered. Mark sections so that the entire section is the same color.
| Good example | Bad example 1 (entire section is not covered) | Bad example 2 (color is uneven) |
| ScanSnap | ScanSnap | ScanSnap |
- Mark up to ten sections on a page.

- For the following types of documents, marked sections cannot be recognized and set as keywords.
- Color documents such as catalogues or pamphlets
- Documents in which two or more colors are used for marking
- Documents containing colors other than for marking (pens other than highlight pens are used, or the document is stained)
- Documents containing too many marked sections
- The following types of marked character strings cannot be set as keywords.
- The size of marked sections is outside the supported range
- Character strings framed by highlight pen

- The marking is irregular (for example, skewed)
- Multiple marked sections are too close to each other
- The color of the highlight pen is too pale or the color has faded
ScanSnap
- When you mark more than one character string, make sure to leave a gap of at least 5 mm between the marked sections. Marked sections that are too close to each other may be detected as one marked section.
- In the following cases, character strings surrounding marked sections may be set as keywords.
- Lines of marked sections cross
- In the following cases, unmarked character strings may be set as keywords.
- Color documents such as catalogues or pamphlets
- Documents with color text, diagrams, pictures, tables and lines
- Documents containing sections framed by highlight pen
- Stained documents

- Increase the resolution when you have trouble setting the keywords correctly.
- Keywords set for a PDF file can be checked in [Document Properties] of Adobe Acrobat / Adobe Reader or Preview [Inspector].
To automatically set keywords to PDF files, change the settings by following the procedure below.
1. From the ScanSnap Manager menu, select [Settings].
![FUJITSU ScanSnap S1500M - From the ScanSnap Manager menu, select [Settings]. - 1](/content/2026/06/1236416/images/6d52ad0229274e3a19b0cafed807316a0385017b50448f348ae50eb8e3721759.jpg)
text_image
Duplex scan Simplex scan Settings... Profile... Profile Management... Check consumable supplies... Help Keep in Dock ✓ Open at Login Show in Finder Hide Quit⇒ The ScanSnap setup window appears.
2. In the [File format] pop-up menu on the [File option] tab, select [PDF(\*.pdf)].
![FUJITSU ScanSnap S1500M - In the [File format] pop-up menu on the [File option] tab, select [PDF(\*.pdf)]. - 1](/content/2026/06/1236416/images/627886963bfff8b4fa8cd31f6bfa35974c3f902d8b59c223acff409830cddc76.jpg)
text_image
ScanSnap Color Image Scanner Use Quick Menu Recommended Small File High Quality Profile Standard Application Save Scanning File option Paper Compression Specify the file options you would like to use. File format: PDF (*.pdf) JPEG is available only when 'Color' or 'Gray' is selected at [Color mode]. Select OCR Set the marked text as a keyword for the PDF file Target marked sections: First marked section All marked sections Convert to Searchable PDF OCR options Language: English Target pages: First page All pages Option... Hide Apply3. Select the [Set the marked text as a keyword for the PDF file] checkbox.
• Target marked sections
Select [First marked section] to recognize only the first marked section, and select [All marked sections] for text-recognize all marked sections.
![FUJITSU ScanSnap S1500M - Select the [Set the marked text as a keyword for the PDF file] checkbox. - 1](/content/2026/06/1236416/images/dc8f40f026d692e6dbceaee4ee654f916645f4f5558d2c33052c9ac747fda4e6.jpg)
The following description is for [First marked section].
- Select this button to set a character string such as a title of a document as a keyword for the PDF file.
Example: When only a title of a document is marked, the marked character string is set as a keyword for the PDF file, and the PDF file becomes searchable by the title character string.
![FUJITSU ScanSnap S1500M - Select the [Set the marked text as a keyword for the PDF file] checkbox. - 2](/content/2026/06/1236416/images/869c8384c750e9ce087af817d95f15a189ee87ef9069511ffefd6d00444ec586.jpg)
text_image
3. How to Use ScanSnap This chapter describes basic operations of ScanSnap. 3.1. Scanning Documents With "ScanSnap", you can turn paper office documents on your desk into digital files, next them, attach them to e-mail, print them, and convert them into Word/Excel/PowerPoint data just by printing a single bottom. The scanned image can be viewed on the screen using the supplied applications (Adobe Acrobat)- When multiple marked sections exist in line, the marked character string closest to the top of the document is set as a keyword.
Example: In the following case, the character string in marked section B, which is higher than marked section A, is set as a keyword.
![FUJITSU ScanSnap S1500M - Select the [Set the marked text as a keyword for the PDF file] checkbox. - 3](/content/2026/06/1236416/images/9acb752fbe40f415d0f964a58e89095ea276310ceccf0a21e6a430dd5c565d98.jpg)
text_image
Marked Section A 1. ScanSnap 2. Image Scanner Marked Section B- Language
Select the language. English, French, German, Italian, Spanish, Russian, and Portuguese can be selected.
- Target pages
To perform text recognition for all pages, select [All pages]; for the first page, select [First page].
![FUJITSU ScanSnap S1500M - Select the [Set the marked text as a keyword for the PDF file] checkbox. - 4](/content/2026/06/1236416/images/412bf87821302fbf1b7f8aef4801a42462af82ceba5a89cdef7143daab33eafc.jpg)
text_image
Application Save Scanning File option Paper Compression Specify the file options you would like to use. File format: PDF (*.pdf) JPEG is available only when "Color" or "Gray" is selected at [Color mode]. Select OCR ✓ Set the marked text as a keyword for the PDF file Target marked sections: First marked section All marked sections □ Convert to Searchable PDF OCR options: Language: English Target pages: First page All pages Option...- Click the [Apply] button in the ScanSnap setup window.
- Click the [×] button in the upper left corner of the window or press the [esc] key to close the ScanSnap setup window.
- Load the document into the ScanSnap.
For details, refer to "Paper Sizes of Documents to Be Scanned" (page 27) and "Loading Documents" (page 29).
- Press the [Scan] button on the ScanSnap.
⇒ Scanning is started.
Marked character strings are text-recognized and the PDF file with keywords is saved.
![FUJITSU ScanSnap S1500M - Select the [Set the marked text as a keyword for the PDF file] checkbox. - 5](/content/2026/06/1236416/images/0bd2179c2a9d62b411bbef3ef46b10bcd9490fae874faf8bebf86e31b22f8a5e.jpg)
- Enabling this setting may require an extended period of processing depending on your computer environment.
-
The ScanSnap may fail to correctly text recognize the following types of documents (characters) as text. However, by increasing [Image quality] for scanning, such documents may be successfully text-recognized.
-
Documents with handwritten characters
- Documents scanned in low quality, including smaller characters
- Skewed documents
- Documents written in languages other than the specified language for text recognition
- Documents including texts written in Italic characters
- Superscript/subscript letters and complex mathematical formulas
- Documents with characters on an unevenly colored background e.g. Shaded characters
- Documents with many decorated characters e.g. Decorated characters (embossed/outlined)
- Documents with characters on a patterned background e.g. Characters overlapping illustrations and diagrams
-
Documents with many characters contacting underlines or borders
-
It may take an extended period of time to scan documents with complex layouts, or smudged documents where characters are unreadable.
- If the same character string is marked several times in a document, it will be set as the same keyword several times for the PDF file.
- Keywords to be added may be up to 255 characters long.
- Quotation marks (") may sometimes be shown before and after the added keywords when you check keywords using Adobe Acrobat or Adobe Reader.
- For Mac OS X v10.4, keywords cannot be set for PDF files that are 512 MB or larger.
Troubleshooting
This chapter describes how to remove jammed documents and resolve other problems.
Clearing Document Jams 307
Troubleshooting for Multifeed 309
Troubleshooting Checklist....317
Clearing Document Jams
If a paper jam occurs during scanning, follow the procedure below to remove the jammed document.
CAUTION
- Open the ADF top section and remove the jammed document smoothly.
- Be careful not to touch any sharp edges when removing the jammed document.
- When removing the jammed document, be careful not to get neckties, necklaces or hair entangled in the ScanSnap.
- The surface of the scan glass becomes hot during operation. Take care not to get burned.

Clean the inside of the ScanSnap by following the guidelines in "Cleaning the Inside of the ScanSnap" (page 333).
- Remove the document on the ADF paper chute (cover).
- Pull the ADF release catch to open the ADF top section.

text_image
ADF paper chute (cover) ADF top section ADF release catch3. Remove the jammed document.
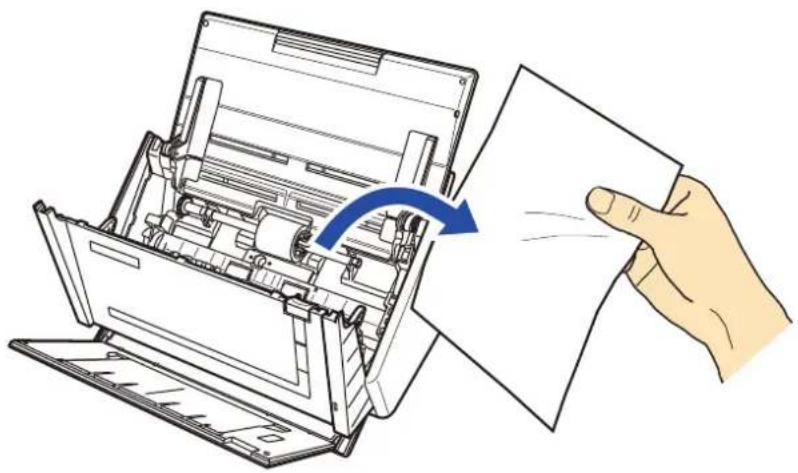
natural_image
Illustration of a hand holding a paper with a blue arrow indicating the process (no text or symbols present)4. Close the ADF top section.

text_image
ADF top section ADF paper chute (cover)⇒ You should hear the ADF top section click when it returns to its original position.

Make sure that the ADF top section is completely closed. Otherwise, paper jams or other feeding errors may occur.
Troubleshooting for Multifeed
The ScanSnap can detect multifeed with an ultrasonic sensor. Multifeed is an error that occurs when two or more sheets are fed into the ScanSnap simultaneously.
When a multifeed error occurs while sheets are scanned, part of the scanned image data may be lost when saved. In such a case, the ScanSnap checks the scanned image data and restores missing pages with its recovery function.
To enable multifeed detection by ultrasonic sensor and the recovery function, select the [Paper] tab → [Multifeed Detection] → [Check Overlapping [Ultrasonic]] on the ScanSnap setup dialog box/window.
Windows
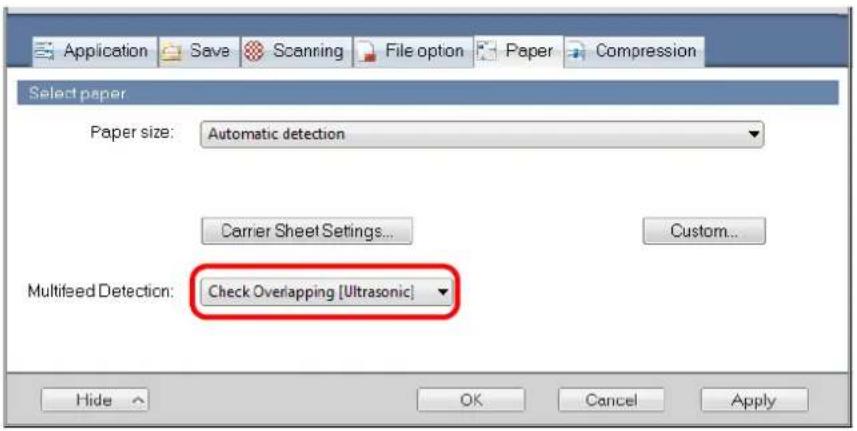
text_image
Application Save Scanning File option Paper Compression Select paper Paper size: Automatic detection Carrier Sheet Settings... Custom... Multifeed Detection: Check Overlapping [Ultrasonic] Hide OK Cancel ApplyMac OS
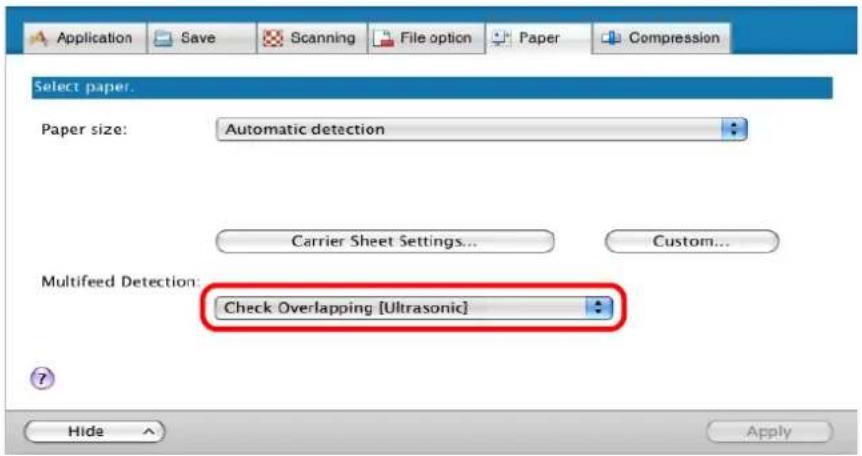
text_image
Application Save Scanning File option Paper Compression Select paper. Paper size: Automatic detection Carrier Sheet Settings... Custom... Multifeed Detection: Check Overlapping [Ultrasonic] Hide Apply
- A multifeed cannot be detected during scanning with the Carrier Sheet or long page scanning.
- Multifeed may be detected for envelopes or documents attached with stamps, sticky notes or photographs, or already folded/doubled documents. When scanning such documents, it is recommended to set [Multifeed Detection] to [None] on the [Paper] tab of the ScanSnap setup dialog box/window.
- If multifeed is to be detected, the following conditions are required.
- Documents set in the ScanSnap to be scanned at once must be of the same thickness.
- Document thickness: 52 to 127 g/m² (0.065 to 0.15 mm)
- Do not punch a hole within 50 mm either side of the center line of the sheet.
- Do stick another document, for example with glue, within either side of the center line of the sheet.
- Multifeed cannot be detected within 30 mm of the top edge of the sheet.
Basic scanning point
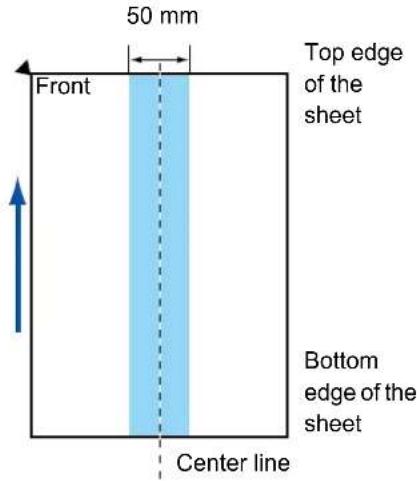
text_image
50 mm Front Top edge of the sheet Bottom edge of the sheet Center line■ When a Multifeed Is Detected
When a multifeed is detected during scanning, scanning operation is paused and the multi-feed detection window appears.
The following describes the multifeed detection window operation procedure.
1. Check that the front and back images are scanned in the same way as the original document.
Check the front and back of a thumbnail by pressing the [Front side] and [Back side] buttons to switch between sides.
Windows

text_image
ScanSnap Manager - Message An overlapped document has been detected. Please make a selection to either keep or discard the last document scanned and then proceed by clicking the [Continue Scanning] or [Quit] button. Front side Back side Tips on how to continue scanning Last-scanned document image Keep Keeps the document as scanned. Discard Roscan this document. Return the document to the ADF paper chute. 1/2 2/2 Continue Scanning QuitMac OS

text_image
ScanSnap Manager - Message An overlapped document has been detected. Please make a selection to either keep or discard the last document scanned and then proceed by clicking the [Continue Scanning] or [Quit] button. Front side Back side Tips on how to continue scanning Last-scanned document image 1/2 2/2 Keep Keeps the document as scanned. Discard Rescan this document. Return the document to the ADF paper chute. ? Continue Scanning Quit
- Thumbnails displayed on the multifeed detection window appear without applying the specified scanning settings, such as color mode or blank page removal. Scanning settings are applied when the image data is saved.
For example, even if the black-and-white scanning setting is set for a color document, the thumbnail will be displayed in color.
Corresponding scanning settings are as follows:
- [Auto Color Detection], [Gray], [B&W], [Color high compression] (Windows only), for [Color mode]
- [Allow automatic blank page removal]
- [Correct skewed character strings automatically]
- [Allow automatic image rotation]
- Carrier Sheet (the image of the document inserted in the Carrier Sheet is shown as a thumbnail)

- If the [Set the document with its face up] check box is selected in [Option] on the [Scanning] tab of the ScanSnap setup dialog box, thumbnails are displayed in the order of the original document.
2. Select what to do with the thumbnails.
- If documents are scanned in the order of the original document
Select [Keep], and then click the [Continue Scanning] button or press the [Scan] button on the ScanSnap.

For envelopes or documents attached with stamps, sticky notes or photographs, or already folded/doubled documents, select [Keep] and the click the [Continue Scanning] button.
Windows
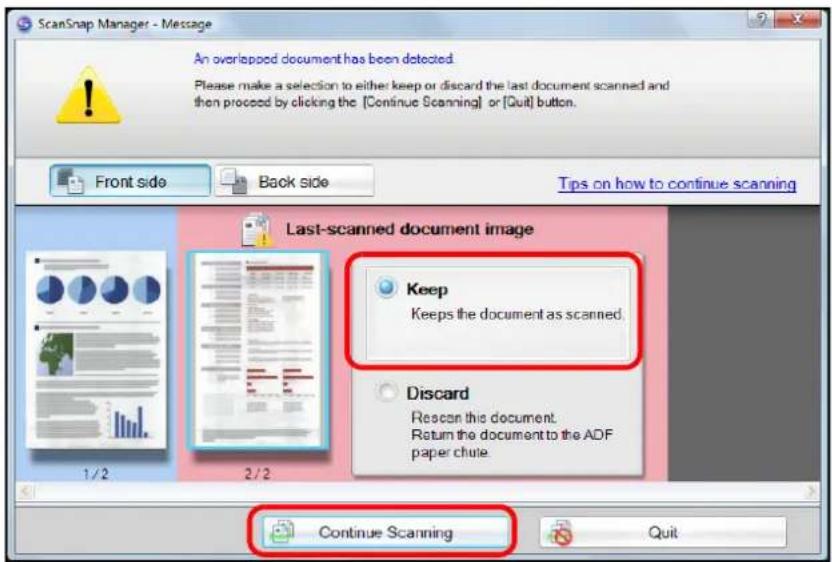
text_image
ScanSnap Manager - Message An overlapped document has been detected. Please make a selection to either keep or discard the last document scanned and then proceed by clicking the [Continue Scanning] or [Quit] button. Front side Back side Tips on how to continue scanning Last-scanned document image Keep Keeps the document as scanned. Discard Reason this document. Return the document to the ADF paper chute. 1/2 2/2 Continue Scanning QuitMac OS

text_image
ScanSnap Manager - Message An overlapped document has been detected. Please make a selection to either keep or discard the last document scanned and then proceed by clicking the [Continue Scanning] or [Quit] button. Front side Back side Tips on how to continue scanning Last-scanned document image Keep Keeps the document as scanned. Discard Rescan this document. Return the document to the ADF paper chute. 1/2 2/2 Continue Scanning Quit⇒Scanning is started.
⇒When scanning is complete, the image data is saved.
- If documents are not scanned in the order of the original document
- Open the ADF top section, remove the documents (1) and realign the edges of the sheets.

natural_image
Illustration of a printer being inserted into a paper, showing paper movement with a hand holding the paper (no text or symbols present)- Remove documents to be re-scanned (2) (normally two sheets or more) from the stacker, and reload in the ADF paper chute (cover) without changing the direction in which the documents are facing.

text_image
Diagram illustrating a printer's paper folding process with labeled parts and directional arrows indicating folding steps.- Load the documents (1) removed in Step 1. on top of the documents (2) in Step 2.
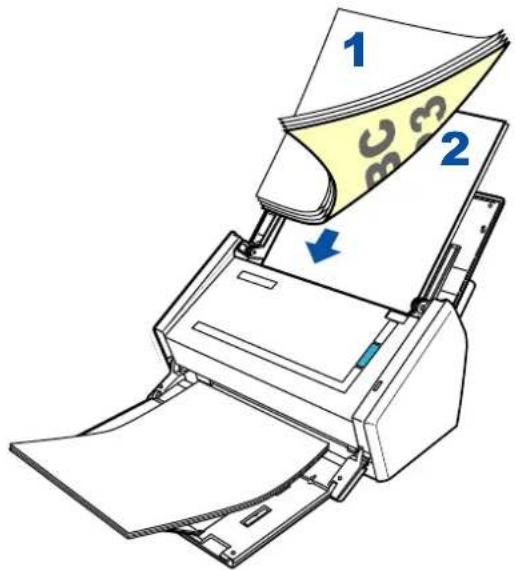
text_image
Diagram of a printer with labeled parts, showing paper feeding into a stack of sheets and a printer's paper being inserted.- Select [Discard], and click the [Continue Scanning] button, or the [Scan] button on the ScanSnap.
Windows
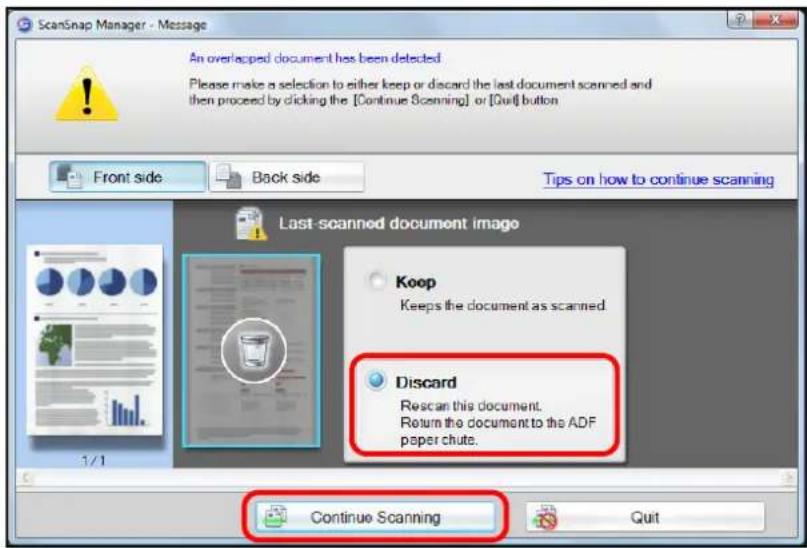
text_image
ScanSnap Manager - Message An overlapped document has been detected Please make a selection to either keep or discard the last document scanned and then proceed by clicking the [Continue Scanning] or [Quit] button Front side Back side Tips on how to continue scanning Last-scanned document image Koop Keeps the document as scanned. Discard Rescan this document. Return the document to the ADF paper chute. Continue Scanning QuitMac OS

text_image
ScanSnap Manager - Message An overlapped document has been detected. Please make a selection to either keep or discard the last document scanned and then proceed by clicking the [Continue Scanning] or [Quit] button. Front side Back side Tips on how to continue scanning Last-scanned document image Keep Keeps the document as scanned. Discard Rescan this document. Return the document to the ADF paper chute. Continue Scanning Quit⇒Scanning is started.
When scanning is complete, the image data is saved.

- If it is not necessary to continue scanning, press the [Quit] button, and select [No] on the message dialog box/window that appears.
- To quit scanning and delete the image data, press the [Quit] button, and select [Yes] on the following dialog box/window that appears.

text_image
ScanSnap Manager - Message Do you want to delete the scanned file(s)? Yes No Cancel
text_image
Do you want to delete the files? No Cancel YesTroubleshooting Checklist
This section describes common problems that may occur during usage of the ScanSnap and how to solve the problems.
Before you call a repair service, perform simple troubleshooting steps in the table below.
If performing these troubleshooting steps does not resolve your problem, contact your
FUJITSU scanner dealer or an authorized FUJITSU scanner service provider.
| Symptom Check | This Item Resolution | |
| The ScanSnap cannot be turned on. | Are the power and the USB cables connected correctly? | Check the power and USB cables are connected correctly.When using a USB hub, check the hub's power supply.If a USB hub is used, it should be a powered hub equipped with an AC adapter. If you connect to a non-powered hub, the ScanSnap may not work properly. |
| Disconnect and then re-connect the power cable.Wait at least 5 seconds before reconnecting the power cable. | ||
| Is the ADF paper chute (cover) closed?The power of the ScanSnap is controlled by closing/opening the ADF paper chute (cover). | Open the ADF paper chute (cover). | |
| Is the computer normally started up?The power of the ScanSnap is controlled by turning the computer on/off. | Wait until the computer has started up completely.The [Scan] button may turn off while the computer is starting up or it is in hibernation state. | |
| Scanning does not start. | Is ScanSnap Manager supplied with your ScanSnap installed in your computer? | Install ScanSnap Manager.For details about how to install the software, refer to "Getting Started". |
| Does the [Scan] button blink continuously? | Disconnect and then re-connect the power cable.Wait at least 5 seconds before reconnecting the power cable. | |
| Is the USB cable connected correctly? | Check the USB cables are connected correctly.When using a USB hub, check the hub's power supply.If a USB hub is used, it should be a powered hub equipped with an AC adapter. If you connect to a non-powered hub, the ScanSnap may not work properly. | |
| Is ScanSnap Manager started?WindowsIf ScanSnap Manager is started up successfully, the [ScanSnap Manager] iconappears on the taskbar.MacosIf ScanSnap Manager is started up successfully, the [ScanSnap Manager] iconappears in the Dock. | If ScanSnap Manager is not started, do the following:WindowsFrom the [Start] menu, select [All Programs] → [ScanSnap Manager] → [ScanSnap Manager] to start up ScanSnap Manager.MacosFrom Finder, select [Applications] → [ScanSnap] → [ScanSnap Manager] to start up ScanSnap Manager. | |
| Scanning does not start. | Is ScanSnap Manager running properly?If ScanSnap Manager is not running properly, the [ScanSnap Manager] icon in the taskbar is displayed as | Do the following:Windows1. Update the ScanSnap Manager driver.Select the [Start] menu → [Control Panel] → [System and Maintenance] → [Device Manager].In the [Device Manager], select [Imaging devices], right-click [ScanSnap S1500] and select [Update Driver Software] from the menu displayed. If this does not improve the situation, perform Step 2.Turn the ScanSnap off and on again. Wait at least 5 seconds before turning the scanner on.If this does not improve the situation, perform Step 3.When using a USB hub, directly connect the ScanSnap to your computer. If this does not improve the situation, perform Step 4.Restart your computer.If none of the above operations resolve the problem, uninstall and re-install ScanSnap Manager.For details about how to uninstall ScanSnap Manager, refer to "Uninstalling on a Windows OS" (page 359).MacOS1. Turn the ScanSnap off and on again. Wait at least 5 seconds before turning the scanner on.If this does not improve the situation, perform Step 2.If an USB hub is used, directly connect the ScanSnap to your computer. If this does not improve the situation, perform Step 3.Restart your computer.If none of the above operations resolve the problem, uninstall and re-install ScanSnap Manager.For details about how to uninstall ScanSnap Manager, refer to "Uninstalling on a Mac OS" (page 361). |
| MacOSIf ScanSnap Manager is not running properly, the [ScanSnap Manager] icon in the Dock is displayed asIf the ScanSnap is in sleep mode before turning the power off, the ScanSnap may not be recognized when the power is turned on again. | ||
| WindowsDid you resume the computer from hibernation mode? | When you want to perform a scan after resuming the computer from hibernation mode, move the mouse or press any key before performing a scan. | |
| MacOSDid you resume the computer from sleep mode? | When you want to perform a scan after resuming the computer from sleep mode, move the mouse or press any key before performing a scan. | |
| The following message appears. Windows ScanSnap is being used by another user or program.MacOS Could not use ScanSnap. Make sure that ScanSnap is NOT being used by any other user or program. | Is the ScanSnap being used by another user? | After the other user has finished scanning, restart ScanSnap Manager. |
| Has the ScanSnap been turned on/off or the cables been connected/disconnected repeatedly? | Wait at least 5 seconds, and turn the ScanSnap on/off or connect/disconnect the cables. | |
| Vertical lines appear in the scanned image data. | Is the inside of the ScanSnap dirty? | Clean the inside of the ScanSnap if dirty. For details about how to clean the inside of the ScanSnap, refer to "Cleaning the Inside of the ScanSnap" (page 333). |
| Moire (striped pattern) stands out in the scanned image data. | Did you try scanning after changing the setting for [Image quality] in the [Scanning] tab in the ScanSnap setup dialog box/ window? | If moire (striped pattern) stands out, select the [Scanning] tab from the ScanSnap setup dialog box/window and change the setting for [Image quality], then retry scanning.Example: Change from [Normal] to [Best]. |
| The scanned image data shifts or is distorted. | Is the document loaded correctly? | Load the document correctly.For details about how to load the document into the ScanSnap, refer to "Loading Documents" (page 29). |
| The scanned image data is too light or too dark. | In black-and-white mode,is the [Brightness (Black and White scanning only)] setting on [Option] of the [Scanning] tab set to extremely Light or Dark? | Select the [Scanning] tab → [Option] from the ScanSnap setup dialog box/window and adjust [Brightness (Black and White scanning only)]. |
| Lines on the document are blurred.Example: Ruled lines on a table cannot be seen. | Are you scanning in color mode, documents including handwritten or typed text, tables or frames with ruled lines? | From the ScanSnap setup dialog box/ window, select the [Scanning] tab → [Option] and select the [Setting for text only document] check box.If the image quality does not improve even after you have tried this method, change [Image quality] setting. |
| The scanning speed is very slow. | Does your computer meet the recommended system requirements? | Confirm the system requirements.For details about the system requirements, refer to "System Requirements" (page 21).Scanning speed will be slower whenever the recommended CPU and memory requirements are not met. If this is the case, disable the settings (clear the check boxes) of the following in the ScanSnap setup dialog box/window to increase the scanning speed.[Scanning] tab → [Option] button- [Correct skewed character strings automatically] check box- [Allow automatic image rotation][File option] tab- [Set the marked text as a keyword for the PDF file] check box- [Convert to Searchable PDF] check box |
| Is the scanners connection a USB 1.1 connection?Note: When using an USB1.1 interface, the data transfer rate become slower due to large data sizes. | If your computer has an USB 2.0 port, connect the ScanSnap to this port.If using a USB hub, it must also support USB 2.0 interfaces. (*1) | |
| Are you scanning while operation of your computer is in unstable, right after computer startup or logon? | Wait for your computer to finish startup and become stable, and start scanning. | |
| Multifeed errors occur frequently.Note:"Multifeed" error is an error that occurs when two or more sheets are fed into the scanner simultaneously.The following types of documents are detected as a multifeed.• Documents with a photograph attached (such as application forms and personal resumes)• Documents with a receipt, slip or large stamp attached• Envelopes• 2 ply paper and carbon paper | Is the pad assy dirty? Clean the pad assy.For details about how to clean the pad assy, refer to "Cleaning the Inside of the ScanSnap" (page 333). | |
| Is the pad assy worn out? Replace the pad assy.For details about how to replace the pad assy, refer to "Replacing the Pad Assy" (page 341). | ||
| Is the document stack thicker than 5 mm? | Keep the thickness of sheets you are loading under 5 mm. | |
| Paper is not fed. It stops midway. | Is the pick roller dirty? Clean the pick roller. For details about how to clean the pick roller, refer to "Cleaning the Inside of the ScanSnap" (page 333). | |
| Is the pick roller worn out? Replace the pick roller. For details about how to replace the pick roller, refer to "Replacing the Pick Roller" (page 345). | ||
| Are there any debris on the document feeding path? | Remove any debris from the document feeding path. For details about how to resolve such a problem, refer to "Clearing Document Jams" (page 307). | |
| Do the loaded documents (e.g. business cards or postcards) satisfy the required size conditions? If not, they might not pass smoothly through the ADF. | Try the following: • Slightly push through with your finger the first sheet of the documents at the start of scanning. • Change the insertion direction of the doc-ument. | |
| Are you scanning documents with a different [Paper size] setting? | Select the [Paper] tab → [Paper size] on the ScanSnap setup dialog box/window, and specify the correct paper size for scanning. | |
| Did you load any paper that is thin, torn, or bent? | When scanning a document that is hard to feed, load it sheet by sheet or use the Carrier Sheet. | |
| The ScanSnap is not recognized even if ScanSnap Manager is installed. | W_Windows Did you connect the ScanSnap to your computer before installing ScanSnap Manager? Is the ScanSnap registered as [Other Device] or [Unknown Device] in [Device Manager]? | Select the [Start] menu → [Control Panel] → [System and Maintenance] → [Device Manager]. Delete the device name such as USB device (which differs depending on the operating system) under [Other Device] selection in the [Device Manager], and restart your computer. |
| The file size of a scanned black & white image is the same as that of a scanned color document image. | Is the black & white document scanned in color or gray mode? | Select the [Scanning] tab from the ScanSnap setup dialog box/window and change the setting for [Color mode] to [B&W]. |
| Color documents are not scanned as color. | Documents in a dark color close to black, such as dark green, may be scanned as black and white or gray. | Select the [Scanning] tab from the ScanSnap setup dialog box/window and change the setting for [Color mode] to [Color]. |
| Images on the back of pages, which are printed-through, are overlaid on the scanned image when scanning a two-sided document (this is called "bleed through" of the back side image). | Is the [Setting for text only document] check box cleared in [Option] on the [Scanning] tab of the ScanSnap setup dialog box/window? | Select the [Setting for text only document] check box. |
| Image data that has been scanned is lost (when [Allow automatic blank page removal] is enabled). | When the [Allow automatic blank page removal] check box is selected, almost blank documents with only a few characters may be accidentally recognized as blank pages and removed from scanned image data. | From the ScanSnap setup dialog box/ window, select the [Scanning] tab → [Option] and clear the [Allow automatic blank page removal] check box. |
| Scanned image data is skewed. | Are the documents fed into the ADF with a skew of more than +/-5 degrees? | The [Correct skewed character strings automatically] function can correct skewed images up to +/-5 degrees.Neatly align the edges of paper sheets with the side guide so that the document skew does not exceed this limit.For details about how to load the document into the ScanSnap, refer to "Loading Documents" (page 29).For details about the [Correct skewed character strings automatically] check box, refer to the ScanSnap Manager Help. |
| Depending on the contents of document, the [correct skewed character strings automatically] function may not work properly. | For details about [Correct skewed character strings automatically], refer to the ScanSnap Manager Help. | |
| The orientation of scanned image data is not displayed correctly (when [Allow automatic image rotation] is enabled). | Depending on the contents of document, the automatic image rotation may not work properly. | For details about the [Allow automatic image rotation] check box, refer to the ScanSnap Manager Help. |
| The scanned image data cannot be read. | Have you scanned documents written in small letters? | When small letters are squashed, select [Best] or [Excellent] for [Image quality] in the [Scanning] tab, and scan them again.It takes longer to scan image data in [Excellent] mode as it enlarges the size of image data. |
| A profile cannot be created with currently configured settings. | Are you using Quick Menu for scanning?While the Quick Menu is used, the changed settings for [Profile] cannot be saved. | To create a profile with the settings you want to use, clear [Use Quick Menu] check box in the ScanSnap setup dialog box/window.For details about how to save the settings, refer to the following:"Saving Scanning Settings" (page 71)"Saving Scanning Settings" (page 211) |
| When the document is scanned with the Carrier Sheet, a message "Document size incorrect" appears or a part of the image data is lost. | Did you put multiple small-size materials (such as pictures and post cards) in the Carrier Sheet for scanning? | Put only one small-size document (such as a picture or a post card) into the Carrier Sheet per scan. |
| — | A detection error in the folded portion may cause a part of the image data to be lost. In this case, set the document so its edge will be about 1 mm inside of the Carrier Sheet frame. | |
| When the document is scanned with the Carrier Sheet, a paper jam occurs frequently. | — | Feed about 50 sheets of Plain Paper Copier (PPC) or recycled paper, and then scan the document by using the Carrier Sheet.You can use either unused or used PPC/ recycled paper. |
| The output image data is wider than the original document. | Are you scanning documents with [Paper size] set to [Automatic detection]?In this case, the image data is trimmed and output in the same size as the original document by detecting the edges of the document.Therefore, failure to detect the edges of the document may result in output of the image with the maximum width. | If you want to customize the size of the scanned image, use applications like ScanSnap Organizer Viewer (Windows only) and Adobe Acrobat to perform trimming and cut the scanned image data.If you wish to scan the document again, set the predefined or custom size before scanning again. |
| Is the inside of the ScanSnap dirty? | Clean the inside of the ScanSnap if dirty.For details about how to clean the inside of the ScanSnap, refer to "Cleaning the Inside of the ScanSnap" (page 333). | |
| Black lines are produced on the scanned document. | Is the scanned document written with a pencil? | It is recommended that you use the Carrier Sheet.If you scan such documents without using the Carrier Sheet, clean the rollers and scan glass as often as possible.For details about how to clean rollers, refer to "Cleaning the Inside of the ScanSnap" (page 333). |
| A part of the scanned image data is lost/Slant lines are produced on the scanned image data/The output image is wider than the original. | With [Automatic detection] being selected in the [Paper size] drop-down list, was the document skewed during a scan?Was the document scanned with the edges of paper sheets aligned with the side guide? | ● Neatly align the edges of paper sheets with the side guide.For details about how to load the document into the ScanSnap, refer to "Loading Documents" (page 29).● If you are scanning documents of mixed paper sizes, carefully load smaller documents so that they can be fed straight.If you have difficulties in feeding documents straight, it is recommended to scan documents in several batches and enable continuous scanning; scan documents of about the same width in one batch.For details about how to load the document into the ScanSnap, refer to the following.Windows"Scanning Documents of Differing Widths or Sizes at the Same Time" (page 166)Mac os"Scanning Documents of Differing Widths or Sizes at the Same Time" (page 280) |
| The Quick Menu is hidden. | Is the [Use Quick Menu] check box cleared? | In the ScanSnap setup dialog box/window, select the [Use Quick Menu] check box. |
| For S1500 onlyWindowsIs ScanSnap Organizer, CardMinder, or Rack2-Filer running?For S1500M onlyMac osIs Cardiris running? | If one of these applications is active, the application automatically interacts with the ScanSnap Manager and is used for scanning. Therefore, the Quick Menu is not displayed. To display the Quick Menu, exit these applications.For details about automatic linkage, refer to the following:Windows"Automatic Linkage with Applications" (page 85)Mac os"Automatic Linkage with Applications" (page 223) | |
| WindowsThe Left-Click Menu is hidden.Mac osThe [Profile] menu is hidden. | Are you using the Quick Menu? Is the Quick Menu displayed after scanning? | In the ScanSnap setup dialog box/window, clear the [Use Quick Menu] check box. |
| Is ScanSnap setup dialog box/ window open? | Close the ScanSnap setup dialog box/ window. | |
| Applications cannot be selected in the ScanSnap setup dialog box/window. | Are you using the Quick Menu? When using the Quick Menu, you can select an application in the Quick Menu after scanning. | If you want to select an application in advance, clear the [Use Quick Menu] check box in the ScanSnap setup dialog box/ window. |
| Saved files of scanned image data cannot be opened with a specified application.Example: An error occurs when you try to open a PDF file. | Is a folder specified as the image saving folder on another computer or a hard disk on the network? For those who answered [Yes] to the above question: did an error occur while scanned image data was being saved (because, for example, a LAN cable came off)?If such network-related errors occur, files may not be saved properly, and corrupted files may exist in the folder. | Check the location of the image saving folder, and then delete corrupted files, if any. After that, retry scanning. |
| For S1500 only Windows The text recognition accuracy decreases significantly when you execute "Scan to Word/Excel/PowerPoint(R)".For S1500M only MacOS The text recognition accuracy decreases significantly when you execute "Scan to Word/Excel". | Have you scanned documents written in small letters?Have you scanned low-quality documents having smeared or unclear characters?The optimum scanning settings depend on the document type.Find the most suitable settings in "Resolution" on the right. | From the ScanSnap setup dialog box/ window, select the [Scanning] tab and set [Image quality] to [Better], [Best] or [Excellent]. Then, scan the document again. It takes longer to recognize image data in [Excellent] mode as it enlarges the size of image data. |
| From the ScanSnap setup dialog box/ window, select the [Compression] tab and slide the [Compression rate] control toward [Compression (Low)]. Then, scan the document again. | ||
| Depending on the document type, the scanned results may not be as expected, or the characters may not be correctly recognized. Windows For more information, refer to the ABBYY FineReader for ScanSnap User's Guide. MacOS For more information, refer to the ABBYY FineReader for ScanSnap Help. | ||
| Is the document to scan skewed? | The more the document is skewed, the greater the possibility of character misrecognition is.Neatly align the edges of paper sheets with the side guide. | |
| For S1500 only W_in The text recognition accuracy decreases significantly when you execute "Scan to Word/Excel/PowerPoint(R)".For S1500M only M_ac osThe text recognition accuracy decreases significantly when you execute "Scan to Word/Excel". | Do the language of the scanned document and the recognition language set in ABBYY FineReader for ScanSnap match? | W_in From [Start] menu →[ABBYY FineReader for ScanSnap (TM) 4.1] → [ABBYY FineReader for ScanSnap (TM) 4.1], select [General Options] tab and set the same language as the scanned document in [Recognition languages]. M_ac osSelect [Applications] → [ABBYY FineReader for ScanSnap] → [FineReader for ScanSnap Preferences] from the Finder, select [General] tab in the window that appears and set the same language as the scanned document in [Recognition languages]. |
| Is the [Allow automatic image rotation] check box cleared in [Option] in the [Scanning] tab of the ScanSnap setup dialog box/ window? | Select the [Allow automatic image rotation] check box. W_in If text recognition is inaccurate even when the [Allow automatic image rotation] check box is selected, check the rotation of the scanned image data in ScanSnap Organizer. If there are still pages with the wrong page orientation, rotate pages with the wrong orientation to their correct orientation in ScanSnap Organizer Viewer, then convert the image data to a Word/Excel/PowerPoint file. For details, refer to ScanSnap Organizer User's Guide. M_ac osIf text recognition is inaccurate even when the [Allow automatic image rotation] checkbox is selected, check the rotation of the scanned image data in Preview. If there are still pages with the wrong page orientation, rotate pages with the wrong orientation to their correct orientation in Preview, then convert the image data to a Word or Excel file. | |
*1 : If you are not sure about the USB port to which the ScanSnap is connected (USB1.1 or USB2.0), check the information about the USB port following the procedure below.
Windows
On the Right-Click Menu, select [Help] → [About ScanSnap Manager]. Then, in the [ScanSnap Manager - Version Information] dialog box, click the [Detail] button to open the [ScanSnap Manager - Scanner and driver information] dialog box. Check [USB type] under [Scanner Information].
Mac OS
On the ScanSnap Manager Menu, select [Help] → [About ScanSnap Manager]. Then, in the [ScanSnap Manager - Version Information] window, click the [Detail] button to open the [ScanSnap Manager - Scanner and driver information] window. Check [USB type] under [Scanner Information].
Please visit our website for your reference.
Other useful information will be posted on the FAQ corner at the following website: http://scansnap.fujitsu.com/
Daily Care

natural_image
A zigzag black line pattern on white background (no text or symbols)This chapter describes how to clean the ScanSnap.

- Before you clean the ScanSnap, turn off the ScanSnap and disconnect the power cable from the AC outlet. Not doing so may cause a fire or electric shock.
- To avoid injuries, do not place internal parts such as pad assy and pick roller in an area where small children may be able to reach them.
- Do not use any aerosol sprays or alcohol based sprays to clean the ScanSnap. Dust blown up by strong air from the spray may enter inside of the ScanSnap. This may cause the ScanSnap to fail, malfunction or scanning errors. Sparks, caused by static electricity, generated when blowing off dust and dirt from the outside of the scanner may cause a fire.

Although the bottom of the ScanSnap may become hot when it is used, it does not affect ScanSnap operation, or cause any bodily harm. Be careful not to hit it to the ground when you move the ScanSnap.
Cleaning Materials....331
Cleaning the ScanSnap Exterior 332
Cleaning the Inside of the ScanSnap 333
Cleaning Carrier Sheet 336
Cleaning Materials
Cleaning materials and their part numbers are as below:
| Cleaning Materials | Parts No. | Unit | Remarks |
| Cleaner F1 (*1) PA03950-0352 1 bottle Size: 100 ml | |||
Cleaning Wipe (*2) PA03950-0419 1 pack Contains 24 sheets | |||
| Lint-free dry cloth (*3) Commercially available | — | — | |
*1 : It may take a long time before the cleaner vaporizes if a large quantity is used. When cleaning the ScanSnap parts, moisten a cloth with modest quantities of the cleaner. In addition, wipe off the cleaner completely with a soft lint-free cloth to leave no residue on the surface of the cleaned parts.
*2 : Pre-moistened with Cleaner F1, cleaning wipes are used instead of moistened cloths.
*3 : Any lint-free cloth can be used.
To obtain these materials, contact your FUJITSU dealer or an authorized FUJITSU scanner service provider.
Cleaning the ScanSnap Exterior
Clean the ScanSnap exterior and the stacker with a dry cloth or cloth moistened with a small amount of Cleaner F1 or any neutral detergent.

- Never use paint thinner or other organic solvents.
- During the cleaning, prevent water or moisture from getting inside the ScanSnap.
- It may take a long time before the cleaner vaporizes if a large quantity is used. When cleaning the ScanSnap parts, moisten a cloth with modest quantities of the cleaner. In addition, wipe off the cleaner completely with a soft lint-free cloth to leave no residue on the surface of the cleaned parts.

text_image
Cloth Neutral detergent or Cleaner F1 ThinnerCleaning the Inside of the ScanSnap
Clean inside of the ScanSnap with a cloth moistened with Cleaner F1.
In an alternating succession of scanning documents, the accumulated paper-powder and dust inside the ScanSnap causes a scanner error.
As a guideline, clean the inside of the ScanSnap every 1,000 scans. Note that this guideline varies according to the type of the documents you are scanning. For example, the inside of the ScanSnap must be cleaned more frequently when scanning documents with loose toner. Clean the inside of the ScanSnap according to the following procedure.

The scan glass surface inside the ADF becomes hot during ScanSnap operation.
Before you start to clean the inside of the ScanSnap, disconnect the AC adapter and power cable from the AC outlet and wait at least 15 minutes to let the ScanSnap cool down.

When you perform cleaning, make sure that the inside of the ScanSnap is free of any foreign object, and be careful not to get your hand or the cloth caught on the pick spring (metal part) as a deformed pick spring (metal part) may cause injury.

- Do not use water or neutral detergent to clean the inside of the ScanSnap.
- It may take a long time before the cleaner vaporizes if a large quantity is used. When cleaning the ScanSnap parts, dampen a cloth with modest quantities of the cleaner. In addition, wipe off the cleaner completely with a soft lint-free cloth to leave no residue on the surface of the cleaned parts.
1. Pull the ADF release catch to open the ADF top section.

text_image
ADF paper chute (cover) ADF top section ADF release catch2. Clean the following locations with a cloth moistened with Cleaner F1.
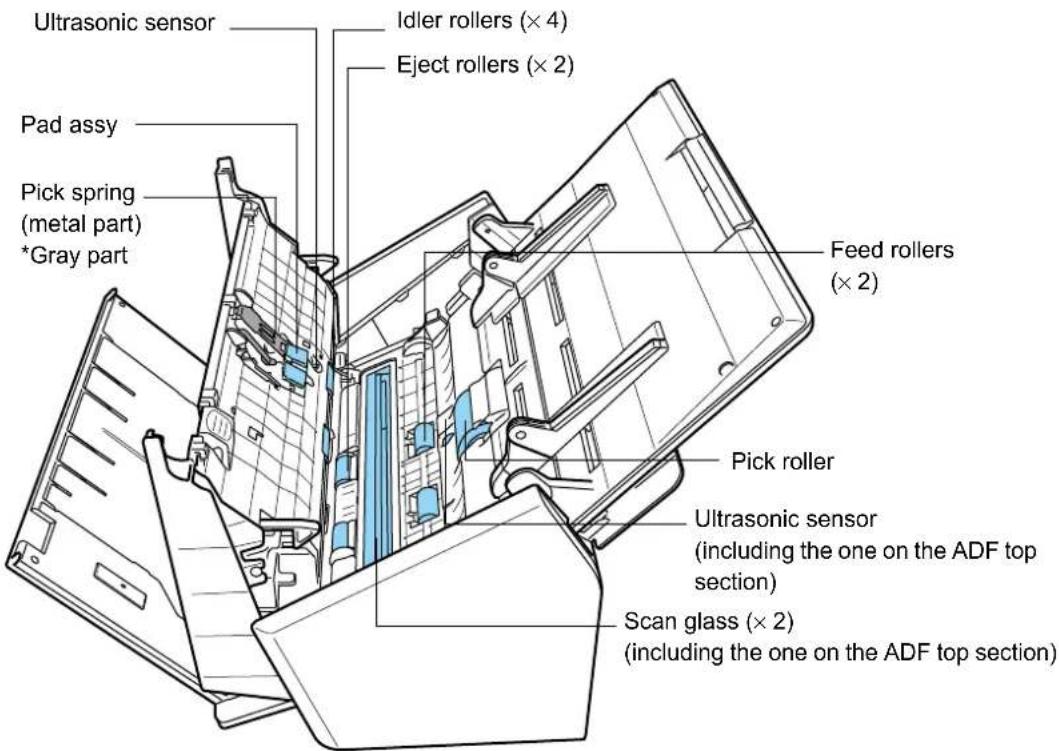
text_image
Ultrasonic sensor Idler rollers (× 4) Eject rollers (× 2) Pad assy Pick spring (metal part) *Gray part Feed rollers (× 2) Pick roller Ultrasonic sensor (including the one on the ADF top section) Scan glass (× 2) (including the one on the ADF top section)
It may take a long time before the cleaner vaporizes if a large quantity is used. When cleaning the ScanSnap parts, dampen a cloth with modest quantities of the cleaner. In addition, wipe off the cleaner completely with a soft lint-free cloth to leave no residue on the surface of the cleaned parts.
Turn off the ScanSnap before cleaning the following locations.
- Pad assy (× 1)
Wipe the pad assy downwards. When cleaning the pad assy, be careful not to get your hand or the cloth caught on the pick spring (metal part).
- Scan glass ( × 2, located on the ADF top section and opposite side) Clean lightly with a soft cloth.
- White sheets (× 2, located on the ADF top section and opposite side) White strips along the edge of the scan glass. Clean lightly with a soft cloth.
- Ultrasonic sensors ( × 2, located on the ADF top section and opposite side) Clean lightly with a soft cloth.
- Pick roller (× 1)
Clean it lightly while rotating the roller with your finger downwards. Be careful not to roughen the surface of the rollers. Take particular care in cleaning the rollers since debris left on the roller adversely affects the feed performance.
- Idler rollers (× 4, located on the ADF top section)
Clean them lightly while rotating the rollers with your finger. Be careful not to roughen the surface of the rollers. Take particular care in cleaning the rollers since debris left on the roller adversely affects the feed performance.
Turn on the ScanSnap before cleaning the following locations, and clean the following rollers while rotating them.
- Feed rollers (× 2)
Clean lightly taking care not to roughen the surface of the rollers. Take particular care in cleaning the rollers since debris left on the roller adversely affects the feed performance.
- Eject rollers (× 2)
Clean lightly, taking care not to roughen the surface of the rollers. Take particular care when cleaning the eject rollers since debris on these rollers adversely affect the pickup performance.
Holding the [Scan] button down for 3 seconds while the ADF top section is open activates the cleaning mode. In this mode, every time the [Scan] button is pressed, the feed and eject rollers rotate about 1/6th of a full turn.

Connect the AC adapter and power cable only when cleaning the feed rollers and eject rollers.
3. Close the ADF top section.

text_image
ADF top section ADF paper chute (cover)⇒ You should hear the ADF top section click when it returns to its original position.

Make sure that the ADF top section is completely closed. Otherwise, paper jams or other feeding errors may occur.
Cleaning Carrier Sheet
If the Carrier Sheet is used extensively, dirt and dust may stick onto the surface or the interior and cause scanning errors.
Clean it regularly to avoid errors.
Cleaning method
Use dry, soft cloth, or soft cloth slightly moistened with Cleaner F1 or mild detergent to lightly clean off the dirt and dust from the surface and the interior of the Carrier Sheet.

- Never use paint thinner or other organic solvents.
- Do not rub the Carrier Sheet too hard. Otherwise, it may be scratched or be deformed.
- After cleaning the interior of the Carrier Sheet with Cleaner F1 or mild detergent, dry the Carrier Sheet completely before closing it.
- As a guideline, it is recommended to replace the Carrier Sheet with new one every 500 scans. For details about purchasing Carrier Sheet, refer to "Purchasing the Carrier Sheet" (page 353).
Consumables

natural_image
A zigzag black line pattern on white background (no text or symbols)This chapter describes how to replace consumables.
WARNING
- Before you replace the consumables, turn off the ScanSnap and disconnect the power cable from the AC outlet. Not doing so may cause a fire or electric shock.
- To avoid injuries, do not place internal parts such as pad assy and pick roller in an area where small children may be able to reach them.

Although the bottom of the ScanSnap may become hot when it is used, it does not affect ScanSnap operation, or cause any bodily harm. Be careful not to hit it to the ground when you move the ScanSnap.
Part Numbers and Replacement Cycle of Consumables 338
Replacing the Pad Assy 341
Replacing the Pick Roller 345
Purchasing the Carrier Sheet 353
Part Numbers and Replacement Cycle of Consumables
The following table lists the part numbers of consumables and rough guidelines for replacing these parts.
| No. | Part Name | Parts No. | Standard Replacement Cycle |
| 1 PAD | ASSY PA03586-0002 50,000 sheets or one year | ||
| 2 PICK | ROLLER PA03586-0001 100,000 sheets or one year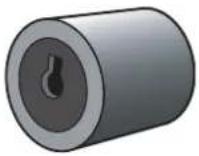 |
These replacement cycles are rough guidelines for the case of using A4/Letter wood-free paper 80 ~g / m^2 (20 lb). So it may differ according to the paper being used.
To obtain these parts, contact your FUJITSU dealer or an authorized FUJITSU scanner service provider.
By the following procedure, you can check how many sheets have been scanned using the consumables.
Windows
1. Select [Check consumable supplies] from the Right-Click Menu.
![FUJITSU ScanSnap S1500M - Select [Check consumable supplies] from the Right-Click Menu. - 1](/content/2026/06/1236416/images/e121906611f0ba92abddb14d78384f0f215fe413f41c1bad679144ee780253c1.jpg)
text_image
Duplex scan Simplex scan Scan Button Settings... Profile Management... Show scanning results Check consumable supplies... Help Exit⇒ The [ScanSnap Manager - Check consumable status] dialog box appears.
2. Check how many times consumables have been used.

text_image
ScanSnap Manager - Check consumable status Number of times the consumables are used. Reset the consumable counter when the consumable is replaced. counter Total Page Count: 100,001 PICK ROLLER Count: 100,001 Reset PAD ASSY Count: 50,001 Reset Target value to change supplies PICK ROLLER: 100,000 sheets PAD ASSY: 50,000 sheets OK Help→ Replace consumables referring to [Target value to change supplies] as a rough guideline.
Mac OS
1. Select [Check consumable supplies] from the ScanSnap Manager menu.
![FUJITSU ScanSnap S1500M - Select [Check consumable supplies] from the ScanSnap Manager menu. - 1](/content/2026/06/1236416/images/ab0ce70bc9c6ac3a13d3d1839b13f20393bae87b0718f03ecc4bdf105862d5ae.jpg)
text_image
Duplex scan Simplex scan Settings... Profile... Profile Management... Check consumable supplies... Help Keep in Dock ✓ Open at Login Show in Finder Hide Quit⇒ The [ScanSnap Manager - Check consumable status] window appears.
2. Check how many times consumables have been used.

text_image
ScanSnap Manager - Check consumable status Number of times the consumables are used. Reset the consumable counter when the consumable is replaced. Total Page Count: 100,001 PICK ROLLER Count: 100,001 Reset PAD ASSY Count: 50,001 Reset Target value to change supplies PICK ROLLER: 100,000 sheets PAD ASSY: 50,000 sheets⇒ Replace consumables referring to [Target value to change supplies] as a rough guideline.
Replacing the Pad Assy
Replace the pad assy following the procedure below.
- Remove the documents on the ADF paper chute (cover).
- Pull the ADF release catch to open the ADF top section.
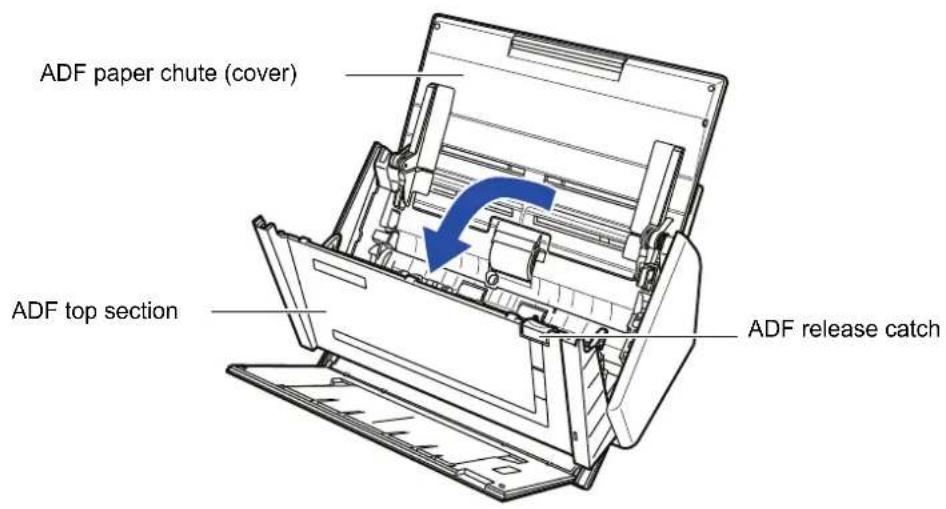
text_image
ADF paper chute (cover) ADF top section ADF release catch- Remove the pad assy.
Pull out the pad assy in the direction of the arrow while pinching both ends of the pad assy.
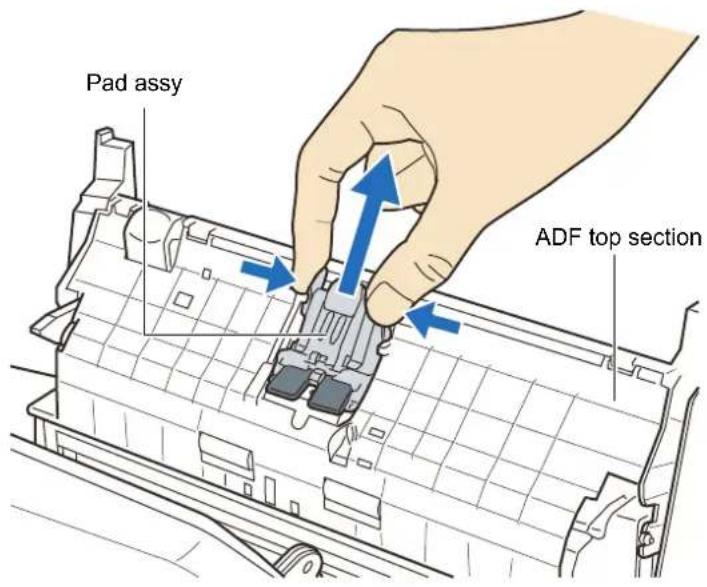
text_image
Pad assy ADF top section4. Attach the new pad assy.

text_image
ADF top section Pad assy
Make sure that the pad assy is completely attached. Otherwise, document jams or other feeding errors may occur.
5. Close the ADF top section.

text_image
ADF top section ADF paper chute (cover)⇒ You should hear the ADF top section click when it returns to its original position.
6. Turn on the ScanSnap.
7. Reset the consumable use count.
Windows
- Select [Check consumable supplies] from the Right-Click Menu.
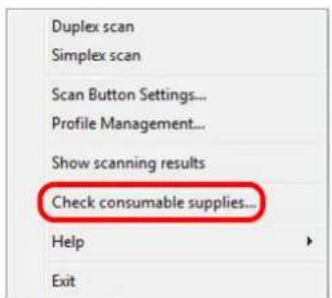
text_image
Duplex scan Simplex scan Scan Button Settings... Profile Management... Show scanning results Check consumable supplies... Help Exit⇒The [ScanSnap Manager - Check consumable status] dialog box appears.
- Click the [Reset] button for the [PAD ASSY Count].

text_image
ScanSnap Manager - Check consumable status Number of times the consumables are used. Reset the consumable counter when the consumable is replaced. Counter Total Page Count: 100,001 PICK ROLLER Count: 100,001 Reset PAD ASSY Count: 50,001 Reset Target value to change supplies PICK ROLLER: 100,000 sheets PAD ASSY: 50,000 sheets OK Help⇒The confirmation message appears.
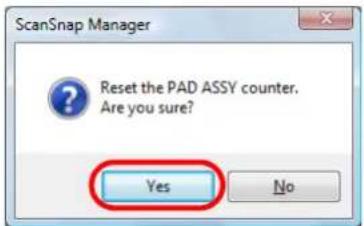
text_image
ScanSnap Manager Reset the PAD ASSY counter. Are you sure? Yes No⇒Clicking the [Yes] button resets the [PAD ASSY Count] to "0".
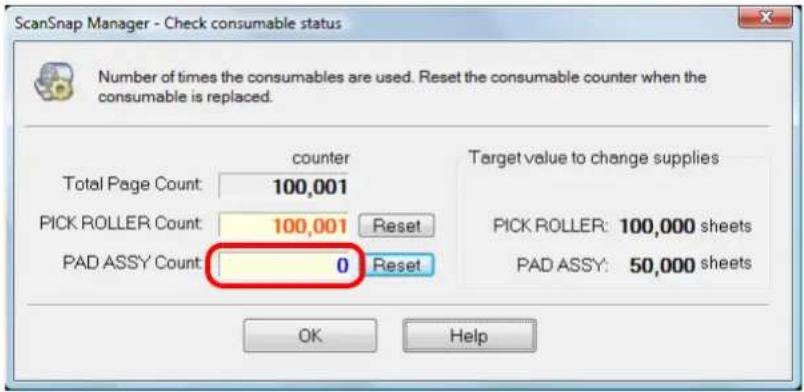
text_image
ScanSnap Manager - Check consumable status Number of times the consumables are used. Reset the consumable counter when the consumable is replaced. Counter Total Page Count: 100,001 PICK ROLLER Count: 100,001 Reset PAD ASSY Count: 0 Reset Target value to change supplies PICK ROLLER: 100,000 sheets PAD ASSY: 50,000 sheets OK HelpMac OS
- Select [Check consumable supplies] from the ScanSnap Manager menu.

text_image
Duplex scan Simplex scan Settings... Profile... Profile Management... Check consumable supplies... Help Keep in Dock ✓ Open at Login Show in Finder Hide Quit⇒The [ScanSnap Manager - Check consumable status] window appears.
- Click the [Reset] button for the [PAD ASSY Count].
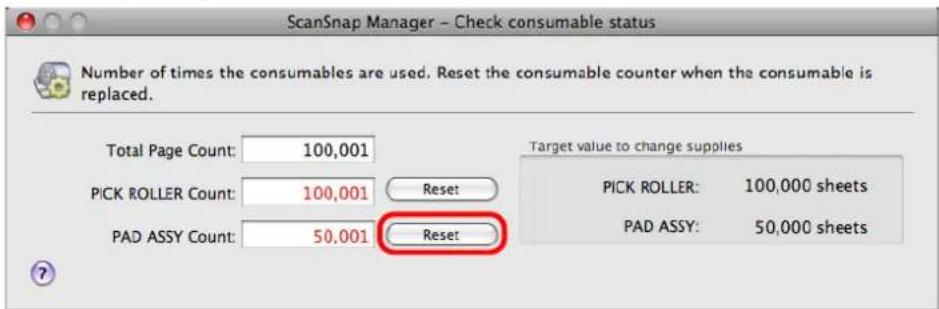
text_image
ScanSnap Manager - Check consumable status Number of times the consumables are used. Reset the consumable counter when the consumable is replaced. Total Page Count: 100,001 PICK ROLLER Count: 100,001 Reset PAD ASSY Count: 50,001 Reset Target value to change supplies PICK ROLLER: 100,000 sheets PAD ASSY: 50,000 sheets⇒The confirmation message appears.
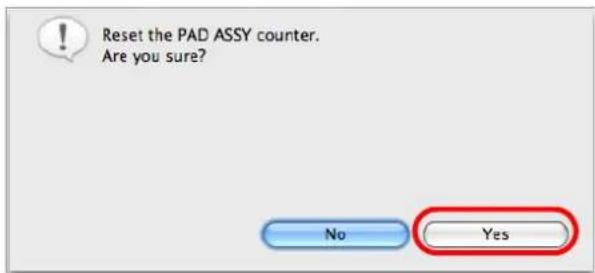
text_image
Reset the PAD ASSY counter. Are you sure? No Yes⇒Click the [Yes] button to reset the [PAD ASSY Count] to "0".
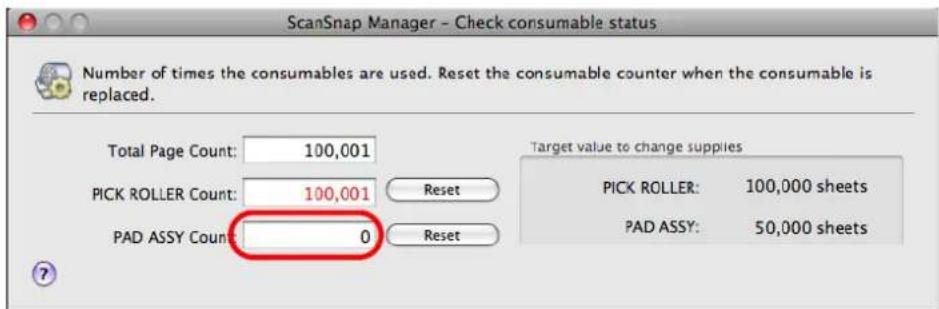
text_image
ScanSnap Manager - Check consumable status Number of times the consumables are used. Reset the consumable counter when the consumable is replaced. Total Page Count: 100,001 PICK ROLLER Count: 100,001 Reset PAD ASSY Count: 0 Reset Target value to change supplies PICK ROLLER: 100,000 sheets PAD ASSY: 50,000 sheetsReplacing the Pick Roller
Replace the pick roller by first removing the pick roller from the ScanSnap.

text_image
Pick roller ShaftReplace the pick roller following the procedure below.
- Remove the documents on the ADF paper chute (cover).
- Pull the ADF release catch to open the ADF top section.
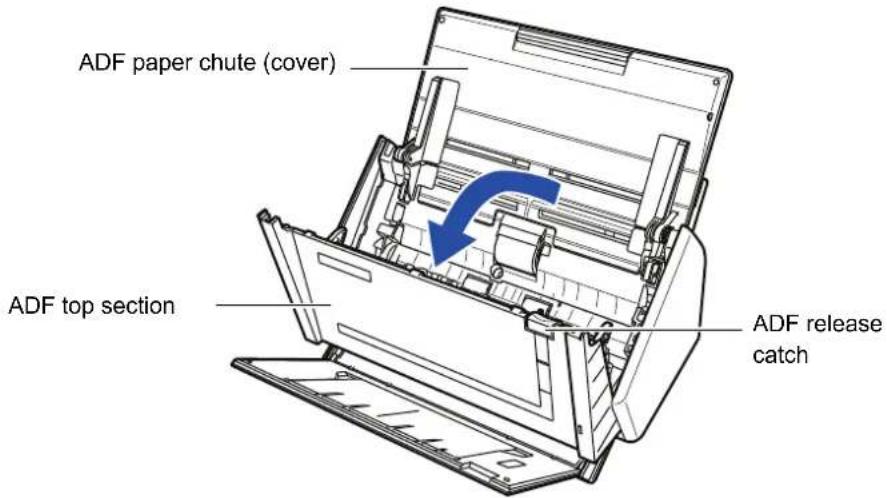
text_image
ADF paper chute (cover) ADF top section ADF release catch3. Adjust the side guide to the "A5" size.
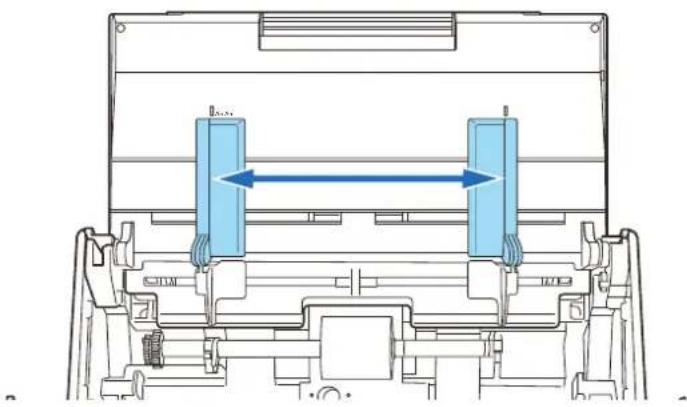
natural_image
Technical line drawing of a mechanical assembly with two blue components and directional arrows indicating movement (no text or symbols)4. Remove the sheet guide.
Hold the pickup tabs on the sheet guide between the thumb and index finger, and then pull up the sheet guide to remove.

text_image
Sheet guide Pickup tab Pickup tab5. Rotate the pick roller bushing (left).

text_image
Pick roller Bushing Shaft6. Remove the pick roller with its shaft.
Slightly pull up the left part of the pick roller shaft (about 5 mm), move it towards the left side, and then raise it to remove from the ScanSnap.

text_image
① ② Shaft Pick roller
If the around the pick roller is dirty by paper-powder, it may cause a scanning error. Remove the dirt using a dry cloth slightly moistened with Cleaner F1 in order to prevent errors.
Do not use water, mild detergent, or air-spray.
7. Remove the pick roller from its shaft.
Pull out the shaft from the pick roller while lifting up its tab.

text_image
Pickup tab Shaft Pick roller
If you push up the pick roller tab using your fingernail, your fingernail may be hurt or get chipped.
If you cannot push it up successfully with your fingernail, use a paper clip to push up the pick roller tab.

text_image
Technical diagram of a mechanical assembly with labeled components and directional arrows indicating motion or force directions.8. Attach the new pick roller to the shaft.
Insert the shaft aligning the protrusion with the slot on the new pick roller.

text_image
Pick roller Protrusion Shaft9. Install the pick roller with its shaft to the ScanSnap.
Insert the right end of the shaft to the bushing (right), and set the shaft to the slot while lowering it.

text_image
Shaft Pick roller10. Secure the bushing (left) by rotating it in the direction of the arrow.
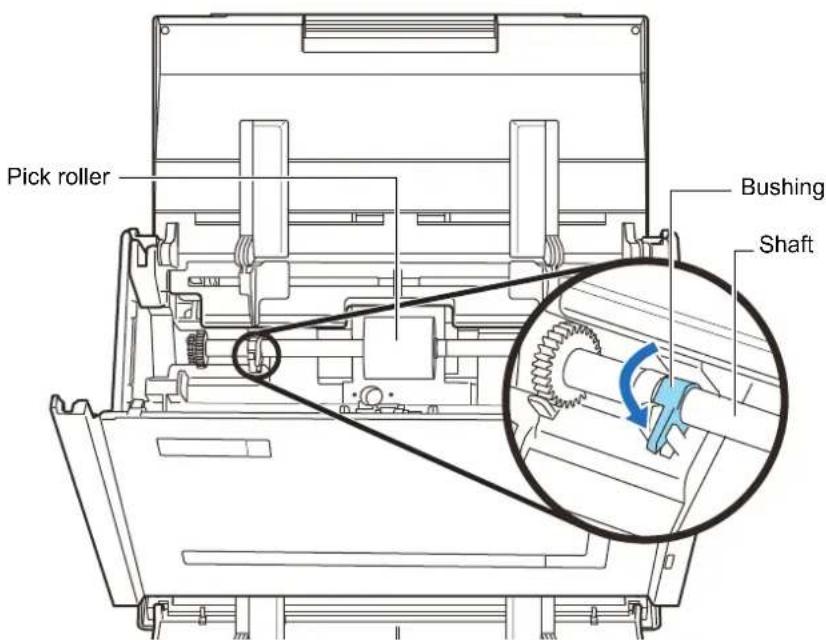
text_image
Pick roller Bushing Shaft
Make sure that the pick roller is completely attached. Otherwise, document jams or other feeding errors may occur.
11. Attach the sheet guide to the ScanSnap.
Hold the pickup tabs on the sheet guide between the thumb and index finger, and then attach the sheet guide to the ScanSnap.
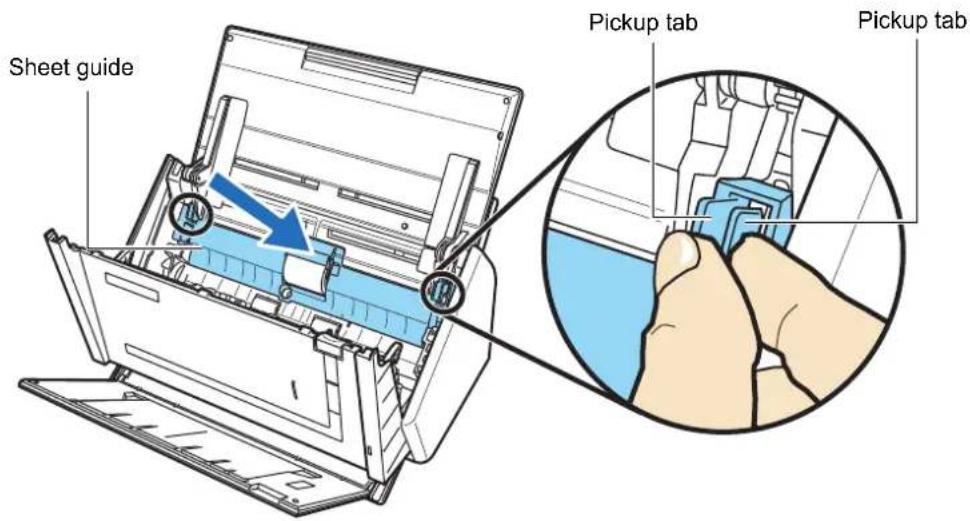
text_image
Sheet guide Pickup tab Pickup tab⇒ The sheet guide makes a clicking sound when the pickup tabs fix into position.

Make sure that the sheet guide is completely attached. Otherwise, document jams or other feeding errors may occur.
12. Close the ADF top section.
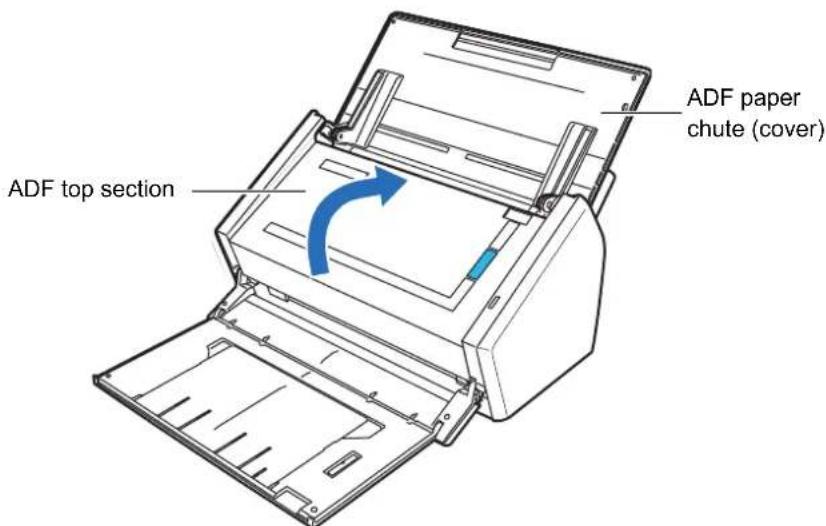
text_image
ADF top section ADF paper chute (cover)⇒ You should hear the ADF top section click when it returns to its original position.
13. Turn on the ScanSnap.
14. Reset the consumable use count.
Windows
- Select [Check consumable supplies] from the Right-Click Menu.

text_image
Duplex scan Simplex scan Scan Button Settings... Profile Management... Show scanning results Check consumable supplies... Help Exit⇒The [ScanSnap Manager - Check consumable status] dialog box appears.
- Click the [Reset] button for the [PICK ROLLER Count].

text_image
ScanSnap Manager - Check consumable status Number of times the consumables are used. Reset the consumable counter when the consumable is replaced. Counter Total Page Count: 100,001 PICK ROLLER Count: 100,001 Reset PAD ASSY Count: 0 Reset Target value to change supplies PICK ROLLER: 100,000 sheets PAD ASSY: 50,000 sheets OK Help⇒ The confirmation message appears.
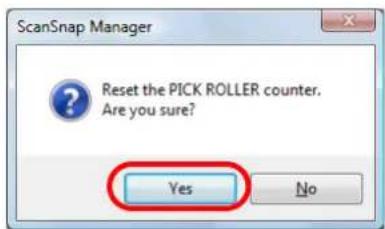
text_image
ScanSnap Manager Reset the PICK ROLLER counter. Are you sure? Yes No⇒ Clicking the [Yes] button resets the [PICK ROLLER Count] to "0".
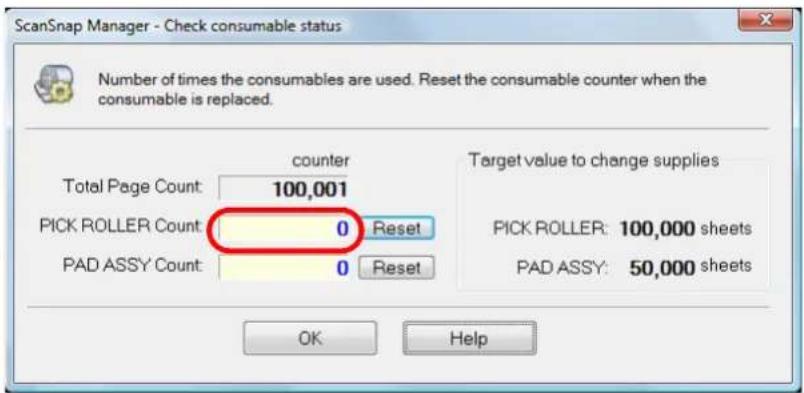
text_image
ScanSnap Manager - Check consumable status Number of times the consumables are used. Reset the consumable counter when the consumable is replaced. Total Page Count: 100,001 PICK ROLLER Count: 0 Reset PAD ASSY Count: 0 Reset counter Target value to change supplies PICK ROLLER: 100,000 sheets PAD ASSY: 50,000 sheets OK HelpMac OS
- Select [Check consumable supplies] from the ScanSnap Manager menu.

text_image
Duplex scan Simplex scan Settings... Profile... Profile Management... Check consumable supplies... Help Keep in Dock ✓ Open at Login Show in Finder Hide Quit⇒The [ScanSnap Manager - Check consumable status] window appears.
- Click the [Reset] button for the [PICK ROLLER Count].
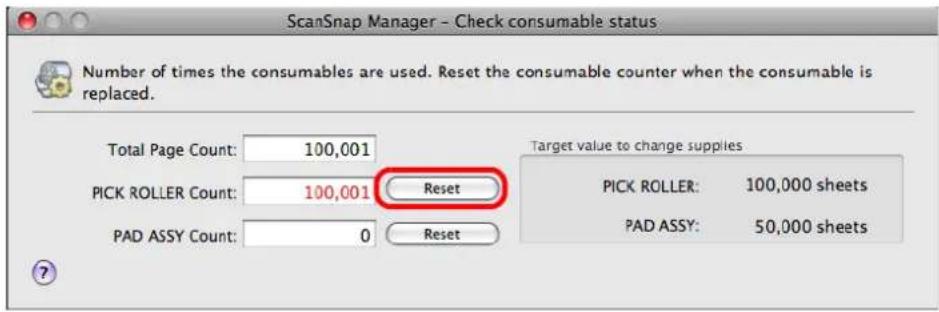
text_image
ScanSnap Manager - Check consumable status Number of times the consumables are used. Reset the consumable counter when the consumable is replaced. Total Page Count: 100,001 PICK ROLLER Count: 100,001 Reset PAD ASSY Count: 0 Reset Target value to change supplies PICK ROLLER: 100,000 sheets PAD ASSY: 50,000 sheets⇒ The confirmation message appears.
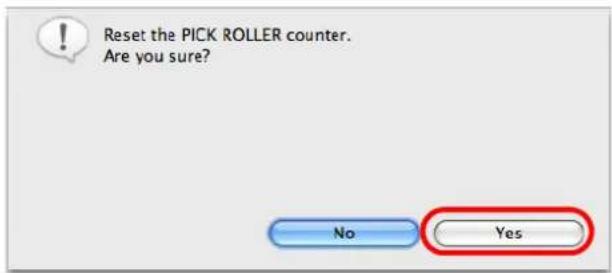
text_image
Reset the PICK ROLLER counter. Are you sure? No Yes⇒ Click the [Yes] button to reset the [PICK ROLLER Count] to "0".

text_image
ScanSnap Manager - Check consumable status Number of times the consumables are used. Reset the consumable counter when the consumable is replaced. Total Page Count: 100,001 PICK ROLLER Count: 0 Reset PAD ASSY Count: 0 Reset Target value to change supplies PICK ROLLER: 100,000 sheets PAD ASSY: 50,000 sheetsPurchasing the Carrier Sheet
If the Carrier Sheet bundled in the ScanSnap cannot be used for scanning due to damage or wear-and-tear, you can purchase a new Carrier Sheet separately.
As a guideline, it is recommended to replace the Carrier Sheet with new one every 500 scans. If scratches and dirt are conspicuous, replace the Carrier Sheet accordingly.
The description of the Carrier Sheet and its part number are as follows:
| Description Quantity P/N | ||
ScanSnap Carrier Sheet 5 pcs PA03360-0013 |
To obtain this parts, contact your FUJITSU dealer or an authorized FUJITSU scanner service provider.
Appendix

natural_image
A zigzag black line on a white background, no text or symbols present.This appendix describes how to update ScanSnap Manager, how to uninstall software, setting items, and ScanSnap installation conditions.
Updating ScanSnap Manager 355
Uninstalling the Software....359
Setting Items With/Without Quick Menu 365
Installation Specifications 368
Updating ScanSnap Manager
In an effort to improve the usability and functionality of ScanSnap Manager, software updates are released regularly.
This section describes how to update ScanSnap Manager.
■ Updating on a Windows OS
ScanSnap Manager can check whether the latest update pack is available and update the software when you select [Help] → [Online Update] from the Right-click menu.

- You can also perform the update by selecting [Start] menu → [All programs] → [ScanSnap Manager] → [Online Update].
- Update Packs are made available without notice. We recommend that you update your program regularly.
When updating ScanSnap Manager, follow the instructions below.

- When updating, it is essential that Internet Explorer is installed in a system which can access the Internet.
- Always log on as a user with "Administrator" privileges.
1. Select [Help] → [Online Update] from the Right-Click Menu.
Refer to Right-Click Menu (page 55) for more information about the Right-Click Menu.
⇒ A confirmation message appears.
2. Click the [Yes] button.
![FUJITSU ScanSnap S1500M - Click the [Yes] button. - 1](/content/2026/06/1236416/images/c955cc0b152bf64a81dcf33b2e1db8a5f2db1c84040db943229ccb314b83e026.jpg)
text_image
ScanSnap Manager - Online Update Do you want to update to "ScanSnap Manager V5.0" online?For the Internet connection, Windows(R) Internet Explorer(R)
privileges are used. Note: You must have the Administrator privileges of the computer. Yes No Help⇒ If the latest update pack is available, a message appears for the confirmation of the download and installation of the software.

text_image
If the latest version of the software is already installed, the message below appears. ScanSnap Manager - Online Update The latest Update program version is already installed. There is no need to update. OK Click the [OK] button to close the message.3. Click the [Yes] button.
![FUJITSU ScanSnap S1500M - Click the [Yes] button. - 1](/content/2026/06/1236416/images/87fd2179cbb4b1743472823c88faa4884752b647be9193923c09a348f60836a6.jpg)
text_image
ScanSnap Manager - Online Update The latest version of the program (Update Pack) is available on the website. [Yes] to run the update now? Download size:About Yes No⇒ The update pack is downloaded, and a confirmation message to start installation appears.
4. Click the [Install] button.
![FUJITSU ScanSnap S1500M - Click the [Install] button. - 1](/content/2026/06/1236416/images/b7b57578718737080accf595087499c278d7ef2a6cb5f893c67df5831a2f55d0.jpg)
text_image
ScanSnap Manager - Online Update Download is completed Click the [Install] button. [Install] button: Starts the installation [Information] button: Shows the update information Install Information![FUJITSU ScanSnap S1500M - Click the [Install] button. - 2](/content/2026/06/1236416/images/749370cbae9edf835333740c2f13cdcab36c18b3474d273054865fe5ecad8c4d.jpg)
When you click the [Information] button, Internet Explorer opens and information about the latest update for ScanSnap Manager appears.
→ Installation starts, and the [Welcome to InstallShield Wizard for ScanSnap Manager] dialog box appears.
Follow the instructions on the screen to install.
■ Updating on a Mac OS
ScanSnap Manager can check whether the latest update pack is available and update the software when you select [Help] → [Online Update] from the ScanSnap Manager menu.

- You can also update by selecting
- [Help] → [Online Update] from the menu bar.
- [Applications] → [ScanSnap] and double-click [Online Update] from the Finder.
- Update Packs are made available without notice. We recommend that you update your program regularly.
When updating ScanSnap Manager, follow the instructions below.

When updating, it is essential that a browser is installed in a system which can access the Internet.
1. Select [Help] → [Online Update] from the ScanSnap Manager menu.
Refer to ScanSnap Manager Menu (page 195) for more information about the ScanSnap Manager menu.
⇒ A confirmation message appears.
2. Click the [Yes] button.
![FUJITSU ScanSnap S1500M - Click the [Yes] button. - 1](/content/2026/06/1236416/images/518f032d717efebdb443a072851d673d06f32234833c1550a580f9aad5db9019.jpg)
text_image
ScanSnap Manager - Online Update Do you want to update to "ScanSnap Manager" online? No Yes⇒ If the latest update pack is available, a message appears for the confirmation of the download and installation of the software.
![FUJITSU ScanSnap S1500M - Click the [Yes] button. - 2](/content/2026/06/1236416/images/b3be03c0d99e5ca1e457f3904d375aaeff3609d1767ba19168e85f0a581b927f.jpg)
If the latest version of the software is already installed, the message below appears..
![FUJITSU ScanSnap S1500M - Click the [Yes] button. - 3](/content/2026/06/1236416/images/60978c8bd33d960432ec74bfd1e50855d3087e62ebaf269ab6f4c9ebc479f11b.jpg)
text_image
ScanSnap Manager - Online Update The latest Update program version is already installed. There is no need to update. OKClick the [OK] button to close the message.
3. Click the [Yes] button.
![FUJITSU ScanSnap S1500M - Click the [Yes] button. - 1](/content/2026/06/1236416/images/09f273fbd1a7c038a953e73efc883443e0f686ecac907485397934b29c9e471e.jpg)
text_image
ScanSnap Manager - Online Update The latest version of the program (Update Pack) is available on the website. [Yes] to run the update now? Download size: No Yes⇒ The update pack is downloaded, and a confirmation message to start installation appears.
4. Exit ScanSnap Manager. (Select [Quit] from the ScanSnap Manager Menu.)
5. Click the [Install] button.
![FUJITSU ScanSnap S1500M - Click the [Install] button. - 1](/content/2026/06/1236416/images/6459ae4955db6e71afbe4388d3262fbdf057b0fd6c2fec9e4fbe25d5fe2530a1.jpg)
text_image
ScanSnap Manager - Online Update Download is completed. Click the [Install] button. Install Information![FUJITSU ScanSnap S1500M - Click the [Install] button. - 2](/content/2026/06/1236416/images/697bd9355185cabce3e1818f39073465eebafe9ce4dc9d643dabc937cdc9bb76.jpg)
When you click the [Information] button, the browser opens and information about the latest update for ScanSnap Manager appears.
⇒ The ScanSnap Manager installer starts.
Follow the instructions on the screen to install.
Uninstalling the Software
This section describes how to uninstall software supplied with the ScanSnap.
■ Uninstalling on a Windows OS
Follow the procedure below to uninstall software (ScanSnap Manager, ScanSnap Organizer, CardMinder, ABBYY FineReader for ScanSnap, and Scan to Microsoft SharePoint) supplied with the ScanSnap S1500.
1. Start your computer.
Always log on as a user with "Administrator" privileges.
2. Exit all currently running programs.
3. Select [Start] menu → [Control Panel] → [Programs] → [Programs and Features].
⇒ The [Uninstall or change a program] dialog box appears with a list of the currently installed applications.
4. Select the application to uninstall.
- When uninstalling ScanSnap Manager Select [ScanSnap Manager].
- When uninstalling ScanSnap Organizer Select [ScanSnap Organizer].
- When uninstalling CardMinder Select [CardMinder].
- When uninstalling ABBYY FineReader for ScanSnap Select [ABBYY FineReader for ScanSnap(TM) 4.1].
- When uninstalling Scan to Microsoft SharePoint Select [Scan to Microsoft SharePoint].
5. Click the [Uninstall] button.
⇒ The confirmation message appears.
6. Click the [Yes] button.
⇒ This executes the uninstallation.
![FUJITSU ScanSnap S1500M - Click the [Yes] button. - 1](/content/2026/06/1236416/images/e641f8dde6f7566c800ede0b0b0a8f3a9cdb7c0fc5dfa1f06f07a9009e428f88.jpg)
Screen displays may vary slightly depending on the operating system of your computer. Follow the on-screen instructions of the operating system.
Example:
- [Change/Remove] button For Windows XP: [Add or Remove Programs] For Windows 2000: [Add/Remove Programs]
- [Uninstall] button For Windows XP: [Change/Remove] button For Windows 2000: [Add/Remove] button
■ Uninstalling on a Mac OS
Follow the procedure below to uninstall software supplied with the ScanSnap S1500M (ScanSnap Manager, ABBYY FineReader for ScanSnap, and Cardiris).
When uninstalling ScanSnap Manager
- Start your computer.
- Exit ScanSnap Manager if it is running. (Select [Quit] from the ScanSnap Manager menu.)
-
If the [ScanSnap Manager] icon 📁 still remains on the Dock, drag the [ScanSnap Manager] icon into the Trash.
-
From the Apple ( ) menu, select [System Preferences].
⇒ The [System Preferences] window appears.
- In the [System Preferences] window, select [Accounts].
⇒ The [Accounts] window appears.
-
In the [Accounts] window, select the currently logged in user from the [My Account] pane.
-
In the [Accounts] window, click [Login Items].
⇒ In the [Login Items] pane, a list of all applications that automatically start at a login is displayed.
-
Select [ScanSnap Manager] from the [Login Items] list.
-
Click the [—] button.
⇒ [ScanSnap Manager] is deleted from the [Login Items] list.
-
Close the [Accounts] window.
-
In a multi-user environment, every user must perform Steps 2 to 10.
- Log in with an account that has admin rights. With Finder, select [Applications] → [ScanSnap], and drag the [ScanSnap] folder into the Trash.
- With Finder, select [volume_name] → [Library] → [Receipts], and drag [ScanSnap Manager.pkg] into the Trash.

Skip this step in Mac OS X v10.6.
- Empty the Trash.
⇒ ScanSnap Manager is uninstalled.
When uninstalling ABBYY FineReader for ScanSnap
- Start your computer.
- Exit ABBYY FineReader for ScanSnap if it is running. (Select [Quit] from the ABBYY FineReader for ScanSnap menu.)
- Log in with an account that has admin rights. With Finder, select the folder in which ABBYY FineReader for ScanSnap is installed (generally, you can find [ABBYY FineReader for ScanSnap] in the [Applications] window) and drag it into the Trash.
- With Finder, select [volume_name] → [Library] → [Receipts], and drag [ABBYY FineReader.pkg] into the Trash.

Skip this step in Mac OS X v10.6.
- Empty the Trash.
⇒ ABBYY FineReader for ScanSnap is uninstalled.
When uninstalling Cardiris
- Start your computer, and log in with an account that has admin rights.
- Exit Cardiris if it is running. (Select [Quit] from the Cardiris menu.)
- Insert the Setup DVD-ROM into the DVD-ROM drive.
⇒ The [ScanSnap] window appears.
- Scroll down and double-click the [Tool] folder, and double-click [Cardiris 3.6 for ScanSnap].
⇒ The [Cardiris 3.6 for ScanSnap] window appears.
- Scroll down and read the "License" to the end. Then, click the [Continue] button.
A confirmation message window appears.
- Click the [Agree] button.
⇒ The [Select Destination] window appears.
- Select the destination where "Cardiris" is installed and click the [Continue] button.
⇒ The [Installation Type] window appears.
- Select [Uninstall] from the pop-up menu, and click the [Uninstall] button.
⇒ A confirmation message appears.
- Click the [Continue] button.
⇒ The uninstallation is started.
⇒ The [Finish Up] window appears.
-
Click the [Quit] button.
-
Close the [ScanSnap] window.
- With Finder, select [volume_name] → [Library] → [Receipts], and drag [Cardiris.pkg] into the Trash.

Skip this step in Mac OS X v10.6.
- Empty the Trash.
⇒ Cardiris is uninstalled.
- Remove the Setup DVD-ROM from the DVD-ROM drive.
Setting Items With/Without Quick Menu
Setting items that you can configure in the ScanSnap setup dialog box/window differ according to whether you are using the Quick Menu. You can select whether or not to use the Quick Menu according to your preferences.
For details about setting items and defaults, refer to the ScanSnap Manager Help.
(OK: Available, NA: Not available)
Setting Items With/Without Quick Menu
| Setting Items | Using the Quick Menu | Without using the Quick Menu | |
| Profile S | Select a profile NA OK | ||
| Add Profile NA OK | |||
| Profile Management NA OK | |||
| Application | Application NA (*3) OK | ||
| Scan to File NA OK | |||
| Windows\ ScanSnap Organizer(*1) | NA OK | ||
| Adobe(R) Acrobat(R) NA OK | |||
| Adobe(R) Acrobat(R) Reader(TM) or Adobe(R) Reader(R) | NA OK | ||
| Scan to E-mail NA OK | |||
| Windows\ Scan to CardMinder(*1) | NA OK | ||
| Scan to Folder NA OK | |||
| Windows\ Scan to Picture Folder | NA OK | ||
| Scan to Print NA OK | |||
| Windows\ ABBYY Scan to Excel(*1) \ Mac OS\ Scan to Excel(*2) | NA OK | ||
| Windows\ ABBYY Scan to Word(*1) \ Mac OS\ Scan to Word(*2) | NA OK | ||
| Windows\ ABBYY Scan to PowerPoint(R)(*1) | NA OK | ||
| Windows\ ABBYY Scan to Searchable PDF(*1) \ Mac OS\ Scan to Searchable PDF(*2) | NA OK | ||
| Windows\ Rack2-Filer(*1) | NA OK | ||
| Windows\ Scan to SharePoint(*1) | NA OK | ||
Setting Items With/Without Quick Menu
| Setting Items | Using the Quick Menu | Without using the Quick Menu | ||
| Application | MacOSCardiris (*2) | NA OK | ||
| MacOSiPhoto | NA OK | |||
| Save Image saving folder OK | ||||
| File name format OK | ||||
| WindowsRename file after scanning | NA OK | |||
| Scanning | Image quality OK | |||
| Auto OK | ||||
| Normal (Color/Gray: 150 dpi, B&W: 300 dpi) OK | ||||
| Better (Color/Gray: 200 dpi, B&W: 400 dpi) OK | ||||
| Best (Color/Gray: 300 dpi, B&W: 600 dpi) OK | ||||
| Excellent (Color/Gray: 600 dpi, B&W: 1200 dpi) OK | ||||
| Color mode OK | ||||
| Auto Color Detection OK | ||||
| Color OK | ||||
| Gray OK | ||||
| B&W OK | ||||
| WindowsColor high compression | NA OK | |||
| Scanning side | OK | |||
| Duplex Scan | OK | |||
| Simplex Scan | OK | |||
| Continue scanning after current scan is finished | OK | |||
| Option | OK | |||
| Brightness (Black and White scanning only) | OK | |||
| Setting for text only document | OK | |||
| Allow automatic blank page removal | OK | |||
| Correct skewed character strings automatically | OK | |||
| Allow automatic image rotation | OK | |||
| WindowsSet the document with its face up | OK | |||
| File option | File format | OK | ||
| PDF (*.pdf) | OK | |||
| JPEG (*.jpg) | OK | |||
| Set the marked text as a keyword for the PDF file | OK | |||
| First marked section | OK | |||
| All marked sections | OK | |||
| Convert to Searchable PDF | OK | |||
Setting Items With/Without Quick Menu
| Setting Items | Using the Quick Menu | Without using the Quick Menu | |
| File option | Language OK | ||
| Target pages OK | |||
| First page OK | |||
| All pages OK | |||
| Option OK | |||
| Multipage PDF (whole batch in one PDF) OK | |||
| Generate one PDF file per (n) page(s) OK | |||
| Windows Set a password for PDF file | NA OK | ||
| Paper Paper size OK | |||
| Automatic detection OK | |||
| Letter (8.5 × 11 in (216 × 279.4 mm)) | OK | ||
| Legal (8.5 × 14 in (216 × 355.6 mm)) | OK | ||
| A4 (210 × 297 mm) OK | |||
| A5 (148 × 210 mm) OK | |||
| A6 (105 × 148 mm) OK | |||
| B5 (JIS) (182 × 257 mm) | OK | ||
| B6 (JIS) (128 × 182 mm) | OK | ||
| Post card (100 × 148 mm) | OK | ||
| Business card (90 × 55 mm, 55 × 90 mm) | OK | ||
| Custom | OK | ||
| Multifeed Detection | OK | ||
| None | OK | ||
| Check Length | OK | ||
| Check Overlapping [Ultrasonic] | OK | ||
| Carrier Sheet Settings | OK | ||
| Compression | Compression rate | OK | |
| 1 | OK | ||
| 2 | OK | ||
| 3 | OK | ||
| 4 | OK | ||
| 5 | OK | ||
*1 : Can only be used with S1500.
*2 : Can only be used with S1500M.
*3 : When using the Quick Menu, the application is associated by specifying an action from the Quick Menu after scanning. Therefore, the [Application] tab is not displayed.
Installation Specifications
The following table summarizes the installation specifications of the ScanSnap.
| Item Specifications | ||
| Dimensions(Width × Depth × Height) | Minimum: 292 × 159 × 158 mm(approx. 11.5 × 6.3 × 6.2 [in])Maximum: 292 × 475 × 286 mm(approx. 11.5 × 18.7 × 11.3 [in]) | |
| Weight 3.0 kg (approx. 6.62 lb) | ||
| Input power supply | Voltage 100 to 240 V (varies regionally) | |
| Number of phases | Single-phase | |
| Frequency 50/60 Hz | ||
| Power consumption During operation: 35 W or lessDuring standby: 4.5 W or less | ||
| Temperature/humidityallowableranges | Temperature | During operation: 5 to 35 (°C) / 41 to 95 (°F)During standby: -20 to 60 (°C) / -4 to 160 (°F)During storage/transportation:-20 to 60 (°C) / -4 to 140 (°F) |
| Humidity (%) During operation: 20 to 80During standby: 8 to 95During storage/transportation: 8 to 95 | ||

text_image
292 mm (11.5 [in]) 475 mm (18.7 [in]) 286 mm (11.3 [in])About Maintenance

natural_image
A zigzag black line pattern on white background (no text or symbols)Contact your FUJITSU scanner dealer or an authorized FUJITSU scanner service provider for repairs to this product.

Do not perform repairs on this scanner.
Index

natural_image
A zigzag black line on a white background, no text or symbols present.A
ABBYY FineReader for ScanSnap
Mac OS 47
Windows 36
actions
Mac OS 226
Windows 92
ADF paper chute (cover)
ADF release catch
ADF top section
Adobe Acrobat 8 Professional
Adobe Acrobat 9 Standard
allow automatic image rotation
Mac OS 278
Windows 165
automatic linkage
Mac OS 223
Windows 85
B
basic flow of operations
C
Cardiris 47,256
Address Book 260
CardMinder
Carrier Sheet
cleaning 336
purchasing 353
Cleaner F1
Cleaning Wipe 331
clearing document jams 307
color high compression 158
consumables 338
copy
Mac OS 242
Windows 111
correct skewed character strings automatically
Mac OS 275
Windows 162
D
daily care 330
deleting profiles
Mac OS 220
Windows 82
E
exiting ScanSnap Manager
Mac OS 207
Windows 67
extension 19
G
generate one PDF file per (n) page(s)
Mac OS 297
Windows 180
H
how to perform a scan
Mac OS 197
Windows 57
|
installing
for S1500 36
for S1500M 47
installing Adobe Acrobat
Mac OS 48
Windows 37
iPhoto 263
L
Left-Click Menu 56
loading documents 29
M
multifeed 322
0
online update
Mac OS 357
Windows 355
operating system
Mac OS 24
Windows 21
P
PAD ASSY 338
paper sizes of documents to be scanned
with the Carrier Sheet 28
without using the Carrier Sheet ..... 27
PICK ROLLER 338
power connector 20
Mac OS 242
Windows 111
profile
Mac OS 211
Windows 71
profile menu 196
Q
Quick Menu
Mac OS ......202
Windows 62
R
Rack2-Filer 148
Rack2-Filer V5.0 Trial Version 36
removing blank pages
Mac OS 271
Windows 160
renaming profiles
Mac OS 217
Windows 79
replacing
pad assy 341
pick roller 345
Right-Click Menu 55
s
saving profiles
Mac OS 212
Windows 72
scan
Mac OS 199,204
Windows 59,64
[Scan] button 19
Scan to CardMinder 134
Scan to E-mail
Mac OS 236
Windows 104
Scan to Excel
Mac OS 251
Windows 128
Scan to Folder
Mac OS 228, 232
Windows 95, 99
Scan to Microsoft SharePoint 36
Scan to Picture Folder 120
Scan to PowerPoint(R) 128
Scan to Print
Mac OS 244
Windows 113
Scan to Rack2-Filer 150
Scan to SharePoint 140
Scan to Word
Mac OS 251
Windows 128
scanning color document in black and white
Mac OS 269
Windows 156
scanning method
Mac OS 199,204
Windows 59,64
ScanSnap
disconnecting 207
features 16
front view 19
rear view 20
status 19
turning on/off 26
ScanSnap Manager 36,47
Mac OS 194
Windows 54
ScanSnap Manager menu 195
ScanSnap Organizer 36
ScanSnap setup dialog box 68, 69
ScanSnap setup window 208, 209
ScanSnap's communication status ..... 90
security cable slot 20
send by e-mail
Mac OS 234
Windows 101
setting the ScanSnap
Mac OS 208
Windows 68
shared folder
Mac OS 227
Windows 93
showing the scan progress status
Mac OS 224
Windows 88
side guide 19
simplex scan
Mac OS 267
Windows 154
sleep state 26
stacker 19
supplied software
S1500 36
S1500M 47
system requirements
Mac OS 24
Windows 21
T
tape seal 20
turning on/off
ScanSnap 26
U
uninstalling
Mac OS 361
Windows 359
updating
Mac OS 357
Windows 355
USB connector 20
V
ventilation ports 20
ScanSnap S1500/S1500M
Operator's Guide
P3PC-2432-02ENZ0
Issue date December 2009
Issued by PFU LIMITED
- The contents of this manual are subject to change without notice.
- PFU LIMITED assumes no liability for incidental or consequential damages arising from the use of this Product, and any claims by a third party.
- Copying of the contents of this manual, in whole or in part, as well as the scanner applications is prohibited under the copyright law.