GT-120 - GPS device i-gotU - Free user manual and instructions
Find the device manual for free GT-120 i-gotU in PDF.

User questions about GT-120 i-gotU
0 question about this device. Answer the ones you know or ask your own.
Ask a new question about this device
Download the instructions for your GPS device in PDF format for free! Find your manual GT-120 - i-gotU and take your electronic device back in hand. On this page are published all the documents necessary for the use of your device. GT-120 by i-gotU.
USER MANUAL GT-120 i-gotU
GPS Logger package comes in two specifications, GPS Logger (USB) & GPS Logger (Bluetooth). Please check the package contents as shown below before getting started.
Package contents & specifications
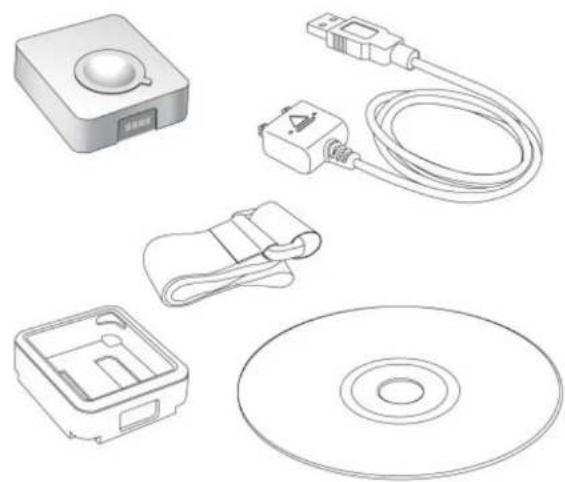
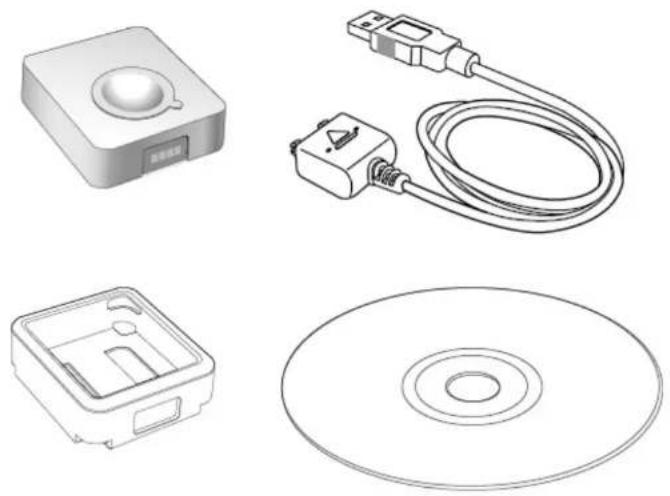
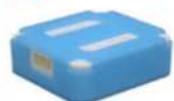
The GPS Logger package comes with 1 @trip PC CD-ROM, 1 GPS data logger, 1 GPS Logger Dock/ USB Cable, and 1 color jelly case.
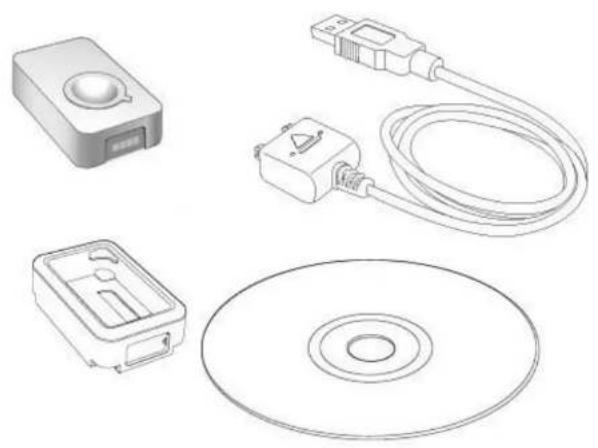
natural_image
Line drawings of electronic components including a CD, switch, and remote control unit (no text or symbols)GT-120 package contents
| GT-120 | |
| Dimension | 44.5 x 28.5 x 13mm |
| Weight | 20g |
| Chipset | Built-in SiRF StarIII low-power chipset |
| Antenna | Built-in GPS patch antenna |
| Battery | Built-in 230mAh Lithium-ion battery |
| LED indicators | Blue & Red |
| Cold start | < 35 seconds |
| Warm start | < 35 seconds |
| Connection interface | USB 1.1 |
| Operation temperature | -10 °C to + 50 °C |
| Water-resistant | Yes |

natural_image
Line drawings of electronic components including a CD, switch, battery, and remote control unit (no text or symbols)GT-200e package contents
| GT-200e | |
| Dimension | 46 x 41.5 x 14 mm |
| Weight | 37g |
| Chipset | Built-in SiRF StarIII low-power chipset |
| Antenna | Built-in GPS patch antenna |
| Battery | Built-in 750 mAh Lithium-ion battery |
| LED indicators | Blue & Red |
| Cold start | < 35 seconds |
| Warm start | < 35 seconds |
| Connection interface | USB 1.1 for PC connection;Bluetooth V2.0 EDR Class 2 for PDA & mobile phones |
| Operation temperature | -10 °C to + 50 °C |
| Water-resistant | Yes |
natural_image
Line drawings of electronic components including a device, cable, switch, and CD (no text or symbols)GT-600 package contents
| GT-600 | |
| Dimension | 46 x 41.5 x 14 mm |
| Weight | 37g |
| Chipset | Built-in SiRF StarIII low-power chipset |
| Antenna | Built-in GPS patch antenna |
| Battery | Built-in 750 mAh Lithium-ion battery |
| LED indicators | Blue & Red |
| Cold start | < 35 seconds |
| Warm start | < 35 seconds |
| Connection interface | USB 1.1 for PC connection; |
| Operation temperature | -10 °C to + 50 °C |
| Water-resistant | Yes |
| Motion detection | Yes |
natural_image
Technical line drawings of electronic components including a USB device, cable, CD, and disc (no text or symbols)| GT-200 | |
| Dimension | 46 x 41.5 x 14 mm |
| Weight | 37g |
| Chipset | Built-in SiRF StarIII low-power chipset |
| Antenna | Built-in GPS patch antenna |
| Battery | Built-in 750 mAh Lithium-ion battery |
| LED indicators | Blue & Red |
| Cold start | < 60 seconds |
| Warm start | < 38 seconds |
| Connection interface | USB 1.1 for PC connection;Bluetooth V2.0 EDR Class 2 for PDA & mobile phones |
| Operation temperature | -10 °C to + 50 °C |
| Water-resistant | Yes |
GT-200 package contents
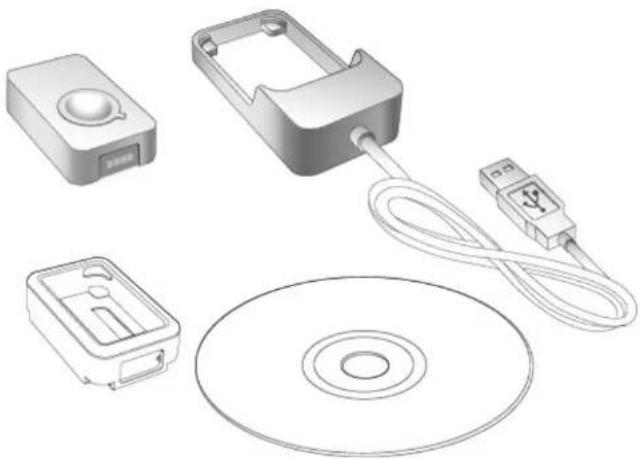
natural_image
Technical line drawing of electronic components including a CD, battery pack, and connector (no text or symbols)GT-100 package contents
| GT-100 | |
| Dimension | 47 x 29 x 12 mm |
| Weight | 21g |
| Chipset | Built-in SiRF StarIII low-power chipset |
| Antenna | Built-in GPS patch antenna |
| Battery | Built-in 230mAh Lithium-ion battery |
| LED indicators | Blue & Red |
| Cold start | < 60 seconds |
| Warm start | < 38 seconds |
| Connection interface | USB 1.1 |
| Operation temperature | -10 °C to + 50 °C |
| Water-resistant | Yes |
| GPS Logger Dock | GPS Logger Dock works both as GT-100 built-in battery charger and data transfer medium for GT-100. |
| GPS Logger USB Cable | GPS Logger Cable works both as GT-600 / GT-200 / GT-200e / GT-120 built-in battery charger and data transfer medium for GT-600 / GT-200 / GT-200e / GT-120. |
| @trip PC CD-ROM | @trip PC is an easy to use software tool to fast create and personalize the Travel Blog for your journey. Follow the on-screen instructions to complete the installation. |
| GPS Logger jelly case | Besides especially designed for broader appliances, both GPS Logger (USB) & GPS Logger (Bluetooth) also comes with a jelly case for easier wear or any other kind of attachment. |
| GPS Logger Fastening Strap | GPS Logger Fastening Strap allows you to tie and fasten the GPS Logger anywhere for easier travel. |
Note: Considering the need for GPS Logger to be used outdoors, it is designed as a water-resistant device. Just like the watch, it'll still function normally when it gets splashed by rain or water. Although it is made water-resistant, it should NOT be carried under water for activities like swimming, diving, and etc. Inappropriate use of GPS Logger might cause unexpected damages to it.
Outlook of GPS Logger

text_image
LED Indicator (Red) Eyelet LED Indicator (Blue) Button Metal contacts GT-100 / GT-120 LED Indicator (Red & Blue) Eyelet Button Metal contacts GT-200 / GT-200e / GT-600Next
Getting Started with GPS Logger
The following demonstrates how to get started with your GPS Logger and @trip PC:
- Install @trip PC

text_image
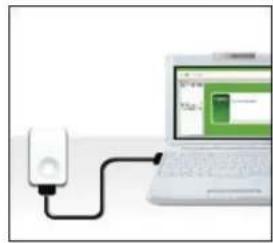
Laptop screen displaying a login interface with a green login page and a CD, next to a blue CD file.- Charge GPS Logger
natural_image
Illustration of a white electronic device connected to a laptop displaying a green screen (no text or symbols visible)- Power on

natural_image
Hand holding a white rectangular device with a small blue star icon on the top (no text or symbols visible)- Get first GPS fix

natural_image
Illustration of a satellite receiving signal from an antenna against a blue sky with clouds (no text or symbols)- Connect PC to import data
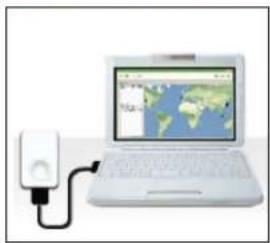
natural_image
Illustration of a laptop connected to a plug with a network interface, showing global map and world map (no text or symbols on device)1. Install @trip PC
Insert the CD-ROM to the CD-ROM drive and follow the on-screen instructions to install @trip PC.
Top
2. Charge GPS Logger
GPS Logger Dock/ USB Cable serves as a charger as well as data transfer medium. Please follow the instructions shown in the illustrations below to connect your GPS Logger to PC and have it fully charged.
It takes about 4 hours to fully charge your GPS Logger for the first time. 2-hour charge is enough for later use. The red LED indicator stays on during charging, and goes off when charging is complete. Remove your GPS Logger when charging is complete.
Tip: You can also use any market available standard USB car charger or USB travel charger to charge up the battery power for your GPS Logger.

Note: One side of the USB connector marked with an arrow should face up when you intend to connect it to the device, in order to avoid unexpected damage caused by Incorrect plugging.

natural_image
Line drawing of a rectangular device with a circular opening and a black arrow pointing to a small component (no text or symbols)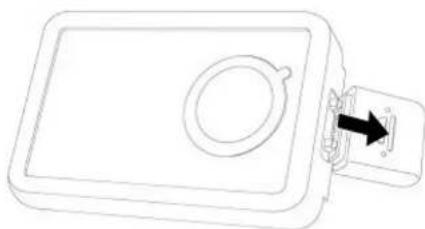
natural_image
Line drawing of a rectangular device with a circular opening and a separate handle, showing an arrow pointing to the right side (no text or symbols)Connect & Remove GPS Logger USB Cable

natural_image
Simple line drawing of a rectangular device with a circular top and a black arrow pointing to a small component (no text or symbols)
natural_image
Line drawing of a square electronic component with a circular hole and a separate connector (no text or symbols)
natural_image
Illustration of a device with two labeled parts connected to a laptop, showing internal components and wiring (no text or symbols present)Install & Charge GPS Logger
Top
3. Power on/off your GPS Logger
Long press the button to power on/off your GPS Logger. The blue LED indicator blinks once upon power-on, and the red LED indicator blinks upon power-off.
Tip: Go to GPS Logger indicators to familiarize yourself with the LED indicators.
Note: @trip PC automatically adds GPS information to the photos taken on your journey with fussy time mapping; therefore, setting up a correct time for your camera/camera phone will enhance the mapping procedure.
Top
4. Initiate your GPS Logger for the first GPS fix
It requires a clear sky for your GPS Logger to receive GPS signals and acquires a GPS fix. Please leave your GPS Logger on the balcony, the top of your car, or anyplace where there is no obstruction or shading to fasten up the GPS fix acquisition for your GPS Logger.
Once the first GPS fix is successfully acquired, both the blue and red LED indicators of GPS Logger will blink simultaneously twice, indicating that track logging has begun. GPS Logger will then start logging based on the tracking interval configured in hardware settings.
Note:
-
Find the LED indicator demos in GPS Logger LED indicators.
-
For more detailed information on the GPS fix, correct wear and use of your GPS Logger, please refer to Essentials for Beginners
Top
5. Data import & @trip PC
Connect your GPS Logger to your computer, and launch @trip PC to start importing track data logged in your GPS device. Click Import GPS Track and follow the on-screen instruction to import the track logs saved on GPS Logger to your computer. Click on the imported track, and you can see it on Google Map in few seconds.
Note:
- It requires Internet connection to retrieve the map data for the selected track.
- For correct mapping of track data and photos, please make sure your camera time is adjusted prior to starting a track. If any photo taken along the track is not correctly located, please Adjust Camera Time with @trip PC, or use Photo Locator for further fixing.
Top
Next
GPS Logger LED Indicators
The following lists various LED indications of GPS Logger:
Main indication:

Power On
The blue LED indicator blinks once.
Operation: Long press (1.5 seconds) the button to power on GPS Logger.
Note: When the device is powered on and starts tracking, the blue LED Indicator blinks every 4 seconds. For GPS Loggers with firmware versions older than 3.0, the blue LED Indicator blinks every 16 seconds.

natural_image
Simple icon of a speech bubble inside a rounded square (no text or symbols)Data Logged
Both the red and blue indicators blink simultaneously twice.
Status: Device is powered on and GPS data has been logged successfully.


natural_image
Simple icon of a speech bubble inside a rounded square (no text or symbols)Power Off
Long press the button, and the red LED stays red until GPS Logger is powered off.

Memory full / Battery low
The red LED blinks: twice / once.

natural_image
Simple icon of a speech bubble inside a rounded square (no text or symbols)BT Pairing
The blue and red LED indicators blink in turn for 5 minutes during pairing mode.
Operation: While Bluetooth GPS Logger is turned off, long press (5 seconds) to enter pairing mode. (Please refer to the user manual of your handset or bluetooth device for details on bluetooth pairing.)
Note:
- If necessary, enter the passcode "0000" to complete pairing.
- Once Bluetooth GPS Logger is successfully paired, it will not exit the pairing mode automatically. It is normal to see both the red and blue LED indicators flash continuously.
- Once Bluetooth GPS Logger is connected via bluetooth, only the blue LED indicator will flash continuously.
- Once bluetooth connection is enabled on GT-200e, it will start logging by default.
- If bluetooth connection fails, GT-200 Bluetooth GPS Logger will turn off automatically after 5 minutes.
Others:
Charging
The red LED indicator stays on during charging and goes off when charging is complete.
Status: The device is connected to power sources, such as car charger or computer USB port.
Push-to-log
The blue LED indicator blinks once, followed by both indicators blinking simultaneously twice.
Status: Device is powered on and functions normally.
Operation: Press the button once to log the current GPS information.
Data Transfer
The red LED indicator stays on, and the blue LED indicator blinks randomly.
Status: The device is connected to PC and transferring data.
GPS Receiver
The blue LED indicator blinks steadily.
Status: Receiving GPS information for the connected navigation device/ software.
Next
Essentials For Beginners
Before hitting on the road with your GPS Logger, please read the following information thoroughly to ensure the GPS Logger to work properly, lest any incorrect operation ruin your precious travel memories.
GPS Logger wear & attachment
When taking GPS Logger from indoors to outdoors, it usually takes longer to get a GPS fix. Please place your GPS Logger face-up toward the sky and press the button to acquire a GPS fix.
Tip: If GPS Logger functions normally and gets a GPS fix, both the red and blue LED indicators blink simultaneously twice, indicating the current GPS information is logged successfully to the device memory.
Please always place your GPS Logger exposed to the open sky to ensure the successful GPS fix acquisition. Refer to the illustration below to expose your GPS Logger as much as possible in the open sky to ensure stable and successful GPS fix acquisition.
 |  |  | 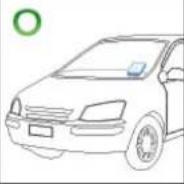 | |||
| face-up | exposed to the sky | near the car windshield | ||||
 | 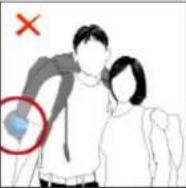 | 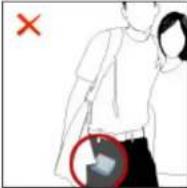 |  | |||
| face-down | inside backpack/ bag or pocket | on the car backseats | ||||
GPS Logger setup
GPS Logger: GPS Logger is water-resistant, designed for a broader use. Multiple tracking modes with different data logging intervals work for both short & long journey.
Note: Click 📄 on the main menu bar of @trip PC to configure your GPS Logger. For detailed setup information, please refer to Hardware & Software Settings.
Camera/ Camera phones: @trip PC automatically adds GPS information to the photos taken on your journey with fussy time mapping; therefore, setting up a correct time for your camera/ camera phone will enhance the mapping procedure.
Note: Besides auto-mapping, you can also manually map the photos to your Trip. For more information, please refer to Compose Trip.
Safety information
Please do not leave your GPS Logger exposed to high temperature for a long time, such as on the inside of the windshield of a car at noon in the summer, to avoid the overheat to cause any device malfunction or danger.
Next
GPS Classroom
What is GPS: Global Position System (GPS) is developed and operated by the Department of Defense (DOD) of the United States, on which the accuracy and maintenance of this system fully depends. Any change made by the authorities might influence the accuracy and performance of the GPS equipments.
How GPS works: GPS provides satellite signals which are specially coded for the computation in a GPS receiver to produce the position, velocity and time. Usually it requires four GPS satellite signals to computer correctly the position in three dimensions and the offset time of the GPS receiver's clock.
Limitations on GPS reception: Initial or any use after a longer interval over four hours takes a few minutes for a successful location. Any obstruction above or around the receiver, such as high buildings in the neighborhood, or bad reception location, such as in a tunnel or in the building, will influence the time needed for a successful GPS location.
Cold Start: Cold start of the GPS device refers to the state of the tracker when time and position are known to within some limits, the almanac known, and the ephemeris unknown.
Example: If the GPS device has been off for a few hours, and the ephemeris data is known for at least three satellites, the start up will be a warm start and fix the positional in 10 - 20 seconds. Therefore, if ephemeris data for only 2 or less satellites is known it's a cold start and acquisition will take as much as a few minutes.
Warm Start: Warm start of the GPS device refers to the state of the device when time and position are known to within some limits, the almanac known, and at least 3 satellite ephemeris are known from previous operation.
Example: If the GPS device has been off for only a few minutes, the ephemeris data for all the satellites will be known and therefore the GPS device will fix the positional in a matter of seconds.
Note: The almanac data is an estimated (computed) data and can be valid for months while the ephemeris is only valid for 3 - 6 hours.
Note: Actual acquisition time depends on the terrain and satellite coverage.
Next
Use GPS Logger as GPS Receiver
A GPS Logger serves not only as a GPS data logger that records all the GPS data on your journey but also works as a GPS receiver for many navigation software by third parties. Connect it to any PC installed with navigation software to work both together as a GPS navigation system.
GPS Logger with PC
-
Slide GPS Logger onto GPS Logger Dock/ USB Cable and connect it to your PC USB port.
-
Please go to Start->Settings ->Control Panel ->System ->Hardware ->Device Manager ->Ports (COM & LPT), and note down the com port number of "GPS Logger USB Com Port" device.
- Please refer to the user manual of your navigation software to set up the transfer port and set the Baud rate between 9600 and 115200.
- The blue LED indicator starts to flash when the setup is completed. GPS Logger now works as GPS receiver for your navigation software.
Note: When you connect GPS Logger to the PC installed with navigation software, please select the specific COM port that GPS Logger is assigned.
Bluetooth GPS Logger
- During Bluetooth GPS Logger is turned off, long press (5 seconds) to enter pairing mode. Long press (1.5 seconds) the button to power off Bluetooth GPS Logger.
- The blue and red LED indicators blink in turn for 5 minutes during pairing mode.
- Once Bluetooth GPS Logger is successfully paired, it will not exit the pairing mode automatically. It is normal to see both the red and blue LED indicators flash continuously.
*If necessary, enter the passcode "0000" to complete pairing.
- Please refer to the user manual of your navigation software for the detailed information on using Bluetooth GPS Logger as GPS receiver for your navigation software.
Next
@trip PC
@trip PC is a specialized software that can auto-add GPS information on the photos taken on your journey and present your journey lively on 3D map. Besides, @trip PC offers great functionality that allows you to create, customize and export your trips in various file formats, in order to share many traveling fun times with your family and friends.
Using @trip PC can be as simple as three short steps:
» Launch @trip PC
» Start A Trip
» Share A Trip
Next
Easy-to-use interface. Let @trip PC do all the hard work for you!
text_image
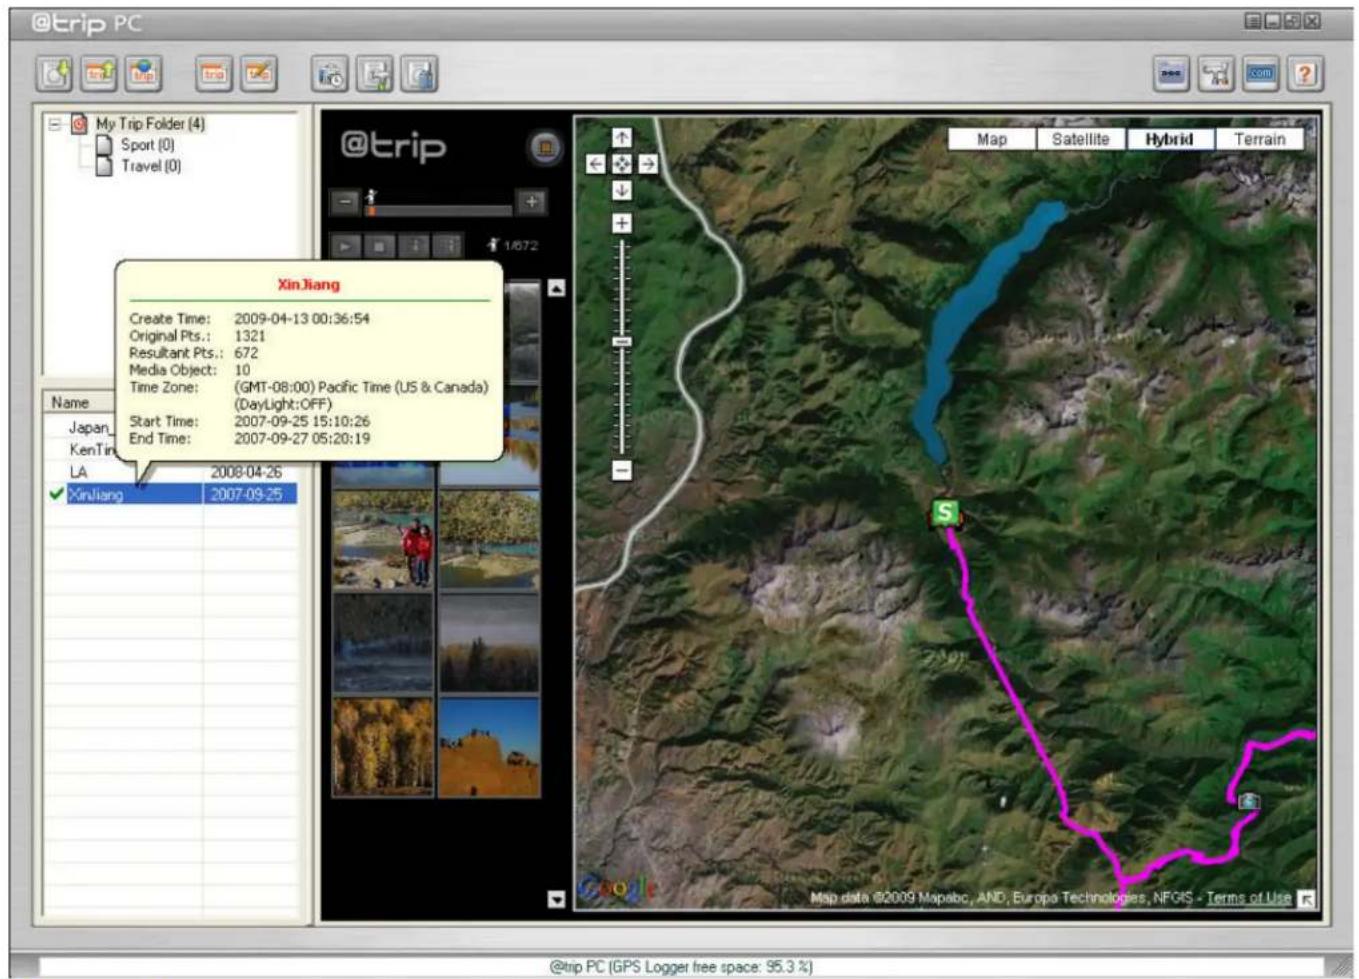
@trip PC My Trip Folder (4) Sport (0) Travel (0) @trip 1/672 XinJiang Create Time: 2009-04-13 00:36:54 Original Pts.: 1321 Resultant Pts.: 672 Media Object: 10 Time Zone: (GMT-08:00) Pacific Time (US & Canada) (DayLight:OFF) Start Time: 2007-09-25 15:10:26 End Time: 2007-09-27 05:20:19 Japan KenTi LA 2008-04-26 XinJiang 2007-09-25 Map Satellite Hybrid Terrain Map data ©2009 Mapabc, AND, Europa Technologies, NFGS - Terms of Use @trip PC (GPS Logger free space: 95.3 %)Main menu bar
Main menu bar provides you with quick accesses to the main functions and information concerned.

Import GPS Track : Click to to launch Import Wizard to import GPS log data.

Share Trip: Click to share your trip by uploading to @trip server (including an option to make it public), exporting to file, or any advanced options.

Download from @trip server: Click to download trip(s) previously uploaded to @trip Server.

New Trip: Click to add a new trip.

Edit Trip: Click to edit existing track(s).

Adjust Camera Time : Click to adjust the dimf your caena.

text_image
Adjust Camera Time 2009-04-13 00:45:16 (GMT-08:00) Pacific Time (US & Canada) Daylight Saving 2009/04/13 00:45:12 Last time sync. with server Sync. Time with Server @trip PC will automatically locate your photo on the map based on the time of the photo and the track. In order to correctly locate your photo geographically, please make sure your camera time is adjusted prior to starting a track with GPS Logger. You can also click ""Sync. Time with Server"" to obtain the correct time for your computer. OKNote: For correct mapping of track data and photos, please make sure your camera time is adjusted prior to starting a track. Or click Sync. Time with Server to obtain the correct time from server.

Hardware Settings: Click to customize the tracking modes of your GPS Logger .

Clear Device Data: Click to clear the GPS logs saved on your GPS Logger.

Track Management: Click to manage all existing tracks.

Software Settings: Click to customize the @trip PC settings.

Visit @trip: Click to connect to @trip website: www.a-trip.com.

Help: Click to bring up @trip PC Help file.
Trip folder window

text_image
My Trip Folder (4) Sport Travel New Folder Delete Rename Copy FolderThis trip folder window gives a clear view of how trips are categorized and stored. Right-click on a folder options: m
☒ New Folder : A sub-folder will be created under the selected folder.
☒ Delete : The selected folder will be deleted.
Rename : The selected folder can be readm
Copy Folder : The selected folder will be duplicated.
Trip information window

text_image
Japan_Helene 2009.06.15 KenTing LA XinJiang Copy Delete Rename Edit Share Trip Export to GPX Export to CSV Reload Map Attributes...Trip information window gives a clear view of all the imported trips in selected trip folder. Right-click on a trip to see more options:
• Copy: The selected trip will be duplicated.
- Delete: The selected trip will be deleted from the list.
- Rename: The selected trip can be renamed.
• Edit: The selected trip can be edited by launching the Trip Composer.
• Share Trip: The selected trip can be shared by launching the Share Wizard.
- Export to GPX: The selected trip can be exported to a GPX file (.gpx).
- Export to CSV: The selected trip can be exported to a CSV file (.csv).
- Reload Map: The map of selected trip will be refreshed.
- Attributes...: The attributes of selected trip can be edited in a pop-up dialog.

text_image
Attributes... Subject: Xinjiang Description: Create Time: 2008-11-24 18:54:30 Track Count: 1 Original Pts.: 1321 Resultant Pts.: 681 ✓ Optimize track(s) ✓ Revise track -0 ✓ Remove redundant waypoints -640 0 - Optimization Level (0 - 100) -0 Media Object: 10 Time Duration: 2007-09-25 15:10:26 ... 2007-09-27 05:20:19 Time Zone: [GMT-08:00] Pacific Time (US & Canada) ☐ Daylight Saving Share URL: Share your trip map via E-mail OK CancelNext
Start A trip
Try one of the methods below to start a trip:
A. Start A Trip by Launching @trip PC
Launch @trip PC, and you'll be prompted to download log data from your GPS device if connected to PC.

text_image
@trip PC My Trip Folder (4) Sport (0) Travel (0) Name Date Japan_Hakone 2008-06-15 KenTing 2008-06-29 LA 2008-04-26 Xinjiang 2007-09-25 @trip PC GPS device detected. Download GPS log data now? Yes No All brand names and trademarks are properties of their respective owners. @trip PC (GPS Logger free space: 95.3 %)- Make sure your GPS device is connected to PC, and click Yes to start downloading logged track data.
- Enter a trip name, and click OK to proceed.
- The Import Wizard will start downloading log data from your GPS device. Downloaded track data will be listed as shown below. Select track(s) to create a trip, and click Next to continue.

text_image
Select Track Start A Trip Time Zone (GMT-08:00) Pacific Time (US & Canada) Daylight Saving Name Device Start Time Waypoints Japan_Hakone(1) 4AE50B98 2008-06-15 10:21:52 2155 KenTing(1) 4AE50BD3 2008-06-29 23:02:30 7702 LA(1) 4AE50C0B 2008-04-26 08:24:34 572 ✓ Trip_A(1) SN:0100215149 2008-09-26 00:24:01 766 XinJiang(1) 4AE50C2D 2007-09-25 15:10:26 1321 < Back Next > Cancel Help- Select a mp template to display your trip.

text_image
Select Template Trip name: Trip_A Map template: Classic Style Description: A classic style screen layout to display your track map. Classic Style Sporting Style Simple Style < Back Next > Cancel Help- Click Add to add photos to the map of your trip. Click Next to continue.
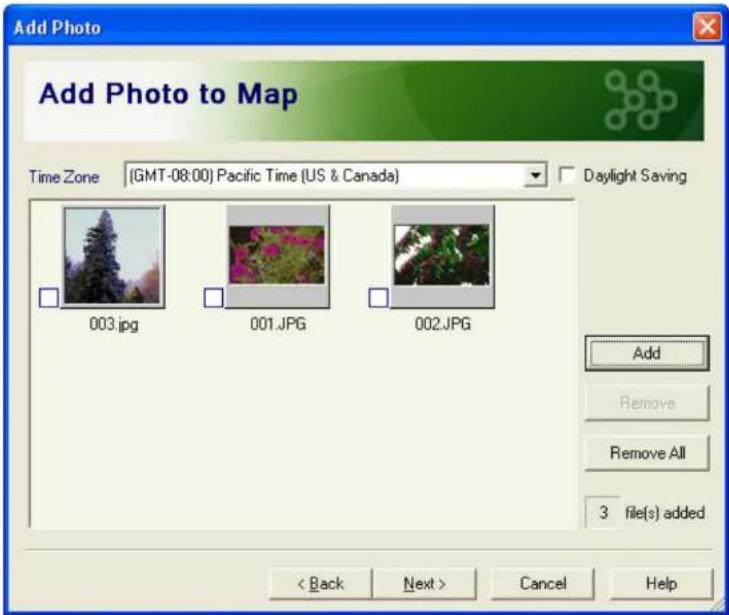
text_image
Add Photo Add Photo to Map Time Zone (GMT-08:00) Pacific Time (US & Canada) Daylight Saving 003.jpg 001.JPG 002.JPG Add Remove Remove All 3 file(s) added < Back Next > Cancel Help- Import Wizard is now processing track data.

text_image
Process Data Process track data... Import Wizard is now processing track data... Please wait while mapping file(s).... 3 done! Please wait while writing information to file.... done! 0%- Finally, a trip is cplated.

text_image
Complete Trip Completed. Track data and photos are imported successfully. Number of photo(s) not yet matched: 3 Use Trip Composer to map the unmatched photo(s). < Back Finish Cancel Help*If added photos failed to match imported track data, click 📄 to launch Trip Composer to map the unmatched photos.
B. Start A Trip by Creating A New Trip
Click 📁 on the main menu bar, and you'll be prompted to select from imported tracks to start a new trip. See Method A for the rest of data import process.
C. Start A Trip by Importing GPS Track
Click 📄 on the main menu bar, and the Import Wizard will prompt you for more import options:
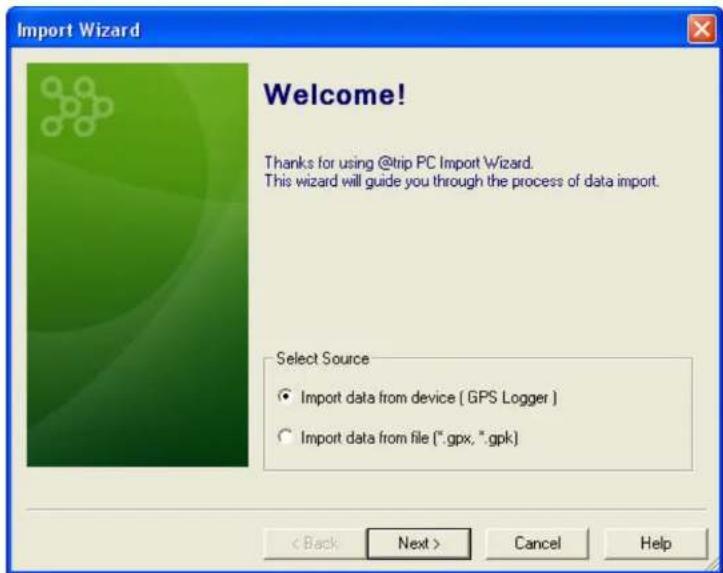
text_image
Import Wizard Welcome! Thanks for using @trip PC Import Wizard. This wizard will guide you through the process of data import. Select Source • Import data from device [ GPS Logger ] • Import data from file (*.gpx, *.gpk) < Back Next > Cancel Help- Import data from device: The Import Wizard will start downloading log data from your GPS device. See Method A for the rest of data import process.
- Import data from file (*.gpx, *gpk): This option allows you to import a previously exported gps file (ex. *.gpx, *gpk). See Method A for the rest of data import process.
Next
Compose Trip
Select a trip from the trip information window, and click 📄 on the main menu bar to launch Trip Composer.
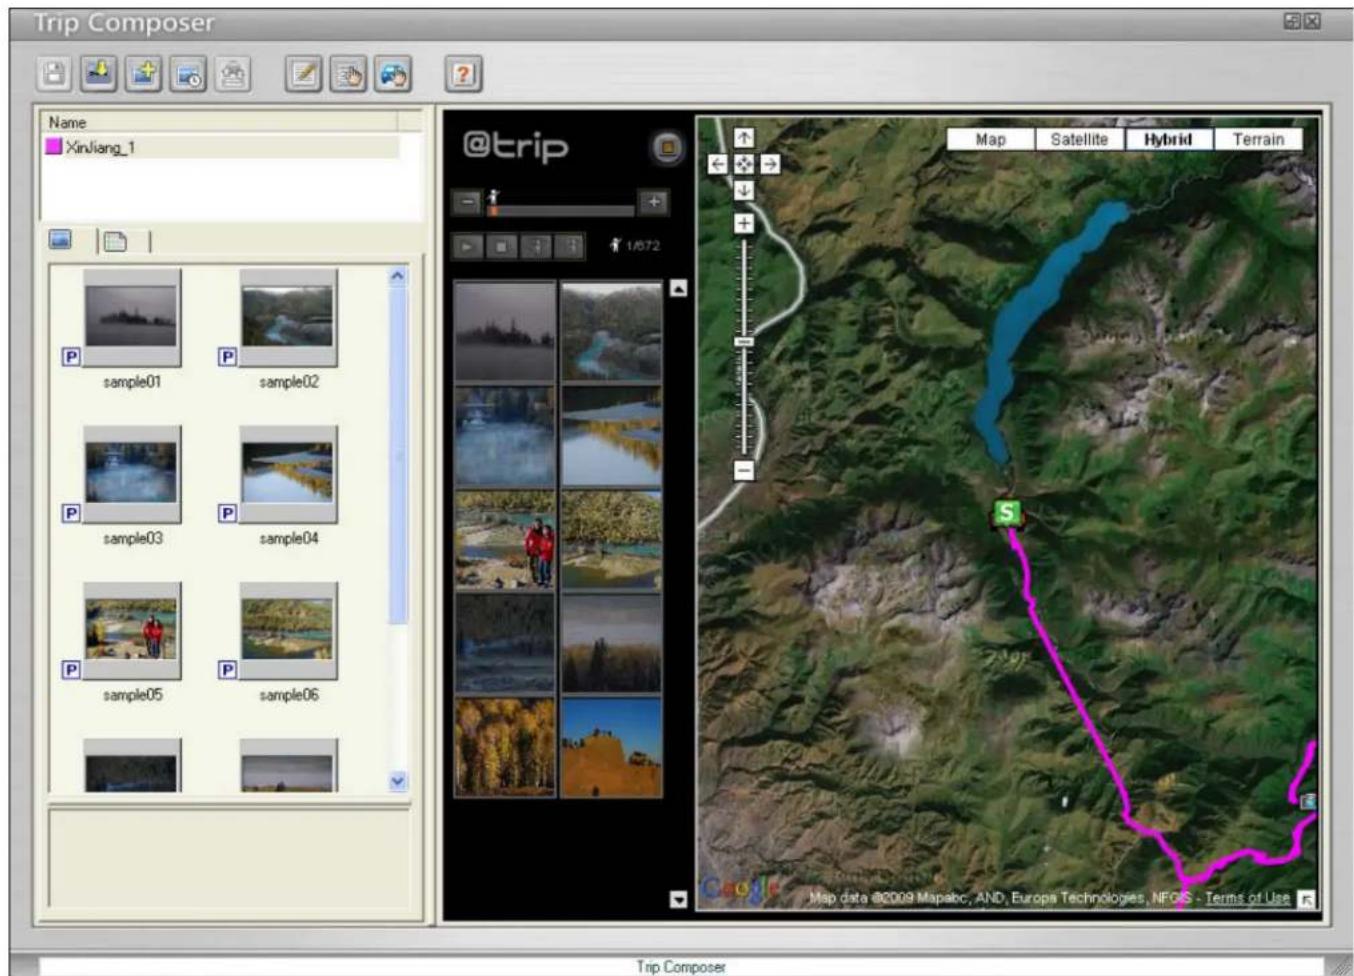
text_image
Trip Composer Name Xinliang_1 @trip 1/872 Map Satellite Hybrid Terrain sample01 sample02 sample03 sample04 sample05 sample06 Map data @0009 Mapabc, AND, Europa Technologies, NFGS - Terms of Use S Map data @0009 Mapabc, AND, Europa Technologies, NFGS - Terms of Use Trip ComposerFunction Menu Bar

Save & Exit: Click to either save changes and exit Trip Composer, exit without saving changes, or return to composer without saving.

Import GPS Track: Click to import track(s).

Import Photo: Click to import photo(s).

Photo Locator: Click to relocate photos that are inaccurately located on the map due to incorrect camera time.

Synchronize : Click to synchronize trips in @trip PC and @trip server.
Update to @trip PC : Click to replace current trip contents in @trip PC with selected trip content@tripserver.
Select All from @trip Server : Click to select all the trip contents @trip server, and click apply to replace the trip contents in @trip PC.
Note: While synchronizing trip contents, only the comparison differences of trip contents in @arip displayed.
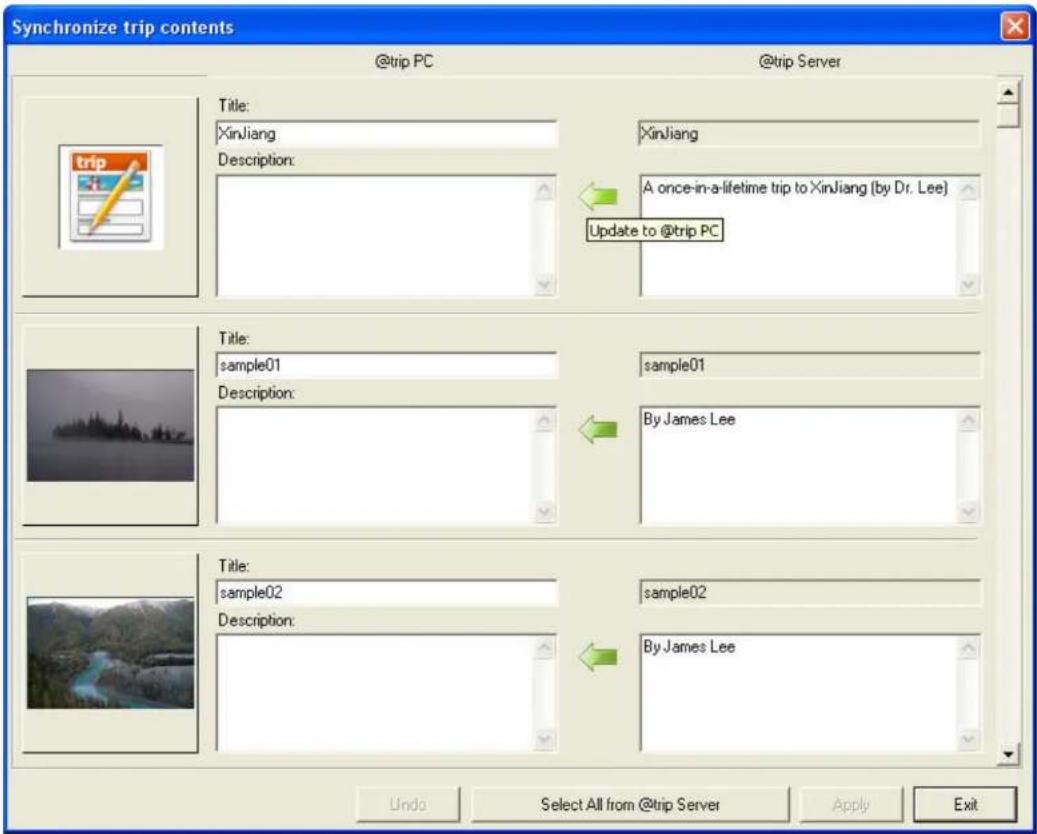
text_image
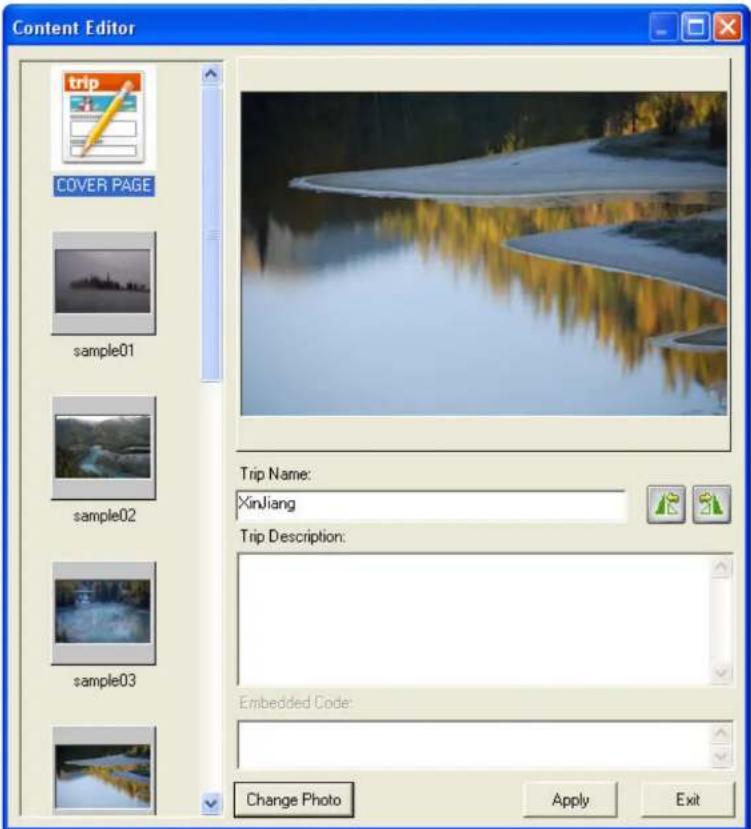
Synchronize trip contents @trip PC @trip Server Title: XinJiang Description: A once-in-a-lifetime trip to XinJiang (by Dr. Lee) Update to @trip PC Title: sample01 Description: sample01 By James Lee Title: sample02 Description: sample02 By James Lee Undo Select All from @trip Server Apply ExitContent Editor: Click to quickly edit Cover Page or photos of the trip.
- Edit Cover Page: Enter a trip name and its brief description, or click Change Photo to select a different photo as the Cover Page of the trip.
• Edit photo: Enter a photo title and its brief description.
Click 📄 or 📃 anytime to rotate the photo left or right.
text_image
Content Editor trip COVER PAGE sample01 sample02 sample03 Trip Name: XinJiang Trip Description: Embedded Code: Change Photo Apply Exit
Template : Click to select aapntemplate.

Set Runner: Click to set up a Runner image to play the track animation on the map.

Help: Click to bring up @trip PC Help file.
Track information window
text_image
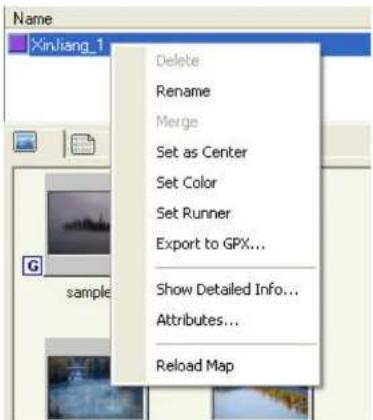
Name XinJiang_1 Delete Rename Merge Set as Center Set Color Set Runner Export to GPX... Show Detailed Info... Attributes... Reload MapAt the track information window, right-click a selected track to see more options:
- Delete: The selected track will be deleted.
- Rename: The selected track can be renamed.
-
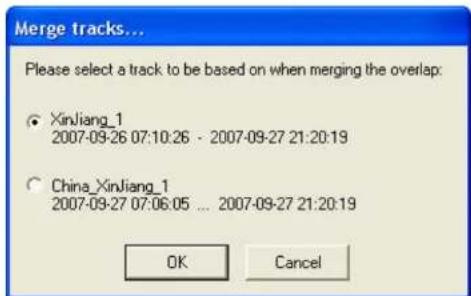
Merge: The selected tracks will be merged.
-
If the track time of selected tracks does not overlap, selected tracks will be merged automatically after clicking Merge.
-
If there is a overlap of track time among selected tracks, please select a primary track to be based on when merging the overlap:
text_image
Merge tracks... Please select a track to be based on when merging the overlap: ○ XinJiang_1 2007-09-26 07:10:26 - 2007-09-27 21:20:19 ○ China_XinJiang_1 2007-09-27 07:06:05 ... 2007-09-27 21:20:19 OK Cancel- Set as Center: The selected track will be set as the center of the map.
- Set Color: The selected track can be added a color to be distinct.
- Set Runner: A Runner image can be set up to play the track animation on the map.

text_image
Select Runner red_car.git Sample01.gif Sample02.gif Sample03.gif Set As Default Add New Restore OK Cancel- Select a Runner image and click OK to exit.
- Click Save As Default, and the selected image will be set as the default Runner image whenever the animation is started.
- Click Add New to add a new image using Runner Editor.
- Click Restore, and Trip Composer will use the image previously set as default Runner image to run animation.

text_image
Runner Editor Preview 1 Select image Runner Pool red_car.git Sample08.git Sample09.git Sample10.git Close- Export to GPX...: The selected track can be exported to a .gpx file.
• Show Detailed Info...: The detailed waypoints information of the selected track will be displayed in a pop-up window.
Waypoints information
| Time | Latitude | Longitude | Altitude | Distan.. | Leg Ti.. | Speed.. | Course |
| 2007/09/25 15:10:26 | N 48.679779 | E 87.026489 | 0.00 | 1109.1 | 63 | 59.0 | 168.4 |
| 2007/09/25 15:11:29 | N 48.670010 | E 87.029533 | 0.00 | 1057.9 | 63 | 53.8 | 166.4 |
| 2007/09/25 15:12:32 | N 48.660763 | E 87.032921 | 0.00 | 504.7 | 216 | 65.7 | 125.6 |
| 2007/09/25 15:16:08 | N 48.658119 | E 87.038506 | 0.00 | 92.0 | 221 | 0.6 | 271.6 |
| 2007/09/25 15:19:49 | N 48.658162 | E 87.037254 | 0.00 | 43.3 | 68 | 4.0 | 193.5 |
| Split | 7117 | 0.00 | 168.1 | 142 | 3.8 | ||
| 2007/09/25 15:20:57 | 1904 | 0.00 | 104.1 | 144 | 1.5 | ||
| 2007/09/25 15:23:19 | 5278 | 0.00 | 54.2 | 67 | 0.2 | ||
| 2007/09/25 15:25:43 | 5553 | 0.00 | 72.2 | 81 | 2.0 | ||
| 2007/09/25 15:26:50 | 5461 | 0.00 | 150.0 | 69 | 1.8 | ||
| 2007/09/25 15:28:11 | 1424 | 0.00 | 156.1 | 82 | 0.3 | ||
| 2007/09/25 15:29:20 | 5545 | 0.00 | 90.4 | 86 | 1.4 | ||
| 2007/09/25 15:30:42 | 5347 | 0.00 | 134.0 | 68 | 2.6 | ||
| 2007/09/25 15:32:08 | N 48.657310 | E 87.036347 | 0.00 | 134.0 | 68 | 2.6 | 91.4 |
| 2007/09/25 15:33:16 | N 48.657288 | E 87.037170 | 0.00 | 71.8 | 61 | 1.8 | 267.6 |
| 2007/09/25 15:34:17 | N 48.657261 | E 87.036194 | 0.00 | 140.6 | 73 | 1.3 | 133.5 |
| 2007/09/25 15:35:30 | N 48.656391 | E 87.037582 | 0.00 | 154.2 | 81 | 3.0 | 314.6 |
| 2007/09/25 15:36:51 | N 48.657364 | E 87.036087 | 0.00 | 33.6 | 82 | 2.2 | 252.2 |
For each individual waypoint of the track, you can:

Split: Split the selected waypoint into two.

Remove Above: Remove the waypoint(s) listed above the selected one from the track.

Remove Selected: Remove the selected waypoint from the track.

Remove Below: Remove the waypoint(s) listed below the selected one from the track.

Set as Landmark...: Set the selected waypoint as a landmark.
区
To set a landmark:
- Enter a title for this lanakn
- Enter brief description about this landin
- Select a media type for this landrk:
- Landmark : Select this edia type, and the landnk will be presented by text (title and description) only orapthe m
- Photo : Select this edia type, and the landnk will be presented with a selected photo on abhe m
- Embedded Code : Select this edia type, and the landnk can be set up by entering abeded htnh code.
Note: To avoid unexpected security loophole, landmarks configured with embedded code will not be displayed on @trip Service at this moment.
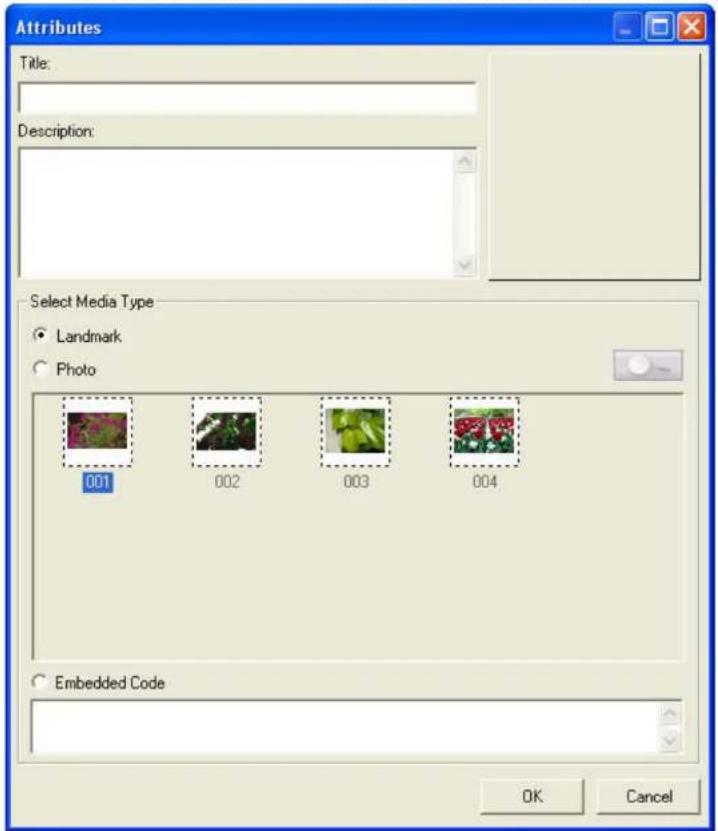
text_image
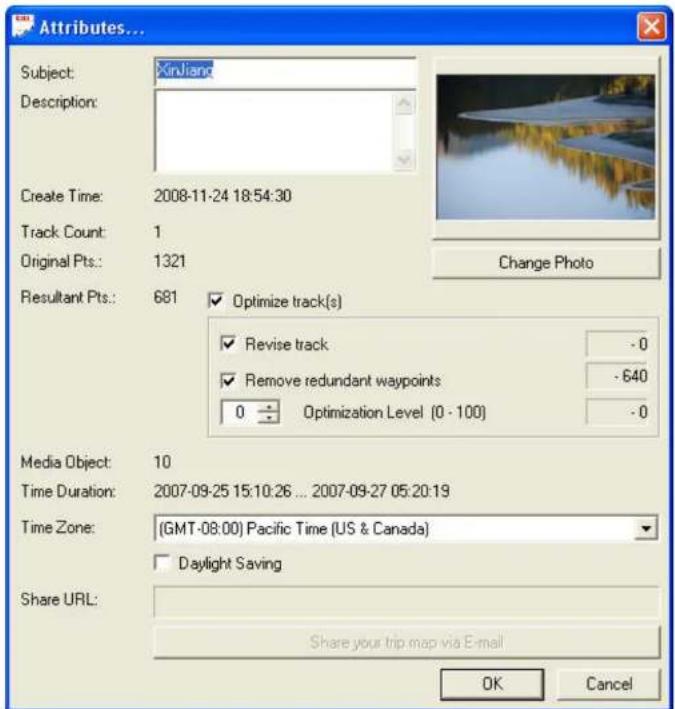
Attributes Title: Description: Select Media Type Landmark Photo 001 002 003 004 Embedded Code OK Cancel- Attributes...: The attributes of the selected track can be edited in a pop-up dialog. Click Change Photo to select a different photo as the Cover Page of the trip.
text_image
Attributes... Subject: Xirilant Description: Create Time: 2008-11-24 18:54:30 Track Count: 1 Original Pts.: 1321 Resultant Pts.: 681 ✓ Optimize track(s) ✓ Revise track - 0 ✓ Remove redundant waypoints - 640 0 ÷ Optimization Level (0 - 100) - 0 Media Object: 10 Time Duration: 2007-09-25 15:10:26 ... 2007-09-27 05:20:19 Time Zone: [GMT-08:00] Pacific Time (US & Canada) ☐ Daylight Saving Share URL: Share your trip map via E-mail OK Cancel- Reload Map: Click to refresh and reload the map displayed at the right half of the composer window.
Track Content Folder
Photo/Landmark: Photos matching the track and configured landmarks are presented in the upper window of this folder. Photos added to the trip without matching any track are presented in the lower window of this folder.
Right-click any landmark/photo in the upper window to see more options:
- Select All: All landmark(s) and photo(s) in this window will be selected.
- Remove from Map: The selected landmark/photo will be removed from the map.
- Attributes...: Attributes of the selected landmark/photo can be edited.
-
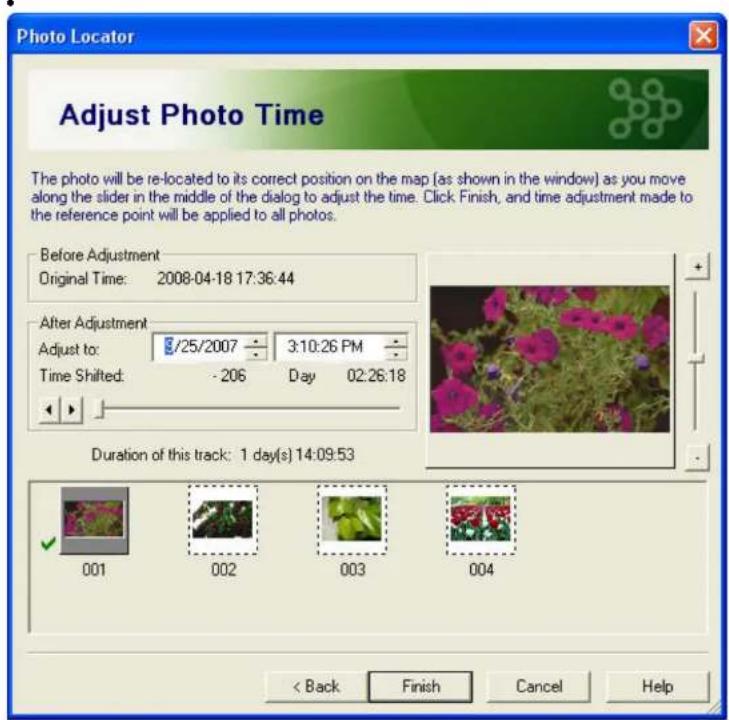
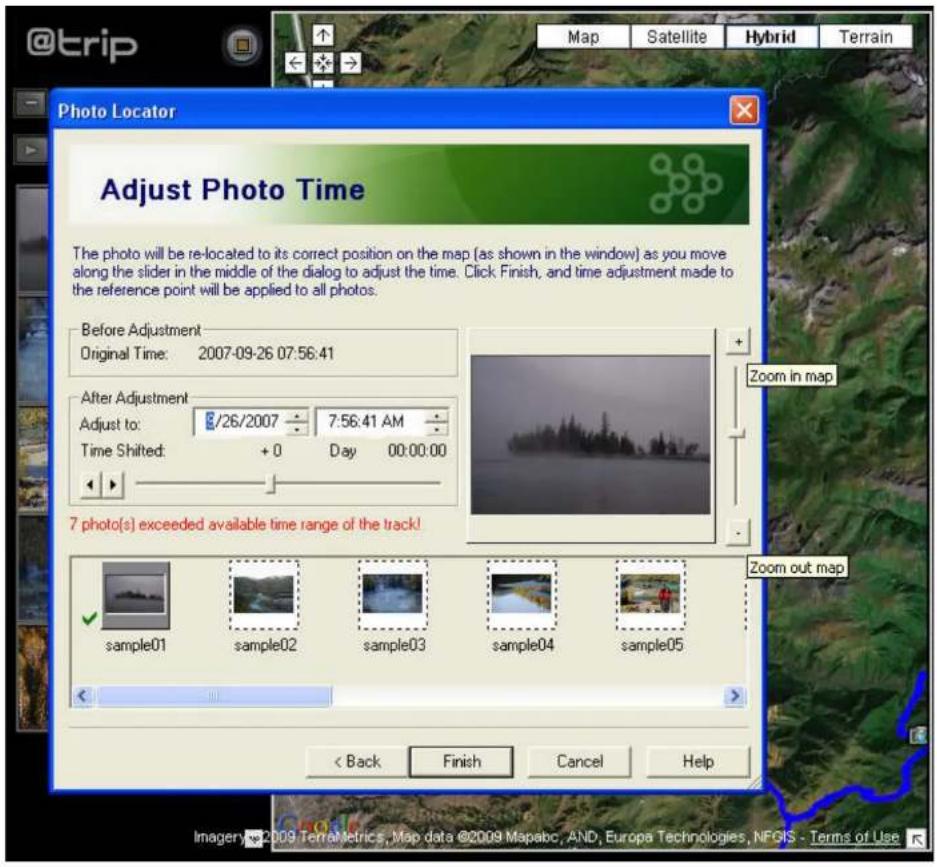
Locate Photos...: Time of the selected photo(s) can be adjusted in Photo Locator.
-
Choose a photo as the reference point, based on which time adjustment will be made to the rest of the photos.
- Use the slider bar in the middle to adjust photo time, and photos will be re-located on the map (as shown in the background window) while time adjustment is being made. Click +/- signs or drag the slider bar next to the photo frame upward/downward to zoom in/out the map in the background window.
- Click Finish to complete photo time adjustment.
text_image
Photo Locator Adjust Photo Time The photo will be re-located to its correct position on the map (as shown in the window) as you move along the slider in the middle of the dialog to adjust the time. Click. Finish, and time adjustment made to the reference point will be applied to all photos. Before Adjustment Original Time: 2008-04-18 17:36:44 After Adjustment Adjust to: 5/25/2007 3:10:26 PM Time Shifted: -206 Day 02:26:18 Duration of this track: 1 day(s) 14:09:53 001 002 003 004 < Back Finish Cancel Help•View on Map: The selected landmark/photo will be displayed on the map.
- Reload Map: The previously displayed map at the right will be refreshed.

text_image
Select All Rotate Left Rotate Right Mirror Remove from Map Attributes... Locate Photos... View on Map Reload Map 001 002 003 004On the other hand, right-click any photo not yet matching any track in the lower window to see more options:
- Select All: All photo(s) in this window will be selected.
- Rotate Left: The selected photo will rotate 90 degree to the left.
- Rotate Right: The selected photo will rotate 90 degree to the right.
- Mirror: The selected photo will be shifted to its symmetric view.
- Delete: The selected photo will be deleted from the trip.
- Add to Map...: The selected photo(s) will be added either to the center of the map or by waypoint location. Once it is added, it'll appear in the upper window.

text_image
Add Photo to Map Add to center of map Add by waypoint location Time Latitude Longitude 2007/09/25 15:10:26 N 48.679779 E 87.026489 2007/09/25 15:11:29 N 48.670010 E 87.029533 2007/09/25 15:12:32 N 48.660763 E 87.032921 2007/09/25 15:16:08 N 48.658119 E 87.038506 2007/09/25 15:19:49 N 48.658142 E 87.037254 2007/09/25 15:20:57 N 48.657764 E 87.037117 2007/09/25 15:23:19 N 48.657379 E 87.034904 2007/09/25 15:25:43 N 48.657150 E 87.036278 2007/09/25 15:26:50 N 48.657063 E 87.035553 2007/09/25 15:28:11 N 48.657310 E 87.036461 2007/09/25 15:29:20 N 48.657223 E 87.034424 2007/09/25 15:30:42 N 48.657135 E 87.036545 2007/09/25 15:32:08 N 48.657318 E 87.035347 2007/09/25 15:33:16 N 48.657288 E 87.037170 2007/09/25 15:34:17 N 48.657261 E 87.036194 2007/09/25 15:35:30 N 48.656391 E 87.037582 2007/09/25 15:36:51 N 48.657364 E 87.036087 2007/09/25 15:38:13 N 48.657272 E 87.035652 2007/09/25 15:39:35 N 48.656422 E 87.037628 2007/09/25 15:41:01 N 48.657169 E 87.037125 2007/09/25 15:42:18 N 48.657352 E 87.036072 2007/09/25 15:43:20 N 48.657406 E 87.034935 OK Cancel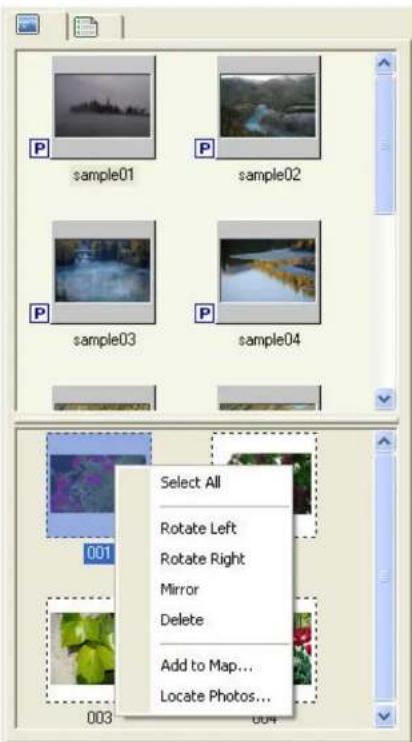
text_image
P sample01 P sample02 P sample03 P sample04 Select All Rotate Left Rotate Right Mirror Delete Add to Map... Locate Photos... 001 003 004- Locate Photos...: Time of the selected photo(s) can be adjusted with this option. Use the slider bar in the middle to adjust the time to desired. See Photo Locator for more details.
Waypoints: Waypoints of selected track are listed in this folder.
Right-click any listed waypoint to see more options:
- Split: Split the selected waypoint into two.
- Remove Above: Remove the waypoint(s) listed above the selected one from the track.
- Remove Selected: Remove the selected waypoint.
- Remove Below: Remove the waypoint(s) listed below the selected one from the track.
- Set as Landmark...: Set the selected waypoint as a landmark.
•Show Detailed Info...: The detailed waypoints information of the selected track will be displayed in a pop-up window.

text_image
Time 2007/09/25 15... N 48.679779 E 87.026489 2007/09/25 15... N 48.670010 E 87.029533 2007/09/25 15... N 48.660763 E 87.032921 2007/09/25 15... N 48.658119 E 87.038506 2007/09/25 15... N 48.658119 E 87.037254 Split Remove Above Remove Selected Remove Below Set as Landmark... Show Detailed Info... 2007/09/25 15... N 48.657261 E 87.036194 2007/09/25 15... N 48.656391 E 87.037582 2007/09/25 15... N 48.657364 E 87.036087 2007/09/25 15... N 48.657272 E 87.035652 2007/09/25 15... N 48.656422 E 87.037628 2007/09/25 15... N 48.657169 E 87.037125 2007/09/25 15... N 48.657352 E 87.036072 2007/09/25 15... N 48.657406 E 87.034935 2007/09/25 15... N 48.657196 E 87.036156 2007/09/25 15... N 48.657364 E 87.034958 2007/09/25 15... N 48.657177 E 87.036476 2007/09/25 15... N 48.657036 E 87.037254 2007/09/25 15... N 48.657425 E 87.033447 2007/09/25 15... N 48.657810 E 87.032852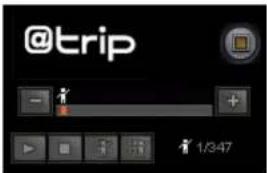
text_image
@trip 1/3:47| Switch between Map Mode and Slideshow Mode | |
| Backward by one auto-selected waypoint | |
| Forward by one auto-selected waypoint | |
| Progress bar of the current track | |
| Stop playing back the current track | |
| Start playing back the current track | |
| Pause the currently played back track | |
| Speed up the playback | |
| Slow down the playback | |
| (3/156) | Current auto-selected waypoint/total auto-selected waypoints |
| (1/10) | Current selected waypoints with geotagged photo/total selected waypoints with geotagged photos |
Next
On the main menu bar of @trip PC, click 📄 to share your trip in different options.

text_image
Share Wizard Welcome! Thanks for using @trip PC Share Wizard. This wizard will guide you through the process to share trip data on Internet. XinJiang Select An Option: • Upload to @trip server ✓ Public ○ Export to file ○ Advanced Note: Please make sure GPS Logger is connected to PC in order to use "Export to file" and "Advanced" options. < Back Next > Cancel HelpNote: Please make sure GPS Logger device is connected to PC in order to use Export to file and Advanced options.
1. Upload to @trip server
- At the Login page, enter your email address (previously registered with @trip Service) and password. If you don't have an @trip account yet, click New account to register one with @trip Service, where you can easily post and share many memorable trips with others.
Click Next to proceed.

text_image
Share Wizard Login Enter your account information to login. E-mail: xxx@hotmail.com Password: ********** Remember password New account If you don't have an @trip account yet, click the button to register one with @trip Service, where you can easily post and share many memorable trips with others. < Back Next > Cancel Help- Before uploading the trip, choose a category that best describes the type of your trip. From the left column of the dialog, you may choose the category by clicking on one or more items that are listed. If none of the listed items suits your trip, you may choose from the existing self-defined tags listed on the right column (previously defined on @trip server), or simply enter a new one.
Click Next to proceed.

text_image
Share Wizard Categorize Trip... Choose a category for your trip, or define your own tag to soit it. Choose a category Pre-defined category Travel Photography Good Food Biking Motorcycling Water Activity Flying Hiking Click on the category(s) listed above. Enter your own tag Self-defined tag Click on the tag(s) listed above, or enter a new one. < Back Next > Cancel Help- Choose a destination to upload the photos of your trip to.
- If you choose to upload photos to @trip server, the Share Wizard will immediately upload your trip along with the photos directly to your account on @trip server.
cIf you choose to upload photos to either Picasa or Flickr web album, you'll be prompted to login to your account at Picasa or Flickr first, followed by uploading the photos to the album. Then, the Share Wizard will continue to upload your trip to @trip server to finalize the share process.

text_image
Share Wizard Welcome! Thanks for using @trip PC Share Wizard. This wizard will guide you through the process to share trip data on Internet. Photo(s) Upload to: Picasa Upload Settings: Fast(1024 pixels) Upload all photos again. < Back Next > Cancel Help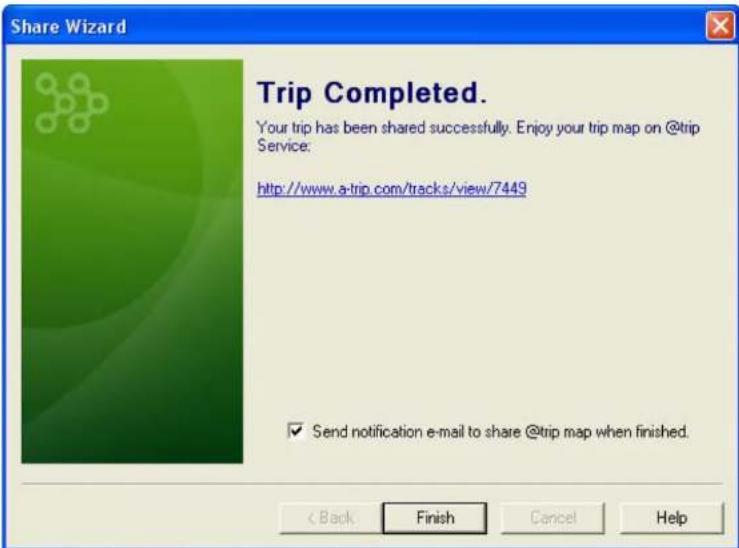
text_image
Share Wizard Trip Completed. Your trip has been shared successfully. Enjoy your trip map on @trip Service. http://www.a-trip.com/tracks/view/7449 ✓ Send notification e-mail to share @trip map when finished. < Back Finish Cancel HelpNote: If the trip you're uploading has been previously uploaded to @trip server, the Share Wizard will prompt you for a decision whether to update the trip to server or create a new one.

text_image
Share Wizard Uploading Data... Please wait while uploading data... Please wait what Upload to server... Update this trip to server or create a new one? Update New trip Cancel < Back Next > Cancel Help2. Export to file
This share option allows you to export the entire trip content to a zipped MHT file (*.zip).
3. Advanced
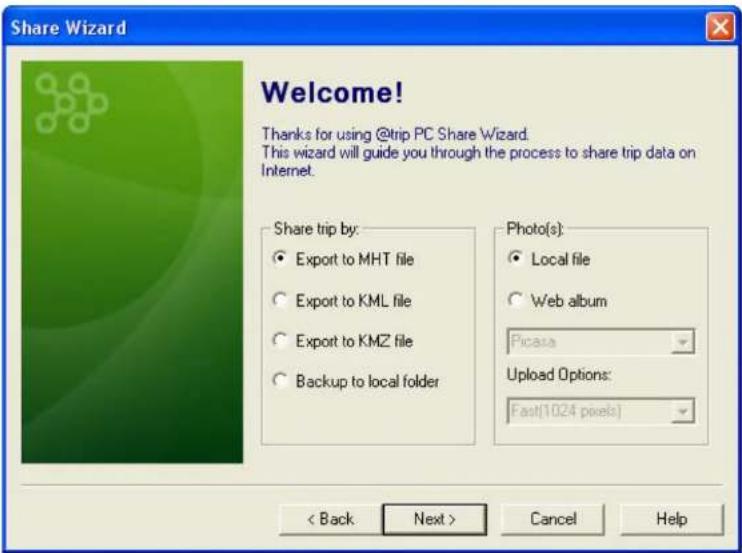
- Export to MHT file
- Export to KML file
- Export to KMZ file
- Backup to local folder
The Advanced option allows you to export your entire trip content (including track data, map, photos, etc.) to different file formats, such as *.mht, *.kml, and *.kmz.
When Export to MHT file or Export to KML file is selected, you can further choose to either save the photos of your trip content in the exported local file or simply upload them to web albums, like Picasa or Flickr directly.
In addition, the Advanced option also allows you to simply backup your entire trip content to a local folder, which makes it easy to further burn it on a CD/DVD for future use.
Note: In order to display KML or KMZ files when exported, you must have Google Earth installed.
text_image
Share Wizard Welcome! Thanks for using @trip PC Share Wizard. This wizard will guide you through the process to share trip data on Internet. Share trip by: ● Export to MHT file ○ Export to KML file ○ Export to KMZ file ○ Backup to local folder Photo(s): ● Local file ○ Web album Picasa Upload Options: Fast(1024 pixels) < Back Next > Cancel Help@trip Service
By connecting to @trip Service, you'll be able to create your personal travel blog where you can share your memorable trips with others, as well as check out many more trips of other travelers.

text_image
@trip My Page Downloads Forum Tutorial Sign in | New account | Language Map Satellite Hybrid Terrain Check this out: 1. Select and zoom 2. Search this area All Travel Photography More Good Food Biking Motorcycling Flying Water Activity Hiking Landscape Adventure Featured Hottest Latest 1 >> Powered by GoogleMy Page
This is the blog page where you can personalize to share traveling information (including tracks and photos) with blog readers. Upload your tracks here, and tell your stories, favorite routes, best courses and etc. along your journeys.
Downloads
All the latest applications and tools associated with @trip PC can be downloaded on this page.
Forum
Travelers who register with @trip travel blog are welcomed to share their comments and fun times in this forum, or start any discussion session to gather more thoughts.
Tutorial
This page includes a collection of software tutorials and related documents to get registered travelers started on various products/service.
Next
Photo Locator
Photo Locator allows you to re-position any of your photos on the track that has been inaccurately located on the map due to incorrect camera time.
On the function menu bar of Trip Composer, click Photo to launch Photo Locator.
- Select one of the options to adjust the time of all or unmatched photos.

text_image
Photo Locator This wizard will guide you through the process of locating your photos on the track. Any of your photo(s) on the track can be correctly re-located on the map, if it is found to be slightly off on its geographical position due to incorrect camera time. Choose the photo(s) to be re-positioned below. Adjust the time of: All Photos Note: All photos will be re-positioned. Only unmatched photo(s) Note: Only unmatched photo(s) will be re-positioned. < Back Next > Cancel Help- Choose a photo as the reference point, based on which time adjustment will be made to the rest of the photos.

text_image
Photo Locator Choose A Reference Point of Time Choose one of the photo(s) listed below to be the reference point. Time adjustment will be applied to all photos based on the time of the reference point. sample01 sample02 sample03 sample04 sample05 sample06 sample07 sample08 < Back Next > Cancel Help- Use the slider bar in thiddle to adjust photo tip and photos will be relocated on the (as shown in the background window) while time adjustment is being ade.
Click ≠ signs or drag the slider bar next to the photo upward/downward to zoom/out the ap in the background window. Click Finish to complete relocating photo(s).
text_image
@trip Map Satellite Hybrid Terrain Photo Locator Adjust Photo Time The photo will be re-located to its correct position on the map (as shown in the window) as you move along the slider in the middle of the dialog to adjust the time. Click Finish, and time adjustment made to the reference point will be applied to all photos. Before Adjustment Original Time: 2007-09-26 07:56:41 After Adjustment Adjust to: 8/26/2007 7:56:41 AM Time Shifted: +0 Day 00:00:00 7 photo(s) exceeded available time range of the track! sample01 sample02 sample03 sample04 sample05 < Back Finish Cancel Help Zoom in map Zoom out map Imagery@2009 TerraMetrics, Map data @2009 Mapabc, AND, Europa Technologies, NFGIS - Terms of UseNext
Hardware & Software Settings
Please follow the instructions below to configure your GPS device with @trip PC.
Hardware Settings
On the main menu bar of @trip PC, click 📄 to configure your GPS device.
text_image
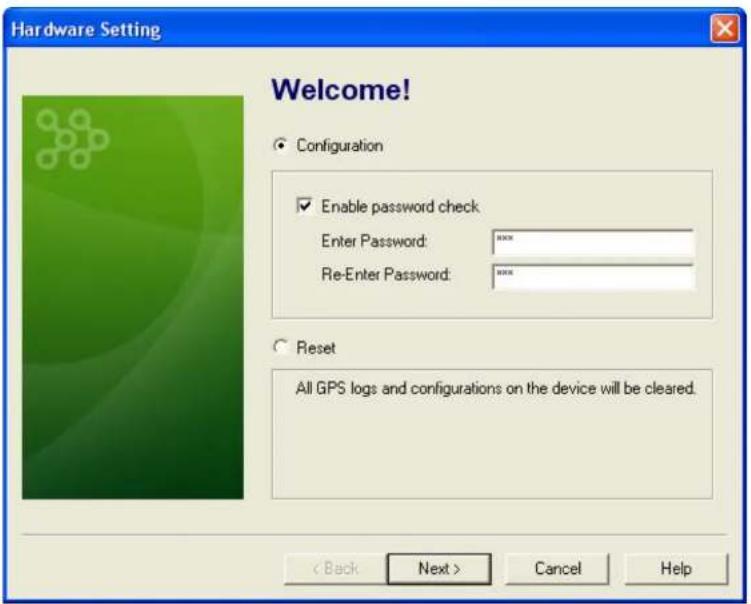
Hardware Setting Welcome! Configuration Enable password check Enter Password: *** Re-Enter Password: *** Reset All GPS logs and configurations on the device will be cleared. < Back Next > Cancel Help- Configuration: By checking the option Enable password check, @trip PC will prompt you to enter a password for verification, whenever your GPS device is connected to PC prior to downloading GPS log data. Click Next to proceed with more options (continued in Step 2).
Reset: If this option is selected, all current GPS log data in your GPS device will be cleared. Click Next to start clearing data, and then exit the wizard. - Select Manual Control to manually turn on/off your GPS device when needed, or select Scheduled Control to have your GPS device turned on/off automatically at a scheduled time. Click Next to continue.

text_image
Hardware Setting Choose Startup Method ● Manual Control ○ Scheduled Control Press the button to manually turn on and off your GPS. < Back Next > Cancel Help
bar
Hardware Setting Choose Startup Method | Time Zone | Manual Control | Scheduled Control | | :--- | :--- | :--- | | Mon | 12 | 4 | | Tue | 0 | 0 | | Wed | 0 | 0 | | Thu | 0 | 2 | | Fri | 0 | 0 | | Sat | 0 | 13 | | Sun | 0 | 8 | | Daylight Saving | 0 | 0 | | Enable LED indicator | 0 | 0 | The chart displays a stacked bar chart (likely a stacked bar or pie chart) with numerical values for each segment. The title 'Choose Startup Method' is displayed in the top-left corner. The legend indicates that the bars represent different startup method categories.-
Enable LED indicator : LED indication is available on GPS Logger if enabled. It would otherwise save battery power and last for a longer tracking time if disabled.
-
Note:
- The GPS device must have been successfully positioned prior to using Schedated.C
- The device startup can only be scheduled twice in one day.
- Set up tracking interval for your travel data logger at this page NextClicko continue.
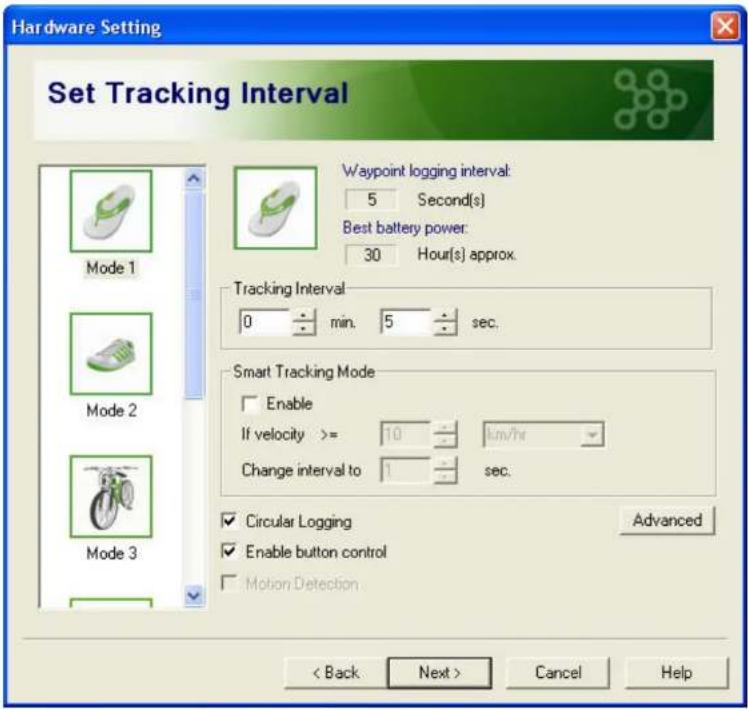
text_image
Hardware Setting Set Tracking Interval Waypoint logging interval: 5 Second(s) Best battery power: 30 Hour(s) approx. Tracking Interval 0 min. 5 sec. Smart Tracking Mode Enable If velocity >= 10 km/hr Change interval to 1 sec. ✓ Circular Logging Advanced ✓ Enable button control ✓ Motion Detection < Back Next > Cancel HelpCircular Logging: When this option is enabled, the GPS logger will keep on recording trips even if the memory has reached its limits. When the memory is full, the oldest records will be overwritten as the GPS logger records on. (This feature is available in firmware version 3.05 and up.)
Enable button control: Button control is available on GPS Logger if enabled. It would otherwise prevent you from any unwanted action if disabled.
- Hardware configuration will be complete after the Setting Wizard finishes writing configuration to the GPS device.
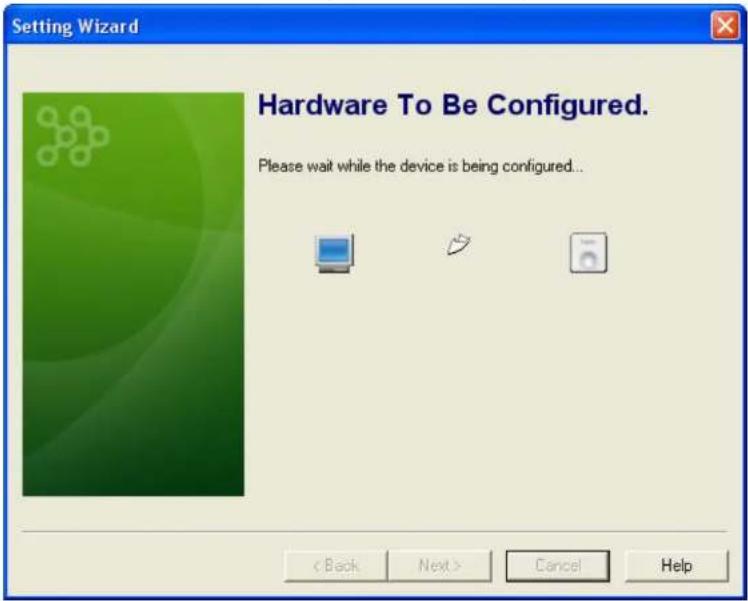
text_image
Setting Wizard Hardware To Be Configured. Please wait while the device is being configured... < Back Next > Cancel HelpSoftware Settings
On the main menu bar of @trip PC, click to configure @trip PC.
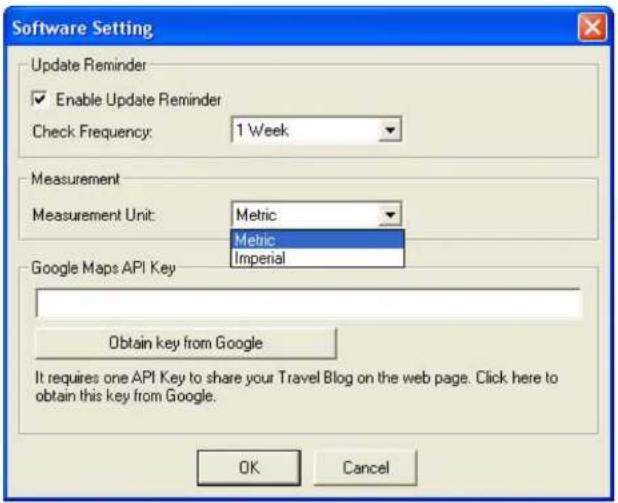
- Update R reminder : Select this option to determine how often you would like to check the latest updates about @trip PC program
- Measurement : Select either Iparial or Metric as you measurement unit for GPS logging.
- Google Maps API Key : In order to share your Travel Blog on the web page, an API key is required by from Google to get an API key from Google.
text_image
Software Setting Update Reminder Enable Update Reminder Check Frequency: 1 Week Measurement Measurement Unit: Metric Metric Imperial Google Maps API Key Obtain key from Google It requires one API Key to share your Travel Blog on the web page. Click here to obtain this key from Google. OK CancelNext
Track Management
On the main menu bar of @trip PC, click 📄 to manage all imported tracks.

text_image
Track Management (GMT-08:00) Pacific Time (US & Canada) Daylight Saving Name Device Start Time Waypoints Japan_Hakone_1 492188C4 2008-06-15 10:21:52 2155 KenTing_1 492189E7 2007-12-06 16:33:37 4286 LA_1 49258974 2008-04-26 08:24:34 572 ✓ Trip_A_1 SN.0100215149 2008-09-26 00:24:01 803 XinJiang_1 Export to GPX 493945B5 2007-09-25 15:10:26 1321 Export to CSV Rename Delete Exit
Export to GPX: Export selected track(s) to a GPX file by clicking the icon or right-clicking any of the listed tracks.

Export to CSV: Export selected track(s) to a CSV file by clicking the icon or right-clicking any of the listed tracks.

Delete: Delete selected track(s) by clicking the icon or right-clicking any of the listed tracks.
Next
Compatible Hardware
@trip PC is compatible with most of the GPS logging devices in current markets. As long as your GPS logging device is capable of generating standard gpx files, you can upload and share every trip logged in your GPS device to @trip Service through @trip PC program easily and hassle-free.
Next
Sports Analyzer
With the advancement of global positioning system network, you can now take your current sports activity to the next level. Sports Analyzer is a small and handy tool that can be utilized to analyze all sorts of sports and outdoor activities.
Next
Getting Started
Easy-to-use interface. Let Sports Analyzer do all the hard work for you!

text_image
Sports Analyzer October 2009 Su Mo Tu We Th Fr Sa 1 2 3 4 5 6 7 8 9 10 11 12 13 14 15 16 17 18 19 20 21 22 23 24 25 26 27 28 29 30 31 Map Satellite Hybrid Terrain East District E 172 172 172 172 172 Google Google Digital Global GPS Spot Time Series Map data: 8000.4 High-View Terms of Use 20091023-105833(1) Start Time: 2009-10-02 17:26:07 2009-10-02 17:26:07 End Time: 2009-10-02 17:54:15 2009-10-02 17:54:15 Time Duration: 00:28:08 00:28:08 Distance: 8.586 (km) 8.586 (km) Avg. Speed: 18.3 (km/hr) 18.3 (km/hr) Max. Speed: 72.0 (km/hr) 72.0 (km/hr) Moving Time: 00:14:50 00:14:50 Avg. Pace: 00:01:45 (time/km) 00:01:45 (time/km) Highest: 140.3 (m) 140.3 (m) Lowest: 17.1 (m) 17.1 (m) Ascent: 683.5 (m) 683.5 (m) Descent: 631.1 (m) 631.1 (m) Calorie: 165 (kcal) 165 (kcal) Altitude Pace 98 [m] 04.02 [time/km] Sports AnalyzerMain menu bar
Main menu bar provides you with quick accesses to the main functions and information concerned.

Import GPS Track : Click to to launch Import Wizard to import GPS log data.

New Activity: Click to add a new activity.

Hardware Settings: Click to customize the tracking modes of your GPS Logger .

Clear Device Data: Click to clear the GPS logs saved on your GPS Logger.

Software Settings: Click to customize the software settings of Sports Analyzer.

Help : Click to bring up the Help file.
Activity Calendar

text_image
October 2009 Su Mo Tu We Th Fr Sa 4 5 6 7 8 11 12 13 14 15 18 19 20 21 22 25 26 27 28 29 30 31 20091103-184716(1) Sport Type: Cycling Start Time: 2009-10-02 17:26:07 End Time: 2009-10-02 17:54:15 Time Zone: (GMT+08:00) Taipei (DayLight:OFF) Duration: 00:28:08 Distance: 8.586 (km) Avg. Speed: 18.3 (km/hr)The calendar gives a clear view of all the activities you've participated in the month indicated.
- Move your mouse over the activity icon shown on the calendar, and a description bubble will pop up displaying the activity details.
- Click on the activity icon, and the activity track/route will be highlighted on the map at the right.

-
Click on the arrows to see more activities in one day.
-
Click on the arrows to go between month pages to see more activities.

- Right-click on the activity icon shown on the calendar to see more options:

text_image
Delete Export to GPX Export to CSV Reload Map Attributes...- Delete: The selected activity can be deleted.
- Export to GPX: The selected activity can be exported to a GPX file (.gpx).
- Export to CSV: The selected activity can be exported to a CSV file (.csv).
- Reload Map: The map of selected activity will be refreshed.
- Attributes...: The attributes of selected activity can be edited in a pop-up dialog.

text_image
Attributes... Name: 20091103-184716(1) Sport Type: Cycling Running/Jogging Climbing (Rock/Mountain) Skiing Golfing Boating Horse-riding MISC Others Height: 175 cm Weight: 65 kg Create Time: 2009-11-03 18:47:29 Time Duration: 2009-10-02 17:26:07 ... 2009-10-02 17:54:15 OK CancelAnalyze Sports Activity
The data table shown on the bottom at the left gives detailed information of the activity selected.
The diagram shown on the bottom at the right gives 6 different track views with respective measurements.
20091103-184716(1)
| Start Time: | 2009-10-02 17:26:07 | 2009-10-02 17:33:33 |
| End Time: | 2009-10-02 17:54:15 | 2009-10-02 17:40:13 |
| Time Duration: | 00:28:08 | 00:06:40 |
| Distance: | 8.586 (km) | 3.777 (km) |
| Avg. Speed: | 18.3 (km/hr) | 34.0 (km/hr) |
| Max. Speed: | 72.0 (km/hr) | 72.0 (km/hr) |
| Moving Time: | 00:14:50 | 00:06:41 |
| Avg. Pace: | 00:01:45 (time/km) | 00:01:42 (time/km) |
| Highest: | 140.3 (m) | 112.0 (m) |
| Lowest: | 17.1 (m) | 44.0 (m) |
| Ascent: | 683.5 (m) | 69.5 (m) |
| Descent: | 631.1 (m) | 112.7 (m) |
| Calorie: | 165 (kcal) | 80 (kcal) |

bar_line
| Time (km) | Altitude | Pace | | --------- | -------- | ---- | | 0 | 90 | 0.20 | | 1 | 130 | 0.40 | | 2 | 100 | 0.10 | | 3 | 110 | 0.20 | | 4 | 90 | 0.30 | | 5 | 70 | 0.10 | | 6 | 80 | 0.50 | | 7 | 60 | 0.20 |- Use the axis with dotted lines to move horizontally back and forth to a fixed point, and you'll see the position of that fixed point on the
map indicated with
- Drag and move the ⚙ and ⚫ axes to highlight a section of the activity.
- In the activity data table, the 2nd column shows the data of the entire activity, while the 3rd column indicates the data of highlighted activity section.
- Switch between _0 , _1 , _2 , and _3 to see different demonstrative diagrams in respective measurements.
Software Settings
On the main menu bar, click 📄 to configure Sports Analyzer.
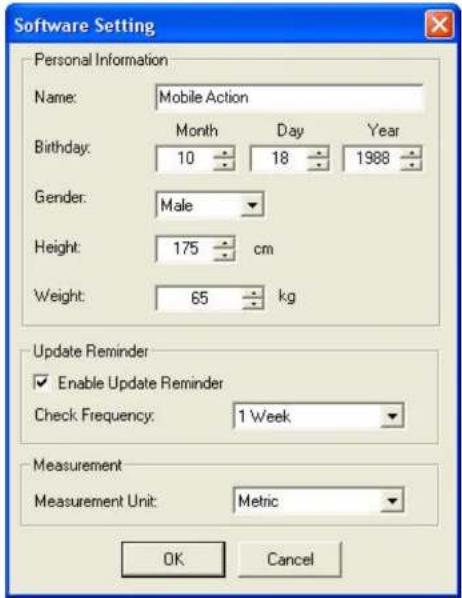
- Personal Information: Enter your personal information, including name, birthday, gender, and etc.
- Update Reminder: Select the option of Enable Update Reminder to determine how often you would like to check the latest updates about i-gotU Suite.
- Measurement: Select either Imperial or Metric as your measurement unit for GPS logging.
text_image
Software Setting Personal Information Name: Mobile Action Birthday: Month Day Year 10 18 1988 Gender: Male Height: 175 cm Weight: 65 kg Update Reminder Enable Update Reminder Check Frequency: 1 Week Measurement Measurement Unit: Metric OK CancelNext
Where I Am
Where am I?
Anytime during your travels and activities, or whenever you want to identify where you are geographically on the map, Where I Am could be of much help to quickly locate you. Simply call upon Where I Am from the i-gotU Suite, and you'll be spotted on a chosen digital map in no time.
- Make sure your i-gotU GPS Logger is connected to the PC prior to starting Where I Am.
- Once started, a menu appears displaying three options of digital maps for selection.

text_image
Where I Am Google Maps Yahoo! Maps Bing Maps- Choose a map option from the menu, and where you are will be pointed out on the selected map in a browser. Use the zooming tool placed at the left of the map to zoom in or out for different geographic views of your current location.
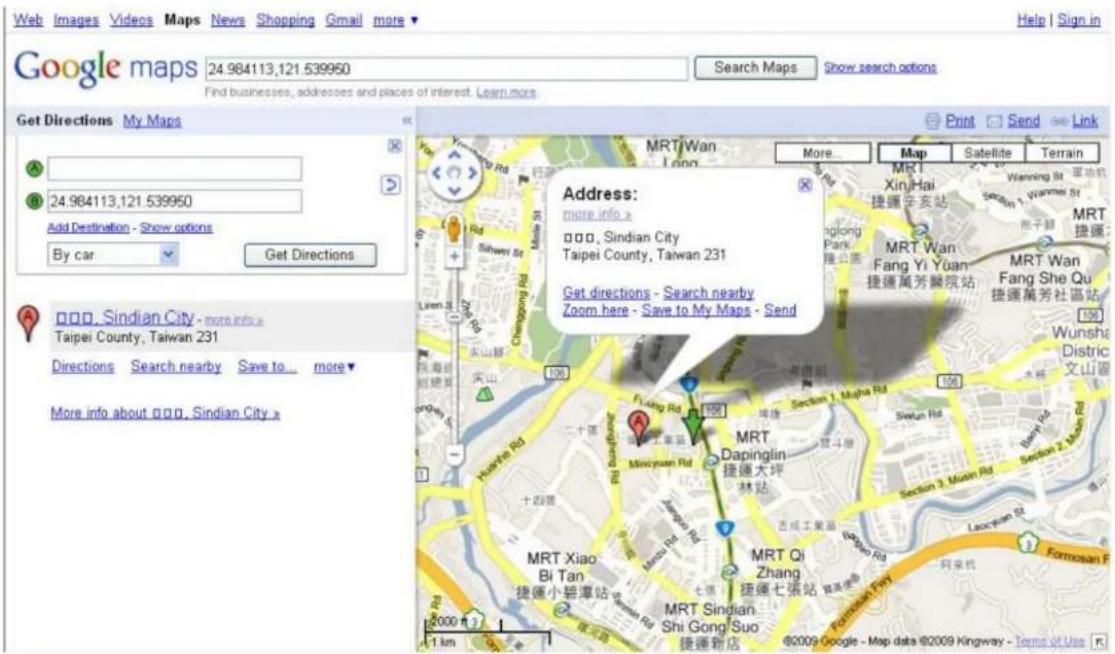
text_image
Web Images Videos Maps News Shopping Gmail more Google maps 24.984113,121.539960 Search Maps Show search options Find businesses, addresses and places of interest. Learn more. Get Directions My Maps A B 24.984113,121.539950 Add Destination - Show options By car Get Directions Address: more info > □□□, Sindian City Taipei County, Taiwan 231 Get directions - Search nearby Zoom here - Save to My Maps - Send More Map Satellite Terrain MRT Wan Xin Hai 捷運辛安站 MRT Wan Fang Yi Yuan 捷運萬芳醫院站 MRT Wan Fang She Qu 捷運萬芳社區站 100 Wunsha District 文山區 Directing Town MRT Xiao Bi Tan 捷運小碧潭站 Shi Gong Suo 捷運新店 1 km @2009 Google - Map data @2009 Kingway - Terms of Use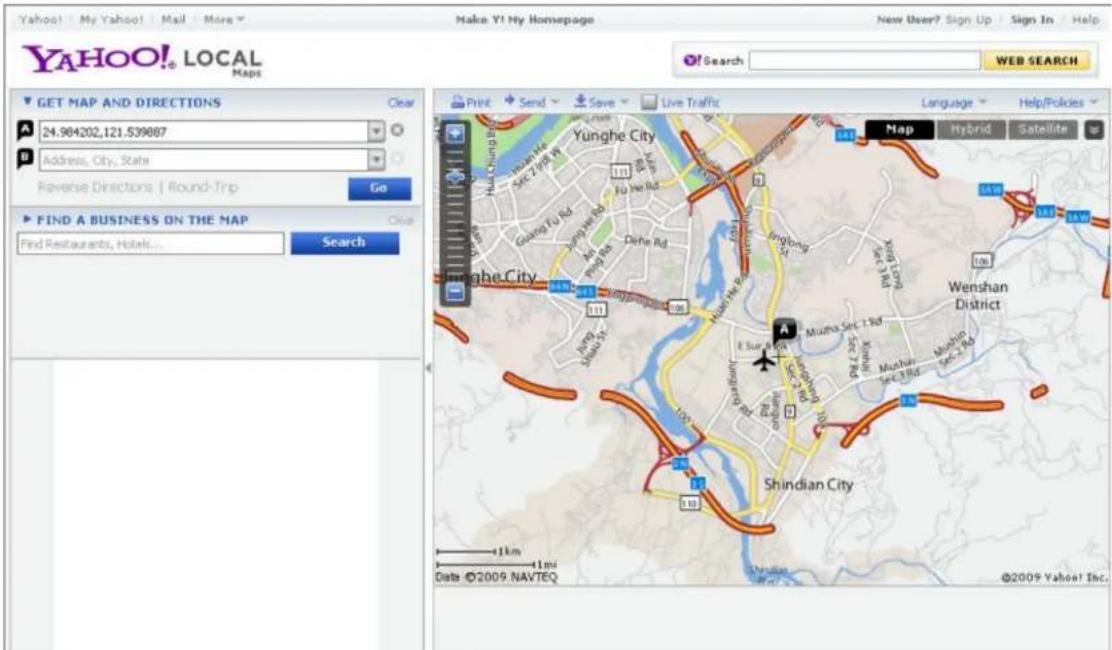
text_image
YAHOO! LOCAL Maps Make Y! My Homepage New User? Sign Up Sign In Help Search WEB SEARCH GET MAP AND DIRECTIONS 24.964202.121.539887 Address, City, State Reverse Directions | Round-Trip Go FIND A BUSINESS ON THE MAP Find Restaurants, Hotels... Search Print Send Save Live Traffic Language Help/Policies Yunghe City Wenshan District Shindian City 111 111 111 111 111 111 111 111 111 111 111 111 111 111 111 111 111 111 111 111 111 111 111 111 111 110 109 108 107 106 105 104 103 102 101 100 99 98 97 96 95 94 93 92 91 90 89 88 87 86 85 84 83 82 81 80 79 78 77 76 75 74 73 72 71 70 69 68 67 66 65 64 63 62 61 60 59 58 57 56 55 54 53 52 51 50 49 48 47 46 45 44 43 42 41 40 39 38 37 36 35 34 33 32 31 30 29 28 27 26 25 24 23 22 21 20 19 18 17 16 15 14 13 12 11 10 9 8 7 6 5 4 3 2 1 0 9 8 7 6 5 4 3 2 1 0 9 8 7 6 5 4 3 2 1 0 9 8 7 6 5 4 3 2 1 0 9 8 7 6 5 4 3 2 1 0 9 8 7 6 5 4 3 2 1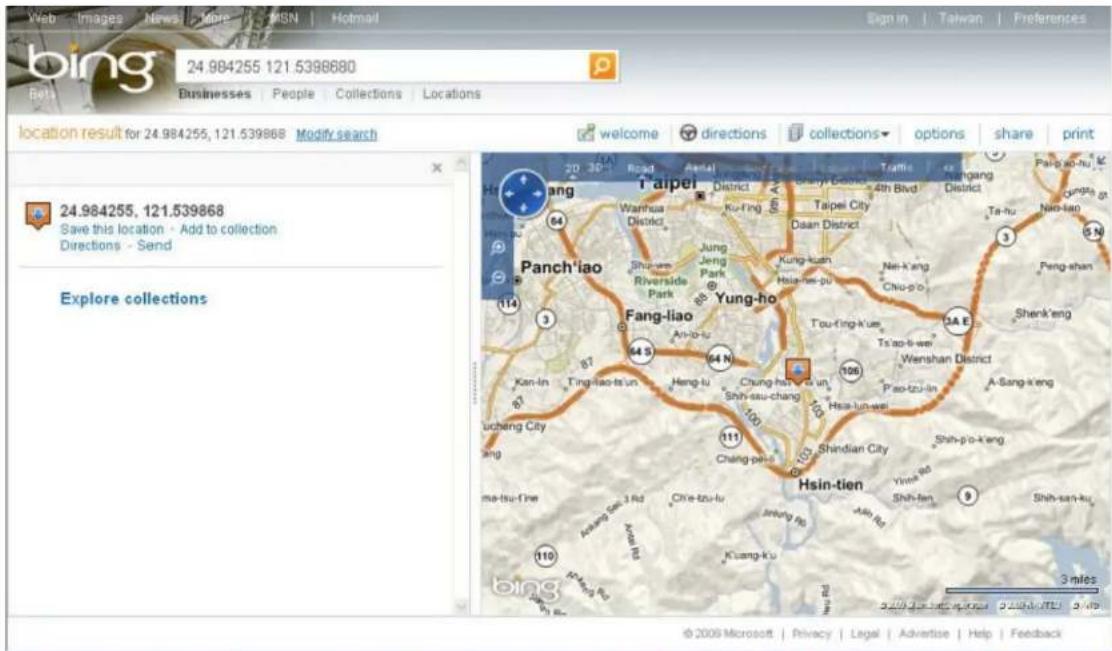
text_image
24.984255, 121.5398680 Bets Businesses People Collections locations location result for 24.984255, 121.539868 Modify search 24.984255, 121.539868 Save this location - Add to collection Directions - Send Explore collections 20 30 40 Road Street Panch'iao T'aipei Wanhua District Ku-fing Jung Jeng Park Shu-yan Riverside Park Yung-ho Fang-liao An-ho-tu 64 S 64 N Chung-hao-ku-ut Shih-su-chang Tsou-fing-kue Tsao-lu-wu Wenshan District Pao-tzu-lin A-Sang-keng Lucheng City Chang-pen Shindian City Shih-pu-keng Hsin-tien Me-tsu-fine Asang San-3 Rd Chie-tzu-tu Shih-fen Shih-san-ku- Kuang-ku Kuang-ku Shih-sun-ku- Kuang-ku Shih-sun-ku- Shih-sun-ku- Shih-sun-ku- Shih-sun-ku- Shih-sun-ku- Shih-sun-ku- Shih-sun-ku- Shih-sun-ku- Shih-sun-ku- Shih-sun-ku- Shih-sun-ku- Shih-sun-ku- Shih-sun-ku- Shih-sun-ku- Shih-sun-ku- Shuh-gui Shuh-gui Shuh-gui Shuh-gui Shuh-gui Shuh-gui Shuh-gui Shuh-gui Shuh-gui Shuh-gui Shuh-gui Shuh-gui Shuh-gui Shuh-gui Shuh-gui Shuh-gui Shuh-gui Shuh-gui Shuh-gui Shuh-gui Shuh-guiNote:
- Map options will not be available for selection if your device is not correctly connected to the PC.
- The two light indications shown on the menu must appear as described below, in order for the map options to be available:
: The connection light appears white indicating GPS Logger is correctly connected.
: The signal light appears green indicating the signal reception of the GPS Logger is in good state.
; signal light indicates fair signal reception.
: Red signal light indicates weak signal reception.
: Gray signal light indicates none signal reception.