NC2000e - Camera KODAK - Free user manual and instructions
Find the device manual for free NC2000e KODAK in PDF.

User questions about NC2000e KODAK
0 question about this device. Answer the ones you know or ask your own.
Ask a new question about this device
Download the instructions for your Camera in PDF format for free! Find your manual NC2000e - KODAK and take your electronic device back in hand. On this page are published all the documents necessary for the use of your device. NC2000e by KODAK.
USER MANUAL NC2000e KODAK
© Eastman Kodak Company, 1997
This manual and the accompanying software are protected by United States and international copyright laws. You may make one backup copy of the enclosed software and one copy of this manual. Do not make additional copies of the software or copies of the manual or electronically transmit them in any form whatsoever, in whole or in part, without the prior written permission of Eastman Kodak Company.
WARRANTY
KODAK Professional DCS Digital Camera
THIS WARRANTY APPLIES TO EQUIPMENT PURCHASED IN THE UNITED STATES.
Warranty Time Period
Kodak warrants your camera to be free from malfunctions and defects in both materials and workmanship for six months from the date of purchase.
Warranty Repair Coverage
If this equipment does not function properly during the warranty period, due to defects in either materials or workmanship, Kodak will, at its option, either repair or replace the equipment, without charge, subject to the conditions and limitations stated herein. Such repair service will include all labor as well as any necessary adjustments and/or replacement parts.
If replacement parts are used in making repairs, these parts may be remanufactured, or may contain remanufactured materials. If it is necessary to replace the entire system, it may be replaced with a remanufactured system. If it should become necessary to repair or replace a malfunctioning or defective system, the provisions of this warranty shall apply to the repaired or replaced system until the expiration of 30 days from the date of return, or until the end of the original warranty period, whichever is later.
Kodak will also provide telephone assistance during the warranty period.
Limitations
Warranty service will not be provided without return of the Warranty Registration card or dated proof of purchase. Please return the Warranty Registration card within 30 days of purchase.
As a condition of warranty service, before sending in your unit to the nearest service center for repair, you must first contact a Kodak representative for return authorization and instructions.
This warranty becomes null and void if, during shipment, you fail to pack your camera in a manner consistent with the enclosed repacking instructions in an appendix.
This warranty does not cover the following: circumstances beyond Kodak's control; service or parts to correct problems resulting from the use of attachments, accessories or alterations not marketed by Kodak; unauthorized modifications or service; misuse; abuse; failure to follow Kodak's operating, maintenance, or repacking instructions; or failure to use Kodak supplied items (such as cables).
KODAK MAKES NO OTHER WARRANTIES, EXPRESS OR IMPLIED, INCLUDING THE IMPLIED WARRANTIES OF MERCHANTABILITY AND FITNESS FOR A PARTICULAR PURPOSE. Repair or replacement without charge is Kodak's only obligation under this warranty. Kodak will not be responsible for any consequential or incidental damages resulting from the purchase, use, or improper functioning of this equipment even if the loss or damage is caused by the negligence or other fault of Kodak. Such damages for which Kodak will not be responsible include, but are not limited to, loss of revenue or profit, downtime costs, loss of use of the equipment, cost of any substitute equipment, facilities, or services, or claims of your customers for such damages.
Outside the United States
In countries other than the United States, the terms of this warranty may be different. Unless a specific Kodak warranty is communicated to the purchaser in writing by a Kodak company, no other warranty or liability exists beyond the information contained above, even though defect, damage or loss may be by negligence or other act.
How to obtain service
In the United States, call 1-800-23-KODAK (1-800-235-6325), and in Canada call 1-800-GO-KODAK (1-800-465-6325).
In other countries, call your nearest Kodak representative.
If service is required, your Kodak representative will instruct you to return the unit to the nearest service center for repair and will issue a return authorization number.
When returning a camera for repair, the unit shall be packed in its original packing materials according to the enclosed repacking instructions in an appendix. The enclosed problem report form (see appendices) should also be completed and enclosed with the equipment. If the original packaging has been discarded or is not available, packing will be at the owner's expense. (NOTE: The camera body that is supplied as part of the camera should be included in the return.)
Return of the repaired or replaced unit to the customer can be expected in five to seven days from the date the camera arrives at the service center.
EASTMAN KODAK COMPANY
Software License Agreement
YOU SHOULD CAREFULLY READ THE FOLLOWING TERMS AND CONDITIONS BEFORE OPENING THE DISKETTE PACKAGE(S). OPENING THE DISKETTE PACKAGE(S) INDICATES YOUR ACCEPTANCE OF THESE TERMS AND CONDITIONS. IF YOU DO NOT AGREE WITH THEM, YOU SHOULD PROMPTLY RETURN THE DISKETTE PACKAGE(S) UNOPENED, ALONG WITH THE ACCOMPANYING MATERIALS.
Eastman Kodak Company (Kodak) provides this software and licenses its use worldwide.
You assume responsibility for selection of the software to achieve your intended results, and for installation, use, and results obtained from the software.
LICENSE
You may:
a. use the software;
b. copy the software onto one or more computers only for the purpose of operating the equipment with which this software was provided (the "Related Equipment") or into any machine-readable form for backup purposes in support of your use of the software;
c. transfer the software and license to another party to whom you also transfer the Related Equipment, if the other party agrees to accept the terms and conditions of this Agreement. If you transfer the software, you must at the same time either transfer all copies to the same party or destroy any copies not transferred.
You must reproduce and include the copyright notice on any copy of the software.
YOU MAY NOT USE, COPY OR TRANSFER THE SOFTWARE, OR ANY COPY, IN WHOLE OR IN PART, EXCEPT AS EXPRESSLY PROVIDED FOR IN THIS LICENSE.
IF YOU TRANSFER POSSESSION OF THE RELATED EQUIPMENT OR ANY COPY OF THE SOFTWARE TO ANOTHER PARTY, YOUR LICENSE IS AUTOMATICALLY TERMINATED.
TERM
The license is effective until terminated. You may terminate it at any time by destroying the software together with all copies in any form. It will also terminate upon conditions set forth elsewhere in the Agreement or if you fail to comply with any term or condition of this Agreement. You agree upon such termination to destroy the software together with all copies in any form.
LIMITED WARRANTY
Kodak warrants the diskettes on which the software is furnished to be free from defects in materials and workmanship under normal use for a period of ninety (90) days from the date of delivery to you as evidenced by a copy of your receipt.
Kodak does not warrant that the functions contained in the software will meet your requirements or that the operation of the software will be uninterrupted or error free.
THE SOFTWARE IS PROVIDED 'AS IS' WITHOUT WARRANTY OF ANY KIND, EITHER EXPRESSED OR IMPLIED, INCLUDING, BUT NOT LIMITED TO, THE IMPLIED WARRANTIES OF MERCHANTABILITY
AND FITNESS FOR A PARTICULAR PURPOSE. THE ENTIRE RISK AS TO QUALITY AND PERFORMANCE OF THE SOFTWARE IS WITH YOU. IF THE SOFTWARE PROVES DEFECTIVE, YOU (AND NOT KODAK OR YOUR DEALER) ASSUME THE ENTIRE COST OF ALL NECESSARY SERVICING, REPAIR, OR CORRECTION.
Some states do not allow the exclusion of implied warranties, so the above exclusion may not apply to you. This warranty gives you specific legal rights and you may also have other rights that vary from state to state.
LIMITATIONS OF REMEDIES
Kodak's entire liability and your exclusive remedy shall be:
- the replacement of any diskette not meeting Kodak's "Limited Warranty" that is returned to Kodak or your dealer with a copy of your receipt, or
- if Kodak or the dealer is unable to deliver a replacement diskette that is free of defects in materials or workmanship, you may terminate this Agreement by returning the software.
IN NO EVENT WILL KODAK BE LIABLE TO YOU FOR ANY DAMAGES, INCLUDING ANY LOST PROFITS, LOST SAVINGS, OR OTHER INCIDENTAL OR CONSEQUENTIAL DAMAGES ARISING OUT OF THE USE OR INABILITY TO USE THE SOFTWARE EVEN IF KODAK OR YOUR DEALER HAS BEEN ADVISED OF THE POSSIBILITY OF SUCH DAMAGES, OR FOR ANY CLAIM BY ANY OTHER PARTY.
Some states do not allow the limitation or exclusion of liability for incidental or consequential damages, so the above limitation or exclusion may not apply to you.
GENERAL
You may not sublicense, assign, or transfer the license or the software, except as expressly provided in this Agreement. Any attempt otherwise to sublicense, assign, or transfer any of the rights, duties, or obligations hereunder is prohibited.
This Agreement will be governed by the laws of the State of New York.
Should you have any questions concerning this Agreement, you may contact Kodak in the United States at 1-800-23-KODAK (1-800-235-6325), in Canada at 1-800-GO-KODAK (1-800-465-6325), and in other countries through your nearest Kodak representative.
YOU ACKNOWLEDGE THAT YOU HAVE READ THIS AGREEMENT, UNDERSTAND IT, AND AGREE TO BE BOUND BY ITS TERMS AND CONDITIONS. YOU FURTHER AGREE THAT IT IS THE COMPLETE AND EXCLUSIVE STATEMENT OF THE AGREEMENT BETWEEN US, WHICH SUPERSEDES ANY PROPOSAL OR PRIOR AGREEMENT, ORAL OR WRITTEN, AND ANY OTHER COMMUNICATIONS BETWEEN US RELATING TO THE SUBJECT MATTER OF THIS AGREEMENT.
Important Safeguards and Precautions

The exclamation point in an equilateral triangle is intended to alert the user to the presence of important operating and maintenance (servicing) instructions in the literature accompanying the equipment.
▶ Read Instructions — Read all the safety and operating instructions before operating the equipment.
▶ Follow Instructions — Follow all operating and use instructions.
Controls — Adjust only those controls that are covered by the operating instructions.
- Heed Warnings — Heed all warnings on the equipment and in the operating instructions.
▶ Retain Instructions and Packaging — Retain the safety and operating instructions for future reference. Retain the packing case for use if the equipment needs to be shipped.
▶ Handling — Handle the equipment as you would any valuable camera. Handle the equipment with care, especially when the hard disk is running. Treat the imager as you would your best lens. Do not drop the equipment. Mishandling can damage the imager resulting in an expensive repair.
- Accessories — Do not place the equipment on an unstable cart, stand, bracket, or table. It can fall, causing serious injury to persons
and serious damage to the equipment. Use only with a stable cart, stand, bracket, or table.
- Cleaning — Unplug the camera from its AC battery charger/adapter and from a computer. Be certain the camera off. Using a damp cloth, clean only the outside cabinet and the liquid crystal display (LCD) on the KODAK camera back. Do not use liquid cleaners or aerosol cleaners on the outside of the equipment. (Refer to Chapter 7 for directions on cleaning the imager in the camera back.)
▶ Dust — If you operate the camera in environments with excessive dust levels, dust may accumulate on the imager in the camera back. (Refer to Chapter 7 for directions on cleaning the imager in the camera back.)
▶ CAUTION: Water and Moisture — Do not use the AC battery charger/adapter near water — for example, near a sink, or in a wet room or basement. Do not use the equipment in heavy rain and do not immerse the equipment in water or other liquids.
▶ Object or Liquid Entry — Never push foreign objects of any kind into the equipment openings. The objects could touch dangerous voltage points or short out parts and cause a fire or electric shock. Never spill liquid of any kind on the equipment.
- Attachments — Do not use attachments that are not recommended. The use of such attachments may cause hazards and serious damage to the equipment.
▶ Power Sources — You should operate the equipment only from the type of power source indicated on the name plate of the AC battery charger/adapter. If you are not sure of the type of AC power that will be used, consult a dealer or local power company.
▶ Overloading — Do not overload power outlets and extension cords; this can result in a risk of fire or electric shock.
▶ Cables — Do not use cables other than those supplied with the camera, except that an additional cable is required if you will use the
camera as the only external device attached to a PowerBook computer (refer to Chapter 4). Use only the SCSI cables supplied with the camera to attach the camera or other peripherals to the computer. If you use other cables, you may violate FCC emission requirements and could corrupt data on the hard disk.
▶ Power-Cord Protection — Route power-supply, and other cords, so that you are not likely to walk on them or pinch them with items placed on or against them; pay particular attention to cords at plugs, receptacles, and the point where they leave the equipment.
▶ Grounding — The AC battery charger/adapter is equipped with a three-wire grounding-type plug with a third (grounding) pin. The three-wire plug will fit into a grounding-type power outlet. This is a safety feature. If you are unable to insert the plug into the outlet, contact an electrician to replace the obsolete outlet. Do not defeat the safety purpose of the grounding-type plug.
Lightning — For added protection for the equipment during a lightning storm, or any time when you will leave the equipment unattended and unused for long periods of time, unplug the AC battery charger/adapter from the power outlet and disconnect the camera from the computer. This will protect the equipment from damage caused by lightning or power-line surges.
▶ Temperature, Humidity, Condensation — We do not recommend operating the equipment outside the operating temperature or humidity ranges as indicated in the Specifications appendix. If condensation occurs, added time may be required to read from or write to a PCMCIA card. Condensation may be present if the camera system and/or PCMCIA card(s) are moved from a relatively cold environment (like an air conditioned hotel room), into a warm, humid environment. We recommend that you allow sufficient time for the camera system and/or PCMCIA cards to normalize within the specified environmental ranges before operation. (Third-party, optional
PCMCIA cards may have more restrictive operating temperature and humidity ranges. Refer to the specifications for the cards you use.)
▶ PCMCIA cards — PCMCIA cards (not supplied with the camera system) are fragile devices that can be damaged if not treated with care. Refer to the documentation accompanying any card(s) you obtain to ensure that you are handling the card as specified in that documentation, and that you are using the card within its operating ranges for temperature, humidity, condensation, and so on.
▶ Servicing — Do not attempt to service the equipment yourself. Opening or removing covers may expose you to dangerous voltage or other hazards. Never open the KODAK camera back. (Refer to Chapter 7 for directions on separating the KODAK camera back from the Nikon N90s Camera to clean a dirty imager.)
▶ Damage Requiring Service — Unplug the equipment from the wall outlet and computer, and refer all servicing to the manufacturer under the following conditions:
- When any cord or plug is damaged (send cord only).
- If liquid has been spilled or if objects have fallen in the equipment.
- If the equipment has been exposed to rain or water.
- If the equipment does not operate normally according to the operating instructions.
- If the equipment has been dropped or the housing has been damaged.
- When the equipment exhibits a distinct change in performance.
▶ Disconnecting Parts — Do not separate the KODAK camera back from the Nikon N90s camera. The system is shipped as a single unit; do not disconnect the parts (except as described in Chapter 7 for cleaning a dirty imager). Do not open or attempt to open the camera back; doing so will void the warranty.
You can connect the camera to a computer with or without a PCMCIA card in the camera. Once the camera is connected to a computer, you can insert/remove a PCMCIA card while the camera and computer are turned on or turned off; however, do not remove a PCMCIA card from the camera while the red "Card Busy" light on the camera back is blinking. The blinking indicates that data are being read from or written to the PCMCIA hard disk. If you do, you may lose the current image, and may lose all of your images as well.
CAUTION: To prevent fire or shock hazard, use only the recommended accessories or attachments.
Battery — Important Warnings
- Do not attempt to remove the battery; it is not a customer serviceable part.
If you will be operating the camera while it is connected to the AC battery charger/adapter, the camera will be ready for operation almost immediately. (However, if you are beginning with a dead battery, and notice unusual behavior such as random characters flashing on the camera back LCD, you may need to wait for approximately three minutes while the adapter charges the battery.) If you will be operating the camera without the AC battery charger/adapter, you should charge the battery for at least two hours before using as described in Chapter 4.
If the unusual behavior continues for more than five minutes, the battery may need to be replaced; contact Kodak.
AC Battery Charger/Adapter — Important Warnings
▶ You should operate the equipment only from the type of power source indicated on the name plate of the AC battery charger/adapter. A line voltage outside of this range can destroy the AC battery charger/adapter and/or the camera.
▶ Use only the supplied AC battery charger/adapter; do not plug other chargers or adapters into the camera.
The AC battery charger/adapter is for indoor use only.
- Do not use the supplied AC battery charger/adapter for any purpose other than for the camera.
- Do not plug the AC battery charger/adapter into any equipment other than the camera.
The rechargeable battery in the KODAK camera back becomes warm during charging; this is normal operation.
▶ Under normal conditions, charging the battery for at least two hours provides optimal capacity. However, under very cold or very hot conditions, charge for at least 30 minutes after the LCD battery indicator indicates a full charge. Charge the battery as close to the time the camera will be used as possible. (Waiting in excess of two days before shooting will result in reduced battery capacity.)
▶ Use the AC battery charger/adapter when connected to a computer if possible; use without the adapter in this configuration for an extended time period will drain the battery. Leaving the camera connected to the AC battery charger/adapter will not maintain a full charge; therefore disconnect before use, then reconnect and charge for two hours to ensure a full charge. Extended camera metering or focusing reduces the number of images available from a charge.
Electromagnetic Emissions
This equipment has been tested and found to comply with the limits for a Class B digital device, pursuant to Part 15 of the FCC Rules. These limits are designed to provide reasonable protection against harmful interference in a residential installation. This equipment generates, uses and can radiate radio energy and, if not installed and used in accordance with the instructions, may cause harmful interference to radio communications.
However, there is no guarantee that interference will not occur in a particular installation. If this equipment does cause harmful interference to radio or television reception, which can be determined by turning the equipment off and on, the user is encouraged to try to correct the interference by one or more of the following measures:
▶ Reorient or relocate the receiving antenna.
▶ Increase the separation between the equipment and receiver.
- Connect the equipment into an outlet on a circuit different from that to which the receiver is connected.
- Consult the dealer or an experienced radio/TV technician for help.
This equipment conforms with the requirements of European Standard EN55022 with respect to radio interference for a Class B device.
This digital apparatus does not exceed the class B limits for radio noise emissions from digital apparatus set out in the radio interference regulations of the Canadian Department of Communications.
Contents
1 Before You Begin 1-1
Macintosh Computer — Hardware and Software 1-2
Required Computer, Memory, Hard Disk 1-2
Computer 1-2
Memory 1-2
Hard disk 1-2
Required Monitor and Display Card 1-2
Required Systems Software 1-3
Required SCSI Cables and Terminators 1-3
Required Applications Software 1-3
IBM PC or Compatible Computer — Hardware and Software 1-4
Required Computer, Memory, Hard Disk 1-4
Computer 1-4
Memory 1-4
Hard disk 1-4
Required Monitor and Display Card 1-4
Required SCSI Interface 1-5
Required Systems Software 1-5
Required Applications Software 1-5
Optional Hardware/Software for Playing Recorded Sound 1-5
Other Optional Equipment 1-6
Optional Camera Equipment 1-6
Optional PCMCIA Hard Disk Card 1-6
2 Introduction 2-1
KODAK Camera Back 2-3
Features 2-4
3 Quick Start 3-1
4 Preparing the Camera and the Computer 4-1
Using the AC Battery Charger/Adapter 4-3
Charging the Battery 4-4
Setting the SCSI ID on the Camera 4-8
Installing a SCSI Host Adapter (TWAIN PC Only) 4-13
Making the SCSI Connection 4-14
Camera as the Sole SCSI Device 4-14
Camera Used with Other SCSI Devices 4-18
Camera Used with a Macintosh PowerBook or a PC Laptop 4-24
Macintosh PowerBook with No External SCSI Devices 4-24
PC (for TWAIN driver) 4-26
Inserting and Removing a PCMCIA Card 4-27
Inserting a PCMCIA Card 4-27
Removing a PCMCIA Card 4-31
Installing the KODAK Driver 4-33
Accessing the Camera from the Driver 4-36
Special Instructions for TWAIN-compliant Software 4-36
Final Steps to the Driver Window 4-38
Updating Camera Firmware 4-40
Formatting a PCMCIA Card 4-42
Quitting — Disconnecting the Camera from the Computer 4-45
5 Using the Camera 5-1
Readying the Nikon N90s Camera 5-2
Turning Off the Camera 5-8
Taking Pictures 5-8
Reading the Frames Remaining Indicator and the Frame Counter 5-9
Frames Remaining 5-9
Frame Counter 5-10
Deleting Pictures (Optional) 5-11
Recording Sound (Optional) 5-14
Turning off the Camera 5-15
Operating Differences with the Nikon N90s Camera 5-16
6 Tutorial — Accessing Camera Images 6-1
Working with Images Already on a PCMCIA Card 6-3
Accessing the Camera from the Driver 6-3
Viewing/Selecting an Image from the Camera with the Driver 6-5
Acquiring One Image from the Camera 6-8
Acquiring Multiple Images or a Contact Sheet 6-9
Rotate, Rename, and Annotate Images 6-11
Navigating Through Images 6-14
Navigating through a Contact Sheet 6-14
One or No Images Selected 6-14
More than One Image Selected 6-15
Preview 6-15
Applying Color Balance to Images 6-16
Applying Color Balance to a Single Image 6-17
Method A: Lighting Menu 6-18
Method B: Click-Balance Tool 6-18
Applying Color Balance to Multiple Selected Images 6-20
Saving Color Balance Changes 6-21
Crop Images 6-21
Close the Driver Image Window Saving Changes) 6-25
Working with Images in the Studio 6-26
Playing Recorded Sound Files 6-29
6 Tutorial — Accessing Camera Images (continued)
Archive and Delete Images 6-30
(Optional) Create Archive Files 6-30
Delete Files 6-32
Revise Preferences 6-32
Quitting 6-32
7 Reference — Camera 7-1
KODAK Camera Back and Imager 7-2
Timing Considerations 7-3
KODAK Camera Back Controls 7-4
Liquid Crystal Display (LCD) 7-4
Battery Indicator 7-6
Frames Remaining Indicator — KODAK Camera Back 7-7
Frame Counter — Nikon N90s Camera 7-7
ISO Warning 7-9
Disk Indicator 7-10
Disk Error Indicator 7-10
Control Buttons 7-11
DELETE Button and Delete Indicator 7-12
SCSI ID Button and SCSI Indicator 7-15
SCSI Connector (KODAK Camera Back) 7-17
Multipurpose Connector (KODAK Camera Back) 7-18
PCMCIA Cards 7-19
Supported PCMCIA Cards 7-19
Card Busy Light 7-20
DOS Formatting and Card Access 7-20
Troubleshooting, Disk Recovery, and Fragmentation 7-20
Camera Operating Configurations 7-22
Supported Configurations 7-22
Taking Pictures While Connected to the Computer 7-23
Using the Camera with a PCMCIA Card 7-23
Using the Camera Without a PCMCIA Card While Connected to a
Computer 7-24
Battery and AC Battery Charger/Adapter 7-25
Battery Charging for Optimal Capacity 7-25
AC Battery Charger/Adapter 7-26
External Battery Adapter 7-27
Recorded Sound 7-28
How to Record Sound 7-29
Recording "Lengthy" Audio Segments 7-30
Sound File Size 7-31
Playing Sound Files 7-31
On/Off State of the KODAK Camera Back 7-32
Troubleshooting the Camera 7-33
Cleaning the Imager 7-41
Determining If the Imager is Dirty 7-41
Examine a Test Image 7-41
Visually Inspect the Imager 7-41
Cleaning a Dirty Imager 7-43
Separating the Camera from the KODAK Camera Back 7-43
Wiping the Imager 7-49
Reassembling the Camera 7-51
Using a Flash 7-53
Calibration (CAL) Files — DCS 460 Only 7-54
8 Reference — Kodak Driver Software 8-1
General Features 8-2
Defaults — Driver Image Window 8-5
Commands 8-6
Source Menu 8-6
Camera 8-7
Folder 8-7
Choose Folder 8-7
View Menu 8-7
Contact Sheet 8-8
Preview 8-8
Test Shot 8-10
Photoshop Menus 8-12
Photoshop Edit Menu 8-12
Photoshop Select menu 8-12
All 8-12
None 8-12
Acquire As Menu 8-13
Photo 8-13
Contact Sheet 8-13
Acquire Contact Sheet Dialog 8-15
Document Name 8-15
Output Resolution 8-16
Size (Thumbnails) 8-16
Show Crop Rectangle (Thumbnails) 8-16
Printable Area Width and Height 8-16
Cancel 8-16
OK 8-16
Take Picture Icon 8-17
Camera Control Icon 8-17
Load Camera Firmware 8-19
Set Clock 8-20
Erase 8-20
Format 8-20
Recover 8-21
Self Test 8-22
Done 8-22
Preferences Icon 8-23
Default Acquire Resolution 8-23
12-Bit Acquire 8-24
Show Tool Tips 8-24
Units: Inches/Centimeters 8-24
Acquired Contact Sheet Layout 8-25
Factory Settings 8-25
Cancel 8-25
OK 8-25
Rename Images Icon 8-25
Name 8-26
Sequence Number: Digits and Starting From 8-26
Example 8-27
Rename 8-27
Cancel 8-27
Rotate Clockwise/Counterclockwise Icons 8-28
8 Reference — Kodak Driver Software (continued)
Commands (continued)
Crop Icon 8-28
Introduction 8-28
The Crop Dialog Box 8-30
Method: Freeform and Fixed Size 8-31
Size 8-31
Left, Top, Width, and Height 8-32
Fix Aspect Ratio 8-32
Final Output 8-33
Remove 8-33
Cancel 8-33
OK 8-33
Crop New Images after Shutter Release 8-33
Navigation Buttons 8-33
Lighting Menu 8-34
Click-Balance Tool 8-35
Sound Menu 8-38
Acquire Button 8-39
Copy To Button 8-40
Archive Image File Format 8-40
Delete Button 8-41
Done Button 8-42
Annotation Area and Image Information Window 8-42
Navigation Bar 8-44
Contact Sheet View 8-44
Preview View or Crop Dialog 8-44
Select All Icon 8-45
Number of Images Selected 8-45
The X-Y Cursor Location 8-45
RGB Values at the Cursor Location 8-46
Thumbnail/Preview Size Menu 8-46
Using Photoshop "Actions" (Macintosh Only) 8-47
Supported Commands 8-49
Driver Commands Not Supported 8-50
Troubleshooting — Kodak Driver Software 8-51
Messages — Kodak Driver Software 8-54
9 Appendices 9-1
Appendix A — Specifications DCS 410, DCS 420, DCS 460, NC2000e A-1
Appendix B — Glossary B-1
Appendix C — Updating Your KODAK Software Driver C-1
Appendix D — Repacking Instructions D-1
Appendix E — Problem Report Form E-1
Appendix F — Using an Infrared Camera (DCS 420IR Only) F-1
Appendix G — Technical and Telephone Assistance G-1
Appendix H — Optional Equipment & Spare Parts List H-1
10 Index 10-1
1
Before You Begin
NOTE: Before you continue, complete and submit the enclosed Warranty Registration card. You should also read the Warranty and the Software License Agreement for the product.
Check the following lists to ensure that you have the required and optional computer hardware and software, and camera accessories, to use the available models of the camera. (Model numbers are included in the Specifications appendix.)
The camera can be used with a Macintosh computer and/or with an IBM PC or compatible computer. Separate specifications for both are included on the following pages. (You may be able to use the camera on other computer platforms, or with additional operating systems, using drivers prepared by companies other than Kodak, or by developing your own driver. Contact Kodak for information.)
Macintosh Computer — Hardware and Software
The following sections list the required and optional computer hardware and software needed to run the Kodak Driver for use with Adobe Photoshop Software on an Apple Macintosh computer.
IMPORTANT: Refer to the read-me files on the supplied software driver diskette for additional details or revisions to these requirements.
Required Computer, Memory, Hard Disk
Computer
An Apple Macintosh computer with a 68020 processor or above, or Power Macintosh product line is required.
Memory
Memory in megabytes (MB) of random access memory (RAM) that are required:
▶ 32 MB RAM required for DCS 410, DCS 420, NC2000e.
▶ 64 MB RAM required for DCS 460.
Hard disk
At least 100 megabytes of free disk space are needed.
Required Monitor and Display Card
A color monitor is required for color work. A display with a minimum 640 x 480 pixel resolution is required, with 1024 x 768 pixel resolution preferred; a PowerBook monitor with a 640 x 400 pixel resolution is also
acceptable. You need the appropriate display card for the monitor in use; we recommend a 16-bit or 24-bit video display card (which can display more than 16.7 million colors). Neither the amount of data stored for each image, nor the quality of any printed output, is affected by the monitor or card in use. If you do not have a 24-bit display card, the software automatically dithers the display data to achieve the best looking image.
Required Systems Software
Apple System software version 7.5 or greater.
Required SCSI Cables and Terminators
Use only the supplied cables; do not use substitute cables, except that an additional cable is required if you will use the camera as the only external device attached to a PowerBook computer. (If you are using a PowerBook computer, refer to Chapter 4.)
Appropriate SCSI terminator(s), as required for your computer system.
Required Applications Software
Adobe Photoshop 3.0.4 or greater.
IBM PC or Compatible Computer — Hardware and Software
These sections list required and optional hardware and software needed to run the Kodak drivers for TWAIN-compliant PC applications.
IMPORTANT: Refer to the read-me files on the supplied software driver diskette for additional details or revisions to these requirement.
Required Computer, Memory, Hard Disk
NOTE: Your TWAIN application, or systems software, may have additional hardware requirements beyond those listed below.
Computer
An 80486 processor or above is required; a 100 MHz Pentium processor or above is recommended.
Memory
A minimum of 64 megabytes (MB) of random access memory (RAM) are required.
Hard disk
At least 100 megabytes of free hard disk space is necessary.
Required Monitor and Display Card
A color monitor is required for color work. VGA or compatible display with a minimum 640 x 480 pixel resolution is required, with 1024 x 768 pixel resolution preferred. You need the appropriate 16-bit display card
for the monitor in use; we recommend a 24-bit display card. A 16-bit card can display up to 32,768 colors, while a 24-bit card can display more than 16.7 million colors. (Neither the amount of data stored for each image, nor the quality of any printed output, is affected by the monitor or card in use.) If you do not have a 24-bit display card, the software automatically dithers the display data to achieve the best looking image.
Required SCSI Interface
ASPI (Advanced SCSI Programming Interface) Windows host adapter such as those from Adaptec, Inc. running EZ-SCSI 4.0 or later.
If other external SCSI devices are connected to your computer, you may need to obtain a SCSI terminator depending on the termination of devices in the SCSI chain.
Required Systems Software
Microsoft Windows 95 or Windows NT 4.0.
Required Applications Software
A TWAIN-compliant software application. The Kodak driver for use with TWAIN-compliant PC applications can be used with software such as Adobe Photoshop and may work with other software applications that support TWAIN specifications.
Optional Hardware/Software for Playing Recorded Sound
A hardware sound board is required if you want to play the ".WAV" files you can record with the microphone in the camera.
Other Optional Equipment
For information about optional equipment, refer to the appendix "Optional Equipment & Spare Parts List" and to the text files installed during software installation that list system and software solutions available from third party vendors.
Optional Camera Equipment
Kodak accessories, for example a shutter release cable and PCMCIA cards.
Electronic flash and accessories.
Extra lenses for the camera.
Close-up accessories.
Nikon remote control accessories.
Finder accessories.
Optional PCMCIA Hard Disk Card
The camera is designed to accept PCMCIA hard disk cards that support the PCMCIA "ATA" interface and operate in 8-bit transfer mode. Refer to the read-me files on the supplied software driver diskette for information on specific cards known to work with the camera.
2
Introduction
This chapter includes:
▶ A brief introduction to the design of the camera.
▶ An overview of the product features.
NOTE: This manual assumes that you are familiar with the operation of the Nikon N90s camera; if you are not, refer to the Nikon instruction manual for the Nikon N90s supplied with the camera.
This camera system takes and stores high-resolution digital images. You can attach the camera to one of several computers and move your images from the camera to the computer using one of the special software drivers provided by Kodak. You can then use the image in other applications or edit it with your image editing software. You can also record sound with the built-in microphone in the camera and play the sound files through your computer system.

natural_image
Line drawing of a Kodak DCS motorcycle with visible branding and no text or symbols beyond brand name (no technical labels or annotations)KODAK Camera Back
The KODAK camera back is a sealed, one-piece unit. A single mounting screw attaches it to an unmodified Nikon N90s camera body that has had its film back removed.

text_image
NIKON N90s CAMERA (with film back removed) DCS KODAK CAMERA BACK Mounting screwFeatures
The KODAK camera back incorporates the following features:

text_image
FRONT VIEW Imager Kodak DCS Tripod socket Mounting screw▶ A KODAK charge coupled device (CCD) imager with image data recorded as listed in the Specifications appendix.
▶ Exposure indexes equivalent to film speeds as listed in the Specifications appendix.
▶ Dynamic random access memory (DRAM) that supports shooting as listed in the Specifications appendix.
▶ A mounting screw rigidly mates the camera back to the camera.
▶ A tripod socket.
BACK VIEW

text_image
LCD Microphone Record button DELETE button Card busy light Remove/insert PCMCIA card here. SCSI port SCSI ID button Multipurpose connector▶ A PCMCIA-ATA Type III slot designed to accept PCMCIA cards that support the "ATA" protocol and operate in 8-bit mode.
▶ A liquid crystal display (LCD) that shows status and control information.
▶ A SCSI port to connect the camera to your computer for transferring images from the camera to your computer. You can take pictures while the camera is connected to a computer. The images are then immediately available on the computer. The camera back is a non-terminated SCSI device.
▶ A single, rechargeable nickel hydride battery that powers both the camera back and the camera; the Specifications appendix lists the number of frames you can expect from a fully-charged battery in typical shooting situations.
▶ Two controls — one sets the camera back SCSI ID; the other deletes the most recent image from the PCMCIA card.
A built-in microphone records sound as ".WAV" files at "telephone quality"—8-bits, 11 kilohertz, monaural.
▶ Software drivers to move images from the camera back to your computer. You can also use the drivers to perform self-tests on the camera from your computer, and to load new firmware (camera control programming) into the camera. This last function allows you to keep the firmware in the camera up-to-date without sending the camera to a service center.
3
Quick Start
This chapter provides a brief summary of the steps you follow to use the camera. Most steps refer you to more detailed explanations elsewhere in this manual; you can also refer to the quick reference and tips card.
If you are experienced with previous Kodak digital cameras, with personal computers, and with the Nikon N90s, you may be able to follow these steps without referring to other material.
If you are inexperienced with previous Kodak digital cameras, with personal computers, and with the Nikon N90s, read through the steps below (without following them), as an overview. Then proceed through the manual for a thorough explanation of each step.
1. Obtain and mount a lens on the camera.
A lens is not supplied with the camera system, but is available from Kodak (and elsewhere). Refer to the appendix "Optional Equipment & Spare Parts List," and to the quick reference card regarding lens behavior.
2. Obtain one or more supported PCMCIA cards.
PCMCIA cards are not supplied with the camera system, but are available from Kodak (and elsewhere). The camera accepts cards that support the PCMCIA "ATA interface and operate in 8-bit mode. Refer to the read-me file on the supplied driver diskette for supported cards, and to the appendix "Optional Equipment & Spare Parts List."
3. PC customers only: obtain and install — if not already present — a supported SCSI host adapter card.
Supported adapters are listed in Chapter 1; brief installation information is in Chapter 4.
4. (Optional) PC customers only: Obtain and install a sound board — if not already present — required to play sounds recorded with the camera system.
5. Install the supplied software driver.
A. Macintosh: Load the first diskette for the Macintosh driver. Review its read-me file. Double-click the installer and follow the instructions it presents to install the software. Refer to Chapter 4.
B. PC: Load the first diskette for the TWAIN (PC) driver. Review its read-me file. Run the SETUP program to install the TWAIN driver supplied by Kodak. Refer to Chapter 4.
6. DCS 460 Only: Install the Calibration File.
A. Macintosh: Load the diskette with the calibration (CAL) file for your camera. Copy the calibration file (its name ends with the characters ".CAL") into the folder containing your Photoshop plug-ins (it is probably named PLUG-INS). Refer to Chapter 4.
B. TWAIN (PC): Load the diskette with the calibration (CAL) file for your camera. Run the SETUP program to install the calibration file.
7. Attach the supplied AC battery charger/adapter.
Connect the adapter to a source supplying power within the range on its label, and to the connector on the lower left corner of the camera back. The first time it is used, allow the battery to charge for at least two hours shortly before it is used. Refer to Chapter 4. The section "Battery Charging for Optimal Capacity" in Chapter 7 includes important battery information.
8. Set the Camera SCSI ID.
Turn on the camera system (set the Nikon N90s on/off switch to "on") push the camera back SCSI button once to enter SCSI mode, and then repeatedly to rotate through SCSI IDs. Stop at the desired ID. Do not select an ID that conflicts with any in use on your computer system. Refer to Chapter 4.
9. Connect the camera system to your Computer.
For this step we encourage all customers to refer to the detailed instructions in Chapter 4 to ensure that this connection is made properly before continuing. There you will turn off your computer, and connect the camera, a non-terminated SCSI device, to the computer.
10. Place a supported PCMCIA card into the camera.
Open the door on the side of the camera, push the PCMCIA card firmly into place, and close the door. (Do not be startled by the red Card Busy light that blinks briefly, or by the slight noise.) Refer to Chapter 4.
11. Update the camera firmware.
This onetime action ensures that the most current control commands (firmware) are loaded in the camera. Refer to Chapter 4.
A. Run Adobe Photoshop and choose
KODAK DCS 400/EOS•DCS/NC2000 from the IMPORT submenu of the Adobe Photoshop 4.0 FILE menu. The driver image window appears.
B. Click the camera control icon, shown below. Click the LOAD CAMERA FIRMWARE icon.

text_image
DCS Source: Camera View Contact Sheet Acquire As: Plate Camera Control A. Camera Settings DCS XXX Serial Number XXXXXX Firmware Version: 011599 Date and Time: Tuesday, March 4, 1999 4:16 PM Load Camera Firmware Set Clock B. Camera Disk Erase Format Recover Self Test Done Acquire Copy To... Delete Done: MacronNOTES: For earlier supported versions of Photoshop, choose the driver from the ACQUIRE submenu of the FILE menu.
For other supported TWAIN applications on the PC, access the TWAIN driver through the select-then-acquire process used by your application to access the driver image window.
12. Format a PCMCIA card.
Your PCMCIA card must be (DOS) formatted by the camera. Formatting destroys any files that may be on the card. Click the camera control icon as described in the previous step. Click FORMAT, a one-time process for each card you use. Refer to Chapter 4.
13. Take pictures with the camera.
The camera is now ready to take pictures. Use it while connected to a computer and/or the AC battery charger/adapter. Or you can use the camera without the computer or adapter. When you are finished with the camera, you can leave it connected to the computer or you can turn off the computer, then disconnect the adapter and the camera. Refer to Chapter 5.
14. Record sound.
With the camera system on and awake, hold the back of the camera about six inches (15 cm) from your mouth (the microphone is behind four small holes centered at the top of the camera back). Press and hold the record button (to the right and below the microphone), and speak into the microphone. Refer to Chapter 5. Recorded sound files can be played by the computer; they cannot be played by the camera. Refer to Chapters 6 and 8.
15. Move images from the camera system to the computer.
With equipment off, reconnect the camera system to the computer (if needed), run your application, access the driver image window as described above. Thumbnails of pictures you have taken appear in the
window. Scroll through images, select one or more, adjust color using the balance controls, crop, and acquire the image into your application by clicking the ACQUIRE button. And/or move images to an archive folder on your computer by selecting the image(s) and using the COPY TO button. Refer to Chapters 6 and 8.
16. Quit
Click the DONE button to leave the driver. Quit your application software. Shut down your computer system. Disconnect the AC battery charger/adapter from the camera back; turn off the Nikon N90s.
4
Preparing the Camera and the Computer
This chapter describes the series of steps you follow to prepare the camera for use in a Macintosh or PC computer environment. This includes how to:
▶ Charge the battery and use the AC battery charger/adapter.
▶ Set the SCSI ID on the camera.
▶ Make the SCSI connection between the camera and your computer.
▶ Install the driver for Adobe Photoshop Software on your Macintosh computer or the TWAIN driver on your PC.
▶ Insert and remove your PCMCIA card.
▶ Access the driver for Adobe Photoshop Software.
▶ Load and/or update camera firmware.
▶ Format a PCMCIA card for use with the camera.
IMPORTANT: We assume that you are familiar with the operation of your computer. If you are not, refer to the manuals that accompany that computer before continuing.
Before you continue, if you have not completed and returned the enclosed Warranty Registration card, please do so now.
CAUTION: In this chapter you will connect the camera to your computer. Once connected, do not disconnect the camera from the computer while using the supplied software, or even while the computer is on. Doing so may result in the loss of data from the PCMCIA card in the camera or from the hard disk in your computer. Instead, turn off all equipment in the order described at the end of this chapter before disconnecting the camera.
Using the AC Battery Charger/Adapter
Keep the following battery considerations in mind as you use the camera.
IMPORTANT: Do not attempt to remove the battery; it is not a customer serviceable part.
IMPORTANT: The section "Battery Charging for Optimal Capacity" in Chapter 7 includes important battery information.
The camera incorporates a single, rechargeable nickel hydride battery that powers both the camera back and the camera; no batteries are installed in the camera.
The Specifications appendix lists the number of frames you can expect from a full-charged battery in typical shooting situations.
- When the camera will be used in the field, charge the battery as close to the time it will be used as possible.
▶ You can operate the camera while connected to the supplied AC battery charger/adapter, or you can recharge the battery with the adapter and then use the camera in the field without the adapter.
The adapter will run the camera continuously while charging the battery.
▶ You can leave the camera continually connected to the AC battery charger/adapter, however, this will not maintain a full charge. Disconnect and then reconnect the charger before use, and charge for two hours to ensure a full charge.
If you are using the camera in an environment in which a power outlet is available, we recommend that you operate the camera while connected to the AC battery charger/adapter as described below.
▶ Refer to Chapter 7 for information on the effect of temperature extremes on battery operation.
Charging the Battery
You should charge the battery for two hours before using the camera for the first time, and thereafter on a regular basis as needed. Charging the battery in this way will ensure that you begin shooting with a fully charged battery, and that you obtain the most images per charge.
Follow these steps to charge the battery.
- Locate the AC battery charger/adapter and power cord supplied with the camera.
AC BATTERY CHARGER/ADAPTER

natural_image
Illustration of a black cable with a connector and a device labeled 'To camera' (no other text or symbols)POWER CORD

text_image
To AC battery charger/adapter To wall outlet-
Plug the appropriate end of the power cord into the AC battery charger/adapter.
-
Plug the other end of the power cord into a wall outlet.
-
Plug the AC battery charger/adapter into the camera; the unit plugs into the round connector at the lower left corner of the back of the camera.

natural_image
Line drawing of a portable electronic device connected to a power cord via cable (no text or symbols)- The first time the camera is used, allow the battery to charge for two hours.
IMPORTANT: An LCD at the top left corner of the camera back displays a battery icon.

text_image
LCD GRAPHICS Battery indicator KODAK camera back LCDWhile the battery is charging, the three segments of this icon light repeatedly in turn from bottom to top; when the battery is fully charged all three remain lit.


Filling battery
When the camera is used without the adapter, the number of lit segments indicates the charge state of the battery. When the bottom segment is blinking, the battery needs recharging.
- (Optional) Use the supplied accessory adapter cable as shown in the following illustration. Doing so allows simultaneous use of the AC battery charger/adapter and optional shutter release accessory (refer to the appendix "Optional Equipment & Spare Parts List" for ordering information). Plug the shutter release accessory into an empty connector on the accessory adapter cable.

text_image
Accessory adapter cableSetting the SCSI ID on the Camera
In this section you will set the SCSI identification (ID) number for the camera. Each SCSI device connected to the same computer must have a different ID number.
CAUTION: This section assumes that the camera and the computer are not currently connected. You should never change the SCSI ID on the camera when it is connected to a computer.
-
Shut down your computer.
-
If SCSI devices other than the camera are connected to your computer, for example a hard disk, determine their SCSI identification numbers so that you can select a different number for the camera. If necessary, refer to the instructions for those devices to determine how to find their numbers.
NOTE: Since you may connect the camera to different computers, or since you may change the external devices connected to the computer you regularly use with the camera, you should ensure that the camera has a unique SCSI ID each time you connect it to the computer.
- Turn on the camera as shown below.

text_image
Power switch set to ON Shutter release button Ps MODE ISO DRIVE OFF [O]- Wake the camera by lightly pressing the shutter release button.
NOTES: The camera turns off after several seconds of inactivity; therefore, as you complete these steps you may need to reawaken the camera by lightly pressing the shutter release button again.
- Locate the indented button on the back of the camera labeled "SCSI ID."

text_image
SCSI ID button SELECT... SCSI ID #ANNUALU- Press the SCSI ID button once with your fingertip or a blunt object; this action wakes SCSI mode. The characters "SCSI" (called the SCSI indicator), as well as a single value from 0 to 7, "PC," and "PP" appear on the camera back LCD. That value is the current SCSI ID of the camera.

text_image
SCSI ID SCSI indicator SCSI ID button SCSI DELETE SCSI ID CARD BUSY- While "SCSI" still appears on the LCD, you change the current SCSI ID by pressing the SCSI ID button repeatedly. The ID rotates through the values 0 to 7, "PC," and "PP." Stop when you have the SCSI ID you want, using the separate information below for Macintosh and TWAIN (PC).
A camera set to a SCSI ID currently in use by another connected SCSI device may not respond to the computer; instead, the camera will flash the SCSI indicator on the camera back LCD. If this occurs, shut down the computer, disconnect the camera, reset the SCSI ID on the camera as described in this section, and try again.
Macintosh: Do not use the SCSI values 0 (usually your internal hard disk) or 7 (usually your computer), do not select "PC" or "PP," and do not use a number currently assigned to any other connected SCSI device such as a CD-ROM drive which is usually number 3 if it is an internal drive supplied by Apple Computer, Inc.
TWAIN (PC): Do not use a number currently assigned to any other connected SCSI device. Do not assign the number used by your SCSI host adapter. Consult your SCSI host adapter manual to see if other SCSI IDs should not be used.
"PC" SETTING FOR IBM LAPTOP CUSTOMERS (not for use with the Macintosh): Use the "PC" SCSI ID setting only if you will be connecting the camera to an IBM or compatible laptop computer using a PCMCIA-to-SCSI II adapter (such as the Adaptec SlimSCSI used with EZ-SCSI 4.0 or the New Media Bus Toaster), to connect the PCMCIA slot on your laptop (not the camera) to the SCSI connector on the camera. "PC" sets the SCSI ID of the camera to 1 and turns on active termination in the camera.
When you finish, take the camera out of "PC" mode, turn off the computer and camera. If left in "PC" mode, a fully charged battery will be exhausted in approximately eight hours since the camera can not change to low power mode when this SCSI setting is active.
"PP" SETTING: The "PP" setting, although it appears, is not currently supported and should not be selected for use with the Kodak driver.
Installing a SCSI Host Adapter (TWAIN PC Only)
The camera connects to your PC at a SCSI port provided by installing one of the supported SCSI host adapter cards. If your PC already has a supported card installed, continue at the next section.
CAUTION: Only trained and qualified technical personnel should perform the following procedure. You should contact a computer service professional to configure and install an ASPI host adapter card such as those available from Adaptec, Inc. running EZ-SCSI 4.0 or later. The installer should read all manufacturers' instructions for both the computer and the host adapter before installing the adapter in your computer.
- Turn off the power to the computer, then to all peripherals.
- If the termination power setting on your SCSI host adapter is disabled, change its setting to enable it.
- Install the SCSI Host Adapter card for your PC according to the manufacturer's installation instructions. When installation is complete, a SCSI2 connector should be available on the back of your PC. The figures in this chapter are intended to illustrate a typical computer (Macintosh or PC).
BACK OF PC AFTER INSTALLING SCSI HOST ADAPTER

text_image
SCSI2 PortMaking the SCSI Connection
The camera is a non-terminated SCSI device that connects to your Macintosh computer or PC with one of the included SCSI cables. In normal usage you may connect and disconnect the camera from the computer on a regular basis; for this reason you may want to position your computer so that its SCSI connector is readily accessible.
Three sets of instructions follow.
- The camera is the sole SCSI device.
II The camera is used with other SCSI devices.
NOTE: You may need to obtain a SCSI terminator to complete these steps if other external SCSI devices are connected to your computer. A single 25-pin SCSI terminator is supplied with the camera.
III. The camera is used with a Macintosh PowerBook or a PC laptop.
Read the section that matches the environment in which you will use the camera
I. Camera as the Sole SCSI Device
Follow these steps if you will connect the camera as the sole external SCSI device attached to your computer
- Turn off the camera and the computer.
IMPORTANT: Later when you connect and disconnect the computer and the camera on a regular basis, make sure that the computer is off.
-
Place the camera in a convenient position next to your computer.
-
Connect the AC battery charger/adapter to the camera as described earlier in this chapter. Although this step is optional, we recommend it whenever the camera is connected to a computer.
-
Select the appropriate SCSI cable for your Macintosh (with 25-pin connectors at both ends), or PC (with a 50-pin SCSI2 HD connector at one end and a 25-pin SCSI connector at the other end.).
IMPORTANT: Use only the cable supplied with the camera; do not use a substitute cable.
MACINTOSH:

text_image
25-pin Connector 25-pin ConnectorPC — for TWAIN driver:

text_image
50-pin SCSI2 HD Connector 25-pin SCSI Connector- Follow the appropriate part of this step for either a Macintosh or a PC.
MACINTOSH: Attach one 25-pin connector to the SCSI port on the back of the Macintosh computer. Make sure the connector is well seated by pressing it into place firmly, and then tighten both knobs on the cable connector.

text_image
KnobsPC: Attach the 50-pin SCSI2 connector to the SCSI2 port on the back of the PC. Make sure the cable connector is well seated by pressing it into place firmly, so that the spring-clips on the connector snap onto the SCSI port.

natural_image
Pure electrical circuit lines without any symbols- Attach the appropriate end of the supplied 25-pin SCSI terminator to the other end of the SCSI cable you just attached to your computer.

text_image
BACK OF COMPUTER 25-pin Terminator- Attach the open end of the 25-pin terminator to the SCSI connector on the back of the camera.

text_image
Camera SCSI Port- (Optional) Later, to disconnect the camera from the computer, shut down the computer and then power off the camera. Then disconnect the terminator from the camera and the SCSI cable from the computer. Do not leave a SCSI cable with an empty connector/terminator dangling from your computer.
Continue at "Inserting and Removing a PCMCIA Card" later in this chapter.
II. Camera Used with Other SCSI Devices
NOTE: If other external SCSI devices are connected to your computer, you may need to obtain a SCSI terminator to complete these steps.
Follow these steps if one or more external SCSI devices are already connected to your computer.
Multiple SCSI devices are connected to the computer in a chain. If the camera is one of multiple SCSI devices connected to your computer, it must be connected as the last device in the chain of SCSI devices since it only includes one SCSI connector.
The total cable length connecting all devices must not exceed 15 feet (4.6 meters).
You will need to determine if the connected SCSI devices are terminated or not. To do so, first look for an external SCSI terminator on the devices. Because some devices contain internal terminators, also check the instructions for your devices to determine if they are terminated internally, and if they are whether that termination is currently active.
We provide two sets of instructions. Follow the first set (A) if none of the connected devices are terminated or if one of the devices is terminated externally. Follow the second set (B) if one of the devices — it should be the last device in the chain — is terminated internally.
A. Follow these steps if none of the connected devices are terminated or if one of the devices is terminated externally.
- Turn off the computer, and all connected SCSI devices.
IMPORTANT: Later, when you connect and disconnect the computer and the camera on a regular basis, make sure that all devices are off.
-
Place the camera in a convenient position next to the last device in the SCSI chain of devices connected to your computer.
-
Connect the AC battery charger/adapter to the camera as described earlier in this chapter. Although this step is optional, we recommend it whenever the camera is connected to a computer.
-
When you have completed part A or part B of this step, the last device in the chain should have a cable (with no terminator) connected to one of its SCSI connector, and the other connector should be empty.

text_image
BACK OF COMPUTER BACK OF ONE OR MORE NON-INTERNALLY TERMINATED SCSI DEVICES Empty SCSI ConnectorA. If there is an external SCSI terminator on an otherwise empty SCSI connector on the last device, remove it.
B. If there is an external SCSI terminator between the end of a cable and a SCSI connector on a device, remove the terminator, and then reconnect the cable. (Later, if you remove the camera cable from your computer, remember to replace this terminator.)
- Select the SCSI cable with the 50-pin connector at one end and the 25-pin connector at the other end.
IMPORTANT: Use only the cable supplied with the camera; do not use a substitute cable.

text_image
50-pin Connector 25-pin Connector- Connect the 50-pin connector to the empty connector on the last SCSI device in the chain. Make sure the connector is well seated by pressing it into place firmly, and then pinch the thin wire clamps over its base.

text_image
25-pin Connector 50-pin Connector- Attach the supplied 25-pin terminator to the other end of the SCSI cable and then to the camera.

text_image
SCSI Connector Camera 25-pin Connector 25-pin Terminator- (Optional) Later, to disconnect the camera from the computer, turn off the computer and all external SCSI devices, and then power off the camera. Then restore the SCSI cables and terminator to the state they were in before the camera was connected. Do not leave a SCSI cable with an empty connector dangling from a SCSI chain.
Continue at "Inserting and Removing a PCMCIA Card" later in this chapter.
B. Follow these steps if the last connected device is terminated internally.
- Turn off the computer, and all connected SCSI devices.
IMPORTANT: Later when you connect and disconnect the computer and the camera on a regular basis, make sure that all devices are off.
-
Place the camera in a convenient position next to the last device in the SCSI chain of devices connected to your computer.
-
Connect the AC battery charger/adapter to the camera as described earlier in this chapter. Although this step is optional, we recommend it whenever the camera is connected to a computer.
-
Select the SCSI cable with the 50-pin connector at one end and the 25-pin connector at the other end.
IMPORTANT: Use only the cable supplied with the camera; do not use a substitute cable.

text_image
50-pin Connector 25-pin Connector- Connect the 50-pin connector to the empty SCSI connector of the device that is terminated internally. Make sure the connector is well seated by pressing it into place firmly, and then pinch the thin wire clamps over its base.

text_image
BACK OF COMPUTER BACK OF ONE OR MORE SCSI DEVICES Not Terminated Terminated Internally 25-pin Connector 50-pin Connector4-22 ▶ Preparing the Camera and the Computer ◀
- Attach the other end of the SCSI cable to the SCSI connector on the camera.

text_image
SCSI Connector 25-pin Connector- (Optional) Later, to disconnect the camera from the computer, shut down the computer and all external SCSI devices, and then power off the camera. Then restore the SCSI cables and terminator to the state they were in before the camera was connected. Do not leave a SCSI cable with an empty connector dangling from a SCSI chain.
Continue at "Inserting and Removing a PCMCIA Card" later in this chapter.
III. Camera Used with a Macintosh PowerBook or a PC Laptop
Follow the steps below to match your computer system, either a Macintosh PowerBook (part A) or a PC Laptop (part B).
A. Macintosh PowerBook with No External SCSI Devices
You can use the camera with a variety of PowerBook models (except do not use the camera with the model 100). However, the information in this section may not apply to all PowerBook models.
For this installation you will need to supply an HDI-30-pin to 25-pin Macintosh PowerBook SCSI adapter cable. Do not use a terminator.
NOTE: This cable is available in two versions; be certain that your cable is no longer than three feet long, and that you obtain a cable for connecting a PowerBook computer to a SCSI device, not for connecting a PowerBook computer to a desktop Macintosh computer.

text_image
PowerBook SCSI Adapter Cable HDI-30-pin Connector 25-pin Connector- Turn off the Macintosh PowerBook computer.
IMPORTANT: Later when you connect and disconnect the Macintosh PowerBook computer and the camera on a regular basis, make sure the computer is off.
-
Connect the AC battery charger/adapter to the camera as described earlier in this chapter. Although this step is optional, we recommend it whenever the camera is connected to a computer.
-
Attach the HDI-30-pin connector of your HDI-30-pin to 25-pin SCSI cable to the HDI-30 port on the back of the Macintosh PowerBook. Make sure the connector is well seated by pressing it into place firmly. IMPORTANT: Do not use a terminator.

text_image
BACK OF POWERBOOK COMPUTER Camera SCSI Connector-
Attach the other end of your HDI-30-pin to 25-pin SCSI cable to the SCSI connector on the back of the camera.
-
(Optional) Later, to disconnect the camera from the Macintosh computer, shut down the computer and then power off the camera. Then disconnect the SCSI cable from the camera and from the Macintosh computer. Do not leave a SCSI cable with an empty connector/terminator dangling from your Macintosh computer.
Continue at "Inserting and Removing a PCMCIA Card" later in this chapter.
B. PC (for TWAIN driver)
The camera can be used with an IBM or compatible laptop computer if you use a PCMCIA-to-SCSI II adapter (such as the Adaptec SlimSCSI used with EZ-SCSI 4.0 or the New Media Bus Toaster). These adapters include a PCMCIA card that plugs into the PCMCIA slot in your laptop (not in the camera). A cable connects this card to the SCSI connector on the camera, using an adapter if needed at the camera end of the cable. None of this equipment is provided with the camera.
In this configuration set the SCSI ID on the camera to "PC;" this sets the camera SCSI ID to 1 and turns on active termination in the camera.
CAUTION: When you finish with the camera in "PC" mode, turn off the computer and camera. If left in "PC" mode, a fully charged battery will be exhausted in approximately eight hours since the camera can not change to low power mode when this SCSI setting is active.
Inserting and Removing a PCMCIA Card
This section describes how to insert and remove a PCMCIA card. PCMCIA cards are not supplied with the camera, but are available as optional equipment. Refer to Chapter 1 and to the read-me files supplied with the software for additional information on supported cards.
A PCMCIA card can be inserted or removed at any time, except when the red "Card Busy" light on the camera back is blinking. You can insert or remove a card while in the field, while connected to the AC battery charger adapter, while connected to a computer, and/or while the camera is on or off.
IMPORTANT: When the red Card Busy light is blinking, data is being read from or written to the PCMCIA card, for example just after you take a picture, or later when you move data from the camera to a computer. If the card is removed while the light is blinking, you may lose the current image, and may lose other images as well.
Inserting a PCMCIA Card
Follow these steps to insert a PCMCIA card. (If a card is currently installed, there is no need to follow these steps now, although if you are unfamiliar with the use of this type of card you may wish first to remove the card as described in the next section, and then to return here to reinstall the card.)
- Be certain that the red "Card Busy" light is not blinking before you continue.

text_image
DELETE SCSI ID CARD BUSY CARD BUSY light- While looking at the back of the camera, open the door on the left edge of the camera back by inserting a thumb or finger into the opening and swinging the door away from you.

text_image
Insert/remove PCMCIA card here.- NOTE: As you complete this step, do not be startled when the red Card Busy light blinks and you hear noise from the camera; this is normal operation when a PCMCIA card is inserted.
Insert your PCMCIA card (not supplied with the camera), by sliding it — thin edge first — into the empty slot, and pushing it firmly into place.

text_image
LCD PICKY 100 MPWhen properly installed, the end of the PCMCIA release button should be flush with the edge of the card.

text_image
Release button PCMCIA card- Swing the door closed over the PCMCIA card.
NOTE: The camera back LCD (see figure above at the start of step 3) may show "E6," a code indicating that the PCMCIA card is not formatted. That is a normal condition at this point in the preparation of the camera. In a later section of this chapter you will format the PCMCIA card.
Removing a PCMCIA Card
Follow these steps to remove a PCMCIA card.
- Be certain that the red "Card Busy" light is not blinking before you continue.
IMPORTANT: When the red Card Busy light is blinking, data is being read from or written to the PCMCIA card, for example just after you take a picture, or later when you move data from the camera to a computer. If the card is removed while the light is blinking, you may lose the current image, and may lose other images as well.
- While looking at the back of the camera, open the door on the left edge of the camera back by inserting your left thumb or other finger into the opening and swinging the door away from you.

text_image
Remove/insert PCMCIA card here.- CAUTION: As you complete this step, the PCMCIA card is ejected from the camera; for that reason, keep your hand in front of the door opening to prevent the fragile card from falling out of the camera. If a PCMCIA card is dropped, you may destroy it, resulting in the loss of all of your data on the card.
Firmly press the rectangular button at the top of the opening inside the door; this action releases the PCMCIA card from its connector and ejects the card from the camera back.

text_image
Press firmly.-
Remove the card from the camera by grasping it at the top and bottom with your thumb and forefinger and pulling it completely from the camera.
-
Swing the door closed over the empty card compartment.
Installing the KODAK Driver
In this section you will install the special software driver provided with the camera. Then you can use the driver to ensure that the camera has the latest firmware (camera control programming), and to format a PCMCIA card(s). Once the software is installed, you can use it regularly to move images and sound files from the camera to your computer by acquiring them while running your copy of Adobe Photoshop (or other supported software on a PC), as described in Chapters 6 and 8.
Installing the software is a onetime action; you complete these steps once, and do not repeat them each time you want to acquire images. The camera can remain connected to the AC battery charger/adapter and the computer while you complete these steps.
- If your computer is not on, turn it on now
- Locate the Kodak-supplied driver diskettes for the computer system you will use — either Macintosh or PC.
- Place the first diskette into the internal drive of your computer.
- Read the contents of the read-me file — it contains the latest information on the camera and software driver.
- Follow the instructions below to install the driver for either a Macintosh computer or PC.
Macintosh: Double-click on the installer icon and follow the directions you find there for installing the camera software.
PC:
A. Choose RUN from START (or the FILE menu if appropriate).
B. Type A:\SETUP (type B:\SETUP if the diskette is in drive B) in the command line.
C. Install the software by following all instructions as they appear.
NOTES ON TWAIN FOR THE PC: TWAIN is a set of written specifications developed by a consortium of vendors, that when implemented in software allows you to acquire data from a peripheral (such as a digital camera or film scanner) directly into your software application (such as image-editing software) without leaving the application. Software that incorporates the specifications is called "TWAIN-compliant." TWAIN-compliant software applications should be able to obtain image data from a TWAIN-compliant source of data, such as the KODAK Driver described in this chapter.
You can install and use the TWAIN-compliant driver for use with ASPI (Advanced SCSI Programming Interface) host adapter card such as those available from Adaptec, Inc. running EZ-SCSI 4.0 or later.
This KODAK Driver is intended for use with applications that are ASPI compliant for Windows, and not for use with applications that are ASPI compliant for other operating platforms.
With an ASPI compliant SCSI host adapter card, you must install the Windows ASPI files that accompany it. The KODAK Driver for use with ASPI compliant host adapter cards will not work properly unless these files have been installed.
The process described in this section automatically:
Creates a subdirectory named "TWAIN" in the Windows directory. (If you have other TWAIN-compliant devices this subdirectory may already exist; if so, a new one is not created.)
Creates (if one does not already exist), a "DCS4xx" subdirectory within the "TWAIN" directory to hold files for the camera.
- Places a set of files within the "DCS4xx" subdirectory.
▶ Overwrites any existing DCS drivers already in the directory. This version of the driver processes images for other Kodak professional cameras (except for the DCS 100 and 200).
6. DCS 460 Only
A. Locate the diskette for your computer system (Macintosh or TWAIN-PC) with the calibration (CAL) file for your camera.
B. Make a backup of the calibration diskette; you cannot obtain images from the camera without the CAL file.
C. Follow the appropriate part of this step for your computer system.
Macintosh: Copy the calibration file (its name ends with the characters ".CAL") into the folder containing your Photoshop plug-ins (it is probably named PLUG-INS).
TWAIN (PC): Run the SETUP program to install the calibration file.
Accessing the Camera from the Driver
Repeat the steps below each time you want to access the KODAK Driver for Adobe Photoshop software or for supported TWAIN-compliant PC applications.
- If the camera and your computer are not connected, turn both off and connect them now by following the directions in "Making the SCSI Connection" earlier in this chapter.
- Connect the AC battery charger/adapter to the camera as described earlier in this chapter. Although this step is optional, we recommend it whenever the camera is connected to a computer.
- If your computer is on, turn it off.
- Turn on the camera by sliding the Nikon N90s power switch to ON.
- Wake the camera by lightly pressing the shutter release button.
- Turn on the computer.
- Run Adobe Photoshop. (The examples throughout this manual use Photoshop — available for both the Macintosh and PC platforms.)
NOTE: You should ensure that the gamma for your monitor is calibrated properly per instructions accompanying Adobe Photoshop; if you do not, images may be consistently too light or too dark.
Special Instructions for TWAIN-compliant Software
All TWAIN-compliant software does not provide access to TWAIN drivers in the same way. As a result, for demonstration purposes this section provides one example using the KODAK Driver with Adobe Photoshop.
If you use other supported software, refer to its documentation to determine if it is TWAIN-compliant, and if it is, how it provides access to TWAIN drivers.
As you use a variety of TWAIN-compliant software, it may be helpful to know how the TWAIN specifications expect applications to perform. The specifications provide for a consistent software interface by encouraging software developers to include two specific commands — SELECT SOURCE and ACQUIRE — on the FILE menu. The specification intends that users should first choose SELECT SOURCE which should display a list of TWAIN-compliant device drivers installed on the system. After the user selects a driver from the list, he/she should be returned to the application. The user should then choose ACQUIRE which should open access to the device and allow the user to obtain image data.
IMPORTANT: Some image editing software takes all available RAM by default at start-up. The TWAIN driver will not work if this occurs. To avoid the problem, set the memory preference for your application (often found on the FILE menu) so that there is at least one megabyte of free RAM.
Once you have installed the TWAIN driver as described earlier in this chapter, and are running Photoshop, you access the driver by following these steps.
-
Choose SELECT TWAIN SOURCE on the IMPORT submenu on the Adobe Photoshop FILE menu; the SELECT SOURCE dialog box appears. (For earlier supported versions of Photoshop choose SELECT TWAIN SOURCE on the ACQUIRE submenu on the Adobe Photoshop FILE menu.)
-
Click the name of the camera driver.
-
Click SELECT; you are returned to Photoshop.
NOTE: The choice is maintained in a preference file for the TWAIN-compliant driver; you do not need to repeat steps 1 through 3 each time you use the driver.
Final Steps to the Driver Window
- Follow the appropriate step below.
MACINTOSH: Pull down the Adobe Photoshop 4.0 File menu and choose KODAK DCS 400/EOS•DCS/NC2000 from the IMPORT submenu. (For earlier supported versions of Photoshop, choose the driver from the ACQUIRE submenu of the FILE menu.)
TWAIN (PC): Choose TWAIN on the FILE menu (TWAIN ACQUIRE in earlier supported versions of Photoshop).
- Wait as the driver image window appears.

text_image
DCS Source: Camera View Contact Sheet Acquire As: Photo 1 DCS00001.TIF 2 DCS00002.TIF 3 DCS00008.TIF 4 DCS00004.TIF 5 DCS00046.TIF 6 DCS00058.TIF 7 8 9 Acquire Copy To... Delete Done Annotation: Type your data here. Camera: DC5 Serial #: 2515 Width: 1534 Height: 1012 Date: 11/12/99 Time: 1:32:10 PM Counter: [42] ISO: 200 Aperture: F4 Shutter: 2000 1 of 18 selected X: 61 Y: 48 R: 204 0: 204 B: 204 HedrusNOTES: Instead of the driver image window above you may see a message that the camera was not found. If you do, follow the troubleshooting suggestions in the message. Additional information regarding this and other messages appears in the "Messages" section of the Chapter 8.
Updating Camera Firmware
The camera incorporates nonvolatile memory that contains controls — called firmware — for most features of the camera. You can update that firmware yourself, which means you can keep the camera up-to-date as changes are made to the firmware. (Refer to the appendix "Updating Your KODAK Software Driver," for additional information.) You can also perform some troubleshooting without sending the camera to a service center, as described in the camera troubleshooting section of this manual.
By following the steps below to update camera firmware the first time you use the driver, you will ensure that the camera contains the most current version of the firmware. You do not need to update camera firmware each time you use the driver.
To complete these steps, the camera must be connected to your computer as described earlier in this chapter. We also assume that Adobe Photoshop (or other supported TWAIN-compliant application on a PC) is currently running on your computer, and that you have accessed the driver image window by choosing the driver as described earlier in this chapter.
- Click the camera control icon of the driver image window. You see the dialog box below.

text_image
DCS Source: Camera - View Contact Sheet - Acquire As: Photo Camera Control Camera Settings DCD XXX Serial Number 100000 Firmware Version: 011399 Date and Time: Tuesday, March 4, 1999 4:16 PM Load Camera Firmware Set Clock Camera Disk Erase Format Recover Self Test Done 1. 2. 7 DCS00001. DCS00004. DCS 2515 524 012 /12/99 02:10 PM [42] 200 F4 2000 Medium- Click the LOAD CAMERA FIRMWARE button.
NOTE: If you see a message indicating that the firmware update failed and specifying the name of a missing "BIN" file, be certain that you have installed the software as described earlier in this chapter.
- Wait while firmware is copied to the camera.
NOTE: You may see a message asking you to use the AC battery charger/adapter and to wait for several minutes; if you do see this message, follow the instructions in the message and wait (to allow the battery to charge) before clicking the LOAD CAMERA FIRMWARE button again.
- Click DONE to close the CAMERA CONTROL dialog box.
Formatting a PCMCIA Card
This section describes how to format a PCMCIA card, an action you may need to take now as you start to use the camera, and may need to repeat later on an occasional basis when you want to format another card, or to reformat a card you have been using with the camera.
To complete these steps, the camera must be connected to your computer as described earlier in this chapter. We also assume that a supported application is currently running on your computer, and that you have accessed the driver image window by choosing the driver as described earlier in this chapter.
A PCMCIA card used for image storage must be (DOS) formatted using the camera with the supplied driver as described in this section.
- Click the camera control icon of the driver image window. You see the CAMERA CONTROL dialog box.

text_image
DCS Source: Camera View Contact Sheet Acquire As: Photo Camera Control 1. Camera Settings DCS XXX Serial Number XXXXXX Firmware Version: 011599 Date and Time: Tuesday, March 4, 1999 4:16 PM Load Camera Firmware Set Clock Camera Disk Close Format Recover Self Test Done 2. Acquire Up To... Delete Done Medium- IMPORTANT: As you complete this step, keep in mind that this operation will erase all existing data on the PCMCIA card.
Click the FORMAT button, and click the response you want on the confirmation box that appears.
-
Wait as the software formats the card. (If the operation fails, try formatting one more time.)
-
If you have more than one card to format, you can remove the current card as described earlier in this chapter, insert another, and click the FORMAT button again to format the new card. You can also use this operation to reformat a card that you have been using with the camera.
-
Click DONE to close the dialog box.
- Click DONE to leave the driver image window.
- Quit the application.
Quitting — Disconnecting the Camera from the Computer
Complete these steps when you have completed your work with the camera and the computer.
- If Photoshop or other supported application is running, quit that application now.
- Turn off the camera by sliding the Nikon N90s power switch to off.
- Turn off your computer.
- Turn off other SCSI devices if present.
- (Optional) Disconnect the camera from the computer.
CAUTION: Do not disconnect the camera from the computer while the driver image window is open, or even while the computer is on. Doing so may result in the loss of data from the PCMCIA card in the camera or from the hard disk in your computer. Instead, turn off all equipment in the order described above before disconnecting the camera.
Your camera is now ready to take pictures as described in Chapter 5.
5
Using the Camera
Follow the steps in this chapter to take pictures with the camera. As you do, you can use the camera in a variety of settings, including:
Indoors while connected to the AC battery charger/adapter. (If you are working indoors, we recommend that you keep the camera connected to the adapter.)
Indoors while connected to a computer (with or without the adapter).
In the field with the camera operating from its battery without being connected to a computer or to the adapter.
Readying the Nikon N90s Camera
- If a formatted PCMCIA card is not in the camera, insert one now.
NOTE: Refer to Chapter 4 for information on formatting, inserting, and removing PCMCIA cards. If the camera back LCD shows "E6" the card has not been formatted; you must format it before you can continue.

text_image
Camera back LCD Insert/remove PCMCIA card here.- Select either step A or B below depending on the environment in which you will use the camera.
A. Indoors. Connect the camera to the AC battery charger/adapter as described in Chapter 4; leave it connected while you operate the camera. The camera will be ready for operation almost immediately. However, if you are beginning with a dead battery, and notice unusual behavior, you may need to wait for approximately three minutes before using the camera.
NOTE: The adapter supplies enough power to support operation of the camera as well as to continue charging the camera battery. Once the battery is fully charged, the AC battery charger/adapter automatically switches to a slow trickle charge.
B. In the field without the AC battery charger/adapter. Before you go into the field, you should charge the battery fully as described in Chapter 4. Charging the battery for two hours will ensure the most images per charge.
- Turn on the camera by sliding the Nikon N90s power switch to ON. The camera liquid crystal display (LCD) panel displays a variety of current settings.
NOTES: There is no separate on/off switch on the camera back.
The camera top LCD will continuously display the CUSTOM signal. The signal appears whenever the camera back is communicating with the camera, for example directly after shooting.
The signal, will always show that the Nikon N90s camera batteries are good, even though there are no batteries in the Nikon N90s camera, and even when the battery in the camera back is weak. This indicator should be ignored.

text_image
Power switch Shutter release button OFF IOJ Ps MODE ISO DRIVE- Select any of the three automatic film advance modes — single frame shooting (S), continuous low-speed shooting (L), or high-speed shooting (H). To do so, hold down the film advance mode (DRIVE) button while rotating the command input control dial.
NOTE: The L and H settings provide essentially the same shooting rate.

text_image
Film advance mode Ps MODE ISO DRIVE 8 F22 OFF OFF Film advance mode button Command input control dial- Choose other settings as desired, with the exceptions noted below:
▶ Multiple exposure mode is not supported. Only the first exposure will be recorded.
▶ You will not be able to shoot when the camera is in S focus (Single Servo AF with Focus-Priority), if the camera cannot focus.
If this occurs, choose another focus mode, or take some other action — for example shoot from a different position — which will allow focusing to occur.
▶ You will not be able to shoot if you have set the exposure-mode to one of the two programmed auto exposure modes offered (either P or Ps), unless you have set the lens to its smallest aperture.
- Lightly press the shutter release button to awaken the camera. The camera LCD panel and the viewfinder LCD display data. The camera is ready.
NOTE: To conserve battery power, the camera and camera back automatically turn off after approximately five seconds. This means the camera is no longer in a ready state. If you do not see the current shutter speed and aperture on the Nikon N90s camera LCD panel and in the viewfinder LCD, you can immediately reawaken the camera by lightly pressing the shutter release button again.

text_image
Shutter speed Aperture Ps MODE ISO DRIVE 8 f22 [24]- Notice that the camera back LCD displays several graphics. (If the AC battery charger/adapter is not attached, you need to lightly press the shutter release to wake the camera and see these data on that LCD.) The graphics display:
▶ The amount of charge in the battery.
The number of frames remaining on the PCMCIA card. For example the illustration below indicates that there is still room for 64 additional images on the card.
▶ An oval that serves several purposes, including indicating the amount of the card filled with images. (An empty oval indicates that the PCMCIA card is empty.)

text_image
LCD GRAPHICS 64 Frames remaining Battery indicator- With the camera awake, check the battery indicator on the LCD on the camera back (not the Nikon N90s camera LCD).
If the segments are lighting in turn from bottom to top, the battery is being charged by the attached AC battery charger/adapter; you can operate the camera normally in this state.
▶ Without the AC battery charger/adapter, if the indicator shows that the battery is low, recharge it or operate the camera from the AC battery charger/adapter.

text_image
Full battery 2/3 full Low battery Blinks when battery exhausted- Set the ISO on the camera; the supported range is listed in the Specifications appendix.
In selecting an exposure setting, if more than one ISO setting is available for your camera model, begin with lower exposure index settings; reserve the use of higher speeds only for situations requiring their use. Higher speeds may result in lower-quality images than lower speeds (you may notice grain or snow in the image). For this reason, as with film, you may want to use a flash and a lower ISO setting.
NOTE: If you set the ISO outside the supported value, you can take one picture (with unpredictable results), but then the camera back resets the ISO as follows: if the ISO was set above the top of range, it will be reset to the top; if the ISO was set below the bottom of the range, it will be reset to the bottom. "ISO" blinks on the camera back LCD until you take another picture or until the camera sleeps; the new ISO is displayed on the camera top LCD if the Nikon N90s ISO button is pressed.

text_image
Blinking ISO 64Turning Off the Camera
You turn off the camera by sliding the Nikon N90s camera power switch to OFF.
When the camera is on but not awake (the LCD on the camera back is off), the drain on the battery is very minimal as the camera waits in a sleep state for your next action. Therefore, in normal usage of the camera during a shooting session with or without the AC battery charger/adapter, it is not necessary to continually turn the camera off then on again. In either case, when you are finished with a shooting session, you should turn off the camera by sliding the Nikon N90s camera power switch to OFF.
Taking Pictures
- Turn on the camera, and wake it by lightly pressing the shutter release button.
- Frame the scene within the inner rectangle of the focusing screen. The focusing screen in the camera has been modified and indicates a reduced view of the scene to match the size of the picture that will be recorded on the imager. (An illustration of the focusing screen appears in the "Specifications" appendix.)
- Focus.
-
Press the shutter release to take a picture.
-
Set the film advance mode for continuous shooting (either L or H mode), and take additional pictures by keeping the shutter release depressed.
NOTE: The camera is ready for the first shot within 0.25 second after the shutter release is depressed, and subsequent images will be recorded depending on camera model (refer to the Specifications appendix) and on camera model and the type of PCMCIA card being used).
Reading the Frames Remaining Indicator and the Frame Counter
Two numbering systems provide different information about your pictures.
Frames Remaining
Each time you take a picture, the number on the camera back LCD decreases by one indicating the number of additional pictures that can be stored on the PCMCIA card currently in the camera.

text_image
Frames remaining 64The oval at the right of the LCD indicates the amount of the PCMCIA card filled with images. As more pictures are taken, subsequent sectors of this graphic appear.

text_image
Card empty Card up to 1/6 filled Card filled (indicator flashes)Frame Counter
A separate numbering system is provided by the Nikon N90s camera. Its frame counter appears in brackets near the right edge in the viewfinder indication area and on the Nikon N90s LCD on top of the camera. These numbers go up by one as each picture is taken. After reaching number 99, the image reference numbers cycle back to 1, 2, etc.
This frame counter is displayed with each image in the software driver image window.
The camera is ready for shooting as long as you see a frame counter in the viewfinder and on the Nikon N90s LCD on top of the camera. If no value is displayed, the camera is not ready — perhaps the battery is low or the card is full. Additionally, the frame counter disappears for several seconds while image data are moved from memory in the camera to the PCMCIA card. When the frame counter reappears, the camera is ready for shooting.
Deleting Pictures (Optional)
This section describes how you can delete one or more of the most recent pictures from the PCMCIA card. This feature is useful if your card is full and you need to make room for more pictures or if you know that you have just taken an unsatisfactory picture and want to delete it. (As explained in later chapters, you can also delete pictures with the supplied software driver.)
- If it is not on, turn on the camera by sliding the Nikon N90s power switch to ON.
-
Wake the camera by lightly pressing the shutter release button.
NOTE: After several seconds of inactivity, the camera automatically turns off. As you complete these steps you may need to begin again at this step. -
Locate the indented button on the back of the camera labeled "DELETE."

text_image
Frames remaining Indicates delete mode Disk indicator 60 DEL DELETE button DELETE SCSI ID CARD BUSY-
Press this DELETE button once with your fingertip or other blunt object; this action wakes delete mode. The characters "DEL" appear on the camera back LCD.
-
While "DEL" still appears on the LCD, press the DELETE button again. The most current image — based on image date and time — is deleted. The red Card Busy light will flicker, indicating that the image is being deleted from the PCMCIA card.
-
(Optional) Press the DELETE button again — repeatedly if you wish — to delete another picture(s).
NOTES: As each image is deleted the frames remaining indicator on the camera back increases by one, indicating that there is now room for one additional image on the PCMCIA card. The frame counter in the viewfinder does not change as a result of deleting an image.
Only image files are deleted. Sound files (described just below), or other files that may be on the disk are not deleted.
Use this feature with care since it is possible that you may unknowingly delete the "wrong" image. This can occur since the camera deletes the image with the most current date and time. Perhaps you have used the PCMCIA card to take pictures, and then the camera or PCMCIA card has been used by another photographer. If you now delete an image, you will delete images from the other photographer since they have the most current date and time stamp.
If you inadvertently delete images, an emergency procedure provides an opportunity for you to recover images if you do so before taking any additional pictures. Refer to the explanation of the RECOVER button in Chapter 8.
Additionally, since the PCMCIA card is DOS formatted, if you have an IBM PC or compatible computer with a PCMCIA card reader and disk utility software with file recovery features, you may be able to recover image and sound files while working with that utility software.
Recording Sound (Optional)
You can record sound on the PCMCIA card via a microphone built into the camera by following these steps.
- Turn on and wake the camera.
- Hold the camera back approximately six inches (15 cm) from your mouth.
- Press and hold the record button.

text_image
Microphone Record button- Speak into the microphone.
- Release the record button; the red Card Busy light blinks as the data are recorded on the PCMCIA card.
The center dot of the disk icon on the camera back LCD comes on when the recording button is pressed and segments of the disk icon bounce up
and back, serving as a level meter (similar to the levels commonly displayed on audio equipment like tape decks). The bouncing segments provide feedback, a visual indication that sound is being recorded. The best quality recording should occur when 4-5 segments are on.

No sound

Maximum
The camera cannot play the recorded sound; instead, you will need to use your computer as described in Chapter 7. Chapter 8 contains additional reference material about recorded sound files.
Turning off the Camera
If you are done with the camera, turn it off by sliding the Nikon camera power switch to OFF.
Operating Differences with the Nikon N90s Camera
There are differences between normal operation of the Nikon N90s camera and its operation as part of the camera system. For that reason we provide a list of the differences, and other considerations, as you begin to work with the camera system.
NOTE: We assume that you are familiar with the operation of the Nikon N90s camera; refer to the instruction manual for the Nikon N90s supplied with the camera system if needed.
▶ You use the camera back incorporating a Kodak imager instead of the Nikon N90s camera back for film. The camera back comes attached to the Nikon camera body, and should not be separated except to clean a dirty imager as described in Chapter 7.
▶ You use no film.
▶ Nikon film camera backs cannot be used.
▶ You must use an ISO setting as listed in the Specifications appendix.
The amount of "noise" (defects) in an image increases linearly with time; there is a slow progression of added noise as exposure time increases. Similarly, a higher ISO (if supported by your camera model — refer to the Specifications appendix), results in more noise than a lower ISO, again in a linear progression. As a result, work with shorter exposure times and lower ISO setting if possible, and avoid long exposures. Exposures of more than 4–5 seconds (and occasionally more than 12 second) can produce noise in the image.
▶ Multiple-exposure mode is not supported. Only the first exposure will be recorded.
The focusing screen in the camera has been modified and indicates a reduced view of the scene to match the size of the picture that will be recorded on the imager. The screen is illustrated in the "Specifications" appendix.
The Nikon Data Link System is not supported. The camera provides access to similar data through the image information window provided on the driver image window.
▶ You will not be able to shoot when the camera is in S focus mode (Single Servo AF with Focus-Priority) if the camera cannot focus. Choose another focus mode, or take some other action — for example shoot from a different position — which will allow focusing to occur.
Note: This is normal operation of the Nikon N90s; it is included here since it is a potential problem to avoid.
If you have set the exposure-mode to one of the two programmed auto exposure modes offered (either P or Ps ), be certain that you set the lens to its smallest aperture.
Note: This is normal operation of the Nikon N90s; it is included here since it is a potential problem to avoid.
- When using the bulb setting, the camera back will obtain an image after 30 seconds, even if the shutter is open for a longer period of time.
The film loading and the film advance and rewind indications do not appear in the Nikon N90s camera LCD.
For information on using a flash, refer to the section "Using a Flash" in Chapter 7.
▶ Lenses behave differently when used with the Nikon N90s. The exact details, including an illustration, appear in the "Specifications" appendix.
6
Tutorial — Accessing Camera Images
This chapter is a tutorial that describes how to use the KODAK driver with your camera connected to your computer. When the camera is connected to your computer, you can work with images you have taken earlier with the camera while not connected to the computer, or you can take new pictures. Both usages (working with images already on a PCMCIA card and taking new images) are described in this chapter.
While the camera and the computer are connected, you use the supplied KODAK software driver to:
▶ Access, view, and select images from your camera.
Acquire images or contact sheets from the camera into Adobe Photoshop. This means that individual image files from your PCMCIA
card are opened into separate windows in Adobe Photoshop. Once acquired you can use all Photoshop features to edit the images and save them in the variety of file formats available in Photoshop.
IMPORTANT: Throughout this chapter we refer to "Photoshop." This single reference refers to both the Macintosh and PC versions of Photoshop 4.0, and also to other supported PC TWAIN-compliant image-editing software.
▶ Rotate, crop, color balance, name, and annotate images.
▶ Copy images from the PCMCIA card in your camera to folders (subdirectories) on your computer hard disk; these images are called archive images. You can then use the driver to access and manipulate archive images from a folder just as you can do with images directly from a PCMCIA card.
▶ Use the software to view unrecorded test shots you make with the connected camera, and then begin recording images when all settings meet your requirements for the image.
▶ Format PCMCIA cards and load firmware into the camera.
▶ Delete image and sound files.
▶ Play recorded sound files.
NOTES: This chapter assumes that you have installed the KODAK driver and that you know how to connect the camera to your computer. Refer to chapter 4 for information if needed.
The settings you choose while in the driver image window are maintained automatically from session to session.
You should ensure that the gamma for your monitor is calibrated properly per instructions accompanying Adobe Photoshop; if it is not, images may be consistently too light or too dark.
Working with Images Already on a PCMCIA Card
This section is a tutorial on how you might work at the computer with images you have previously taken with the camera.
NOTE: A later part of this tutorial describes how you can use the camera while connected to a computer (perhaps in a studio setting) to take new pictures; however, all features described in this section also apply to the later section, so we encourage you to work through both sections.
Accessing the Camera from the Driver
Repeat the steps below each time you want to access the camera from your computer.
- Follow the steps described in chapter 4 to connect the AC battery charger/adapter to the camera, to connect the camera to your computer, and to ensure that both are on.
NOTE: Although using the AC battery charger/adapter is optional, we recommend it whenever the camera is connected to a computer.
- If one is not present, insert your PCMCIA card with camera images into the camera.
NOTES: As you work with the camera and the computer, you can insert and remove cards at any point in the process; however, do not remove a PCMCIA card while the red Card Busy light on the camera back is blinking. If you do, you may lose all data on the card.
Use extreme care with PCMCIA cards, as they are easily damaged. If dropped, you may destroy the PCMCIA card resulting in the loss of all of your data on the card.
-
Run Adobe Photoshop.
-
Choose Kodak DCS 400/EOS•DCS/NC2000 from the IMPORT submenu of the Adobe Photoshop 4.0 FILE menu.
NOTES: For earlier supported versions of Photoshop, choose the driver from the ACQUIRE submenu of the FILE menu.
OPEN from the FILE menu will not acquire images from the camera.
- Wait as the driver image window appears. If you see a message that the camera was not found, or that the calibration file cannot be found, refer to the "Messages" section of chapter 8.
The driver can display images from a variety of supported Kodak camera types. This means that you can use the same PCMCIA card with different supported Kodak cameras and view all of the images with the same driver.
KEY TO FIGURE: All driver features are identified by letter in the following figure. Many of these features are introduced in this chapter, but not explained in detail; however, full explanations of all features appear in order by these letters in chapter 8.
A. Source Menu
N. Acquire Button
B. View Menu
O. Copy To Button
C. Active Photoshop Menus
P. Delete Button
D. Acquire As Menu
Q. Done Button
E. Take Picture Icon
R. Annotation Area
F. Camera Control Icon
S. Image Information Window
G. Preferences Icon
T. Navigation Bar
H. Rename Images Icon
U. Select All Icon
I. Rotate Clockwise/Counterclockwise Icons
V. Number of Images Selected
J. Crop Icon
W. X-Y Cursor Location
K. Lighting Menu
X. RGB Values at the Cursor Location
L. Click-Balance Tool
Y. Thumbnail/Preview Size Menu
M. Sound Menu
Driver Image Window (Macintosh and TWAIN):

text_image
Source: Folds View: Contact Sheet Acquire As: Photo Acquire A B C D File Edit Image Layer Select Filter View Window DCS Source: Camera View Contact Sheet Acquire As: Photo E F G H DCS00001.TF DCS00002.TF DCS00003.TF 4 5 I J K L M DCS00004.TF DCS00046.TIF DCS00053.TIF 7 8 9 1 of 16 selected X: 61 Y: 49 R: 204 G: 204 B: 204 Medium Acquire Copy To... Delete Done Annotation: Type your data here. Camera: DCB Serial #: 2515 Width: 1524 Height: 1012 Date: 11/12/99 Time: 1:02:10 PM Counter: [42] SO: 200 Aperture: F# Shutter: 2000 N O P Q R S T U V W X YViewing/Selecting an Image from the Camera with the Driver
In this section we start by assuming that you want to select a single image to acquire into Photoshop. You begin your work session by making choices across the top of the driver image window from left to right.
- If it is not already selected, choose CAMERA from the SOURCE menu to work with images from a connected camera.

text_image
Source : Camera ● Camera Folder Choose Folder...FOLDER and CHOOSE FOLDER allow you to work with images that you have previously copied from the camera to a folder (sub-directory) on your computer hard drive (as explained later in this chapter).
- If it is not already selected, choose CONTACT SHEET from the VIEW menu. This displays thumbnails — each a subsample of data from the full image — of all images from the source (here a PCMCIA card in the camera). The thumbnails are displayed in the image area of the driver image window, sorted in order by date and time, with the oldest image displayed first.

text_image
View: Contact Sheet • Contact Sheet Preview Test ShotPREVIEW allows you to view larger versions of each image, while TEST SHOT works with a single, unsaved image which is always the most recent picture you take with the camera after making this choice.
- If it is not already selected, choose PHOTO from the ACQUIRE As menu. This specifies that, when you acquire images into Photoshop, each image will be acquired into a separate window.

text_image
Acquire As: Photo Contact Sheet PhotoCONTACT SHEET allows you to acquire a contact sheet of selected images instead of separate windows each with a single image. As with non-digital photography, a contact sheet consists of rows of thumbnails.
- Scroll if needed, using the scroll bar, until the image you want to acquire appears in the image area.
You can also scroll using the navigation bar in the lower left corner of the screen as described later in this chapter.
- If it is difficult to distinguish between the images, choose a larger image size from the Thumbnail/Preview size menu in the lower right corner of the window.

- Click once directly on the image you want to acquire; a color border appears around the image indicating that you have selected it.
Acquiring One Image from the Camera
You are now ready to acquire an image into Photoshop. Acquiring an image copies its image data from the PCMCIA card into Photoshop, where the acquired image opens into a Photoshop window. The original image is unchanged by the process.
- With an image selected, click the ACQUIRE button. (You can also double-click the image as an alternate to the two-step process of selecting one image and then clicking the ACQUIRE button.)
Acquire
-
Wait as a progress box appears; you remain in the driver as the image opens into a Photoshop window behind the driver image window. (You can cancel acquiring by clicking the CANCEL button in the progress box.)
-
(Optional) Click the DONE button to close the driver image window.
Done
- (Optional) Edit the acquired image using Photoshop features. Save the image to your computer hard disk (you cannot save it back to the PCMCIA card in the camera) in the file format of your choice.
IMPORTANT: If you have not made any changes to the acquired image while in Photoshop, and you click the close box of the acquired image window or choose CLOSE from the Photoshop FILE menu or quit Photoshop, the window will close without asking you if you want to save it. Therefore, be sure you save any acquired images you do not want to lose before closing their windows or quitting Photoshop.
Acquiring Multiple Images or a Contact Sheet
In the previous section you acquired a single image into Photoshop. In this section you will acquire multiple images (or a contact sheet of those images) simultaneously.
-
If you closed the driver image window, access it again.
-
Select multiple images using any of the following techniques.
▶ Click one image; then if you are working on a Macintosh, shift-click (hold down the shift key while you click additional images) or if you are on a PC, control-click, to add or subtract from the selected image.
▶ Drag the mouse over adjacent thumbnails.
▶ Click the All button on the driver image window.
▶ Choose ALL from the SELECT pulldown menu.
- (Optional) Choose CONTACT SHEET from the ACQUIRE As menu; you are now set to acquire all selected images as a contact sheet rather than as single images in separate windows.
NOTE: If you choose CONTACT SHEET from the ACQUIRE As menu, you see the Acquire Contact Sheet dialog; click OK to accept the default values, or refer to chapter 8 for additional details of choices on this dialog.

text_image
Acquire As: Photo Contact Sheet ● Photo- Click the ACQUIRE button. If the setting in step 3 is CONTACT SHEET, one or more Photoshop windows opens behind the driver, with thumb-
nails of the subset of selected images, as illustrated below after printing the file; however, if the setting in step 3 is PHOTO, each image is acquired into a separate Photoshop window.
IMPORTANT: If you have not made any changes to the acquired image while in Photoshop, and you click the close box of the acquired image window or choose CLOSE from the Photoshop FILE menu or quit Photoshop, the window will close without asking you if you want to save it. Therefore, be sure you save any acquired images you do not want to lose before closing their windows or quitting Photoshop.

text_image
Folder: Rodney's Camera Files Sunday, April 6, 1999 10:29 PM DC50001 0.TIF DC500020.TIF DC500030.TIF DC500090.TIF DC500130.TIF DC500190.TIF DC500300.TIF DC500310.TIF DC500320.TIF DC500340.TIF DC500350.TIF DC50C360.TIF DC50C420.TIF DC50C440.TIF DC50C450.TIF Page 1Rotate, Rename, and Annotate Images
- Suppose that one or more images is not displayed in the proper rotation.
A. Select the image or images not shown in the proper rotation.
B. Click the desired rotation icon; the image or images rotate 90 degrees in the chosen direction for each click on the icon.

- Suppose that the images on the PCMCIA card are in groups from several different photo assignments, and that you want to name them appropriately. (By default the driver assigns names, but they may not be optimum for your purposes.)
NOTE: The new names are only retained for images that you are about to acquire or archive in this work session, or for images you have previously archived. (Acquiring and archiving are both explained later in this chapter.) The new names are not written to the PCMCIA card.
A. Select the image or images that you want to rename; if you select multiple images they are renamed as a group.
B. Click the rename icon.

C. Change the values in the RENAME dialog box that appears. Type a name into the NAME area; it becomes the first portion of the image name for all selected images. If more than one image is selected, the values in the SEQUENCE NUMBER area are appended to the end of the name. Change the SEQUENCE NUMBER values as desired. An EXAMPLE appears in the box illustrating how images will be re-
named based on the data in the text boxes. Note that the ".TIF" suffix is automatically added to the file name: do not type the period or "TIF" in the NAME area.

text_image
Rename Name City Sequence Number Digits: 3 Starting From: 1 Example: City001.tif Cancel RenameD. Click the RENAME button; the driver renames all selected images, and returns you to the driver image window.
- (Optional) Annotate an image. Click a single image and then type descriptive material in the annotation window; edit as needed, then click outside the annotation window (or press Enter) to leave the annotation window.
The data in the image information window is displayed automatically by the driver.
The number of characters in the annotation window plus the number of characters in the image information window must total 255 or less. Some cameras display more lines in the image information window than others; for this reason, with some cameras you may not be able to fill the annotation window with your text. However, you can delete some lines from the image information window by clicking on the line (to select the entire line), and pressing the delete key on the keyboard. This works to delete all lines except for these image information lines: Camera; Serial #; Width; Height; Date; and Time.
When an image is acquired, text from both areas is also acquired, and is placed in the Photoshop caption area.

text_image
Annotation: Type your data here. Annotation Window Image Information Window Camera: DCS Serial #: 2515 Width: 1524 Height: 1012 Date: 11/12/99 Time: 1:02:10 PM Counter: [42] ISO: 200 Aperture: F4 Shutter: 2000Navigating Through Images
As described earlier in the chapter, you can scroll through images by using the scroll bar at the right of the image area.
In addition, the driver provides a navigation bar with four control icons and a center edit area in which you enter an image number to "go to" that image.

text_image
First Previous Go To Next Last 24The four icons mean, from left to right, navigate to the: first image, previous image, next image, and last image. Typing a number into the "go to" edit box in the middle of the navigation bar and pressing the Return key moves you to that numbered image.
Navigating through a Contact Sheet
When viewing images in CONTACT SHEET, as you have been in this chapter, clicking icons in the navigation bar produces different results depending on the number of images selected.
One or No Images Selected
- If more than one image is selected, deselect them now, and select a single image in the middle of the contact sheet.
- Click the "first" icon; the first of all of your images is selected.
-
Click the "next" icon several times; the selected image changes, moving consecutively to the "next" image with each click.
-
Click the "previous" icon several times; the selected image changes, moving consecutively to the "previous" image with each click.
- Click the "last" icon; the last of all of your images is selected.
More than One Image Selected
Suppose that you have 30 consecutively numbered images on the PCM-CIA card, and that you have selected images 5, 10, and 20 while in CONTACT SHEET view. Now if you click one of these four icons, all of the three selected images are deselected and a single image is selected as follows. If you click the "first" icon, image 1 is selected. If you click the "previous" icon, image 4 is selected. If you click the "next" icon, image 21 is selected. If you click the "last" icon, image 30 is selected.
Preview
The PREVIEW option of the VIEW menu presents an enlargement of an image on the screen.
- Select a single image. (In the next section of this chapter, you will work in PREVIEW with multiple selected images.)
- Choose Preview from the View menu.

text_image
View: Contact Sheet • Contact Sheet Preview Test ShotThe screen changes, and a single enlargement of the selected image fills the image area on the screen.

text_image
DCS Source: Cameras View Preview Acquire Acc Photos Daylight Acquire Copy To... Delete Done DCS00940.TIF Annotation: Take your data here. Camera: DCS Serial #: 2013 Width: 1524 Height: 1012 Date: 11/12/99 Time: 1:02:10 PM Counter: [42] ID: 200 Aperture: F4 Shutter: 2000 1 of 54 selected X: 249 Y: 199 R: 90 G: 90 E: 80 SmallApplying Color Balance to Images
This section describes how to color balance images, and applies only to color images, not to images taken with monochrome camera models. The section is divided into two parts; the first describes the process for working with a single image, and the second describes how to work with multiple selected images at the same time.
Color balancing does not change an image at its source. Instead the color balance settings you establish are saved with the original image and are applied to that image when the image is acquired into Photoshop (and when the image is displayed by the driver).
Color balance choices are contained in two separate features — the lighting menu and the click-balance tool — both of which are described below. Lighting can be set with either. However, lighting choices are mutually exclusive; you cannot apply one type of lighting and then refine it with another. Instead, each time you apply any color balancing, your previous choice is lost, and only the current lighting setting is applied.
Click-balance is always the preferred method of applying color balance to images.
Applying Color Balance to a Single Image
-
If you are not in the driver image window, return there now.
-
Click the image to be color balanced.
-
Choose PREVIEW from the VIEW menu; you see a single large version of the image. (Color balancing in PREVIEW instead of CONTACT SHEET is preferred because the effect of color balance adjustments will be more readily evident.)

text_image
View: Contact Sheet • Contact Sheet Preview Test Shot- (Optional) Choose a larger image size from the Thumbnail/Preview size menu in the lower right corner of the window. This allows you to work with a blowup of the image.

text_image
Small • Medium Large Medium- Color balance the image using either method A (lighting menu) or method B (click-balance Tool) that follows.
Method A: Lighting Menu
The lighting menu provides a simple, direct method of quickly applying one of several lighting choices to your image. Then later, once the image has been acquired, you can refine it if needed in Photoshop.
- Select an option from the lighting menu that corresponds to the original lighting conditions under which you took the images. The change is applied and is immediately visible on the image.

text_image
Daylight ● Daylight Tungsten Fluorescent Flash- Acquire the image as described earlier in this chapter.
Method B: Click-Balance Tool
Unlike the lighting menu which provides distinct choices to match lighting conditions under which the image was made, the click-balance tool provides a more refined method of color balancing, and is always the preferred method of applying color balancing to images.
- To activate the click-balance tool, first click its checkbox "on" (an X appears in the checkbox to the left of this option when on).

- Move the cursor over the image, the cursor changes to a special click-balance eyedropper cursor.

- Click the point of the eyedropper on a white or light gray area (an area that is not overexposed) of the image to be corrected, or click a point that should be white or light gray where each of the red (R), green (G), and blue (B) color values displayed below the image are as high as possible, but lower than 255. The change is applied and is immediately visible on the image.
NOTES: When you click, you may see the message that one of the colors is saturated. As prompted, click another point.
If there is no white or light gray area in the image, follow the steps in the next section to take a photograph of a neutral gray or white card and use it for color balancing.
- (Optional) If the correction was not satisfactory, click the eyedropper (not the checkbox) in the click-balance tool to turn on click-balance again, and then click another point in the image.

- (Optional) Remove the click-balance setting for the image by clicking the click-balance checkbox "off."

- Acquire the image as described earlier in this chapter.
Applying Color Balance to Multiple Selected Images
-
If you are not in the driver image window, return there now.
-
If you are not in CONTACT SHEET view, choose it now.
-
Select several images that need the same color balancing applied to all of them; the settings you establish apply to all selected images.
-
As described in detail in the previous section:
A. Choose PREVIEW from the VIEW menu; note that if multiple-images were selected that they appear in a stack in PREVIEW.
B. (Optional) Choose a larger image size from the Thumbnail/Preview size menu.
C. Color balance the image using either the lighting menu or click-balance tool.
- Use the choices on the navigation bar to move through the selected images.

flowchart
graph TD
    A["First"] --> B["Previous"]
    B --> C["Go To"]
    C --> D["Next"]
    D --> E["Last"]
    B --> F["24"]
- (Optional) As you navigate through the images, change the color balance as needed, repeatedly navigating through the images to ensure that the color balancing results are as desired.
IMPORTANT: Notice that the color balance changes you make to one image are applied to all of the selected set of images. This means that if one image of the group has unsatisfactory color balance, and that you correct it, the
changes are applied to all of the other selected images. To correct that single image without affecting others, return to CONTACT SHEET view, select only that single image, enter Preview, and color balance the single image.
- (Optional) If you want to use click-balance, but there is no white or light gray area in the image, take a photograph of a neutral gray or white card (for example KODAK Gray Cards, Publication No. R-27) under the same lighting conditions that existed when the image was taken. Then select the image of the card as well as all other images taken under the same lighting conditions. Click the special cursor on the image of the card; the color balance applies to all selected images.
Saving Color Balance Changes
- Click the DONE button to leave the driver image window; all revisions you have made in this work session are saved.
NOTE: The settings you chose while in the driver are saved, and will be in effect the next time you enter the driver image window.
Crop Images
Suppose that you want to crop one or more images before acquiring them. When you crop an image, its size at the source is not reduced; the full image is always maintained. Instead, the results of your cropping activity is a cropping rectangle stored with each cropped image. You select one or more image and crop as described in this section; the same cropping rectangle applies to all selected images. The resultant cropping rectangle is visible over the images whenever the images are displayed by the driver in any view.
When an image with a cropping rectangle is acquired into Photoshop, only the image area within the cropping rectangle is acquired. Image
acquisition will be faster than with a full image, and the acquired image will be smaller than a full-size image. And, if you are not satisfied with your initial crop, you can revise or remove the cropping rectangle as desired at any time. These actions are described below.
-
If you are not in the driver image window, access it as described earlier in this chapter.
-
Select the image or images that you want to crop.
NOTE: You can not simultaneously crop multiple images from different camera types. The DCS 410, DCS 420, and EOS•DCS 5 are the same camera type; the NC2000e and EOS•DCS 3 are the same camera type; and the DCS 460, DCS 465, and EOS•DCS 1 are the same camera type.
- Click the Crop icon.

- Wait as the CROP dialog box appears; note that if multiple-images were selected that they appear in a stack in the box. In this step you will set some of the options of this dialog box to crop images. (All options are explained in detail in chapter 8.)

text_image
Stack indicates that multiple images will be cropped. Crop DC500045.1IF Method ● Freeform ○ Fixed Size Size... Left: 266 Top: 262 Width: 1012 Height: 584 □ Fix Aspect Ratio Final Output Width: 3.37 in Height: 1.95 in Resolution: 300 ppi File Size: 2309 KB Remove Cancel OKA. Choose one of the two available methods. FREEFORM is the correct choice for most cropping activity, while FIXED SIZE is appropriate when
you know beforehand the exact output dimensions desired for the image. Make one of these choices:
▶ FREEFORM allows you to drag any edge of the selection rectangle in any direction.
- FIXED SIZE allows you to specify the exact output dimensions desired. A SIZE dialog box appears; it allows you to establish fixed dimensions (in inches or centimeters) for the crop rectangle.
B. If the METHOD is FREEFORM, drag the mouse to create the desired crop rectangle.
C. (Optional) Resize the rectangle by dragging its sides or corners.
D. (Optional) Reposition the rectangle by moving the cursor inside the cropping rectangle, and dragging it to the desired position.
E. (Optional) Resize or reposition the cropping rectangle by entering numeric values in the LEFT, TOP, WIDTH, and HEIGHT text boxes. The first two reposition the top left corner of the rectangle, and last two control its width and height.
F. (Optional) Turn "on" the FIX ASPECT RATIO checkbox (an X appears in the checkbox to the left of this option when on); the driver holds the width and height in proportion while you adjust the dimensions of the cropping rectangle.
NOTE: If you are working in FIXED SIZE, the Fix ASPECT RATIO checkbox is always off.
G. (Optional) If multiple images were selected, click the navigation buttons — first, previous, next, and last — beneath the image to scroll through the selected images in the stack; the cropping rectangle appears on each image. If the cropping rectangle does not provide the desired cropping action for all selected images as
you step through them, resize or reposition cropping rectangle as desired; the change affects the cropping rectangle on all selected images.

flowchart
graph TD
    A["First"] --> B["Previous"]
    B --> C["Go To"]
    C --> D["Next"]
    D --> E["Last"]
    B --> F["24"]
H. (Optional) Turn "on" the CROP NEW IMAGES AFTER SHUTTER RELEASE checkbox (an X appears in the checkbox to the left of this option when on), and the cropping rectangle is superimposed on all new images you take until you return here and turn off this option. Keep in mind that all cropping rectangles can be revised later at any time as desired.
I. (Optional) Remove the cropping rectangle from all images in the stack by clicking REMOVE.
J. Click OK. The current cropping rectangle is superimposed on all selected images and you are returned to the driver image window
Close the Driver Image Window (Saving Changes)
- Click DONE; the driver image window closes and all changes to settings you have made during this work session are saved.
- Return to the driver later as desired and perform additional work as described in this or the next section of this chapter.
Working with Images in the Studio
This section is a tutorial on using the camera in a studio setting to take new images.
NOTE: The earlier part of this chapter describes how you can work with images on a PCMCIA card in the camera. All features described there also apply to studio work (and are not repeated below), so we encourage you to review the earlier sections of this chapter.
-
With the camera connected to your computer, access the driver image window as described earlier in this chapter.
-
Choose CAMERA from the SOURCE menu to work with images from a connected camera.

text_image
Source : Camera ● Camera Folder Choose Folder...- Choose TEST SHOT from the VIEW menu. This displays a single image which is always the most recent picture you take with the camera after choosing TEST SHOT.

text_image
View: Contact Sheet • Contact Sheet Preview Test ShotIMPORTANT: In TEST SHOT, images you take are not saved to the PCMCIA card in the camera unless you click the KEEP button as described below; instead, images are displayed in the image area one at a time. Each new image you take replaces the previous one, which is lost.
- As prompted by a message that appears in the driver image window, click the Take Picture icon (or use the shutter release to take a picture). The camera takes a picture and displays it in the image area.

-
(Optional) If the "test" picture is one that you want to keep, click the KEEP button, and the image is saved to the PCMCIA card in the camera. (The COPY To button becomes the KEEP button when in TEST SHOT.)
-
(Optional) Adjust your studio settings as needed (reposition lighting, etc.) and then take an additional test picture.
-
(Optional) Click the KEEP button to save the image, or click the Take Picture icon to take another picture — it replaces the previous image which is not saved. (If you do not clicked KEEP, a message warns you that you are about to lose the current image.)
-
Choose CONTACT SHEET or PREVIEW from the VIEW menu (to leave TEST SHOT). Subsequent images you take will be recorded on the PCMCIA card in the camera.

text_image
View: Contact Sheet • Contact Sheet Preview Test Shot-
Take additional images as desired.
-
Color balance, crop, rename, and annotate images as described in earlier sections of this chapter.
-
Acquire images as described earlier in this chapter.
IMPORTANT: If you have not made any changes to the acquired image while in Photoshop, and you click the close box of the acquired image window or
choose CLOSE from the Photoshop FILE menu or quit Photoshop, the window will close without asking you if you want to save it. Therefore, be sure you save any acquired images you do not want to lose before closing their windows or quitting Photoshop.
- Click DONE; the driver image window closes and all changes to settings you have made during this work session are saved.
Playing Recorded Sound Files
Sound files recorded with the camera are saved to the PCMCIA card and are associated with the image taken just before the sound was recorded. Once in the driver, sound files associated with an image are represented by the symbol below.

text_image
5 DCS00046.TIF Sound file icon-
Select a single image that has the sounds you want to play.
-
Use the Sound menu to play the sounds as follows:
A. If a single sound file was recorded with the image, it is played through your computer speakers when you click the menu.
B. If multiple sound files were recorded, the menu displays the choice ALL and lists each sound (named SOUND 1, SOUND 2, and so on). Select ALL to play all sounds in sequence, or select an individual item from the menu to play that single sound.

text_image
Sound menu All Sound 1 Sound 2Archive and Delete Images
The driver provides a variety of additional features that allow you to work with image and sound files.
As described in this section, you can copy images from the PCMCIA card in the camera to your computer hard disk for archival purposes and later retrieval into Photoshop, and you can delete some or all of the images on the PCMCIA card in the camera or on your computer hard disk.
Archiving images provides advantages over acquiring images. The file size of an archived color image is much smaller than the file size of a color image acquired and saved through Photoshop. Also, saving images as archive files is faster than acquiring and saving them through Photoshop.
These features are briefly described here, and are explained fully in chapter 8.
(Optional) Create Archive Files
-
Access the driver and display images from a PCMCIA card in the camera.
-
Select images you want to save as archive files.
NOTE: Archive files are composed of uninterpolated data; they have not been "acquired" into Photoshop. This means they contain the raw, native data generated from the imager in the camera back.
- Click the COPY To button. A "copy to" dialog box appears; make the desired choices. The selected images (with any associated sound files, revised filenames, cropping data, color balancing data, etc.), are saved to your computer hard disk, with each image file and each sound file becoming a separate file on your computer hard disk. The filenames are generated by the driver unless you have renamed the files with the Rename icon, in which case your names are used.
Copy To...
- Later, to work with these archive files, enter the driver, and use CHOOSE FOLDER from the SOURCE menu (Macintosh), or click the icon near the SOURCE drop-down menu (TWAIN-PC), to locate and open the folder with the archive images.
Macintosh:

text_image
Source : Camera ● Camera Folder Choose Folder...TWAIN (PC):

text_image
Source: FolderIMPORTANT: Use only the driver to open image archive files. Do not open an archive file directly into Photoshop or other image software and then resave the data with the same filename. Image archive files you create with the COPY To button contain several sections — one section with a TIFF version of the thumbnail, and then another section with the image data. When you open the file with Photoshop, only the TIFF thumbnail is opened, and if saved, only the thumbnail is saved — not the image data. For this reason, you should only open these files from within the driver image window using the CHOOSE FOLDER choice of the SOURCE menu as described in this step; this will ensure that you obtain the image data.
IMPORTANT: If your camera model is of the type that requires a calibration file (DCS 460 or EOS•DCS 1), refer to the important information on calibration (CAL) files for archived images in the section "Calibration (CAL) Files" at the end of Chapter 7.
Delete Files
-
Select images you want to delete.
-
Click the Delete button.
Delete
IMPORTANT: When clicked, the DELETE button deletes all selected images, including those selected images that may have temporarily scrolled out of view. The images are not only deleted from the driver image window, but are also deleted from their source (PCMCIA card or archive file). Additionally, sound files associated with the selected images are also deleted.
-
Respond as desired to the confirmation dialog box.
-
(Optional) Delete additional images from another source.
Revise Preferences
Clicking the preferences icon allows you to set many of the parameters used in the driver, including: general preferences, contact sheet preferences, and color preferences. All are described in chapter 8.

Quitting
Follow these steps when you are done with the driver.
NOTE: The settings you chose while in the driver are saved, and will be in effect the next time you enter the driver image window.
- Click the DONE button to leave the driver image window; all revisions you have made in this work session are saved.
Done
- (Optional) Edit and save opened acquired images in Photoshop.
IMPORTANT: If you have not made any changes to the acquired image while in Photoshop, and you click the close box of the acquired image window or choose CLOSE from the Photoshop FILE menu or quit Photoshop, the window will close without asking you if you want to save it. Therefore, be sure you save any acquired images you do not want to lose before closing their windows or quitting Photoshop.
-
Quit Photoshop.
-
Turn off the camera and computer as described in an earlier chapter.
-
(Optional) Disconnect the camera from the computer.
IMPORTANT: Do not disconnect the camera from the computer while the computer is on.
- (Optional) Disconnect the AC battery charger/adapter from the camera.
7
Reference — Camera
This section of the manual explains and describes the following:
▶ KODAK camera back and Imager.
▶ Camera back controls.
▶ PCMCIA cards.
▶ Camera operating configurations.
▶ Battery and AC battery charger/adapter.
▶ Recorded sound.
▶ On/off state of the camera back.
▶ Timing considerations.
▶ Troubleshooting the camera.
▶ Cleaning a dirty imager.
▶ Using a flash.
KODAK Camera Back and Imager
The KODAK camera back incorporates a charge coupled device (CCD) full-frame imager that collects light striking the imager.
The Specifications appendix lists the camera models available and the dimensions of the imager and the size of the file produced by the imager.
Just after you take a picture, the Nikon N90s camera transmits data such as the ISO, aperture, and shutter speed to the KODAK camera back through the connector cable. After the shutter closes, the camera back uses this information to process the image data.

text_image
NIKAK N90S Connector cable DCS Kodak KodakWhen you take a picture, light passes through the lens onto the imager; each pixel in the imager receives and stores a specified amount of light. These data — for one image — leave the imager chip in analog form, and
are converted to digital form and stored with other data in dynamic random access memory (DRAM).
Once the data are in DRAM, the data from the image are transferred to the PCMCIA card. Hardware in the camera back generates a thumbnail from the image data. The thumbnail is a subsample of image data. The thumbnail is then stored with the full image on the PCMCIA card.
You can use one of the supplied software drivers on your computer to update firmware (nonvolatile memory) in the camera back that controls how the camera works. This is a key feature since this design means it is possible for you to update camera firmware yourself as it may be released by Kodak instead of returning the camera for firmware updates.
A self-test of camera performance is available to you through a button on the Camera Control panel of the software drivers. This can be helpful for field troubleshooting before you call Kodak.
Timing Considerations
When you take a picture, it is first stored in DRAM; then the image is moved from DRAM onto the PCMCIA card. Timing details appear in the Specifications appendix.
KODAK Camera Back Controls
Liquid Crystal Display (LCD)
A liquid crystal display (LCD) on the KODAK camera back provides status information for the camera.

text_image
KODAK CAMERA BACK LCDLCD CAMERA-OFF GRAPHICS

natural_image
Simple diagram with a battery and an oval shape, no text or symbols presentLCD FULL GRAPHICS
(For this illustration all items are shown simultaneously, although at no time do all of these items appear together on the LCD.)

text_image
Frames remaining ISO warning Battery indicator ISO 28 DEL SCSI Disk indicator Delete indicator SCSI indicatorBattery Indicator
When the camera is awake, the battery indicator displays the amount of battery life — full, 2/3 full, and 1/3 remaining — in the battery in the camera back. (There are no batteries in the Nikon N90s camera.) When the battery life is exhausted, the bottom indicator blinks, and the battery needs to be recharged. (Refer to “Battery” later in this chapter for information on battery life.)

text_image
Full battery 2/3 full Low battery Blinks when battery exhaustedWhen you operate with the AC battery charger/adapter connected, the three segments of this icon light repeatedly in turn from bottom to top while the battery is charging. When it is fully charged all three segments remain lit.

Frames Remaining Indicator — KODAK Camera Back
The frames remaining indicator displays the number of additional pictures that can be stored on the PCMCIA card currently in the camera.

text_image
Frames remaining 60The number of images that can be stored on a PCMCIA card depends on the storage capability of the card; an example of the storage capacity of one size card appears in the Specifications appendix.
Frame Counter — Nikon N90s Camera
A separate numbering system is provided by the Nikon N90s camera. Its frame counter appears in brackets near the right edge in the viewfinder indication area and on the Nikon N90s LCD on top of the camera. These numbers go up by one as each picture is taken. After reaching number 99, the image reference numbers cycle back to 1, 2, etc.
The camera is ready for shooting as long as you see a Nikon N90s frame counter in the viewfinder or on the LCD on top of the Nikon N90s. If no value is displayed, the camera is not ready — perhaps the battery is low or the card is full. Additionally, the frame counter disappears for several
seconds while image data are moved from memory in the camera system to the PCMCIA card. When the frame counter reappears, the camera is ready for shooting.
The number displayed in the Nikon N90s frame counter may be higher than the maximum number of images that can be stored on the PCMCIA card, since images stored on the PCMCIA card retain their numbers when images with lower numbers are deleted.
The Nikon N90s frame counter is displayed with each image in the software driver image window.
When you delete images (with the DELETE button on the camera back or with a software driver), existing images on the PCMCIA card are not renumbered. Consider the figure below. Suppose that you had an empty PCMCIA card, took five pictures, and then deleted image 5 with the DELETE button and images 2 and 3 with the software driver. Image 4 is not renumbered. As new pictures are stored to the PCMCIA card, they are given the next higher number that has not been previously used for an image. In the figure below, new images will be numbered 6, 7, ...
Frame number

text_image
1 2 3 4 5 6 7The highest frame number is 99. It is possible that you will reach this frame number by a continuous process of making images, deleting some, and then making additional images. When you reach frame number 99,
the next picture you take will be numbered 1, then 2, then 3, and so on, even if those numbers are already in use.
Therefore it is possible that you may have several images on a PCMCIA card with the same number. Duplicate image numbers do not cause any functional problems; however, you can avoid potential confusion by occasionally erasing or formatting the PCMCIA card after copying all needed images to your computer hard disk.
ISO Warning
"ISO" blinks as a warning on the LCD if you try to take a picture and the Nikon N90s is not set to a supported ISO as listed in the Specifications appendix.
If you take a picture and the camera is not set at a supported ISO, you will be able to take one picture (with unpredictable results), but then the camera back will automatically reset to a supported ISO. "ISO" blinks on the camera back LCD until you take another picture or until the camera goes to sleep; the new ISO will be displayed on the camera top LCD if the N90s ISO button is pressed.

text_image
Blinking ISO 64Disk Indicator
The disk indicator, shown in each of its stages below, appears when you wake the camera. It indicates the amount of the available PCMCIA card filled with images. When the entire disk indicator flashes, the PCMCIA card is full.
Card empty
Card up to 1/6 filled
Card filled (indicator flashes)


Disk Error Indicator
Two characters, an "E" followed by a single digit (for example "E2") — if they appear on the LCD — indicate that an error has occurred on the PCMCIA card. If this occurs, remove and reinsert the PCMCIA card (or try another card if available), and retry the operation. If you continue to have problems, refer to "Troubleshooting the Camera" in this chapter, and to the discussion of FORMAT in Chapter 8.

text_image
E2Control Buttons
Two control buttons — DELETE and SCSI ID — are provided on the KODAK camera back. Both are recessed in the housing and are operational when pressed with a fingertip or other blunt object.

text_image
DELETE button SCSI ID buttonDELETE Button and Delete Indicator
You use the DELETE button to delete the most recent image on the PCMCIA card.
IMPORTANT: If you inadvertently delete images, an emergency procedure provides an opportunity for you to recover images if you do so before making any additional images. Refer to the explanation of the RECOVER button in Chapter 8.
To use the DELETE button, if you are not connected to a computer or the AC battery charger/adapter, first turn on the camera and lightly press the shutter release button to wake the camera. (If you are connected to a computer that is "on," or to the AC battery charger/adapter, the camera back will be "on;" you do not need to turn on the Nikon N90s camera.) Then press DELETE once to wake delete mode. The characters "DEL" — the delete indicator — appear on the camera back LCD. Then press DELETE again to delete the last image.
As long as the characters "DEL" appear on the LCD, you can press the DELETE button again and again to delete additional images. With each press the frames remaining indicator on the camera back increases by one, indicating that there is now room for one additional image on the PCMCIA card. The frame counter in the viewfinder does not change as a result of deleting an image.
Several seconds after you stop deleting images, delete mode turns off; reactivate it, if needed, as described above, and press the DELETE button again.

text_image
Frames remaining Indicates delete mode Disk indicator 60 DEL DELETE button DELETE SCSI ID CARD BUSYThe DELETE button is for emergencies, not for routine operation. As an example of its use, suppose you are beginning to shoot and realize that the PCMCIA card is full, and that you do not have another PCMCIA card. The DELETE button provides an on-site method of deleting images so that you can continue to use the camera. Or perhaps you know that you need to conserve space on the PCMCIA card and you realize that a picture you have just taken is not satisfactory. You can use the DELETE button to delete that image.
The DELETE button deletes only one image at a time, and only the most recent image on the PCMCIA card. That is, if you have 20 images on the PCMCIA card, you cannot delete the fifteenth image and leave the others. However, you can delete the fifteenth image with one of the supplied software drivers when connected to a computer. In addition you can use the software drivers to delete multiple selected images simultaneously, or to erase or format the entire PCMCIA card.
NOTE: The DELETE button does not function when the camera is connected to a computer; use the DELETE button on the software driver to delete images in this configuration.
SCSI ID Button and SCSI Indicator
You use the SCSI ID button to set the camera SCSI ID. The setting is important when the camera is connected to your computer.

text_image
SCSI ID SCSI indicator SCSI ID button DELETE SCSI ID CARD BUSYTo set the SCSI ID, first make sure the camera is not connected to your computer. Then turn on the camera and lightly press the shutter release button (this is not necessary if you are connected to the AC battery charger/adapter) to wake the camera. Then, press the SCSI ID button once with your fingertip or other blunt object to wake SCSI mode. The characters "SCSI" — the SCSI indicator — appear on the camera back LCD as does the current SCSI ID value, a single digit from 0 to 7, "PC," or "PP."
As long as the characters "SCSI" appear on the LCD, you can press the SCSI ID button again and again to rotate through the available values. Stop when you have selected the SCSI ID you want. Several seconds after you press the SCSI ID button for the last time, SCSI mode turns off; reactivate it — if needed — and press the SCSI ID button again.
Select the appropriate SCSI ID before you connect the camera to your computer. Select an ID that is different from the SCSI ID of any other connected SCSI devices.
"PC" SETTING FOR IBM LAPTOP CUSTOMERS (not for use with the
Macintosh): Use the "PC" SCSI ID setting only if you will be connecting the camera to an IBM or compatible laptop computer using a PCMCIA-to-SCSI II adapter (such as the Adaptec SlimSCSI used with EZ-SCSI 4.0 or the New Media Bus Toaster), to connect the PCMCIA slot on your laptop (not the camera) to the SCSI connector on the camera. "PC" sets the SCSI ID of the camera to 1 and turns on active termination in the camera.
When you finish, take the camera out of "PC" mode, turn off the computer and camera. If left in "PC" mode, a fully charged battery will be exhausted in approximately eight hours since the camera can not change to low power mode when this SCSI setting is active.
"PP" SETTING: The "PP" setting, although it appears, is not currently supported and should not be selected.
SCSI Connector (KODAK Camera Back)
A single 25-pin, female, subminiature D, SCSI connector appears on the KODAK camera back.
You connect the camera to your computer from this connector with one of the supplied SCSI cables. Once you connect it you can operate the camera and the computer simultaneously. Detailed directions for making this connection, and for using the camera in this state appear in Chapter 4.

text_image
SCSI ID button SCSI E SCSI connectorMultipurpose Connector (KODAK Camera Back)
A 7-pin mini-DIN connector on the camera back serves several purposes.
▶ You plug the AC battery charger/adapter directly into this connector.
- You connect the Kodak remote shutter release accessory into this connector. Refer to the appendix "Optional Equipment & Spare Parts List" for additional information.
- You can also plug a cable accessory into this connector that allows you to connect the camera into a Quantum Battery 5 — QB5. Refer to the appendix "Optional Equipment & Spare Parts List" for additional information.

text_image
DELETE INPUT Multipurpose connectorPCMCIA Cards
"Standard," removable, credit-card sized PCMCIA cards (Personal Computer Memory Card International Association) are used for image storage. The camera incorporates a PCMCIA-ATA Type III slot.
The camera saves images to the PCMCIA card currently plugged into the KODAK camera back. You can fill one card, remove it, insert another card, and continue shooting.
These removable, miniaturized media provide great flexibility since you can carry a significant amount of image storage capability with you into the field or the studio. The camera functions as a card reader, so no separate PCMCIA card reader is required. However, if you have a commercially available PCMCIA card reader for your computer system, you can return only the card to a central site for image retrieval while the camera remains in the field.
PCMCIA cards are extremely fragile, and are easily damaged — especially if dropped. For this reason, use extreme care with the cards. Dropping a card may destroy it, resulting in the loss of all of your data on the card.
Supported PCMCIA Cards
The camera is designed to accept PCMCIA hard disk cards that support the PCMCIA "ATA" interface, although all such cards may not work. (Refer to the read-me file on the supplied software driver diskette for information on specific cards known to work with the camera.) The ATA protocol is the same interface used for AT disk drives in PCs. PCMCIA hard disk cards are available in a variety of sizes, for example 105, 170, 260, and 340 megabyte (MB) sizes.
In addition to PCMCIA hard disk cards, the camera will accept flash memory cards if the cards support the ATA protocol. (This means that standard PCMCIA memory SRAM cards are not supported.)
Consult the specifications for your cards to determine if their operating limits (for temperature, humidity, etc.), are more restrictive than those for the camera, and if they are, adhere to those limits.
Card Busy Light
A red Card Busy LED appears on the camera back. When flashing, it indicates that the camera back is accessing — reading from or writing to — a PCMCIA card in place in the slot in the camera back; it is a warning not to remove the installed PCMCIA card. If you do, you may lose all data on the card. Wait until the blinking stops before removing the PCMCIA card.
DOS Formatting and Card Access
The PCMCIA cards used for image storage must be (DOS) formatted. You should format them with the camera using one of the supplied drivers as described in Chapter 4.
The image and sound files placed on the cards by the camera system are also DOS format files, meaning that if you have a separate card reader you can use DOS commands on your PC, if available, to manage image files without the software driver. If you have a separate card reader — or other equipment that uses these PCMCIA cards — you can use that equipment to store and retrieve files in a variety of formats on the cards.
Troubleshooting, Disk Recovery, and Fragmentation
If you encounter a problem that you believe is associated with the PCMCIA card, you can perform simple troubleshooting by trying another card if available. Doing so will enable you to determine if the problem is
associated with that single PCMCIA card, or with another part of the camera system. If the problem is with the PCMCIA card, you can try the steps in the next paragraph.
The RECOVER button on the Camera Control panel of the software drivers can be used in some circumstances while the camera is connected to a computer to recover files that have been inadvertently deleted. In addition, since the PCMCIA card is in DOS format, it may be possible to recover an image or sound file using PC utility programs, if available, with file recovery features; doing so requires a separate PCMCIA card reader since these programs cannot access the cards through the camera back. If these actions are unsuccessful, you may need to format the card, an operation which will erase all of your data on the card.
It is possible that a PCMCIA card may become fragmented, meaning that files — such as the large image files — are broken into linked parts on noncontiguous areas of the card. This can occur in several situations, such as when small non-image files are stored in and among image files, meaning that a large number of small unused areas are interspersed on the card, rather than having all empty blocks together on one portion of the card. Fragmentation can result, and if it does, it can result in slowed camera performance.
If you believe this has occurred, you can delete all files on the card and/or format the card — after saving files as desired to your computer hard disk.
You can also run a utility program (not supplied with the camera system) with "defragger" capability that rearranges existing files into contiguous areas of the PCMCIA card. This in turn frees large blocks on the card, meaning that image files produced by the camera can be stored in a single contiguous area — more efficient for file storage and retrieval. Using a utility program requires a separate PCMCIA card reader since these programs cannot access the cards through the camera back.
Camera Operating Configurations
You can use the camera in the following equipment configurations.
IMPORTANT: Refer to Chapter 4 for specific cabling and termination details.
Supported Configurations
Each row of this table represents a supported configuration. Refer to the following pages of this section for additional information.
| PCMCIA in camera | AC adapter connected | Connected to computer |
| Yes | No | No |
| Yes | Yes | No |
| Yes | Yes | Yes^(1,2) |
| Yes | No^(3) | Yes^(1,2) |
| No^(4) | Yes | Yes^(2) |
| No^(4) | No^(3) | Yes^(2) |
(1) The computer can be on or off, and can be running an image editing application or another application.
(2) Other SCSI devices can be connected to the computer.
(3) Although this configuration is supported, we recommend you always use the AC adapter when connected to a computer.
(4) The driver image window must be open to obtain images from the camera back in this configuration.
Taking Pictures While Connected to the Computer
You can take pictures while the camera is connected to the computer (for example in a studio). The following apply to this usage.
The camera functions independently, so if a PCMCIA card is in the camera, it is not necessary for the computer to be running the software driver while taking pictures. The camera will continue to function while connected to the computer even if other software is active or if the computer is off.
The AC battery charger/adapter can be used with the camera. We recommend this configuration.
If you use the camera while the software driver is running on the computer, images will appear one-after-another in the image window as you take pictures, allowing you to determine quickly if the current image is acceptable or not.
If no PCMCIA card is in the camera, each new image replaces the previous one. If you have an image you want to save, acquire it or save it to an archive folder before taking another picture.
▶ Do not take new pictures while an image is being acquired.
The DELETE button on the camera back is disabled while the camera is connected to a computer. Instead use the DELETE button on the driver image window of the software driver to delete images.
The Take Picture icon on the software driver can be clicked to issue a command that directs the camera to take a picture.
Using the Camera with a PCMCIA Card
With a PCMCIA card installed in the camera, the unit is portable, and can be used in the large variety of stand-alone shooting situations in which the Nikon N90s can be used.
Images are stored on the PCMCIA card as you take them. The camera will not operate once the PCMCIA card is full. When full, you will need to do one or more of the following.
▶ Use the DELETE button on the camera to delete the most recently made image(s) from the PCMCIA card.
NOTE: The DELETE button does not function when the camera is connected to a computer; use the DELETE button on the software driver to delete images in this configuration.
▶ Attach the camera to the computer, and use a supplied software driver to delete images from the PCMCIA card (after acquiring them from the camera if desired), or while connected, use TEST SHOT.
Remove the full PCMCIA card and insert another PCMCIA card with space available for additional images.
Using the Camera Without a PCMCIA Card While Connected to a Computer
You can use the camera without a PCMCIA card only if you are connected to a computer and running one of the supplied software drivers. In this configuration, the software operates in TEST SHOT view, except that when you click KEEP, the COPY TO dialog box is displayed allowing you to select a folder location to save the image.
If there is no PCMCIA card in the camera, you can only take a picture if the driver image window is opened.
Battery and AC Battery Charger/Adapter
Battery Charging for Optimal Capacity
IMPORTANT: Do not attempt to remove the battery; it is not a customer serviceable part.
The camera incorporates a single, rechargeable nickel hydride battery that powers both the camera back and the Nikon N90s camera; no batteries are installed in the Nikon camera. The Specifications appendix lists the number of frames you can expect from a fully-charged battery in typical shooting situations.
Battery charging is inhibited when the internal battery temperature is above 120^ F ( 50^ C). The camera will continue to operate for as long as the battery charge is sufficient. You will not be able to power the camera until the internal battery temperature drops below this limit.
Under normal conditions, charging the battery for at least two hours provides optimal capacity. However, under very cold or very hot conditions, charge for at least 30 minutes after the LCD battery indicator indicates a full charge. Charge the battery as close to the time the camera will be used as possible. (Waiting in excess of two days before shooting will result in reduced battery capacity.)
Use the AC battery charger/adapter when connected to a computer if possible; use without the adapter in this configuration for an extended time period will drain the battery. Leaving the camera connected to the AC battery charger/adapter will not maintain a full charge; therefore disconnect before use, then reconnect and charge for two hours to ensure a full charge. Extended camera metering or focusing reduces the number of images available from a charge.
AC Battery Charger/Adapter
AC BATTERY CHARGER/ADAPTER

natural_image
Illustration of a cable being inserted into a device labeled 'To camera' (no other text or symbols)POWER CORD

text_image
To AC battery charger/adapter To wall outletCAUTION: Observe all cautions regarding this unit included in "AC Battery Charger/Adapter — Important Warnings" at the front of this manual.
You can use the supplied AC battery charger/adapter to operate the camera and to charge the battery in the KODAK camera back.
You can operate the camera while connected to the supplied AC battery charger/adapter, or you can recharge the battery with the adapter and then use the camera in the field without the adapter. The adapter will run the camera continuously while it is charging the battery.
The adapter is a universal unit, with a range of 95–250 volts, 47–63 Hz, without a switch.
If you are using the camera in an environment in which a power outlet is available, for example in a studio or when connected to a computer, we recommend that you operate the camera while connected to the AC battery charger/adapter.
External Battery Adapter
This optional accessory allows the camera to be used with the Quantum Battery 5 (QB5). Refer to the appendix "Optional Equipment & Spare Parts List" for additional information.
Recorded Sound
The camera can record sound via a built-in microphone positioned in the camera back. This feature, implemented with a goal of simplicity and ease of use, allows you to record audio information about images or other subjects.

text_image
Microphone Record buttonThe feature is intended as an annotation system that records sound at "telephone quality" — 8-bits, 11 kilohertz, monaural. Recorded sound is saved as a ".WAV" file on the PCMCIA card; WAV files are the Windows standard sound file format. Sound files are time- and date-stamped when written to the PCMCIA card.
As a sound segment is recorded, it is held briefly in dynamic random access memory (DRAM) in the camera back, and is then moved to the
PCMCIA card where it is saved as a sound file. As a result, the card may contain an intermingling of image and sound files.
The camera alone cannot play the recorded sound; instead, a computer is needed to access and play the sound files.
How to Record Sound
To record sound, make sure that a PCMCIA card is in the camera back, then turn on and wake the camera (or operate while connected to the AC battery charger/adapter or to a computer that is on), and hold the camera back approximately six inches (15 cm) from your mouth, press and hold the record button, speak into the microphone, and when finished, release the record button. The center dot of the disk icon on the camera back LCD comes on when sound is being recorded.

If the shutter release is pressed while the record button is down, audio recording stops until the image has been recorded. If the record button is still down, the camera begins to record sound again.
For simplicity there are no controls other than the record button; there is no volume control, and no way to set the recording level.
Sound will not be recorded while shooting an image.
As sound is being recorded, segments of the disk icon bounce up and back, serving as a level meter (similar to the levels commonly displayed on audio equipment like tape decks). The bouncing segments provide feedback, a visual indication that sound is being recorded. The best quality recording occurs when 4-5 segments are on.

No sound

Maximum
Sound files are loosely associated with the image taken before the sound was recorded.
Recording "Lengthy" Audio Segments
Approximately 25 seconds of uninterrupted sound can be recorded in a single file. If you press and hold the record button for over 25 seconds, a slightly different recording action will occur.
The first 25 seconds of audio fills all available dynamic random access memory. Recording then stops for up to several seconds — even though the button is still depressed — while the data in memory are moved to a new file on the PCMCIA card by the camera. Then recording begins again for another 25 seconds, after which this new segment of sound is moved to a new sound file on the PCMCIA card, and so on. Each 25 second segment is stored on the card as a separate file.
During the interruption between each 25 second segment, the red Card Busy light on the camera back blinks, and the dot in the disk icon goes off. These indicate that data are being written to the card, and that sound is not being recorded.
Sound File Size
You can completely fill a PCMCIA card with only sound files; the limit is the storage capacity of the PCMCIA card.
When sound is not being recorded, you can refer to the disk icon on the camera back LCD; it indicates the combined proportion of the PCMCIA card filled with image and/or audio files.

Playing Sound Files
Recorded sound files can be played from the PCMCIA card with the software driver and your computer as explained in Chapter 8. No additional hardware is required to play the recorded file on a Macintosh computer; a sound board is required to play the recorded file on a PC.
On/Off State of the KODAK Camera Back
There is no separate on/off switch for the KODAK camera back. Instead, when you turn on and then wake the Nikon camera, the camera back turns on. As described in this section, it is possible for the camera back to be on when the camera is off.
The on/off state of the KODAK camera back depends on the mode of camera operation as follows.
If the camera is operated without the AC battery charger/adapter and without being connected to a computer, the camera back is "on" while the Nikon N90s is awake, and sleeps when the camera sleeps. If the camera is saving an image to a PCMCIA card when the Nikon Camera sleeps, the camera back remains on until the image is saved.
The camera back is continuously "on" when the camera is operated while connected to the AC battery charger/adapter; once the batteries are fully charged the adapter switches automatically to a slow trickle charge. If the camera is saving an image to a PCMCIA card when the adapter is disconnected, the camera back remains on until the image is saved.
The camera back is also continuously "on" when the camera is operated while connected to a computer that is on. If the camera is saving an image to a PCMCIA card when the computer is turned off, the camera back remains on until the image is saved.
Troubleshooting the Camera
| Trouble | Possible Cause | Suggested Solution |
| No power when using the battery. | The Nikon camera is not on. | Slide the Nikon camera power switch to on. |
| The battery is discharged. | Charge the battery with the AC battery charger/adapter, or operate from the AC battery charger/adapter. | |
| No power to charge the battery when using the AC battery charger/adapter. | The cable from the AC battery charger/adapter to the camera back is loose or not plugged into the camera back. | Make sure the cable is connected to the camera back and seated securely. |
| The AC battery charger/adapter cable is loose or not plugged in at the wall. | Make sure the cable is connected to the wall and seated securely. | |
| There is no power at the power source. | Have the power source repaired and/or try another power source. | |
| The AC battery charger/adapter power cable is faulty. | Replace the cable. | |
| The AC battery charger/adapter is faulty. | Contact Kodak. | |
| There are unexpected delays when reading from or writing to a PCMCIA card. | The battery is cold. | Warm the battery to room temperature. |
| Condensation may be present in the camera or PCMCIA card. | Condensation may be present if the camera is moved from a relatively cold environment (like an air conditioned hotel room), into a warm, humid environment. We recommend that you allow sufficient time for the camera to normalize within the specified environmental ranges before operation. | |
| The data on the PCMCIA card is fragmented. | Run a utility program (not supplied with the camera system) that includes “defragger” capability, or move files from the card to your computer hard disk and reformat the card with the supplied software driver. | |
| The PCMCIA card is damaged or defective. | Try another card. | |
| Pressing the camera shutter release button does not release the shutter. | The Nikon N90 camera is in a programmed auto exposure mode and the lens is not at the minimum aperture. | Change to another exposure mode, or stop down to the minimum aperture. |
| The Nikon N90 camera is in single servo autofocus mode (S) and is unable to focus. | Change to another focus mode, or re-aim the camera from a different position or remove the lens cap. | |
| No PCMCIA card is in place in the camera system. | Insert a PCMCIA card or operate the camera system while connected to a computer as described earlier in this chapter. | |
| The camera is off. | Turn on the camera. | |
| The PCMCIA card in the camera back is full. | Delete images from the PCMCIA card in the camera back. | |
 | If connected to a computer, delete images or erase the PCMCIA card with the software driver. | |
| Use another PCMCIA card, if available. | ||
| The PCMCIA card is not formatted; “E6” appears on the camera back LCD. | Format the PCMCIA card as described in Chapter 4, and try again.continued | |
| continued from previous page | The battery is low. | Recharge the battery, or operate from the AC battery charger/adapter. |
| Pressing the camera shutter release button does not release the shutter. |  |  |
| The characters "ISO" appear on the camera back LCD. | The camera ISO was not set within the prescribed range when the most recent picture was taken. (The camera will have already reset the ISO to an allowed setting.) | Use a supported ISO as described in the Specifications appendix. |
 |
Trouble
Possible Cause
Suggested Solution
Two characters, an "E" followed by a single digit (for example "E2"), appear on the camera back LCD.

An error occurred on the PCMCIA card or in DRAM.
For the problems below, remove and reinsert the PCMCIA card and try again. If unsuccessful, do a "sleep/awake" sequence: let the camera back sleep (disconnect the AC adapter from the camera back, shut down the computer if connected, and disconnect the camera back from the computer), reconnect and try again. If you continue to have problems format the PCMCIA card with the Format button on the driver Camera Control panel (this will erase all images and sound files from the card). If the problem persists, contact Kodak; report the number of the error condition.
E2 - failure of the PCMCIA card to start.
E3 - failure when attempting to read the PCMCIA card.
E4 - failure when attempting to write to the PCMCIA card.
E5 – defective card, a non-ATA card, or a card that does not work. (Refer to the read-me on the driver diskette for a list of supported cards.)
E6 - unformatted PCMCIA card.
E7 - defective card, a non-ATA card, or a card that does not work. (Refer to the read-me on the driver diskette for a list of supported cards.)
| Trouble | Possible Cause | Suggested Solution |
| You are losing images from the PCMCIA card. | An error occurred on the card. | Turn off the camera so that the camera back goes off. Turn on the camera and retry the operation. If you continue to have problems, reformat the PCMCIA card with the Format button on the camera control dialog box of the software driver. (This will erase all existing images from the card.)If the problem persists, contact Kodak. |
| Image data on the PCMCIA card have become corrupted; you are unable to access the image data. | You may be using an improper SCSI cable to connect the camera system to your computer. | Use only the supplied SCSI cables (or other cables as specified in Chapter 4 to attach the camera or other peripherals to the computer. |
| Your SCSI chain is not terminated properly. | Ensure that the SCSI chain is terminated properly as described in Chapter 4. | |
| The files have become corrupted for an unknown reason. | If you have access to an IBM PC or compatible computer with a PCMCIA card reader and disk utility software, you may be able to recover image and sound files with that utility software.If that computer system is unavailable or that action is unsuccessful, you may need to format the disk with the camera, an operation which will erase all of your data on the card. | |
| The camera acts erratically, unusual or unexpected characters appear on the camera back LCD, or the LCD flickers unexpectedly. | The battery in the camera back is low or dead.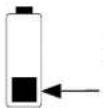 Blinks when battery is exhausted Blinks when battery is exhausted | Recharge the battery in the camera back. |
| If the unusual behavior continues for over five minutes the battery may need to be replaced by Kodak. | Contact Kodak. | |
| The firmware in the camera has become corrupted. | Update camera firmware, as described in Chapter 8. | |
| You are experiencing erratic camera behavior or unusual characters appear on the camera back LCD. You know the battery is charged. | The firmware in the camera has become corrupted. | Update camera firmware as described in Chapter 8. |
| The camera is stuck in one mode for unknown reasons. | An unexplained event may have occurred. | Update camera firmware as described in Chapter 8. |
| The camera system is warm when the camera is connected to the AC battery charger/adapter. | A warm temperature is normal. | Continue to operate the camera normally. |
| When the camera is connected to a computer, and/or the camera is being operated with the AC battery charger/ adapter, a connected studio flash will not go off, or goes off only once and then freezes. | Polarity is reversed in the studio flash — a condition that becomes apparent when the camera smystem is grounded.You can confirm this condition by operating the camera with the flash after disconnecting the AC adapter and the computer; the flash should then operate normally. | If the plug is reversible, reverse the plug where the sync cord plugs into the flash.Or, operate with an IR slave or a radio slave. |
| You have other problems with a flash. | A non-dedicated incompatible electronic flash is being used. | Refer to the section “Using a Flash” at the end of this chapter. |
Cleaning the Imager
The imager is the component of the camera that records light when you take a picture. Even though it is located inside the camera back, it is still possible for the imager to become dirty.
The directions in this section describe how to determine if the imager needs cleaning, and how to clean the imager.
Determining If the Imager is Dirty
There are two ways to determine whether the imager needs cleaning:
▶ You can take a test picture and look for imperfections in the image that indicate dirt on the imager.
▶ You can visually inspect the imager for dirt.
Both techniques are described below.
Technique 1: Examine a Test Image
- Set up the camera to operate while connected to a computer.
- Set the lens aperture to its highest f number, to provide for maximum depth of field.
- Take a photograph of a plain white object like a clean, white wall.
- Examine the image on the computer monitor; imperfections in the image, such as dark clusters or streaks, may indicate a dirty imager.
Technique 2: Visually Inspect the Imager
-
Set up your camera to operate in stand-alone mode (not connected to either a computer or the AC battery charger/adapter).
-
Turn off the camera.
- Remove the lens from the camera.
- Turn on the camera.
- Set the camera to manual exposure mode.
- Select the bulb setting.
- Press and hold the shutter release button; the shutter stays open, and the imager is visible through the lens mounting flange.
CAUTION: Do not attempt to clean the imager while the camera is in this state; the shutter can be damaged if you release the shutter button while any object is in the opening.

text_image
Imager (visible through lens mounting flange) Nikon N90s Kodak D S KodakLens mounting flange
- Hold the camera so that light reflects off the imager; visually inspect the imager for grease, fingerprints, lint, or other dirt.
- Release the shutter release button.
- Turn off the camera.
- Mount the lens.
- Turn on the camera and reset the exposure mode and move off the bulb setting.
- If the imager is clean, proceed to operate the camera normally; however, if the imager is dirty, clean it using the following steps.
Cleaning a Dirty Imager
CAUTION: In the following steps you will separate the camera body and the camera back — an action that exposes the imager to the environment. Because the imager is sensitive to static discharge, you must observe the static discharge control measures described below.
As you complete these steps, be certain that you do not touch the inside of the camera back (except as instructed).
Separating the Camera from the KODAK Camera Back
- Locate or order cleaning materials for the camera. Cleaning materials are not supplied with all camera models, but can be ordered from
Kodak. These include an electrostatic discharge (ESD) wrist strap, low-lint web cleaner pads, and a cleaning solution. The wrist strap is used to provide protection against damaging electronic components of the camera back.
IMPORTANT: Use only the cleaning materials available from Kodak.

text_image
Wrist Strap Clip CLEANER PADS CLEANING SOLUTION-
Assemble the electrostatic discharge (ESD) wrist strap (if assembly is necessary). The wrist strap protects electronic components of the camera back from static damage.
-
Attach the strap to your hand.

natural_image
Line drawing of a human hand with a coiled spring and wrist strap (no text or symbols)-
Turn off the camera.
-
If the AC battery charger/adapter is connected, disconnect it from the camera.
-
Lay the camera on its back on a flat, steady surface.
-
Unscrew the coupling nut at the top of the connector cable and pull straight out to remove the connector cable from the Nikon N90s camera.

text_image
Unscrew (°) ... ... then pull straight out. Nikon NGOS DCS Kodal Kodal d-
Loosen the handstrap (do not remove it) by separating the Velcro parts; you may need to slide the buckle down on the lower end of the strap to loosen it.
-
Loosen the large mounting screw in the center of the base of the camera back until it turns freely.

text_image
Mounting screw- CAUTION: Use extreme caution as you complete this step because the Nikon N90s and the KODAK camera back are connected by two thin wires.
Hold down the camera back with one hand while you use the other hand to lift the camera body up and to the side of the camera back.

text_image
Nikon N90s Kodak 525- Push the head of the mounting screw until it is flush against the bottom of the camera back. This action exposes the threads on the other end of the mounting screw.

text_image
Push Threads- Attach the clip on the end of the ESD wrist strap cable to the exposed threads on the end of the mounting screw; you and the camera will now be at the same potential.

natural_image
Line drawing of a human hand wearing a wristband connected to a medical device (no text or symbols)Wiping the Imager
-
Examine the imager visually. If there is lint on the imager (but not grease, fingerprints, or other dirt), continue at step 9; otherwise continue with the next step.
-
Dampen one corner of the web cleaning pad sparingly with the cleaning solution.
-
Wrap the damp corner of the cleaner pad over the forefinger of one hand.
-
Hold the camera back firmly in place on the flat surface with your other hand.
-
Gently scrub the imager with the damp corner of the cleaner pad; use a circular motion, and move over the entire imager. This action should dislodge dirt and/or remove grease and fingerprints.

text_image
Kodak SOSReassembling the Camera
-
Remove the ESD wrist strap from the mounting screw and from your wrist.
-
Push the threaded end of the mounting screw back into the camera back.

text_image
Push- CAUTION: As you complete this step be certain that the thin wires recede into their openings in the Nikon N90s camera and KODAK camera back.
Hold down the camera back with one hand while you use the other hand to push the camera body into place against the camera back.
- Tighten the mounting screw.

natural_image
Technical line drawing of a mechanical component with a button and handle (no text or symbols)Mounting screw
- Push the connector cable coupling firmly back into place into the Nikon N90s camera and tighten the coupling nut.

text_image
Push straight in ... ... then tighten (←) coupling nut. Kodaak DCS Kodaak 5- Reposition the buckle on the lower end of the handstrap and reconnect the Velcro.
The camera is now ready.
Using a Flash
WARNING: Do not connect a non-dedicated electronic flash unit to the camera (hot shoe or PC terminal) without verification from a Nikon authorized service facility that the flash unit is compatible with the camera body. Some electronic flash units will damage the camera body unless they are isolated with an IR slave or a radio slave. Check with a Nikon authorized service facility for compatible equipment.
Flash units or flash accessories designed for dedicated use with other camera brands will not work properly and may damage the camera body.
When using a dedicated Nikon flash, you may need to set exposure compensation on the camera body. Take test pictures to verify proper exposure.
When using studio flash or non-dedicated flash you must set the camera to manual exposure mode to set the proper shutter speed for flash synchronization. Use the included Nikon N90s manual to identify shutter speeds that work with these settings.
The shutter speed for flash synchronization with studio flash may be different from dedicated Nikon flash synchronization. Before use, test the flash at various shutter speeds to make sure it synchronizes properly with the camera.
When using the camera with a studio flash, if either the SCSI cable or the charger are connected, it may be necessary to reverse the ground polarity of the flash cord in order for the flash to work; alternately, use an IR slave or a radio slave to isolate the camera from the flash.
(The read-me file on the supplied driver diskette may contain additional information regarding using a flash.)
Calibration (CAL) Files — DCS 460 Only
In order to use any images taken with your DCS 460 Camera, a "calibration" (CAL) file designed for your particular camera back must be present on your computer hard disk. Instructions in Chapter 4 describe how to install that CAL file. If several different cameras are in use at your location, the unique CAL file for each camera must be installed in order to access images from each camera; this means that you may have multiple CAL files on your hard disk.
CAL files are required in order to display thumbnails or previews of images in the driver image window, and are required in order to acquire an image. If the CAL file is not on your hard disk, or not in the proper place on your hard disk, you will see a message specifying the name of the missing CAL file when the driver attempts to display the image, and you will not be able to display or acquire the image.
When you copy images from a PCMCIA card to your hard disk with the COPY TO button, the CAL file(s) associated with the camera(s) used to take the selected images are automatically copied to the folder with the images. The calibration files are needed subsequently to display and/or acquire the images. For this reason it is very important that you do not delete any CAL files you find in folders with your images.
If you transport your images to another computer system (perhaps you are distributing unacquired images to others at a different location at which the software driver has been installed), be certain that you also transport the CAL files found in the folder with the images. You will not be able to display those images in the driver image window, nor will you be able to acquire those images, unless their associated CAL files are available. The CAL files should be placed in the same folder as the images.
8
Reference — KODAK Driver Software
This section of the manual includes detailed information about the KODAK driver, including:
▶ General Features.
▶ Driver commands.
- Adobe Photoshop features of interest to camera users.
▶ Driver messages.
▶ Driver troubleshooting.
IMPORTANT: Throughout this chapter we refer to "Photoshop." This single reference refers to both the Macintosh and PC versions of Photoshop, and also to other supported PC TWAIN-compliant image-editing software.
General Features
When you access the driver, you see the following window — called the driver image window — on your computer monitor. Within it is the image area which displays images, either thumbnails or a single larger image called a preview. Thumbnails and preview images can be displayed in several different sizes. A variety of menus, icons, buttons, textboxes, and indicators surround the image area of the driver image window. These are described in detail in this chapter.
The driver can display images from a variety of supported Kodak camera types. This means that you can use the same PCMCIA card with different supported Kodak cameras and view all of the images with the same driver.
The letters shown on the illustration below correspond to the sections of this chapter in which the labeled items are described.
KEY TO FIGURE: All driver features are identified by letter in the following figure; full explanations of all features appear in order by these letters in this chapter.
A. Source Menu
B. View Menu
C. Active Photoshop Menus
D. Acquire As Menu
E. Take Picture Icon
F. Camera Control Icon
G. Preferences Icon
H. Rename Images Icon
I. Rotate Clockwise/Counterclockwise Icons
J. Crop Icon
K. Lighting Menu
L. Click-Balance Tool
M. Sound Menu
N. Acquire Button
O. Copy To Button
P. Delete Button
Q. Done Button
R. Annotation Area
S. Image Information Window
T. Navigation Bar
U. Select All Icon
V. Number of Images Selected
W. X-Y Cursor Location
X. RGB Values at the Cursor Location
Y. Thumbnail/Preview Size Menu
Driver Image Window (Macintosh and TWAIN):

text_image
A B C D File Edit Image Layer Select Filter View Window DCS Source: Camera View Contact Sheet Acquire As Photo E F G H DCS00001.TF 2 DCS00002.TF DCS00003.TF 4 5 I J K L M DCS00004.TF DCS000046.TIF DCS000053.TIF 7 8 9 1 of 10 selected X: 61 Y: 49 R: 2014 G: 2014 E: 2014 Acquire Copy To... Delete Done Annotation: Type your data here. Camera: DCS Serial #: 2515 Width: 1524 Height: 1012 Date: 11/12/99 Time: 1:02:10 PM Counter: [42] ISO: 200 Aperture: T4 Shutter: 2000 R S T U V W X YThe driver provides a variety of features that allow you to work with image and sound files on the PCMCIA card in the camera, on your computer hard disk, and in memory of the camera. The driver allows you to return from a photographic shoot, rapidly view the images, and acquire selected images (or a contact sheet of images), immediately into Photoshop. The driver is also designed to allow you to work with your camera in a studio setting.
You can transfer selected images to your computer hard disk for archival purposes and/or for later retrieval into Photoshop. You can then delete some or all of the images on the PCMCIA card in preparation for making additional images on that card. Sound files can be played through the driver and are saved to your computer hard disk when their corresponding image is archived.
You select thumbnail images in the image area by clicking an image, by shift-clicking (on a Macintosh) or control-clicking (on a PC) to add or subtract from the selected images, by dragging the mouse over adjacent thumbnails, by clicking the ALL button, or by choosing the ALL or NONE choices on the Photoshop SELECT menu (which is active while you are in the driver image window). A narrow color border surrounds highlighted images.
You scroll through the images by moving the vertical scroll box or scroll arrows, or with a row of navigation tools — the navigation bar — on the driver image window. The navigation tools allows you to move to the first or last image, forward or back to the image before or after the selected image, or to a specific image by entering its number. (Refer to the "Navigation Bar" section of this chapter for a full explanation of this tool.)
Depending on the size and configuration of your monitor, and the thumbnail size, you see one or more thumbnails on each row, and one or more rows of thumbnails in the image area of the driver image window.
The image filename (which may be a default name assigned by the driver, or a name you have assigned), appears with each image, as does the frame number.
To use the driver, you must first install it by following the series of one-time steps described in the chapter "Preparing the Camera and the Computer." Then each time you want to use the driver, you access it as described in those chapters.
Defaults — Driver Image Window
The following default values are used for the driver image window each time you begin a work session. Once you have entered the driver image window, you can change these values as desired.
Source. The driver always looks for an attached camera first. If no camera is found, the driver opens the last image folder with which you were working, and if no folder is found, you are asked to select a folder.
▶ View. This setting always opens as CONTACT SHEET.
▶ Acquire As. This setting always opens as PHOTO.
▶ Rotation. The default value is no rotation.
▶ Crop. The default value is no cropping.
▶ Lighting. The default value is the lighting setting of the first image retrieved; if there are no images at the source, then DAYLIGHT is the default.
▶ Click-balance. The default setting is no click-balance in effect.
▶ Thumbnail/Preview size. The value of this setting is from the end of the previous work session is applied.
In addition, many settings for choices on dialog boxes are also maintained in a preferences file from work session to work session.
Commands
This section of the chapter describes each element of the driver image window. The letter before each command corresponds to the letters shown on the illustration at the start of this chapter.
NOTE: As you work with the driver, notice that all features are not always active; instead, some choices are dimmed. This is normal operation, for all features are not always applicable to the current settings and are therefore dimmed by the driver. For example, when you are in TEST SHOT, you can only work with one image at a time. For that reason the navigation tools are dimmed since there are no other images to which you can move.
A. SOURCE Menu
Macintosh:

text_image
Source : Camera Camera Folder Choose Folder...TWAIN (PC):

Allows you to work with images from a camera connected to your computer or from image archive files that you have previously copied to a folder on your computer hard disk.
CAMERA
Use the CAMERA option to work with images from a connected camera. With this source, the window title bar displays the camera name.
FOLDER
Choose FOLDER to work with images in the folder you were working with before working with the current source. For example, make this choice if you are working with the CAMERA as source, and want to return to the archive folder you were using before choosing CAMERA.
CHOOSE FOLDER
Use the CHOOSE FOLDER option to select a folder containing images you have saved previously (with the COPY To button) to your computer hard disk. When you work with this option, all image archive files and sound files from the selected folder replace the current contents of the driver image window. This choice is implemented differently in the Macintosh and TWAIN drivers:
Macintosh: Choose FOLDER from the SOURCE popup menu.
TWAIN: Click the icon near the Source drop-down menu.
B. VIEW Menu

text_image
View: Contact Sheet • Contact Sheet Preview Test ShotAllows you to set the desired view of images in the image area of the driver image window: CONTACT SHEET displays multiple image thumbnails,
PREVIEW displays a single large image, and TEST SHOT displays a single large image from the camera (allowing for adjustments before saving an image).
CONTACT SHEET
Choose CONTACT SHEET to view all image files from the camera or an archive folder source. The images are displayed in rows of multiple thumbnails, with the size of each thumbnail determined by the thumbnail/preview size menu on the driver image window.
PREVIEW
Select an image (or images) while in CONTACT SHEET and then choose PREVIEW to view an enlarged version of an image from its source. If multiple images are selected, they appear as a stack of images in PREVIEW.
This option is useful when a close examination of the image is desired, for example when changing the color balance options (the effect of color balance adjustments are evident more readily with a larger image than with smaller contact sheet images).
Color balancing while in PREVIEW works differently depending on whether you have selected a single image or multiple images before choosing PREVIEW.
When you select a single image, and enter PREVIEW to color balance it, the revised color balancing applies only to that single image. While still in Preview, you can then navigate through one single image after another, making changes that apply to just that single image.
▶ However, when you select multiple images and then enter PREVIEW to color balance them, the revised color balancing applies to all selected images. Using the navigation tool as described just below allows you
to move through the subset of selected PREVIEW images to ensure that the color balancing is appropriate for all images.

text_image
DCS Source: Camera View Preview Acquire As: Photo Day light DCS00840.TIF Acquire Copy To... Delete Done Annotation: Type your data here. Camera: DCS Serial #: 2515 Width: 1524 Height: 1012 Date: 11/12/99 Time: 1:02:10 PM Counter: [42] GO: 200 Aperture: T4 Shutter: 2000 30 1 of 54 selected X: 249 Y: 199 R: 90 G: 90 B: 90 SmallYou move through the large format preview images from the source with the image navigation tools as described below.
If you have selected no images when you choose PREVIEW, the first image of the source is displayed in PREVIEW view. If you click any of the navigation buttons you move through all source images using the first image as the starting point.
If you have selected only one image before you choose PREVIEW, that image is displayed in PREVIEW view. If you click any of the navigation buttons you move through all source images using that image as the starting point.
If you have selected multiple images before you choose PREVIEW, the first of the selected images is displayed, and the images appear in a stack. The navigation buttons move you through only the selected set of images. For example if you select images 3, 6, 7, 9, and 10, image 3 would be displayed upon entering PREVIEW. If you press the "next" navigation icon, image 6 is displayed; if you press the "last" navigation icon, image 10 is displayed.
▶ While in PREVIEW, if you type an image number into the text area of the navigation box, that image is displayed. However, if you are working with a stack of images, you will receive an error message if you type an image number, and the number does not correspond to one of the selected images.
The size of the preview image is controlled by the thumbnail/preview size menu. If the image in the selected display size does not fit in the image area, the scroll bars are enabled.
The window title bar displays the name of the image source followed by the name of the image currently being shown.
TEST SHOT
Choose TEST SHOT to work with a single image which is always a picture you take with the camera after entering TEST SHOT. In TEST SHOT, images you take are not saved to the PCMCIA card in the camera unless you click the KEEP button as described below; instead, images are displayed in the image area one at a time. Each new image you take replaces the previous one, which is lost.
TEST SHOT allows you to make adjustments to camera settings and other settings as needed (reposition lighting, etc.), without wasting disk space on the PCMCIA card.
If the "test" picture is one that you want to keep, click the KEEP button, and the image is saved to the PCMCIA card in the camera. (The COPY To
button becomes the KEEP button when in TEST SHOT.) If you do not want to keep the image, take another picture — it replaces the previous image which is not saved. (If you do not clicked KEEP, a message warns you that you are about to lose the current image.)
Choose CONTACT SHEET or PREVIEW from the VIEW menu, to leave TEST SHOT. Subsequent images you take will be recorded on the PCMCIA card in the camera.
Since it is possible that you may inadvertently leave the camera in TEST SHOT (resulting in lost pictures that you believe are being recorded), the driver provides several visual indicators that you are in TEST SHOT.
- When you take another picture, if you have not "kept" the previous one, a warning message is displayed, indicating that the first image was not saved and reminding you that the camera is in TEST SHOT.
- The text "TEST SHOT" appears in the window title bar along with the camera name.
- The COPY To button becomes the KEEP button.
While in TEST SHOT you can:
▶ Take another picture.
▶ Click the ACQUIRE button to acquire the image into Photoshop.
- Click the KEEP button to save the image to the PCMCIA card in the camera.
▶ Determine that you are satisfied with the testing, and choose CONTACT SHEET or PREVIEW from the VIEW menu. Subsequent images you take are stored to the PCMCIA card in the camera.
NOTE: You cannot record sound while in TEST SHOT.
C. Photoshop Menus
Two Photoshop menus — EDIT and SELECT — are active when you are in the driver.
Photoshop Edit Menu
You can use the CUT, COPY, PASTE, and CLEAR items from the Photoshop EDIT menu with annotation text; however, you can not cut, copy, paste, or clear selected images with these commands.
Photoshop SELECT menu
You can use the ALL and NONE items from the Photoshop SELECT menu.
All
Selects "all" images on the contact sheet including images that have scrolled out of view in the image area of the driver image window; if you scroll the image window, you see that all images are selected. If you are working in the annotation window, ALL selects all text in the window.
It is important to realize that ALL chooses images from the PCMCIA card in the camera or archive folder, not just images visible in the driver image window. For example, suppose you choose ALL and then click DELETE. These actions not only delete the thumbnails from computer memory, but in addition, these actions delete all images from their source (CAMERA or FOLDER).
NOTE: The All choice from the Select menu performs the same function as the All button on the driver image window.
NONE
Deselects all selected images. (This choice deselects all images, but does not deselect text when you are within the annotation window.)
D. ACQUIRE As Menu

text_image
Acquire As: Photo Contact Sheet ● PhotoThe ACQUIRE As menu choices work in concert with the ACQUIRE button, and determine whether selected images are acquired as pages of contact sheets (choose CONTACT SHEET), or whether selected images are each acquired into a separate Photoshop window (choose PHOTO). These choices affect only acquired images and do not affect the display of the driver image window. Since PHOTO is the simpler choice, it is described first below.
Photo
If PHOTO is chosen, the driver creates a new Photoshop document for each selected thumbnail; each document contains an image at the resolution specified in the preferences.
CONTACT SHEET
If CONTACT SHEET is chosen, the driver generates one or more Photoshop windows, each displaying thumbnails. The thumbnails on the contact sheet document consist of the set of thumbnails selected while in CONTACT SHEET view in the driver image window.
The following general characteristics apply to all contact sheets.
▶ Each thumbnail is centered inside a square "slide surround."
The rotation of each image matches its display in the driver image window.
As many thumbnails as possible are placed on a sheet; the size of each thumbnail is determined by the preferences described below.
If all selected images do not fit on a single contact sheet, multiple contact sheets are created.

text_image
Folder: Rodney's Camera Files Sunday, April 6, 1999 10:29 PM DCS0001 0.TIF DCS00020.TIF DCS00030.TIF DCS00030.TIF DCS00130.TIF DCS00190.TIF DCS00300.TIF DCS00310.TIF DCS00320.TIF DCS00340.TIF DCS00350.TIF DCS00360.TIF DCS00420.TIF DCS00440.TIF DCS00450.TIF Page 1ACQUIRE CONTACT SHEET Dialog
With CONTACT SHEET as the selected ACQUIRE As option, when you click the ACQUIRE button, the ACQUIRE CONTACT SHEET dialog is displayed. Use its options to establish the characteristics of the acquired contact sheet document.

text_image
Acquire Contact Sheet Document Name: Camera Output Resolution: 300 pixels/inch Thumbnails Size: Medium Show Crop Rectangle Printable Area Width: 8 Inches Height: 10 Inches Cancel OKDOCUMENT NAME
When a contact sheet is acquired, the name of the resulting document is determined from this entry, with “-n” appended, where “n” is the number of the contact sheet. For example, if three contact sheet documents are required to display the thumbnails and you have entered the DOCUMENT NAME Friday’s shoot, then the documents would be named Friday’s shoot-1, Friday’s shoot-2, and Friday’s shoot-3. Additionally, the caption field of the Photoshop file information for the document contains the same text.
OUTPUT RESOLUTION
Specify the resolution (in inches or centimeters as set in the general preferences) you desire for the acquired contact sheets. Specify a resolution to match your printer.
SIZE (THUMBNAILS)
Select from these sizes which control the size — SMALL, MEDIUM, or LARGE — of the thumbnail on the acquired contact sheet.
NOTE: These settings are different from a similar setting on the driver image window which controls the size of thumbnails displayed in the driver image window.
SHOW CROP RECTANGLE (THUMBNAILS)
Click this feature "on" (an X appears in the check box to the left of this option when on), to superimpose the cropping rectangle (if present) on each acquired thumbnail.
PRINTABLE AREA WIDTH and HEIGHT
Specify the WIDTH and HEIGHT (in inches or centimeters as set in the general preferences) desired for the printable area of the acquired contact sheets.
CANCEL
Exits the dialog box, canceling changes you may have made to the choices in the box. No contact sheets are acquired.
OK
Exits the dialog box, saving any changes you have made to options in the box (the current settings are saved from one work session to the next), and generates the contact sheets as Photoshop pages.
E. Take Picture Icon

Causes the camera to take a picture and display it in the driver image window. There may be a very short delay to allow the camera to focus (if supported by the camera).
To take a picture with this icon the camera must be connected to your computer, the SOURCE must be CAMERA, and the camera must be on.
Since lighting, rotation, cropping, and naming data are maintained with each image, the driver must assign initial values for these settings to every new image when the image is displayed in the driver image window. Refer to SOURCE Menu, CAMERA in this chapter for an explanation of these starting values.
NOTES: You can not take a picture while the camera is accessing a PCMCIA card, that is while the red camera light indicates activity on the PCMCIA card. Therefore, you should not take pictures while images are being saved to archive files.
F. Camera Control Icon

This icon is active only when a camera is attached to the computer; otherwise, it is dim.
When you click the camera control icon, the following dialog box appears, allowing you to perform utility functions on the attached camera or on a PCMCIA card in the camera.

text_image
Camera Control Camera Settings DCS XXX Serial Number XXXXXX Firmware Version: 011599 Date and Time: Tuesday, March 4, 1999 4:16 PM Load Camera Firmware Set Clock Camera Disk Erase Format Recover Self Test DoneThe top lines of the dialog box display the camera name, camera serial number, firmware (the instructions in the camera that control its operation) version, and the current date and time stored on the attached camera. The date and time are displayed in local format; the time appears in a 24-hour format.
NOTE: These data may be different from similar data displayed in the image information window. The data in this dialog box pertains to the camera currently connected to your computer, and not necessarily to the camera used to take the images you are viewing in the driver image window.
LOAD CAMERA FIRMWARE
Click this button to update the firmware in the attached camera. Firmware, the control programming for the camera, is stored in nonvolatile camera memory. Firmware controls most of the features of the camera.
Before clicking this button, be sure that the camera has a full charge; if it does not, you may see a message asking you to use the AC battery charger/adapter and to wait for several minutes. Follow these instructions and wait (to allow the battery to charge) before clicking this button again.
When you click the LOAD CAMERA FIRMWARE button, the driver looks for a "BIN" file (a file whose name ends in "BIN"), which must be installed as described in the chapter "Preparing the Camera and the Computer." The contents of the file are transferred from your computer hard disk into the nonvolatile memory in the camera. An error message is displayed if the required "BIN" file is not found.
This feature allows you to keep the firmware in the camera up-to-date without sending the camera to a service center. For example, if an upgrade to the firmware becomes available and you obtain that upgrade (refer to the appendix "Upgrading Your KODAK Software Driver"), you can copy that new firmware into the camera with this command. It also allows you to replace the firmware in the camera with the current version if the camera exhibits unexpected behavior (such as unusual characters on the camera back liquid crystal display).
IMPORTANT: If you obtain an updated copy of the BIN file, keep only the most current version installed on your computer hard disk. This ensures that the current BIN file is used should you update the camera firmware.
If you are working with a camera that does not currently have a PCMCIA card installed, updating camera firmware deletes the image in camera memory if one is present.
After you download firmware, the camera needs one picture to recalibrate the imager. For this reason the first picture you take after downloading firmware may not be optimal.
SET CLOCK
When you click the SET CLOCK button, the current date and time are automatically retrieved from your computer system clock and copied to the camera. The date and time (in 24-hour format) are maintained in the camera back by the battery.
Each image is date and time-stamped when made. These data appear in the driver image window image information area for the selected image.
NOTE: If the date or time are not displayed correctly at the top of the CAMERA CONTROL dialog box, and if clicking SET CLOCK does not correct the problem, make sure that your computer system clock is set accurately; then click the SET CLOCK button again.
ERASE
Click this button to erase the PCMCIA card in the camera. This is the same as selecting all images in the driver image window when CAMERA is the source and then clicking the DELETE button.
You may be able to recover images deleted with this button; refer to RECOVER below for details.
FORMAT
Click this button to format the PCMCIA card in the camera. This action is similar to formatting a floppy diskette or hard disk on your computer system. Existing images (and all other data) on the card are permanently removed and cannot be recovered.
If you have unexplainable problems with the PCMCIA card (perhaps you are losing images, or you see an "E" followed by a single digit, for example "E2," on the camera back LCD), acquire or save all images from the card if possible, then click this button to reformat the PCMCIA card — all images are lost — and try the card again.
RECOVER
Click this button to recover images deleted from a PCMCIA card in the camera. The images you recover may have been previously deleted with:
The DELETE button on the outside of the camera back.
The DELETE button in the software driver image window.
The ERASE button on the CAMERA CONTROL dialog box of the software driver.
You cannot use this option to recover images that were deleted when you formatted the card with the FORMAT button.
When you click the RECOVER button, every image location on the card is examined. The most recent image that was in each location is recovered.
The following examples explain the action of this button.
Example 1. Suppose that you have taken ten pictures and then deleted one. If you recover the PCMCIA card before you take any additional pictures, you will have all ten images — the original nine images will still be there, and you will have recovered the tenth image.
Example 2. Suppose that you have taken ten pictures, have deleted three, and taken another picture. In this case, the newest picture overwrites one of the deleted images. If you recover the PCMCIA card, you will have ten images — the nine original images, plus the latest picture you have taken. The exact location of the overwritten deleted image cannot be predetermined. The picture you deleted that was overwritten with a new image cannot be recovered.
Example 3. Suppose that you have filled the PCMCIA card with images, and erased all images by clicking ERASE or by selecting all images in the driver image window and then clicking the DELETE button. If you recover the disk with this button before you take any additional pictures you will have recovered all of the images you erased.
Example 4. Suppose that you begin with a blank PCMCIA card. Over time you have taken pictures, erased the disk, taken more pictures, deleted some, taken additional pictures, and so on — never having more than 20 images on the PCMCIA card. As you take new pictures while there are still active images on the PCMCIA card, the new images are written into an empty location on the PCMCIA card; deleted images that are overwritten become unrecoverable. Suppose you now delete all images by clicking the ERASE button and take three new pictures; the three new images will overwrite three images on the PCMCIA card. The exact location of the overwritten images cannot be predetermined. If you recover the PCMCIA card, you will recover 20 images. The three new images will be there plus 17 of the most recent 20 images.
SELF TEST
Click this button to perform a diagnostic self-test of the camera. Messages inform you of the outcome of the self-test. These data can be helpful for identifying problems before you call Kodak for service.
DONE
Click this button to close the CAMERA CONTROL dialog box.
G. Preferences Icon

You set the parameters used in the driver by clicking the Preferences icon, which displays the PREFERENCES panel.

text_image
Preferences Default Acquire Resolution: 300 Pixels/in 12-Bit Acquire Units Show Tool Tips Inches Centimeters Acquired Contact Sheet Layout Color Background Slide Mount Text Factory Settings Cancel OKDefault Acquire Resolution
Provides the resolution in pixels-per-inch or pixels-per-cm of an acquired image. The value you enter here is sent to Photoshop with an image when acquired and becomes the RESOLUTION of the image (in the IMAGE SIZE dialog box of the Photoshop IMAGE menu).
NOTE: If you choose the FIXED SIZE option in the CROP dialog box, a different resolution is established and overrides the setting here.
12-BIT ACQUIRE
When "on," (an "X" appears to the left of this choice when on) provides 12-bit color support into Photoshop.
The camera captures images in 12-bit color for each of the red, green, and blue planes. However, supported versions of Photoshop receive images in either 8-bit per color format (24-bits per image) or 16-bit per color format (48-bits per image).
When this option is off, the driver fits the 12-bits per color from the camera to the 8-bit per color Photoshop format with limited loss of luminance or color data. The full resolution of the file is preserved.
When this option is on, the driver expands the 12-bits per color from the camera to the 16-bits per color Photoshop format. When on, acquiring an image requires more time and RAM than when off. When on, you have the full 12-bit dynamic range formatted to 16-bit for precise adjustments. You must still change the data to 8-bits per color plane for printing, export, and so on.
SHOW TOOL TIPS
When "on," (an "X" appears to the left of this choice when on) a one- or two-word help tag appears near each item in the driver image window when the mouse rests over the item. These provide help in understanding the purpose of each item in the window. When off the tags do not appear.
UNITS: INCHES/CENTIMETERS
Select the desired units — used at several places throughout the software.
ACQUIRED CONTACT SHEET LAYOUT
Use these settings to control the appearance of the BACKGROUND, slide surround (SLIDE MOUNT), and TEXT caption colors of acquired contact sheets (not the contact sheet of the driver image window). Click a color patch to change that color. You can also turn off either the SLIDE MOUNT or TEXT caption by deselecting the corresponding checkbox; with both off, and with a black background, the effect is like contact sheets printed from film.
FACTORY SETTINGS
Restores all settings on this panel to their "factory" default values.
CANCEL
Exits from the dialog box, canceling changes you may have made to any of the settings.
OK
Exits from the dialog box, saving all changes you have made to any setting.
H. Rename Images Icon

When you click this icon, a RENAME dialog box appears that allows you to name or rename the set of selected images. The new names are only
retained for images that you have archived, for images that you are about to archive in this work session, or for images you are about to acquire in this work session. This excludes images on the PCMCIA card, for the new names are not written out to the PCMCIA card.
All values you enter on this dialog box are saved from session to session so that you are not required to re-enter common information each time this dialog box is opened.

text_image
Rename Name City Sequence Number Digits: 3 Starting From: 1 Example: City001.TIF Cancel RenameNAME
Type a name into the NAME area of this dialog box. The characters you type become the first portion of the image name for all of the selected images. Since the characters you type become part of the computer filenames of the images (if you archive them with the COPY TO command), you should only use characters in the NAME area that are allowable in filenames any computer system on which you may read these files.
SEQUENCE NUMBER: DIGITS and STARTING FROM
The values you place in the SEQUENCE NUMBER area determine characters that are appended to the end of the name you type in the NAME area of this
dialog box. You supply a one-character number in the Digits field, a value from 1 to 9. You also supply a one- or two-character number in the STARTING FROM field, a value from 0 to 99. If you have selected only one image before clicking the Rename Images icon, the Digits and STARTING FROM text boxes are disabled.
EXAMPLE
The EXAMPLE shows you how the first image will be renamed based on the data you have entered in the text boxes on this dialog box. Notice that the characters ".TIF" are appended automatically to the filename.
RENAME
When you click the RENAME button, the driver renames all selected images.
If an image on this contact sheet already has the name you are trying to assign to another image, a dialog box appears indicating that a file with this name already exists in the folder. On this dialog box, click:
▶ CANCEL to discontinue renaming this and subsequent images (previously renamed images retain their new names).
▶ SKIP to ignore the current image, but rename the subsequent images. (No sequence number is missed, the next image receives the sequence number that would have been used for this image.)
▶ CONTINUE if you have entered a "new" name. The new name is used for this one file, and subsequent files are renamed with the "old" name.
CANCEL
Click CANCEL to close this dialog box without making any changes to the names of selected images.
I. Rotate Clockwise/Counterclockwise Icons

When you click one of the rotation icons, selected images are rotated 90 degrees in the direction of the arrow on the icon. Each time you click a rotate button the selected images rotate an additional 90 degrees in the chosen direction.
The orientation of new images matches the orientation of the most recently rotated image.
J. Crop Icon

Introduction
You click the Crop icon to establish cropping parameters for selected images. This section presents an overview of the crop feature, and then the entire CROP dialog box is explained in detail in the next section.
When you crop images from archive files or from the PCMCIA card in the camera, the size of the images at their source is not reduced; the full image is always maintained. Instead of reducing file size, the results of your cropping activity is a cropping rectangle that is stored with the image, and that is displayed over the image in any view. For example, if you take a new image, then establish a cropping rectangle for it, and then archive the image, the entire image is saved as is the cropping data.
After you have established a cropping rectangle for an image (whether an image on a PCMCIA card in the camera, or an archive image, or a test shot image), when the image is acquired into Photoshop, the crop rectangle is applied to the image data. Only the image area within the crop rectangle you have established is acquired. This means that image acquisition is faster, and that the acquired image is smaller than a full-size image.
You can apply cropping rectangles to one image at a time or to multiple images simultaneously. If you select multiple images before clicking the Crop icon, the selection rectangle you create is applied to all of the selected images. To apply different cropping to different images, do not select multiple images before clicking the Crop icon; instead, select and crop each image independently.
Once you have cropped image(s) and left the crop dialog box, you can change the cropping by selecting the image(s), clicking the Crop icon, and making the desired changes. However, if multiple images were selected that do not all have the same crop rectangle, a message appears allowing you to: remove existing cropping data and revise cropping for all selected images; or cancel cropping, leaving the cropping data unchanged on the multiple images.
NOTE: You can not simultaneously crop multiple images from different camera types. The DCS 410, DCS 420, and EOS•DCS 5 are the same camera type; the NC2000e and EOS•DCS 3 are the same camera type; and the DCS 460, DCS 465, and EOS•DCS 1 are the same camera type.
A checkbox on the crop dialog box allows you to apply the current crop rectangle to future images you take. This can be helpful in a studio setting in which a newly established cropping rectangle can be applied to a series of subsequent images.
The Crop Dialog Box
You provide image cropping information with the CROP dialog box that appears when you click the Crop icon.

text_image
Stack indicates that multiple images will be cropped. Crop DCS00045.TIF Method ● Freeform ○ Fixed Size Size... Left: 206 Top: 262 Width: 1012 Height: 584 □ Fix Aspect Ratio Final Output Width: 3.37 in Height: 1.95 in Resolution: 300 ppi File Size: 2309 KB Remove Cancel OKIf no cropping has been applied previously to this image, drag a rectangle around the area of the image you want cropped. If previous cropping has been defined, that cropping rectangle is shown superimposed on top of the image displayed in this dialog box. Move and reshape the crop rectangle as described next.
METHOD: FREEFORM AND FIXED SIZE
Two cropping methods are supported. FREEFORM is the correct choice for most cropping activity, while FIXED SIZE is appropriate when you know beforehand the exact output dimensions desired for the image. Make one of these choices:
- Click FREEFORM to reshape the crop rectangle by dragging any edge of the selection rectangle in any direction as desired.
▶ Click FIXED SIZE, and establish a fixed size for the crop rectangle in the dialog box that appears. This rectangle can also be reshaped, although a fixed aspect ratio will be applied to the resultant rectangle. The driver will adjust the resolution to accommodate the new rectangle.
In either case, when the cursor is moved inside the cropping rectangle it changes to a hand cursor to allow you to repositioning the entire rectangle.
When you switch between these two, previous cropping data are lost, and a new crop rectangle is established.
SIZE
The SIZE button is enabled only when the METHOD is FIXED SIZE. Enter the final output size desired for the selected images, in units—either inches or centimeters — as established in the preferences.

text_image
Final Output Size Enter the final output dimensions for the selected image(s). Output resolution will be adjusted to compensate. Width: 4.25 Inches Height: 3.50 Inches Cancel OKAfter you enter values, when you click OK, a crop rectangle is centered on the image with pixel dimensions equivalent to the product of the default resolution (a preference setting) and the final output dimensions you entered in the FINAL OUTPUT SIZE dialog box. If this calculation yields a result that is larger than the pixel dimensions of the image, the driver reduces the resolution. To change the size of the final output while FIXED SIZE is on, click the SIZE button again and change the WIDTH and/or HEIGHT values.
As the crop rectangle is re-sized, the output resolution will be recalculated to maintain the final output size, where the resolution equals the number of pixels divided by the dimensions (in inches or centimeters).
LEFT, TOP, WIDTH, and HEIGHT
Type values into these text boxes to establish absolute numeric values in pixels for the top left corner (the origin point) of the selection rectangle, and — when the METHOD is FREEFORM — for the width and height of the rectangle.
The WIDTH and HEIGHT text boxes can be used with either FREEFORM or FIXED SIZE. They indicate pixels that will be in the acquired image. (They do not control output size; use the WIDTH and HEIGHT text boxes on the FINAL OUTPUT SIZE dialog box described above to control output size.)
FIX ASPECT RATIO
If you turn "on" this checkbox (an X appears in the check box to the left of this option when on), the driver holds the width and height in proportion while you adjust the dimensions of the cropping rectangle. When on, if you drag an edge of the cropping rectangle, the driver applies the update to both dimensions of the crop box, keeping the aspect ratio in proportion. A graphic of a small link appears to the right of the WIDTH and HEIGHT fields when the option is on.
NOTE: When FIXED SIZE is selected, FIXED ASPECT RATIO is always on.
FINAL OUTPUT
The data displayed by the values in the final output area provide the width, height, resolution, and file size of the cropped area of the images.
REMOVE
Removes the cropping rectangles from all selected images.
CANCEL
Exits the dialog box, canceling changes you may have made to all options.
OK
Exits the dialog box, accepting all changes made to all options.
IMPORTANT: If multiple images were selected before cropping, clicking OK applies the selected crop parameters to all selected images.
CROP NEW IMAGES AFTER SHUTTER RELEASE
If you turn "on" this checkbox (an X appears in the check box to the left of this option when on), the most recent cropping rectangle that you have created is superimposed on all new images you take; when "off," no cropping rectangle is applied to new images.
Navigation Buttons
If you select multiple images before you click the Crop icon, any changes to the crop rectangle applies to all of the selected images. For this reason, the CROP dialog box provides navigation buttons (identical in function to those in the driver image window), which appear beneath the image. You click these navigation buttons (first, previous, next, and last) to scroll through the selected images; the current cropping rectangle appears on each image as you scroll through them. This allows you to determine if the cropping rectangle you have created provides the desired cropping
action for all of the selected images. You can also type a specific image number in the navigation edit 'go to' box in the middle of the navigation bar to display that image. When you click OK the current cropping rectangle is applied to all images in the selection set.
K. Lighting Menu

text_image
Daylight ● Daylight Tungsten Fluorescent FlashThese options apply only to color images, and not to images taken with monochrome camera models. The lighting menu provides a simple, direct method of quickly applying one of several lighting choices to your image. Then later, once the image has been acquired, you can refine it if needed in Photoshop.
NOTES: In addition to the choices on this menu, the driver provides a click-balance lighting tool described in the next section. Lighting can be set with either lighting option. However, lighting choices are mutually exclusive; you cannot apply one type of lighting and then refine it with another. Instead, each time you apply any color balancing, your previous choice is lost, and only the current lighting setting is applied.
Click-balance is always the preferred method of applying color balancing to images. If you have applied click-balance to an image, you must turn it off (as described in the next section), before you can apply a choice from this lighting menu.
After selecting images, you should select an option from the lighting menu to correspond to the original lighting conditions under which you made the images. Choices are DAYLIGHT, TUNGSTEN, FLUORESCENT, and FLASH. The option you select is stored with the images on the PCMCIA card in the
camera or with the selected image archive files. Changes you make in these settings are visible on the images displayed on your computer monitor.
The choice you make is used for color correction by the driver when the image is acquired. The menu provides the following choices.
DAYLIGHT Uses daylight color-correction values when acquiring the image.
TUNGSTEN Uses tungsten color-correction values when acquiring the image.
NOTE: The Tiffen Hot Mirror filter is always recommended when shooting under tungsten lighting. A filter for one size lens is supplied; filters for other size lenses are available. Without the filter, color results may not be very accurate with a tungsten light source; however, acceptable color rendition can be obtained with this filter under tungsten lighting.
FLUORESCENT Uses fluorescent color-correction values when acquiring the image.
Flash Uses flash color-correction values when acquiring the image.
L. Click-Balance Tool
Unlike the lighting menu which provides distinct choices to match lighting conditions under which the image was made, the click-balance tool provides a more refined method of color balancing, and is always the preferred method of applying color balancing to images
The 'checkbox' appears on the left of the tool, and the 'eyedropper' is on the right.

NOTE: In addition to this tool, the driver provides a lighting menu described in the last section. Lighting can be set with either lighting option. However, lighting choices are mutually exclusive; you cannot apply one type of lighting and then refine it with another. Instead, each time you apply any color balancing, your previous choice is lost, and only the current lighting setting is applied. Click-balance is always the preferred method of applying color balancing to images.
You use this tool to set color balancing for a single image (selected or unselected) or for a set of selected images. This icon provides an additional type of color balancing to those provided on the lighting menu described in the last section. This feature is always the preferred option for color balancing an image.
To activate this feature, first click its checkbox "on" (an X appears in the check box to the left of this option when on). Then, when you move the cursor over an image in any view (CONTACT SHEET, PREVIEW, or TEST SHOT), the cursor changes to an eyedropper cursor.

You then click the eyedropper on an area of the image that is white or light gray (an area that is not overexposed), or click a point that should be white or light gray. White balance values for the entire image are calculated based on averaging a 16 x 16 pixel square around the point at which you have clicked.
After that single click, the eyedropper cursor is no longer available, although the click-balance tool remains on. If the adjustment was not satisfactory, click the cursor on the eyedropper portion of the click-balance tool; this changes the cursor to the eyedropper cursor again. Then click another point in the image. Repeat the process as needed
When using the click-balance tool, we suggest that you view the image you want to balance in PREVIEW view, since it displays a larger image and therefore allows you to find a click point more easily. With the image you want displayed in PREVIEW view, move the cursor to a white or light gray
area where each of the red (R), green (G), and blue (B) color values displayed below the image are as high as possible, but lower than 255. After you click, you view the result of the change immediately on the image.
To apply the same click-balance settings to multiple images at the same time, select the images from the contact sheet, and then view them in PREVIEW, where they appear as a stack of images. Now when you click-balance the top image, the color balancing resulting from your actions is applied to all of the selected images in the stack and is stored with all of the images. Use the navigation tool to move through the stack of previewed images to ensure that the color balancing is appropriate for all images.
You can change the click-balance point by repeating the procedures described above and clicking a different point; or you can remove the click-balance setting for one or more images by selecting them and clicking the click-balance checkbox "off."
NOTES: When you click, you may see a message indicating that ONE OF THE COLORS IS SATURATED, AND ASKING YOU TO CLICK ANOTHER POINT FOR BALANCING. As prompted, click another point.
If there is no white or light gray area in the image, take a photograph of a neutral gray or white card (for example KODAK Gray Cards, Publication No. R-27) under the same lighting conditions that existed when the image was taken. Then select the image of the card as well as all other images taken under the same lighting conditions. Follow the procedures described above to set a click-balance point, however, to set the correct value, click the special cursor on the image of the card, rather than one of the other images.
The checkbox for this tool may contain a minus sign “-” instead of being blank or containing an "X." The minus sign appears when you have selected multiple images and they do not all have the same lighting settings.
M. Sound Menu

text_image
All Sound 1 Sound 2 • • •You use this Sound menu to play sounds associated with a single selected image. When you click the sound menu icon, one of several things occur:
▶ If a single sound file was recorded with the image, it is played through your computer speakers.
If multiple sound files were recorded at this point, a menu appears with the choice ALL and with each sound listed (named SOUND 1, SOUND 2, and so on). Select ALL to play all of the sounds in sequence, or select an individual item from the menu to play its sound.
The driver image window presents a visual indication that you recorded a sound file with the camera. A single small sound icon appears above the upper right corner of the image you took before recording sound.
When the image is copied to a folder, the sound files associated with the image are also copied, with each separate recording becoming a separate file on your computer hard disk.
On a PC, sound files are recorded as ".WAV" files.
N. ACQUIRE Button
Acquire
You click the ACQUIRE button to acquire selected images or a contact sheet into Photoshop; the setting of the ACQUIRE As menu determines what is acquired:
If the ACQUIRE As menu is set to PHOTO (or the view is TEST SHOT), then each selected image opens into a separate Photoshop window. Your annotation (if present) and the image information are acquired and placed in the caption area of the Photoshop file information field.
If the ACQUIRE As menu is set to CONTACT SHEET, then one or more Photoshop documents is generated; the documents display a thumbnail of each of the images selected in the driver image window. Refer to "ACQUIRE As Menu" in this chapter for complete details.
Acquiring images or contact sheets does not affect images at their source. You can also double-click the image(s) or preview as an alternate to the two-step process of selecting an image and then clicking the ACQUIRE button.
IMPORTANT: If you have not made any changes to the acquired image while in Photoshop, and you click the close box of the acquired image window or choose CLOSE from the Photoshop FILE menu or quit Photoshop, the window will close without asking you if you want to save it. Therefore, be sure you save any acquired images you do not want to lose before closing their windows or quitting Photoshop.
O. Copy To Button
Copy To...
You click this button to copy highlighted images, and associated sound files if any, to your computer hard disk. The SOURCE can be either CAMERA or FOLDER.
When this button is clicked, a save dialog box appears. Each image file and each sound file from the source becomes a separate file on your computer hard disk. The filenames are generated by the driver unless you have renamed the files (click the Rename icon) in which case your names are used.
The DELETE ORIGINALs option on the dialog box, if checked, deletes the image files and associated sound files at their source after they are copied to your computer hard disk. A confirmation box appears before the images are deleted. (Deleted images include all selected images, even those selected images that may have temporarily scrolled out of view in the image area of the driver image window.)
Archive Image File Format
Images in these archive files created with the COPY To button are composed of uninterpolated data; they have not been "acquired" into Photoshop. This means they contain the raw, native data generated from the imager in the camera back. As a result, images you save to your computer hard disk by clicking COPY TO should be read only with the driver provided by Kodak. (See the IMPORTANT paragraph below).
In addition to complete image data, an image archive file includes: a thumbnail, all text you have typed in the annotation area, camera settings
from the image information window, image naming data, image color balance data, image cropping data, and image rotation data.
The Specifications appendix lists file sizes for these image files for your camera.
IMPORTANT: Do not open image archive files (files that you create by copying images to your computer hard disk with the COPY To button) with Photoshop or other image software and then resave the data with the same filename. The image archive files you create with the COPY To button contain several sections — one section with a TIFF version of the thumbnail, and then another section with the image data. When you open the file with Photoshop, only the TIFF thumbnail is opened, and if saved, only the thumbnail is saved — not the image data. For this reason, you should only open these files from within the driver image window using the CHOOSE FOLDER choice of the SOURCE menu as described in this chapter; this ensures that you obtain the image data.
P. DELETE Button
Delete
You click the DELETE button to delete selected images from their source — either the camera or an image archive file. A dialog box warns you that images will be deleted. Selected images include images you have clicked that may have temporarily scrolled out of view in the image area of the driver image window.
NOTES: The DELETE button on the camera back does not function when the camera is connected to a computer; use this DELETE button on the software driver image window to delete images in this configuration.
You may be able to recover images you delete with this button; refer to the "Recover" button section of this chapter.
Q. DONE Button
Done
You click DONE to close the driver image window and return to Photoshop. All changes — color balancing, annotation, cropping, rotation, renaming of any image — you have made to images are saved with the image when you click this button. (New names resulting from renaming files are only saved to archive files, not to files on PCMCIA cards.)
R-S. Annotation Area and Image Information Window

text_image
Annotation: Type your data here. Camera: DCS Serial #: 2515 Width: 1524 Height: 1012 Date: 11/12/99 Time: 1:02:10 PM Counter: [42] ISO: 200 Aperture: F4 Shutter: 2000When you select a single thumbnail while in contact sheet view, or when you view a preview image or a test shot image, the annotation area and image information window display information about the image.
You can type short descriptive material in the annotation area; then use the mouse or arrow keys to move through text once entered. The text is saved with the image on the PCMCIA card or in an archive file, but not with a test shot image unless you save the image.
The image information window includes, from top to bottom: the camera model that took the image, the camera serial number, the image width and height (in pixels), the date and time (displayed in 24-hour format) the image was made, and the image counter (the exposure number displayed by the camera when the image was made).
The remaining information in the area depends on which camera was used to take the selected picture. This information can include: ISO, aperture, shutter speed, lens, and other settings such as the approximate camera-to subject distance in meters (if supported by the camera and lens).
The shutter speed and camera aperture are shown as they appear in the camera LCD panel and viewfinder. The date and time are maintained by the battery in the camera system. You update the date and time with the SET CLOCK choice of the CAMERA CONTROL dialog box as described in this chapter.
The text from the annotation area and the image information window are obtained when you acquire the image into Photoshop. These data are placed into the caption area of the file information for the image.
The number of character »in the annotation window plus the number of characters in the image information window must total 255 or less. Some cameras display more lines in the image information window than others; for this reason, with some cameras you may not be able to fill the annotation window with your text. However, you can delete some lines from the image information window by clicking on the line (to select the entire line), and pressing the keyboard delete key. This works to delete all lines except: Camera; Serial #; Width; Height; Date; and Time.
T. Navigation Bar

flowchart
graph TD
    A["First"] --> B["Previous"]
    B --> C["Go To"]
    C --> D["Next"]
    D --> E["Last"]
    B --> F["24"]
The items in this area allow you to navigate through images. From left to right the controls navigate you to images as follows: "first" image; "previous" image; type a number then click outside the box (or press the Enter Key) to move to that specific image; "next" image; "last" image. These controls work differently in CONTACT SHEET view and in PREVIEW/CROP.
CONTACT SHEET VIEW
Suppose that you are working in CONTACT SHEET view with images consecutively numbered from 1-30, and that you have selected only image number 5. In this situation clicking: "first" takes you to image 1; clicking "previous" takes you to image 4; clicking "next" takes you to image 6, and clicking "last" takes you to image 30.
Suppose that you are again working with images consecutively numbered from 1-30, and that you have selected five images: 5, 10, 15, 20, and 25. Now if you click one of the four navigation icons, all of the five selected images are deselected and a single image is selected as follows. If you click the "first" icon, image 1 is selected. If you click the "previous" icon, image 4 is selected. If you click the "next" icon, image 26 is selected. If you click the "last" icon, image 30 is selected.
PREVIEW View or CROP Dialog
In PREVIEW view when color balancing images, or in the CROP dialog, use the navigation controls to move through only the subset of selected
images. For example if you are working with images consecutively numbered from 1-30, and you have selected images 5, 10, 15, 20, and 25. Suppose that you are in preview or crop, and looking at image number 15. Now if you click the "first" icon, image 5 is selected. If you click the "previous" icon, image 10 is selected. If you click the "next" icon, image 20 is selected. If you click the "last" icon, image 25 is selected.
These icons are very important for moving through the selected subset of images to ensure that the color balancing or cropping that you that you are applying produces the desired effect with all of the subset of images.
U. Select All Icon
When you are working with images, clicking this icon selects all images at their source (either the PCMCIA card in the camera or the archive folder, depending on the current source); or when you are working in the annotation window, selects all text. Performs the same function as choosing ALL in the Photoshop SELECT menu.

V. Number of Images Selected
3 of 19 selected
This area shows the number of images currently selected out of the total number of images at the source.
W. The X-Y Cursor Location
X:51 Y:38
These values indicate the current X and Y pixel location (in the full image) of the cursor as it moves over the image.
X. RGB Values at the Cursor Location
These indicate the red (R), green (G), and blue (B) values of the pixel at the current cursor location
Y. Thumbnail/Preview Size Menu

This menu provides three sizes from which you can choose the desired viewing size for thumbnails or previews. These settings only affect the image size displayed on your monitor; they do not affect the size of the image at its source or the size of the image acquired.
The exact size of the thumbnails in pixels depends on the camera and the printer resolution specified in the contact sheet preferences panel.
You can choose a small size when navigating through images, and then a large size to view the detail of an image or to perform color balancing. Small sizes load faster than larger sizes.
Using Photoshop "Actions" (Macintosh Only)
The driver supports the Actions feature of Photoshop version 4.0 and later. There are a number of considerations to keep in mind while working with actions.
▶ You cannot initiate or terminate a script in the driver. Instead, you must start recording before you enter the driver, and you must stop recording after you leave the driver, when back in Photoshop.
▶ While in the driver, actions can be recorded while in CONTACT SHEET or PREVIEW, but not while in TEST SHOT view.
- When appropriate, the action applies to the selected image or images (by their image number, not name).
The driver image window is not displayed during action playback.
As with all actions, you can view the commands recorded by the driver; this can help you understand how the driver produces actions. The same action can record differently depending on the state of the driver when you begin recording; however, the actions should perform the same.
As with any scripting, you may need to experiment to ensure that you are obtaining the desired results with driver actions.
Several examples of the use of actions with the driver image window follow.
Example-1: You want a script to acquire all images from a PCMCIA card in the connected camera.
- Start recording a new action script.
-
Select the driver; you enter the driver image window.
-
Click the Select All icon.
- Select PHOTO from the ACQUIRE As menu.
- Click the ACQUIRE button.
- Click the DONE button; you leave the driver image window.
- Stop recording the script; you see these commands.

text_image
Example-1 Import Using: Kodak DCS Plugin Multi-import: DCS command list set source command Source: camera acquire command Target: all As: photoExample-2: You want to acquire a contact sheet for all images in a specific folder; perhaps your regular image archive folder.
- Start recording the new action script.
- Select the driver; you enter the driver image window.
- Navigate to the desired folder.
- Click the Select All icon.
- Select CONTACT SHEET from the ACQUIRE As menu.
- Click the ACQUIRE button.
- Make choices on the ACQUIRED CONTACT SHEET dialog box; click OK.
-
Click DONE to close the driver image window.
-
Stop recording the script; you see these commands.

text_image
Example-2 Import Using: Kodak DCS Plugin Multi-import: DCS command list set source command Source: camera set source command Source: folder Folder: Hard Drive: KODAK folders: Images: Images Bruce 1: set contact sheet settings Thumbnail Size: medium acquire command Target: all As: contact sheet Named: "Folder: Images Bruce 1"Supported Commands
The driver image window supports Photoshop action recording of the following driver commands.
▶ Select a SOURCE of CAMERA or FOLDER. If you have several different cameras at your site, a source of CAMERA selects whichever camera is currently connected to the computer. The FOLDER choice records the path to the folder you select while recording the action.
▶ Rotate images clockwise or counterclockwise.
- Click the Take Picture icon; however, a shutter release is not recorded.
▶ Select a lighting setting of DAYLIGHT, TUNGSTEN, FLUORESCENT, or FLASH.
▶ Establish a crop rectangle. This records the crop rectangle in pixels. When Fixed Size is chosen, that fact is recorded as well as the crop rectangle, the height and width, and the resolution.
▶ Enter annotation text. This records the text and the image for which it is recorded.
▶ Acquire as a PHOTO or a CONTACT SHEET.
▶ ACQUIRE button.
▶ ACQUIRE CONTACT SHEET records the settings from this dialog box.
▶ Save preferences settings.
▶ Rename images. Records the name, number of digits, and starting digit for selected images.
▶ DELETE images.
- Archive images with COPY To. Saves selected images to the designated folder; also records the DELETE ORIGINAL setting.
- Detect a click on the first or last image as targeting the "first" or "last" image; a click on another image is targeted on that actual image number.
▶ Use click-balance tool. This records the X-Y location on the image you clicked, as well as the actual image numbers of other selected images as defined at their source. Targeting is used to identify images as described in the previous paragraph.
Driver Commands Not Supported
The following driver commands are not recorded.
▶ ERASE the PCMCIA card in the camera.
▶ FORMAT the PCMCIA card in the camera.
▶ LOAD CAMERA FIRMWARE.
▶ RECOVER the PCMCIA card in the camera.
▶ SELF TEST of the camera.
▶ SET CLOCK.
▶ TEST SHOT view.
▶ Play all sound files or sound files by number.
▶ A shutter release is not recorded, although clicking TAKE PICTURE is recorded.
Troubleshooting — KODAK Driver Software
| Trouble | Possible Cause | Suggested Solution |
| The driver choice does not appear on the Acquire submenu. | The driver has not been installed, or has not been installed properly. | Quit Photoshop, install the driver as described in Chapter 4, run Photoshop and try again. |
| The time and/or date for an image(s) is incorrect. | The computer system clock from which the clock in the camera was set, contained an incorrect time and/or date. | Reset the computer system clock. Connect the camera to your computer, run the driver, and reset the clock in the camera using the Set Clock choice on the Camera Control panel. |
| The battery has been dead for an extended period (perhaps a month or more) without recharging. | Recharge the camera battery with the AC battery charger/adapter, and then reset the clock in the camera using the Set Clock choice on the Camera Control panel. | |
| You are experiencing erratic camera behavior or unusual characters appear on the camera back liquid crystal display (LCD). You know the battery is charged. | The firmware in the camera has become corrupted. | Update camera firmware as described earlier in this chapter. |
| All acquired images have a consistent defect. | There is dirt or dust on the imager. | Clean the imager as described in “Cleaning the Imager” in Chapter 7. |
| All acquired images have a magenta spot in the center of the image. | Some lenses may have a hot spot, especially noticeable when you stop down. | Use a different lens or stop down less (use a larger aperture). |
| An undesirable color shift has occurred in saturated colors. | The image has been overexposed. | Under expose for proper color saturation. |
| Acquired images have random defects, or there is other noise in the image. | The ISO setting is too high. | Take the picture again with a lower ISO. |
| You are using a SCSI cable longer than those supplied with the camera. | Use only the supplied or specified cables. | |
| The exposure time is too long. | Avoid long exposures. Exposures of more than 4–5 seconds (and occasionally more than 1/2 second) can produce noise in the image. | |
| Images are consistently too light or too dark. | The gamma for your monitor is not calibrated properly. | Calibrate the gamma for your monitor as explained in the Adobe Photoshop manual. |
| The computer crashes when the camera is attached. | There is a SCSI ID conflict. | Reset the SCSI ID on the camera as described in Chapter 4. |
| The computer crashes as the camera is disconnected. | You have disconnected the camera from the computer while the computer is on. | The correct procedure is to shut down the computer before disconnecting the camera from the computer. |
| The battery has become exhausted while the camera is connected to the computer; the AC battery charger/adapter is not being used. | When the camera is connected to a computer that is on, and the software driver window is opened, the camera will not go to sleep. This can exhaust the battery if it continues for an extremely long period of time (perhaps a month or more) without recharging. | Recharge the battery in the camera back.We recommend that you operate the camera from the AC battery charger/adapter when connected to a computer. |
| You click the Take Picture button, but no picture is recorded. | The PCMCIA card in camera is full (the disk indicator is flashing). | Delete images from the PCMCIA card, or use a different card if available. |
| The camera is off. | Turn on the camera. | |
| The camera is not awake. | Wake the camera and try again. | |
| You click the camera shutter button but no picture is recorded | The camera is off. | Turn on the camera. |
Messages — KODAK Driver Software
The software driver designed by Kodak adds new messages to Photoshop. An explanation of those messages — listed in alphabetical order — follows.
NOTES: For an explanation of other Adobe Photoshop messages, refer to the instructions for that product.
| Message | Possible Cause | Suggested Solution |
| “A camera hardware error has been found. Verify that SCSI cables are connected properly, and that the camera has a unique SCSI ID, and then try again.” | A problem with the camera hardware has been detected. | Verify that all SCSI connections are correct (if necessary turn off all equipment to alter the connections), make sure the camera has a unique SCSI ID, and try again. |
| “A hardware error has been found in the SCSI cabling or connectors. Verify that SCSI cables are connected properly.” | A hardware error has been detected in the cabling or SCSI connectors. | Verify that all SCSI connections are correct (if necessary turn off all equipment to alter the connections). Try other cables if available. Be certain that terminators (if used with your computer setup) are still properly connected. Make sure terminator power is enabled on your SCSI card. If the problem persists, contact Kodak. |
| “A hardware error has occurred on an input-output device (not the camera).” | A hardware error was detected while trying to open or save an image to a storage device. | Service the peripheral to determine the cause of the problem. |
| "A parity hardware error has been found in the cabling or in the camera during image transfer. Verify that SCSI cables are connected properly." | A hardware error has been detected in the cabling or in the camera. | Verify that all SCSI connections are correct (if necessary turn off all equipment to alter the connections). Try other cables if available. If the problem persists, contact Kodak. |
| "A problem occurred when the driver tried to communicate with the camera (the SCSI manager is busy and cannot handle the current request at this time). Please try again." | A problem occurred when the software driver tried to communicate with the camera. | Try again; if the problem persists, contact Kodak. |
| "A problem occurred with the TWAIN driver, and the matrix file 'filename' is not compatible with the current TWAIN driver. Reinstall the driver and try again." | A problem occurred with the software driver, perhaps during installation. | Reinstall the TWAIN driver as described in Chapter 4, and try again.If the problem persists, obtain a new driver (refer to the appendix "Updating Your KODAK Software Driver"), install it, and try again. |
| "A problem with the hardware has been detected. (Timeout during command phase.) Verify that SCSI cables are connected properly, and that the camera has a unique SCSI ID, and then try again." | A problem with the camera hardware has been detected. | Verify that all SCSI connections are correct (if necessary turn off all equipment to alter the connections), make sure the camera has a unique SCSI ID, and try again. |
| "A problem with the hardware has been detected. (Timeout during data phase.) Verify that SCSI cables are connected properly, and that the camera has a unique SCSI ID, and then try again." | A problem with the camera hardware has been detected. | Verify that all SCSI connections are correct (if necessary turn off all equipment to alter the connections), make sure the camera has a unique SCSI ID, and try again. |
| "A problem with the hardware has been detected. (Timeout during message phase.) Verify that SCSI cables are connected properly, and that the camera has a unique SCSI ID, and then try again." | A problem with the camera hardware has been detected. | Verify that all SCSI connections are correct (if necessary turn off all equipment to alter the connections), make sure the camera has a unique SCSI ID, and try again. |
| "A problem with the hardware has been detected. (Timeout during selection phase.) Verify that SCSI cables are connected properly, and that the camera has a unique SCSI ID, and then try again." | A problem with the camera hardware has been detected. | Verify that all SCSI connections are correct (if necessary turn off all equipment to alter the connections), make sure the camera has a unique SCSI ID, and try again. |
| "A problem with the hardware has been detected. (Timeout during status phase.) Verify that SCSI cables are connected properly, and that the camera has a unique SCSI ID, and then try again." | A problem with the camera hardware has been detected. | Verify that all SCSI connections are correct (if necessary turn off all equipment to alter the connections), make sure the camera has a unique SCSI ID, and try again. |
| “A problem with the hardware has been detected. (Timeout waiting for initial bus free phase.) Verify that SCSI cables are connected properly, and that the camera has a unique SCSI ID, and then try again.” | A problem with the camera hardware has been detected. | Verify that all SCSI connections are correct (if necessary turn off all equipment to alter the connections), make sure the camera has a unique SCSI ID, and try again. |
| “A SCSI error occurred.” | There may be one of a variety of problems, including loose or incorrect cables, improper SCSI configuration, and so on. | Shut down the computer, turn off the camera, and disconnect the camera from the computer and the AC battery charger/adapter. Check all SCSI connections and cables. Reconnect your equipment, restart, and try again. |
| “An item named itemname already exists in this location. Do you want to replace it with the one you’re copying?” | While working with an archive folder, you have selected an image, and clicked “Copy To;” however, an image with this filename already exists in the folder. | Click OK to replace the archive file with the selected file; or click Cancel and no replacement occurs. If you click OK, sound files are replaced without notifying you. |
| “ASPI software for Windows has not been initialized. Install or reinstall the WINDOWS ASPI software.” | A problem has occurred with your software ASPI manager for Windows. | Install, or reinstall, the ASPI manager for Windows. This software, which is not available from Kodak, should be provided with your ASPI Windows host adapter card. |
| "Camera battery is low. To continue working, use the AC adapter." | The battery needs charging. | If you are operating without the AC adapter but are in an environment where power is available, attach the adapter, wait for a short time and try again.If neither a power source nor an adapter is available, you will not be able to complete this operation.We encourage you to charge the battery for two hours before any field operations.NOTES: If the battery in the camera is not sufficient for your needs, consider obtaining a Quantum Battery 5 (QB5). Kodak produces an accessory cable that allows you to attach the camera system to the QB5. (Neither the QB5 nor the cable accessory is supplied with the camera system.) |
| "Camera firmware was loaded successfully." | You clicked Load Camera Firmware; the operation was successful. | Click OK; no other action is required. |
| "Camera 'Self Test' completed successfully." | The self test you initiated completed successfully. | Click OK; no other action is required. |
| "Camera 'Self Test' failed. Click the 'Load Camera Firmware' button and then try the 'Self Test' button again." | An unspecified hardware problem occurred. | Try again. If the problem continues, load camera firmware, and try again.If you continue to have problems, contact Kodak. |
| "Can not acquire image 'imageid' because 'reason.'" | This is a general purpose message that occurs when trying to acquire images.For example you might see this message when a calibration (CAL) file is not found for the image. | Respond appropriately. For example, if the calibration (CAL) file is missing, you must obtain the file (it was supplied by Kodak with the camera used for the picture) and place it in the folder with the image file. |
| "Can not acquire this contact sheet. The Printable Area (Width and Height) on the Acquire Contact Sheet dialog box is too small to hold even one thumbnail of the Thumbnail Size specified on the dialog box." | As indicated, the driver can not acquire this contact sheet because the dimensions specified for the contact sheet are too small. | Either increase the Width and/or Height as needed of the Printable Area and/or reduce the Thumbnail Size; then try again. |
| "Can not complete the Copy To operation because the disk is full." | You are trying to save a file that is larger than the available space on the selected disk. | Select another disk if available, or delete files from this disk and try again. |
| "Can not crop image 'imageid' because 'reason.'" | This is a general purpose message that occurs when trying to crop images. | Respond appropriately as suggested by the specified reason. |
| "Can not load camera firmware because the file 'filename' can not be found. Make sure the file is at the same location as the driver file (reinstall the driver if necessary)." | A file, perhaps the ".BIN" file, was not found in the same folder as the driver file. | Place a copy of the ".BIN" file in the same folder as the driver file. The BIN file is supplied by Kodak on the diskette with the product.Or reinstall the driver. |
| "Can not load image thumbnail." | An unusual condition is detected when trying to access an image at its source. | Try again; if the problem persists, you may not be able to access this image. |
| "Can not locate the SCSI host adapter. Have a technician install a supported adapter, or troubleshoot an installed adapter." | The driver does not find the SCSI host adapter. | You must have a supported SCSI host adapter installed to access files from the camera. (Refer to the read me for supported SCSI host adapters.)If necessary have a technician install a board, or perform troubleshooting on an already installed board. |
| "Can not open image 'imageid.'" | An unusual condition is detected when trying to access an image at its source.For example, suppose that you are working with the images from an archive folder. This message can occur if you have the driver window opened, and then you leave the driver, remove or delete one of the images from the current folder, return to the driver, and then try to work with the removed or deleted image. | Try again; if the problem persists, you may not be able to access this image. |
"Can not play sound file."
The sound file may be corrupt.
If possible, record the sound again and repeat the operation.
Otherwise, you may not be able to play the sound.
| Message | Possible Cause | Suggested Solution |
| "Can not recognize the PCMCIA card in the camera. | This message occurs when the driver opens and is unable to read the PCMCIA card in the camera. A variety of reasons can cause this occurrence as described below. | Remove and reinsert the PCMCIA card, then try again. |
| Remove the card, reinsert it firmly, and try again. | ||
| Confirm that the battery is charged. | ||
| Switch to an archive folder. | The card is not inserted properly in the camera. | |
| The card may not be formatted. To format it, click the Camera Control icon, then click the Format button." |
| The battery needs charging. | Attach the AC adapter and charge the battery. |
| The PCMCIA card in the camera is not DOS formatted. | Click the Camera Control icon, then click the Format button to format the PCMCIA card. This action permanently erases any files on the card.Or, if a second PCMCIA card that is known to be DOS formatted is available, replace the current PCMCIA card with the second card.Work with an archive folder instead of this problem PCMCIA card. |
| Message | Possible Cause | Suggested Solution |
| "Can not recognize the PCMCIA card in the camera. | The card is not inserted properly in the camera. | Remove and reinsert the PCMCIA card, then try again. |
| Remove the card, reinsert it firmly, and try again. | ||
| Confirm that the battery is charged. | ||
| The card may not be formatted. To format it, click the Camera Control icon, then click the Format button." | ||
| The battery needs charging. | Attach the AC adapter and charge the battery. | |
| The PCMCIA card in the camera is not DOS formatted, or has become corrupted after the driver has successfully accessed it. | Click the Camera Control icon, then click the Format button to format the PCMCIA card. This action permanently erases any files on the card.Or, if a second PCMCIA card that is known to be DOS formatted is available, replace the current PCMCIA card with the second card. | |
| "Can not save the Preferences file. The system disk may be full, or may be locked, or you do not have 'write privileges' to the disk." | The system disk is full, or is locked, or is write protected, or there is a problem with the system disk. | Create room on the system disk, or unlock the disk, or remove write protection from the system disk, or have the system disk repaired. |
| "Can not save these images because the destination folder or disk is locked, or you do not have 'write privileges' to the folder." | A problem occurred while writing the file. For example, the disk is locked, or write protected, or there is another problem with the hard disk. | Unlock the disk, change write protection, or write the file to another disk if available. |
| "Can not 'Take Picture.' EOS-1 N is in ONE SHOT focus mode and can not focus." | This is normal operation of the camera. | Choose another focus mode or try to focus on another part of the subject that allows the camera to focus. |
| "Can not 'Take Picture.'► The camera back may be busy.► The camera can not be electrically tripped." | This message only applies to the DCS 465. | If you are working with an electrically tripped camera, wait for the camera to complete the current operation and then try again.Or if the camera can not be electrically tripped, you can not use the Take Picture button with this camera. Instead you must trip the camera manually. |
| "Can not 'Take Picture.'► The N90s may be in S focus mode and can not focus.► The N90s may be in P exposure mode and its lens is not stopped down or could not focus." | This is normal operation of the camera. | If you are in S focus mode, choose another focus mode or shoot from another position that allows the camera to focus.If you are in one of the programmed exposure modes, be certain that you set the lens to its smallest aperture and that the camera can focus. |
| "Color balance can not be applied to monochrome images." | An monochrome image is selected for color balancing; color balancing can not be applied to monochrome images. | When click balancing, work only with color images. |
| “Command failure: unable to free resource from global memory. Restart your computer and try again.” | A problem has occurred with Windows. | Restart your computer and try again.If this does not resolve the problem, obtain technical support from your Windows supplier. |
| “Connect the adapter (if it is not already connected), and allow the adapter to charge the camera for three minutes before clicking the Load Camera Firmware button again.” | The battery does not have enough power to update the camera firmware. | Allow the camera battery to charge for three minutes from the AC battery charger/adapter, and then click the Load Camera Firmware button again. |
| “Data transfer from the camera to the computer has been interrupted. Verify that SCSI cables are connected properly.” | There has been an interruption in data transfer between the camera and the computer. | Verify that the SCSI cable is connected properly between the camera and the computer. If not, turn both off, reconnect them, and try again. |
| “File Error: can not find the file WINASPI.DLL. Install or reinstall the WINDOWS ASPI software, and remove other ASPI software if possible.” | The driver for ASPI is installed, but an ASPI compliant host adapter is not installed in the computer. | Obtain an ASPI compliant host adapter, have a technician install it, and then try again. |
| The TWAIN compliant KODAK Driver for ASPI is installed, as is an ASPI compliant host adapter, but the Windows ASPI files that accompany the ASPI compliant host adapter are not installed. | Install the Windows ASPI files that accompany the ASPI compliant SCSI host adapter, then try again.If for some reason the Windows ASPI files were not supplied with your host adapter, contact the source of the host adapter to inquire about obtaining them.Even though you may have installed ASPI files for other operating platforms (for example for DOS), the Windows ASPI files must be installed to use the KODAK Driver. | |
| "General problem with 'Take Picture.'" | An unspecified problem has occurred when you clicked the Take Picture icon. | Close the driver, reopen it and try again. If the problem continues, click the Load Camera Firmware button, and try again. If the problem persists, reinstall the driver. |
| "No ASPI software for Windows was found. Install or reinstall the WINDOWS ASPI software." | A problem has occurred with your software ASPI manager for Windows. | Install, or reinstall, the ASPI manager for Windows. This software, which is not available from Kodak, should be provided with your ASPI Windows host adapter card. |
| "Some items in this location have the same names as items you're copying. Do you want to replace them with the ones you're copying?" | While working within an archive folder, you have selected multiple images, and clicked "Copy To;" however, some images with the same filenames already exists in the folder. | Click OK to replace the archive files with the selected files; or click Cancel and no replacement occurs. If you click OK, sound files are replaced without notifying you. |
| "The action is canceled. It can not click-balance because the click point is outside the image border. (The action was recorded on a picture from a camera with a larger imager.)" | When the action is run, the driver is unable to complete a click-balance operation. The picture on which the operation was initially recorded came from a camera with a larger imager, and the click-balance point is outside the border of the image the action is trying to color balance. | You will not be able to use the script with this image. |
| "The action is canceled. It refers to a sequential image beyond those available at the source. (The script was recorded with more images than are currently at the source.)" | When the action is run, the driver was unable to complete an operation.For example, suppose that you recorded the action with five images and included a command to rotate the fifth image. Now you try to run the script with a source that only holds three images.Or suppose that you recorded the action with five images and included a command to click-balance the fifth image.Now you try to run the script with a source that only holds three images. | You will not be able to use the script with these images. |
| "The battery is low, and the 'Take Picture' operation can not be completed. Connect the AC adapter, wait a shot time, and try again." | The battery needs charging. | Attach the AC battery charger/adapter, wait a short time for the battery to charge sufficiently, and try again. |
| "The camera and the computer have been disconnected. Turn off the camera and the computer, reconnect them, and then try again." | The camera and the computer have been disconnected. | Turn off the camera and the computer, reconnect them, and try again. |
| "The camera body is off. Turn it on and try again." | The camera is off. | Turn on the camera by moving its power switch to the ON setting and try again. |
| "The camera is performing another operation. Wait briefly and try again." | You have tried a command (for example Copy To), and the camera is still performing another operation. | Wait for a short time (for example wait until the red Card Busy light on the camera back stops blinking), and then try again. |
| "The camera or camera back was not found. Try the following. ▶ Check all cables. ▶ Check for SCSI ID conflict. ▶ Check for dead battery. ▶ Switch to an archive folder." | The SCSI cable is not connected properly. | Verify that the SCSI cable is connected properly between the computer and the camera. If not, turn both off, reconnect the cable, and try again. |
| The camera SCSI ID is set improperly. | Reset the camera SCSI ID so that it is different from other devices connected to the computer. To do so, turn off the camera, then the computer. Reset the camera SCSI ID. Restart.(With a Macintosh computer the CD-ROM drive is often SCSI ID number 3; be certain that you avoid its number.) | |
| You have connected the camera to a different computer (or to the same computer to which you recently connected an additional SCSI device), resulting in a SCSI ID conflict. | Reset the camera SCSI ID so that it is different from other devices connected to the computer. To do so, turn off the camera, then the computer. Set the camera SCSI ID to a unique value. Restart.(With a Macintosh computer the CD-ROM drive is often SCSI ID number 3; be certain that you avoid its number.) (Continued on next page.) | |
| "The camera or camera back was not found. Try the following. (Continued from previous page.)▶ Check all cables.▶ Check for SCSI ID conflict.▶ Check for dead battery.▶ Switch to an archive folder." | The battery in the camera is dead. | Operate from the AC battery charger/adapter or charge the battery from the adapter and try again. |
| You have deliberately chosen the driver when no camera was connected with the intention of working with images in an archive folder. | Click folder and open an archive folder from your computer hard disk. | |
| "The folder 'folderid' was not found. The action is terminating. Create a new folder in the proper location, and run the action again, or record the action again to point to an existing folder." | This message appears when you run a script. The script points to a folder that does not exist as specified. Perhaps the folder has been deleted since the script was recorded. | Follow the instructions that appear in the message. |
| "The last SCSI command completed with an error, indicating a hardware error in the cabling or SCSI connectors. Verify that SCSI cables are connected properly." | A hardware error has been detected in the cabling or SCSI connectors. | Verify that all SCSI connections are correct (if necessary turn off all equipment to alter the connections). Try other cables if available. Be certain that terminators (if used with your computer setup) are still properly connected. If the problem persists, contact Kodak. |
| "The 'Load Camera Firmware' command failed. Refer to the 'Messages' section in the User's Manual." | There may be one of a variety of problems, including loose or incorrect cables, improper SCSI configuration, and so on. | Shut down the computer, turn off the camera, and disconnect the camera from the computer and the AC battery charger/adapter. Check all SCSI connections and cables. Reconnect your equipment, restart, and try again. |
| There is an unusual condition with the driver for Photoshop. | Choose the driver. If the problem recurs, shut down your Macintosh computer; restart the computer and Photoshop, and try the driver again.If the condition persists, delete the camera driver file from your computer hard disk, and install the driver again. | |
| The ".BIN" file was not found in the same folder as the driver file. | Place a copy of the ".BIN" file in the same folder as the driver file. The BIN file is supplied by Kodak on the diskette with the product. | |
| "The number in the 'Digits' box is not large enough to accommodate the number in the 'Starting From' box." | The value in the 'Digits' box is too small for the value in the 'Starting From' box. | Increase the value in the 'Digits' box or decrease the value in the 'Starting From' box so that the value in the Digits box is large enough to accommodate the Starting From value. |
| "The PCMCIA card in the camera is full. You can:► Enter Test Shot and save images to a folder using the Keep button.► Click Cancel, delete images from the PCMCIA card, then choose Test Shot again." | You have tried to enter Test Shot but the PCMCIA card is full, so additional images can not be saved to it. | Since the PCMCIA card is full, you can enter Test Shot and use the Keep button to save images to an archive folder.Or you can, delete images from the card, and then enter Test Shot. If desired, new images can be saved to the PCMCIA card which now has room for the new images. |
| "The PCMCIA card in the camera is full. You can:► Enter Test Shot and save images to a folder using the Keep button.► Delete images." | The PCMCIA card in the camera is full, and additional images can not be recorded on it. | Since the PCMCIA card is full, you can enter Test Shot and use the Keep button to save images to an archive folder.Or you can switch to Contact Sheet, delete images from the card, and continue shooting. New images will be saved to the PCMCIA card which now has room for new images. |
| "The PCMCIA card in the camera is full. You can:► Stay in Test Shot and save images to a folder using the Keep button.► Stwitch to Contact Sheet, delete images from the PCMCIA card, then choose Test Shot again." | You are working in Test Shot and additional images can not be saved to the PCMCIA card. As indicated, the PCMCIA card in the camera is full, and additional images can not be recorded on it. | As prompted, use the Keep button while in Test Shot.Or, switch to Contact Sheet, delete images from the card, reenter Test Shot and continue shooting. |
| "The PCMCIA card was recovered, but no images were found." | You initiated a recover operation which was performed, but no images were found on the card. | No action is required. If there were images on the card, they can not be recovered with this command. |
| "The required ASPI software is not found. Install or reinstall the WINDOWS ASPI software, and remove other ASPI software if possible." | A problem has occurred with your software ASPI manager for Windows. | Install, or reinstall, the ASPI manager for Windows. This software, which is not available from Kodak, should be provided with your ASPI Windows host adapter card. |
| One or more DOS ASPI manager(s) is installed and is in conflict with the Windows ASPI manager. | Be certain that a WINDOWS ASPI manager is installed; remove the DOS ASPI manager(s). | |
| "There is no PCMCIA card in the camera. You can insert a PCMCIA card now, or work without a card in Test Shot view." | You are trying to take a picture but there is no PCMCIA card in the camera. | As indicated, you can insert a PCMCIA card now and continue to shoot normally, or you can work in Test Shot view without a card. |
| "There is not enough memory to complete the operation. Close unneeded windows, if opened, and try again." | There is not enough memory to complete the operation. | If unneeded windows are opened, close them and try the operation again.Or quit Photoshop and increase its memory size. Restart Photoshop and try the operation again. |
| "There is not enough memory to hold all the sounds for this folder. You will not be able to play the sounds for all images in this folder." | There is not enough memory available in your computer, and even the small amount of memory allocated for each sound by the TWAIN driver has exhausted available memory. | Divide the images in the folder, moving images for which there are sounds to a new folder. |
| "TWAIN DCS source error. Low memory condition encountered. Free up some memory and try again. (Be certain the computer system meets the minimum memory requirements.)" | There is not enough memory to complete the operation. | Be certain that the computer meets the minimum system requirements (refer to Chapter 1). Shut down other applications if they are running and try again. |
| "TWAIN DCS source error. (Remaining wording of message varies). Try again and/or reinstall the driver." | A problem has occurred with the software driver. | Try the operation again. If necessary, reinstall the TWAIN driver and try again. If the problem continues, contact Kodak. |
| "TWAIN error accessing data from the source. The failure is due to an unknown cause. Try again and/or reinstall the driver." | A TWAIN-compliant KODAK Driver has not been installed or has been installed improperly. | Reinstall the TWAIN driver as described in Chapter 4 and try again. |
| "TWAIN error opening the data source. The failure is due to an unknown cause. Try again and/or reinstall the driver." | A TWAIN-compliant KODAK Driver has not been installed or has been installed improperly. | Reinstall the TWAIN driver as described in Chapter 4 and try again. |
| "Unable to delete some images. The folder or disk may be locked, or you do not have 'write privileges' to the folder." | The folder or disk from which you are trying to delete archive images may be locked. | Unlock the folder or disk.Or, if you are working with images on a CD-ROM, you will be unable to delete the images on the CD-ROM. |
| "Unable to rename some images. The folder or disk may be locked, or you do not have 'write privileges' to the folder." | The folder or disk in which you are trying to rename archive images may be locked. | Unlock the folder or disk.Or, if you are working with images on a CD-ROM, you will be unable to rename the images on the CD-ROM. |
| "Unable to save image modifications. The destination folder or disk may be locked, or you do not have 'write privileges' to the folder." | The folder or disk to which you are trying to save archive images may be locked. | Unlock the folder or disk.Or, if you are working with images on a CD-ROM, you will be unable to save the images on the CD-ROM. |
| You have typed text in the annotation area for an image in an archive folder but the archive folder is locked, preventing you from saving the changes. | Unlock the folder and try again.(Continued on next page.) | |
| "Unable to save image modifications. The destination folder or disk may be locked, or you do not have 'write privileges' to the folder." (Continued from previous page.) | You may not have privileges to write to the specified folder. | Change privileges, or write the file to another folder. |
| The folder you were using during your last work session has been deleted or renamed. | Choose a different folder from the Open dialog box. | |
| You have switched from Photoshop to the Finder and have changed the location of an opened file. | Choose a different folder from the Open dialog box. | |
| You have a damaged hard disk on your computer. | Have the hard disk repaired. | |
| "You can not copy archive images into the same folder in which they are already stored." | While working with an archive folder, you have selected images, chosen Copy To, and tried to save the images into the same folder as the opened archive folder. This is not allowed. | Try again, but this time first create a new folder or save the images to a folder other than the opened archive folder. |
| "You can not simultaneously crop images of different sizes. Select groups of images that all have the same dimensions, and try again." | You can not simultaneously crop multiple images from different camera types. The DCS 410, DCS 420, and EOS•DCS 5 are the same camera types; the NC 2000, NC 2000e, and EOS•DCS 3 are the same camera type; and the DCS 460, DCS 465, and EOS•DCS 1 are the same camera type.Although the driver can display images from all camera types, you can not simultaneously crop images from different camera types. | Select images only from the same camera type before cropping. |
| "You clicked on an area that is too saturated to use for color balancing. Use the Click Balance tool again to select a less saturated area." | After choosing the Click Balance tool, you have clicked the crosshair on an overexposed area of the image. | Choose the Click Balance tool again and then click a white area that is not overexposed. (Refer to the explanation of the Click Balance tool earlier in this chapter.) |
9
Appendices
This section includes the following appendices.
A — Specifications
B — Glossary
C — Updating Your KODAK Software Driver
D — Repacking Instructions
E — Problem Report Form
F — Using an Infrared Camera (DCS 420IR Only)
G — Technical and Telephone Assistance
H — Optional Equipment & Spare Parts List
Appendix A — Specifications DCS 410, DCS 420, DCS 460, NC2000e
KODAK Camera Back
The following camera models are available:
DCS 410c (color)
DCS 420c (color)
DCS 420m (monochrome)
DCS 420IR (infrared monochrome)
DCS 460c (color)
DCS 460m (monochrome)
NC2000e (color)
▶ Imager: charge coupled device (CCD) full-frame imager.
▶ Imager size:
DCS 410—
Width 13.8 mm x height 9.2 mm, 1524 x 1012-pixels.

DCS 420 (all models) —
Width 13.8 mm x height 9.2 mm, 1524 x 1012-pixels.

▶ Specifications ◀ A-1
DCS 460 (both models) —
Width 27.6 mm x 18.4 mm, 3060 x 2036-pixels.

text_image
3060 pixels 2036 pixelsNC2000e —
Width 20.5 mm x 16.4 mm, 1268 x 1012-pixels.

text_image
1012 pixels 1268 pixels▶ Image file sizes:
DCS 410 —
Unacquired image file size: approximately 1.5 megabytes (MB) for each image.
Acquired image file size: approximately 4.5 MB for each color image acquired normally at 8-bit acquire (and 9 MB when 12-Bit Acquire is on).
DCS 420 (all models) —
Unacquired image file size: approximately 1.5 megabytes (MB) for each image.
Acquired image file sizes: approximately 4.5 MB for each color image acquired normally at 8-bit acquire (and 9 MB when 12-Bit Acquire is on), and 1.5 MB for each monochrome or infrared image.
DCS 460 (both models) —
Unacquired image file size: approximately 6 megabytes (MB) for each image.
Acquired image file sizes: approximately 18 MB for each color image acquired normally at 8-bit acquire (and 36 MB when 12-Bit Acquire is on), and 6 MB for each monochrome image.
NC2000e—
Unacquired image file size: approximately 1.3 megabytes (MB) for each image.
Acquired image file sizes: approximately 3.9 MB for each color image acquired normally at 8-bit acquire (and 7.8 MB when 12-Bit Acquire is on), and 1.3 MB for each monochrome or infrared image.
▶ Sound file size: A 105 MB PCMCIA card can store about 2-3 hours of audio if no images or other files are stored on the card.
Twelve bits/color.
▶ Supports ISO settings as follows:
DCS 410—100
DCS 420c — 100 to 400
DCS 420m — 200 to 800 (You can also shoot at 1600 with possible degraded performance.)
DCS 420IR — 200 to 800 (You can also shoot at 1600 with possible degraded performance.)
DCS 460c — 80
DCS 460m — 160
NC2000e — 200 to 1600
▶ Dynamic random access memory (DRAM) buffer that supports shooting as below:
DCS 410 — supports shooting one image at a time.
DCS 420 (all models) — supports a five-image burst.
DCS 460 (all models) — supports a two-image burst.
NC2000e — supports a twelve-image burst, sixteen megabytes DRAM.
Timing: For all camera models, the camera is ready for the first shot within 0.25 seconds after the shutter button is depressed. Timing for subsequent images depends on the type of PCMCIA card being used, and on the camera model as below.
DCS 410 — If you continue to press the shutter after the first image, subsequent images are taken approximately every several seconds, with the exact time dependent on the type of PCMCIA card being used.
DCS 420 (all models) — If you continue to press the shutter after the first image, subsequent images of the five-image burst are taken at intervals of approximately 0.5 seconds. Continuing to press the shutter after the burst records images at several second intervals, with the exact time dependent on the type of PCMCIA card being used.
DCS 460 (all models) — If you continue to press the shutter after the first image, the second image of the two-image burst is recorded in approximately 1.6 seconds. Continuing to press the shutter after the second image of the burst records images at approximately eight second intervals.
NC2000e — If you continue to press the shutter after the first image, subsequent images of the burst are taken at a rate of approximately 2.8 images/second. Continuing to press the shutter after the burst records images at approximately two second intervals.
Built-in microphone records sound in ".WAV" file format at "telephone quality"—8-bits, 11 kilohertz, monaural.
▶ Built-in, liquid crystal display (LCD) status display.
▶ Two external controls:
DELETE. Deletes most recent image on PCMCIA card (if present). SCSI ID. Sets SCSI ID.
- PCMCIA-ATA Type III slot designed to accept PCMCIA hard disk cards that support the PCMCIA "ATA" interface and operate in 8-bit transfer mode.
Third-party, optional, PCMCIA hard disk cards, with storage capacity as indicated below for one card size:
DCS 410 — A 340 megabyte PCMCIA card stores up to 203 images. DCS 420 (all models) — A 340 megabyte PCMCIA card stores up to 203 images.
DCS 460 (all models) — A 340 megabyte PCMCIA card stores up to 53 images.
NC2000e — A 340 megabute PCMCIA card stores up to 247 images.
▶ SCSI 25-pin, female, subminiature D connector with standard pin assignments for Macintosh II computer.
▶ Multipurpose 7-pin mini-DIN connector (for the AC battery charger/adapter, remote shutter release, ...).
▶ Single, rechargeable nickel hydride battery that powers both the KODAK camera back and the Nikon N90s camera.
In typical shooting situations, a fully charged battery (a battery that has been charged for at least two hours with the supplied AC battery charter/adapter), provides power for shooting as below. Fewer images per charge can be taken at low temperatures.
NOTE: These estimates are based on testing that begins with a fully charged battery. In testing, the camera is turned on, and left on throughout the test. An image is made and the camera is allowed to sleep; this cycle is repeated until the battery is no longer able to power the camera.
DCS 410 — battery provides power for shooting up to 1,000 frames.
DCS 420 (all models) — battery provides power for shooting up to 1,000 frames.
DCS 460 (all models) — battery provides power for shooting up to 300 frames.
NC2000e — battery provides power for shooting up to 1,000 frames.
▶ Tripod mount.
▶ Lenses behave differently when used with the Nikon N90s. The imager in the camera provides a smaller image area than 35 mm film. DCS 410 and DCS 420 (all models) — The imager produces a field of view equal to using a lens with 2.6 times the focal length of the lens in use as indicated in the representative lenses listed in the following figure. For example, an 18 mm lens performs approximately like a 50 mm lens.

bar
A standard AF Nikkor lens . . . performs approximately like this lens. | Configuration | Score | | :--- | :--- | | 18 | 50 | | 24 | 60 | | 28 | 70 | | 35 | 85 | | 50 | 135 | | 105 | 300 | | 200 | 500 |▶ Specifications ◀ A-7
DCS 460 (all models) — The imager produces a field of view equal to using a lens with 1.3 times the focal length of the lens in use as indicated in the representative lenses listed in the following figure. For example, an 18 mm lens performs approximately like a 24 mm lens.

bar
A standard AF Nikkor lens . . . performs approximately like this lens. | Score | Value | | :--- | :--- | | 18 | 24 | | 24 | 28 | | 28 | 35 | | 35 | 50 | | 50 | 60 | | 70 | 70 | | 105 | 135 | | 200 | 300 |NC2000e — The imager produces a field of view equal to using a lens with 1.5 times the focal length of the lens in use as indicated in the representative lenses listed in the following figure. For example, an 18 mm lens performs approximately like a 28 mm lens.

bar
A standard AF Nikkor lens ... performs approximately like this lens. | Score | Value | | :--- | :--- | | 18 | 28 | | 24 | 35 | | 35 | | | 50 | 70 | | 70 | 105 | | 105 | 135 | | 200 | 200 | | 200 | 300 |Software Drivers
▶ Photoshop (Macintosh) driver.
▶ TWAIN (PC) driver.
Other
▶ Focusing screen modified for imager size; it indicates the reduced view of the scene to match the size of the picture that will be recorded on the imager.
DCS 410 and DCS 420 (all models) modified focusing screen:

DCS 460 (all models) modified focusing screen:

NC2000e modified focusing screen:

▶ Universal AC battery charger/adapter, 95-250 V AC, 47-63 Hz. Safety: UL, CSA, TUV.
▶ Dimensions. Nikon N90s camera body with KODAK camera back attached: 7.1 in. (18.0 cm) high x 6.7 in. (17.0 cm) wide x 4.5 in. (11.4 cm) deep.
Weight: approximately 3.60 lbs. (1.63 kg.). Includes KODAK camera back, Nikon N90s camera body; excludes lens and recording media.
▶ Operating temperatures: 32^ to 130^ F ( 0^ to 55^ C). Third-party, optional PCMCIA cards may have more restrictive operating temperature ranges.
▶ Operating humidity: 8 to 85% relative humidity non-condensing. Third-party, optional PCMCIA cards may have more restrictive operating humidity ranges.
Appendix B — Glossary
This section provides brief explanations of terms used in conjunction with the camera. Refer to these items individually in the Index in this manual to find additional reference material about the following terms.
AC battery charger/adapter. This unit provides a continuous source of power to the camera, with sufficient power to support continuous operation of the camera as well as to continue charging the camera battery.
Archive. An image copied or moved from the camera to the hard disk on your computer.
Archive folder. See Image archive folder.
Balance. Balance features (lighting and click-balance) on the driver image window, that allow you to indicate the original lighting conditions under which you took the picture or otherwise adjust color. Your selection is used for color correction by the software driver when the image is acquired into your image editing application.
BIN file. This file contains firmware, the control programming used by the camera. You copy — download — this software from your computer hard disk into the camera when you click the LOAD CAMERA FIRMWARE button. Downloading firmware is a onetime action. You do not need to repeatedly copy the firmware each time you use the camera. Instead, you only download firmware the first time you use the camera, and then when you receive firmware updates or if you are experiencing unusual problems with the camera.
Burst. A rapid sequence of photographs taken by holding down the camera shutter release. (Not supported by all camera models.)
Camera back. See KODAK Camera Back.
Camera Control. A window displayed by the driver when you click the camera control icon of the driver image window. It incorporates a variety of product features, for example format disk and recover disk.
Card Busy light. A red light labeled CARD BUSY that blinks on the back of the KODAK Camera Back when data are being read from or written to the PCMCIA card, for example just after you take a picture, or when you move data from a PCMCIA card in the camera to a computer. Do not remove the card when this light is blinking or you may lose the current image or other images as well from the card.
CCD (charge coupled device). The type of imager inside the KODAK Camera Back.
Color balance. See Balance.
Download firmware. See BIN file.
DRAM (dynamic random access memory). Memory in the camera used to hold an image when taken before it is transferred to a PCMCIA card or to your computer.
Driver. The software provided by Kodak as part of the camera that allows you to access the camera from your computer. It also allows you to acquire camera images, to set camera defaults, to test the camera, to update the camera, to manage images you may have copied to your computer hard disk, and so on. Also called the "Photoshop driver" on the Macintosh computer platform, and the "TWAIN driver" on the PC platform.
Driver image window. The window displayed by the driver in which thumbnails or previews of your images appear. The window also displays controls that allow you to manipulate images.
Dynamic random access memory. See DRAM.
Firmware. Camera control programming. See also BIN file.
Frame counter. The frame numbering system provided by the camera. The frame counter increases by one as each picture is taken. The frame counter assigned by the camera appears with each thumbnail in the driver image window. This is a different number from the frames remaining indicator described just below.
Frames remaining. A number on the camera back LCD that indicates the number of additional pictures that can be stored on the PCMCIA card currently in the camera. This is a different number from the frame counter described just above.
Image archive folder. Folders/directories on the hard disk on your computer in which archive files are stored.
Image burst. See Burst.
Imager. The light sensitive object positioned within the camera back that collects light striking it when the shutter is released.
KODAK Camera Back. A sealed, one-piece unit produced by Kodak, to which the camera is attached. The camera back includes the hardware features of the product.
LCD. The liquid crystal display on the camera back displaying status and control information.
PCMCIA card. "Standard," removable credit-card sized cards that meet the Personal Computer Memory Card International Association standard, that are used with the camera for image storage.
Photoshop driver. The software provided by Kodak as part of the camera that allows you to access the camera from your Macintosh computer. It also allows you to acquire images, to set camera defaults, to test the camera, to update the camera, to manage images you may have moved or copied to your computer hard disk, and so on. Another driver, the "TWAIN driver" provides similar access on the PC platform (including access to the PC version of Photoshop).
Plug-in. Another name for the driver software. See also Driver.
Preview. A single, large representation of one image that appears in the image area of the driver image window. Previews can be viewed in a variety of sizes.
Self-test. A feature of the driver that allows you to perform a diagnostic self-test of the camera.
Thumbnails. Small representations of images — in a variety of sizes — that appear in the driver image window. A thumbnail is a subsample of the data in the full image.
TWAIN. A set of written specifications developed by a consortium of vendors, that when implemented in software allows you to acquire data from a peripheral (such as a digital camera or film scanner) directly into your software application (such as an image-editing software) without leaving the application.
TWAIN driver. The software provided by Kodak as part of the camera that allows you to access the camera from your PC. It also allows you to acquire images, to set camera defaults, to test the camera, to update the camera, to manage images you may have moved or copied to your computer hard disk, and so on. Another driver, the "Photoshop driver" provides similar access on the Macintosh computer platform.
Update camera firmware. The process you follow to move firmware — the camera control programming — from your computer to the camera. See also Bin file.
WAV file. The Windows standard sound file format used by the camera when recorded sounds are saved.
Appendix C — Updating Your KODAK Software Driver
This appendix provides information on obtaining and installing updated software drivers including:
▶ Directions for downloading software drivers electronically from several sources. (We recommend this as the preferred method of obtaining driver updates.)
▶ Directions for obtaining software drivers on diskettes directly from Kodak.
Directions for installing the software driver and updating camera firmware once you have obtained the updated version of the driver.
Downloading Software Drivers Electronically
NOTE: The availability of software downloading service described in this section may vary from area to area.
When Kodak prepares updated versions of the software drivers for the camera, it makes those updates available electronically on a public ftp server. Downloading an update from this network is the quickest way to obtain the most current driver. You receive the driver directly — in a timely way — at your convenience.
Downloading a driver requires: a modem, communications software, a telephone line, and access to this server. These items are not supplied by Kodak.
You access this ftp server using one of the following methods:
Via FTP at "ftp ftp.kodak.com/pub/photo-cd/drivers/" Log-in as "anonymous" using your complete e-mail address as a password. The file "Descriptions.txt" in the drivers directory lists all
files by product, version, release date, and so on. Find and download the driver for the product you use.
▶ Via the World Wide Web at:
"http://www.kodak.com/productInfo/technicalInfo/driverSupport.shtml"
This page contains links to driver listings by product type. Find and download the driver for the product you use by following the hyperlinks.
▶ Via FTP (or WWW) through America Online (AOL) or CompuServe.
A driver description index is posted on AOL (keyword Kodak, and then check the Kodak Information Library) and on CompuServe ("Go Kodak" and then check Library 1). Instructions are also posted describing how to access the Kodak ftp site through the on-line service ftp utility. Find and download the driver for the product you use.
We encourage you to visit our driver site on a regular basis.
Once you have obtained a driver, continue at "Installing the Software Driver" below.
Obtaining Software Updates Directly from Kodak
You can order diskettes containing current versions of the KODAK Driver for Adobe Photoshop Software (Macintosh) and/or the KODAK Driver for TWAIN-Compliant Software.
If you obtain software directly from Kodak, install it as described in the next section.
Installing the Software Driver
This section describes how to update the driver on your hard disk, and how to update the firmware in your camera using the updated driver files.
The section assumes that you have obtained driver files as described earlier in this appendix.
-
Complete all the steps in "Installing the KODAK Driver" in Chapter 4, except that if the files have been downloaded from a network — instead of obtained on a diskette — access the files from the location of the downloaded data (since there is no diskette).
-
Access the new driver by completing all the steps in "Accessing the Camera from the Driver" in Chapter 4.
-
Update your camera with the new firmware by completing all the steps in "Updating Camera Firmware" in Chapter 4.
The software and camera are now ready for use.
Appendix D — Repacking Instructions
If you are having difficulties using your camera, please contact a Kodak representative before returning your unit for service. (In the United States, call Kodak at 1-800-23-KODAK (1-800-235-6325). In Canada call 1-800-GO-KODAK (1-800-465-6325); in other countries, call your nearest Kodak representative.) If service is required, your Kodak representative will instruct you how to return the unit to the nearest service center for repair and will issue a return authorization number.
Also, please make sure that you have filled out and returned your Warranty Registration card; warranty service will not be provided without return of the Warranty Registration card or dated proof of purchase.
Please follow these instructions if you need to repack your camera to ship it to Kodak for repair. Be sure to use the original shipping carton and packing materials. (If the original packaging has been discarded or is not available, packing will be at the owner's expense.)
For system testing and calibration after repair, all major system components (camera body, Kodak camera back, cables, and AC battery charger/adapter) must be returned together.
IMPORTANT: DO NOT PACK LENSES, SOFTWARE, OR MANUALS.
- Fill out the enclosed Problem Report Form (in another appendix). Be certain your return address is complete.
- Disconnect all cables from the camera.
- Remove the lens from the camera body.
- Cover the lens opening with the camera body cap.
- Put the camera into the static shielding bag and seal the bag with tape.
-
Place all major system components (see above) into their appropriate locations within the original shipping carton.
-
Place the completed Problem Report Form on the top of (inside) the shipping carton.
- Close and seal the shipping carton with tape.
- Ship as instructed by your Kodak representative.
Appendix E — Problem Report Form
Customer Return Address
Name ____
Company
Address
City ____ State ____ Zip ____ — ____
Phone ( ) ____
Equipment Description
Camera Serial Number
(See the bottom of the camera next to "S/N.")
Problem Description
Appendix F — Using an Infrared Camera (DCS 420IR Only)
This appendix provides information for customers who have purchased the KODAK Professional DCS 420IR Digital Camera, the infrared (IR) version of the camera.
This appendix assumes that you are familiar with infrared photography, and provides only the following introductory material specific to the DCS 420IR.
▶ The DCS 420IR is a monochrome camera.
▶ Unlike other DCS 420 Camera models that incorporate a cover glass that blocks infrared light, the DCS 420IR has a standard cover glass that allows infrared light to reach the imager.
The spectral response of the DCS 420IR is 420 to 1,000 nanometers at greater than 5% quantum efficiency.
The best focusing (the sharpest results), is obtained if you use Micro Nikkor lenses. Other lenses will work, but may produce results that are less sharp, since the visible spectrum and the IR content of the image, focus at a different point with other lenses.
If you must use a lens other than a Micro Nikkor, stop down to f/8 or greater (for maximum depth of field which may minimize the effects of the IR focus shift), or use the IR compensation dot on the lens — if present — after manually focusing.
▶ Set the ISO only to values from 200 to 800. However, you can use the Nikon N90s camera exposure compensation to extend exposure selections. The table below suggests initial values for several lighting conditions using exposure compensation; using these values allow
you to gain several stops. (If you were to shoot outside without exposure compensation, the results would be significantly overexposed.)
Lighting Conditions Suggested Initial Nikon N90s Exposure Compensation Value for the DCS 420IR Camera with no filter
| Daylight — sunny | -1.7 (use a lower value for cloudy conditions) |
| Tungsten | -2.7 |
| Fluorescent | -0.7 |
▶ We recommend that you bracket to try to ensure proper exposure.
If you use filters that block visible light, the Nikon N90s light meter and autofocus will not work. However, both should work if you use a #25 Red Filter over the camera lens.
Many publications contain information about IR photography and IR filters. For example, the "KODAK Photographic Filters Handbook," CAT No E 152 8108, includes a variety of data on Kodak filters, including filters intended for use in IR photography. These filters can be used with the DCS 420IR. This publication can be ordered by contacting Silver Pixel Press at 1-800-368-6257.
Appendix G — Technical and Telephone Assistance
Refer to the following sources for assistance if you have questions as you work with the camera.
| Assistance Needed | Source of Assistance |
| You encounter difficulties with hardware, images, or product performance. | Refer to the troubleshooting sections of this manual: camera (in Chapter 7), and driver (in Chapter 8). If needed, call your dealer. |
| The liquid crystal display (LCD) on the KODAK camera back shows information you do not understand. | Refer to Chapter 7. |
| You need assistance with the Nikon N90 camera. | Refer to the Nikon instruction manual supplied by Kodak with the camera. |
| A message appears on the computer screen that you do not understand when using one of the supplied software drivers. | Refer to the messages section of this manual in Chapter 8. |
| You encounter difficulty with the camera. | Perform the self-test and update the camera firmware. Refer to Chapter 7. |
| You need other general assistance. | Contents and index in this manual. |
| You are a customer in the U. S, and you are unable to find answers to your questions using this manual. | Contact your dealer, then call Kodak at 1-800-23-KODAK (1-800-235-6325). |
Assistance Needed
Source of Assistance
| You are a customer outside the U. S. and you are unable to find answers to your questions using this manual. | In Canada contact your dealer, then call 1-800-GO-KODAK (1-800-465-6325); elsewhere contact your local Kodak service representative. |
| You have a question about the Warranty. | Contact your dealer, then call Kodak at 1-800-23-KODAK (1-800-235-6325). |
| You have a question about the Software License Agreement. | Contact your dealer, then call Kodak at 1-800-23-KODAK (1-800-235-6325). |
Appendix H — Optional Equipment & Spare Parts List
Ordering Optional Kodak Equipment from Your Dealer
To order items in this category, contact your dealer. For product information, including detailed information on options and accessories, and to obtain catalog numbers where not provided, in the United States call 1-800-23-KODAK (1-800-235-6325), in Canada call 1-800-GO-KODAK (1-800-465-6325), and elsewhere contact your local Kodak representative, except as noted below.
NOTE: None of the items described in this section is supplied with the camera. The read-me file on the supplied software driver diskette may provide revisions or additions to this material.
| Item Name | CAT No. | Description |
| Removable media and lens accessory | 875 8377 | Supported PCMCIA card plus a Nikon AF NIKKOR 28mm lens. |
| Removable media | 865 6019 | Supported PCMCIA card. |
| External adapter for Quantum Battery 5 | 890 3676 | Cable that allows direct connection between the Quantum Battery 5 (see “Ordering Optional Equipment from Other Vendors” later in this appendix) and the multipurpose connector on the camera back. |
| Shutter release accessory | 899 1473 | Shutter release cable that plugs into the multipurpose connector on the camera back. |
NOTE: For product information on any of these printers, in the United States call 1-800-23-KODAK (1-800-235-6325), in Canada call 1-800-GO-KODAK (1-800-435-6325), in other locations contact your local Kodak representative.
| Item Name | Description |
| KODAK XLS 8650 Digital Printer (raster) | Prints 300 pixels per inch, 24-bit color or eight-bit gray scale images up to 8.5 × 12 -inches (21.6 x 30.5-cm) to KODAK EKTATHERM XLS print paper or transparencies. Print time for reflective prints is 1.7 minutes or less at maximum image area including EKTATHERM XTRALIFE (1.2 minutes without EKTATHERM XTRALIFE), and 3.2 minutes or less at maximum image area for transparency material. Kodak's new EKTATHERM XTRALIFE Ribbon, available in color or black, incorporates a laminate patch that: protects a finished reflective print from fingerprints, gives reflective prints additional light-fade stability, and prevents dye from transferring to PVC sleeves and folder. The printer can use the KODAK EKTATHERM Color Proofing Ribbon/CMYK reflective print paper with a new dye set for matching color prepress proofing requirements. |
| KODAK XLS 8650 PS Digital Printer (raster and postscript) | Includes all features of the printer above, and in addition includes an ADOBE POSTSCRIPT Level 2 language interpreter. |
| KODAK Digital ScienceTM Desktop Color Proofer 9000 Digital Printer | Prints 300 pixels per inch, 24-bit color images up to 12.2 × 18-inches (30.9 x 45.7-cm) to KODAK EKTATHERM Color Proofing Ribbon/CMYK reflective print paper. In addition to raster printing, this printer includes an ADOBE POSTSCRIPT Level 2 language interpreter. The printer can use the KODAK EKTATHERM Color Proofing Ribbon/CMYK reflective print paper with a new dye set for matching color prepress proofing requirements. |
Ordering Optional Equipment from Other Vendors
To order items in this category, contact the individual vendors listed below.
NOTES: None of these items is supplied with the camera. Kodak assumes no responsibility for your use of optional equipment from other vendors.
Information about additional third party products is placed in a file on your computer when the software driver is installed; the read-me lists the name and location of the file.
| Item Name | Description |
| Quantum Battery 5 (QB5) | The QB5 is a rechargeable, external power pack that extends the operating time for the camera. For information contact Quantum Instruments Inc., 1075 Stewart Avenue, Garden City, NY 11530, 516-222-0611. Requires the external adapter for QB5 (see the first section of this appendix). |
| Pelican Pro Case 1550 | Hard shipping case for the camera. Available from Bristol Boarding Cases Company, 34 Elton Street, Rochester, NY, 14607, 1-800-343-3408. |
| Software Drivers | You may be able to obtain software drivers prepared by companies other than Kodak that enable you to use the camera on computer platforms in addition to the Macintosh or PC, or with operating systems in addition to the Macintosh operating system or Windows.You may also be interested in developing your own software driver.For information contact Kodak. |
Ordering Spare Parts from Kodak
To order any of the following spare parts for your camera, call Kodak Parts Services at 1-800-431-7278 (fax 1-716-588-3051).
| Part Name | Part No. | Description |
| Macintosh Computer Cables | 8B5450 | 25-pin to 25-pin SCSI cable |
| 8B5471 | 25-pin to 50-pin SCSI cable | |
| Gender Changer | 966976 | Macintosh SCSI gender changer for use with the Macintosh Ilfx or PowerBook computers. |
| SCSI Terminator | 692480 | This item is not supplied with the camera.50-pin SCSI terminator for Macintosh computers except the Ilfx.This item is not supplied with the camera. |
| 25-pin Terminator | 8B5454 | 25-pin pass through terminator. |
| AC Battery Charger/Adapter | 3B4701 | AC battery charger/adapter |
| Accessory Adapter Cable | 3B4045 | This multipurpose 1-to-3 connector/splitter allows you to use the AC battery charger/adapter and the shutter release accessory simultaneously. |
| Software Package | We encourage you to obtain software updates electronically as described in the appendix "Updating Your KODAK Software Driver" in this manual. However, you can also order them as below. Contact Kodak for current part numbers. | |
| Driver for Macintosh Adobe Photoshop |
Driver for TWAIN
| Part Name | Part No. | Description |
| Tiffen Hot Mirror Filter | 1942655 | 52 mm filter |
| 8250300 | 58 mm filter | |
| 1677103 | 62 mm filter |
Ordering New Manuals from Kodak
To order an additional user's manual, call Kodak Advertising Distribution 8:00 a.m. to 5:00 p.m. (eastern time zone), Monday through Friday, at 1-800-233-1650 (fax 1-716-588-4807).
| Part Name | Part No. | Description |
User's Manual
User's Manual. The part number appears on the last page of this manual.
10
Index
)) symbol (Sound files) 6-29, 8-38
- minus sign (Click-balance check-box) 8-37
100 MHz Pentium processor 1-4
12-Bit Acquire A-2 to A-3
12-Bit Acquire (General preferences) 8-24 to 8-30
16-bit video display card 1-3
16-bits per color 8-24 to 8-30
24-bit video display card 1-3
24-bits color image 8-24 to 8-30
25 Red Filter (Infrared camera) F-2
25-pin terminator (Ordering) H-4
48-bits color image 8-24 to 8-30
68020 processor 1-2
8-bits per color 8-24 to 8-30
80486 processor 1-4
90° rotation. See Rotate icons
A
AC battery charger/adapter, 3-3, 4-3, 4-4 to 4-14, 7-25 to 7-27
Cautions 7-26
Charge state 5-6
Glossary entry B-1
Ordering H-4
Range 7-27
Safety A-11
Use with computer 6-3
Warnings xiv, xv
Proximity to water xi
Accessing the camera 4-36 to 4-39
Accessories x
Accessory adapter cable 4-7
Ordering H-4
Acquire
Button 3-6, 6-8, 6-9 to 6-10, 8-39
Driver image window 8-11
Illustrated 6-10
Location on driver 8-3
Used with Acquire As 8-13
Contact sheet 6-7, 6-9 to 6-10
Images 6-8, 8-39
Defined 6-8
Multiple images 6-9
Submenu, Adobe Photoshop 3-5
TWAIN 4-37
Acquire As menu 6-9, 8-13 to 8-16
Contact Sheet 6-7, 6-9, 8-39
Default 8-5
Illustrated 8-13
Location on driver 8-3
Photo 6-7
Use with Acquire button 8-39
Acquire Contact Sheet dialog 6-9, 8-15 to 8-16
Illustrated 6-9
Acquired Contact Sheet layout
(Preferences) 8-25 to 8-30
Acquired image file size
DCS 410 A-2
DCS 420 A-2
DCS 460 A-3
NC2000e A-3
Actions (Photoshop) 8-47 to 8-50
Commands not supported 8-50
Supported commands 8-49
Active termination 4-12, 4-26
Adaptec 1-5,4-34
SlimSCSI 4-12, 4-26, 7-16
Adobe Photoshop. See Photoshop
Advanced SCSI Programming Inter-
face 1-5,4-34
All
Button (Driver image window) 6-9, 8-4
Photoshop Select menu 8-4, 8-12
Select pulldown menu 6-9
Sound menu 6-29, 8-38
America Online (Download software) C-2
Annotation window 6-11 to 6-13, 8-3
Character limit 6-12, 8-43
Driver image window 6-12
Illustrated 6-13
AOL. See America Online (Download software)
Aperture 5-5,7-2
Annotation area 8-43
Apple Macintosh computer. See
Macintosh computer
Applications software (IBM PC) 1-5
Archive 3-6
Glossary entry B-1
Archive images 6-30 to 6-33
Defined 6-2
File Format 8-40 to 8-41
Aspect Ratio. See Fix Aspect Ratio
checkbox (Crop dialog box)
ASPI. See Advanced SCSI Programming Interface
ATA interface A-5
PCMCIA card 1-6,2-5
Attachments xi
Hazardous potential xi
Automatic film advance modes 5-4
B
B 6-19,8-37,8-46
Balance (Defined) B-1
Battery xiv, 7-25 to 7-27
Capacity A-6
Charge remaining (LCD) 5-6
Charging 4-4 to 4-14, 5-3, 7-25
Inhibited by high tempera-
ture 7-25
Icon (LCD) 4-6
Indicator (LCD) 7-6
None in Nikon N90s 7-6
Testing A-6
Warnings xiv
BIN file 4-41, 8-19
Glossary entry B-1
Blue 6-19,8-24,8-37,8-46
Bulb setting 5-17
Use for cleaning imager 7-42
Burst A-4
Defined B-1
C
Cable accessory 7-18
Cables xi, xi to xii, 1-3
Ordering H-4
Calibration (CAL) files 3-3, 4-34 to
4-35,6-4,7-54
Missing 7-54
Camera
Access from driver 6-3 to 6-5
Dimension A-11
Humidity A-11
Image information window 6-12, 8-43
Memory (Nonvolatile) 4-40
Operating temperature A-11
Power switch 4-9
Self-test 7-3
Sleeps 5-5
Source menu 6-6, 6-26, 8-7
Timing 5-9
Turn off 5-8, 5-15
Weight A-11
Camera Control
Dialog box 4-43, 8-18
Set Clock 8-43
Glossary entry B-2
Icon 3-4, 3-5, 4-41, 8-17 to 8-22
Location on driver 8-3
Camera model A-1
Image Information window 8-43
Camera serial number E-1
Image Information window 8-43
Camera types 6-22, 8-29
Cancel
Acquire 6-8
Acquire Contact Sheet dialog 8-16
Crop dialog box 8-33
General preferences 8-25
Rename conflict dialog 8-27
Rename dialog 8-27
Caption area
Photoshop 6-13
Receives annotation text 8-43
Caption field (Photoshop) 8-15
Card Busy light 3-4, 4-27, 4-28, 5-13, 6-3, 7-20
Glossary entry B-2
Recording sound 5-14
Cautions x to xvi
CCD (Imager) 2-4, 7-2, A-1
Defined B-2
Glossary entry B-2
CD-ROM drive 4-12
Charge coupled device. See CCD (Imager)
Charging the battery 4-4 to 4-14
Choose Folder (Source menu) 6-6, 6-31, 8-7
Class B digital device xvi
Cleaning
Camera xi
Imager 7-41 to 7-52
Cleaner pads 7-44
Cleaning materials 7-43
Cleaning solution 7-44
Click-balance
Default 8-5
Eyedropper cursor 6-19
Preferred 6-17
Remove setting 6-19
Tool 6-17, 6-18 to 6-19, 8-34, 8-35
to 8-37
Checkbox 6-18
Illustrated 6-18, 8-35
Location on driver 8-3
Remove setting 8-37
Clockwise rotation. See Rotate icons
Close-up accessories 1-6
Closing Photoshop window (Changes not saved) 6-8, 6-10, 6-27 to 6-28, 6-33, 8-39
Color balance 6-16 to 6-21
Lighting menu 8-34 to 8-35
Multiple images 6-20 to 6-21, 8-8
Preview 8-8
Saving changes 6-21
Setting saved 6-16
Single image 6-17 to 6-19, 8-8
Commands (Driver image window) 8-6 to 8-46
CompuServe (Download software) C-2
Computer speakers 8-38
Computer system clock 8-20
Condensation xii
Connector cable (Camera to KODAK
camera back) 7-2, 7-46
Contact Sheet
Acquire As menu 6-7, 6-9, 8-13 to 8-14
Defined 6-7
Navigating 6-14, 6-14 to 6-15, 8-44
to 8-45
View menu 6-27, 8-8, 8-11
Continue (Rename Conflict dialog) 8-27
Continuous low-speed shooting 5-4
Control buttons (KODAK camera
back) 7-11 to 7-16
Control programming. See Firmware
Control-click 6-9,8-4
Controls on KODAK camera back 2-5
Copy (Photoshop Edit menu) 8-12
Copy To (Without a PCMCIA card) 7-24
Copy To button 3-6, 6-31, 8-7, 8-26, 8-40 to 8-41
Becomes Keep button 6-27,8-10
Calibration file 7-54
Driver image window 6-30
Illustrated 6-30, 8-40
Location on driver 8-3
Counterclockwise rotation. See Rotate icons
Coupling nut (Camera connector cable) 7-46
Crop 6-21 to 6-25
Change existing 8-29
Default 8-5
Dialog box 6-23, 8-30 to 8-34
Cancel 8-33
Crop New Images 8-33
Final Output 8-33
Fix Aspect Ratio checkbox 6-24
Fixed Size 6-23
Height 8-32
Illustrated 6-23
Left 8-32
Link graphic 8-32
Navigating 8-33 to 8-34, 8-44
OK 8-33
Remove 8-33
Remove button 6-25
Size dialog box 6-24
Top 8-32
Width 8-32
Crop (continued)
Freeform 6-23 to 6-24
Icon 6-22, 8-28 to 8-34
Illustrated 6-22
Location on driver 8-3
Overview 8-28 to 8-29
Rectangle
Defined 6-21 to 6-25, 8-28 to
8-34
Remove 6-25
Crop New Images (Checkbox) 6-25
Crop New Images after Shutter Release
(Crop dialog box) 8-33
Cut (Photoshop Edit menu) 8-12
D
Data Link System (Not supported) 5-17
Date 8-18, 8-20, 8-43
Annotation area 8-43
Image information window 6-12,
8-43
Daylight (Lighting popup menu) 8-34 to 8-35, 8-35
DCS 400/EOS·DCS Plug-in 6-4
DCS 410 6-22, 8-29, A-1 to A-11
DCS 410c A-1
DCS 420 6-22, 8-29, A-1 to A-11
DCS 420c A-1
DCS 420IR A-1, F-1
DCS 420m A-1
DCS 460 4-34 to 4-35, 6-22, 8-29, A-1
to A-11
Calibration file 6-31, 7-54
Install calibration file 3-3
DCS 460c A-1
DCS 460m A-1
DCS 465 6-22,8-29
DCS4xx subdirectory 4-34
Dedicated Nikon flash 7-53
Default Acquire Resolution (General
preferences) 8-23 to 8-30
Defaults (Driver image window) 8-4 to 8-5, 8-5
Defragger 7-21
DEL indicator (LCD). See Delete: KODAK camera back Delete button: DEL
indicator (LCD)
Delete
Delete last image 2-5
Driver Delete button 6-32, 7-14,
7-23, 8-12, 8-21, 8-41
Illustrated 6-32
Location on driver 8-3
Recover disk after 8-22
Files 6-31
Images 2-5, 5-11 to 5-13, 6-30 to
6-33,7-8
KODAK camera back Delete
button 5-12, 7-8, 7-11, 7-12 to 7-14,
7-24,8-21,8-41,A-5
DEL indicator (LCD) 5-13, 7-12,
7-12 to 7-14
Delete mode 7-12
Disabled while connected to
computer 7-23
Delete Originals option (Save dialog box) 8-40
Diagnostic self-test. See Self Test: Camera
Control icon
Digits (Rename dialog) 8-26 to 8-30
Dimensions A-11
Disconnecting Parts xiii
Disk error indicator (KODAK camera
back) 7-10
Disk icon (Recording sound) 5-14
Disk indicator 7-10
Illustrated 7-5
Display (monitor) card 1-2 to 1-3, 1-4
Distance to subject (Image information window) 8-43
Document Name (Acquire Contact Sheet dialog) 8-15
Done button 3-6, 6-33, 8-42
Camera Control 8-22
Driver image window 6-8, 6-28
Save changes 6-21, 6-25
Illustrated 6-33
Location on driver 8-3
DOS format (PCMCIA cards) 4-42,
5-13, 7-20, 7-21
Download Camera Firmware 8-19 to 8-20
Download software C-1, C-1 to C-2
America Online C-2
AOL C-2
CompuServe C-2
World Wide Web C-2
DRAM 2-4,7-3,A-4
Glossary entry B-2
DRIVE button (Nikon camera) 5-4
Driver 1-1, 2-6, A-10
Defined B-2
Developing 1-1
Download C-1
Installing 4-33 to 4-35
Obtaining electronically C-1, C-1 to
C-2
Obtaining from Kodak C-2
Ordering H-3, H-5
To update firmware 7-3
Tutorial 6-1 to 6-33
Update C-1 to C-3
Driver image window 3-4, 4-41, 6-4 to 6-33
Acquire button 6-8, 6-9
All button 6-9, 8-4
Annotate 6-11 to 6-13
Annotation window 6-12
Commands 8-6 to 8-46
Copy To button 6-30
Defaults 8-4 to 8-5
Defined 8-2, B-3
Delete button 8-21
Done button 6-8, 6-28
Save changes 6-25
Features 6-4 to 6-5
Illustrated 6-4 to 6-5, 8-3
Image Area 6-6
Image information window 6-12
Preferences icon 6-32
Preview 6-15 to 6-16
Rename icon 6-11, 6-11 to 6-13
Rotate 6-11 to 6-13
Settings maintained 6-21, 6-32
Source menu 8-6 to 8-7
Take Picture icon 6-27
Duplicate image numbers 7-9
Dust xi
Dynamic random access memory. See DRAM
E
E errors (LCD) 5-2, 7-10, 8-21
Electromagnetic emissions xvi
Electronic flash 7-53
Electrostatic discharge (ESD) wrist strap 7-44
En error codes. See E errors (LCD)
EOS·DCS 1 6-22, 8-29
Calibration file 6-31
EOS·DCS 3 6-22,8-29
EOS·DCS 5 6-22,8-29
Erase button (Camera Control
icon) 8-20, 8-21
Recover images after 8-22
ESD wrist strap 7-44
European Standard EN55022 xvi
Example (Rename dialog box) 6-11, 8-27 to 8-30
Exposure
Avoid long 5-16
Compensation (Use with flash) 7-53
Indexes 2-4
Mode 5-5, 5-17
Number (Annotation window) 8-43
External battery adapter 7-27
Ordering from Kodak H-1
Eyedropper cursor 8-36 to 8-37
Illustrated 6-19,8-36
EZ-SCSI 1-5, 4-12, 4-13, 4-26, 4-34,
7-16
F
Factory Settings (General prefer-
ences) 8-25
Features 2-4 to 2-6
Field of view
DCS 410 A-7
DCS 420 A-7
DCS 460 A-8
NC2000e A-9
Filename (Images) 8-4, 8-40
Film advance indicator (Does not
appear) 5-17
Film advance mode (DRIVE button) 5-4, 5-9
Film camera back (Not used) 5-16
Film Loading indicator (Does not appear) 5-17
Film speed equivalents 2-4
Filter (Tiffen Hot Mirror) 8-35
Final Output (Crop dialog box) 8-33
Finder accessories 1-6
Fire (Prevention) xiv
Firmware 2-6,4-33,4-40,8-19 to 8-20
Glossary entry B-3
Updating 7-3
Version 8-18
First image (Navigation bar) 6-14, 6-15, 8-44
Fix Aspect Ratio checkbox (Crop dialog box) 6-24, 8-32
Fixed Size (Crop dialog box) 6-23 to
6-24, 6-24, 8-31
Resolution 8-23
Flash 1-6,5-7,5-17,7-53
Lighting menu 8-34 to 8-35, 8-35
Flash memory cards 7-19
Fluorescent (Lighting menu) 8-34 to
8-35, 8-35
Focal length (Lens)
DCS 410 A-7
DCS 420 A-7
DCS 460 A-8
NC2000e A-9
Focus mode 5-5, 5-17
Focusing screen 5-8, 5-16, A-10
Folder (Source menu) 6-6, 8-7
Format
Button 4-43
Cannot recover images 8-21
Camera Control icon 8-20 to 8-21
PCMCIA card 3-5, 4-42 to 4-44, 5-2
Remove duplicate frame
numbers 7-9
Fragmentation (PCMCIA card) 7-20
Frame counter 5-9 to 5-10, 5-13, 7-7 to
7-9, 7-12
Defined B-3
Frame number 8-4
Frames Remaining indicator 5-6, 5-9 to
5-10, 5-13, 7-7, 7-12
Glossary entry B-3
Free hard disk 1-2, 1-4
Freeform (Crop) 6-23 to 6-24, 8-31
ftp server (Downloading software) C-1
to C-2
G
G 6-19,8-37,8-46
Gamma (Monitor setting) 4-36, 6-2
Gender changer (Ordering) H-4
General Preferences. See Preferences icon
Glossary B-1 to B-5
Go to image (Navigation bar) 6-14, 8-44
Green 6-19,8-24,8-37,8-46
Grounding xii
H
H (High-speed shooting) 5-4, 5-9
Handling x
Handstrap 7-46
Hard disk
IBM PC requirements 1-4
Macintosh requirements 1-2
Hardware 1-1, 1-2 to 1-3, 1-4
Height
Acquire Contact Sheet dialog 8-16
Crop dialog box 6-24, 8-32
Image information window 6-12,
8-43
Help (Built-in) 8-24
Help tag 8-24
High-speed shooting 5-4
Hot shoe 7-53
Humidity xii, A-11
|
IBM PC computer 1-1
Driver (Installing) 3-2, 4-33 to 4-34
Hardware 1-4 to 1-5
Display card 1-4
Monitor 1-4
SCSI interface 1-5
Software 1-4 to 1-5
Applications software 1-5
Systems software 1-5
Image
Archive 6-30 to 6-33
Archive folder (Defined) B-3
Image (continued)
Area
Defined 8-2
Driver image window 6-6
Counter
Annotation window 8-43
8-43
Delete 6-30 to 6-33
File size A-2 to A-3
Filename 8-4
Grain, noise 5-7
Height (Image Information window) 8-43
Noise 5-16
Numbers (Duplicate) 7-9
Same frame number 7-9
Selected 6-7
Width (Image Information window)) 8-43
Image Information window 5-17, 6-12, 8-42 to 8-43, 8-43
Data differs from Camera Control 8-18
Driver image window 6-12
Location on driver 8-3
Imager 2-4, 7-2, 7-2 to 7-3, A-1
Cleaning 7-41 to 7-52
Glossary entry B-3
Imager size A-1 to A-2
Import submenu (Photoshop) 3-4, 6-4
Informational data. See Annotation area
Infrared camera F-1
Install software driver 3-2, C-1
After obtaining update C-3
Instructions x
IR slave 7-53
ISO 5-7,5-16
Annotation area 8-43
Begin with low value 5-7
Indicator 5-7, 7-9
Infrared camera F-1
Outside supported value 5-7
Results of shooting at unsup- ported 7-9
Setting 7-2, A-3
Use lower for less noise 5-16
Warning 7-9
K
Keep button 8-10 to 8-11
Test Shot 6-26, 6-27
Without a PCMCIA card 7-24
KODAK camera back 2-3, 7-2 to 7-3
Connector 4-5
Controls 7-4 to 7-18
Defined B-3
LCD "E" errors 8-21
On/Off state 7-32
Sleeps 5-5
KODAK charge coupled device imager.
See CCD (Imager)
Kodak DCS 400/EOS·DCS/
NC2000 3-4,4-38,6-4
KODAK Digital Science Desktop Color
Proofer 9000 D H-2
KODAK driver. See Driver
KODAK Gray Cards 6-21, 8-37
Kodak imager. See Imager
KODAK Photographic Filters Handbook (Infrared camera) F-2
KODAK XLS 8650 Digital Printer H-2
KODAK XLS 8650 PS Digital
Printer H-2
L
L setting (Continuous low-speed shooting) 5-4, 5-9
Laptop computer (IBM PC) 4-24 to 4-26, 7-16
Large (Thumbnail size) 8-16
Last image (Navigation bar) 6-14, 8-44
LCD (KODAK camera back) 2-5, 5-3, 7-4 to 7-10, A-5
Defined B-3
Disk icon
Recording sound 7-31
Left textbox (Crop dialog box) 6-24, 8-32
Lenses 1-6, 3-2, 5-17, A-7 to A-9
Annotation area 8-43
Behavior 5-17
DCS 410 A-7
DCS 420 A-7
DCS 460 A-8
NC2000e A-9
Lenses (continued)
Focal length
DCS 410 A-7
DCS 420 A-7
DCS 460 A-8
NC2000e A-9
Remove for cleaning imager 7-42
Lighting
Default 8-5
Menu 6-17, 6-18, 8-34 to 8-35, 8-36
Illustrated 6-18, 8-34
Location on driver 8-3
Lightning xii
Link graphic (Crop dialog box) 8-32
Liquid crystal display. See LCD (KODAK camera back)
Load Camera Firmware 3-4, 4-41, 8-19 to 8-20
M
Macintosh computer 1-1, 1-2 to 1-3
Driver (Installing) 3-2, 4-33
Hardware 1-2 to 1-3
Display card 1-2
Monitor 1-2
PowerBook 4-24 to 4-26
Software 1-2 to 1-3
Required 1-3
Systems software 1-3
Manual exposure mode
Use for cleaning imager 7-42
Use with flash 7-53
Medium (Thumbnail size) 8-16
Memory
IBM PC requirements 1-4
Macintosh requirements 1-2
Memory (Nonvolatile camera) 8-19
Message(s) 8-54 to 8-74
Camera not found 6-4
Micro Nikkor lenses (Infrared camera) F-1
Microphone 2-6, 3-5, 5-14, 7-28 to 7-31, A-5
Microsoft 1-5
Windows 1-5
Windows 95 1-5
Windows ASPI files 4-34
Windows NT 1-5
Minus sign (Click-balance) 8-37
Moisture xi
Monitor 1-2 to 1-3, 1-4
Determines thumbnail size 8-4
Gamma 4-36
Monochrome camera models A-1
Color balance (Not available) 6-16
Mounting screw 2-4
Multiple images (Crop) 8-33
Multiple-exposure mode 5-4
Not supported 5-16
Multipurpose connector
7-pin mini-DIN A-6
KODAK camera back 7-18
N
Name area (Rename dialog box) 6-11, 8-26 to 8-30
Naming images. See Rename icon
Native image data. See Uninterpolated data
Navigating 6-14 to 6-15
Navigation bar 6-7, 6-14 to 6-15, 6-20, 8-4, 8-9 to 8-10, 8-44 to 8-45
Crop dialog box 6-23, 6-24, 8-33 to 8-34
Go to edit box 6-14
Illustrated 6-14, 6-20, 6-25, 8-44
Location on driver 8-3
NC 2000e 1-2, 6-22, 8-29, A-1 to A-11
New Media Bus Toaster 4-12, 4-26, 7-16
Next image (Navigation bar) 6-14, 6-15, 8-44
Nickel hydride battery 2-5, 7-25, A-6
Nikon AF NIKKOR lens (Ordering from Kodak) H-1
Nikon Data Link System (Not supported) 5-17
Nikon N90s camera 2-1
Battery indicator (Ignore) 5-3
Camera back 5-16
Instruction manual 2-1
LCD 7-7
No batteries installed 7-25
On/off 3-3
Nikon N90s camera (continued)
Operating Differences 5-16 to 5-17
Power switch 4-45, 5-3
Using 5-1 to 5-17
Nikon remote control accessories 1-6
Non-dedicated electronic flash 7-53
Non-terminated SCSI device 2-5
Non-volatile memory (Firmware) 7-3
None (Photoshop Select menu) 8-4, 8-12, 8-12 to 8-15
Number (Images selected) 8-3, 8-45
0
OK button
Acquire Contact Sheet dialog 8-16
Crop dialog box 6-25, 8-33
General preferences 8-25
On/Off state (KODAK camera back) 7-32
Operating Configurations 7-22
Optional
Camera Equipment 1-6
Equipment H-1 to H-5
IBM PC sound card 1-5
Orientation of images. See Rotate icons Origin point. See Crop: Dialog box: Top
Output Resolution (Acquire Contact Sheet dialog) 8-16
Overloading power outlets xi
P
P. See Programmed auto exposure modes Packing x
Paste (Photoshop Edit menu) 8-12
PC (SCSI setting) 4-12, 7-16
SCSI ID 4-26
SCSI indicator 4-11
SCSI2 connector 4-13
PC terminal (Flash) 7-53
PCMCIA card xii, xiii, 1-6, 3-2, 3-4,
7-19 to 7-21, A-5
Connected to computer 6-3
Defined B-4
Erase 8-20
Error 7-10
Filled oval (LCD) 5-6
PCMCIA card (continued)
Format 5-2, 8-20
Fragmentation 7-20
Humidity restrictions 7-20
Insert and remove cards 4-27 to
4-32, 6-3
Ordering from Kodak H-1
Recover. See Recover
Release button 4-30
Storage capacity A-3, A-5
Supported cards 7-19
Temperature restrictions 7-20
Troubleshooting 7-20
Use with camera 7-23 to 7-24
Use with care 6-3
Working with Images 6-3 to 6-25
PCMCIA card reader 5-13
PCMCIA-ATA Type III slot 2-5, 7-19, A-5
PCMCIA-to-SCSI II adapter 4-12, 4-26, 7-16
Pelican Pro Case 1550 (Ordering) H-3
Pentium processor 1-4
Personal Computer Memory Card
International Assoc. 7-19. See also PCMCIA card
Photo
Acquire As menu 8-13, 8-39
Acquire menu 6-7
Photoshop 1-3, 1-5
Acquire images 6-1 to 6-2
Acquire submenu 6-4
Actions 8-47 to 8-50
Camera connected to computer 6-3
Caption field 6-13, 8-15
Driver (Defined) B-4
Edit menu 8-12
Copy 8-12
Cut 8-12
Paste 8-12
Import submenu 6-4
Menus 8-12
Location on driver 8-3
Open command 6-4
Plug-ins 3-3,4-35
Photoshop (continued)
Select menu 8-4, 8-12
All 8-12
None 8-12
Version 1-3, 6-2, 6-4, 8-1
Picture. See Image
Plug-ins
Defined B-4
Photoshop 3-3, 4-35
Power cord xii
AC battery charger/adapter 4-4
Protection xii
Power line surge xii
Power Macintosh 1-2
Power sources xi
PowerBook (Macintosh computer) 4-24
to 4-26
Cables 1-3
PP (SCSI setting) 4-11, 4-12, 7-16
Precautions x to
Preference file 4-37
Preferences icon 8-23 to 8-25
Driver image window 6-32
Illustrated 6-32
Location on driver 8-3
Prevent fire or shock hazard xiv
Preview
Click-balance tool 8-36
Color balance 6-20
Defined 6-15
Driver image window 6-15
Glossary entry B-4
Illustrated 6-16
Multiple images 6-20
Size menu 8-46
View menu 6-6, 6-17, 6-27, 8-8 to
8-10, 8-9 to 8-10, 8-11
Preview View (Navigation bar) 8-44
Previous image (Navigation bar) 6-14, 8-44
Printable Area Width and Height
(Acquire Contact Sheet dialog
box) 8-16
Printer resolution 8-46
Printers (Optional equipment) H-2
Problem Report Form E-1
Programmed auto exposure modes 5-5, 5-17
PS. See Programmed auto exposure modes
q
QB5 7-18,7-27
Ordering H-3
Quantum Battery 5 7-18, 7-27
Ordering H-3
Quick Start 3-1 to 3-6
Quit driver 3-6, 4-45, 6-32 to 6-33
R
R 6-19,8-37,8-46
Radio slave 7-53
RAM 1-2, 1-4
Random access memory. See RAM
Raw image data. See Uninterpolated data
Read-me file 1-2, 1-4, 1-6, 3-2
Recalibrate the imager (After firmware update) 8-20
Record button (KODAK camera
back) 5-14,7-29
Record sound. See Sound
Recover
Button 7-21
Camera Control icon 8-21 to 8-22
Disk utility software 5-13
Images 5-13, 7-12, 8-20
PCMCIA cards 7-20
Red 6-19,8-24,8-37,8-46
Remote shutter release accessory 7-18
Remove (Crop dialog box) 6-25, 8-33
Rename button (Rename dialog
box) 6-11, 6-12, 8-27 to 8-30
Rename dialog box 8-25 to 8-27
Illustrated 6-12,8-26
Rename icon 8-25 to 8-27
Archive 6-30
Driver image window 6-11, 6-11 to 6-13
Illustrated 6-11, 8-25
Location on driver 8-3
Rename conflict dialog (Illus-
trated) 8-27
Use with Copy To button 8-40
Repacking Instructions D-1 to D-2
Repair
Required Computer
IBM PC 1-4
Macintosh 1-2
Requirements
IBM PC 1-4 to 1-5
Macintosh 1-2 to 1-3
Resolution
Acquire (General preferences) 8-23
Acquire Contact Sheet dialog 8-16
Photoshop Image menu 8-23
Reverse the ground polarity (Flash) 7-53
Rewind indicator (Does not appear) 5-17
RGB Values indicator 8-46
Location on driver 8-3
Rotate icons
Driver image window 6-11 to 6-13,
8-28
Illustrated 6-11
Location on driver 8-3
Rotation (Default) 8-5
S
S (Single Frame shooting) 5-4
S focus mode (Single Servo AF)
Focus-Priority 5-4, 5-17
Safeguards (Precautions) x to xvi
Accessories x to x
Saturated color 8-37
Save changes (Driver image window -
Done button) 6-25
Save dialog box 8-40
Scripts. See Actions (Photoshop)
Scroll 6-7, 6-14 to 6-15, 8-4
Arrows 8-4
Bar 8-10
Box 8-4
SCSI
Cable 4-15
Length restriction 4-18
PowerBook 4-24
Required 1-3
Connection 4-14 to 4-26
Connector (KODAK camera
back) 7-17, A-5
SCSI (continued)
Host adapter 3-2, 4-12, 4-34
Installing 4-13
ID 2-5,3-3,4-8 to 4-12
Laptop 4-26
Value 7-16
ID button (KODAK camera
back) 7-11, 7-15 to 7-16, A-5
Identification. See SCSI: ID
Indicator 4-11, 4-12, 7-15 to 7-16,
7-16
Mode 7-16
Non-terminated device 4-14
Port 2-5,4-13
Terminator 1-3, 1-5, 4-14
Not used with PowerBook 4-25
Ordering H-4
SCSI2 connector 4-13
Select All icon 8-45
Location on driver 8-3
Select images 6-5 to 6-7, 8-4
Defined 6-7
Multiple images 6-9, 8-29
Select pulldown menu 6-9
Select Source (TWAIN) 4-37
Self Test (Camera Control icon) 2-6,
7-3,8-22
Defined B-4
Sequence Number area (Rename dialog
box) 6-11,8-26 to 8-30
Serial # (Image information win-
dow) 6-12,8-43
Service xiii
Set Clock (Camera Control dialog
box) 8-20, 8-43
Settings (Maintained) 6-2
SETUP program (Calibration file) 3-2, 4-33, 4-35
Install 3-3
Shift-click 6-9, 8-4
Shock hazard (Prevention) xiv
Show Crop Rectangle (Acquire Contact
Sheet dialog) 8-16
Show Tool Tips (General prefer-
ences) 8-24
Shutter release accessory 4-7
Ordering from Kodak H-1
Shutter release button 4-9, 5-5, 5-8,
5-11, 6-27, 7-12, 7-16, 7-29
Cleaning imager 7-43
Shutter release cable 1-6
Shutter speed 5-5,7-2
Annotation window 8-43
Silver Pixel Press (Infrared camera) F-2
Single frame shooting 5-4
Single Servo AF with Focus-Priority 5-4
Size (Crop dialog box) 6-24, 8-31 to
8-32
Skip (Rename conflict dialog) 8-27
Slide Mount (Acquired Contact Sheet
Layout) 8-25
Slide surround (Contact sheet) 8-13
SlimSCSI 4-12, 4-26, 7-16
Small (Thumbnail size) 8-16
Software 1-1, 1-2 to 1-3, 1-4
Software driver. See Driver
Software License Agreement vi to ix, 1-1
Sound 3-5, 7-28 to 7-31
Board 3-2
Disabled in Test Shot 8-11
Files 6-29
Archives 6-30 to 6-31
Associated with previous
image 7-30
Deleted 6-32
Icon 6-29
Not deleted with DELETE
button 5-13
Playing 7-31
Size 7-31, A-3
Menu 6-29,8-38
All 6-29
Illustrated 8-38
Location on driver 8-3
Optional IBM PC hardware 1-5
Recording 5-14 to 5-15, 8-38
WAV files 8-38
Source menu 6-6
Camera 6-6, 6-26
Copy To button 8-40
Choose Folder 6-6, 8-41
Default 8-5
Driver image window 8-6 to 8-7
Source menu (continued)
Folder 6-6
Copy To button 8-40
Illustrated 6-26, 6-31, 8-6
Location on driver 8-3
Spare parts H-1 to H-5
Specifications A-1 to A-11
SRAM cards 7-19
Starting From (Rename dialog box) 8-26
to 8-30
Status of battery (KODAK camera
back) 7-6
Studio flash 7-53
Studio setting 6-26 to 6-28
Crop image 8-29
Systems software
IBM PC requirements 1-5
Macintosh requirements 1-3
T
Take picture 3-5, 5-8 to 5-9, 7-23
Take Picture icon 6-27, 7-23, 8-17
Driver image window 6-27
Location on driver 8-3
Technical assistance G-1
Telephone assistance v, G-1
Software license ix
Temperature xii, A-11
Impact on battery life A-6
Termination (Active) 4-12, 4-26
Terminator. See SCSI: Terminator
Test pictures 6-27
Test Shot 8-10 to 8-11
Acquire As menu (Use with Acquire
button) 8-39
View menu 6-6, 6-26
Without a PCMCIA card 7-24
Text (Acquired Contact Sheet lay-
out) 8-25
Thumbnail 3-5
Caution with TIFF files 6-31
Defined 6-6,7-3,B-4
Generating 7-3
Selecting 8-4
Size determined by monitor 8-4
Size menu 8-46
Stored with image 7-3
Thumbnail/Preview size menu 6-7, 8-46
Color balance in Preview 6-17
Default 8-5
Driver image window 8-10
Illustrated 6-17
Location on driver 8-3
TIF (Rename dialog) 8-27
TIF suffix (Filenames) 6-12
TIFF file (Caution opening) 6-31, 8-41
Tiffen Hot Mirror Filter 8-35
Ordering H-5
Time 8-18, 8-20, 8-43
Annotation area 8-43
Image information window 6-12, 8-43
Timing 7-3, A-4 to A-5
Title bar 8-10, 8-11
Top (Crop dialog box) 6-24, 8-32
Tripod mount 2-4, A-6
Troubleshooting
Camera 7-33 to 7-40
Driver 8-51 to 8-53
PCMCIA cards 7-20
Self-test 7-3
Tungsten (Lighting menu) 8-34 to 8-35,
8-35
Tutorial (Driver software) 6-1 to 6-33
TWAIN
Acquire 4-37
Applications 1-4, 3-5
Calibration file 3-3
Defined 4-34, B-4
Driver (defined) B-5
Select Source 4-37
Specifications 4-37
Subdirectory 4-34
TWAIN-compliant 1-5,4-34
Accessing camera 4-36 to 4-37
Image-editing software 8-1
Twelve bits/color A-3
U
Unacquired image file size
DCS 410 A-2
DCS 420 A-2
DCS 460 A-3
NC2000e A-3
Uninterpolated data 8-40
Archive files 6-30
Units: Inches/Centimeters (General
preferences) 8-24
Update camera firmware 3-4, 4-40 to
4-41, 7-3, 8-19 to 8-20
Defined B-5
Update KODAK driver 8-19, C-1 to C-3
User Manual (Ordering) H-5
Utility programs (Recover PCMCIA
cards) 5-13,7-21
V
VGA or compatible display 1-4
View (Default) 8-5
View images 6-5 to 6-7
View menu 6-6, 6-20, 8-7 to 8-11
Contact Sheet 6-6
Illustrated 6-15, 6-17, 6-26, 6-27
Location on driver 8-3
Preview 6-6 to 6-7, 6-17
Test Shot 6-6, 6-26
Viewfinder
Indication area 7-7
LCD 5-5
W
Warnings x
Warranty iii to v, 1-1
Warranty Registration card 1-1, 4-2,
D-1
Warranty service D-1
Water and Moisture xi
WAV file 1-5, 2-6, 7-28, 8-38, A-5
Defined B-5
Web cleaner pads 7-44
Weight A-11
White balance values. See Click-balance:
Tool
Width
Acquire Contact Sheet dialog 8-16
Crop dialog box 6-24, 8-32
Image information window 6-12,
8-43
Windows. See Microsoft: Windows
Windows 95. See Microsoft: Windows 95
Windows ASPI files. See Microsoft:
Windows ASPI files
Windows NT. See Microsoft: Windows
NT
World Wide Web (Downloading
software) C-2
Wrist strap 7-44
X
X-Y cursor location 8-45
Location on driver 8-3
Eastman Kodak Company ("Kodak") reserves the right to change this information without notice. The information contained herein is based on the experience and knowledge relating to the subject matter gained by Kodak prior to publication, but Kodak makes no warranty, express or implied, with respect to this information. Kodak shall not be liable for any loss or damage, including consequential or special damages, resulting from the use of this information, even if loss or damage is caused by Kodak's negligence or other fault.
This publication contains proprietary information of Kodak or its licensors and is their exclusive property. No use may be made of it except according to a written agreement with Kodak. No patent or other license is granted by this information.
Use of the accompanying software is subject to Kodak's Software License Agreement, which contains Kodak's limitation of liability terms.
APPLE COMPUTER, INC. ("APPLE") MAKES NO WARRANTIES, EXPRESS OR IMPLIED, INCLUDING WITHOUT LIMITATION THE IMPLIED WARRANTIES OF MERCHANTABILITY AND FITNESS FOR A PARTICULAR PURPOSE, REGARDING THE APPLE SOFTWARE. APPLE DOES NOT WARRANT, GUARANTEE OR MAKE ANY REPRESENTATIONS REGARDING THE USE OR THE RESULTS OF THE USE OF THE APPLE SOFTWARE IN TERMS OF ITS CORRECTNESS, ACCURACY, RELIABILITY, CURRENTNESS OR OTHERWISE. THE ENTIRE RISK AS TO THE RESULTS AND PERFORMANCE OF THE APPLE SOFTWARE IS ASSUMED BY YOU. THE EXCLUSION OF IMPLIED WARRANTIES IS NOT PERMITTED BY SOME STATES. THE ABOVE EXCLUSION MAY NOT APPLY TO YOU.
IN NO EVENT WILL APPLE, ITS DIRECTORS, OFFICERS, EMPLOYEES OR AGENTS BE LIABLE TO YOU FOR ANY CONSEQUENTIAL, INCIDENTAL OR INDIRECT DAMAGES (INCLUDING DAMAGES FOR LOSS OF BUSINESS PROFITS, BUSINESS INTERRUPTION, LOSS OF BUSINESS INFORMATION, AND THE LIKE) ARISING OUT OF THE USE OR INABILITY TO USE THE APPLE SOFTWARE EVEN IF APPLE HAS BEEN ADVISED OF THE POSSIBILITY OF SUCH DAMAGES. BECAUSE SOME STATES DO NOT ALLOW THE EXCLUSION OR LIMITATION OF LIABILITY FOR CONSEQUENTIAL OR INCIDENTAL DAMAGES, THE ABOVE LIMITATIONS MAY NOT APPLY TO YOU. Apple's liability to you for actual damages from any cause whatsoever, and regardless of the form of the action (whether in contract, tort (including negligence), product liability or otherwise), will be limited to \$50.

Kodak Professional
EASTMAN KODAK COMPANY • ROCHESTER, NY 14650
KODAK Professional DCS 410, DCS 420, DCS 460 Digital Cameras
Part No. 1H6359
Kodak and Kodak Professional are trademarks.
Revised 6-97
Printed in U.S.A.