BG-4K-VP44PRO - Projector BZBGear - Free user manual and instructions
Find the device manual for free BG-4K-VP44PRO BZBGear in PDF.

User questions about BG-4K-VP44PRO BZBGear
0 question about this device. Answer the ones you know or ask your own.
Ask a new question about this device
Download the instructions for your Projector in PDF format for free! Find your manual BG-4K-VP44PRO - BZBGear and take your electronic device back in hand. On this page are published all the documents necessary for the use of your device. BG-4K-VP44PRO by BZBGear.
USER MANUAL BG-4K-VP44PRO BZBGear
text_image
BZB2GEAR L25J R In Rf Out TE & RX RF-232 Output BZB2GEAR Audi Out FWx4 Receivers
TableofContents
Statement 4
Safety Precaution 4
Introduction 5
Feature 5
Packing List 5
Specifications 6
Operation Controls and Functions 6
Wiring Diagrams 7
Input / Output Channel Key Operation 9
Panel Control 10
Remote Control 34
Audio Extraction 35
RS232 Control 36
Scene Examples 37
Web Control 47
Web Interface Control 49
Tech Support 56
Warranty 56
Mission Statement 56
Copyright 56
Statement
Please read these instructions carefully before connecting, operating, or configuring this product. Please save this manual for future reference.
SafetyPrecaution
- To prevent damaging this product, avoid heavy pressure, strong vibration, or immersion during transportation, storage, and installation.
- The housing of this product is made of organic materials. Do not expose to any liquid, gas, or solids which may corrode the shell.
- Do not expose the product to rain or moisture.
- To prevent the risk of electric shock, do not open the case. Installation and maintenance should only be carried out by qualified technicians.
- Do not use the product beyond the specified temperature, humidity, or power supply specifications.
- This product does not contain parts that can be maintained or repaired by users. Damage caused by dismantling the product without authorization from BZBGEAR is not covered under the warranty policy.
- Installation and use of this product must strictly comply with local electrical safety standards.
Introduction
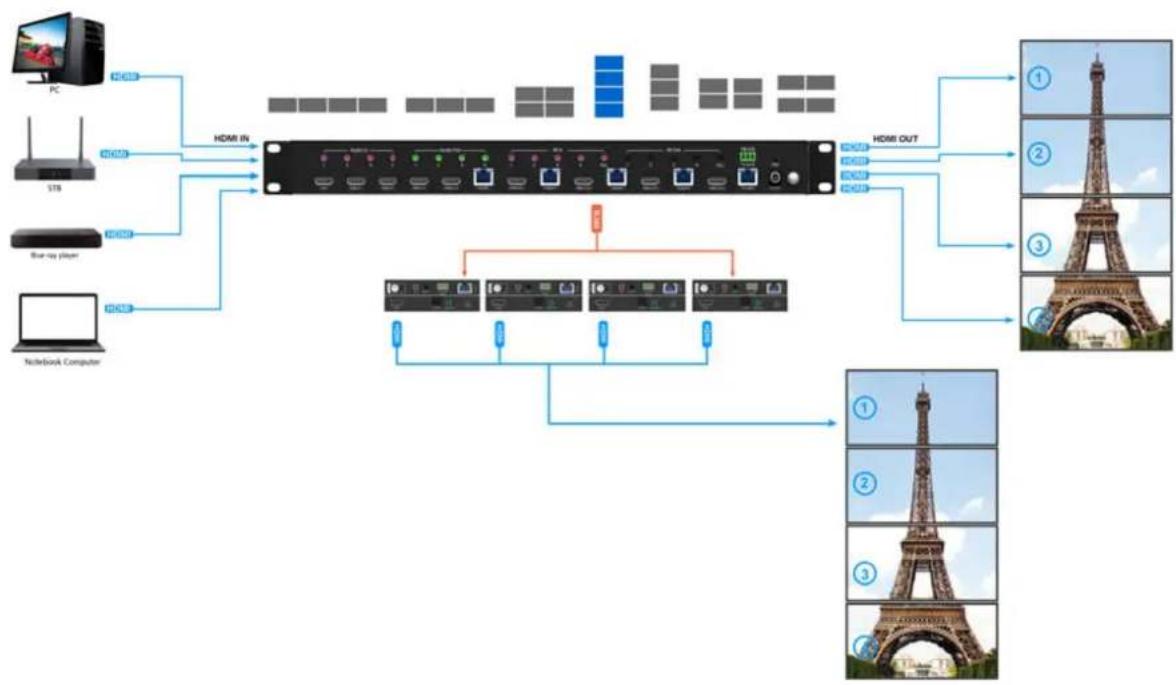
The BG-4K-VP44PRO is a 4x4 HDMI 2.0 Seamless Matrix that offers a range of impressive features. It has 4 HDMI inputs and 4 RJ45 outputs with 1 HDMI loop output, supporting 4K@60HZ 4:4:4 8bit with HDCP 2.2. In Seamless Matrix Mode, it provides smooth switching without delay or signal loss. It also offers Video Wall Mode with up to 7 different modes built-in and supports cascading. The Multiviewer Mode can display 4 videos simultaneously on a single screen with various built-in layouts.
Additionally, the BG-4K-VP44PRO is capable of audio matrixing for analog audio embedding, extraction, and independent audio switching capabilities. The device supports EDID management and LPCM 2.0 audio format. With PoC (Power over Cable), the receivers are powered by the base unit simplifying installations. Control options include panel buttons, remote control, RS232, and TCP/IP control.
Feature
- Seamless matrix with 4 HDMI inputs, 4 RJ45 outputs for 70m signal extension, and 1 HDMI loopout
• 4K@60HZ 4:4:4 8bit, HDCP 2.2 - Seamless Matrix Mode: 4 in, 4 out with no switching delay or signal loss
- Video Wall Mode: Up to 7 different modes built-in and supports cascading
- Multiviewer Mode: Display 4 videos on the same screen with different configurations
- Audio Matrix: Analog audio embedding, extraction, and the audio can be independently switched.
- Advanced EDID management
- LPCM 2.0 audio format
- PoC (Power over Cable): receivers powered by base unit via ethernet cable.
- Control via Panel button, Remote, RS232, TCP/IP Control
PackingList
- 1x BG-4K-VP44PRO
• 1x 12V/4A DC power adapter -
1x Remote control
• 1x 3 Pin Phoenix Terminal Plug -
4x BG-4K-VP44PRO-R
- 5x IR Transmitter Cables
- 5x IR Receiver Cables
• 1x CD and User Manual
Specifications
| TechnicalSpecifications | |
| Operating Temperature Range | -5 to +40°C(23 to +104 °F) |
| Storage Temperature Range | -10 to +60°C(-14 to +140 °F) |
| Operating Humidity Range | 5 to 90 % RH (no condensation) |
| Video Input Connectors | 4x HDMI Type A, 19-pin, female |
| Video Output Connectors | 4x RJ45 female and 4x HDMI Type A, 19-pin, fem |
| Bandwidth | 18 Gbit/s |
| Supported Video Format | 4K@60Hz,YUV 4:4:4 8bit4k@30Hz/1080P/1080i/720P |
| Supported Audio Formats | LPCM 2.0 |
| HDCP Compliant | HDCP 2.2 and HDCP 1.4 |
| Input ports | 4x HDMI Ports |
| Output ports | 4x RJ45 Ports and 4x HDMI Ports |
| Power Consumption | 41 watts (Max.) |
| Dimensions | Matrix: L262 x W163 x H36 mm |
| Mass (Main Unit) | Matrix: 2710g |
OperationControlsandFunctions
FrontPanel
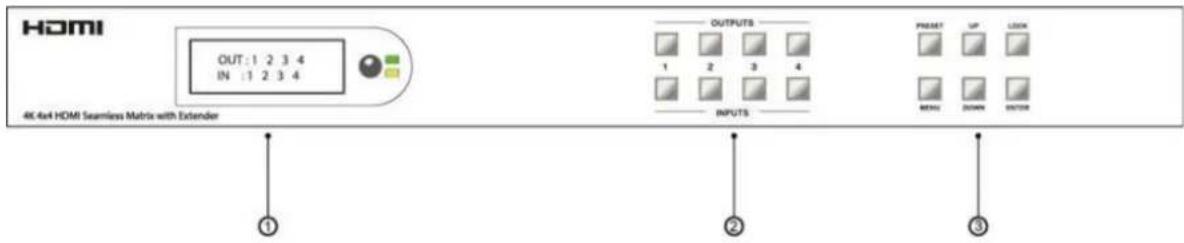
text_image
HDMI OUT:1 2 3 4 IN:1 2 3 4 OUTPUTS 1 2 3 4 INPUTS PRESSET UP LOCK MENU DOWN ENGLISH 4K 4x4 HDMI Seamless Matrix with Extender ① ② ③- LCD screen, IR receiving port, and indicator light
- Output button OUT 1\~4 & Input button IN 1\~4
- MENU button: PRESET; MANU; UP; DOWN; LOCK; ENTER
RearPanel

text_image
1 2 3 4 5 6 7 8 9 10 11 12 13 14 15 16 17 18 19 20 21 22 23 24 25 26 27 28 29 30 31 32 33 34 35 36 37 38 39 40 41 42 43 44 45 46 47 48 49 50 51 52 53 54 55 56 57 58 59 60 61 62 63 64 65 66 67 68 69 70 71 72 73 74 75 76 77 78 79 80 81 82 83 84 85 86 87 88 89 90 91 92 93 94 95 96 97 98 99 100- 3.5mm Audio In
- 3.5mm Audio Out
- IR In & Out
- RS232 port
- HDMI IN x4 with 1x HDMI Loop out
- HDMI OUT x4
- RJ45 x4
- Ethernet port
- Power input 12V/4A and FW updating Port
WiringDiagrams
SeamlessMatrixMode

flowchart
graph LR
    A["PC"] -->|GUSB| B["Hardware Bus"]
    C["I/O"] -->|GUSB| B
    D["TV"] -->|GUSB| B
    E["Video Player"] -->|GUSB| B
    F["Internet Computer"] -->|GUSB| B
    B --> G["Output"]
    G --> H["Output"]
    style A fill:#f9f,stroke:#333
    style C fill:#f9f,stroke:#333
    style D fill:#f9f,stroke:#333
    style E fill:#f9f,stroke:#333
    style F fill:#f9f,stroke:#333
    style G fill:#ccf,stroke:#333
    style H fill:#ccf,stroke:#333
VideoWallMode
flowchart
graph TD
    PC["PC"] -->|HDMI IN| HDMI["162.0"]
    IIS["162.0"] -->|HDMI IN| HDMI
    Monitor["Monitor"] -->|HDMI IN| HDMI
    Laptop["Laptop"] -->|HDMI IN| HDMI
    HDMI -->|HDMI OUT| EiffelT["(Eiffel Tower)"]
    HDMI -->|HDMI OUT| EiffelT
    EiffelT -->|①| EiffelT1["Image ①"]
    EiffelT -->|②| EiffelT2["Image ②"]
    EiffelT -->|③| EiffelT3["Image ③"]
    EiffelT -->|④| EiffelT4["Image ④"]
Multiviewermode
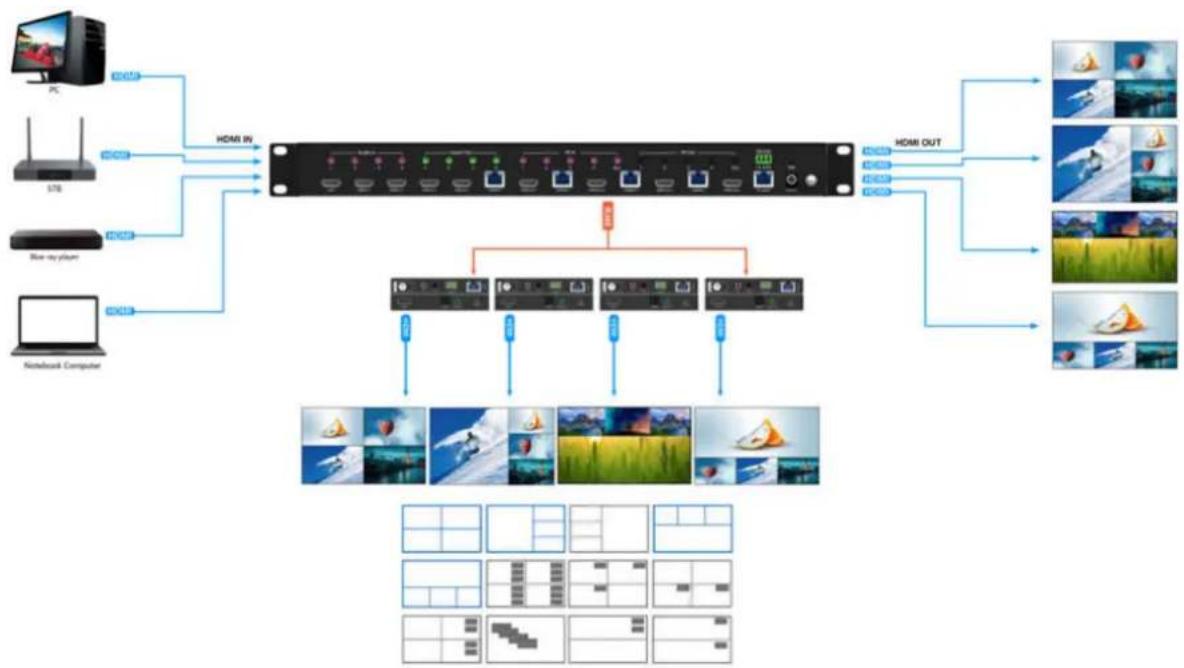
flowchart
graph TD
    PC["PC"] -->|HDMI IN| Switch["Switch"]
    I/O["I/O"] -->|HDMI IN| Switch
    Switch --> Output["Output Module"]
    subgraph_Video_Out["Video Out"]
        direction TB
        H1["Image 1"] -->|HDMI OUT| H2["Image 1"]
        H2 -->|HDMI OUT| H3["Image 2"]
        H3 -->|HDMI OUT| H4["Image 3"]
        H4 -->|HDMI OUT| H5["Image 4"]
        H5 -->|HDMI OUT| H6["Image 5"]
        H6 -->|HDMI OUT| H7["Image 6"]
        H7 -->|HDMI OUT| H8["Image 7"]
        H8 -->|HDMI OUT| H9["Image 8"]
        H9 -->|HDMI OUT| H10["Image 9"]
        H10 -->|HDMI OUT| H11["Image 10"]
        H11 -->|HDMI OUT| H12["Image 11"]
        H12 -->|HDMI OUT| H13["Image 12"]
        H13 -->|HDMI OUT| H14["Image 13"]
        H14 -->|HDMI OUT| H15["Image 14"]
        H15 -->|HDMI OUT| H16["Image 15"]
        H16 -->|HDMI OUT| H17["Image 16"]
        H17 -->|HDMI OUT| H18["Image 17"]
        H18 -->|HDMI OUT| H19["Image 18"]
        H19 -->|HDMI OUT| H20["Image 19"]
    end
Input/OutputChannelKeyOperation
| Channel | ButtonMethodology |
| OUT1-4 | Press the OUTPUT# button for the display you wish to change a # will be highlighted on the display screen. Multiple outputs can be selected and highlighted at once.Long press any OUTPUT button to highlight/select all outputs at 3. Press the INPUT # button you would like to display and the highlighted/selected output(s) will change to the selected input#.4. Press the OUTPUT # button again to cancel the selection of a highlighted output on the display screen. |
| IN1-4 | Press and hold an INPUT # button to change all inputs to the sele input. |
| MENU | Press the MENU button to enter the on screen display (OSD) menu back to the previous option. |
| ENTER | Press the ENTER button to confirm a selected option or advance to next menu screen. |
| UP | Press the UP button to navigate the OSD Menu. |
| DOWN | Press the DOWN button to navigate the OSD Menu. |
| PRESET | Press the PRESET button to enter the preset call menu.Use the UP and DOWN buttons to highlight one of the 26 pres modesPress the ENTER key to enable the highlighted preset mode. |
| LOCK | Long press the LOCK button to lock the touch panel buttons. Long the LOCK button again to unlock. |
PanelControl
Video
There are 4 switching channels which can be configured to form a matrix of 1 × 4 4 × 4 and can switch any input signal to any of the outputs.
Operation: "output channel" + "input channel"

text_image
Output 1 2 3 4 Input 2 2 2 2Examples:
- Switch output 1 to input 4
a. Press output button "1" and then press input "4" button to switch - Switch Outputs 1, 2, and 3 switch to input 2.
a. Press output buttons "1", "2", and "3" and then press input button "2" to complete the switch. - Switch all outputs to input 4 source
a. Long press output button "4" and then short press input "4" to switch.
MainMenu
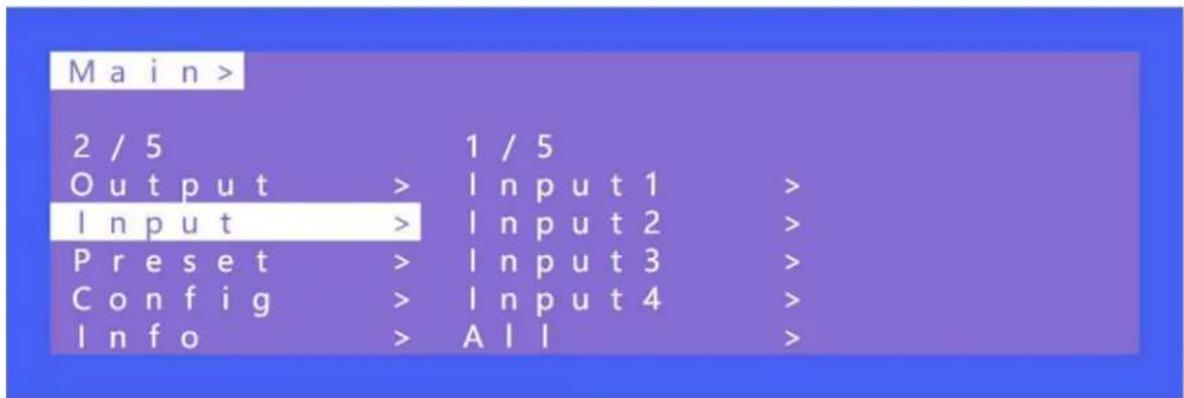
The main menu is divided into 5 sections, which are Output, Input, Preset, Config, and Info. Each section has multiple sub-menus that need to be set up for the best performance.
| Main > | ||
| 1 / 5 | 1 / 5 | |
| Output > | Output 1 > | |
| Input > | Output 2 > | |
| Preset > | Output 3 > | |
| Config > | Output 4 > | |
| Info > | All > | |
Output
There are 5 sub-menus in the Output interface: output 1\~4 and All, which are used for individual or all output settings. Each channel contains 3 function items, which are video, audio, and power.
| Main > Output > | |
| 1 / 5 | 1 / 3 |
| Output 1 > | Video > |
| Output 2 > | Audio > |
| Output 3 > | Power > |
| Output 4 > | |
| All > | |
Choose a desired output before setting video or audio parameters.
There are 9 options in video: Source, Onoff, Pattern, Format, Genlock, Mirror, Coord, PIP, and Image. There are 4 options in Audio: HDMI onoff, HDMI SRC, DEC onoff, and DEC SRC.
| Main > Output > Output 1 > | |
| 1 / 3 | 1 / 10 |
| Video > | Source > |
| Audio > | Onoff > |
| Power > | Pattern > |
| Format > | |
| Genlock > | |
1) Source
Any output can be switched to any input or all outputs can be switched to the same input; Default setting is PTP (Point to Point)
| Main > Output > Output 1 > Video > | |
| 1 / 9 | 4 / 4 |
| Source > | Input 1 |
| Onoff > | Input 2 |
| Pattern > | Input 3 |
| Format > | Input 4 @ |
| Genlock > | |
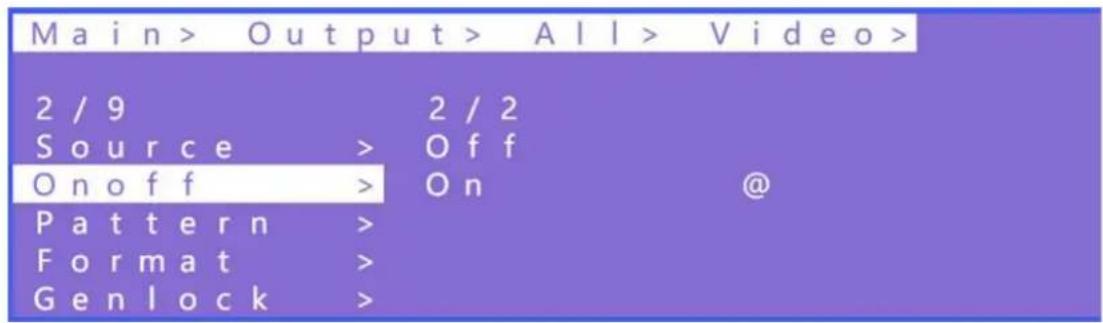
2) Onoff
Turn the video stream on or off for one or all of the outputs. The video streams are turned on by default.
text_image
Main > Output > All > Video > 2 / 9 2 / 2 Source > Off On off > On @ Pattern > Format > Gen lock >3) Pattern
Built-in images can be shown on a display(s) by using the Pattern option which can be used for signal testing or video alignment.
For example: Using the Cross or Cross1 images in 4x4 Video Wall mode to test whether each display is formatted and mounted correctly.
text_image
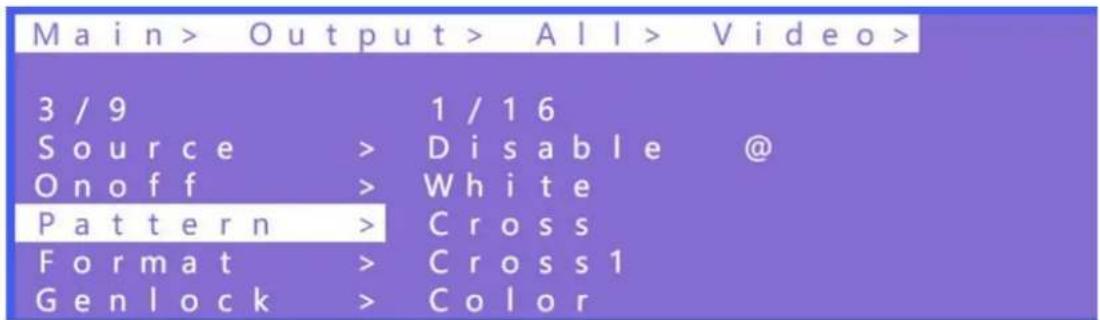
Main > Output > All > Video > 3 / 9 Source > 1 / 16 Onoff > Disable @ White Pattern > Cross Format > Cross1 Genlock > Color4) Format
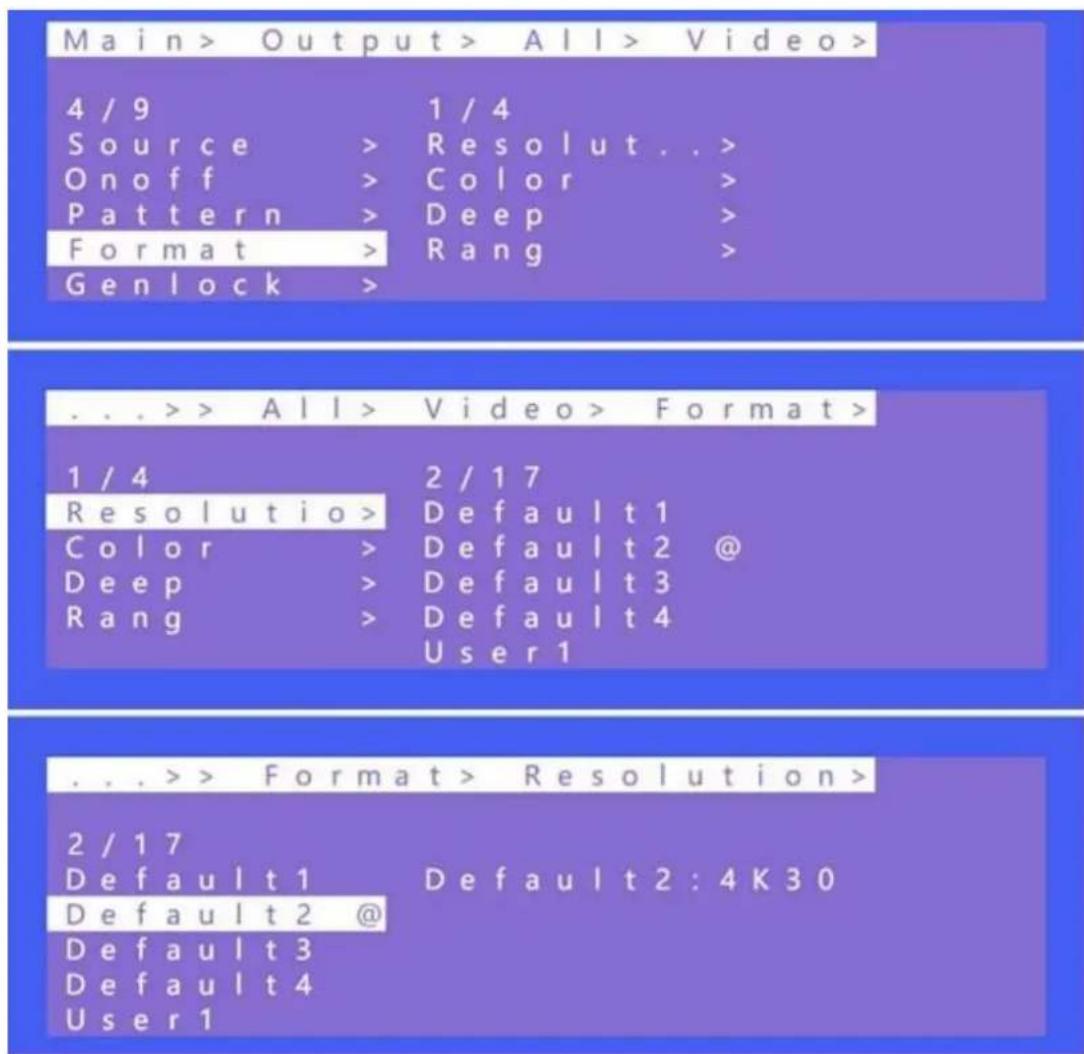
The Format function can set and force the output resolution format but it does not provide an upscale image quality.
Example:
The input is 1080P@60Hz and the output is set to 4K60Hz. Although the TV is displayed in 4K@60Hz the image will still be in 1080P@60Hz.
NOTE:Selecting the input mode will enable the following input resolution but switching with the matrix will not be seamless unless the resolution from the source is in the same format and without HDR. There will be a system check time for 15 seconds. The setting will return to the original resolution if the display does not support the selected resolution.
text_image
Main > Output > All > Video > 4 / 9 1 / 4 Source > Resolut.. > Onoff > Color > Pattern > Deep > Format > Rang > Genlock > ... >> All > Video > Format > 1 / 4 2 / 17 Resolutio > Default1 Color > Default2 @ Deep > Default3 Rang > Default4 User1 ... >> Format > Resolution > 2 / 17 Default1 Default2 : 4K30 Default2 @ Default3 Default4 User15) Genlock
Genlock is a common technique where the video output of one source is used to synchronize other picture sources together. Default is to Off. Output 1 cannot be selected as it is the reference. Only Output 2, Output 3, and Output 4 can be enabled. Switching the output resolution will affect other output images. (The image may be black for a while and the resolution will not be able to be changed.)
| Main > Output > All > Video > | |
| 5 / 9 | 2 / 2 |
| Source > Off | |
| On off > On @ | |
| Pattern > | |
| Format > | |
| Genlock > | |
Operation:
- Select "Output" in the main menu and press "ENTER"
- Press "UP" or "DOWN" to select "Output 1\~4, all"
- Click "ENTER" to enter the next sub-menu
- Press "UP" or "DOWN" to select "Video"
- Press "UP" or "DOWN" to select "Genlock"
- Click "ENTER" to enter the next sub-menu
- Press "UP" or "DOWN" to select "Off" or "On" to complete the operation.
6) Mirror
Mirror can flip an image on the horizontal or vertical axis. X is used to mirror horizontally and Y is used to mirror on the vertical axis. By default Mirror is set to off.
There are 3 options including Crop, Zoom, and Windows in the sub-menu, allowing users to crop and zoom images respectively.
Windows represents the current window image

natural_image
Four-panel illustration showing a silhouetted figure in a boat on water under a full moon, with sky and clouds in the background (no text or symbols)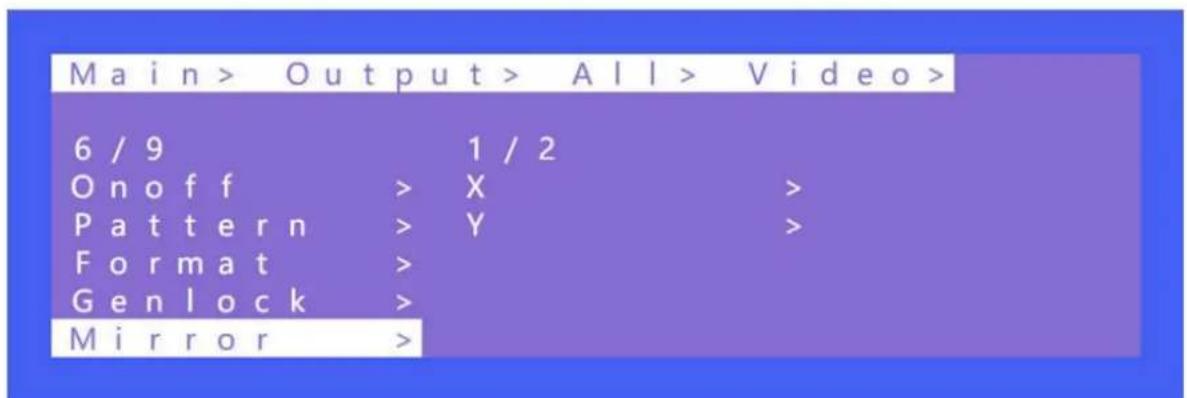
text_image
Main > Output > All > Video > 6 / 9 1 / 2 On off > X > Pattern > Y > Format > Gen lock > Mirror >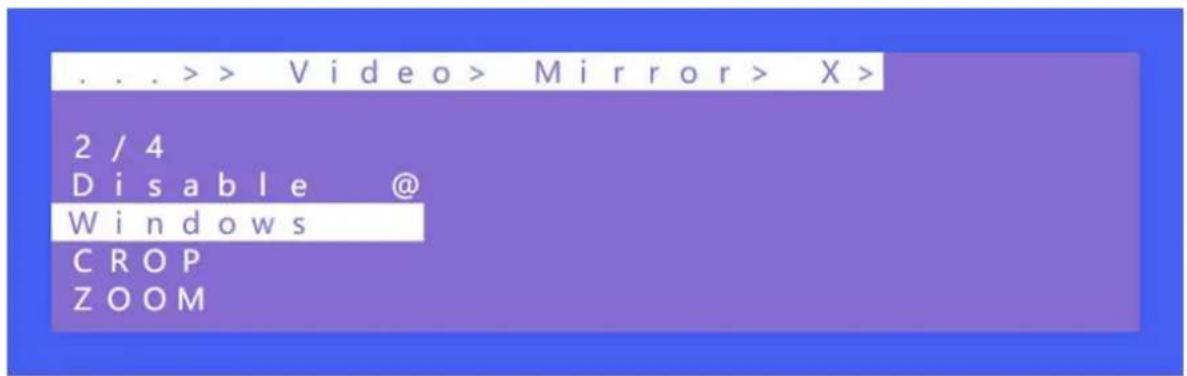
text_image
... >> Video > Mirror > X > 2 / 4 Disable @ Windows CROP ZOOM7) Coord
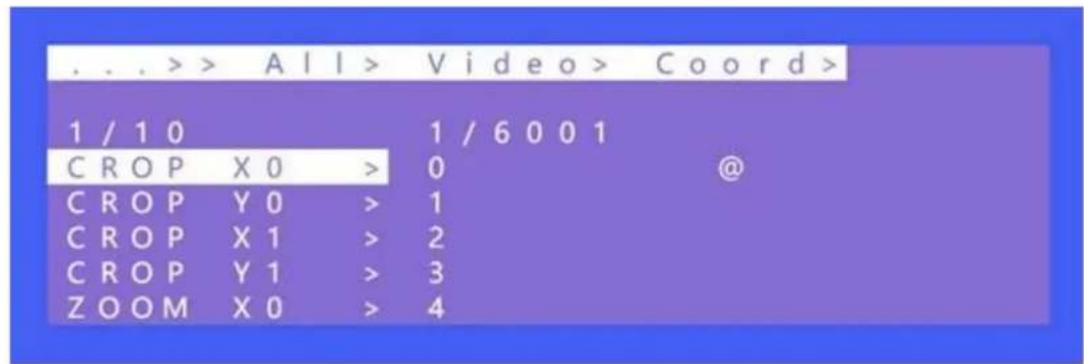
Coord is used to fine tune the parameters of an image in multiview and video wall modes. There are 3 types including Crop, Zoom, and Gap.
Crop trims an image, Zoom will magnify the image, and Gap will compensate for the bezel on the display.
There are a total of 10 coordinate parameters which can be changed: CROPX0, CROPY0, CROPX1, CROPY1, ZOOMX0, ZOOMY0, ZOOMX1, ZOOMY1, GapX, and GapY.
Adjusting these parameters will have effects in multiview and video wall modes.
The default starting point of Crop : CROPX0 = 0, CROPY0 = 0.
The default end point of Crop: CROPX1 = 6000, CROPY1 = 6000.
The default start point of Zoom: ZoomX0 = 0, ZoomY0 = 0
The default end point of Zoom: ZoomX1 = 6000, ZoomY1 = 6000
The default start point of GapX=0, GapY=0
| Main > Output > All > Video > | |||
| 7 / 9 | 1 / 10 | ||
| Pattern | > | CROP X0 | > |
| Format | > | CROP Y0 | > |
| Genlock | > | CROP X1 | > |
| Mirror | > | CROP Y1 | > |
| Coord | > | ZOOM X0 | > |
text_image
. . . >> All > Video > Coord > 1 / 10 C R O P X 0 > 1 / 6 0 0 1 C R O P Y 0 > 0 @ C R O P X 1 > 1 C R O P Y 1 > 2 Z O O M X 0 > 3 4
text_image
. . . >> All > Video > Coord > 9 / 10 1 / 1001 ZOOM Y0 > 0 @ ZOOM X1 > 1 ZOOM Y1 > 2 Gap X > 3 Gap Y > 48) PIP
PIP is mainly used for the layer priority. By default, each output has 4 layers. It can change the sequence of the layers in multiview mode. Each layer can choose an output. You can turn this function on or off in Status.
Alpha will adjust the transparency between the layers.
NOTE: One layer can select only one output and it cannot select it repeatedly, otherwise it will not take effect.

text_image
Main > Output > All > Video > 8 / 9 1 / 9 Format > Status > Genlock > Layer 1 > Mirror > Layer 2 > Coord > Layer 3 > PIP > Layer 4 >9) Image
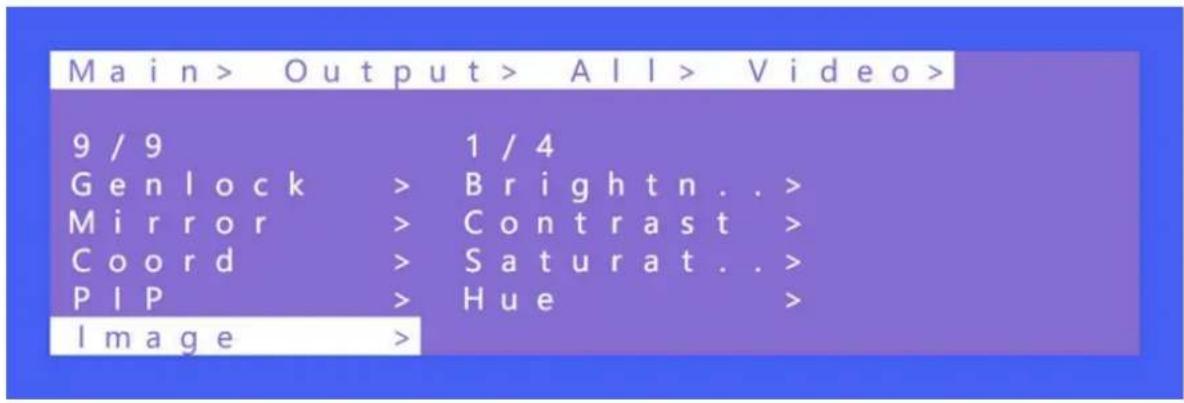
Image is used to set the parameters of the output image. There are 4 parameters: Brightness, Contrast, Saturation, and Hue. Parameters range from 0 to 100 and they are set to 50 by default.
text_image
Main > Output > All > Video > 9 / 9 1 / 4 Genlock > Brightn..> Mirror > Contrast > Coord > Saturat..> PIP > Hue > Image >Audio
There are 4 options in Audio: HDMI Onoff, HDMI SRC, DEC Onoff, DECSRC. This unit can switch audio independently, turn off HDMI audio output, extract audio as well as switch extracted audio to another source.

text_image
Main > Output > Output 1 > 2 / 3 Video > 1 / 4 Audio > HDMI On . . > Power > HDMI SRC > DEC On off > DEC SRC >1) HDMIOnoff
HDMI Onoff can turn HDMI audio on or off. Video will be displayed on TV without audio when turning off the audio.

text_image
Main > Output > Output1 > Audio > 1 / 4 2 / 2 HDMI On of > Off HDMI SRC > On @ DEC On off > DEC SRC >2) HDMISRC
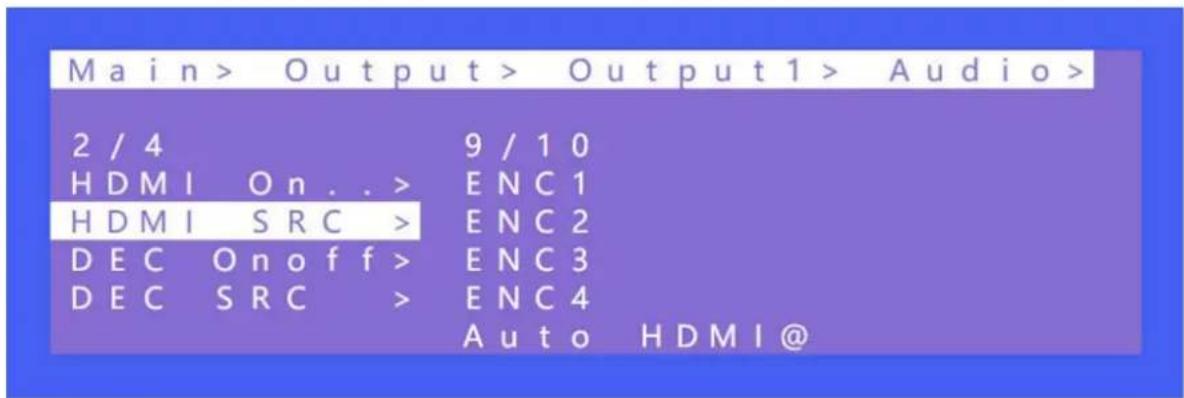
HDMI SRC enables switching to different input signal sources. It supports switching to analog audio in 1\~4 and HDMI input 1\~4.
AutoHDMI(Default) the audio is from the corresponding input.
AutoENCaudio is from the corresponding audio input. Audio follows the matrix input's and does not switch to other audio sources.
text_image
Main > Output > Output1 > Audio > 2 / 4 9 / 10 HDMI On..> ENC1 HDMI SRC > ENC2 DEC Onoff> ENC3 DEC SRC > ENC4 Auto HDMI@3) DEConoff
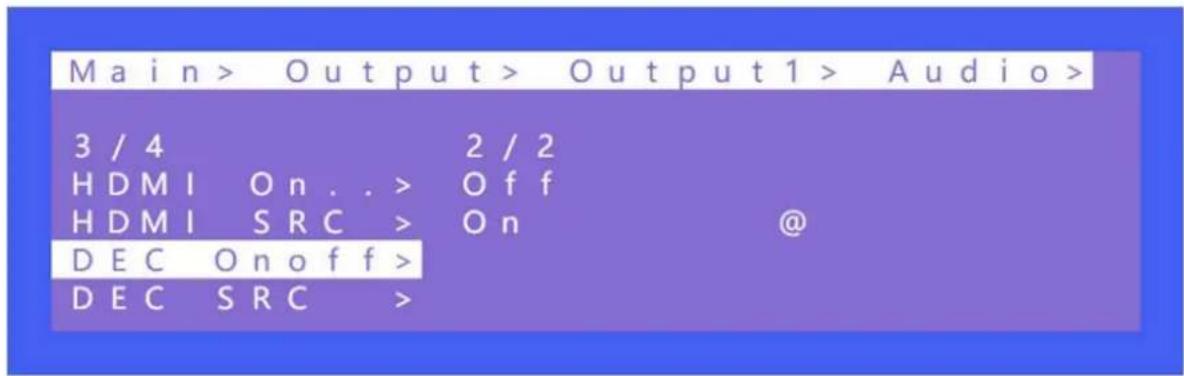
DEC Onoff can turn on or off the audio for the entire device. Click "On" to turn on the audio, click "Off" to turn off the audio. It is ON by default.
text_image
Main > Output > Output1 > Audio > 3 / 4 2 / 2 HDMI On . . > Off HDMI SRC > On @ DEC On off > DEC SRC >4) DECSRC
DEC SRC allows audio to be extracted and embedded to a different input source. Audio can be switched to HDMI inputs 1\~4. Auto HDMI follows the corresponding input. The default is Auto HDMI.
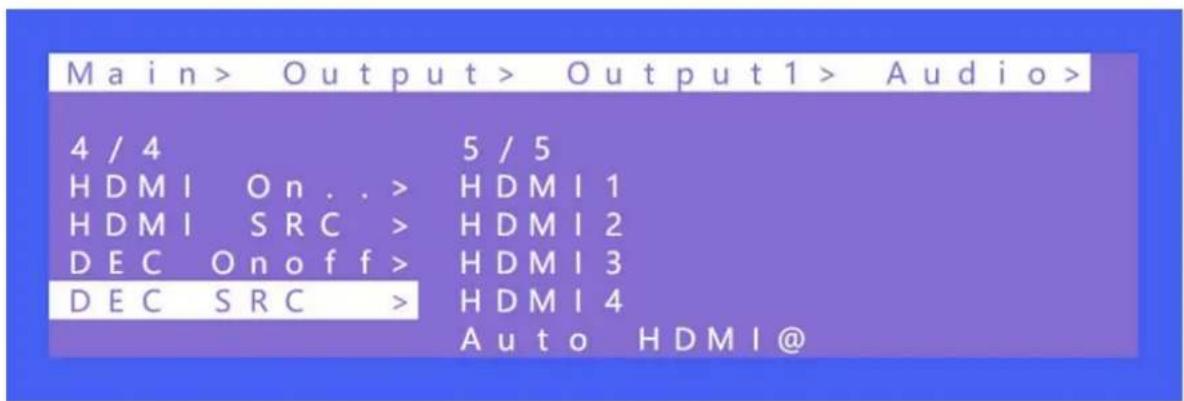
text_image
Main > Output > Output1 > Audio > 4 / 4 5 / 5 HDMI On . . > HDMI 1 HDMI SRC > HDMI 2 DEC On off > HDMI 3 DEC SRC > HDMI 4 Auto HDMI@Power
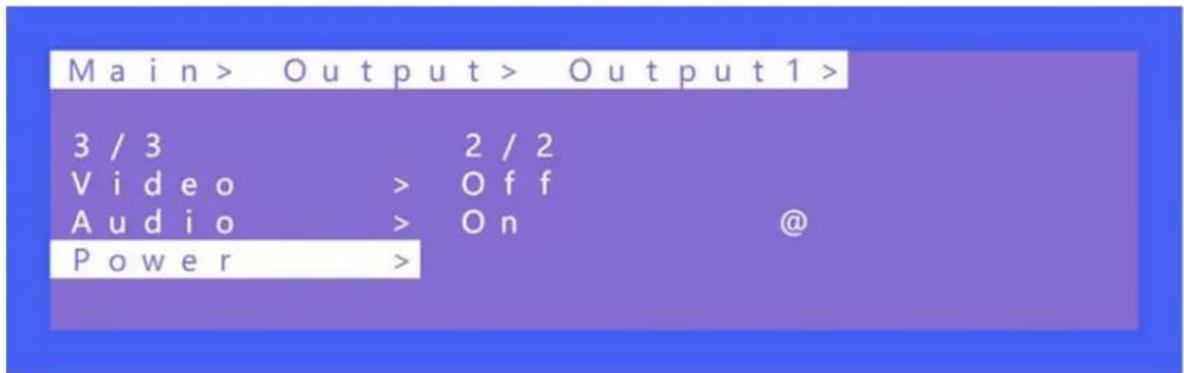
Power will turn on or off the HDMI output of 5V. This is different from “Onoff” as there is a blue screen displayed on a TV while selecting “off” in “Onoff”. Image will completely turn off after selecting “Off” in “Power”. It is on by default.
Main menu including 5 Modes: Output, Input, Preset, Config, Info
text_image
Main > Output > Output 1 > 3 / 3 2 / 2 Video > Off Audio > On @ Power >Input
There are three options in the Input interface which are Video, Audio, and EDID. Video is used to provide the switch channel and built-in Pattern switch. Audio is used to set the delay to sync embedded/extracted audio with a video stream. EDID supports built-in, copy, user, and temp.
text_image
Main > 2 / 5 Output > 1 / 5 Input > Input 1 > Preset > Input 3 > Config > Input 4 > Info > All >
text_image
Main > Input > 1 / 5 Input 1 > 1 / 3 Input 2 > Video > Input 3 > Audio > Input 4 > EDID > All >1) Video
Video Onoff can turn the input channel on or off. All of the outputs corresponding to the input will have no image or audio when this input is set to "Off". Pattern provides a built-in pattern which can be selected to replace the input source image.

text_image
Main > Input > Input 1 > 1 / 3 Video > 1 / 2 Audio > Onoff > EDID > Pattern >2)Audio
Audio delay setting range 0\~50(ms) and auto, the default is auto. This setting is used to help embedded or extracted audio sync better with the video stream.

text_image
Main > Input > Input 1 > 2 / 3 Video > 1 / 1 Audio > Delay > EDID >3)EDID
There are 4 EDID options including built-in EDID, User EDID, Copy HDMI EDID, and temp. Each input EDID can be set individually. The default setting is default1.
After copying the TV EDID, the audio parameter is automatically changed to LPCM 2.0.
| Default1 | 4K60 4:4:4-LPCM: 2.0-192Khz | Default2 | 4K60 4:2:0-LPCM: 2.0-192Khz |
| Default3 | 4K30 4:4:4-LPCM: 2.0-192Khz | Default4 | 1080P120 4:4:4-LPCM: 2.0-192Khz |

text_image
Main > Input > Input 1 > 3 / 3 Video > Default 1 Audio > Default 2 @ EDID > Default 3 Default 4 User 1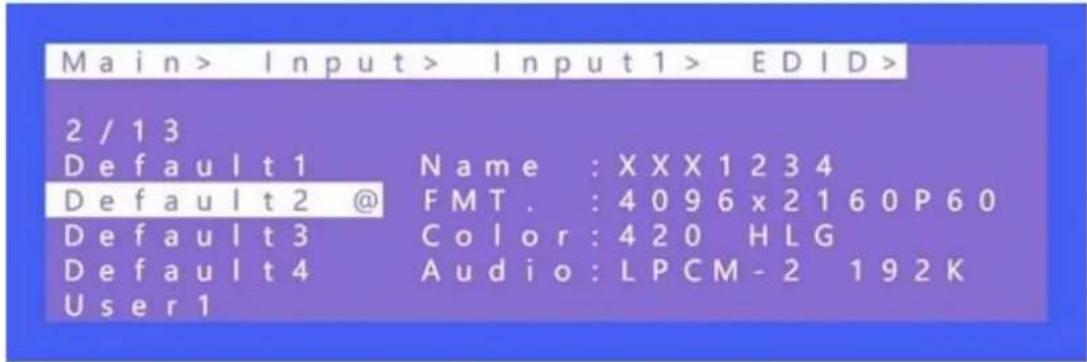
text_image
Main> Input> Input1> EDID> 2 / 13 Default1 Name :XXX1234 Default2 @ FMT. :4096x2160P60 Default3 Color:420 HLG Default4 Audio:LPCM-2 192K User1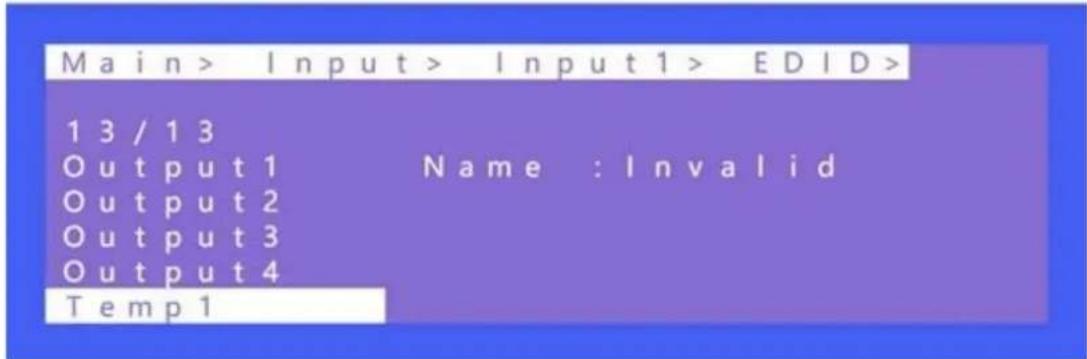
text_image
Main > Input > Input1 > EDID > 13 / 13 Output 1 Name : Invalid Output 2 Output 3 Output 4 Temp 1Example: Switching Default1 to input1:
- Select "EDID" in the main menu and press "ENTER"
- Press "UP" or "DOWN" to select "Input 1"(the fifth option indicates that select all inputs)
- Click "ENTER" to enter the next sub-menu
- Press "Default1" to complete the operation
- The selected EDID will show some of its information (resolution, audio format, and audio channel)
Preset
Preset can save the current video, audio, EDID, and system settings. The unit supports 8 different presets. Presets can be modified and called using the web interface, remote, and front panel.
There are 4 Preset options as follows:
Clear:Remove the selected preset.
Save:Stores the current preset (can be covered).
Call:Activates the currently selected preset.
Demo:Plays the demo according to the scenes sequence.

text_image
M a i n > 3 / 5 Output > 1 / 5 Input > Clear > P r e s e t > Save > C a l l > C o n f i g > C a s c a d e > I n f o > Demo >Operations:
-
Select "Preset" in the main menu and short press "ENTER" to enter the preset interface. Call indicates calling preset, Save indicates saving preset, Clean indicates cleaning preset.
-
Save preset: select "Save" in Preset and select "Mode" or "Scene" to save in "Scene" or "P2P"
-
Call preset: Select "Call" in Preset, then select a saved preset to complete the operation.
-
Clear preset: Select "Clear" in Preset, select a saved scene to complete the operation.
The saved preset scenes are restored to their default values.
For example:
Save: Preset+Save+Scene+Scene1
Call: Preset+Call+Scene+Preset1
Clear: Preset+Clear+Scene+Preset 1

text_image
Main > Preset > 3 / 5 Clear > Mode > Save > Scene > Call > Cascade > Demo >
text_image
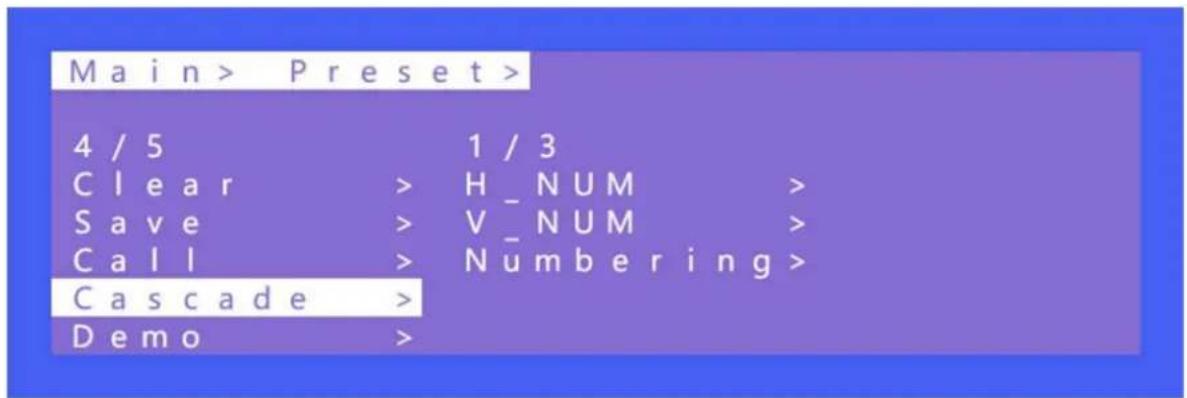
Main > Preset > Clear > 1 / 2 Mode > 1 5 / 2 7 Scene > W - 2 x 1 W - 2 x 1 2 x 1 W - 3 x 1 W - 4 x 1 M - 2 x 2 @ Main > Preset > Clear > 2 / 2 Mode > 1 / 9 Scene > Scene 1 @ Scene > Scene 2 Scene 3 Scene 4 Scene 5Cascade Video Wall:
Cascade allows users to combine multiple matrix units together to form a video wall that would not normally be possible for one unit alone.
H_NUM indicates the number of displays horizontally in the video wall.
V_NUM indicates the number of displays vertically in the video wall.
Numbering indicates the matrix's current position in the cascade sequence (Up to 5 matrices are supported for cascading).
text_image
Main > Preset > 4 / 5 Clear > H_NUM > Save > V_NUM > Call > Numbering > Cascade > Demo >Instructions for operation:
Each matrix must be set to the same number of displays horizontal and vertical. Then set the "Numbering" of each matrix (numbering cannot be repeated). Next, connect each matrix to the corresponding display on the video wall. Note the output order must go in sequence.
For Example:
Creating horizontal 2, vertical 3 video wall (2x3).
Matrix 1's output 1\~4 are connected to TV 1\~4, the loop out of matrix 1 is connected to matrix 2's input; Matrix 2's outputs 1\~2 are connected to TV 5\~6.
A 2x3 video wall is generated
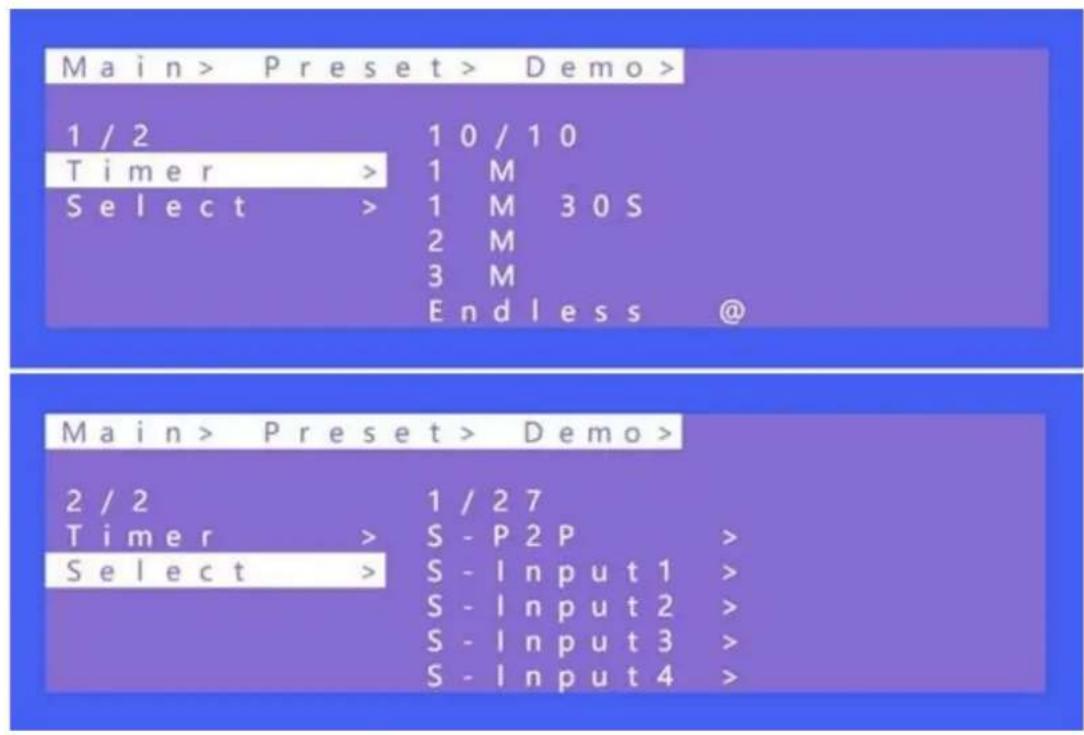
Demo operation:
Timer can set the rotation time, the default is "Endless", the minimum time is 3 seconds.
Select indicates if need to perform the scenario in rotation. If this parameter is set to yes, the scenario will be played. If this parameter is not set to yes, the scenario will be skipped.
text_image
Main > Preset > Demo > 1 / 2 10 / 10 Timer > 1 M Select > 1 M 30S 2 M 3 M End less @ Main > Preset > Demo > 2 / 2 1 / 27 Timer > S - P2P >. Select > S - Input 1 > S - Input 2 > S - Input 3 > S - Input 4 >Config
Config can set Network, RS232, LCD, OSD, MENU, user EDID, and system.

text_image
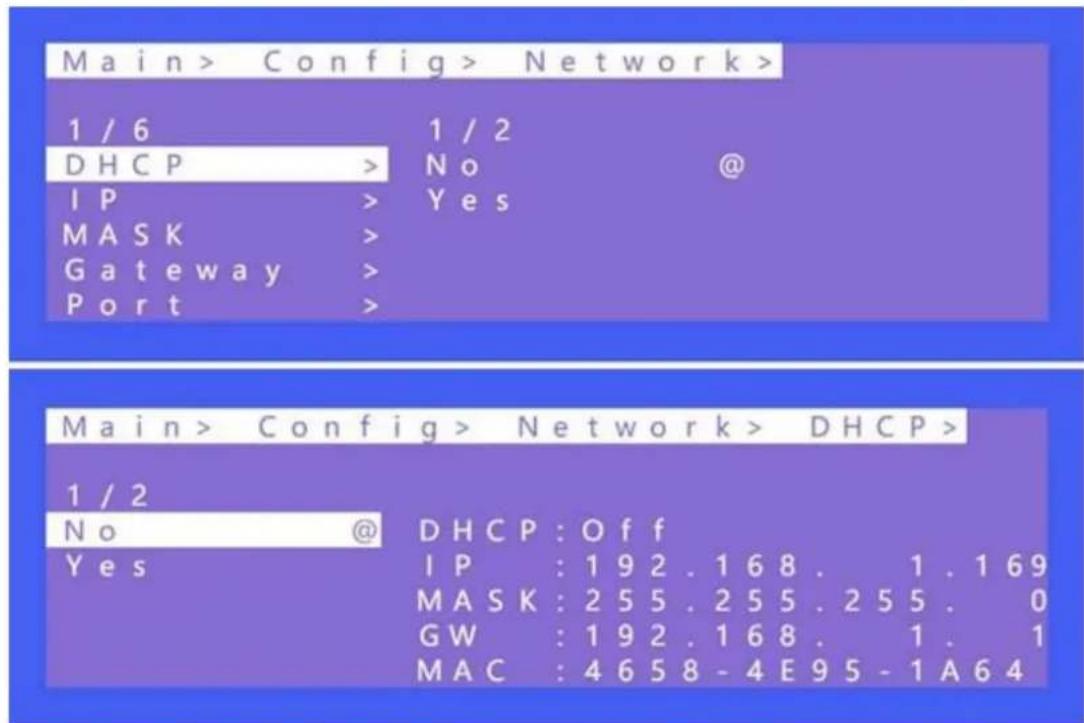
Main > 4 / 5 Output > 1 / 7 Input > Network > Preset > RS - 232 > Config > LCD > Info > OSD > Menu >1) NetworkSetting
Network can set DHCP, IP, Mask, Gateway, Port, and Mac. The Mac address cannot be changed.
ThedefaultIPaddressis192.168.1.200
TCP/UDP protocol, default port: TCP 5000, UDP 5001
Baud Rate: 115200
Telnet: 23
text_image
Main > Config > Network > 1 / 6 1 / 2 DHCP > No @ IP > Yes MASK > Gateway > Port > Main > Config > Network > DHCP > 1 / 2 No @ DHCP : Off Yes IP : 192.168. 1.169 MASK : 255.255.255. 0 GW : 192.168. 1.1 MAC : 4658 - 4E95 - 1A64
text_image
Main > Config > Network > 2 / 6 1 / 4 DHCP > Part 1 > IP > Part 2 > MASK > Part 3 > Gateway > Part 4 > Port > Main > Config > Network > IP > 1 / 4 193 / 256 Part 1 > 188 Part 2 > 189 Part 3 > 190 Part 4 > 191 192 @ Main > Config > Network > Port > 1 / 2 5000 / 65534 TCP > 5000 @ UDP > 5001 5002 5003 5004 . . . >> Network > Port > TCP > 5000 / 65534 5000 @ DHCP : Off 5001 IP : 192.168. 0.57 5002 MASK : 255.255.255. 0 5003 GW : 192.168. 0.1 5004 MAC : 4658 - 4E9E - 0A6BTCP/UDP port change operation:
- Select "Config" in the main menu and press "ENTER"
- Press "UP" or "DOWN" to select "network"
- Click "ENTER" to enter the next sub-menu
- Press "UP" or "DOWN" to select baud rate "Port" to enter the next sub-menu
- Select "UDP" or "TCP"
- Press "UP" or "DOWN" to select "1\~65534" to complete the operation.
2)RS-232
Data, Stop, and Parity parameters are for display purposes only and cannot be modified.

text_image
Main > Config > 2 / 7 1 / 4 Network > Baud > RS - 232 > Data > LCD > Stop > OSD > Parity > Menu > Main > Config > RS - 232 > 1 / 4 1 / 6 Baud > 1 15200 @ Data > 57600 Stop > 38400 Parity > 19200 96003)LCD
Bright can adjust the brightness of the LCD screen, and Timer can set the backlight time. The default backlight level is 8 and the time is 30 seconds.
Bright backlight levels range from 0-8, and 0 indicates off.
Timer can be set from 3 seconds \~ Endless.

text_image
Main > Config > 3 / 7 1 / 2 Network >Bright > RS - 232 >Timer > LCD > OSD > Menu >
text_image
Main > Config > LCD > 2 / 2 6 / 1 1 Bright > 30S @ Timer > 1 M 1 M 30S 2 M 3 M Main > Config > LCD > 1 / 2 9 / 9 Bright > 4 Timer > 5 6 7 8 @4)OSDSettings
There are 4 options in OSD: User, Time, Menu, Info.
Userindicates the output coordinate time of OSD.
Timeindicates the running time after the device is powered on.
Menuindicates that the LCD is mapped to the TV.
Infoindicates the displayed time of audio and video information.
When the parameter is set to 0 seconds, OSD display is turned off. By default, User and time are endless, menu and INFO are 30 seconds
text_image
Main > Config > 4 / 7 1 / 4 Network > User > RS - 232 > Time > LCD > Menu > OSD > Info > Menu >5)Menu
Timer indicates the time of menu returns to the channel. Default 30s.
Select Run indicates whether the confirm button of the last sub-menu is enabled.
If it is set to disable, you need to press "ENTER". If it is set to enable, you do not need to press "ENTER"
text_image
Main > Config > 5 / 7 1 / 2 Network > Timer > RS - 232 > SelectRun > LCD > OSD > Menu >
text_image
Main > Config > Menu > 1 / 2 10 / 10 Timer > 1 M SelectRun> 1 M 30S 2 M 3 M End less @
text_image
Main > Config > Menu > 2 / 2 2 / 2 Timer > Disable SelectRun > Enable @6)UserEDID
User EDID can store the EDID of the output display device of the connection matrix to user1\~4, which can be stored in default, output, and temp1, and then used in the EDID list.

text_image
Main > Config > 6 / 7 1 / 5 LCD > User 1 > OSD > User 2 > Menu > User 3 > User EDID> User 4 > System > All >7)System
System Settings include reboot, Power, and Factory. Reboot restarts the device, power controls the device's sleep state, and factory is used to factory reset the unit to its original configuration.
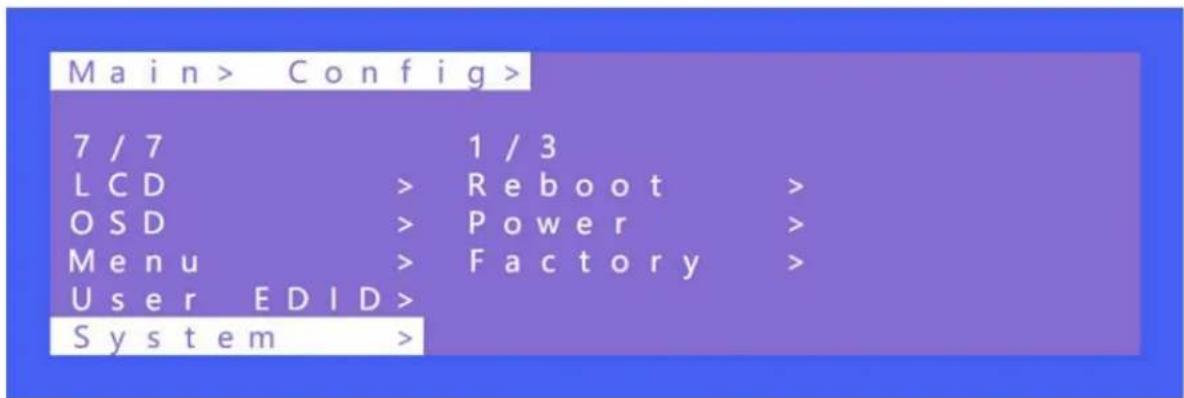
text_image
Main > Config > 7 / 7 1 / 3 LCD > Reboot > OSD > Power > Menu > Factory > User EDID> System >
text_image
Main > Config > System > 1 / 3 1 / 2 Reboot > No @ Power > Yes Factory >TimedOff
Timed Off indicates timed standby, Timed On indicates timed wake up, and Auto Sleep puts the unit to sleep automatically if no signal is detected.

text_image
Main > Config > System > 2 / 3 Reboot > 1 / 3 Power > Timed Off > Factory > Timed On > Auto Sl.. >Factory
Simple: Partially restores factory settings excluding network settings. User: Restores all factory settings.
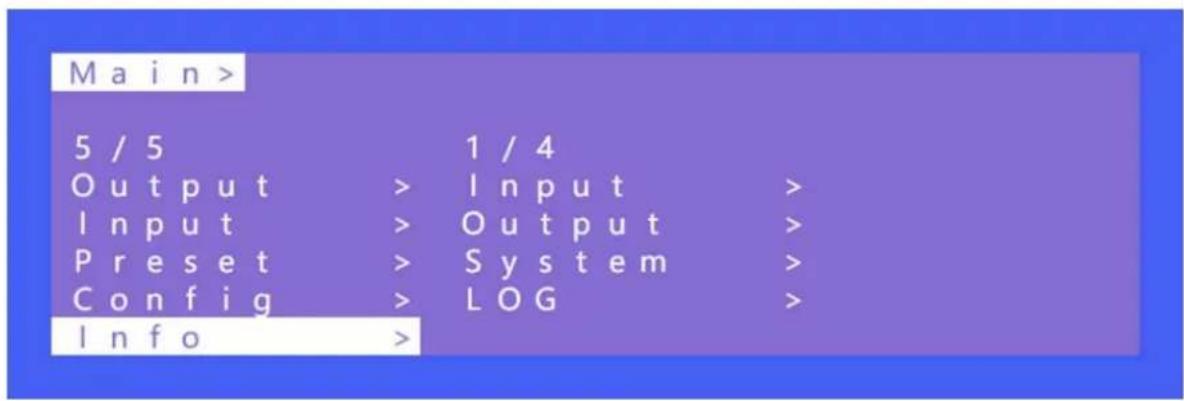
Info
Query device information, including input, output, system, and log. The information can only be viewed and cannot be set or changed.
Input: resolution information of the signal sources
Output: EDID information of the TV of outputs.
System: System information includes Web, version, and company info.
Log: Matrix log
text_image
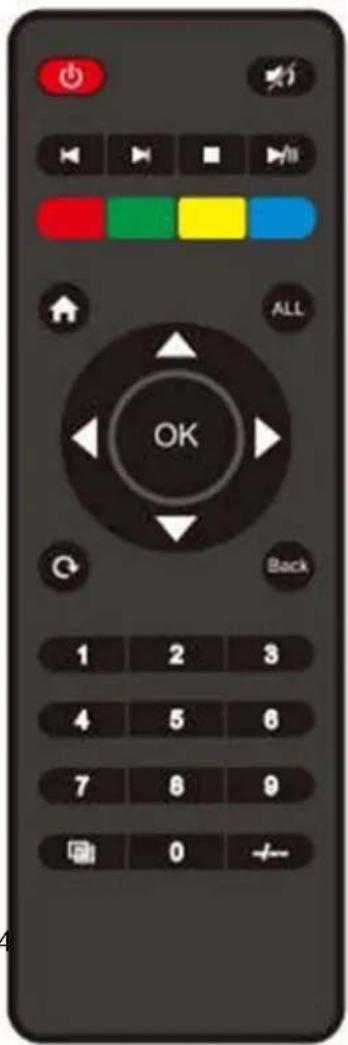
Main > 5 / 5 Output > 1 / 4 Input > Input > Preset > Output > Config > System > Info > LOG >RemoteControl

:Standby or power on

:Mute button

:Return to previous level

:Move to next level

:Picture off

:Page turn by 100 of the last sub-menu
:Page turn by 10 of the last sub-menu

:Menu

:All output

:Up

:Menu

:OK

:Enter

:Down

:Return or exit

:Menu

When selecting Output, means Out1--Out4 When selecting Input, means In1--In4

: Preset

:(N/A)

:Point to Point 1-1, 2-2, 3-3, 4-4
text_image
OK ALL Back 1 2 3 4 5 6 7 8 9 0 + -AudioExtraction
HDMIAudio
Default HDMI audio output supports uncompressed audio formats PCM and LPCM 2.0. The maximum sampling rate support 192KHZ COPY EDID audio formats are forced into LCPM 2.0.
HDMI Source:
- ENC1\~4 indicates that HDMI outputs select the embedding audio
- HDMI1\~4 indicates that HDMI outputs select other audio source
- Auto HDMI indicates that the input signal source is switched with the matrix, but the audio state is not switched
- Auto ENC indicates the HDMI sound will be overwritten and replaced with the corresponding embedded audio
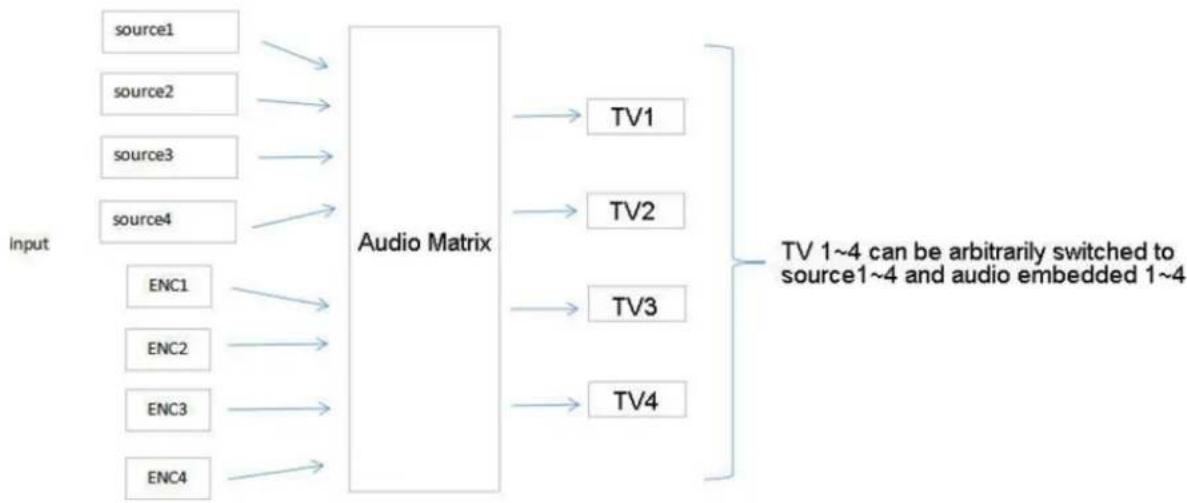
flowchart
graph LR
    A["source1"] --> B["Audio Matrix"]
    C["source2"] --> B
    D["source3"] --> B
    E["source4"] --> B
    F["ENC1"] --> B
    G["ENC2"] --> B
    H["ENC3"] --> B
    I["ENC4"] --> B
    B --> J["TV1"]
    B --> K["TV2"]
    B --> L["TV3"]
    B --> M["TV4"]
    N["TV 1~4 can be arbitrarily switched to source1~4 and audio embedded 1~4"]
AudioExtraction

text_image
Audio Out 1 2 3 4Analog Audio
- HDMI 1\~4 indicates that HDMI output audio selects audio from another input signal source.
- Auto HDMI will have audio follow the HDMI Matrix Switching.
flowchart
graph LR
    A["HDMI 1"] --> B["Audio Matrix"]
    C["HDMI 2"] --> B
    D["HDMI 3"] --> B
    E["HDMI 4"] --> B
    B --> F["Analog 1"]
    B --> G["Analog 2"]
    B --> H["Analog 3"]
    B --> I["Analog 4"]
RS232Control
ComPortSettings
Choose the correct COM port that connects to the PC in enter the following information in the parameters configuration area for your command application.
| SerialPortDefaultSettings | |
| Baud Rate | 115200 bps(Default) |
| Parity Bits | None |
| Data Bits | 8 |
| Stop Bits | 1 |
CommandList
1). All commands start with “#”
2).“_” the underline cannot be omitted.
3) Command head, Parameter and target need to add one "SPACE".
4) Out can be followed by multiple digits, separated by commas (,). For example, "#video_d out3,2,1 source=3"
The following table is only an example. Please refer to the list of instructions.
| Type | Format | Value | Regulation |
| Command head | #cmd | without | |
| Explain | Can be used to search command,after receiving command,the system will feedback open command format fields | ||
| Example1 | #cmd | ||
| Search all open command | |||
SceneExamples
VideoWallMode

natural_image
Creative illustration of a goldenfish swimming through a water splash slice, set against a light blue background (no text or symbols)W-2x2:2 Vertical x 2 Horizontal

natural_image
Four-panel image showing a cut of orange fruit, goldfish, a snowboarder, and a bridge at night with Big Ben (no text or symbols)W-1x2:1 Vertical x 2 Horizontal

natural_image
Composite image showing a cut of orange fruit with goldfish, an illuminated cityscape at dusk, and a bridge over the Great Wall (no text or symbols)W-1x2 1x2:1 Vertical x 2 Horizontal

natural_image
Composite image showing a cut of orange fruit with goldfish, water splashing, and a cityscape at night (no text or symbols)W-1x3: 1 Vertical x 3 Horizontal

natural_image
Creative illustration of a goldenfish swimming through a water splash into an orange slice (no text or symbols)W-1x4: 1 Vertical x 4 Horizontal

natural_image
Four-panel collage showing Eiffel Tower, a snowboarder in the sky, Big Ben's bridge, and a cityscape with London (no text or symbols)W-2x1:2 Vertical x 1 Horizontal

natural_image
Composite image showing the Eiffel Tower and the New York City skyline under a blue sky, with no visible text or symbols.W-2x1 W-2x1: 2 Vertical x 1 Horizontal

natural_image
Composite image showing the Eiffel Tower and a slice of oranges against a blue sky (no text or symbols)W-3x1: 3 Vertical x 1 Horizontal

natural_image
Exterior view of the Eiffel Tower under a blue sky, with no visible text or symbols.W-4x1:4 Vertical x 1 horizontal
MultiviewMode

natural_image
Four-panel collage showing a cut of orange fruit, a hot air balloon, a snowboarder in mid-air, and a bridge at night with Big Ben (no text or symbols)M-2x2

natural_image
Snowboarder in action against a blue sky, with inset images of a pear, hot air balloon, and a bridge (no text or symbols)M-3×1-R

natural_image
Composite image showing a pear slice, a hot air balloon, and a snowboard on a snowy slope under a clear blue sky (no text or symbols)M-3x1-L

M-3x1-U

M-3x1-D

M-1+234 A

M-1+2 1+3 1+4 A

natural_image
Sunset over a green wheat field with silhouetted stalks (no text or symbols)
natural_image
Scenic mountain landscape with a lake and forested slopes under a cloudy sky (no text or symbols visible)
natural_image
Golden wheat field at sunset with a bright sun and a blue mountain range inset (no text or symbols)
natural_image
Scenic mountain landscape with a lake and forested slopes, featuring a small inset image of a tree on a starry sky (no text or symbols)M-1+2 3+4 A

natural_image
Collage of nature scenes including green grass, snow-capped mountains, and a lake at sunset, with inset images showing landscape details (no text or symbols)M-1+34 2+34 A

natural_image
Collage of four photographs showing a mountain landscape with blue sky and green fields, no text or symbols present.M-POP A

natural_image
Scenic landscape collage showing golden wheat field, snow-capped mountains, and a lake with forested slopes (no text or symbols)M-2x1+34 A

natural_image
Four-panel collage showing a golden sun over green wheat stalks, a scenic mountain landscape with a lake, and a snowy mountain landscape with a tree on a lake (no text or symbols)M-2x1+32x1+4 A
ImageCroppingandTVCoordinateChanges
Input starting point: CROP X0(0), CROP Y (0),
Input ending point: CROP X1(3000), CROP Y0(3000)
Input scaling starting point: ZOOM X0(0), ZOOM Y0(0),
Input scaling ending point: ZOOM X1(6000), ZOOM Y0(6000)
natural_image
Modern television displaying an elephant in a savanna field with trees and grass (no text or symbols visible)Before cropping

natural_image
Modern flat-screen TV displaying an elephant on a rock, set against a backdrop of trees and natural scenery (no text or symbols visible)After cropping
CascadingVideoWall
To perform a cascade connection multiple matrices are required. All of the matrices need to set the same number of video wall displays in the same format. The matrices flow from 1\~2\~3 respectively when connected to the TV wall. See the example below:
A 3x3 video wall; Matrix1 connects to TV 1 to 4, Matrix2 connects to TV 5 to 8, Matrix3 connects to TV 9, the front matrix loops out to connect to the next matrix's input 1
flowchart
graph TD
    A["matrix1"] --> B["1"]
    A --> C["4"]
    D["matrix2"] --> E["2"]
    D --> F["1"]
    D --> G["5"]
    H["matrix3"] --> I["3"]
    H --> J["2"]
    H --> K["6"]
    B --> L["7"]
    C --> M["8"]
    E --> N["9"]
    F --> O["1"]
    G --> P["3"]
***Theblacknumberistheoutputorderofthematrix,andtheredisthepositionoftheTVwall
WebControl
ChangeIPAddressofPC
Before configuring the device through the website, it is necessary to configure the IP address of the computer to ensure that the computer and the device are set in the same network segment.
- Open the network control center and set the computer's IP address:
- Choose "Use the following IP address", and set the IP address to 196.168.1.x (where x ranges from 0 to 254, but cannot be with the device's default IP address 192.168.1.200)
- Subnet mask set to 255.255.255.0
- Gateway set to 192.168.1.1
- Click "OK"
text_image
Internet Protocol Version 4 (TCP/IPv4) Properties General You can get IP settings assigned automatically if your network supports this capability. Otherwise, you need to ask your network administrator for the appropriate IP settings. Obtain an IP address automatically Use the following IF address: IP address: 192 . 168 . 1 . 2 Subnet mask: 255 . 255 . 255 . 0 Default gateway: | Obtain DNS server address automatically Use the following DNS server addresses: Preferred DNS server: . Alternate DNS server: . Validate settings upon exit Advanced... OK CancelLoginbybrowser
Enter the Default IP address (192.168.1.200) to access the login screen in your preferred web browser.
Type in the username and password (default user and default password: admin)

text_image
BZB2 GEAR® admin ...... LoginWebInterfaceControl
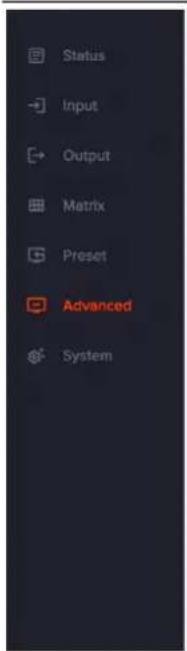
Status
- In the Status interface, you can view the matrix information
- Input Status displays the connection status, resolution, color space, audio, and HDCP information from the input signal source
- Output Status will display partial EDID information of the connected display such as connection status, resolution, color space, and audio.
- Firmware version displays the current MCU and HTML versions for the matrix.

text_image
BZB2 GEAR® Status Input Output Matrix Preset Advanced System Need Help? support@bzbgear.com @88p.499-9206| Connected | Resolution | Color | Audio | HDCP | |
| MK | ✓ | 3840+2160P 59.94 | 4:2:2 8bit SMPTE | XXX-2 48K 24bit | HDCP2.2 |
| Bluray | ✓ | 4096+2160P 60 | 4:2:0 8bit SDR | XXX-2 44.1K 24bit | None |
| burbgear | ✓ | 4096+2160P 60 | 4:2:0 8bit SDR | XXX-2 44.1K 24bit | None |
| animals | ✓ | 3840+2160P 59.94 | 4:2:2 8bit SMPTE | XXX-2 48K 24bit | HDCP2.2 |
| Output Status | |||||
| Connected | Resolution | Color | Audio | ||
| TV 1 | x | x | x | x | |
| TV 2 | x | x | x | x | |
| TV 3 | x | x | x | x | |
| TV 4 | x | x | x | x | |
Input

text_image
Status Input Output Matrix Preset Advanced SystemInput
text_image
Input Edit Name Video Audio Delay(ms) Copy EDID From In 1 MK On Off - Auto + Default 14096x2160Pg60-444 HDR:None LPC √ In 2 Blurry On Off - Auto + Default 14096x2160Pg60-444 HDR:None LPC √ In 3 bzbgear On Off - Auto + Default 14096x2160Pg60-444 HDR:None LPC √ In 4 animals On Off - Auto + Default 14096x2160Pg60-444 HDR:None LPC √ Copy EDID From Default 14096x2160Pg60-444 HDR:None L √ to User 1 √ Set Select Custom EDID File Browse to User 1 √ Upload- Edit Name: The input name can be changed by clicking in the "In 1-4" fields.
- Video: Click the buttons to enable or disable the video inputs.
- Audio Delay(ms): The default is Auto, click “-” or “+” to adjust (range 0-50, Auto).
- Copy EDID From: Default1-4, User-4, Output1-4, and Temp1 which can be switched on any of the inputs
text_image
Default1:4096x2160P@60-444 HDR:HLG LPCM 2.0 XXX1234 Default2:4096x2160P@60-420 HDR:HLG LPCM 2.0 XXX1234 Default3:4096x2160P@30-444 HDR:HLG LPCM 2.0 XXX1234 Default4:1920x1080P@120-444 HDR:HLG LPCM 2.0 XXX1234 User1:1920x1080P@60-444 HDR:None ERR:ERR SAM0D1A User2:4096x2160P@60-444 HDR:HLG LPCM 2.0 XXX1234 User3:4096x2160P@60-444 HDR:HLG LPCM 2.0 XXX1234 User4:4096x2160P@60-444 HDR:HLG LPCM 2.0 XXX1234 Output1:1920x1080P@60-444 HDR:None ERR:ERR SAM0D1A Output2:Invalid Output3:Invalid Output4:Invalid Temp1:Invalid- Copy EDID of sink to User1\~4
Copy EDID From
Default 1:4096x2160P@60-444 HDR:None L
to
User 1

- USER EDID can be saved as a Bin document for User1\~4. Click Browse to find the route of the EDID, select User1\~4 and click upload to save it.

text_image
Select Custom EDID File Browse to User 1 UploadOutputMenu
text_image
Status Input Output Matrix Preset Advanced SystemOutput
| Output | Edit Name | Video | HDMI Audio | Audio Source | Audio Extraction | Extraction Source | Resolution | ||
| Out 1 | TV 1 | On | Off | On | Off | Audio Follow √ | On Off | Audio Follow √ | 4K60 √ |
| Out 2 | TV 2 | On | Off | On | Off | Audio Follow √ | On Off | Audio Follow √ | 4K60 √ |
| Out 3 | TV 3 | On | Off | On | Off | Audio Follow √ | On Off | Audio Follow √ | 4K60 √ |
| Out 4 | TV 4 | On | Off | On | Off | Audio Follow √ | On Off | Audio Follow √ | 4K60 √ |
| All | Audio Follow √ | Audio Follow √ | 4K60 √ | ||||||
- Edit Name: Output name can be changed, double click output1\~4 to modify
- Video: Click the green button to enable or disable the video outputs.
- HDMI Audio: Click the button to enable or disable the audio outputs.
- Audio Source: Switch HDMI output audio, click the drop-down box to select HDMI1-4, Audio In 1-4, Audio Follow Video, or Use Embedded Audio and the changes will take effect automatically.
| HDMI 1 |
| HDMI 2 |
| HDMI 3 |
| HDMI 4 |
| Audio In 1 |
| Audio In 2 |
| Audio In 3 |
| Audio In 4 |
| Audio Follow Video |
| Use Embedded Audio |
- Audio Extraction: Turn on/off Audio Extraction
- Extraction Source: Audio extraction switching, click the drop-down list box to select HDMI 1-4 and Audio Follow Video options. The changes will take effect automatically.
- Resolution: Output video format, the default is auto. Following the output TV EDID specifications, users can manually select 4K60, 4K30, 1080P60, and 720P60.
| 4K60 |
| 4K30 |
| 1080P60 |
| 720P60 |
| Auto |
Matrix
- The names of the inputs and outputs that can be customized in the previous two sections are displayed on the Matrix page with their new names. Change source and display pairings by simply clicking one of the buttons.
- Selecting the "All" output will change all outputs to the same selected input source.
- When the button is blue, it indicates the input signal source is selected for the corresponding output.

text_image
Matrix Status Input Output Matrix Preset Advanced System MK Bluray bzbgeer animals TV 1 MK Bluray bzbgear animals TV 2 MK Bluray bzbgear animals TV 3 MK Bluray bzbgear animals TV 4 MK Bluray bzbgear animals All MK Bluray bzbgear animalsPresetMenu
Preset can be used to call, save, clear, and customize the preset name.
text_image
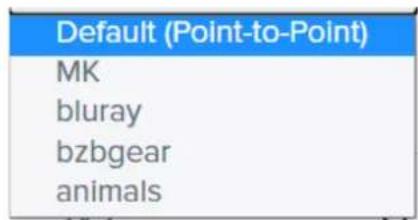
Preset Status Input Output Matrix Preset Advanced System Mode Preset Selection Edit Name Clear Save Call Matrix Default (Point-to-P) Default Clear Save Call Video Wall 2x2 2x2 Clear Save Call Multiview 2x2 2x2 Clear Save Call Scene 1 1 Clear Save Call- Matrix allows users to customize up to 5 presets. By default, selecting one of the inputs will change all outputs to the selected input source by default. Point-to-Point passes inputs to their corresponding outputs. Click the drop-down box to select a preset and then click "Call" to recall a preset. Click "Save" to save the current scene which can be customized using the "Matrix" page. Click "Clear" to clear the scene and return it to the default value.
text_image
Default (Point-to-Point) MK bluray bzbgear animals- Video Wall allows users to pick a predefined video wall layout. Click the drop-down box to select a layout and then click "Call" to activate the selected video wall. Click "Save" to save the current scene, and click "Clear" to clear the scene to its default value. Change the wall source by selecting the input from the "Matrix" page.
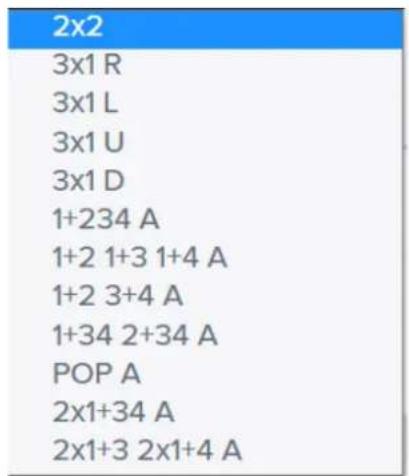
- Multiview can display up to 4 sources on a single display. There are multiple multiview layouts which are predefined. Sources for each scene can be customized by clicking the drop-down box to select a layout and then choosing sources for outputs on the "Matrix" page. Click "Call" to recall a saved scene, click "Save" to save the current scene, and click "Clear" to clear the scene to its default value.
text_image
2x2 3x1 R 3x1 L 3x1 U 3x1 D 1+234 A 1+2 1+3 1+4 A 1+2 3+4 A 1+34 2+34 A POP A 2x1+34 A 2x1+3 2x1+4 A- Scene can save and customize an additional 8 presets.
Advance
text_image
Status Input Output Matrix Preset Advanced SystemAdvanced
| Output | PIP | Crop-X0 | Crop-Y0 | Crop-X1 | Crop-Y1 | Zoom-X0 | Zoom-Y0 | Zoom-X1 | Zoom-Y1 | Confirm | |
| TV 1 | On | Off | 0.00% | 0.00% | 100.00% | 100.00% | 0.00% | 0.00% | 50.00% | 50.00% | Apply |
| TV 2 | On | Off | 0.00% | 0.00% | 100.00% | 100.00% | 50.00% | 0.00% | 100.00% | 50.00% | Apply |
| TV 3 | On | Off | 0.00% | 0.00% | 100.00% | 100.00% | 0.00% | 50.00% | 50.00% | 100.00% | Apply |
| TV 4 | On | Off | 0.00% | 0.00% | 100.00% | 100.00% | 50.00% | 50.00% | 100.00% | 100.00% | Apply |
| All | On | Off | 0.00% | 0.00% | 100.00% | 100.00% | 0.00% | 0.00% | 100.00% | 100.00% | Apply |
Gap
| Out 1 | Out 2 | Out 3 | Out 4 | ALL | |
| Gap X | 0.00% | 0.00% | 0.00% | 0.00% | 0.00% |
| Gap Y | 0.00% | 0.00% | 0.00% | 0.00% | 0.00% |
-
PIP On/Off can turn picture in picture on or off on the selected display.
-
Crop-X0 (Image cropping starting point of horizontal coordinates, range 0\~6000) Crop-Y0 (Image cropping starting point of vertical coordinates, range 0\~6000) Crop-X1 (Image cropping ending point of horizontal coordinates, range 0\~6000) Crop-Y1 (Image cropping ending point of vertical coordinates, range 0\~6000) Zoom-X0 (Image scaling starting point of horizontal coordinates, range 0\~6000) Zoom-Y0 (Image scaling starting point of vertical coordinates, range 0\~6000) Zoom-X1 (Image scaling ending point of horizontal coordinates, range 0\~6000) Zoom-Y1 (Image scaling ending point of vertical coordinates, range 0\~6000)
-
Gap adjusts the bezel alignment for the selected display. X adjusts the image on the horizontal axis and Y on the vertical.
**Press"Apply"afterinputtingthecoordinates.
System

text_image
Status Input Output Matrix Preset Advanced System Network Settings Mac Address 46:58:4E:95:72:66 IP Address 192.168.30.237 Subnet Mask 255.255.255.0 Gateway 192.168.30.1 DHCP On Off TCP Port 5000 Apply Account Management Username New Password Confirm Password Apply System Management Reboot Reboot Reset User Settings Reset User Settings Factory Restore Factory Restore- Network displays relevant information such as Mac Address, IP Address, Subnet Mask, and Gateway. Fields will become editable and can be customized when the DHCP option is set to "Off."
- Account Management allows users to change the login information of a user.
- Reboot: Power cycle the device.
- Reset User Settings: Partial factory reset settings such as presets and matrix layouts but it will exclude network settings.
- Factory Restore: Restore all settings to factory defaults.
TechSupport
Have technical questions? We may have answered them already!
Please visit BZBGEAR's support page (bzbgear.com/support) for helpful information and tips regarding our products. Here you will find our Knowledge Base (bzbgear.com/knowledge-base) with detailed tutorials, quick start guides, and step-by-step troubleshooting instructions. Or explore our YouTube channel, BZB TV (youtube.com/c/BZBTVchannel), for help setting up, configuring, and other helpful how-to videos about our gear.
Need more in-depth support? Connect with one of our technical specialists directly:
Phone
1.888.499.9906
support@bzbgear.com
LiveChat
bzbgear.com
Warranty
BZBGEAR Pro AV products and cameras come with a three-year warranty. An extended two-year warranty is available for our cameras upon registration for a total of five years.
For complete warranty information, please visit bzbgear.com/warranty.
For questions, please call 1.888.499.9906 or email support@bzbgear.com.
MissionStatement
BZBGEAR is a breakthrough manufacturer of high-quality, innovative audiovisual equipment ranging from AVoIP, professional broadcasting, conferencing, home theater, to live streaming solutions. We pride ourselves on unparalleled customer support and services. Our team offers system design consultation, and highly reviewed technical support for all the products in our catalog. BZBGEAR delivers quality products designed with users in mind.
Copyright
All the contents in this manual and its copyright are owned by BZBGEAR. No one is allowed to imitate, copy, or translate this manual without BZBGEAR's permission. This manual contains no guarantee, standpoint expression or other implies in any form. Product specification and information in this manual is for reference only and subject to change without notice.
Allrightsreserved. No reproducing is allowed without acknowledgement.