DKS-5550Q - Home Theater LG - Free user manual and instructions
Find the device manual for free DKS-5550Q LG in PDF.

User questions about DKS-5550Q LG
0 question about this device. Answer the ones you know or ask your own.
Ask a new question about this device
Download the instructions for your Home Theater in PDF format for free! Find your manual DKS-5550Q - LG and take your electronic device back in hand. On this page are published all the documents necessary for the use of your device. DKS-5550Q by LG.
USER MANUAL DKS-5550Q LG
Please read this manual carefully before operating your set. Retain it for future reference.
Designs and specifications are subject to change without notice for improvement.
The working life of this product is 7 years since the date of purchase.
Safety Precautions

CAUTION
RISK OF ELECTRIC SHOCK DO NOT OPEN

WARNING: TO REDUCE THE RISK OF ELECTRIC SHOCK
DO NOT REMOVE COVER (OR BACK) NO USER-SERVICEABLE PARTS INSIDE REFER SERVICING TO QUALIFIED SERVICE PERSONNEL.

This lightning flash with arrowhead symbol within an equilateral triangle is intended to alert the user to the presence of uninsulated dangerous voltage within the product's enclosure that may be of sufficient magnitude to constitute a risk of electric shock to persons.

The exclamation point within an equilateral triangle is intended to alert the user to the presence of important operating and maintenance (servicing) instructions in the literature accompanying the appliance.
WARNING: TO REDUCE THE RISK OF FIRE OR ELECTRIC SHOCK, DO NOT EXPOSE THIS PRODUCT TO RAIN OR MOISTURE.
CAUTION:
This Digital Video Disc Player employs a Laser System.
To ensure proper use of this product, please read this owner's manual carefully and retain for future reference, should the unit require maintenance, contact an authorized service location-see service procedure.
Use of controls, adjustments or the performance of procedures other than those specified herein may result in hazardous radiation exposure.
To prevent direct exposure to laser beam, do not try to open the enclosure. Visible laser radiation when open. DO NOT STARE INTO BEAM.
CAUTION: The apparatus shall not be exposed to water, dripping or splashing and that no objects filled with liquids, such as vases, shall be placed on the apparatus.
CAUTION concerning the Power Cord
Most appliances recommend they be placed upon a dedicated circuit:
That is, a single outlet circuit which powers only that appliance and has no additional outlets or branch circuits. Check the specification page of this owner's manual to be certain.
Do not overload wall outlets. Overloaded wall outlets, loose or damaged wall outlets, extension cords, frayed power cords, or damaged or cracked wire insulation are dangerous. Any of these conditions could result in electric shock or fire. Periodically examine the cord of your appliance, and if its appearance indicates damage or deterioration, unplug it, discontinue use of the appliance, and have the cord replaced with an exact replacement part by an authorized servicer.
Protect the power cord from physical or mechanical abuse, such as being twisted, kinked, pinched, closed in a door, or walked upon. Pay particular attention to plugs, wall outlets, and the point where the cord exits the appliance.

Disposal of your old appliance
- When this crossed-out wheeled bin symbol is attached to a product it means the product is covered by the European Directive 2002/96/EC.
- All electrical and electronic products should be disposed of separately from the municipal waste stream via designated collection facilities appointed by the government or the local authorities.
- The correct disposal of your old appliance will help prevent potential negative consequences for the environment and human health.
- For more detailed information about disposal of your old appliance, please contact your city office, waste disposal service or the shop where you purchased the product.
Table of Contents
Introduction
Safety Precautions....2
Table of Contents. 3
Before Use 3
Front Panel and Rear Panel....4
Remote Control 5
Preparation
Connections 6-7
Before Operation 8-13
Operation
Operation with DVD 14-16
Operation with Audio CD and MP3/WMA Disc ..... 16-17
Programmed Playback 17
Operation with JPEG Disc 18
Operation with DivX Disc 19
Operation with KARAOKE 20-24
Reference
Language Code List....25
Country Code List 25
Troubleshooting/Specifications
About Symbols
About the symbol display
“ may appear on the TV screen during operation. This icon means the function explained in this owner's manual is not available on that specific DVD video disc.
About the disc symbols for instructions
A section whose title has one of the following symbol is applicable only to the disc represented by the symbol.
DVD DVD
CD Audio CDs
MP3 MP3 disc
WMA WMA disc
JPEG JPEG disc
DivX DivX disc
About the symbols for instructions
⚠ Indicates hazards likely to cause harm to the unit itself or other material damage.
N Indicates special operating features of this unit.
Indicates tips and hints for making the task easier.
Before Use
playable Discs


DVD (8 cm / 12 cm disc)
Audio CD (8 cm / 12 cm disc)
In addition, this unit can play a DVD±R, DVD±RW and CD-R or CD-RW that contains audio titles, MP3, WMA, JPEG or DivX files.
Notes
- Depending on the conditions of the recording equipment or the CD-R/RW (or DVD±R/RW) disc itself, some CD-R/RW (or DVD±R/RW) discs cannot be played on the unit.
- Do not attach any seal or label to either side (the labeled side or the recorded side) of a disc.
- Do not use irregularly shaped CDs (e.g., heart-shaped or octagonal). It may result in malfunctions.
Regional code of the DVD player and DVDs
This DVD player is designed and manufactured for playback of region "5" encoded DVD software. The region code on the labels of some DVD discs indicates which type of player can play those discs. This unit can play only DVD discs labeled "5" or "ALL". If you try to play any other discs, the message "Check Regional Code" will appear on the TV screen. Some DVD discs may not have a region code label even though their playback is prohibited by area limits.

Note on DTS-encoded CDs
When playing DTS-encoded CDs, excessive audio level may be heard from the analog stereo output. To avoid possible damage to the audio system, turn down the volume before playing back such discs, adjust the volume gradually, and keep the volume level low. To enjoy DTS Digital Surround™ playback, an external 5.1 channel DTS Digital Surround™ decoder system must be connected to the digital output of the unit.
Front Panel and Rear Panel

text_image
POWER ( STANDBY/ON ) Switches the player ON and OFF. PLAY ( ▶ ) Starts playback. PAUSE/STEP ( IIP/STEP ) Pauses playback. Press repeatedly for frame-by-frame playback. STOP ( ■ ) Stops playback. Reverse Scan/Skip ( I◀◀ ◀◀) Go to previous chapter / track or to the beginning. Press and hold for two seconds for fast reverse search. Forward Skip/Scan (▶▶▶▶I ) Go to the next chapter / track.Press and hold for two seconds for fast forward search. △ OPEN / CLOSE Opens or closes the disc tray. Microphone jacks (MIC1, MIC2) Connect a microphone to MIC1 or MIC2 or to both sockets. Disc Tray Insert a disc here. Shows the current status of the player. Display window Remote Sensor Point the DVD Player remote control here. AUDIO OUT (Left/Right) Connect to an amplifier, receiver, or stereo system. VIDEO OUT Connect to a TV with video inputs. 5.1 CHANNEL AUDIO OUT Connect to a 5.1 channel receiver - center speaker connection - subwoofer connection - front speakers connections - rear (surround) speakers connections OPTICAL (Digital audio out jack) Connect to digital (optical) audio equipment. AC Power Cord Plug into the power source.
Do not touch the inner pins of the jacks on the rear panel. Electrostatic discharge may cause permanent damage to the unit.
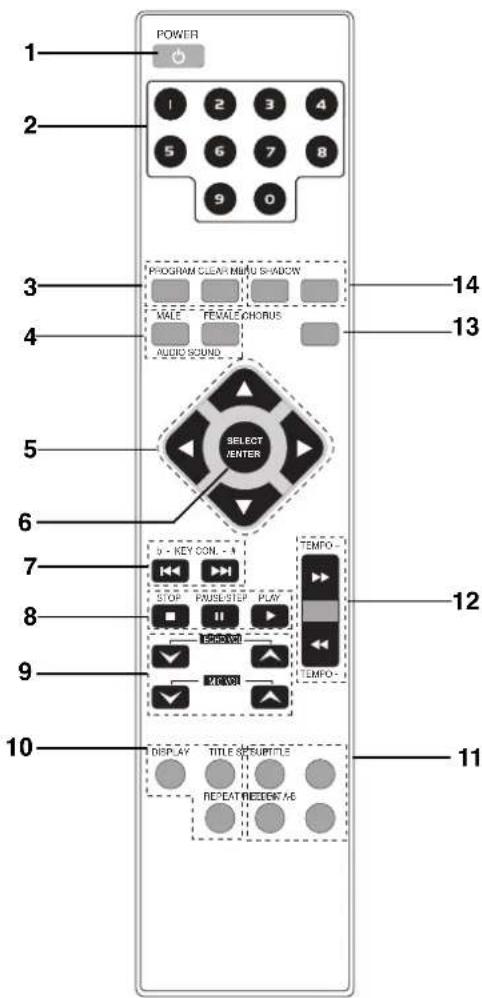
Remote Control
text_image
POWER 1 2 3 4 5 6 7 8 9 0 PROGRAM CLEAR MENU SHADOW MALE FEMALE CHORUS AUDIO SOUND SELECT /ENTER 14 13 6 7 8 9 10 DISPLAY TITLE STRUPTILE REPEAT REELECT ME 11 12 TEMPO --
POWER button
-
NUMERIC buttons (0-9)
-
• PROGRAM button
- CLEAR button
-
• AUDIO button
-
MALE button
-
SOUND button
• FEMALE button -
ARROW buttons (/ʌ/ʊ) ◄ ◄ (For use in highlighting a selection on a GUI menu screen, TITLE and MENU screen.)
-
SELECT/ENTER button
-
KEY CONTROL (b/#) buttons
-
• STOP (■) button
• PAUSE(II)/ STEP button
- PLAY (▶) button
- • ECHO volume control (ECHO VOL. / button
- Microphone volume control (MIC VOL. button
-
• DISPLAY button
-
TITLE button
-
REPEAT button
-
• SUBTITLE button
-
SET UP button
- REPEAT A-B button
-
RETURN button
-
TEMPO(-/+) buttons (◀◀/▶▶)
-
CHORUS button
(When a Song with chorus function is played, use this button.)
-
· MENU button
-
SHADOW button
Remote Control Operation Range
Point the remote control at the remote sensor and press the buttons.
• Distance: About 23 ft (7 m) from the front of the remote sensor
- Angle: About 30^ in each direction of the front of the remote sensor
Remote control battery installation

natural_image
Diagram of a battery inside a casing with an arrow indicating direction (no text or symbols)Detach the battery cover on the rear of the remote control, and insert two R03 (size AAA) batteries with and aligned correctly.
Caution
Do not mix old and new batteries. Never mix different types of batteries (standard, alkaline, etc.).
Connections
Tips
- Depending on your TV and other equipment you wish to connect, there are various ways you could connect the player. Use only one of the connections described below.
- Please refer to the manuals of your TV, VCR, Stereo System or other devices as necessary to make the best connections.
Caution
- Make sure the DVD Player is connected directly to the TV. Tune the TV to the correct video input channel.
- Do not connect the DVD Player's AUDIO OUT jack to the phono in jack (record deck) of your audio system.
- Do not connect your DVD Player via your VCR. The DVD image could be distorted by the copy protection system.
Connecting to a TV
Video connection
1 Connect the VIDEO OUT jack on the DVD Player to the video in jack on the TV using the video cable (V).
2 Connect the Left and Right AUDIO OUT jacks of the DVD Player to the audio left/right in jacks on the TV (A) using the audio cables.
Rear of TV
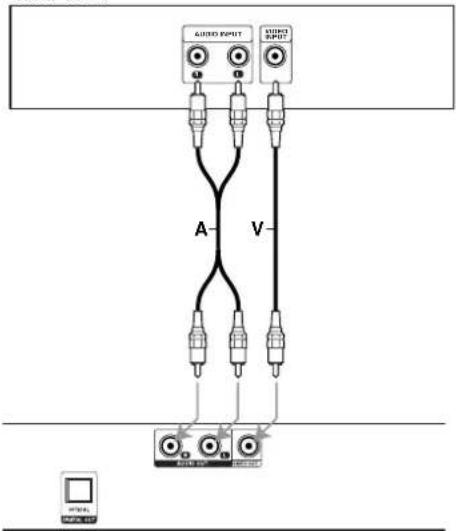
text_image
AUDIO INPUT AUDIO OUTPUT A VRear of
DVD player
Connecting to Optional Equipment
Connecting to an amplifier equipped with two channel analog stereo
Connect the Left and Right AUDIO OUT jacks on the DVD Player to the audio left and right in jacks on your amplifier, receiver, or stereo system, using the audio cables (A).
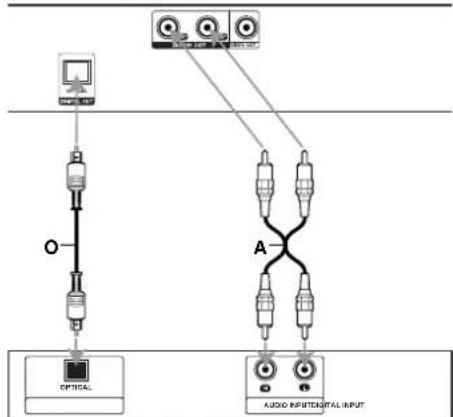
Connecting to an amplifier equipped with two channel digital stereo (PCM) or to an Audio/Video receiver equipped with a multi-channel decoder (Dolby Digital™ or MPEG 2)
Connect one of the DVD Player's DIGITAL OPTICAL OUT jacks to the corresponding in jack on your amplifier. Use an optional digital audio cable. (O)
Digital Multi-channel sound
A digital multi-channel connection provides the best sound quality. For this you need a multi-channel Audio/Video receiver that supports one or more of the audio formats supported by your DVD Player (MPEG 2 va Dolby Digital). Check the receiver manual and the logos on the front of the receiver.
Caution:
Due to the DTS Licensing agreement, the digital output will be in DTS digital out when DTS audio stream is selected.
Rear of DVD player
flowchart
graph TD
    A["Optical"] --> B["Switch"]
    B --> C["Audio Input/Output Input"]
    D["Radio"] --> E["Switch"]
    E --> F["Audio Input/Output Input"]
    G["Antenna"] --> H["Switch"]
    H --> I["Audio Input/Output Input"]
    J["Radio"] --> K["Switch"]
    K --> L["Audio Input/Output Input"]
    M["Antenna"] --> N["Switch"]
    N --> O["Audio Input/Output Input"]
Amplifier (Receiver)
Notes
- If the audio format of the digital output does not match the capabilities of your receiver, the receiver will produce a strong, distorted sound or no sound at all.
- Six Channel Digital Surround Sound via digital connection can only be obtained if your receiver is equipped with a Digital Multi-channel decoder.
- To see the audio format of the current DVD in the on-screen display, press AUDIO.
Connections
Connecting to Optional Equipment
(continued)
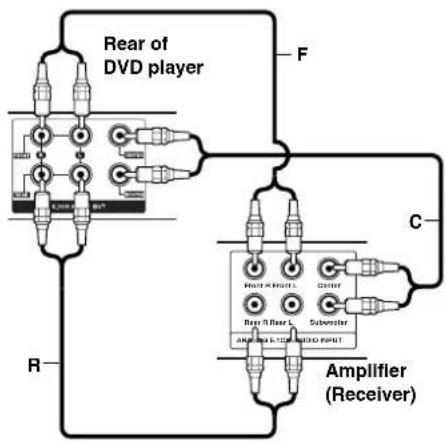
Analog connection to a multi-channel A/V receiver with 6 Channel connectors (Dolby Digital, DTS)
This DVD Player contains a multi-channel decoder. This enables playback of DVDs recorded in Multi-channel Surround without the need for an optional decoder.
1 Connect the CENTER and WOOFER jacks for the Center speaker and the Subwoofer (C) to the corresponding in jacks on your receiver.
2 Connect the Left and Right FRONT speaker jacks (F) to the corresponding in jacks on your receiver.
3 Connect the Left and Right REAR speaker jacks (R) to the corresponding in jacks on your receiver.
4 Make the appropriate Sound settings for Analog Output and Speaker Settings in the setup menu. See page 11.
flowchart
graph TD
    A["Rear of DVD player"] --> B["Back"]
    A --> C["Front"]
    A --> D["Amplifier (Receiver)"]
    B --> E["Pin 1"]
    B --> F["Pin 2"]
    B --> G["Pin 3"]
    C --> H["Pin 4"]
    C --> I["Pin 5"]
    C --> J["Pin 6"]
    D --> K["Pin 7"]
    D --> L["Pin 8"]
Before Operation
Mini Glossary for Audio Stream & Surround mode
□□DIGITAL
The Dolby Digital surround format lets you enjoy up to 5.1 channels of digital surround sound from a Dolby Digital program source. If you play DVDs with "mark," you can enjoy even better sound quality, greater spatial accuracy, and improved dynamic range. Manufactured under license from Dolby Laboratories. "Dolby", "Pro Logic" and double-D symbol are trademarks of Dolby Laboratories.
BYPASS
Outputs the sound from the front left and right speakers and subwoofer.
Sound Mode CDD
You can enjoy surround sound simply by selecting one of the pre-programmed sound fields according to the program you want to listen to.
When DVD is inserted
You can change the Digital Audio Output mode by pressing the AUDIO button on the remote control during playback. Although the DVD contents differ from disc to disc, the following explains the basic operation when this feature is used.
a) After you select 2 channel (For example or
3.200 ) by pressing AUDIO button, press SOUND button repaetedly.
- "BYPASS" indicator will be only displayed on the display window.
b) After you select 5.1 channel (For example or
) by pressing AUDIO button, press SOUND button.
- " indicator will be displayed on the TV screen.
When CD is inserted
Each time you press SOUND button, the sound mode of Audio CD is changed on the display window as the following order.
BYPASS → STUDIO → CLUB → HALL → THEATER 1
→ CHURCH → BYPASS...
For your reference
- Initial sound of DVD function is BYPASS.
- You can identify the encoding format of program software by looking at its packaging.
- Dolby Digital discs are labelled with the logo.
- Dolby Surround encoded programs are labelled with the 📄DOULBY logo.
- D TS Digital Surround discs are marked with DTS.
Note
When you play sound tracks with 96kHz sampling frequency, the output signals will be converted to 48kHz (sampling frequency).
Before Operation
General Explanation
This manual gives basic instructions for operating the DVD Karaoke. Some DVDs require specific operation or allow only limited operation during playback. When this occurs, the symbol appears on the TV screen, indicating that the operation is not permitted by the DVD Karaoke or is not available on the disc.
On-Screen Display
General playback status can be displayed on the TV screen. Some items can be changed on the menu.
On-screen display operation

Press DISPLAY during playback.

Press A to select an item. The selected item will be highlighted.

Press for to change the setting of an item. The number buttons can be also be used for setting numbers (e.g., title number). For some functions, press SELECT/ENTER to execute the setting.
Temporary Feedback Field Icons


Repeat title


Repeat sequence

Resume play from this point

Action prohibited or not available

Notes
- Some discs may not provide all of the features on the on-screen display example shown below.
- If no button is pressed for 10 seconds, the on-screen display disappears.
Example: On-Screen Display during playing DVD
| Items | Function / Action using to select item | Selection Method | |
| Title Number | 1/3 | Shows the current title number and total number of titles / skips to the desired title number. | Numbers, or SELECT/ENTER |
| Chapter Number | 1/12 | Shows the current chapter number and total number of chapters / skips to the desired chapter number. | Numbers, or SELECT/ENTER |
| Time search | 0:20:09 | Shows the elapsed playing time / searches by elapsed time. | Numbers, SELECT/ENTER |
| Audio language and Digital Audio Output mode | 1 ENGDDD5.1 CH | Shows the current audio soundtrack language, encoding method, and channel number / changes the setting. | or AUDIO |
| Subtitle language | 1 ENG | Shows the current subtitle language / changes the setting. | or SUBTITLE |
| Angle | 1/3 | Shows the current angle number and total number of angles / changes the angle. | or SOUND |
| Sound | Bypass | Shows the current sound mode / changes the setting. |
Before Operation
Initial Settings
By using the Setup menu, you can make various adjustments to items such as picture and sound. You can also set a language for the subtitles and the Setup menu, among other things. For details on each Setup menu item, see pages 10 to 13.
To display and exit the Menu:
Press SETUP to display the menu. A second press of SETUP will take you back to initial screen.
Togo to the next level:
Press on the remote control.
To go back to the previous level:
Press on the remote control.
General Operation
1 Press SETUP.
The setup menu appears.
2 Use A to select the desired option then press a move to the second level.
The screen will be shown the current setting for the selected item, as well as alternate setting(s).
3 Use to select the second desired option then press to move to the third level.
4 Use ▲ / ♥ to select the desired setting then press SELECT/ENTER to confirm your selection.
Some items require additional steps.
5 Press SETUP or PLAY to exit the setup menu.
LANGUAGE

text_image
LANGUAGE OBO Disc Audio Disc Subtable Disc Menu English Original Off Original Move SelectOSD
Select a language for the Setup menu and on-screen display.
Disc Audio / Subtitle / Menu DVD
Select the language you prefer for the audio track (disc audio), subtitles, and the disc menu.
Original: Refers to the original language in which the disc was recorded.
Other: To select another language, press number buttons to enter the corresponding 4-digit number according to the language code list on page 25. If you enter the wrong language code, press CLEAR on the remote control.
10
DISPLAY
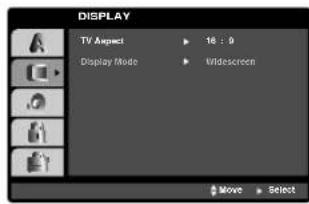
text_image
DISPLAY TV Aspect 16:9 Display Mode Widescreen Move SelectTV Aspect DVD
4:3: Select when a standard 4:3 TV is connected. 16:9: Select when a 16:9 wide TV is connected.
Display Mode DVD
Display Mode setting works only when the TV Aspect mode is set to "4:3".
Letterbox: Displays a wide picture with bands on the upper and lower portions of the screen.
Panscan: Automatically displays the wide picture on the entire screen and cuts off the portions that do not fit.
Before Operation
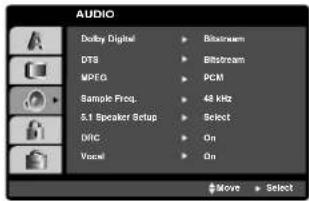
AUDIO
Each DVD disc has a variety of audio output options. Set the player's AUDIO options according to the type of audio system you use.
text_image
AUDIO Dolby Digital DTS MPEG Sample Freq. 5.1 Speaker Setup DRC Vocal Bisobram Bitobram PCM 48 kHz Select On On Move SelectDolby Digital / DTS / MPEG DVD
Bitstream: Select "Bitstream" if you connect the DVD Player's DIGITAL OUT jack to an amplifier or other equipment with a Dolby Digital, DTS or MPEG decoder.
PCM : Select when connected to a two-channel digital stereo amplifier. DVDs encoded in Dolby Digital or MPEG will be automatically downmixed to two-channel PCM audio.
Sample Freq. (Frequency) DVD
If your receiver or amplifier is NOT capable of handling 96 kHz signals, select 48 kHz. When this choice is made, this unit automatically converts any 96 kHz signals to 48 kHz so your system can decode them.
If your receiver or amplifier is capable of handling 96 kHz signals, select 96 kHz. When this choice is made, this unit passes each type of signal through without any further processing.
Check the documentation for your amplifier to verify its capabilities.
5.1 Speaker Setup DVD
Select speaker settings, including volume balance and distance, or test the speaker settings.
Speaker settings are only active on the Analog Multi-Channel Output.
Speaker Setup
Make the following settings for the built-in 5.1 channel surround decoder.
- Press SETUP. The setup menu appears.
- Use No select the AUDIO option then press to move to the second level.
- Use No select the Speaker Setup option then press to move to the third level. "Select" is highlighted.
-
Press SELECT/ENTER and 5.1 Speaker Setup menu appears.
-
Use /to select the desired speaker.
- Adjust options using // buttons
- Press SELECT/ENTER to confirm your selection. Returns to the previous menu.
Speaker selection
Select a speaker that you want to adjust. [Front speaker (Front L), Front speaker (Front R), Center Speaker (Center), Subwoofer (Woofer), Rear speaker (Rear L) or Rear speaker (Rear R)]
Size
Since the speaker settings are fixed, you cannot change the setting.
Volume
Press to adjust the output level of the selected speaker. (-5dB \~ 5dB)
Distance
If you have connected speakers to your DVD Player, setting the Distance lets the speakers know how far the sound has to travel to reach your set listening point. This allows the sound from each speaker to reach the listener at the same time.
Press (to) adjust the Distance of the selected speaker.
Test
Select "All" to test the signals of each speaker. Adjust the volume to match the volume of test signals memorized in the system. (When the size of the Front L/R speaker is selected to "Large", the subwoofer (Woofer) is not available.) Front L → Center → Front R → Rear R → Rear L → Woofer
You can adjust the volume during operating the test tone, first use to select Volume or Speaker option then use buttons to select volume or speaker, so that all speaker's volume is same from the listener's position.
Dynamic Range Control (DRC) DVD
With the DVD format, you can hear a program's soundtrack in the most accurate and realistic presentation possible, thanks to digital audio technology. However, you may wish to compress the dynamic range of the audio output (the difference between the loudest sounds and the quietest ones). This allows you to listen to a movie at a lower volume without losing clarity of sound. Set DRC to On for this effect.
Vocal DVD
Set Vocal to On only when a multi-channel Karaoke DVD is playing. The karaoke channels on the disc will mix into a normal stereo sound.
Before Operation
LOCK (Parental Control)

text_image
LOCK Rating ▶ Unlock Password ▶ ***** Country Code ▶ RU Move ▶ SelectRating DVD
Some movies contain scenes that may not be suitable for children to view. Many of these discs contain parental control information that applies to the complete disc or to certain scenes on the disc. Movies and scenes are rated from 1 to 8, depending on the country. Some discs offer more suitable scenes as an alternative.
The parental control feature allows you to block access to scenes below the rating you input, thereby preventing your children from being able to view material you believe is unsuitable.
1 Select "Rating" on the LOCK menu then press ▶.
2 To access the Rating, Password and Country Code features, you must input the 4-digit security code you created.
If you have not yet entered a security code you are prompted to do so.
Input a 4-digit code and press SELECT/ENTER. Enter it again and press SELECT/ENTER to verify. If you make a mistake before pressing SELECT/ENTER, press CLEAR.
3 Select a rating from 1 to 8 using the ▲▼ buttons.
Rating 1-8: Rating one (1) has the most restrictions and rating eight (8) is the least restrictive.
Unlock
If you select unlock, parental control is not active and the disc plays in full.
Note
If you set a rating for the player, all disc scenes with the same rating or lower are played. Higher rated scenes are not played unless an alternate scene is available on the disc. The alternative must have the same rating or a lower one. If no suitable alternative is found, playback stops. You must enter the 4-digit password or change the rating level in order to play the disc.
4 Press SELECT/ENTER to confirm your rating selection, then press SETUP to exit the menu.
Password (Security Code)
You can enter or change password.
1 Select Password on the LOCK menu then press
2 Follow step 2 as shown left (Rating). "Change" or "New" is highlighted.
3 Enter the new 4-digit code, then press SELECT/ENTER. Input it again to verify.
4 Press SETUP to exit the menu.
If you forget your Security Code
If you forget your security code you can clear it using the following steps:
1 Input the 6-digit number "210499" on the setup menu and the security code is cleared.
2 Enter a new code as described above.

When "INPUT appears on the TV screen, press STOP (■) and then press SETUP to move to the setup menu.
Country Code DVD
Enter the code of the country/area whose standards were used to rate the DVD video disc, based on the list in the reference chapter.
1 Select "Country Code" on the LOCK menu then press ▶.
2 Follow step 2 as shown left (Rating).
3 Select the first character using Buttons.
4 Shift the cursor using button and select the second character using buttons.
5 Press SELECT/ENTER to confirm your country code selection.
Before Operation
OTHERS

text_image
OTHERS PBC On SelectD:\X(R)\Registrar Move SelectPBC (Playback Control)
Playback control provides special navigation features that are available on some disc. Select [On] to use this feature.
DivX(R) Registration DivX
You can show the DivX DRM (Digital Rights Management) Registration code for your unit only.
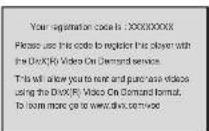
The Registration code is used for VOD (Video-On-Demand) service agent. You can purchase or rental an encrypt movie file.
Notes
If you rent the DivX VOD file, it has several options of viewing limits as show below.
• Display the number which you can watch the file.

• The rental has been expired.

- Display the authorization error.

Operation with DVD
Playing a DVD
Playback Setup
- Turn on the TV and select the video input source connected to the unit.
- Audio system: Turn on the audio system and select the input source connected to the unit.

Press ▲ OPEN/CLOSE button to open the disc tray.

Load your chosen disc in the tray, with the playback side facing down.

Press ▲ OPEN/CLOSE button to close the tray. Playback starts automatically. If playback does not start, press PLAY.
In some cases, the disc menu might appear instead.

If a menu screen is displayed
The menu screen may be displayed first after loading a DVD which contains a menu.
DVD
Use the 🔊/buttons to select the title/chapter you want to view, then press SELECT/ENTER to start. Press TITLE or MENU to return to the menu screen.

Notes
- If parental control is set and the disc is not within the rating settings you must input the password. (See "LOCK" on page 12.)
– DVDs may have a region code. Your player will not play discs that have a region code different from your player. The region code for this player is 5 (five).
General Features

ote
Unless stated otherwise, all operations described use the remote control. Some features may also be available on the Setup menu.
Moving to another TITLE DVD
When a disc has more than one title, you can move to another title. Press DISPLAY while playback is stopped then the appropriate number (0-9) or use ▶to move to another title.
You can play any title by inputting its number while play-back is stopped.
Moving to another CHAPTER/TRACK
DivXD
When a title on a disc has more than one chapter or a disc has more than one track, you can move to another chapter/track as follows:
- Press I◀◀ or ▶▶▶ briefly during playback to select the next chapter/track or to return to the beginning of the current chapter/track.
- Press ◀◀ twice briefly to step back to the previous chapter/track.
- To go directly to any chapter during DVD playback, press DISPLAY and press Ato select the chapter/track icon. Then, input the chapter/track number or

Search
1 Press ◀◀ or ▶▶ during playback.
The player will now go into SEARCH m
2 Press ◀◀ or ▶▶ repeatedly to select the required speed.
DVD; X2, X4, X8, X16, X100
DivX; X2, X4, X8, X16
3 To exit SEARCH mode, press PLAY.
Still Picture and Frame-by-frame playback
DivXD
1 Press PAUSE/STEP on the remote control during playback.
The player will now go into PAUSE mode.
2 You can advance the picture frame-by-frame by pressing PAUSE/STEP repeatedly on the remote control.
3 To exit still motion mode, press PLAY.
Slow Motion
DVD
1 Press PAUSE/STEP on the remote control during playback.
The player will enter PAUSE mode.
2 Use the ◀◀/▶▶ to select the required speed: ◀1/2, ◀1/4, ◀1/8 or ◀1/16 [(backward) - DVD only] or ▶1/2, ▶1/4, ▶1/8 or ▶1/16 (forward).
3 To return to normal PLAY, press PLAY.
Operation with DVD
General Features (continued)
Repeat

DivXD
You can play a title/chapter/all/track on a disc. Press REPEAT during playback to select a desired repeat mode.
DVD Video Discs - Repeat Chapter/Title/Off
• Chapter: repeats the current chapter.
• Title: repeats the current title.
- Off: does not play repeatedly.
DivX - Repeat Track/All/Off
- Track : repeats the current track
- All : repeats all the tracks on a disc.
- Off: does not play repeatedly.
Repeat A-B DVD
To repeat a sequence in a title:
1 Press A-B at your chosen starting point. "A - " appears briefly on the TV screen.
2 Press A-B again at your chosen end point. "A - B" appears briefly on the TV screen, and the repeat sequence begins.
3 To cancel the sequence, press A-B.
Time Search DVD
The Time Search function allows you to start playing at any chosen time on the disc.
1 Press DISPLAY during playback. The on-screen display appears on the screen. The Time Search box shows the elapsed playing time of the current disc.
2 Within 10 seconds, press ▲ to select the Time Search icon in the on-screen display. The “-:-:-” appears in the Time Search box.
3 Within 10 seconds, use the number buttons to enter the required start time. Enter hours, minutes, and seconds from left to right in the box. If you enter the wrong numbers, press CLEAR to remove the numbers you entered. Then enter the correct numbers.
4 Within 10 seconds, press SELECT/ENTER to confirm the start time. Playback starts from the selected time on the disc. If you enter an invalid time, playback will continue from the current point.
Special DVD Features DVD
Checking the contents of DVD Video discs: Menus
DVDs may offer menus that allow you to access special features. To use the disc menu, press MENU. Then, press the appropriate number button to select an option. Or, use the ▼/buttons to highlight your selection, then press SELECT/ENTER.
Title Menu DVD
1 Press TITLE. If the current title has a menu, the menu will appear on the screen. Otherwise, the disc menu may appear.
2 The menu can list camera angles, spoken language and subtitle options, and chapters for the title.
3 To remove the title menu, press TITLE again.
Disc Menu DVD
Press MENU. The disc menu is displayed.
Changing the Audio Language DVD
Press AUDIO repeatedly during playback to hear a different audio language or audio track.
Subtitle DVD
Press SUBTITLE repeatedly during playback to see the different subtitle languages.

If uppears, the feature is not available on the disc.
Operation with DVD and Video CD
Special DVD Features DVD
System Select
You must select the appropriate system mode for your TV system. If NO DISC appears in the display window, press and hold /STEP on the front panel for more than 5 seconds to be able to select a system (PAL, NTSC, or AUTO).
- When the selected system does not coincide with the system of your TV, normal color picture may not be displayed.
AUTO: Select when DVD player is connected with Multi system TV.
NTSC: Select when DVD player is connected with NTSC-TV.
PAL: Select when DVD player is connected with PAL-TV.
Last Scene Memory DVD
This player memorizes the user settings for the last disc that you have viewed. Settings remain in memory even if you remove the disc from the player or switch off the player. If you load a disc that has its settings memorized, the latest stop position is automatically recalled.

Notes
- Settings are stored in memory for use any time.
- This player does not memorize settings of a disc if you switch off the player before commencing to play it.
Screen Saver
The screen saver picture appears when you leave the DVD Player in stop mode for about five minutes. After the Screen Saver has been engaged for about five minutes, the DVD Player will automatically turn itself off.
Operation with Audio CD and MP3/WMA Disc
Playing an Audio CD and MP3/WMA
Disc

MP3COWMA
The DVD Karaoke can play MP3/WMA formatted recordings on CD-ROM, CD-R, or CD-RW discs.
Audio CD
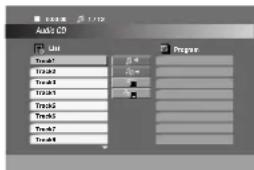
Once you insert an audio CD a menu appears on the TV screen. Press to select a track then press PLAY or SELECT/ENTER and playback starts.
text_image
Auto CD Line Track1 Track2 Track3 Track4 Track5 Track6 Track7 Track8 PropertMP3 / WMA
- Press /to select a folder, and press SELECT/ENTER to see the folder contents.
- Press /to select a track then press PLAY or SELECT/ENTER. Playback starts.
- If you are in a file list on the MP3/WMA menu and want to return to the Folder list, use the 🔊 / ♥ to highlight 🔒 and press SELECT/ENTER.
- Press MENU to go to the next page.
- On a CD with MP3/WMA file and JPEG file, you can switch MP3/WMA and JPEG menu. Press TITLE and MP3/WMA or JPEG word on top of the menu is highlighted. Then, use to select MP3/WMA or JPEG then press SELECT/ENTER.
Pause

MP3CDWMA
1 Press PAUSE/STEP during playback.
2 To return to playback, press PLAY or press PAUSE/STEP again.
Moving to another Track

MP3CDWMA
- Press ◀◀◀ or ▶▶◀ briefly during playback to go to the next track or to return to the beginning of the current track.
- Press ◀◀ twice briefly to step back to the previous track.
- In case of audio CD, to go directly to any track, enter the track number using the numbered buttons (0-9) during playback.
Operation with Audio CD and MP3/WMA Disc
Repeat Track/All/Off CD MP3 WMA
You can play a title/chapter/all/track on a disc.
1 Press REPEAT when playing a disc. The repeat icon appears.
2 Press REPEAT to select a desired repeat mode.
- Track: repeats the current track
- All: repeats all the tracks on a disc.
- Off(No display): does not play repeatedly.
Search CD MP3 WMA
1 Press ◀◀ or ▶▶ during playback.
The player will now go into SEARCH mode.
2 To exit SEARCH mode, press PLAY.
MP3 / WMA disc compatibility with this player is limited as follows:
- Sampling frequency: within 32 - 48 kHz (MP3), within 24 - 48kHz (WMA)
- Bit rate: within 32 - 320kbps (MP3), 40 - 192kbps (WMA)
- The player cannot read an MP3/WMA file that has a file extension other than ".mp3" / ".wma".
- CD-R physical format should be ISO 9660
- If you record MP3 / WMA files using software that cannot create a file system (eg. Direct-CD) it is impossible to playback MP3 / WMA files. We recommend that you use Easy-CD Creator, which creates an ISO 9660 file system.
- File names should have a maximum of 8 letters and must incorporate an .mp3 or .wma extension.
- They should not contain special letters such as / ? * : "< > I etc.
- The total number of files on the disc should be less than 999.
This DVD player requires discs and recordings to meet certain technical standards in order to achieve optimal playback quality. Pre-recorded DVDs are automatically set to these standards. There are many different types of recordable disc formats (including CD-R containing MP3 or WMA files) and these require certain pre-existing conditions (see above) to ensure compatible playback.
Customers should note that permission is required in order to download MP3 / WMA files and music from the Internet. Our company has no right to grant such permission. Permission should always be sought from the copyright owner.
Programmed Playback CD MP3 WMA
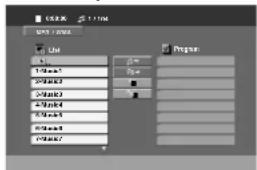
The Program function enables you to store your favorite tracks from any disc in the player memory. A program can contain 300 tracks (Audio CD/MP3/WMA).
1 Insert a disc.
Audio CD and MP3/WMA Discs:
Audio CD or MP3/WMA menu appears as below.

Audio CD Menu MP3/WMA Menu
22 Select a track on the List.
3 Press PROGRAM. Or, select "Add" icon then SELECT/ENTER to place the selected track on the Program list. Repeat to place additional tracks on the list.
Note
You can add all tracks in the disc. Select "Add All" icon then press SELECT/ENTER.
4 Select the track you want to start playing on the Program list.
Tip
Press MENU to move to the next page.
5 Press PLAY or SELECT/ENTER to start. Playback begins in the order in which you programmed the tracks and "PROG." appears on the display window. Playback stops after all of the tracks on the Program list have played once.
Repeat Programmed Tracks
You can play a title/chapter/all/track on a disc.
1 Press REPEAT when playing a disc. The repeat icon appears.
2 Press REPEAT to select a desired repeat mode.
- TRACK: repeats the current track
- ALL: repeats all the tracks on a disc.
- Off (No display): does not play repeatedly.
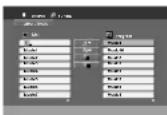
Erasing a Track from Program List
1 Use AI / to select the track that you wish to erase from the Program list.
2 Press CLEAR. Or, select " (delete)" icon then Press SELECT/ENTER to place the selected track on the Program list. Repeat to erase additional tracks on the list.
Erasing the Complete Program List
Select "Del all)", then press SELECT/ENTER. The complete Program for the disc is erased.
Note
The programs are also cleared when the disc is removed.
Toresume normal playback from programmed playback Select a track on the List then press SELECT/ENTER. "PROG." disappears from the display window.
Operation with JPEG Disc
Viewing a JPEG disc JPEG
This unit can play discs with JPEG files. Before playing JPEG recordings, read the notes on JPEG Recordings on right.
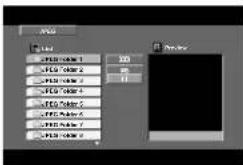
1 Insert a disc and close the tray. The JPEG menu appears on the TV screen.
text_image
APD 1.00 APD - 1 APD - 2 APD - 3 APD - 4 APD - 5 APD - 6 APD - 7 APD - 8 APD - 9 APD - 10 APD - 11 APD - 12 APD - 13 APD - 14 APD - 15 APD - 16 APD - 17 APD - 18 APD - 19 APD - 20 ADD ADD ADD ADD ADD ADD ADD ADD ADD ADD ADD ADD ADD ADD ADD ADD ADD ADD ADD ADD ADD ADD ADD ADD ADD ADD ADD ADD ADD ADD ADD ADD ADD ADD ADD ADD ADD ADD ADD ADD ADD ADD ADD ADD ADD ADD ADD ADD ADD ADD APPV2 Press A to select a folder, and press SELECT/ENTER. A list of files in the folder appears.

If you are in a file list and want to return to the Folder list, use the 🔊 buttons on the remote to highlight “=” and press SELECT/ENTER to return to the previous menu screen.
3 If you want to view a particular file, press highlight a file and press SELECT/ENTER or PLAY.
Slide Show starts from the selected file if Speed option is not Off.
While viewing a file, you can press STOP(■) to move to the previous menu (JPEG menu).

- Press MENU to move to the next page.
- There are four Slide Speed options: :
(Slow), >> (Normal), >>> (Fast) and II (off).
Use / to highlight the Speed. Then, use
/ to select the option you want to use then press
SELECT/ENTER.
- If you set Speed option to Off, Slide Show is not active.
Slide Show
Use ▲/ to highlight the (Slide Show) then press SELECT/ENTER.
Moving to another File
Press ◀◀◀ or ▶▶◀ once during viewing a picture to advance to the next file or to the previous file.
Still Picture
1 Press PAUSE/STEP during slide show. The player will now go into PAUSE mode.
2 To return to the slide show, press PLAY or press PAUSE/STEP again.
JPEG disc compatibility with this player is limited as follows:
- Depending upon the size and number of JPEG files, it could take a long time for the DVD player to read the disc's contents. If you don't see an on-screen display after several minutes, some of the files may be too large — reduce the resolution of the JPEG files to less than 2760 x 2048 pixels and burn another disc.
- The total number of files and folders on the disc should be less than 999.
- Some discs may be incompatible due to a different recording format or the condition of disc.
- Ensure that all the selected files have the ".jpg" extensions when copying into the CD layout.
- If the files have ".jpe" or ".jpeg" extensions, please rename them as ".jpg" file.
- File names without ".jpg" extension will not be able to be read by this DVD player. Even though the files are shown as JPEG image files in Windows Explorer.
Operation with DivX Disc
The unit can play the DivX files.
1 Insert a disc and close the tray. The DivX menu appears on the TV screen.
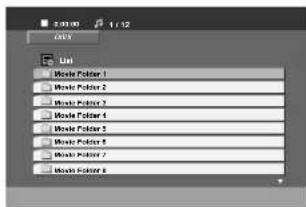
text_image
2.01.00 1:12 Unit Movie Folder 1 Movie Folder 2 Movie Folder 3 Movie Folder 4 Movie Folder 5 Movie Folder 6 Movie Folder 7 Movie Folder 82 Press to select a folder, and press SELECT/ENTER to see the folder contents.

If you are in a file list and want to return to the Folder list, use the buttons on the remote control to highlight "→" and press SELECT/ENTER to return to the previous menu screen.
3 If you want to view a particular file, press ▲ / ▼ highlight a file and press SELECT/ENTER or PLAY. Playback starts.

- Be sure to select "SUBTITLE ON" mode by pressing the subtitle file every time before playing a DivX file.
- When the subtile has more than two languages in the file, original subtile is only available.
Display DivX
Press DISPLAY during playback.
General playback status can be displayed on the TV screen.
DivX disc compatibility with this player is limited as follows:
- A vailable resolution size of the DivX file is under 720x576 (W x H) pixel.
- The file name of the DivX subtitle is available by 20-40 characters (differs from language).
- If there is impossible code to express in the DivX file, it may be displayed as "_" mark on the display.
- If the number of the screen frame is over 30 per 1 second, this unit may not operate normally.
- If the video and audio structure of recorded file is not interleaved, either video or audio is outputted.
- If the file is recorded with GMC, the unit supports some of 1-point of the record level.
- GMC? GMC is the acronym for Global Motion Compensation. It is an encoding tool specified in MPEG4 standard. Some MPEG4 encoder, like DivX or Xvid, have this option. There are different levels of GMC encoding, usually called 1-point, 2-point, or 3-point GMC.
playable DivX subtitle file
●".srt", ".smi", ".sub".
playable DivX file
- "AC3", "DTS", "PCM", "MP3", "WMA".
- Sampling frequency: within 32 - 48 kHz (MP3), within 24 - 48kHz (WMA)
- Bit rate: within 32 - 320kbps (MP3), 40 - 192kbps (WMA)
Operation with KARAOKE
You can play KARAOKE(singing along) with CD by connecting a microphone to the unit.
You can enjoy KARAOKE with a stereo-recorded disc, even if it is a non-karaoke disc, by reducing the singer's voice.
Karaoke Basic Playback
1 Check if the system is connected. (Refer to the page 6-7.)
2 Turn on the powers of TV (or Amplifier) and DVD Karaoke and enter to the video mode on TV.
3 Press ▲ OPEN/CLOSE to open the disc tray and load supplied karaoke disc in the tray with the label facing up.
4 Press ▲ OPEN/CLOSE to close the tray.

text_image
[TV Screen] КАРАОКЕ VEST POTOTOKA5 Connect the microphone to the MIC 1 or MIC 2 jack.
6 Select the melody number you want by pressing NUMERIC buttons.
If you cancel the selected melody number, press the CLEAR.
7 Press PLAY. The selected melody number is played. Sing in tone with microphone. After melody ends, it is stopped automatically and score appears.
Note
Don't connect the microphone during playing DivX disc.
Karaoke Advanced Playback
Return Function
This is a function that returns to the preceding MENU.
Press the RETURN.
Note
If there is no preceding menu (in case of the first menu), this function may not be executed.
To Adjust MIC Volume
Press the Microphone volume control (MIC VOL.
▲) button on the remote control clockwise to increase the volume, or counterclockwise to decrease it. (0\~15 steps)
To Adjust ECHO Volume
You can give an echo effect to the sound from the microphones.
Press the ECHO volume control (ECHO VOL. ▼) button on the remote control clockwise to increase the echo, or counterclockwise to decrease it. (0\~15 steps)
Key Control
You can change the key to suit your vocal range. You can adjust the key to 13 steps (6steps higher, 6steps lower and the original key).
- The setting appears on the screen.
Press KEY CONTROL (b/#) repeatedly on the remote control or turn KEY CONTROL (b/#) on the front panel to find the key that suits your vocal range.
- To flatten the key one by one, press the KEY CONTROL (b) repeatedly during playback.
- To sharp the key one by one, press the KEY CONTROL (#) repeatedly during playback.
- To return to the original key, press the KEY CONTROL (b/#) repeatedly to appear the original key.
Operation with KARAOKE
Reserving the Songs
When you want to make a reservation of next melody, you can enjoy the most 8 melodies reservation Without waiting.
1 Press the NUMERIC buttons to reserve melody number you want in the karaoke disc play mode. Melody number appears on the TV screen.
2 Press PROGRAM. The melody number is made a reservation.
3 Repeat steps 1-2. You can reserve 8 songs.

After the one song finishes its playback, the next song will be playback automatically.
To cancel the reserved song
Each time you press CLEAR, the reserved song will be cancelled one by one.
To cancel or change the wrong reserved song Press the PROGRAM to move to the desired position, then press the CLEAR to cancel the reserved song.
Male/Female Function
If you want to sing a song of MAN's or WOMEN's key, press MALE(☐/FEMALE( ) button repeatedly to change MAN's or WOMEN's key.
Tempo Change
You can use this function when you want to play fast or slow.
- Press TEMPO + repeatedly during singing to play faster.
- Press TEMPO - repeatedly during singing slower.
Shadow Function
If some CD caption and the song's subtitle are mixed up, the song's subtitle may be invisible. In this case, to highlight the song's subtitle, press SHADOW. - It will be highlighted by background shadow image.
Karaoke MENU Playback
Preparation
Press MENU on the karaoke mode.
The main MENU appears on the screen.
Main MENU (On the TV screen)

Select by pressing / on the main menu.


Use to select the desired option, and press SELECT/ENTER.

text_image
1. БАЛЫЫ 2. ФАНФАРЫ 3. ТЕКСТ ГЕСНИ 4. БОК-ВОКАЛSCORE ON/OFF
( ). БАЛЛЫ ВКЛ ВЫКЛ

: When singing by selection of melody, song score comes out after one piece of song is ended.
To cancel it, select the

FANFARE ON/OFF
In condition of POWER ON, scoring fanfare operates. The fanfare sound comes out after singing finished.
To cancel it, select the

LYRIC ON/OFF
: When singing by selection of melody, song lyric appears on the TV screen.
To cancel it, select the

CHORUS ON/OFF
(1. БЭК-ВОКАЛ Вкл Выкл

: When singing by selection of melody, song chorus is heard a sound.
To cancel it, select the


ote
To move to the main menu, press MENU or RETURN.
Operation with KARAOKE
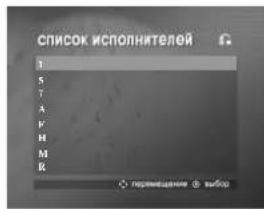
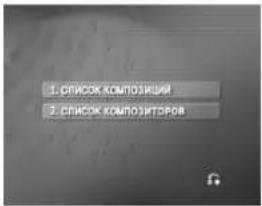
MUSIC LIST ( ) ПИСОК КОМПОЗИЦИЙ
LOCAL SONG () and POPME ПЕСНИ
SONG ( ). ЗАРУБЕЖНЫЕ ПЕСНИ

Select by pressing the ZIYUH
△ / on the main menu.
The LOCAL SONG, POP SONG and CLASSIC menu will be shown on the TV screen.
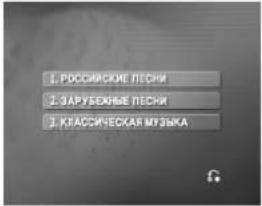
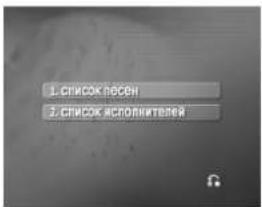
by pressing the 📄 / 🤦, and press SELECT/ ENTER. SONG LIST and SINGER LIST menu will be shown on the TV screen.
text_image
1. СПИСОК НАСЕН 2. СПИСОК ИСПОПИТЕЛЕЙ1 Select and select the initial of the song title you want by pressing the ▲ then press SELECT/ ENTER.

2 Select the song title you want by pressing the ▲, and press SELECT/ ENTER.
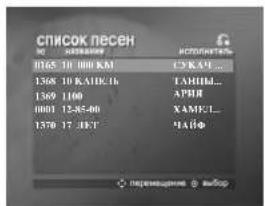
text_image
СПИСОК ПЕСЕН 0165 10 1000 KAI 1368 10 КАИСКБ 1369 1100 1001 12-85-40 1370 17-JEY СУКАЧ... ТАНЦЫМ... АРИИ ХАМКЛ... МАЙФ1 Select and select the initial
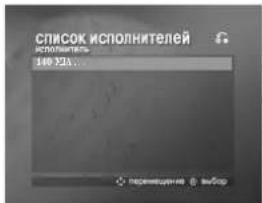
of the singer you want by pressing the 📂 in the SONG LIST and SINGER LIST menu, and press SELECT/ ENTER.
2 Select the singer you want by pressing the ▲/▼, and press SELECT/ ENTER.
3 Select the song title of the singer you want by pressing the ⚠ and press SELECT/ ENTER.
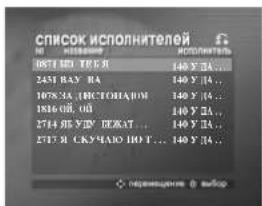
- To move the previous mode, select the by pressing the ▲ then press SELECT/ ENTER
- The special letters may not be displayed on the TV screen.
Operation with KARAOKE
1 Select by pressing the MYZYKA / / , and press SELECT/ ENTER in the LOCAL SONG, POP SONG and CLASSIC menu. The CLASSIC LIST and COMPOSER LIST menu will be shown on the TV screen.
1 Select and select the initial of the song title you want by pressing the ▲, ▼ then press SELECT/ ENTER.
2 Select the song title you want by pressing the 🔒, and press SELECT/ ENTER.

text_image
СПИСОК КОМПОЗИЦИЙ ИН КРЕВЕНИЯ КОМПОТОР 3802 АБОНГ ГОРОЖЕН ЛАН... SCHUMANN 3803 AIR (HOLBERG) GRIGG 3804 ALMOST TOO SERBOLI... SCHUMANN 3805 ANDANIEK & ROMIO C... MONOLO SOD 3806 ANDRA'S DANCE P... GRIGG 3807 ARABESKE OP.18 SCHUMANN 3808 ARABESQUE NO.1 IN E DEBUSSY 3809 ARABESQUE NO.2 IN E DEBUSSYCOMPOSER LIST (2) СПИСОК КОМПОЗИТОРОВ
1 Select and select the initial of the composer you want by pressing the ▲ ▼ in the CLASSIC LIST and COMPOSER LIST menu, and press SELECT/ ENTER.
2 Select the composer you want by pressing the ▲/▼, and SELECT/ ENTER.

3 Select the song title of the composer you want by pressing the ⚠ and press SELECT/ ENTER.

text_image
СПИСОК КОМПОЗИТОРОВ Н. МЕРЕДНИЯ КОМПОЗИТОР 3846 BAGATEL OP.32 NO.1 DEETHOVEN 3847 BAGATEL OP.32 NO.4 DEETHOVEN 3852 FUER ELISE DEETHOVEN 3904 MOONLIGHT SONATA.. DEETHOVEN 3905 MOONLIGHT SONATA.. DEETHOVEN 3906 MOONLIGHT SONATA.. DEETHOVEN 3923 PATHETIQUE SONAT.. DEETHOVEN 3924 PATHETIQUE SONAT.. DEETHOVEN
To move the previous mode, select the by pressing the ▲ then press SELECT/ ENTER.
Operation with KARAOKE
5 Select number you want by pressing ▲ ▼ and press SELECT/ ENTER.
pressing Sing along with the accompaniment. on
6 Repeat step 4\~5. Change the team of red team or blue team alternately.
7 When reaching the targeted winning number, the HOSPABILITIES will be shown on the TV screen. It appears as below.

text_image
ПОЗДРАВЛЕМ22 Press SELECT/ENTER to begin randomly.
CHALLENGE (ОРЕВНОВАНИЕ
It has a function which enjoy a song game dividing by two teams of red team & blue team.
8 Whether you keep going the song game or not, select 1.4A or 2.HET by pressing / below.
as
1 Select 4. СОРЕВНОВАНИЕ by the main menu. It appears as below.
- Select by pressing ⬆ПЫТОК, and select one of NUMERIC buttons 1\~9 by pressing ⬆to select winner's number, then press SELECT/ ENTER.
3 Select by pressing результат , and select one of 60,70,80 or 90 by pressing / to select success score, then press SELECT/ ENTER.
4 Select by pressing /, then press SELECT/ ENTER. It appears as below.

text_image
0 1 2 3 4 9 6 7 8 9 10 11 12 13 14 15 16 17 18 19 2024
Language Code List
Use this list to input your desired language for the following initial settings: Disc Audio, Disc Subtitle, Disc Menu.
| Language | Code | Language | Code | Language | Code | Language | Code |
| Abkhazian | 6566 | Finnish | 7073 | Macedonian | 7775 | Slovenian | 8376 |
| Afar 6565 | French 7082 | Malagasy | 7771 | Somali 8379 | |||
| Afrikaans | 6570 | Galician | 7176 | Malay 7783 | Spanish | 6983 | |
| Albanian | 8381 | Georgian | 7565 | Malayalam | 7776 | Sudanese | 8385 |
| Ameharic | 6577 | German | 6869 | Maltese | 7784 | Swahili 8387 | |
| Arabic | 6582 | Greek | 6976 | Maori | 7773 | Swedish | 8386 |
| Armenian | 7289 | Greenlandic | 7576 | Marathi 7782 | Tagalog | 8476 | |
| Assamese | 6583 | Guarani | 7178 | Moldavian | 7779 | Tajik 8471 | |
| Azerbaijani | 6590 | Gujarati | 7185 | Mongolian | 7778 | Tamil | 8465 |
| Bashkir 6665 | Hausa | 7265 | Nauru | 7865 | Tatar 8484 | ||
| Basque | 6985 | Hebrew | 7387 | Nepali | 7869 | Telugu | 8469 |
| Bengali; Bangla | 6678 | Hindi 7273 | Norwegian | 7879 | Thai | 8472 | |
| Bhutani | 6890 | Hungarian | 7285 | Oriya | 7982 | Tibetan 6679 | |
| Bihari | 6672 | Icelandic 7383 | Panjabi 8065 | Tigrinya | 8473 | ||
| Breton | 6682 | Indonesian | 7378 | Pashto, Pushto | 8083 | Tonga | 8479 |
| Bulgarian | 6671 | Interlingua | 7365 | Persian | 7065 | Turkish 8482 | |
| Burmese 7789 | Irish 7165 | Polish | 8076 | Turkmen 8475 | |||
| Byelorussian | 6669 | Italian 7384 | Portuguese | 8084 | Twi | 8487 | |
| Cambodian | 7577 | Japanese | 7465 | Quechua | 8185 | Ukrainian | 8575 |
| Catalan | 6765 | Javanese | 7487 | Rhaeto-Romance | 8277 | Urdu | 8582 |
| Chinese 9072 | Kannada 7578 | Rumanian | 8279 | Uzbek | 8590 | ||
| Corsican 6779 | Kashmiri | 7583 | Russian | 8285 | Vietnamese | 8673 | |
| Croatian | 7282 | Kazakh 7575 | Samoan 8377 | Volapük | 8679 | ||
| Czech | 6783 | Kirghiz 7589 | Sanskrit | 8365 | Welsh | 6789 | |
| Danish 6865 | Korean | 7579 | Scots Gaelic | 7168 | Wolof | 8779 | |
| Dutch 7876 | Kurdish | 7585 | Serbian | 8382 | Xhosa | 8872 | |
| English 6978 | Laothian | 7679 | Serbo-Croatian | 8372 | Yiddish | 7473 | |
| Esperanto | 6979 | Latin | 7665 | Shona | 8378 | Yoruba 8979 | |
| Estonian | 6984 | Latvian, Lettish | 7686 | Sindhi | 8368 | Zulu | 9085 |
| Faroese 7079 | Lingala | 7678 | Singhalese | 8373 | |||
| Fiji 7074 | Lithuanian | 7684 | Slovak 8375 |
REFERENCE
Country Code List
Choose a country code from this list.
| Country Code | Country Code | Country Code | Country Code | ||||
| Afghanistan AF | Ethiopia ET | Malaysia | MY | Saudi Arabia | SA | ||
| Argentina AR | Fiji | FJ | Maldives | MV | Senegal | SN | |
| Australia AU | Finland FI | Mexico MX | Singapore SG | ||||
| Austria AT | France FR | Monaco | MC | Slovak Republic | SK | ||
| Belgium BE | Germany | DE | Mongolia | MN | Slovenia | SI | |
| Bhutan BT | Great Britain | GB | Morocco MA | South Africa | ZA | ||
| Bolivia BO | Greece | GR | Nepal NP | South Korea | KR | ||
| Brazil BR | Greenland | GL | Netherlands | NL | Spain ES | ||
| Cambodia KH | Islands HM | Dutch Antilles | AN | Sri Lanka | LK | ||
| Canada CA | Hong Kong | HK | New Zealand | NZ | Sweden SE | ||
| Chile CL | Hungary | HU | Nigeria NG | Switzerland CH | |||
| China CN | India | IN | Norway | NO | Taiwan TW | ||
| Colombia CO | Indonesia | ID | Oman | OM | Thailand | TH | |
| Congo CG | Israel | IL | Pakistan | PK | Turkey TR | ||
| Costa Rica CR | Italy | IT | Panama | PA | Uganda UG | ||
| Croatia HR | Jamaica | JM | Paraguay PY | Ukraine | UA | ||
| Czech Republic | CZ | Japan JP | Philippines | PH | United States | US | |
| Denmark | DK | Kenya | KE | Poland PL | Uruguay | UY | |
| Ecuador | EC | Kuwait KW | Portugal | PT | Uzbekistan UZ | ||
| Egypt | EG | Libya | LY | Romania | RO | Vietnam | VN |
| El Salvador | SV | Luxembourg | LU | Russian Federation | RU | Zimbabwe | ZW |
Troubleshooting / Specifications
Check the following guide for the possible cause of a problem before contacting service.
| Symptom | Possible Cause | Correction |
| No power. | The power cord is disconnected. | Plug the power cord into the wall outlet securely. |
| The power is on, but the DVD player does not work. | No disc is inserted. | Insert a disc. (Check that the DVD or audio CD indicator in the display window is lit.) |
| No picture. | The TV is not set to receive DVD signal output. | Select the appropriate video input mode on the TV. |
| The video cable is not connected securely. | Connect the video cable securely. | |
| No sound. | The equipment connected with the audio cable is not set to receive DVD signal output. | S elect the correct input mode of the audio receiver so you can listen to the sound from the DVD player. |
| The power of the equipment connected with the audio cable is turned off. | Turn on the equipment connected with the audio cable. | |
| The AUDIO options are set to the wrong position. | Set the Digital Audio Output to the correct position, then turn on the DVD player again by pressing POWER. | |
| The DVD player does not start playback. | An unplayable disc is inserted. | Insert a playable disc. (Check the disc type, color system, and regional code.) |
| The rating level is set. | Cancel the rating function or change the rating level. | |
| The remote control does not work properly. | The remote control is not pointed at the remote sensor on the DVD player. | Point the remote control at the remote sensor of the DVD player. |
| The remote control is too far from the DVD player. | Operate the remote control closer to the DVD player. |
General
Power requirements ..... AC 110-240 V, 50/60 Hz
Power consumption 14 W
Dimensions (approx.) .430 X 43 X 260 mm (w x h x d)
Mass (approx.) 2.3 kg
Operating temperature . . . 5°C to 35°C (41°F to 95°F)
Operating humidity 5% to 90%
Outputs
VIDEO OUT 1 Vp-p 75 Ω,
sync negative, RCA jack x 1
Audio output (optical audio) .....3 V (p-p), 75 Ω,
Optical connector x 1
Audio output (analog audio) . . .2.0 Vrms (1 KHz, 0 dB),
600 Ω, RCA jack (L, R) x 1
System
Laser ....Semiconductor laser, wavelength 650 nm
Signal system PAL/NTSC/AUTO
Frequency
response ..... DVD (PCM 96 kHz): 8 Hz to 44 kHz
DVD (PCM 48 kHz): 8 Hz to 22 kHz
CD: 8 Hz to 20 kHz
Signal-to-noise ratio .... More than 100 dB
(ANALOG OUT connector only)
Harmonic distortion .... Less than 0.008 %
Dynamic range .... More than 100 dB (DVD)
More than 95 dB (CD)
- Design and specifications are subject to change without notice.
Manufactured under license from Dolby Laboratories. Dolby, MLP Lossless and the double-D symbol are trademarks of Dolby Laboratories. Confidential unpublished works. Copyright 1992-1997 Dolby Laboratories. All rights reserved.
DTS and DTS Digital Surround are registered trademarks of Digital Theater Systems, Inc.
P/NO : MFL39518837