MXG030SS - Stove MATRIX - Free user manual and instructions
Find the device manual for free MXG030SS MATRIX in PDF.

User questions about MXG030SS MATRIX
0 question about this device. Answer the ones you know or ask your own.
Ask a new question about this device
Download the instructions for your Stove in PDF format for free! Find your manual MXG030SS - MATRIX and take your electronic device back in hand. On this page are published all the documents necessary for the use of your device. MXG030SS by MATRIX.
USER MANUAL MXG030SS MATRIX
Manual for installation, use and maintenance
MXG030SS MXG060SS MXG070SS
Gas hobs
Contents:
3 Important information
4 Important safety warnings
6 Using your hob
7 Igniting the hob
7 Selecting the right burner
8 Care and maintenance
9 Mains electricity connection
11 Installation
14 Ventilation
15 Natural gas to LPG conversion
17 Troubleshooting
Appliance information:
Please enter the details on the appliance rating plate below for reference, to assist CDA Customer Care in the event of a fault with your appliance and to register your appliance for guarantee purposes.
| Appliance Model | |
| Serial Number |
EU Declarations of Conformity:
This appliance has been manufactured to the strictest standards and complies with all applicable legislation, including Gas safety, Electrical safety (LVD) and Electromagnetic interference compatibility (EMC).
Parts intended to come into contact with food conform to 1935/2004/EC.
IMPORTANT INFORMATION FOR CORRECT DISPOSAL OF THE PRODUCT IN ACCORDANCE WITH EU DIRECTIVE 2012/19/EC.
At the end of its working life, the product must be taken to a special local authority waste collection centre or to a dealer providing appliance recycling services.
Disposing of a household appliance separately avoids possible negative consequences for the environment and health. It also enables the constituent materials to be recovered, saving both energy and resources. As a reminder of the need to dispose of household appliances separately, the product is marked with a crossed-out wheeled dustbin.
Please note:
- Gas hobs become hot and remain hot during and immediately after use. Do not touch the pan stands, burners or hob spill tray until the appliance has been allowed to cool.
- Keep children away from the appliance when in use.
• After use, please ensure that the gas taps are in the 'Off' position.
- Ensure that the appliance is correctly adjusted for the type of gas available before installation.
- The use of a gas appliance produces heat and humidity in the room in which it is installed. Ensure that the room is well ventilated, either by the use of natural ventilation outlets (e.g. windows) or a ducted extractor.
- This hob (Class 3) has been designed for use only as a cooking appliance. Any other use (e.g. heating rooms) should be considered incorrect and potentially dangerous.
• These instructions are valid only for the countries of destination, the symbols of which appear on the cover and on the appliance.
Safety instructions:
Make sure that this instruction booklet is read thoroughly and understood before attempting to install or operate this hob. The instructions are provided in the interest of your safety.
Gas safety regulations and use of your hob
- It is a legal requirement that all gas appliances are installed by qualified personnel only in accordance with current legislation. It is your responsibility to ensure compliance with the law.
- Repairs or servicing of this product must only be carried out by an authorised service agent using approved parts.
- No attempt must be made to modify this appliance under any circumstances.
- Cooking appliances can become very hot in use – please keep children and pets away from them.
- Do not allow children to operate or play with any part of the appliance.
- Do not use unstable pans and ensure that the handle is positioned away from the edge of the worktop.
-
In the interest of hygiene and safety, please ensure the hob is kept clean.
-
This appliance is designed for domestic cooking only. Commercial use will invalidate the warranty.
- Do not cover the hob or place combustible materials on or near the surface even when the hob is not in use.
- Do not fill deep fat frying containers more than one third full of oil and NEVER leave unattended.
- Before cleaning the hob, switch off at the mains.
- When cooking is finished, switch off all controls and allow to cool.
- These appliances are not intended for use by persons (including children) with reduced physical, sensory or mental capabilities, or lack of experience and knowledge, unless they have been given supervision or instruction concerning use of the appliance by a person responsible for their safety.
- If the supply cable is damaged, it must be replaced by the authorised service agent or qualified person only.
- Do not immerse the appliance or the power cable into water or any other liquid.
- The gas regulator must comply with EN 16129 or EN 12864 and local code. Make sure of the out let pressure before connecting the gas regulator to the product.
- The flexible hose must comply with approval standard and the local code.
Using your hob

text_image
Rapid gas burner 3000W Semi-rapid gas burner 1750WMXG030SS MXG060SS
text_image
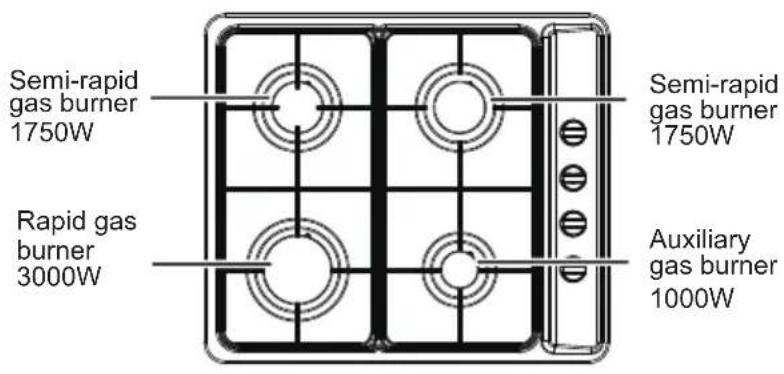
Semi-rapid gas burner 1750W Rapid gas burner 3000W Semi-rapid gas burner 1750W Auxiliary gas burner 1000WSemi-rapid gas burner 1750W
Auxiliary gas burner 1000W

text_image
Triple flame gas burner 3500W Semi-rapid gas burner 1750W Semi-rapid gas burner 1750W Rapid gas burner 3000W Auxiliary gas burner 1000WMXG070SS
It is important that you read these instructions thoroughly before using the appliance, paying particular attention to the installation and safety instructions. If you have any problems installing, operating or cooking with your hob, please check these instructions to ensure all of them have been adhered to.
| Type Triple | flame gas burner | Rapid gas burner | Semi-rapid gas burner | Auxiliary gas burner | Material | Flame failure device | Power supply | Size (mm) | Built-in (mm) |
| MXG030SS | / | 3.0kW | 1.75kW | Yes / | Stainless steel | 220-240V~50HZ | 297x515x106 | 283x498 | |
| MXG060SS | / | 3.0kW | 1.75kW | 1.0kW Yes | Stainless steel | 580x500x85 | 557x477 | ||
| MXG070SS | 3.5kW | 3.0kW 1.75 | kW 1.0kW | Yes | Stainless steel | 680x500x96 | 557x477 |
WARNING! For your own safety, make sure that these instructions on installation, use and maintenance are followed.
Igniting the hob burners
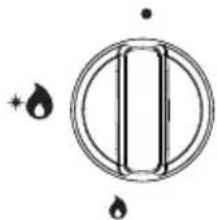
- To light the hob, push down the appropriate knob and turn anti-clockwise to the large flame symbol (Fig.1).
- Keep the knob depressed until the burner lights.
- Turn the knob to the required setting.
- In the event of the burner flames being accidentally extinguished, turn off the burner immediately and do not attempt to reignite for at least 1 minute.
NOTE: Matches can be used to light the burners in the event of a power failure.
Keep the control knob pressed in for 15 seconds ensuring the burner stays lit when released. If the burner fails to stay lit wait for 1 minute before relighting.
- Closed position
- Maximum position
Minimum position
natural_image
Simple diagram with a circle containing vertical bars and two droplet symbols, no text or labels present.Fig.1
Selecting the right burner
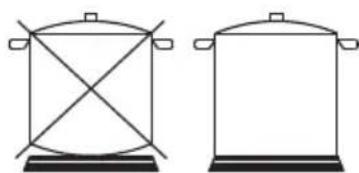
Use an appropriately sized pan with a flat bottom for each burner (see the table below and Fig.2).
When the contents of the pan start to boil, turn the knob down to reduced rate position. Always put a lid on the pan.
natural_image
Two simple line drawings of a cooking pot with handles and cross-shaped spans (no text or symbols)Fig.2
| Burners | Triple Flame 3500W | Rapid 3000W | Semi-rapid 1750W | Auxiliary 1000W |
| Pans (cm) 24-26 | 20-22 16-18 | 10-14 |
NOTE: Please do not use pots or pans that overlap the boundaries of the hob.
Care and maintenance
Cast iron or enamelled parts
In order to clean the hotplate, burner caps and pan supports on your hob, please use a soft cloth and hot, soapy water.
Stubborn stains can be removed with a non-abrasive cleaning agent, so as not to damage the enamel surface.
NOTE: The enamelled pan supports can also be cleaned safely in the dishwasher.
Stainless steel
To clean the hotplate surface, clean with a cloth soaked in hot, soapy water and then dry with a soft cloth to avoid scratching.
Plastic
To clean the control knobs, wipe clean with a damp, soapy cloth. The control knobs may be removed for thorough cleaning, if necessary, but ensure not to damage the seal.
Glass
A non-abrasive cleaner should be used on glass surfaces. Any abrasive cleaner (including Cif) will scratch the surface and could erase the control panel markings. Glass can be effectively cleaned by simply using a dilute solution of water and mild detergent and drying to a shine with a clean cloth.
Caution: In case of hotplate glass breakage shut immediately off all burners and any electrical heating element and isolate the appliance from the power supply do not touch the appliance surface
• Do not touch the appliance surface
• Do not use the appliance
Mains electricity connection
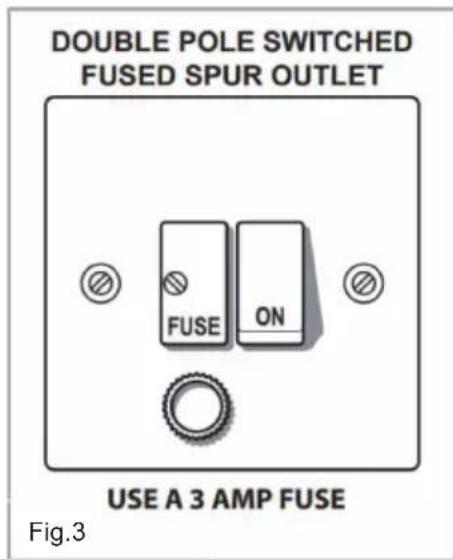
THIS APPLIANCE MUST BE CONNECTED TO THE MAINS SUPPLY BY A COMPETENT PERSON, USING FIXED WIRING VIA A
DOUBLE POLE SWITCHED FUSE SPUR OUTLET AND PROTECTED BY A 3A FUSE.
We recommend that the appliance is connected by a qualified electrician, who is a member of the N.I.C.E.I.C. and who will comply with the I.E.T.and local regulations.
The wires in the mains lead of this appliance are coloured in accordance with the following code:
text_image
DOUBLE POLE SWITCHED FUSED SPUR OUTLET FUSE ON USE A 3 AMP FUSE Fig.3BLUE = NEUTRAL, BROWN = LIVE, GREEN & YELLOW = EARTH
As the colours of the wires in the mains lead for the appliance may not correspond with the coloured markings identifying the terminals connecting to the fused spur, proceed as follows:
- The wire which is coloured green & yellow must be connected to the terminal marked E (Earth) or coloured green.
- The wire which is coloured blue must be connected to the terminal marked N (Neutral) or coloured black or blue.
- The wire which is coloured brown must be connected to the terminal marked L (Live) or coloured red or brown.
If the mains cable of this appliance is damaged, it must only be replaced by a CDA approved service engineer, agent, or other suitably qualified person.
IMPORTANT – ONLY USE A 3 AMP FUSE
The use of a 13A fuse can cause internal wiring damage which will not be covered under the CDA warranty.
Do not mount the electrical isolation switch behind the chimney section. It is a requirement that you must be able to isolate the extractor from the mains electrical supply after installation.
Installation
Gas Supply Requirements
IMPORTANT: THIS APPLIANCE SHOULD BE FITTED BY A GAS SAFE REGISTERED FITTER OR OTHER SUITABLY QUALIFIED PERSON.
- This installation must comply with the Gas Safety (installation and use) Regulations 1984.
- This appliance is category II2H3+ and is designed for use in the UK and Ireland. The installation must comply with the Gas Safety (installation and use) Regulations 1984.
- The CDA Group Ltd is not legally able to provide any assistance in the installation of gas appliances except to Gas Safe registered installers. Any Gas Safe registered fitter requiring help must provide their name, address and registration number. Information supplied will be validated before help is provided.
- In the event that this appliance is not installed in accordance with the above requirements, the appliance may be disconnected from the mains gas supply until any faults are rectified; this is a legal requirement.
- This appliance should be installed using 15mm copper pipe connected via an isolation valve in an adjacent unit. The isolation valve needs to be accessible in an emergency or for service purposes.
- This appliance must not be connected to a combustion gas recovery scavenging system
- The connection to the gas supply must comply with all current
regulations in force.
• We are not legally able to offer advice on the installation of gas appliances to non Gas Safe registered personnel.
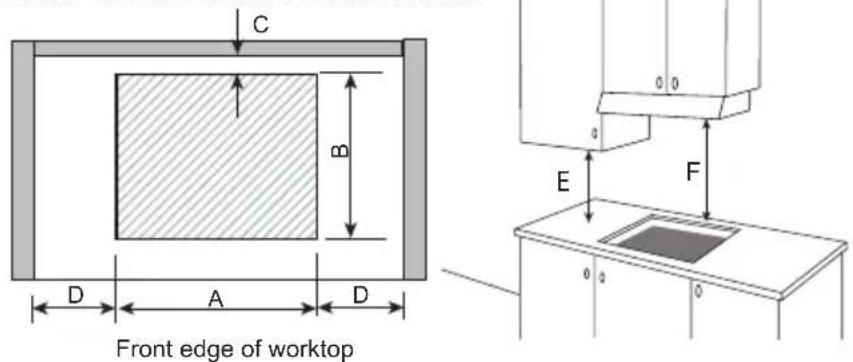
Unit: mm
MXG030SS
natural_image
Technical line drawing of a mechanical component with labeled parts (S), no readable text or symbols present.Fig. 5
Rear wall should be a flame retardant material
text_image
C B D A D Front edge of worktop E F 0 0 0 0 0 0Fig. 4
Installation location
The appliance may be located in a kitchen, kitchen/diner or utility room, however, it cannot be in a room containing a bath or shower. The hob must not be installed in a bed-sitting room of less than 20 ~m^3 . LPG models must never be installed in a room or internal space below ground level, i.e. in a basement.
text_image
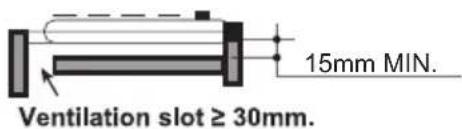
Ventilation slot ≥ 30mm. 15mm MIN.Fig. 6
The appliance can be fitted to any worktop with a thickness of 20mm or 50mm. No overhanging surface or cooker hood should be closer to the hob than 650mm.
Fix the appliance in position (Fig. 4, next page). The sides of the adjacent cabinets above may be lower than 650mm down to 400mm, provided they are heat and steam resistant.
CAUTION: Accessible parts may be hot when the grill is in use. Young children should be kept away.
CAUTION: This appliance is for cooking purposes only. It must not be used for other purposes, for example room heating. When fitting a gas hob above a drawer or a standard housing unit, suitable precautions must be taken to prevent contact with the hotplate surface as it can become very hot during operation.
The recommended method is to fix a wooden panel within the cabinet at a distance of 15mm below the underside of the hob (Fig. 6). This panel must have adequate ventilation to the rear.
NOTE: The panel underneath the hob must be easily removable to allow for any servicing requirements. When installed, the hob depth is 35mm plus 20mm terminal for MXG030SS and 40mm for MXG060SS/MXG070SS from the surface of the worktop.
Installing and fixing the hob
Before inserting the hob into the work surface, please follow the below instructions:
- Remove the pan stands and burner caps before turning the hob upside down, taking care not to damage the ignition plugs and thermocouples.
-
Place the seal "S" around the bottom edge of the hob as shown in the illustration below.
-
Place the hob in the installation opening and push it down so that the hob is resting firmly on the worktop.
- Secure the hob in position using the fixing brackets supplied. Screw one end of the bracket into the pre-drilled holes in the underside of the hob. The other end of the bracket should be located underneath the worktop to secure the hob in position.

text_image
S 3cm Screw Fixing bracket WorktopFig. 7
NOTE: When fitting the hob into worktops of less than 30mm, the use of packing blocks may be required.
Ventilation
All rooms require a window or equivalent (e.g. a door) which can be opened. Some rooms require a permanent vent in addition to a window (see below).
This unit must not be used in a room which is less than 5m^3 . The following table details the requirements based on the kitchen volume (L × W × H) in m^3 .
| Room Volume (m3) Air Vent Required (cm ) | 3 |
| 5 100 | |
| 6 to 10 50 | |
| 6 to 11 No permanent vent required if a door opens to the outside | |
| 11 or more None required | |
The above requirements also allow use of a gas oven and grill but if
there are any other fuel burning appliances in the same room, consult the relevant British Standard (BS5440) or GAS SAFE document.
Natural gas to LPG conversion
This conversion must only be carried out by a competent person (i.e. a Gas Safe registered fitter). Instructions to fit replacement injectors:
- Disconnect the appliance from the gas and electrical supplies.
- Remove burner components "B" and pan supports (Fig. 9).
- Remove the injectors "A" (Fig. 9) with a socket spanner and replace with the corresponding injectors.

text_image
B AFig. 9
text_image
Diagram showing mechanical or electrical components labeled M, D, and C with directional arrows indicating motion or movement.Fig. 10
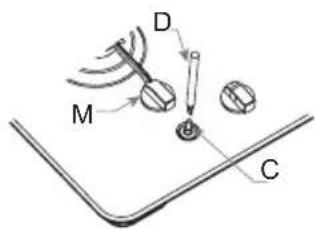
Setting up minimum flow rates:
-
Turn on the LPG supply, light the burners and turn the controls to the minimum position as indicated by the small flame symbol.
-
Remove the control knobs "M" (Fig. 10).
-
Insert a small screwdriver "D" (Fig. 10) into the hole at the top of the tap "C" and turn the adjustment screw left or right until the flame of the burner is conveniently regulated to the low position.
-
Make sure when turning quickly from maximum position to minimum position that the flame does not extinguish.
-
Replace the knobs "M".
Injector replacement table
| - Burners Gas Normal | pressure | Normal rate | Injector diameter | Nominal heat input (kW) | ||
| ance ±0.01) | min. | |||||
| 1 Auxiliary Butane | 28-30 | 1 | 0.49 | 0.6 | ||
| Propane | 37 | 1 | 0.49 | 0.6 | ||
| Natural | 20 | 1 | 0.72 | 0.6 | ||
| 2 Semi-rapid Butane | 28-30 | 1.75 | 0.67 | 0.8 | ||
| Propane | 37 | 1.75 | 0.67 | 0.8 | ||
| Natural | 20 | 1.75 | 0.97 | 0.8 | ||
| 3 Rapid Butane | 28-30 | 3.0 | 0.86 | 1.2 | ||
| Propane | 37 | 3.0 | 0.86 | 1.2 | ||
| Natural | 20 | 3.0 | 1.18 | 1.2 | ||
| 4 Triple flame Butane | 28-30 | 3.5 | 0.95 | 2.6 | ||
| Propane | 37 | 3.5 | 0.95 | 2.6 | ||
| Natural | 20 | 3.5 | 1.35 | 2.6 | ||
Troubleshooting
In the event of an emergency, you should:
• S rwitch off all working units of the cooke
• Disconnect the mains plug
- Call the service centre
- Some minor faults can be fixed by referring to the instructions given in the table below. Before calling the customer support centre or the service centre check the points that are presented in the table below
| Problem Solution | |
| 1. Uneven or yellow flame rather blue | Switch off and check the following:Are the burners fitted correctly?Are the holes in the burner clear?Check that no dust has fallen into the flame turning it yellow |
| 2. Burner failing to ignite | Check that the power is turned on or that the fuse has not blown.Make sure that the ignitor is not coated with food spillage. |
| 3. Spark but no gas | Make sure the gas is turned on.Check that the burner holes are not blocked. |
| 4. Smell of gas | Check to see if any gas taps have been left on.If they are off, switch the gas off at the mains and call the CDA customer care team.WARNING! DO NOT check with a naked flame, strike any matches or press ignitor. |
Regular inspections
Besides keeping the hob clean, you should:
- Carry out periodic inspections of the control elements and cooking units of the hob. After the guarantee has expired you should have a technical inspection of the hob carried out at a service centre at least once every two years
• Fix any operational faults
Caution! All repairs and regulatory activities should be carried out by the appropriate service centre or by an appropriately authorised fitter.
In the event of your appliance requiring technical assistance and/or spare parts, please contact CDA Customer Care. For more information about the warranty of your product, including terms and conditions, please visit www.cda.co.uk/warranty
CDA Customer Care
Phone: 01949 862 012
Email: customer.care@cda.co.uk
In this case it is necessary to state all the appliance data on the rating plate, such as model, serial number etc.
If the problem is not solved, disconnect the power supply and report the fault.
Important! All repairs must be performed by qualified service technicians. The use of engineers not approved by CDA may invalidate any warranty provided.
ATTENTION!
This appliance must be installed in compliance with the current regulations and only installed in rooms equipped with adequate ventilation. Consult the instruction manual before proceeding with installation or use of the appliance.
About ErP
A) Measurement and calculation methods
- The gas hob was CE approval according to the Gas Appliance Directives 2009/142/EC.
- The energy efficiency of this gas hob was tested and measured according to EN 30-2-1-1998+A1-2003+A2-2005.
- The semi-rapid burner and rapid burner were tested separately; the auxiliary burner is not required for test because its nominal heat input is less than 1.16kW.
- The energy efficiency of the gas burners and the hob were calculated according to COMMISSION REGULATION (EU) No. 66/2014.
B) Rational use of the energy and the appliance
- The gas hob is designed for domestic use only, please do not use for commercial.
- The gas hob is designed for use with gas (LPG and Natural gas), the combustion products contain carbon monoxide and carbon dioxide, the exhaust of combustion products is affecting our environment when reach a certain amount of CO and CO2.
- To ensure the rational use of energy, please install the gas hob according to the specifications in clause 5, and please make sure you are using the correct diameter of pan for each burner.
- To ensure the safety use, please read this instruction manual before use; please follow the installation, operation and maintenance guideline.
- To ensure the optimal life expectancy of the gas hob, please follow the operation and maintenance guideline strictly; please do not modify the appliance.
- Please contact your local after-sale service for repairing and exchanging of the components (such as gas valve, control knob) if necessary.
- The materials of the gas hob is metal, please dispose the gas hob recycling when the gas hob comes to the end-of-life.
- The packaging materials of this appliances is recyclable, please make good use of waste materials.
| Energy Efficiency Information | |||||
| Attribute Symbol Units | Symbol | Value | Units | ||
| noitacifitnedl ledoM | MXG030SS | MXG060SS | MXG070SS | ||
| Annual Energy Consumption Built in Built in | Built in | ||||
| Time increase factor | 2 | 4 | 5 | ||
| Fluid Dynamic Efficiency | EE_Gas burner | SR:56.0 /R:56.0 / | Aux:NA /SR:56.0 /SR:56.0 /R:56.0 / | Aux:NA /SR:55.6 /SR:55.6 /R:55.6 /Tr:55.6 | % |
| Energy Efficiency Index | EE_Gas hob | 56.0 | 56.0 | 55.6 | % |

text_image
MATRIXServiced by

text_image
|C|D|A|For service or queries relating to your product please contact:
The Customer Care Department on 01949 862 012 or email customer.care@cda.co.uk
For more information please contact:
The Sales Department on 01949 862 010 or email sales@cda.co.uk
Customer Care Department. The CDA Group Ltd, Harby Road, Langar, Nottinghamshire, NG13 9HY T: 01949 862 012 F: 01949 862 003 E: customer.care@cda.co.uk