
Taylor 2.0 - Tripod 3 Legged Thing - Free user manual and instructions
Find the device manual for free Taylor 2.0 3 Legged Thing in PDF.

| Product Type | Monopod (tripod conversion via Docz included) |
| Brand | 3 Legged Thing |
| Model | Taylor 2.0 |
| Leg Sections | 4 |
| Locking Mechanism | Twist locks (quarter-turn) |
| Mounting Screw | Retractable 1/4"-20 and 3/8"-16 |
| Mounting Plate | Included, with 3/8" screw (retractable to 1/4") |
| Bubble Grip | Yes, for enhanced grip |
| Base | Rubber boot / footwear with non-slip feet |
| Docz Included | Yes (tripod conversion kit) |
| Docz Legs | 3 legs with quick-release buttons |
| Docz Ball Head | Yes, adjustable with rubber lock |
| Cleaning | Rinse with water after use in sand/dirt; use silicone grease |
| Lubricant | Silicone grease only; do not use WD40 |
| Warranty | 5 years global |
| Registration Required | Yes, at www.3leggedthing.com/register |
| Support Contact | support@3leggedthing.com |
| Safety Warning | Read instructions before use; always hold camera when mounting/removing |
| Manufacturer | 3 Legged Thing, Unit 9 Kinsbourne Farm, Bury End, Stagsden, Bedfordshire MK43 8TS, United Kingdom |
Frequently Asked Questions - Taylor 2.0 3 Legged Thing
User questions about Taylor 2.0 3 Legged Thing
0 question about this device. Answer the ones you know or ask your own.
Ask a new question about this device
Download the instructions for your Tripod in PDF format for free! Find your manual Taylor 2.0 - 3 Legged Thing and take your electronic device back in hand. On this page are published all the documents necessary for the use of your device. Taylor 2.0 by 3 Legged Thing.
USER MANUAL Taylor 2.0 3 Legged Thing
Look at the end of your box. See that little sticker with a serial number and a barcode? Peel it off and put it here for safe keeping.
Or don't.
IMPORTANT
DO NOT USE YOUR MONOPOD UNTIL YOU HAVE READ THESE INSTRUCTIONS. NO WARRANTY CLAIM WILL BE ENTERED INTO FOR THE MISUSE OR INCORRECT USE OF THESE PRODUCTS.
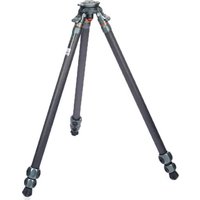
ANATOMY OF A MONOPOD

1 Retractable Screw Mount
2 Mounting Plate
3 Bubble Grip
4 Leg Section
5 Twist Locks
6 Boot / Footwear
Always hold your camera when removing from the monopod!
Using The Monopod
To open and extend the monopod simply grip the twist locks (5) in your hand, quarter turn, loosening the monopod allowing you to select a desired height. Once the required height has been obtained lock the monopod in place by rotating back to the original position, which will fully engage the leg lock. The twist locks do not require to be undone further than a half turn, unless you intend to completely disassemble the monopod for cleaning.
To attach your camera, ballhead, or accessory, insert the mounting screw (1) into the base of your camera. If your camera has a 1/-20 thread, retract the spring-loaded sleeve on the screw to reveal the smaller thread, then insert into the base of your camera. Turn the monopod until the screw meets resistance. Do not over-tighten.
The Mounting Plate comes with one 3/8" threaded screw in the centre. The outer part can be retracted to reveal the 1/4" thread in the centre.

natural_image
Two identical cylindrical objects with a central screw, one being cut with an arrow (no text or symbols)ANATOMY OF DOCZ

Using Docz
To open the legs from folded, pull down until they click into place. To fold them back up, press the button (5) at the base of each leg and fold upwards.
1 3/8"-16 Screw Thread
2 Screw Lock
3 Ball
4 Legs
5 Leg Buttons
6 Rubber Boot / Ball Adjuster
7 Rubber Feet

natural_image
Technical line drawing of a mechanical device with four arms and central hub (no text or symbols)To attach to a monopod unscrew the rubber Boot and the adapter in the base of the monopod. If this adapter is stuck, you can remove this by using tools, or a coin, and turn it anti-clockwise. Put the adapter somewhere safe!
Once removed, insert Docz' orange screw thread (1) into the base of the monopod and turn until the screw meets resistance. If you want to adjust the ball position, turn the orange screw lock (2) upwards until it meets the base of the monopod. To adjust the ball (3) position, loosen the rubber Boot (6) on the base of Docz. Angle the monopod to the desired position. Tighten the Boot (6) to lock the ball into place.
Cleaning
It is advised that you wash your monopod after using it in sand, or dirt.
For videos on how to clean your 3 Legged Thing products, please visit:
https://www.3leggedthing.com/faq
Never use WD40 on your monopod as it can be a solvent. Always use silicone grease.
Warranty Information
Your 3LT product comes with a 5 Year Global Warranty. On the box you will find a sticker with a unique barcode and serial number. Use this serial number to register your products at www.3leggedthing.com/register.
Details of your warranty can be found at www.3leggedthing.com. Your warranty covers 3 Legged Thing products only.
If you have a question or suspect you have a fault, contact us first at support@3leggedthing.com.

natural_image
Abstract black and white circular logo with stylized eye and V-shaped elements (no text or symbols)BLT Social Media

3LeggedThing
/3LeggedThing
@3LeggedThing

Unit 9 Kinsbourne Farm
Bury End
Stagsden
Bedfordshire
MK43 8TS
United Kingdom of
Fadeless Splendour

Brand : 3 Legged Thing
Model : Taylor 2.0
Category : Tripod