
LCSB-1212 - USB Drive Angler - Free user manual and instructions
Find the device manual for free LCSB-1212 Angler in PDF.

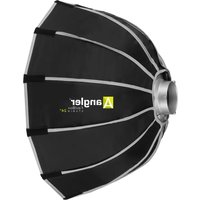
| Product Type | Collapsible LED Softbox |
| Model | LEDSB-1818 |
| Brand | Angler |
| Dimensions (W x H x D) | 18 x 18 x 12.75 in (45.7 x 45.7 x 32.4 cm) |
| LED Opening (W x H) | 12 x 12 in (30.5 x 30.5 cm) |
| Weight | 16.3 oz (463 g) |
| Material - Side and Rear Panels | Polyester |
| Material - Inner Panels | Silver-coated Polyester |
| Material - Diffuser | Polyester |
| Compatible Lights | 1 x 1 LED fixtures (e.g., Luxli Timpani) |
| Accessory Compatibility | Angler LEDSBG-1818 LED Grid (sold separately) |
| Attachment Method | Securing straps and adjustable corners with touch-connect strips |
| Diffuser Installation | Attach to recessed touch-connect strip on front inner edge |
| Grid Installation | Attach to recessed touch-connect strip on front inner edge (over diffuser) |
| Warranty | One-year limited warranty |
| Manufacturer | Gradus Group (www.gradusgroup.com) |
| Care Instructions | Do not machine wash; unfold in spacious area |
| Safety Warning | Use only with LED fixtures; keep away from breakable objects when unfolding |
| Intended Use | Professional photo/video lighting diffusion and control |
Frequently Asked Questions - LCSB-1212 Angler
User questions about LCSB-1212 Angler
0 question about this device. Answer the ones you know or ask your own.
Ask a new question about this device
Download the instructions for your USB Drive in PDF format for free! Find your manual LCSB-1212 - Angler and take your electronic device back in hand. On this page are published all the documents necessary for the use of your device. LCSB-1212 by Angler.
USER MANUAL LCSB-1212 Angler
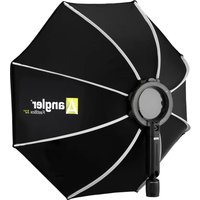
Collapsible LED Softbox
LEDSB-1818
For 1 × 1 LED Lights
INSTRUCTIONS

natural_image
Black and white photo studio lighting device with 'angler' branding on the side (no text or symbols on body)
angler®
Overview


Attaching the Softbox
Preparing the Light Fixture
If the fixture has height adjustment knobs, raise the fixture's height so it sits above the bottom of the yoke.
Some 1 × 1 fixtures have two sets of side knobs for tilt and height adjustment. Adjust the height so the tilt knobs are in the middle of the fixture. This will make it easier to fit the softbox onto it.
Tip: Tilting the fixture upward in its yoke will make it easier to fit the softbox onto the fixture.
Attaching the Softbox
- Open the adjustable corners held together with straps and touch-connect strips.
- Align the softbox with a 1 × 1 light so the securing straps don't interfere with the light's rear control panel.

natural_image
Close-up of hands handling a black bag with a patterned cover, no visible text or symbolsNote: For Luxli's Timpani, the securing straps should be on the sides of the fixture, the buckles should be on the right, and the strap that's closest to the edge of the softbox is on top.
- Fit the top of the softbox over the fixture's top rim, and attach the upper strap across the back of the light.
- Fit the bottom of the softbox over the fixture's bottom rim, and attach the lower strap.
- Fit the corners over the fixture, and close the adjustable corners so the fit is snug.
- Secure the adjustable corners with the corner straps.

natural_image
Close-up of a hand pressing down on a black plastic device component (no visible text or symbols)
natural_image
Close-up of a hand pressing a black control panel with a red indicator light (no visible text or symbols)
natural_image
Close-up of hands installing a black fabric or zipper on a dark garment (no text or symbols visible)
natural_image
Close-up of hands installing a black plastic clip on a dark fabric (no text or symbols visible)Adding the Diffuser
Attach the diffuser to the innermost edge of the recessed touch-connect strip. Make sure to leave enough room for a grid.

natural_image
Person holding a tablet with a blank sheet of paper, no visible text or symbolsAngler LEDSBG-1818 LED Grid for the LEDSB-1818 Softbox (sold separately)
The accessory grid narrows the beam spread and controls light spill. Attach the accessory grid to the recessed touch-connect strip on the front inner edge of the softbox.

natural_image
Person holding a black grid-patterned object, possibly a fabric or material sample (no text or symbols visible)Warnings
Please read and follow these instructions, and keep this manual in a safe place.
For use only with LED fixtures.
Use caution when unfolding this product. Unfold in an area large enough to accommodate the full size of the softbox.
Do not unfold around breakable objects.
Do not machine wash.
All photos are for illustrative purposes only.
SPECIFICATIONS
| MATERIAL SIDE AND REAR PANELS: POLYESTER INNER PANELS: SILVER-COATED POLYESTER DIFFUSER: POLYESTER |
| DIMENSIONS (W × H × D) 18 × 18 × 12.75 IN. (45.7 × 45.7 × 32.4 CM) |
| LED OPENING (W × H) 12 × 12 IN. (30.5 × 30.5 CM) |
| WEIGHT 16.3 OZ. (463 G) |
One-Year Limited Warranty
This Angler product is warranted to the original purchaser to be free from defects in materials and workmanship under normal consumer use for a period of one (1) year from the original purchase date or thirty (30) days after replacement, whichever occurs later. The warranty provider's responsibility with respect to this limited warranty shall be limited solely to repair or replacement, at the provider's discretion, of any product that fails during normal use of this product in its intended manner and in its intended environment. Inoperability of the product or part(s) shall be determined by the warranty provider. If the product has been discontinued, the warranty provider reserves the right to replace it with a model of equivalent quality and function.
This warranty does not cover damage or defect caused by misuse, neglect, accident, alteration, abuse, improper installation or maintenance. EXCEPT AS PROVIDED HEREIN, THE WARRANTY PROVIDER MAKES NEITHER ANY EXPRESS WARRANTIES NOR ANY IMPLIED WARRANTIES, INCLUDING BUT NOT LIMITED TO ANY IMPLIED WARRANTY OF MERCHANTABILITY OR FITNESS FOR A PARTICULAR PURPOSE. This warranty provides you with specific legal rights, and you may also have additional rights that vary from state to state.
To obtain warranty coverage, contact the Angler Customer Service Department to obtain a return merchandise authorization (“RMA”) number, and return the defective product to Angler along with the RMA number and proof of purchase. Shipment of the defective product is at the purchaser’s own risk and expense.
For more information or to arrange service, visit www.anglerlights.com or call Customer Service at 212-594-2353.
Product warranty provided by the Gradus Group.
www.gradusgroup.com
Angler is a registered trademark of the Gradus Group.
© 2019 Gradus Group LLC. All Rights Reserved.

ANGLER®
A Gradus Group Brand
GG2

natural_image
Abstract geometric logo with a white letter 'A' on a green gradient background (no text or symbols)anglerights.com

Brand : Angler
Model : LCSB-1212
Category : USB Drive