
BHF 3 - Electric heating DELONGHI - Free user manual and instructions
Find the device manual for free BHF 3 DELONGHI in PDF.

| Product Type | Electric Fan Heater |
| Brand | De'Longhi |
| Model | BHF 3 |
| Category | Electric Heater |
| Power Supply | 220-240 V ~ 50 Hz |
| Power | 2000 W |
| Dimensions (approx.) | 25 x 20 x 15 cm |
| Weight (approx.) | 2 kg |
| Materials | Plastic and Metal |
| Heating Functions | 3 Heating Positions |
| Thermostat | Adjustable with Frost Protection Function |
| Summer Ventilation | Without Heating (Ventilation Only) |
| Electronic Timer | On Some Models, Up to 6 Programs |
| Installation | Floor Standing or Wall Mount with Included Bracket |
| Control Type | Rotary Knobs |
| Display | Digital (Models with Timer) |
| Operation Indicator | Yes |
| Overheat Protection | Automatic Shutdown, Manual Reset |
| Power Cord | With Cord Reel |
| Cleaning | Inlet and Outlet Grilles, No Solvents |
| Compliance | EEC Directive 89/336 |
| Spare Parts | Power Cord, Wall Bracket |
| Repairability | Contact Authorized Technical Service |
Frequently Asked Questions - BHF 3 DELONGHI
User questions about BHF 3 DELONGHI
0 question about this device. Answer the ones you know or ask your own.
Ask a new question about this device
Download the instructions for your Electric heating in PDF format for free! Find your manual BHF 3 - DELONGHI and take your electronic device back in hand. On this page are published all the documents necessary for the use of your device. BHF 3 by DELONGHI.
USER MANUAL BHF 3 DELONGHI
MAIN FAN HEATER ELEMENTS (Fig. 1)

A Control panel flap
B Wall-mounting bracket
C Control panel for models with timers
D Electronic timer
E Function selector
F Thermostat
G Control panel for models without timers
H Function selector
Thermostat
L Thermostat indicator light
M Grille rotation grips
N Adjustable ventilation grilles
Cable winder
P Base
INSTALLATION
The fan heater can easily be positioned on any supporting surface or installed on the wallmounting bracket supplied.
Proceed as follows to wall-mount the heater:
- Fit the wall-mounting bracket, respecting the minimum distances shown in Fig. 2. The room heater must be outside the protective area (Fig. 4) when installed in a bathroom or shower room and under all circumstances away from taps, basins and showers, etc.
- Remove the screw in the bottom of the base and unclip the base, pulling it out from the rear.
- Clip the fan heater onto the bracket, slanting it slightly (Fig. 3) and then fix it in place using a screwdriver, turning the screw in the top part of the mounting bracket clockwise.
ELECTRIC CONNECTION
- Before fitting the plug in the mains socket, make absolutely sure that the voltage of your mains electricity supply is the same as the value in V shown on the heater.
- Make sure the mains socket has a capacity of 10/16 Amperes.
- This appliance complies with EEC Directive 89/336, relating to electro-magnetic compatibility.
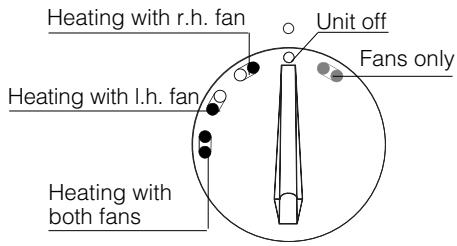
FAN HEATER CONTROLS FUNCTION SELECTOR
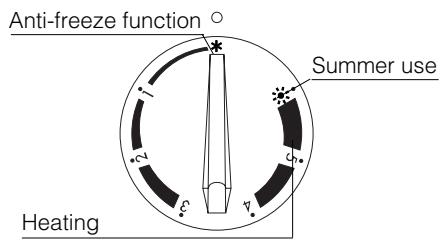
THERMOSTAT
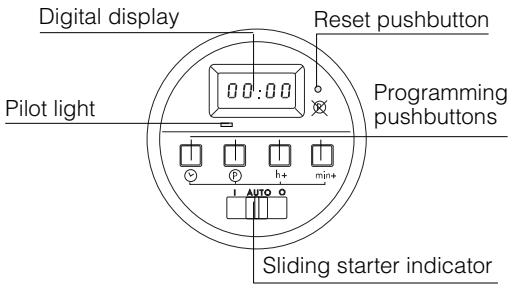
ELECTRONIC TIMER
fig. 5
OPERATION AND USE
Heating and setting the thermostat
- Turn the function selector knob to one of the 3 different heating positions available (Fig. 5).
- Turn the thermostat knob clockwise to its maximum position.
- On models fitted with electronic timer, slide the starter indicator (fig.5) to position "I"; the indicator lamp will come on.
When the room has reached the temperature desired, set the thermostat by slowly turning the thermostat knob counter-clockwise until you hear the click which switches off the heater and then stop turning the knob immediately.
The temperature set in this way will be automatically maintained at a constant level by the thermostat.
Anti-freeze function
- Turn the function selector knob to one of the 3 different heating positions available (Fig. 5).
- Turn the thermostat knob to the anti-freeze position (Fig. 5).
- On models fitted with electronic timer, slide the starter indicator (fig.5) to position "I"; the indicator lamp will come on.
When the fan heater has been set in this way it will automatically come on whenever the temperature in the room falls close to zero degrees and the room will thus remain at a temperature of a few degrees above zero.
Summer use
- Turn the function selector knob to the "fans only" position (Fig. 5).
- Turn the thermostat knob to the "summer use" position (Fig. 5).
- On models fitted with electronic timer, slide the starter indicator (fig.5) to position "I"; the indicator lamp will come on.
The fans only will be switched on when the fan heater has been set in this way.
Switching off the heater
Turn the function selector knob back to its "O" position (Fig. 5) to switch off the fan heater. On models with the electronic timer, you must also press the start pushbutton (Fig. 5) until moving the display line to the "O" position (Fig. 6).
ELECTRONIC TIMER (not on all models)
Setting the time and day of the week
Set the timer to the correct time, proceeding as follows:
- Press the pushbutton and h+ pushbutton (Fig. 5) simultaneously until the display shows the hours for the correct time, then release both pushbuttons.
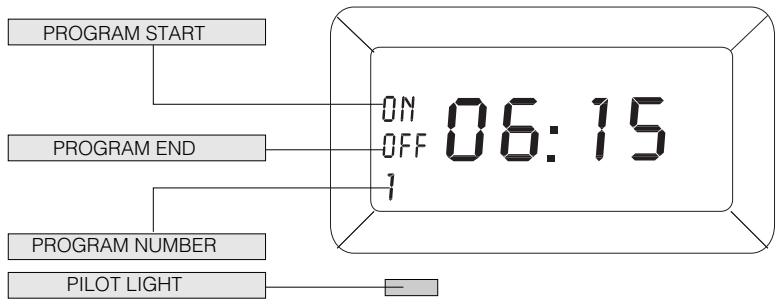
fig. 6
- Press the pushbutton and min+ pushbutton (Fig. 5) simultaneously until the display shows the minutes for the correct time, then release both pushbuttons.
(Keep both pushbuttons pressed for more than 3 seconds to move through the hours and minutes in fast mode).
How to program the timer (up to a maximum of 6 programs)
- Move the sliding indicator to "AUTO" (fig.5).
- Press the ⑥ pushbutton to access the 1st operation program. The message ON will be shown on the display together with the program number (1). See Fig. 6.
- Set the start of program time by pressing the h + pushbutton to set the hours and the min+ pushbutton to set the minutes.
- Press the ⑥ pushbutton again to set the end of program time. The message OFF and 1 will be shown on the display (Fig. 6). Now set the time using the h + and min+ pushbuttons.
Press the pushbutton to access the successive programs (up to 6). The message ON and 2 will be shown on the display.
Repeat the operations described in points 3 and 4.
To display the exact time, press the pushbutton.
To start the fan heater at the programmed time you now need to simply set the function selector and thermostat to the settings desired, following the instructions in the section "HEATING AND SETTING THE THERMOSTAT".
NOTE:
- The pilot light indicates that the appliance is working.
- The timer has a rechargeable plug battery.
The timer has a plug battery. The time and programs entered will remain in the memory and will be shown on the digital display even if the electricity goes off or the plug gets pulled out of its socket.
To delete the programs and time set, press the reset pushbutton × with the tip of a pencil.
- The plug battery is completely recharged by leaving the appliance plugged into an electrical outlet for at least eight (8) hours.
MAINTENANCE
Always check that the plug has been removed from the mains socket before carrying out any operations on the fan heater.
- Clean the air intake and outlet grilles at regular frequent intervals.
- Do not use abrasive powders or solvents.
WARNING
- The unit must not be positioned immediately below a fixed power socket.
- Never use the fan heater for drying laundry.
- A safety device switches the fan heater off if it accidentally overheats. To reset the unit for normal operation, remove the plug from the mains socket for a few minutes, eliminate the cause of the overheating (e.g. air intake or outlet grilles obstructed) and then plug the fan heater back in again. Contact your nearest Technical Assistance Service if the fan heater does not start operating normally again.
- Never direct the fan heater's air flow towards furniture, curtains, spray cans and inflammable material.
- If you need to replace the power supply cable, only ever use H05VV-F type cable with a cross-section area of 2 × 1 ~mm^2 .
- Never cover the appliance while it is operating, to avoid any risk of fire.