
PWPSB1103 - Bluetooth speaker Pyle - Free user manual and instructions
Find the device manual for free PWPSB1103 Pyle in PDF.

| Product Type | Powered Soundbar System |
| Brand | Pyle |
| Model | PWPSB1103 |
| Dimensions (L x W x H) | 11" x 4.5" x 6.85" (28 x 11.4 x 17.4 cm) |
| Power Output | 40 Watts RMS / 80 Watts Peak |
| Amplifier Type | Class D Stereo Power Amplifier |
| Bluetooth Version | 5.0 |
| Bluetooth Range | 30+ ft (9.1+ m) |
| Bluetooth Network Name | "PyleUSA" |
| Waterproof Rating | IPX6 (Weatherproof) |
| Speaker Drivers | (2) 3.5" Mid-bass Drivers with Y35 Ferrite Magnets |
| Tweeters | (2) 1" PEI Dome Tweeters |
| Frequency Response | 20Hz - 20KHz |
| Inputs | 3.5mm Auxiliary Input, RCA Output |
| LED Colors | Red, Blue, Purple (Solid or Pulsating modes) |
| Mounting System | Aluminum Clamp System fits 1.5"–2" bars |
| Construction Materials | Polypropylene Mica Cone, Butyl Rubber Surround |
| Package Contents | Soundbar, Clamp Base, 2 Aluminum Buckles, Rings (1.75" & 2"), Screw Bag, Audio Cable |
| Compatibility | Works with Bluetooth-enabled devices (smartphones, tablets, etc.) |
| Power Supply | Requires stable power source (vehicle battery) |
Frequently Asked Questions - PWPSB1103 Pyle
User questions about PWPSB1103 Pyle
0 question about this device. Answer the ones you know or ask your own.
Ask a new question about this device
Download the instructions for your Bluetooth speaker in PDF format for free! Find your manual PWPSB1103 - Pyle and take your electronic device back in hand. On this page are published all the documents necessary for the use of your device. PWPSB1103 by Pyle.
USER MANUAL PWPSB1103 Pyle
natural_image
Black PYLE lighting fixture with red LED array and control buttons (no visible text or symbols on main body)PWPSB1103
11" Powered ATV/UTV Soundbar System
USER GUIDE
READ ALL INSTRUCTIONS CAREFULLY BEFORE USING THIS PRODUCT. RETAIN THIS OWNER'S MANUAL FOR FUTURE REFERENCE.
FEATURES:
• Built-in Class D Stereo Power Amplifier
• (2) 3.5" Mid-bass Drivers with Y35 Ferrite Magnets
- Forward-firing Speakers for Maximum SPL and Sound Staging
• (2) 1" PEI Dome Tweeters
• Built-in BT Technology
• Supports A2DP Audio Streaming
• 3.5mm Auxiliary Input
- RCA Output for a Second Sound Bar, Subwoofer, Amplifier, or Powered Speakers
• Built-in LED lights (Red, Blue, Purple)
• LED Modes: Solid Color, Pulsating
- Marine Rated with Rugged Weatherproof Exterior
- IPX6 Waterproofing/Weatherproofing
- Weather Resistant Grill and Hardware
TECHNICAL SPECIFICATIONS:
• Power Supply: 40 Watts RMS/80 Watts Peak
- Construction Materials: Polypropylene Mica Cone, Butyl Rubber Surround
- BT Range: 30'+ ft.
- Aluminum Clamp System Fits 1.5"-2" Bars
• Frequency Response: 20Hz-20KHz
- Speaker Size: 3.67" x 3.67" x1.99"-inches
- Tweeters: 1" -inch
- Product Dimensions (L x W x H): 11" x 4.5" x 6.85"-inches
California Prop 65 Warning

WARNING:
This product contains Di (2-ethylhexyl) phthalate (DEHP) which is known to the state of California to cause cancer birth defects and other reproductive harm. Do not ingest.
For more info go to: www.P65warnings.ca.gov
WHAT'S IN THE BOX
• (1) 11" -inch Powered Soundbar
• (1) Aluminum Clamp Base
• (2) Aluminum Clamp Base Buckles
• (2) 1.75" -inches Aluminum Rings
• (2) 2" -inches Aluminum Rings
• (1) Screw Bag
• (1) Audio Connection Cable, 3.5mm
BLUETOOTH CONNECTIVITY
- Wireless Music Streaming Ability
- Quick & Hassle-Free Device Pairing
- Wireless BT Version 5.0
- Wireless BT Network Name: "PyleUSA"
- Works with All of Your Favorite BT-Enabled Devices (Smartphones, Tablets, Laptops, Computers, etc.)
- Secure Installation: Make sure the soundbar is firmly attached to the cage bar to prevent it from moving or falling.
- Power Safety: Use the recommended power supply and ensure the power source is stable.
- Water Protection: The soundbar is waterproof (IPX6), but do not submerge it or expose it to heavy water jets for long periods.
- Fit and Compatibility: Check that the mounting hardware matches your cage bar size (1.5"-2").
- Bluetooth Use: Keep the device you want to pair within 30 feet of the soundbar. Disconnect other devices before pairing.
- Volume and Use: Avoid playing music at maximum volume for long periods to protect the speakers.
- Weather Conditions: Store the soundbar indoors during extreme weather like heavy rain or freezing temperatures.
PARTS LIST
| 1 | Non-slip rubber pad (120 x 14 x 1mm) | 2 PCS |
| Non-slip rubber pad (120 x 14 x 4mm) | 2 PCS | |
| Non-slip rubber pad (130 x 14 x 2mm) | 2 PCS | |
| 2 | Clamp base | 1 PC |
| 3 | Aluminum buckle | 2 PCS |
| 4 | M5x50mm screw | 1 PC |
| 5 | Non-slip nut for M5 screw | 1 PC |
| 6 | Non-slip rubber pad (45 x 30mm) | 1 PC |
| 7 | Aluminum ring 1.75" | 2 PCS |
| Aluminum ring 2" | 2 PCS | |
| 8 | M6x60mm screw | 2 PCS |
| 9 | Non-slip flat washer for M6 screw | 2 PCS |
| 10 | Non-slip nut for M6 screw | 2 PCS |
| 11 | M5x20mm screw | 2 PCS |
| 12 | Spring washer for M5 screw | 2 PCS |
BUTTON FUNCTION
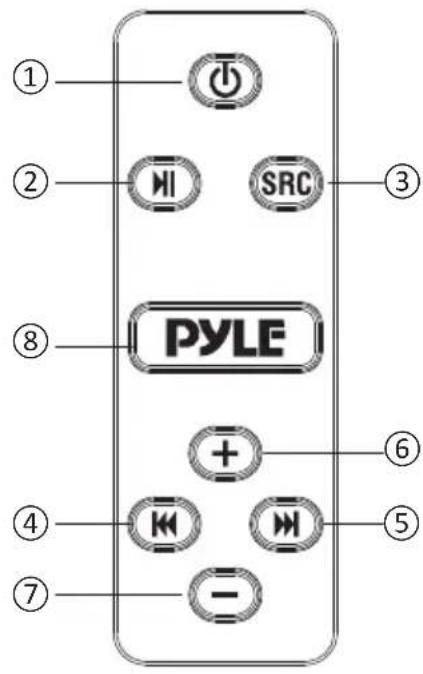
| 1 |  | Power On/Off: Press and hold for 3 seconds. | |
| 2 |  | Play/Pause: Short press. | |
| 3 |  | Switching Modes: BT and AUX-IN modes.BT Name: "PyleUSA" | |
| 4 |  | Previous Song: Short press. | |
| 5 |  | Next Song: Short press. | |
| 6 |  | Volume Up:Short press to increase volume gradually.Press and hold to increase volume continuously. | |
| 7 |   | Volume Down:Short press to decrease volume gradually.Press and hold to decrease volume continuously. | |
| 8 |  | LED Colors: Cycle through colors(red, blue, purple, 3-color cycle, or off). | |
INSTALLATION
- Installing the Clamp Base on the Soundbar:
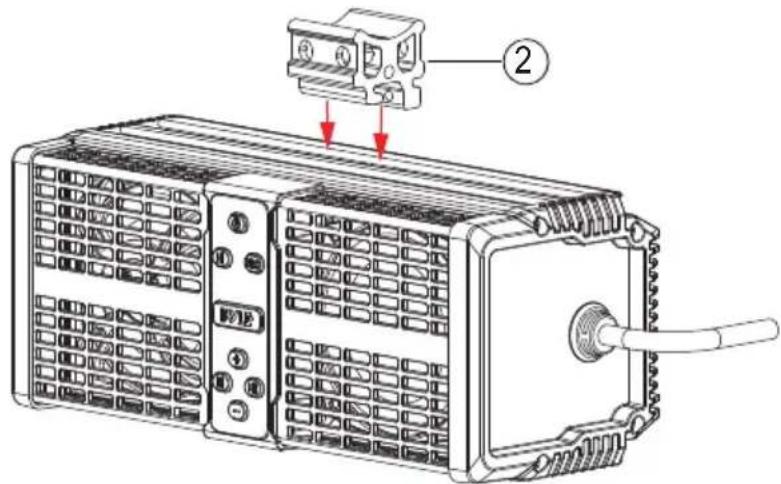
a. Align the clamp base with the two slots on the soundbar.
b. Push the clamps horizontally into the slots.
c. Use two M5 x 20 mm screws and M5 spring washers to secure the clamps from the back of the soundbar.
d. Once the clamps are firmly attached to the soundbar, install the buckle on the right and left sides of the clamp base.
e. Use an M5 x 50 mm screw from the side panel to secure the buckle, then lock it with an M5 screw.
f. The clamp base is now fully locked to the soundbar.
2. Attach the Non-Slip Pads:
Stick 45 x 30 x 2 mm rubber non-slip pads onto the clamp base.

natural_image
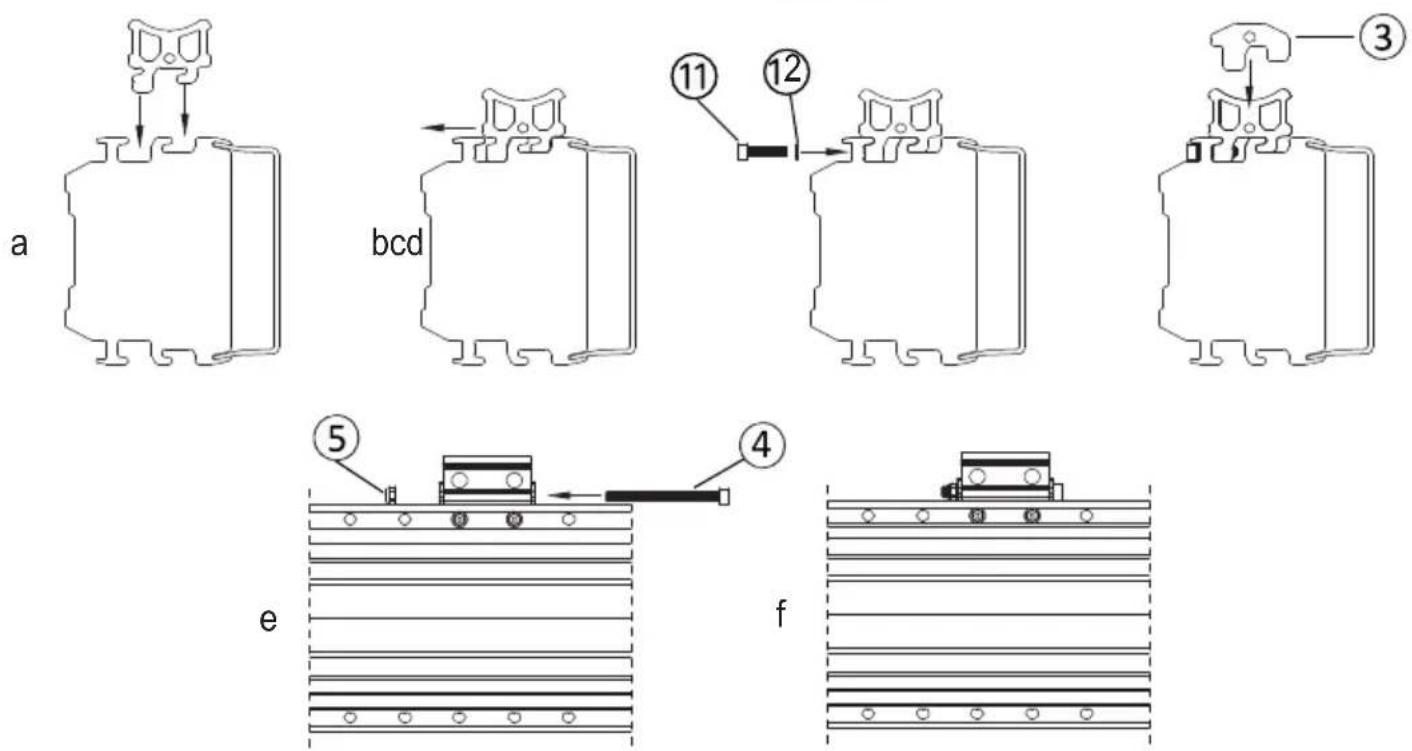
Technical line drawing of a microwave oven with control panel and fan (no text or symbols)3. Installing on the Cage Bar (1.5" to 2.0" Diameter):

- Wrap the rubber strip around the cage bar to prevent scratches.
- Press the aluminum rings onto the rubber strip. Align the screw mounting holes on the aluminum ring with the base.
- Use the appropriate components based on the cage bar size:
- 2" Cage Bar: Use a 2" aluminum ring and a 120 x 14 x 1 mm rubber strip.
- 1.875" Cage Bar: Use a 2" aluminum ring and a 130 x 14 x 2 mm rubber strip.
- 1.75" Cage Bar: Use a 1.75" aluminum ring and a 120 x 14 x 1 mm rubber strip.
- 1.5" Cage Bar: Use a 1.75" aluminum ring and a 120 x 14 x 4 mm rubber strip.
4. Secure the Aluminum Ring:
Use M6 x 60 mm screws and M6 spring washers to attach the aluminum ring to the base. Secure it with an M6 non-slip nut on the back, ensuring each nut is seated in the hexagonal groove.
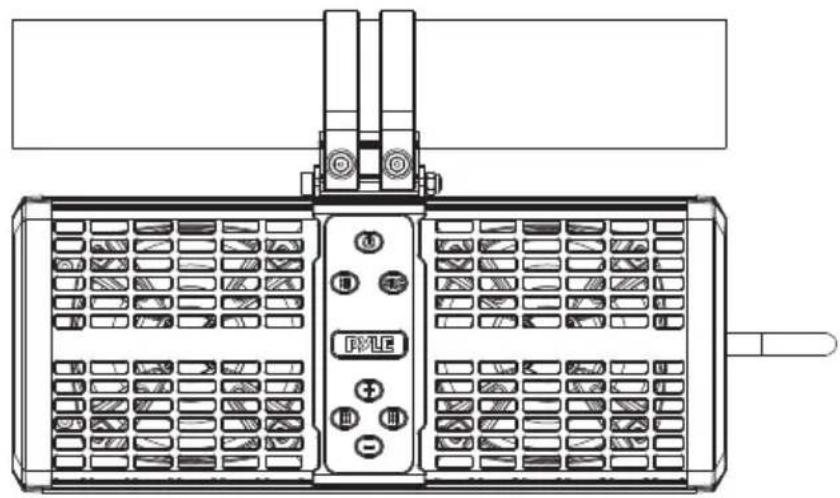
5. Final Positioning Below the Cage Bar:
After completing the steps, the PWPSB1103 soundbar will be positioned beneath the cage bar as shown in the diagram.
natural_image
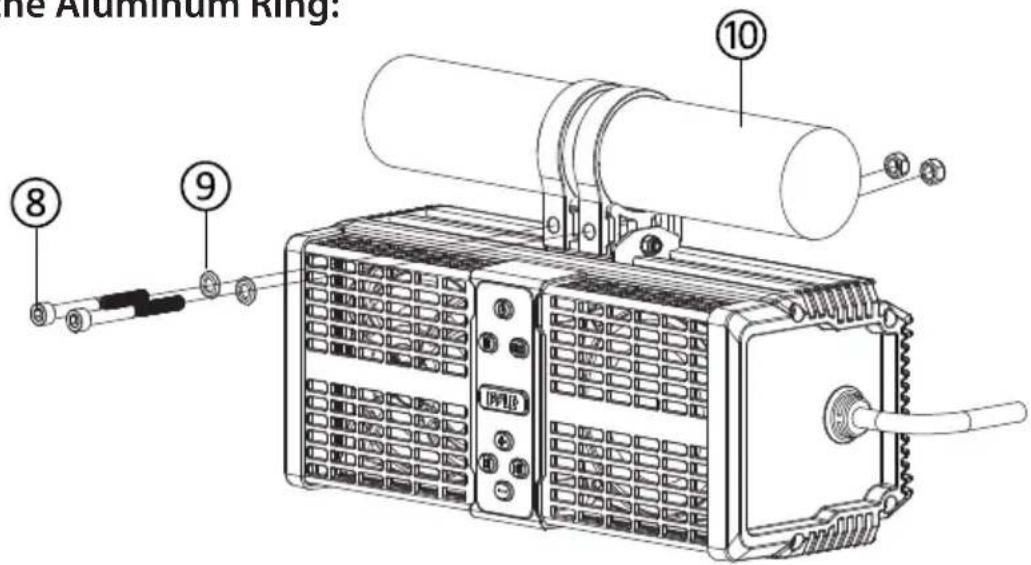
Technical line drawing of a dual-panel electronic device with control panel and indicator lights (no text or symbols)6. Optional Positioning
Above the Cage Bar:
For installation above the cage bar, follow the same steps as above.
The PWPSB1103 will be positioned above the cage bar as shown in the diagram.

natural_image
Technical line drawing of a control panel with buttons and grid layout (no text or symbols)WIRE DIAGRAM
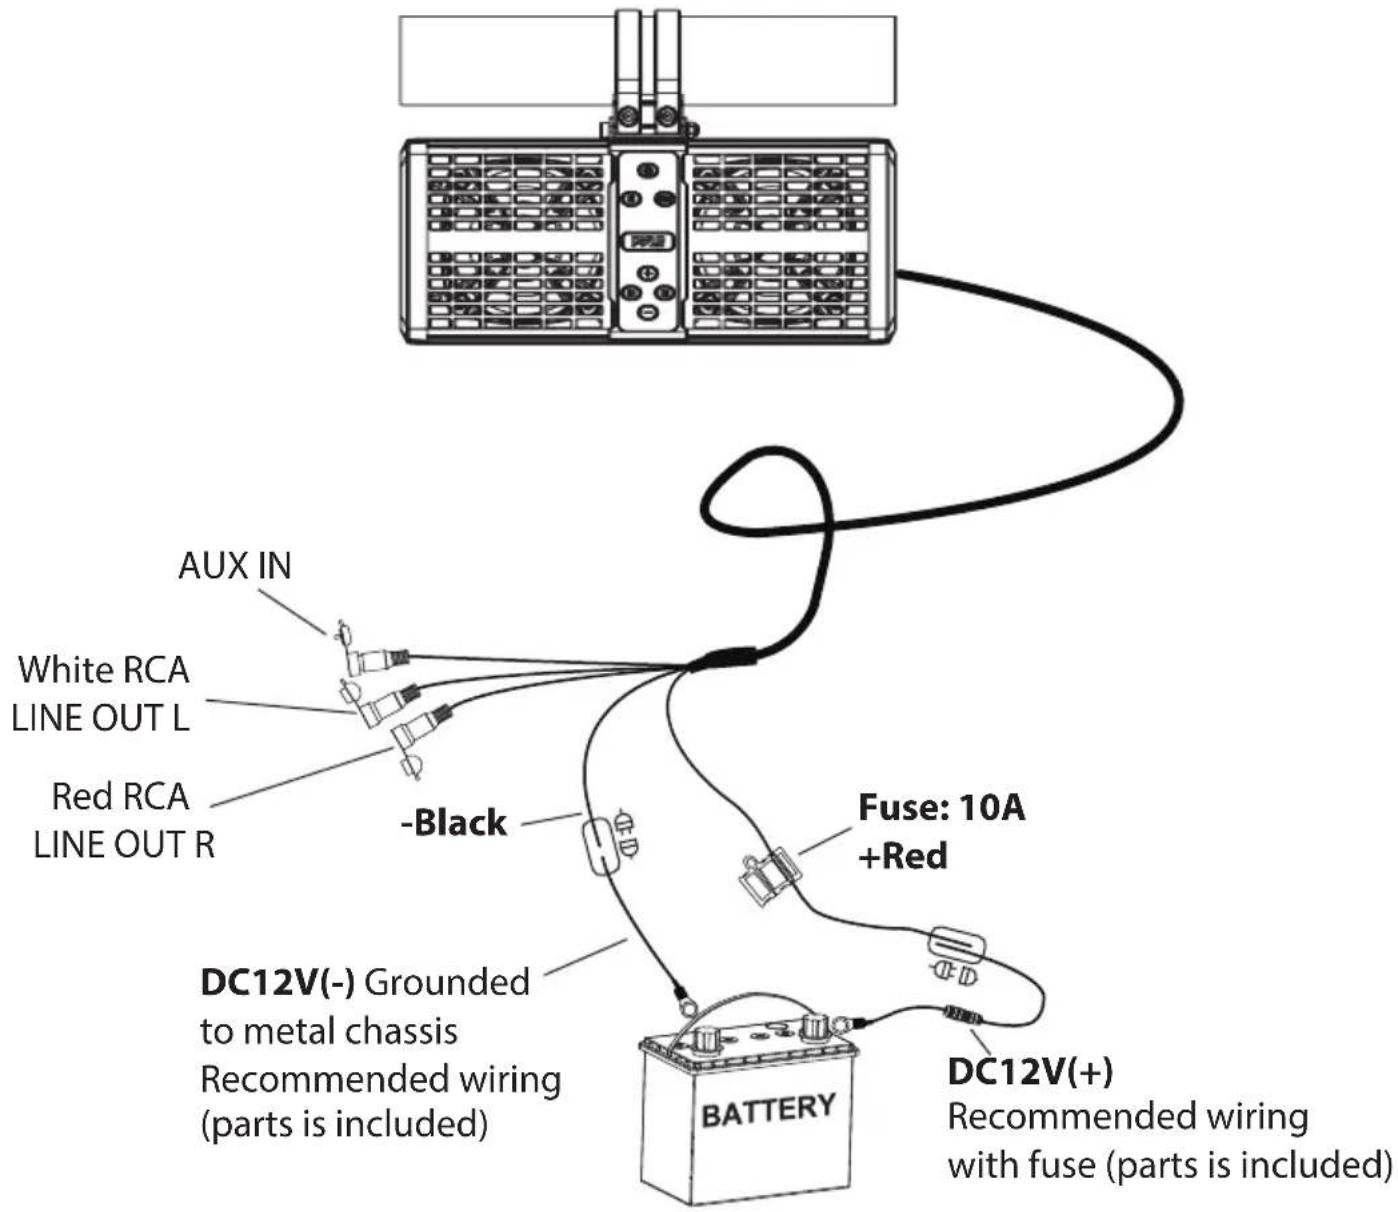
BLUETOOTH PAIRING & CONNECTION
Power: Press and hold the power button for 3 seconds to turn the device on or off. When powered on, the background LED will light up white.
BT Pairing:
- Turn on Bluetooth on your device and search for "PyleUSA."
- While waiting to connect, the BT indicator will flash blue. No password is required.
- Once connected, the BT indicator LED will remain solid blue.
AUX-IN: Press the SRC button to switch to AUX-IN mode.
The indicator LED will turn green.
AUTO CONNECTION
- If the device moves out of Bluetooth range, it will disconnect automatically, and the BT indicator LED will flash blue.
- If the device returns to within Bluetooth range within 10 minutes, it will reconnect automatically, and the BT indicator LED will remain solid blue.
- If no reconnection occurs within 10 minutes, follow the BT pairing steps to reconnect.
- If another device pairs to the soundbar during the 10-minute window, follow the BT pairing steps to reconnect.
CLEANING, MAINTENANCE, AND STORAGE GUIDE
Cleaning
- Wipe the soundbar with a damp cloth; use mild soap for tough dirt.
- Avoid harsh cleaners, alcohol, or submerging the soundbar in water.
- Dry thoroughly after cleaning to prevent moisture damage.
Maintenance
- Check and tighten screws, clamps, and hardware regularly.
- Inspect rubber strips and seals for cracks or wear; replace if needed.
- Test Bluetooth and LED functions to ensure they work properly.
- Avoid extreme heat or cold to protect the soundbar.
Storage
- Store in a cool, dry place away from sunlight and moisture.
- Detach from the cage bar if not used for a long time.
- Keep in original packaging or a padded case to prevent damage.
Register Product
Thank you for choosing PyleUSA. By registering your product, you ensure that you receive the full benefits of our exclusive warranty and personalized customer support.
Complete the form to access expert support and to keep your PyleUSA purchase in perfect condition.

Model Number: PWPSB1103
PyleUSA.com/pages/register
PYLE®
PyleUSA.com

Questions or Comments?
We are here to help!
Phone: 1.718.535.1800
PyleUSA.com/ContactUs
- PWPSB1103
- 11" Powered ATV/UTV Soundbar System
- USER GUIDE
- READ ALL INSTRUCTIONS CAREFULLY BEFORE USING THIS PRODUCT. RETAIN THIS OWNER'S MANUAL FOR FUTURE REFERENCE.
- FEATURES:
- TECHNICAL SPECIFICATIONS:
- California Prop 65 Warning
- WARNING:
- WHAT'S IN THE BOX
- BLUETOOTH CONNECTIVITY
- INSTALLATION
- Attach the Non-Slip Pads:
- Installing on the Cage Bar (1.5" to 2.0" Diameter):
- Secure the Aluminum Ring:
- Final Positioning Below the Cage Bar:
- Optional Positioning
- WIRE DIAGRAM
- BLUETOOTH PAIRING & CONNECTION
- BT Pairing:
- AUTO CONNECTION
- CLEANING, MAINTENANCE, AND STORAGE GUIDE
- Cleaning
- Maintenance
- Storage
- Register Product
- PYLE®
- PyleUSA.com
Brand : Pyle
Model : PWPSB1103
Category : Bluetooth speaker