SRA3622 - Amplifier QSC - Free user manual and instructions
Find the device manual for free SRA3622 QSC in PDF.

User questions about SRA3622 QSC
0 question about this device. Answer the ones you know or ask your own.
Ask a new question about this device
Download the instructions for your Amplifier in PDF format for free! Find your manual SRA3622 - QSC and take your electronic device back in hand. On this page are published all the documents necessary for the use of your device. SRA3622 by QSC.
USER MANUAL SRA3622 QSC
1- Read these instructions.
2- Keep these instructions.
3- Heed all warnings.
4- Follow all instructions.
5- Do not use this apparatus near water.
6- Clean only with a dry cloth.
7- Do not block any ventilation openings. Install in accordance with QSC Audio Product's instructions.
8- Do not install near any heat sources such as radiators, heat registers, stoves, or other apparatus (including amplifiers) that produce heat.
9- Do not defeat the safety purpose of the polarized or grounding-type plug. A polarized plug has two blades with one blade wider than the other. A grounding-type plug has two blades and a third grounding prong. The wide blade or the third prong is provided for your safety. If the provided plug does not fit your outlet, consult an electrician for the replacement of the obsolete outlet.
10- Protect the power cord from being walked on or pinched, particularly at plugs, convenience receptacles, and the point where they exit the apparatus.
11- Only use attachments/accessories from QSC Audio Products, Inc.
12- Use only with carts, stands, tripods, brackets, interconnecting cables, or software specified by QSC Audio Products. When moving or transporting using a cart, use caution to avoid injury from tip-over.
13- Unplug the apparatus during lightning storms or when unused for long periods of time.
14- Refer all servicing to qualified personnel. Servicing is required when the apparatus has been damaged in any way, such as power supply cord or plug is damaged, liquid has been spilled or objects have fallen into the apparatus, the apparatus has been exposed to rain or moisture, does not operate normally, or has been dropped.
15- When installing equipment into a rack, distribute the units evenly. Otherwise, hazardous conditions may be created by an uneven weight distribution.
16- Connect the unit only to a properly rated supply circuit.
17- Reliable earthing (grounding) of rack-mounted equipment should be maintained.
18- Maximum operating ambient temperature is 50°C.

The lightning flash with arrowhead symbol within an equilateral triangle is intended to alert the user to the presence of uninsulated “dangerous” voltage within the product’s enclosure that may be of sufficient magnitude to constitute a risk of electric shock to humans.

The exclamation point within an equilateral triangle is intended to alert the user to the presence of important operating and maintenance (servicing) instructions in this manual.
CAUTION
RISK OF ELECTRIC SHOCK DO NOT OPEN
CAUTION: To reduce the risk of electric shock, do not remove the cover. No user-serviceable parts inside. Refer servicing to qualified service personnel. WARNING: To prevent fire or electric shock, do not expose this equipment to rain or moisture.
Your SRA amplifier has a serial number located on the rear panel, near the AC cord entry. It looks like the example at right. Please write the serial number down and keep for your records. Retain your sales receipt; it is your proof of purchase. Model: SRA
Model: SRA
Serial Number: ____
Date of Purchase: ____
Purchased From: ____

text_image
QSC QSC AUDIO PRODUCTS COSTA MESA, CA USA MADE IN USA MODEL: SRA1222 OUTPUT PWR PER CH/MP: 350 W/4 Ω 120V - 5.6A 50/60 Hz SERIAL: 000000000 Pat.#5767744© Copyright 2002, QSC Audio Products, Inc.
QSC® is a registered trademark of QSC Audio Products, Inc.
"OSC" and the QSC logo are registered with the U.S. Patent and Trademark Office
Speakon® is a registered trademark of Neutrik Inc., Lakewood, NJ
INTRODUCTION
General Overview....4
Illustrations....5
UNPACKING
Unpacking and Inspection....6
What is Included....6
SETUP
Stand-alone Mounting....6
Rack Mounting....7
Supporting the Rear of the Amplifier....9
Gain Control Security Cover....10
Cooling Requirements....12
AC Power Requirements....13
Operating Mode Selection....14
Clip Limiters....18
Low Frequency Filters....19
CONNECTIONS
Inputs: General Use and Recommendations....20
XLR and RCA Connector Pinouts....21
Outputs: General Use and Recommendations....22
Binding Posts....23
Speakons....25
Remote On/Off (Remote Trigger)....28
DataPort....31
USE
AC Power Switch....32
Gain Controls....32
Signal and Clip LED indicators....32
APPLICATION EXAMPLE....33
TROUBLESHOOTING....34
SPECIFICATIONS....36
WARRANTY INFORMATION ....38
HOW TO CONTACT QSC AUDIO PRODUCTS ....38

text_image
POWER ON SRA 2422 STUDIO REFERENCE AMPLIFIER QSC 1 2 CLIP NORMAL POWERQSC's SRA Series Amplifier
Congratulations on your purchase of the SRA (Studio Reference Amplifier) Series power amplifier. To help you obtain the best results from your purchase, we encourage you to carefully review this manual. With information including connections, configuration and operation, it offers many useful guidelines.
Building upon QSC's widely recognized reputation throughout the cinema industry as "The Power Behind the Pictures," the SRA Series of power amplifiers bring world-class audio performance to recording studios, high-end home theaters, and numerous additional applications. This SRA Series manual encompasses three models- the SRA1222, SRA2422, and the SRA3622 - with power points ranging from 200 to 750 watts per channel @ 8 ohms. These amplifiers draw upon QSC's expertise in high frequency switching power supplies and include the popular DataPort for integration with optional QSC crossover and DSP modules.
The SRA's exemplary performance is a result of OSC's high current output section and advanced HF switch mode power supply technology that enables these amplifiers to weigh considerably less than conventional transformer driven models while also occupying less rack space. This patented technology delivers crystal-clear highs, smooth and accurate mids, and a powerful, articulate low-end response - providing realism to your audio playback. Further, a full complement of connectors facilitates easy integration into virtually any environment.
QSC's SRA Series amplifiers also boast useful features such as individually selectable clip limiters and subsonic filters, front-mounted lockoutable gain controls, plus signal and clip LED indicators to monitor performance. SRA Series amplifiers can be configured for stereo, parallel, or bridge mono operation. As expected from the world's largest manufacturer of professional power amps with an unparalleled reputation for reliability and customer support, the SRA Series amplifiers deliver performance you can count on.
SRA Features
• Active inrush limiting- will not trip circuit breakers at turn on
- A hum-free noise floor and ultra low distortion
- Optional DSP modules for the ultimate in custom applications
- Short circuit, DC, subsonic, and thermal overload protection
- Gain control security cover prevents misadjustments
• LED indicators for power, signal, and clip
- Detachable rack ears included
• Only 10 kg (22 lb.) for easy racking and shipping
- Selectable subsonic filters: off, 20 Hz, or 50 Hz
INTRODUCTION- Illustrations

text_image
1 POWER ON SRA 3622 STUDIO REFERENCE AMPLIFIER QSC 2 CHANNEL 1 CLIP 10 21 15 23 11 20 5 27 -48 28 3 SIGNAL 1 2 POWER CHANNEL 2 11 16 21 15 23 11 20 5 27 -48 28 5Front Panel (gain control security cover removed)
1- Power switch
2- Channel 1 gain control
3- Power "on" indicator
4- Channel 1 signal and clip indicators
5- Channel 2 gain control
6- Channel 2 signal and clip indicators

Note! Amplifiers are shipped with the gain controls set at maximum gain (+29 dB) and with gain control security cover installed. See page 10 for security cover removal and installation information.

text_image
2 4 6 8 9 12 14 16 18 19 INPUT INPUT DATAPOST ACCOUNT INPUT MAZE IN O.S.A. INPUT INPUTS CH 1 MODE SWITCHES CLIP LIMITATION ON FILTER ON 200x 50Hz MAX FLOUR LIMITATION ON CLIP LIMITATION ON MODE SWITCHES CH 2 OUTPUT CH 1 CH 2 REMOTE TRIGGER IN OUT NOTE SWITCHES FOR SHAPPLY SWITCHING ITEMS & SWAP FILTER ON ON RETURN SWITCHING ITEMS & SWAP FILTER ON FOR CHAPPLY SWITCHING ITEMS & SWAP FILTER ON ON OFF CONTENTS & SWITCHING ITEMS & SWAP FILTER ON CONTENTS & SWITCHING ITEMS & SWAP FILTER ON CONTENTS & SWITCHING ITEMS & SWAP FILTER ON CONTENTS & SWITCHING ITEMS & SWAP FILTER ON CONTENTS & SWITCHING ITEMS & SWAP FILTER ON CONTENTS & SWITCHING ITEMS & SWAP FILTER ON CONTENTS & SWITCHING ITEMS & SWAP FILTER ON CONTENTS & SWITCHING ITEMS & SWAP FILTER ON CONTENTS & SWITCHING ITEMS & SWAP FILTER ON CONTENTS & CONTENTS & CONTENTS & CONTENTS & CONTENTS & CONTENTS & CONTENTS & CONTENTS & CONTENTS & CONTENTS & CONTENTS & CONTENTS & CONTENTS & CONTENTS & CONTENTS & CONTENTS & CONTENTS & CONTENTS & CONTENTS & CONTENTS & CONTENTS & CONTENTS & CONTENTS & CONTENTS & CONTENTS & CONTENTS & CONTENTS & CONTENTS & CONTENTS & CONTENTS & CONTENTS & CONTENTS & CONTENTS & CONTENTS & CONNECTIONS FUTTER ON 20x 50Hz FILTER FUTTER ON 20x 50Hz FILTER FUTTER ON 20x 50Hz FILTER FUTTER ON 20x 50Hz FILTER FUTTER ON 20x 50Hz FILTER FUTTER ON 20x 50Hz FILTER FUTTER ON 20x 50Hz FILTER FUTTER ON 20x 50Hz FILTER VOC SWITCHER FUTTER ON 20x 50Hz FILTER VOC SWITCHER FUTTER ON 20x 50Hz FILTER VOC SWITCHER FUTTER ON 20x 50Hz FILTER VOC SWITCHER FUTTER ON 20x 50Hz FILTER VOC SWITCHER FUTTER ON 20x 50Hz FILTER VOC SWITCHER FUTTER ON 20x 5Rear Panel
1- DataPort connector
2- Channel 1 RCA input connector
3- Channel 2 RCA input connector
4- Channel 1 XLR input connector
5- Channel 2 XLR input connector
6- Mode switches
7- XLR connector pinout reference chart
8- Channel 1 Speakon® pinout reference chart
9- Channel 1 Speakon output connector
10- Channel 2 Speakon pinout reference chart
11- Channel 2 Speakon output connector
12- Channel 1 binding post output connectors
13- Channel 2 binding post output connectors
14- Cooling air intake vents
15- Remote trigger in/out jacks
16- Remote Trigger pinout reference chart
17- Serial number decal location
18- Mode switch settings reference chart
19- AC power cord entry (IEC inlet)
The SRA amplifier is highly durable and carefully packaged. We recommend you inspect the unit carefully after removing it from the packaging, as occasionally there may be damage due to some unfortunate incident during shipment. Report any damage to the shipping carrier. We recommend saving the carton and packing material in case the unit must be shipped back to your dealer, distributor, or service center. Also note: some freight companies consider damage claims without the original packing materials invalid.
The QSC shipping box should contain:
1- The SRA amplifier
2- This Owner's Manual
3- Accessory packet containing:
-rack mount ears (2, used for rack mount installation only)
-four adhesive feet (for non-rack mounting installation)
-5/64" hex key (Allen wrench) for gain control security cover removal
-remote on/off (trigger) control cable, 36" long
4- IEC Power Cord
SETUP- Stand-alone Mounting
If the amplifier is to be used "stand-alone" (not mounted in an equipment rack) install the self-adhesive rubber feet on its bottom surface. The self-adhesive rubber feet are included with the amplifier.
To install the self-adhesive rubber feet:
1- Turn the amplifier upside down on a soft, nonabrasive surface.
2- Peel the backing paper off of each rubber foot and place near each of the four corners of the chassis bottom
3- Press firmly to activate the pressure sensitive adhesive.
4- Turn the amplifier back over so that the rubber feet rest on the supporting surface.

natural_image
Technical line drawing of a server rack unit with mounting points and green arrows indicating orientation (no text or symbols)SETUP- Stand-alone mounting (cont'd.)

text_image
Dimensions shown are useful for non-rack mount installations. 443 mm 17.44" 363 mm 14.25" 85 mm 1.50" 194 mm 15.50" 13 mm 1.50" 95 mm 1.75"Rack Mounting
Rack mounting the amplifier
Rack mounting is optional. The amplifier fits a 483 mm (19") width equipment rack.
To rack mount the amplifier:
1- Install the rack mount ears (see below and the following page for details).
2- Position the amplifier in the equipment rack and secure all four corners of the front panel using machine screws and washers. The size and thread type of the screws is determined by the equipment rack. Washers should be large enough to prevent the screw head from slipping into the rack ear mounting hole. Plastic washers will help prevent the screws from scratching the front panel.
To attach the rack mounting ears, you will need:
1- A #2 size cross point (Phillips) screwdriver.
2- The rack mount ears included with you SRA amplifier.
Continued, top of next page.....


Continued, from previous page.....
Attaching the rack mount ears:
1- Remove the two screws holding the front panel end cap in place. Use a #2 cross point screwdriver (Phillips).
2- Place the rack mount ear as shown, aligning it so the screws will go back into their original locations.
3- Insert the screws and tighten being sure to keep the rack mount ear properly aligned.
4- Repeat procedure for the other side

When installing equipment into a rack, distribute the units evenly. Otherwise, hazardous conditions may be created by an uneven weight distribution.

natural_image
Technical line drawings of three mechanical components with mounting holes and fasteners (no text or symbols)Dimensions for rack mount installations.
Note: Some dimensions are taken from the front surface of the rack rail.

text_image
Dimensions for rack mount installations. Note: Some dimensions are taken from the front surface of the rack rail. 443 mm 17.44" 354 mm 13.94" 85 mm 3.50" 354 mm 15.90" 379 mm 14.93" 76 mm 3.00" 8.5 x 12.7 mm 8.37 x 8.50" slot 6.4 x 12.7 mm 8.25 x 8.50" with left side 370 mm 14.57" 281 mm 15.00"Supporting the rear of the amplifier
If transporting the amplifier in a loaded equipment rack, support the rear of the amplifier using rear rack ears. They are optional and not included with the amplifier. QSC's Technical Services Group has the rear rack ear kits for sale.
The rear ear kit mounts two ways (shown below):
- using machine screws to secure the amplifier to the rear ears - using a post and the notch to support the rear.

Refer to the instructions that come with the optional rear rack ear kit! Information is for reference only.
Method 1- The amplifier is first installed and secured to the front rack rails. The rear ears are then secured to the amplifier and to the rails using screws.

text_image
Rear ear Amplifier Rack railMethod 2- The post is installed on the rear ears, then the ears attached to the rack using screws. The amplifier is then installed from the front of the rack and the notch in the amplifier's rear chassis tab slides over the post.

text_image
Rear ear Rack rail AmplifierSETUP- Removing the Gain Control Security Cover
Gain Control Security Cover
The amplifier is shipped with its gain controls at their maximum setting of +29 dB and a security cover installed to prevent tampering.
To adjust gain settings, remove the cover. Reinstall the cover to prevent unintentional changes.

natural_image
Interior view of a room with a white wall-mounted panel and a dark interior wall (no text or symbols visible)Cover retaining tab detail (left) and corresponding chassis retaining slot (right).
Removing the Security Cover
1- Using a 5/64" (or 2 mm) hex key, remove the cover's retaining screw and set it aside.

natural_image
Hand using a screwdriver to adjust a small electronic device with a perforated panel (no visible text or symbols)2- Insert the end of the hex key tool into the cover's screw hole and pull/swing the plate out as shown.

natural_image
Hand holding a small wire inside a white electronic device with a grid of dots (no text or symbols visible)3- Once the right side has been withdrawn from its retaining slot, pull the gain control lockout plate out from the front panel recess.

natural_image
Hand placing a small white object with four dots on its surface, mounted on a wooden surface (no text or symbols visible)(continued, following page)
4- Gain controls exposed for adjustment.

Installing the Gain Control Security Cover
1- Slide the cover into the front panel recess. Push it fully to the right and against the front panel. You should feel the cover's retaining tabs drop into the slot in the front panel.

natural_image
Hand holding a white rectangular device with four small holes, partially enclosed by a black metal bracket (no text or symbols visible)2- While lightly pressing the right side of the cover against the chassis, use the hex key tool (inserted into the plate's screw hole) to slide the cover to the left until the LEDs line up with the cover's holes. Continue to lightly press the cover against the chassis while you insert the cover's retaining screw and secure the screw. Fully tighten the retaining screw.

natural_image
Close-up of hands holding a small black object inside a white plastic tray (no text or symbols visible)Cooling Air Inlet and Exhaust Vents
The amplifier has a rear-mounted variable-speed fan. Speed is determined by the temperature of the amplifier's internal heat sink assembly.
Cooling air enters the rear of the amplifier and exhausts from the front vents.
If mounting in an enclosure, be certain not to restrict airflow.

text_image
Warm air exhausts through the front panel vents. Amplifier Fan Cool air is pulled into the rear of the amplifier. Equipment Rack
Do not obstruct cooling air vents!
AC Power
Verify operating voltage before plugging amplifier into AC mains. Make sure the AC mains voltage is the same as specified on the serial number plate.
Do not use a smaller gauge cord than supplied with the amplifier! 120 Volt models are supplied with a #14 AWG cordset. 220 Volt models are supplied with 1.0 mm² cordset.

Do not use improper AC mains voltage! It can create hazardous conditions and severely damage the amplifier!

text_image
MODE SWITCHES CLIP LIMIT FILTERS STEREO PARALLEL BRIDGE MONO OFF ON CH1 1 2 FILTER ON 3 50 Hz FILTER 4 20 Hz FILTER 5 6 7 6 50 Hz FILTER 7 20 Hz FILTER 8 50 Hz FILTER 9 FILTER ON CH2 10 1 2 3 4 5 6 7 8 9 10 1 2 3 4 5 6 7 8 9 10 OFF ON CH2 QSC USE CH1 INPUT. USE THE BRIDGE MONO SPEAKER CONNECTION. USE CH1 GAIN CONTROL.-The serial number plate is affixed to the rear panel, bottom right corner, adjacent the AC cord entry.
| Typical AC Line Current Consumption | ||
| SRA1222 | SRA2422 | SRA3622 |
| 5.6 amps at 4 ohms | 5.0 amps at 8 ohms | 8.0 amps at 8 ohms |
| Conditions: 120 VAC line, both channels driven with pink noise at 1/8 rated power. | ||
AC Power Connection
Plug the IEC-style end of the cord into the amplifier. Plug the AC mains-end of the cord into the AC outlet.

natural_image
Pure electrical outlet diagram without any text, numbers, or symbolsIEC Inlet
(amplifier end of cord)
Orient the IEC-style connector correctly with the inlet, then insert the plug fully.

120 Volt Models, 15 Amp Receptacle. Insert the plug fully.

240 Volt Models, European three conductor Earthing Receptacle Insert the plug fully.
Mode Switches
The mode switches are located on the rear panel. The switches are recessed to prevent accidental changes. It is best to set the switches as required before mounting the amplifier in an equipment rack as they may become difficult to access.
Change switch positions by sliding the switch left or right. Operate the switches with a small, flat-tip screwdriver or similar tool. Do not use a pencil or other item that could break and fall into the amplifier.
The possible operating modes are Stereo (Biamp application uses Stereo mode, too), Parallel, and Bridge. Each is described in detail on pages 14 through 17. Additionally, clip limiting and low frequency filtering are switchable on each channel. Page 18 and 19 describes the clip limiter and LF filter operation.

text_image
CH 1 MODE SWITCHES 1 CLIP LIMITER ON 2 FILTER ON 3 20 Hz FILTER 4 PARALLEL 5 XLR 6 INPUTS 7 BRIDGE ON 8 20 Hz FILTER 9 FILTER ON 10 CLIP LIMITER ON MODE SWITCHES CH 2 STEREO BRIDGE MONO OFF 50 HzMode Switches are located on the rear panel.

Note:
The block diagrams in this section do not show all the required connections. They are simplified to convey the main operating principles of each operating mode. For detailed connection information, refer to pages 20 through 29.
Stereo Mode
In stereo mode, each input signal is sent to its respective channel. Each channel has independent gain control, clip limiting, filtering, input, and output connection.
To operate in stereo mode, set the mode switches for stereo. Set switches 4, 5, 6 and 7 to the left. Connect the two input signals and the two speakers.
Continued, top of next page.....

flowchart
graph LR
    A["CH1 Input"] --> B["XLR or RCA"]
    B --> C["CH1"]
    C --> D["CH1 Output"]
    E["Full range loudspeakers"] --> F["Ch1"]
    G["Mode switches set for stereo"] --> H["CH1"]
    I["CH2 Input"] --> J["XLR or RCA"]
    J --> K["CH2"]
    K --> L["CH2 Output"]
    M["CH2 Input"] --> N["CH2"]
    O["CH2 Input"] --> P["CH2"]

Stereo Mode Notes:
- To operate in stereo mode, set switches 4, 5, 6, and 7 to the left position.
- Input connections: connect one input to CH1 and the other to CH2. Use the XLR or RCA connectors.
- Output connections: using the binding posts or the Speakon connectors, connect CH1 and CH2 outputs to their respective speakers.

text_image
CH 1 MODE SWITCHES STEREO BRIDGE MONO OFF 4 PARALLEL XLR INPUTS 7 BRIDGE ON MODE SWITCHES CH 2Stereo Mode: mode switches 4, 5, 6, and 7 to the left.
Biamp Applications- Use Stereo Mode
Mode switch settings for biamp are the same as for stereo. Multi-amp applications (like biamp) split the signal into different ranges before amplification, dedicating each channel to a specific task. The signal processing takes place externally before the signal is amplified.

Biamp Notes:
- Switch settings are the same as for stereo mode (see top of page).
- Audio inputs to amp must be preprocessed.
- Input connections: connect one input to CH1 and the other to CH2. Use the XLR or RCA connectors.

flowchart
graph LR
    A["Full range input signal to processor"] --> B["Signal processor configured as crossover"]
    B --> C["High frequency processor output feeds CH2"]
    C --> D["Low frequency processor output feeds CH1"]
    D --> E["XLR or RCA"]
    E --> F["SRA amplifier"]
    F --> G["CH1"]
    F --> H["CH2"]
    G --> I["Output"]
    H --> J["Output"]
    I --> K["LF Output"]
    J --> L["HF Output"]
    K --> M["LF loudspeaker"]
    L --> N["HF loudspeaker"]
- Output connections: binding posts or Speakon connectors, connect CH1 and CH2 outputs to their respective speakers. CH1 Speakon can output both channels if 4 wire cable is used.
- Verify all signal routing and test your configuration at low power to avoid damaging speakers.
- QSC's DSP modules are ideal for biamp mode applications.
Parallel Mode
In parallel mode, channel 1 and channel 2 XLR inputs are connected in parallel. Applying an input signal to either XLR input will drive both channels.
Each channel still has independent gain control, clip limiting, and output connection, just like stereo mode.
Do not use the RCA inputs if operating in parallel mode.

flowchart
graph LR
    A["CHA"] --> B["CH1 XLR Input"]
    B --> C["XLR"]
    C --> D["CH1 amplifier"]
    D --> E["CH1 Output"]
    E --> F["Full range loudspeakers"]
    G["CH2"] --> H["CH2 output"]
    H --> I["CH2 Output"]
    style A fill:#f9f,stroke:#333
    style G fill:#f9f,stroke:#333
    style H fill:#f9f,stroke:#333
    style I fill:#ccf,stroke:#333

Parallel Mode Notes:
- Do not use the RCA inputs for parallel mode.
- Set switches 4, 5, and 6 to the right and switch 7 to the left.
- Connect the single input signal to either CH1 or CH2's XLR input connectors.
- Output connections: binding posts or Speakon connectors, connect CH1 and CH2 outputs to their respective speakers.
- Since parallel mode connects both channels XLR inputs in parallel, the unused XLR can be used to daisy chain the input signal to another piece of equipment (see p.21).

text_image
CH 1 MODE SWITCHES STEREO BRIDGE MONO OFF 4 PARALLEL XLR INPUTS 6 7 BRIDGE ON MODE SWITCHES CH 2Parallel Mode: mode switches 4, 5, and 6 to the right and switch 7 to the left.
Bridge Mode
In bridge mode, both output channels are interconnected into one, higher power output. The result is one output with about 4 times the peak power and about 3 times the sustained power of a single channel.
Use CH1's gain control, clip limiter, and LF filter. Use channel 1's XLR or RCA input.
Output connection is different for bridge mode; the positive output for each channel gets connected to the loudspeaker. Page 24 details bridge mode output connections for binding posts, and page 26 for Speakon bridge output connections.

flowchart
graph TD
    A["CH1 Input"] --> B["XLR or RCA"]
    B --> C["CH1"]
    C --> D["CH1+ Output"]
    D --> E["2 ohm"]
    F["CH2"] --> G["CH2"]
    G --> H["CH2+ Output"]
    H --> I["Single, high power loudspeaker"]
    style A fill:#f9f,stroke:#333
    style F fill:#ccf,stroke:#333
    style G fill:#cfc,stroke:#333
    style H fill:#fcc,stroke:#333
    subgraph SRA amplifier
        C
        D
        E
        F
        G
    end
    note right of F: Do not use CH2 input! CH2 input is internally bridged with CH1.
    note right of G: Do not use CH2 input! CH2 input is internally bridged with CH1.

Bridge Mode Notes:
- To operate in bridge mode, set switches 4, 5, 6 to the left and switch 7 to the right position.
- Input: Use CH1's XLR input connector.
- Output connections: Use the two red binding posts. CH1 red binding post= positive, CH2 red binding post= negative; or use CH1 Speakon terminal 1+ and 2+ (1+ is positive).
- Use CH1's LF filter, clip Limiter, and gain control. Set CH2's clip limiter to the same setting as CH1's.

text_image
CH 1 MODE SWITCHES STEREO BRIDGE MONO OFF 4 PARALLEL XLR INPUTS 6 7 BRIDGE ON MODE SWITCHES CH 2Bridge Mode: mode switches 4, 5, and 6 to the left, and switch 7 to the right.
Clip Limiters
The SRA has separate clip limiters for each channel which respond only to actual amplifier clipping. Amplifier clipping generates internal error signals which cause the clip limiter to quickly reduce amp gain and minimize the overdrive. To preserve as much of the program dynamics as possible, limiting occurs only during actual clipping.
Each channel has its own clip limiter switch that can be operated independently. Switch 1 operates CH1's clip limiter and switch 10 operates CH2's clip limiter.

text_image
CH 1 MODE SWITCHES 1 CLIP LIMITER ON 10 CLIP LIMITER ON MODE SWITCHES CH 2Channel 1's clip limiter is operated by switch 1. Channel 2's clip limiter is operated by switch 10.
CLIP LIMITER ON: To turn the limiter on, slide the switch to the right (Sw.1: Ch.1, Sw.10: Ch.2).
CLIP LIMITER OFF: To turn the limiter off, slide the switch to the left.
Clip Limiting Tips
Clip limiting reduces extreme overdrive peaks, allowing a higher average signal level without audible distortion. Increasing the gain with the clip limiter engaged, until clipping is again audible, can double the average output power. Be careful not to exceed the power rating of your speakers.
The clip limiter is set to respond quickly after clipping is detected. On low frequency material, this may be perceived as a "rubbery" effect. It may be preferable to turn clip limiting off, and let the amp clip occasionally, especially if the speakers are robust.
If operating in Bridge mode, set CH2's clip limiter to the same setting as CH1's clip limiter.
Low Frequency Filters
Unless you already have filtering in the signal path preceding the amplifier, use the low frequency filter to protect your speakers from cone overexcursion caused by frequencies below the speaker's limits. The speaker's documentation will specify the low frequency limit.
Generally, match the frequency selection to your speaker's low frequency capability. This improves speaker performance by limiting subaudio cone movement, making more power available for the speaker's rated frequency range.
Each channel has its own low frequency filter. Channel 1's low frequency filter is operated by switches 2 and 3. Channel 2's filter is operated by switches 8 and 9.

text_image
CH 1 MODE SWITCHES 50 Hz 2 FILTER ON 3 20 Hz FILTER 50 Hz 8 20 Hz FILTER 9 FILTER ON MODE SWITCHES CH 2Channel 1's low frequency filter is operated by switches 2 and 3. Channel 2's filter is operated by switches 8 and 9.
FILTER ON: To turn the filter on, slide the switch to the right (Sw.2: Ch.1, Sw.9: Ch.2).
FILTER OFF: To turn the filter off, slide the appropriate switch to the left.
20 HERTZ: To set the filter for a 20 Hz. rolloff, slide the switch to the right (Sw.3: Ch.1, Sw.8: Ch.2).
50 HERTZ: To set the filter for a 50 Hz. rolloff, slide the appropriate switch to the left.

NOTE! The filter on/off switch must be set to the "on" position for the frequency selection to be active. If the on/off switch is set to the "off" position, no filtering will take place regardless of the frequency selection.
SRA Series amplifier low frequency response curves.

line
| Frequency (Hertz) | Output (dB) for Filter=0 Off | Output (dB) for Filter=20 Hz | Output (dB) for Filter=50 Hz | | ----------------- | ---------------------------- | ---------------------------- | ---------------------------- | | 10 | -0.5 | -6.0 | -6.0 | | 20 | -0.4 | -4.0 | -5.0 | | 50 | -0.3 | -2.0 | -3.0 | | 100 | -0.2 | -1.0 | -1.5 | | 200 | -0.1 | -0.5 | -0.5 | | 500 | -0.05 | -0.2 | -0.2 | | 1k | -0.02 | -0.1 | -0.1 |Audio Input Connections
Input connections to the SRA can be made with balanced XLR connectors for all operating modes, or unbalanced RCA connectors for Stereo and Bridge mode. We recommend using the balanced XLR connectors whenever possible. Unbalanced connections are prone to noise and interference pickup as well as ground-loop induced hum.
The XLR connectors are precision balanced (0.1% tolerance on balancing resistors) and provide superior audio performance over the RCA connectors. The RCA connectors are unbalanced and thus prone to ground loop and common-mode noise pickup (as are all unbalanced connections).
The RCA connectors have special circuitry added to help minimize ground-loop induced hum. This
circuitry inserts a small impedance between the RCA connector's "ground" and the chassis ground.
If the mode switches are set for parallel mode, the XLR input connectors are directly wired in parallel. This means the input can be connected to either of the XLRs and the remaining XLR can be used for daisy-chaining the input signal to other equipment (shown opposite page, bottom). Do not daisy chain from an RCA connector. Make sure only one input signal is applied to the amplifier when operating in Parallel or Bridge modes.
If your system has noise or hum, disconnect all amplifier inputs to verify the source of the noise. If the noise disappears, the noise source is not the amplifier. Check cabling and other equipment connections (see p.35 for troubleshooting).
Input Connector Use
Use the RCA, XLR, or DataPort connectors for signal input to the amplifier. Do not mix input connector usage.

Use balanced connections and high-quality cable and connectors for best results.
RCA
(unbalanced)

text_image
INTU INTU IMPROVANCE INTU IMPROVANCE INTU IMPROVANCE INTU IMPROVANCE INTU IMPROVANCE INTU IMPROVANCE INTU IMPROVANCE INTU IMPROVANCE INTU IMPROVANCE INTU IMPROVANCE INTU IMPROVANCE INTU IMPROVANCE INTU IMPROVANCE INTU IMPROVANCE INTU IMPROVANCE CH 1 INTU IMPROVANCE INTU IMPROVANCE INTU IMPROVANCE INTU IMPROVANCE INTU IMPROVANCE INTU IMPROVANCE INTU IMPROVANCE INTU IMPROVANCE INTU IMPROVANCE INTU IMPROVANCE INTU IMPROVANCE INTU IMPROVANCE INTU IMPROVANCE INTU IMPROVANCE INJ INJ INJ INJ INJ INJ INJ INJ INJ INJ INJ INJ INJ INJ INJ INJ INJ INJ INJ INJ INJ INJ INJ INJ INJ INJ INJ INJ INJ INJ INJ INJ INJ INJXLR
(balanced or unbalanced)

text_image
INPUT INFRASTRUCTURE INFLUANCE INFLUANCE DCAPPER INFLUANCE MAX10 MAX10 INFLUANCE INFLUANCE INFLUANCE INFLUANCE INFLUANCE INFLUANCE INFLUANCE INFLUANCE INFLUANCE INFLUANCE INFLUANCE INFLUANCE INFLUANCE INFLUANCE INFLUANCE INFLUANCE INFLUANCE INFLUANCE INFLUANCE INFLUANCE INFLUENCE INFLUANCE INFLUANCE INFLUANCE INFLUANCE INFLUANCE INFLUANCE INFLUANCE INFLUANCE INFLUANCE INFLUANCE INFLUANCE INFLUANCE INFLUANCE INFLUANCE INFLUANCE INFLUANCE INFLUANCE INFLUANCE INFLUANCE INFLUANCEL INFLUANCEL INFLUANCEL INFLUANCEL INFLUANCEL INFLUANCEL INFLUANCEL INFLUANCEL INFLUANCEL INFLUANCEL INFLUANCEL INFLUANCEL INFLUANCEL INFLUANCEL INFLUANCEL INFLUANCEL INFLUANCEL INFLUANCEL INFLUANCEL INFLUANCEL INFLU CONTROL INFLU CONTROL INFLU CONTROL INFLU CONTROL INFLU CONTROL INFLU CONTROL INFLU CONTROL INFLU CONTROL INFLU CONTROL INFLU CONTROL INFLU CONTROL INFLU CONTROL INFLU CONTROL INFLU CONTROL INFLU CONTROL INFLU CONTROL INFLU CONTROL INFLU CONTROL INFLU CONTROL INFLU CONTROL INFLU INSULency INFLU INSULency INFLU INSULency INFLU INSULency INFLU INSULency INFLU INSULency INFLU INSULency INFLU INSULency INFLU INSULency INFLU INSULency INFLU INSULency INFLU INSULency INFLU INSULency INFLU INSULencyDataPort
(refer to DataPort accessory's instructions)

text_image
INPUT INFRASTRUCTING INFLUSTRATED TICK UNLIMITED CH 1 DCAPPER RETURN UNIT UNIT AIR UNIT AIR UNIT AIR UNIT AIR UNIT AIR UNIT AIR UNIT AIR UNIT AIR UNIT AIR UNIT AIR UNIT AIR UNIT AIR UNIT AIR UNIT AIR UNIT AIR UNIT AIR UNIT AIR UNIT AIR UNIT AIR UNIT AIR UNIT AIR UNIT AIR UNIT AIR UNIT AIR UNIT AIR UNIT AIR UNIT AIR UNIT AIR UNIT AIR UNIT AIR UNIT AIR UNIT AIR UNIT AIR UNIT AIRXLR Connector Pinout

text_image
Balanced + pin 2 - pin 3 + pin 1
text_image
Unbalanced Jumper + pin 2 + pins 1 and 3RCA (phono plug) Connector Pinout

text_image
Signal (+) GroundDaisy Chain Example (parallel mode only)
All amplifiers being daisy chained must be in parallel mode.

text_image
Input signal CH 1 MODE SWITCHER OUTPUT CH 2 CH 1 MODE SWITCHER OUTPUT CH 2 CH 1 MODE SWITCHER OUTPUT CH 2 CH 1 MODE SWITCHER OUTPUT CH 2 CH 1 MODE SWITCHER OUTPUT CH 2 CH 1 MODE SWITCHER OUTPUT CH 2 CH 1 MODE SWITCHER OUTPUT CH 2 CH 1 MODE SWITCHER OUTPUT CH 2 Ch 1 Mode SWITCHER OUTPUT CH 2 CH 1 Mode SWITCHER OUTPUT CH 2 CH 1 Mode SWITCHER OUTPUT CH 2 CH 1 Mode SWITCHER OUTPUT CH 2Connecting the Outputs to the Loudspeakers
There are two basic speaker connection configurations for the SRA amplifier. Stereo and parallel modes use two separate output connections (two loudspeaker loads). Bridge mode uses one output connection (one loudspeaker load).
Use either the binding post or the Speakon output connectors. Each connector type is detailed in the following sections.
Refer to the diagrams provided for speaker connection. Mode descriptions (stereo, parallel, bridge, or biamp) and using the mode switches is shown on pages 14 through 17.

Do not use less than 4-ohm loads in Bridge mode! Note polarity of connections for Bridge mode.

WARNING! Use proper speaker wire. Stereo or Parallel Mode: Use NEC Class 2 wiring. Bridge Mode: Use NEC Class 1 wiring. Refer to local and national electrical codes to assure code compliance.
Selecting Speaker Cable
Use the highest quality loudspeaker cable available, which may or may not be the most expensive.
Look for...
- ...large conductor size: #10 AWG is the largest that will fit the binding posts. Smaller wire sizes, like #12 or #14 AWG may be fine for shorter speaker cable use. Avoid small sizes like #16 and up.
- ...the conductors to be stranded. The higher the "strand count", the more flexible and long-lived the cable will be. This means less stress on the output connectors of your amplifier and higher reliability. Solid wire is not recommended; it stresses the connectors and will fail when flexed.
- ...quality insulation. The insulation should be thick enough to protect the conductors wherever they are installed and be flexible enough that handling the cable is not difficult. If operating in extreme cold temperatures, be sure your cable insulation will still be flexible. If operating in extreme hot conditions, be sure not to exceed the cable's maximum rated operating temperature.
- ....quality copper. This is hard to judge; it's best to use name brand cable you trust. Cables made of recycled copper of unspecified resistivity have some risk. When in doubt, measure the resistance of a known length of cable and compare to standard wire table data. Whether or not the copper has small amounts of oxygen is of little impact.

NOTE! AWG is the abbreviation for American Wire Gauge. The smaller the gauge number, the larger the physical size of the wire. Example: #10 AWG is a bigger, thicker wire than #16 AWG.
Using the Binding Posts
The binding posts support several connection methods; banana plugs, spade lugs, or direct wire connection. European models do not support the use of banana plugs.
If using banana plugs, plug into the binding post directly.
If using spade lugs, refer to the diagram, below, for acceptable dimensions of lug.
If connecting the cable directly, strip about 1/2-inch of insulation from the ends and neatly twist any loose strands. Loosen the retaining nut fully, insert the wire, and tighten. Do not overtighten! Maximum wire gauge is #10 AWG (2.58 mm diameter).

text_image
CH 1 BRIDGE MOND CH 2Binding post outputs on the rear panel.
Continued, following page.....

text_image
13 mm 1/2" 2.58 mm max. diameter #10 AWG maximum 19 mm 3/4" European models do not have banana plug feature. 6.3 mm minimum 0.25" minimum 12.9 mm maximum 0.51" maximum WA prop wire Parallel Mo Class 2 wiri Mode: Use M wiring. Refe national ele assure codeStereo and Parallel Mode output connections using binding posts
Connect each set of binding post outputs to its respective loudspeaker.
Maintain proper polarity when hooking up loudspeakers. Connect each red binding post (+, or positive) to the red (or +, positive) terminal of each loudspeaker. Connect each black binding post (-, or negative) to the black (or -, negative) terminal of each loudspeaker. All amplifiers and loudspeakers must maintain proper connection polarity in order for bass response to be optimum.

text_image
Z= 2 ohms minimum CH 1 + - + - + - + - CH 2 Z= 2 ohms minimum + -Bridge Mode output connections using binding posts
Connect channel 1's red binding post (+, positive) to the loudspeaker's red (+, or positive) terminal. Connect channel 2's red binding post (+, positive) to the loudspeaker's black (-, or negative) terminal. If operating other amplifiers in bridge mode, make sure the connection polarity is maintained.

text_image
Z= 4 ohms minimum + - CH 1 CH 2 2 ohm
Do not use less than 4-ohm loads in bridge mode! Note polarity of connections for bridge mode.
Speakon Outputs
The Speakon connectors offer quick, reliable connection and disconnection of the speakers.
Although more expensive than banana or spade-lug style speaker cable termination, the speed, convenience, and reliability make Speakon use popular with portable and live sound setups.
The Speakons are wired: CH1 Speakon: Pin 1+ = CH1 positive
Pin 1- = CH1 negative
Pin 2+ = CH2 positive
Pin 2- = CH2 negative
CH2 Speakon: Pin 1+ = CH2 positive
Pin 1- = CH2 negative

WARNING! Use proper speaker wire.
Stereo or parallel mode: Use NEC Class 2 wiring.
Bridge mode: Use NEC Class 1 wiring.
Refer to local and national electrical codes to assure code compliance.
Two-conductor Speakon Cable
Use two-conductor Speakon cable for stereo or parallel mode. Two cables will be required; one for CH1 and one for CH2.

text_image
To Amplifier To SpeakerFour-conductor Speakon Cable
For biamp applications, use four conductor cable.
Four conductor cable may be used for carrying both of the output channels with a single cable. Signal splitting required at loudspeaker end of cable.

text_image
To Amplifier To SpeakerStereo or Parallel Modes
Stereo and Parallel modes use one cable for each channel. Each cable connects to its respective output connector and speaker.
CH1's Speakon can be used with a four conductor cable for carrying both outputs. The required signal splitting would take place at the speaker-end of the cable.

flowchart
graph TD
    A["CH1 CH2 BRIDGE PINS"] --> B["2 wire Speaker cables"]
    C["OUTPUT"] --> B
    D["CH2 CH2 PINOUT"] --> B
    B --> E["Speaker"]
    style A fill:#f9f,stroke:#333
    style C fill:#f9f,stroke:#333
    style D fill:#f9f,stroke:#333
    style B fill:#ccf,stroke:#333
    style E fill:#dfd,stroke:#333
    style_F["Speaker cable wiring"] --> G["Speaker cable wiring"]
    style G --> H["Speaker cable wiring"]
Bridge Mode
Bridge Mode Speakon connection uses CH1's Speakon only. Pin 1+ is the positive signal and Pin 2+ is the negative signal. NOTE! Make sure the speaker-end is wired according to its specifications. The diagram below assumes cabinet to be wired pin1+ and pin 1-. Verify proper connections are made!

text_image
CH1 CH2 BRIDGE PINS 1+ 1- 2+ 2- 1+ 2+ POS NE6 POS NE6 POS NE6 OUTPUT CH2 1- 1- POS NE6 PINOUT 2 wire Speakon cable Speakon cable wiring
WARNING! Use proper speaker wire.
Stereo or Parallel Mode: Use NEC Class 2 wiring.
Bridge Mode: Use NEC Class 1 wiring.
Refer to local and national electrical codes to assure code compliance.
Biamp Operation
In biamp, one channel is used for lows, while the other channel is used for highs. It requires the use of signal processing equipment between the source material and the amplifier. Always test the system at the lowest practical power level for proper operation.
Biamp-ready loudspeakers have no crossover and connect to the amplifier using the four-conductor Speakon. Some loudspeakers feature switchable passive or active (biamp) crossover configuration. Make sure any switchable loudspeaker is set for Active mode to disable the internal crossover if you are biamping.
Amplifiers designed specifically for biamp operation have different power points for each channel. Because high frequency drivers are much more
efficient than are low frequency drivers, less power is required at higher frequencies. Biamp makes more efficient use of the power available from a given amplifier and provides more head room at lower frequencies. Triamp systems add one more level of frequency separation for amplifiers and speakers.
Conventional speaker crossovers consist of inductors, capacitors, and resistors. The heat generated in these components is power that could be delivered to the speaker. Near the crossover frequency, power loss can be close to 50%! No wonder professional sound companies prefer the multi-amplification approach. Biamp, triamp, or more..... it makes best use of the available AC power to produce sound.

flowchart
graph TD
    A["CH1 CH2 BRIDGE PINS"] --> B["4 wire Speaker cable"]
    B --> C["Biamp-ready loudspeaker"]
    D["Ch1 CH2 OUTPUT"] --> B
    E["CH2 CH2 PINOUT"] --> B
    F["Speaker cable wiring"] --> G["Speaker cable wiring"]
    style A fill:#f9f,stroke:#333
    style B fill:#ccf,stroke:#333
    style C fill:#cfc,stroke:#333
    style D fill:#fcc,stroke:#333
    style E fill:#cff,stroke:#333
    style F fill:#ffc,stroke:#333
    style G fill:#fcc,stroke:#333
Remote Trigger
Remote turn-on and turn-off capability is provided by the remote trigger jacks on the rear panel. Remote trigger can be operated by two methods, 12 Volt DC or contact closure (switch, relay). The IN and OUT jacks can be used interchangeably as they are wired in parallel.
The amplifier's front panel power switch must remain in the ON position when using the remote trigger feature. The amplifier's power status is controlled from the remote trigger connections. If no plug is inserted in the remote trigger jacks, amplifier on/off is controlled by the front panel power switch.
If a mono plug is inserted into either jack, the amplifier will go into standby mode (off). Apply +12 Volts DC to the tip and ground (- or negative) to the sleeve, and the amplifier will be enabled (on). Be sure to use a mono plug for +12 Volts DC remote trigger operation.
If a stereo plug is inserted into either jack and no connections are made between the tip, ring, and sleeve, the amplifier will be enabled (on). If a contact connection (switch or relay contacts) is made between the sleeve and the ring, the amplifier will go into standby mode (off). The tip connection is not utilized when contact closure method is used.


text_image
REMOTE TRIGGER USING 12 VOLT DC METHOD. FOR STANDBY INSTALL 3.5MM TIP/SLEEVE JACK. TO ENABLE AMPLIFIER APPLY 12V DC REMOTE TRIGGER USING 3.5 MM TRS CONTACT CLOSURE FOR STANDBY CONNECT RING AND SLEEVE TO ENABLE OPEN CONTACT BETWEEN RING AND SLEEVE| Remote Trigger Method | Type of Plug Power On (enable) | Power Off (standby) | |
| 12 Volts DC |  |  |  |
| Contact Closure | Ring/Tip/Sleeve (stereo)  | 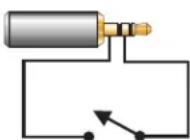 Contacts Open Contacts Open | 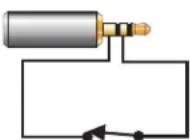 Contacts Closed Contacts Closed |
12 Volt DC Remote Trigger
For 12 Volt DC remote trigger operation, use a mono (2 terminal) 3.5 mm mini-plug. Do not use a stereo (3 terminal) plug.
Connect a suitable two-conductor cable to the plug. Connect the tip of the plug to the + (or positive) polarity wire and the sleeve to the - (or negative) polarity wire.
Turn the amplifier on (enable) by applying +12 Volts DC to the cable. Make certain that the + polarity of the 12 Volts DC connects to the tip of the plug!
Turn the amplifier off (standby) by removing the voltage. This is normally done by turning off the main AC power switch of the processor (or other primary system controller).
Another possible remote on/off solution is shown to the right. This solution uses a 12 Volt DC signal and a switch wired to the mono mini-plug. Make sure any AC adapter used is DC voltage output, not AC.

text_image
12 VDC Remote Trigger Output. Connect to SRA amplifiers using mono mini plug (tip positive, +). Processor (or other "master" turn-on device) with 12 VDC remote trigger output. To additional 12VDC remote trigger inputs.AC-DC adapter with 12VDC output

text_image
12 VAC to remote trigger in
Note- We recommend the front panel AC power switch be switched to the "off" position anytime the system will not be operated for an extended period. This prevents the remote trigger from accidentally powering up the amplifier while you are away. It is a good idea to do the same with all remote turn-on/turn-off capable equipment when it is not to be operated for extended periods.
CONNECTIONS- Remote on/off (remote trigger) Contact Closure Type
12 Volt DC Remote Trigger
For contact closure remote trigger operation, use stereo (3 terminal) 3.5 mm mini-plug. Do not use a mono (2 terminal) plug.
Connect a suitable two-conductor cable to the plug. Connect the sleeve of the plug to one wire and the ring to the other wire. The tip of the plug is left unconnected.
The other end of the cable is connected to a pair of switch or relay contacts. These contacts are typically inside the main AC power controlling device (processor) When the switch or relay contacts are closed, the amplifier will turn off. When the switch or relay contacts are opened, the amplifier will turn on.
Another possible remote on/off solution is shown to the right. This solution uses a switch wired to the stereo mini-plug. The switch could be replaced with a set of relay contacts, should your application require it.
Contact closure remote trigger output. Connect to SRA amplifiers using stereo mini plug (ring and sleeve).

text_image
Processor (or other "master" turn-on device) with contact closure remote trigger output. To additional contact closure remote trigger inputs
text_image
Connect contacts to sleeve and ring of stereo mini plug. Tip connection not used. to remote trigger in
Note- We recommend the front panel AC power switch be switched to the "off" position anytime the system will not be operated for an extended period. This prevents the remote trigger from accidentally powering up the amplifier while you are away. It is a good idea to do the same with all remote turn-on/turn-off capable equipment when it is not to be operated for extended periods.
What is a DataPort?
The DataPort is a QSC-specific connection used for interfacing amplifiers, amplifier monitoring devices and signal processors. QSC Audio produces a line of digital signal processing as well as other accessories that plug directly into the DataPort. The DataPort connection provides all the necessary interconnects between the accessory and the amplifier.
For home theater and studio applications, DSP can be very useful for "tuning" the response of the system. For example, a QSC DSP-4 module connected to the amplifier could be configured as a crossover or a subwoofer filter, or many other functions. Audio response can be tailored using the DSP and its software to compensate for speaker response "dips" or "peaks".
Contact your QSC representative or QSC Audio directly to find out what DataPort accessories might fit your application.
Connecting
In general, the connection is made by orienting the DataPort accessory or cable's male HD-15 plug with the DataPort receptacle and inserting fully. Tighten the retaining screws. Do not use excessive force to tighten the retaining screws!
Refer to the instructions included with your DataPort accessory for detailed connection information.

text_image
INPUT CH 1 DATA PORT ACCESSORY INPUT CH 2 MADE IN U.S.A. INPUT IMPEDANCE: 20K BALANCED 10K UNBALANCED XLR INPUT PINOUTS + - - ? P2 P3 P1DataPort is located on the left side of the rear panel.

natural_image
Illustration of a laptop connected to an electronic device via cable (no text or symbols present)A typical DataPort application shown with a programmable QSC DSP-4 signal processor. The PC is required only for programming the DSP-4 and is not required to remain connected.
AC Power Switch
On the front panel, left side, is the Power switch. The switch is labeled ON, above it and to the left.
To turn the power on: Press in on the upper portion of the rocker switch. The amplifier will go through its power-up cycle; the red-colored Clip LEDs will illuminate briefly, then the green-colored Power LED will remain on.
To turn the power off: Press in on the bottom portion of the rocker switch. It may take a few moments for the Power LED to extinguish. This is normal.
If the Power LED fails to illuminate when the power is switched on, check the power cord for proper connection at both ends and verify the AC power source is functioning properly.
CHANNEL 1

CHANNEL 2

Gain Controls
A gain control adjustment is provided for each channel. The voltage gain of the amplifier (in dB) is marked around each control.
Rotating the control clockwise increases the gain applied to the signal. Rotating the control counterclockwise reduces the gain applied to the signal.
In stereo and parallel operating modes (see pages 14 through 16) each channel's gain is adjusted by its own control. In bridge mode, use channel 1's gain control and set channel 2's control fully counterclockwise.

natural_image
Line drawing of a hand inserting a device into a rack labeled QSC (no text or symbols on the diagram itself)
CLIP


SIGNAL


2
Signal and Clip LED Indicators
SIGNAL- Illuminates when the input signal strength is sufficient to drive the output above -30 dB relative to full output.
CLIP- Illuminates when the input signal strength is strong enough to drive the output to the limits of the power supply (i.e. clipping).
Clip Indicator Tips
- Normally, the clip LEDs will flash occasionally when the amplifier is driven hard (high output level).
- If Illuminated most of the time, the amplifier is being driven extremely hard and may eventually overheat, triggering the thermal shutdown circuitry.
- If fully illuminated, the amplifier is in thermal shut down or short-circuit cutback is engaged. Reduce the input signal strength; if the Clip LED turns off, there is a problem with the speaker's wiring or one of the speakers. If the LED remains on when input signal strength is fully reduced, the amp is in thermal shutdown. Reduce gain settings or input signal and allow the amp to cool down. Leave the power on so that the fan continues to run; operation will automatically resume after the amplifier has cooled sufficiently.
7.1 Surround Application
The block diagram, at right, shows how SRA amplifiers might be connected in a 7.1 home theater application. The connections shown are simplified so as to convey the signal routing scheme. All amplifiers shown are operated in stereo mode. Amplifier inputs can be via the RCA or XLR connectors. Amplifier outputs can be via the binding posts or the Speakon connectors. Each application/installation is different; refer to you professional audio installer for detailed application solutions.
Note: Loudspeaker orientation is for illustration only. Abbreviations and terms may vary by manufacturer.

flowchart
graph TD
    A["Processor"] --> B["SRA Amplifier: Left and Right Channels"]
    A --> C["SRA Amplifier: Center and Subwoofer Channels"]
    A --> D["SRA Amplifier: Left Surround and Right Surround Channels"]
    A --> E["SRA Amplifier: Left Back Surround and Right Back Surround Channels"]
    B --> F["Left Front Right Front"]
    C --> G["Subwoofer"]
    D --> H["Center"]
    E --> I["Right Surround"]
    F --> J["Left Surround"]
    G --> K["Right Surround"]
    H --> L["Left Rear Surround"]
    I --> M["Right Rear Surround"]
The amplifier won't turn on when the Power switch is operated (green Power LED not illuminating)-
- Verify AC power source is providing required voltage. The simplest test is to plug a known-working lamp into the same outlet and verify it works. Properly functioning AC power is required in order to operate the amplifier.
- Check each end of the amplifier's power cord. The AC plug or IEC-type connector needs to be properly inserted. Inspect the cord for damage. If any damage is found, replace the cord immediately.
- Unplug any device connected to the amplifier's Remote Trigger jacks. If the amplifier now turns on and off normally, the problem is with the cables or equipment that was connected to the Remote Trigger jacks.
Signal LED's not responding to input signal level (not lighting)-
- If the green Power indicator LED is lit, but the signal LEDs do not light up at all, check the input. Make sure the signal source is working and try another input cable. Connect the source to another channel or amplifier and verify that it is working properly. Connect a known good signal source to the amplifier to verify the amplifier is working properly.
- If you are using the XLR or RCA jacks, be sure the connectors are fully inserted at both ends of all interconnecting cables.
- If using the DataPort inputs, make sure connections are tight and that the software configuration in the upstream device (if applicable) is not muting the signal.
Signal LEDs responding to signal level but no output-
- If the green signal LED indicators are lighting normally, the fault is somewhere between the amp and the speakers. Check the speaker wiring for proper connection at each end and for any damage or breaks. Try another speaker and cable. If your system has multiple speakers connected in series, any one speaker failure will cause all other speakers (in the same series circuit) to lose their signal.
Clip LED flashing, but no output-
- If the red Clip indicator flashes when signal is applied, the amplifier output may be shorted. Disconnect the speaker cables from the amplifier. If the clip indicator no longer illuminates, the problem is in the speaker cable or the speaker.
- Connect the speaker cables to the amplifier, but not the speakers. Make certain the conductors cannot touch at the unconnected speaker-end of the cables. If the Clip indicator no longer illuminates, the problem is most likely in the speaker.
- Check that the speaker cable connections are tight and properly terminated at each end. Check the speaker cables for stray strands or breaks in the insulation. Trim off all loose strands of wire and insulate any exposed wire with electrical tape. All connections should be made with great care and all wire terminations should be carefully checked to ensure quality workmanship.
The Clip LEDs are fully illuminated-
- The amplifier is in Thermal Protection mode. Let the amplifier cool down. Leave the Power on so the fan will cool the amplifier. Check for proper ventilation. If the fan isn't running at all, the amplifier requires servicing.
- If normal operation does not resume after letting amplifier cool down, the amplifier requires service.
The amplifier "cuts-out" when I really crank it up (intermittent operation)-
- Make sure the AC power source is rated for the required current! Avoid using extension cords! If required, use only the shortest possible 10-gauge heavy-duty extension cords.
- If the AC power source is "sagging" (or drooping) under heavy load, the circuit is overloaded or has other fundamental problems. Use another circuit or have the circuit checked by a licensed, professional electrician.
I am using the amp for a subwoofer application and it sounds "rubbery", what's up?
- Verify that the Clip Limiters are OFF. Why? The Clip Limiter is set to respond as quickly as possible after clipping is detected. On low frequency material, this may be perceived as a "rubbery" effect. It may be preferable to turn Clip Limiting off, and let the amp clip occasionally, especially if the speakers are robust.
- If your subwoofer is rated for frequencies below 50 or 20 hertz, set the Low Frequency (LF) filters accordingly.
No channel separation-
- Check the mode switch settings on the back of the amplifier. If the mode switches are set for PARALLEL mode, there will be no channel separation. The mode switches must be set for STEREO for each channel to operate independently.
- Make sure other equipment in the signal path to the amplifier, such as DSP, mixers, preamps, etc., is set for stereo, not mono.
The output sounds distorted-
- Indication: Clip indicator flashing- If the red clip indicator flashes before the signal indicator does, the load impedance is abnormally low or shorted. Unplug each speaker one-by-one at the amplifier. If the clip LED goes out when you disconnect a cable, then that cable or speaker is shorted. Try another cable and speaker to locate and/or remove the fault.
- Indication: Clip Indicator not flashing- This could be caused by a faulty speaker or loose connection. Check the wiring and try another speaker. If not the speaker or connections, see next item to test for signal source distortion.
- The signal source may be clipping. Keep the amplifier gain controls at least halfway (19 dB or so) up so that the source does not have to be overdriven. Reduce signal levels upstream of the amplifier to identify overdrive source.
There seems to be a lot of "hiss" noise on the outputs-
- Unplug the input cables to the amplifier. If the hiss goes away, then the problem is with the equipment or cables leading to the amplifier.
- If the hiss is present with no audio input cables connected, check that the AC line cord is properly grounded at its connection to the line. If the ground connection is OK and the hiss continues with no input cables connected, then the amplifier requires servicing.
- To keep the normal noise floor low, operate the primary signal source at full level, without clipping, and avoid boosting the signal further between the source and the amplifier.
The output has a "hum" noise-
- Use a common AC ground connection for all audio equipment.
- Check the input cables for broken ground (shield) connection.
- Use balanced connections where possible for the entire signal chain.
- The design of the amplifier eliminates internal hum fields, but external transformers or other magnetic devices may cause hum. Move cabling and signal sources to identify "hot spots" in the system; then avoid those spots. Cables with faulty shielding are a common entry point for hum. Use top quality cabling. Another common source of magnetic fields are "wall warts" or pluggable transformers; keep input wiring away from them.
- Troubleshoot the system for ground-loop problems. Any identified ground loop must be broken using audio signal isolation. Do not "lift" or break AC power grounds under any circumstance as safety of the system will be compromised.
SRA1222 SRA2422 SRA3622
Output Power:
(watts per channel, stereo/parallel mode)
8 ohms, 20Hz to 20kHz, 0.03% THD 200 425 725
4 ohms, 20Hz to 20kHz, 0.05% THD 350 725 1100
2 ohms, 1kHz, 1.0% THD 600 1200 1800
Output Power:
(watts, bridge mode)
8 ohms, 20Hz to 20kHz, 0.10% THD 750 1550 2400
4 ohms, 20Hz to 20kHz, 0.10% THD 1200 2400 3600
Output circuitry: class AB 2-tier class H 2-tier class H
Distortion (SMPTE-IM): <0.01% <0.02% <0.02%
Distortion (4 and 8 ohm, typical):
20 Hz to 20 kHz: 10 dB below rated power <0.02% <0.02% <0.02%
1 kHz and below: at full rated power <0.01% <0.01% <0.01%
Input Sensitivity: 1.43V 2.12V 2.71V
(for rated power into 8 ohm load)
Input Sensitivity: 1.35V 1.92V 2.38V
(for rated power into 4 ohm load)
Power requirements: 5.6 amps 5.0 amps 8.0 amps
(pink noise, 1/8 rated power)
at 4 ohms/ch. at 8 ohms/ch. at 8 ohms/ch.
Slew Rate:
20V/uS
20V/uS
20V/uS
Frequency response, all models:
20 Hz to 20 kHz, ±0.2 dB
(LF filter switched off)
8 Hz to 50 kHz, +0, -3 dB
Damping factor @ 1 kHz and below:
500
Noise, all models, 20 Hz–20 kHz:
-107 dB
Specifications subject to change without notice!
ALL MODELS
Voltage gain: 28× (29 dB)
Controls: Front- AC switch, Recessed Ch. 1 and Ch. 2 gain knobs
Rear- DIP switch (Ch. 1: clip limiter on/off, LF filter on/off,
LF filter freq select—20 or 50 Hz; Ch. 2: clip limiter on/off, LF filter on/off,
LF filter freq select—20 or 50 Hz; inputs parallel or stereo; bridge mode)
Connectors: Input- gold-plated RCA, 3-pin XLR (1 each per channel)
Output- Neutrik Speakon (1 per channel) and safety-shrouded binding posts
Remote- two 3.5 mm jacks in parallel (12V or switch remote on/off trigger)
DataPort-HD-15 for QSC DSP accessory
Input impedance: XLR-10k ohms unbalanced, 20k ohms balanced
RCA- 10k ohms unbalanced
Indicators: Clip-red LED (1 per channel)
Signal (-30 dB)- green LED (1 per channel)
Power- green LED
Cooling: ultra-quiet variable-speed fan, rear-to-front air flow
Amplifier Protection: Full short circuit, open circuit, thermal, ultrasonic, and RF protection. Stable into reactive or mismatched loads.
Load protection: on/off muting, DC-fault power supply shutdown
Dimensions: Width- 483 mm (19.0") with rack mount ears installed
445 mm (17.5") without rack mount ears
Height- 89 mm (3.5") 2 rack units
Depth-394 mm (15.5") overall
381 mm (15.0") from front of rack rail to tip of rear support chassis tab
Weight: 10 kg (22 lb.) net
Available Finish: black chassis with black front panel/inserts or black chassis with silver front panel/inserts
Specifications subject to change without notice!
WARRANTY (USA only; other countries, see your dealer or distributor)
Disclaimer
QSC Audio Products, Inc. is not liable for any damage to speakers, or any other equipment that is caused by negligence or improper installation and/or use of this amplifier product.
QSC Audio Products 3 Year Limited Warranty
QSC Audio Products, Inc. ("QSC") guarantees its products to be free from defective material and / or workmanship for a period of three (3) years from date of sale, and will replace defective parts and repair malfunctioning products under this warranty when the defect occurs under normal installation and use - provided the unit is returned to our factory or one of our authorized service stations via pre-paid transportation with a copy of proof of purchase (i.e., sales receipt). This warranty provides that the examination of the return product must indicate, in our judgment, a manufacturing defect. This warranty does not extend to any product which has been subjected to misuse, neglect, accident, improper installation, or where the date code has been removed or defaced. QSC shall not be liable for incidental and/or consequential damages. This warranty gives you specific legal rights. This limited warranty is freely transferable during the term of the warranty period.
Customer may have additional rights, which vary from state to state.
In the event that this product was manufactured for export and sale outside of the United States or its territories, then this limited warranty shall not apply. Removal of the serial number on this product, or purchase of this product from an unauthorized dealer, will void this limited warranty.
Periodically, this warranty is updated. To obtain the most recent version of QSC's warranty statement, please visit www.qscaudio.com.
Contact us at 800-854-4079 or visit our website at www.qscaudio.com.
HOW TO CONTACT QSC AUDIO PRODUCTS

Mailing Address: QSC Audio Products, Inc.
1675 MacArthur Boulevard
Costa Mesa, CA 92626-1468 USA

Telephone Numbers:
Main Number (714) 754-6175
Sales (714) 957-7100
Sales & Marketing (800) 854-4079
Technical Services Group (714) 957-7150
(toll-free in U.S.A. only)
(800) 772-2834
(toll-free in U.S.A. only)

Facsimile Numbers:
Sales & Marketing FAX (714) 754-6174
Technical Services Group FAX (714) 754-6173

World Wide Web: www.qscaudio.com
E-mail: info@qscaudio.com
service@qscaudio.com

QSC Audio Products, Inc. 1675 MacArthur Boulevard Costa Mesa, California 92626 USA
"QSC" and the QSC logo are registered with the U.S. Patent and Trademark Office.
©2002 QSC Audio Products, Inc.