Z1-BL2 - Pump Puretec - Free user manual and instructions
Find the device manual for free Z1-BL2 Puretec in PDF.

User questions about Z1-BL2 Puretec
0 question about this device. Answer the ones you know or ask your own.
Ask a new question about this device
Download the instructions for your Pump in PDF format for free! Find your manual Z1-BL2 - Puretec and take your electronic device back in hand. On this page are published all the documents necessary for the use of your device. Z1-BL2 by Puretec.
USER MANUAL Z1-BL2 Puretec
text_image
The more start the more water efficient WATER RATING www.waterrating.gov.au 8 litres per minute In accordance with ASHZS 1439 Licence No. 1672 Parasol Pty Ltd
WaterMark
AS/NZS 3497
Licence No. WM 74617
Pro-Switch

natural_image
Line drawing of a kitchen faucet and water level control unit (no text or symbols)User Guide
Z1 Tripla Black Series
Quick Twist Filter System with Tripla Matt Black Mixer Tap
What's Inside
Puretec Customer Service .... 3
Operation 3
Cartridge Replacement....3
Servicing 4
Technical Information....4
Recommended Working Pressures....4
PART 1 Mixer Tap Assembly
Installation Guide (BL1 & BL2 Models)....5
Installation Guide (BL3 Model) 6
Assembly (BL1 & BL2 Models) 7
Assembly (BL3 Model) 8
Water Connection Patterns....9
Replacement of Ceramic Disc Cartridge(s)....10
PART 2 Filter Installation
Filter Cartridge Installation....10
Installation Requirements....10
Installation Procedure....11
Use Guidelines 12
Mixer Tap & System Assembly 13
Tripla BL1 & BL2 Parts Description 15
Tripla BL3 Parts Description .... 16
Performance Data....17
Warranty....18
Installation Note: A water filter system/tap, like any product, has a limited life and may eventually fail. Also sometimes failure happens early due to unforeseen circumstances. To avoid possible property damage, this product should be regularly examined for leakage and/or deterioration and replaced when necessary. A drain pan, plumbed to an appropriate drain or outfitted with a leak detector, should be used in those applications where any leakage could cause property damage, and/or the water supply should be turned off if no one is home/present.
Puretec Customer Service
Thank you for purchasing Puretec Z1 Tripla water filter system. Your system is a proven performer manufactured from only quality materials and components and will give years of ‘spring fresh’ water free of impurities if maintained properly.
The Puretec Z1 system cartridges need replacing regularly to maintain optimum performance. This is a simple procedure when following instructions. For cartridge replacements contact your nearest Puretec stockist.
The system is designed for metropolitan supply water but can be used in other situations. For other types of water supply please contact your local Puretec stockist or call our Puretec Customer Service Helpline prior to installing the tap.
Customer Service Helpline 1300 140 140 (Australia) 0800 130 140 (New Zealand).
Caution: Do not use with water that is microbiologically unsafe or with water of unknown quality without adequate disinfection before or after the system. This product must be installed in accordance with local plumbing regulations by a licensed plumber.
Operation
The Puretec Z1 Tripla system is designed to run economically for many years, dependent on the initial installation and periodical maintenance.
Flush systems for 10 minutes after any period of non-use more than 2 days. For a period of non-use of 2 weeks or more, it may be necessary to replace cartridge.
Chrome Plated Surface - should only be cleaned with liquid detergent or soap and water. Under no circumstance should any abrasive or acid base cleaning agents be used.
Cartridge Replacement
To maintain the high quality of the purified water the cartridges need changing every 6 months dependent on water quality and usage.
When replacing cartridge, ensure you reset the LED reminder light by removing/replacing the battery from the rubber seat. Please refer to page 8 for a detailed diagram.
Order Z1-R for a replacement cartridge to suit your Z1 Tripla Black System.
Servicing
Periodically clean the aerator for any lodged sediment that may restrict flow. A Puretec water filter is highly recommended on all incoming lines for product longevity.
Should it be necessary to have your mixer serviced while under warranty, please carry out the following procedure:
-
Firstly call the plumber, preferably the one that has installed it, (most problems are caused by the supply lines not being cleaned out properly, prior to connecting the mixers).
-
Make sure that the plumber has installed your mixer according to the User Guide.
-
If the plumber is satisfied that he cannot rectify the problem then contact your plumbing supply store or your local Puretec stockist.
Important: We do not recommend the dismantling of any internal part of the mixer as this will breach your warranty.
Technical Information
Puretec mixers can be used in conjunction with:
• Pressure storage hot water system.
• Any mains water pressure not exceeding 520 kPa.
• Maximum hot water temperature of 60°C.
• Instantaneous hot water system.
• Any filtered water supply.
Recommended Working Pressures
• Minimum working pressure 200 kPa.
• Maximum working pressure 520 kPa.
It should be noted that water mains pressure builds up during off peak periods, mainly at night, sometimes doubling or trebling normal daytime pressures.
Note: Not suitable for unequal pressure. On high pressure areas where the pressure exceeds the recommended working pressure as indicated above pressure limiting valves must be installed or warranty is voided.
PART 1
Installation Guide (BL1 & BL2 Models)

text_image
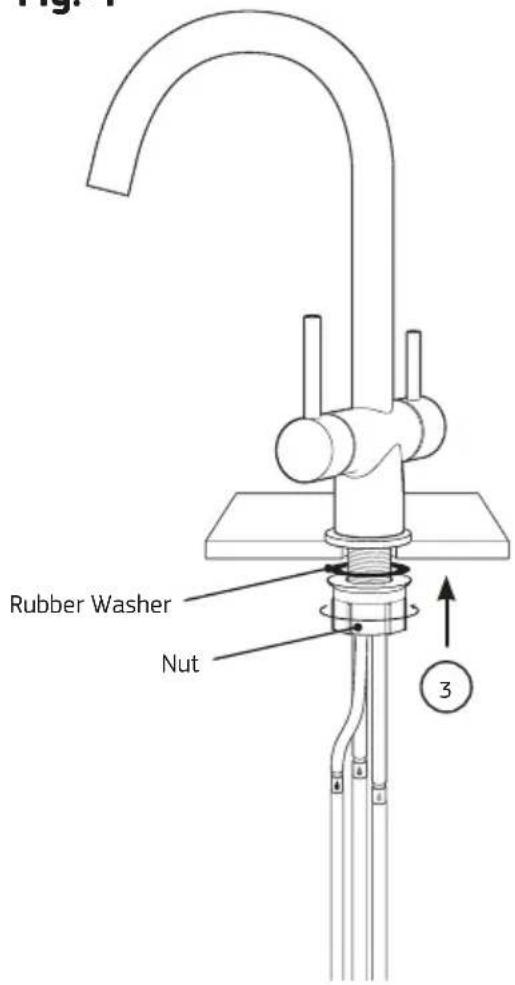
Fig. 1 Base Faucet Hole (∅33mm) Rubber Washer Nut Water Filter Connection (green ⬆) HOT (red ⬆ ) COLD (blue ⬆)Note: It is important to flush out the supply pipes to the mixer before connecting the flexible hoses with the initial installation, so no foreign matter can enter into the ceramic disk cartridges.
A Puretec Water Filter is highly recommended for product longevity.
Installation Guide (BL3 Model)
text_image
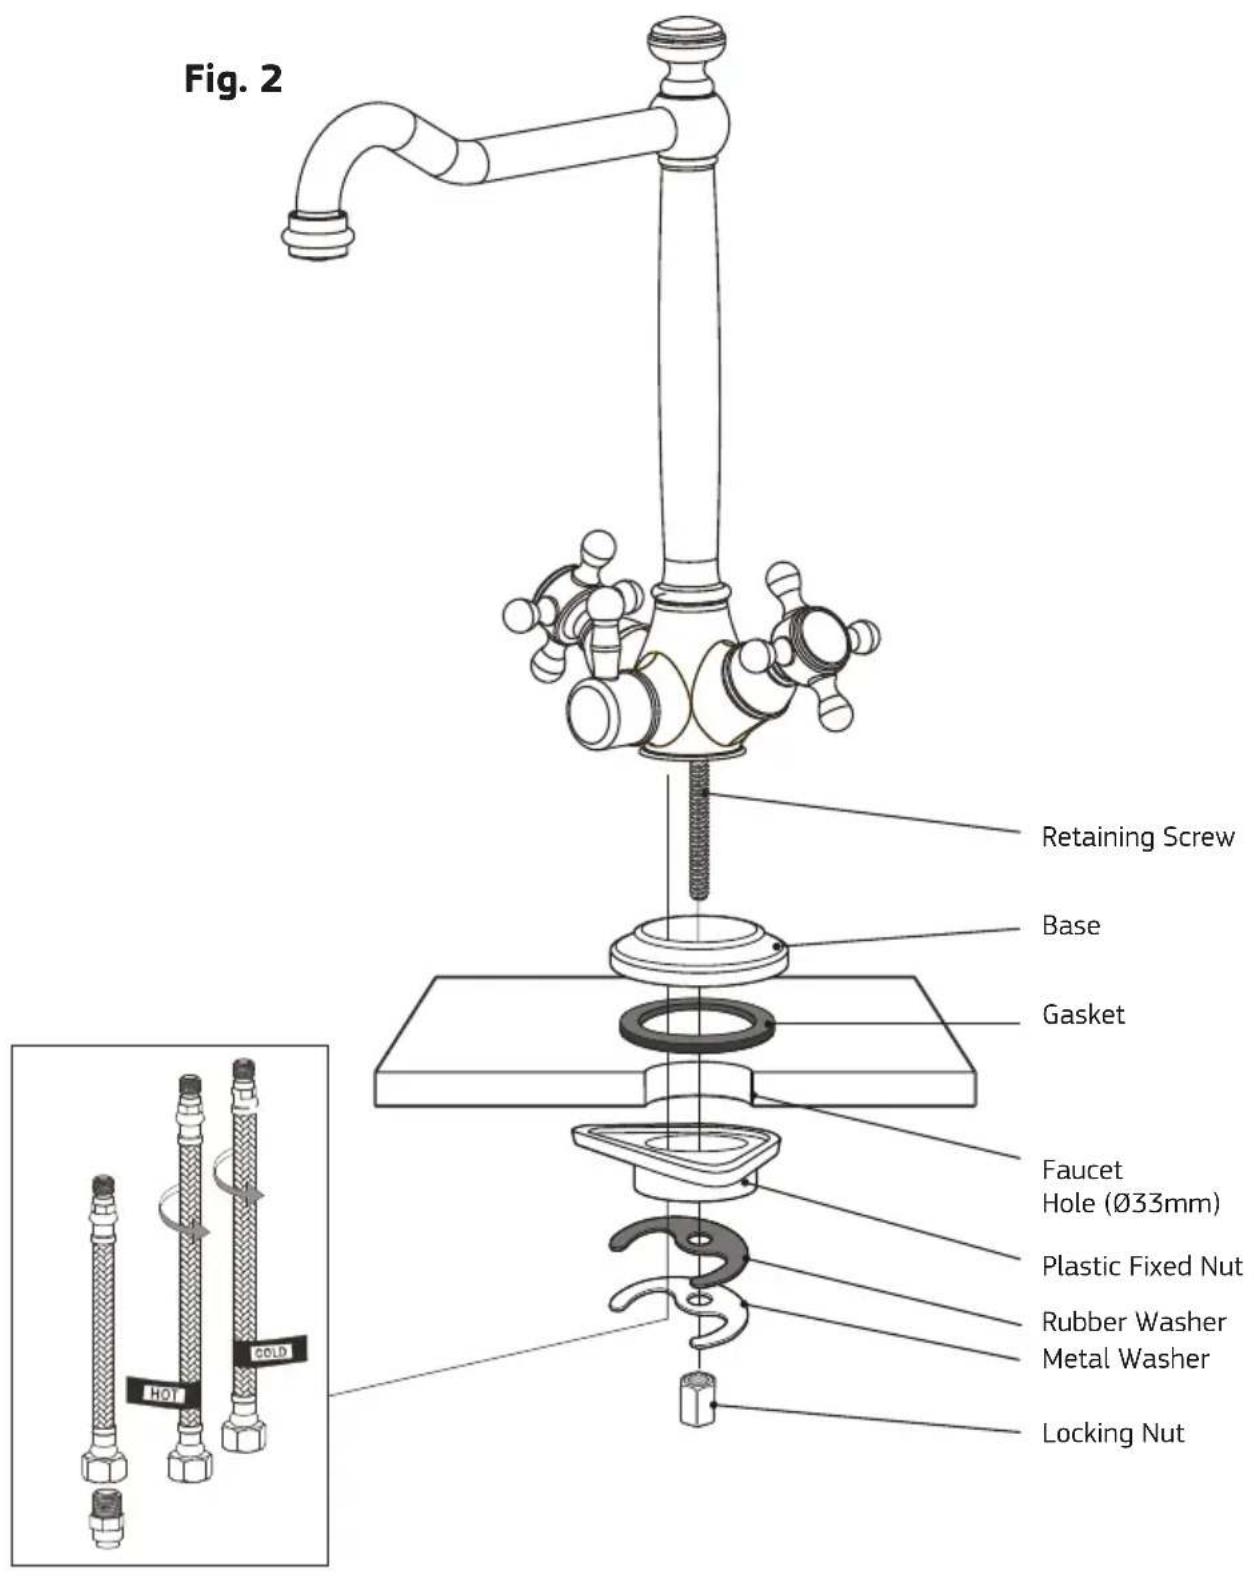
Fig. 2 Retaining Screw Base Gasket Faucet Hole (Ø33mm) Plastic Fixed Nut Rubber Washer Metal Washer Locking NutAssembly (BL1 & BL2 Models)
Step 1.
Connect the hoses to the Faucet and tighten them.
Only use hand to screw the flexible hose. Do not over tighten. Don't use any tools.
Step 2.
Feed the hoses through the Basin or Sink. Required through hole size is ∅33mm.
Fig. 4
text_image
Rubber Washer Nut 3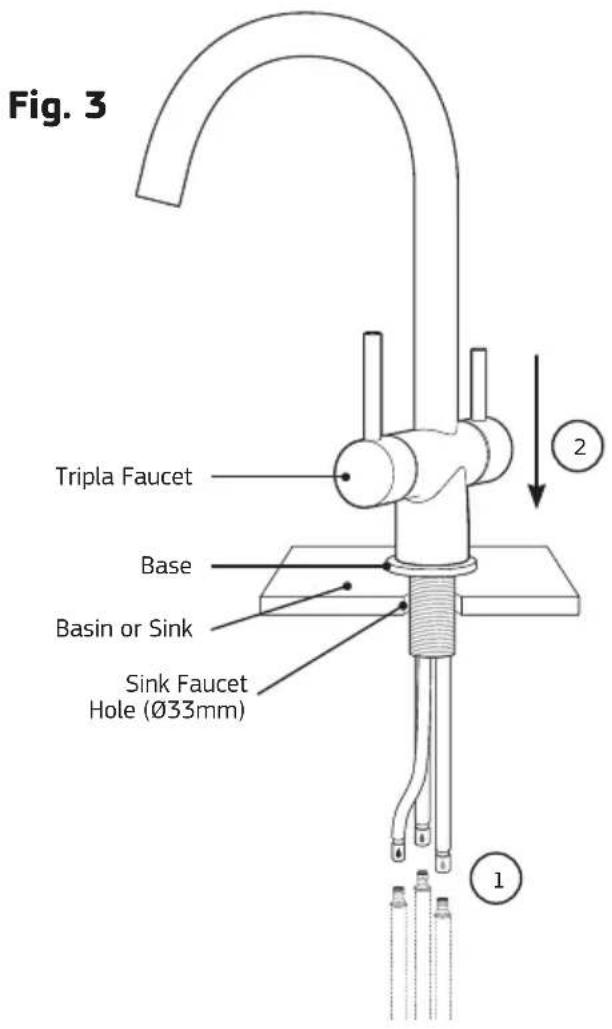
text_image
Fig. 3 Tripla Faucet Base Basin or Sink Sink Faucet Hole (∅33mm) 1 2Base should be on top of the sink or benchtop.
Step 3.
Place the Rubber Washer and screw the Nut below the sink. Position the tap on your desired angle then tighten the Nut.
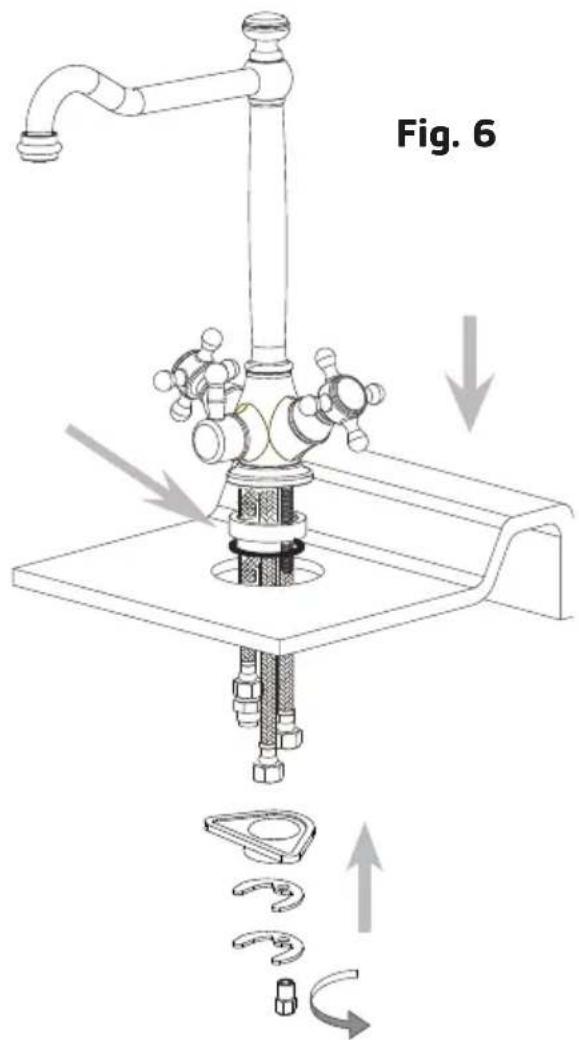
Assembly (BL3 Model)
Step 1.
Connect the retaining screw and braided hoses to the faucet and tighten them.
Only use hand to screw the flexible hose. Do not over tighten. Don't use any tools.
See connection pattern on Page 8.
Step 2.
Connect the straight adaptor to the filtered flexible hose.
text_image
Fig. 6
text_image
Fig. 5Step 3.
Feed the hoses through the basin or sink. Required through hole size is ∅33mm.
Base and washer should be on top of the sink.
Step 4.
Insert the plastic fixed nut, rubber washer, metal washer and screw the nut by turning counterclockwise.
Step 5.
Position the tap on your desired angle and tighten the nut by using a wrench.
Water Connection Patterns
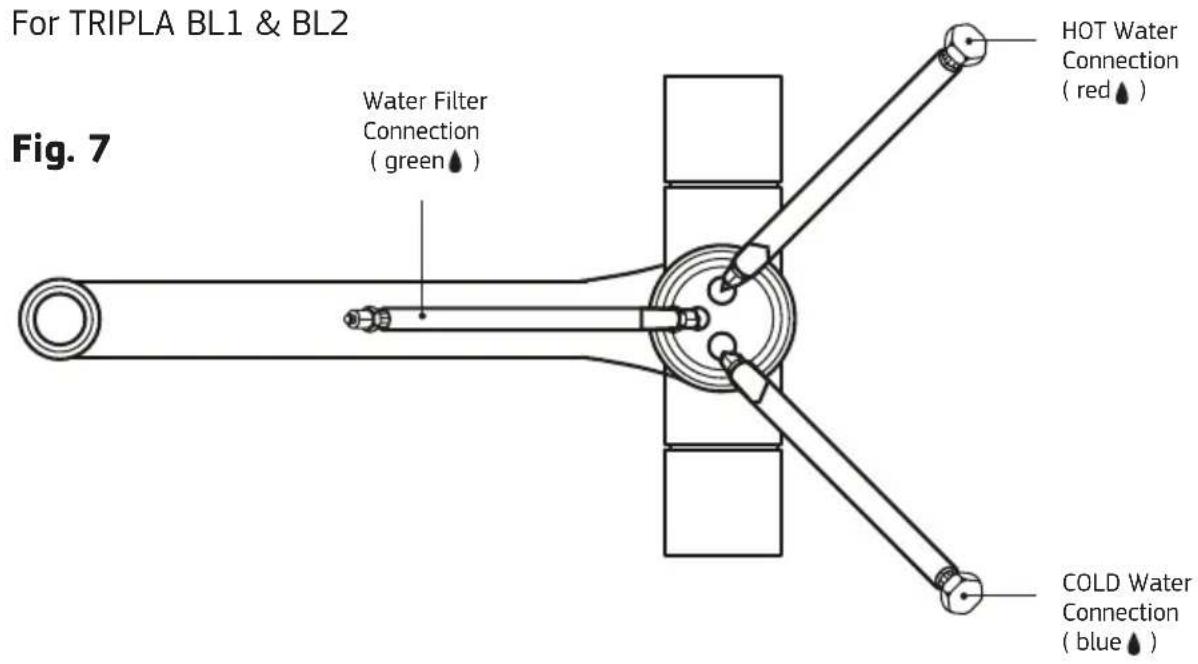
text_image
For TRIPLA BL1 & BL2 Fig. 7 Water Filter Connection ( green ↓ ) HOT Water Connection ( red ↓ ) COLD Water Connection ( blue ↓ )For TRIPLA BL3
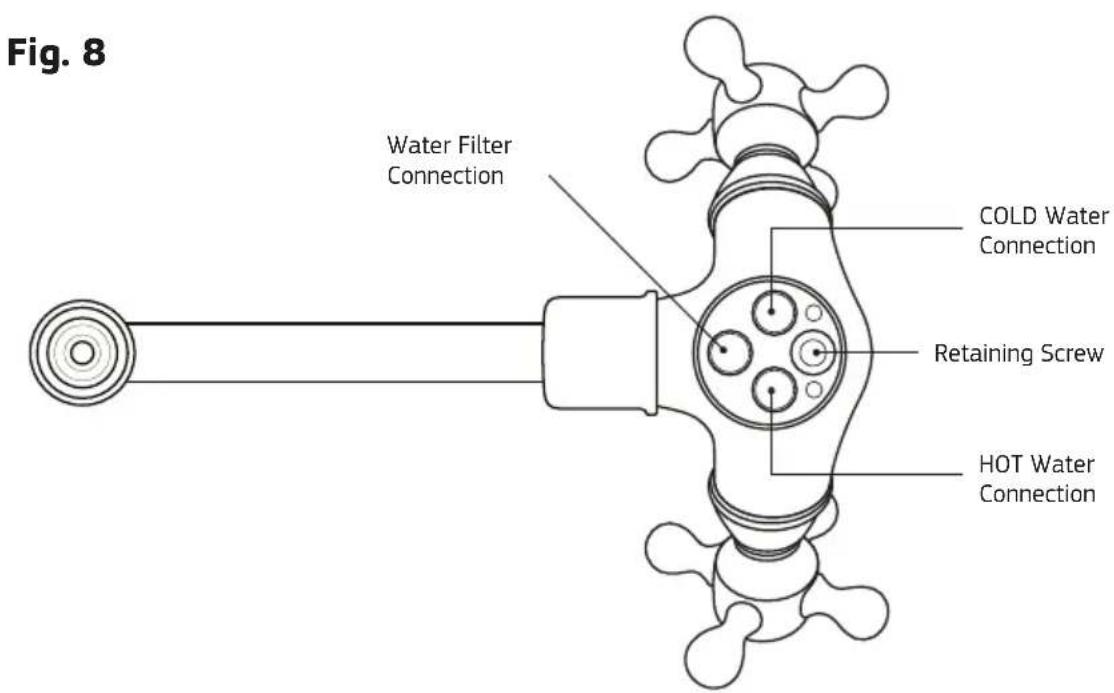
text_image
Fig. 8 Water Filter Connection COLD Water Connection Retaining Screw HOT Water ConnectionReplacement of Ceramic Disc Cartridge(s)
1. Hot/Cold Outlet
- Remove hot and cold water indicator then release screw in lever and lift lever off, now you can unscrew dome cap and loosen the cartridge lock nut.
- Lift out old cartridge and clean inside making sure no old O-rings are still stuck inside cartridge housing.
- Insert new cartridge making sure O-rings on bottom of new cartridge have not fallen off and lugs in bottom of cartridge line up with holes in cartridge housing.
- Now you can tighten lock nut with a torque wrench to 14 newton meters, then reinstall dome cap, lever screw and hot and cold water indicator.
2. Filtered/Rain Ancillary Outlet
- Remove front button cover using fine-edged 1.2mm screwdriver.
- Unscrew handle then remove cartridge by unscrewing it anti-clockwise, using 5/8" socket. Install cartridge by following removal instructions as above, in reverse order.
- Ensure cartridge is firmly tightened, not over tightened.
PART 2
Filter Installation
This system comes complete with an installation kit enabling it to be connected to 15 mm ( 12 ) male thread.
Installation Requirements
- 15mm ( 12 ) Cold water line - mains only.
- Supply pressure: 200 - 520 kPa (when pressure exceeds 500 kPa, a pressure limiting valve must be installed).
- Supply temperature 0^ - 38^ (protect from freezing).
- Suitable location for faucet.
Alternative fittings may be required if being connected to anything other than an existing 15mm ( 12 ) copper pipe (copper pipe NOT included). No electrical or drainage requirements needed.
Installation Procedure
Installation Note: A water filter system/tap, like any product, has a limited life and may eventually fail. Also sometimes failure happens early due to unforeseen circumstances.
To avoid possible property damage, this product should be regularly examined for leakage and/or deterioration and replaced when necessary. A drain pan, plumbed to an appropriate drain or outfitted with a leak detector, should be used in those applications where any leakage could cause property damage, and/or the water supply should be turned off if no one is home/present.
INSTALLATION MUST BE COMPLETED BY A LICENCED PLUMBER. FAULTY OPERATION DUE TO UNQUALIFIED PERSONS WILL RESULT IN VOIDED WARRANTY COVERAGE.
-
Select suitable location that is close to the point of filtered water delivery (eg. sink). Remember to allow access room for changing filters and a suitable place where water spillage will not cause damage. Location should not be in direct sunlight.
-
Isolate water supply and cut existing copper pipe (coppe pipe NOT included) ready to install the SmartTee™.
-
Connect the SmartTee™ to the multivalve with a piece of white tubing (see Fig 9-10).
-
Install filter cartridge by positioning it in the desired location, marking the position of fixing hole and fixing with bracket screw. Z1 Series can be mounted horizontally or vertically. Allow room for the connecting tubes. Ensure flow arrow on cartridge is in direction of water flow.
-
Fit the stem to tube reducers into either side of the filter by pushing the fittings into the 3/8"quick-connect fittings already installed on the filter head (for quick-connect fittings see Fig. 10).
-
Fit tubing into 1/4" connectors (stem to tube reducers). Allow slack in the tubing. Connect the tubing into the filtered water flexible hose securing with the nut found on the flexible hose (plain).
-
Connect cold water flexible hose (blue streak) to cold mains water supply and the hot water flexible hose (red streak) to the hot water supply.
-
Restore water supply & check for leaks, rectifying them, if any, before leaving the unit.
-
Run the system for at least 5 minutes to remove carbon fines. Water may appear milky, but this is normal and is only tiny air bubbles that will clear after a short period.
Cartridge Installation/Changeout
- Rotate the old cartridge counterclockwise 1/4 turn, pull it out and dispose of it.
- Remove all packaging from the new cartridge, including any wraps or caps (if applicable).
Replacement cartridge: Z1-R
-
Insert the new cartridge into the filter head and rotate clockwise 1/4 turn.
-
Turn on the water and check for leaks. If leaks occur, repeat step 3. If leaks persist, discontinue use and call your supporting dealer.
-
Flush filter for 5 minutes before use or until water runs clear.
Use Guidelines
• Minimum operating pressure 200 kPa.
• Maximum operating pressure 520 kPa.
- Do not allow exposure to temperatures below 0^ , protect from freezing.
• Maximum operating temperature 38°C.
• Maximum flow rate 5.5 Lpm.
- This system must be installed according to local plumbing codes on the cold water line.
- Replacement Cartridges: See Installation/Changeout
- This system requires regular replacement of the filter cartridge to maintain proper operation. Varying chlorine, sediment, or organic substance levels may affect replacement frequency.
- Be sure to change the filter cartridge at least every 30,000 litres or 6 months which ever occurs first; or whenever you detect a change in taste, odour, or decrease in flow.
Mixer Tap & System Assembly
Fig. 9
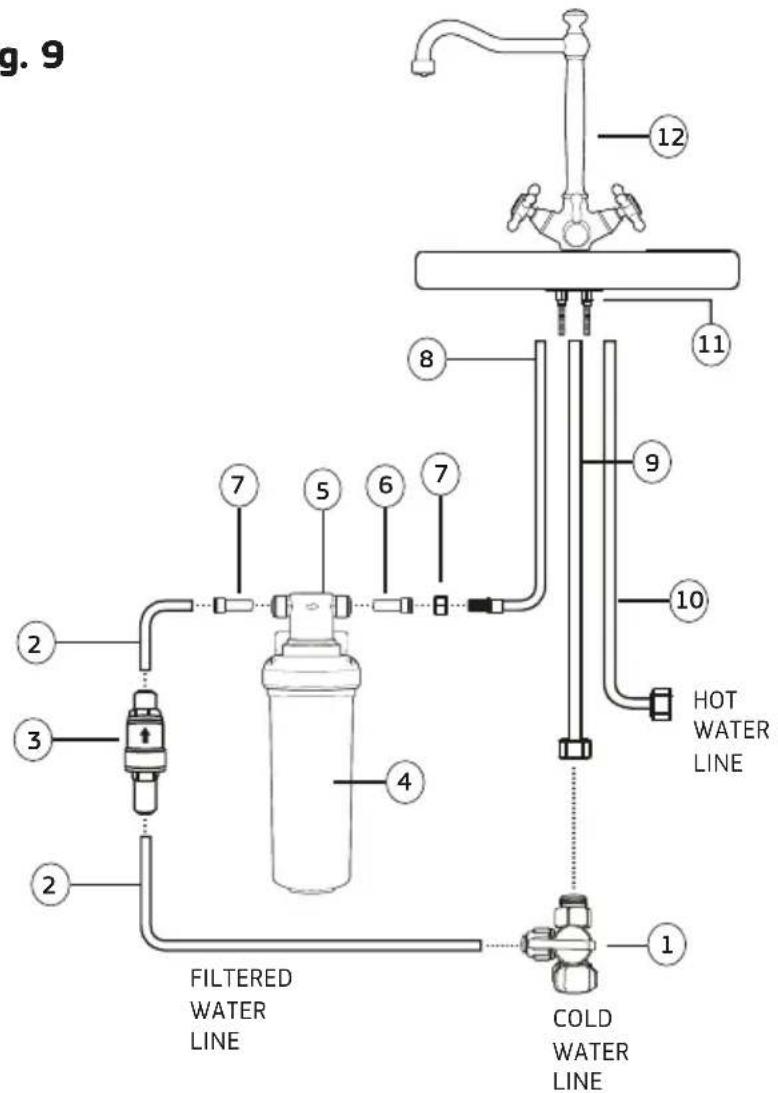
text_image
g. 9 12 11 8 7 5 6 7 9 2 3 4 2 FILTERED WATER LINE COLD WATER LINE 10 HOT WATER LINENo. DESCRIPTION
| 1 SmartTeeTM | |
| 2 White Tubing | |
| 3 | Pressure Limiting Valve (Multivalve) |
| 4 Z1-R Filter Cartridge | |
| 5 | Mounting Bracket & Head |
| 6 Nut | |
| 7 | 38 " Stem to 12 " Tube Reducer |
| 8 | Filtered Water Flexible Hose - Plain |
| 9 | Cold Water Flexible Hose - Blue Streak |
| 10 | Hot Water Flexible Hose - Red Streak |
| 11 | Lock Nut and Washer |
| 12 Mixer Tap | |
Fig. 10
HOW TO USE QUICK CONNECT FITTINGS
1. Cut the tube square and push in to the tube stop. For metal tube remove burrs and chamfer tube end to prevent O-Ring seal being damaged.

3. Tube is secured in position.
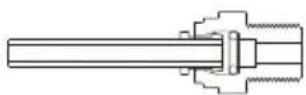
2. Fitting grips before it seals. Ensure tube is pushed in to tube stop.
natural_image
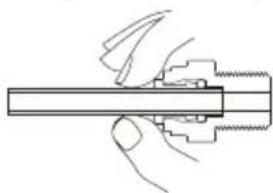
Hand holding a mechanical component with bolts and a shaft (no text or symbols visible)DISCONNECTION PROCEDURE
4. Push collet against body and slide tube out of fitting.
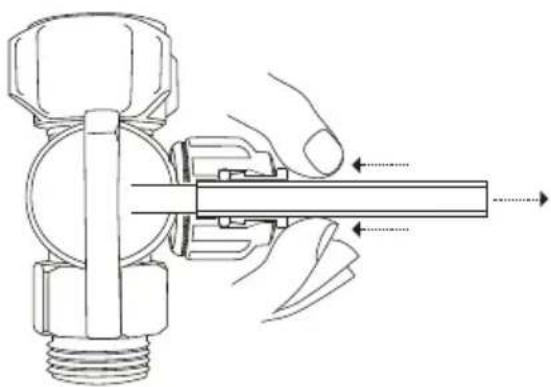
Figure 11 - SmartTee™ Quick Connect Fitting

text_image
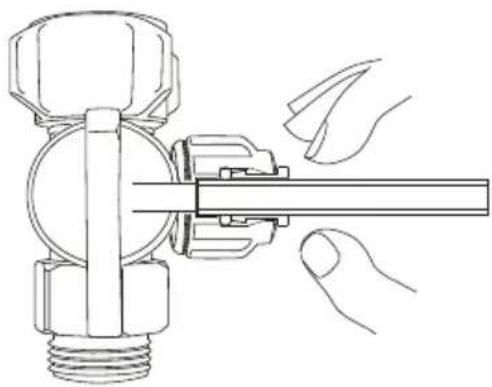
Anticlockwise Callet- Turn the quick connect nut on the SmartTee™ anticlockwise to release the collet.

natural_image
Technical line drawing of a mechanical valve assembly with hand gesture (no text or symbols)- Cut the tube square and push into into the tube stop (inside the collet). For metal tube; remove burrs and chamfer tube end to prevent O-ring seal being damaged.
natural_image
Technical line drawing of a mechanical valve assembly with hands adjusting the shaft (no text or symbols)- The fitting grips before it seals. Ensure the tube is pushed all the way into the tube stop.

text_image
Clockwise- Once the tube is secured in position, turn the quick connect nut clockwise to secure.
Note: Hand tighten only. Do not overtighten.
DISCONNECTION PROCEDURE
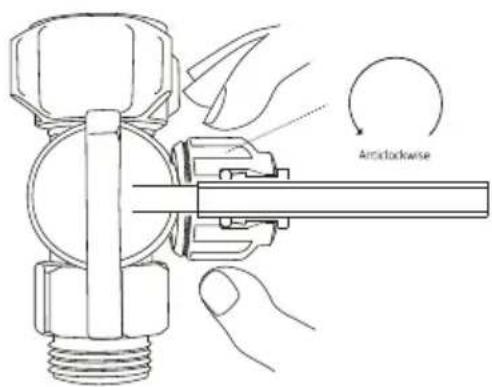
text_image
Arclockwise- Turn the quick connect nut on the SmartTee™ anticlockwise to release the collet.
natural_image
Technical line drawing of a hand holding a valve assembly with directional arrows indicating movement (no text or symbols)- Push the collet against the quick connect nut and slide tube out of fitting.
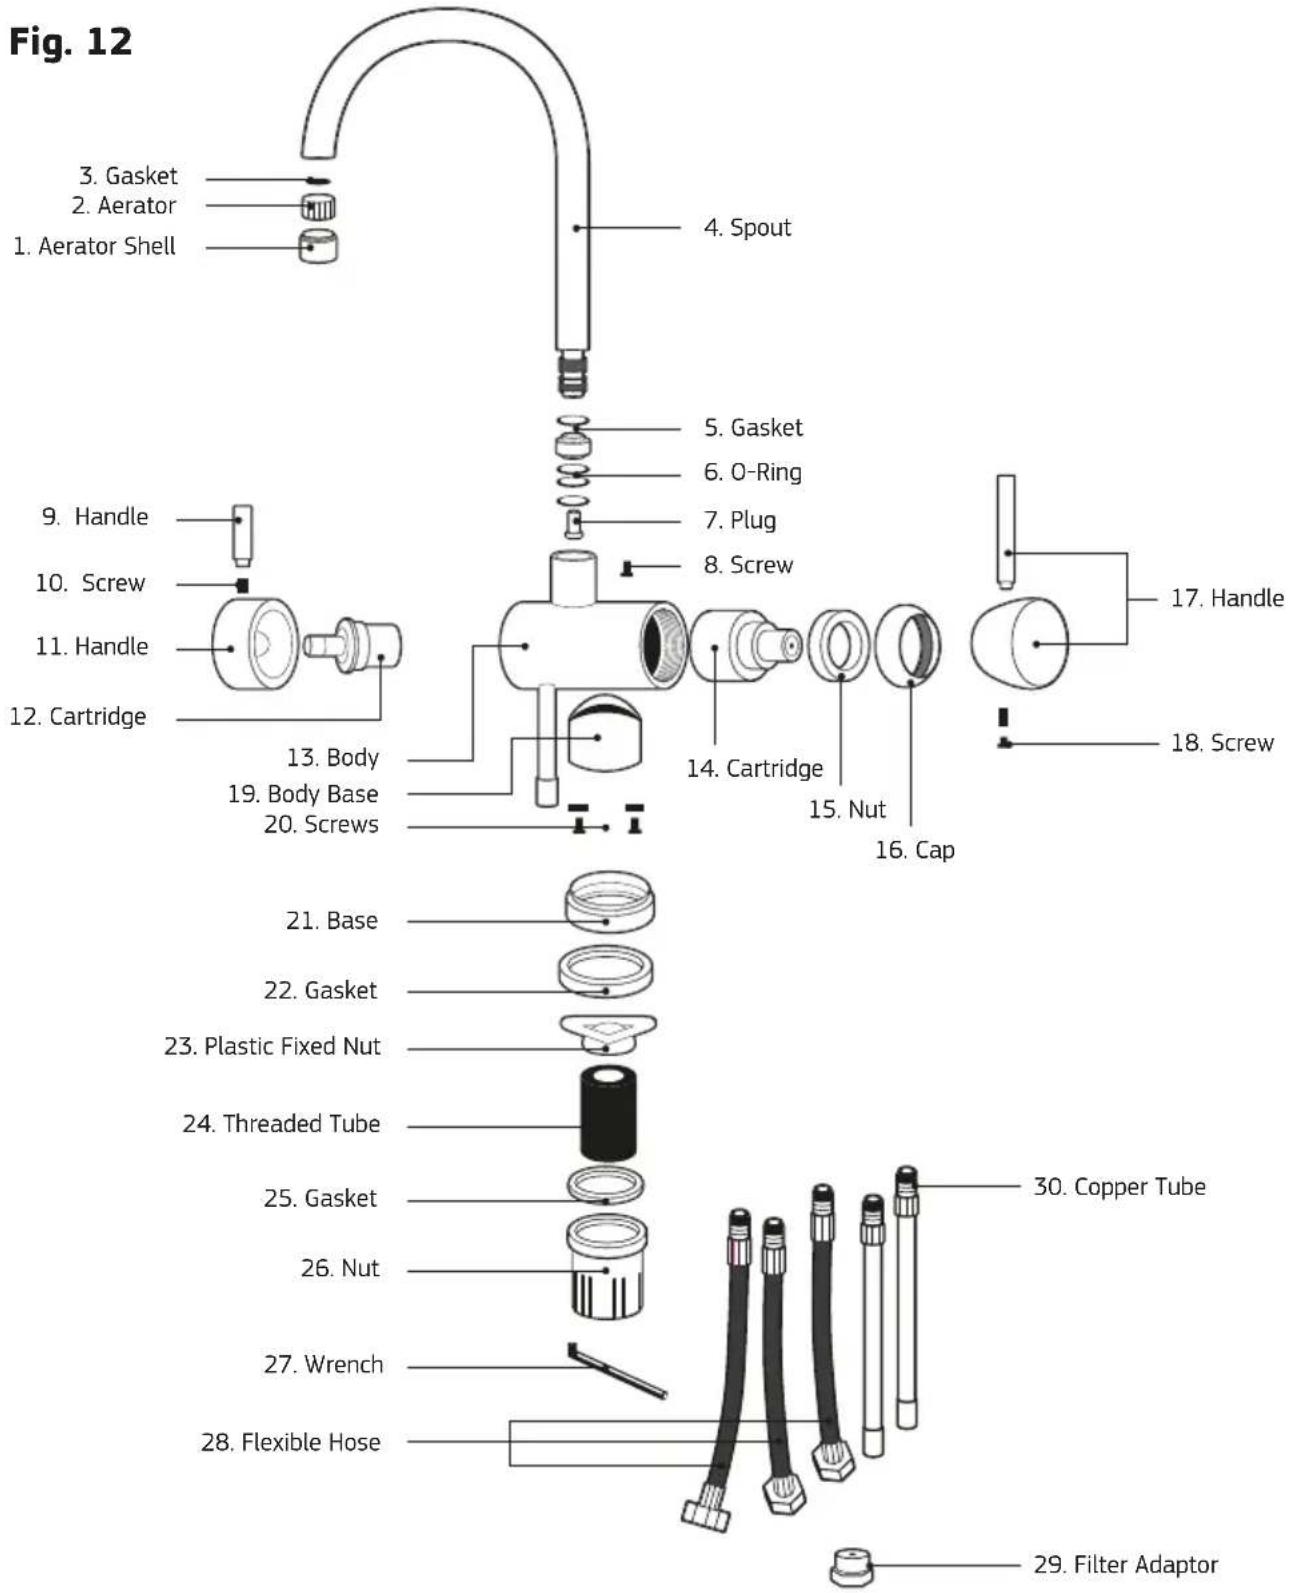
Tripla BL1 & BL2 Parts Description
text_image
Fig. 12 3. Gasket 2. Aerator 1. Aerator Shell 4. Spout 5. Gasket 6. O-Ring 7. Plug 8. Screw 9. Handle 10. Screw 11. Handle 12. Cartridge 13. Body 19. Body Base 20. Screws 14. Cartridge 15. Nut 16. Cap 17. Handle 18. Screw 21. Base 22. Gasket 23. Plastic Fixed Nut 24. Threaded Tube 25. Gasket 26. Nut 27. Wrench 28. Flexible Hose 30. Copper Tube 29. Filter AdaptorTripla BL3 Parts Description
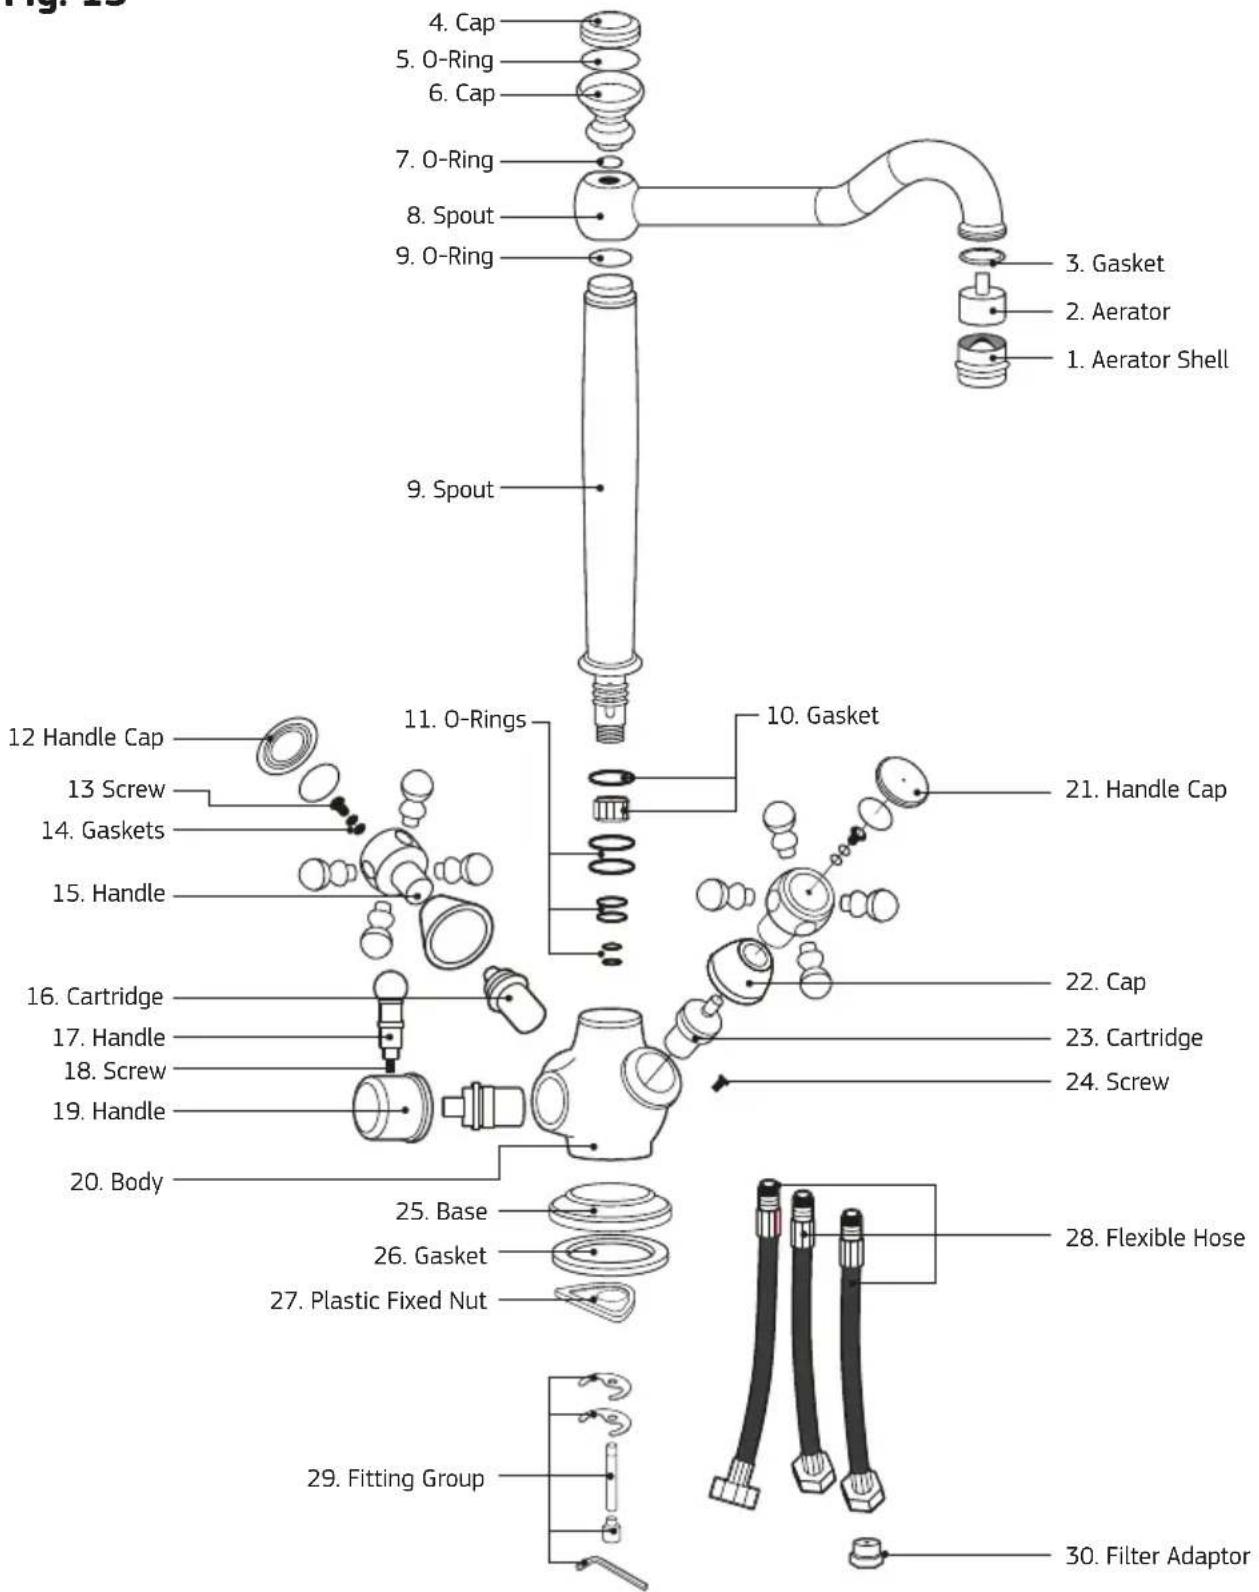
Fig. 13
text_image
Fig. 25 4. Cap 5. O-Ring 6. Cap 7. O-Ring 8. Spout 9. O-Ring 9. Spout 3. Gasket 2. Aerator 1. Aerator Shell 11. O-Rings 10. Gasket 21. Handle Cap 12 Handle Cap 13 Screw 14. Gaskets 15. Handle 16. Cartridge 17. Handle 18. Screw 19. Handle 20. Body 25. Base 26. Gasket 27. Plastic Fixed Nut 28. Flexible Hose 29. Fitting Group 30. Filter AdaptorPerformance Data
| Substance Guidelines* | Average Influent Concentration | Max Effluent Concentration | Min Percent Removal | Average Effluent Concentration | Average Percent Removal | |
| NSF Standard 42 Drinking Water Treatment Units | ||||||
| Chlorine (23,000 L) | 5 - Health0.6 - Aesthetic | 2.1 0.3 50% 0.25 >94% | ||||
| Standard 53 Cyst Live Cryptosporidium POU/POE | ||||||
| Cyst <1 100,000 | ND (1) 99.98% + | ND (1) 99.99% | ||||
| Test Parameters | |
| Hardness, Total mg/L 120 | |
| TDS mg/L 290 | |
| Temp deg C 21°C | |
| Turbidity NTU 0.1 | |
| pH 7.57 | |
*Australian Drinking Water Guidelines - 1996
ND = Not Detected
This appliance meets the domestic water treatment appliance Standards AS/NZS3497 for the following water treatment processes:
| Class | Treatment type | Function | Pass |
| I Microbiological Status | |||
| Bacteriostatic | Will stop bacteria increasing, but will not remove them unless II(a) is passed. | N/A | |
| II | Microbiological Treatment | ||
| II (a) | Bacteria Removal | Will remove or inactivate bacteria. | YES |
| II (b) | Virus Removal | Will remove or inactivate virus. | YES |
| II (c) | Protozoa Removal | Will remove or inactivate Cryptosporidium and Giardia, but will not remove or inactivate bacteria and virises unless II(a) and II(b) is passed. | YES |
| III Turbidity & Particulate Reduction Reduces cloudiness. YES | |||
| IV Taste & Odour Reduction Reduces taste & odours. YES | |||
| V | Chemical Treatment | Decreases chlorine. | YES |
Notes
The complete range of Puretec products are developed, refined and made to meet and exceed stringent specifications for the worldwide market.
Important Note: Sales of products are subject to our Terms & Conditions which are available upon request. All specifications, prices and photos are a guide only and are subject to change without notice. Please ring to confirm details. Do not use products with microbiological unsafe water without adequate disinfection. Under normal circumstances a pressure limiting valve is not required. If incoming water pressure is excessive it may however be necessary to install an approved pressure limiting valve. Maximum flow depends on cartridge, vessel, pressure, impurities etc.
Warranty
This warranty commences from the date of purchase. To make a claim under the warranty, take the product and proof of purchase to place where you purchased the product, and they will lodge a Warranty Request with Puretec. In addition to the guaranties provided under the law, Puretec offer warranties as follows: Tripla Tapware warranty is 1 year parts and labour, plus 5 years parts only. Puretec Z1 Filter System warranty is 1 year parts and labour, plus 9 years parts only. Excludes cartridges.
Puretec will pay your reasonable, direct expenses of claiming under this warranty. You may submit details and proof of your expense claim to place of purchase for consideration.
The warranty only applies if the product was used and/or installed in accordance with the user guide and/or installation instructions. This warranty is given in lieu of all other express or implied warranties and manufacturer shall in no circumstance be held liable for damages consequential or otherwise or delays caused or faulty manufacturing except as excluded by law.
Applicable to all above, is that the warranties need to be approved by Puretec to ensure product was not incorrectly used, installed or claimed. False and incorrect claims will be pursued at Puretec's discretion, including chargeable inspection and labour costs incurred.
All installation and service work should be completed by qualified tradespeople. Faulty operation due to unqualified persons will result in voided warranty coverage.
Warranty/Australia
This warranty is given by Puretec Pty Ltd, ABN 44 164 806 688, 37-43 Brodie Road Lonsdale SA 5160, telephone no. 1300 140 140 and email at sales@puretec.com.au.
This warranty is provided in addition to other rights and remedies you have under law: Our goods come with guarantees which cannot be excluded under the Australian Consumer Law. You are entitled to replacement or refund for a major failure and to compensation for other reasonably foreseeable loss or damage. You are also entitled to have the goods repaired or replaced if the goods fail to be of acceptable quality and the failure does not amount to a major failure.
Warranty/New Zealand
This warranty is given by Puretec NZ LP, Reg. No 50081773, PO Box 875 Cambridge 3450 NZ, telephone no. 0800 130 140 and email at sales@puretec.co.nz.
This warranty is provided in addition to other rights and remedies you have under law: Our goods come with guarantees which cannot be excluded under the Consumer Guarantees Act. You are entitled to replacement or refund for a major failure and to compensation for other reasonably foreseeable loss or damage. You are also entitled to have the goods repaired or replaced if the goods fail to be of acceptable quality and the failure does not amount to a major failure.

text_image
9 341362 025722AUSTRALIA
P 1300 140 140
E sales@puretec.com.au
W puretec.com.au
NEW ZEALAND
P 0800 130 140
E sales@puretec.co.nz
W puretec.co.nz