MSR 450 - Measuring instrument PCE Instruments - Free user manual and instructions
Find the device manual for free MSR 450 PCE Instruments in PDF.

User questions about MSR 450 PCE Instruments
0 question about this device. Answer the ones you know or ask your own.
Ask a new question about this device
Download the instructions for your Measuring instrument in PDF format for free! Find your manual MSR 450 - PCE Instruments and take your electronic device back in hand. On this page are published all the documents necessary for the use of your device. MSR 450 by PCE Instruments.
USER MANUAL MSR 450 PCE Instruments
natural_image
Digital laboratory balance scale with beaker of blue liquid, digital display showing reading (no readable text or symbols)User Manual
Magnetic Stirrer PCE-MSR 450

text_image
QR code image containing encoded data, no visible human-readable textUser manuals in various languages (français, italiano, español, português, nederlands, türk, polski, русский, 中文) can be found by using our product search on: www.pce-instruments.com
Last change: 9 January 2020
v1.0
Contents
1 Safety notes....1
2 Device description .... 3
3 Delivery contents 4
4 Installation....4
4.1 Location and mounting 4
4.2 Connecting power cord 4
5 User interface and display 5
6 Features .... 5
7 Operation 6
7.1 Switching on the device....6
7.2 Setting time....6
7.3 Setting speed....6
7.4 Slip Detection Mode 7
7.5 Pulse Mode Operation....7
7.6 Program Mode 7
7.7 Line Program selection....8
7.8 Auto Restart Mode 8
7.9 Keypad Lock Mode 8
8 Troubleshooting....9
9 Maintenance and cleaning 9
10 Technical specifications ....9
11 Contact.... 10
12 Disposal 10
1 Safety notes
Please read this manual carefully and completely before you use the device for the first time. The device may only be used by qualified personnel and repaired by PCE Instruments personnel.
Damage or injuries caused by non-observance of the manual are excluded from our liability and not covered by our warranty.
- The device must only be used as described in this instruction manual. If used otherwise, this can cause dangerous situations for the user and damage to the meter.
- The instrument may only be used if the environmental conditions (temperature, relative humidity, ...) are within the ranges stated in the technical specifications. Do not expose the device to extreme temperatures, direct sunlight, extreme humidity or moisture.
- Do not expose the device to shocks or strong vibrations.
- The case should only be opened by qualified PCE Instruments personnel.
- Never use the instrument when your hands are wet.
- You must not make any technical changes to the device.
- The appliance should only be cleaned with a damp cloth. Use only pH-neutral cleaner, no abrasives or solvents.
- The device must only be used with accessories from PCE Instruments or equivalent.
- Before each use, inspect the case for visible damage. If any damage is visible, do not use the device.
- Do not use the instrument in explosive atmospheres.
- The measurement range as stated in the specifications must not be exceeded under any circumstances.
- Place device on a flat, stable, clean, non-slippery and fire-proof surface.
- Ensure that only trained staff use the device. Keep the instructions manual in place where it can be accessed easily.
- Beware of the possible effects of magnetic field on pacemakers, data media, etc.
- Properly lift the device with both hands while moving or installing.
- Do not place any steel or magnetic material on the top surface except the recommended magnetic stirring bar with beaker or flask in between. Doing this can affect the magnetism of device.
- Wear your personal protective equipment in accordance with the hazardous category of the media to be processed. Otherwise, there is a risk from:
Splashing and evaporation of liquids Ejection of parts
The release of toxic or combustible gases
- The top surface must be clean and kept intact. Wear protective gloves while cleaning the device. Use a soft mild cloth to clean.
- Do not use damaged beaker, flask, stirring bar or any other component for operation. It may affect the efficiency of the device.
- Reduce the speed if: the medium splashes out of the vessel due to high speed. the appliance is not running smoothly. the container moves on the base plate.
- Do not move the device when it's connected to power supply or during its operation.
- Ensure that the product is used only for specified operation. It should not be used for shaking hazardous or reactive solutions.
- Give specific attention to the risks associated with: Flammable materials Flammable media with low steam pressure Overfilling of medium Incorrect vessel size Unstable vessel Glass breakage
• Note that there is a possibility of contamination or unwanted chemical reaction.
- The rating of power supply must match with the specified rating.
- Process pathogenic materials only in a closed vessel under a suitable extractor hood. Do not operate the appliance in explosive atmospheres, with a hazardous substance or under water.
- Only that liquid should be used for mixing which does not react dangerously to the extra energy produced through processing. This also applies to any extra energy produced in other ways. For example: Through light irradiation, through surrounding temperature etc.
- Abrasion of the dispersion equipment or the rotating accessories can get into the medium you are working on.
- In the case of power failure or mechanical interruption, stirrer will not start automatically after the restoration of power if its auto start mode is not activated. Due care should be taken
- To protect do not cover the device, even partially, with elements such as metallic plates or sheets otherwise it may overheat. Ensure that mounting plate remains clean.
• The socket must be earthed (protective ground contact).
- Do not use the device if the ceramic setup surface is damaged, e. g. scratches, splinters or corrosion. A damaged set-up surface could break if used.
- Non-observance of the safety notes can cause damage to the device and injuries to the user.
We do not assume liability for printing errors or any other mistakes in this manual.
We expressly point to our general guarantee terms which can be found in our general terms of business.
If you have any questions please contact PCE Instruments. The contact details can be found at the end of this manual.
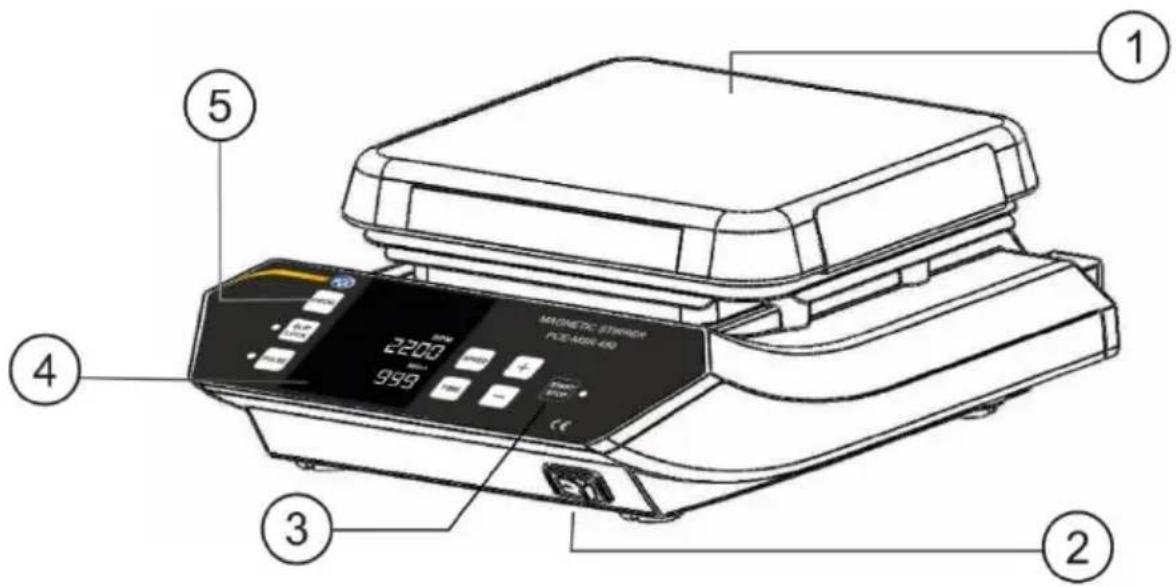
2 Device description
Front side
text_image
MAGNETIC STRIPID PCE-NON-400 2200 9991 Ceramic Plate 4 Digital Display
2 On / off switch 5 Mode Selection Buttons
3 Start/Stop Button
Rear side
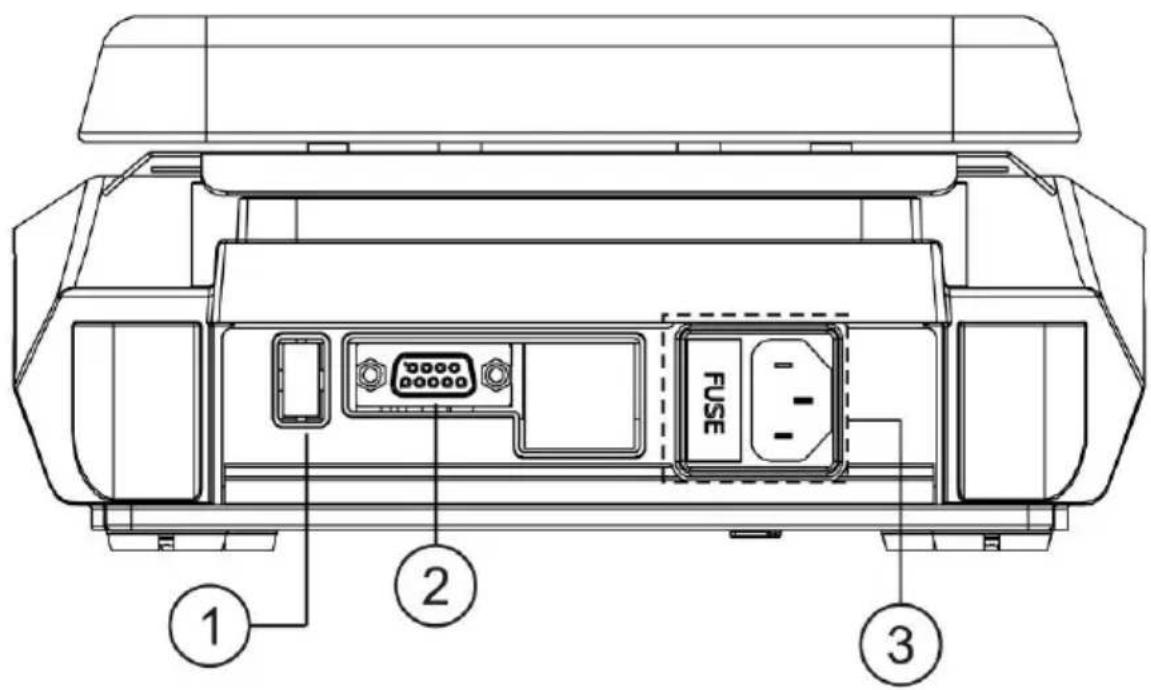
text_image
FUSE ① ② ③1 USB Port 3 Power Port and Fuse
2 RS 232 Port
3 Delivery contents
1 x magnetic stirrer PCE-MSR 450
1 x Magnetic Stirring Bar
1 x Power Cord
1 x User Manual
4 Installation
This magnetic stirrer is provided in a packed box. Open the box, then remove the packaging and gently place the device on the firm and levelled surface. Take care while unpacking & removing all accessories. The user manual should be kept with the device for easy access. Please keep all packaging in safe storage for at least two years for warranty purpose.
4.1 Location and mounting
Place the stirrer on a flat and levelled surface and ensure that all the four legs of this stirrer stand on the surface firmly. Avoid installing on a slippery surface or surface prone to vibration.
- Ideal ambient temperature is 25^ ± 1^ ; avoid placing the unit in direct sunlight.
- Keep clearance of at least 20 cm from all side to guarantee the cooling efficiency.
- Keep the unit away from heated solution to avoid sample temperature issues.
- Do not place the equipment at a place where it becomes difficult to operate it.
4.2 Connecting power cord
- Connect one end of the power cord to the rear side of the stirrer and another end to the power supply as shown in the figure below.
- Push the power cord firmly for proper connection and turn ON the main switch.
- Make sure that input power source is according to stirrer requirement.

natural_image
Technical line drawing of a fuse connector assembly (no text or symbols)5 User interface and display

text_image
MAGNETIC STIRRER PCE-MSR 450 PROG SLIP LOCK PULSE RPM 2200 Mins 999 SPEED + TIME - START STOP CE ① ③ ⑦ ⑥ ⑤ ② ④ ⑨| 1. Speed | Press “Speed” to select Speed value. Then press “+/-” to set Speed value in RPM. |
| 2. Time | Press “Time” to select time value. Then press “+/-” to set Time value in minutes. |
| 3. Increment | Press “+” to increase values. |
| 4. Decrement | Press “-” to decrease values. |
| 5. Pulse Mode | Press “Pulse” to activate the pulse mode in any operation. Long pressing “Pulse” lets user select timings for pulse mode from 30 sec to 99 sec. |
| 6. Pulse LED | Pulse LED glow to indicate Pulse mode activation. |
| 7. Slip/Lock | Short Press “Slip/Lock” to activate Slip detection feature OR by long pressing “Slip/Lock” Keypad LOCK mode safety feature gets activated. |
| 8. PROG | Long press “Prog/Mode” to activate Program Mode. |
| 9. Start/Stop | Press “Start/Stop” to Start or Stop any operation. |
Important Note :By default, motor rotates in clockwise direction.
6 Features
- High performance stirrer - optimum use of laboratory space
- Variable speed and time setting with digital display.
- Brushless DC motor for long life and maintenance - free operation.
- Noiseless and consistent stirring.
-
Closed design allows easy cleaning and protects the equipment against penetration of liquids.
-
Programmable pulse mode for vigorous stirring.
-
Nonslip strength rubber feet.
-
Stirring bar Slip detection feature.
-
Keypad lock feature for safety.
-
Inbuilt memory storage for various programs.
-
Remote operation with the data logger.
-
Auto-Start Mode.

7 Operation
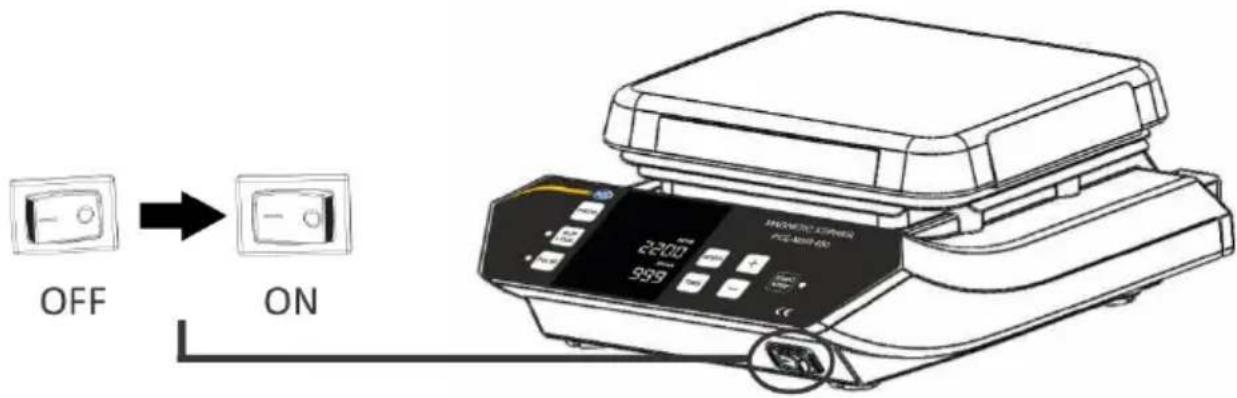
7.1 Switching on the device
Plug the power cord into its socket on the rear panel, now connect the power cord to AC power output. Now switch ON the mains and switch ON the stirrer from the front side, as shown in figure. The power LED on its front panel will glow.
text_image
OFF ONImportant Note: Values of any parameter or mode will get set saved only after the respective display blinks for 5 times.
7.2 Setting time
The time in the display will show in minutes. The stirrer timer set for operation is in between 1 min to 999 mins and infinite. Infinite time is seen as “)(”. To set time, press “TIME” button and then set the value by pressing “+/-” button. When time button is pressed, the “Mins” display will blink indicating the time value is selected. Once time value is selected, single press “+/-” will increase or decrease time value by 1min.
Long press increment or decrement button to quickly increase or decrease time value. Time value gets saved after 5 blinks. The timer is a countdown timer showing remaining time left. Once time is over, the stirrer stops.
7.3 Setting speed
Speed is displayed as RPM. The minimum and maximum speed of stirrer is 200 RPM and 2200 RPM respectively. When the equipment is used for the 1% time, the speed will be set to zero and shown as "0". Once speed value is selected, single press "+/-" will increase or decrease speed value by 10 RPM. Long press "+/-" to quickly increase or decrease speed value. Speed value gets saved after 5 blinks.
7.4 Slip Detection Mode
To activate the slip detection mode single press the "SLIP" which makes the LED near the "SLIP" glow indicating that slip detection mode is activated.
Working of Slip Detection Mode
When the slip detection mode is active and if the stirrer bar slips away from the stirring motion, then the system will restart by reducing the value of SET RPM by 100 RPM. If still the stirrer bar slips then again the system will restart by reducing the SET RPM value by 100 RPM till 200 RPM (minimum value).
Note : This is applicable only when the speed reaches the SET RPM. It is not applicable during its RAMP UP or RAMP DOWN.
7.5 Pulse Mode Operation
Press "Pulse" to start pulse mode operation. In pulse mode, the stirring direction will change between clockwise and counter-clockwise direction for every 30 seconds which can be set from 30 to 99 seconds. Upon the selection of "PULSE", pulse button will glow. Again press the "Pulse" button to STOP pulse operation.
Programmable Pulse Mode Operation
By default, the pulse mode cycle time is 30 seconds (i.e. 30 seconds clockwise and 30 seconds anti-clockwise). With programmable pulse mode, the user can modify cycle time from 30 secs to 99 secs. Long press the pulse button to select pulse mode cycle time. The time display will change to "s 30" where "30" means pulse cycle time in seconds - this indicates that user can now modify pulse cycle time. Then press increment or decrement button to modify cycle time between 30 secs to 99 secs.
7.6 Program Mode
Program mode operation is the feature which allows user to save 99 programs which can have different speed parameters. The user can use any of this program simply by turning ON the program mode.
To turn ON the program mode, Long press "PROG" the display will blink and show "P01" indicating program mode is activated. The user can select any program from "P01 to P99" by pressing "+/-. Once required program is selected, press "Speed" to select and set speed value, press "Time" to select and set time value.
Once all values are set the display will blink 5 times and after that, all the selected values of different parameters will get saved in respective program. If the user wants to set another program then while the display is blinking press the “+/-” to move to the next program and set the values in next program. If the user wants to modify previously saved program than first Long press the “PROG” to activate program mode, select the program which you want to modify by pressing “+/-”
Now the selected program will show previously saved values of parameters. The user can change the values of parameters as per need, once all parameters are fed, the program will be saved automatically with new values after the display showing the selected program number blinks for 5 times.
7.7 Line Program selection
To turn ON the line program, long press "PROG" button. The user can find LP 1 either before P01 i. e, by pressing "-" button or after ATS mode i. e, by pressing "+" button. After selection of LP 1, the user can set all parameters like speed & time and then the selected program will get saved after 5 blinks. After filling all the parameters in LP 1, LP 2 will appear and the user can repeat the above process to save all the parameters. This particular product has 5 line programs.
After user inputs all the parameters in the line programs as per his/her discretion, press "START" to run the line programs.
If user wishes to save and run only 2 line programs or 3 line programs etc., he/she can set the value as per the number of line program and when screen goes to the next line program, set speed value to 0 (zero).
Then by pressing time button select END at time display by pressing “+/-” button to end further addition. Following this, home screen would be displayed and the user can run the Stirrer.
7.8 Auto Restart Mode
In the case of power failure or disconnection of AC power cord, when stirrer is restarted the previous set values of parameters will appear on display but it will not count the time for which it has already been used. To keep the count you have to operate the stirrer in Auto Restart mode.
To select Auto Restart Mode, Long Press the “PROG” to enter into program selection menu. In program mode between P99 and P01 Auto Restart Mode can be selected by pressing “+/-”. The display will show “ATS” indicating that the Auto Restart Mode is activated.
7.9 Keypad Lock Mode
This mode is useful when the user doesn't want to change set values of parameters while the stirrer is operating. This mode enables you to lock your operating keys. By Long Pressing the "LOCK" this mode will be activated which is indicated at RPM display which shows "L ON".
After setting the values of parameters and activating Keypad Lock Mode press "Start" to start the operation of the stirrer with the keypad lock. While operating stirrer in Lock Mode only the "Start/Stop" and "Lock" will remain active and rest of the buttons will not operate when the stirrer is running.
To deactivate Keypad Lock Mode long press the "LOCK" and the "RPM" display
will show "L OF" indicating Keypad Lock Mode is deactivated.
8 Troubleshooting
Any type of malfunction during operation can be identified by the error message on display.
Proceed as follows in such cases.
1. Problem : No Display
Solution : 1. Check main power is available.
- Check that power adaptor is working properly and it is properly connected at both ends.
- If the problem still persists then contact PCE Instruments.
2. Problem : Err 7
Root Cause : Internal Temperature of device exceeds 80°C
Solution : 1. Switch off the device and allow it to cool down then Switch On.
- If the problem still persists then contact PCE Instruments.
9 Maintenance and cleaning
- To clean the housing of the device from dyes, building materials or cosmetic materials use isopropyl alcohol as the cleaning agent.
- To clean the housing of the device from food materials or fuels, use water containing detergent as cleaning agent.
- Wear proper protective gloves while cleaning the instrument.
- Be careful that no liquid enters the device during cleaning.
- Kindly contact suppliers before using any other methods for cleaning.
This instrument is maintenance free. However, it is subjected to natural wear and tear on parts and their statistical failure rate. If it requires any service kindly contact PCE Instruments.
10 Technical specifications
| Motor | Brushless DC motor |
| Number of Stirring positions | 1 |
| Stirring quantity in Ltr(max) | 20 l |
| Stirring direction | clockwisePulse mode: alternating (clockwise / counterclockwise) |
| Speed Range | 200 ... 2200 RPMAdjustable in steps of 10 RPM |
| Accuracy in RPM | +/- 1 RPM |
| Stirrer bar length min / max | 24 / 60 mm |
| Recommended Stirring bar length | 25 mm |
| Setup Plate material | Ceramic Plate |
| Timer | 1 ... 999 minutes / Infinite |
| Protection class according to DIN EN | IP 21 |
| Environmental conditions | 5 .... 40 °C80 % RH |
| Product Operating Voltage | 230VAC / 115 VAC |
| Power consumption | 35 W |
| Set-up plate dimensions | 180 x 180 mm |
| Dimensions (L x W x H) | 225 x 330 x 113 mm |
| Weight | 4.5 kg |
11 Contact
If you have any questions, suggestions or technical problems, please do not hesitate to contact us. You will find the relevant contact information at the end of this user manual.
12 Disposal
For the disposal of batteries in the EU, the 2006/66/EC directive of the European Parliament applies. Due to the contained pollutants, batteries must not be disposed of as household waste. They must be given to collection points designed for that purpose.
In order to comply with the EU directive 2012/19/EU we take our devices back. We either re-use them or give them to a recycling company which disposes of the devices in line with law.
For countries outside the EU, batteries and devices should be disposed of in accordance with your local waste regulations.
If you have any questions, please contact PCE Instruments.

text_image
Pb www.pce-instruments.com
PCE Instruments contact information
Germany France Spain
PCE Deutschland GmbH PCE Instruments France EURL PCE Ibérica S.L.
Im Langel 4 23, rue de Strasbourg Calle Mayor, 53
D-59872 Meschede 67250 SOULTZ-SOUS-FORETS 02500 Tobarra (Albacete)
United States of America
PCE Americas Inc.
711 Commerce Way suite 8
Jupiter / Palm Beach
33458 FL
USA
Tel: +1 (561) 320-9162
Fax: +1 (561) 320-9176
info@pce-americas.com
www.pce-instruments.com/us
United Kingdom Italy
PCE Instruments UK Ltd
Unit 11 Southpoint Business Park
Ensign Way, Southampton
Hampshire
United Kingdom, SO31 4RF
Tel: +44 (0) 2380 98703 0
Fax: +44 (0) 2380 98703 9
info@pce-instruments.co.uk
www.pce-instruments.com/english
PCE Italia s.r.l.
Via Pesciatina 878 / B-Interno 6
55010 LOC. GRAGNANO
CAPANNORI (LUCCA)
Italia
www.pce-instruments.com/dutch www.pce-instruments.com/chile
Chile Hong Kong
PCE Instruments Chile S.A.
RUT: 76.154.057-2
Santos Dumont 738, local 4
Comuna de Recoleta, Santiago, Chile
Tel.: +56 2 24053238
Fax: +56 2 2873 3777
info@pce-instruments.cl
PCE Instruments HK Ltd.
Unit J, 21/F., COS Centre
56 Tsun Yip Street
Kwun Tong
Kowloon, Hong Kong
Tel: +852-301-84912
jyi@pce-instruments.com
www.pce-instruments.cn
China
PCE (Beijing) Technology Co., Ltd
1519 Room, 6 Building
Men Tou Gou Xin Cheng,
Men Tou Gou District
102300 Beijing
China
Tel: +86 (10) 8893 9660
info@pce-instruments.cn info@pce-cihazlari.com.tr
www.pce-instruments.cn
Turkey
Pehlivan Sok. No.6/C
www.pce-instruments.com/turkish