FHYC40JEVLK - Air-conditioner DAIKIN - Free user manual and instructions
Find the device manual for free FHYC40JEVLK DAIKIN in PDF.

User questions about FHYC40JEVLK DAIKIN
0 question about this device. Answer the ones you know or ask your own.
Ask a new question about this device
Download the instructions for your Air-conditioner in PDF format for free! Find your manual FHYC40JEVLK - DAIKIN and take your electronic device back in hand. On this page are published all the documents necessary for the use of your device. FHYC40JEVLK by DAIKIN.
USER MANUAL FHYC40JEVLK DAIKIN
Operating Manual Handset Wireless
English
GS02 Remote Control Indication

text_image
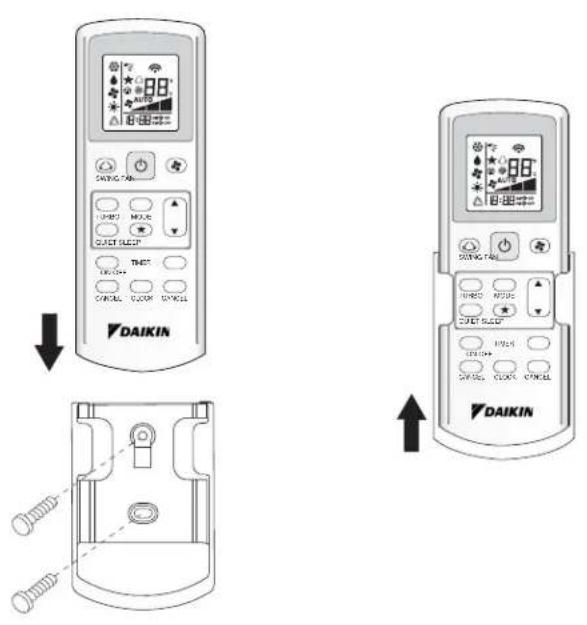
1 2 3 4 5 6 SWING FAN TURBO MODE QUIET SLEEP 13 12 8 9 11 ON OFF TIMER CANCEL CLOCK CANCEL 10 DAIKINHOW TO MOUNT ONTO THE WALL
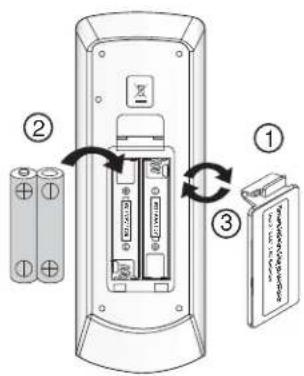
TO INSERT BATTERIES (AAA.R03)
text_image
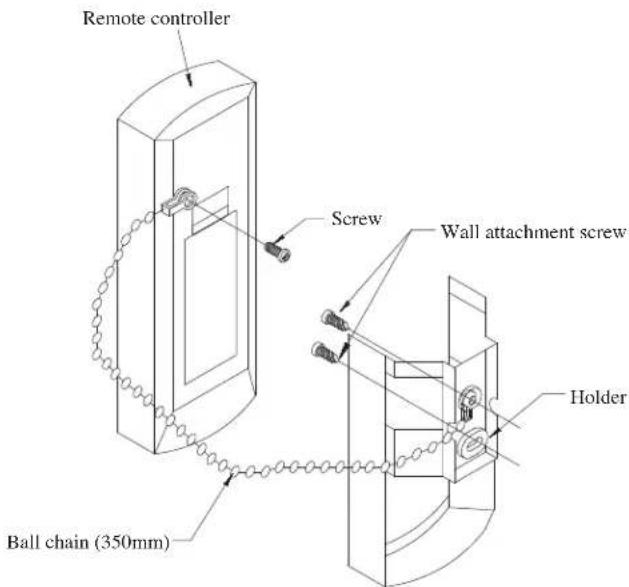
Diagram showing battery charging process with labeled components and directional arrows indicating charging directionREMOTE CONTROLLER LOSS PREVENTION WITH BALL CHAIN (OPTIONAL)
text_image
Remote controller Screw Wall attachment screw Holder Ball chain (350mm)Installation
- Match the ring at the end of the ball chain with the screw hole on the back of the remote controller and secure it with the screw.
- Attach the holder and the ball chain as above at the position where signals from the remote controller can be received easily.
- Pass the ball chain through the back of the holder and match the ring at the end of the ball chain to the upper hole of the holder. Fix the holder to the wall by putting through 2 screws across it.
OPERATING GUIDE
1. Transmission source
• The source where the signal will be transmitted.
2. Signal transmission indication
- Blink to confirm that the last setting has been transmitted to the unit.
3. "ON/OFF" Button
- Press once to start the air conditioner unit.
- Press again to stop the unit.
4. Fan speed selection
- Pressing button continuously will toggle the fan speed in the following order:

- Stop pressing when the desired fan speed appears on the display screen.
5. Operation mode
- Press the MODE button to select the type of operating mode.
- For cooling only unit, the available modes are: COOL (*), DRY (♠) and FAN (♣).
- For heat pump unit, the available modes are: AUTO (△), COOL (*), DRY (♠), FAN (♣) and HEAT (♦).
- The AUTO (△) mode is unavailable for chilled water system.
6. Automatic air swing
- Press the SWINGn to activate the automatic air swing function.
- To distribute the air to a specific direction, press the SWING △ button and wait until the louver move to the desired direction and press the button once again.
Swing mode selection method (for CK-E model)
- Press SWING (☐) button for 4 seconds to enter field setting mode. While in field setting mode, it will only show SWING MODE (◀).
- Press temperature ▲ and ▼ button to select SWING MODE (◀) rotation from Swing Mode 1 to Swing Mode 3.
- There are 3 different SWING MODE, which are:

Swing mode 1 Swing mode 2 Swing mode 3
SWING MODE will not activate unless SWING is activated.
Swing is indicated by the logo:
- If no mode changes within 4 seconds, unit will operate according to the selected SWING MODE (◀).
7. Turbo function (model dependent)
- Press for fast cooling or heating operation.
• Fan speed turn to maximum speed.
- Press again to deactivate the function.
• Available under HEAT and COOL modes only.
- Any change of fan speed will deactivate this function.
- The Turbo function (✗) is unavailable for chilled water system and remote control with SWING MODE (✗) function.
8. OFF timer setting
- Press the OFF TIMER button will activate the off timer function.
- Set the desired off time by pressing the OFF TIMER button continuously.
- Press the CANCEL button to cancel the off timer setting.
9. Quiet function (model dependant)
• Pressfor quiet operation.
• Fan speed turn to minimum speed.
- Press again to deactivate the function.
- Any change of fan speed will deactivate this function.
- The Silent function ( ④) is unavailable for chilled water system.
10. Clock time setting
- Press and hold ⏱ button to set the clock time.
11. ON timer setting
- Press the ON TIMER button will activate the on timer function.
- Set the desired on time by pressing the ON TIMER button continuously. If the timer is set to 7.30am, the air conditioner will turn on at 7.30am sharp.
- Press the CANCEL button to cancel the on timer setting.
12. Sleep mode setting
- Press ★ button will activate the sleep mode function.
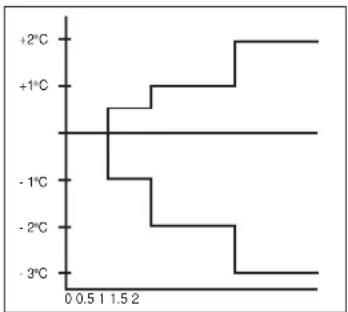
- This is an energy saving option. When the unit is operating under cooling mode, the set temperature is increased by 0.5^ C after the first half an hour, another 0.5^ C after the second half an hour and 1^ C after the following 1 hour.
- When the unit is operating under heating mode, the set temperature is decreased by 1°C after the first half an hour, another 1°C after the second half an hour and 1°C after the following 1 hour.
- This function is available under COOL, HEAT and AUTO mode.
line
| Temperature (°C) | Value | |---|---| | +2 | 0 | | +1 | 0 | | -1 | 0 | | -2 | 0 | | -3 | 0 |13. Temperature setting
- To set the desired room temperature, press the ▲ or ▼ button to increase or decrease the set temperature.
- The temperature setting range is from 16°C to 30°C (Optional setting 20°C to 30°C).
- Press both buttons ▲ and ▼ simultaneously to toggle from °C to °F setting.
MEMO
- In the event that there is any conflict in the interpretation of this manual and any translation of the same in any language, the English version of this manual shall prevail.
- The manufacturer reserves the right to revise any of the specification and design contain herein at any time without prior notification.
OYL MANUFACTURING COMPANY SDN. BHD.
Lot 60334, Persiaran Bukit Rahman Putra 3, Taman Perindustrian Bukit Rahman Putra, 47000 Sungai Buloh, Selangar Darul Ehsan, Malaysia.
DAIKIN INDUSTRIES, LTD.
Head offi ce: Umeda Center Bldg., 2-4-12, Nakazaki-Nishi, Kita-ku, Osaka, 530-8323 Japan
Tokyo offi ce: JR Shinagawa East Bldg., 2-18-1, Konan, Minato-ku, Tokyo, 108-0075 Japan http://www.daikin.com/global_ac/