WP24 - Measurement PCE Instruments - Free user manual and instructions
Find the device manual for free WP24 PCE Instruments in PDF.

User questions about WP24 PCE Instruments
0 question about this device. Answer the ones you know or ask your own.
Ask a new question about this device
Download the instructions for your Measurement in PDF format for free! Find your manual WP24 - PCE Instruments and take your electronic device back in hand. On this page are published all the documents necessary for the use of your device. WP24 by PCE Instruments.
USER MANUAL WP24 PCE Instruments
Southpoint Business Park
Ensign way
Hampshire / Southampton
United Kingdom, SO31 4RF
From outside UK: +44
Tel: (0) 2380 98703 0
Fax: (0) 2380 98703 9
info@pce-instruments.com
www.pce-instruments.com/english
www.pce-instruments.com
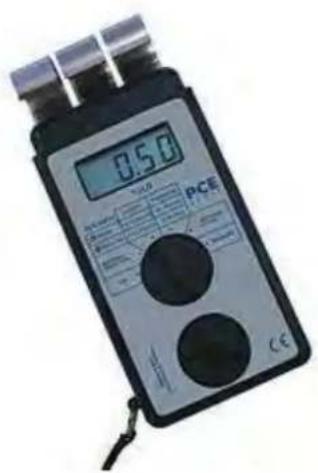
MANUAL Moisture Analyser PCE-WP24
text_image
0.50 PCE 100 200 300 400 500 600 700 800 900 1000- Application ....3
- Technical data .... 3
2.1 Wood....3
2.2 Building material....3
2.3 Other parameters common for wood and building material....3
- Description of controls 4
- Material selection....4
- Wood moisture contents measurements 4
5.1 Preparing the instrument without changes to density and thickness parameters .....4
5.2 Preparing the instrument with changes to density or/and thickness parameters.....5
5.3 Measurements .... 5
5.4 Remarks....5
5.5 Density of selected wood types....6
- Building materials moisture contents measurements (described with the example of concrete)....7
6.1 Preparing the instrument without changes to density and thickness parameters .....7
6.2 Preparing the instrument with changes to density or/and thickness parameters......7
6.3 Measurements 8
6.4 Remarks....8
6.5 Determining the density of building materials....9
- Errors....9
- Changing the battery 9
- Service....10
1. Application
Moisture Meter PCE-WP24 is designed for quick and non-damaging measurement of moisture contents in wood and building materials. The device measures the dielectric constant (SIC) of the material. The material is penetrated by the electromagnetic field generated by the device. The moisture meter is equipped with knobs for setting the density and thickness of wood and density and thickness of concrete and other building materials. The characteristic is based on the following assumptions:
- for wood – doublesided natural drying process of timber,
- for concrete – singlesided natural drying process of concrete.
In both cases the moisture meter measures the average moisture contents.
2. Technical data
2.1 Wood
Range 4% - 60%
Max. depth of penetration 60 mm
Settings range:
• density 0.3 – 1.1 g/cm³
- thickness 10 – 60 mm
Minimal settings' step:
• density 0.02 g/cm ^4
• thickness 2 mm
2.2 Building material
Range 0 - 10%
Max.depth of penetration 50 mm
Settings range:
• density 0.8 – 2.8 t/m³
• thickness 30 lub 50 mm
Minimal settings' step:
• density 0.2 t/m³
2.3 Other parameters common for wood and building material
Display LCD, 12.7 mm
Resolution 0.1 Power battery 6F22, 9V
Battery life approx. 5000 meas.
Low power indication yes
Size:
• device 165 * 80 * 33 mm
• case 270 * 180 * 55 mm
3. Description of controls
There are two control knobs on the front panel:
upper – to select the operating function,
OFF – power off
MATERIAL SELECTION – start-up of material (diodes) switching, the moment the knob is moved to
DENSITY sets the material type
DENSITY – setting the density with the lower knob
THICKNESS – setting the thickness with the lower knob
SETTINGS CHECK – alternately displaying the previously set density and thickness
MEASURE – automatic calibration (approx. 4 sec.) and measurement
lower – to set the density and thickness of the material. This knob is active only when the upper knob is set to DENSITY or THICKNESS
4. Material selection
In order to set the type of material switches the upper knob to MATERIAL SELECTION. The diodes beside signs WOOD and BUILD. MAT. start to blink alternately. To start wood moisture contents measurements switch the upper knob to DENSITY when the WOOD diode is lit.
Measurements of moisture contents in building materials can be started by switching the upper knob to DENSITY when the BUILD. MAT. Diode is lit.
5. Wood moisture contents measurements
5.1 Preparing the instrument without changes to density and thickness parameters
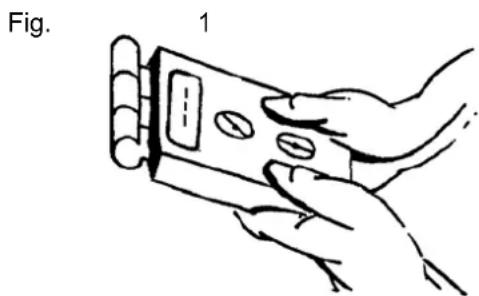
Quickly switch the upper control from OFF to SETTINGS CHECK. The diode WOOD will light up. The LCD will display the density and thickness set during the previous measurements (e.g. 0.56 and 42). Hold the device in the air (fig. 1), switch the upper control knob to MEASURE. The device will calibrate automatically (the display shows -- -). The end of calibration is indicated by the number 4.0 (the lower range limit) displayed on the LCD. The device is ready for measurements.
natural_image
Illustration of a hand holding a handheld device with a screen and buttons (no text or symbols)5.2 Preparing the instrument with changes to density or/and thickness parameters
Follow these steps:
- set the upper knob to MATERIAL SELECTION
- when the WOOD diode is lit set the upper control knob to DENSITY and then set the required density using the lower control knob,
- set the upper control knob to THICKNESS and set the required thickness with the lower control knob,
- set the upper control knob to SETTINGS CHECK. The LCD will display the density and thickness alternately,
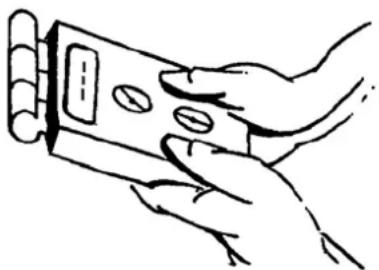
- hold the instrument in the air (fig. 1) and set the upper control knob to MEASURE. The device will calibrate automatically (the display shows - - -). The end of calibration is indicated by the number 4.0 (the lower range limit) displayed on the LCD. The device is ready for measurements.
A table with the density values for the most popular wood types is on the back of the moisture meter.
5.3 Measurements
The measurements should be conducted in at least several places. These places should be as flat, smooth and clean as possible. The actual result of the measurements is the arithmetic average of all the measurements. A line drawn between the electrodes should be perpendicular to the fibres. If the timber is too thin, place the electrodes parallel to the fibres.
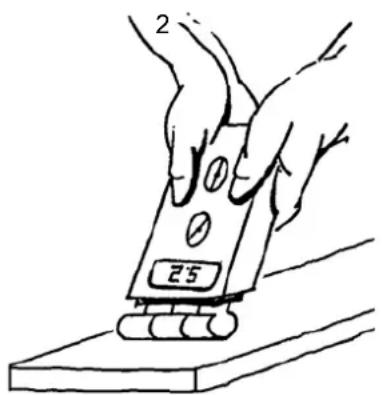
Hold the device as shown on fig 2. Press the electrodes hard against the wood. Read the result. There should not be any metal elements, wet wood or concrete etc under the timber. It's best if the timber is supported only by it's ends or placed on a layer of Styrofoam several centimeters thick.
The instrument is equipped with an automatic power off which activates 5 minutes after the last change in upper control knob setting. Moisture meter can also be switched off instantly by setting the upper control knob to OFF.
Fig.
text_image
2 255.4 Remarks
The size of the timber should not be less than 80 x 40 mm. Measuring moisture contents of smaller pieces leads to results lower than the real moisture contents.
The electrodes are made of special silicon bronze and during normal operation should not get deformed. If due to excess force or accidental fall the electrodes get deformed, they should be bend to their original shape. Deformed or misplaced electrodes are the source of errors and in extreme cases can prevent proper calibration of the device.
Avoid measurements when the timber or the operator of the device is loaded with high electrostatic charges. Such charges (sparks) make measurements difficult and can damage the instrument.
5.5 Density of selected wood types
| Wood type (brand name) | Density (g/cm3) |
| Abacji | 0,35 |
| Abura | 0,53 |
| Afara white 0,52 | |
| Afrormosia | 0,65 |
| Alder, Blackalder 0,51 | |
| Alerce | 0,34 |
| Ash common 0,65 | |
| Ash japanese 0,61 | |
| Ash white 0,64 | |
| Aspen, Poplar 0,45 | |
| Balsa | 0,08 |
| Basswood, Lime 0,49 | |
| Beech | 0,68 |
| Birch common 0,61 | |
| Californian Redwood 0,39 | |
| Mountain Cherry 0,54 | |
| Chestnut, Sweet 0,55 | |
| Douglas Fir, Oregon 0,47 | |
| Eberesche | 0,73 |
| Ebony Macassar | 1 |
| Elm | 0,64 |
| European Cherry | 0,55 |
| Spruce European | 0,43 |
| Hickory, White heart 0,76 | |
| Hornbeam common | 0,79 |
| Iroko | 0,63 |
| Larch European | 0,55 |
| Larch japanese | 0,49 |
| Lauan White | 0,52 |
| Locust black | 0,74 |
| Mahogany Broad | 0,55 |
| Mahogany Grand, Bassam | 0,47 |
| Mansonia | 0,6 |
| Maple | 0,59 |
| Maple | 0,58 |
| Maple sugar | 0,63 |
| Maple soft | 0,47 |
| Meranti dark red | 0,67 |
| Meranti White | 0,82 |
| Merbau | 0,77 |
| Niangon, Wishma | 0,6 |
| Oak, European | 0,65 |
| Oak, White | 0,74 |
| Okoume, Gaboon | 0,41 |
| Pear | 0,7 |
| Pine insignis | 0,4 |
| Pine, Weymouth 0,37 | |
| Pine, Europ. Black | 0,53 |
| Pine, Redwood | 0,49 |
| Popular Black Populus nigra 0,41 | |
| Ramin | 0,56 |
| Rubberwood | 0,49 |
| Redoak, Northern 0,66 | |
| Sapele | 0,62 |
| Silver Fir 0,41 | |
| Spruce W.H. Alaska pine, 0,44 | |
| Teak | 0,63 |
| Utile | 0,59 |
| Walnut | 0,64 |
6. Building materials moisture contents measurements (described with the example of concrete)
6.1 Preparing the instrument without changes to density and thickness parameters
Quickly switch the upper control from OFF to SETTINGS CHECK. The diode BUILD. MAT. will light up. The LCD will display the density and thickness set during the previous measurements (e.g. 1.6 and 50). Hold the device in the air (fig. 3), switch the upper control knob to MEASURE. The device will calibrate automatically (the display shows -- -). The end of calibration is indicated by the number 00.0 (the lower range limit) displayed on the LCD. The device is ready for measurements.
natural_image
Line drawing of a hand holding a handheld device (no text or symbols visible)Fig. 3
6.2 Preparing the instrument with changes to density or/and thickness parameters
Follow these steps:
- set the upper knob to MATERIAL SELECTION
- when the BUILD. MAT. diode is lit set the upper control knob to DENSITY and then set the required density using the lower control knob,
- set the upper control knob to THICKNESS and set the required thickness with the lower control knob,
- set the upper control knob to SETTINGS CHECK. The LCD will display the density and thickness alternately,
- hold the instrument in the air (fig. 3) and set the upper control knob to MEASURE. The device will calibrate automatically (the display shows - - -). The end of calibration is indicated by the number 00.0 displayed on the LCD. The device is ready for measurements
A table with approximate density values for the most popular building materials is on the back of the moisture meter.
6.3 Measurements
The measurements should be conducted in at least several places. These places should be flat, smooth and clean. The actual result of the measurements is the arithmetic average of all the measurements.
Hold the device as shown on fig. 4. Press the electrodes hard against the concrete. Read the result.
Fig.

text_image
2.5The instrument is equipped with an automatic power off which activates 5 minutes after the last change in upper control knob setting. Moisture meter can also be switched off instantly by setting the upper control knob to OFF.
6.4 Remarks
Besides the moisture contents, the result are also influenced by:
• bulk density of the concrete
• graining and type of aggregate
- use of admixtures
• temperature of the concrete
• value of the water-cement indicator (W/C)
• water chemical constitution
• salinity of the concrete (in case of old concrete)
- smoothness of the surface
In case a very high accuracy of measurement is required the device should be calibrated to compensate for the influence of the factors listed above. Such calibration should be done using the dry oven test.
During normal use it is enough to compensate only for the bulk density of the concrete.
The device can not be used to measure the moisture contents of concrete that is densely reinforced or contains admixtures that conduct electricity. The measurement should not be done closer than 50 mm from the nearest reinforcement.
The results of the measurement can be totally distorted by the occurrences of stray currents (coming form for example a malfunctioning electrical installation). The accuracy of the device can also be very low while measuring very fresh or recently dampened concrete. This is due to the interference from the very moist top layer of the concrete.
6.5 Determining the density of building materials
Determining the density of building materials is based on assumption that for a nearly dry building material the result should be almost zero percent.
Case A
A sample (fragment) of the material is available. It can be removed and dried separately (e.g. brick, ceramic plate, concrete slab).
- Dry the sample completely – reduce the moisture contents nearly to 0%. This can be done using a dryer, microwave oven or hot air gun.
- Set the density so that the result of the measurement is close to 0.1 – 0.2%.
- Conduct the measurements as described in chapter 6.3.
Case B
The only available material is already laid and there is no sample available (fragment).
- Locally dry the material (levelling, plaster) completely. The minimal dried surface should measure approx. 15x15cm. The layer of the dried material should be at least 3 cm thick. The best way to dry the surface is to use a hot air gun.
- Set the density so that the result of the measurement is close to 0.1 – 0.2%.
- Conduct the measurements as described in chapter 6.3.
Conduct the measurements in other (not dried) places using the determined density.
7. Errors
If the instrument can not calibrate properly it indicates the following error:
-Alr - generator voltage too low
Alr - generator voltage too high
In such case power off the device, check the geometry of the electrodes, clean the electrodes, make sure the device is dry and then start the calibration again (see chapter 5.1 or 5.2 or 6.1 or 6.2). If the instrument still reports error contact the producer.
8. Changing the battery
The device is equipped with a power level control circuit. When the power drops below acceptable level a sign "LO BAT" appears on the left side of the LCD. This indicates that the battery has expired and should be replaced with a new one.
To replace the battery unscrew the screw on the back of the instrument and carefully remove the back panel. Store the device in a dry place. Remove the battery if stored for a long time.
9. Service
The Moisture Meter PCE-WP24 has a 12 months guarantee.
- all repairs during the guarantee period will be done within 10 days from the date of delivery,
- all other repairs will be done within 14 days from the date of delivery.
GUARANTEE
The manufacturer guarantees the correct functioning of the Moisture Meter PCE-WP24 under normal use for a period of 12 months: