HV-C60CC - Stove HOOVER - Free user manual and instructions
Find the device manual for free HV-C60CC HOOVER in PDF.

User questions about HV-C60CC HOOVER
0 question about this device. Answer the ones you know or ask your own.
Ask a new question about this device
Download the instructions for your Stove in PDF format for free! Find your manual HV-C60CC - HOOVER and take your electronic device back in hand. On this page are published all the documents necessary for the use of your device. HV-C60CC by HOOVER.
USER MANUAL HV-C60CC HOOVER
natural_image
Black electrical stove burner with four circular ventricles and a floor-mounted indicator lights below (no text or symbols on the stove itself)60cm Ceramic Cooktop
Model Number: HV-C60CC
INSTRUCTION MANUAL
Contents
03 General Safety Instructions
06 Product Overview
08 Installation
17 Getting Started
19 Instructions
28 FAQs & Troubleshooting Guide
29 Other Useful Information
General Safety Instructions
IMPORTANT SAFETY INSTRUCTIONS: READ CAREFULLY AND KEEP FOR FUTURE REFERENCE!
Read this manual thoroughly before first use, even if you are familiar with this type of product. The safety precautions enclosed herein reduce the risk of fire, electric shock and injury when correctly adhered to. Keep the manual in a safe place for future reference, along with the completed warranty card and your purchase receipt. If you sell or transfer ownership of this product, pass these instructions on to the next owner of the appliance.
Always follow basic safety precautions and accident prevention measures when using an electrical appliance, including the following.
WARNING: Electric shock hazard - professional installation only!
- This cooktop must be professionally installed to an appropriately earthed wiring system by a licensed electrician, following the instructions in this manual. Detailed installation instructions start on page 8.
- Ensure to make these instructions available to the installer. Failure to install the appliance correctly could invalidate any warranty or liability claims.
- This appliance should be connected to a circuit which incorporates an isolating switch providing full disconnection from the power supply.
- Alterations to the domestic wiring system must only be made by a qualified electrician. Failure to follow this advice may result in electric shock or death.
General usage conditions and restrictions
- Domestic use only: This cooktop is designed for indoor household use only. It can be built into a standard kitchen cabinet or housing unit. This cooktop is not designed for commercial, industrial or trade use.
- Intended purpose: Only use this cooktop for its intended purpose, in its intended environment and as described in this manual. Any other use may cause fire, electric shock or injury. Do not use it for space heating purposes.
- Follow instructions: Observe all rules and provisions in this manual. Do not allow anybody who is not familiar with the contents of this manual to operate the cooktop. These instructions are not intended to cover every possible condition and situation. As with any electrical household appliance, use common sense and caution when installing, operating and maintaining it.
- Usage restriction: The appliance is not intended for use by persons (including children) with reduced physical, sensory or mental capabilities, or lack of experience and knowledge, unless they have been given supervision or instruction concerning use of the appliance by a person responsible for their safety.
General Safety Instructions (Cont.)
- Notimer:The appliance is not intended to be operated by means of an external timer or separate remote control system.
- RCD: Unless your home is already fitted with a residual current device (safety switch), we recommend installing an RCD with a rated residual operating current not exceeding 30 mA to provide additional safety protection when using electrical appliances. See your electrician for professional advice.
- Children: Keep younger children away from the cooktop during use, as young children do not recognise the risks involved when using electrical appliances. If it is necessary for younger family members to be in the kitchen, ensure that they are kept under close supervision at all times.
- Children shall not play with the appliance, or sit, stand, or climb on it. Cleaning and user maintenance shall not be carried out by children without supervision. Do not store items of interest to children in cabinets above the appliance. Children climbing on the cooktop could be seriously injured.
- Do not stare at the cooktop elements when they are in use.
- Do not heat empty: Do not switch on a hotplate without a pan or pot on it. Do not use a hotplate to warm up plates. Never use the appliance for warming or heating the room.
- Handle with care: Do not place or drop heavy objects on your cooktop. Do not stand on your cooktop. Do not use pans with jagged edges or drag pans across the ceramic glass surface as this can scratch the glass.
- Cookware: Do not use unstable cookware, or aluminium foil containers on the cooktop. Do not let large cookware overlap the bench as this could deflect heat onto the benchtop, which could damage the surface. Pot and pan handles may become hot during use; position handles away from the edge of the cooktop and out of children's reach. Never cook directly on the glass surface without a pot or pan.
- To protect against the risk of electric shock, do not touch the cooktop with wet hands or feet, or when bare footed.
- After use: Always turn off the cooking zones and the cooktop by using the touch controls.
- Cleaning: Do not use steam cleaning equipment for cleaning the cooktop. Ensure that no part of the cooktop is immersed in water or other liquid.
- Damage: Do not use the cooktop if any part has been damaged or does not work properly. Do not attempt to repair it yourself. Only have it repaired by an authorised service centre. Incorrect repair could expose you to the risk of electric shock, fire or injury. Prolonged use of the unit in such conditions could cause fire or electrocution.
General Safety Instructions (Cont.)
- Disconnect the appliance from the electrical outlet before carrying out any maintenance on it.
- Winding the cord: If winding the power cord, avoid tight bends as this could damage the cord.
- Damaged supply cord: The power supply cord must be checked regularly and if it is damaged, it must be replaced by the manufacturer, its service agent or similarly qualified person in order to avoid a hazard. In case of damage, contact our after sales support centre.
- Misuse: We accept no liability for any eventual damages to property or injury to persons caused by misuse of the product or noncompliance with these instructions.
WARNING - FIRE RISK!
- Never leave the cooktop unattended during use. Oils and fats in pots and pans may catch fire due to overheating. Boil-over causes smoking and greasy spill-overs that may ignite. The cooking process, even if only short term, always has to be supervised.
- In case of a fire, never try to extinguish it with water. Switch off the cooking zone and cover the flame(s) with a lid or a fire blanket.
- Do not store items on the cooktop. Never use the cooktop as a work or storage surface for utensils. When switched on, flammable objects present a fire hazard and metallic objects such as cutlery or lids can get very hot.
- Keep connection leads away from the cooktop as their insulation materials are usually not resistant to high temperatures.
WARNING - CRACKED SURFACE!
- If the surface is cracked, immediately switch off the cooktop and disconnect it from the mains supply in order to avoid the possibility of electric shock. Call for service. Do not cook on a broken or cracked cooktop.
WARNING - HOT SURFACES!

text_image
Yellow triangular warning sign with black outline and 'St�' symbol indicating warming or heatThis symbol indicates that the appliance can become hot during use and retain heat for some time after turning off. Do not touch hot surfaces.
Product Overview
A Ceramic cooktop
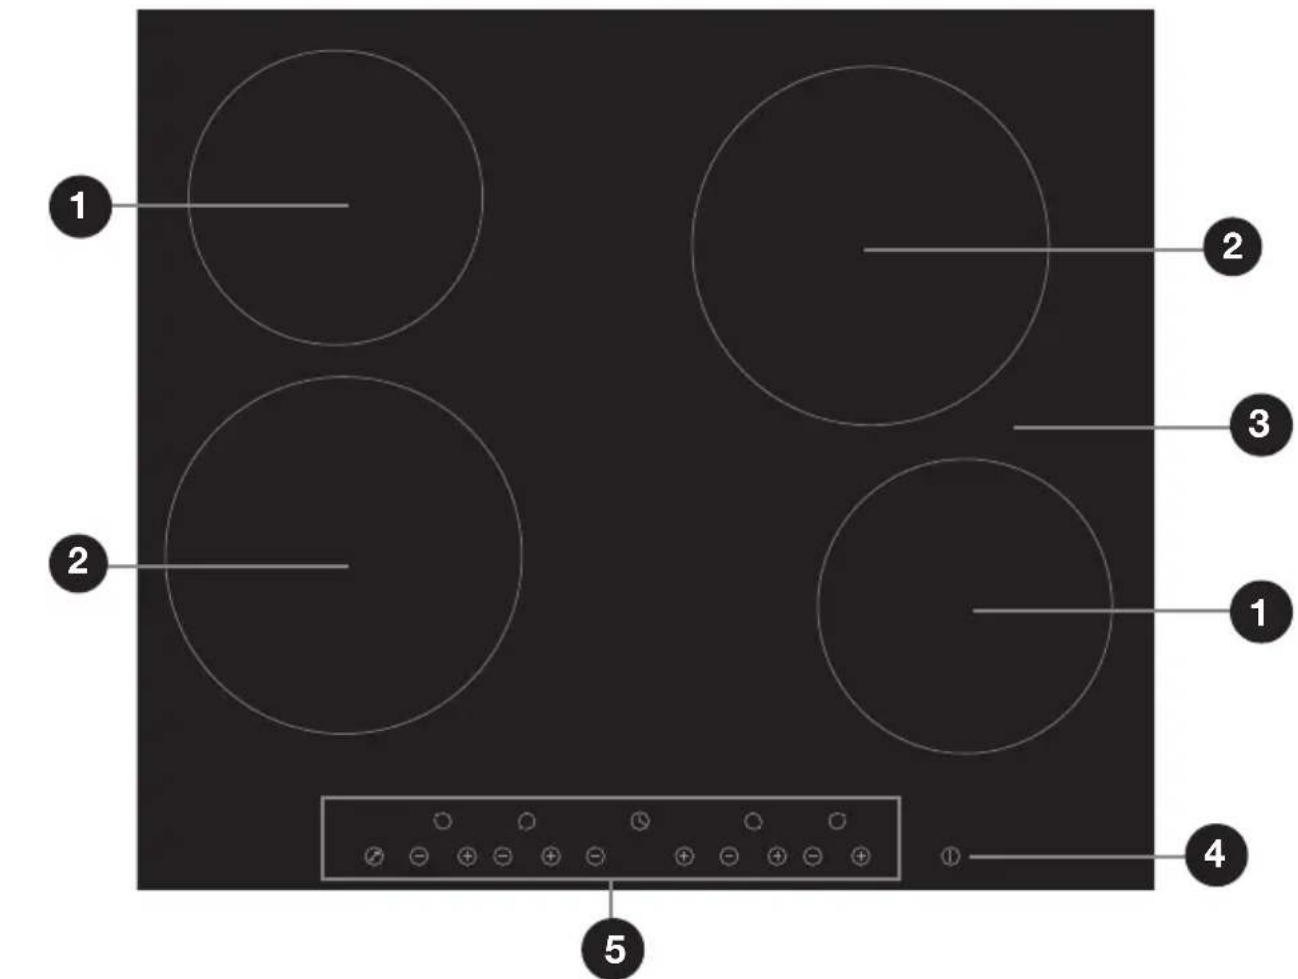
text_image
1 2 3 2 1 4 5B Control panel
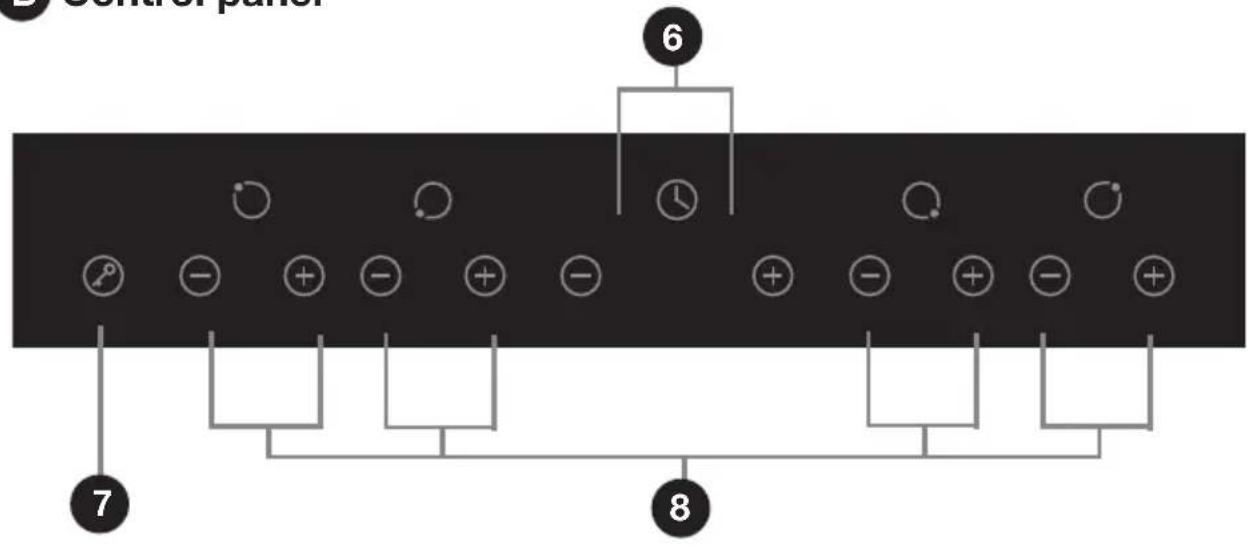
text_image
Control panel 6 7 8NOTE: Please see opposite for part descriptions.
Product Overview (Cont.)
Scope of delivery
(A) Electric ceramic cooktop
1 Max. 1200 W cooking zone (165 mm ø)
2 Max. 1800 W cooking zone (200 mm ∅)
3 Ceramic glass plate
4 ON/OFF control
5 Control panel
(B) Control panel
6 Timer controls
7 Child lock control
8 Cooking zone controls
(C) Installation hardware
8 Cooktop mounting brackets and screws (x4)
(D) Documentation (not shown)
Instruction manual
Quick start guide
Warranty certificate
© Installation hardware
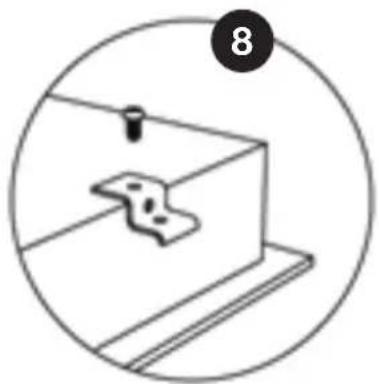
natural_image
Simple line drawing of a mechanical component inside a circular frame (no text or symbols)NOTE:
Due to continued product improvement, images and illustrations in this manual may vary slightly from the product purchased. All images in this manual are for reference purposes only. Parts are not necessarily pictured to scale.
Installation
Unpacking the appliance
- This product has been packaged to protect it against transportation damage. Unpack the appliance and remove all packaging materials from around all parts of the appliance.
- WARNING: Cut Hazard! Take care, the panel edges are sharp. Failure to use caution when unpacking and installing the appliance could result in injury or cuts.
- Keep all packaging materials until you have made sure your new ceramic cooktop is undamaged and in good working order. If you have any doubts, do not use the appliance and call our after sales support centre for advice.
- Keep the packaging materials in a safe place. It will help prevent any damage if the product needs to be transported in the future.
- The carton is recyclable. Whenever possible, reuse the carton and recycle it when disposing of the packaging materials.
- Plastic wrapping can be a suffocation hazard for babies and young children, so ensure all packaging materials are out of their reach, and dispose of them safely.
WARNING! PROFESSIONAL INSTALLATION ONLY!
- This cooktop must be correctly installed by an appropriately qualified, licensed electrician in accordance with all applicable rules and regulations and following these installation instructions. Please note the details of your licensed installer on page 33 of this manual.
- Do not try to install the cooktop yourself; doing so will expose you to danger and void the warranty. Improper installation, adjustment, alteration or service can cause injury or damage. We decline any responsibility for injury or damage, to persons or property, as a result of improper use or installation.
- Connection to an appropriately earthed wiring system is essential and mandatory. Alterations to the domestic wiring system must only be made by a qualified electrician. Failure to follow this advice may result in electric shock or death.
Installation (Cont.)
Important installation advice
Kitchen and benchtop requirements
- Kitchen area: Before installation, make sure the kitchen area is dry and there is sufficient ventilation and easy access to all control elements.
- Benchtop: The benchtop surface must be level, and no structural members must interfere with space requirements. It should be made of heat-resistant and insulated material in order to avoid the risk of electric shock and deformation caused by heat radiation from the hotplate. Wood and similar fibrous or hygroscopic material is unsuitable as benchtop surface unless impregnated.
- Curtains: Do not install the cooktop next to curtains, soft furnishings or other flammable materials.
- Adjacent cabinetry finishes: Make sure that the benchtop and any adjacent furniture are able to withstand high heat (90°C). Certain types of vinyl or laminate kitchen furniture are particularly prone to heat damage or discolouration at high temperatures. It is your responsibility to ensure that your cabinetry and installation materials are able to withstand high heat.
- Installation materials: The glue used to join any plastic or wooden veneers/finishes to the cabinetry must be able withstand temperatures of up to 150°C to ensure the panelling does not become loose.
- Rear and surrounding walls: The rear wall and any surrounding surfaces must be able to withstand high heat (90°C). We recommend you use heat-resistant and easy-to-clean finishes (such as ceramic tiles) for any wall surfaces surrounding the cooktop.
- Ventilation: Heat, steam and moisture will be created during use of the cooktop. Take care to avoid injury and ensure that the room is adequately ventilated. If the appliance is going to be used for prolonged periods of time, additional ventilation may be required. If in doubt about your ventilation requirements, consult your qualified installer.
Installation (Cont.)
Important clearances
- Walls or vertical structures must be at least 200 mm away from the cooktop.
- Overhanging surfaces: There must be no overhanging surfaces, and no rangehood or exhaust system within 760 mm above the cooktop.
- Underneath clearance: There must be a minimum 50 mm clearance between the base of the appliance and any surface to ensure an adequate flow of fresh air from outside the cabinetry to the base of the cooktop.
- Above oven installation: If the cooktop is installed above an oven, the oven must have a built-in cooling fan. The two appliances must be connected separately, to make it easier to take the appliances out and for electrical safety.
- Above cupboard installation: If the cooktop is installed above a drawer or cupboard space, a thermal protection barrier should be installed below the base of the cooktop.
- Unsuitable locations: The cooktop must NOT be installed directly above a dishwasher, fridge, freezer, washing machine or clothes dryer, as the humidity may damage the cooktop electronics.
- Seek professional advice: Consult your local building authorities and by-laws if in doubt regarding installation requirements.
Electrical connection
- Isolating switch: The appliance should be mounted and positioned to comply with the local wiring rules and regulations. It should be connected to a circuit which incorporates an isolating switch providing full disconnection from the power supply. The isolating switch must be of an approved type and provide a 3 mm air gap contact separation in all poles (or in all active [phase] conductors if the local wiring rules allow for this variation of the requirements). When the cooktop is installed, the isolating switch should be easily accessible to the user.
- Power cord: Do not allow electrical fittings or cables to come into contact with areas on the cooktop that get hot. If the power cord is damaged, it must be replaced by the manufacturer or a qualified service engineer in order to avoid a hazard. The power cord must not be accessible through cupboard doors or drawers.
Installation (Cont.)
Benchtop preparation
The cooktop can be fitted to any benchtop with a minimum thickness of 30 mm. For the purpose of installation and use, make sure to maintain a minimum space of 50 mm around the opening. To install the cooktop on your benchtop, make an opening with the dimensions given in Fig. 1 below.
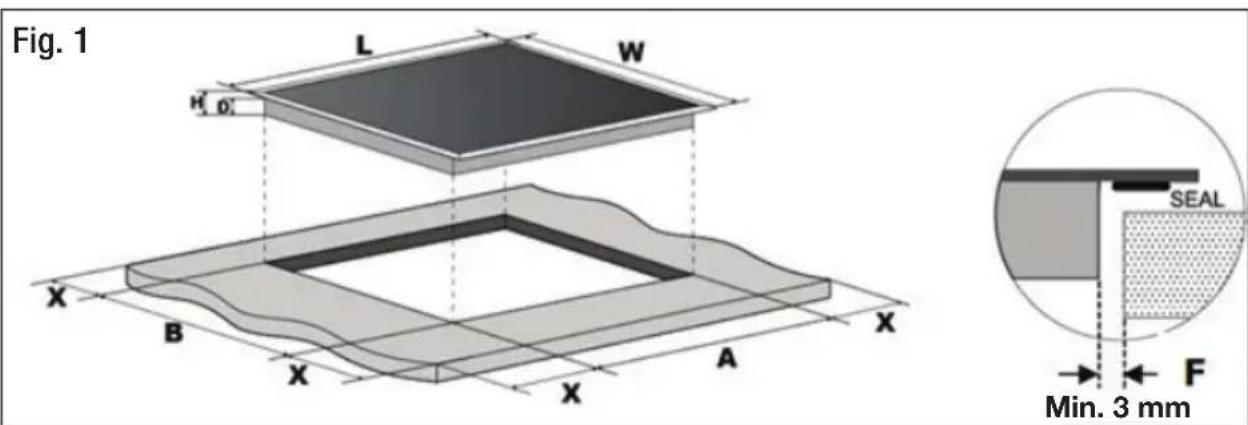
text_image
Fig. 1 L W H' 0' X B X A X X B X A SEAL Min. 3 mm F| L (mm) | V (mm) | H (mm) | D (mm) | A (mm) | B (mm) | X (mm) | F (mm) | |
| 590 52 | 0 55 | 51 56 | +4 | +1 | 490+4 +1 | 50 min. | 3 min. |
IMPORTANT!
- You must observe the ventilation requirements and minimum clearances, as listed and illustrated above and on the next page.
- There are ventilation holes around the outside of the cooktop. When you put the cooktop into position, you must ensure that these holes are not blocked by the worktop.
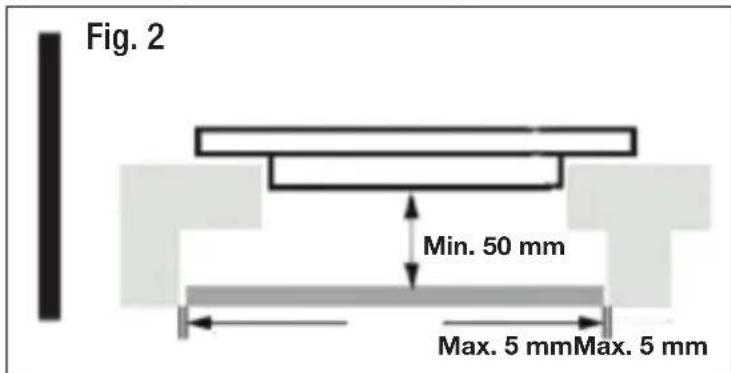
- In order to avoid accidentally touching the hot bottom part of the hob,
or getting an unexpected electric shock while the cooktop is in operation, you must put a wooden insert, fixed by screws, at a minimum distance of 50 mm from the bottom part of the hob, as illustrated in Fig. 2.
text_image
Fig. 2 Min. 50 mm Max. 5 mm Max. 5 mmInstallation (Cont.)
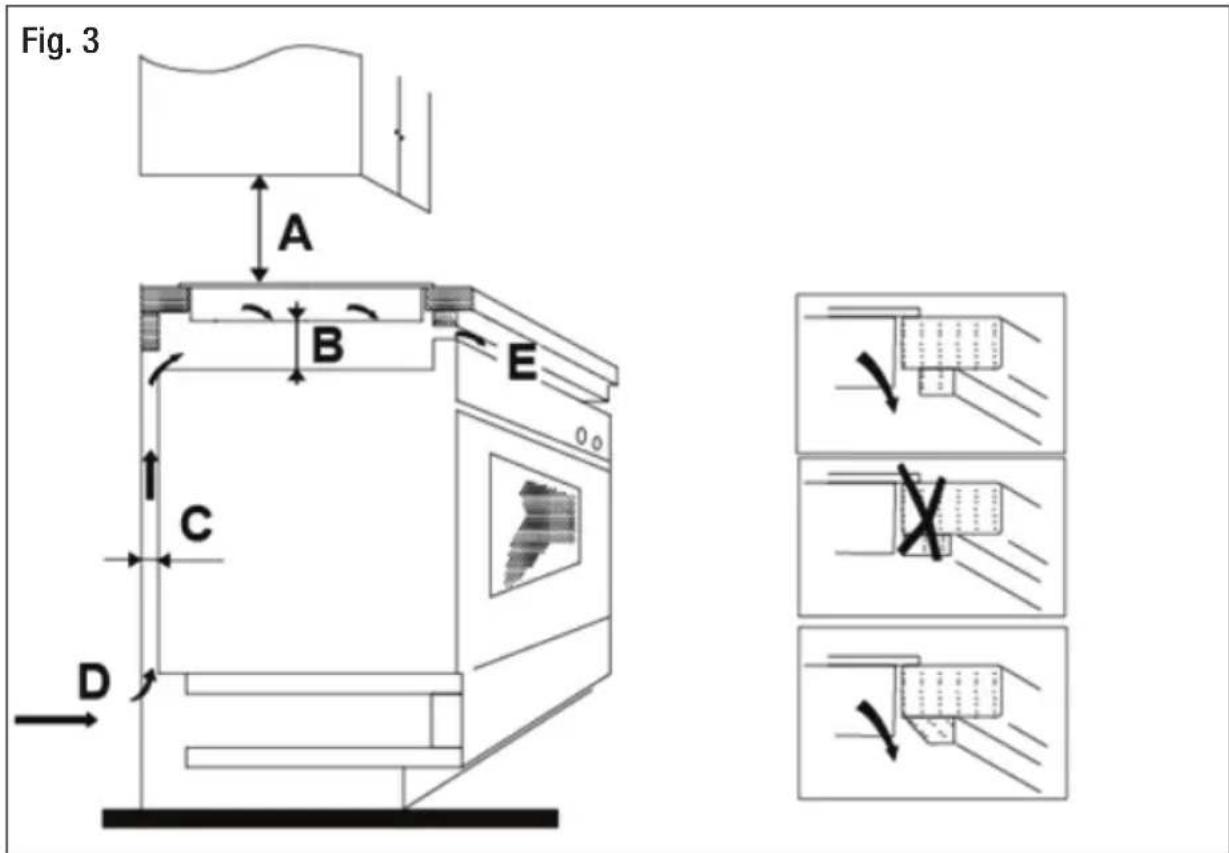
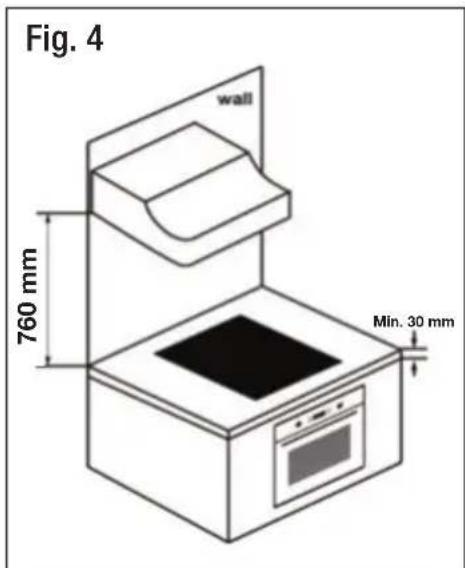
Ventilation and space requirements
- Make sure to observe the clearance requirements as illustrated in Fig. 3 and Fig. 4.
- The minimum distance between the cooktop and the cupboard above the hotplate must be 760 mm.
text_image
Fig. 3 A B E C D| A(mm) | B(mm) | C(mm) | D | EAir exit |
| 760 50 min. 20 | min. Air intake 5 mm | |||
text_image
Fig. 4 wall 760 mm Min. 30 mmInstallation (Cont.)
Inserting and fixing the cooktop
- Carefully lower the cooktop into the aperture hole that you have cut out.
- Using the screws provided, affix the 4 mounting brackets to the underside of the cooktop, as illustrated (Fig. 5).

text_image
Fig. 5 A Screw B Bracket C Screw hole D Base- IMPORTANT! Adjust the bracket position to suit your benchtop thickness (Fig. 6), making sure that after installation, the brackets will not touch the inner surfaces of the benchtop.

text_image
Cooktop Benchtop Bracket A Screw Screw Cooktop Benchtop Bracket B Fig. 6Installation (Cont.)
Electrical connection
WARNING: Electric Shock Hazard! The connection to the electricity supply, and any eventual alterations to the domestic wiring system, must only be made by a licensed electrician and following all applicable regulations in force. Connection to an appropriately earthed wiring system is essential and mandatory. Failure to follow this advice may result in electric shock or death.
Before the electrical connection
Before connecting the cooktop to the mains power supply, the installer must check and ensure that:
- The domestic wiring system is suitable for the power drawn by the cooktop (see page 31).
- The supply system has an effective earth connection and corresponds to the standards in force.
- The voltage corresponds to the value given on the appliance rating plate.
- The power supply cable sections can withstand the load specified on the rating plate.
- The circuit breaker can be reached easily when the appliance is installed.
- The power supply cord is in good working order. (A damaged cord must be replaced by the manufacturer or a qualified service technician in order to avoid a hazard.)
- The electrical circuit for the appliance incorporates an isolating switch providing full disconnection from the power supply.
Power supply cord
- The power supply cord must be so positioned that no point can reach a temperature of 50^ C higher than the ambient temperature.
- The power cord must not be bent or compressed. The cord can be looped, if necessary, but make sure that is not kinked or trapped when the cooktop is in position.
- Care must be taken to avoid the cable being in contact with hot parts of the appliance.
- If the appliance is to be connected directly to the mains electricity supply, an omnipolar circuit breaker must be installed with a minimum gap of 3mm between the contacts.
- The bottom surface and the power supply cord must NOT be accessible after installation.
Installation (Cont.)
Connecting the cooktop to the mains power supply
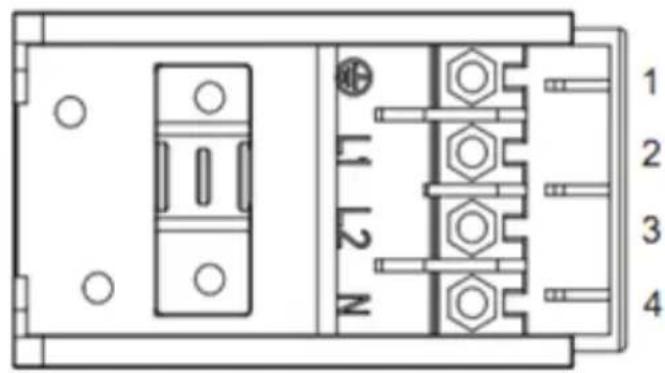
The power supply should be connected in compliance with any relevant standards, or a single-pole circuit breaker, according to the connection method shown in Fig. 7.
Fig. 7
text_image
1 2 3 4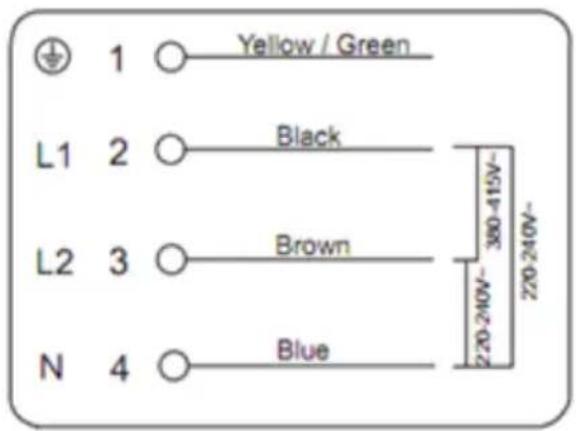
text_image
1 ○ Yellow / Green L1 2 ○ Black L2 3 ○ Brown N 4 ○ Blue 220-240V~ 380-415V~ 220-240V~
text_image
1 2 3 4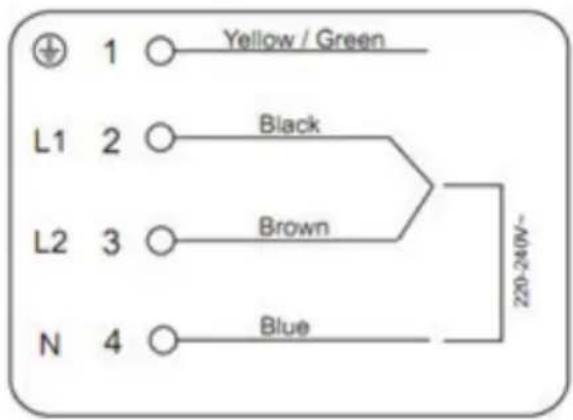
text_image
1 ○ Yellow / Green L1 2 ○ Black L2 3 ○ Brown N 4 ○ Blue 220-240V~Installation (Cont.)
Wiring diagram (Fig. 8)

text_image
1200W 6,30,54 L2 1800W 15,39,63 1800W 15,39,63 L3 1200W 6,30,54 N1 L1 C 1 C 2 C 3 C 4 D1 D2 D3 D4 N2
text_image
L N Control line Earth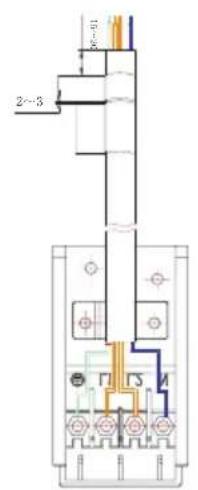
text_image
2~3 10~40 F1 F2 MGetting Started
Before first use
When your new ceramic cooktop has been professionally installed, follow a few simple steps to prepare it for your first use.
- Most importantly, read this manual thoroughly to familiarise yourself with the appliance. Pay particular attention to the safety instructions on pages 3-5. Refer to pages 6-7 for a picture and list of the controls.
- Remove any protective film that may still cover parts of the cooktop.
- Wipe the cooktop surface with a damp cloth or sponge to remove any dust that has accumulated during transport and installation. Dry thoroughly.
- To help eliminate any ‘new’ smell that exists and evaporate any humidity that may have formed on the heating elements during transit, switch on one cooking zone at a time and let it heat up for 5 minutes at the maximum setting. Place a saucepan filled half full with cold water on each zone as you burn it off. Do not burn off more than one zone at a time. Any odour or smoke can be disregarded safely; ensure good ventilation.
- See pages 19–20 for basic operation instructions.
NOTE: The first few times the cooktop is used, it may give off an acrid, burning smell. This is no cause for concern. The smell will disappear completely with repeated use. Ensure good ventilation.
Touch control operation
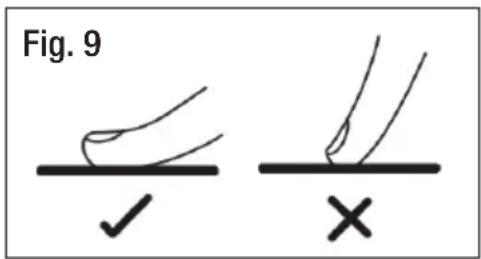
- All operations are performed by means of the touch controls on the control panel. They respond to touch, so there is no need to apply any pressure. Use the ball of your finger, not its tip (Fig. 9). You will hear a beep each time a touch is registered.
- Make sure the controls are always clean, dry, and that there is no object (e.g. a utensil or a cloth) covering them. Even a thin film of water may make the controls difficult to operate.
• Each touch control has a corresponding visual display (indicator light).
text_image
Fig. 9 ✓ ×Getting Started (Cont.)
Choosing the right cookware
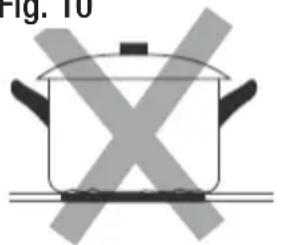
Keep the following points in mind when selecting pots and pans for use on the ceramic cooktop. They will ensure efficient heat transfer, save you energy and cooking time, and help you keep the cooktop in optimum condition. It is particularly important that the bases of the pots and pans you are using are in good condition.
Do not use cookware with jagged edges or a curved base (Fig. 10).
Fig. 10
natural_image
Simple line drawing of a cooking pot with crossed-out X marks (no text or symbols)
natural_image
Simple line drawing of a cooking pot with crossed X marks, no text or symbols present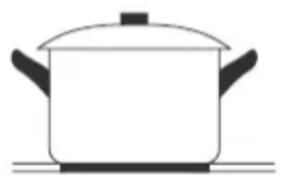
natural_image
Simple line drawing of a cooking pot on a stove (no text or symbols)Make sure that the base of your pan is smooth, sits flat against the glass, and is the same size as the cooking zone. Always centre your pan on the cooking zone (Fig. 11).
Fig. 11

natural_image
Illustration of a cooking pot with crossed-out X marks, labeled Fig. 11 (no text on pot itself)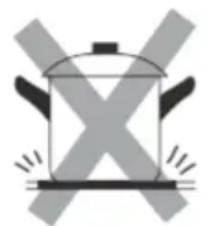
natural_image
Simple line drawing of a cooking pot with X-shaped marks and flames (no text or symbols)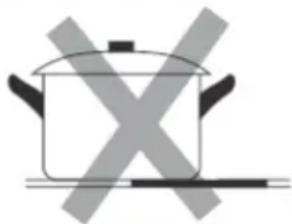
natural_image
Simple line drawing of a cooking pot with crossed-out X marks (no text or symbols)
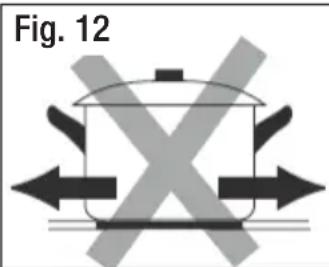
Always lift pans off the ceramic cooktop – do not slide, or they may scratch the glass (Fig. 12).
text_image
Fig. 12
natural_image
Simple line drawing of a cooking pot with upward and downward arrows indicating direction (no text or symbols)IMPORTANT: Always use appropriate cookware. Never cook directly on the glass surface without a pot or pan.
Instructions
Using the ceramic cooktop
Once the cooktop has been connected to the power supply, the buzzer will emit a beep sound and all indicators light up briefly and then go out. This indicates that the ceramic cooktop has entered the state of standby mode.
To start cooking
- Touch the ON/OFF control to switch on the cooktop (Fig. 13). All indicators will show [-].
- Place a suitable pan on the cooking zone that you want to use (Fig. 14). Make sure the bottom of the pan and the surface of the cooking zone are clean and dry.
- Select a heat setting by touching the or + control (Fig. 15) for the cooking zone you want to use.
IMPORTANT!
- If you do not choose a heat setting within 1 minute, the cooktop will automatically switch off and you will have to start again at step 1.
• Each cooking zone can be set from power level 1 to 9. - You can modify the heat setting at any time during cooking.
- By holding down either of the — or + control, the value will adjust up or down.

text_image
I Fig. 13
natural_image
Line drawing of a cooking pot on a stand, labeled Fig. 14 (no text or symbols on the diagram itself)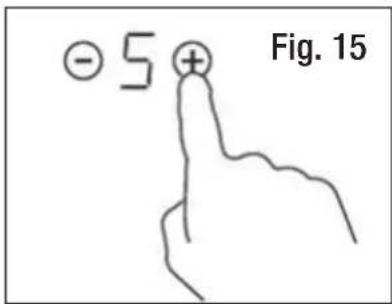
text_image
- 5 + Fig. 15Instructions (Cont.)
When you have finished cooking
- Turn the cooking zone off by touching the control until [0] is shown, or by touching the and + controls at the same time (Fig. 16).
- Turn the whole cooktop off by touching the ON/OFF control (Fig. 17).
Residual heat warning
After a cooking zone is switched off, the residual heat indicator [H] indicates that the temperature of the zone is still high enough to cause injury (Fig. 18). It will disappear when the surface has cooled down to a safe temperature.
The residual heat indicator can also be used as an energy saving function, for keeping food warm on a cooking zone that is still hot.

text_image
OR Fig. 16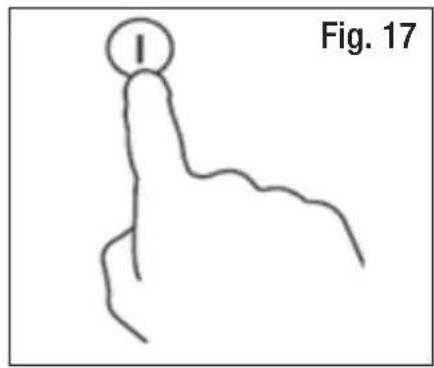
text_image
I Fig. 17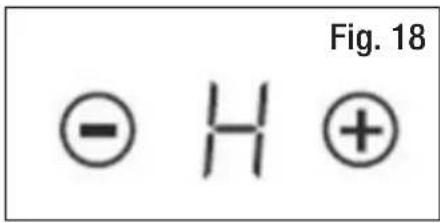
text_image
Fig. 18 ⊖ H ⊕CAUTION!
- Beware of hot surfaces! Do not touch a cooking zone when the residual heat indicator is illuminated.
- The ceramic cooktop surface is tough; however, it is not unbreakable and can be damaged, especially if a sharp or hard object falls on it with some force.
- Do not use the cooktop if the surface is broken or cracked. Switch off the appliance immediately to avoid the possibility of electric shock and contact our after sales support centre for advice.
Instructions (Cont.)
Safety features
Child lock
You can lock the controls to prevent unintended use, for example, children accidentally turning the cooking zones on. When the controls are locked, all the controls are disabled, except the ON/OFF control.
- To lock the controls, touch the child lock Ⓟ control. The timer indicator will show [ Lo ].
- To unlock the controls, make sure the ceramic hob is turned on, then touch and hold the child lock ⏻ control for a while. You can now start using the cooktop again.
IMPORTANT! When the cooktop is in child lock mode, all controls are disabled except the ON/OFF control. In an emergency you can always turn the cooktop off with the ON/OFF control, but the next time you want to use it, you must unlock it first.
Over-temperature protection
The ceramic cooktop is equipped with a temperature sensor that monitors the temperature inside the cooktop. When an excessive temperature is detected, the cooktop will stop operation automatically.
Auto shut-down
If a cooking zone is accidentally left on, a safety shut-down will activate after a certain period of time and switch off the cooking zone. The length of time depends on the set power level for that zone (Table 1).
For example, if a cooking zone is left unattended while set to heat at power level 4, it will switch off automatically after 4 hours.
| Table 1: Auto Shut-Down | |
| Power Level | Time Limit(hours) |
| 1–3 8:00 | |
| 4–6 4:00 | |
| 7–9 2:00 | |
Instructions (Cont.)
Using the timer
Your cooktop timer can be set (for up to 99 minutes) in two different ways:
- You can use it as a minute minder. In this case, the timer will NOT turn any cooking zone off when the set time is up.
- You can set it to turn one cooking zone off (or more than one) after the set time is up.
Timer overview

flowchart
graph TD
    A["Timer controls"] --> B["36"]
    B --> C["Minute display shows the number of minutes"]
    D["Time scale: 1s, 2s"] --> E["+"]
    E --> F["Time scale: 1s, 2s"]
Instructions (Cont.)
Using the timer as a minute minder
NOTE: You can use the timer as a minute minder function, provided that:
(a) the cooktop is turned on
(b) you have at least one cooking zone in use.
- Adjust the timer setting by touching the timer + or - controls (Fig. 20). The minute minder indicator will start flashing and will show in the timer display.
* Touch the timer + or - controls once to increase or decrease the time by 1 minute.
* Touch and hold the timer + or - controls increase or decrease the time by 10 minutes.
* If the setting time exceeds 99 minutes, the timer will automatically return to 0.
- To cancel the timer, touch the timer + and - controls together (Fig. 21) and in the minute display, [00] will be shown in first and then [--].
- When the time is set, the countdown will start immediately. The display will show the remaining time and the timer indicator will flash for 5 seconds (Fig. 22).
- At the end of the set time, the buzzer will beep for 30 seconds and the timer indicator will show [ -- ] (Fig. 23).

text_image
Fig. 20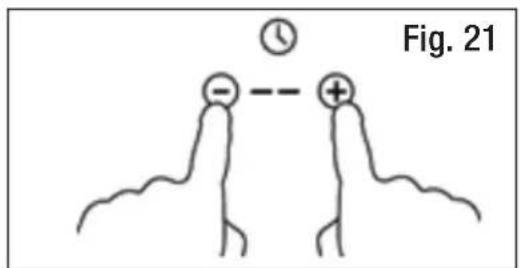
text_image
Fig. 21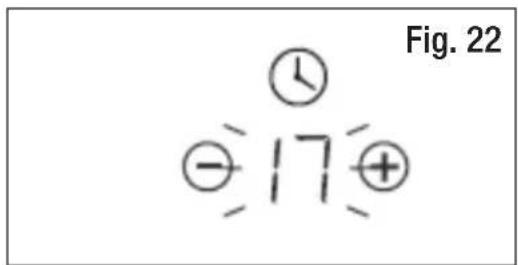
text_image
Fig. 22 ① ② 17 ⊕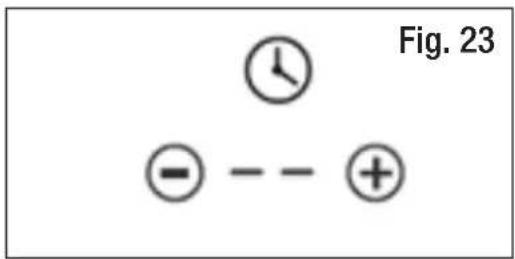
text_image
Fig. 23 - - - +IMPORTANT!
This timer function is a minute minder only, it does not turn the cooking zone OFF.
Instructions (Cont.)
Setting the timer to turn one cooking zone off
-
Touch the + or - control of the corresponding cooking zone you want to set the timer for (Fig. 24).
-
Set the time by touching the timer + or - controls (Fig. 25).
* Touch the timer + or - controls once to increase or decrease the time by 1 minute.
* Touch and hold the timer + or - controls increase or decrease the time by 10 minutes.
* If the setting time exceeds 99 minutes, the timer will automatically return to 0.
-
To cancel the timer, touch the timer and controls together (Fig. 26) and in the minute display, [00] will be shown in first and then [--].
-
When the time is set, the countdown will start immediately. The display will show the remaining time and the timer indicator will flash for 5 seconds (Fig. 27).
-
At the end of the set time, the corresponding cooking zone will be switched off automatically. The display will show [H], indicating that the zone is still hot (Fig. 28).
NOTE:
- The illuminated red dot near the power level indicates that the respective zone is selected (Fig. 29).
- If you want to change the time after the timer is set, you have to start from step 1.

text_image
-5 + Fig. 24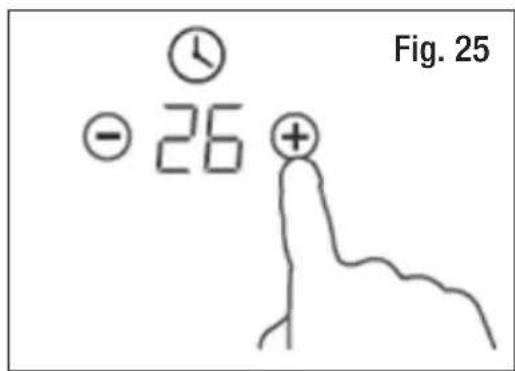
text_image
Fig. 25 - 26 +
text_image
Fig. 26
text_image
Fig. 27 -39+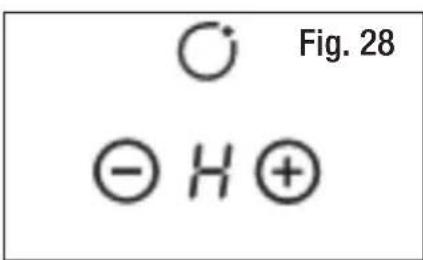
chemical
Diagram of molecular orbital symbols showing O, H, and H+ orbitals with Figure 28 label
text_image
Fig. 29 ⊖ 5⊕Instructions (Cont.)
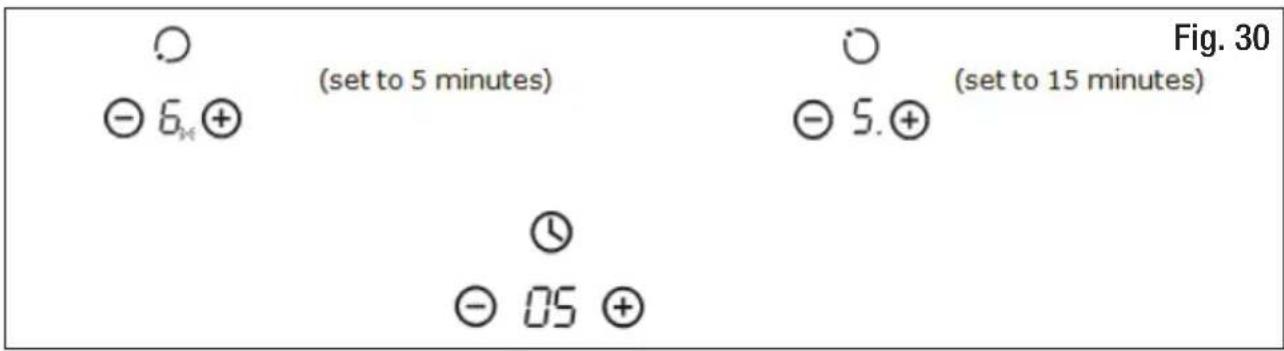
Setting the timer to turn more than one cooking zone off
To set timers for more than one cooking zone, proceed as follows:
-
Set the timer for each cooking zone, as described on page 24.
-
If you have set a timer for multiple cooking zones, the timer indicator shows the shortest time set. For example, if you have set a 5 minute timer for one zone and a 15 minute timer for another zone, the timer indicator shows [5] (Fig. 30).
NOTE: The red dot next to the power level indicator will flash.
text_image
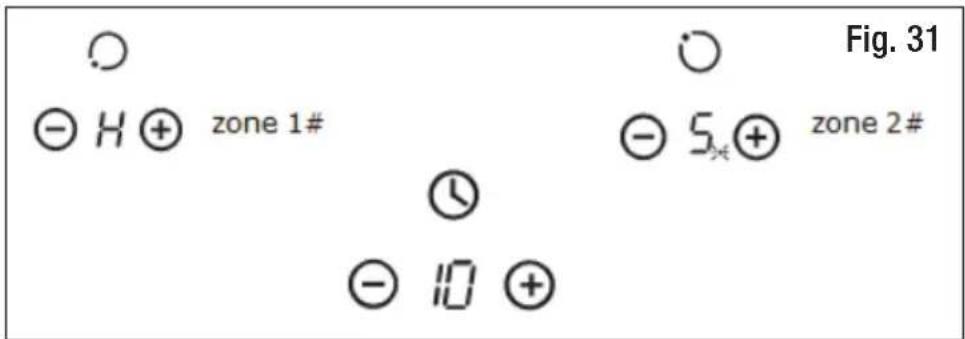
(set to 5 minutes) ( set to 15 minutes ) Fig. 30 - 6. + - 5. + (set to 5 minutes) (set to 15 minutes) (set to 5 minutes) (set to 15 minutes) (set to 5 minutes) (set to 15 minutes) (set to 5 minutes) (set to 15 minutes)- When the countdown timer for the shortest set time expires, the corresponding cooking zone will be switched off automatically. The display will then show the new time remaining for the other cooking zone, and its red dot indicator will flash (Fig. 31).
text_image
Figure. 31 Zone 1# Zone 2# zone 1# zone 2#- When the next cooking timer expires, the corresponding cooking zone will be switched off automatically and the display will show [H], indicating that the zone is still hot.
NOTE:
- The illuminated red dot next to the power level indicates that the respective zone is selected.
- If you want to change the time after the timer is set, you have to start from step 1.
Instructions (Cont.)
Cooking guidelines
IMPORTANT!
Take utmost care when frying as oil and fat heat up very quickly. At extremely high temperatures oil and fat will ignite spontaneously and this presents a serious fire risk.
General cooking tips
- Always place a (filled) pot on the cooking zone before switching it on. Do not heat up a zone without pot, or with an empty pot. Do not let pots boil dry.
- Using a lid will reduce cooking times and save energy by retaining the heat.
- Minimise the amount of liquid or fat to reduce cooking times.
- Start cooking on a high setting and reduce the setting when the food has heated through or has comes to the boil.
- Do not leave pans with dishes based on fats and oils unattended on a switched-on cooking zone as hot fat can spontaneously catch fire.
- Never use a cooking zone to warm plates.
• Always switch off the cooking zone before removing the pot or pan.
Searing meat (such as steak)
Follow the steps below to cook juicy, flavoursome steak, or sear other meats.
- Stand the meat at room temperature for about 20 minutes before cooking.
- Heat up a heavy-based frypan.
- Brush both sides of the steak with oil. Drizzle a small amount of oil into the hot pan and then lower the meat into the hot pan.
- Turn the steak only once during cooking. The exact cooking time will depend on the thickness of the steak and how cooked you want it. Times may vary from about 2–8 minutes per side. Press the steak to gauge how cooked it is – the firmer it feels the more well done it will be.
- Leave the steak to rest on a warm plate for a few minutes to allow it to relax and become tender before serving.
Simmering, cooking rice
- Simmering occurs below boiling point, at around 85^ C, when bubbles are just rising occasionally to the surface of the cooking liquid. It is the key to delicious soups and tender stews because the flavours develop without overcooking the food. Egg-based and flour-thickened sauces should also be cooked below boiling point.
- Some tasks, including cooking rice by absorption, may require a higher setting higher than the lowest to ensure the food is cooked properly.
Instructions (Cont.)
Stir-frying
- Choose a ceramic compatible, flat-based wok or a large fry pan.
- Have all the ingredients and equipment ready. Stir-frying should be quick. If cooking large quantities, cook the food in several smaller batches.
- Preheat the pan briefly and add two tablespoons of oil.
• Cook any meat first, put it aside and keep warm. - Stir-fry the vegetables. When they are hot but still crisp, turn the cooking zone to a lower setting, return the meat to the pan and add your sauce.
- Stir the ingredients gently to make sure they are heated through. Serve immediately.
Preventing spillage
• Take care when cooking to prevent liquids spilling onto the cooktop surface.
- Food or liquid with a high sugar content may damage the cooktop if it comes into contact with the ceramic cooktop surface. Wipe up any spillages immediately; however, this may not prevent the cooktop surface from becoming damaged, so take utmost care.
Heat settings
The settings in Table 2 are guidelines only. They are affected by the type of cookware used and the amount of food to be cooked. Use the settings to experiment with the cooktop to find the settings that best suit you.
| Table 2: Heat Setting Guidelines | |
| Heat Setting Cooking Method | |
| 1-2 | Delicate, slow warming of small amounts of foodMelting chocolate or butterHeating foods that burn quicklyGentle simmering |
| 3-4 | ReheatingRapid simmeringCooking rice |
| 5-6 Cooking pancakes | |
| 7-8 | SautéingCooking pasta |
| 9 | Stir-fryingSearingBringing soup to the boil, boiling water |
FAQs & Troubleshooting Guide
If you experience problems with your ceramic cooktop, or it appears not to be operating correctly, check in Table 3 below for solutions to common problems. If none of the solutions offered help you solve your problem, please contact our after sales support centre for advice; contact details are printed at the back of this manual. Do not attempt to repair the appliance yourself.
| Table 3: Troubleshooting Guide | ||
| Problem Possible Causes Solution | ||
| The cooktop cannot be turned on. | No power. | Make sure the cooktop is connected to the power supply and that it is switched on. |
| Check whether there is a power outage in your home or area. If you have checked everything and the problem persists, call a qualified technician, or our after sales support centre. | ||
| The touch controls are unresponsive. | The controls are locked. | Unlock the controls (see the section ‘Safety Features’). |
| The touch controls are difficult to operate. | There may be a slight film of water over the controls or you may be using the tip of your finger when touching the controls. | Make sure the touch control area is dry and use the ball of your finger when touching the controls. |
| The glass is being scratched. | Rough-edged cookware. | Use cookware with flat and smooth bases (see the section ‘Choosing the Right Cookware’). |
| Unsuitable, abrasive scourer or cleaning products being used. | See the section ‘Cleaning and Maintenance’. | |
| Some pans make crackling or clicking noises. | This may be caused by the construction of your cookware (layers of different metals vibrating differently). | This is normal for cookware and does not indicate a fault. |
Other Useful Information
Cleaning and maintenance
GENERAL CAUTIONS
- Before cleaning the cooktop or carrying out any maintenance, always switch off the appliance.
- Always allow the cooktop surface to cool before cleaning the cooktop.
- You may find it easier to clean some deposits while the cooktop surface is still warm. However, wait until the surface is safe to touch and take care not to burn yourself if cleaning it when it is still warm.
- Residues from cleaning agents left on the cooktop surface will damage it. Always remove residues with warm water and a little washing-up liquid.
- Never use abrasive or harsh cleaning agents (such as scouring powders, abrasive stones, steel wool, wire brushes and so on), corrosive spray products or sharp objects that may scratch the ceramic glass surface, causing irreversible damage.
- Take care to avoid injury when using a ceramic cooktop scraper. Retract the blade when you have finished with it, and keep it out of reach of children.
Everyday cleaning of the glass surface
Remove fingerprints, marks, stains left by food of non-sugary spill-overs daily from the glass surface.
- Use the ON/OFF control to switch off the cooktop.
- Apply a cooktop cleaner while the glass is still warm, but not hot!
- Rinse and wipe dry with a clean cloth or paper towel. This is important! Leaving cleaning residue on the cooktop may stain the glass.
- Switch the power to the cooktop back on.
NOTE:
- When the power to the cooktop is switched off, there will be no hot surface indication but the cooking zone may still be hot! Take extreme care.
- Heavy-duty scourers, some nylon scourers and harsh/abrasive cleaning agents may scratch the glass surface. Take care and check suitability of your cleaning agents.
- Never leave cleaning residue on the cooktop; the glass may become stained.
Other Useful Information (Cont.)
Boil-overs, melts, and hot sugary spills on the glass
Remove these immediately with a fish slice, palette knife or razor blade scraper suitable for ceramic glass cooktops, but beware of hot cooking zone surfaces.
- Use the ON/OFF control to switch off the cooktop.
- Hold the blade or utensil at a 30^ angle and scrape the soiling or spill to a cool area of the cooktop.
- Clean up the soiling or spill with a dishcloth or paper towel.
- Follow steps 2 to 4 for ‘Everyday cleaning of the glass surface’, on page 29.
NOTE:
- Remove stains left by melts and sugary food or spill-overs as soon as possible. If left to cool on the glass, they may be difficult to remove or even permanently damage the glass surface.
- CAUTION: Cut Hazard! When the safety cover is retracted, a palette knife or ceramic cooktop scraper is very sharp. Use with extreme care and always store it safely and out of reach of children. Failure to use caution could result in injury or cuts.
Spill-overs on the touch controls
- Use the ON/OFF control to switch off the cooktop.
- Soak up the spill using a dry cloth or paper towel.
- Wipe the touch control area with a clean damp sponge or cloth.
- Wipe the area completely dry with a paper towel.
- Switch the power to the cooktop back on.
NOTE:
- The cooktop may beep and turn itself off, and the touch controls may not function while there is liquid on them.
- Make sure you wipe the touch control area dry before turning the cooktop back on.
Other Useful Information (Cont.)
Service, repair and spare parts
CAUTION!
- This appliance must only be serviced by authorised personnel.
- If your cooktop appears not to be operating correctly, contact our after sales support centre. Do not attempt to repair the appliance yourself!
Our after sales support centre stocks a variety of spare parts for the 60 cm ceramic cooktop. To find out more, or to purchase a part, contact the centre at tempo.org/support or on 1300 886 649.
Technical specifications
| Model Number HV-C60CC | |
| Cooking Zones 2x 1800 W (200 mm diameter)2x 1200 W (165 mm diameter) | |
| Supply Voltage 220-240 V~ / 380-415 V~ | |
| Frequency 50 Hz or 60 Hz | |
| Installed Electric Power 5500–6600 W | |
| Product Weight approx. 9 kg | |
| Product Size 590 (L) x 520 (W) x 55 (H) mm | |
| Cut-out Dimensions 560 (A) x 490 (B) mm | |
Compliance
This product has been fully tested and meets all requirements as set out by standards AS/NZS 60335.1 and AS/NZS 60335.2.6.

The RCM Mark (Regulatory Compliance Mark) indicates that the product complies with the relevant guidelines of the ACMA as well as corresponding government requirements for the safety of electrical devices.
Other Useful Information (Cont.)
Responsible disposal


text_image
PLEASE DISPOSE OF THOUGHTFULLYPackaging materials are recyclable. Please dispose of them responsibly for recycling.
At the end of its working life, do not throw this appliance out with your household waste. Electrical and electronic products contain substances that can have a detrimental effect on the environment and human health if disposed of inappropriately. Observe any local regulations regarding the disposal of electrical consumer goods and dispose of it appropriately for recycling.
Contact your local authorities for advice on recycling facilities in your area. Or find recycling scheme services listed on Planet Ark's website at www.recyclingnearyou.com.au, or call Planet Ark on 1300 733 712.
Other Useful Information (Cont.)
Licensed installer details
Please ask your licensed installer/electrician to fill in the details below (or in the INSTALLATION manual) so you have them on record should you need to contact the installer in the future.
Proof of professional installation is also required for warranty claims.
Please fill in the details below:
Name of licensed installer: ....
Licence number: ....
Date of installation: ....
Signature: ....
This page has been left blank intentionally
This page has been left blank intentionally
Warranty returns
Should you for any reason need to return this product for a warranty claim, make sure to include all accessories with the product.
Product does not work?
If you encounter problems with this product, or if it fails to perform to your expectations, make sure to contact our After Sales Support Centre on (AU) 1300 886 649 or (NZ) 0800 836 761 for advice.
Distributed by Tempo (Aust) Pty Ltd ABN 70 106 100 252
PO BOX 132, Frenchs Forest NSW 1640, Australia
Customer Helpline:
(AU) 1300 886 649 (NZ) 0800 836 761
Web Support: tempo.org/support
For an electronic copy of this manual, please contact our after sales support centre.
IM Version No: V1.0
Issue: December 2021