ZXS900S - Water heater Monogram - Free user manual and instructions
Find the device manual for free ZXS900S Monogram in PDF.

User questions about ZXS900S Monogram
0 question about this device. Answer the ones you know or ask your own.
Ask a new question about this device
Download the instructions for your Water heater in PDF format for free! Find your manual ZXS900S - Monogram and take your electronic device back in hand. On this page are published all the documents necessary for the use of your device. ZXS900S by Monogram.
USER MANUAL ZXS900S Monogram
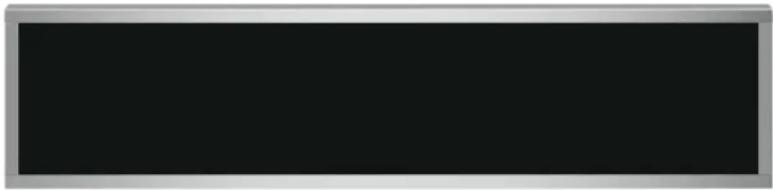
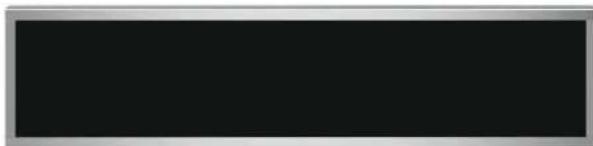
MONOGRAM 30" STAINLESS STORAGE DRAWER
ZXS900SSNSS

MONOGRAM
natural_image
Blank black rectangle with silver border (no text or symbols)
THE MONOGRAM MINIMALIST COLLECTION
Streamlined design and precisely machined metals create a contemporary yet functional aesthetic
LARGE-CAPACITY STORAGE DRAWER
Offering a contemporary yet functional design, this spacious 1.9 cu. ft. drawer stores all your cookware beautifully.
PUSH-TO-OPEN DRAWER
Handle-free, push-to-open drawer adds a touch of elegant simplicity and stylish convenience.
natural_image
Solid black rectangle with a silver border (no text or symbols)SPECIFICATIONS
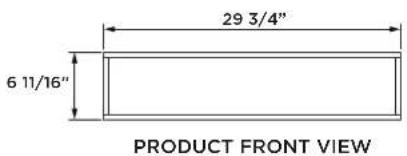
Overall Width 29 3/4" (75.5 cm)
Overall Height 6 11/16" (16.9 cm)
Overall Depth 23 7/16" (59.5 cm)
Drawer Capacity 190 cu. ft. (538 l)
Standard Cut-out Width 28 1/2" (72.4 cm)
Standard Cut-out Height 5 5/16" (15.1 cm)
Standard Cut-out Depth 22 1/8" (53.6 cm)
Net Weight 54 lbs. (24.5 kg)
Approx. Shipping Weight 60 lbs. (27.2 kg)
For more details refer to the installation instructions for this product.
OVERALL DIMENSIONS
text_image
29 3/4" 6 11/16" PRODUCT FRONT VIEW
text_image
28 1/8" 23 7/16" PRODUCT TOP VIEW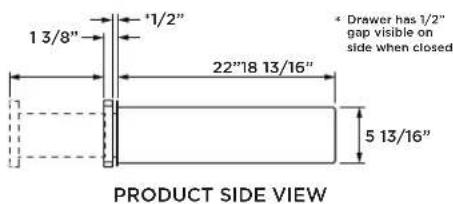
text_image
1 3/8" '1/2" 22"18 13/16" 5 13/16" * Drawer has 1/2" gap visible on side when closed. PRODUCT SIDE VIEWDimensions in parentheses are in centimeters unless otherwise noted. Actual product dimensions may vary due to manufacturing tolerances.
STANDARD INSTALLATION
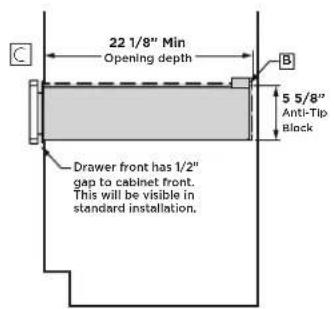
text_image
22 1/8" Min Opening depth 5 5/8" Anti-Tip Block Drawer front has 1/2" gap to cabinet front. This will be visible in standard installation.STANDARD INSTALLATION SIDE VIEW

text_image
28 1/2" Opening width 7/16" Product Overlap 5 7/8" Opening height 5/8" Product Overlap 3/8" Product Overlap A DSTANDARD INSTALLATION FRONT VIEW
FLUSH INSET INSTALLATION
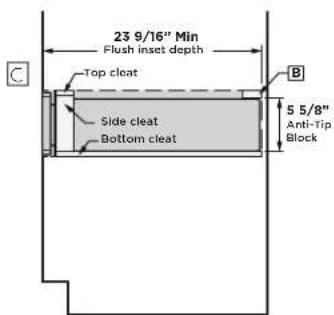
text_image
23 9/16" Min Flush inset depth Top cleat Side cleat Bottom cleat 5 5/8" Anti-Tip BlockFLUSH INSET INSTALLATION SIDE VIEW
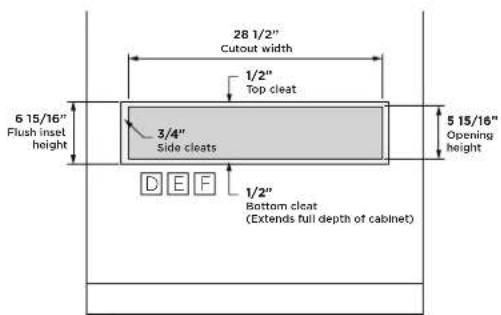
text_image
28 1/2" Cutout width 1/2" Top cleat 6 15/16" Flush inset height 3/4" Side cleats 1/2" Bottom cleat (Extends full depth of cabinet) 5 15/16" Opening heightFLUSH INSET INSTALLATION FRONT VIEW
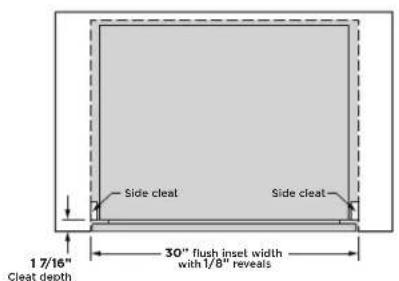
text_image
Side cleat Side cleat 17/16" Cleat depth 30" flush inset width with 1/8" revealsFLUSH INSET INSTALLATION TOP VIEW
HELPFUL TIPS
A If you are installing in frameless cabinets, it may be necessary to install 1/2" wide cleats to accept drawer mounting screws. See drawer for mounting screw locations.
Install an anti-tip block against rear wall, 5 5/8" from floor of cutout to bottom of block. The anti-tip block must be installed to prevent the drawer from tipping forward when opened and loaded. Failure to add the anti-tip block could result in personal injury.
When installing the storage drawer below a cabinet drawer, a solid barrier must be installed at least above the storage drawer to block access. Use any solid material such as 1/4" thick plywood. Allow at least 1/4" air gap between the barrier and the top of the storage drawer. Observe the 3/8" min. above the toe kick installation height.
The storage drawer may be supported by either a solid bottom or 2"x2" or 2"x4" runners. The support must be level and rigidly mounted, flush with the bottom edge of the cut-out (there is no way to level the drawer once it has been installed, so make sure that the supports are level). The floor or runners must be capable of supporting at least 65 lbs.
Cabinet surfaces must be an appearance finished surface for flush installation.
F Cleats may be visible and should be finished to match cabinetry.
For more details refer to the installation instructions for this product.
INSTALLATION BELOW COOKTOP
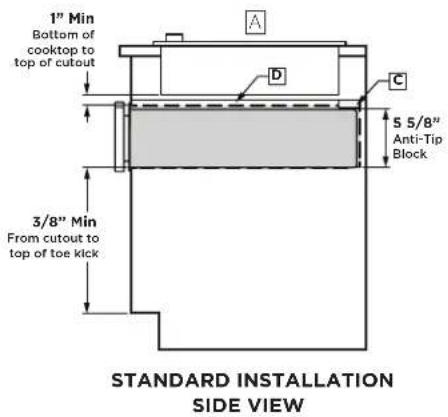
text_image
1" Min Bottom of cooktop to top of cutout A D C 5 5/8" Anti-Tip Block 3/8" Min From cutout to top of toe kick STANDARD INSTALLATION SIDE VIEW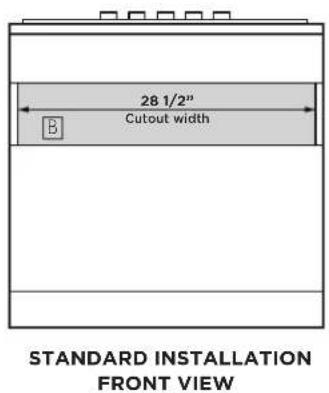
text_image
28 1/2" Cutout width STANDARD INSTALLATION FRONT VIEWtext_image
1 3/8" Min Between cutoutsHELPFUL TIPS
A Additional clearance between cut-outs may be required. Check to be sure that oven supports above the storage drawer location do not obstruct the required interior 23-1/2" depth and 5-7/8" height.
B If you are installing in frameless cabinets, it may be necessary to install 1/2" wide cleats to accept drawer mounting screws. See drawer for mounting screw locations.
Install an anti-tip block against rear wall, 5 5/8" from floor of cutout to bottom of block. The anti-tip block must be installed to prevent the drawer from tipping forward when opened and loaded. Failure to add the anti-tip block could result in personal injury.
When installing the storage drawer below a cooktop, a solid barrier must be installed at least 1" from the lowest point of the bottom of cooktop burner box to the top of the cut-out. Use any solid material such as 1/4" thick plywood. Allow at least 1/4" air gap between the barrier and the top of the storage drawer. Observe the 3/8" min. above the toe kick installation height.
When installing two storage drawers side by side, install them in separate cut-outs and allow a 1-3/4" min. gap between each cut-out.
For more details refer to the installation instructions for this product.
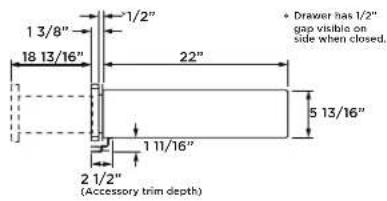
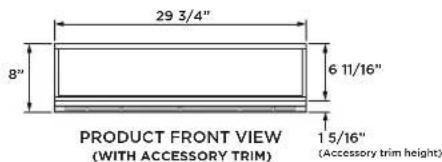
INSTALLATION WITH BOTTOM TRIM
text_image
1 3/8" 18 13/16" 1/2" 22" 5 13/16" 1 11/16" 2 1/2" (Accessory trim depth) * Drawer has 1/2" gap visible on side when closed.PRODUCT SIDE VIEW (WITH ACCESSORY TRIM)
text_image
29 3/4" 8" 6 11/16" PRODUCT FRONT VIEW (WITH ACCESSORY TRIM) 1 5/16" (Accessory trim height)
text_image
28 1/8" 23 7/16" PRODUCT TOP VIEW (WITH ACCESSORY TRIM)
text_image
23 9/16" Min Flush inset depth Top cleat Side cleat Bottom cleat (Bottom cleat is set back from top and side cleats.) 2 3/4" 5 A B A B FLUSH INSERT INSTALLATION SIDE VIEW (WITH ACCESSORY TRIM)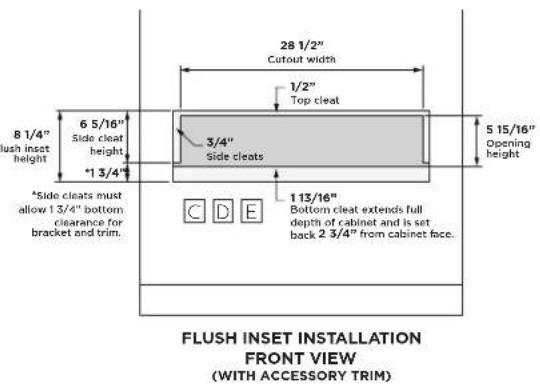
text_image
28 1/2" Cutout width 1/2" Top cleat 8 1/4" flush inset height 6 5/16" Side cleat height *1 3/4" 3/4" Side cleats 5 15/16" Opening height 113/16" Bottom cleat extends full depth of cabinet and is set back 2 3/4" from cabinet face. C D E *Side clears must allow 1 3/4" bottom clearance for bracket and trim. FLUSH INSERT INSTALLATION FRONT VIEW (WITH ACCESSORY TRIM)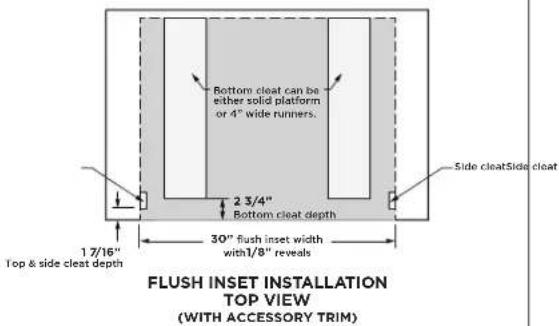
text_image
Bottom cleat can be either solid platform or 4" wide runners. 2 3/4" Bottom cleat depth Side cleat Side cleat 1 7/16" Top & side cleat depth 30" flush inset width with1/8" reveals FLUSH INSERT INSTALLATION TOP VIEW (WITH ACCESSORY TRIM)HELPFUL TIPS
A Install an anti-tip block against rear wall, 5 5/8" from floor of cutout to bottom of block. The anti-tip block must be installed to prevent the drawer from tipping forward when opened and loaded. Failure to add the anti-tip block could result in personal injury.
When installing the storage drawer below a cabinet drawer, a solid barrier must be installed at least above the storage drawer to block access. Use any solid material such as 1/4" thick plywood. Allow at least 1/4" air gap between the barrier and the top of the storage drawer. Observe the 3/8" min. above the toe kick installation height.
The storage drawer may be supported by either a solid bottom or 2"x2" or 2"x4" runners. The support must be level and rigidly mounted, flush with the bottom edge of the cut-out (there is no way to level the drawer once it has been installed, so make sure that the supports are level). The floor or runners must be capable of supporting at least 65 lbs.
☐ Cabinet surfaces must be an appearance finished surface for flush installation.
E Cleats may be visible and should be finished to match cabinetry.
For more details refer to the installation instructions for this product.
INSTALLATION WITH MINIMALIST WALL OVEN AND MINIMALIST ADVANTIUM
text_image
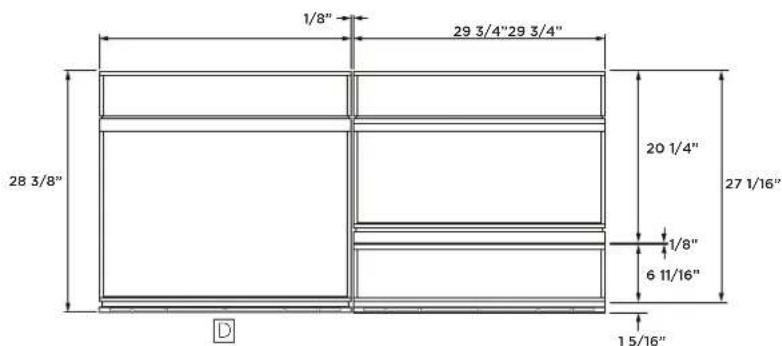
1/8" 29 3/4"29 3/4" 28 3/8" 20 1/4" 27 1/16" 1/8" 6 11/16" 1 5/16"PRODUCT FRONT VIEW (WALL OVEN & DRAWER HAVE ACCESSORY FLUSH WALL OVEN TRIM)
text_image
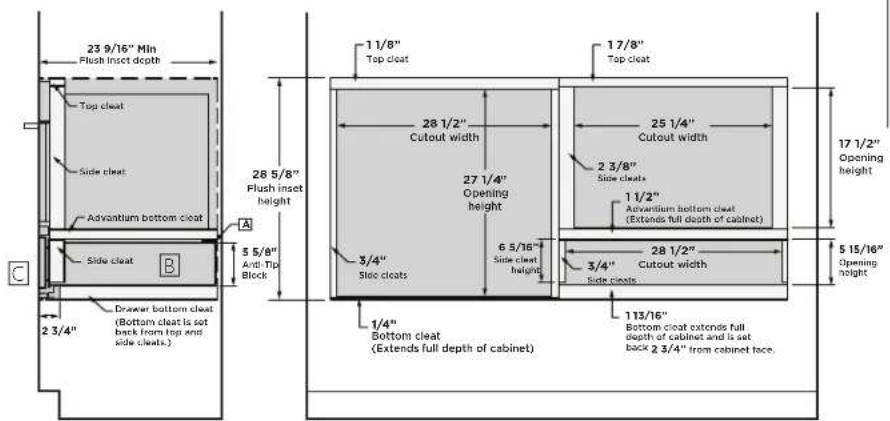
23 9/16" Min Flush inset depth Top cleat Side cleat Advantium bottom cleat A 5 5/8" Anti-Tip Block B 2 3/4" Drawer bottom cleat (Bottom cleat is set back from top and side cleats.) 1 1/8" Top cleat 28 5/8" Flush inset height 27 1/4" Opening height 3/4" Side cleats 6 5/16" Side cleat height 1/4" Bottom cleat (Extends full depth of cabinet) 113/16" Bottom cleat extends full depth of cabinet and is set back 2 3/4" from cabinet face. 17 1/2" Opening height 2 3/8" Side cleats 25 1/4" Cutout width 11/2" Advantium bottom cleat (Extends full depth of cabinet) 2 3/8" Cutout width 3/4" Side cleats 17 1/2" Opening height 5 15/16" Opening heightFLUSH INSET INSTALLATION
SIDE VIEW
FLUSH INSET INSTALLATION FRONT VIEW

text_image
Side cleat 1 7/16" Cleat depth Center cleat 1 7/16" Cleat depth Bottom cleat can be either solid platform or 4" wide runners. 2 3/4" Drawer bottom cleat depth Side cleat 59 7/8" flush inset width with 1/8" revealsFLUSH INSET INSTALLATION TOP VIEW
HELPFUL TIPS
Install an anti-tip block against rear wall, 5 5/8" from floor of cutout to bottom of block. The anti-tip block must be installed to prevent the drawer from tipping forward when opened and loaded. Failure to add the anti-tip block could result in personal injury.
B The storage drawer may be supported by either a solid bottom or 2"x2" or 2"x4" runners. The support must be level and rigidly mounted, flush with the bottom edge of the cut-out (there is no way to level the drawer once it has been installed, so make sure that the supports are level). The floor or runners must be capable of supporting at least 65 lbs.
Cabinet surfaces must be an appearance finished surface for flush installation. Cleats may be visible and should be finished to match cabinetry.
For optimal finished appearance, Wall Oven must use ZX30VT1 flush vent trim accessory.
For more details refer to the installation instructions for this product.
INSTALLATION UNDER MINIMALIST WALL OVEN
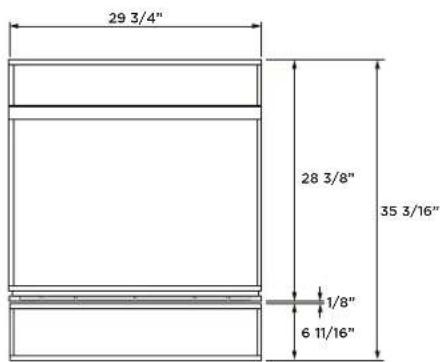
text_image
29 3/4" 28 3/8" 35 3/16" 1/8" 6 11/16"PRODUCT FRONT VIEW
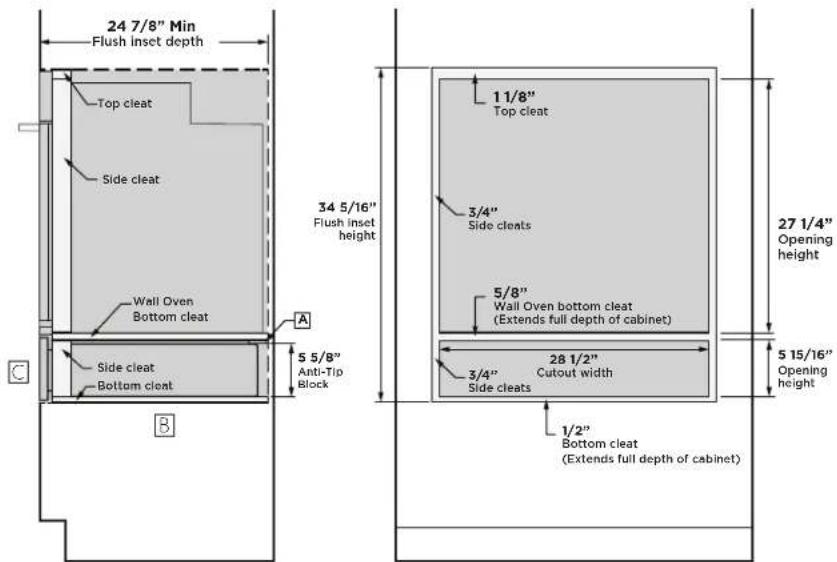
text_image
24 7/8" Min Flush inset depth Top cleat Side cleat Wall Oven Bottom cleat Side cleat Bottom cleat 34 5/16" Flush inset height A 5 5/8" Anti-Tip Block B 1 1/8" Top cleat 3/4" Side cleats 5/8" Wall Oven bottom cleat (Extends full depth of cabinet) 28 1/2" Cutout width 3/4" Side cleats 1/2" Bottom cleat (Extends full depth of cabinet) 27 1/4" Opening height 5 15/16" Opening heightFLUSH INSET INSTALLATION FRONT VIEW

text_image
Side cleat Side cleat 30" flush inset width with 1/8" reveals 1 7/16" Clast downFLUSH INSET INSTALLATION TOP VIEW
HELPFUL TIPS
Install an anti-tip block against rear wall, 5 5/8" from floor of cutout to bottom of block. The anti-tip block must be installed to prevent the drawer from tipping forward when opened and loaded. Failure to add the anti-tip block could result in personal injury.
B The storage drawer may be supported by either a solid bottom or 2"x2" or 2"x4" runners. The support must be level and rigidly mounted, flush with the bottom edge of the cut-out (there is no way to level the drawer once it has been installed, so make sure that the supports are level). The floor or runners must be capable of supporting at least 65 lbs.
Cabinet surfaces must be an appearance finished surface for flush installation. Cleats may be visible and should be finished to match cabinetry.
For more details refer to the installation instructions for this product.