AXDSPX-BMWM25 - Unspecified AXESS - Free user manual and instructions
Find the device manual for free AXDSPX-BMWM25 AXESS in PDF.

User questions about AXDSPX-BMWM25 AXESS
0 question about this device. Answer the ones you know or ask your own.
Ask a new question about this device
Download the instructions for your Unspecified in PDF format for free! Find your manual AXDSPX-BMWM25 - AXESS and take your electronic device back in hand. On this page are published all the documents necessary for the use of your device. AXDSPX-BMWM25 by AXESS.
USER MANUAL AXDSPX-BMWM25 AXESS
natural_image
Collection of electronic components including a black rectangular device, cable connectors, and various colored audio sensors (no visible text or symbols)MetraOnline.com may be used to assist with dash assembly instructions. Simply enter your Year, Make, Model vehicle into the vehicle fit guide and look for the Dash Kit Installation Instructions.

www.MetraOnline.com
BMW MOST25® DSPX Interface
with Amplifier Bypass Harness 2010-2020
Visit axxessinterfaces.com for a current application list
INTERFACE COMPONENTS
- AXDSPX-BMWM25 interface • AXDSPX-BMWM25 harness
• AXBK-1 Bass Knob • LD-MOSTCAP •BMWM25
TOOLS & INSTALLATION ACCESSORIES REQUIRED
- Crimping tool and connectors, or solder gun, solder, and heat shrink
- Tape
- Wire cutter
- Zip-ties
- Multimeter • Tone generator
Google Play Store

Apple App Store
iOS 12.1 or higher

TABLE OF CONTENTS
Interface Features....2
Connections: Adding a Full-Range Amp
& Sub to a Factory System....3
Installing the Fiber Optic Cable....4
Installation 5-6
Quick Setup Steps: AX-DSP-XL App....7
Specifications 8
Troubleshooting....9
LED Feedback 9
Speaker Assignment QR Code 10
Visit AxxessInterfaces.com for more detailed information about the product and up-to-date vehicle specific applications
ATTENTION: With the key out of the ignition,
disconnect the negative battery terminal before
installing this product. Ensure that all installation
connections, especially the air bag indicator lights, are
plugged in before reconnecting the battery or cycling the ignition to test this product.
NOTE: Refer also to the instructions included with the
aftermarket accessory before installing this device.
For Dash Disassembly Instructions, refer to metraonline.com. Enter the year, make, and model of the vehicle in the Vehicle Fit Guide for Radio Install kits.
INTERFACE FEATURES
INTERFACE FEATURES
- Includes a DSP (Digital Signal Processor)
- Designed for MOST® amplified sound systems
- Selectable 31 Band graphic EQ or 5 Band Parametric EQ
• 10 individually assignable outputs - Independent equalization on each of the 10 outputs
- Independent high pass, low pass, and bandpass filters
• Each channel can be delayed independently up to 10ms -
Clipping detection and limiting circuits
-
Bass knob included for level control of subwoofer amp
- Settings adjusted via Bluetooth® in a smart device application (tablet or mobile phone), compatible with both Android and Apple devices
- Read, write, and store configurations for future recall
- Password protect feature available in the mobile app
- Includes an amplifier bypass harness
- Micro-B USB updatable
CONNECTIONS: ADDING A FULL-RANGE AMP & SUB TO A FACTORY SYSTEM

flowchart
graph TD
    A["Factory Amp (must be removed)"] --> B["Factory Amp Harness"]
    B --> C["OR"]
    C --> D["PWR CONNECTION TYPE"]
    D --> E["RCA Jacks (sold separately)"]
    E --> F["Speaker Assignment QR Code located on page 10 of instructions"]
    G["PWR CONNECTION TYPE"] --> H["Type: A\n1 Series\n2 Series"]
    G --> I["Type: B\n3-7 Series\nX Series"]
    J["AXBK-1"] --> K["SS"]
    L["Not Used"] --> M["CS2P"]
    N["An SPDT relay, Metra part number E-123, must be used if the amp turn-on current of all amps exceed 1-amp."] --> O["RCA Jacks (sold separately)"]
    P["Speaker Assignment QR Code located on page 10 of instructions"] --> Q["RCA Jacks (sold separately)"]
    style A fill:#f9f,stroke:#333
    style G fill:#ccf,stroke:#333
    style J fill:#cfc,stroke:#333
    style P fill:#fcc,stroke:#333
REV. 5/10/24 INSTAXDSPX-BMWM25
INSTALLING THE FIBER OPTIC CABLE
Installing the Fiber Optic Cable:
Removal of the original fiber optic connection is required to adapt to the
Media Oriented System Transport
(MOST) interface. The black connector housing uses a different keyway than the MOST interface.
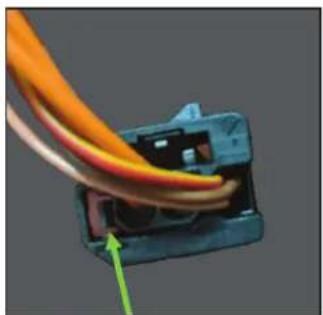
• From the original Fiber Optic Connector: Using a pick tool, carefully pull this tab towards the outside edge for the connector housing. Gently remove the fiber optic insert from the connector. (Figure A)
natural_image
Close-up of a blue plastic electrical connector with wires and a green arrow pointing to a component (no text or symbols visible)(Figure A) (Figure B)
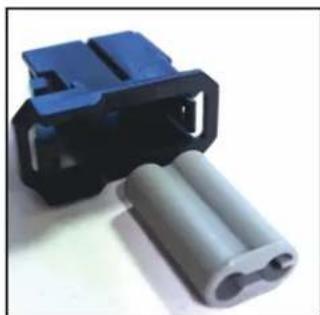
- From the MOST Interface: Using the same steps from above, remove the gray insert from the black fiber optic housing. Replace the gray connector with the fiber optic cables into the MOST interface's black connector housing. (Figure B)
- Plug the MOST connector into the fiber decoder box.
natural_image
Close-up of a blue plastic connector with two white plastic clips attached (no text or symbols visible)INSTALLATION
- Locate the factory amp in the left side of the trunk, unplug all connectors, then remove the amp.
- Install the AXDSPX-BMWM25 harness and make all necessary connections, but leave the Blue/White amp turn-on wire disconnected.
- Connect the MOST ^ fiber optic connector removed from the factory amplifier into the AXDSPX-BMWM25 interface. For fiber optic connection, please refer to page 8, Installing the Fiber Optic Cable.
- Plug the 12-pin and 16-pin connectors from the AXDSPX-BMWM25 harness into the AXDSPX-BMWM25 Interface.
- Download and install the AX-DSP-XL app from the Google Play Store or Apple App Store or use the QR code on the cover.
- Cycle the ignition on.
- Open the app then select the Bluetooth Connection tab. Follow the instructions to pair the mobile device to the interface. (Figure A)

text_image
Not Connected SETUP INSTRUCTIONS BLUETOOTH CONNECTION CONFIGURATION INPUTS CROSSOVER ADJUST EQUALIZER ADJUST DELAY ADJUST LEVELS SCAN DISCONNECT Available Devices To connect to the AX-DSP make sure the ignition is in the on position and the AX-DSP is powered up. Hit the SCAN Button and select your AX-DSP from the available devices. Conformation that you are connected to the DSP will show in the top left corner of your screen. To disconnect from the AX-DSP hit the Disconnect button.(Figure A)
INSTALLATION(CONT.)
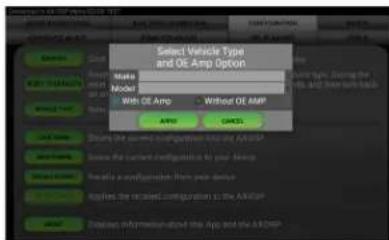
- Scroll to the Configuration tab then select the vehicle type. Press the Lock Down button to save the configuration. (Figure B)
- Connect the Blue/White amp turn-on wire.
- Click the Identify button to confirm the interface is connected properly. A chime will be heard from the front left speaker. Test all functions of the installation for proper operation.
Note: The outputs may need to be configured within the Outputs tab.
- Adjust the DSP settings in the app as desired. Refer to the instructions under the Setup Instructions tab, or online at Axxessinterfaces.com for an explanation of each tab in the app.

text_image
SETUP INSTRUCTIONS BLUETOTH CONNECTION CONFIGURATION INPUTS CROSSOVER ADJUST EQUALIZER ADJUST DELAY ADJUST LEVELS IDENTIFY Click Reset to DEFAULTS Reset on only VEHICLE TYPE Select Select Vehicle Type and OE Amp Option Make: BMW Model: With OE Amp Without OE AMP APPLY CANCEL LOCK DOWN Stores the current configuration into the AX-DSP SAVE CONFIG Saves the current configuration to your device RECALL CONFIG Recalls a configuration from your device APPLY CONFIG Applies the recalled configuration to the AX-DSP ABOUT Displays Information about this App and the AX-DSP(Figure B)
QUICK SETUP STEPS THROUGH AX-DSP-XL APP
Google Play Store

Apple App Store
iOS 12.1 or higher

- Download and install the AX-DSP-XL app from the Google Play Store or Apple App Store.
- Turn Vehicle Ignition on. Make sure the Remote Turn on lead is disconnected.
- Open the app: Select Bluetooth Connections page.
- Select Scan, all available AXDSP devices within range will be displayed. Select your AXDSP and hit connect. (Figure A)
-
Select the Configuration page.
-
Select Vehicle Type Icon
- Select the Vehicle Make:
- Select the Vehicle's model:
- Select With OE Amp
-
Hit Apply (Figure B)
-
Make sure radio volume is all the way down.
- Connect the amp turn-on wire from the AXDSPX-BMWM25 harness to the aftermarket amplifiers.

text_image
Connected STAIN INSTRUCTIONS BLUTTOUTH CONNECTOR CONSOLIDATION MOUNT ON/OFFICER ADJUST ON/OFFICER ADJUST BEAT ADJUST LEVEL SCAN DISCONNECT Available Devices To connect to the AX DSP make sure the ignition is in the on-position and the AX DSP is powered up. Hit the SCAN Button and select your AX DSP from the available devices. Conformation that you are connected to the DSP will show in the top left corner of your screen. To disconnect from the AX DSP hit the Disconnect button(Figure A) (Figure B)
text_image
Select Vehicle Type and OE Amp Option Media Model With OE Amp Without OE AMP APP GAMES- From the Configuration page click the Identify button to confirm that the AXDSPX-BMWM25 is connected properly. If so, a chime will be heard from the front left speaker.
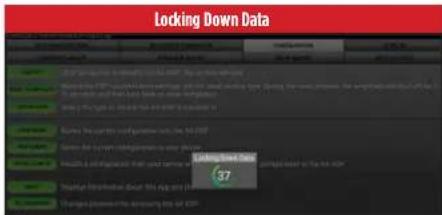
- Press the Lock Down button to save the configuration. (Do not turn ignition off until this process is completed) (Figure C)
- Select the Bluetooth Configurations page and disconnect the DSPX.
- Turn ignition off, close all door then lock vehicle using the key fob. The vehicle will need to sit uninterrupted for 10 minutes while the vehicle goes to sleep. (Make sure Key fob is 15 feet away from the vehicle)
- Unlock Vehicle, turn ignition on and test radio's functions.
- Adjust the DSP settings in the app as desired. Refer to the instructions under the Setup Instructions tab, or online at AxxessInterfaces.com for an explanation of each tab in the app.
text_image
Locking Down Data 37(Figure C)
Last and the most important:
You MUST lock down your configuration and cycle the key!!!
SPECIFICATIONS
Specifications
Input Impedance 1M Ohm
Input Channels 6 High/Low level Selectable
Input Options High Level or Low Level
Input Type Differential-Balanced
Input Voltage
High Level Range 0 - 28v Peak to Peak
Input Voltage
Low Level Range 0 - 4.9v Peak to Peak
Output Channels 10
Output Voltage Up to 5v RMS
Output Impedance 50 Ohms
Equalizer Type 31 Band Graphic EQ, +/- 10dB
THD <0.03%
Frequency Response 20Hz - 20kHz
Crossover 3-Way LPF, BPF, HPF THP per channel
Crossover Type Linkwitz-Riley 24DB Slope, Fixed
Sampling 48kHz
S/N Ratio 105dB @ 5V RMS
General
Operating Voltage 10 - 16VDC
Standby Current Draw -7mA
Operation Current Draw \~150mA
Adjustments/Controls Application via Bluetooth®
Remote Output 12VDC, Signal Sense or with Ignition
TROUBLESHOOTING
If the Red light in the interface is blinking, it is not communicating with the vehicle.
- Cycle the key off.
- Unplug the connectors from the vehicle to the interface.
- Inspect that all connections are made properly.
- If everything is correct, connect the harnesses back into the interface, and cycle the ignition on. The Red light should now be solid.
LED FEEDBACK
| BLINK RATE CONDITION/STATUS | |
| LED Heartbeat | BOARD POWERED ON |
| LED Fade In/Out Slow CONNECTED TO MOST | |
| LED Fast Flashing CONNECTED TO BT, NOT CONNECTED TO MOST | |
| LED On CONNECTED TO MOST & BT | |
| LED SOS Pattern CORRUPT DSP FILE AND/OR FAILED TO PROGRAM DSP | |

AXDSPX-BMWM25
INSTALLATION INSTRUCTIONS
Visit AxcessInterfaces.com for more detailed information about the product and up-to-date vehicle specific applications
Speaker Assignment QR Code

Having difficulties? We're here to help.
Contact our Tech Support line at: 386-257-1187
Or via email at: techsupport@metra-autosound.com
Tech Support Hours (Eastern Standard Time)
Monday - Friday: 9:00 AM - 7:00 PM
Saturday: 10:00 AM - 5:00 PM
Sunday: 10:00 AM - 4:00 PM

Metra recommends MECP certified technicians