
ML750ST - Mini projector OPTOMA - Free user manual and instructions
Find the device manual for free ML750ST OPTOMA in PDF.


| Product type | Mini DLP projector |
| Brand | OPTOMA |
| Model | ML750ST |
| Native resolution | SVGA (800 x 600) |
| Brightness | 500 lumens |
| Light source | LED |
| Lamp life | 30,000 hours |
| Throw ratio | 1.5:1 (short throw) |
| Image size | 20 to 200 inches |
| Connectivity | HDMI, USB, VGA, audio input |
| Built-in speakers | Yes, 1 x 1 W |
| Power supply | AC adapter, 100-240V |
| Power consumption | 65 W (max), 0.5 W (standby) |
| Dimensions (W x D x H) | 140 x 108 x 55 mm |
| Weight | 1.1 kg |
| Maintenance | Clean the air filter every 100 hours |
| Safety | Auto shutdown, Kensington lock |
| Spare parts | Lamp, filter, remote control available |
| Repairability | Repairability index: 7.2/10 |
Frequently Asked Questions - ML750ST OPTOMA
User questions about ML750ST OPTOMA
0 question about this device. Answer the ones you know or ask your own.
Ask a new question about this device
Download the instructions for your Mini projector in PDF format for free! Find your manual ML750ST - OPTOMA and take your electronic device back in hand. On this page are published all the documents necessary for the use of your device. ML750ST by OPTOMA.
USER MANUAL ML750ST OPTOMA
natural_image
Line drawing of a projector with visible screen and lens (no text or symbols)Contents
Safety Instructions....4
Intended Use Statement....5
Safety Information....5
Safety Labels 7
Trademarks 8
Video and Audio Decoder Notices 8
Regulatory Notices 9
CE Statement....10
WEEE Statement.... 10
Introduction....11
Package Contents 11
About Your Projector....12
Main Unit 12
Input / Output Connections.... 13
Control Panel.... 14
Remote Control 15
Installing the Remote Control Battery.... 16
Operating Range with Remote Control 16
Installation....17
Connecting to a Computer 17
Connecting to a DVD Player 19
Connecting to Multi-Media....20
Turning On/Off the Projector 22
Turning Your Projector On 22
Turning Your Projector Off 22
Adjusting the Projected Image 23
Raising the Projector Height 23
Lowering the Projector Height....23
Adjusting the Projector Focus 23
Adjusting Projection Image Size 24
User Controls....26
Using the On-Screen Display 26
Main Menu 26
Image 27
Display 28
Setup 28
Advanced....31
Multi-Media Introduction 32
Photo Format 32
Video Format 32
Audio Format....33
Office Viewer Format....33
How to set-up File Type for Multi-Media with USB 35
How to set-up File Type for Multi-Media with MicroSD.... 37
How to set-up File Type for Multi-Media with Internal Memory 39
Multi-Media Main Menu....41
Multi-Media SETTINGS for System, USB, MicroSD, and Internal Memory ...... 41
System Settings....42
Photo Settings 43
Video Setup 44
Music Setup 45
Other Multi-Media Connections 46
Projecting Files from the PC 46
Mirroring the Screen of the Portable Device 48
Appendices 51
Troubleshooting 51
Guiding Signals....53
Compatibility Modes (HDMI/VGA) 54
Tripod Mount the Projector....55
Specification....56
Safety Instructions
 | The lightning flash with arrow head within an equilateral triangle is intended to alert the user to the presence of uninsulated “dangerous voltage” within the product’s enclosure that may be of sufficient magnitude to constitute a risk of electric shock to persons. |
 | The exclamation point within an equilateral triangle is intended to alert the user to the presence of important operating and maintenance (servicing) instructions in the literature accompanying the appliance. |
WARNING: TO REDUCE THE RISK OF FIRE OR ELECTRIC SHOCK, DO NOT EXPOSE THIS APPLIANCE TO RAIN OR MOISTURE. DANGEROUS HIGH VOLTAGES ARE PRESENT INSIDE THE ENCLOSURE. DO NOT OPEN THE CABINET. REFER SERVICING TO QUALIFIED PERSONNEL ONLY.
Class B emissions limits
This Class B digital apparatus meets all requirements of the Canadian Interference-Causing Equipment Regulations.
Important Safety Instruction
- Do not block any ventilation openings. To ensure reliable operation of the projector and to protect from over heating, it is recommended to install the projector in a location that does not block ventilation. As an example, do not place the projector on a crowded coffee table, sofa, bed, etc. Do not put the projector in an enclosure such as a book case or a cabinet that restricts air flow.
- Do not use the projector near water or moisture. To reduce the risk of fire and/or electric shock, do not expose the projector to rain or moisture.
- Do not install near heat sources such as radiators, heaters, stoves or any other apparatus such as amplifiers that emits heat.
- Clean only with dry cloth.
- Only use attachments/accessories specified by the manufacturer.
- Do not use the unit if it has been physically damaged or abused.
Physical damage/abuse would be (but not limited to):
Unit has been dropped.
Power supply cord or plug has been damaged.
☐ Liquid has been spilled on to the projector.
☐ Projector has been exposed to rain or moisture.
Something has fallen in the projector or something is loose inside.
Do not attempt to service the unit yourself. Opening or removing covers may expose you to dangerous voltages or other hazards. Please call Optoma before you send the unit for repair. - Do not let objects or liquids enter the projector. They may touch dangerous voltage points and short out parts that could result in fire or electric shock.
- See projector enclosure for safety related markings.
- The unit should only be repaired by appropriate service personnel.
Intended Use Statement
• Operation temperature:
- For 0 - 2500 ft, 5 °C \~ 40 °C
- For 2500 - 5000 ft, 5 °C \~ 35 °C
- For 5000 - 10000 ft, 5 °C \~ 30 °C
• Maximum Humidity:
- Operating: 10%\~80%RH (Max.), Non-condensing
- Storage: 5%\~95% RH, Non-condensing
The ambient operating environment should be free of airborne smoke, grease, oil and other contaminants that can affect the operation or performance of the projector.
Use of this product in adverse conditions will void the product warranty.
Safety Information
Please read, understand, and follow all safety information contained in these instructions prior to the use of this projector. Retain these instructions for future reference.
Explanation of Signal Word Consequences
| ⚠ Warning: | Indicates a potentially hazardous situation, which, if not avoided, could result in death or serious injury and/or property damage. |
| ⚠ Caution: | Indicates a potentially hazardous situation, which, if not avoided, may result in minor or moderate injury and/or property damage. |
| ⚠ Warning: | Hazardous voltage |
⚠ Warning
To reduce the risk associated with hazardous voltage:
- Do not modify this product in any way.
- Do not attempt to service this projector.
- There are no user-serviceable parts. Service to be performed only by a Optoma authorized service provider using Optoma approved system components.
- Do not use the wall power supply in a wet environment.
- Do not use with a damaged wall power supply. Replace damaged part prior to use.
To reduce the risk associated with fire and explosion:
- Do not immerse the projector in any liquid or allow either to get wet.
- Use only Optoma approved power supply.
To reduce the risks associated with choking:
- Keep all small parts like the remote control battery away from young children and pets.
To reduce the risk associated with hazardous voltage, impact, tripping, and intense visible light:
- Do not use this projector around unsupervised children.
Caution
To reduce the risks associated with hearing loss:
- Be sure to read earphone manufacturer's instructions with respect to volume level.
- User is responsible to set a safe volume level.
To reduce the risk associated with explosion, and/or chemicals from a leaking batteries:
• Use only with battery type CR2025.
- Orient the battery's plus (+) and minus (-) terminals of the batteries according to the markings found on the remote control.
- Do not leave the battery in the remote for an extended period of time.
- Do not heat or expose the battery to fire.
- Do not disassemble, short, or recharge battery
- Do not carry batteries loose in your pocket or purse.
- Avoid eye and skin contact in the event that battery leaks.
- Do not recharge the battery near a heat source or in extremely hot conditions.
To reduce the risk associated with environmental contamination:
- Dispose of all system components in accordance with applicable government regulations.
To reduce the risks associated with LED bright light:
- Do not stare directly into the projector lens.
To reduce the risks associated with tripping and falling:
- Position the charging cord and data cables so that they are not a tripping hazard.
Important Note: Do not expose the projector to direct sunlight in a closed space such as a vehicle.
SAVE THESE INSTRUCTIONS
Safety Labels
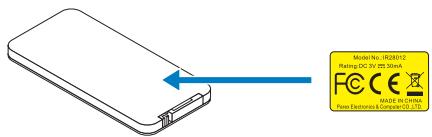
Remote Control
Model No. IR28012
Trademarks
Optoma and the Optoma logo are trademarks of Optoma Company. Adobe and the Adobe logo are either registered trademarks or trademarks of Adobe Systems Incorporated in the United States and/or other countries. Microsoft, PowerPoint, and Excel are registered trademarks of Microsoft Corporation. microSD and microSDHC are trademarks of the SD Association.
All other trademarks or registered trademarks are property of their respective companies.
Video and Audio Decoder Notices
MPEG-4 NOTICE
This product is licensed under the mpeg-4 visual patent portfolio license for the personal and non-commercial use of a consumer for (i) encoding video in compliance with the mpeg-4 visual standard ("mpeg-4 video") and/or (ii) decoding mpeg-4 video that was encoded by a consumer engaged in a personal and noncommercial activity and/or was obtained from a video provider licensed by mpeg la to provide mpeg-4 video. No license is granted or shall be implied for any other use. Additional information including that relating to promotional, internal and commercial uses and licensing may be obtained from mpeg la, llc. See http://www.mpegla.com.
AVC VIDEO NOTICE
This product is licensed under the avc patent portfolio license for the personal and noncommercial use of a consumer to (i) encode video in compliance with the avc standard (“avc video”) and/or (ii) decode avc video that was encoded by a consumer engaged in a personal and non-commercial activity and/or was obtained from a video provider licensed to provide avc video. No license is granted or shall be implied for any other use. Additional information may be obtained from mpeg la, I.L.C. See http://www.mpegla.com.
MPEG LAYER-3 NOTICE
Supply of this product does not convey a license nor imply any right to distribute MPEG Layer-3 compliant content created with this product in revenue-generating broadcast systems (terrestrial, satellite, cable and/or other distribution channels), streaming applications (via Internet, intranets and/or other networks), other content distribution systems (pay-audio or audio-ondemand applications and the like) or on physical media (compact discs, digital versatile discs, semiconductor chips, hard drives, memory cards and the like). An independent license for such use is required.
For details, please visit http://mp3licensing.com.
Regulatory Notices
FCC STATEMENT - CLASS B
This equipment generates, uses and can radiate radio frequency energy, and if not installed and used in accordance with the instruction manual may cause interference to radio communications. It has been tested and found to comply with the limits for a Class "B" computing device pursuant to Subpart B of Part 15 of the FCC Rules, which are designed to provide reasonable protection against such interference when operated in a residential installation. However, there is no guarantee that interference will not occur in a particular installation. If this equipment does cause harmful interference to radio or television reception, which can be determined by turning the equipment off and on, the user is encouraged to try to correct the interference by one or more of the following measures:
• Reorient or relocate the receiving antenna.
- Increase the separation between the equipment and receiver.
- Connect the equipment into an outlet on a circuit different from that to which the receiver is connected.
- Consult the dealer or an experienced radio/TV technician for help.
NOTICE: This Class B digital apparatus complies with Canadian ICES-003.
Industry Canada regulatory information
Operation is subject to the following two conditions:
(1) this device may not cause interference, and
(2) this device must accept any interference, including interference that may cause undesired operation of the device.
The user is cautioned that this device should be used only as specified within this manual to meet RF exposure requirements. Use of this device in a manner inconsistent with this manual could lead to excessive RF exposure conditions.
This Class [B] digital apparatus complies with Canadian ICES-003.
INSTRUCTIONS TO USERS: This equipment complies with the requirements of FCC equipment provided that the following conditions are met. If the cables include a EMI ferrite core, attach the ferrite core end of the cable to the projector. Use the cables which are included with the projector or specified.
Note: Changes or modifications not expressly approved by the party responsible for compliance could void the user's authority to operate the equipment.
Complies with IDA Standards DA103121
CE Statement
ElectroMagnetic Compatibility Statement: Meets 2004/108/EC Directive Low Voltage Directive: Meets 2006-95-EC Directive.
WEEE Statement
The following information is only for EU-members States:
The mark shown to the right is in compliance with Waste Electrical and Electronic Equipment Directive 2002/96/EC (WEEE). The mark indicates the requirement NOT to dispose the equipment as unsorted municipal waste, but use the return and collection systems according to local law.

Introduction
Package Contents
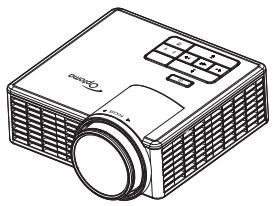
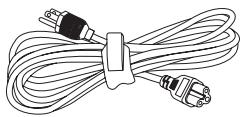
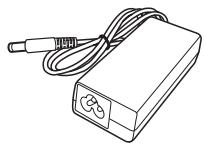
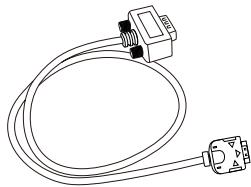
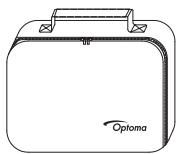
Your projector comes with all the items shown below. Ensure that you have all the items, and contact your local reseller or service center if anything is missing.
natural_image
Line drawing of a projector with a circular lens (no text or symbols)Projector
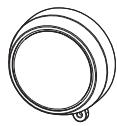
Lens cap
natural_image
Coiled cable with connectors and connectors, no text or symbols visiblePower cable
natural_image
Line drawing of a portable electronic device with cables and connectors (no text or symbols)AC adapter
natural_image
Line drawing of a cable with two connectors (no text or symbols)Universal 24-pin to VGA cable

Basic user manual and documentation
natural_image
Line drawing of a portable backpack with a logo and 'Optoma' branding (no text or symbols on the device itself)Carrying case
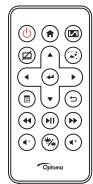
Remote control
Note: The remote control is shipped with battery.
About Your Projector
Main Unit
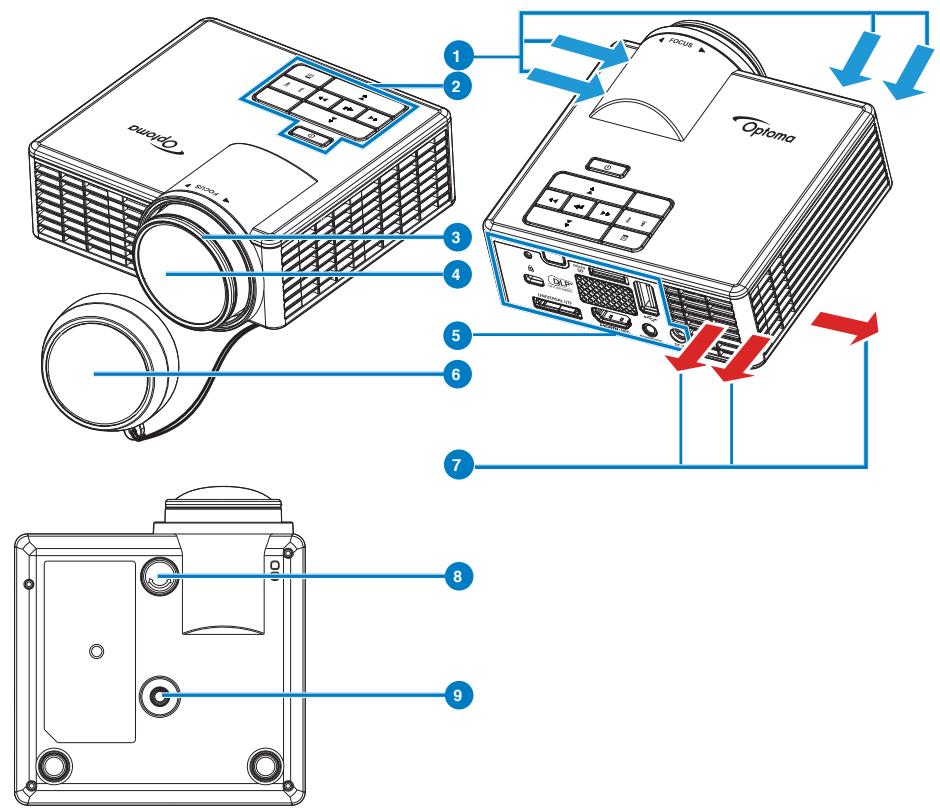
# Description
1 Ventilation (inlet)
2 Control panel
3 Focus ring
4 Lens
5 Input / Output connections
6 Lens cap
7 Ventilation (outlet)
8 Tilt adjusting wheel
9 Screw hole for tripod
Input / Output Connections
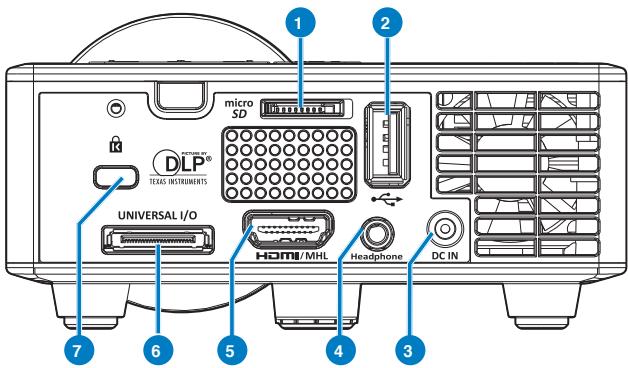
# Description
1 MicroSD card slot
2 USB Type A connector
3 DC input connector
4 Headphone connector
5 HDMI / MHL connector
6 Universal I/O connector
7 Security cable slot
Control Panel
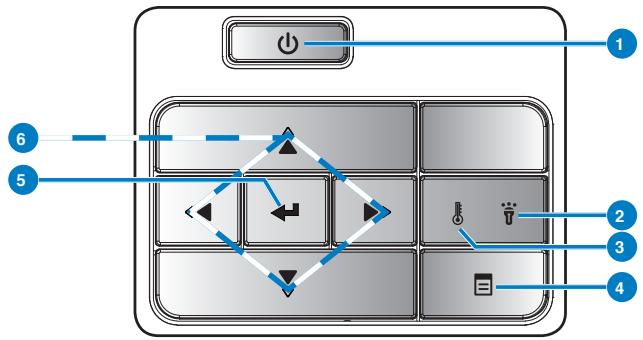
| # | Name | Description |
| 1 | Power | Turns the projector on or off. |
| 2 | Error LED | Error LED is solid amber, one of the LED has failed. The projector will automatically shut down. |
| 3 | Temp LED | If the TEMP amber indicator is blinking, one of the following problems could be occurring:Internal temperature of the projector is too high.The fans has failed. |
| 4 | Menu | Press to activate the OSD. Use the directional keys and the Menu button to navigate through the OSD. |
| 5 | Enter | Press to confirm the selection item. |
| 6 | Four Directional Select Keys | Press to navigate through the On-Screen Display (OSD) Menu items. |
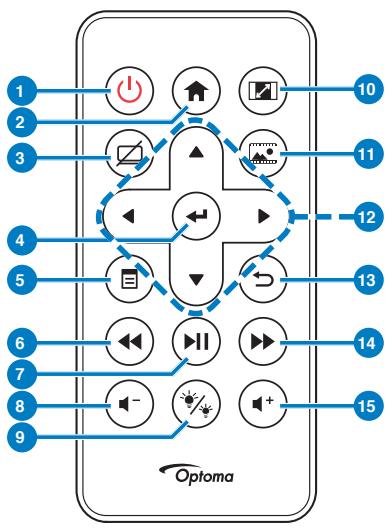
Remote Control
flowchart
graph TD
    A["1"] --> B["Power Light"]
    C["2"] --> D["Switch"]
    E["3"] --> F["Microcontroller"]
    G["4"] --> H["Analog Interface"]
    I["5"] --> J["Video Input"]
    K["6"] --> L["Audio Signals"]
    M["7"] --> N["Signal Lines"]
    O["8"] --> P["Speaker Lines"]
    Q["9"] --> R["Audio Signal"]
    S["10"] --> T["Logic Gate"]
    U["11"] --> V["Logic Gate"]
    W["12"] --> X["Logic Gate"]
    Y["13"] --> Z["Logic Gate"]
    AA["14"] --> AB["Logic Gate"]
    AC["15"] --> AD["Logic Gate"]
| # | Name | Description |
| 1 | Power ⏻ | Turns the projector on or off. |
| 2 | Home ⏻ | Press to return to the home page. |
| 3 | Mute ⏱ | Press to mute/unmute audio and/or video depnding on the chosen mute option in the OSD menu (Main > Setup > Advanced > Mute). |
| 4 | Enter ⏻ | Press to confirm the selection. |
| 5 | Menu ⏮ | Press to activate the OSD. |
| 6 | Rewind ⏻ | Press to search backward. |
| 7 | Play/Pause ⏻ | Press to play/pause media file. |
| 8 | Volume down ⏻ | Press to decrease the volume. |
| 9 | LED mode ⏻ | Allows you to select the display mode. |
| 10 | Aspect ratio ⏻ | Press to change aspect ratio of a displayed image. |
| 11 | Media mode ⏻ | Press to change Input Source to Media. |
| 12 | Up/Down/Left/Right | Press to navigate through the On-Screen Display (OSD) Menu items. |
| 13 | Back ⏻ | Press to return to the previous page. |
| 14 | Fast Forward ⏻ | Press to search forward. |
| 15 | Volume up ⏻ | Press to increase the volume. |
Note: Home and Back buttons can be used only in Media mode.
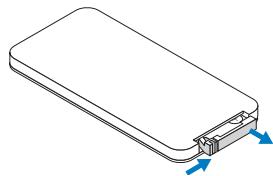
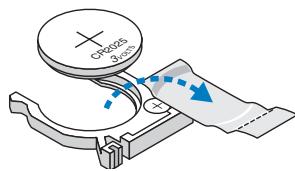
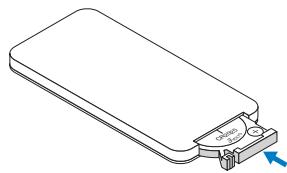
Installing the Remote Control Battery
-
Remove the battery holder by holding down the side release firmly and pulling out the battery holder.
-
Insert a CR2025 coin cell battery and align the polarity correctly according to the marking in the battery holder.
Note: When you use the remote control for the first time, there is a plastic sheet between the battery and its contact. Remove the sheet before use.
- Replace the battery holder.
natural_image
Isometric line drawing of a rectangular electronic device with internal components and blue directional arrows indicating movement (no text or symbols)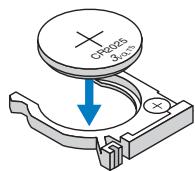
natural_image
Isometric line drawing of a rectangular electronic device with a small component inserted, showing no text or symbols.Operating Range with Remote Control
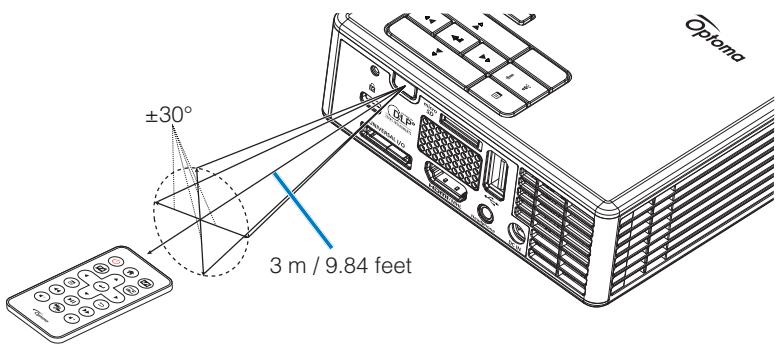
Note: Actual operating range may slightly differ from the diagram. Additionally, a weak battery reduces or eliminates the operating range of the remote control.
Installation
Connecting to a Computer
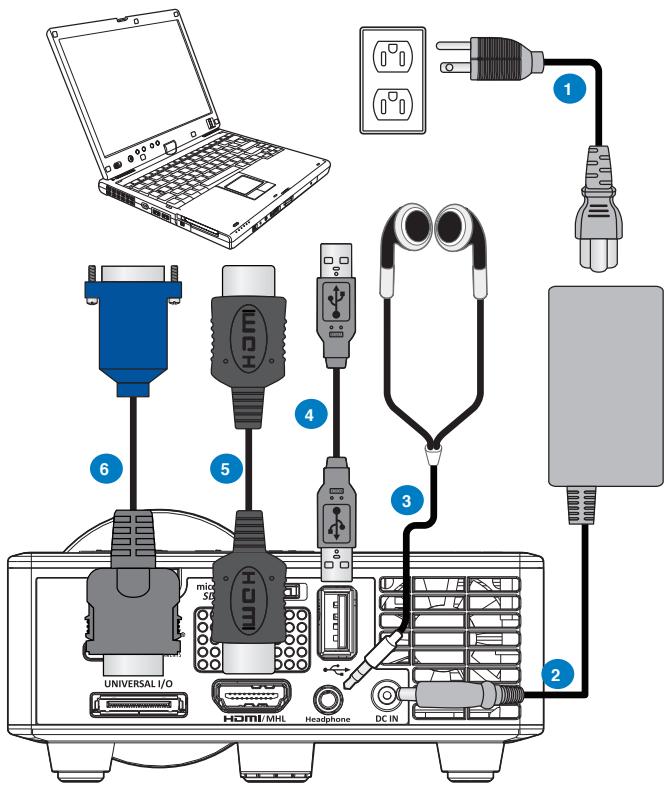
# Description
1 Power cord
2 AC adapter
3 Audio cable ( ^1 )
4 USB-A to USB-A cable ( ^2 )
5 HDMI cable ( ^*2 )
6 Universal 24-pin to VGA cable
Note:
- (*1)The projector supports only TRS-type audio cables (without microhpone function); with some headsets, due to the impedance difference, you might notice a slight difference in the volume levels (lower volume).
- (*2)The accessory is not shipped with your projector.
Connecting to a DVD Player
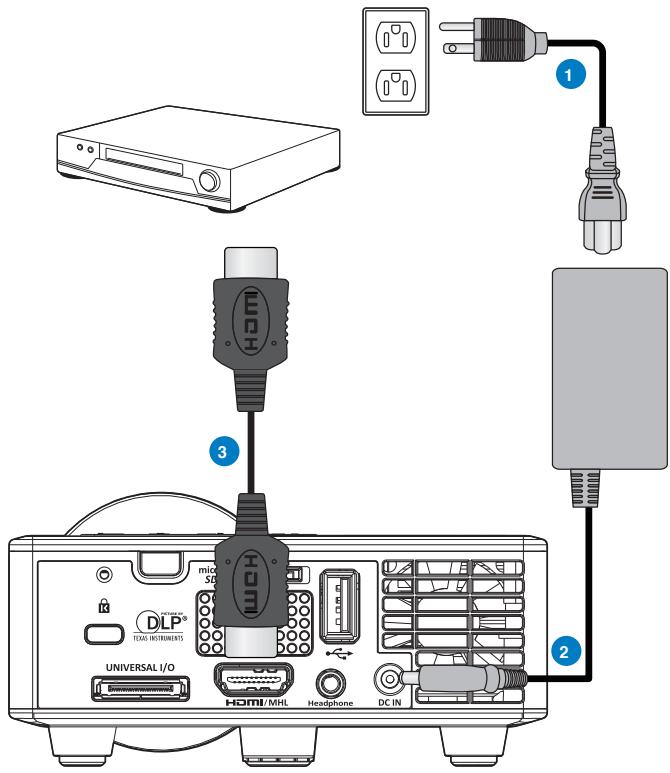
# Description
1 Power cord
2 AC adapter
3 HDMI cable ( ^*2 )
Note: (^*2) The accessory is not shipped with your projector.
Connecting to Multi-Media
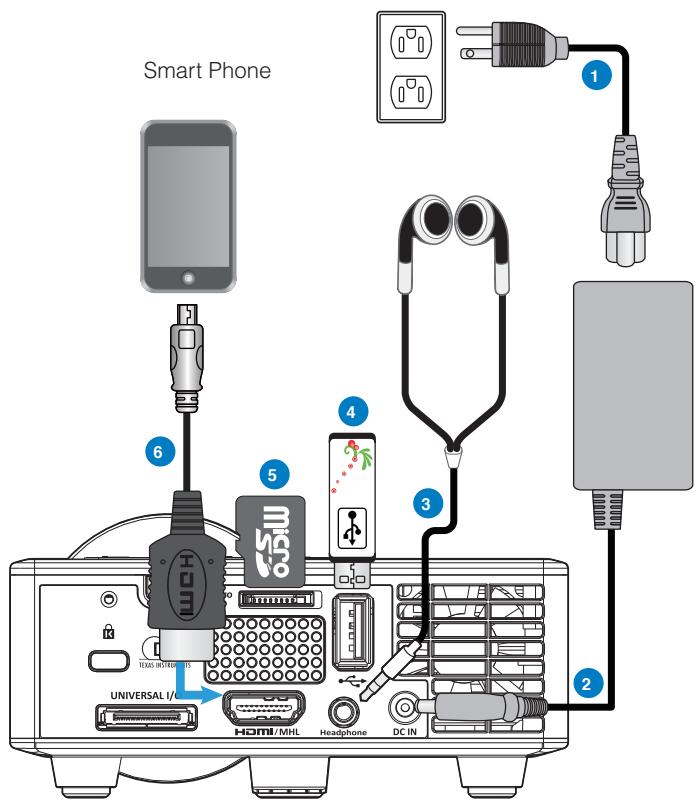
# Description
1 Power cord
2 AC adapter
3 Audio cable ^1
4 USB flash disk ( ^2 )
5 MicroSD card ( ^2 )
6 MHL cable ( ^2 )
Note:
- (*1)The projector supports only TRS-type audio cables (without microhpone function); with some headsets, due to the impedance difference, you might notice a slight difference in the volume levels (lower volume).
- (*2)The accessory is not shipped with your projector.
Turning On/Off the Projector
Turning Your Projector On
Note: Turn on the projector before you turn on the source (computer, DVD player, etc.). The Power button light blinks amber until pressed.
- Connect the power cord with AC adapter and appropriate signal cables to the projector.
- Remove the lens cap.
- Press the Power button.
- Turn on your source (computer, DVD player, etc).
- Connect your source to the projector using the appropriate cable.
- The input source is determined by the last connected input source. (By default, the input source of the projector is set to Multimedia). Change the input source of the projector if necessary.
Turning Your Projector Off
Note: The “Press Power Button to Turn Off Projector” message will appear on the screen. The message disappears after 5 seconds or you can press the Menu button to clear it.
- Press the Power button. Follow the instruction displayed on screen to properly turn off the projector.
- Press the Power button again. The cooling fans continue to operate for 3\~5 seconds.
- Disconnect the power cord and AC adapter from the electrical outlet and the projector.
Adjusting the Projected Image
Raising the Projector Height
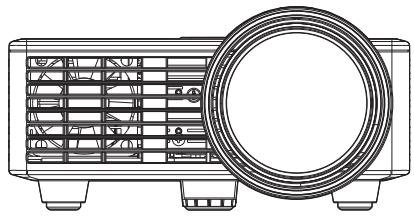
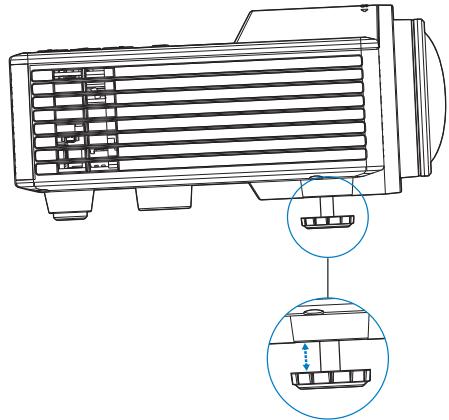
Raise the projector to the desired display angle, and use the front tilt adjustment wheel to fine-tune the display angle.
Lowering the Projector Height
Lower the projector, and use the front tilt adjustment wheel to fine-tune the display angle.
natural_image
Line drawing of a projector with front panel and circular lens (no text or symbols)Front tilt adjustment wheel (Angle of tilt: 0 to 3 degrees)
natural_image
Technical line drawing of an electric motor with internal cooling fins and mounting brackets (no text or symbols)Important Note: To avoid damaging the projector, ensure that the adjustment wheels are fully retracted before moving the projector or placing the projector in its carrying case.
Adjusting the Projector Focus
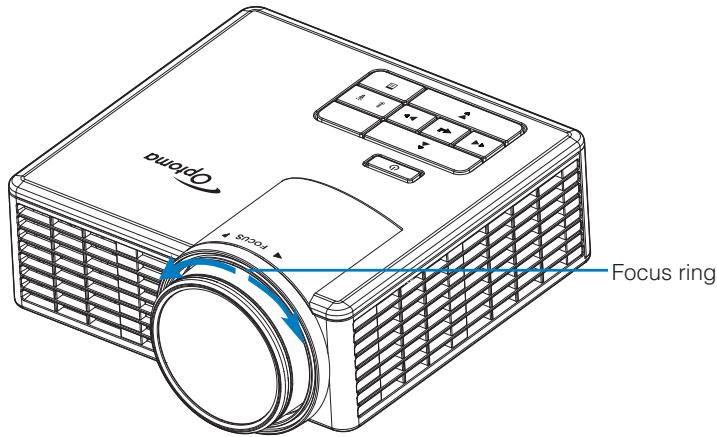
Rotate the focus ring until the image is clear. The projector focuses at distances ranging between 2.82 ft to 5.64 ft (86 cm to 172 cm).
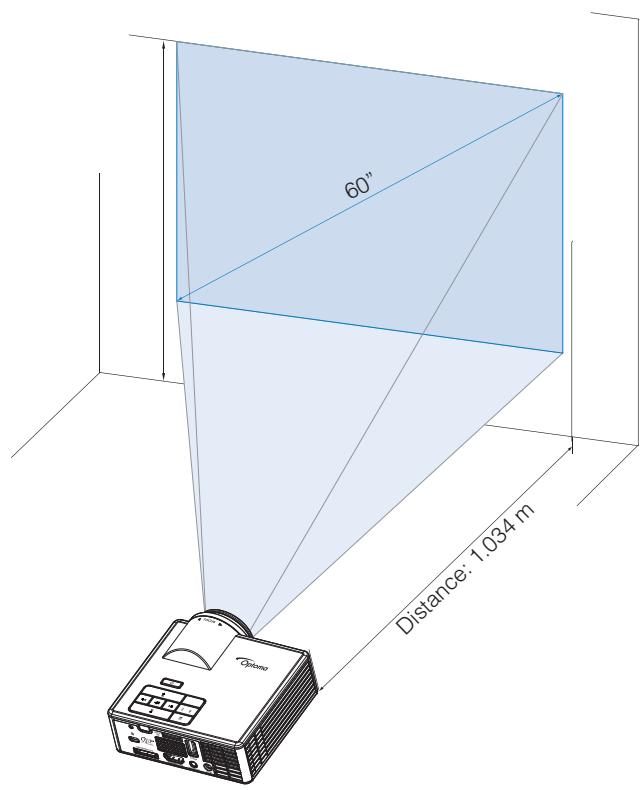
Adjusting Projection Image Size
line
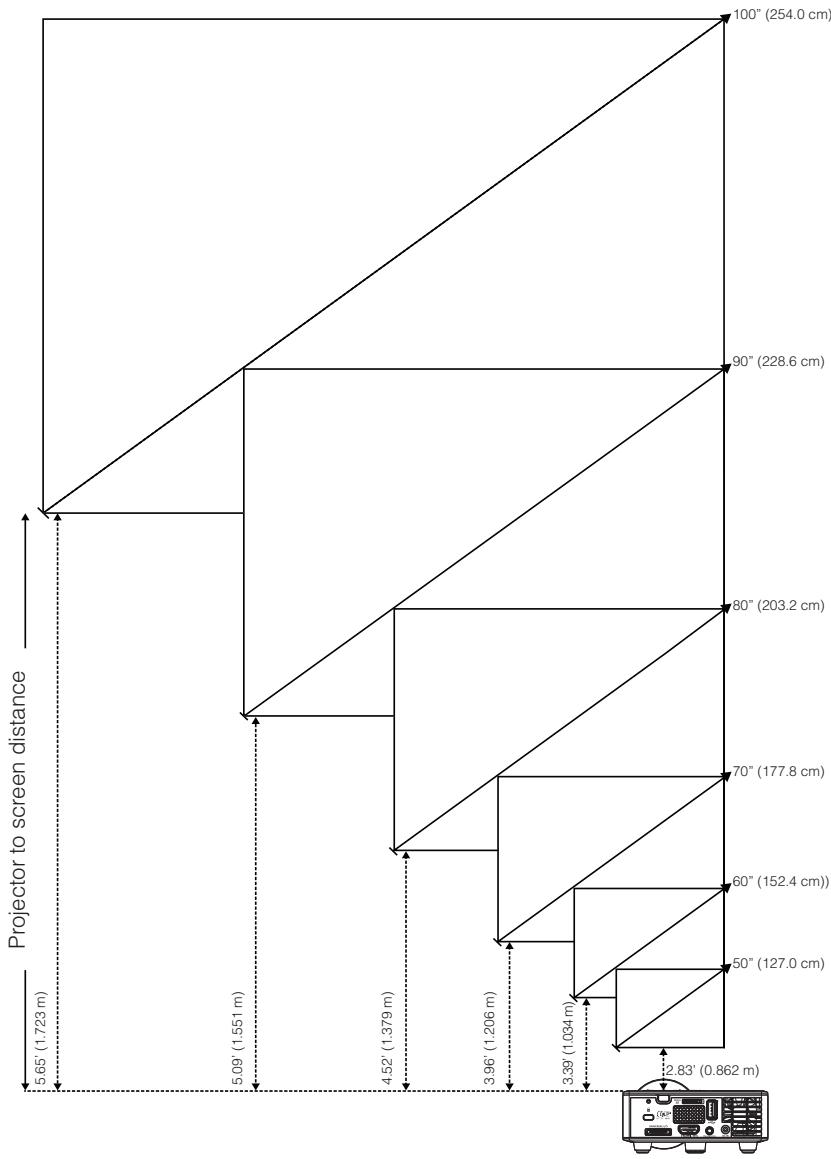
| View Angle (°) | Projector to Screen Distance (m) | | -------------- | -------------------------------- | | 50° | 1.723 | | 60° | 1.551 | | 70° | 1.379 | | 80° | 1.206 | | 90° | 203.2 | | 100° | 228.6 || Screen Size | Distance | ||
| Diagonal | Width | Height | |
| 50” (127.0 cm) | 42.52” (108 cm) | 26.38” (67 cm) | 2.83’ (0.862 m) |
| 60” (152.4 cm) | 50.79” (129 cm) | 31.89” (81 cm) | 3.39’ (1.034 m) |
| 70” (177.8 cm) | 59.45” (151 cm) | 37.01” (94 cm) | 3.96’ (1.206 m) |
| 80” (203.2 cm) | 67.72” (172 cm) | 42.52” (108 cm) | 4.52’ (1.379 m) |
| 90” (228.6 cm) | 76.38” (194 cm) | 47.64” (121 cm) | 5.09’ (1.551 m) |
| 100” (254.0 cm) | 84.65” (215 cm) | 53.15” (135 cm) | 5.65’ (1.723 m) |
Note: This graph is for user reference only.
User Controls
Using the On-Screen Display
- The projector has a multi-language On-Screen Display (OSD) Menu that can be displayed with or without an input source.
- Press the Menu button on the control panel or the remote control to enter the Main Menu.
- To select an option, press the ⚠ or ⏰ buttons on your projector's control panel or remote control.
- Use the ⬆ or ⬆ buttons on the control panel or remote control to adjust the settings.
- To exit the OSD, press the Menu button directly on the control panel or the remote control.
Main Menu
The Main menu allows you to select the input source, adjust the volume, select the display mode, and configure the brightness, contrast, image, display, and setup settings.
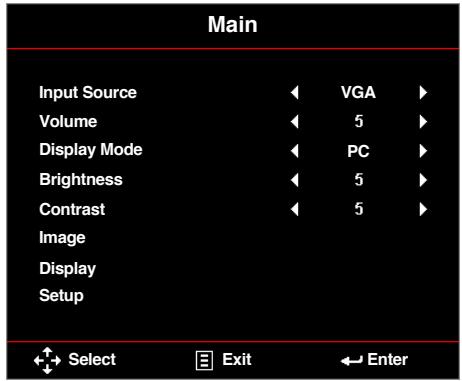
- Input Source: Select your projector's input source. The options are: VGA, HDMI / MHL, and Media.
■ Volume: Adjust the volume.
Note: Audio output is not supported in VGA mode.
- Display Mode: Optimize the display image. The options are: Bright, PC, Cinema/iDevice*, Photo, and ECO.
Note: *The iDevice option replaces the Cinema option if the input source is HDMI and the iDevice option (Main > Setup > Advanced) is enabled.
■ Brightness: Adjust the brightness of the image.
■ Contrast: Adjust the display contrast.
Image
The Image menu allows you to modify various image settings, such as 3D, format, zoom, color temperature, color space, and others.
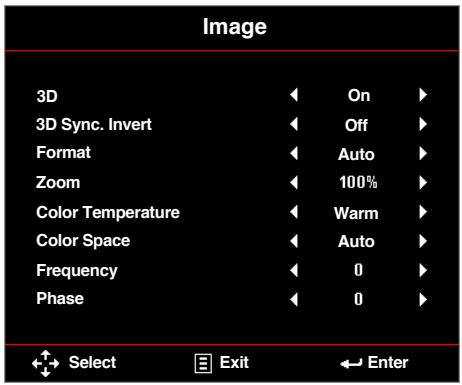
■ 3D: Turn the 3D function on or off.
■ 3D Sync. Invert: Turn the 3D sync. inverter option on or off.
Note:
-3D/3D Sync. Invert cannot be changed when you select image settings.
- In 3D mode, the maximum supported input timing is 1024x768 @ 120Hz.
■ Format: Select the format to adjust how the image appears. Options are:
- Auto: Maintain the aspect ratio of the image projector according to the input source.
• 4:3: The input source scales to fit the screen and projects a 4:3 image.
• 16:9: The input source scales to fit the screen and projects a 16:9 image.
• 16:10: The input source scales to fit the screen and projects a 16:10 image.
■ Zoom: Zoom in or zoom out the image. Options are: 50%, 75%, 100%, 125%, 150%, 175%, or 200%.
■ Color Temperature: Select the color temperature. Options are: Warm, Medium, and Cold.
Note: The Color Temperature function is not supported in Bright, Eco, and 3D modes.
■ Color Space: Select an appropriate color matrix type. Options are: Auto, RGB, and YUV.
Note: The Color Space function is supported only in HDMI mode.
Frequency: Change the display data clock frequency to match the frequency of your computer's graphics card. If you see a vertical flickering wave, use the Frequency control to minimize the bars. This is a coarse adjustment.
Note: The Frequency can be adjusted only in VGA mode.
■ Phase: Synchronize the signal timing of the display with the graphic card. If the image appears to be unstable or flickers, use the Phase to correct it. This is a fine adjustment.
Note: The Phase can be adjusted only in VGA mode.
Display
The Display menu allows you to modify the display settings, such as keystone and position.
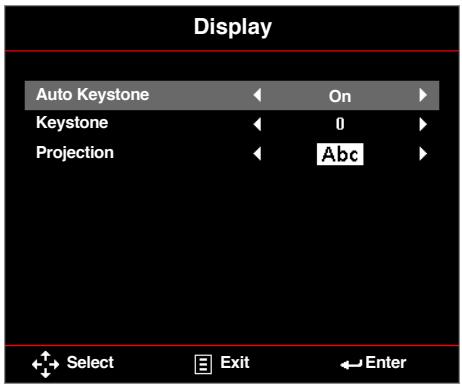
■ Auto Keystone: Select On to automatically adjust image distortion caused by tilting the projector.
Note: The Auto Keystone function can be only used to adjust the image distortion vertically.
■ Keystone: Adjust image distortion caused by tilting the projector (+/-40 degrees).
Note: If you adjust the keystone degree manually then the Auto Keystone function will be automatically switched off.
■ Projection: Select the projection mode, depending upon how the projector is mounted.
• Auto Keystone: On
Abc No reverse
ødA Left/ Right reverse
• Auto Keystone: Off
Abc No reverse
ødA Left/ Right reverse
Abc Up/ Down reverse
pc Up/ Down and Left/ Right reverse
Setup
The Setup menu allows you to choose the default OSD language, modify boot-up source, set sleep timer, and other options.
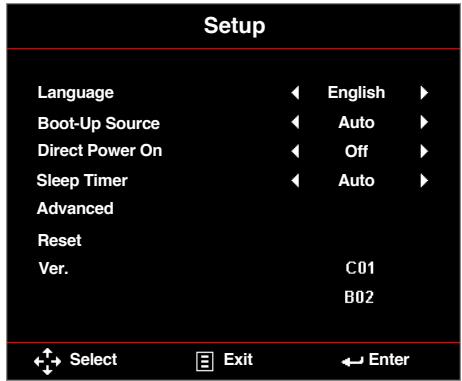
■ Language: Set the language for the OSD. Options are: English, Germany, French, Italian, Spanish, Portuguese, Polish, Dutch, Russian, Swedish, Greek, 中文 (繁), 中文 (简), Janpanese, Korean, and Turkish.
- Boot-Up Source: Select the projector's boot-up source. Options are: Auto, VGA, HDMI / MHL, and Media.
Note: If the Boot-Up Source is set to "Auto" then at each boot-up of the projector the input source is always chosen the same as in previous session.
■ Direct Power On: Choose On to activate Direct Power mode. The projector will automatically power on when AC power is supplied, without pressing the Power button on the projector control panel or on the remote control.
Sleep Timer: Set the countdown timer interval. The countdown timer will start, with or without a signal being sent to the projector. The projector will automatically power off when the countdown has finished. Options are: Auto, Off, 30 min, 1 hour, 3 hours, 8 hours, 12 hours.
Note: If the Sleep Timer is set to "Auto" then the project will automatically power off after 15 minutes if no signal has been detected.
- Reset: Reset all settings to its factory default, including computer sources and video source settings. After choosing this option, a confirmation message appears on the screen. Select "Yes" to confirm or "No" to cancel reset.
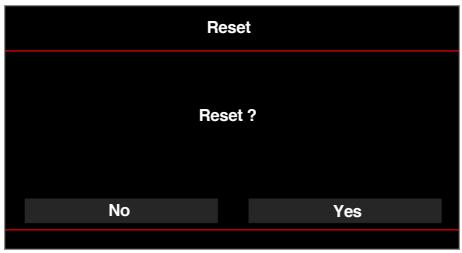
- Ver.: View the current projector's firmware version.
Advanced
The Advanced menu allows you to change settings for iDevice, Mute, Saturation, and Hue.
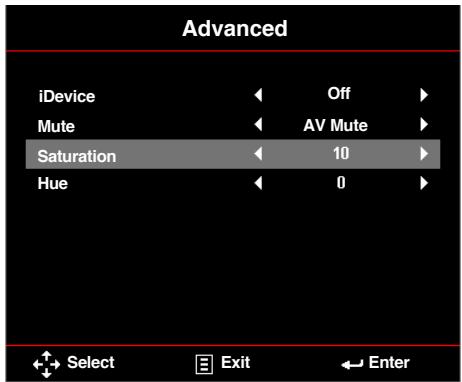
■ iDevice: Select On to display the best color reproduction when projecting images from iDevice (iPhone/ iPad/ iPod) through Lightning HDMI adapter.
Note: If you want to project images from iDevice, connect the device to the projector through the Lightning HDMI adapter, set input source to HDMI, enable iDevice option (Main > Setup > Advanced), and set iDevice as display mode (Main > Display Mode).
Mute: Select the Mute mode. Options are: AV Mute (mute both audio and video), Audio (mute audio only), and Video (mute video only).
Note: The function of the Mute button (☑) on the remote control depends on the selected "Mute" option in the OSD menu.
■ Saturation: Adjust the saturation of the image.
Note: Saturation can be only adjusted in HDMI mode with supported video timings 1080p/i, 720p, and 480p/i.
■ Hue: Adjust the hue of the image.
Note: Hue can be only adjusted in HDMI mode with supported video timings 1080p/i, 720p, and 480p/i.
Multi-Media Introduction
Multi-media format supported:
Photo Format
| Image Type (Ext Name) | Sub Type | Encode Type | Max Size |
| Jpeg / Jpg | Baseline | YUV420 | 4000x4000=16,000,000 pixel |
| YUV422 | |||
| YUV440 | |||
| YUV444 | |||
| Progressive | YUV420 | 4000x4000=16,000,000 pixel | |
| YUV422 | |||
| YUV440 | |||
| YUV444 | |||
| BMP | 4000x4000=16,000,000 pixel |
Video Format
| File Format | Video Format | Decode Max res. | Max Bit Rate (bps) | Audio Format | Profile |
| MPG,MPEG | MPEG1 | 1920x1080 30fps | 30M bps | MPEG1 L1-3 | |
| AVI, MOV, MP4, MKV | H.264 | 1920x1080 30fps | 30M bps | MPEG1 L1-3 HE-ACC v1 AC3 | BP/MP/HP |
| AVI, MOV, MP4, | MPEG4 | 1920x1080 30fps | 30M bps | HE-ACC v1 | SP/ASP |
| AVI, MOV, MP4, | Xivd | 1920x1080 30fps | 30M bps | MPEG1 L1-3 HE-ACC v1 | HD |
| AVI | MJPEG | 8192x8192 30fps | 30Mbps | MPEG1 L1-3 HE-ACC v1 | Baseline |
| WMV | VC-1 | 1920x1080 30fps | 30M bps | WMA8/9(V1/v2) | SP/MP/AP |
Audio Format
| Music Type (Ext Name) | Sample Rate (KHz) | Bit Rate (Kbps) |
| MP3 | 8-48 | 8-320 |
| WMA | 22-48 | 5-320 |
| ADPCM-WAV(WAV) | 8-48 | 32-384 |
| PCM-WAV(WAV) | 8-48 | 128-1536 |
| AAC | 8-48 | 8-256 |
Office Viewer Format
| File Format | Support Version | Page/Lines Limitation | Size Limitation |
| Adobe PDF | PDF 1.0, 1.1, 1.2, 1.3, 1.4 | Up to 1000 pages (One File) | Up to 75MB |
| MS Word | British Word 95,Word 97, 2000, 2002, 2003Word 2007(.docx),Word2010(.docx), | Because office viewer does not load all pages of MS/Word file at the same time, there are not obvious limitations of page and line. | Up to 100MB |
| MS Excel | British Excel 5,95Excel 97, 2000, 2002, 2003Excel 2007(.xlsx),Excel 2010(.xlsx)Office XP Excel | Row Limit: up to 595Column Limit: up to 256Sheet: up to 100Note:Any of the three limitations above can not appear on one excel file simultaneously. | Up to 15MB |
| MS PowerPoint | British PowerPoint 97 | Up to 1000 pages (One File) | Up to 19MB |
| PowerPoint 2000, 2002, 2003 | |||
| PowerPoint 2007(.pptx) | |||
| PowerPoint 2010(.pptx) | |||
| Office XP PowerPoint | |||
| PowerPoint presentation 2003 and earlier (.ppx) | |||
| PowerPoint presentation 2007 and 2010 (.ppsx) |
Note:
- Animations are not supported when viewing MS PowerPoint files.
- When projecting files, some documents may not be displayed the same as shown on the screen of a PC.
How to set-up File Type for Multi-Media with USB
Note:
- A USB flash disk must be plugged into the projector if you want to use the multimedia USB function.
- Please don't connect USB port for camera since it would be exist compatibility problem.
Follow these steps to playback the Photo, Video, or Music files on your projector:
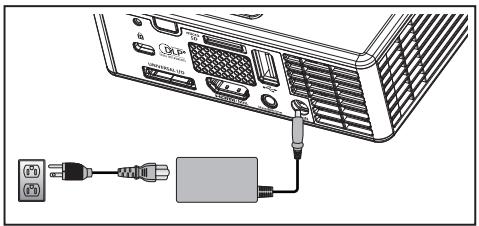
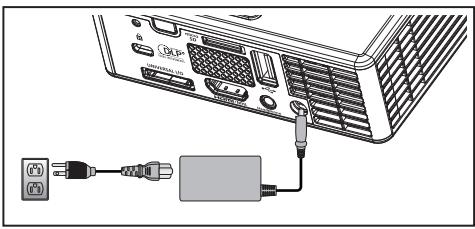
- Connect the power cable with AC adapter and turn on the projector by pressing the Power button.
natural_image
Diagram showing connection between an electronic device and a power adapter (no text or symbols present)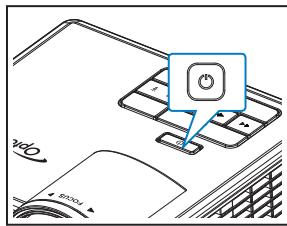
- Plug in a USB flash disk to your projector.
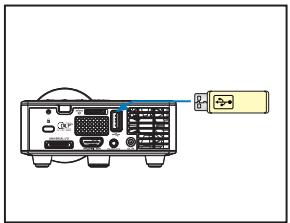
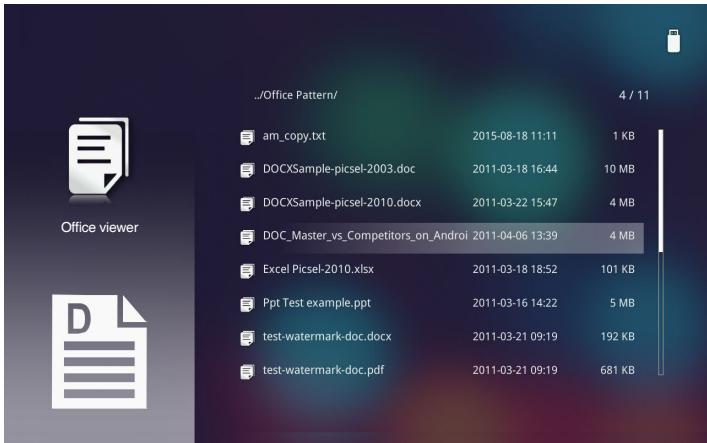
The Multi-Media menu opens.
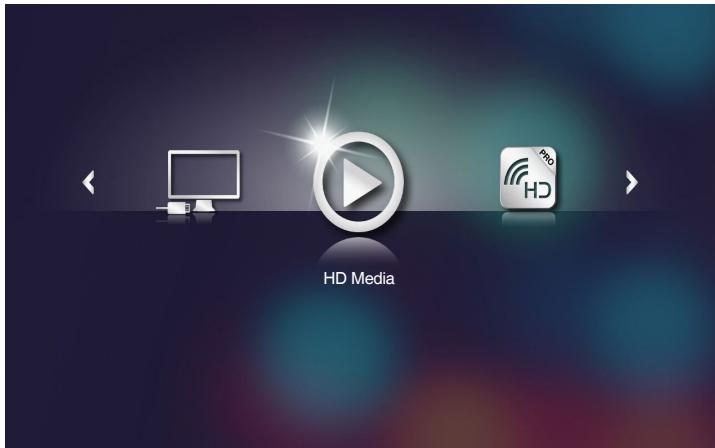
Note: To open the Main Menu, press the Menu button on the remote control or long press for 1 second the Menu button on the control panel of the projector.
- Select the HD Media menu.
The HD Media menu opens.
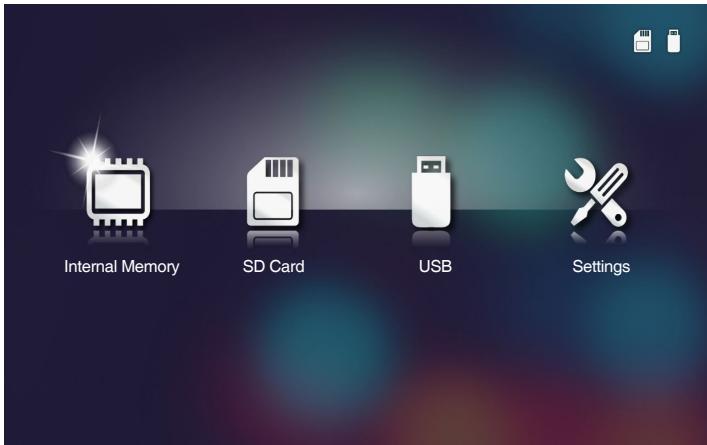
- Access the USB menu and select the multimedia files: Photo, Video, or Music. Or select the Settings option to change settings for Photo, Video, or Music.
- Select the file you want to open.
Note: The maximum allowed file name length is 28 characters.
How to set-up File Type for Multi-Media with MicroSD
Note: A microSD card must be plugged into the projector if you want to use the multimedia microSD function.
Follow these steps to playback the Photo, Video, or Music files on your projector:
- Connect the power cable with AC adapter and turn on the projector by pressing the Power button.
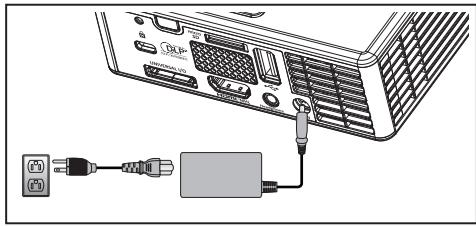
natural_image
Diagram showing an electronic device with ports, cables, and a plug connected to a network (no text or symbols visible)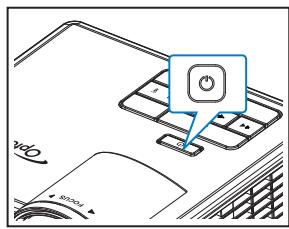
- Plug in a MicroSD card to your projector.

The Multi-Media menu opens.
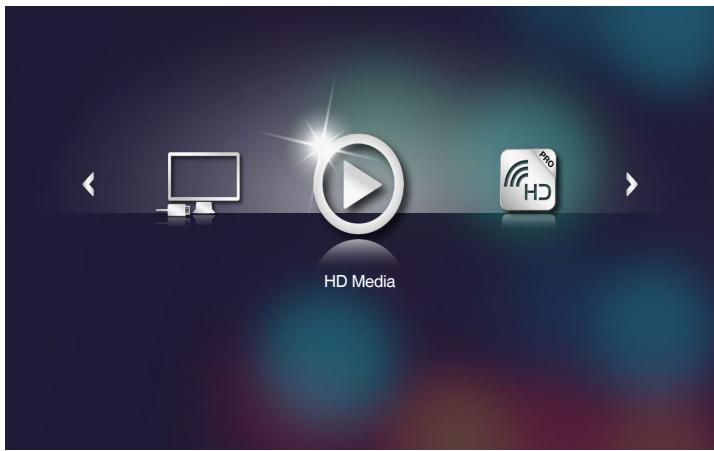
Note: To open the Main Menu, press the Menu button on the remote control or long press for 1 second the Menu button on the control panel of the projector.
- Select the HD Media menu.
The HD Media menu opens.
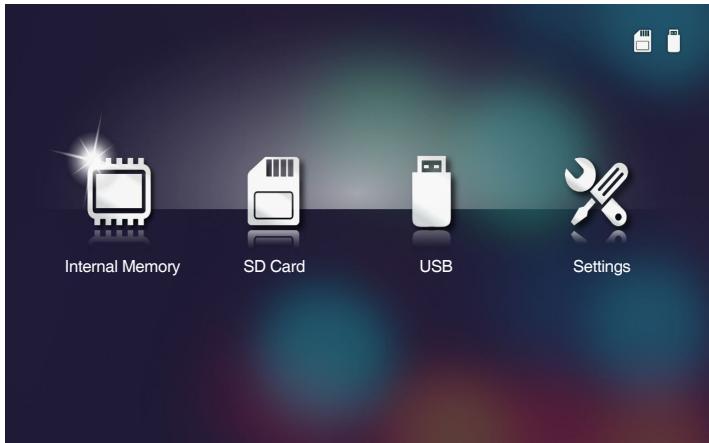
- Access the SD Card menu and select the multimedia files: Photo, Video, or Music. Or select the Settings option to change settings for Photo, Video, or Music.
- Select the file you want to open.

Note: The maximum allowed file name length is 28 characters.
How to set-up File Type for Multi-Media with Internal Memory
Note: A microSD card must be plugged into the projector if you want to use the multimedia microSD function.
Follow these steps to playback the Photo, Video, or Music files on your projector:
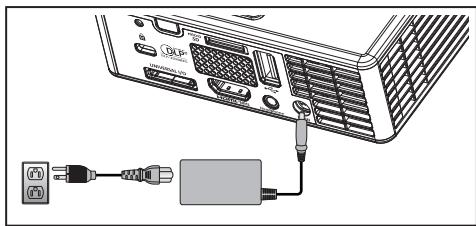
- Connect the power cable with AC adapter and turn on the projector by pressing the Power button.
natural_image
Diagram showing connection between a computer interface and a power adapter connected to a device (no text or symbols visible)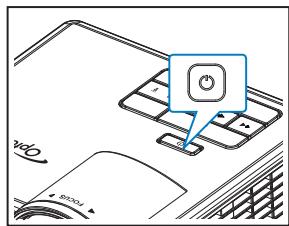
The Multi-Media menu opens.
Note: To open the Main Menu, press the Menu button on the remote control or long press for 1 second the Menu button on the control panel of the projector.
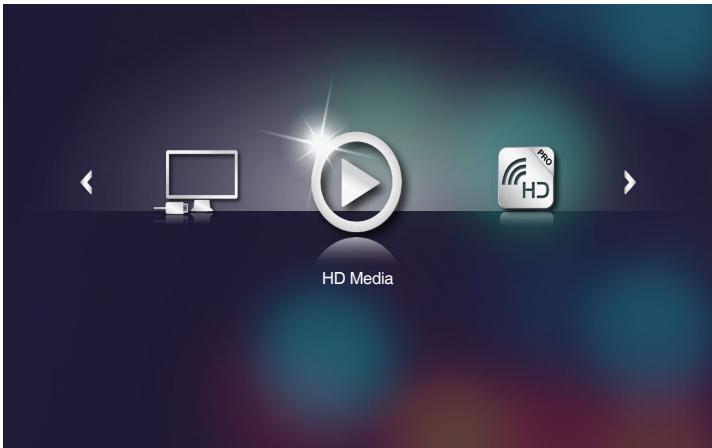
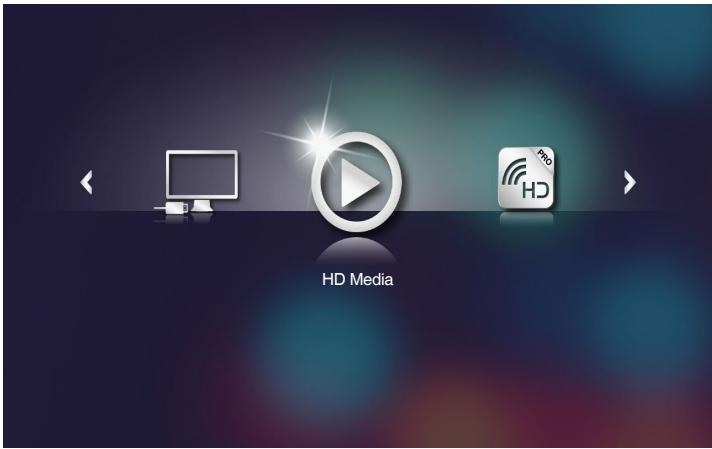
- Select the HD Media menu.
The HD Media menu opens.
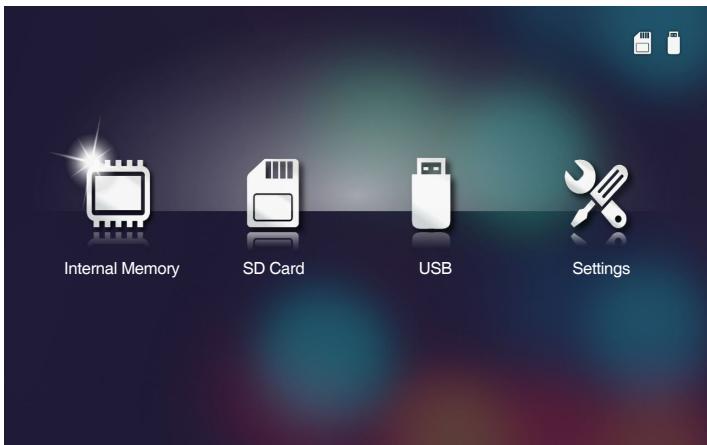
- Access the Internal Memory menu and select the multimedia files: Photo, Video, or Music. Or select the Settings option to change settings for Photo, Video, or Music.
- Select the file you want to open.
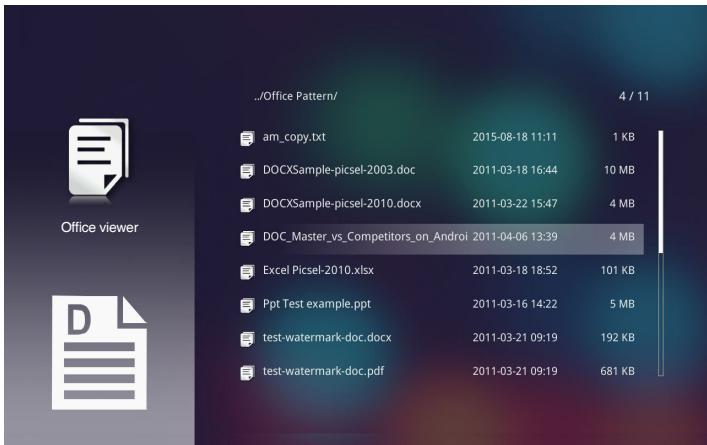
Note: The maximum allowed file name length is 28 characters.
Multi-Media Main Menu
Multi-Media SETTINGS for System, USB, MicroSD, and Internal Memory
The multi-media settings menu allows you to change settings for System, Photo, Video, and Music.
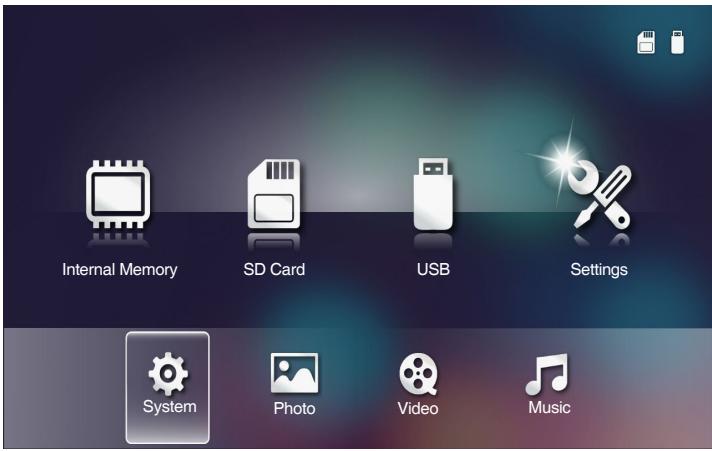
Note: Multi-media setup menu and set are the same for the USB, MicroSD, and Internal Memory.
System Settings
Access the system settings menu. The system settings menu provides the following options:
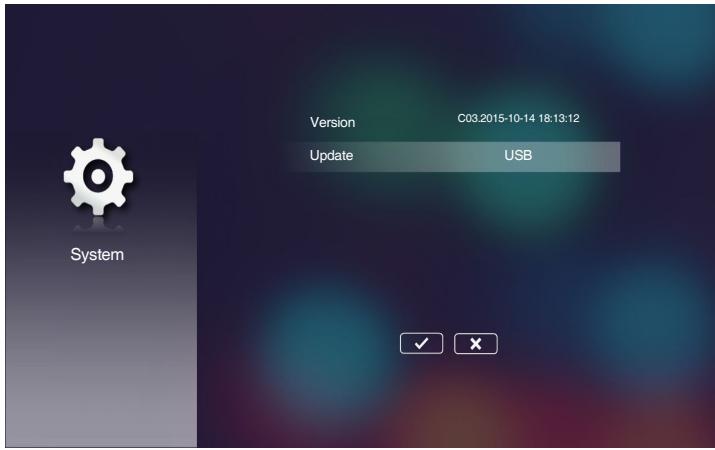
Version
View the current projector's firmware.
Update
Update the projector firmware only from the USB stick.
Photo Settings
Access the photo settings menu. The photo settings menu provides the following options:
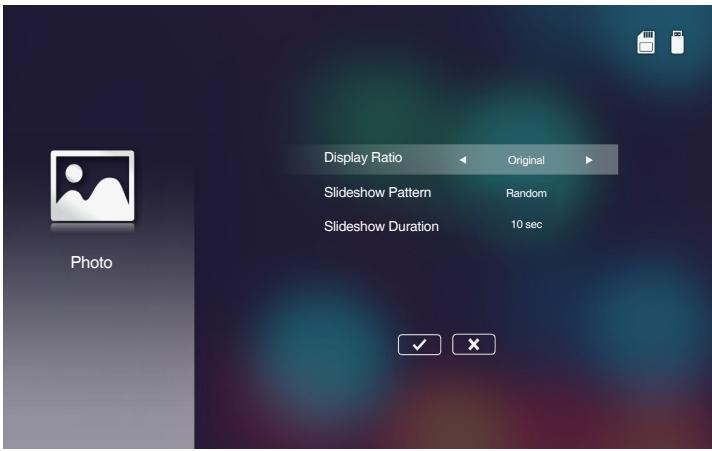
■ Display Ratio
Select the display ratio of the photo as Original or Full Screen.
■ Slideshow Pattern
Select what slideshow effect you want. Options are: Random, Ring Diffusion, Middle Enlarge, Expand Blink, Window Shades, Linear Interaction, Cross Interleaved, Banding Alternate, Rectangle Enlarge.
■ Slideshow Duration
Select the slideshow duration. The image will automatically switch to the next photo after the time out. Options are: 10 sec, 30 sec, 1 min.
Note: Slideshow Duration, and Slideshow Pattern function only support Slideshow mode.
Video Setup
Access the video settings menu. The video setting menu provides the following option:
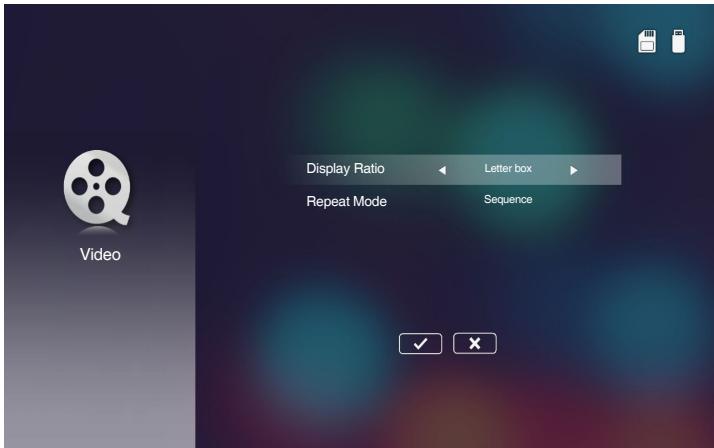
■ Display Ratio
Select the display ratio of the Video.
- Letter box: If the video source does not fit a 16:10 screen then the video image is stretched equally in the horizontal and vertical directions to fit the screen.
Therefore parts of the video are cropped at the top and bottom (left and right) sides and appear as "black bars" around the video. - Cut screen: Choose to display the video in its native resolution without scaling. If the projected image exceeds the screen size then it will be cropped.
- Full screen: Regardless the native aspect ratio, the video image is stretched non-linearly in the horizontal and vertical directions to exactly fit the 16:10 screen. You will not see the "black bars" around the video image but the proportions of the original content may be distorted.
- Original screen: Choose to display the video image in its native resolution without scaling. If the video resolution is lower than 1280x800 then you will see "black bars" around the edges of the video image. If the resolution is higher than 1280x800 then the video is displayed in 1280x800 resolution.
Repeat Mode
Select the video repeat mode. Options are: Sequence, Single, Random, Once.
Music Setup
Access the music settings menu. The music settings menu provides the following option:
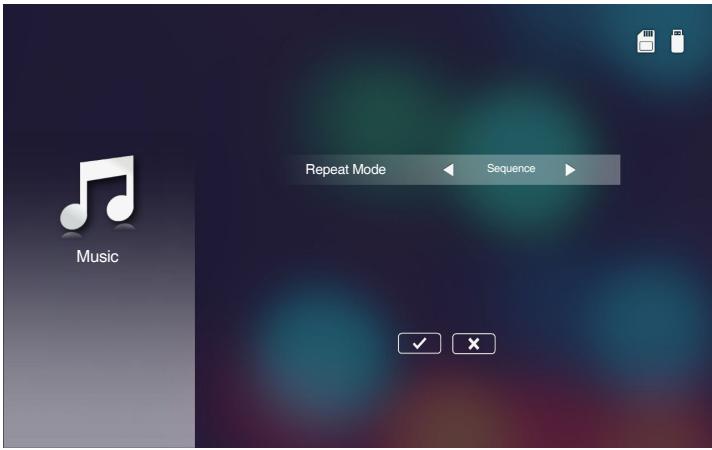
Repeat Mode
Select the music play mode. Options are: Sequence, Single, Random.
Other Multi-Media Connections
Using the multi-media menu, you can project files from the PC or mirror the screen of your portable device.
Projecting Files from the PC
Follow these steps to project files from your PC:
- Connect the power cable with AC adapter and turn on the projector by pressing the Power button.
natural_image
Diagram showing connection between a computer monitor and an audio jack (no text or symbols present)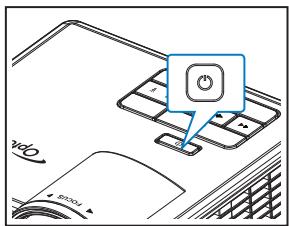
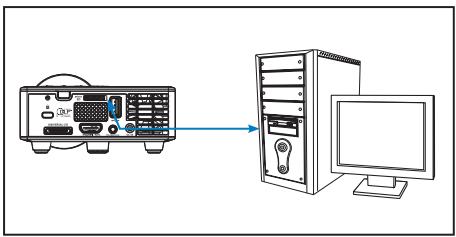
- To access files from the hard disk of your PC, plug in one end of a USB-A cable to your PC and the other end of the USB cable to the projector.
flowchart
graph LR
    A["Device with ports"] --> B["Computer with monitor"]
The Multi-Media menu opens.
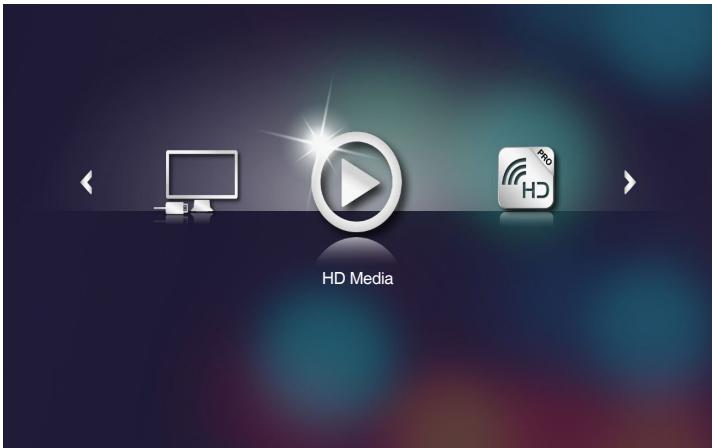
- Select the Connect to PC menu.
The Connect to PC menu opens.
natural_image
Illustration of three electronic devices on a dark background, no text or symbols present- Select the file you want to project on the wall.
Tip: In Windows 10 and Mac OS 10.9, you can also save files from your PC directly to the projector's internal memory or to the microSD card that has been inserted into the projector.
Mirroring the Screen of the Portable Device (with the Optional USB Wi-Fi Dongle)
Follow these steps to mirror the screen of your portable device:
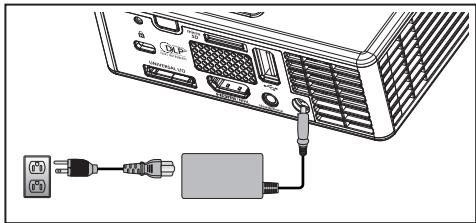
- Connect the power cable with AC adapter and turn on the projector by pressing the Power button.
natural_image
Diagram showing connection between a computer tower and an audio device via cable (no text or symbols present)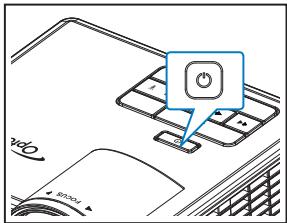
The Multi-Media menu opens.
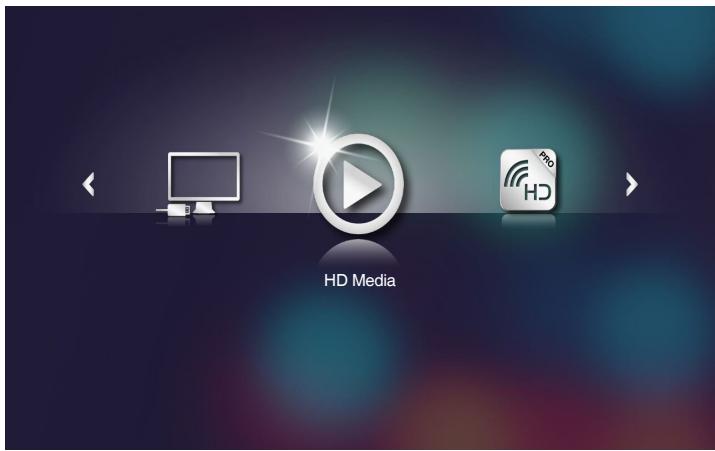
- Select the HDCast Pro menu.
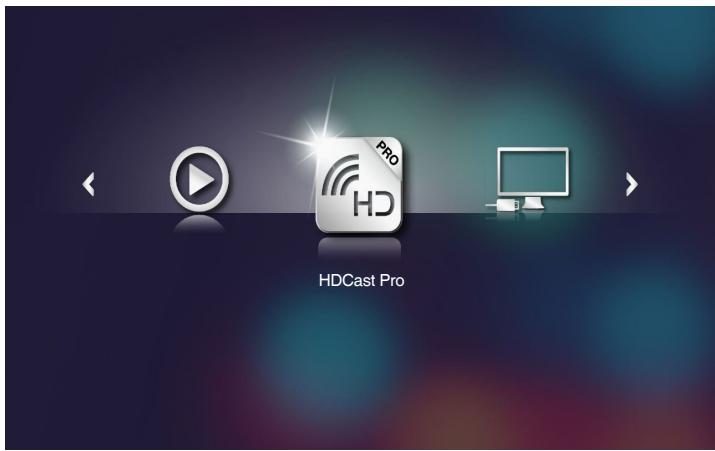
The HDCast Pro menu opens.
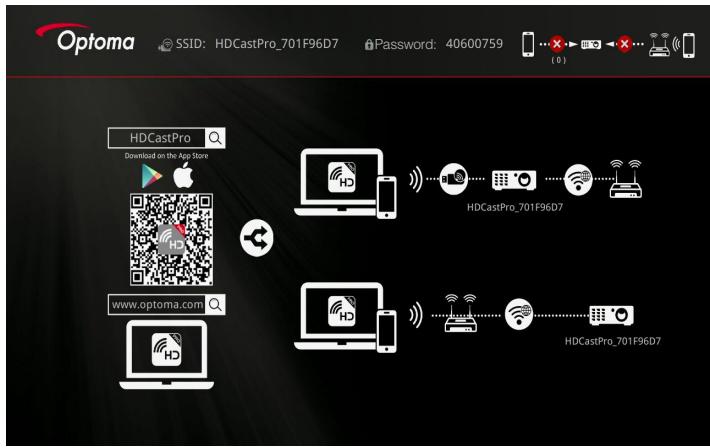
-
Do one of the following:
-
Depending on the operating system of your mobile device, open the App Store (iOS) or Google Play (Android) and install the HDCast Pro app on your mobile device.
- Scan the QR code on the HDCast Pro menu with your mobile device and then follow the on-screen instructions to install the HDCast Pro app.
If you are using a laptop, download HDCast Pro app from www.optoma.com/hdcastpro website.
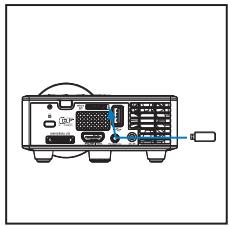
- Plug in a Wi-Fi dongle (Optional) to your projector.
natural_image
Front view of a computer monitor with ports and an external cable (no visible text or labels)- Connect your portable device via Wi-Fi to the projector. An example connection parameters are as follows:
• SSID of the projector: HDCastPro 701F96D7
• Wi-Fi password: 40600759
Note: The projector SSID and Wi-Fi password varies depending on the connected Wi-Fi dongle.
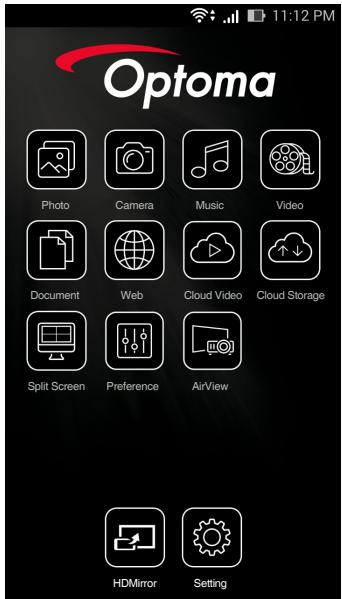
- Open HDCast Pro app on your portable device.
The following screen opens.
Android
Windows
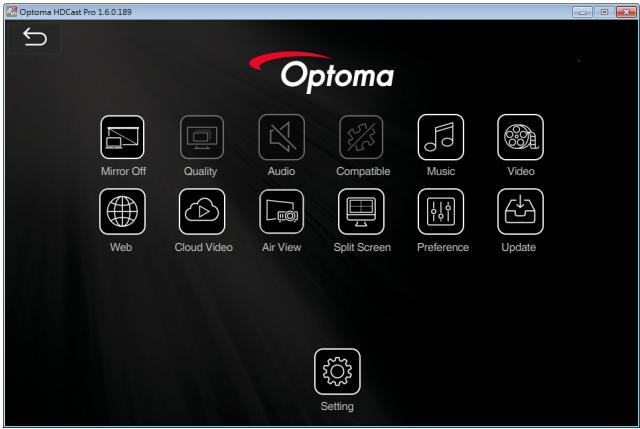
- Select HDMirror (Android) from the menu to start mirroring the screen of your portable device.
Appendices
Troubleshooting
If you experience problems with your projector, see the following troubleshooting tips. If the problem persists, contact your local reseller or service center.
| Problem | Possible Solution |
| No image appears on the screen | Ensure that the projector is turned on.Ensure that you have chosen the correct input source on the OSD Main > Input Source menu.Ensure the external graphics port is enabled. If images are not displayed properly, please upgrade the video driver of your computer.Ensure that all the cables are securely connected.Ensure that the pins of the connectors are not bent or broken. |
| Partial, scrolling or incorrectly displayed image | If you experience difficulty in changing resolutions, or if your monitor freezes, restart all the equipment and the projector.If images are not displayed properly, please upgrade the video driver of your computer. |
| The screen does not display your presentation | If you are using a portable computer, press the toggle output settings. Example: [Fn]+[F4]. |
| Image is unstable or flickering | Adjust the phase in the OSD Main > Image > Phase menu (in PC Mode only). |
| Image has vertical flickering bar | Adjust the frequency in the OSD Main > Image > Frequency menu (in PC Mode only). |
| Image is out of focus | Adjust the focus ring on the projector lens.Ensure that the projection screen is within the required distance from the projector (2.82 ft [86 cm] to 5.64 ft [172 cm]). |
| The image is stretched when displaying a 16:9 DVD | The projector automatically detects the input signal format. It will maintain the aspect ratio of the projected image according to input signal format with an Original setting.If the image is still stretched, adjust the format in the Main > Image > Format menu in the OSD. |
| LED warning indicator (LED) is solid amber | A projector LED has failed and the projector will automatically shut down. If the problem persists, contact Optoma. |
| TEMP warning indicator (LED) is blinking amber | The projector has overheated. The display automatically shuts down. Turn the display on again after the projector cools down. If the problem persists, contact Optoma.If the projector fan fails, the projector will automatically shut down. Clear the projector mode by pressing and holding thePowerbutton for 10 seconds. Please wait for about 5 minutes and try to power up again. If the problem persists, contact Optoma. |
| The remote control is not operating smoothly or works only within a limited range | The battery may be low. Check if the LED indication from the remote is too dim. If so, replace with a new CR2025 battery. |
Guiding Signals
| Projector Status | Description | Power (Blue / Amber) | TEMP Warning (Amber) | LED Warning (Amber) |
| Standby mode | Projector in Standby mode. Ready to power on. | Amber | OFF | OFF |
| Power on | Projector in Normal mode, ready to display an image. | Blue | OFF | OFF |
| Projector overheated | Air vents might be blocked or ambient temperature may be above 35 °C. The projector automatically shuts down. Ensure that the air vents are not blocked and that the ambient temperature is within operational range. If the problem persists, contact us. | Amber flashing and Blue ON | Amber Flashing (Cycling turn-off 1sec and turn-on 3sec) | OFF |
| Fan breakdown | One of the fans has failed. The projector automatically shuts down. If the problem persists, contact us. | Amber flashing and Blue ON | Amber Flashing (Cycling turn-off 0.5sec and turn-on 2sec) | OFF |
| LED failure | LED shutdown. | OFF | OFF | Amber |
Note: If there is a fan failure, the TEMP LED will blink amber (2sec on / 0.5 sec off). -If the projector fan fails, the projector will automatically shut down. Reset the projector mode by pressing and holding the Power button for 10 seconds. Please wait for about 5 minutes and try to power up again.
Compatibility Modes (HDMI/VGA)
| Signal | Mode | Resolution | Refresh Rate (Hz) |
| HDMI, VGA(via Universal port) | VGA | 640 x 480 | 60/75 |
| SVGA | 800 x 600 | 60/75/120(*) | |
| XGA | 1024 x 768 | 60/75/120(*) | |
| SXGA | 1280 x 1024 | 60/75 | |
| WXGA | 1280 x 768 | 60/75 | |
| WXGA | 1280 x 800 | 60 | |
| WXGA | 1366 x 768 | 60 | |
| WXGA+ | 1440 x 900 | 60/75 | |
| SXGA+ | 1400 x 1050 | 60 | |
| WSXGA+ | 1680 x 1050 | 60 | |
| HDMI, YPbPr(via Universal port) | 480i | 720 x 480 | 30 |
| 480p | 720 x 480 | 60 | |
| 576i | 720 x 576 | 25 | |
| 576p | 720 x 576 | 50 | |
| 720p | 1280 x 720 | 50/60 | |
| 1080i | 1920 x 1080 | 25/30 | |
| 1080p | 1920 x 1080 | 24/50/60 |
Note: (*)3D timing for TI DLP 3D.
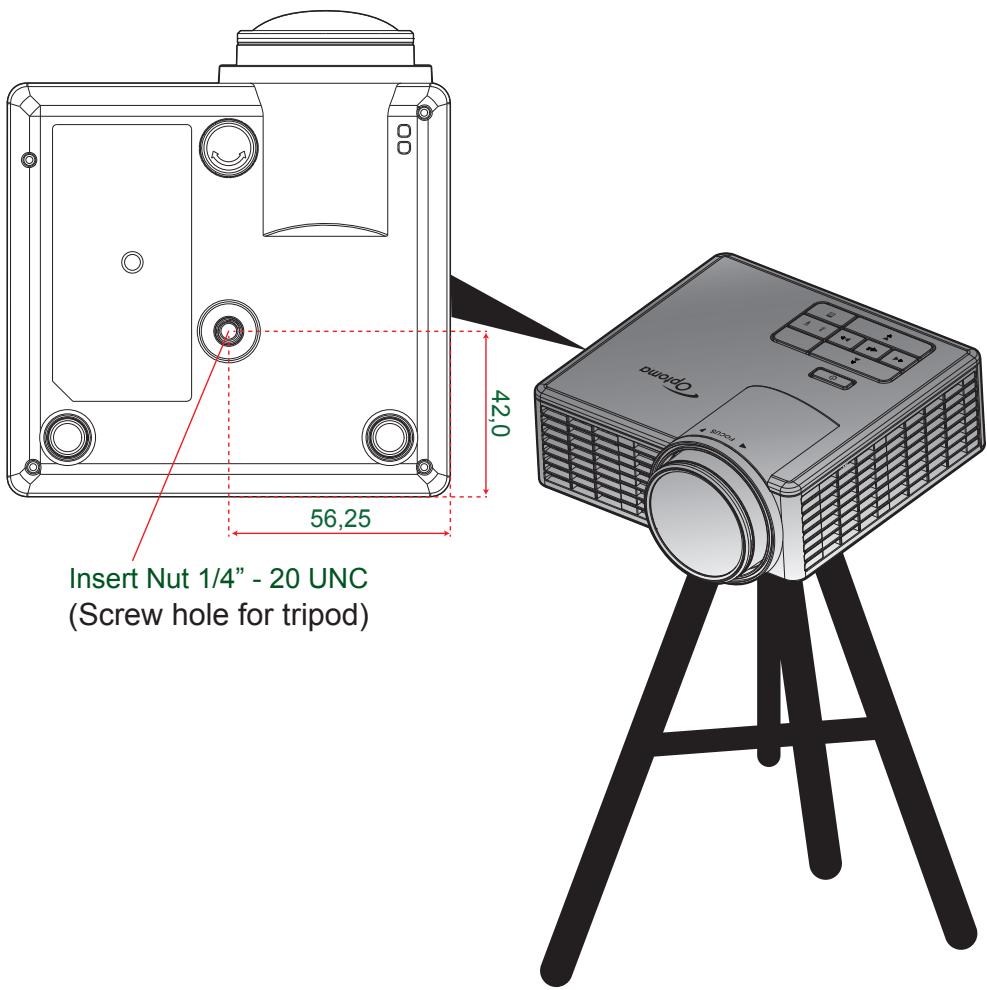
Tripod Mount the Projector
Screw a standard tripod into the screw hole on the projector.
Note: Please note that damage resulting from incorrect installation will void the warranty.
Unit: mm
Specification
| Optical | Description |
| Maximum resolution | - Video timing maximum up to 1080p- Graphic up to WSXGA+ (1680 x 1050) @60Hz |
| Lighting source | RGB LED (LED life=20,000hrs) |
| Lens | Manual focus |
| Image size (diagonal) | - 25" ~ 200" (with ME travel)- 50" ~ 100" (focus range with optimized at 60" image size) |
| Projection distance | - 0.43m~ 3.44m (with ME travel)- 0.86 m~1.72m (focus range with optimized at 60" image size) |
| Electrical | Description |
| Inputs | - Universal VGA in x1 (need to use special cable),- HDMI/MHL in x1,- USB-A x 1, Micro SD x 1 |
| Outputs | Headphone out x1 |
| Color reproduction | 16.7 Million color |
| Scan rate | - Horizontal scan rate: 15.375~79.796 KHz- Vertical scan rate: 24~ 75 Hz (120Hz for 3D featured projector) |
| Built-in speaker | Yes, 1.5W (Amplifier) |
| Power requirement | AC Adapter, Input 100 - 240V AC 50/60Hz, Output 19V DC (to projector), Standby Mode < = 0.5W |
| Input current | AC in 1.5A (DC in 3,42A) max |
| Multimedia | Description |
| FW based | Linux similar OS |
| USB-A port | - Support Host mode for USB storage disk(USB 2.0 supported, up to 64GB).- Support WiFi dongle- Support 5V/1A power (Bright mode only 0.5A) for 3C device |
| Micro-SD slot | - Support Micro SD & SDHC card (up to 32GB)- Not support SDXC & UHS-I card type |
| Mechanical | Description |
| Installation orientation | Desktop/Front, Desktop/Rear |
| Dimensions | 112.5 x 105 x 40.5mm (w/o lens ring and rubber foot) |
| Weight | 0.45 kg |
| Environmental conditions | Operating: 5 ~ 40°C in Bright mode and ECO mode, 10% to 85% humidity (non-condensing) |
Note: All specifications are subject to change without notice.
- Contents
- Safety Instructions....4
- Introduction....11
- Installation....17
- User Controls....26
- Multi-Media Introduction 32
- Appendices 51
- Safety Instructions
- Class B emissions limits
- Important Safety Instruction
- Intended Use Statement
- • Operation temperature:
- • Maximum Humidity:
- Safety Information
- ⚠ Warning
- To reduce the risk associated with hazardous voltage:
- To reduce the risk associated with fire and explosion:
- To reduce the risks associated with choking:
- To reduce the risk associated with hazardous voltage, impact, tripping, and intense visible light:
- Caution
- To reduce the risks associated with hearing loss:
- To reduce the risk associated with explosion, and/or chemicals from a leaking batteries:
- To reduce the risk associated with environmental contamination:
- To reduce the risks associated with LED bright light:
- To reduce the risks associated with tripping and falling:
- SAVE THESE INSTRUCTIONS
- Safety Labels
- Trademarks
- Video and Audio Decoder Notices
- MPEG-4 NOTICE
- AVC VIDEO NOTICE
- MPEG LAYER-3 NOTICE
- Regulatory Notices
- FCC STATEMENT - CLASS B
- Industry Canada regulatory information
- CE Statement
- WEEE Statement
- Introduction
- Package Contents
- About Your Projector
- # Description
- Control Panel
- Remote Control
- Installing the Remote Control Battery
- Operating Range with Remote Control
- Installation
- Connecting to a Computer
- Note:
- Connecting to a DVD Player
- Connecting to Multi-Media
- Turning On/Off the Projector
- Turning Your Projector On
- Turning Your Projector Off
- Adjusting the Projected Image
- Raising the Projector Height
- Lowering the Projector Height
- Adjusting the Projector Focus
- User Controls
- Using the On-Screen Display
- Main Menu
- Image
- Display
- Setup
- Advanced
- Multi-Media Introduction
- How to set-up File Type for Multi-Media with USB
- How to set-up File Type for Multi-Media with MicroSD
- How to set-up File Type for Multi-Media with Internal Memory
- Multi-Media Main Menu
- Multi-Media SETTINGS for System, USB, MicroSD, and Internal Memory
- System Settings
- Version
- Update
- Photo Settings
- Video Setup
- ■ Display Ratio
- Repeat Mode
- Music Setup
- Other Multi-Media Connections
- Projecting Files from the PC
- Mirroring the Screen of the Portable Device (with the Optional USB Wi-Fi Dongle)
- Appendices
- Troubleshooting
- Tripod Mount the Projector
Brand : OPTOMA
Model : ML750ST
Category : Mini projector