The Hermes Traveller - Watch AstronSCIENTIFIC - Free user manual and instructions
Find the device manual for free The Hermes Traveller AstronSCIENTIFIC in PDF.

User questions about The Hermes Traveller AstronSCIENTIFIC
0 question about this device. Answer the ones you know or ask your own.
Ask a new question about this device
Download the instructions for your Watch in PDF format for free! Find your manual The Hermes Traveller - AstronSCIENTIFIC and take your electronic device back in hand. On this page are published all the documents necessary for the use of your device. The Hermes Traveller by AstronSCIENTIFIC.
USER MANUAL The Hermes Traveller AstronSCIENTIFIC
text_image
HERMES ASTRO-PHOTOGRAPHY UNIVERSAL TELESCOPEThe HERMES TRAVELLER
The Hermes Traveller is the first ever universal single-tube telescope for viewing, planetary & deep space object astrophotography... all in one... portable... and only possible with Rotarion.
by AstronSCIENTIFIC SL
1.1. Introduction:
1.1. The Hermes Traveller, characteristics & highlights:
- First ever single tube telescope for eyepiece viewing and astro-photography for both imaging techniques: a) moon & planets and b) deep space objects (DSO) such as galaxies, nebulae, etc..
-
The telescope is recommended for intermediate, advanced, and expert amateurs or professionals in astro-photography.
• State of the art, best quality parts and components supplied from best industry brands.
• Light weight, portable single tube telescope supplied with a military grade quality transport case.
• Hardware quick and easy setup, estimated time under 2 minutes: -
Red color aluminum handle for easy telescope lift, carry and assembly, from the transport case to your mount & tripod and back.
- Steel counter-weight in dove-tail bar for easy telescope balancing.
-
Fully integrated astronomy telescope components ready for use.
-
Telescope tube, motorized focuser, Rotarion wheel, Rotarion CAM Kit parts and Rotarion AutoFocus, optics and astro-photography cameras integrated, including a DSO camera off-axis guide system.
- No need to assemble or un-assemble the Hermes Telescope when changing telescope viewing or astro-photography application.
- Astronomy applications and setups by Rotarion wheel Ports #:
o Port 1: Viewing
o Port 2: Deep Sky Objects (DSO) astro-imaging.
o Port 3: Not available in this telescope.
o Port 4: Moon and Planets astro-imaging.
1.2. Extra equipment you will need to operate the Hermes Traveller:
• Equatorial Goto Mount: Celestron Mount Advanced VX AVX type or with higher payload capacity.
• PC or Laptop computer with Windows 10.
• Imaging capture software and post-processing software (in the web there are free software apps).
• Reliable Power source or Power tank 12 Volt.
• Foldable table, chair, red flashlight, warm clothes...
1.3. In the box:
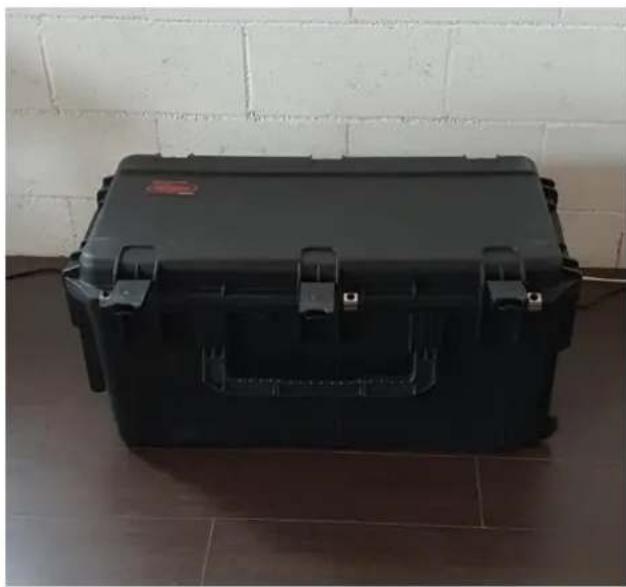
3.1. Hermes Traveller transport case.
natural_image
Black plastic hard case placed on a tiled floor against a white brick wall (no text or symbols visible)Watertight military suitcase with custom foam and with integrated telescopic handle (trolley) and 2 pulling wheels. Rotational molded case for extreme strength of military certificates (MIL-STD-810F). Powder-coated black stainless-steel latches and extremely strong hinges. Ergonomic handles. Dust and watertight (MIL-C-4150J, IP67) with automatic compression valve (MIL-STD-648C), resistant to UV rays, solvents, corrosion and fungi (MIL-STD-810F). MATERIAL: Roto-molded polyethylene (LLDPE). RESISTANCE: High. COLOR Black. LATCHES Black painted steel butterfly latches - padlock ring. STACKABLE: yes.
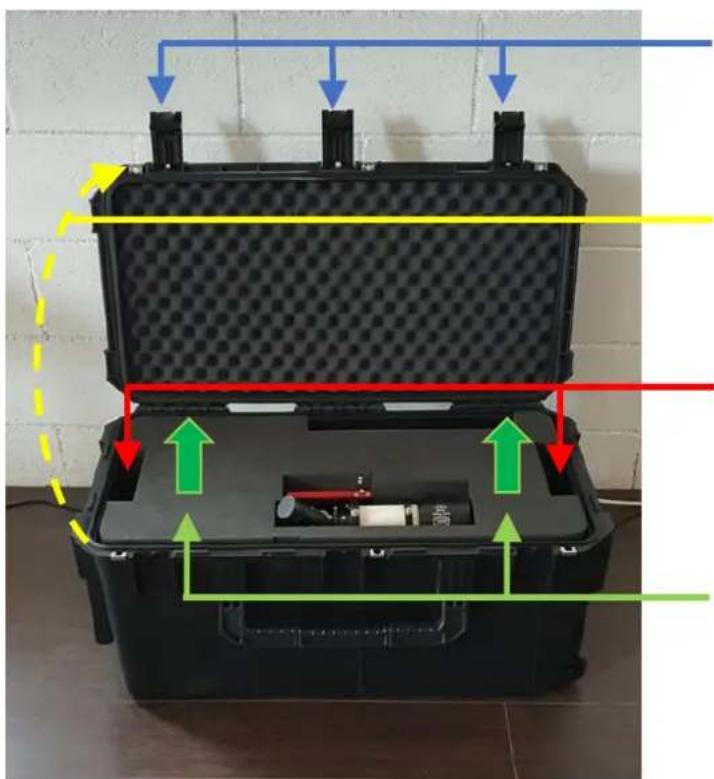
3.2. Opening the transport case.
natural_image
Black plastic hard-shell case with internal components and directional arrows indicating movement or flow (no text or symbols visible)A) Release and open the black 3 hinges,
B) Open the case.
C) Grab with both hands the upper foam.
D) CAREFULLY lift vertically the upper foam.
3.3. Inside the Hermes Traveller's transport case.
• The Hermes Traveller telescope:
• 2 pairs of pre-packed wire-hoses for easy connection to pc/laptop and to power supply.
○ Rotarion wheel power and remote control.
○ Rotarion AutoFocus and motor focuser power and remote control.
• 1 Bahtinov transparent mask, for extra fine manual infinite focusing for DSO imaging.
• 1 Instruction Manual printed folder.

natural_image
Interior view of a black hard-shell device with internal components and red/green annotations (no readable text or symbols)- Observe how the Hermes Traveller telescope is placed inside the foam -
3.4. The telescope fits tight in the water-cut foam.
A) Right side blue circle: observed the telescope is closed with the black metal safety cap on; the safety cap presses the black foam wall.
B) Left side blue circle: The planetary QHY blue color camera is placed all the way inside the TeleVue x5 PowerMate (release the seen screw and thight it again) so the camera does NOT touch the left side foam wall.
3.5. All telescope integrated wiring is connected and ready for use, EXCEPT:
A) Red color circles: NO wires are connected to any camera nor the filter wheel (not seen); that is to prevent power and USB connectors to be broken under transport stress.
B) Red color arrows: Two long wire black hoses (to be connected later to a pc or laptop computer and to power supply) are safely placed among other items.
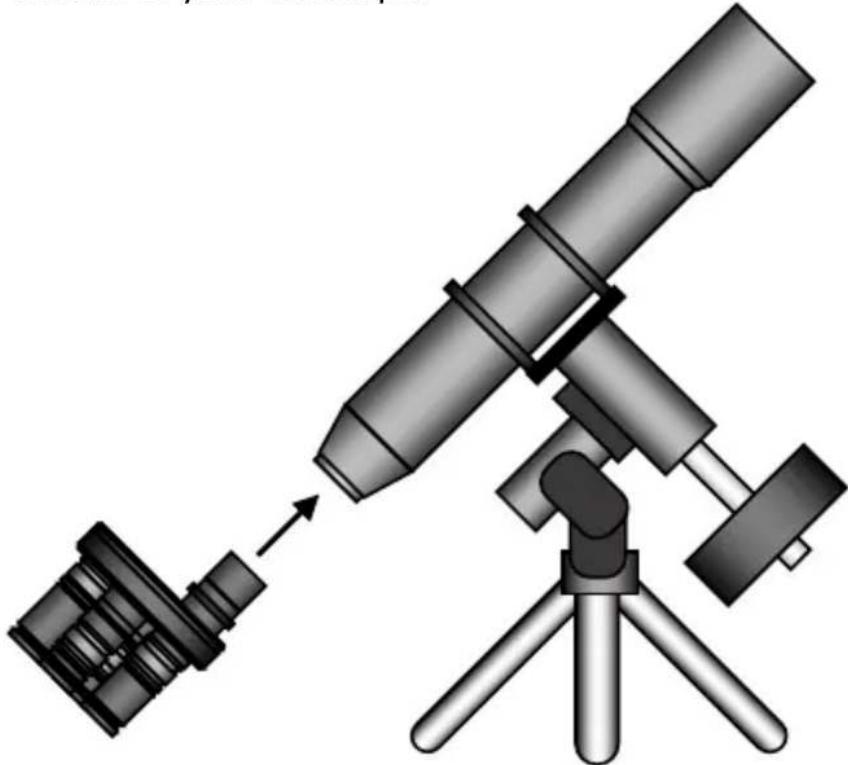
3.6. How to remove the Hermes Traveller from the case:
A) Yellow color circle: Grab with 1 hand ONLY (recommended left hand) on the red color aluminum Handle.
B) Carefully lift vertically the Hermes Traveller using ONLY the red color aluminum Handle
C) Place the telescope dove- tail bar on your tripod mount, tighten all screws in your mount (See in your tripod mount the Instructions Manual).
D) Remove telescope front-end metal cap, connect cameras and filter wheel wires (power and USB), connect 1 dot) black wire hose to Rotarion, and 2 dots) black wire hose to cameras; both wire hoses ends connect to pc or laptop and to power supply.
E) Proceed with telescope balancing routine (see in YouTube videos of how to balance a telescope).
1.4. Operating the Hermes Traveller (see ANEX: Manufacturer's Instruction Manuals Index)

text_image
2.2 1.1 4.3 2.1 1.2 2.3 4.2 4.1 ROTARIÓN 3.1 3.2 5.2 5.1 6.1 6.2 6.3 6.4 7.1 7.2 6.5- INDEX FOR MANUFACTURER'S MANUALS -
- Spotter/Finder:
1.1. Baader
1.2. Baader Cross-hair finder eyepiece.
- Telescope tube:
2.1. Hermes Traveller Handle-bar.
2.2. TeleVue Inc TV-85.
2.3. Dovetail-bar and steel counterweight.
- Rotarion remote wheel:
3.1. Rotarion & Rotarion Remote Control software.
3.2. Rotarion CAM Kit & Rotarion Remote Control PRO software.
- Focusing:
4.1. TeleVue TV-85 focuser
4.2. StarLight motor focuser.
4.3. Rotarion Autofocus (only wires seen in this image).
4.4. Bahtinov Mask (inside the case).
- Port # 1: Viewing:
5.1. TeleVue Diagonal
5.2. TeleVue 40mm Plössl eyepiece + TeleVue EyeGuard Extender.
- Port # 2: Deep Space Object astro- photography:
6.1. TeleVue TV-85 Reducer & Flattener optic Custom for Rotarion.
6.2. M48 TS quick release adapter + ZWO off-axis guide.
6.3. ZWO guide camera.
6.4. ZWO filter wheel + Baader RGBL+H Alpha filters (inside ZWO filter wheel).
6.5. ZWO Monochrome cooled camera.
- Port # 4: Planetary astro-photography:
7.1. TeleVue PowerMate x5 optic.
7.2. QHY color camera.
1.5. How to place the Hermes Traveller in the case for safe transport & storage:

natural_image
Interior view of a black plastic optical device with visible components and red arrows indicating directions (no text or symbols)- Observe how the Hermes Traveller telescope is placed inside the foam -
A) BEFORE removing the telescope from your mount & tripod.
a. Close the telescope front-end black metal safety cap.
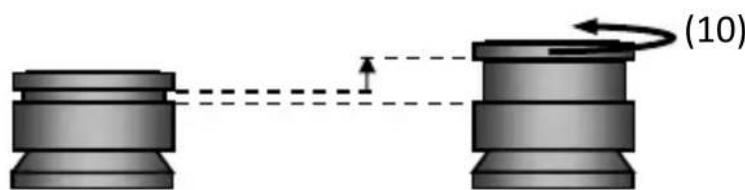
b. Green color circle: carefully unlock the 2 barrel hand-screws found in the telescope focuser, then rotate until aligned the fluorescent dots found in the telescope focuser and the Rotarion wheel; lock again the 2 screws found in the telescope focuser.
c. Make sure Port # 1 TWO fluorescent dots in red Rotarion carrousel are aligned on Rotarion TWO fluorescent dots. This will ensure the correct fit of the telescope in the foam.
d. White color circles: unlock screw in motor focuser first, second using focuser wheel move the focuser to maximum inward position; finally lock screw in motor focuser.
e. Red color circles: Disconnect wires connected to any camera or the filter wheel.
f. Red color arrows: Disconnect 2 black color wire hoses with connectors, power and USB; place both back wires hoses in the case.
g. Carefully grab and hold the Hermes Traveller red aluminum handle and remove the telescope from your mount & tripod.
B) AFTER removing the telescope from your mount & tripod, placing the inside the foam
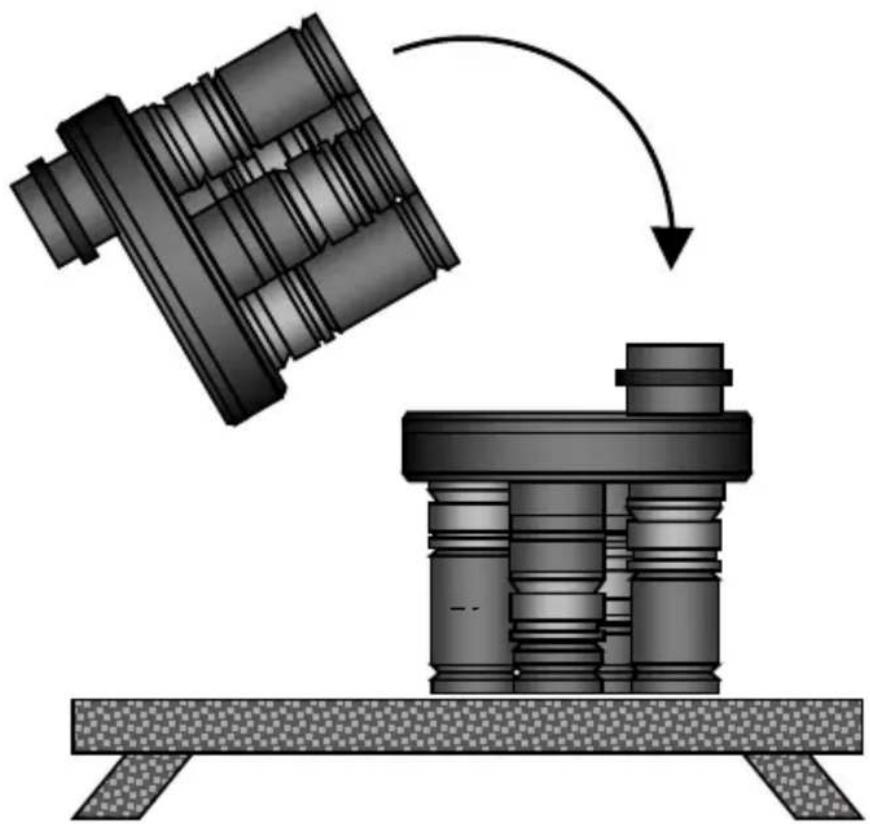
a. Right side blue color circle: Holding the telescope by the red aluminum handle-bar, lower it CAREFULLY inside the foam, making sure the front-end of the telescope tube is leaning until touching the foam wall as shown.
b. Red Color circles: with previously disconnected all power and USB connectors of cameras and filter wheel (not seen), so they connectors won't break because they touched the foam walls around the cameras, PRESS downward the telescope inside the foam using the handle ONLY.
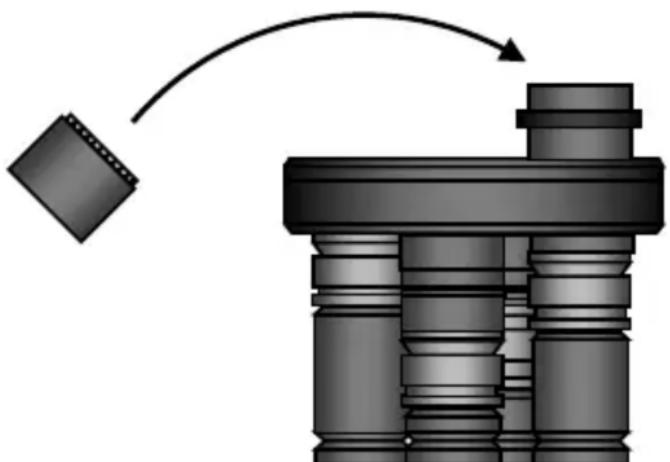
C) CLOSING the Case:
a. See image on 3.2 Opening the transport case.
b. Sept sequence C), B) and A).
Note on step C): the fluorescent 2 dots on the black upper foam plus the 2 dots on Hermes Traveller's red handle must be aligned to properly place the foam before B) lowering the case's lid C) and closing the 3 black hinges.

natural_image
Black plastic case with hexagonal bolt pattern and internal components, no visible text or symbols1.6. Quality Control and final Field Tests: Hermes Traveller Serial Number #001.
A) Quality Control: Feb 17, 2021, signed by inventor Alv. Martinez
B) Field Test Port # 2: DSO image:

natural_image
Deep space image showing a prominent red nebula against a starry background (no text or symbols)The Crescent Nebula NGC6888, Constellation Swan.
5000 light years away, discovered by William Hersell 1792.
Good Seeing conditions.
Hermes Traveller: OTA TV85 - ZWO ASI1600MMC PRO -
Filters R, G, B, H Alpha. Baader.
10 subs of Halpha 300" BIN 1 - 10 subs of each R,G,B filters of 120s BIN 2.
Captured SGPro / Processed AstroPixelProcessor, Pixinsight, and Photoshop.
By Carlos Uriarte - October 2020 – The Pyrenees – Spain.
C) Filed Test Port # 4: Planetary image:
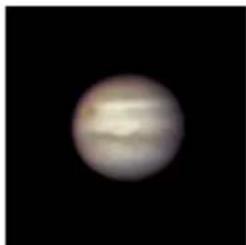
natural_image
Close-up image of a planet with visible atmospheric light against a black background (no text or symbols)Jupiter.
588 Million Km away. Poor Seeing conditions.
Hermes Traveller: OTA TV85 – TeleVue PowerMate x5 QHY Color.
40,000 Frames – Selected best 20%.
Captured FireCapture / Processed AutoStakker, Astra and Photoshop.
By Josep Soldevilla - October 2020 – Barcelona – Spain.
ANEX
Hermes Traveller #0001,
Manufacturer's Integrated Components Instruction Manuals Index.

text_image
2.2 1.1 4.3 2.1 1.2 2.3 4.2 4.1 ROTARION 3.1 3.2 5.2 5.1 6.1 6.2 6.4 6.3 7.1 7.2 6.5- INDEX FOR MANUFACTURER'S MANUALS -
1. Spotter/Finder:
1.1. Baader
1.2. Baader Cross-hair finder eyepiece.
2. Telescope tube:
2.1. Hermes Traveller Handle-bar.
2.2. TeleVue Inc TV-85.
2.3. Dovetail-bar and steel counterweight.
3. Rotarion remote wheel:
3.1. Rotarion & Rotarion Remote Control software.
3.2. Rotarion CAM Kit & Rotarion Remote Control PRO software.
4. Focusing:
4.1. TeleVue TV-85 focuser
4.2. StarLight motor focuser.
4.3. Rotarion Autofocus (only wires seen in this image).
4.4. Bahtinov Mask (inside the case).
5. Port # 1: Viewing:
5.1. TeleVue Diagonal
5.2. TeleVue 40mm Plössl eyepiece + TeleVue EyeGuard Extender.
6. Port # 2: Deep Space Object astrophotography:
6.1. TeleVue TV-85 Reducer & Flattener optic Custom for Rotarion
6.2. M48 TS quick release adapter + ZWO off-axis guide.
6.3. ZWO guide camera.
6.4. ZWO filter wheel + Baader RGBL+H Alpha filters (inside ZWO filter wheel).
6.5. ZWO Monochrome cooled camera.
7. Port # 4: Planetary astro-photography:
7.1. TeleVue PowerMate x5 optic.
7.2. QHY color camera.
1.1. Baader 60mm VARIO Finder - with 60/250mm ASTRO objective
... a high-quality finder, rich field scope, guiding scope, telephoto lens
... optical design based on the phantastic Carl ZEISS C-Lens Design - up to 120x magnification

text_image
baader planetanum VARIO FINDER 10 X 60 ERECT IMAGE baader planetanum Vario-Finder 10x60 (51x250 94.1) #29574602957460
baader planetanum Vario-Finder 10x60 (51x250 94.1) ERECT IMAGEBaader's 60mm VARIO finder is a true multi talent. Naming this system just "finder" does not become fair on it. The precise two-element achromatic objective with 60mm aperture and versatile connection options offer many opportunities. So the accessory space on your telescope is used optimally.
Fields of use for the VARIO finder:
-- 60mm SUPER finder with sharp image, 45° view and illuminated 25mm crosshair eyepiece
-- High image quality up to approx. 120x by ZEISS C-lens design
-- 60mm Spotting Scope for rich-field observation - be impressed by the image definition
-- Robust guiding scope - optimally suited for auto guiding applications
-- Contrasty telephoto lens for astro- and nature imaging
-- Nice travel spyglass with 14 " photo tripod adapter (included)
Variable viewing position, as you desire:
text_image
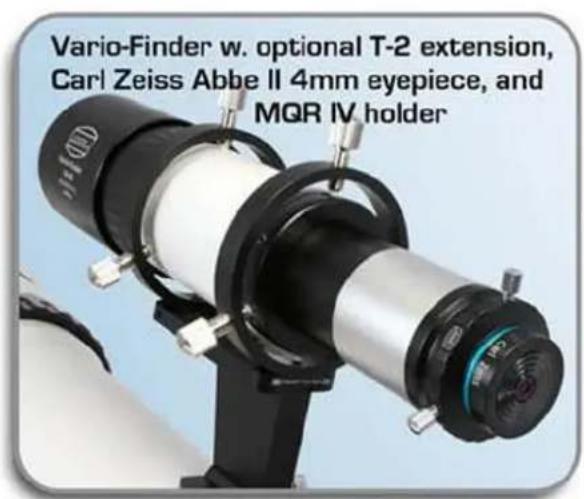
Vario-Finder w. optional T-2 extension, Carl Zeiss Abbe II 4mm eyepiece, and MQR IV holder
text_image
Vario-Finder w. optional MQR IV holder, star diagonal, and 31mm Aspheric eyepieceThe Baader VARIO Finder offers useful T2 connection and 1.25" also. Beneath cameras, you can connect 1.25" accessories like diagnoals, Amici prisms etc. Within a minute, this system can be altered from a straight telescope to a comfortable 90° right angle finder.
Baader VARIO Finder as guiding scope:
Vario-Finder w. optional LVI SmartGuider, Baader Stronghold Tangent Assembly, and T-2 extension tube 40mm

natural_image
Close-up of a scientific instrument with a red and black component mounted on a blue base (no visible text or symbols)A. very. attractive solution for astro photographers: the VARIO finder as the ultimate guiding scope. The fast optical system supports any auto guider. All parts are solidly screwed into each other so there's no risk for tilting or bending. Change quickly between the "finder" and "guider" mode and keep unnecessary stress from your mount.
The Baader "Stronghold Tangent Assembly" is a brainy and precise accessory for this finder. We can offer it optinally.
text_image
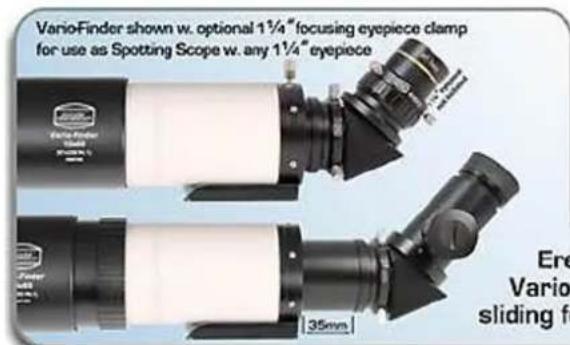
VarioFinder shown w. optional 1¼" focusing eyepiece clamp for use as Spotting Scope w. any 1¼" eyepiece Ere Vario- sliding fo 35mmVario-Finder includes:
- Vario-Finder fl 250mm
- EQ dove tail /
tripod-adantes
-T-2 erecting prism 45° - 25mm guiding eyepiece with illuminated recticle and T-2 thread
text_image
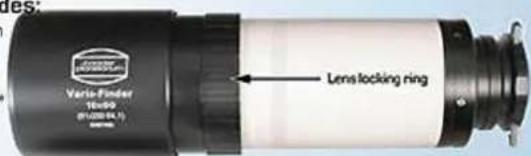
Varlo-Flinder 10x90 (### 64.1) Lens locking ringErect Image Vario-Finder with sliding focusing action
natural_image
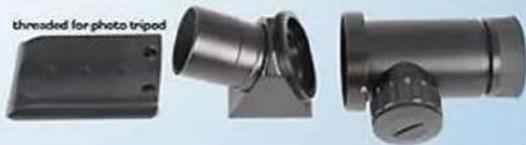
Three black mechanical components with no visible text or symbols, including a labeled part 'threaded for photo tripod' (no other text or symbols)Technical details:
-- Aperture: 60mm
-- Focal length: 250mm
-- Objective: Design Carl ZEISS C-lens doublet
-- Focusing with locking ring, 12mm range and additional rear push-focuser with 35mm travel
-- Eyepiece side connections: T2 and 1.25"
-- Photo tripod thread and GP-style dovetail rail included
-- Enough back focus for nearly all photographic applications
-- Eyepiece: illuminated 25mm crosshair eyepiece included
-- Female thread of the metal dew cap ... M71x0,75
Scope of delivery:
-- Baader VARIO Finder 10x60
-- 45° Amici Prism for correct image orientation
-- 25mm crosshair eyepice (illuminated), with T2 connection
-- Photo tripod thread (1/4")
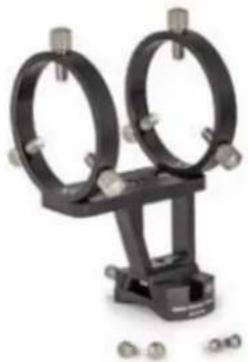
Manual for MQR III and MQR IV Multipurpose Finder Bracket # 2467020 and # 2467030
Congratulations on your purchase of an MQR III or MQR IV finder bracket. The stable guidescope rings of the MQR are connected by a solid rail. The finder bracket can be used with the Baader Standard Base # 2457000 and many other viewfinder mounts (Vixen, Synta, Celestron) with the 70 mm high Universal Red Dot Mount (RDM) # 2457010, at which a standard dovetail is attached to.
The standard base can be attached with one or two screws to telescopes with diameters between 130 and 400 mm. The sinusoidal base adapts to the telescope tube in a non-rotating manner and always has two stable, linear areas of contact.
natural_image
Mechanical clamp device with two black rings and metal fasteners (no visible text or symbols)
natural_image
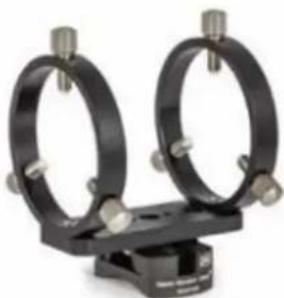
Two black metal rings mounted on a base with metal fasteners (no text or symbols visible)Guidescope rings and base plate without the RDM, e.g. for rails with Mini-Weaver-dovetail.
Removal of the dovetail to use the Mini-Weaver compatible dovetail
You can remove the RDM from the base plate of the guidescope rings by loosening the two upper M5 hexagon socket screws. This requires a 4 mm hex wrench. Then you can fasten the pipe clamps with suitable screws on standard visor rails with Mini-Weaver dovetail as well as on flat surfaces.

natural_image
Black metal bracket with mounting holes and a central hole (no text or symbols visible)The RDM with dovetail for standard finder bases.
natural_image
Close-up of a black mechanical clamp or bracket with two circular rings and metal fittings (no visible text or symbols)Low-Profile-Mount: The dovetail can be attached directly to the base plate.
Removing the RDM Adapter for low profile mounting
The dovetail can also be removed from the RDM by loosening the two lower hexagon socket screws.
Using the two new M5x12 screws supplied, you can now screw the dovetail directly to the base plate of the pipe clamps. This allows a very flat viewfinder mounting.

Removing the dovetail from the RDM.

natural_image
Black telescope with visible lens and optical components (no text or symbols)Example of use: Baader Variofinder with MQR IV in Low-Profile-Configuration.

BAADER PLANETARIUM ^GMBH
Zur Sternwarte 4 • D-82291 Mammendorf • Tel. +49 (0) 8145/8089-0 • Fax +49 (0) 8145/8089-105 www.baader-planetarium.com • kontakt@baader-planetarium.de • www.celestron.de
1.2. Baader 60mm VARIO Finder - with 60/250mm ASTRO objective
Baader POLARIS I - 25mm calibration- and guiding eyepiece with T2 connection, illuminated ... adaptations to 1¼" and 2" available.
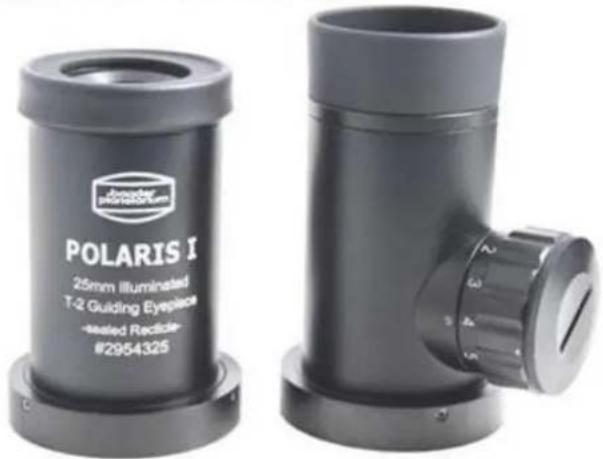
text_image
Polaris I 25mm Illuminated T-2 Guiding Eyepiece +tested Redicle- #2954325The POLARIS T2 eyepiece fits to all male T2 back ends. A red LED reticle illumination is included.
Fields of use:
- Exact centering, e.g. for precise GoTo alignment
- Measurements - precisely laser engraved reticle scales allow e.g. double star distance measurements and more.
-- Guiding: manual guiding is possible
The reticle of the POLARIS I eyepiece:

natural_image
Close-up of a black optical instrument with lens and adjustment knobs (no visible text or symbols)The multi-coated reticle contains a scale with calibrated distances allowing a multi-purpose use.
Adapters to 1¼" and 2":

natural_image
Two black cylindrical optical components with adjustment knobs, shown against a white background (no text or symbols visible)
text_image
NBWSUN® Long life at any device Lithium Microwave Battery CB 2032 BY-Von1aBattery for Red Dot Finderscopes
Replacement battery for red dot finderscopes.
Battery Type:
CR2032 - 3V - Lithium
Compatible red dot finderscopes:
Recommended adapters in the "accessories"
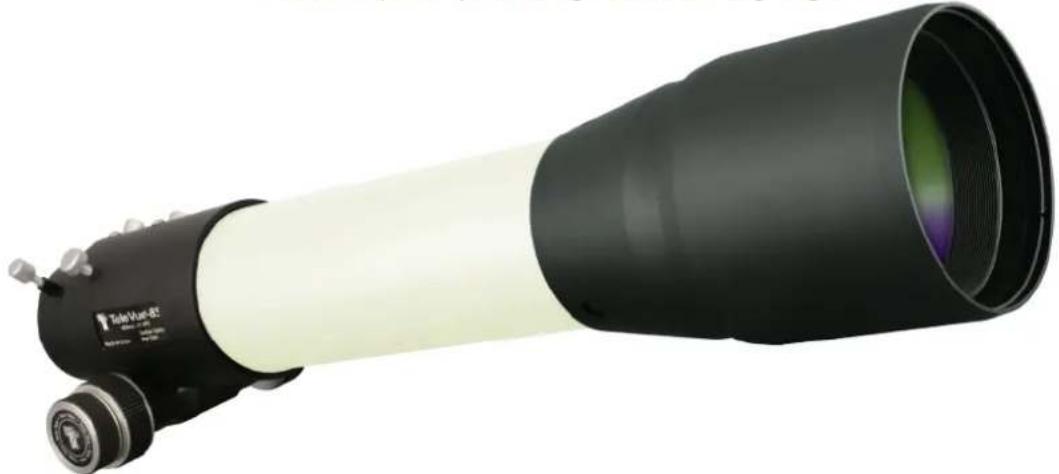
2.1. TeleVue Inc TV-85
TeleVue®-85 Operating Guide
600mm f/7 2-ELEMENT APO REFRACTOR
natural_image
Black and white optical telescope with long lens and visible lens (no text or symbols)Thank you for purchasing the Tele Vue-85. We hope it brings great enjoyment to your observing experience. The wonderfully versatile hand-built 3-1/3" aperture telescope features a diffraction limited, 600mm focal length, f/7 APO doublet objective which delivers razor sharp images sure to please you for years to come and wherever you observing interests lead you.

WARNING: NEVER try to look at the sun or point the telescope toward or near the sun without professional solar observing equipment rigidly secured in front of the objective lens. When observing the sun with the proper filters, use only the Tele Vue "Sol-Searcher" (SSF-1006) for finding the Sun. Remove any other finding devices such as Starbeam from the telescope. Instant and ent eye damage may result from viewing the sun directly, even during a solar eclipse, or when through thin clouds, or when the sun is near the horizon.
Standard features of the optical tube assembly (O.T.A.) include: sliding dew shield, screw-on cover, 2" rack and pinion focuser, and custom padded carrying bag.
Accessories
The Tele Vue-85 Accessory Package includes a 2" Everbrite diagonal, 2" to 1¼" adapter, Ring Mount, and Delite eyepiece.
Mounting - The Tele Vue Ring Mount (available separately or in the package) permits mounting to the Tele Vue Gibraltar, Panoramic, and Tele-Pod mounts, or heavy duty camera tripods. You will receive the two ¼-20 studs, wing knobs, Allen wrench and complete mount assembly instructions with the mount. Tele Vue also has adapter plates to allow attachment on specific equatorial mounts (consult your Tele Vue dealer).
Finders - For night use, we recommend the Starbeam reflex sight (SFT-2003) to complement the wide field of the telescope. The Starbeam attaches to the Ring Mount and can be left in place when the scope is stored in its case.
Use the Qwik-Point (part # QBT-1006) for daytime spotting. It's beam is bright enough for use in even bright sunlight. However it is not recommended for nighttime use.
Terrestrial Viewing Considerations - Indeed, the Cornell Ornithology Lab comparison reported the Tele Vue-85 as having the finest optics for birding.
The Tele Vue 55mm Plössl or 41mm Panoptic in a 2" diagonal will provide a 4.4° true field. This can serve as a finder, for rich field viewing or for terrestrial use. (Image is upright, but left-right reversed using diagonal mirrors.)
Tele Vue developed the 1¼" 60° Everbrite Diagonal (part# DPC-6012) specifically for terrestrial observers who appreciate the highest levels of image performance. The 60° angle is far more comfortable for terrestrial observing than the standard 90°, and the 99% reflective Everbrite dielectric coating gives the truest color rendition of any mirror or prism, and is sharpest at the highest powers.
For 1¼" diagonals and prisms, the 32mm Plössl or 24mm Panoptic offer the maximum field. 2.6° at 19x and 25x respectively.
If you use the telescope in a harsh environment such as at a beach where sand, mud and salt spray are present, or for birding, you may wish to use a 95mm clear filter for protection, while using the telescope. It is available from camera dealers, and simply screws onto the lens cell in place of the cover. These filters are generally not used for astronomy as they can degrade optical quality.
Getting Acquainted with Your New Tele Vue-85
Note: O.T.A. purchasers must supply eyepieces, eyepiece adapter, diagonal, and ring mount in order for the telescope to function. TV-85 Accessory Package includes these items.
1.1 Optical Tube Assembly
The OTA consists of the objective cell, tube and focuser. The front cell houses the carefully aligned objective. Never attempt to loosen the 3 alignment screws in the front lens cell. The tube is aluminum and powder coated, requiring no special care. The rack and pinion focuser is driven by high leverage 1:1 knobs on both the left and right sides, and a 10:1 reduction knob only on the right side. The two tension screws on the top of the focuser body can be adjusted to add resistance when using heavy eyepieces. These tension screws tighten against a brass clamp ring, which then cinches down on the Teflon sleeve in which the draw tube slides. For photography it is not necessary to tighten beyond the need to keep a camera stationary. Even when sufficiently tight, the focuser knobs can still drive the draw tube. The two lock screws in the end of the draw tube also tighten against a brass clamp ring for extra holding power on the diagonal or other accessories.
1.2 Ring Mount
The Ring Mount (available separately or in the package) permits easy telescope balancing. Simply unlock the "bat handle," reposition the telescope by sliding it fore or aft, and re-lock. Slots with 10-32 holes are available for mounting accessories.
1.3 Eyepieces
Tele Vue eyepieces offer a range of magnifications from 11x to 200x, with the Tele Vue-85. We recommend choosing low and medium power eyepieces in ratios of field stop diameters. For example, factors of 1.4 or 2.0. When choosing higher power eyepieces, use ratios of magnification. (see reference chart in the "Choosing Your Eyepieces" article.) The TV-85 Accessory Package includes an 18.2 DeLite that offers a 1.8° true field at 33x magnification with 20mm of eye relief.
1.4 Photography
For prime focus photography at 600mm f/7 using a DSLR, use camera adapter (part# ACM-2000). For flat field astrophotography at 480mm f/5.6, use the Tele Vue 0.8x reducer/flattener, (part# TRF-2008). Tele Vue Powermates with optional T-ring adapters provide a variety of options for extending focal length. To reach focus with the Powermates requires our 3.5" extension tube. Afocal photography using your cell phone camera is accomplished with FoneMate™(part# SFA-001). For Piggyback DSLR photography, attach the Piggy-Cam platform, (part# PGC-1001) to the Ring Mount.
OTA shown with optional TV-85 Accessory Package (TVP-3373*)

text_image
OTA shown with optional TV-85 Accessory Package (TVP-33/3*) *Eyepiece 18.2 DeLite® *2" to 1¼" Adapter Lock Screws Focuser Tension Knobs Accessory Channel *Ring Mount Sliding Dew Shield Front Cell Bat Handle Alignment Screws (factory sealed) Lens Cover TeleVue-85 @1000. 37 (MP) Draw Tube Focuser Knob 10:1 Reduction Knob Tube *Diagonal Draw Tube Fan 10:1 Reduction Knob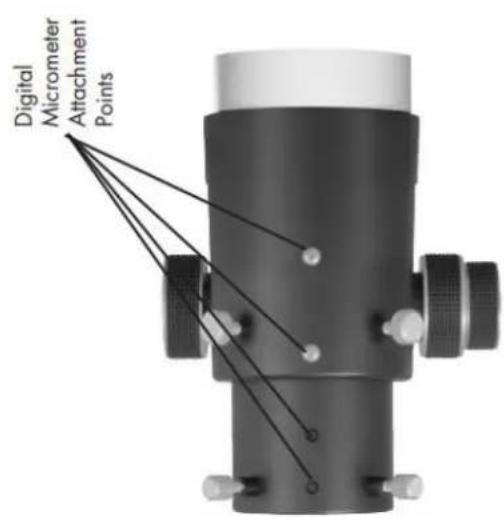
text_image
Digital Micrometer Attachment PointsTele Vue recommends choosing low and medium power eyepieces in ratios of field stop diameters. For example, factors of 1.4 or 2.0. When choosing higher power eyepieces, use ratios of magnification.
| Tele Vue-85 | |||||||||||
| Focal Length (mm) | Type | Product Code | Apparent Field (deg) | Field Stop Dia. (mm) | Eye Relief (mm) | Weight (lb.) | Mag. | True Field (deg) | Exit Pupil (mm) | # of Elem. | Dioptrx Ready |
| 2" Eyepieces for Wide True Fields | |||||||||||
| 55 | Plössl | EPL-55.0 | 50 | 46.0 | 38 | 1.1 | 10.9 | 4.39 | 7.8 | 4 | Y |
| 41 | Panoptic | EPO-41.0 | 68 | 46.0 | 27 | 2.1 | 14.6 | 4.39 | 5.8 | 6 | Y |
| 31 | Nagler 5 | EN5-31.0 | 82 | 42.0 | 19 | 2.2 | 19.4 | 4.01 | 4.4 | 6 | Y |
| 35 | Panoptic | EPO-35.0 | 68 | 38.7 | 24 | 1.6 | 17.1 | 3.70 | 5.0 | 6 | Y |
| 21 | Ethos | ETH-21.0 | 100 | 36.2 | 15 | 2.3 | 28.6 | 3.46 | 3.0 | - | Y |
| 22 | Nagler 4 | EN4-22.0 | 82 | 31.1 | 19 | 1.5 | 27.3 | 2.97 | 3.1 | 7 | Y |
| 27 | Panoptic | EPO-27.0 | 68 | 30.5 | 19 | 1.0 | 22.2 | 2.91 | 3.8 | 6 | Y |
| 17 | Ethos | ETH-17.0 | 100 | 29.6 | 15 | 1.6 | 35.3 | 2.83 | 2.4 | - | Y |
| 17 | Nagler 4 | EN4-17.0 | 82 | 24.3 | 17 | 1.6 | 35.3 | 2.32 | 2.4 | 7 | Y |
| 11⁄4" Eyepieces for Wide True Fields | |||||||||||
| 40 | Plössl | EPL-40.0 | 43 | 27.0 | 28 | 0.4 | 15.0 | 2.58 | 5.7 | 4 | Y |
| 32 | Plössl | EPL-32.0 | 50 | 27.0 | 22 | 0.4 | 18.8 | 2.58 | 4.5 | 4 | Y |
| 24 | Panoptic | EPO-24.0 | 68 | 27.0 | 15 | 0.5 | 25.0 | 2.58 | 3.4 | 6 | Y* |
| 13 | Ethos | ETH-13.0 | 100 | 22.3 | 15 | 1.3 | 46.2 | 2.13 | 1.8 | - | Y |
| 16 | Nagler 5 | EN5-16.0 | 82 | 22.1 | 10 | 0.4 | 37.5 | 2.11 | 2.3 | 6 | N |
| 19 | Panoptic | EPO-19.0 | 68 | 21.3 | 13 | 0.4 | 31.6 | 2.03 | 2.7 | 6 | Y* |
| 25 | Plössl | EAP-25.0 | 50 | 21.2 | 17 | 0.3 | 24.0 | 2.02 | 3.5 | 4 | N |
| 17.3 | Delos | EDL-17.3 | 72 | 21.2 | 20 | 0.9 | 34.7 | 2.02 | 2.5 | - | Y |
| 18.2 | Delite | EDE-18.2 | 62 | 19.1 | 20 | 0.5 | 33.0 | 1.82 | 2.6 | - | Y |
| 10 | Ethos | ETH-10.0 | 100 | 17.7 | 15 | 1.1 | 60.0 | 1.69 | 1.4 | - | Y |
| 13 | Nagler 6 | EN6-13.0 | 82 | 17.6 | 12 | 0.4 | 46.2 | 1.68 | 1.8 | 7 | Y* |
| 14 | Delos | EDL-14.0 | 72 | 17.3 | 20 | 0.9 | 42.9 | 1.65 | 2.0 | - | Y |
| 20 | Plössl | EAP-20.0 | 50 | 17.1 | 14 | 0.2 | 30.0 | 1.63 | 2.8 | 4 | N |
| 15 | Delite | EDE-15.0 | 62 | 16.0 | 20 | 0.5 | 40.0 | 1.53 | 2.1 | - | Y |
| 11⁄4" Eyepieces for Medium Powers | |||||||||||
| 12 | Delos | EDI-12.0 | 72 | 15.0 | 20 | 0.9 | 50.0 | 1.43 | 1.7 | - | Y |
| 13 | Delite | EDE-13.0 | 62 | 13.8 | 20 | 0.5 | 46.2 | 1.32 | 1.8 | - | Y |
| 10 | Delos | EDL-10.0 | 72 | 12.7 | 20 | 0.9 | 60.0 | 1.21 | 1.4 | - | Y |
| 15 | Plössl | EAP-15.0 | 50 | 12.6 | 10 | 0.2 | 40.0 | 1.20 | 2.1 | 4 | N |
| 9 | Nagler 6 | EN6-09.0 | 82 | 12.4 | 12 | 0.4 | 66.7 | 1.18 | 1.3 | 7 | Y* |
| 11 | Delite | EDE-11.0 | 62 | 11.7 | 20 | 0.4 | 54.5 | 1.12 | 1.6 | - | Y |
| 9 | Delite | EDE-09.0 | 62 | 9.6 | 20 | 0.5 | 66.7 | 0.92 | 1.3 | - | Y |
| 11 | Plössl | EAP-11.0 | 50 | 9.1 | 8 | 0.1 | 54.5 | 0.87 | 1.6 | 4 | N |
| 11⁄4" Eyepieces for Higher Powers | |||||||||||
| 8 | Ethos | ETH-08.0 | 100 | 13.9 | 15 | 1.0 | 75.0 | 1.33 | 1.1 | - | Y |
| 6 | Ethos | ETH-06.0 | 100 | 10.4 | 15 | 1.0 | 100.0 | 0.99 | 0.9 | - | Y |
| 8 | Delos | EDL-08.0 | 72 | 9.9 | 20 | 1.0 | 75.0 | 0.95 | 1.1 | - | Y |
| 7 | Nagler 6 | EN6-07.0 | 82 | 9.7 | 12 | 0.5 | 85.7 | 0.93 | 1.0 | 7 | Y* |
| 4.7 | Ethos SX | ETH-04.7 | 110 | 8.9 | 15 | 1.3 | 127.7 | 0.85 | 0.7 | - | Y |
| 6 | Delos | EDI-06.0 | 72 | 7.6 | 20 | 1.0 | 100.0 | 0.73 | 0.9 | - | Y |
| 7 | Delite | EDE-07.0 | 62 | 7.5 | 20 | 0.5 | 85.7 | 0.72 | 1.0 | - | Y |
| 3.7 | Ethos SX | ETH-03.7 | 110 | 7.0 | 15 | 1.1 | 162.2 | 0.67 | 0.5 | - | Y |
| 5 | Nagler 6 | EN6-05.0 | 82 | 7.0 | 12 | 0.5 | 120.0 | 0.67 | 0.7 | 7 | Y* |
| 8 | Plössl | EAP-08.0 | 50 | 6.5 | 6 | 0.1 | 75.0 | 0.62 | 1.1 | 4 | N |
| 4.5 | Delos | EDI-04.5 | 72 | 5.6 | 20 | 1.1 | 133.3 | 0.53 | 0.6 | - | Y |
| 5 | Delite | EDE-05.0 | 62 | 5.3 | 20 | 0.5 | 120.0 | 0.51 | 0.7 | - | Y |
| 3.5 | Nagler 6 | EN6-03.5 | 82 | 4.8 | 12 | 0.5 | 171.4 | 0.46 | 0.5 | 7 | Y* |
| 3.5 | Delos | EDL-03.5 | 72 | 4.4 | 20 | 1.1 | 171.4 | 0.42 | 0.5 | - | Y |
| 4 | Delite | EDE-04.0 | 62 | 4.3 | 20 | 0.5 | 150.0 | 0.41 | 0.6 | - | Y |
| 3 | Delite | EDE-03.0 | 62 | 3.2 | 20 | 0.5 | 200.0 | 0.31 | 0.4 | - | Y |
| 11⁄4" Zoom Eyepieces for Medium and Higher Powers | |||||||||||
| 6-3 | Nagler Zoom | ENZ-0306 | 50 | 5.1-2.6 | 10 | 0.3 | 100.0-200.0 | 0.49-0.25 | 0.9-0.4 | 5 | N |
Mounting points are provided on top of the focuser body and draw tube for easy installation of the Digital Micrometer Kits (part#s RMK-2002 or RMF-2003). These kits allow imagers to index focus position to within 0.0001", providing a very convenient way of finding best focus, returning to it, or checking that it hasn't changed. The dual speed focuser with its 10:1 focus reduction provides extraordinarily fine focus adjustment for critical focusing. The Focusmate Driver (part# FDF-2004) adds hands free motorized focusing. For installation, setup and use of the Digital Micrometer Kit and Focusmate Driver, see the instructions included with each.
1.5 Caring for the Tele Vue-85
Tele Vue-85 requires no special care. Treat it as you would any fine camera lens. Use the lens cap when the telescope is being stored or not in use. The captive dew shield provides protection from glare, helps protect the lens from dust or spray blown in by the wind and minimizes dew formation on the lens.
If dew forms on the lens during cold weather, it is best to use an electric hair dryer (on the lowest setting) to gently warm it away. A few specks of dust will have no effect on the quality of the image, and may be gently blown off with a squeeze bulb. Do not use compressed air cans to blow dust off any optical surfaces.
Fingerprints, however should be cleaned off. Though the anti-reflection coatings are durable, they are easily scratched. The simplest cleaning method is to moisten a very soft, lint-free tissue, cloth, "Q-Tip" or surgical cotton with a lens or glass cleaner and gently whisk away the stain. Do not apply any solutions directly to the glass surfaces. After every cleaning stroke, use a fresh applicator. The fewer strokes the better! Any residual "film" will not affect visual performance.
Collimation of your Tele Vue-85 has been locked at the factory. With reasonable care it will remain aligned. However, rough handling can cause misalignment. WARNING: Do not loosen the button head screws in the front lens cell as this will cause misalignment. If necessary, contact Tele Vue for re-collimation.
Our 90° and 60° star diagonals employ a first-surface mirror. Like all first-surface mirrors, they should be cleaned only when absolutely necessary. First blow loose dust away with a squeeze bulb. CAUTION: Do not clean mirror with water or water based cleaners such as Windex or any other commercial lens cleaners; this is not a lens. All contain too much water and will leave a residue. Moisten a "Q-Tip" with methanol or Isopropyl alcohol, reagent grade. Clean gently using only the weight of the cotton swab. Use very light pressure and never rub. Slight residual stains or dust spots will have no visible effects in observing.
The tube and other parts are powder-coated for durability and can be polished with any non-abrasive car wax. Black anodized surfaces can be cleaned with Windex.
If you have any questions about the care, operation or performance of your Tele Vue-85, please call Tele Vue at (845) 469-4551 from 9:30 am to 5:00 pm EST.
1.6 Warranty
The Tele Vue-85 is warranted to be free of manufacturing or workmanship defects for 5 (five) years from the date of purchase, to the original owner. Please return the warranty card for easy identification. If your Tele Vue-85 requires warranty service, please call Tele Vue to discuss the defect, upon which you will receive a return authorization. NO RETURNS ARE ACCEPTED WITHOUT PRIOR AUTHORIZATION.
The warranty does NOT include: collimation, defects caused by mis-handling, defects of subjective nature, and coverage for any telescope purchased through an unauthorized Tele Vue dealer.
Warranty work will be performed at Tele Vue's discretion and may only be performed by Tele Vue Optics or its assigned agents. The telescope must be shipped in its case with proper inner and outer packaging. Return shipping and insurance charges are the purchaser's responsibility.
3.1. Rotarion & Rotarion Remote Control software.
ROTARIÓN
The EyepieceWheel
&
ROTARION
Remote Control Software

natural_image
Close-up of a black and red scientific instrument with multiple lenses, no visible text or symbols on the device itself.Instruction Manual

CAUTION!
ROTARION and accessories are optical instruments with moving parts to be used only by adults.
MOVING PARTS
Keep away body and fingers from moving parts!
READ THIS MANUAL BEFORE USING ROTARION!
Congratulations on your purchase of ROTARION!
ROTARION is designed and manufactured to be used for daytime terrestrial observation and for nighttime astronomical observation.
ROTARION is a unique device, patented in the European Union and the United States, to be used with any telescope with a 2" focuser and four of your favorite 1.25" eyepieces.
For the first time ever, you can change the power or magnification of your telescope with just a simple click, connecting your ROTARION remotely to a Windows computer with the ROTARION REMOTE CONTROL software included in this box.
ROTARION makes the eyepiece change easy. Automatic, quick, and precise without touching the telescope therefore avoiding disturbances in the positioning or misalignment of the optical axis between eyepieces. No more searching in the dark for your next eyepiece!
The automatic eyepiece change allows you to adjust the correct magnification on your telescope by increasing or decreasing the focal length of the eyepiece used, the "zoom effect".
Re-locate lost objects out of the field of view due to improper alignment or poor tracking of the telescope. Quick change to your largest eyepiece in mm number to maximize visual field and re-locate. All with a simple Click!
And with the Rotarion automatic eyepiece change you can use higher power eyepieces than you ever had before. Now you can discover the joy of bigger and better views with higher magnification!
ROTARION is a device of the highest quality, designed and manufactured in BARCELONA with state-of-the-art techniques and the best materials and components from the US, Japan, and Germany.
First, read this Instruction Manual and follow the assembly instructions step-by-step. If you follow the assembly instructions correctly, even if the assembly is initially laborious, the use of ROTARION is very simple and easy.
All this to offer you many hours of enjoyment observation, and satisfaction with your telescope.
Maximum quality, universal, versatile, and easy to use, ROTARION continues our corporate mission:
AstronSCIENTIFIC
Astronomy Made Easy
In the box
- ROTARION, The EyepieceWheel.
- ROTARION REMOTE CONTROL software for PC or Windows computer (USB Stick / Pen-Drive).
- USB cable for Windows computer control.
- Serial cable for Windows computer control.
- AC Power Adapter 110-240 Volt / DC 12 Volt with international AC adapters.
• 12 Volt wire with car-plug adapter. - 4 units, Baader Click-Lock 1,25" eyepiece-adapter.
- 3 units, rings "Extenders" M42 - 5mm focal length to adjust eyepiece heights.
- 3 units, rings "Extenders" M42 - 10mm focal length to adjust eyepiece heights.
- 3 units, rings "Extenders" M42 - 20mm focal length to adjust eyepiece heights.
- 2 units, 2" barrel 30mm length for 2" focuser, with filter thread.
- 1 unit, 2" retainer ring to adjust position in your 2" focuser.
- User's manual.
- Telescope, eyepieces, optics and other ROTARION products or accessories not included.
System Requirements
To operate ROTARION EyepieceWheel and ROTARION REMOTE CONTROL software you need the following equipment:
Not included in the box:
• A telescope with a 2 "focuser (A).
- A mount and telescope tripod or column that supports the weight of the telescope, the weight of your 4 eyepieces to be used and 2Kg extra (B).
- 4 eyepieces of 1.25" with maximum outer diameter 50mm (C).
• Computer or Windows PC (D).
Included in the box:
• ROTARION EyepieceWheel (E).
- ROTARION REMOTE CONTROL Software.

text_image
Windows (D) (A) (B) (C)22
Index
A-ROTARION The EyepieceWheel
- Introduction
- Selecting your eyepieces for ROTARION
- Mounting your eyepieces in the ROTARION
- Mounting the ROTARION on your telescope
B-ROTARION REMOTE CONTROL Software
- Installing the Software
- Connecting the ROTARION
- Status LED
- Start of ROTARION
- ROTARION REMOTE CONTROL screen
- Setup screen
- ROTARION REMOTE CONTROL ports
- Warning Messages
C-Using the ROTARION and ROTARION REMOTE CONTROL Software
- CAUTION! MOVING PARTS!
- Observing position
- Observing objects with the ROTARION
- The "Zoom Effect"
- The "Finder Effect"
D-Additional Product Information
- Product Compliance Information
- Service, Maintenance, Cleaning, Disposal, Serial Number, and Dealer
E-Warranty
- Warranty Period
- Warranty Coverage
- Warranty Nullity
A-ROTARION
The EyepieceWheel
1. Introduction
Change the power-magnification of your telescope with a simple Click.
The AstronSCIENTIFIC's ROTARION EyepieceWheel is a universal and automatic eyepiece exchanger. You can automatically quick-change eyepieces and any other optics. The eyepiece change is easy, fast, and accurate, without touching the telescope, and therefore avoiding disturbances or deviations in the positioning of the optical axis of the telescope.
2. Selecting your eyepieces for the ROTARION
Choose 4 of your favorite eyepieces based on a scaling provided by the mm indicated in each eyepiece. From a large field of view eyepiece, with the lowest magnification and greatest number in mm, to the eyepiece with smaller number in mm, smaller field of view and greater magnification. It is important that the intermediate scaling between the mm of each eyepiece is as proportional as possible.
Example:
As you observe in the data sheet on the following page, you have 6 available 1.25" eyepieces with different magnifications (mm) and you select 4 eyepieces so that the scaling of the magnification between them is as proportional as possible.
| Available | Selected | |||
| Eyepiece mm | Eyepiece mm | |||
| TeleVue | 40 | TeleVue | 40 | |
| TeleVue | 35 | |||
| Meade | 28 | Meade | 28 | |
| Baader | 17 | Baader | 17 | |
| Celestron | 10 | |||
| Celestron | 8 | Celestron | 8 | |
When selecting a proportional scaling, you ensure that when you order the ROTARION to change an eyepiece, the next eyepiece will always show you the object you are observing.
CAUTION: ROTARION is designed to accept 1.25" eyepieces with a maximum 50mm outer/external diameter. Depending on combinations with other smaller outside diameter eyepieces, you may exceed the maximum outside diameter of 50mm at your discretion and your responsibility.
3. Mounting your eyepieces in the ROTARION
Remove the ROTARION from the box and observe the 4 ports:
- Port [PORT-1], 12 hours of a traditional clock (A).
- Port [PORT-2], 3 hours of a traditional clock (B).
- Port [PORT-3], 6 hours of a traditional clock (C).
- Port [PORT-4], 9 hours of a traditional clock (D).

text_image
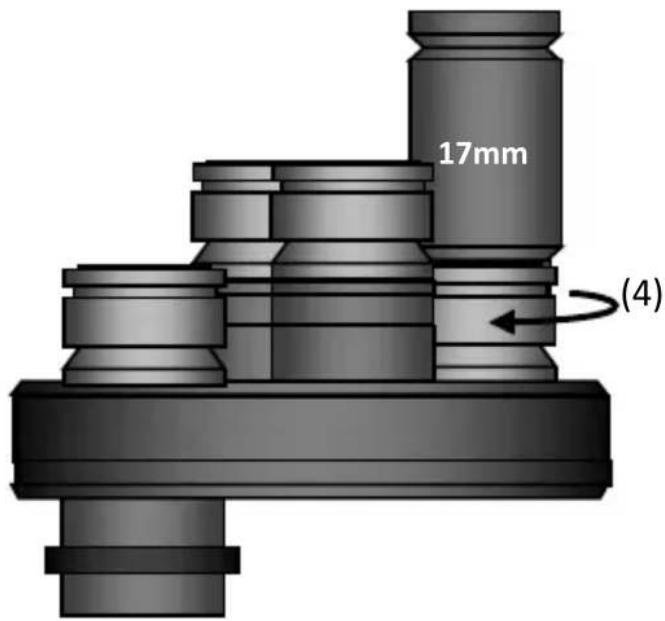
(A) (D) (B) (C) 25 (A) (B) (D) (C)Once the 2 eyepieces with the greatest and the smallest number of mm and the 2 intermediate have been selected according to their best proportional scaling, you will align them from lower magnification (largest mm) to higher magnification (smallest mm) to verify their differences in height between them.
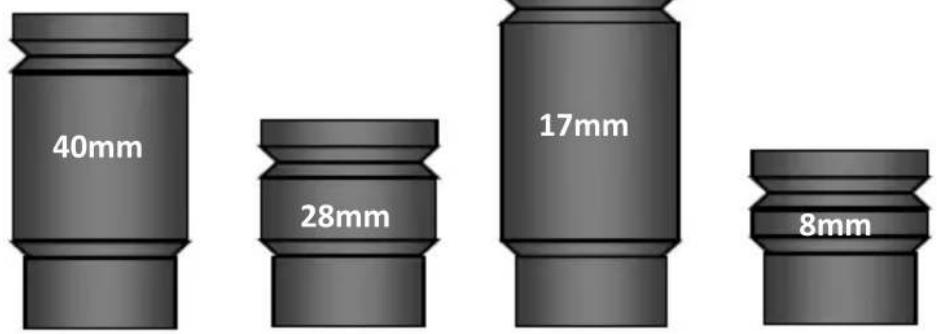
text_image
40mm 28mm 17mm 8mmThe difference in heights between the eyepieces should be compensated by combining the 5mm, 10mm, and 20mm M42v0,75 Extenders supplied in the ROTARION threaded to 3 of the 4 supplied Baader Click-Locks.

text_image
to 3 of the 4 supplied Baader Click-Locks. Baader Click-Lock 1,25" Extenders: 5mm 10mm 20mmYou select the largest height eyepiece (in this case the 17mm) corresponding to position number 3 in the series of 4 eyepieces on this page, we will place it in port [PORT-3] of the ROTARION, corresponding to the Hour 6 of a traditional clock, unscrewing first the "Extenders" mounted under the Baader Click-Lock.
-
Unscrew Extenders from 5mm, 10mm and 20mm of the Baader Click-Lock.
-
Thread the Baader Click-Lock back on the ROTARION.
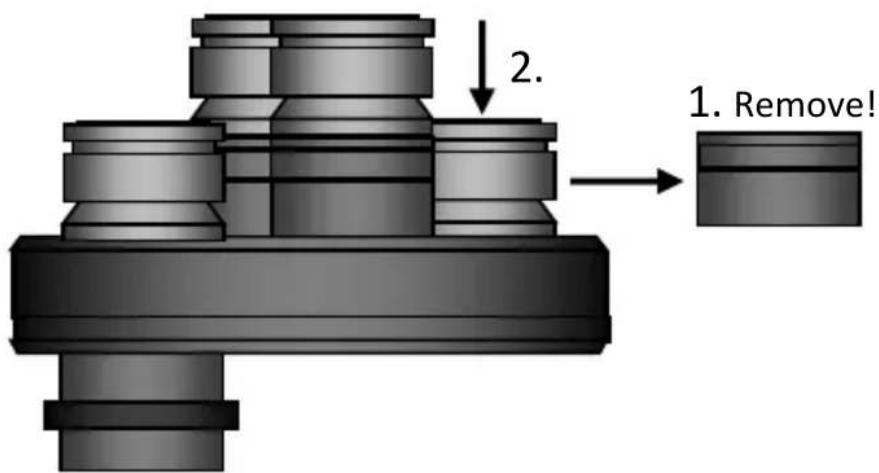
text_image
2. 1. Remove!- Mount the highest height eyepiece (in this example 17mm) in the Baader Click-Lock.

text_image
40mm 28mm 17mm 8mm 17mm- Once inserted in the Baader Click-Lock, rotate the center cylinder of the Click-Lock Baader (4) clockwise to hold the eyepiece in the Click-Lock eye-cup.
text_image
17mm (4)- You will proceed inserting the following eyepieces of lowest height, matching the height of the eyepiece with the necessary "Extenders". Following the example, you proceed to mount the eyepiece of lowest height, in this case, the eyepiece of 8mm, which corresponds to the position 4 of the series of eyepieces drawn at the beginning of this Section 3, in the port [PORT-4] of your ROTARION.

text_image
8mm 17mm- Note in the drawing of the previous point 5, that the eyepiece of 8mm mounted in the Baader Click-Lock is not equal in height to the 17mm eyepiece. Using a combination of 5mm, 10mm and 20mm available Extenders, you threaded them into the Click-Lock Baader of the 8mm eyepiece to match the height of the 17mm eyepiece. In this case you only need to use the 20mm Extender, not using the 5mm Extender and the 10mm Extender. Once the eyepiece has been installed in its Baader Click-Lock, you proceed to hold the eyepiece by turning the central part of the Click-Lock in the clockwise direction, as in the previous drawing in step number 5.
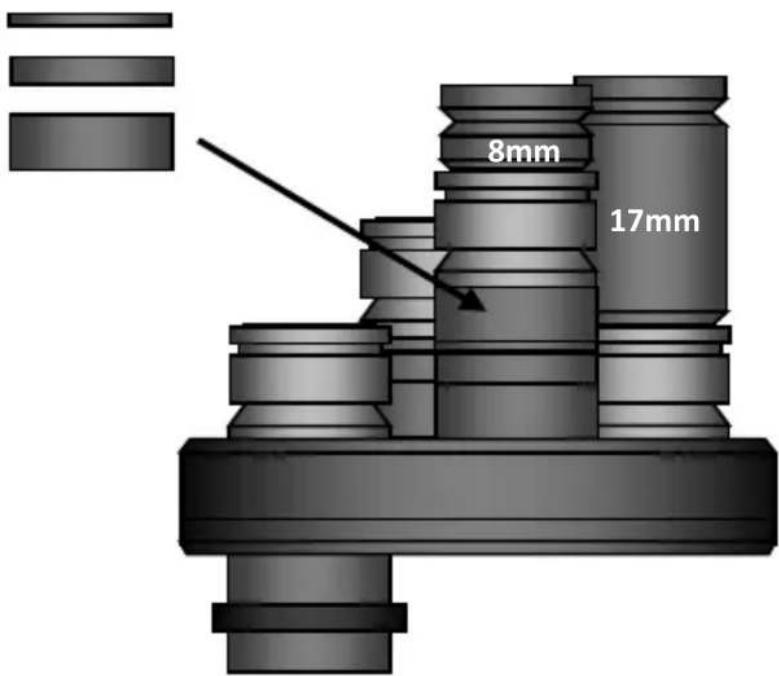
text_image
8mm 17mm- You continue to mount the remaining eyepieces. In this example, you mount the 28mm eyepiece to the [PORT-2] port of the ROTARION, corresponding to the Hour 3 position of a traditional clock, using the extra "Extenders" to equal the heights of the already
mounted eyepieces. In this case, you only use the "Extender" of 5mm.
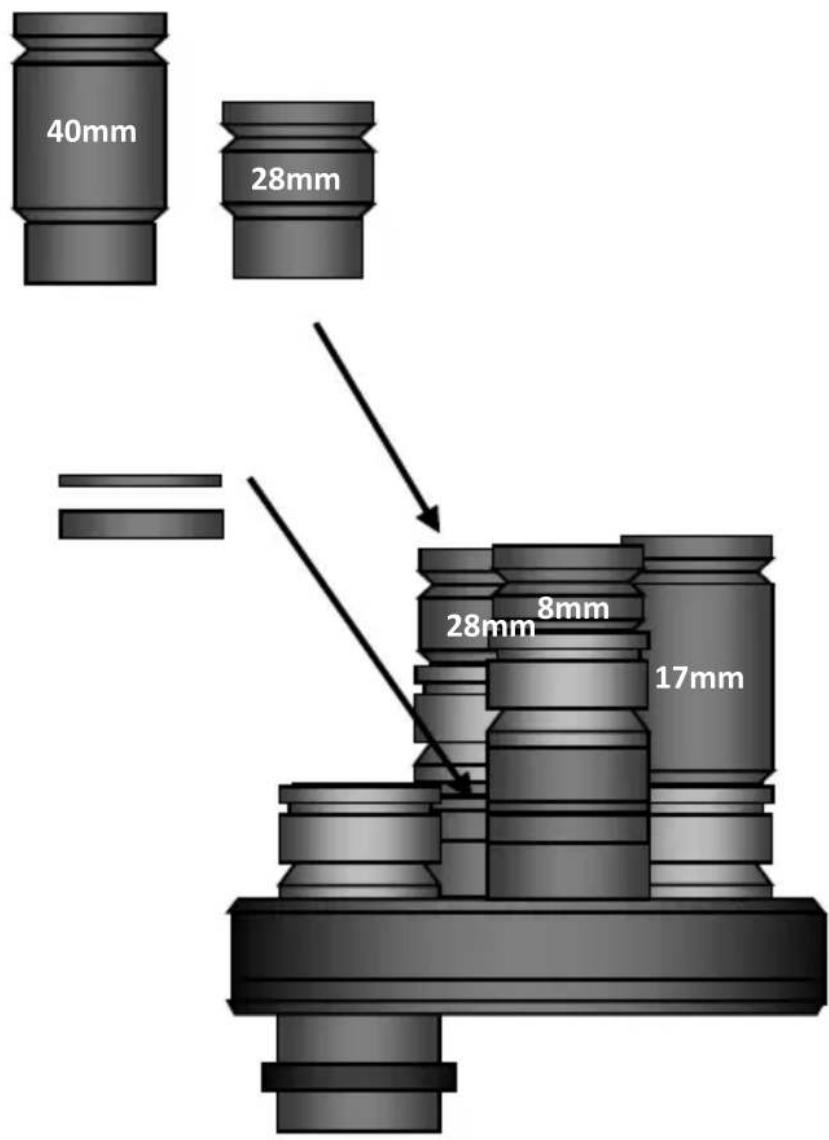
text_image
40mm 28mm = 28mm 8mm 17mm- Finally, on the following page, you assemble the remaining eyepiece. In this example, the eyepiece of least power and greatest number of mm and greatest field of view, the 40mm eyepiece in port [PORT-1] of the ROTARION, corresponding to Hour 12 of a traditional watch. If necessary, you will use the spare Extenders. In this example, you thread the "10mm
Extender2 in the Baader Click-Lock to match the height to the rest of the eyepieces.
text_image
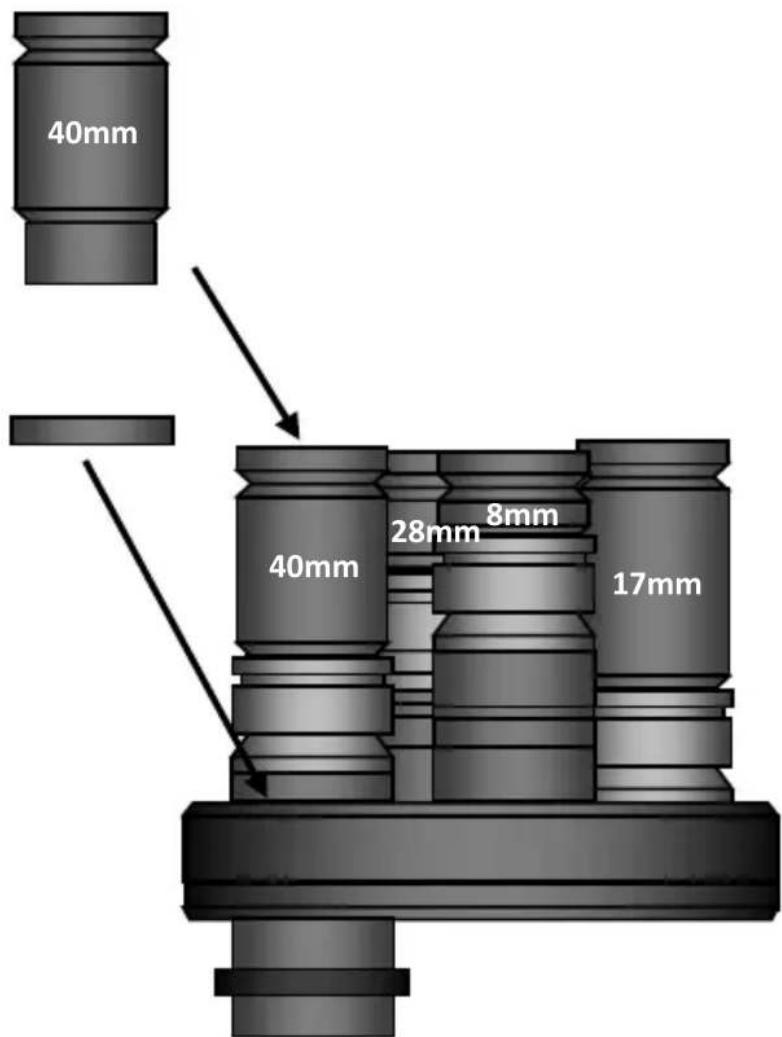
40mm 40mm 28mm 8mm 17mm- Once all eyepieces have been assembled by combining the Baader Click-Locks and the 9 "Extenders" included in the ROTARION, it is possible that you must perform a "fine-tuning" of all final heights to accurately match the height of the 4 eyepieces mounted on the ROTARION. To do this, you will use the helical adjustment of the Baader Click-Lock that has an additional travel of 6-7mm by turning the top ring (10).
natural_image
Diagram of two cylindrical objects connected by a dashed line, with a labeled arrow indicating rotation (no text or symbols present)- You perform the heights adjustments using the top helical rings of the Baader Click-Locks according to the previous step 9. In this example, you adjust the height of the 40mm, 28mm and 8mm eyepieces to equal the height of the 17mm eyepiece. Note the small difference in height of the 40mm eyepiece Baader Click-Lock, before and after the fine adjustment, indicated by an arrow (10). The result, indicated in the second figure of this page, are the heights alignment of the 4 eyepieces mounted in the ROTARION, indicated with an OK.

text_image
No Ok. 40mm 28mm 8mm 17mm (10) 40mm 28mm 8mm 17mm Ok.-
CAUTION! Once all the heights have been adjusted by means of the helical adjustment of the Baader Click-Locks, ensure that the eyepieces are secured to the Baader Click-Lock by turning the central cylinder according to the drawing in previous step 4.
-
For the final verification of height adjustment of your eyepieces, an easy method is to place the ROTARION and its eyepieces face down on a flat surface, for example a table, ensuring that the eyepieces are firmly attached to the Baader Click-Locks as indicated on previous point 4, to avoid any eyepiece fall.
natural_image
Mechanical assembly diagram showing a mechanical component being lifted by a rotating arm (no text or symbols present)- If the ROTARION placed face down on the table is not stable, you must adjust again the heights between eyepieces using the helical top ring of the Click-Lock Baader, as indicated in previous step 10.
NOTE: Currently there are more than 500 models of eyepieces in the international market and although the ROTARION has been verified with many models of 1.25" eyepieces, it is normal to have some unused Extenders (Spacers). But it is also possible, although unlikely, that in a particular case, the differences in height between your eyepieces are very large and you will need some additional "Extenders" (or Spacers), in addition to the 9 "Extenders" (or Spacers) included in the ROTARION's box. In which case, in your usual astronomy store, you should be able to purchase additional "Extenders" (or Spacers) M42x0,75 of different heights, since it is a standard component.
4. Mounting the ROTARION on your telescope.
If you have not mounted your four 1,25" eyepieces in the ROTARION you must follow the previous instructions of this manual, Chapter A, Sections 2, and 3 which explains the selection of eyepieces and the assembly of eyepieces in ROTARION.
After completing the method of selection and assembly of the eyepieces in the ROTARION, according to Sections 1, 2 and 3, you proceed to mount your ROTARION in your telescope.
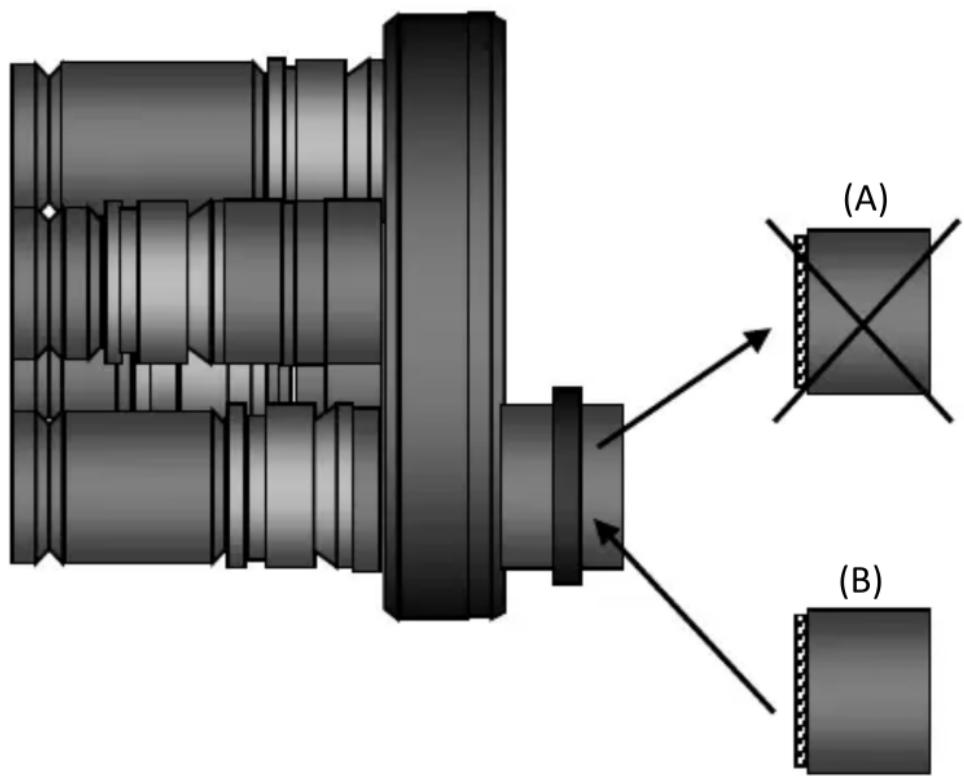
- Remove the additional 2" barrel from the box and thread it to the 2" barrel with retaining ring already mounted on the ROTARION.
natural_image
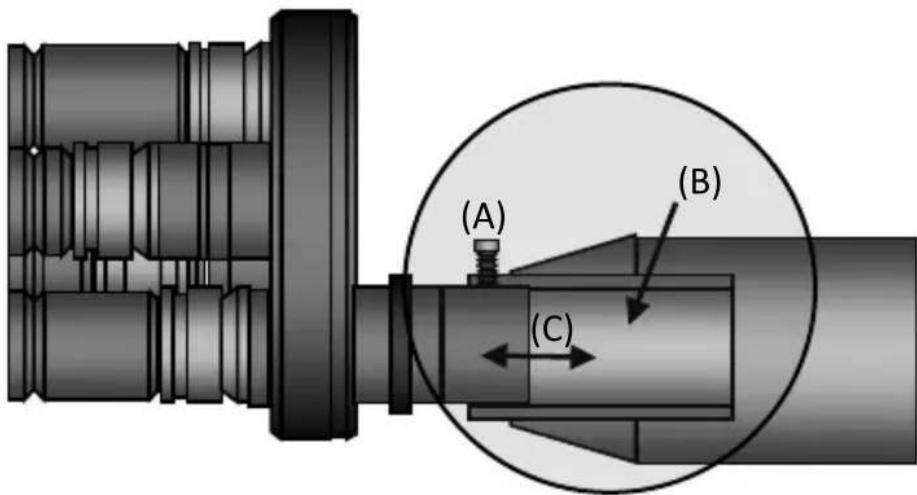
Mechanical assembly diagram showing a component with a diamond-shaped part and a curved arrow indicating motion (no text or symbols)- Insert the ROTARION into the 2 "focuser female draw-tube of your telescope and hold the ROTARION to your telescope by firmly tightening the 2" focuser screws of your telescope.
natural_image
Illustration of a telescope with an arrow pointing to it, mounted on a tripod (no text or symbols present)- If you do not find the correct focus point with your telescope, unscrew the fastening screws of your focuser (A) and move the ROTARION position on the 2" female draw tube of the focuser (B), sliding it in or out with care (C). Once the correct focus point is reached, retighten the retaining screws of your focuser (A) firmly.
text_image
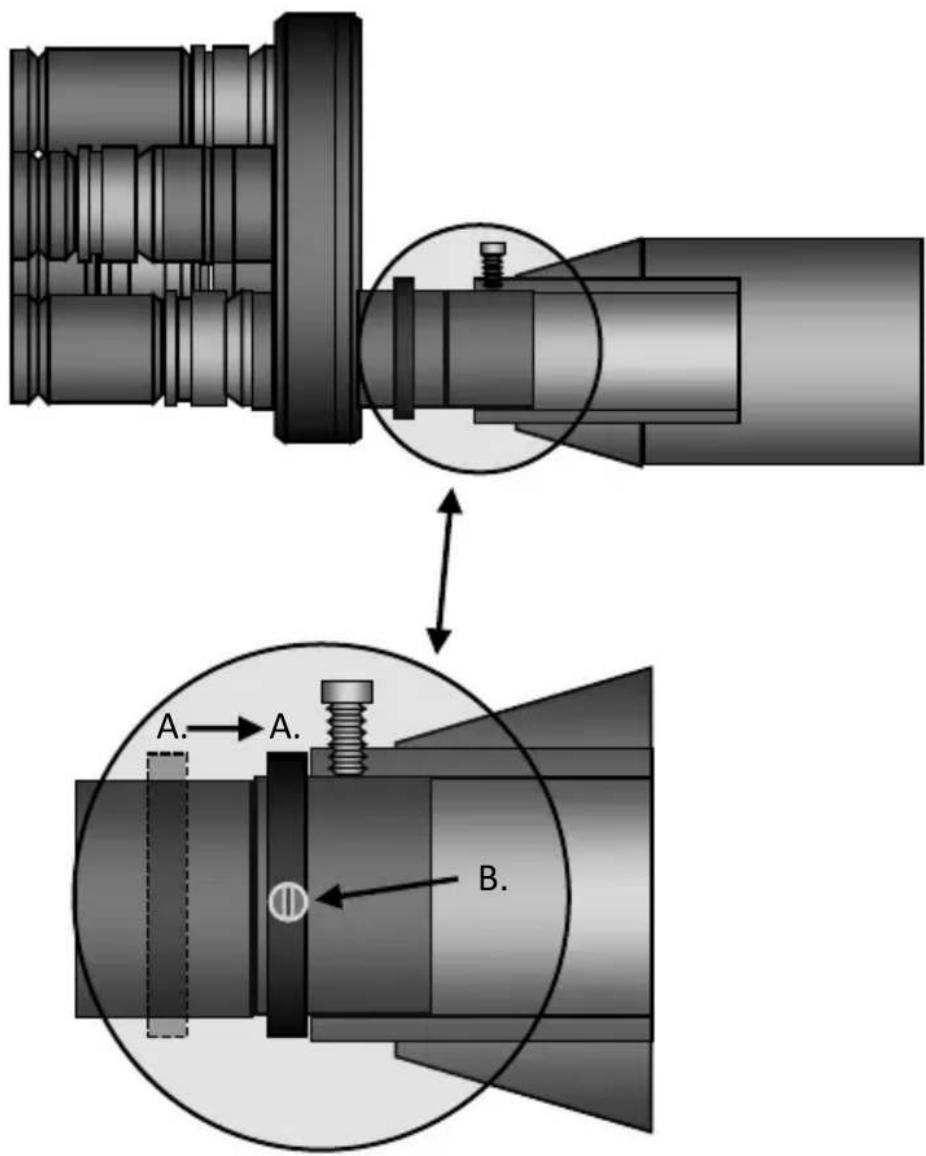
(A) (B) (C)- Once you have reached the optimum position of the ROTARION on the 2 "female of your telescope's focus, use the 2" movable retaining ring (A) in the lower drawing, unscrewing and re-screwing the micro screws (B) to "memorize" the correct position of the ROTARION in your telescope's focuser.
text_image
Technical diagram showing mechanical assembly with labeled components A and B, including a magnified view of a shaft and bolt assembly.NOTE: After adjusting the position of the ROTARION within the 2" female draw-tube of your focuser, your telescope must allow the focus of the 4 eyepieces by the exclusive use of the wheel or motor of your focuser. Due to the large number of types and models of 2" telescopes and focusers on the market, it is possible that you may not reach focus with all eyepieces. It can happen with some Newton type reflecting telescopes or also in some refractor models. In
your usual astronomy store you can find Barlow lenses and optical path corrector lenses, either "Focal Point Extenders" or "Path Correctors" for telescopes and focusers with little focal travel range, or with back-focus limitations. In the specific case of Newton-type telescopes, there are several manufacturers of "Coma" corrective lenses that further extend the focal length of the telescope by solving the "back-focus" limitations.
Optics such as "Barlows", "Focal Point Extenders" and "Path Correctors" with focal length extension should be installed by replacing the (A) 2" barrel in the ROTARION. AstronSCIENTIFIC cannot recommend specific optics (B) to increase focal travel due to the enormous number of eyepiece combinations, its later leveling through the "Extenders" in the ROTARION and the specific back focus needs of each telescope. At your usual specialized store, they can recommend the optics that suits your specific needs of your telescope.
To reach focus in refractors and Newtonians a 2-inch Barlow (B) x2, x3 x4 or a combination of them works fine.
text_image
(A) (B)The use wedges or diagonal prisms or Amici (A) prisms shortens or reduces the focusing length/range of the telescope, but this does not mean any difficulty in focusing with the most common and popular reflector telescopes such as Schmitt-Cassegrain, Ritchey-Chretien, Maksutov or similar (B) of great focal travel/range.
For refractors we recommend the Tele Vue 2" Everbrite Diagonal for Rotarion.

text_image
(A) (B) (D) (C)- Finally, with the ROTARION mounted on your telescope, you must balance the telescope. There are many videos on YouTube where you can learn how to balance a telescope. In the upper drawing, the 2 basic actions of telescope balancing adjustment are shown: 1-adjustment of the counterweight (C) and 2-adjustment of the optical tube assembly (D).
With the ROTARION and eyepieces mounted on your telescope and having balanced your telescope, you continue to Chapter B-ROTARION REMOTE CONTROL software.
B-ROTARION REMOTE CONTROL Software
1. Software Installation
To install the software ROTARION REMOTE CONTROL you need a computer or PC with Windows and a USB connector.
Load the Pen-Drive / USB-Stick included. On the Pen-Drive / USB-Stick you will find the installation file of the ROTARION EyepieceWheel program called "Setup". Run that file and follow the instructions to install the program.
The program will be located in the Windows Start menu under Programs> ROTARION> ROTARION REMOTE CONTROL.
No need to install drivers for the ROTARION. The USB port is an HID device that Windows recognizes automatically and the serial port input does not use a special driver.
Once the installation is completed, the next time you connect the ROTARION to your computer, it will remember that this device has already been installed once and will recognize it automatically.
2. Connecting the ROTARION
The ROTARION EyepieceWheel has 3 options for interface control. Two options with the ROTARION REMOTE CONTROL software through a USB port, or via a Serial port or a third option without a Windows PC computer with hand controller accessory named ROTARION HAND CONTROL.

text_image
5 3 2 1 4ROTARION EyepieceWheel connectors
(1) Power input
(2) Serial Port
(3) USB Port
(4) Status Led
(5) Focuser Port
USB connection: A USB port can be used to control the ROTARION The Eyepiece Wheel. Then the only required connection is a USB cable included in the box between the USB port of the ROTARION EyepieceWheel (3) and a USB port of the computer or Windows PC.
If the USB port does not have sufficient power, or if you are using the ROTARION PHOTO accessory, it is necessary to
connect the 12-volt power supply to the power input (1).
Serial Port Connection: Can also be controlled via a serial port. It requires a special RJ12 cable labeled "R-S", included in the box, connected between the serial port of the ROTARION (2) and a serial port on the Windows computer or PC.
This interface is mandatory if you are going to use the ROTARION AUTOFOCUS accessory.
Serial port control does not require any special drivers. Only determine the correct COM port in the [SETUP] panel drop-down list (Chapter 4, item 10).
For this interface, it is necessary to connect the 12-volt power supply to the input (1).
Connection ROTATION HAND CONTROL: It can also be controlled via a handset via the serial connection (2).
ROTARION HAND CONTROL is available from AstronSCIENTIFIC distributors. The kit includes a ROTARION HAND CONTROL with Bluetooth, the ROTARION AUTOFOCUS software pre-installed (without the ROTARION AUTOFOCUS hardware) and an RJ12 cable to connect it to the serial port of the ROTARION EyepieceWheel (2).
The 12-volt power supply must be connected to the input (1).
3. Status LED
Normally the LED of the ROTARION (4) is green, changing to red color when the ROTARION carousel/wheel rotates. The following table describes all possible cases.
| Color | Blink | ROTARION EyepieceWheel STATUS |
| Green | No | Stopped. Ready to be activated. |
| Green | Yes | Initial Warning |
| Red | No | ROTARION Turning |
| Red | Yes | [ERROR] |
4. ROTARION activation
Start the ROTARION REMOTE CONTROL program. This will display the eyepiece wheel control screen for the first time.
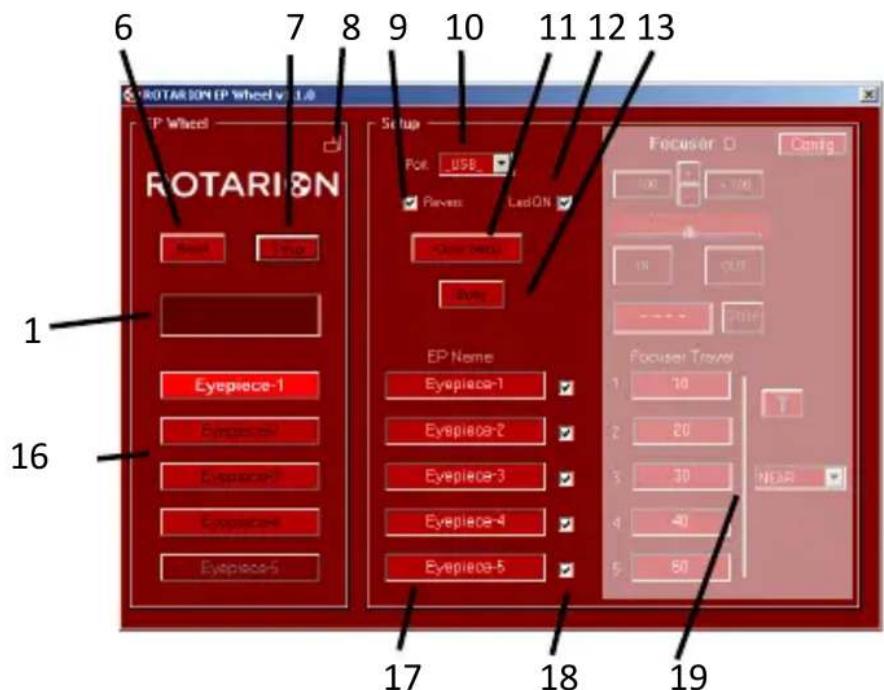
text_image
6 7 8 9 10 11 12 13 1 16 ROTARION EP Wheel v 1.0 TP Wheel ROTARION Reset Lock Setup Port: USB Revers: LedON Close button Load Focuator O Config 10 100 10 OUT - - - - - - - - - - - - - - - - - - - - - - - - - - - - - - - - - - - - - - - - - - - - - - - - - - - - - - - - - - - - - - - - - - - - - - - - - - - - - - - - - - - - - - - - - - - - - - - - - - - - - Epipiece-1 Eyespiece-1 Eyespiece-2 Eyespiece-3 Eyespiece-4 Eyespiece-5 Focuator Travel 10 20 30 40 50 NEAR 16 17 18 19ROTARION REMOTE CONTROL screen. [SETUP] open.
Press the [SETUP] button (7) to open / close the Setup panel,
Select the port you are using, USB port or COM port from the drop-down menu (10).
Press the [QUERY] key (13) to manually connect to the ROTARION. The next time you start the program, you will automatically connect to it.
The display shows the initial Warning message, indicating that the ROTARION is ready to start and REMOVE THE HANDS AND OBJECTS BEFORE PUSHING THE [RESET] BUTTON.
READ CHAPTER C SECTION 1, CAUTION! MOVING PARTS! BEFORE PROCEEDING.
Press the [RESET] button (6) and the ROTARION EyepieceWheel carousel does full rotation movements in one direction and the opposite direction during which it performs a calibration and determines the number of available ports. When the process is finished, it stops at the [PORT-1] port. It is ready for use.
5. ROTARION REMOTE CONTROL screen
The main screen of the ROTARION REMOTE CONTROL program, with the [SETUP] screen closed, looks like this:
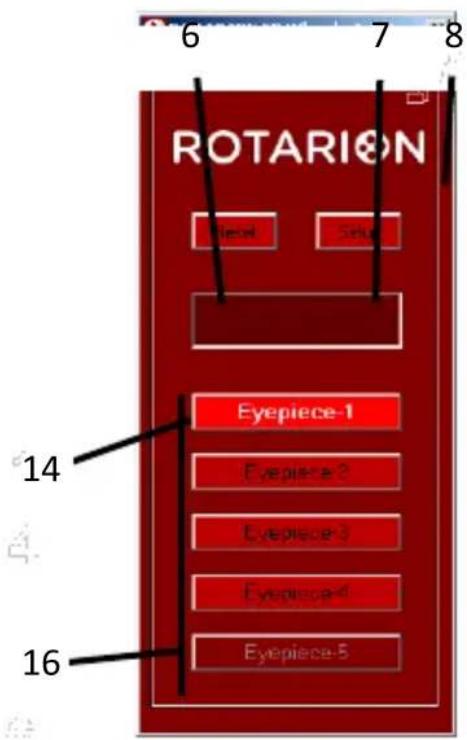
text_image
ROTARION 14 16[Setup]
Pressing the [SETUP] button (7) opens or closes the set-up panel, leaving the ROTARION REMOTE CONTROL basic screen.
[Reset]
For safety reasons, the ROTARION does not start the turning of the carousel or wheel (A) automatically; Indicates that it is ready to start the turn and for you to remove hands, cables and objects (B) that may interfere with the turning of the ROTARION carousel before pressing the [RESET] Button.
![AstronSCIENTIFIC The Hermes Traveller - [Reset] - 1](/content/2026/06/1225772/images/72ef6775f3157464041e66fc2fa11580b50a501c2049161fa7d1e3f4c278a84e.jpg)
text_image
CAUTION! Remove hands and objects! (B) MOVING PARTS! Wheel turning (A)By pressing the [RESET] button (6), the ROTARION does full rotations in one direction and the opposite direction during which it performs a calibration and determines the number of available ports. When the process is finished, it stops at the [PORT-1] port. It is ready for use.
[Display]
In this display (14) information messages appear during ROTARION operation. In case of an error or important
WARNING, the message with the background illuminated in Red color appears. For complete information, see the next point 8, WARNING MESSAGES in this chapter.
[Port Buttons]
Using the [PORT-1] buttons to [PORT-4] (16), you indicate to the ROTARION REMOTE CONTROL which eyepiece you will choose. When you press one of them the ROTARION will rotate to select it. The button lights up when it has reached the port. The labels of these buttons can be changed on panel (17) by pressing [SETUP] to access that screen.
[Panel Orientation]
By pressing the Horizontal / Vertical orientation icon (8), the ROTARION REMOTE CONTROL screen changes from portrait to landscape mode and vice versa. You can move it around the screen by dragging it with the mouse. The program memorizes the relative positions of each orientation.
![AstronSCIENTIFIC The Hermes Traveller - [Panel Orientation] - 1](/content/2026/06/1225772/images/3f3554ebd3f8fd2c4a4266adfb6c9332387c8abb717e4a40699d626666e318a0.jpg)
text_image
ROTARION EP Wheel v1.1.0 EP Wheel ROTARION Eyepiece-1 Eyepiece-2 Eyepiece-3 Eyepiece-4 Eyespiece-5 Eyespiece-6 Eyespiece-7ROTARION REMOTE CONTROL screen, Horizontal orientation
6. Setup screen
Select the [SETUP] button (7) to open the ROTARION REMOTE CONTROL setup panel.
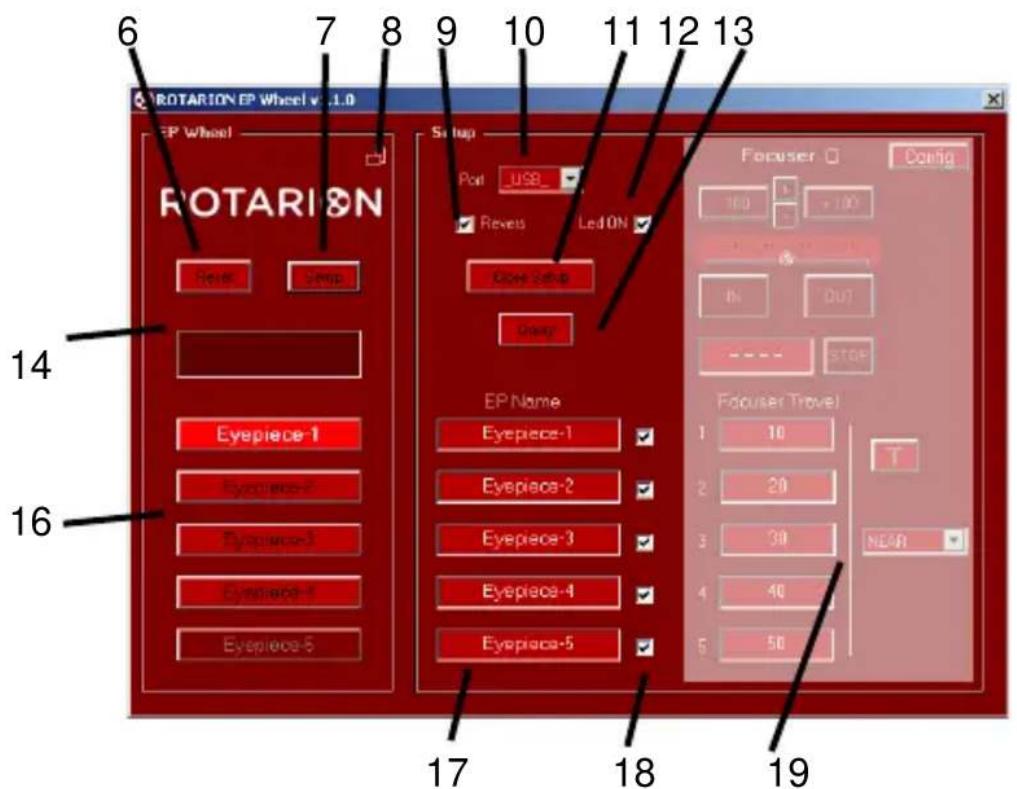
text_image
6 7 8 9 10 11 12 13 6 7 8 9 10 11 12 13 ROTARION EP Wheel v. 1.0 EP Wheel ROTARION Reset Setup Port USB_ Revers Led ON Close Setup Unsure Focuser Config 100 5 100 IN OUT ---- STOP 14 16 EP Name Eyepiece-1 Eyepiece-2 Eyepiece-3 Eyepiece-4 Eyepiece-5 17 18 19 Focuser Travel 1 10 2 20 3 30 NEAR 4 40 5 50ROTARION REMOTE CONTROL Display. Open setup
[Port Selection]
Select the port you are using, USB port or COM port from the drop-down menu (10).
![AstronSCIENTIFIC The Hermes Traveller - [Port Selection] - 1](/content/2026/06/1225772/images/c6d6e1886a2f0a8767e8f11f4d1b1f84a1992e21c17f3eccfb7928bc4d374917.jpg)
You can then press the [QUERY] key (13) to manually connect to the ROTARION; The next time you start the program ROTARION REMOTE CONTROL will automatically connect to it.
[Revers]
With box (9) de-activated, the ROTARION EyepieceWheel rotates in counter clock wise direction only. Activating this box, the rotation movement is bidirectional, but it limits the rotating movement to port [PORT-4]; once it reaches that port the ROTARION can only return to previous ports in a revers motion. [Led ON]. Activate this if you are
using heating bands with wires mounted around your optics or cameras to prevent wires entanglements.
[LED on]
With the box lit (12), the status LED of the EyepieceWheel (5) remains lit. Normally the LED is green, changing to red when the Wheel turns. With the box off (12) you turn off the LED so that it does not disturb during night observations.
[Close Setup]
Close the ROTARION REMOTE CONTROL configuration panel (11).
[Query]
When you press [QUERY] (13), the connection to the ROTARION is started manually. Normally it is not necessary to press it since when the program is started it is connected automatically. But if you change the communication port, the connection is stopped, and it will necessary to start the connection manually, or to exit and restart the program.
[Eyepiece Name Panel]
In this panel (17) you can give the name of the eyepiece that you place in each port. These names will appear on the home screen. Example: [PORT-1] = 1-TeleVue 40; [PORT-2] = 2-Meade 28; etc. By means of the boxes (18) it is possible to cancel a port by unchecking the box. Useful if you do not mount an eyepiece.
[Focuser Panel]
In this panel (19) you can adjust everything related to the ROTARION AUTOFOCUS accessory, which is explained in
detail in its own User Manual.
![AstronSCIENTIFIC The Hermes Traveller - [Focuser Panel] - 1](/content/2026/06/1225772/images/3671feff7e6c862727c753355c3b2570b30d4e95b77997d1314d45b972fbe1e4.jpg)
text_image
Focuser Config. Control Mini ControlIf you have the ROTARION AUTOFOCUS accessory, in the [FOCUSER CONFIG] Panel you can activate the checkbox indicated on the previous page [MINI CONTROL], so that the AUTOFOCUS Control appears at the bottom of the main screen of the ROTARION REMOTE CONTROL program.
![AstronSCIENTIFIC The Hermes Traveller - [Focuser Panel] - 2](/content/2026/06/1225772/images/1e9c5ba5479d0c43a135c4a57d1b3c0914dfeb099330d57d8aaa59e426d724d2.jpg)
text_image
ROTARION EP Wheel v1.1.0 EP Wheel ROTARION Face Setup Eyepiece-1 Eyepiece-2 Eyepiece-3 Eyepiece-4 Eyepiece-5 Focuser -100 + - +100 Mimminger - 0.1 IN OUT - - STOPPlease refer to the ROTARION AUTOFOCUS Instruction Manual.
7. Rotation Remote Control Ports
You must have installed [PORT-1] to [PORT-4] eyepieces ordered from lowest to highest power according to Chapter A point 2.
GOTO n
When you press the [PORT-1] button to [PORT-4] the ROTARION EyepieceWheel begins to turn until it locates that port.
During the time its turning, the display shows WAITING ... and the keys are locked. Once the port is reached, the keys are unlocked and the selected port lights up.
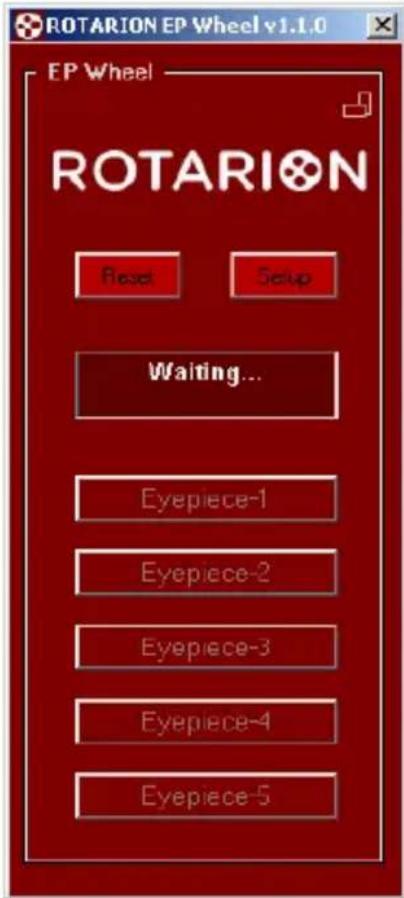
text_image
ROTARION EP Wheel v1.1.0 EP Wheel ROTARION Reset Setup Waiting... Eyepiece-1 Eyepiece-2 Eyepiece-3 Eyepiece-4 Eyepiece-5GOTO in progress
[PORT-1]
It is the initial port of the ROTARION once the [RESET] has been made. In it you must have installed the eyepiece with least power or magnification and largest field of view. This will make it easier to find the celestial object for observation.
[PORT-2]
In this port, you have selected an eyepiece with a higher power than the previous [PORT-1]. The visual field is smaller, but if you have focused the object in [PORT-1], it is easy to re-focus because the object is in the visual field of view.
[PORT-3]
In this port, you have selected an eyepiece with a higher power than the previous [PORT-2]. The visual field is even smaller, but you have the object in the visual field of view. You can focus on it again.
[PORT-4]
In this port, you have selected an eyepiece with a higher power than the previous [PORT-2]. The objects appear larger and the visual field is smaller, but you have the object in the field of view. You can focus on it again.
[PORT-5]
This port is not available in this version of the ROTARION EyepieceWheel.
![AstronSCIENTIFIC The Hermes Traveller - [PORT-5] - 1](/content/2026/06/1225772/images/d2ba9f5492129c5b555670cd1131724e83026c6cde45a8d5ce5a0a325c09c7aa.jpg)
text_image
ROTARION EP Wheel v2.5.8 EP Wheel ROTARION Eyespiece-1 Eyespiece-2 Eyespiece-3 Eyespiece-4 Eyespiece-5[PORT-1]
![AstronSCIENTIFIC The Hermes Traveller - [PORT-5] - 2](/content/2026/06/1225772/images/0de2c158b1a5056f7b4578b80e659169b5219aac319b74f4bfba211f4df8ecda.jpg)
text_image
ROTARION EP Wheel v1.1.4 EP Wheel ROTARION Enter Close Eyespiece Eyespiece-2 Eyespiece-1 Eyespiece- Eyespiece-5[PORT-2]
![AstronSCIENTIFIC The Hermes Traveller - [PORT-5] - 3](/content/2026/06/1225772/images/814226ede438f43ad5f382b02a45a484e5e035a5b69c11f443e27c1a2ccbea03.jpg)
text_image
ROTARION EP Wheel v.0.1.4 EP Wheel ROTARION Home Route Repurchase Caspase Evepiece-3 Evepiece-4 Evepiece-5[PORT-3]
![AstronSCIENTIFIC The Hermes Traveller - [PORT-5] - 4](/content/2026/06/1225772/images/649d43b1564ba84732c2e2f7fe7776d55ef4714c275ab9765043e6e3a097ca06.jpg)
text_image
ROTARION EP Wheel v1.0 EP Wheel ROTARION Power Reset Rotation Contour Etopower Eyepiece-4 Etopower[PORT-4]
8. Warning Messages
The display (14) shows warning messages during ROTARION operation. In case of an error or important WARNING, the message with the background illuminated in Red appears.


Initial Warning
Each time you connect the ROTARION REMOTE CONTROL it is necessary to make a [RESET] (6) to find the port [PORT-1]. For safety reasons, the ROTARION does not start the rotation of the carousel (A) automatically; Indicates that it is ready to start the turn and that you remove hands, cables, and objects (B) that may interfere with the rotation of the ROTARION carousel before pressing the [Reset] button. The LED (4) flashes green.

text_image
CAUTION! Remove hands and objects! (B) MOVING PARTS! Wheel turning (A)ERROR
Port Error
For safety reasons, when the ROTARION does not find the next selected port, it interrupts the rotation movement, it partially inverts the rotation movement to release any entrapment of objects and indicates ERROR. Check that there is no wire or object interfering with the turning of the ROTARION carousel/wheel. The LED (4) flashes red.
After verifying that no object is interfering with the turning of the ROTARION, you can press the [RESET] button (6) on the ROTARION REMOTE CONTROL to restart the device.
Device Not Found
Device Not Found
It cannot find ROTARION through the USB connection. Verify that you are properly connected and powered.
Port COM Error
Port COM Error (computer com port)
It cannot find ROTARION through the serial connection. Verify that you are properly connected and powered. Verify that you have selected a correct [COM] port.
Starting Rotarion
Starting Rotarion
The ROTARION is turning for a [RESET]. The LED (4) lights red.
Waiting...
Waiting...
The ROTARION is turning during the selection of an eyepiece. The LED (4) lights red.
C-Using the ROTARION and ROTARION REMOTE CONTROL Software.
1. CAUTION! MOVING PARTS!
ROTARION EyepieceWheel, ROTARION REMOTE CONTROL software and its accessories are not toys, they are optical instruments with mechanisms only to be used by adults.
The carousel (A) of the ROTARION EyepieceWheel performs revolving-type turning movements until reaching the port requested in the ROTARION REMOTE CONTROL software.
Remove hands, cables, and other nearby objects (B) that may interfere with the movement of the ROTARION EyepieceWheel carouse, I before you order a turn or an eyepiece or lens change in the ROTARION REMOTE CONTROL software.
If any object interferes with the rotating movement of the ROTARION EyepieceWheel carousel by generating an entrapment and preventing reaching the port indicated in the ROTARION REMOTE CONTROL, the safety system automatically activates after 3 seconds, interrupting the requested turning movement and performing a partial reverse rotation to release the trap, indicating an [ERROR]
message on the ROTARION REMOTE CONTROL software screen.
Follow the instructions in this manual and the main message window of the ROTARION REMOTE CONTROL software at all times.

text_image
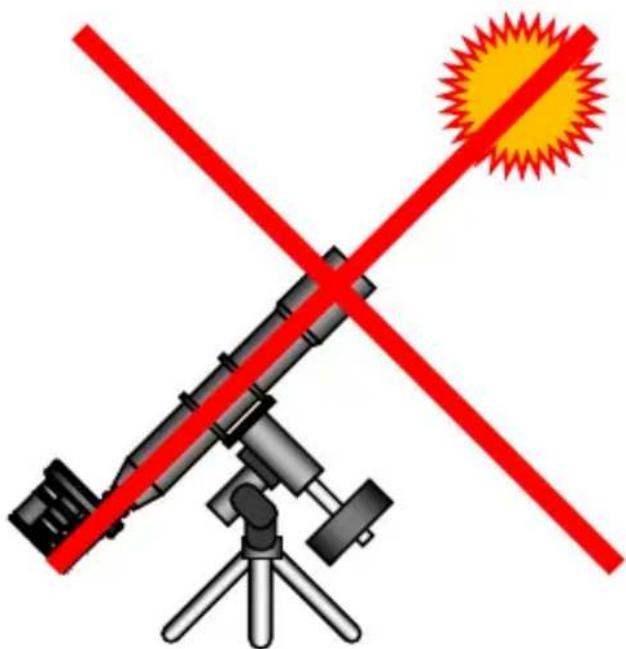
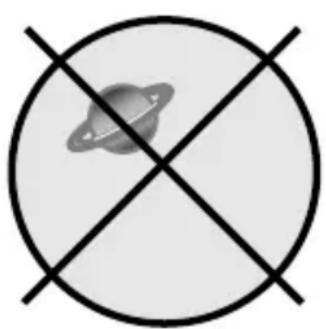
CAUTION! Remove hands and objects! (B) MOVING PARTS! Wheel turning (A)WARNING!
Do not point your ROTARION and telescope to the sun! Viewing the sun through a telescope without proper solar filters will cause severe and permanent eye damage or blindness!
natural_image
Illustration of a telescope with red X-shaped cross and sunburst symbol (no text or labels)2. Observing position
For the visual use of the ROTARION EyepieceWheel you must place it as indicated in the drawing below.
The user who uses the left eye (A) to visualize must place the ROTARION to his left. The user who uses the right eye to visualize must position the ROTARION EyepieceWheel to his right (B).
In both cases, the ROTARION is positioned in your telescope to use the lower eyepiece (C) as shown in the drawing on this page.

flowchart
graph TD
    A["Input: Face A"] --> C["Target C"]
    B["Input: Face B"] --> C["Target C"]
    style A fill:#f9f,stroke:#333
    style B fill:#f9f,stroke:#333
    style C fill:#ccf,stroke:#333
3. Viewing objects with ROTARION
To locate objects, it more convenient to use your eyepiece with a greater number of mm or less magnification. The less magnified eyepieces have the largest field of view and therefore it is easier to locate objects with your telescope than with an eyepiece of greater magnification and less visual field.
If you have followed these instructions correctly, your lower power or magnification eyepiece should be placed in the port [PORT-1] of your ROTARION with a larger number in mm and greater field of view.
Once the observing object is found, you should focus with the telescope and center the object (A) on the eyepiece before changing to the next eyepiece, so that the image of the object in the next eyepiece is in your field of view.
[PORT-1] Centered NOT OK. OK.
[PORT-1] Centered
natural_image
Simple diagram with a planet and intersecting lines, no text or symbols present.
natural_image
Simple grayscale icon of a planet with rings inside a circle (no text or symbols)4. The "Zoom Effect"
With the object centered on the eyepiece and focused, by pressing the [PORT-2] button of the ROTARION REMOTE CONTROL software, the ROTARION changes the eyepiece on the [PORT-1] to the eyepiece [PORT-2] with increased power or magnification.

Now you must focus the telescope again. The observed image should be larger and have less visual field. Center the image again in the eyepiece (B).
[PORT-2] Centered NOT OK. (B)
natural_image
Crosshair symbol with a planet and ring, no text or labels present[PORT-2] Centered OK.

natural_image
Simple grayscale icon of a planet with rings, enclosed in a black circular border (no text or symbols)Afterwards, you can increase the magnification of your telescope by changing to the following eyepieces of smaller number of mm and higher magnification, [PORT-3] and [PORT-4].
When you perform the object centering procedure on the eyepiece and focus before changing to the next eyepiece, the object will appear in your field of view.
NOTE: The size of the image of the objects in your eyepiece is a function of the magnification of your telescope. The magnification formula X equals the focal length of your telescope divided by the number in mm of the eyepiece.
Example: for power calculation, magnification or magnification X must know 3 things about your telescope
- The diameter of your telescope D = 152mm = 6 "*
- The focal length of the telescope F = 1000 mm .
- The number in mm of the eyepiece = 20mm.
Magnification X = Focal length / mm of eyepiece
Therefore, if we use a telescope with 1000mm focal length and a 20mm eyepiece.
$$ \text { Magnification X } = 1 0 0 0 \mathrm{mm} / 2 0 \mathrm{mm} = 5 0 \mathrm{X} $$
Which would give us 50 magnifications, but if you change to a 10mm eyepiece it would be 100 magnifications.
There is a maximum limit of magnification in your telescope due to optics and atmospheric conditions or "seeing". If you increase too much power or magnification the image of the object in the eyepiece will appear faint and blurred. The maximum magnification limit of your telescope is calculated:
$$ \text { Max X } = \text { Diameter in inches } * 5 0 $$
If you use a telescope with a diameter of 6 inches:
$$ \text { Magnification Max } = 6 \text { "* } 5 0 = 3 0 0 X $$
That is, the maximum magnification for this telescope is 300X.
* For your information, the conversion from inches to mm is: 1" inch = 25.36mm.
5. The "Finder Effect".
If the image of an object moves or trails through the field of view (A) of the eyepiece due to mount tracking problems or because the telescope has not been set correctly and finally disappears from the field of view (B), you can re-relocate the object by pressing [PORT-1] to change to the eyepiece with the largest number in mm, the lowest power or magnification and greater field of view (C).
(A)

natural_image
Simple illustration of a planet with rings and an arrow, enclosed in a circle (no text or symbols)(C)

natural_image
Simple circular diagram with a dashed arrow pointing inward, labeled (B) at top (no text or symbols within the circle)(D)

natural_image
Simple diagram showing a planet with a dashed line and a black arrow, enclosed in a circle (no text or symbols)
natural_image
Simple diagram of a planet with a dashed arrow pointing to its surface, enclosed in a circle (no text or symbols)Once the object has been relocated, remember to center the image in the eyepiece (D) before making the change to an eyepiece of smaller number of mm, greater power or magnification and smaller field of view. This ensures that the object will appear in the field of view of the next eyepiece.
D-Additional Product Information
Please read the following instructions and information.
1. Product Compliance Information
The AstronSCIENTIFIC S.L. corporation with address at Marti i Julia 6-8, Barcelona 08834 Spain E.U. has certified this product with the IEC 61010-1 Norm for Safety requirements for electrical equipment for measurement, control, and laboratory use in compliance with the Bureau Veritas Consumer Products Services Germany GmbH corporation based at Türkheim, Germany.
If the equipment is used in a manner not specified by the manufacturer, the protection provided by the equipment may be impaired.
The CE Certificate Product Marking:
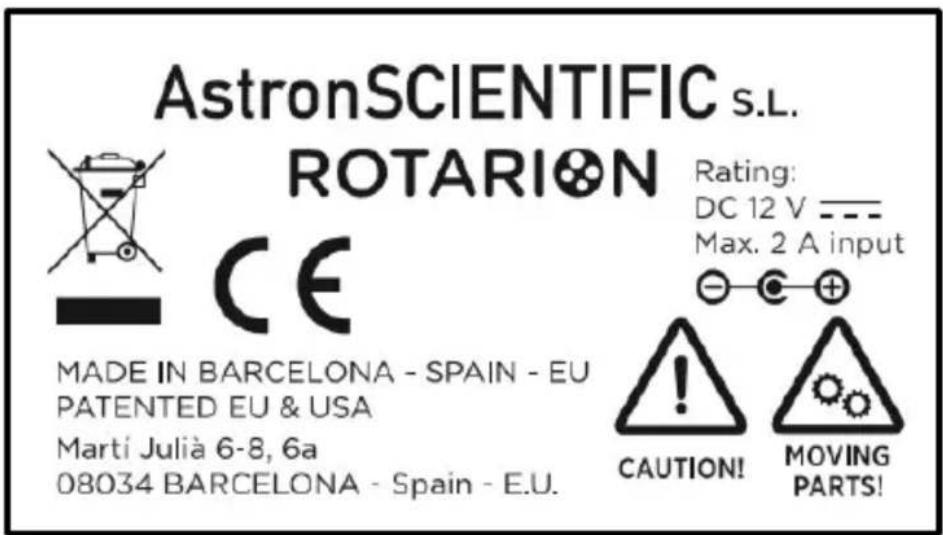
text_image
AstronSCIENTIFIC S.L. ROTARION Rating: DC 12 V —— Max. 2 A input CE MADE IN BARCELONA - SPAIN - EU PATENTED EU & USA Martí Julià 6-8, 6a 08034 BARCELONA - Spain - E.U. CAUTION! MOVING PARTS!Instruction Manual Version:
Rotarion EyepieceWheel & Rotarion Remote Control V:1.0 CE
2. Service, Maintenance, Cleaning, Disposal, Serial Number, and Dealer:
Car adapter fuse:
• 4 Amp 12V 6.3x32mm, fast acting.
- To replace it, unscrew the tip and replace.
Operating environmental conditions:
- Max. 2000m. / 0-40 °C / 32-104 Fahrenheit and 80% humidity.
Degree of Protection IEC 60529:
- Not applicable.
The Power Supply:
- Input: 100-240Vac; 50/60Hz; 0,55A Output: 12Vdc; 2A; Limited Power Source
- Disconnect the Power Supply unit from the ROTARION. The Power Supply unit must be freely accessible and must not be covered nor obstructed for disconnecting the ROTARION when needed.
- Only use the supplied Power Supply unit.
- Please compare the rating plate of the Power supply unit with the local mains voltage and frequency.
Maintenance technical data:
- Maintenance free.
Cleaning:
- Use a soft cloth without liquids.
Disposal:

●
- Equipment with this symbol shall not be disposed of together with household or commercial waste.
- Please find out about separate disposal at your regional offices.
- The directive 2012/19/EU on waste electrical and electronical equipment (WEEE) is applicable in the European Union member states.
Serial Number (or PN) :
Dealer:

text_image
flln tlnDate:
E-Warranty
The warranty is extended to all countries where this product is distributed by AstronSCIENTIFIC S.L. or by a distributor assigned by it. This warranty is subject to the legal provisions of each country.
3. Warranty period
The Warranty period is 2 years from the date of the sales invoice issued by AstronSCIENTIFIC S.L. or by the distributor authorized by AstronSCIENTIFIC S.L.
4. Warranty Coverage
The conformity of the product is warranted according to the use for which it is intended.
Within the warranty period, we will remedy any defect in the operation of the product due to its manufacture, whether repairing, replacing parts or providing a new product, provided that the option chosen is feasible and not economically disproportionate according to the criteria of AstronSCIENTIFIC S.L.
For any of the three options, repair, replacement of parts or exchange for a new product, the consumer must go to the authorized distributor of AstronSCIENTIFIC S.L. where the product was purchased.
5. Warranty Nullity
This warranty will not be valid in the following cases:
Misuse, improper use, neglect, accident, or deterioration of the product due to failure to comply with the warnings and restrictions contained in this Instruction Manual or in the operating instructions provided by AstronSCIENTIFIC S.L.
External agents such as water or other harmful chemicals, obstructive or corrosive.
Likewise, faults or malfunctions caused by incorrect voltages and electrical installations will not be covered by this guarantee.
This warranty does not cover any product that has been altered or repaired by any person other than AstronSCIENTIFIC S.L. repair personnel, or any product whose serial number, model number or identification has been removed, defective or altered.
AstronSCIENTIFIC S.L. shall not be liable for any indirect, special, incidental, or consequential damages related to the sale or use of the product.
3.2. Rotarion CAM Kit & Rotarion Remote Control PRO software.
STEP 1 - ROTARION CAM Kit
HOW TO REMOVE ROTARION STAINLESS STEEL HANDLES
1.- Remove (unscrew) the Click-Lock clamps including all extenders/spacers, and without removing the four black color thread adapters Part# 4.1 "SC-to-T2".

natural_image
Technical illustration of four different mechanical components with no visible text or symbols2.- Unscrew the 2 screws (A) located on the bottom of the ROTARION with the included Allen wrench and remove the SMALL handle (B) carefully.

text_image
(B) (A)3.- Introduce the NEW 2 stainless steel Allen screws (C) and screw the 2 Nylon head nuts (D) using the supplied Allen wrench and the N°10 wrench. Screw the 2 nuts tightly.
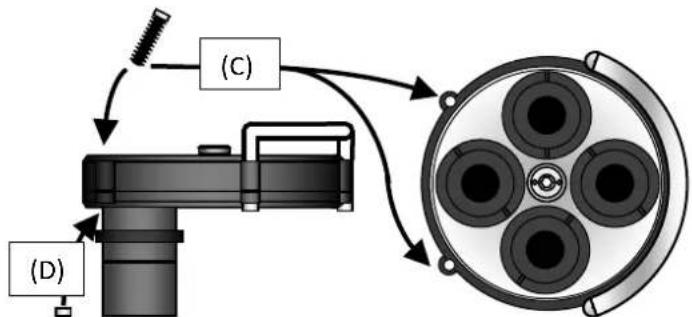
flowchart
graph TD
    A["Component (C)"] --> B["Component (D)"]
    B --> C["Arrow to (C)"]
    C --> D["Arrow to (D)"]
    style A fill:#f9f,stroke:#333
    style B fill:#ccf,stroke:#333
    style C fill:#cfc,stroke:#333
    style D fill:#fcc,stroke:#333
4.- Unscrew the 3 screws (E) located on the bottom of the ROTARION with the included Allen wrench and remove the LARGE handle (F) carefully.
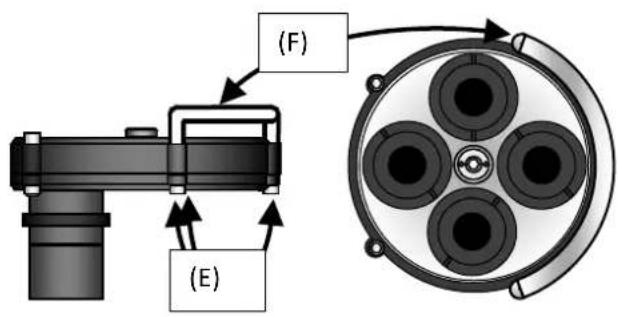
text_image
(F) (E)5.- Introduce the NEW 3 stainless steel Allen screws (G) and screw the 2 Nylon head nuts (H) using the supplied Allen wrench and the N° 10 wrench. Screw the 3 nuts tightly.
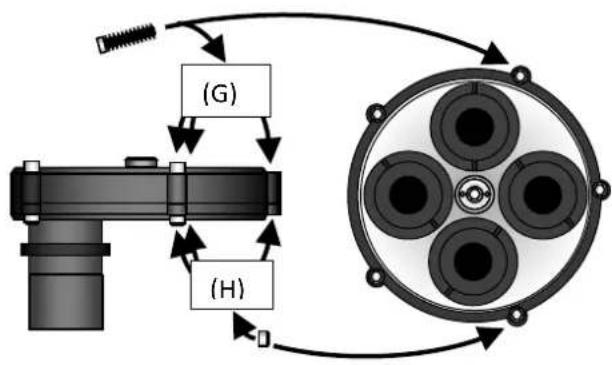
flowchart
graph TD
    A["Gear Switch"] --> B["Gear"]
    B --> C["(H)"]
    C --> D["Component Box 1"]
    C --> E["Component Box 2"]
    C --> F["Component Box 3"]
    C --> G["Component Box 4"]
    style A fill:#f9f,stroke:#333
    style B fill:#ccf,stroke:#333
    style C fill:#cfc,stroke:#333
    style D fill:#fcc,stroke:#333
    style E fill:#cff,stroke:#333
    style F fill:#ffc,stroke:#333
    style G fill:#fcc,stroke:#333
STEP 2 - ROTARION CAM Kit
Telescope System Adapters Map
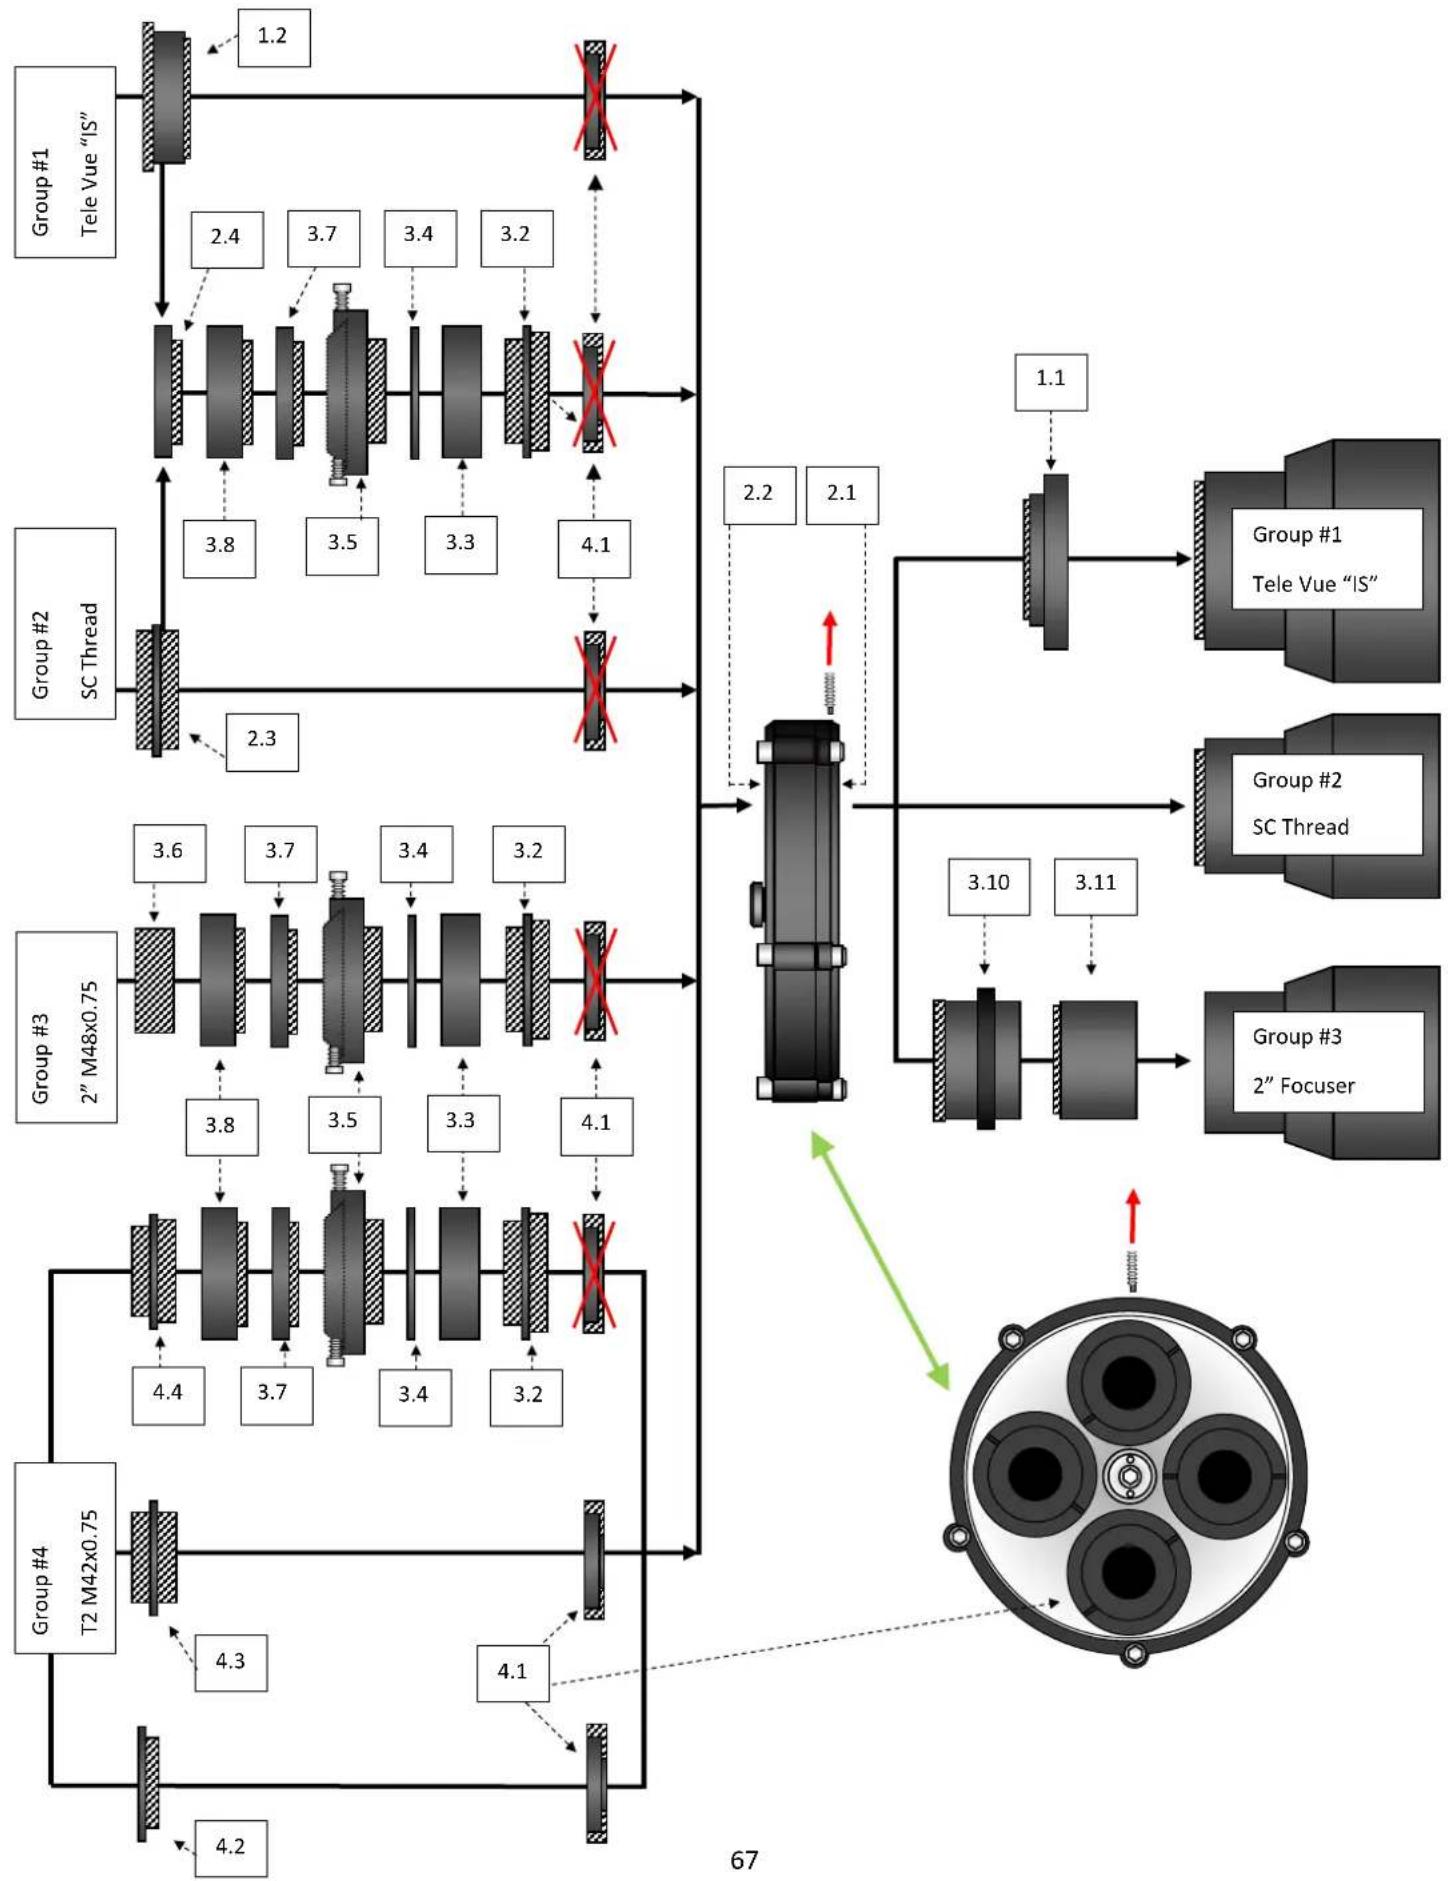
flowchart
graph TD
    A["Group #1\nTele Vue "IS""] --> B["1.2"]
    B --> C["Group #2\nSC Thread"]
    C --> D["2.3"]
    D --> E["Group #3\n2" M48x0.75"]
    E --> F["3.6"]
    F --> G["4.4"]
    G --> H["Group #4\nT2 M42x0.75"]
    H --> I["4.3"]
    I --> J["Group #4"]
    J --> K["4.2"]
    K --> L["67"]
    L --> M["Group #3\n2" Focuser"]
    M --> N["3.10"]
    N --> O["Group #2\nSC Thread"]
    O --> P["3.11"]
    P --> Q["Group #1\nTele Vue "IS""]
    Q --> R["1.1"]
    R --> S["Group #1"]
    S --> T["67"]
    T --> U["Output"]
    style A fill:#f9f,stroke:#333
    style C fill:#f9f,stroke:#333
    style E fill:#f9f,stroke:#333
    style H fill:#f9f,stroke:#333
    style J fill:#f9f,stroke:#333
    style L fill:#f9f,stroke:#333
    style N fill:#f9f,stroke:#333
    style O fill:#f9f,stroke:#333
    style P fill:#f9f,stroke:#333
    style Q fill:#f9f,stroke:#333
    style R fill:#f9f,stroke:#333
| STEP 3 - ROTARION CAM KitTelescope System Adapters | ||||||||||||||
| GROUP | TELESCOPL SYSTEM | THRAD | ROTARION SIDE | PARTN | DRAWING# | UNITS | ADAPTEL/G | COMMLN/S | ADAPTER'S OPITICAL PATH LENGTHS | |||||
| TO TELESCOPE | TO CARROUSFI | Adapter's local length (including male breeds) | Male breeds | Telescope's focal path length used in mm = Adapter's total length when assembled with other parts | Rotator's carried loss a 1mm available power cylinder space for Adapter's non-throxed parts | Total stereoscope's focal path length used in mm | ||||||||
| 1 | TELE VUE IMAGING SYSTEM (IS) | 2"9/16 34TPI | YLS-1.2 | 00X504a 1 | M1108(TVO IS female-to-SC male) | To be mounted instead of already mounted Part#1 10 2" bars, SC male to M48 female (remove barrel locking screw first),use the M1108 to throw the Rotation to Tele Vue IS telescopes | 14,85 7,5 | 7,35 N/A | 7,35 | |||||
| YES 1.2 | 00X507 2 | M1240(SC male-to- TVO IS male) | Remove the already mounted part#4.1 SC male to T2 female adaptors in Rotation's carousel,use M1240 for Tele Vue "Large First Corrector" or any other Tele Vue "6" parts and optics in Rotation carried side | 20,3 6 | 14,8 - 113 | |||||||||
| YES 3.4 | 4 2 M48 male to- SC female | Follow assembly instructions of GROUP #3,to be mounted in part#3.5 M48 Rotating camera adapter instead of part#3.6; use it for large camera sensors assemblers | 15 | 5 | 10 | N/A | 10 | |||||||
| 2 | SC TELSCOPL SYSTEM | 2" 24" PPI | YLS-2 | 1 | SC Telescope female(Thread in Rotation's telescope side) | First lose 2" barrel locking screw,second unscrive and remove the part#3.10 2" barrel, SC male-to- M48 female | N/A | N/A | N/A | N/A | N/A | |||
| YES 2.2 | 4 | SC Telescope female(thread in Rotation's carousel) | Remove the already mounted part#4.1 SC male to T2 female adaptors in Rotation's carousel | N/A | N/A | N/A | M/A | N/A | ||||||
| YES 2.3 | 00X503 2 | SC male to SC male | Remove the already mounted part#4.1 SC male to T2 female adaptors in Rotation's carousel | 12,4 | 11,4 | 1 | -1 | 0 | ||||||
| YES 2.4 | 2 | M48 male to- SC female | Follow assembly instructions of GROUP #3,to be mounted in part#3.5 M48 Rotating camera adapter instead of part#3.6; use it for large camera sensors assemblers | 15 | 5 | 10 | N/A | 10 | ||||||
| 3 | 2" SYSTEMwith M48 Rotating camera adaptors for large camera sensors | M48x0.75mm | YLS | 3.10 000 120 1 | 2" barrel(SC male to M48 female) | Already mounted in Rotation, to be use in any 2" telescopic focuser,verify that part#3.11 2" barrel extender, M48 male to M48 female is already mounted | 36,9 7,5 | 29 N/A | 29 | |||||
| YES - | 3.11 000 101 1 | 2" barrel extender(M48 male-to-M48 female) | Already mounted in Rotation in part#3.10 2" barrel, SC male-to- M48 female,to be use in any telescope 2" fraser | 36 | 9 | 30 | N/A | 30 | ||||||
| YES 3.2 | 100500 2 | SC male-to- M48 male | Remove the already mounted part#4.1 SC male-to T2 female adapter in Rotation's carousel | 11,9 | 10,9 | 1 | -1 | 0 | ||||||
| YLS | 3.3 | M48 female to M48 female | To be mounted in part#3.2 SC male to M48 male | 7,5 | 9 | 7,5 | N/A | 7,5 | ||||||
| - | YES | 3.4 | 2 | M48 0.5mm ring | Optional, if need it, to align locking screws of part#3.5 M48 Rotating camera adapters | 0,5 | 9 | 0,5 | N/A | 0,5 | ||||
| YES | 3.5 | 2 | M48 Rotating camera adapters | I first remove the 3 looking screws and the inner male parts;seared thread in part#3.5 M48 female-to- M48 female,third align both adapters so 2 of the locking screws face to the other adapter's 2 locking screws,fourth, if need for screws alignment, use part#3.4 M48 6.5mm ring | 12 | 4 | 8 | N/A 8 | ||||||
| YES 3.6 | 2 M48 male to- M48 male | To be mounted in part#3.5 M48 Rotating camera adapters,to mount M48 large-sensor cameras | 7,5 | 7,5 | 0 | N/A 0 | ||||||||
| YLS | 3.7 | 2 | M48 length 5mm spacers/extenders | Optional, if need it, to be mounted in part#3.6 M48 male to M48 male,to para focalize focus positions among camera sensors in 2 two camera setup | 9,4 | 5 | N/A 5 | |||||||
| YES 3.8 | 2 | M48 length 10mm spacers/extenders | Optional, if need it, to be mounted in part#3.6 M48 male-to M48 male,to para-focalize focus positions among camera sensors in 2 two-camera setup | 13 | 3 | 10 | N/A | 10 | ||||||
| 4 | T2 SYSTEMwith M48 Rotating camera adaptors and M48 reducers for small camera sensors | M42x0.75mm | YLS | 4.1 | 200100 | 4 | SC male to T2 female | Already mounted in Rotation's carousel | 7 | 6 | 1 | 1 | 9 | |
| YES 4.2 | 19C201 2 | T2 aluminium caps | To be threaded in already mounted part#4.1 SC male to T2 female adaptors in Rotation carouselto close unused Rotation's carried positions | 3,5 | 4,5 | N/A | N/A | N/A | ||||||
| YES | 4.3 | 2 | T2 male-to T2 male | To be threaded in already mounted part#4.1 SC male-to T2 female in Rotation carousel | 31 | 11 | 6 | N/A | 0 | |||||
| YLS 4.4 | 2 | M48 male to T2 male | Follow assembly instructions of GROUP #3,to be mounted in part#3.5 M48 Rotating camera adapter for T2/M42 small-sensor cameras | 10 | 4<4 | 2 | N/A 2 | |||||||
STEP 4.A - ROTARION CAM Kit application example:
Small Sensor DSO Chrominance & Luminance (25% faster than traditional RGB+L)
Equipment Setup: Tele Vue IS telescope + Rotarion CAM + 2x NPR-1073 & TRG1072 + Camera Atik 490 EX Mono & Camera Atik 490EX Color
**Note: Example configuration drawing only. Additional spacers/extenders may be necessary between the NPR-1073 or LCL-1069 and the camera depending on the chip to surface plate dimension of the camera. Consult the telescope operating guide for details.
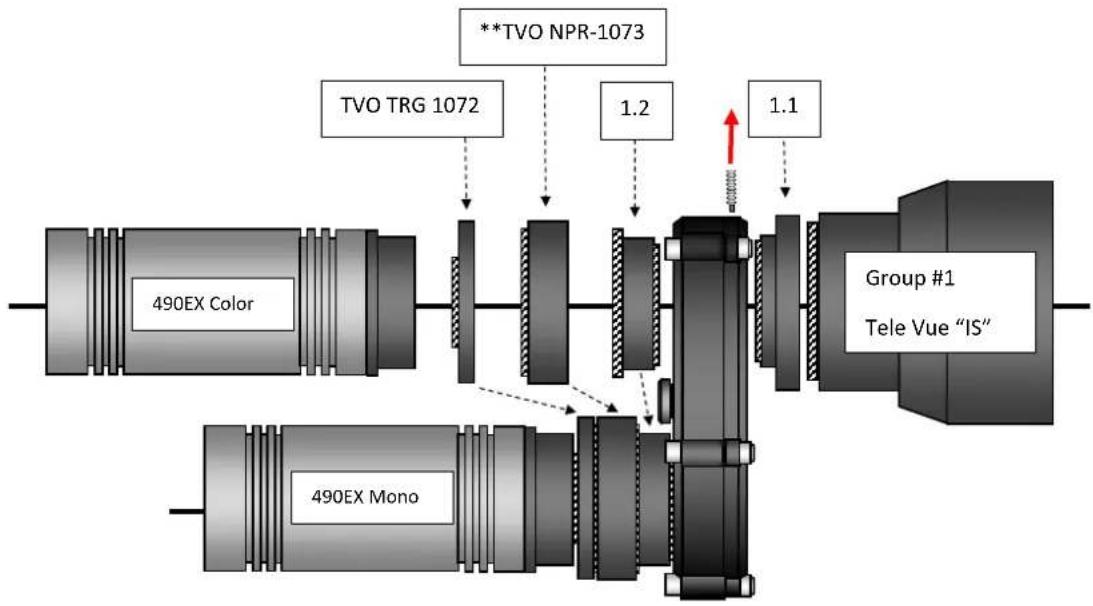
flowchart
graph TD
    A["490EX Color"] --> B["490EX Mono"]
    C["TVO TRG 1072"] --> D["1.2"]
    E["**TVO NPR-1073"] --> F["1.1"]
    G["Group #1\nTele Vue "IS""] --> H["Red Arrow"]
    B --> I["Vertical Segment"]
    D --> I
    F --> I
    H --> I
STEP 4.B - ROTARION CAM Kit application example:
DSO (RGB+L) with Reducer & PLANETARY with PowerMate
Equipment Setup: Tele Vue IS telescope + Rotarion CAM + NPR-1073 and TRG1072 and Camera Atik ONE with filter wheel (RBG+L) + PowerMate and PTR 1250 and Camera Atik 490EX Color
**Note: Example configuration drawing only. Additional spacers/extenders may be necessary between the NPR-1073 or LCL-1069 and the camera depending on the chip to surface plate dimension of the camera. Consult the telescope operating guide for details.
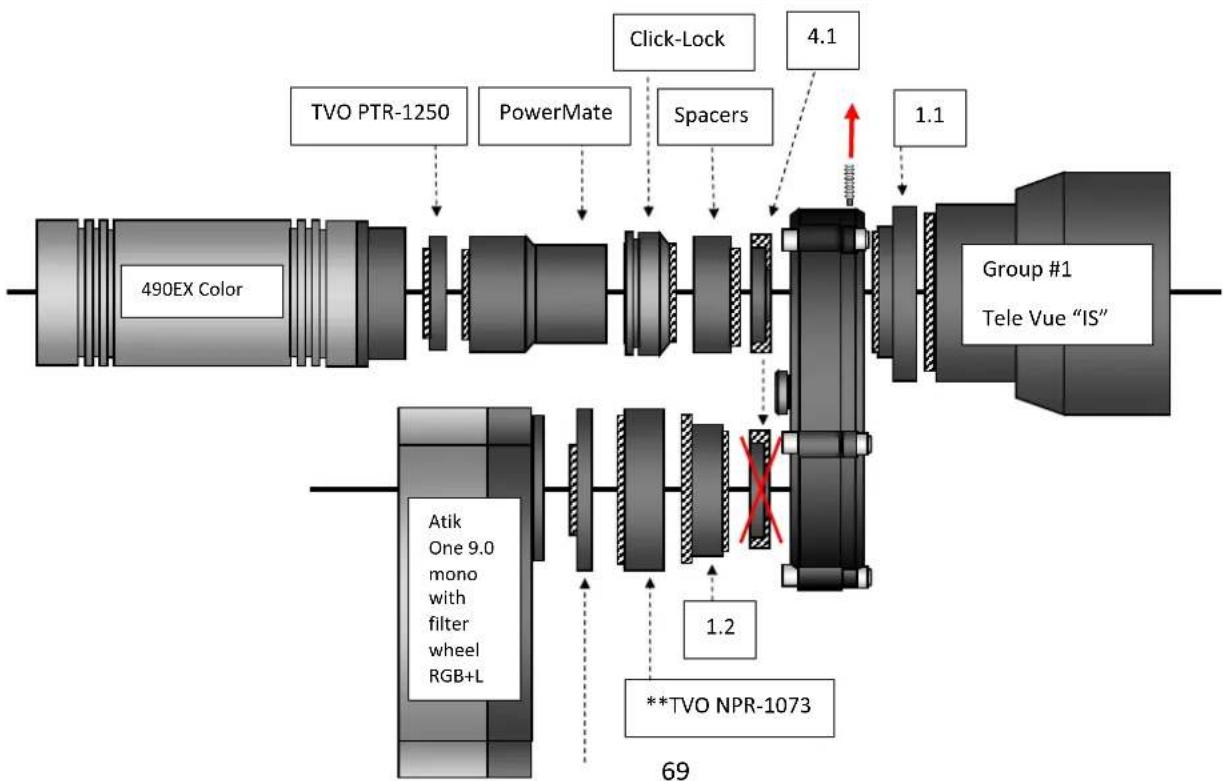
flowchart
graph LR
A["490EX Color"] --> B["TVO PTR-1250"]
B --> C["PowerMate"]
C --> D["Click-Lock"]
D --> E["Spacers"]
E --> F["Group #1<br>Tele Vue "IS""]
F --> G["1.1"]
G --> H["69"]
H --> I["Atik<br>One 9.0<br>mono<br>with<br>filter<br>wheel<br>RGB+L"]
I --> J["1.2"]
J --> K["**TVO NPR-1073"]
STEP 4.C - ROTARION CAM Kit application example:
Large Sensor Chrominance & Luminance (25% faster than traditional RGB+L) with SCT Corrector II -0.63x and M48 Camera rotating adapters [3.5]
Equipment Setup: SC telescope + Rotarion CAM + 2x Starizona Corrector II -0.63x + Camera Moravian G3 Mark II Mono & Moravian G3 Mark II Color
*Note: Using in the imaging assembly M48 Rotating camera adapters [3.5], and other M48 parts (normally with inner diameter 44mm) may cause very small vignetting in full-frame sensors, to be corrected by taking "flats".
**Note: Example configuration drawing only. Additional spacers/extenders may be necessary between Corrector and camera and between SCT and Rotarion. Consult the telescope operating guide for details.
***Note: the locking screws of the M48 Rotating camera adapters [3.5] have to be aligned as seen below; to do so, you must remove all 3 locking screws before screwing the M48 Camera Adapter body parts, use optionally the 0,5mm rings [3.4] to achieve locking-screws alignment.
![AstronSCIENTIFIC The Hermes Traveller - Large Sensor Chrominance & Luminance (25% faster than traditional RGB+L) with SCT Corrector II -0.63x and M48 Camera rotating adapters [3.5] - 1](/content/2026/06/1225772/images/478859ae875feb1bf0d9d835eeefffc8b09571ff0f4e6f5de37f236478161693.jpg)
text_image
Moravian G3 Mark II Color Starizona SCT Corrector II -0.63x 3.6 3.7 3.5 3.4 3.3 3.2 4.1 Moravian G3 Mark II Mono Group #2 SC Thread *** Locking-screws must be aligned in M48 Rotating Camera Adapters [3.5], remove locking-screws before screwing M48 body part, use optionally 0,5mm rings [3.4] for alignment.STEP 5 - ROTARION CAM Kit
ROTARION Remote Control PRO software
1.- Open your ROTARION Remote Control software (if you have not installed it yet, proceed with the installation now; use the ROTARION Remote Control software Instruction Manual included in the ROTARION The Eyepiece Wheel box).
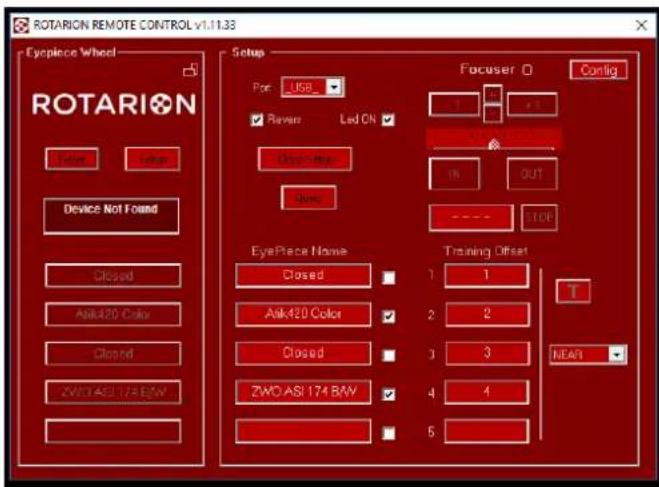
text_image
ROTARION REMOTE CONTROL v1.11.33 Eyepiece Wheel ROTARION Setup Port: USB ✓ Revers Led ON Close Help Close EyePiece Name Closed Ask420 Color Closed ZWO ASI 174 BAY Focuser O Config IN OUT STOP EyePiece Name Training Offset 1 1 2 2 3 3 4 4 5 NEAR2.- Connect the ROTARION PRO USB key. Now the micro-tuning adjustment keys [A] will appear in the software interface. See next image and compare it to previous image.
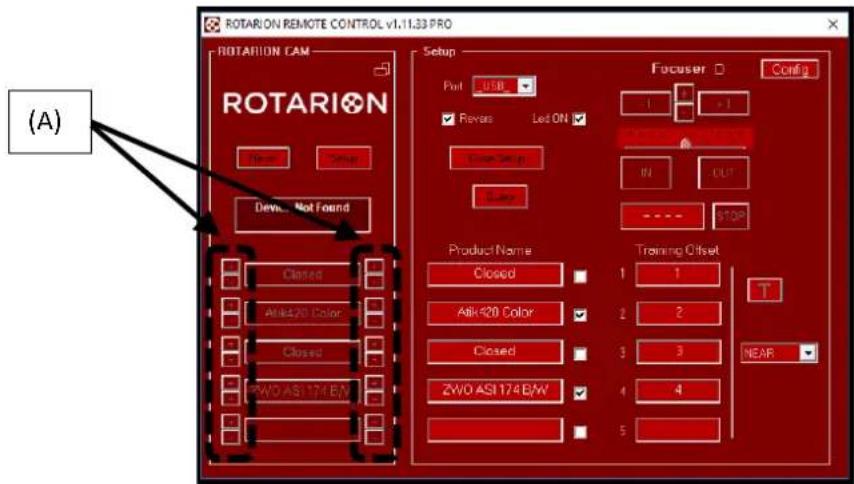
text_image
ROTARION REMOTE CONTROL v1.11.33 PRO ROTARION CAM Setup Port: USB ✓ Revers Led ON Close-up Close Focuser Config 1 >1 W OUT STOP Product Name Closed Training Offset 1 1 T Abk420 Color 2 2 Closed 3 3 ZW0 ASI 174 E/W 4 4 5 NEAR (A)3.- Click on the micro-tuning adjustment keys [A] to adjust the angular backlash cause by either heavy camera loads, or unbalance camera loads.
Please note that there are 4 micro-tuning keys [B] for each ROTARION position.
Each side keys (2 keys per side, and identified by "+" or "-" symbols) correspond to either turning the ROTARION carousel to the left or to the right.
On same side keys, you may adjust more backlash or less backlash using the "+" or "-" keys.
Also observe that each side keys [B] are only activated and available when the ROTARION carousel turned from that specific side (left or right turn). So, if you are clicking on the right-side keys and you cannot observe carousel movement, click on the other left-keys and you will see movement.
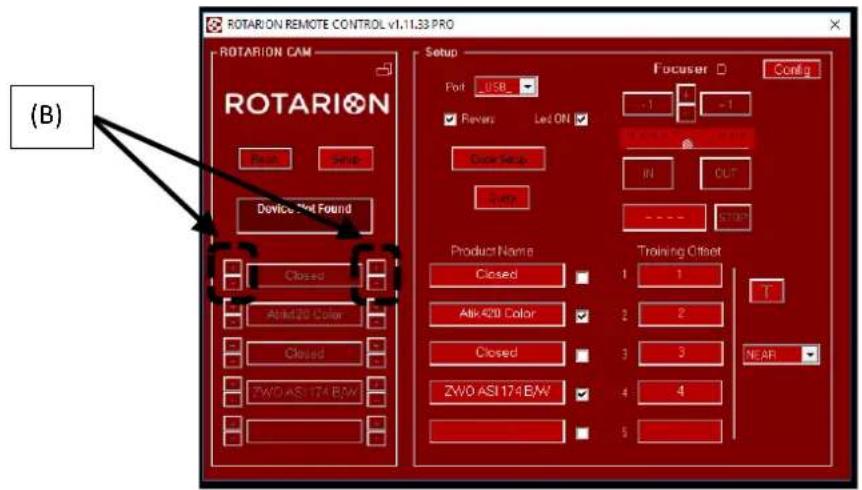
text_image
ROTARION REMOTE CONTROL v1.11.33 PRO ROTARION CAM Device Not Found (B) Setup Port USB Revers Led ON Outer Setup Open Product Name Training Offset Closed 1 1 Alt420 Color 2 2 Closed 3 3 ZWO ASI 174 B/W 4 4 5 Focuser Config -1 -1 IN OUT - - - - STOP T NEAR4.- Use the 4 red dials [C] on the ROTARION carrousel and the black dial [D] in ROTARION body closes to the 2" barrel as reference points for the micro-tuning adjustments.

flowchart
graph TD
    A["(D)"] --> B["Central Component"]
    B --> C["(C)"]
    style A fill:#f9f,stroke:#333
    style B fill:#ccf,stroke:#333
    style C fill:#cfc,stroke:#333
4.- Note:
- Micro-tuning backlash adjustment is a trial and error procedure, that is, you may have to adjust several times to achieve perfect on-axis results on each position for each left/right turns.
- Once adjusted the micro-tuning, the system memorizes the individual backlash for every position, therefore you can remove the ROTARION PRO USB key after.
- Although the ROTARION can be powered only by the USB wire, we recommend to plug-in the external power, either by using the 12Volt car wire or the international power supply AC/DC wire.
4.1. TV-85 Focuser & 4.2. StarLight Motor Focuser SI-PDMS--POSI DRIVE MOTOR SYSTEM
The Posi Drive Motor System for the Feather Touch focuser can lift in Excess of 56 pounds. This motor system attaches to the pinion shaft and not the reduction assembly which eliminates any slip and offers precise repeatability with heavier payloads. The PDMS has 2.3 microns per step(.00009") which is 11,400 steps per inch. The PDMS-FT motor comes standard with an over-ride to allow for manually focusing with the COARSE focus knob. The PDMS motor has the thermistor built onto the motor circuit board for temperature compensation.
Your Feather Touch Focuser knob assembly

natural_image
Close-up of a mechanical device with a yellow knob and metallic shaft (no visible text or symbols)
natural_image
Exterior view of a black industrial pump or motor with attached plastic clip and label (no readable text on device)Your Posi Drive motor assembly with tools
Remove dust cover
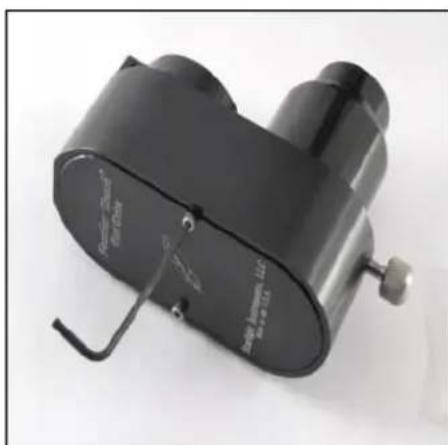
natural_image
Black industrial binocular device with attached metal bracket (no visible text or symbols)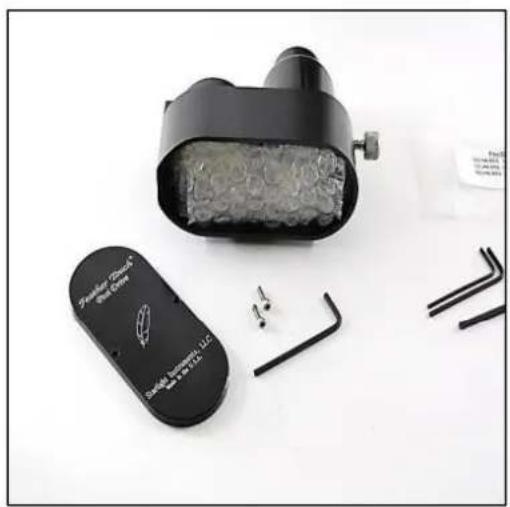
natural_image
Black electronic device with a textured internal component and multiple small pins, placed on a white surface (no visible text or symbols)Remove packing material

natural_image
Black and white photo of a portable electronic device with yellow lens, black case, and small accessories (no visible text or symbols)
natural_image
Close-up of a black cylindrical mechanical component with a metallic clip and attached hook (no visible text or symbols)Remove 8-32 button- head cap screw

natural_image
Close-up of a black cylindrical mechanical component with metallic fittings and mounting holes (no visible text or symbols)Remove pulley assembly and belt from housing
Do not remove motor assembly from housing

natural_image
Close-up of mechanical components including a yellow rotary knob, black belt drive, and metallic fittings (no text or symbols visible)
natural_image
Close-up of a brass mechanical component with a black curved line attached, no visible text or symbols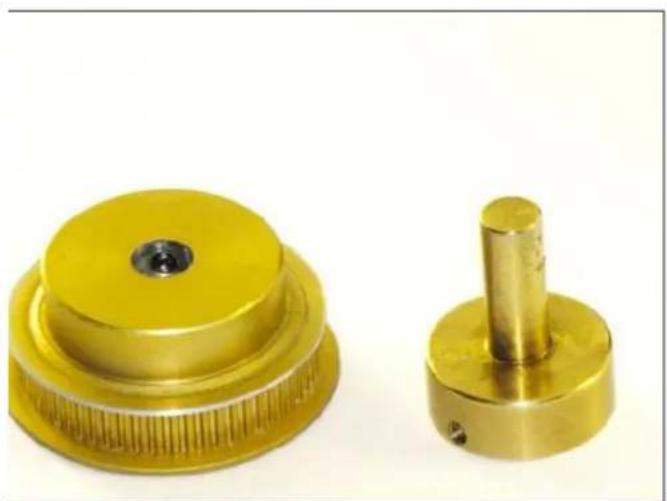
natural_image
Two brass mechanical components: a circular gear with a central hub and a cylindrical pin (no text or symbols visible)Remove shaft extension from pulley
Remove gold knob

natural_image
Close-up of a mechanical gear assembly with a yellow and metallic shaft, no visible text or symbolsRemove black knob

natural_image
Close-up of a laboratory instrument with yellow and metallic components, no visible text or symbols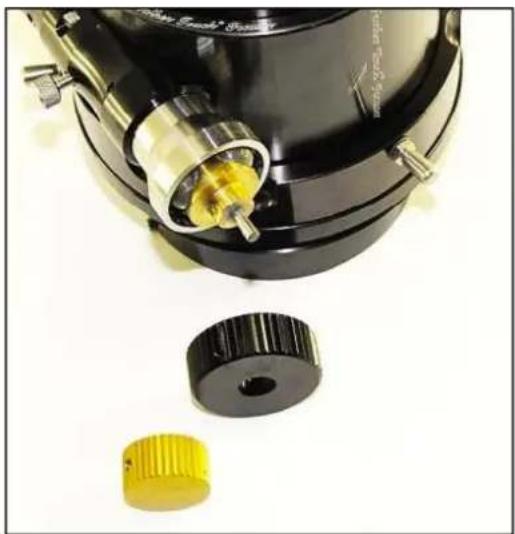
natural_image
Close-up of a mechanical device with black casing, yellow and yellow components, and a metallic component (no visible text or symbols)Install shaft extension
Make sure setscrew is on the flat
*Tighten securely*

natural_image
Close-up of a mechanical assembly with a golden cylindrical component inserted into a black cylindrical housing (no visible text or symbols)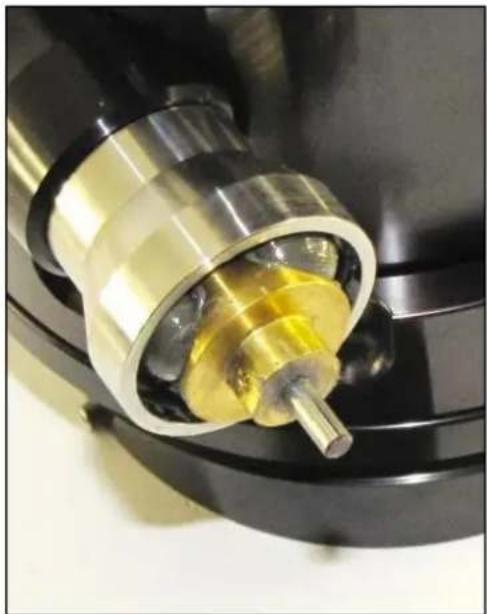
natural_image
Close-up of a mechanical component with a metallic shaft and yellow internal structure (no visible text or symbols)*Tighten securely*
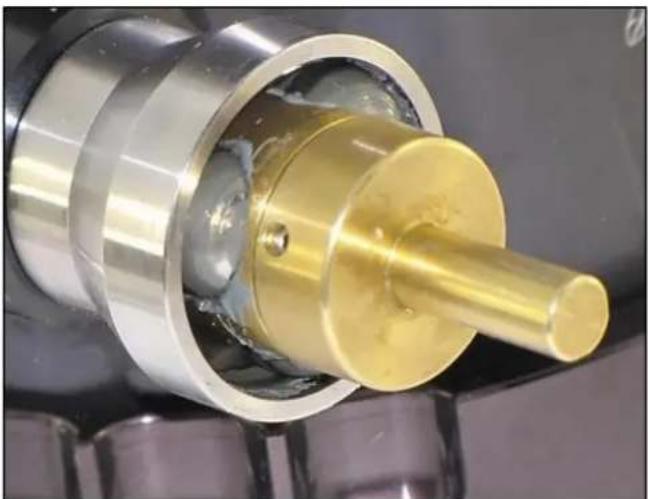
natural_image
Close-up of a mechanical assembly showing a golden cylindrical component inserted into a metallic housing (no visible text or symbols)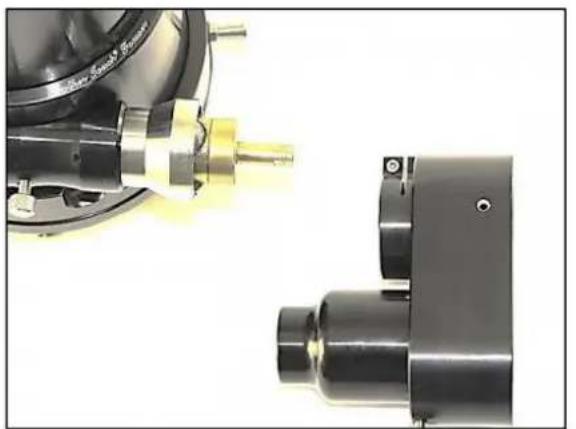
natural_image
Close-up of two mechanical components, one with a metallic tool and the other a cylindrical component (no visible text or symbols)
natural_image
Close-up of a mechanical optical device with black components and metallic fittings (no visible text or symbols)Make sure clamp screw is loose
Fit the motor housing onto the reduction assembly
Make sure the motor housing is seated all the way on reduction assembly. You will be able to see the housing through the cut out
Tighten the clamp screw enough to keep the housing from rotating
*Do not over tighten*

natural_image
Close-up of a mechanical component with metallic surfaces and bolt holes (no visible text or symbols)
natural_image
Close-up of a mechanical component with a metallic fitting and textured surface (no visible text or symbols)Loosen thumb screw

natural_image
Close-up of a black and yellow mechanical brush focusing device (no visible text or symbols)Make sure set screws are positioned over flats on shaft extension
natural_image
Close-up of a mechanical device with yellow components and metallic parts (no visible text or symbols)Utilizing the access hole tighten both of the pulley set screws

natural_image
Close-up of a black mechanical device with yellow internal components and a black belt ring (no visible text or symbols)Install timing Belt

natural_image
Close-up of a hand adjusting a mechanical belt drive mechanism (no text or symbols visible)
natural_image
Close-up of mechanical gears and shafts in a vehicle assembly (no visible text or symbols)
natural_image
Close-up of a hand operating a mechanical tool with a metallic component (no visible text or symbols)After timing belt is on both pulleys rotate motor housing clock wise to tension the belt
To help get any slack out of the timing belt turn the course focus knob back and forth while you are turning the motor housing clock wise
natural_image
Close-up of a hand holding a mechanical device with yellow gears and a black housing (no visible text or symbols)When the timing belt is tensioned tighten the thumb screw
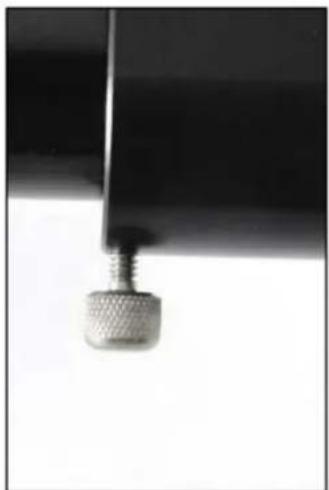
natural_image
Close-up of a metallic screw head with a pointed tip, against a plain background (no text or symbols visible)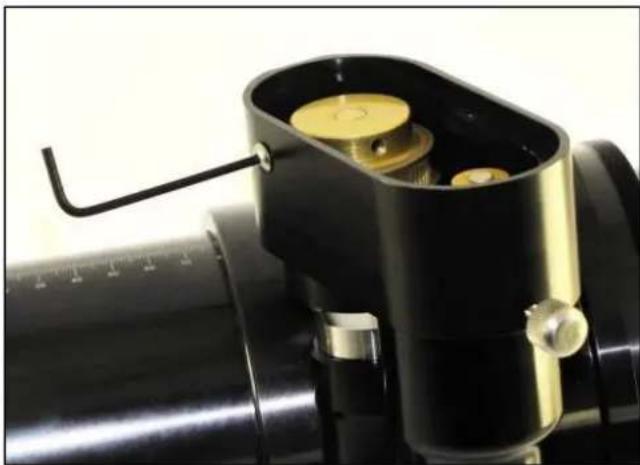
natural_image
Close-up of a mechanical device with black casing and yellow circular components, no visible text or symbolsReplace the 8-32 button head screw
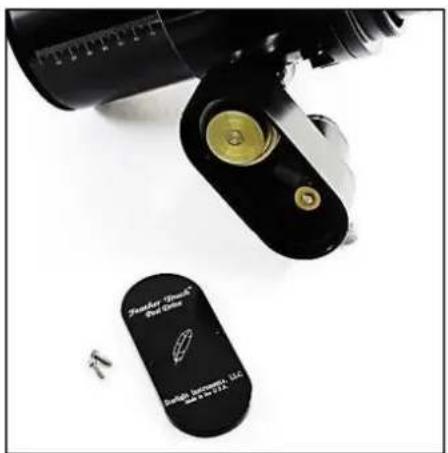
natural_image
Close-up of a black mechanical device with a gold-colored knob and a small labeled tag (no readable text or symbols)Replace the dust cover
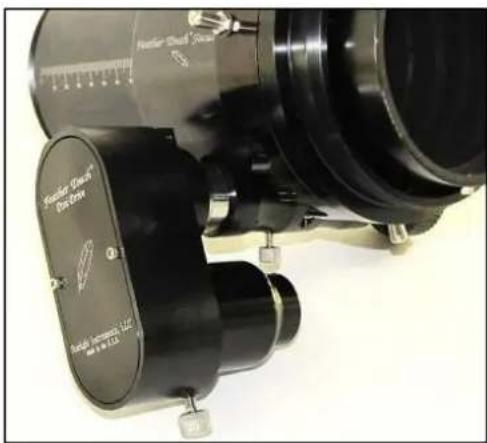
natural_image
Close-up of a black Fourier optical instrument with labeled components and scale (no readable text or symbols beyond branding)
text_image
Fountain Touch® Box Drive Double Instrument, LLC 800 W. 10 E.U.A.Congratulations you are ready to go!!!
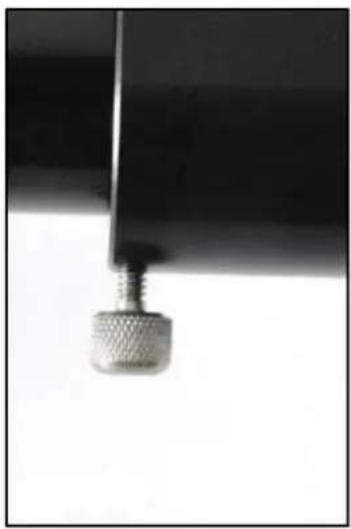
natural_image
Close-up of a metallic threaded component with a pointed tip, against a plain background (no text or symbols visible)To use the focuser in manual mode
Loosen the thumb screw and turn the motor housing counter clockwise to the stop
To reengage the motor
Rotate motor housing clock wise to tension the belt. To help get any slack out of the timing belt turn the course focus knob back and forth while you are turning the motor housing clock wise
When the timing belt is tensioned tighten the thumb screw
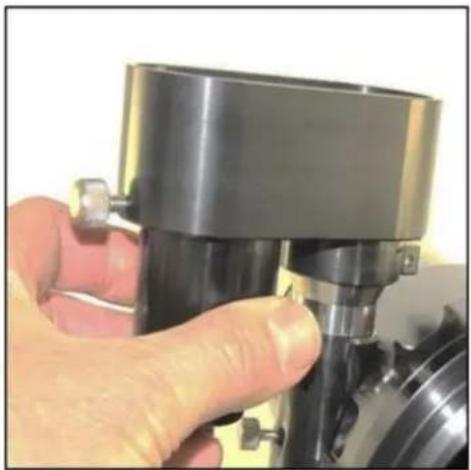
natural_image
Close-up of a hand adjusting a mechanical component with a black cylindrical housing (no visible text or symbols)4.3. Rotarion Autofocus
ROTARION
Autofocus

text_image
AstronSCIENTIFIC AUTOMEST AUTO-Focus ROTARI®N AutoFocusInstruction Manual

CAUTION!
ROTARION and accessories are optical instruments with moving parts to be used only by adults.

MOVING PARTS
Keep away body and fingers from moving parts!
READ THIS MANUAL BEFORE USING ROTARION!
AstronSCIENTIFIC
ASTRONOMY MADE EASY
Congratulations on your purchase of ROTARION AUTOFOCUS!
ROTARION AUTOFOCUS is designed and manufactured to be used for daytime terrestrial observation and for nighttime astronomical observation.
ROTARION is a unique device, patented in the European Union and the United States, to be used with any telescope with a 2" focuser and four of your favorite 1.25" eyepieces.
For the first time, you can change the power or magnification of your telescope with just a simple click and the new chosen lens will focus automatically when connecting your ROTARION and ROTARION REMOTE CONTROL software or ROTARION HAND CONTROL to the ROTARION AUTOFOCUS found in this box.
ROTARION makes the eyepiece change easy. Automatic, quick, precise and without touching the telescope avoiding disturbances in the positioning or misalignment of the optical axis between eyepieces. No more searching in the dark for your next eyepiece!
The automatic eyepiece change allows you to adjust the correct magnification on your telescope by increasing or decreasing the focal length of the eyepiece used, the "zoom effect".
Re-locate lost objects out of the field of view due to improper alignment or poor tracking of the
telescope. Quickly change to your largest eyepiece in mm to maximize your field of view and re-locate. All with a simple Click!
The ROTARION AUTOFOCUS connected to the ROTARION REMOTE CONTROL software includes an easy Training Procedure (“T” Key) so it can learn your variable focal offsets among your optics mounted on the ROTARION. The built-in algorithm calculates for you each time you order a lens change, the needed focus correction to make your optics par-focal, and it is compatible with many market available motor focusers.
ROTARION AUTOFOCUS is a device of the highest quality, designed and manufactured in BARCELONA with the latest state-of-the-art techniques and the best materials and components from the U.S.A., Japan, and Germany.
First, read this instruction manual thoroughly and then follow the assembly instructions step-by-step. If you follow the instructions correctly, even if it is initially laborious, the use of ROTARION AUTOFOCUS is very simple and easy.
All this to offer you many hours of enjoyment observation, and satisfaction with your telescope.
Maximum quality, universal, versatile, and easy to use, ROTARION continues our corporate mission:
AstronSCIENTIFIC
Astronomy Made Easy
In the Box
- ROTARION AUTOFOCUS with female SUBD-9 connector cable labeled "A", compatible with Moonlite or Robofocus stepper motors.
- Adapter wire A01 for Orion, TeleVue motor
- Adapter wire A02 for JMI motor
- Adapter wire A10 for FeatherTouch MSM20 motor
- Adapter wire A11 for Feather Touch HSM20 motor
- Plastic zip strap
- Double sided adhesive tape
- Instruction Manual
System Requirements
- It is necessary to have an ROTARION EyepieceWheel to use the ROTARION AUTOFOCUS.
- In addition, a telescope with a motor coupled to the focuser. The motor can be: Stepper (Moonlite, Starlight FeatherTouch) or DC (Orion, TeleVue, JMI)
- Specific wire to connect to the focusing motor included.
- ROTARION REMOTE CONTROL Software included with your ROTARION, a PC Windows XP / Vista / Win7 / Win8 compatible is required. You will also need a Serial port on your computer
- Optionally, you can use the ROTARION HAND CONTROL connected to the ROTARION, for the control of the ROTARION AUTOFOCUS, ideal for field use without a PC or computer.
Index
A-Introduction
B-Characteristics
C-Connecting the focuser's motor
D-Connecting the ROTARION AUTOFOCUS to your ROTARION EyepieceWheel
E-Config screen
- Mini Control
- Backlash
- Min Speed
- Max Speed
- Power Moving
- Power Stopped
- Max Position
- Motor Type
- Wiring (Motor model)
- Revers
- Selector ResetPos
- Position Reset
F-Control Screen
- Focuser Led
- Auto Advance keys
- Ruler
- Keys [IN] / [OUT]. Manual Advance
- Actual Position
- STOP key
- Focuser Training Offset Panel
- TRAINING key
G-Preparation & Training
- Motor Type
- Motor Model
- Preparation
a. Atmospheric Factors & Focusing
b. Motor Focuser Systems
c. Crayford and Rack-and-Pinion Focusers
d. Other Focusers
- TRAINING procedure
3.1. Near Object
3.2. Far Object
3.3. Very Far Object
3.4. TRAINING Completed
H-Ready for Observation
- Observing an Object
- Changing to a New Object
- Resetting the Focuser
I-Additional Product Information
- Product Compliance Information
- Service, Maintenance, Cleaning, Disposal, Serial Number, and Dealer
J-Warranty
- Warranty Period
- Warranty Coverage
- Warranty Nullity
A-Introduction
The ROTARION AUTOFOCUS of
AstronSCIENTIFIC is a telescope par-focal system and focus controller, which works alongside the ROTARION EyepieceWheel automatic eyepiece exchanger. It is designed to control the motor that is commonly found in telescope focusers, whether DC type (DC motor) or Stepper type (stepper motor).
You can quick-change eyepieces and focus automatically. All with a single Click!
B-Characteristics
- Connects directly to the ROTARION EyepieceWheel automatic eyepiece exchanger.
- Obtains energy from the ROTARION EyepieceWheel itself.
- Compatible with any DC focusing motor that uses 5 to 12V such as Orion, TeleVue, JMI, etc.
- Compatible with Moonlite, Robofocus, Feather Touch stepper motors.
- The output is a 9 pin SUBD female connector compatible with Moonlite motors. A specific cable is required for all other motors.
- Red LED indicator of focuser movement.
- Adjustable speed control and PWM frequency control to optimize performance with your specific motor model.
C-Connecting the Motor Focuser
The ROTARION AUTOFOCUS output is a female SUBD-9 connector labeled "A", compatible with Moonlite or Robofocus stepper motors.
To connect it to another motor, you need a specific adapter cable for the motor. Various types of cables are available from AstronSCIENTIFIC distributors.
The adaptor cables found in the box are:
A01: for DC motor ORION, TeleVue
A02: for DC motor JMI
A10: for stepper motor Feather Touch MSM20
A11: for stepper motor Feather Touch HSM20
These cables have a SUBD-9 male connector on one end and a specific connector for the motor focuser on the other end.
Attach the connector of the ROTARION AUTOFOCUS marked "A" to the motor cable that corresponds to your focuser marked "Axx". Connect the other end of the motor cable to your motor focuser.
D- Connecting the ROTARION AUTOFOCUS to your ROTARION EyepieceWheel
The second ROTARION AUTOFOCUS cable must be connected to the ROTARION EyepieceWheel Focuser port (5). Although the connector looks

text_image
1 2 3 4 5ROTARION EyepieceWheel Connectors
1 Power input
2 Serial Port
3 USB Port
4 Status Led
like a mini-USB, it is a data and power cable.
AUTOFOCUS
5 Port
Connect the Serial Port (2) to the PC/computer or ROTARION HAND CONTROL. The RED LED in the ROTARION AUTOFOCUS box should blink 3 times. If not verify the power supply in the ROTARION and also verify the micro-USB cable connector from the ROTARION AUTOFOCUS to the ROTARION.
Currently the USB port (3) is operative for the ROTARION EyepieceWheel only. ROTARION AUTOFOCUS control via USB port is not available yet.
CAUTION: Although the Focuser port's power and data connector (5) has the form of a mini USB, IT IS NOT A USB CONNECTOR.
Never connect a mini-USB connector from another device. It could seriously damage both.
Now let's get to know the ROTARION REMOTE CONTROL software that simultaneously controls the ROTARION EyepieceWheel and the ROTARION AUTOFOCUS.
In blue color we have marked the legends referring to the basic operation of the ROTARION EyepieceWheel, and in green color the legends referring to the ROTARION AUTOFOCUS.
E-Config Screen
Select the [Config] / [Control] button (23) to access the ROTARION AUTOFOCUS configurable parameters.

text_image
6 7 8 9 10 11 12 13 ROTARION OF WHEEL V1.1.0 EP Wheel Poi COMC Reverse LedO Close EP Name Eyepiece-1 Eyepiece-2 Eyepiece-3 Eyepiece-4 Eyepiece-5 Setup Focuser Config. Control Mini Control Backlash 5 steps Min Speed 92 ms/step Max Speed 1 ms/step Power Moving 100 % Power Stopped 0 % Max Position 50000 steps Inertia 0 steps Motor Type Steppen Wiring RF/Monite Revers NO EPI NEAR 14 17 18 23 32 33 34 35 36 37 38Mini Control (31)
When you activate this box and the Setup screen (7) or (11) is closed, the ROTARION AUTOFOCUS mini-control panel will appear at the
bottom of the ROTARION REMOTE CONTROL main screen.

text_image
Focuser - 100 + - + 100 IN OUT - - STOP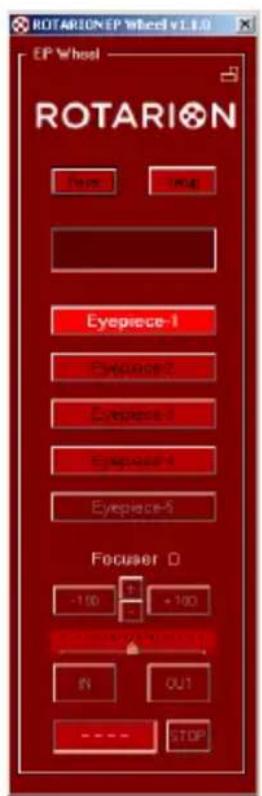
text_image
ROTARION EP Wheel v1.0 EP Wheel ROTARION Face Face Eyepiece-1 Eyepiece-2 Eyepiece-3 Eyepiece-4 Eyepiece-5 Focuser -100 +100 IN OUT STOPBacklash (32)
The Backlash is a slack in the focuser mechanism that is noticed during movement. That is, depending on the focuser and after moving in one direction, by reversing the motion a substantial distance the motor may have to move the before the focuser begins to move.
To compensate it, the AUTOFOCUS can add additional steps to the distance each time the direction of rotation is reversed. The default value is 0
Min Speed (33)
Specifies the minimum speed at which the motor will move, in milliseconds / step. Value from 1...99 ms / step
Max Speed (34)
Specifies the maximum speed at which the motor will move, in milliseconds / step. Value from 1...99 ms / step
In stepping motors, the movement starts at Min Speed and is increased by a ramp to Max Speed.
In DC motors, there is no speed increase by ramp. Min and Max Speed values are the same.
Note: As the speed is expressed in ms / step, the value for the minimum speed must be greater than the value for the
Power Moving (35)
The Power Moving is the% of the total power (PWM) that is applied to the motor when it is moving.
Range 0...100%
Power Stopped (36)
Power Stopped is the \% of the total power (PWM) that is applied to the motor when it is stationary.
Value from 0...100%
In a stepper motor, the Power Stopped allows the motor to maintain a certain torque when it is at rest. If the motor has a gearbox, you can leave it at 0%; In this way you avoid the heating of the motor.
In a DC motor, no power is applied while at rest because it would move. However, it is used to brake the engine and stop it in the shortest possible time (shorter distance).
Default is 0% for stepper motors and 100% for DC motors.
Max Position (37)
Specifies your maximum focuser range. If this value is reached the motor stops. Max Position is 60,000 steps, but you may type a lower value when finding your specific mechanical focuser range from IN to OUT.
The minimum value for the Current Position counter (25) is "0", that is your focuser all the
way IN. Therefore, it is unable to take negative values.

text_image
MaxPosition is less than Actual Position. Please, check the values OKThe value of Max Position
must be greater than your actual focus coordinate displayed at the Current Position counter, and your future position when clicking the auto advance keys (+10, +100, +1000, etc..). If any are larger, the upper and lower warning
messages will appear.
Verify if you can increase your Max Position value without causing a

text_image
MaxPosition is less than New Position. Please, check the values OKmechanical problem in your focuser!
Click [YES] to continue and increase the Max Position value.
Inertia (38)
Specifies the compensation in number of inertia steps for DC motors for heavy optical/imaging gear loads. It is in development. Leave the values at 0.
Motor Type (39)
You need to identify what type of motor and model is in your focuser.
Select from the drop-down list your motor focuser type, which will connect to the AUTOFOCUS:

Types of motor: DC (direct current), Stepper (step by step).
Wiring (Motor model) (40)
Select from the drop-down list the "model" of motor, depending on the Motor Type

(39) selected in the previous section. If it does not match any of the list, choose one that is compatible.
When selecting the motor model, an automatic preset of the Speed and Power parameters is made. It is possible to change these values to suit the type of motor and / or telescope focuser.
Motor brands pre-programed:
motor DC: Orion, TeleVue, JMI
motor Stepper: RoboFocus, Moonlite, FeatherTouch
Note: Remember that if you have changed the Speed / Power parameters for one motor and select another one, default parameters are loaded. If you then re-select the motor you had previously, the default values for that motor are loaded. The
Revers (41)
It allows the motor to be turned in inverted mode, to adjust the [IN] and [OUT] keys with the

movement of the focuser. See section (24) [IN] / [OUT] Keys
Selector ResetPos (42)
Select the value from the drop-down list to be
used as the reference value for the Current Position counter. See next section.
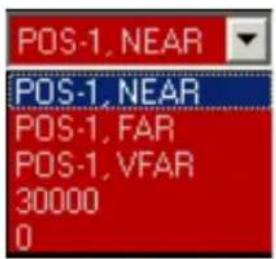
text_image
POS-1, NEAR POS-1, NEAR POS-1, FAR POS-1, VFAR 30000 0Reset Position Key (43)
Pressing this button resets the

Current Position counter. That is, the
telescope user has moved the focuser without
the [IN] or [OUT] or the auto advance keys (21)
and the ROTARION AUTOFOCUS has lost your focuser mechanical coordinate and is not focusing correctly.
To correct it, the user must synchronize again the focuser mechanical coordinate with a previous focused object used during the
TRAINING procedure in the Current Position counter. To proceed choose one of the following reference values from the selector ResetPos (42) drop-down list.
Reference values:
PORT-1 NEAR: Position for NEAR object in eyepiece PORT-1
PORT-1 FAR: Position for FAR object in eyepiece in PORT-1
PORT-1 VFAR: position for VERY FAR object in eyepiece in PORT-1
30000: Intermediate focuser coordinate of telescope travel. Recommended for Schmidt Cassegrain and similar telescopes with internal primary mirror displacement.
0: Maximum IN (inward) focuser coordinate. Recommended for Crayford and rack-and-pinion focusers found in most refractor and reflector telescopes.
Once you have focus one of the previous chosen references values (PORT-1 NEAR, PORT-1 FAR,...30000, 0), you sure?", click [YES].

text_image
Reset Position To 30000 Are You Sure ? No Yesto the question "Are
Note: You should normally have the Eyepiece 1 selected and the object well focused before making a Position Reset.
F-Control Screen
Select the [Control] / [Config] key (23) to access the AUTOFOCUS Control screen
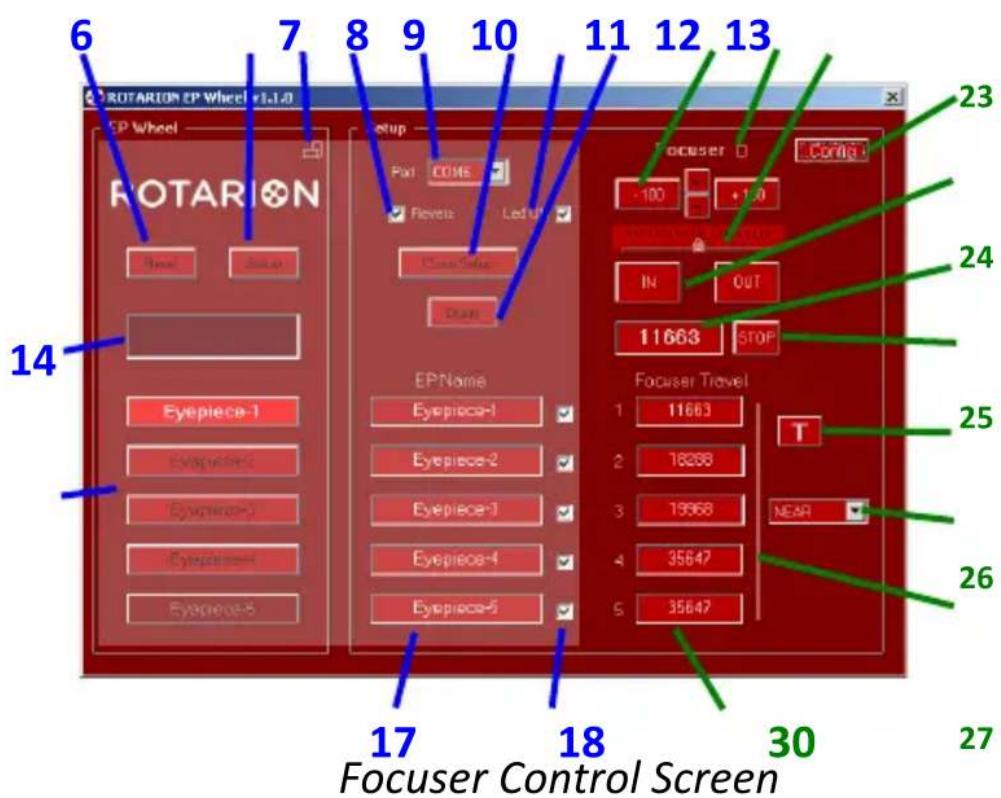
text_image
6 7 8 9 10 11 12 13 ROTARION CP Wheel +1.1.0 CP Wheel ROTARION Epoos Epoos Epoos Epoos Epoos Epoos Epoos Epoos Epoos Epoos Epoos Epoos Epoos Epoos Epoos Epoos Epoos Epoos Epoos Epoos Epoos Epoos Epoos Epoos Epoos Epoo Epoos Epoos Epoos Epoos Epoos Epoos Epoos Epoos Epoos Epoos Epoos Epoos Epoos Epoos Epoos Epoos Epoos Epoos Epoos Epoos Epoos Epoos Epoos Epoos Epoas Epoas Epoas Epoas Epoas Epoas Epoas Epoas Epoas Epoas Epoas Epoas Epoas Epoas Epoas Epoas Epoas Epoas Epoas Epoas Epoas Epoas Epoas Epoas Epoas Epoa Epoa Epoa Epoa Epoa Epoa Epoa Epoa Epoa Epoa Epoa Epoa Epoa Epoa Epoa Epoa Epoa Epoa Epoa Epoa Epoa Epoa Epoa Epoa Epoa Epoo Epoo Epoo Epoo Epoo Epoo Epoo Epoo Epoo Epoo Epoo Epoo Epoo Epoo Epoo Epoo Epoo Epoo Eepiece-1 Eyepiece-2 Eyepiece-3 Eyepiece-4 Eyepiece-5 EPName: Eyepiece-1 Eyepiece-2 Eyepiece-3 Eyepiece-4 Eyepiece-5 Focuser Travel: 1 11663 T NEAR 35647 35647 30 27 Focuser Control ScreenFocuser LED (20)
LED flashes when the focuser is in motion.

Auto Advance Keys (21)
When you press the forward keys, the motor moves the number of steps indicated on them.
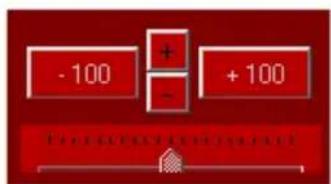
text_image
-100 + - +100 Proportional to the BPGWith the [+] and [-] buttons, you change the number of steps and the scaling factor of the ruler (22).
Range of steps: ±1, ±10, ±100, ±1000, ±10000
CAUTION: The ROTARION AUTOFOCUS does not have the ability to detect when your focuser has reached the IN or OUT ends. Damage can occur if you try to go beyond the mechanical limits of your focuser. Find
Ruler (22)
With this ruler you can follow the movement of the focuser.

The cursor slides under the graduated scale the number of steps of the focuser motor.
The scale factor is adapted to


the steps that you select using the + or - buttons.
To center the cursor, click on the graduated ruler.

[IN] / [OUT] Keys. Manual Advance (24)
Pressing the [IN] or [OUT] key causes the motor to move for as long as you hold it down.
![AstronSCIENTIFIC The Hermes Traveller - [IN] / [OUT] Keys. Manual Advance (24) - 1](/content/2026/06/1225772/images/495ee2ce6b2679314d6e97fe7f2f73270b62b6c2f342ee570efdb6ad24e731d6.jpg)
Usually with the [IN] key you should move the position of the focuser inwards and use the [OUT] key to move it outward. If the movement using the [IN] and [OUT] keys does not match
the direction of the focuser, you can activate the Revers function (41).
Current Position (25)
The Current Position measured in steps of the focuser appears in this display. Each step in the OUT direction increases the position, while in the IN direction decreases it.
STOP Button (26)
Pressing [STOP] stops/halts any movement of the focuser. Do it only in case of emergency, because it will be necessary to resynchronize the position.
Focuser Training Offset Panel (29)
In this panel you will find the training offset values of the focuser for each eyepiece located in PORT-1 to PO-4.
For each eyepiece 3 different focusing distances are saved (offset), which are selected through the drop-down list (28)

text_image
NEAR NEAR FAR VERY FARNEAR: for NEAR objects
FAR: for FAR objects
VFAR: for VERY FAR objects
By means of the TRAINING Procedure explained later in this manual, the 3 panels of position of the focuser are configured.
TRAINING Button (27)

This button starts the TRAINING
Procedure, which consists of adjusting the focus for 3 objects, with 3 focus
distances: near, far and very far, and for each of the eyepieces.
See the TRAINING Procedure chapter later.

When you start TRAINING, the button lights up and an [OK] button
is displayed beside it, which is used during the procedure.
G- Preparation & Training
When starting up for the first time, you must set the type and model of motor that corresponds to your focuser.
1. MOTOR TYPE
Choose the appropriate motor type from the Motor Type (39) list.

In the ROTARION HAND CONTROL choose the option
MENU 5. Focus Config MotorTyp <>
2. MOTOR MODEL
Choose the appropriate motor type from the Wiring (40) list.

In the ROTARION HAND CONTROL choose the option
MENU 5. Focus Config Wiring <>
3. PREPARATION
Before you begin the next Instructional Manual section “TRAINING PROCEDURE”, please read the following and follow the indicated recommendations below.
3.1. ATMOSPHERIC FACTORS & FOCUSING
Local changes in atmosphere factors such as density, humidity, temperature, and pressure will decrease focus offset precision calculated by the “Training Procedure”, as well as changing viewing locations (altitude, etc....) with different atmospheric factors. Therefore, since the weather conditions can change even in a few minutes, it may be necessary to fine-focus the initially proposed ROTARION AUTOFOCUS focus coordinates.
When you fine-focus one or all eyepieces mounted in positions PORT-1 till PORT-4 using the IN or OUT keys or with the Auto Advance Keys (21), the system will memorize the new focus offsets reproducing later excellent autofocus results.
3.2. MOTOR FOCUSER SYSTEMS
The more mechanically precise is your focuser is, the better ROTARION AUTOFOCUS
repeatability, and the better autofocus results you will get. As an example, a standard Crayford focuser can be less precise (due to shaft slippage, etc..) than a focuser with rack-and-pinion.
The more mechanically rigid the attachment is your motor to your focuser, the better focusing results your will get too. A direct motor to focuser connection without elastic parts or brackets that have flexure it produces better repeatability.
A stepper motor is highly recommended due to the motor type inherent precision over a standard DC motor. Although the ROTARION AUTOFOCUS powering a DC motor with a high-quality rack and pinion Crayford focuser such as the TeleVue, will produce excellent results.
3.3. CRAYFORD AND RACK-AND-PINION FOCUSERS
For Crayford focusers and rack-and-pinion focusers found in most refractor and Newtonian telescopes, there is an easy mechanical repeatability test to validate your telescope
motor focuser system and also how to calculate your focuser range to be typed in "MAX POSITION" (37) box.
Range IN = 0 Range max OUT = "Max
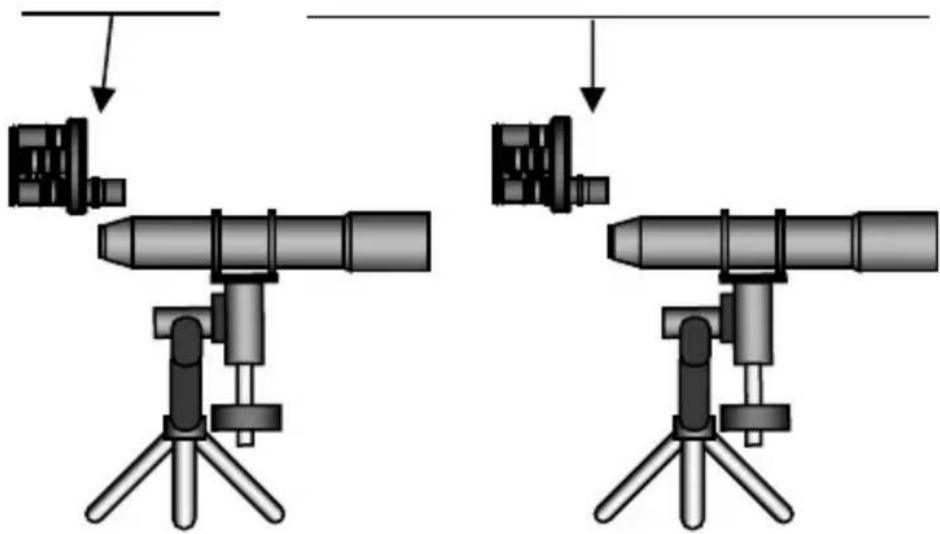
natural_image
Two identical mechanical devices with tripod supports and cylindrical components, shown from different angles (no text or symbols)Place your telescope horizontally, as seen on the previous drawing, and using the [IN] & [OUT] focusing keys or the Auto Advance Keys (21) founded in the ROTARION REMOTE CONTROL software, find your focuser travel steps for both IN and OUT ranges.
That is, the range outward or “IN-to-OUT” and the range inward or “OUT-to-IN”. If the difference among IN-to-OUT and OUT-to-IN ranges or focus travel numbers are less than 5%, then OK. Type the larger number of steps in the “MAX POSITION” box (37).
Place your telescope vertical aiming the Zenit, as seen below, loaded with your ROTARION and
any other needed accessories and repeat the test "IN-to-OUT" and "OUT-to-IN".
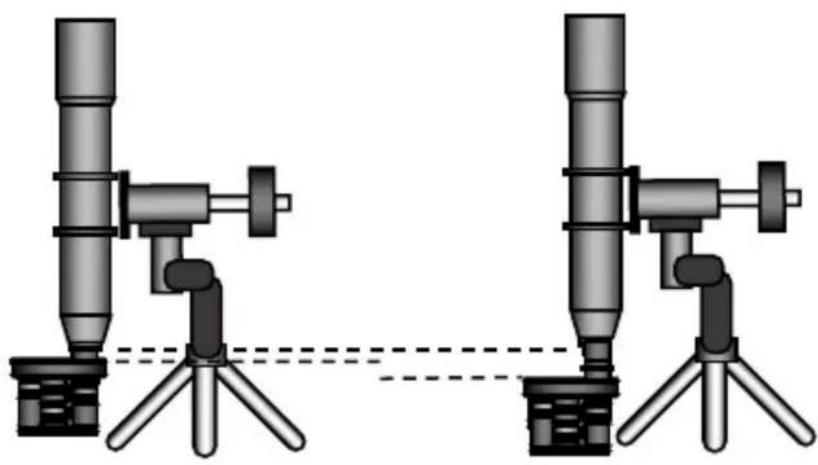
natural_image
Two identical mechanical devices with cylindrical components mounted on tripod bases, connected by a dashed line (no text or symbols)If there is over 5% difference among your “IN-to-OUT” and/or your “OUT-to-IN” vertical ranges in number of steps to the number you calculated on the previous focuser horizontal test and typed in the “MAX POSITION” box (37), you either have mechanical focuser problems or your motor does not have the necessary precision or power to achieve focusing repeatability. Fix it or replace the non-performing focuser parts before proceeding with the “TRAINING PROCEDURE”.
3.4. OTHER FOCUSERS:
For some reflecting telescopes without Crayford focusers and with focusing by internal primary mirror displacement such as the Schmidt Cassegrain, or similar, it is not necessary to perform the previous procedure, since it is
sometimes difficult to measure those telescope's focus range.
Instead, and before doing the “TRAINING PROCEDURE”, you must focus manually the PORT-1 eyepiece and fine-tune the focus to a NEAR object using the IN or OUT keys or with the Auto Advance Keys (21) and select the “30,000” option in the drop-down menu (42) and after do a “RESET POSITION” (43) found in the SETUP>CONFIG screen.
The result should be a “30,000” displayed at the “CURRENT POSITION” counter (25) and a NEAR object focused with eyepiece in position PORT-1 of the ROTARION. If so, proceed to the TRAINING PROCEDURE.
If you do not follow the previous recommendation, you may reach “0” in the “CURRENT POSITION” counter (25) when focusing later with higher power and small mm number eyepiece while teaching the ROTARION AUTOFOCUS for the FAR and VERY FAR offsets. If so, you will be unable to complete the TRAINING PROCEDURE correctly, you will have to repeat the TRAINING PROCEDURE again from a largest focus coordinate in eyepiece PORT-1, selecting and focusing a NEAR object again, and
resetting “CURRENT POSITION” counter (25) to 30,000, as explained previously in this section.
3.5. OTHER FOCUSERS, IMAGING SCT:
Follow the steps of previous section 3.4. when using imaging optics in Schmitt-Cassegrain telescopes.
The recommended optics for C6 - C8 - C9,25 - C11 - C14 telescopes are found in AstronSCIENTIFIC website, menu TECH INFO.
In this case, focus first with the recommended reducer/flattener 0.63x in PORT-1 before doing the “Training Procedure” using the IN or OUT keys or with the Auto Advance Keys (21) and select the “30,000” option in the drop-down menu (42) and after do a “RESET POSITION” (43) found in the SETUP>CONFIG screen.
Place your SCT horizontally during daytime to perform the "Training Procedure"
After doing the “Training procedure” calculate your backlash (in C8 with Feather-Touch motor should be around 400).
Only after successfully complete the “Training Procedure” and typing the correct backlash and successfully focusing automatically with the Rotarion AutoFocus, activate the SCT Mirror - Lock option box.
4. TRAINING PROCEDURE
TERRESTRIAL USE
If you are going to use your ROTARION for terrestrial observation such as birding or digiscoping, place your telescope horizontally and define your viewing area as in NEAR, FAR, and VERY FAR. Choose 3 non-moving objects NEAR, FAR and VERY FAR as focusing reference.
The smaller the range of view or viewing distance among NEAR, FAR & VERY FAR, the better autofocus results you will get for objects located within that viewing area.
Example: it is better to define a viewing area from NEAR to VERY FAR of 0,5 to 3 miles (or Km) than a viewing area of twice or double the range such as from 0,5 to 6 miles (or Km). The smaller the viewing area, the more precise automatic focusing results you will achieve within that range.
ASTRONOMICAL USE
If you are going to use your ROTARION for nighttime astronomical observation or astro-imaging, place your telescope inclined to your most common position (for example, around 60, 70 or 80 degrees over the horizon) and define your viewing area as in NEAR=Moon, FAR=Planets and VERY FAR=Stars.
TRAINING
With your telescope select 3 objects at different distances:
3a First object NEAR / (Near-Moon)
3b Second object FAR / (Far-Planet)
3c Third object VERY FAR / (Very Far-Star)

Before starting the TRAINING Procedure, you will need to select the eyepiece from PORT-1.

Press the [TRAINING]
button (you must have the eyepiece in position 1).

text_image
Are You Sure To START TRAINING ? No YesAccept the question of whether you are sure to
In the ROTARION HAND CONTROL choose the option

MENU 5. Focus Config Training ON
Accept the question Are You Sure? Yes In the bottom line appears TN: 0 The flashing T key remind us that we are in Training and the N indicates the NEAR object chosen in point 3a.
start TRAINING.
4.1. NEAR OBJECT

text_image
TRAINING NEAR ObjectUsing the eyepiece in position 1 (PORT-1) and using the [IN] / [OUT] keys, focus on the closest object chosen in point 3a.
With a good fine focus, press the [OK] key that appears next to the TRAINING key.

A window appears with the confirmation that you have well-focused the NEAR object of eyepiece 1 in PORT-1.

text_image
Eyepiece POS-1, NEAR Object Focus OK ? No YesClick [YES].
A window appears that reminds us that you must change to the eyepiece-2 in PORT-2. Click [OK].

text_image
You Need To Go To Position 2 To Continue Training OKIn the ROTARION HAND CONTROL focus with the IN and OUT keys and briefly press MENU and accept the question EP1, NEAR OK?

Change from eyepiece-1 to eyepiece-2 in PORT-2 using (16) keys
Using the eyepiece in PORT-2 and using the [IN] / [OUT] focusing keys, focus the same object chosen in point 3a.
With a good fine focus, press the [OK] key

Confirm that you have well focused the NEAR object of the eyepiece 2 in PORT-2. Click [YES].
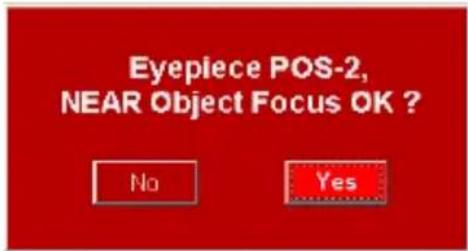
text_image
Eyepiece POS-2, NEAR Object Focus OK ? No YesA window appears that reminds us that you must change to the next eyepiece-3 in PORT-3. Click [OK].

text_image
You Need To Go To Position 3 To Continue Training OKIn the ROTARION HAND CONTROL focus with the IN and OUT keys and briefly press MENU and accept the question EP2, NEAR OK?

Change from eyepiece-2 located in PORT-2 to eyepiece-3 in PORT-3 using the (16)
keys.
Using the eyepiece in PORT-3 and using the [IN] / [OUT] keys, focus the same object chosen in point 3a.
With a good fine focus, press the [OK] key

Confirm that you have well focused the NEAR object of the eyepiece 3. Click [YES].

text_image
Eyepiece POS-3, NEAR Object Focus OK ? No YesA window appears that reminds us that you must change to the eyepiece-4 in PORT-4. Click [OK].

text_image
You Need To Go To Position 4 To Continue Training OKIn the ROTARION HAND CONTROL focus with the IN and OUT keys and briefly press MENU and accept the question EP3, NEAR OK?

Change from eyepiece-3 to eyepiece-4 in PORT-4 using the (16) keys.
Using the eyepiece in PORT-4 and using the [IN] / [OUT] keys, focus the same object chosen in point 3a.
With a good fine focus, press the [OK] key.

Confirm that you have well focused the NEAR object of the eyepiece 4. Click [YES].

text_image
Eyepiece POS-4, NEAR Object Focus OK ? No Yes"We already know the focus coordinates for NEAR objects"
In the ROTARION HAND CONTROL focus with the IN and OUT keys and briefly press MENU and accept the question EP4, NEAR OK?
In the bottom line the N letter change to F indicating the FAR object chosen in point 3b.

Now you must select yepiece-1 in PORT-1.
This window reminds us, and indicates that you must select the FAR object (distant) chosen in point 3b

text_image
You Need To Go To Position 1 To Continue Training Now Over a FAR Object OKwith the eyepiece 1 in PORT-1. Click [OK].
4.2. FAR OBJECT

text_image
TRAINING FAR ObjectUsing the eyepiece in position 1 and using the [IN] / [OUT] keys, focus the far object chosen in 3b.
With a good fine focus, press the [OK] key

A window appears with the confirmation that you have well-

text_image
Eyepiece POS-1, FAR Object Focus OK ? No Yesfocused the FAR object (distant) of the eyepiece 1 in PORT-1. Click [YES].
A window appears that reminds us that you must change to the eyepiece-2 in PORT-2. Click [OK].

text_image
You Need To Go To Position 2 To Continue Training OKIn the ROTARION HAND CONTROL focus with the IN and OUT keys and briefly press MENU and accept the question EP1, FAR OK?

Change from eyepiece-1 to eyepiece-2 using the (16) keys.
Using the eyepiece in PORT-2 and using the [IN] / [OUT] keys, focus the same object chosen in point 3b.
With a good fine focus, press the [OK] key.

Confirm that you have well focused the FAR object on the eyepiece 2. Click [YES].

text_image
Eyepiece POS-2, FAR Object Focus OK ? No YesA window appears that reminds us that you must change to the eyepiece 3 in PORT-3. Click [OK].

text_image
You Need To Go To Position 3 To Continue Training OKIn the ROTARION HAND CONTROL focus with the IN and OUT keys and briefly press MENU and accept the question EP2, FAR OK?

Change from eyepieces from PORT-2 to PORT-3 using the (16) keys.
Using the eyepiece in position 3 and using the [IN] / [OUT] keys, focus the same object chosen in point 3b.
With a good fine focus, press the [OK] key.
Confirm that you have well focused the FAR object of the eyepiece 3. Click [YES].

text_image
Eyepiece POS-3, FAR Object Focus OK ? No YesA window appears that reminds us that you must change to the eyepiece 4 in PORT-4. Click [OK].

text_image
You Need To Go To Position 4 To Continue Training OKIn the ROTARION HAND CONTROL focus with the IN and OUT keys and briefly press MENU and accept the question EP3, FAR OK?

Change from eyepiece in PORT-3 to the eyepiece in PORT-4 using the (16) keys.
Using the eyepiece in PORT-4 and using the [IN] / [OUT] keys, focus the same object chosen in point 3b.
With a good fine focus, press the [OK] key.
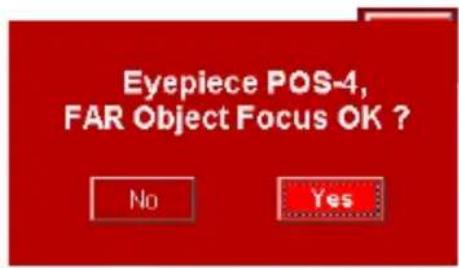
text_image
Eyepiece POS-4, FAR Object Focus OK ? No YesConfirm that you have well focused the FAR object of the eyepiece 4. Click [YES].
"We already know the focus coordinates for FAR objects"
In the ROTARION HAND CONTROL focus with the IN and OUT keys and briefly press MENU and accept the question EP4, FAR OK?
In the bottom line the F letter change to V indicating the VERY FAR object chosen in point 3c.

Now you must change to eyepiece-1 in PORT-1.
This window reminds us, and indicates that you must select the VERY FAR object (very

text_image
You Need To Go To Position 1 To Continue Training Now Over a VERY FAR Object OKdistant) chosen in point 3c. Click [OK].
4.3. VERY FAR Object
TRAINING VERY FAR Object
Using the eyepiece in position 1 and using the [IN] / [OUT] keys, focus the VERY FAR object chosen in 3c.

text_image
You Need To Go To Position 2 To Continue Training OKWith a good fine focus, press the [OK] key.

text_image
Eyepiece POS-1, VERY FAR Object Focus OK ? No YesConfirm that you have well focused the VERY FAR object of eyepiece-1. Click [YES].
A window appears that reminds us that you must change to the eyepiece 2 in PORT-2. Click [OK].
In the ROTARION HAND CONTROL focus with the IN and OUT keys and briefly press MENU and accept the question EP1, VFAR OK?

Change from eyepiece-1 to eyepiece-2 in PORT-2 using the (16) keys.
Using the eyepiece in position 2 and using the [IN] /

text_image
Eyepiece POS-2, VERY FAR Object Focus OK ? No Yes[OUT] keys, focus the same object chosen in point 3c.
With a good fine focus, press the [OK] key.

text_image
You Need To Go To Position 3 To Continue Training OKConfirm that you have well focused the VERY FAR object of the eyepiece 2. Click [YES].
A window appears that reminds us that you must change to the eyepiece 3 in PORT-3. Click [OK].
In the ROTARION HAND CONTROL focus with the IN and OUT keys and briefly press MENU and accept the question EP2, VFAR OK?
3
Change from eyepiece-2 to eyepiece-3 in PORT-3 using the (16) keys.
Using the eyepiece in position 3 and using the [IN] /
[OUT] keys, focus the same object chosen in point 3c.

text_image
Eyepiece POS-3, VERY FAR Object Focus OK ? No YesWith a good fine focus, press the [OK] key

Confirm that you have well focused the FAR object of the eyepiece 3. Click [YES].
A window appears that reminds us that you must change to the eyepiece 4 in PORT-4. Click [OK].
In the ROTARION HAND CONTROL focus with the IN and OUT keys and briefly press MENU and accept the question EP3, VFAR OK?

Change from
eyepiece-3 to
eyepiece-4 in PORT-4 using the (16) keys.
Using the eyepiece in position 3 and using the [IN] / [OUT] keys, focus the same object chosen in point 3c.
With a good fine focus, press the [OK] key

Confirm that you have well focused the VERY FAR object of the eyepiece 4. Click [YES].

text_image
You Need To Go To Position 4 To Continue Training OK"We already know the focus coordinates for VERY FAR objects"
In the ROTARION HAND CONTROL focus with the IN and OUT keys and briefly press MENU In the ROTARION HAND CONTROL focus with the IN and OUT keys and briefly press MENU and accept the question EP4, VFAR OK?
Appears TRAINING Is DONE. Training is over.
TRAINING Procedure is over!
You have successfully completed the TRAINING PROCEDURE, click [OK] to go to your ROTARION REMOTE CONTROL software MAIN SCREEN.
4.4. TRAINING completed
During the TRAINING procedure, you have entered in the memory of the ROTARION AUTOFOCUS the focus coordinates for objects NEAR, FAR and VERY far for each of the eyepieces in PORT-1 till PORT-4.
You can access these coordinates (30) of the [FOCUS OFFSETS] panel using the drop-down list (28).
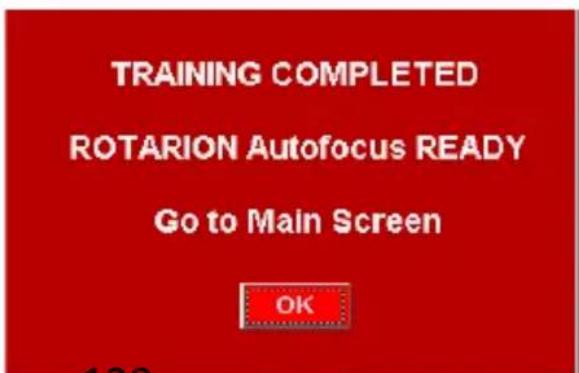
text_image
TRAINING COMPLETED ROTARION Autofocus READY Go to Main Screen OKNote: We can change these values if necessary or by experimentation. We recommend not to change the focus coordinates obtained by the TRAINING.
In the ROTARION HAND CONTROL we can access them through the option:
MENU 5. Focus Config Travel NEAR/FAST/VFAST
H-Ready for Observation
1. Observing an Object
Once the TRAINING is done you have the equipment ready for observation either for daytime terrestrial use or nighttime astronomy use, using only the ROTARION REMOTE CONTROL main screen with the ROTARION AUTOFOCUS mini panel activated (31).
When you select an object for observation, you first observe it with the eyepiece of smaller magnification and with the largest mm number, Eyepiece 1, situated at position PORT-1. Decide if the observed object is NEAR, FAR or VERYFAR (28) and use the number of steps indicated in the panel using the drop-down list so it equals the number in the counter “CURRENT POSITION” (25) as the initial focusing coordinate. Then you continue to fine-tune the focus to sharpen the image using always the [IN] or [OUT] keys or with the Auto Advance Keys (21).
Once the object in PORT-1, is in focus and centered, you are ready to change to eyepiece in position PORT-2
When you change to position PORT-2 (where you have a more powerful eyepiece, Eyepiece 2) the program calculates the focus coordinate for this eyepiece using mathematical algorithms. These algorithms use the values set during the TRAINING procedure. This way, the object will appear automatically focused or nearly focused.
If necessary, fine-tune the focus of PORT-2 lens using the [IN] or [OUT] keys or with the Auto Advance Keys (21). If the ROTARION
AUTOFOCUS algorithm focus proposal for the second eyepiece in PORT-2 needs user's fine focus improvement, may be due to changing atmospheric conditions, the ROTARION
AUTOFOCUS will memorize the new user's focus offset among PORT-1 and PORT-2 optics.
Similarly, when selecting position PORT-3 (where you have a higher-powered eyepiece, Eyepiece 3) the software calculates the focus coordinate for this third eyepiece using the value you have set for the Eyepiece 2 in PORT-2 and the focus values memorized during TRAINING.
The object will appear in the Eyepiece 3 visual field automatically focused or nearly focused. If necessary, again, fine-tune the focus. If you must fine focus the third eyepiece in PORT-3, the ROTARION AUTOFOCUS will memorize the new focus adjustment among PORT-2 and PORT-3.
Follow the previous procedure for your fourth position PORT-4 eyepiece or ROTARION PRIMEFOCUS kit (if installed).
After the fine focus of PORT-1 till PORT-4, you can return to a previous (lower power) eyepiece and the viewed object will be automatically focused, with the latest memorized fine focus offset.
In other words, once you have fine-tuned the focus from PORT-1 till PORT-4, you can change back and forth to any chosen eyepiece and your ROTARION AUTOFOCUS will produce precise and well-focused results.
Moreover, the ROTARION AUTOFOCUS system allows the user to modify slightly the fine-focus offset without erasing the previous memorized fine-focus coordinate. If the user's focus modification is large, the algorithm will propose a new focus coordinate for the following more powerful eyepieces.
As indicated previously, for this focusing process to work accurately, it is necessary to work with good quality mechanical focusers & motor focus systems. Although the ROTARION AUTOFOCUS can operate with DC motors, the best results are obtained with stepper motors and rack and pinion focusers.
2. Changing to a New Object
If you change the observed object for another object at a different distance, you must go to PORT-1 and focus again using the [IN] or [OUT] keys or with the Auto Advance Keys (21), so the system knows that you are observing a new object with new focus offsets and coordinates. After, you will have to go to PORT-2 and focus again if necessary. The ROTARION AUTOFOCUS will erase the previous memorized fine-focus offsets from the previously viewed object and will calculate new ones for the new viewed object.
As you change from eyepiece in PORT-1 to the PORT-2 and so on, you may have to fine-focus and center the currently viewed object before changing to the next eyepiece so the ROTARION AUTOFOCUS memorizes the new fine-focus offsets and focus coordinates among PORT-1 till PORT-4.
3. Resetting the Focuser
If you accidentally or manually move the focuser without using the IN or OUT keys or without the Auto Advance Keys (21), the ROTARION AUTOFOCUS coordinate will not match the mechanical focus coordinates of your focuser
and the ROTARION AUTOFOCUS will not work properly.
Therefore, you must synchronize again your focuser position with the ROTARION AUTOFOCUS coordinate displayed in the CURRENT POSITION counter (25).
Go to PORT-1, select an object you chose during TRAINING and focus it, or move your focuser to max inward coordinate (0) and press the key RESET POSITION (43) found in the SETUP>CONFIG screen.
See in this manual Chapter E- Config Screen, section Selector ResetPos (42) and section Reset Position (43) and follow the procedure.
I-Additional Product Information
Please read the following instructions and information.
1. Product Compliance Information
The AstronSCIENTIFIC S.L. corporation with address at Marti i Julia 6-8, Barcelona 08834 Spain E.U. has certified this product with the IEC 61010-1 Norm for Safety requirements for electrical equipment for measurement, control, and laboratory use in compliance with the Bureau Veritas Consumer Products Services Germany GmbH corporation based at Türkheim, Germany.
If the equipment is used in a manner not specified by the manufacturer, the protection provided by the equipment may be impaired.
• The CE Certificate Product Marking:

text_image
AstronSCIENTIFIC s.L. ROTARIÓN AUTO FOCUS CE MADE IN BARCELONA - SPAIN - EU PATENTED EU & USA Martí Julià 6-8, 6a 08034 BARCELONA - Spain - E.U. CAUTION! MOVING PARTS!- Instruction Manual Version: Rotarion AutoFocus V:1.0 CE
2. Service, Maintenance, Cleaning, Disposal, Serial Number, and Dealer:
Car adapter fuse:
• 4 Amp 12V 6.3x32mm, fast acting.
- To replace it, unscrew the tip and replace.
Operating environmental conditions:
- Max. 2000m. / 0-40 °C / 32-104 Fahrenheit and 80% humidity.
Degree of Protection IEC 60529:
- Not applicable.
The Power Supply:
- Input: 100-240Vac; 50/60Hz; 0,55A
Output: 12Vdc; 2A; Limited Power Source
- Disconnect the Power Supply unit from the ROTARION. The Power Supply unit must be freely accessible and must not be covered nor obstructed for disconnecting the ROTARION when needed.
- Only use the supplied Power Supply unit.
- Please compare the rating plate of the Power supply unit with the local mains voltage and frequency.
Maintenance technical data:
- Maintenance free.
Cleaning:
- Use a soft cloth without liquids.
Disposal:
•
- Equipment with this symbol shall not be disposed of together with household or commercial waste.
- Please find out about separate disposal at your regional offices.
- The directive 2012/19/EU on waste electrical and electronical equipment (WEEE) is applicable in the European Union member states.
Serial Number (or PN): ____
Dealer:
Date:
J-Warranty
The warranty is extended to all countries where this product is distributed by AstronSCIENTIFIC S.L. or by a distributor assigned by it. This warranty is subject to the legal provisions of each country.
6. Warranty period
The Warranty period is 2 years from the date of the sales invoice issued by AstronSCIENTIFIC S.L. Or by the distributor authorized by
AstronSCIENTIFIC S.L.
7. Warranty Coverage
The conformity of the product is warranted according to the use for which it is intended.
Within the warranty period, we will remedy any defect in the operation of the product due to its manufacture, whether repairing, replacing parts or providing a new product, provided that the option chosen is feasible and not economically disproportionate according to the criteria of AstronSCIENTIFIC S.L.
For any of the three options, repair, replacement of parts or exchange for a new product, the consumer must go to the authorized distributor of AstronSCIENTIFIC S.L. where the product was purchased.
8. Warranty Nullity
This warranty will not be valid in the following cases:
Misuse, improper use, neglect, accident, or deterioration of the product due to failure to comply with the warnings and restrictions contained in this Instruction Manual or in the operating instructions provided by AstronSCIENTIFIC S.L.
External agents such as water or other harmful chemicals, obstructive or corrosive.
Likewise, faults or malfunctions caused by incorrect voltages and electrical installations will not be covered by this guarantee.
This warranty does not cover any product that has been altered or repaired by any person other than AstronSCIENTIFIC S.L. repair personnel, or any product whose serial number, model number or identification has been removed, is defective or altered.
AstronSCIENTIFIC S.L. Shall not be liable for any indirect, special, incidental, or consequential damages related to the sale or use of the product.