YM-410F - Musical instrument YAMAHA - Free user manual and instructions
Find the device manual for free YM-410F YAMAHA in PDF.

User questions about YM-410F YAMAHA
0 question about this device. Answer the ones you know or ask your own.
Ask a new question about this device
Download the instructions for your Musical instrument in PDF format for free! Find your manual YM-410F - YAMAHA and take your electronic device back in hand. On this page are published all the documents necessary for the use of your device. YM-410F by YAMAHA.
USER MANUAL YM-410F YAMAHA
Make sure to read the "Safety Precautions" on page 22 and the "PRECAUTIONS" on page 23.
Using the Concert Marimba Safely
The concert marimba is a large and heavy instrument that gets used in various places by persons of all ages, so please obey the following instructions regarding their regular care and placement.
Especially in the case of children, a responsible adult should provide proper instruction on
how to use and treat the marimba before use.
Preventing Injuries—Make sure that all precautions described below are obeyed—

Icons are used in this section to promote the safe use of this product, and to prevent you and others from harm and property damage. Please fully understand the meaning of the icons before reading the manual.

This icon urges you to pay caution (includes dangers and warnings).
This icon indicates actions that are prohibited.

For example: Do not disassemble.
This icon indicates special instructions that should be strictly followed.
 Warning Disregard of the warnings with this mark or misuse may result in death or personal injury. Warning Disregard of the warnings with this mark or misuse may result in death or personal injury. | |
 Before you use the concert marimba, carefully read the instructions listed below and the owner's manual. Before you use the concert marimba, carefully read the instructions listed below and the owner's manual. | |
| Cautions when setting the instrument. | |
 Never place the instrument on an sloping, unstable, etc., platform. The instrument may fall or overturn and result in injury. Never place the instrument on an sloping, unstable, etc., platform. The instrument may fall or overturn and result in injury. | |
| Cautions for treatment of the instrument. | |
 Never lean on or climb onto the instrument. The instrument may fall and result in injury. Never lean on or climb onto the instrument. The instrument may fall and result in injury. | |
| Do not play or roughhouse around the instrument. Bumping into the instrument may result in injury. It may also cause instrument may also fall over. Keep children away from the instrument. | |
 If an earthquake occurs, strong shocks caused by the earthquake may overturn the instrument or cause it to move about. Stay away from the instrument during earthquakes. If an earthquake occurs, strong shocks caused by the earthquake may overturn the instrument or cause it to move about. Stay away from the instrument during earthquakes. | |
| Cautions when moving the instrument. | |
 When moving the instrument on its casters, only move across smooth, flat surfaces. Hold the instrument by its frame end and push forward slowly. When moving the instrument on its casters. 1. Avoid moving the instrument across surfaces that are sloped, uneven, or graveled. The concert marimba can collapse and/or get out of control. 2. Do not run with the instrument. The instrument may become impossible to stop, crash into a wall, and cause serious injury. 3. If the instrument must be lifted, do so with at least two (2) persons. Lift the instrument by its frame ends using both hands. Holding the rail section can result in the instrument dropping or falling off. Never hold the instrument anywhere other than the frame ends.* Approximate weights for concert marimbas are given in the following chart. When moving the instrument on its casters, only move across smooth, flat surfaces. Hold the instrument by its frame end and push forward slowly. When moving the instrument on its casters. 1. Avoid moving the instrument across surfaces that are sloped, uneven, or graveled. The concert marimba can collapse and/or get out of control. 2. Do not run with the instrument. The instrument may become impossible to stop, crash into a wall, and cause serious injury. 3. If the instrument must be lifted, do so with at least two (2) persons. Lift the instrument by its frame ends using both hands. Holding the rail section can result in the instrument dropping or falling off. Never hold the instrument anywhere other than the frame ends.* Approximate weights for concert marimbas are given in the following chart. | |
| YM-41 41 kg (90 lbs 6 oz) YM-410 49 kg (108 lbs) YM-460/2400R 55 kg (121 lbs 4 oz) | |
| YM-46 44 kg (97 lbs) YM-410F 55 kg (121 lbs 4 oz) YM-460F/2400 61 kg (134 lbs 8 oz) | |
| YM-410D 55 kg (121 lbs 4 oz) | |
 Moving the instrument up or down stairs should never be done with the instrument assembled. Doing so is a danger as parts can fall off, or you can loose balance causing the instrument to fall over. Only move the instrument after it has been disassembled. Moving the instrument up or down stairs should never be done with the instrument assembled. Doing so is a danger as parts can fall off, or you can loose balance causing the instrument to fall over. Only move the instrument after it has been disassembled. | |
Warning
Disregard of the warnings with this mark or misuse may result in death or personal injury.
Cautions when setting the instrument.
Cautions for treatment of the instrument.
Cautions when moving the instrument.
| YM-41 41 kg (90 lbs 6 oz) YM-410 49 kg (108 lbs) YM-460/2400R 55 kg (121 lbs 4 oz) |
| YM-46 44 kg (97 lbs) YM-410F 55 kg (121 lbs 4 oz) YM-460F/2400 61 kg (134 lbs 8 oz) |
| YM-410D 55 kg (121 lbs 4 oz) |
 Caution Caution | Injury or handicaps to persons caused by the disregard of warnings with this mark or, misuse of the instrument, may result in the loss of personal property. |
| Please change cracked tone bars as soon as possible. Cracked tone bars have sharp edges that can cut hands. | |
| If the instrument is often moved, bolts, parts, etc., may become loose. After moving the instrument, check and make sure all bolts, parts, etc., are firmly fastened. Firmly tighten all loose items. | |
| Do not use the hammer for anything other than playing the instrument. It may be the cause of injury or accidents. Do not let children strike other, etc., with the mallet. Do not allow such dangerous behavior to take place. | |
| When assembling, be careful not to pinch your fingers or hands. Take special care when assembling rails and resonator pipes. Two persons should carry out this part of the assembly, double-checking as the assembly proceeds. |
PRECAUTIONS
Please read the following instructions carefully before using your marimbas.
◆ Installation Location
Use or storage in the following locations may cause damage, even when packaged.
- In direct sunlight, such as near a window, or in a closed vehicle in daytime.
- Near heating devices or in other locations subject to excessive heat.
• In excessively cold environment.
• In places with excessive humidity or dust.
• Locations subject to vibrations.
◆ Maintenance
- The tone bars should be polished from time to using a soft and dry cloth or silicone cloth. Stains that cannot be removed with a dry cloth may be wiped off using a small amount of ethyl alcohol. Never use thinner or benzene or a wet cloth for cleaning purplses.
◆ Keep This Manual for Future Reference
- After reading, make sure to keep the manual in a safe place.
Handling
- Never place an object on or lean against the instru-
ment, as this may cause damage to the tone bars and frame parts or topple the instrument, which is extremely dangerous. - Do not use hand orchestra bell mallets or other hard objects on your marimbas. The resulting dents or scratches in the tone bars could impair the sound. (Wood tone bars)
Also avoid hitting the tone bars hard with a hard mallet. The tone bars can crack. (Acoustalon tone bars)
◆ Moving and Transporting the Instrument
- Before moving the instrument, make sure that the caster brakes are released. Also make sure to lift the instrument slightly when moving over rough surfaces.
- When the instrument must be transported to a ferent location, disassemble it to the same state as when it was purchased (see page 26), taking care to pack each component properly. Disassembly steps are in the opposite order of assembly.
◆ When Not in Use
• Always engage the caster brakes.

Assembly Cautions
- When assembling/disassembling the instrument, do so with at least two persons and follow the instructions outlined in this manual. Assembly in the wrong order can cause the pipes to drop which may result in an injury, impair the performance functionality of the instrument or cause noise.
- Adjusting the playing height (see page 32) on the YM-410/410F/460/460F/2400/2400R
should be done with at least two persons.
dif-
- After final adjustment of the legs the fixing screws must be tightened securely to prevent loosening. Looseness may cause the instrument to shift during performance and can also cause noise and other problems. Retighten the screws from time to time.
Thank you for purchasing a YAMAHA concert marimbas.
Exhaustive research by Yamaha technicians and craftsmen focusing on tone quality and playability, has led to the design and creation of these marimbas, using select, high quality materials, and Yamaha's original FRP Acoustalon. We are convinced that you will enjoy playing your instrument that produces spreading and yet deep sounds as well as rich volume to your content.
This manual describes proper use of YAMAHA concert marimbas. Please read it thoroughly to ensure that your instrument will give you enjoyment for a long time.
Yamaha Concert Marimba Features
1. High-Quality Tone Bars
Tone bars are made of rosewood, which delivers an ideal marimba tone and timbre, and African padauk, which offers a rich sound that is soft and deep. After allowing the woods to dry naturally over time, only the finest select pieces are selected for use in making the tone bars.
Type F models use Yamaha's FRP Acoustalon tone bars that have a unique semi-hollow design. These bars deliver a clear sound that is extremely close to the sound produced by high-quality rosewood. It offers excellent projection, and full volume. Compared to wood tone bars, Acoustalon is highly weather resistant, being little affected by changes in temperature and humidity, which can alter the pitch.
2. Fine Tuning
Tone bars are tuned by the highly refined ears and skills of our technicians and precision strobe tuners in an environmentally controlled room in which both temperature and humidity are kept constant. Precise tuning of the harmonic overtones, which determine timbre, results in stable pitch and tone without any unevenness.
3. Easy Assembly/Disassembly
The instrument is designed to offer easy assembly and disassembly to provide convenient storing and transport. The YM-460/460F/410D/46/2400/2400R utilize folding designs with two-section frames and pipes to provide the utmost in compact convenience.
4. Height Adjustment
(YM-460/460F/410/410F/2400/2400R)
Height adjustable models offer smooth height adjustment. Locking screws fit into channels on leg pipes to eliminate slippage ad looseness.
The YM-460/460F/2400/2400R offers a 5-step height adjustment that goes from 89cm at its lowest position, to 97cm at its highest. Since the YM-410/410F is adjustable in 7-steps, from 76cm to 88cm, it promotes proper playing posture from children to adults.
5. Large Casters
Large 100mm-diameter casters offer smoother transport. (YM-46 and 41 utilize 75mm-diameter casters).
6. 3-Step Height Adjustment for Resonator Pipes
Resonator height can be adjusted in 3-steps to avoid loss of ideal resonance due to temperature changes. (The YM-41 only provides 2-step adjustment.)
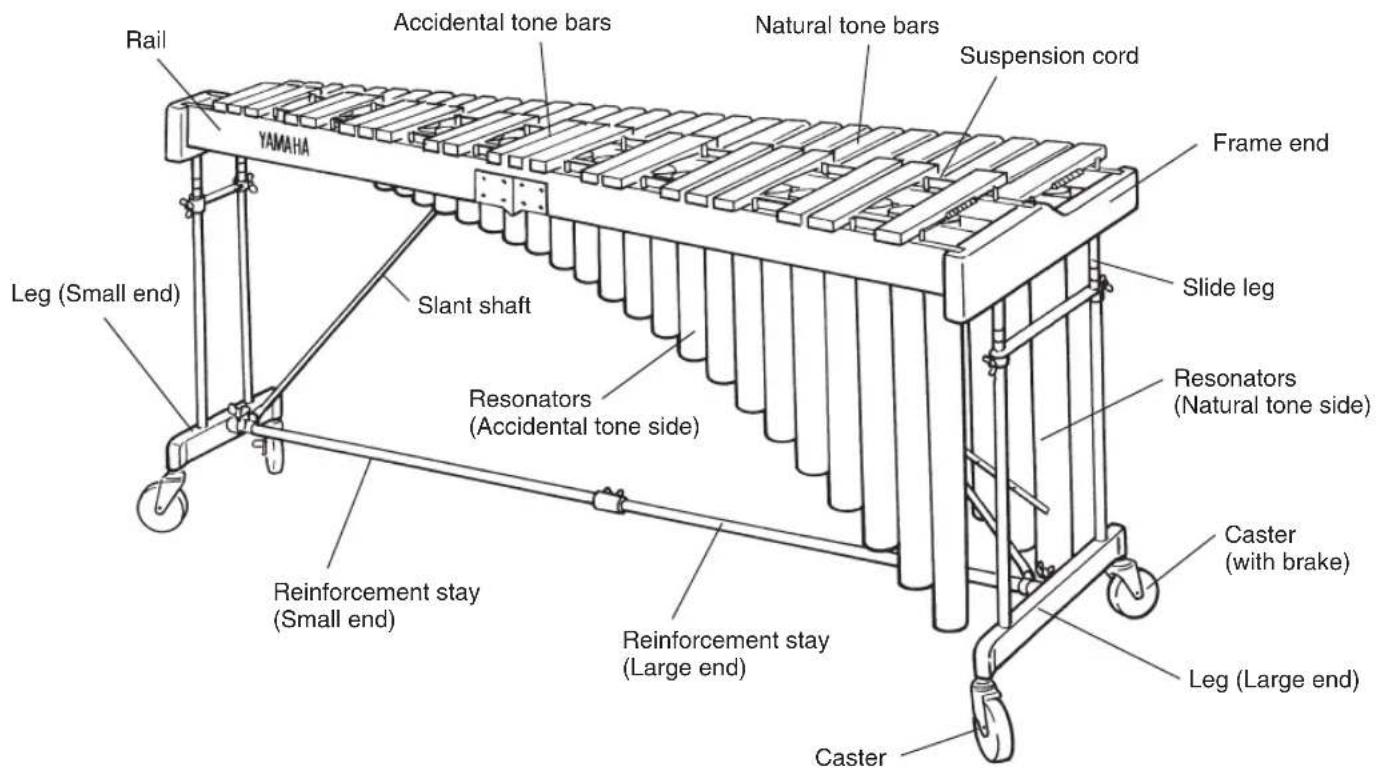
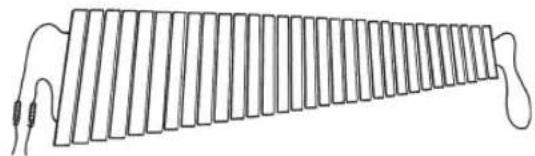
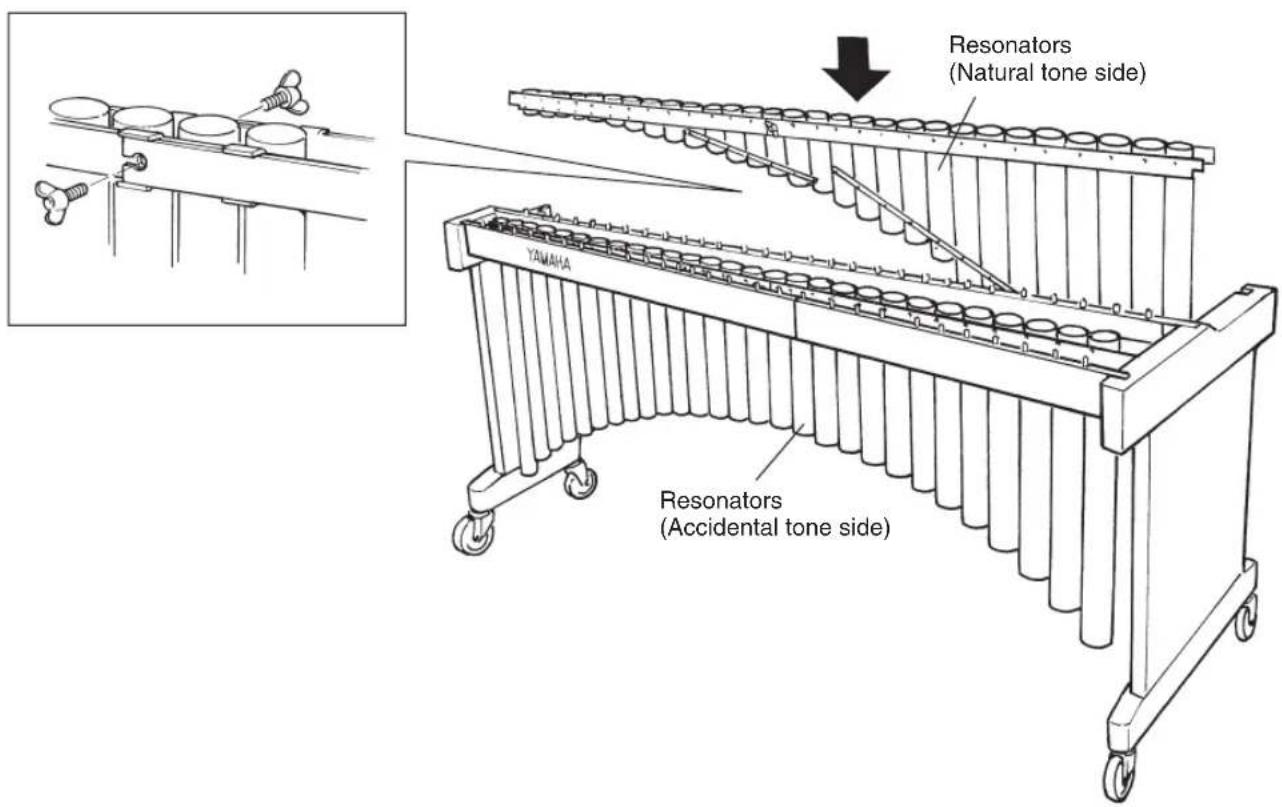
■ YM-460/460F/410/410F/46/41/2400/2400R
* The illustration shows model YM-460.
text_image
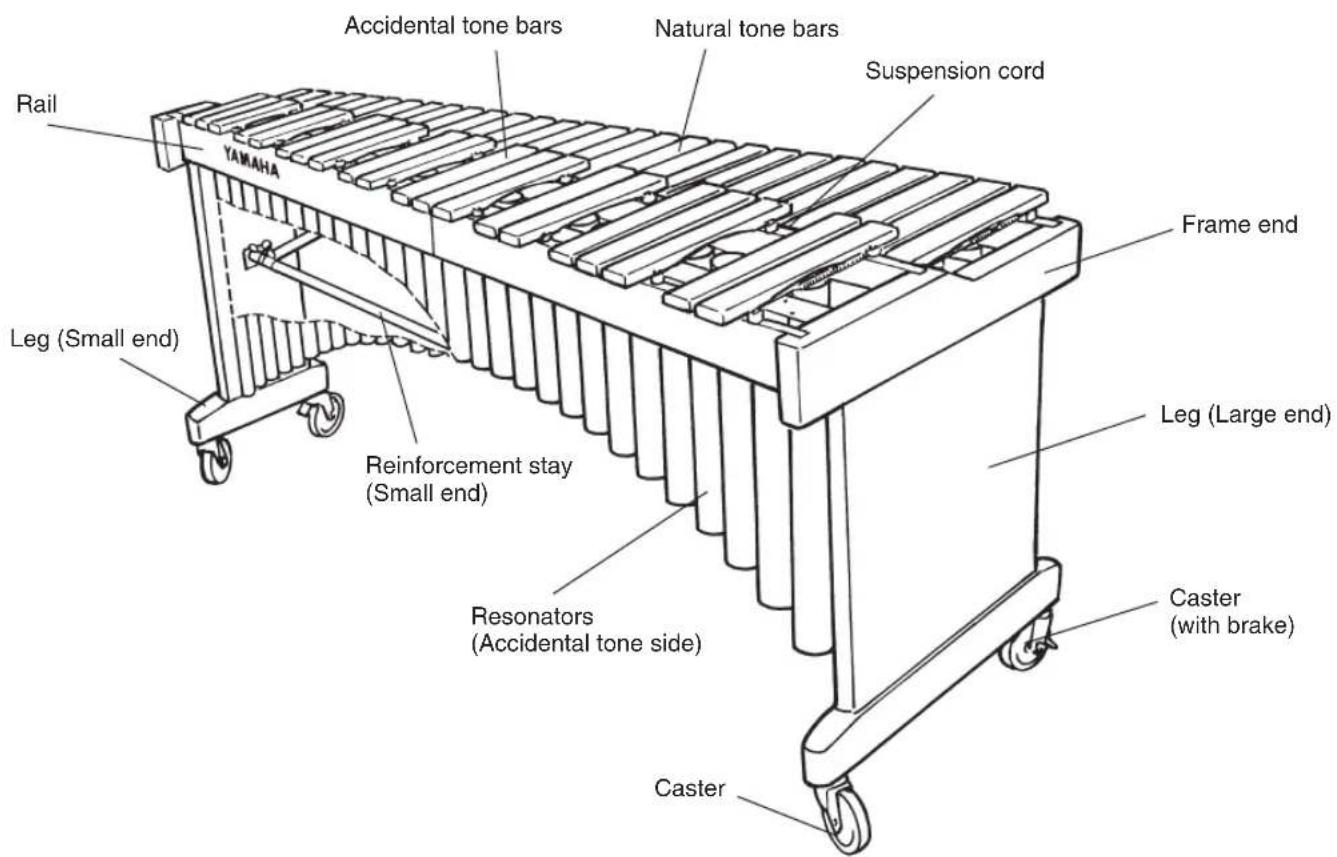
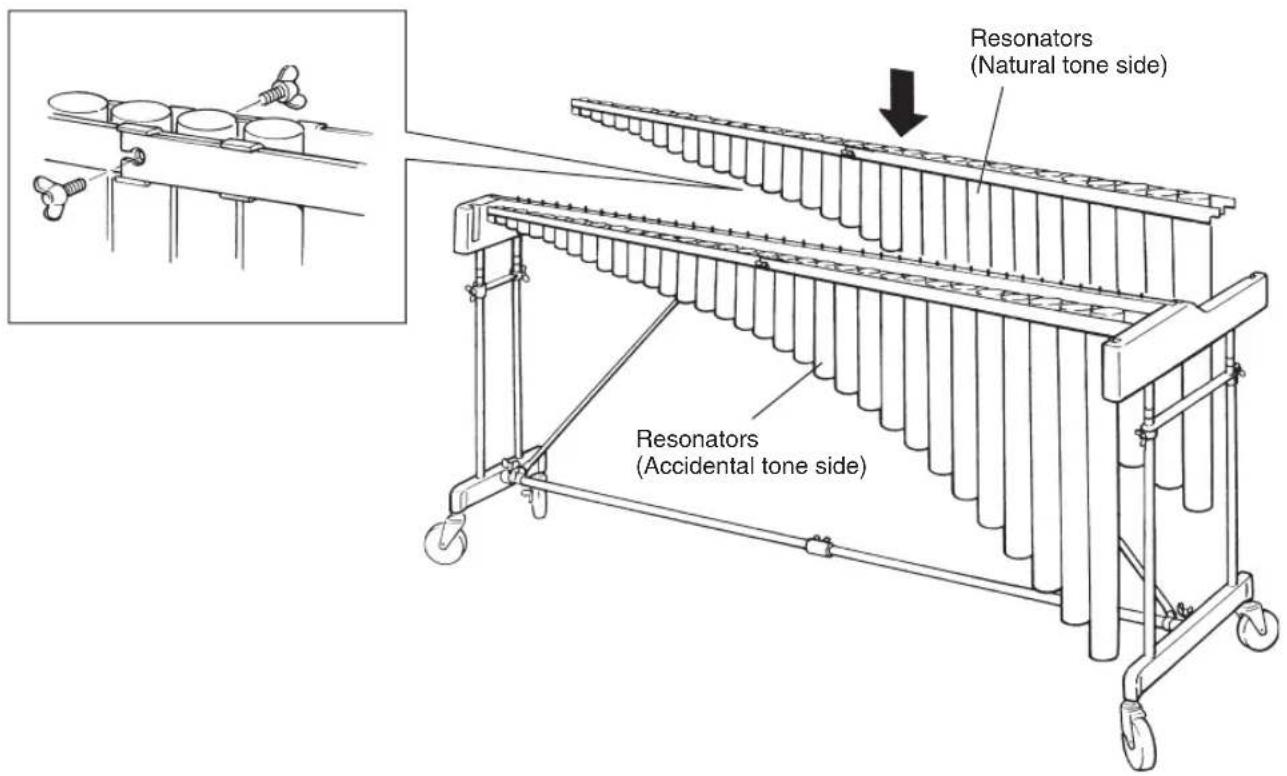
Rail YAMAHA Accidental tone bars Natural tone bars Suspension cord Frame end Slide leg Leg (Small end) Slant shaft Resonators (Accidental tone side) Caster (with brake) Leg (Large end) Reinforcement stay (Small end) Reinforcement stay (Large end) CasterYM-410D
text_image
Rail YAMAHA Accidental tone bars Natural tone bars Suspension cord Frame end Leg (Small end) Reinforcement stay (Small end) Resonators (Accidental tone side) Caster Caster (with brake) CasterThe shipping carton of your marimba should contain the parts shown below. Before assembling the instrument, confirm that all parts are included as listed.
* In the event that a part is missing, please contact the shop where the instrument was purchased.
① Natural tone bars
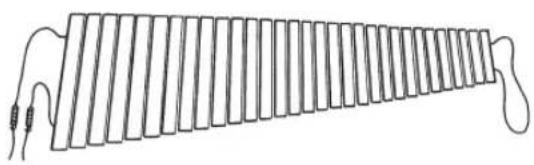
natural_image
Diagram of a coiled spring with two wires attached (no text or symbols)② Accidental tone bars

natural_image
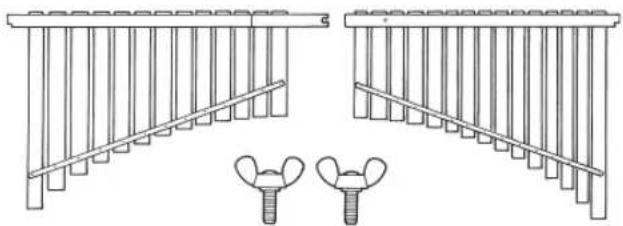
Diagram of a multi-layered cylindrical structure with curved ends, resembling a mechanical or electrical component (no text or symbols)③ Resonators (Natural tone side)
YM-460/460F/410/410F/46/2400/2400R:
2 sections plus wing bolts x2
YM-41: One-piece type
natural_image
Technical line drawing of a mechanical component with flanges and two separate views (no text or symbols)④ Resonators (Accidental tone side)
YM-460/460F/410/410F/46/2400/2400R:
2 sections plus wing bolts x2
YM-41: One-piece type

natural_image
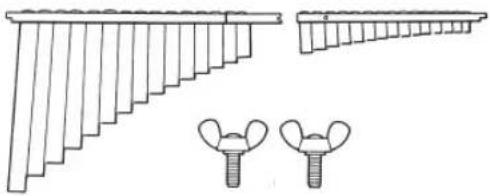
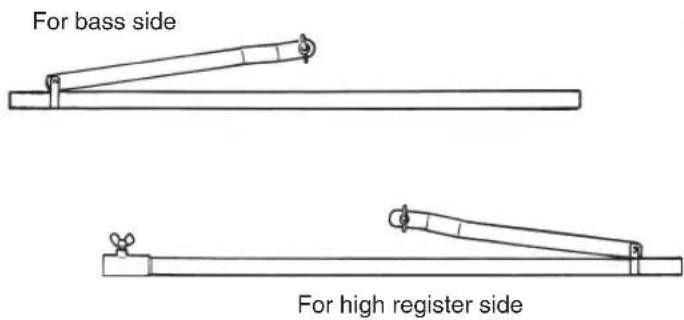
Technical line drawing of a staircase with railings and two separate views of a support structure (no text or symbols)⑤ Reinforcement stay
YM-460/460F/46/2400/2400R: 2 sections
YM-410/410F/41: One-piece type
(YM-460/460F/2400/2400R)
For bass side

natural_image
Technical line drawing of three mechanical arms with no text or symbolsFor high register side
(YM-460/460F/2400/2400R)
YM-460/460F/46/2400/2400R: Two-section folding type
YM-410/410F/41: One-piece type
⑥ Rail (1)

⑦ Rail (2)
YM-460/460F/46/2400/2400R: Two-section folding type
YM-410/410F/41: One-piece type
text_image
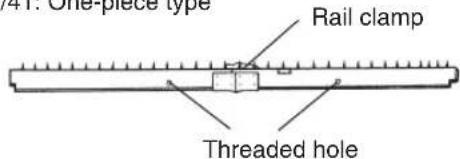
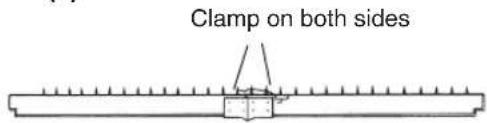
41. One-piece type Rail clamp Threaded hole⑧ Rail (3)
YM-460/460F/46/2400/2400R: Two-section folding type
YM-410/410F/41: One-piece type

text_image
Clamp on both sides⑨ Rail (4)
YM-460/460F/46/2400/2400R: Two-section folding type
YM-410/410F/41: One-piece type

text_image
YAMAHA YAMAHA logo⑩ Leg (Large end)
YM-460/460F/410/410F/2400/2400R:
With height adjustment
YM-46/41:
Without height adjustment
natural_image
Line drawing of a four-wheel cart with handle and wheels (no text or symbols)⑪ Leg (Small end)
YM-460/460F/410/410F/2400/2400R:
With height adjustment
YM-46/41:
Without height adjustment

natural_image
Line drawing of a mechanical lift or cart with wheels and handle (no text or symbols)For safety, the instrument should be assembled by at least two persons in a location with sufficient space.
We recommend to you to assemble the instrument on a soft rug or carpet.
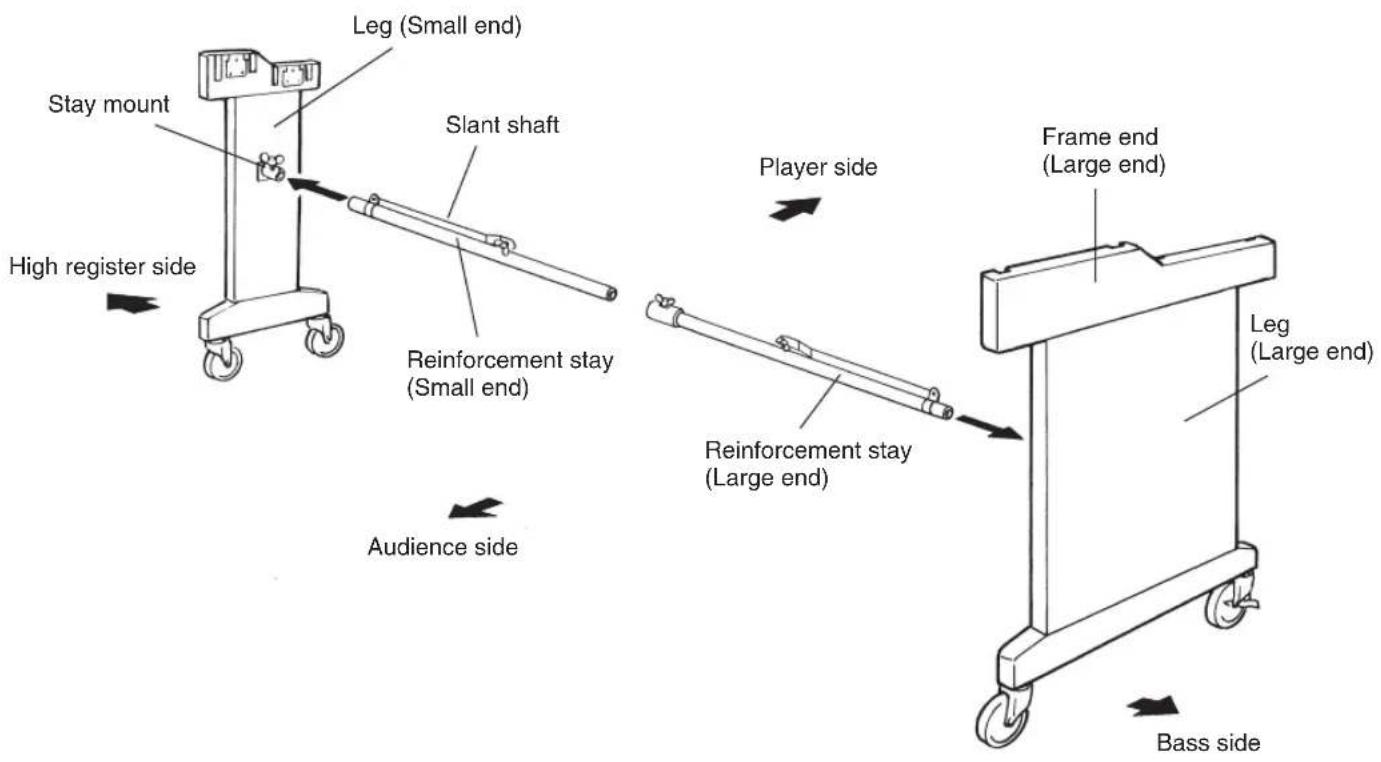
1 Connect the large and the small end legs using the reinforcement stays.
* YM-460/460F/410/410F/2400/2400R: Before proceeding to the next step, make sure that the slide leg fixing bolts of the large and small end legs are securely fastened.

text_image
The tip of each slide leg fixing bolt must be tightly seated in one of the slide leg notches. Slide leg Slide leg fixing bolt Leg (Large end) Leg (Small end) Slide leg fixing bolt Slide leg fixing bolt Slide leg fixing bolt1-1. Place the large and small end legs and reinforcement stays so that they will be positioned as illustrated below after assembly.
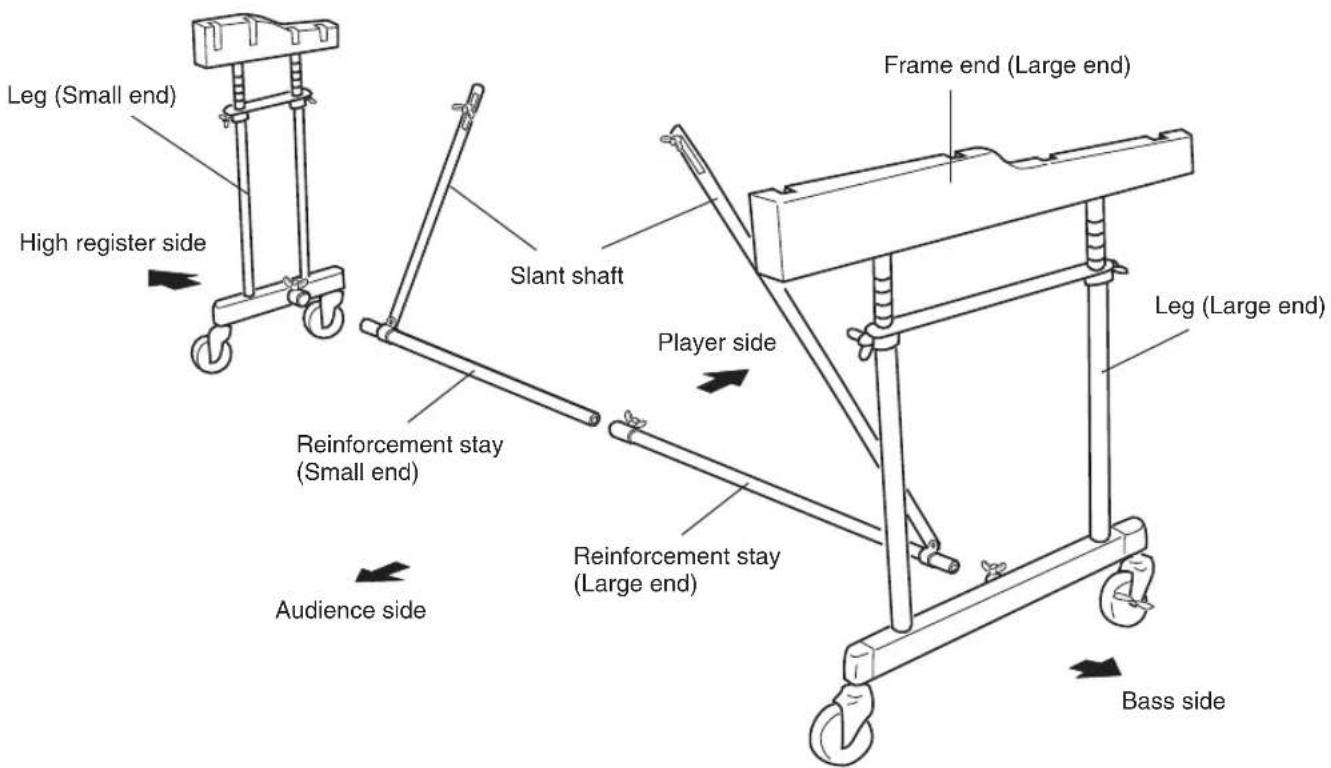
text_image
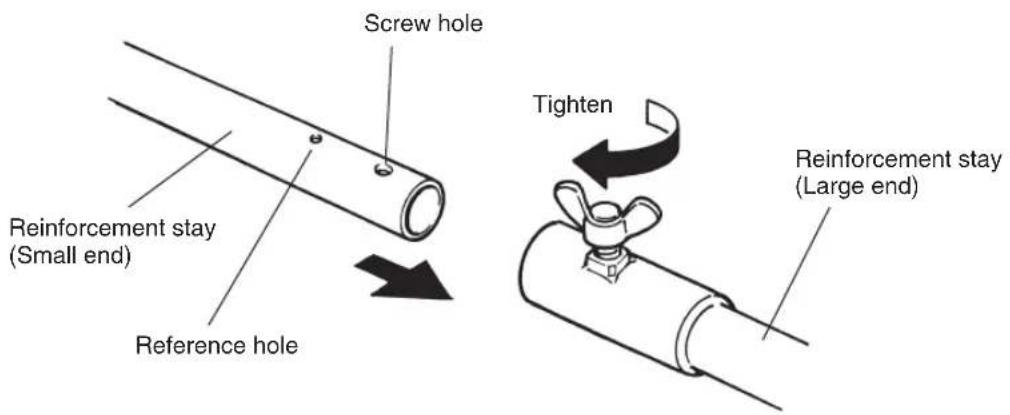
Leg (Small end) High register side Slant shaft Player side Reinforcement stay (Small end) Reinforcement stay (Large end) Audience side Frame end (Large end) Leg (Large end) Bass side1-2. YM-460/460F/46/2400/2400R: Connect the reinforcement stays at the center. Align the end of the fixing bolt and the holes in the reinforcement stays and tighten the fixing bolt securely.
* Insert the support using the reference hole close to the hole for the screw as a guide.

text_image
Reinforcement stay (Large end) Screw hole Reference hole Reinforcement stay (Small end)1-3. Insert the reinforcement stay with its notch facing up into the lower joint of the large end leg as far as it will go (aligning the notch with the fixing bolt) and tighten the fixing bolt securely.
(A mark "E" is printed on the reinforcement stay and the large end joint.)
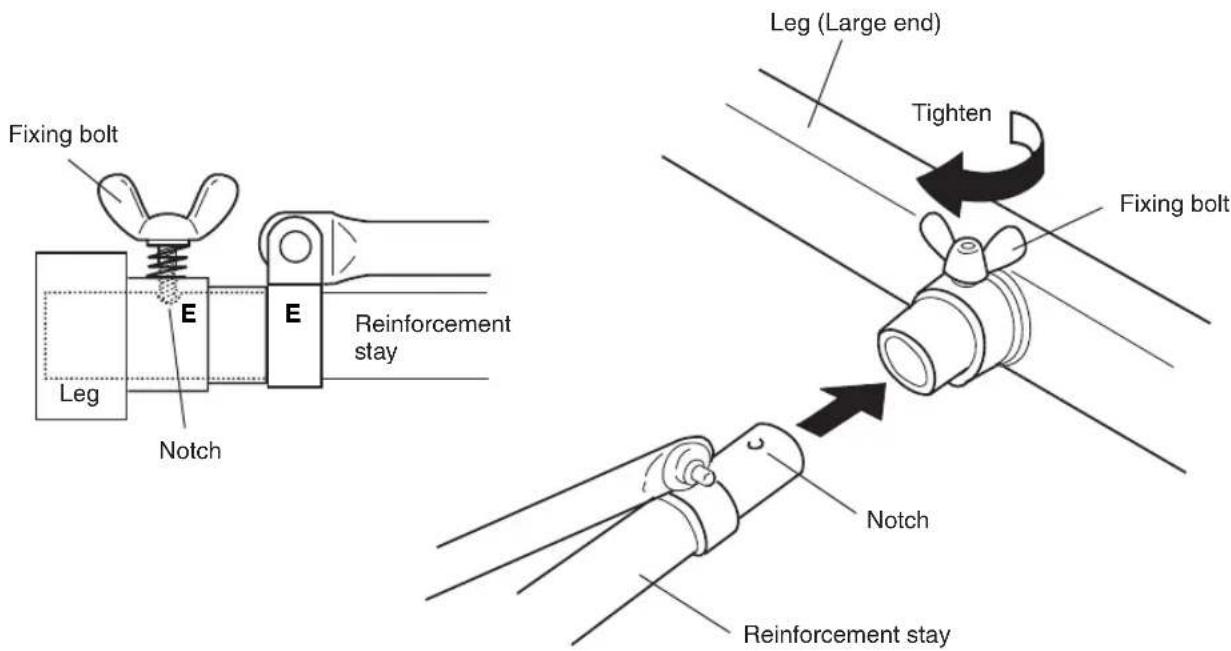
text_image
Fixing bolt Leg Notch E E Reinforcement stay Leg (Large end) Tighten Fixing bolt Notch Reinforcement stay1-4. In the same way, install the reinforcement stay to the small end leg.
(There is no marking on the small end joint.)
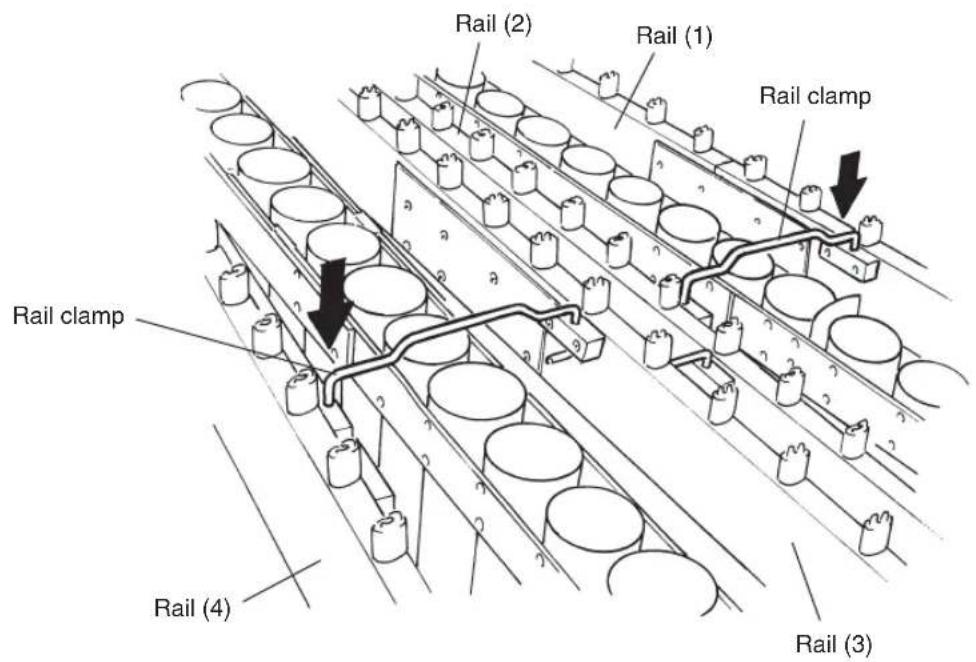
2 Insert the rails (2) and (3) into the frame ends of the legs.
2-1. First, insert the rail (2). Make sure that the end of the rail with the tone bar posts spaced further apart is positioned on the bass side.
A mark "B" is printed on the large end face of the rail (2) and the groove section of the frame end of the large end leg.
* Do not insert one side of the rail all the way down first, but push both sides into grooves alternately little by little until both sides are inserted fully and stop.
Tone bar height can be adjusted at this point. (Refer to 6 on page 32.)

text_image
Rail (4): With YAMAHA logo. Logo side facing the audience. (3): Both sides have clamps attached. The side with the shorter clamp should face the player. (2): Hole for attaching the stay. The side with the threaded hole should face the audience. Tone bar posts High register side YAMAHA A B C D Player side Frame end Bass side Audience side2-2. After confirming that legs on the left and right sides are vertical, use the screw to connect the end of the stay to the hole for attaching the stay in the long frame (2) and firmly tighten the screw.
* The YM-410 and 410F have two (2) holes. When leg height is set low, use the hole closer to the center of the instrument, and when the leg height is high, use the outer hole and tighten the screw firmly.
2-3. Next, in the same way, insert the rail (3) securely.
A mark "C" is printed on the large end face of the rail (3) and the groove section of the frame end of the large end leg.
2-4. Engage the short rail clamp located at the center of the rail (3) with the rail (2).
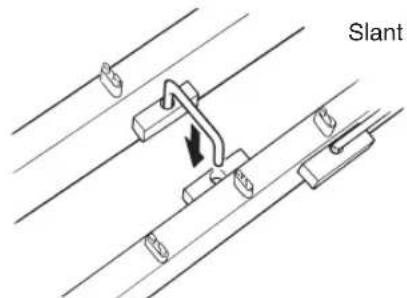
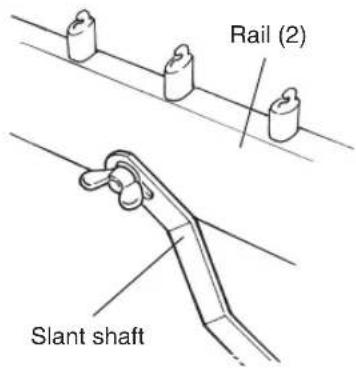
text_image
Slant
text_image
Rail (2) Slant shaft3 Attach the resonators.
3-1. Assemble the resonator pipes of the YM-460/460F/410/410F/46/2400/2400R. Make sure that the natural tone and accidental tone sides are properly assembled. All pipes on the natural tone side have bottoms attached.
3-2. Insert the resonators into the resonator holders on the frame ends in the same way as the rails. Place the bass side of the resonators into the center grooves on the resonator holder.
* Make sure not to confuse the natural tone resonators and accidental tone resonators.
* Take care not to bump the resonators against the legs, etc.
text_image
Resonators (Natural tone side) Resonators (Accidental tone side)* The resonators are factory adjusted so that the optimum resonance level is obtained at 23°C (73.4°F) If desirable resonance is not available due to the temperature lower or higher than 23°C (73.4°F), adjust setting of the resonators. Move the resonators to fit into shorter grooves when the temperature is higher and into longer grooves when the temperature is lower.
| Temperature Grooves to use |
| Higher Short groove (“A” in the figure below)Around 23°C (73.4°F) Center groove (“B”)Lower Long groove (“C”) |

text_image
Resonator holder
text_image
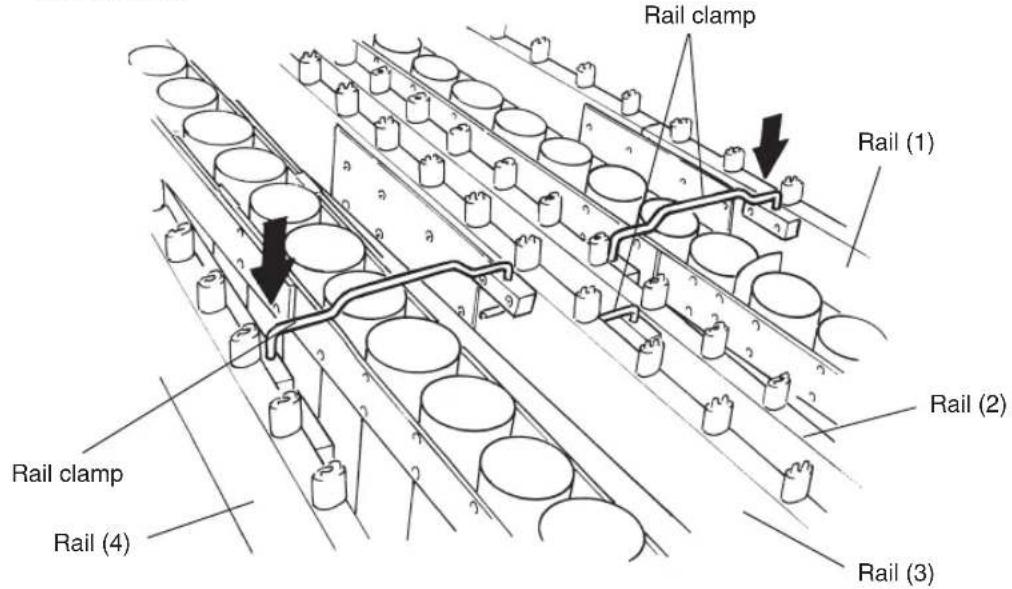
A : For a higher temperature B : For a temperature around 23°C (73.4°F) C : For a lower temperature4 Insert the rails (1) and (4) into the frame ends of the legs.
4-1. Insert the outer rails (1) and (4) in the same way as the inner rails (2) and (3).
A mark "A" is printed on the large end face of the rail (1) and the groove section of the frame end of the large end leg, and a mark "D" for the rail (4).
5 Set the tone bars.
5-1. While adjusting the long frame, engage the rail clamp on rail (2) and rail (3) with rail (1) and rail (4), respectively.
text_image
Rail (2) Rail (1) Rail clamp Rail clamp Rail (4) Rail (3)5-2. Set the natural tone bars first.
With one person holding the suspension cords on the bass side and the other holding the suspension cords on the treble side securely with both hands, gently place the tone bars on the rails.
Align each tone bar individually and hook its cord onto the corresponding tone bar post.
After confirming that the cord is secured to every tone bar post, fix the tone bars by pulling the right and left cords forward from the large end side and hooking the two springs into each other.
* When setting the tone bars, use care not to cause any damage to them.

text_image
Small end Suspension cord Large end Suspension cord SpringsYM-460/460F/410/410F/2400/2400R Only
6 Adjust the height of the tone bars.
Make sure that this procedure is performed by at least two persons.
Reverse the assembly procedure going from steps 5 → 4 → 3 and remove the resonators and the stay fixing bolts attached to the rail section (2) so that the stays can be moved.
With two persons, hold the instrument under the frame on both bass and treble sides, and loosen the wing screws that lock the slide legs in place.
After determining the desired height, tighten the wing bolts so they fit into the channels on the slide legs firmly fixing the legs in place. Use the next channel above as a guide to make sure the tone bars are parallel with the floor.
Upon completion of assembly, check to make sure that each bolt is tightened securely.
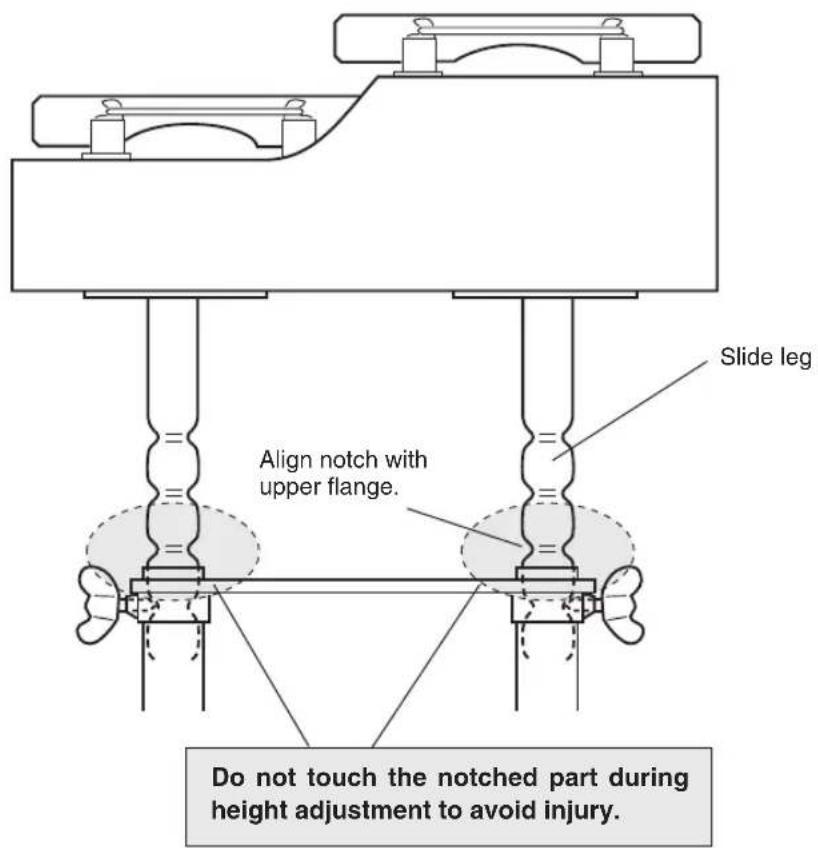
text_image
Slide leg Align notch with upper flange. Do not touch the notched part during height adjustment to avoid injury.When a slide leg fixing bolt is tightened in between two notches, there is a danger of the slide leg slipping. Always make sure that the slide legs are held securely.
* Never attempt to adjust the height with the tone bars in place. It is very dangerous. Always make sure that those parts are removed as described in the procedure above before adjusting the height.
The shipping carton of your marimba should contain the parts shown below. Before assembling the instrument, confirm that all parts are included as listed.
* In the event that a part is missing, please contact the shop where the instrument was purchased.
① Natural tone bars
natural_image
Pure diagram of a coiled spring with no text, numbers, or symbols② Accidental tone bars

natural_image
Diagram of a coiled structure with two wires attached, no text or symbols present③ Resonators (Natural tone side)

natural_image
Technical line drawing of three structural components with fluted bases and two separate views (no text or symbols)④ Resonators (Accidental tone side)
natural_image
Technical line drawing of two vertical structural beams with support columns and two separate inset diagrams showing mechanical components (no text or symbols)⑤ Reinforcement stay
text_image
For bass side For high register side⑥ Rail (1)

⑦ Rail (2)

text_image
Rail clamp Threaded hole⑧ Rail (3)
text_image
Clamp on both sides⑨ Rail (4)

text_image
YAMAHA YAMAHA logo⑩ Leg (Large end)

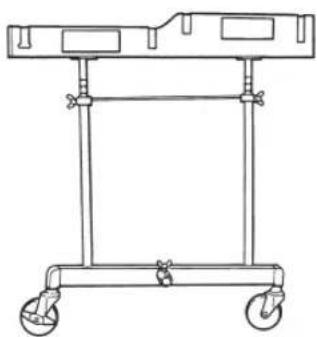
natural_image
Line drawing of a four-wheel cart with a handle and wheels (no text or symbols)⑪ Leg (Small end)
natural_image
Line drawing of a mechanical cart with wheels and a handle (no text or symbols)For safety, the instrument should be assembled by at least two persons in a location with sufficient space.
We recommend to you to assemble the instrument on a soft rug or carpet.
1 Connect the large and the small end legs using the reinforcement stays.
1-1. Place the large and small end legs and reinforcement stays so that they will be positioned as illustrated below after assembly.
text_image
Leg (Small end) Stay mount Slant shaft High register side Reinforcement stay (Small end) Player side Frame end (Large end) Audience side Reinforcement stay (Large end) Leg (Large end) Bass side1-2. Connect the reinforcement stays at the center. Align the end of the fixing bolt and the holes in the reinforcement stays and tighten the fixing bolt securely.
* Insert the support using the reference hole close to the hole for the screw as a guide.
text_image
Screw hole Reinforcement stay (Small end) Reference hole Tighten Reinforcement stay (Large end)1-3 Insert the reinforcement stay with its notch facing up into the stay mount hole of the large end leg as far as it will go (aligning the notch with the fixing bolt) and tighten the fixing bolt securely.

text_image
Fixing bolt Leg E E Reinforcement stay Notch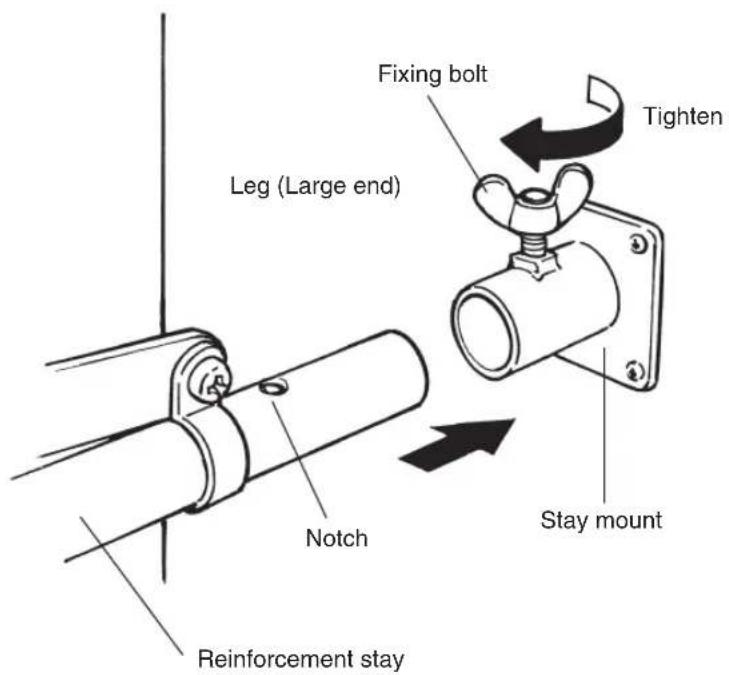
text_image
Fixing bolt Tighten Leg (Large end) Notch Stay mount Reinforcement stay1-4. In the same way, install the reinforcement stay to the small end leg. (There is no marking on the small end joint.)
2 Insert the rails (2), (3) and (4) into the frame ends of the legs.
2-1. First, insert the rail (2). Make sure that the end of the rail with the tone bar posts spaced further apart is positioned on the bass side.
A mark "B" is printed on the large end face of the rail (2) and the groove section of the frame end of the large end leg.
* Do not insert one side of the rail all the way down first, but push both sides into grooves alternately little by little until both sides are inserted fully and stop.

text_image
Rail (4): With YAMAHA logo. Logo side facing the audience. (3): Both sides have clamps attached. The side with the shorter clamp should face the player. (2): Hole for attaching the stay. The side with the threaded hole should face the audience. (1) Tone bar posts YAMAHA A Player side D C B High register side Frame end Bass side Audience side2-2. After confirming that legs on the left and right sides are vertical, use the screw to connect the end of the stay to the hole for attaching the stay in the long frame (2) and firmly tighten the screw.
2-3. Next, in the same way, insert the rails (3) and (4) securely. A mark “C” is printed on the large end face of the rail (3) and the groove section of the frame end of the large end leg, and a mark “D” for the rail (4).
2-4. Engage the short rail clamp located at the center of the rail (3) with the rail (2).
text_image
Rail (2) Slant shaft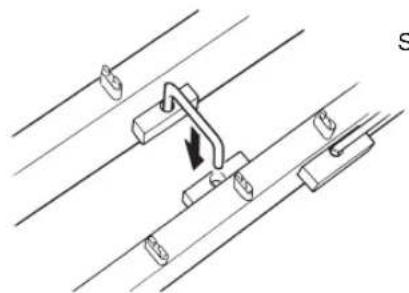
natural_image
Pure mechanical assembly diagram showing diagonal lines and bracket components without any text or symbols3 Attach the resonators.
3-1. Assemble the resonator pipes. Make sure that the natural tone and accidental tone sides are properly assembled. All pipes on the natural tone side have bottoms attached.
3-1. First, lower the accidental resonator pipes from above the instrument between the frame sections, and into the rubber resonator holder. Next set the natural tone resonator pipes in the rubber resonator holder. Set the bass side of the resonator pipes into the center grooves on the resonator holder. Make sure that the pipes are set between the tone bar posts.
* Make sure not to confuse the natural tone resonators and accidental tone resonators.
* Take care not to bump the resonators against the legs, etc.
text_image
Resonators (Natural tone side) YAMAHA Resonators (Accidental tone side)* The resonators are factory adjusted so that the optimum resonance level is obtained at 23°C (73.4°F). If desirable resonance is not available due to the temperature lower or higher than 23°C (73.4°F), adjust setting of the resonators. Move the resonators to fit into shorter grooves when the temperature is higher and into longer grooves when the temperature is lower.
| Temperature Grooves to use | |
| Higher Short groove (“A” in the figure below)Around 23°C (73.4°F)Lower Long groove (“C”) | Center groove (“B”) |

text_image
Resonator holder
text_image
A : For a higher temperature B : For a temperature around 23°C (73.4°F) C : For a lower temperature4 Insert the rail (1) into the frame ends of the legs.
4-1. Insert the outer rail (1) in the same way as the inner rails (2), (3) and (4).
A mark "A" is printed on the large end face of the rail (1) and the groove section of the frame end of the large end leg.
5 Set the tone bars.
5-1. While adjusting the long frame, engage the rail clamp on rail (2) and rail (3) with rail (1) and rail (4), respectively.
text_image
Rail clamp Rail (1) Rail (2) Rail clamp Rail (4) Rail (3)5-2. Set the natural tone bars first.
With one person holding the suspension cord on the bass side and the other holding the suspension cord on the treble side securely with both hands, gently place the tone bars on the rails.
Align each tone bar individually and hook its cord onto the corresponding tone bar post.
After confirming that the cord is secured to every post, fix the tone bars by pulling the right and left cords forward from the large end side and hooking the two springs into each other.
* When setting the tone bars, use care not to cause any damage to them.

text_image
Small end Suspension cord Large end Suspension cord Springs6 Once again, confirm that all screws are tightened firmly.
YM-460/460F/2400/2400R
• Range: A25 – C76 (4-1/3 octave)
- Bars:
YM-460/2400R: Rosewood,
Open Pore Finish
YM-460F/2400: Acoustalon (FRP),
Brown Urethane Finish
- Bar sizes:
YM-460/2400R:
58 - 38 mm (2.2 - 1.5") wide
25 - 21 mm (0.98 - 0.83") thick
YM-460F/2400:
58 - 38 mm (2.2 - 1.5") wide
23 mm (0.91") thick
- Resonator:
Aluminum Alloy Tube
Light Gold Acrylic Coating
Frame:
MICA black finish
Two-piece folding, Disassembled type
- Leg sections:
Steel Pipe with Black Leather Satin Finish
(with Adjustable Height)
- Dimensions (W x D x H):
197 x 88 x 89 - 97 cm
(77.6" x 34.6" x 35 - 38")
• Weight:
YM-460/2400R: 55 kg (121 lbs 4 oz)
YM-460F/2400: 61 kg (134 lbs 8 oz)
- Casters:
100mm Diameter Casters
YM-410D/410/410F
• Range: C28 – C76 (4 octave)
- Bars:
YM-410D: Rosewood,
Open Pore Finish
YM-410: Rosewood,
Open Pore Finish
YM-410F: Acoustalon (FRP),
Brown Urethane Finish
- Bar sizes :
- Bar sizes :
- Bar sizes :
- Bar sizes :
- Bar sizes :
- Resonator:
YM-410D/410:
58 - 38 mm (2.2 - 1.5") wide
25 - 21 mm (0.98 - 0.83") thick
YM-410F: 58 - 38 mm (2.2 - 1.5") wide
23 mm (0.9") thick
- Resonator:
- Resonator:
- Resonator:
- Resonator:
- Resonator:
•Frame:
Aluminum Alloy Tube
YM-410D: Brown Urethane Matte Finish
•Frame: YM-410D: Brown Urethane Matte Finish
Two-piece folding, Disassembled type
Two-piece folding, Disassembled type
YM-410/410F: Black Finish, Disassembled Type
- Leg sections:
- Leg sections:
- Leg sections:
YM-410D: Wood with Brown Urethane Matte
YM-410D: Wood with Brown Urethane Matte
YM-410D: Wood with Brown Urethane Matte
YM-410D: Wood with Brown Urethane Matte
YM-410D: Wood with Brown Urethane Matte
Finish and Brown Leather
YM-410/410F: Steel Pipe with Black Leather
YM-410/410F: Steel Pipe with Black Leather
Satin Finish (with Adjustable Height)
- Dimensions (W x D x H):
- Dimensions (W x D x H):
YM-410D: 183 x 83 x 88 cm
(72" × 32.7" × 34.6")
YM-410/410F: 183 x 83 x 76 - 88 cm
(72" × 32.7" × 29.9 - 34.6")
• Weight:
• Weight:
• Weight:
• Weight:
• Weight:
YM-410D/410F: 55 kg (121 lbs 4 oz)
YM-410: 49 kg (108 lbs)
- Casters:
100mm Diameter Casters
YM-46/41
- Range:
YM-46: A25 - C76 (4-1/3 octave)
YM-41: C28 - C76 (4 octave)
- Bars:
African Padauk, Open Pore Finish
- Bar sizes:
YM-46: 58 - 38 mm (2.2 - 1.5") wide
24 - 22.5 mm (0.95 - 0.89") thick
YM-41: 53 - 38 mm (2.2 - 1.5") wide
24 - 22.5 mm (0.95 - 0.89") thick
- Resonator:
Aluminum Alloy Tube
Light Gold Acrylic Coating
Frame:
YM-410D: Black Finish, Two-piece folding, Disassembled Type
YM-41: Black Finish, Disassembled Type
- Leg sections:
Steel Pipe with Black Leather Satin Finish
- Dimensions (W x D x H):
YM-46: 189 x 84 x 86.5 cm
(74.4" x 33.1" x 34.1")
YM-41: 176 x 80 x 85 cm
(69.3" x 31.5" x 33.5")
- Weight:
YM-46: 44 kg (97 lbs)
YM-41: 41 kg (90 lbs 6 oz)
- Casters:
75mm Diameter Casters
- SCALE RANGE
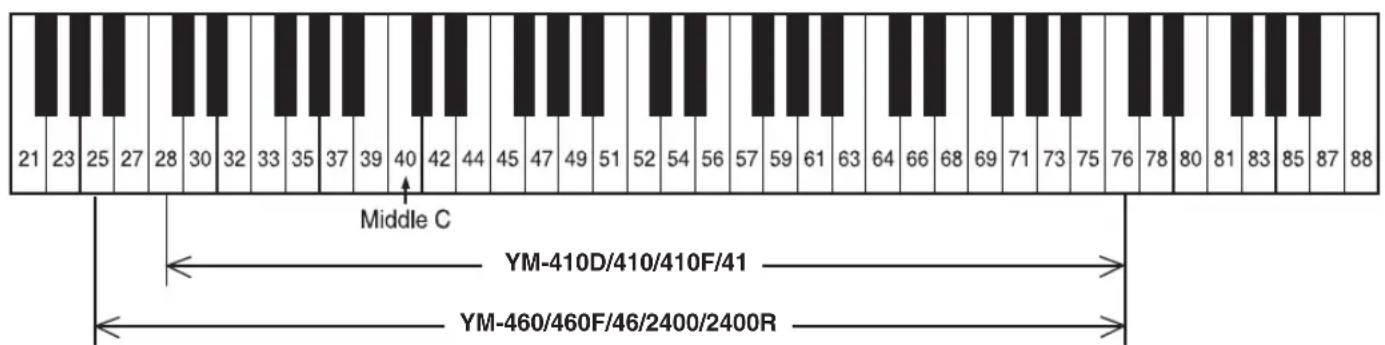
text_image
21 23 25 27 28 30 32 33 35 37 39 40 42 44 45 47 49 51 52 54 56 57 59 61 63 64 66 68 69 71 73 75 76 78 80 81 83 85 87 88 Middle C YM-410D/410/410F/41 YM-460/460F/46/2400/2400R* The contents of this manual apply to the latest specifications as of the publishing date. To obtain the latest manual, access the Yamaha website then download the manual file. Since specifications, equipment or separately sold accessories may not be the same in every locale, please check with your Yamaha dealer.