
KH 2360 - Television SILVERCREST - Free user manual and instructions
Find the device manual for free KH 2360 SILVERCREST in PDF.


| Product type | Portable DVD player with two 7-inch LCD screens |
| Brand | SILVERCREST |
| Model | KH 2360 |
| Supported formats | DVD, VCD, SVCD, Audio CD, MP3, WMA, JPEG, DivX, MPEG4 |
| TV standards | PAL / NTSC |
| LCD screen resolution | 480 x 243 pixels |
| LCD screen size | 7 inches |
| Mains power supply | 100-240 V ~ 50/60 Hz, 0.6 A |
| Vehicle power supply | 12 V, max. 10 A |
| Power consumption | 24 W (player + 2 screens) |
| Operating temperature | 10 °C to 40 °C |
| Operating humidity | 0 % to 80 % without condensation |
| Main functions | DVD player, two LCD screens, SD/MMC card reader, USB port, headphone output, OSD settings, parental control |
| Care and cleaning | Wipe the exterior with a soft dry cloth. Do not use liquid products inside. |
| Safety | Do not expose to moisture, unplug before cleaning, do not open the casing, use only the provided accessories. |
| Spare parts and repairability | Contact customer service. Do not attempt repairs yourself. |
| Package contents | DVD player, 2 LCD screens, remote control with battery, mains adapter, vehicle adapter, AV and DIN cables, carry case, 2 headphones, manual |
| Warranty | 3 years |
Frequently Asked Questions - KH 2360 SILVERCREST
User questions about KH 2360 SILVERCREST
0 question about this device. Answer the ones you know or ask your own.
Ask a new question about this device
Download the instructions for your Television in PDF format for free! Find your manual KH 2360 - SILVERCREST and take your electronic device back in hand. On this page are published all the documents necessary for the use of your device. KH 2360 by SILVERCREST.
USER MANUAL KH 2360 SILVERCREST
- Technical Data 4
- Applications and functions 4
- Safety Instructions 5
4.Appliance description 7 - Starting Up the Device 8
- Attaching the LCD monitor to a headrest 9
- Carrying out connections 11
7.1 Connecting the LCD monitors to the DVD player 11
7.2 Mains power connection 11
7.3 Connection to another device 12
7.4 Headphone connection 13
7.5 Setting the display position 14
8.Card reader and USB connection 14
8.1 Inserting memory cards/USB memory sticks with MP3/WMA/Mpeg4/JPEG data 14
8.2 Displaying the contents of the memory card/USB memory stick 15
8.3 Removal of Memory cards/USB Memory sticks from the memory card slot 15
8.4Playback procedure for a memory card: 16
9.Use 16
9.1 Switching the device on and off in the standby mode 16
9.2 Display settings 16
9.3 Setting the image format 16 - The setup menu 17
10.1 General Setup Page 17
10.2 Video Setup Page 18
10.3 Preference Page 19 - Sound functions 21
11.1 To control the Volume 21
11.2 Mute 21 - Playback functions 21
12.1Playback start,stop,pause 21
12.2 SKIP function (Chapter/Title forward/backward) 22
12.3 Search forward/backwards 22
12.4 Slow motion function (DVD, VCD, S-VCD and DivX only) 23
12.5 Image enlargement (Zoom) 23
12.6 Viewing angle (DVD only) 23
12.7 Repeat function for DVDs, VCDs, S-VCDs and Audio CDs 23
12.8 Repeat sequence (A-B) 24
12.9 Direct title/track selection 24
12.10 Direct chapter, title or time selection via the search function 25
13.Display functions 26
13.1 Display disc information 26
13.2 Accessing the DVD menu 26
13.3Playback Control (PBC) with VCDs/S-VCDs 27
13.4 Superimpose and fade out subtitles(DVDs/VCDs/S-VCDs only) 27
13.5 Changing the playback language 28
13.6 Programming function 28
14 Display of MP3/ WMA/JPEG/AVI/MPEG and DivX data 29
- Playback of MP3/ WMA/MPEG and DivX discs 30
15.1 Repeat function with MP3/WMA/ MPEG/JPEG/DivX discs 30
15.2 Replay of JPEG discs 30
16.Playback of USB/SD/MMC data mediums 31
16.1 Compatible data mediums 31
16.2 Using USB/SD/MMC data mediums 31
- Cleaning of the DVD player 32
- Disposal 32
- Troubleshooting 33
- Glossary / Key Word Index 34
- Warranty and service 37
22.Importer 37
Read these operating instructions carefully before using the appliance for the first time and preserve this manual for later reference. Pass this manual on to whoever might acquire the appliance at a future date.
The SilverCrest KH 2360 DVD player with two 7 inch LCD displays contains copyright protection technology, which protects it from process claims of certain US patents, for example other intellectual property rights of the Macrovision corporation and other copyright owners.
The use of this copyright protection technology must be approved by the Macrovision corporation and is intended exclusively for non commercial use in private surroundings; any other use requires the express approval of Macrovision Corporation.
Reverse engineering and disassembling are expressly prohibited.
Manufactured under license from Dolby Laboratories, Inc.
Dolby and the double-D-symbols are registered trademarks of Dolby Laboratories, Inc. Confidential Unpublished Works.
1992-1997 Dolby Laboratories, Inc. All rights reserved.
This appliance is protected by the US patents 4.631.603, 4.577.216, 4.819.098, 4.907.093 and 6.516.132.
The license applies exclusively for private use.
The Silvercrest KH 2360 DVD player is licensed as a DivX Certified Product.
KH 2360
Portable DVD player
1. Technical Data
DVD player
Power consumption
DVD player + 2 LCD: 24 Watt
TV standard: PAL/NTSC
Operating temperature: 10^ +40^ C
Operation humidity: 0 80%
(No condensation)
max. storage
medium size: 1GB (USB/memory card)
Laser: Laser class 1
Mains plug
Input: AC 100-240 V~50/60 Hz 0,6A
Output: DC 12 V - 2.5A
Manufacturer: Kuantech (Shen Zhen) Co., LTD.
Model: KSAFE1200250W1UK
Vehicle adapter
Type: KD627
Input: DC 12 V/max. 10 A
Output: 1500 mA
Headphones
Model: LXF-D103
Impedance: 32 ± 15% Ohm
Power rating: 3 mW
max. power consumption: 10 mW
LCD screens
Resolution: 480(H) × 243(V) Pixels
Viewing area: 154,08^ (H)- 87,5° (V)
2. Applications and functions
The SilverCrest KH 2360 DVD player is intended exclusively for private, non commercial use in enclosed spaces.
Playback formats
DVD videos in the 12cm and 8cm (diameter) formats marked with the country/region code 2 or ALL AND by the logo DVD video
- MPEG4 and DivX "Standard" videos (DivX versions 3.11, 4.x, 5.x, 6.x).
Video CDs (VCDs) and Super Video CDs (S-VCDs) in the 12cm and 8cm (diameter) formats.
Audio CDs in the 12cm and 8cm (diameter) formats marked with the logo CD
- Data format CD Audio (.cda), MP3 (.mp3), Windows Media Audio (.wma), DivX (.avi), (.mp4) and JPEG (.jpg) on the storage medium CD-R, CDRW, USB memory stick as well as memory cards of the type SD and MMC.
Output/playback device
The following devices can be connected to the DVD player for image output/playback (if these devices have available the corresponding connection potentials and connection of a DVD player is provided for/ allowed by the manufacturer of the playback device):
- Stereo and Mono televisions with the formats PAL or NTSC and the picture formats 4:3/16:9.
- LCD/Plasma screens or video projectors.
Video devices such as DVD player, video recorder, TV receiver or game consul.
For output/playback of sound and/or music the following devices can be used and/or connected to the portable DVD player:
- from the speaker of one of the televisions connected to the DVD player
- from external audio components such as a HiFi system, receiver or surround sound system (analogue)
from other external image and sound sources
The two supplied 7 inch LCD monitors, which connect to the DVD player, are provided for image and sound outputs.

Important!
No liability/warranty will be assumed for damage resulting from improper use of the device!
3. Safety Instructions
- This appliance is not suitable for children or for people whose physical, sensorial or intellectual faculties prevent the safe usage of the appliance without support or supervision. Children should be watched-over to ensure that they do not play with the appliance.
- Pull the power supply unit from the power socket after every use and before cleaning to avoid unintentional switch ons.
- Check the appliance and all parts for visible damage. The safety concept can work only if the appliance is in a faultless condition.
- The power plug must always be easily accessible, so that the appliance can be quickly separated from the mains in the event of an emergency.
Danger of electrical shocks.
- Connect the appliance only to correctly installed and properly earthed power sockets. The mains voltage must conform with the specifications on the ratings plate of the power supply unit.
- Only use the supplied power supply unit. If you replace the power supply unit, only replace it with one of the same model.
- Arrange for defective power plugs and/or cables to be replaced at once by qualified technicians or our Customer Service Department.
- Arrange for customer service to repair or replace connecting cables and/or appliances that are not functioning properly or have been damaged.
Never submerge the device or the power cable in water. Wipe it only with a slightly damp cloth.
- Do not expose the appliance to rain and never use it in a humid or wet environment.
- Make sure that the power cord does not become wet during operation.
- You may not open the housing or repair the appliance yourself. Should you do so, appliance safety can no longer be assured and the warranty will become void.
- Protect the appliance against drip and spray water. Do not place any water-filled vessels (e.g. flower vases) on the appliance.
- If water enters the DVD player or the LCD monitors or if they fall into water, irreparable damage can occur and there exists the danger of electric shock!
Risk of fire!
- Do not use the appliance in the vicinity of hot surfaces.
- Do not keep the appliance in places exposed to direct sunlight, Otherwise, it may overheat and become irreparably damaged.
- Do not leave the appliance unattended when in use.
- Never cover the ventilation slots of the appliance while it is being used.
-
Do not operate the DVD player in the immediate vicinity of a heat source such as an oven, hot air blowers (in a vehicle: close to heating vents) and similar devices! Heat contact can lead to the equipment overheating and to melting of plastic parts, whereby the DVD player could be irreparably damaged!
-
Do not operate the DVD player in cupboards, on shelves, in the glove compartment or other enclosed furnishings as well as not on beds and covers because the ventilation of the DVD player will be impaired and it could overheat.
When overheated the DVD player can be irreparably damaged and the risk of a fire exists
- This device must not be placed in the immediate vicinity of flammable materials, for example curtains, flammable liquids etc.
- Do not place any open sources of fire, like candles, on the device.
Injury hazard
- Keep children away from the connecting cable and the appliance. Children frequently underestimate the dangers of electrical appliances.
- Ensure that the appliance stands with a safe and secure positioning.
- Do not operate the appliance if it has sustained a fall or is damaged. Arrange for the appliance to be checked and/or repaired by qualified technicians.
- Keep batteries away from children. Children can put batteries into their mouths and swallow them.
Important!
Never mount the device and monitors in the vehicle whilst it is in motion!
There is a considerable risk of injury in the event of an accident!
Use the device mounted in the vehicle only when the vehicle is standing still.
Make sure that the device is securely packed away in the supplied carrying case whilst driving.
Danger! Laser radiation!
The appliance is fitted with a „Class 1 Laser".
- Never open the device.
- Never attempt to repair the device.
- There is invisible laser radiation inside the device. Do not expose yourself to the laser beam.
Thunderstorms!
Equipment connected to a power supply can be damaged during a thunderstorm. For this reason always remove the power supply unit from the power socket during a thunderstorm.
Important!
Plug the power supply unit of the DVD player into a power socket only after you have connected the DVD player to a television or to the 7 inch LCD monitors. With a power connection via the vehicle adapter, connecting the adapter is always the last step. In the event that you wish to change the type of video or audio connection first pull beforehand, without fail, the power supply unit from the power socket! Otherwise the DVD player and possibly equipment connected to it could become irreparably damaged through voltage peak strikes!
Important!
The main switch on the right side is used for the ON/OFF function. It is not used as a disconnect switch for the mains voltage. The power supply unit is used to disconnect from the mains power. In order to completely disconnect the equipment from the mains voltage the power supply unit must be pulled from the power socket. The power socket for the power supply unit should be situated close to the device and easily accessible
Notice regarding surge voltages (FEO / fast electrical overloads):
In a case of malfunction due to an electrical fast transient (power surge) the product must be returned to default settings in order to re-establish normal operation. It is possible that the power supply will have to be disconnected and then reconnected again. The batteries (if present) must be removed and then reinserted.
Notice regarding the handling of batteries/rechargeable battery pack
The remote control is run by a battery. For the handling of batteries please observe the following:

Risk of Explosion!
Do not throw batteries into a fire. Do not recharge non-rechargeable batteries.
- Only recharge batteries that are specifically designated "Rechargeable" or are designed to be recharged.
- Never open batteries, never solder or weld batteries. The risk of explosions and injuries exist!
- Regularly check the condition of the battery. Leaky batteries can damage the remote control.
- If you do not intend to use the remote control for a long time, remove the battery.
- Put on protective gloves when handling a depleted battery.
- Clean the battery compartment and the battery contacts with a dry cloth.
4. Appliance description
Remote control
POWER button (Switch the DVD player on and off)
DISP button (Display of the playback information)
N/P button (NTSC/Pal/Multi selection)
PLAY/PAUSE button (Start and pause of the current playback)
STOP button (Stop playback)
FF button (Fast forward - x2, x4, x8, x16, x32)
1 REPEAT button (Repeat chapter, title, song, the entire disc)
SETUP button (Superimpose OSD / settings menu)
Navigation button
10 MENU (Superimpose DVD menu)
10 VOL +/- buttons (Volume output increase/decrease)
USB/CARD/DVD button (Select USB/memory card contents)
PREV button (Skip backwards a chapter or unit)
14 SLOW button (Adjust playback speed)
NEXT button (Skip forwards a chapter or unit)
Navigation button
1 ENTER button (Confirm input)
Navigation button
10 MONITOR 1/2 button (Select LCD monitor AV-IN and DVD)
20 Number buttons 0 to 9 (Numerical input 0-9)
21 10+ button (for two digit number input)
2 GOTO button (Skip to chapter or song)
2 PROGRAMME button (Set the title or song sequence)
ZOOM button (Image enlargement/reduction)
ANGLE button (Change camera perspective)
SUBTITLE button (Superimpose/fade out subtitles)
27 AUDIO button (Change playback language)
FR button (Fast rewind -x2, x4, x8, x16, x32)
A-B button (Repeat sequence)
TFT MODE button (Set contrast, hue, saturation and sharpness)
Navigation button
32 TITLE button (Superimpose DVD/CD contents)
MUTE button (Switch off playback sound)
B Top of the DVD player
3 OPEN button (press to open the disc draw)
Rear of the DVD player
AV OUT (Audio/Video output)
33 MONITOR 1 (Connection socket for LCD monitor 1)
37 MONITOR 2 (Connection socket for LCD monitor 2)
Right side of the DVD player
38 VOLUME (DVD players headphone output volume control)
Phone (Headphone connection)
AVIN (Audio/Video input for external devices)
4 POWER OFF/ON (Switch off/on)
DC IN 12V (Connection socket for 12V power supply)
USB (USB connection)
3 Front panel of the DVD player
SD/MMC (Memory card slot for SD/MMC cards)
IR (Infrared receiver sensor)
ON/STANDBY (Standby indicator)
F Front panel of the LCD monitor
Monitor
Power LED (Illuminates red when the device is switched off)
IR sensor for the remote control signal
LCD monitor speaker
Underneath the LCD monitor
3 CONNECT TO MAIN UNIT (Connection socket to the DVD player)
PHONE (Headphones connection)
5 BRIGHTNESS (Adjust the brightness of the LCD screens)
3 SCREEN (Format change switch 16:9/4:3)
LCD monitor right side
5 POWER (LCD monitor on/off switch)
53 VOLUME (Volume control for LCD monitors only)
5. Starting Up the Device
5.1 Unpacking
- Remove the DVD player, both monitors and the accessories from the packing.
- Remove all adhesive tapes, foils and transport restraints.
Important
Do not permit small children to play with plastic packaging. There is a risk of suffocation!
5.2 Check the delivered contents
Before putting the appliance into use, check that all items are present and free of visible damage.
1 DVD Player
2 7 inch LCD monitors
1 Remote control
1 Battery for the remote control, CR2025/3 V
1 Power supply unit
1 AV cable 3 × Cinch on 3.5mm jack plugs
2 DIN connection cables for the LCD monitors
1 Vehicle adapter
1 Carrying case with two securing straps for the headrest
2 Headphones
1 Operating manual
5.3 Preparing the remote control
Inserting the battery
The remote control requires a battery of the type CR2025/3V button cell (supplied):
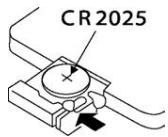
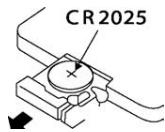
- Pull the battery compartment out of the remote control.
- Now place the supplied battery, of the type CR2025 (button cell) in the battery compartment. Make sure that the battery is inserted in accordance with its correct polarity.
- Slide the battery compartment back into the remote control.
Using the remote control
In order to guarantee faultless operation when using the remote control...
- When using the remote control always point it directly at the infrared sensor on the front panel of the device.
- Make sure that there are no obstructions between the remote control and the DVD player that will hinder reception
- When using the remote control place yourself not more than 5 metres from the DVD player otherwise interferences can occur during operation of the DVD player functions with the remote control.
6. Attaching the LCD monitor to a headrest
For attachment to the headrest use exclusively the supplied Velcro fastening strap and pad.
- Remove the pad from the Velcro fastening strap.
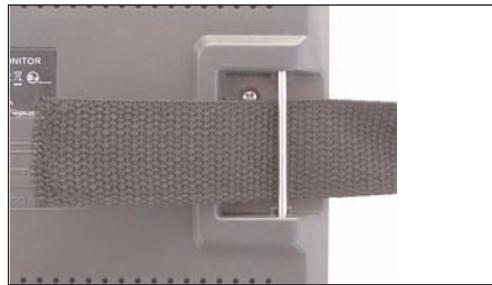
- Pull the Velcro fastening strap, with the Velcro side towards the rear, through the right retainer on the rear of the LCD monitor. Please do not pull the strap through the left retainer at this time.
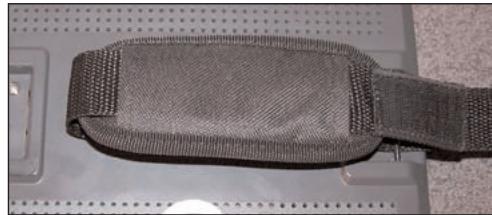
- Pull the open end of the strap through the pad. The unpaded side must be facing the device.

- Finally, pull the strap through the left retainer. The plastic tab should now point to the right.
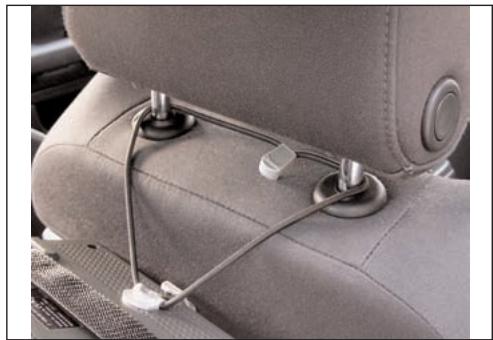
- Before fastening, place the elastic safety strap that is secured to the LCD monitor, around the headrest and/or headrest mounting.
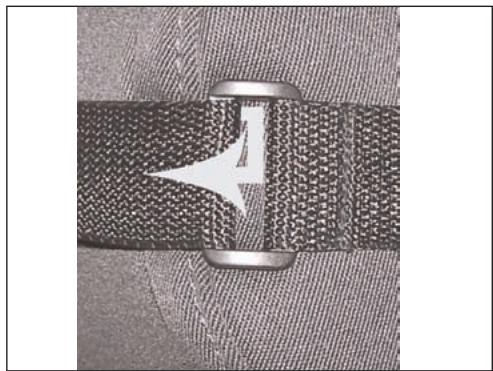
- Hold the LCD monitor against the headrest and pull the Velcro strap from the inside to the outside, through the plastic tab. The Velcro must also here point in the direction of the headrest.
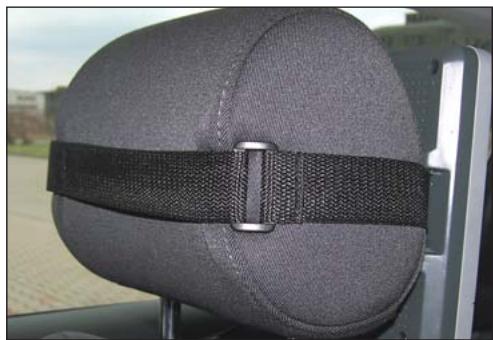
- The plastic tab should lie to the left side, viewed from the direction of travel, of the headrest (as in the diagram above).
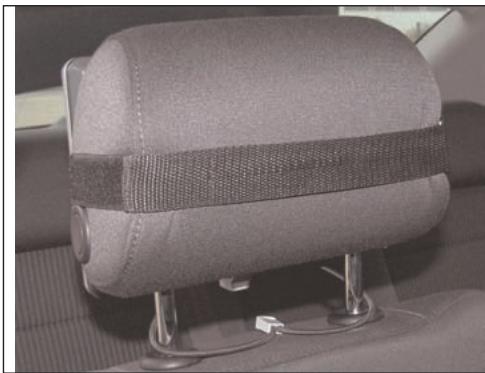
- Join the open end of the Velcro fastening strap with its opposite side at the front of the headrest. Make sure that the strap sits securely and is tight.
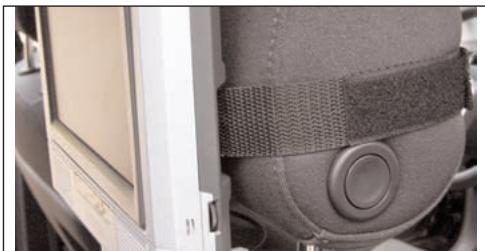
- The Velcro fastening strap should be attached to the centre of the headrest. If possible do not impede the headrests height adjustment mechanism.
Note:
If you are using the LCD monitor in a vehicle make sure that the monitor does not interfere with safety relevant components such as airbags, seat airbags or side airbags.
Fastening to active headrests is not recommended.
If you install the LCD monitors in a vehicle make sure that the cables are layed in a manner that will not cause them to be a trip hazard and they do not obstruct entry to and exit from the vehicle.

Important!
Never mount the device and monitors in the vehicle whilst it is in motion!
There is a considerable risk of injury in the event of an accident!
Use the device mounted in the vehicle only when the vehicle is standing still.
Make sure that the device is securely packed away in the supplied carrying case whilst driving
7. Carrying out connections
7.1 Connecting the LCD monitors to the DVD player
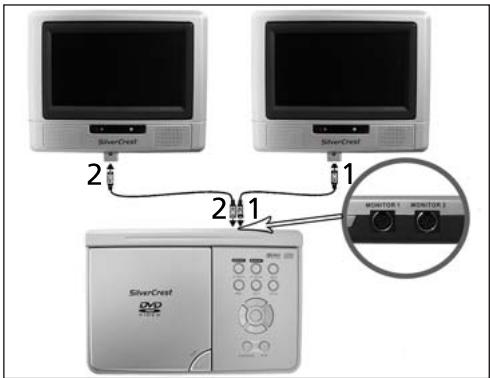
Connect both LCD monitors to the DVD player by joining the sockets CONNECT TO MAIN UNIT 5 on the monitors with the inlets MONITOR 1 3 and MONITOR 2 7 each with a DIN connection cable.

Note:
Use exclusively the two supplied DIN connection cables to connect the LCD monitors to the DVD player.
You can also connect only one LCD monitor to the DVD player.
If you install the LCD monitors in a vehicle make sure that the cables are layed in a manner that will not cause them to be a trip hazard and the connection cables to the DVD player do not obstruct entry to and exit from the vehicle.
In addition the device can be connected to other input and output devices:
with a television set
with a video or DVD recorder
with a receiver, also, for example, a stereo system
with a Dolby Digital system

Important!
Make sure that all devices are switched off before you connect them. Do not plug the device into the mains power until all connections have been made.
7.2 Mains power connection
Connection with the power supply unit
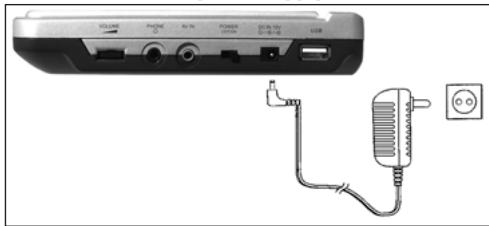
- Plug the power supply unit device plug in the socket DC IN 12V on the DVD player.
- Plug the power supply unit into a power socket.

Note:
Before you connect the DVD player to the mains power with the power supply unit, switch the DVD player with the POWER ON/OFF switch off - Position OFF. First connect the device plug with the socket DC IN 12V on the DVD player.
Making a power connection with the vehicle adapter
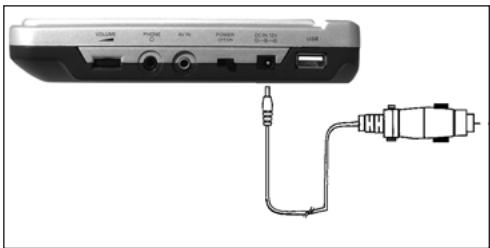
- Plug the device plug of the vehicle adapter in the socket DC IN 12V on the side of the device.
- Plug the vehicle adapter into a suitable 12V socket, for example the cigarette lighter connection in the vehicle.
Note:
- The supplied vehicle adapter may only be used in vehicles with a 12V power system.
- The DVD player may only be operated with the supplied vehicle adapter.
- Do not use the supplied vehicle adapter for other devices.
- After use remove the vehicle adapter from the DVD player and from the vehicles power socket.
7.3 Connection to another device
Connection to a television
The DVD player can be connected to televisions which operate with the PAL or NTSC standards. In this way you can transmit the display onto the television screen.
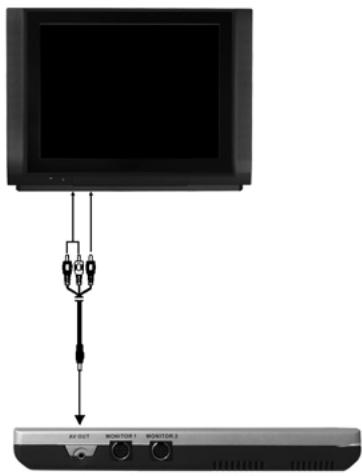
- Switch off the DVD player and the television.
- Connect the jack plug of the supplied AV cable with the AV-OUT output on the DVD player.
- Connect the yellow cinch cable for the image signal with the FBAS video input (yellow) on the television.
- Connect the red/white cinch cable for the sound signal with the sound input (red/white) on the television.
In the same way you can also connect the DVD player with a video or DVD recorder in order to transmit the DVD players video and audio signals to these devices.
Audio connection with a stereo system
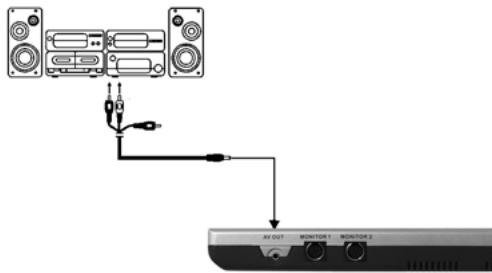
- Switch the DVD player and your stereo system off before making connections.
- Connect the jack plug of the supplied AV cable with the AV-OUT output on the DVD player.
- Connect the red/white cinch cable for the sound signal with a sound input (red/white) on your stereo system.
Connecting external devices to the DVD player via AV IN (i.e. game consul)
You can playback images and sound from an external device via the DVD player.
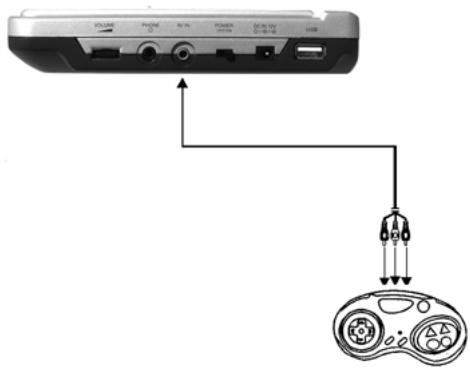
- Connect the jack plug of the supplied AV cable with the AV IN input on the DVD player.
-
Connect the yellow cinch cable for the image signal with the FBAS video output (yellow) on the external device.
-
Connect the red/white cinch cable for the sound signal with the sound output (red/white) on the external device.
- To display the external image on the LCD monitors press the button MONITOR 1/2 to switch the DVD player to the AV IN mode.
Note:
Depending on the data carrier the display can remain black for a few seconds until the DVD players image is again displayed.
The sound of an external device connected to the DVD players audio input will also playback if the device is set to an operating mode other than AV.
Setting the TV standard
Press several times the button N/P to set the television standard for the video input. The setting will be shown in the display.
PAL For video signals in the PAL television standard.
MULTI The video signal will be recognized automatically.
NTSC For video signals in the NTSC television standard.
7.4 Headphone connection
Important!
Only use the supplied type LXF-D103 headphones.
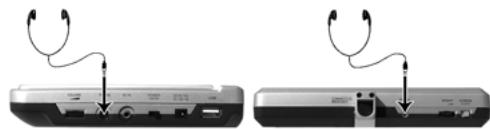
- Connect the headphones jack plug with the socket on the DVD player or the LCD monitors
-
Adjust the volume before connecting to the DVD player ⑧ and the LCD monitors 56 to a low level.
-
If headphones are connected to the DVD player or the LCD monitors there will be no sound output from the AV output of the DVD player or from the built in speakers on the LCD monitors.

Important!
Listening to music over long periods with full volume on headphones can lead to hearing damage
7.5 Setting the display position
In the event that you find the image quality of a DVD to be insufficient, slightly swivel the display to optimize the viewing angle.
8. Card reader and USB connection
8.1 Inserting memory cards/USB memory sticks with MP3/WMA/Mpeg4/ JPEG data
Note:
The DVD-Player always starts in DVD mode. To read memory cards press the button USB/CARD/DVD on the remote control. The DVD player recognizes the data formats JPEG, MP3, WMA and MPEG4. The cards must be in FAT 16 or FAT 32 formats, the player can not recognize NTFS. The player only supports 3.3V memory cards, older types with 5V operational voltage will not be recognized.
Proper insertion of memory cards of the type SD and MMC into the DVD player:
- Switch the DVD player on.
- Make sure that the LCD monitor is ready for operation.
If the LCD monitors, the DVD player and possibly other connected devices (i.e. an audio component) are ready for operation and are switched on and the DVD player is connected correctly to the LCD monitors or to a television you will now see the SilverCrest logo on the TV screen.
If no disc is inserted into the player NO DISC will be displayed on the LCD monitors.
- Now slide the memory card into the memory card slot 4 on the front panel of the DVD player.
Observe the following steps - depending on which type of memory card you would like to playback.
Warning!
Always be sure to insert the memory cards into the memory card slots as described below!
Never bend the memory cards while inserting them into the memory cards slots!
Slide the memory card up to the stop in the memory card slot, with a light pressure.
Allow the memory card to slide in without force:
- Check to make sure that the memory card is one that the DVD player is capable of reading.
Important!
Do not attempt to insert memory cards of another type in the memory card slot!
- Make sure that you have inserted the memory card into the memory card slot in the correct manner.
- Under no circumstances attempt to force the memory card into the memory card slot! Otherwise the DVD player, memory card and the data on the memory card could be damaged!
Supported memory card types
Memory cards of the type SD and MMC can be played back.
MultiMediaCard /SecureDigital memory cards (MMC/SD)
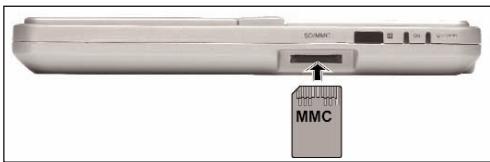
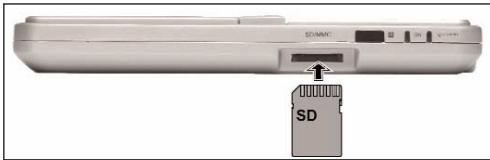
Slide the MultiMediaCard/SecureDigital memory card straight and with the contacts in front into the memory card slot 4.
For this purpose...
- the side of the memory card that contains the contacts must face up.
- the slanted corner of the memory card must be on the left side.
USB memory sticks (USB)
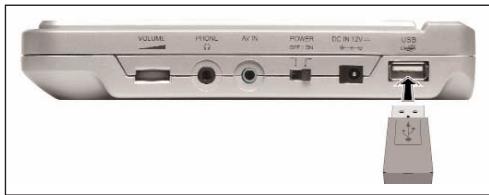
The DVD player supports USB memory sticks 1.1 and 2.0
- Slide the USB memory stick into the USB slot ①. Thereby the USB symbol on the USB plug faces upward.
8.2 Displaying the contents of the memory card/USB memory stick
- Press several times the button USB/CARD/DVD to display the respective memory card contents.
The currently inserted medium is shown in the display ①.
Note:
Because chipsets in the USB memory cards differ, no guarantee can be given that all USB memory sticks will be correctly recognized.
8.3 Removal of Memory cards/USB Memory sticks from the memory card slot
Memory cards/USB Memory sticks should only be removed after the memory card slot is deactivated. Thus avoiding the possibility of damage or data loss.
- Press the button USB/CARD/DVD to return to the DVD mode.
- You can now remove the memory card/USB memory stick from the memory card slot ④
8.4 Playback procedure for a memory card:
If you have correctly inserted a memory card or a USB memory stick into the SilverCrest DVD player and pressed the button USB/CARD/DVD on the remote control, the player automatically recognizes the folders and data that exist on the memory medium.
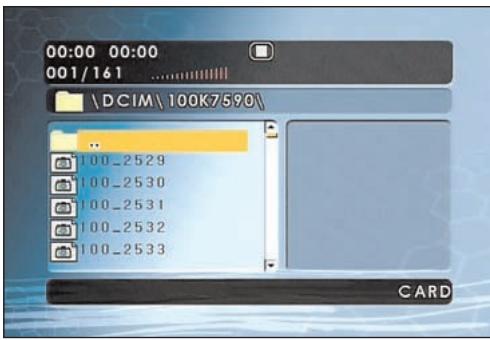
These will be displayed on the screen in the players data browser and, as is described in chapter 14, are handled in exactly the same way as a DVD/ CD medium.
9. Use
- Carry out the required connections as described in chapter 7 and provide a power supply.
9.1 Switching the device on and off in the standby mode
- Set the switch POWER to the position ON to switch the DVD player on.
The LCD monitors turn on and the background image appears.
If no disc is inserted into the disc tray the notice LOADING will appear briefly followed by the prompt NO DISC.
- To switch the device to standby mode press the button POWER ① on the remote control.
The Power LEDs on the LCD monitors light up. In this condition the device can again be switched on via the button POWER 1 on the remote control.
- To switch off the DVD player altogether, set the switch POWER ① to the position OFF.
9.2 Display settings
- Press the button TFT-MODE to access the display settings. The settings can be accessed at any time.
- Select with the navigation buttons one of the inputs Contrast (Contrast), Hue (Hue), Saturation (Saturation) and Sharpness (Sharpness).
- With the navigation buttons you change the value.
- To exit the settings press the button TFT-MODE again.
9.3 Setting the image format
- Set the switch SCREEN on each LCD monitor either to 4:3 or 16:9 to set the image format of the LCD monitors.
10. The setup menu
The DVD player has a screen menu available, in which you can carry out image and sound settings as well as other functions such as, for example, activation of the child lock. When you carry out changes in the setup menu, these changes are saved even when the device is switched off.
- You can set the default settings at any time in the menu PREFERENCE PAGE.
- The setup menu can be accessed during playback. To have access to all the settings you must be in the stop mode. To achieve this press the button STOP twice.
The setup menu subdivides into the following menus:
- General setup menu
Video Setup - Preference settings
Navigating in the menu
- Press the button SETUP to access the setup menu. The main menu appears GENERAL SETUP PAGE.
- With the navigation buttons and the button ENTER 17 you carry out all the settings in the menu.
- With the navigation buttons 9 select a menu by moving the yellow highlighting under the corresponding menu symbol.
- With the navigation buttons 16 select an input in a menu by moving the yellow bar over an input.
- With the navigation button change an input in the submenu and the navigation button will take you back a menu level.
- To confirm a selection press the button ENTER ①
All navigation possibilities in a current menu are displayed at the lower edge of the menu.
Exiting the setup menu
- You can exit the setup menu at any time by pressing the button SETUP again.
10.1 General Setup Page
When you access your DVD players setup menu with the button SETUP ③ the menu GENERAL SETUP PAGE appears.
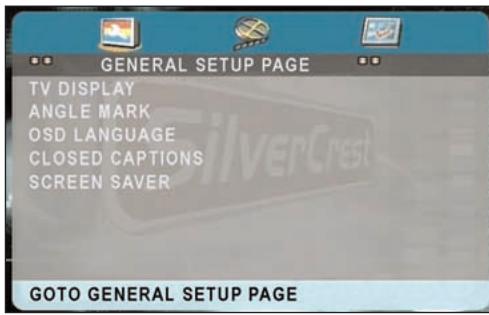
TV display
Here you can match the vertical and horizontal image display to the playback device in use.
Normal/PS: Select this setting to display broadcasts in the usual 4:3 format on a 4:3 television set. Broadcasts in the 16:9 format will be displayed in full screen without the distracting bars although the side edges of the image will be trimmed.
Normal/LB: Display of a film in 16:9 format on a traditional 4:3 format television. The image is displayed with black bars on the lower and upper edges of the screen.
Wide: This setting is recommended when using the supplied LCD monitors or for the output of an image on a wide-screen television in 16:9 format
Angle Mark
On some DVDs particular scenes are recorded from various viewing angles.
- Select the input ON in order to switch to the next viewing angle by pressing the ANGLE button during playback of the film.
- To deactivate this function select the input OFF.
OSD Language
Here you set the language, in which the OSD Menu will be displayed on the television screen.
Closed Captions
You set this if by every playback of a DVD the subtitle (if present) is to be automatically displayed on the television screen.
- For this purpose set the function to ON.
- If you want to activate the subtitles manually set this function to OFF.
The subtitles can be set, during playback, with the SUBTITLE button 26.
Screen Saver
In this menu you can activate or deactivate the screensaver. The screensaver protects the DVD players LCD screen or the picture tube of a connected television set from a displayed image burning onto the screen. To activate the screen saver set this function to ON. The screen saver will now switch on when the playback is stopped and no activity takes place for several minutes.
- To switch the screen saver off set the function to OFF.
10.2 Video Setup Page
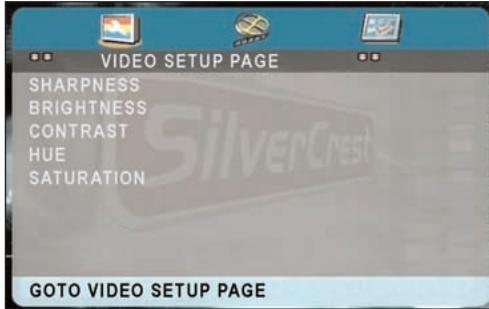
In this menu you can set the image parameters of the output video signal and thus align with the playback quality of the image on the connected picture screens.
Sharpness
Here you set the image sharpness to HIGH, MEDIUM or LOW.
Brightness
Set with the aid of the buttons 39 the brightness.
- Subsequently press the button ENTER ⑦ to continue.
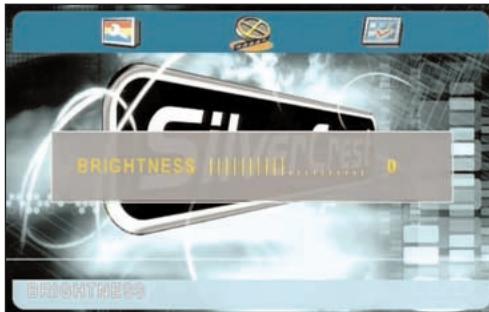
Contrast
Set with the aid of the buttons the contrast.
- Subsequently press the button ENTER to continue.
Hue
Set with the aid of the buttons 39 the hue. The further the controller is pushed to the right the warmer the entire image becomes. On the other hand pushed to the left the image radiates a cooler ambience.
- Subsequently press the button ENTER to continue.
Saturation
Set with the aid of the buttons 39 the colour saturation.
- Subsequently press the button ENTER to continue.
10.3 Preference Page
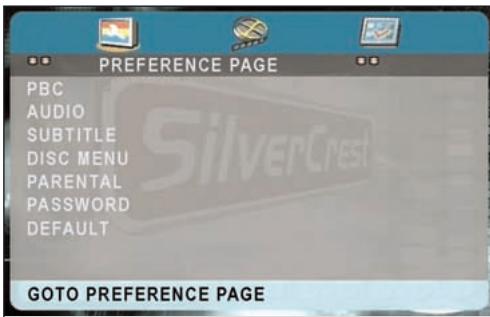
In this menu you can set the language settings for the audio and subtitle playback as well as activate the child lock function and set up a password for the DVD player.
PBC
Here you can switch the playback control (Playback Control) on or off.
With Video CDs (VCDs or S-VCDs) the button MENU can be used to display the discs main menu when the PBC function is switched on.
AUDIO
Set the audio language here, which should be used as standard when playing back the film.
SUBTITLE
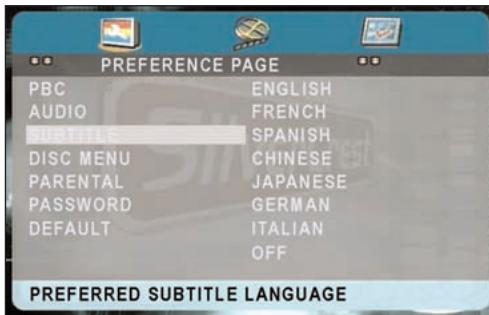
Set the sub title language here, which should be used as standard when playing back the film.
DISC MENU
Set the disc menu language here, which should be used as standard when playing back the film.
PARENTAL
Some DVDs and CDs are encoded with an encryption signal. In this way DVDs can be divided into eight different approval classes.
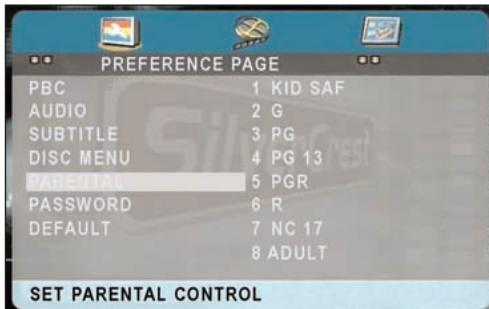
- Select one of the following approval classes to protect the playback of this media class with a password request:
8 ADULT: for adults only;
7 NC 17: not for teenagers under 18 years of age;
6 R: for teenagers under 16, adult supervision is strongly recommended;
5 PGR: for teenagers under 16, adult supervision is recommended;
4 PG 13: adult supervision strongly recommended; some scenes are not suitable for children under 12;
3 PG: adult supervision recommended;
2G.: for all age groups;
1 KID SAF.: also suitable for small children.
Example
If a DVD was encoded with, for example, approval class 7 or 8 and you have an approval class setting between 1 and 6 then a message follows and the password must be entered.
Also only parts of the DVD, that is to say certain film scenes, may be encoded with an approval class or various approval classes.
- To activate the age approval select an approval class and then enter your password with the number buttons in the password request box that follows. The factory default password is 136900.
- Confirm your entry by pressing the button ENTER ⑦.
Note:
In the next menu item PASSWORD you can change the factory default password and enter a new password for the child lock.
Password
Here you can change the preset password (136900) and enter your own password.. Only the numbers 0-9 can be used.
To change the password select the input CHANGE.
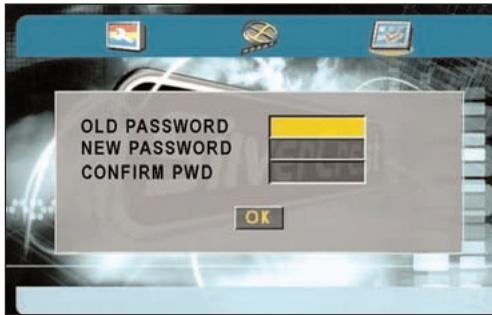
- Enter in the line OLD PASSWORD the valid password with the number buttons ① . The highlight changes to the next line NEW PASSWORD.
- Enter the new password with the number buttons 20. The highlighting changes to the next line CONFIRM PWD.
- Enter the new password with the number buttons 20. The tab changes to the OK field.
- Press the button ENTER ①. The password has now been changed.
Note:
In the event that you forget your password you can use the factory default password (136900).
DEFAULT
Here you reset the DVD player's factory default settings. All language, image, sound and general settings will be reset to the default settings. Exceptions to this are the child lock and the password since it would be of little use if your child could simply reset them.
11. Sound functions
11.1 To control the Volume
- With the buttons VOL+/- 1, the volume control on the device 3 or on the LCD monitors 5 you increase and/or decrease the volume.
11.2 Mute
- Press the button MUTE to switch the sound off.
To switch the sound on again press the MUTE 3 button again or press one of the buttons VOL+/- 1.
12. Playback functions
To play a disc with the DVD player:
- Switch your LCD monitors on.
- Make sure that the DVD player is ready for operation. With this DVD player you can playback the following discs:
DVD (Country code 2 or ALL)
Video CD
Super Video CD
MPEG4 Discs
DVD+R DL
DVD-R DL
DVD+RW
DVD+R
DVD-RW
DVD-R
CD-R
CD-RW
Audio CD
MP3
JPEG
Note:
Multisession playback is not possible, playback of unfinalised discs is not possible
If the LCD displays, the DVD player and possibly other connected devices (i.e. an audio component) are ready for operation and are switched on and the DVD player is connected correctly to the television you will now see the Silvercrest logo on the LCD screens. If there is no disc in the disc tray of the DVD player NO DISC will be shown on the television screen.
- Open the disc tray by pressing the button OPEN on the top panel of the device. OPEN will now appear in the display.
- Place the disc in the disc tray with the inscribed side facing up. When you insert the disc you will feel a slight resistance, which you can overcome with light pressure, now the disc is sitting firmly on the spindle.
With double sided discs the side that you want to play must be facing down.
- After you have inserted the disc please close the lid of the disc tray until it audibly locks into place.
- The contents of the inserted disc will now load; this may take a few seconds. Playback of the inserted disc begins automatically.
12.1 Playback start, stop, pause
Depending on the inserted disc it is possible that the contents do not immediately play back, but first a selection menu appears in the display.
- In this case select with the navigation buttons 319 16 18 the menu item, which will start the playback of the film.
- To start playback of the film press the button EN-TER or the button PLAY/PAUSE.
Pause playback
To pause the playback:
- During playback press the button PLAY/PAUSE ①. The prompt Ⅱ appears in the display.
The display shows a freeze frame of the scene you have just paused. - To continue playback of the film press the button PLAY/PAUSE 4.
Stop playback
To stop playback, press the button STOP ①.
Resume function
If you stopped playback of the inserted DVD/VCD/S-VCD by pressing the button STOP ⑤ once then the DVD player automatically saves the position, at which you stopped the playback. This function is called "Resume function".
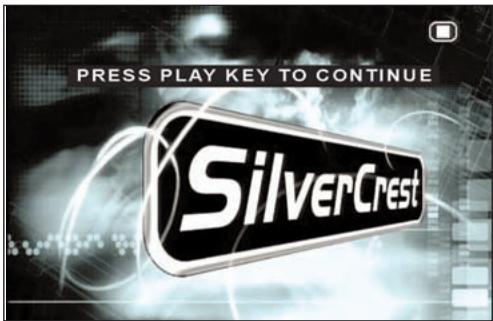
The display will show PRESS PLAY KEY TO CONTINUE.
- As soon as you press the PLAY/PAUSE ① button again playback will continue from the saved position.
- If you press the button STOP ⑤ a second time, the saved position, at which you stopped playback is deleted.
- As soon as you press the button PLAY/PAUSE again playback of the inserted DVD/VCD/S-VCD starts from the beginning.
12.2 SKIP function (Chapter/Title forward/backward)
Note:
This function may not be available on all DVDs/VCDs/S-VCDs! If you attempt to carry out functions that are not available the symbol will appear in the display.
- With the buttons SKIP ⑤ forwards and SKIP ⑥ backwards you can, during playback, skip within the film on the inserted DVD/VCD/S-VCD to the beginning of the next chapter/title or skip back to the previous chapter/title.
The respectively selected chapter/title will immediately play back without you having to press the PLAY/PAUSE ① button.
12.3 Search forward/backwards
- Press the button FF ⑤ or FR 28, during playback, to start a search forwards/backwards.
- Press the button FF ⑥ or FR ⑧ several times to apply the following search speeds:
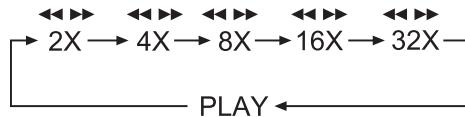
Note:
During the search no sound will play.
- To continue playback of the film at normal speed from the selected position, during the search, press the button PLAY/PAUSE ① twice.
Note:
With playback of MPEG4 files the speed of search forward and search backwards can be limited. This is data dependent and not a device malfunction.
12.4 Slow motion function (DVD, VCD, S-VCD and DivX only)
- Press the button SLOW to set playback to slow motion. Press the button SLOW several times to apply the following slow motion speeds:
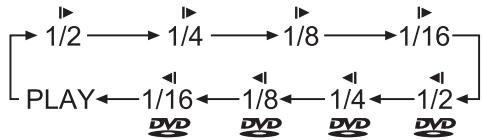
Note:
During slow motion playback no sound will be played.
- To continue playback at normal speed, during slow motion playback press the button PLAY/PAUSE.
Note:
With VCDs, S-VCDs and MPEG4 files slow motion backwards is not supported.
12.5 Image enlargement (Zoom)
Note:
This function may not be available on all DVDs/VCDs/S-VCDs! If you attempt to carry out functions that are not available the symbol will appear in the display.
During playback of an inserted DVD/VCD/S-VCD you can enlarge and reduce the image on the television screen in three stages.
- Press the button ZOOM 24 several times to apply the following enlargement and/or reduction:

With the navigation buttons \nthe enlargement section can be shunted.
12.6 Viewing angle (DVD only)
Note:
This function may not be available on all DVDs/VCDs/S-VCDs! If you attempt to carry out functions that are not available the symbol will appear in the display.
Many films on DVD contain chapters, which were recorded from different viewing angles simultaneously. Films that have such chapters available allow you to observe these chapters from various perspectives.
- For this, during playback of the inserted DVD, press the button ANGLE on the remote control. Each press of the ANGLE button will switch to one of the available viewing angles.
12.7 Repeat function for DVDs, VCDs, S-VCDs and Audio CDs
With the repeat function you can...
... in the case of DVDs, selectively repeat title, chapter or the entire DVD.
... in the case of VCDs/S-VCDs individual titles and/or the entire VCD/S-VCD repeatedly playback.
... in the case of audio CDs, playback repeatedly a particular track and/or the entire CD.
To switch on repeat playback...
- Press several times, during playback, the button REPEAT ①.
The repeat symbol appears in the display with one of the following notifications:
CHAPTER Select CHAPTER to continuously repeat the current playback chapter until playback repeat is switched off or playback is stopped by pressing the button STOP twice.
TITLE Select TITLE to continuously repeat the current playback title until playback repeat is switched off or playback is stopped by pressing the button STOP ⑤ twice.
ALL Select ALL to continuously repeat all available titles on the disc, thus the entire disc, until playback repeat is switched off or playback is stopped by pressing the button STOP 5 twice.
No Display To switch off repeat playback press the button REPEAT several times during playback until no more notifi-cations appear in the display.
12.8 Repeat sequence (A - B)
With this function you can repeat playback of a favourite sequence within a chapter of the current playback disc.
To do this ...
During playback press the button A-B as soon as the start of the desired sequence is reached. On the television screen the repeat symbol appears with the notice A.
- Press the button A-B again as soon as the end of the desired sequence is reached. With this, bear in mind that the beginning and end of the sequence must fall within the same chapter.
On the television screen the repeat symbol appears with the notice AB.
Repeat playback of the selected sequence begins immediately without having to press the PLAY/PAUSE
button. The sequence will continuously repeat until you press the button A-B again to switch off the function.
12.9 Direct title/track selection
To select a title/track on the disc directly, during playback, enter the title/track number via the number buttons 20.
If there are more than 9 titles press the button 10+ and then enter the corresponding title/track number.
Example:
Press the button 10+ and enter the number "2" to playback the title/track number 12.
If there are more than 19 title/tracks you must press the button 10+ twice and enter the next number or press the button 10+ twice and enter the number "2" to playback track/title 22.
12.10 Direct chapter, title or time selection via the search function
Note:
This function may not be available on all DVDs/ VCDs/S-VCDs! If you attempt to carry out functions that are not available the symbol will appear in the display.
If you do not want to playback the entire disc you can select a particular chapter/time position.
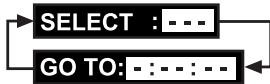
- For this press, during playback, the button GOTO 2 several times to superimpose the following displays one after the other:
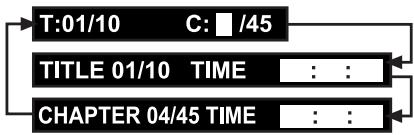
DVD
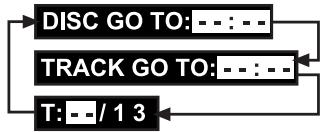
CD/VCD/SVCD
DivX/MPEG
DVD
TC:
Enter here a chapter number from where playback should start.
TITLE TIME
Enter here a time position for the current played back title, from where playback should start.
CHAPTER
TIME
Enter here a time position for the current playback chapter, from where playback should start.
CD/VCD/SVCD
DISC GOTO:
Enter here a time position on the disc from where playback should start.
TRACK GOTO:
Enter here a time position for the current playback title from where playback should start.
T:-:
Enter here a title number from where playback should start.
DivX and MPEG CD
SELECT:
Enter here a title number on the disc from where playback should start.
GOTO:
Enter here a time position for the current playback title from where playback should start.
13. Display functions
13.1 Display disc information
Note:
This function may not be available on all DVDs/ VCDs/S-VCDs! If you attempt to carry out functions that are not available the symbol will appear in the display.
With this function you can superimpose all the available information from a DVD/VCD/S-VCD inserted into the DVD player onto the television screen during playback.
- During playback press the button DISP ① several times to superimpose, one after the other, the following information:
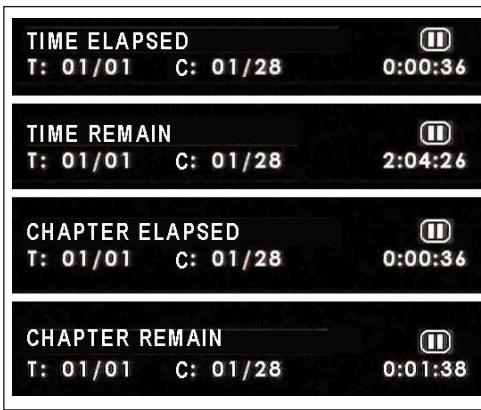
With DVDs:
- the current title number/the total number of titles
- the current chapter number/total number of chapters
- the played back so far time in hours, minutes and seconds (TIME ELAPSED)
- the remaining time of the title in hours, seconds and minutes (TIME REMAIN)
-
the played back so far time of the chapter in hours, minutes and seconds (CHAPTER ELAPSED)
-
the remaining time of the chapter in hours, seconds and minutes (CHAPTER REMAIN)
With VCDs/S-VCDs/DivX/MPEG CDs
- the played back so far time of the current playback title on the CD in minutes and seconds
- the remaining time of the current playback title on the CD in minutes and seconds
For audio CDs:
- the current title number/the total number of titles
- the played back so far time of the current playback title on the CD in minutes and seconds (SZ)
- the remaining time of the current playback title in minutes and seconds (TR)
- the total played back time of the CD in minutes and seconds (DZ)
- the remaining time of the CD in minutes and seconds (DR)
Fading out disc information
- To fade out the disc information press the button DISP 2 again.
13.2 Accessing the DVD menu
Note:
This function may not be available on all DVDs/VCDs/S-VCDs! If you attempt to carry out functions that are not available the symbol will appear in the display.
With many films on DVD there is a main menu on the disc that apart from the option of playing the main film enables you, for example...
to choose the language for subtitles and film dialogue
to select direct from chapters
to playback the films bonus material (Background information, "Making of" etc.)
If such a menu is present on the DVD that is inserted into the DVD player then you can access it, during playback, by pressing the button MENU 0.
- You select particular menu items by pressing the navigation buttons 31 9 16 18; to confirm the selected menu item press ...
the button PLAY/PAUSE 4
or
the button ENTER 17.
To return to playback press the button MENU 10 again.
Note:
If you cancel playback by pressing the button STOP twice (Playback stop without resume function) activation of the main menu on the disc is not possible.
13.3Playback Control (PBC) with VCDs/S-VCDs
Many VCDs/S-VCDs have Playback Control (in short "PBC"). Playback control means a main menu, which allows for operation of several functions of the VCD/ S-VCD.
If PBC is available on the disc inserted into the DVD player then you must first activate it in order to superimpose the menu.
To activate PBC...
- During playback or when playback is stopped press the button MENU ⑩. In the display the notice PBC OFF appears.
- Press the button MENU ⑩ again. In the display the notice PBC ON appears. PBC is now switched on and the main menu on the disc can be accessed with the buttons MENU ⑩ or TITLE ②.
Note:
If you switch on PBC during playback then it is possible that playback will stop and start again from the beginning and/or with the main menu.
13.4 Superimpose and fade out subtitles (DVDs/VCDs/S-VCDs only)
Note:
This function may not be available on all DVDs/VCDs/S-VCDs! If you attempt to carry out functions that are not available the symbol will appear in the display.
In the event that the film on the inserted DVD/VCD/S-VCD has subtitles available then you can superimpose these on the television screen during playback by pressing the button SUBTITLE 3.
- With the first press of the button SUBTITLE 25 the subtitle of the first available language will be superimposed on the television screen.
- With each further press of the button SUBTITLE 35 the subtitles in subsequent available languages, one after the other, will be superimposed on the television screen.
The number of the currently superimposed sub title language will be superimposed on the television screen ( i.e. "1/10" for the first of ten available subtitle languages).
- When the last of the available subtitle languages is superimposed (i.e. "10/10" for the tenth of ten available subtitle languages) then you can switch off the subtitle function by pressing the button SUBTITLE 2 again. OFF will be superimposed on the television screen.
13.5 Changing the playback language
Note:
This function may not be available on all DVDs/VCDs/S-VCDs! If you attempt to carry out functions that are not available the symbol will appear in the display.
- With many films on DVD/VCD/S-VCD you can select another playback language, during playback, by pressing the button AUDIO ⑦.
- With the first press of the AUDIO button the first available playback language will be switched on. With each further press of the AUDIO button other available playback languages will be switched on one after the other.
The currently switched on playback language will be superimposed on the television screen.
13.6 Programming function
You can programme a playback sequence for the titles and chapters that are available on the DVD, VCD, S-VCD disc.
For this, during playback, you press the button PROGRAMME to superimpose the following window:
Programming window
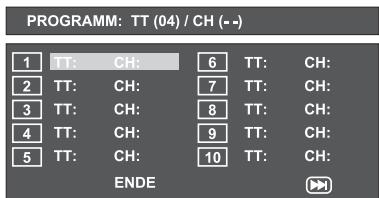
The upper line shows the total number of titles (TT:) available on the disc.
Under this the programme positions 1-10 are listed, programme position 1 is highlighted.
- Enter with the number buttons ② the number of the title, which shall be played back first.
The upper line will now show the chapters available in this title (CH:).
-
Enter with the number buttons ① the number of the chapter that shall be played back. The highlighting moves to the programme position 2.
-
Select with the navigation buttons further programme positions and enter the title and chapter number for these programme positions.
To show the next 10 programme positions select with the navigation buttons ▲▼ 31 9 16 the field and press the button ENTER 7. You can allocate up to 20 programme positions.
- To delete entries in a programme select the programme position and press the button ENTER ①.
- To cancel the programming function select the field EXIT and press the button ENTER ⑦. All allocated programme positions are deleted.
4. Start playback of the programme position by selecting the field START and pressing the button ENTER ①.
During the programmed playback the notice PROGRAMME appears in the display.
The programme list will be deleted as soon as you press the STOP button.
14 Display of MP3/WMA/JPEG/AVI/MPEG and DivX data
- Insert a storage medium into the DVD player. The contents of the data medium will be shown on the display:
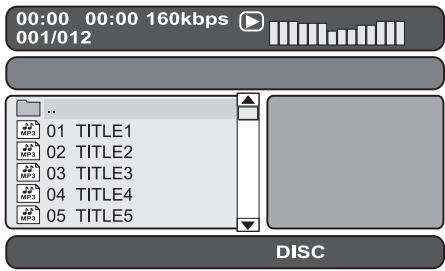
Display of MP3 data
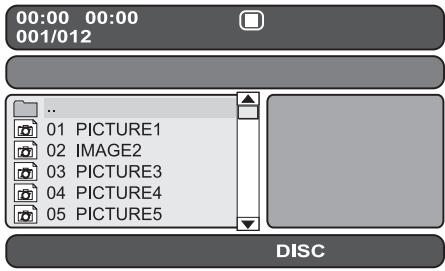
Display of JPEG data
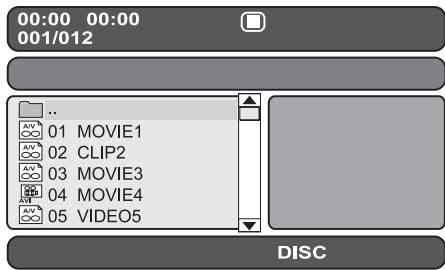
Display of AVI, MPEG and DivX data
- The data will be listed on the left (Data window). Folders will be depicted with the symbol .
To superimpose the folders available on the disc press the button PROGRAMME 2 several times until the notice FOLDER appears at the bottom of the display. - Press the button PROGRAMME ② again.
- Folders will now be faded out and all data on the disc is represented in a list.
- The area on the right is intended for the previewing of JPEG images. A preview appears as soon as you highlight a JPEG data in the data window.
- At the bottom is located the information bar, in which is displayed the image size (JPEG Image) as well as the medium (DISC, USB or SD/MMC), on which the data is located.
- Select a data with the help of the navigation buttons - Pressing the button ENTER 17 you confirm your selection. The data will be played back and/or the JPEG Photo displayed.
To open a folder, select the folder and press the button ENTER ⑦. The contents of the folder will be listed.
2. To reach a higher folder level select the symbol with the entry ". ." and press the button ENTER ①.
15. Playback of MP3/WMA/MPEG and DivX discs
- Select a data with the help of the navigation buttons - Pressing the button ENTER 7 you confirm your selection. Playback starts immediately.
With the playback of music or video data the following functions can be used:
Play/Pause
See "12 Playback functions"
Stop
See "12 Playback functions"
Skip
See "12 Playback functions"
Search
See "12 Playback functions"
Slow (with MPEG and DivX data only)
See "12 Playback functions"
Zoom (with JPEG, MPEG and DivX data only)
See "12 Playback functions"
AB Repeat
See "12 Playback functions"
15.1 Repeat function with MP3/WMA/MPEG/JPEG/DivX discs
During playback press the button REPEAT ① several times to apply the following repeat functions (the set function appears in the display):
REPEAT1 Endless repeat of the current title/image.
REPEAT
FOLDER Repeat the current folder.
REPEAT ALL Repeat all folders.
SHUFFLE Random playback of all titles/images.
RANDOM Random playback of all titles/images whereby each title/image will played back only once.
SINGLE One time playback of the current title/ image (Repeat function off).
15.2 Replay of JPEG discs
- Highlight with the navigation buttons 15 an image and press the button ENTER or PLAY/PAUSE to open the image.
The image is shown on the display
Subsequently change the view to the next available image on the disc/in the folder.
- To show the currently displayed image longer press the button PLAY/PAUSE 4.
To continue the playback press the button PLAY/PAUSE again. - You can access an image direct by entering the data number of the image with the number buttons 20 and subsequently confirm with the button ENTER 1.
-
With the navigation buttons you can, during playback, rotate the image in 90^ steps.
-
During playback press the button STOP to display a miniature view of all the images in the folder/ on the disc. 12 miniatures will be displayed on each page.
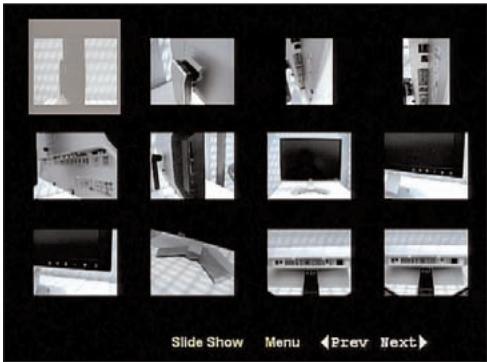
- Select with the navigation buttons 31 9 16 18 an image and start playback with ENTER 17 or PLAY/PAUSE 4.
- Select with the navigation buttons one of the following entries of the lower display line and confirm with ENTER 1:
Slide Show Starts a slide show of the images in the folder/on the disc
Menu Shows the available button functions for JPEG playback. Press the button ENTER ① until this view has faded out.
Prev changes to the previous page Next changes to the next page
- Press the button MENU to change back to the data list again.
16. Playback of USB/SD/MMC data mediums
16.1 Compatible data mediums
With your device you can playback MP3/WMA/JPEG/AVI/MPEG/DivX data from USB data mediums (Universal Serial Bus = universal interface for data transfer) like, for example, a USB Stick or Flash memory card in the SD/MMC formats.
Note:
Due to the vast number of available storage mediums there can be no guarantee of compatibility with all current and future storage mediums. Do NOT connect to the device any hard discs that are equipped with a USB connection! This can result in the loss of data!
16.2 Using USB/SD/MMC data mediums
- Plug the USB plug of the USB data medium in the USB connection ③ of the DVD player and/or an SD/MMC-card in the slot for SD/MMC cards ④ as described in chapter 8.
- Press the button USB/CARD/DVD ① several times until at the bottom in the display ⑦ the notice "USB" and/or CARD appears. The playback of MP3/WMA/AVI/MPEG/JPEG/DivX data is exactly the same as playback from a disc.
To switch back to the disc playback again press the button USB/CARD/DVD several times until at the bottom in the display the notice DISC appears.
17. Cleaning of the DVD player
- Clean the housing of the DVD player exclusively with a soft damp cloth and a mild washing-up liquid. When cleaning make sure that no moisture gets into the DVD player!
- If necessary, clean the inside of the disc tray exclusively with a clean dry brush (i.e.a lens brush, obtainable from a photographic dealer). Never use anything wet to clean the inside of the disc tray!
Warning!
Moisture penetrating into the DVD player creates the risk of an electric shock! Besides which, moisture can cause irreparable damage to the DVD player!
18. Disposal

Do not dispose of the appliance in your normal domestic waste.
Dispose of the appliance through an approved disposal centre or at your community waste facility.
- Observe the currently valid regulations In case of doubt please contact your local waste disposal centre.
18.2 Disposing of batteries!
- Batteries should not be disposed of with household waste. Every consumer is obliged by law to deposit all batteries at a collecting point of his community/his precinct or to return them to a shop.
This obligation is intended to ensure that batteries are disposed of in an environmentally safe fashion.
Only dispose of batteries when they are fully discharged.
19. Troubleshooting
Display is blank/DVD player shows no functions even though it is switched on
A Check whether the power supply unit is properly plugged into the socket.
B Check to see that the socket, into which you have plugged the power supply unit of the DVD player is supplying electricity by plugging in another device. If necessary, plug the power supply unit of the DVD player into another socket.
C Switch off the DVD player with the POWER switch and then wait ten seconds. Subsequently switch the DVD player on again.
Display shows "No Disc" even though a disc is inserted
A The disc is dirty, scratched or damaged. Clean the disc or insert another disc.
B The Country/Region code on the inserted DVD/VCD/S-VCD does not correspond to the Country/Region code of the DVD player. In this case the DVD/VCD/S-VCD cannot be played with the DVD player.
Inserted disc will not playback
- A film of condensation may have formed on the laser sensor lens of the DVD player. In particular this may occur if the DVD player has been subjected to large temperature fluctuations.
If this is the case place the DVD player in a dry environment at normal room temperature. First remove any disc that may be inserted into the disc tray. Then leave the DVD player switched off for at least one hour without using until the condensation film has evaporated.
No image or black/white image only
A Check to make sure that all connection cables between the DVD player and the LCD monitors (or other devices) are firmly inserted into the corresponding sockets
B Check to see that the television standard, which you set with the N/P button matches the connection variation, with which you have connected the DVD player to a television (or video projector).
C Check by means of the televisions (or Video projectors) operating instructions to see if settings to the television (or Video projector) may be necessary in order to use the DVD player with the television.
No sound
A Check to see if the DVD player is possibly switched to mute (MUTE button).
B Check to see that all connecting cables between the DVD player and potentially connected audio components are firmly plugged into the corresponding sockets
C Check to see if you have reduced the volume on the LCD monitors
D Check by means of the televisions operating instructions to see if settings to the television may be necessary in order to use the DVD player with the television.
Check by means of the operating instructions for a potential connected audio component if settings to it are necessary in order to use it with the DVD player.
No 4:3 or 16:9 image
A Check by means of the televisions operating instructions, which image formats the television has at its disposal.
B Check to see if the settings in the OSD menu match the available image format of the television.
Remote control not functioning
A Check whether the remote control battery is inserted into the battery compartment with the correct polarity.
B Check to see if the remote control battery is depleted and, if necessary change the battery.
C Make sure that there are no obstacles located between the remote control and the DVD player.
D Be situated no more than five meters from the DVD player when using the remote control.
Playback language/ Subtitle language do not correspond to the settings in the OSD menu
The playback language/Subtitle language setting in the OSD menu is not available on the inserted disc.
One or several functions can not be switched on
The selected function may not be available on all DVDs/VCDs/S-VCDs! If you attempt to carry out a function that is not available the symbol will appear in the display.
None of the buttons on the appliance or on the remote control are functioning/other malfunctions
A Switch off the DVD player with the POWER switch and then wait ten seconds. Subsequently switch the DVD player on again.
B If the malfunction is still present: Reset the DVD player to its default settings.
Contact one of our service partners in your area if ...
the stated function defect can not be resolved as described or
- other functional defects arise.
For this see chapter 21 "Warranty and service".
20. Glossary / Key Word Index
20.1 What are DVDs, VCDs and S-VCDs?
DVDs
DVD is the abbreviation for "Digital Versatile Disc". DVDs are a storage medium for audio and video data; they are available in 8 cm and 12 cm (Diameter) formats. Because of the much higher storage capacity as compared to CD-Rs/CD-RWs DVDs can provide a playback duration of up to eight hours for the audio and video data stored on them.
VCDs/S-VCDs
"Video CD" (VCD) and "Super Video CD" (S-VCD) are designations for two processes of compressed storage, thus space saving, of films on CDs. VCDs and S-VCDs are available in 8 cm and 12 cm (Diameter) formats. Their storage capacity is a great deal lower than that of DVDs. For this reason they only offer a playback duration, for the saved audio and video data on them, of 20 minutes (8 cm format) and/or 74 minutes (12 cm format).
VCDs are available in two versions:
- With version 1.1 VCDs/S-VCDs only audio and video data can be played back.
- With version 2.0 VCDs/S-VCDs, PBC (Playback Control) functions are available. In addition still images can be played back in a higher resolution.
Playback Control (PBC)
Version 2.0 VCDs/S-VCDs have Playback Control (in short "PBC") at their disposal. Then on the VCD/S-VCD a main menu is available, by which various functions of the VCD/S-VCD are allowed to be operated.
20.2 What are Title and Chapter?
Title is the name given to the largest units of image and sound units on DVDs; on many DVDs the (Main) film has the title number 01. For bonus material (i.e. Film trailer, background information etc.), that is available on many DVDs, other possible title numbers can be used.
Chapter is the name given to the next smaller image and sound units beneath title. If the DVD/VCD/S-VCD or its title is divided into chapters, numbers are assigned to you, through the input of which the chapter can be selected direct.
Bear in mind that not on all DVDs ...
- are the DVD or the title divided into (numbered) chapters
- Chapters are also designated as "Scenes" (i.e. in the main menu of DVDs)
20.3 Dolby Surround
Dolby Surround is an analogue sound format, by which the two channels of a stereo sound signal are used in order to accommodate room sound information for further channels. With a Dolby Surround decoder the signals are again converted into sound and/or music and are fed to two additional loudspeakers, which are to be situated behind the listening area.
Dolby Prologic
In comparison to Dolby Surround sound format, with Dolby Prologic an additional channel in the stereo signal is used; this is the so called "Centre" channel. The corresponding centre loudspeaker is to be situated in the middle between the stereo loudspeakers.
The deepest sounds are fed to a bass loudspeaker, the so called "Subwoofer". The subwoofer can be placed in any desired location in the room; the logic for this is that the bass sounds that the subwoofer puts out can scarcely be localized exactly by the human ear
Dolby Digital (5.1)
Dolby Digital, also designated as AC3, is a digital sound format, by which up to six separate audio channels can be transported. With most of the current DVDs, the sound is stored in the so called "Dolby Digital 5.1" format; the "5" in the title "5.1" stands for three front and two rear surround sound channels, the "1" for the bass sound channel.
DTS
DTS is the abbreviation for "Digital Theatre System" and refers to one of the most common surround sound formats for DVDs. As with Dolby Digital 5.1, DTS uses three front and two rear surround sound channels as well as a bass sound channel.
20.4 What are PAL and NTSC?
PAL
PAL is the abbreviation for "Phase Alternation Line". PAL is the mid and west Europe (Exception: France, see the heading "SECAM") customary and most wide spread colour television standard.
NTSC
NTSC is the abbreviation for "National Television System Committee". NTSC is a colour television standard that is primarily used in the USA and Japan.
20.5 MP3, WMA, JPEG, DivX and MPEG
MP3
MP3 denotes a process and/or format developed by the Fraunhofer Institute for the compression of audio data. In the MP3 format compressed music pieces are only a fraction of their original size, which,
for example, on CD-Rs/CD-RWs allows for storage of a considerably greater volume of music than on commercially available audio CDs, on which audio data is stored in the CDA format.
The structure of an MP3-CD can, for example, appear as follows, if the MP3 data is stored in files:
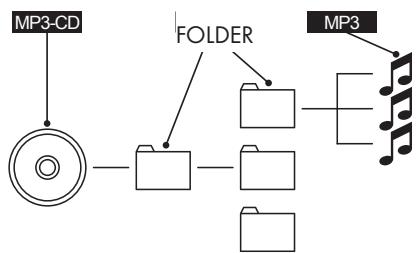
WMA
WMA ("Windows® Media Audio") is a data format developed by Microsoft® for audio data.
JPEG
JPEG ("Joint Photographics Expert Group") denotes a wide spread graphic format, developed by the organization with the same name, with which image data of the colour and grey scales are compressed.
DivX
DivX is a coding format for videos and multimedia data, invented by the DivX Networks, Inc company.
MPEG
MPEG ("Moving Picture Experts Group") refers to a video compression format.
20.6 What are files?
As opposed to audio CDs the title on a CD-R/CD-RW with MP3-, WMA- or JPEG data can be stored in files, for example, in order to file titles from different genres.
21. Warranty and service
The warranty for this appliance is for 3 years from the date of purchase. Should you have grounds for complaint, despite our high quality standards, please contact our Service Hotline. In the event that your complaint cannot be resolved over the telephone, you will receive from them
- a processing number (RMA number) as well as
- an address, to which you can send your product for warranty processing.
In the case of a mail-in shipment please enclose a copy of the purchase receipt (sales slip). The appliance must be securely packed and the RMA number clearly visible. Shipments without an RMA number can not be processed.
Note:
The warranty provisions cover only material or factory defects.
The warranty provisions do not cover
- worn out parts
- damage to breakable parts like switches or rechargeable batteries.
This product is for private use only and is not intended for commercial use. The warranty is void in the case of abusive and improper handling, use of force and internal tampering not carried out by our authorized service branch. Your statutory warranty claims are not restricted by this warranty.
22. Importer
Kompernass GmbH
Burgstrasse 21
D-44867 Bochum
www.kompernass.com
SilverCrest
MOBILE DVD PLAYER with two monitors KH 2360
In order to guarantee a cost free repair procedure please get in touch with the service hotline. Make sure you have your sales slip handy.
Sender, please write clearly:
Last name:
First name
Street
City/Town
Country
Telephone
Date/Signature
Description of fault:
Warranty
IE
Kompernass Service Ireland
c/o Irish Connection
41 Harbour view
Howth Co. Dublin
Tel: 087-99 62 077
Fax: 18398056
e-mail: support.ie@kompernass.com

- KH 2360
- Portable DVD player
- Technical Data
- DVD player
- Mains plug
- Vehicle adapter
- Headphones
- LCD screens
- Applications and functions
- Playback formats
- Output/playback device
- Important!
- Safety Instructions
- Danger of electrical shocks.
- Risk of fire!
- Injury hazard
- Danger! Laser radiation!
- Thunderstorms!
- Notice regarding surge voltages (FEO / fast electrical overloads):
- Notice regarding the handling of batteries/rechargeable battery pack
- Risk of Explosion!
- Appliance description
- Remote control
- Starting Up the Device
- Preparing the remote control
- Inserting the battery
- Using the remote control
- Attaching the LCD monitor to a headrest
- Note:
- Carrying out connections
- Connecting the LCD monitors to the DVD player
- Mains power connection
- Connection with the power supply unit
- Making a power connection with the vehicle adapter
- Connection to another device
- Connection to a television
- Audio connection with a stereo system
- Connecting external devices to the DVD player via AV IN (i.e. game consul)
- Setting the TV standard
- Headphone connection
- Setting the display position
- Card reader and USB connection
- Inserting memory cards/USB memory sticks with MP3/WMA/Mpeg4/ JPEG data
- Proper insertion of memory cards of the type SD and MMC into the DVD player:
- Warning!
- Allow the memory card to slide in without force:
- Supported memory card types
- MultiMediaCard /SecureDigital memory cards (MMC/SD)
- USB memory sticks (USB)
- Displaying the contents of the memory card/USB memory stick
- Removal of Memory cards/USB Memory sticks from the memory card slot
- Playback procedure for a memory card:
- Use
- Switching the device on and off in the standby mode
- Display settings
- Setting the image format
- The setup menu
- Navigating in the menu
- Exiting the setup menu
- General Setup Page
- TV display
- Angle Mark
- OSD Language
- Closed Captions
- Screen Saver
- Video Setup Page
- Sharpness
- Brightness
- Contrast
- Hue
- Saturation
- Preference Page
- PBC
- AUDIO
- SUBTITLE
- DISC MENU
- PARENTAL
- Example
- Password
- DEFAULT
- Sound functions
- To control the Volume
- Mute
- Playback functions
- Playback start, stop, pause
- Pause playback
- Stop playback
- Resume function
- SKIP function (Chapter/Title forward/backward)
- Search forward/backwards
- Slow motion function (DVD, VCD, S-VCD and DivX only)
- Image enlargement (Zoom)
- Viewing angle (DVD only)
- Repeat function for DVDs, VCDs, S-VCDs and Audio CDs
- Repeat sequence (A - B)
- Direct title/track selection
- Example:
- Direct chapter, title or time selection via the search function
- DVD
- CD/VCD/SVCD
- DivX and MPEG CD
- Display functions
- Display disc information
- With DVDs:
- With VCDs/S-VCDs/DivX/MPEG CDs
- For audio CDs:
- Fading out disc information
- Accessing the DVD menu
- 13.3Playback Control (PBC) with VCDs/S-VCDs
- Superimpose and fade out subtitles (DVDs/VCDs/S-VCDs only)
- Changing the playback language
- Programming function
- Programming window
- Display of MP3/WMA/JPEG/AVI/MPEG and DivX data
- Playback of MP3/WMA/MPEG and DivX discs
- Play/Pause
- Stop
- Skip
- Search
- Slow (with MPEG and DivX data only)
- Zoom (with JPEG, MPEG and DivX data only)
- AB Repeat
- Repeat function with MP3/WMA/MPEG/JPEG/DivX discs
- REPEAT
- Replay of JPEG discs
- Playback of USB/SD/MMC data mediums
- Compatible data mediums
- Using USB/SD/MMC data mediums
- Cleaning of the DVD player
- Disposal
- Disposing of batteries!
- Troubleshooting
- Display is blank/DVD player shows no functions even though it is switched on
- Display shows "No Disc" even though a disc is inserted
- Inserted disc will not playback
- No image or black/white image only
- No sound
- No 4:3 or 16:9 image
- Remote control not functioning
- Playback language/ Subtitle language do not correspond to the settings in the OSD menu
- One or several functions can not be switched on
- None of the buttons on the appliance or on the remote control are functioning/other malfunctions
- Contact one of our service partners in your area if ...
- Glossary / Key Word Index
- What are DVDs, VCDs and S-VCDs?
- DVDs
- VCDs/S-VCDs
- Playback Control (PBC)
- What are Title and Chapter?
- Dolby Surround
- Dolby Prologic
- Dolby Digital (5.1)
- DTS
- What are PAL and NTSC?
- PAL
- NTSC
- MP3, WMA, JPEG, DivX and MPEG
- MP3
- WMA
- JPEG
- DivX
- MPEG
- What are files?
- Warranty and service
- Importer
- Warranty
Brand : SILVERCREST
Model : KH 2360
Category : Television