EKC6707 - Oven ELECTROLUX - Free user manual and instructions
Find the device manual for free EKC6707 ELECTROLUX in PDF.

User questions about EKC6707 ELECTROLUX
0 question about this device. Answer the ones you know or ask your own.
Ask a new question about this device
Download the instructions for your Oven in PDF format for free! Find your manual EKC6707 - ELECTROLUX and take your electronic device back in hand. On this page are published all the documents necessary for the use of your device. EKC6707 by ELECTROLUX.
USER MANUAL EKC6707 ELECTROLUX
natural_image
Simple line drawing of a kitchen oven with a mounted dish (no text or symbols)Model EKC6707

natural_image
Abstract black circular logo with a stylized letter 'B' on light blue background (no text or symbols)ENGLISH
⚠️ Important Safety Information

You MUST read these warnings carefully before installing or using the hob. If you need assistance, contact our Customer Care Department.
- The work of installation must be carried out by competent and qualified installers according to the regulations in force.
- Any modifications to the domestic electrical mains which may be necessary for the installation of the appliance should be carried out only by competent personnel.
- Check your appliance for any transport damage. Never connect a damaged appliance. If your appliance is damaged, contact your supplier.
- It is dangerous to modify, or attempt to modify, the characteristics of this appliance.
- Avoid installation of the appliance near inflammable material (e.g. curtains, tea towels, etc.).
- This appliance is heavy. Take care when moving it.
- This appliance cannot be positioned on a base.
- Remove all packaging before using the appliance.
- Some parts have a shock-resistant plastic film protection. Be sure to remove this plastic film before you start operating the appliance and clean the parts involved using a soft cloth wrung out in warm water to which a little washing up liquid has been added.
- Ensure that the gas and electrical supply complies with the type stated on the rating plate, located near the gas supply pipe.
Child Safety
- This appliance is designed to be operated by adults. Do not allow children to play near or with the appliance.
- The appliance gets hot when it is in use. Children should be kept away until it has cooled.
- Children can also injure themselves by pulling pans or pots off the appliance.
During Use
- This appliance is intended for domestic cooking only. It is not designed for commercial or industrial purposes.
- Ensure a good ventilation around the appliance. A poor air supply could cause lack of oxygen.
- This appliance is not connected to a combustion products evacuation device. It shall be installed and connected in accordance with current installation regulations. Particular attention shall be given to the relevant requirements regarding ventilation.
-
When in use the appliance will produce heat and moisture in the room in which it has been installed. Ensure there is a continuous air supply, keeping air vents in good condition or installing a cooker hood with a venting hose.
-
When using the appliance for a long period of time, the ventilation should be improved, by opening a window or increasing the extractor speed.
- If the appliance is fitted with a cover, its function is to protect the surface from dust when closed and to accumulate splashes of grease when open. Do not use for other purposes.
• Always clean the cover before closing. - Leave the burners and/or plates to cool before closing the cover.
- Do not use this appliance if it is in contact with water. Do not operate the appliance with wet hands.
- Ensure the control knobs are in the 'OFF' position when not in use.
- During use the appliance becomes hot. Care should be taken to avoid touching heating elements inside the oven.
- Always stand back from the oven when opening the oven door, to allow any build-up of steam or heat to release.
- When using other electrical appliances, ensure the cable does not come into contact with the hot surfaces of the appliance.
- Unstable or misshapen pans should not be used on the hob burners as unstable pans can cause an accident by tipping or spillage.
- To facilitate ignition, light the burners before placing pans on the grid. After having lit the burners check that the flame is regular.
• Always lower the flame or turn it off before removing the pan. - Never leave the appliance unattended when cooking with oil and fats.
- This appliance should be kept clean at all times. A build-up of fats or foodstuffs could result in a fire.
- Never use plastic dishes in the oven or on the hob burners. Never line any part of the oven with aluminium foil.
• Always ensure that the oven vent which is located at the centre back of the hob is left unobstructed to ensure ventilation of the oven cavity. - Perishable food, plastic items and areosols may be affected by heat and should not be stored above the appliance.
- Only heat-resistant plates may be placed in the drawer situated under the oven. Do not put combustible materials there.
- Never use steam or high pressure steam cleaners to clean the appliance.
Service
- This appliance should only be repaired or serviced by an authorised Service Engineer and only genuine approved spare parts should be used.
Contents
For the User
Important Safety Information 2
Control Panel 4
The Gas Burner Controls 5
Electric Hotplate Control 6
Hints and Tips 6
Electric Oven 7
Before the First Use of the Appliance 8
Hints and Tips for using the hob 9
Hints and Tips for using the oven 9
Defrosting 13
Cooking Chart - Conventional and Fan cooking 14
Cooking Chart - Grilling 15
Cooking Chart - Pizza 15
Maintenance and Cleaning 16
Cleaning the Oven 17
Something not working 20
Service and Spare Parts 20
For the Installer
Instructions for the Installer 21
Technical data 21
Gas connection 22
Adaptation to different kinds of gas 23
Electrical connection 24

Environmental Information
• After installation, please dispose of the packaging with due regard to safety and the environment.
- When disposing of an old appliance, make it unusable, by cutting off the cable.
• The symbol 📋 on the product or on its packaging
indicates that this product may not be treated as household waste. Instead it shall be handed over to the applicable collection point for the recycling of electrical and electronic equipment. By ensuring this product is disposed of correctly, you will help prevent potential negative consequences for the environment and human health, which could otherwise be caused by inappropriate waste handling of this product. For more detailed information about recycling of this product, please contact your local city office, your household waste disposal service or the shop where you purchased the product.
Guide to Use the instructions
The following symbols will be found in the text to guide you throughout the Instructions:

Safety Instructions

Step by step instructions for an operation

Hints and Tips

Environmental Information
Keep this instruction book for future reference and ensure it is passed on to any new owner.
These instructions are only valid for countries whose identification symbols are shown on the cover of this instruction booklet and on the appliance itself.

This appliance is manufactured according to the following EEC directives: 73/23 EEC - 90/683 EEC - 93/68 EEC - 89/336 EEC - 90/396 EEC, current edition.
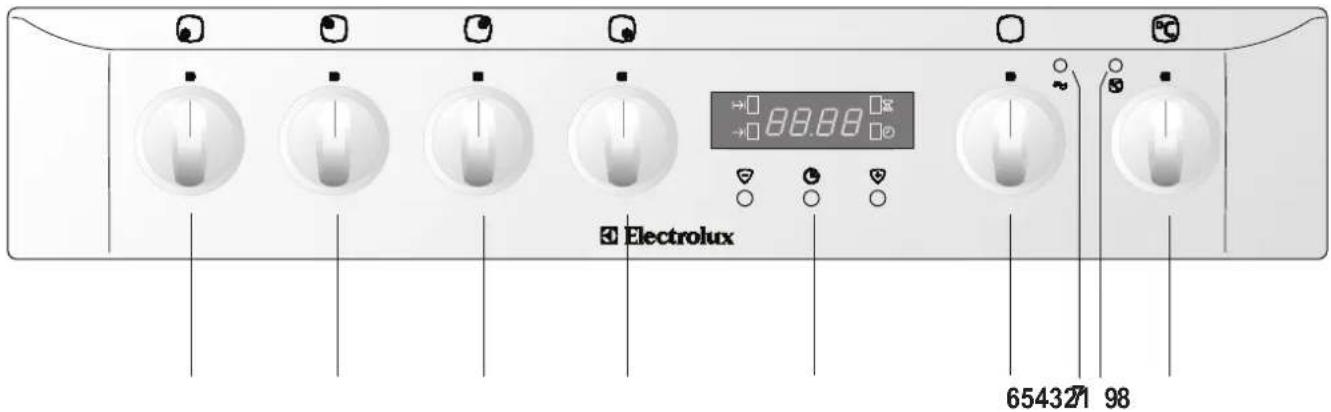
Control Panel
text_image
Electrolux 6543271 98- Front left cooking zone control knob
- Back left cooking zone control knob
- Back right cooking zon control knob
- Front right cooking zone control knob
-
Electronic Programmer
-
Oven function control knob
- Mains on Light
- Oven Thermostat Pilot Light
- Oven thermostat control knob
The Oven Cavity

text_image
Grill element Oven Light Oven fanAccessories
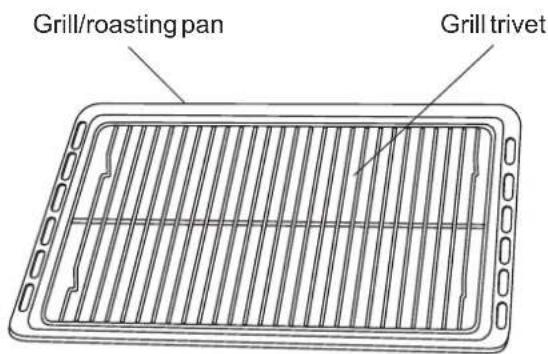
text_image
Grill/roasting pan Grill trivetAnti-tip shelf (x 2)
natural_image
Line drawing of a rectangular grid structure with vertical bars, no text or symbols presentCeramic glass hob
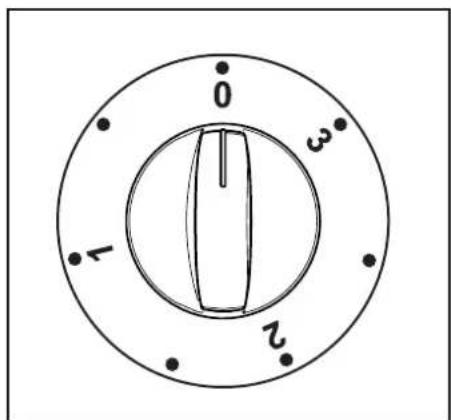
Using the hotplates
The control panel incorporates knobs to operate the four hot plates.
A) This is a 7 position control knob: 0 = off and 1-3 indicate the levels of power uo to the mawimum.
B) Double circuit cooking zone: this cooking zone has two heating elements.
- To switch on the smaller cooking zone, turn the relevant control knob to the required heat setting between 1 and 3.
text_image
0 1 2 3- To switch on both heating elements, turn the control knob to maximum heat setting (3) then turn the knob further to nearly reach the "0" symbol. You will hear a "click" and the wider cooking zone will switch on. Then turn back the knob and adjust it to the required heat setting. Now the two heating elements will operate together, giving a higher power output that a normal cooking zone.
Hob pilot light
The ceramic glass hob is equipped with a pilot light which turns on when the surface is too hot; it is a helpful device which protects users from burns.
This light turns on some minutes after the plate has been set into operation, abd it stays on during the whole time of functioning and also when the plate is off to show the presence of residual heat in the pyroceram surface.
The pilot light turns finally off only when the surface temperature decreases to safety values (lukewarm temperature), more o less 50°C, allowing users to clean the plate with no risk.
i Practical hints
The ceramic glass hob is resistant to sudden changes in temperature, it is insensitive to heat and cold and hals also a good resistance to mechanical blows; a sharpened object, however, no matter if it is small (for example a point of a knife) can irreparably damage the cooking surface, jeopardising its functionality.
Before using the cooking plate for the first time, carefully wash the pyroceram plate with a non-abrasive detergent, dry it and then wsitch it on for about 10 minutes at the highest position.
When using the cooking plate for the first time, unpleasant smells, or smell of burnt material, might be smelt: this is absolutely normal and it is due to the evaporation of greasy working residues and of hte dope used during the installation. These smells will vanish after some time of working.

Attention: if the surface shows a crack, immediately switch the equipment off and call the Aftersales Service.
Suitable pans and pots
Remember that a large pan offers a larger surface to heat and therefore cooks food quicker than a narrow pan.
Always use pans of a size suitable for the food to be cooked. In particular, take care that pans are not too small for liquid preparations which could easily spill over or that they are not too big for food which must be cooked quickly; uncovered areas on the bottom are easily burnt by fats and juice.
For cakes, it is preferable to use tins which do not open. A tin which opens lets out fruit juices and sugar which, when spilling onto the bottom of the oven, caramelize and are difficult to clean. Avoid placing pans with plastic handles in the oven as they may not support the heat.
Saucepans suitable for use on solid plate hobs should have several characteristics:

text_image
0 3 1 2- they should be heavy duty.
- they should fit the heat area exactly, or be slightly larger for efficient use, NEVER smaller.
- they should have a flat base to ensure good contact with the plate.
This is particularly important when using pans for high temperature frying or pressure cooking.
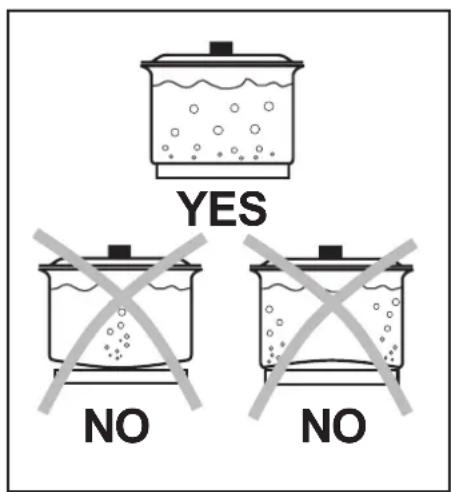
Ensure pans are large enough to avoid liquids being split onto the plates.
Never leave the plates on without a pan on them or with an empty pan on them.
Particular care should be taken when cooking with oil or fat.
During cooking, when using fats or oils, take particular care as they can, when over-heated, self-ignite.
text_image
YES NO NOElectric Oven
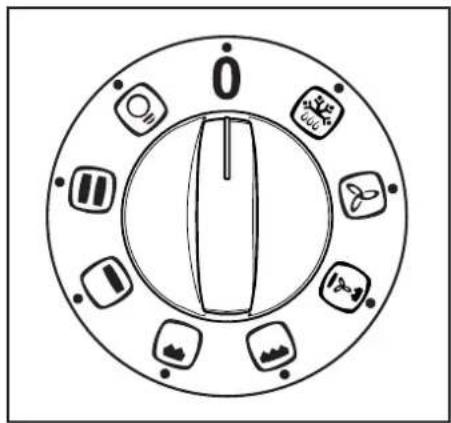
Oven Function and Thermostat control knobs
They enable to select the most appropriate type of heating for the different cooking requirements by appropriately connecting the heating elements and adjusting temperature to the required level.

Oven Light - The oven light will be on without any cooking function

Conventional cooking - The heat comes from both the top and bottom element, ensuring even heating inside the oven.

Bottom heating element - The heat comes from the bottom of the oven only.

Inner grill element only - can be used for grilling small quantities.

Full Grill - The full grill element will be on.

Pizza - The bottom element provides direct heat to the base of pizzas, quiches or pies, while the fan ensures air is circulated to cook the pizza toppings or pie fillings.

Fan cooking - This allows you to roast or roast and bake simultaneously using any shelf, without flavour transference.

Defrost Setting - This setting is intended to assist in thawing of frozen food.
Thermostat Control Knob
Turn the thermostat control knob clockwise to select temperatures between 50°C and 230°C (MAX).
Thermostat Control Light ℃
The thermostat control light will come on when the thermostat control knob is turned. The light will remain on until the correct temperature is reached. It will then cycle on and off to show the temperature is being maintained.
Mains on Light
The mains on light will come on when the oven function control knob and/or the cooking zone control knobs are set.
The Safety Thermostat
This oven is provided with a safety thermostat. In case of malfunctioning of the main thermostat, and consequential over-heating, the safety device will stop the power supply to the appliance. If this happens, call your local Service Force Centre. Under no circumstances should you attempt to repair the appliance yourself.
text_image
0 1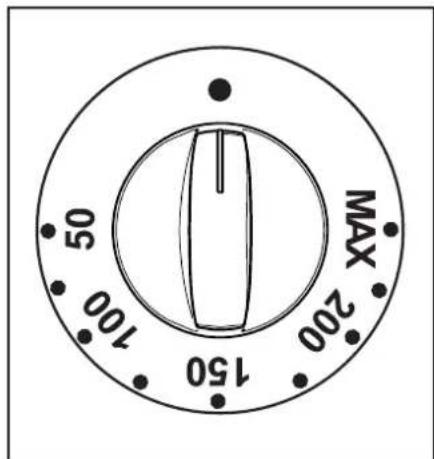
text_image
MAX 50 100 150 200Before the First Use of the Appliance

Before using the appliance, remove all packaging, both inside and outside the appliance, including the advertising labels and any protective film.

Before cooking for the first time, carefully wash the oven accessories.
Before first use, the oven should be heated without food. During this time, an unpleasant odour may be emitted. This is quite normal.

The oven will work only if the time of day has been set.
- Set the time of day with the electronic programmer (see chapter "Electronic Programmer").
- Switch the oven function control knob to conventional cooking
- Set the thermostat control knob to MAX.
- Open a window for ventilation.
- Allow the oven to run empty for approximately 45 minutes.
This procedure should be repeated with the full grill function and fan cooking function for approximately 5-10 minutes.

Once this operation is carried out, let the oven cool down, then clean the oven cavity with a soft cloth soaked in warm water to which a little mild washing-up liquid has been added.
Storage Drawer
The storage drawer is located underneath the oven cavity.

During cooking the storage drawer may become hot if the oven is on high for a long period of time, therefore flammable materials such as oven gloves, tea towels, plastic aprons etc. should not be stored in the drawer.
Oven accessories such as baking sheets, will also become hot, therefore care should be taken when removing these items from the drawer whilst the oven is in use or still hot.
Electronic Programmer

text_image
5 6 4 12.00 7 8 - + 1 3 2- Push button for selecting a function
- Decreasing control button
- Increasing control button
- Display
- "Cooking Duration" pilot lamp |→|
- "End of cooking" pilot lamp →
- "Minute minder" pilot lamp
- "Time of day" pilot lamp ⏱
The oven will only work if the time of day has been set. However, the oven can also be operated without any programme.
Setting the time of day ⏻
When the power supply is switched on, or after a power failure, the "Time of day" pilot lamp will flash on the display.
To set the correct time of day:
- Press button ☑. ☑
- After the setting is carried out, wait for 5 seconds: the "Time of day" pilot lamp ⏻will go out and the display will show the set time. The appliance is ready for use.
To reset the correct time of day:
- Press button ② repeatedly to select the "Time of day" function. The relevant pilot lamp will start flashing. Then proceed as described above. The time of day can only be reset if no automatic function (cook duration |→| or end of cooking) has been set.
"Cooking Duration" function |→|
This function allows the oven to automatically switch off at the end of a programmed cooking duration time. Place food in the oven, select a cooking function and adjust the cooking temperature. Press button ② repeatedly to select the "Cooking Duration" function. The relevant pilot lamp I will start flashing. Then, proceed as follows:
To set the duration time:
- Press button ⚙️. ⏰
- After the setting is carried out, wait for 5 seconds: the "Cooking Duration" pilot lamp I will come on and the display will revert to the time of day.
- When cooking time is over, the oven will be switched off automatically and an acoustic alarm will be heard, while the pilot lamp will start flashing. Turn the oven function and the thermostat control knob to zero. To switch off the acoustic alarm, press any button.
NOTE: turning the acoustic alarm off will reset the oven to manual, and if the oven function and the thermostat knobs are not set to zero the oven will start to heat again.
To cancel the duration time:
- Press button 📋 repeatedly to select the "Cooking Duration" function. The relevant pilot lamp I will flash and the display will show the remaining cooking time.
- Press button ⬇ until the display shows "0:00". After 5 seconds the pilot lamp will go out and the display will revert to the time of day.

text_image
12.00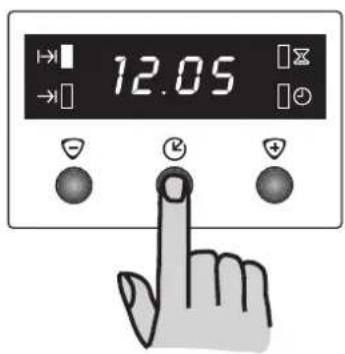
text_image
12.05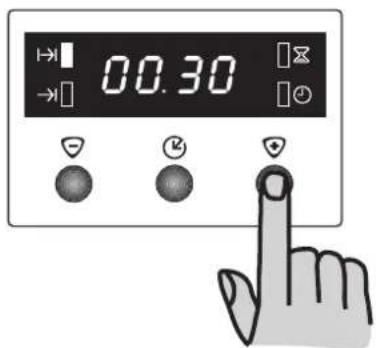
text_image
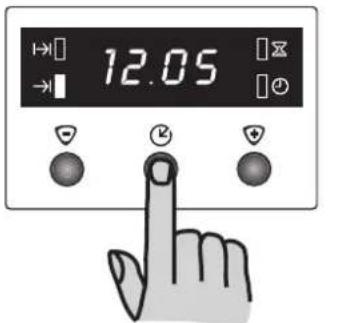
00.30"End of cooking" function →
With this function, you can set the oven to switch off automatically when a programmed end of cooking time is over. Place food in the oven, select a cooking function and adjust the cooking temperature. Press button 2 repeatedly to select the "End of cooking" function. The relevant pilot lamp will start flashing. Then, proceed as follows:
To set the End of cooking time:
- Press button
- After the setting is carried out, wait for 5 seconds: the "End of cooking" pilot lamp will come on and the display will revert to the time of day.
- When cooking time is over, the oven will be switched off automatically and an acoustic alarm will be heard, and the pilot lamp will start flashing. Turn the oven function and the thermostat control knob to zero.
To switch off the acoustic alarm, press any button. NOTE: turning the acoustic alarm off will reset the oven to manual, and if the oven function and the thermostat knobs are not set to zero the oven will start to heat again.

To cancel the End of cooking time:
- Press button Ⓐ repeatedly to select the "End of cooking" function. The relevant pilot lamp → will flash and the display will show the programmed End of cooking time.
- Press button √ until the display shows the current time of day. The programmer will beep and the pilot lamp will go out.
“Cooking duration” |→| and “End of cooking time” →combined
The functions "Cooking duration" and "End of cooking time" can be used simultaneously to set the oven to switch on and off automatically at a later time.
- With the "Cooking duration" function (carry out the cooking duration setting as described in the relevant chapter) set the duration time. Then, press button ②: the display will show the programmed setting.
- With the "End of cooking time" function (carry out the End of cooking setting as described in the relevant chapter) set the end of cooking time. The relevant pilot lamps will come on and the display will show the time of day. The oven will switch on and off according to the set programmes.
"Minute minder" function ✗
The minute minder alarm will sound at the end of a timed period, but THE OVEN WILL REMAIN ON, if it is in use.
To set the minute minder:
- Press button ② repeatedly to select the "Minute minder" function. The relevant pilot lamp ③ will start flashing.
- Then, press button + or - (maximum: 2 hours, 30 minutes).
- After the setting is carried out, wait for 5 seconds: the "Minute minder" pilot lamp will come on.
- At the end of the timed period, the pilot lamp will start flashing and an acoustic alarm will be heard. To switch off the acoustic alarm, press any button.
To cancel the minute minder:
- Press button 📋 repeatedly to select the "Minute minder" function. The relevant pilot lamp ⚫ will flash and the display will show the remaining time.
- Press button √ until the display shows "0:00". After 5 seconds the pilot lamp will go out and the display will revert to the time of day.
How to switch off the display
-
Press two or three programmer push buttons simultaneously and keep them pressed for about 5 seconds. The display will switch off.
-
To switch on the display, press any button.
The display can be switched off only if no other functions have been set.
text_image
12.05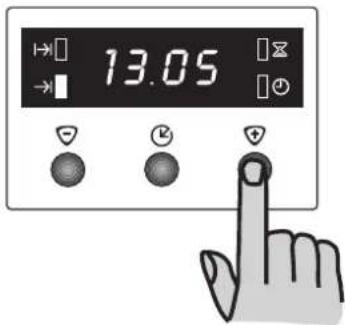
text_image
13.05
text_image
12.05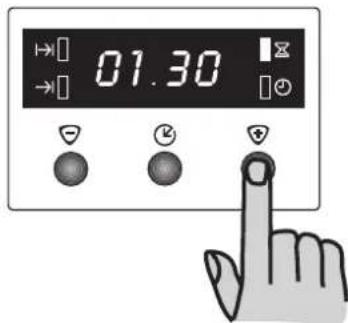
text_image
01.30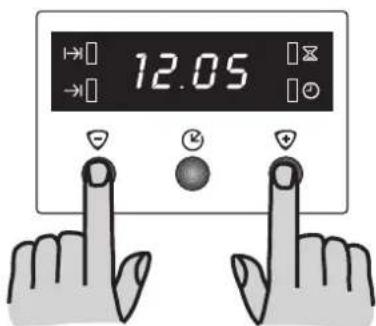
text_image
12.05i Hints and Tips for using the hob
Start your cooking with a big flame by turning the knob to the symbol ⬆Then adjust the flame as necessary.
The outside of the flame is much hotter than its inside (nucleus). Accordingly, the top of the flame should lick the bottom of the pan. Excessive flames mean a waste of gas.
In contrast with electric grids, gas burners do not require flat-bottomed pans: the flames lick the bottom and spread the heat all over the surface.
No special pans are required for gas burners. However, thinwalled pans transmit the heat to the food more quickly than thick-walled ones.
Since heat doesn't spread evenly on the pan's bottom, the food may only be partially heated. Consequently it is advisable to stir the food many times.
A thick pan bottom prevents partial overheating as it allows sufficient thermic compensation.
Avoid very small pans. Wide and shallow pans are more suitable than narrow and deep ones as they allow a faster heating. Cooking is not quickened by placing narrow pans on wide burners. The result is just a waste of gas. For a proper usage, place small pans on small burners and large pans on large burners.
Remember to cover pans to reduce gas consumption.
i Hints and Tips for using the oven

Always cook with the oven door closed.
Stand clear when opening the drop down oven door. Do not allow it to fall open - support the door using the door handle, until it is fully open.

The oven has four shelf levels, and is supplied with one shelf. The shelf positions are counted from the bottom of the oven as shown in the diagram.
It is important that the oven accessories are correctly positioned.
Do not place cookware directly on the oven base.

When cooking with the oven or grill, the cover must be kept open to avoid overheating.

Attention! - Do not place objects on the oven base and do not cover any part of the oven with aluminium foil while cooking, as this could cause a heat build-up which would affect the baking results and damage the oven enamel. Always place pans, heat-resisting pans and aluminium trays on the shelf which has been inserted in the shelf runners.
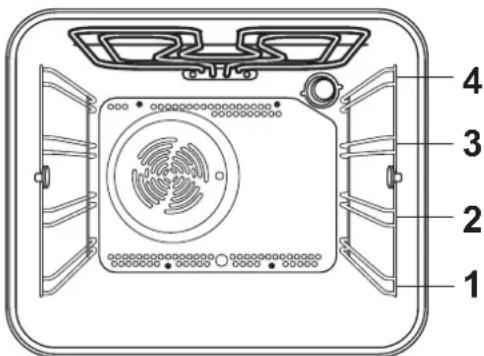
text_image
1 2 3 4Condensation and Steam
The oven is supplied with an exclusive system which produces a natural circulation of air and the constant recycling of steam. This system makes it possible to cook in a steamy environment and keep the dishes soft inside and crusty outside. Moreover, the cooking time and energy consumption are reduced to a minimum. During cooking steam may be produced which can be released when opening the oven door. This is absolutely normal.
However, always stand back from the oven when opening the oven door during cooking or at the end of it to allow any build up of steam or heat to release.

When food is heated, it produces steam in the same way as a boiling kettle does. When steam comes in contact of the oven door glass, it will condense and produce water droplets.
To reduce condensation, ensure the oven is well heated before placing food in the oven cavity. A short oven pre-heating (about 10 minutes) will then be necessary before any cooking.
We recommend you to wipe away condensation after each use of the appliance.
Cookware
- Use any oven proof cookware which will withstand temperatures of 230^ .
- Baking trays, oven dishes, etc. should not be placed directly against the grid covering the fan at the back of the oven, or placed on the oven base.
- Do not use baking trays larger than 30cm× 35cm (12 in x 14 in) as they will restrict the circulation of heat and may affect performance.
Pottery
Remember that a wide-bottomed pan allows a faster cooking than a narrow one. Always use pots which properly fit what you have to cook. Particularly make sure that the pans are not too small for liquids, since these could easily overflow. Moreover, the pans should not be too large for a faster cooking. In fact, grease and juices may spread on the bottom and burn easily.
It is better to use non-openable moulds for baking cakes. In fact, an openable mould lets juices and sugar leak through, falling on the bottom of the oven and consequently burning on the bottom of the baking tray, making cleaning difficult. Avoid putting plastic-handled pans in the oven as they are not heat-proof. You should use pans with the right diameter to fit the burner, in order to make the most out of it, thus reducing gas consumption. It is also advisable to cover any boiling casserole and, as soon as the liquid starts boiling, lower the flame enough to keep the boiling point.
The effects of dishes on cooking results
Dishes and tins vary in their thickness, conductivity, colour, etc. which affects the way they transmit heat to the food inside them.
A Aluminium, earthenware, oven glassware and bright shiny utensils reduce cooking and base browning.
B Enamelled cast iron, anodized aluminium, aluminium with non-stick interior and coloured exterior and dark, heavy utensils increase cooking and base browning.
Hints and Tips on Cooking Fish and Meat
You can place meat in oven proof dishes, or directly on the oven shelf. In this case, remember to place the drip tray in the first position from the bottom with some water in it. The dripping pan will avoid the falling of melted fat on the oven base.
White meat, poultry and fish in general, need to be cooked at a medium temperature (between 150 and 175°C). If you need to cook red meat (slightly browned on the outside and more gently cooked in the inside), a higher temperature (between 200 and 230°C) for a short time is recommended.
Hints and Tips on baking
Cakes usually need to be cooked at a medium temperature (between 150 and 200°C).
A short oven pre-heating (about 10 minutes) is recommended when cooking cakes or baking. Once the cooking has been started, keep the oven door closed during all the cooking time, and check the cooking results through the oven door glass.
Hints and Tips on grilling
If you need to grill meat or fish, place them directly on the shelf after spreading a little oil on them.
In the grill function, heat comes only from the top element. Therefore, you need to adjust the cooking level depending on meat or fish's thickness.
Always remember to place the dripping pan in the lower position with some water in it.
Cooking times
Cooking times vary according to the type of food to be cooked, its consistency, and volume. We suggest that you take particular note of your first cooking experiments with the oven, since operating in the same conditions for the same dishes you will of course obtain similar results. Only experience will enable you to make the appropriate changes to values given on charts.
Defrosting
The oven fan operates without heat and circulates the air, at room temperature, inside the oven. This increases the speed of defrosting. However, please note that the temperature of the kitchen will influence the speed of defrosting.
This function is particularly suitable for delicate food which could be damaged by heat, e.g. cream filled gateaux, iced cakes, pastries, bread and other yeast products.

How to Use Defrosting
Turn the oven function control knob to 📁s set the thermostat control knob to OFFposition ●.

Hints and Tips
- Cover food with a lid, aluminium foil or plastic film to prevent drying out during defrosting.
- ALWAYS COOK THOROUGHLY IMMEDIATELY AFTERTHAWING.
- Frozen food should be placed in a single layer when ever possible and turned over half way through the defrosting process.
- Only joints of meat and poultry up to 2 kg. (4 lb.) are suitable for defrosting in this way.
Cooking Chart- Conventional and Fan cooking
These charts are intended as a guide only. It may be necessary to increase or decrease the temperature to suit your individual requirements. Only experience will enable you to determine the correct setting for your personal requirements.

Cooking times do not include pre-heating time. A short oven pre-heating (about 10 minutes) is necessary before any cooking.
| Weight (gr.) | TYPE OF DISH | tionalng  | cooking  | Cooking time[07/32]minutes | NOTES | ||
 | temp. °C |  | temp. °C | ||||
| CAKES | |||||||
| Whipped up kneading | 2 170 | 2 (1 and 3)* | 160 45 ~ 60 In cake mould | ||||
| Shortbread dough | 2 170 | 2 (1 and 3)* | 160 20 ~ 30 In cake mould | ||||
| Butter-milk cheese cake | 1 160 | 2 150 60 ~ 80 In cake mould | |||||
| Apple cake 1 180 2 (1 and 3)* | 170 | 40 ~ 60 In cake mould | |||||
| Strudel 2 175 2 150 60 ~ 80 | |||||||
| Jam-tart 2 175 2 (1 and 3)* | 160 30 ~ 40 | ||||||
| Fruit cake 1 175 1 160 45 ~ 60 In bread pan | |||||||
| Sponge cake 1 175 2 (1 and 3)* | 160 30 ~ 40 | In cake mould | |||||
| Christmas cake | 1 170 | 1 160 40 ~ 60 In cake mould | |||||
| Plum cake | 1 170 | 1 160 50 ~ 60 In bread pan | |||||
| Flat cake | 2 170 | 2 160 35 ~ 45 In baking tray | |||||
| Small cakes | 2 175 | 2 (1 and 3)* | 160 25 ~ 35 In baking tray | ||||
| Biscuits | 2 | 160 | 2 (1 and 3)* | 150 | 20 ~ 30 | In baking tray | |
| Meringues | 2 | 100 | 2 (1 and 3)* | 100 | 90 ~ 120 | In baking tray | |
| Buns | 2 | 190 | 2 (1 and 3)* | 180 | 12 ~ 20 | In baking tray | |
| Pastry: Choux | 2 | 200 | 2 (1 and 3)* | 190 | 15 ~ 25 | In baking tray | |
| BREAD AND PIZZA | |||||||
| 1000 | White bread | 1 | 190 | 2 | 180 | 40 ~ 60 | 1-2 pieces |
| 500 | Rye bread | 1 | 190 | 1 | 180 | 30 ~ 45 | In bread pan |
| 500 | Bread rolls | 2 | 200 | 2 (1 and 3)* | 175 | 20 ~ 35 | 6-8 rolls |
| 700 | Pizza, large | 1 | 210 | 1 | 200 | 15 ~ 25 | in baking tray |
| 500 | Pizza, small | 1 | 210 | 1 | 200 | 10 ~ 20 | in baking tray |
| FLANS | |||||||
| Pasta flan | 2 | 200 | 2 (1 and 3)* | 175 | 40 ~ 50 | in mould | |
| Vegetable flan | 2 | 200 | 2 (1 and 3)* | 175 | 45 ~ 60 | in mould | |
| Quiches | 1 | 200 | 2 (1 and 3)* | 180 | 35 ~ 45 | in mould | |
| Lasagne | 2 | 180 | 2 | 160 | 45 ~ 60 | in mould | |
| Cannelloni | 2 | 200 | 2 | 175 | 40 ~ 55 | in mould | |
| MEAT | |||||||
| 1000 | Beef | 2 | 190 | 2 | 175 | 50 ~ 70 | On grid |
| 1200 | Pork | 2 | 180 | 2 | 175 | 100 ~ 130 | On grid |
| 1000 | Veal | 2 | 190 | 2 | 175 | 90 ~ 120 | On grid |
| 1500 | English roast beef | ||||||
| 1500 | underdone | 2 | 210 | 2 | 200 | 50 ~ 60 | On grid |
| 1500 | done | 2 | 210 | 2 | 200 | 60 ~ 70 | On grid |
| 1500 | well done | 2 | 210 | 2 | 200 | 70 ~ 80 | On grid |
| 2000 | Shoulder of pork | 2 | 180 | 2 | 170 | 120 ~ 150 | With rind |
| 1200 | Shin of pork | 2 | 180 | 2 | 160 | 100 ~ 120 | 2 pieces |
| 1200 | Lamb | 2 | 190 | 2 | 175 | 110 ~ 130 | Leg |
| 1000 | Chicken | 2 | 190 | 2 | 175 | 60 ~ 80 | Whole |
| 4000 | Turkey | 2 | 180 | 2 | 160 | 210 ~ 240 | Whole |
| 1500 | Duck | 2 | 175 | 2 | 160 | 120 ~ 150 | Whole |
| 3000 | Goose | 2 | 175 | 2 | 160 | 150 ~ 200 | Whole |
| 1200 | Rabbit | 2 | 190 | 2 | 175 | 60 ~ 80 | Cut in pieces |
| 1500 | Hare | 2 | 190 | 2 | 175 | 150 ~ 200 | Cut in pieces |
| 800 | Pheasant | 2 | 190 | 2 | 175 | 90 ~ 120 | Whole |
| Meat loaf | 2 | 180 | 2 | 160 | 40 ~ 60 | in bread pan | |
| FISH | |||||||
| 1200 | Trout/Sea bream | 2 | 190 | 2 (1 and 3)* | 175 | 30 ~ 40 | 3-4 fishes |
| 1500 | Tuna fish/Salmon | 2 | 190 | 2 (1 and 3)* | 175 | 25 ~ 35 | 4-6 fillets |
If you wish to cook more than one dish at the same time, we suggest that you change the cooking levels of your dishes during the last 5-10 minutes in order to obtain a more uniform colour of your dishes.
(*) If you need to cook more than one dish at the same time, we recommend you to place them on the levels quoted between brackets. Shelf positions are counted from bottom of the oven.

Cooking times do not include pre-heating time.
A short oven pre-heating (about 10 minutes) is necessary before any cooking.
Cooking Chart - Grilling


| TYPE OF DISH | Quantity |  | Temperature°C | Cooking time(minutes) | ||
| Pieces | Weight | Upperside | Lowerside | |||
| Fillet steaks | 4 800 | 3 max 12 ~ 15 | 12 ~ 14 | |||
| Beef-steaks 4 600 3 max | 10 ~ 12 | 6 ~ 8 | ||||
| Sausages | 8 | — | 3 | max | 12 ~ 15 | 10 ~ 12 |
| Pork chops | 4 600 | 3 max 12 ~ 16 | 12 ~ 14 | |||
| Chicken (cut in two) | 2 | 1000 | 3 | max | 30 ~ 35 | 25 ~ 30 |
| Kebabs | 4 | — | 3 | max | 10 ~ 15 | 10 ~ 12 |
| Chicken (breast) | 4 400 | 3 max 12 ~ 15 | 12 ~ 14 | |||
| Hamburger | 6 | 600 | 3 | max | 10 ~ 15 | 8 ~ 10 |
| Fish (fillets) | 4 400 | 3 max 12 ~ 14 | 10 ~ 12 | |||
| Sandwiches | 4-6 | — | 3 | max | 3 ~ 7 | — |
| Toast | 4-6 | — | 3 | max | 2 ~ 4 | 2 ~ 3 |
Cooking Chart - Pizza

| Weight (gr.) | TYPE OF DISH |  | Temperature°C |  | NOTES |
| 700 | Pizza, large 1 200 15 | ~ 25 in baking tray | |||
| 500 | Pizza, small 1 200 10 | ~ 20 in mould on the shelf | |||
| 500 | Flat cake 1 200 15 ~ 25 in baking tray |

The oven temperatures are intended as a guide only. It may be necessary to increase or decrease the temperatures to suit individual preferences and requirements.
Maintenance and Cleaning

Before any maintenance or cleaning can be carried out, you must DISCONNECT the appliance from the electricity supply.
This appliance cannot be cleaned with steam or with a steam cleaning machine.
The Hob Top
The hob is best cleaned whilst it is still warm, as spillage can be removed more easily than if it is left to cool.
Regularly wipe over the hob top using a soft cloth well wrung out in warm water to which a little wasing up liquid has been added. Avoid the use of the following:
- household detergent and bleaches;
- impregnated pads unsuitable for non-stick saucepans;
- steel wool pads;
- bath/sink stain removers.
Should the hob top become heavily soiled, it is recommended that a cleaning product such as Hob Brite or Bar Keepers Friend is used.
Pan Supports
The pan supports are dishwasher proof. If washing them by hand, take care when drying them as the enamelling process occasionally leaves rough edges. If necessary, remove stubborn stains using a paste cleaner.
The Burners
The burner caps and crowns can be removed for cleaning. Wash the burner caps and crowns using hot soapy water, and remove marks with a mild paste cleaner. A well moistened soap impregnated steel wool pad can be used with caution, if the marks are particularly difficult to remove.
After cleaning, be sure to wipe dry with a soft cloth.
Ignition electrode
The electric ignition is obtained through a ceramic "electrode" and a metal electrode. Keep these components well clean, to avoid difficult lighting, and check that the burner crown holes are not obstructed.
The Hotplate
Spills onto the actual plate should be removed using warm water and a soft brush, nylon or plastic scourer. To keep the plate looking as new, hotplate conditioner can be purchased from most hardware stores (follow the manufacturer's instruction for use).
Alternatively, wipe the plate with a drop of olive oil on a kitchen towel to avoid rust. It is important to note that the plate will smoke a little and produce a slightly unpleasant odour when next used.
Drying
Important: After cleaning, dry the hotplate thoroughly by switching on to a low-medium setting for a few minutes.
text_image
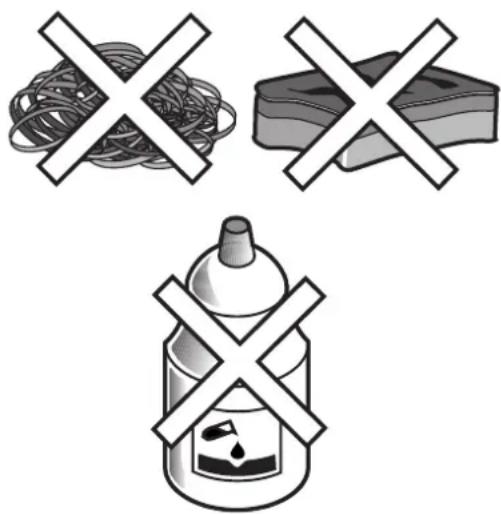
Illustration showing three food items: pasta, bread, and a cooking oil with crossed-out X marks.Cleaning the Oven

The oven should be kept clean at all times. A build-up of fats or other foodstuffs could result in a fire, especially in the grill pan.
Cleaning materials
Before using any cleaning materials on your oven, check that they are suitable and that their use is recommended by the manufacturer.
Cleaners that contain bleach should NOT be used as they may dull the surface finishes. Harsh abrasives should also be avoided.
- Never use steam or steam machines to clean the appliance.
External cleaning
Regularly wipe over the control panel, oven door and door seal using a soft cloth well wrung out in warm water to which a little washing up liquid has been added.
To prevent damaging or weakening the door glass panels avoid the use of the following:

• Household detergent and bleaches
- Impregnated pads unsuitable for non-stick saucepans
- Brillo/Ajax pads or steel wool pads
• Chemical oven pads or aerosols
- Rust removers
- Bath/Sink stain removers
Clean the outer and inner door glass using warm soapy water. Should the inner door glass become heavily soiled it is recommended that a cleaning product such as Hob Brite, or Bar Keepers Friend is used.
Oven Cavity
The enamelled oven cavity is best cleaned whilst the oven is still warm.
Wipe the oven over with a soft cloth soaked in warm soapy water after each use. From time to time it will be necessary to do a more thorough cleaning, using a proprietary oven cleaner.
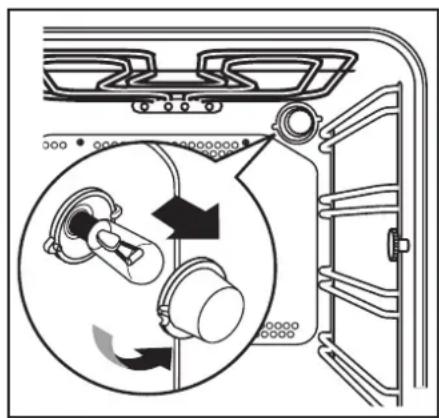
Oven lamp replacement

Disconnect the appliance from the electricity supply.
If the oven bulb needs replacing, it must comply with the following specifications: electric power, 15 W/25 W; electric rate, 230 V (50 Hz); resistant to temperatures of 300°C; connection type: E14. These bulbs are available from your local Service Force Centre.

To replace the faulty bulb:
- Ensure the oven is disconnected from the electrical supply.
- Turn the glass cover anticlockwise.
- Remove the faulty bulb and replace it with the new one.
- Refit the glass cover.
- Reconnect to the electrical supply.
natural_image
Diagram of a washing machine interior showing valve, handle, and door mechanism (no text or labels)Cleaning The Oven Door
The oven door is made up of three glasses.
It is possible to remove them for easier cleaning.

Warning - The oven door may bang shut if you try to extract the inner glasses when the oven door is still fitted to the oven.
Before cleaning the oven door, we recommend you to remove it from the oven.
Proceed as follows:
- open the oven door completely and locate the two hinges which link the door to the oven;
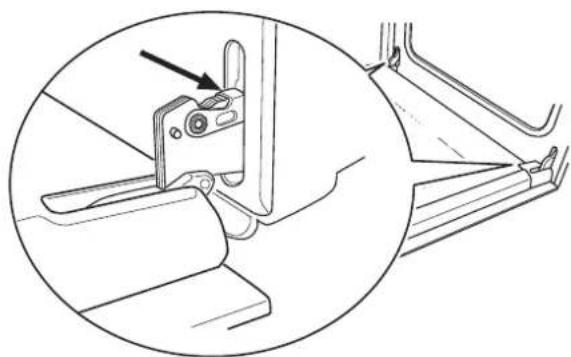
natural_image
Technical diagram of a mechanical bracket assembly with an arrow indicating a component (no text or symbols present)- unlock and turn the small levers located on the two hinges;
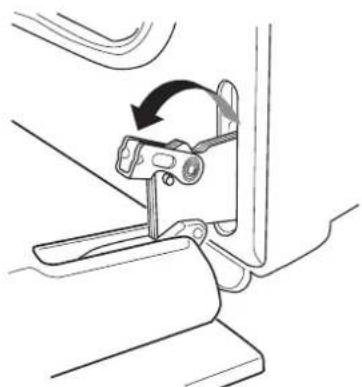
natural_image
Technical line drawing of a mechanical clamp or bracket assembly (no text or symbols)- handle the door by its left- and right-hand sides, then slowly turn it towards the oven until it is half-closed; at this point, gently pull the oven door away from the oven frame;
natural_image
Line drawing of a person inserting a tablet into a vehicle door panel (no text or symbols)- place the oven door on a solid surface, being careful to avoid the glass becoming scratched. Then remove the two screws located on the sides of the oven door;

natural_image
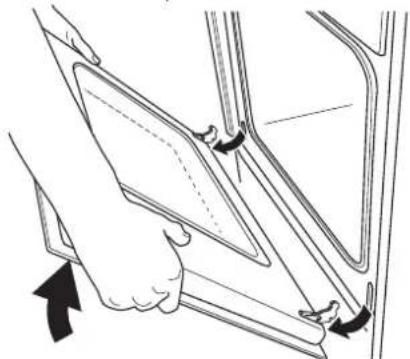
Diagram of a rectangular device with internal components and directional arrows indicating motion (no text or symbols)- extract the inner glass support;

natural_image
Illustration of hands holding a mechanical device with arrows indicating motion (no text or symbols)- gently extract the two inner glasses, starting with the uppermost one first.
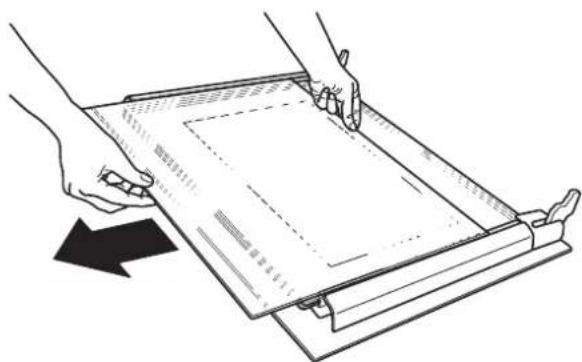
natural_image
Illustration of hands using a folding paper or ruler to fold or spread a sheet, with a black arrow indicating the motion (no text or symbols present)Clean the oven door glass with warm water and a soft cloth only. Never use harsh abrasives as they could damage the special heat-resistant surface of the inner glasses.
Once the cleaning is carried out, refit the oven door, following the procedure in reverse (Fig. 9 and Fig. 10).
The two glasses in the middle are special glasses that have been treated to resist heat. They are marked with a small dot located on a corner and a black frame respectively (Fig. 8).
It is important that, when refitting the oven door, the inner glasses are fixed in the right position.
To check if this operation has been carried out correctly, when inserting the glass, make sure that the surface of the glass marked with a black frame looks upwards and that the dot is located on the upper right corner of the glass (see Fig. 8).

DO NOT clean the oven door while the glass panels are warm. If this precaution is not observed the glass panels may shatter.
If the door glass panels become chipped or have deep scratches, the glasses will be weakened and must be replaced to prevent the possibility of the panel shattering. Contact your local Service Force Centre who will be pleased to advise further.

natural_image
Illustration of hands folding a rectangular object with a dashed line inside, showing a curved arrow indicating rotation (no text or symbols)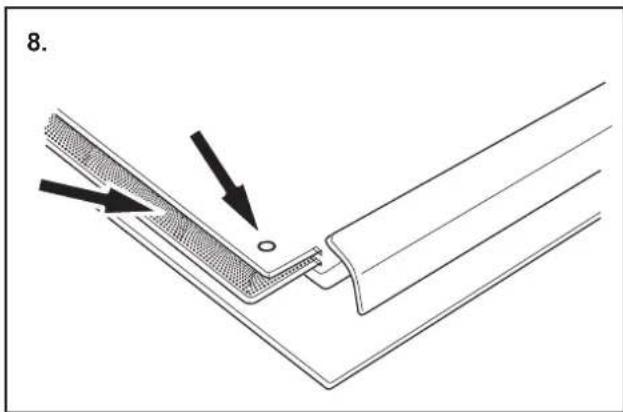
text_image
8.
text_image
9. insert the inner glass support;
text_image
10.then fix the two screws located on the sides of the oven door.Oven Shelves and Shelf Supports
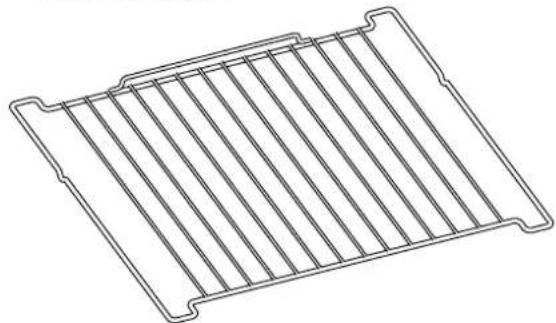
To clean the oven shelves, soak in warm soapy water and remove stubborn marks with a well wetted soap impregnated pad. Rinse well and dry with a soft cloth. The shelf supports can be removed for easy cleaning.
Proceed as follows:
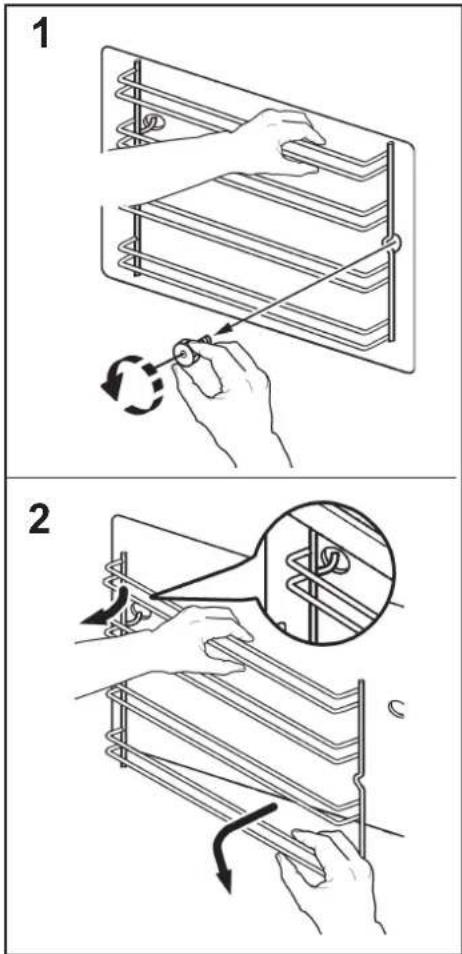
1) remove the front screw while keeping the shelf support in position with the other hand (see diagram 1);
2) disengage the rear hook and take off the shelf support (see diagram 2);
3) once the cleaning is carried out, refit the shelf supports following the procedure in reverse.
Please, ensure the retaining nuts are secure when refitting the shelf support.
text_image
Technical diagram illustrating two steps of a mechanical assembly or cleaning procedure, labeled 1 and 2.Lid cleaning (only for model EKM 6711 X)
The crystal lid can be dissassembled to allow a better cleaning (see diagram).
Clean the crystal lid only with warm water and avoid the use of rough cloths or abrasive substances.
After a proper cleaning, carefully reposition the lid into its hinges.
Balancing the lid (only for model EKM 6711 X)
Appliances provided with crystal lids are equipped with specially balanced springs, inserted in the hinges at the back of the appliance, to allow the lid to be closed smoothly and easily.
You can use a screwdriver to adjust the closure of the lid. The necessary force for opening/closing the lid can be increased by turning the adjusting screw 2 or 3 times as shown in the diagram.
Controls - Sundries
Periodically check the condition of the flexible pipe of gas connection and make it replaced by skilled technicians as soon as it shows abnormalities. Annual replacement is recommended.
Have the cocks periodically lubricated by skilled technicians. In case of unusual working have the range checked by skilled technicians.

natural_image
Technical diagram showing two mechanical assembly steps: top shows a bracket with an upward arrow, bottom shows a close-up of a bracket with a circular inset detail (no text or symbols)Something not working
If the appliance is not working correctly, please carry out the following checks, before contacting your local Service Centre.
| SYMPTOM■There is no spark when lighting the gas. | SOLUTION◆Check that the unit is plugged in and the electrical supply is switched on◆Check the mains fuse has not blown◆Check the burner cap and crown have been replaced correctly, e.g. after cleaning. |
| ■The gas ring burns unevenly. | ◆Check the main jet is not blocked and the burner crown is clear of food particles.◆Check the burner cap and crown have been replaced correctly, e.g. after cleaning. |
| ■The oven does not come on. | ◆Check that a cooking function has been selected.◆Check that the oven door is completely closed.◆Check that the time of day has ben set (see chapter "Setting the time of day").◆Check that the socket switch or the switch from the mains supply to the appliance are ON. |
| ■The oven light does not come on. | ◆Select a function with the oven function control knob.◆Check the light bulb, and replace it if necessary (see "Oven lamp replacement"). |
| ■It takes too long to finish the dishes, or they are cooked too fast. | ◆The temperature may need adjusting. |
| ■Steam and condensation settle on the food and the oven cavity. | ◆Refer to the contents of this booklet, especially to the chapter "Hints and Tips for using the oven".◆Leave dishes inside the oven no longer than 15-20 minutes after the cooking is completed. |
| ■The oven fan is noisy. | ◆Check that shelves and bakeware are not vibrating in contact with the oven back panel. |
| ■The display shows "12.00". | ◆Set the time of day (see chapter "Setting the time of day"). |
If after all these checks, the appliance still does not work, contact your local Service Force Centre.
Service and Spare Parts
If your appliance does not work correctly, even after carrying out all the checks which are listed in the previous chapter, then please contact your local Service Centre, specifying the type of malfunctioning, the appliance model (Mod.), the product number (Prod. No.) and the serial number (Ser. No.) marked on the identification plate. This plate is placed on the front external edge of the oven cavity (see figure). Service and Spare Parts
Original spareparts, certified by the product manufacturer and carrying this symbol are only available at our Service Centre and authorized spareparts shops


natural_image
Diagram of a front view of a washing machine with fan and door, showing internal components and a close-up of the door (no text or symbols)Instructions for the Installer
Technical Data
Dimensions
Height 900 mm
Depth 600 mm
Width 600 mm
Oven Capacity 53 litres
Hob
Front left hotplate ∅210/120 mm 2,2 kW
Front right hotplate ∅145 mm 1,2 kW
Back right hotplate ∅180 mm 1,8 kW
Back left hotplate ∅145 mm 1,2 kW
Max. power rating: 6400 W
Oven
Bottom heating element 1,000 W
Oven elements 1,800 W
Inner Grill Element 1,650 W
Full Grill Element 2,450 W
Convection heating element 2,000 W
Pizza 3,000 W
Convection fan 25 W
Oven light 25 W
Total rating 3,050 W
Supply voltage (50 Hz) 230 V
Total appliance electric rating (hob + oven) 9,450 W
Supply voltage (50 Hz) 230 V
Installation

This appliance cannot be positioned on a base.
The following instructions are meant for a qualified installer, in order that the operations of installation, regulation, and service are executed according to the existing regulations.
Whenever changes are mode involving the disconnection of the appliance it is necessary to proceed with maximum caution.

THE MANUFACTURING COMPANY DECLINES ANY RESPONSABILITY FOR POSSIBLE DAMAGES RESULTING FROM AN INSTALLATION WHICH DOES NOT COMPLY WITH THE RULES IN FORCE.
Positioning
This appliance has been designed to be placed close to furniture units not exceeding the height of the working level.
Levelling
The appliance is provided with adjustable small feet placed in the back and front corners of the base.
By adjusting the small feet (see figure) it is possible to change the height of the appliance so as to ensure a better levelling with other surfaces and a uniform distribution of the liquids contained in pans or pots.

natural_image
Line drawing of a washing machine connected to a tool, with hands holding the tool (no text or symbols present)Electrical connection
The unit is preset to work with a voltage of single phase 230 V.
Before making the connection make sure that:
— the energy power available in the user's house is sufficient for the normal supply of this appliance (see rating plate).
— the unit is correctly connected to earth through a suitable plug and according to the installation country Laws.
— the socket or the omnipolar switch used for the connection must be easily reached with the installed appliance.
The appliance is supplied with electric cable, therefore you will have to fit it with a standard plug, suitable for the total electric load shown on the rating plate. The plug is to be inserted into a suitable wall socket.
If you wish to directly connect to the mains, you have to interpose an omnipolar switch with a minimum opening between contacts of 3 mm, between the unit and the mains, complying with the existing regulations. The brown live wire (originating from the clamp of the appliance junction box) must always be connected to the phase of the mains supply. In any case, the supply cord must be positioned in such a way as it doesn't reach in any point a temperature higher by 50°C than the room temperature.
Replacement of the electric cable
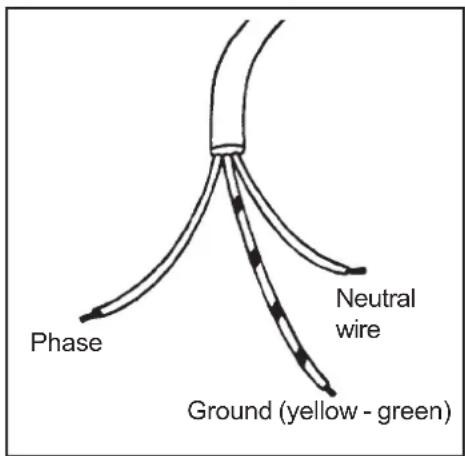
Should the supply cord need to be replaced, use only the following cable types: H07 RN-F, H05 RN-F, H05 RR-F, H05 VV-F, H05 V2V2-F (T90), H05 BB-F. It is necessary that the yellow/green earth wire is about 2 cm longer than the live and neutral ones (see diagram). After the connection, test the heating elements for about 3 minutes to ensure that they are working correctly.
The manufacturer refuses any responsibility in cases where normal safety measures are not observed.
text_image
Phase Neutral wire Ground (yellow - green)| - | ES | DA | DE | EL | EN | FR | IT | NL | PT | SV | FI | |
| 1 | Fabricante | Mærke | Hersteller | Προμηθευτής | Manufacturer | Fabricant | Costruttore | Fabrikant | Fabricante | Leverantör | Tavarantoimittaja | ElectroluxEKM6711EKM6711X |
| 2 | Modelo | Model | Modell | Μοντέλο | Model | Modèle | Modello | Model | Modelo | Modell | Malli | |
| 3● | Clase de eficiencia energética | Relativt ener-giforbrug | Energieeffizi-enzklasse | Τάζη ενεργειακής απόδοσης | Energy efficiency class | Classement selon son efficacité énergétique | Classe di efficienza energetica | Energie-efficiëntieklasse | Classe de eficiência energetica | Energielfektivitetsklass | Energiatehokkuusluokka | A |
| 4 | - Calentamiento convencional | - Traditionel opvarmning | - Konventionelle Beheizung | Συμβατική | - Conventional | - Classique | - Convezione naturale | - Conventioneel | - Convencional | - Konventionell värming | - Yla-alalämpö | |
| 5 | - Convección forzada | - Varmluft | - Um/Heißluft | - Με κυκλοφορία θερμού απρο | - Forced air convection | - Convection forcée | - Convezione forzata | - Geforceerde luchtconvectie | - Convecção fora de ar | - Värmning med varmluft | - Kiertolima | ← |
| Consumo de energiaFunción de ca-lentamiento: | EnergiforbrugOpvarmnings-funktion: | Energieverbrauch Beheizung: | Κατυνέλιοση ενέργειας Αεττουργια θέρμανσης | Energy consumption Heating function: | Consommation d'énergie Fonction chauffage: | Consumo di energia Funzione di riscaldamento: | Energieverbruik Verhittings-functie: | Consumo de energia Função de aquecimento: | Energiförbrukning Vämnings-funktion: | Energian-kulutusKuumennustapa: | ||
| 6 | - Calentamiento convencional | - Traditionel opvarmning | - Konventionelle Beheizung | Συμβατική | - Conventional | - Classique | - Convezione naturale | - Conventioneel | - Convencional | - Konventionell värming | - Yla-alalämpö | 0,79 kWh |
| 7 | - Convección forzada | - Varmluft | - Um/Heißluft | - Με κυκλοφορία θερμού απρο | - Forced air convection | - Convection forcée | - Convezione forzata | - Geforceerde luchtconvectie | - Convecção fora de ar | - Värmning med varmluft | - Kiertoílma | 0,78 kWh |
| 8 | - Vapor | - Damp | - Dampf | - Ατμοσ | - Steam | - Vapeur | - Vapore | - Stoom | - Vapor | - Anga | - Höyry | |
| 9 | Volumen neto (litros) | Netto-volumen (liter) | Netto-volumen (Liter) | Ωφέλιμος όγκος (λίτρα) | Usable volu-me (litres) | Volume utile (litres) | Volume utile (litri) | Netto volume (liter) | Volume útil Litros | Användbar volym (liter) | Käyttötilavuus (litraa) | 53 |
| ●●●●●●●● | Tipo:- Pequeño- Medio- Grande | Type:- Lille- Melemstort- Stort | Typ:- Klein- Mittel- Groß | Τέπος:- Μεκρός- Μεσαίος- Μεγάλος | Size:- Small- Medium- Large | Type:- Faible volume- Volume moyen- Grand volume | Tipo:- Piccolo- Medio- Grande | Type:- Klein- Middelgroot- Groot | Tipo- pequeno- médio- grande | Storlek:- Liten- Medelstor- Stor | Koko:- Pieni- Keskikokoinen- Suuri | ← |
| Tiempo de cocción con carga normal: | Tilberedningstid ved standardbelastning: | Kochzeit bei Standard-beladung: | Χρόνος για νήσιμο τολατοιημένου φορτίος | Time to cook standard load; | Temps de cuisson en charge normale: | Tempo necessario per cottura carico normale: | Bereidings-tijd bij standaardbela-sting: | Tempo de cozedura da carga-padrão: | Tillagningstid för en stan-dardlast: | Paistoalka vakiokuormalla: | ||
| 10 | - Calentamiento convencional | - Traditionel opvarmning | - Konventionelle Beheizung | Συμβατική | - Conventional | - Classique | - Convezione naturale | - Conventioneel | - Convencional | - Konventionell värming | - Yla-alalämpö | 43 min. |
| 11 | - Convección forzada | - Varmluft | - Um/Heißluft | - Με κυκλοφορία θερμού απρο | - Forced air convection | - Convection forcée | - Convezione forzata | - Geforceerde luchtconvectie | - Convecção fora de ar | - Värmning med varmluft | - Kiertoilima | 41 min. |
| 12 | Superficie de la placa de cocción de mayor tamaño | Arealet af den starste bageplade | Größe des größten Backblechs | Η μεγαλύτερη επεφωνίου υηστιματος εκφραζόμενη | The area of the largest baking sheet | Aire de la surface de la plus grande plaque pour patisserie | Superficie del piano di cottura più grande | Oppervlakte van de grootste bakplaat | Área da superficie da maior placade pastelaria | Ytan för den størsta bakplåten | Suurimman leivinpellina | 1130 cm2 |
| 13 | Ruido [dB (A) re 1 pW] | Lydeffekt-niveau dB (A) (Stej) | Geräusch (dB (A) re 1 pW) | Σύριξος [dB (A) evá 1 pW] | Noise (dB (A) re 1 pW) | Bruit [dB (A) re 1 pW] | Rumore [dB (A) re 1 pW] | Geluidsniveau dB (A) re 1 pW | Nivel de ruido dB (A) re 1 pW | Bullernivå dB (A) | Ädni (dB (A) re 1 pW) | 47 |
| ● Más eficiente Bassí consumiLaví forbrug EfficientNeonger Verbrauch Mais eficienteIbo adornadoMore efficientÉconome | ||||||||||||

From the Electrolux Group. The world's No.1 choice.
The Electrolux Group is the world's largest producer of powered appliances for kitchen, cleaning and outdoor use. More than 55 million Electrolux Group products (such as refrigerators, cookers, washing machines, vacuum cleaners, chain saws and lawn mowers) are sold each year to a value of approx. USD 14 billion in more than 150 countries around the world.