
VIRO5 - Loudspeaker Audac - Free user manual and instructions
Find the device manual for free VIRO5 Audac in PDF.

| Product Type | 2-way passive outdoor/indoor speaker |
| Dimensions (W x H x D) | 198 x 235 x 191 mm |
| Weight | 4.2 kg |
| Power Handling (RMS/AES) | 60 W |
| Program Power | 120 W |
| Peak Power | 240 W |
| Nominal Impedance | 8 Ω |
| Sensitivity (1W/1m) | 89 dB |
| Maximum SPL (1m) | 110 dB |
| Frequency Response (±3 dB) | 100 Hz – 20 kHz |
| Drivers | 2-way coaxial: 1" silk dome tweeter, 5.25" outdoor treated paper with rubber surround |
| Enclosure Material | Powder coated aluminium |
| Grille Material | Aluminium with hydrophobic cloth |
| Protection Rating | IP55 |
| Mounting | Included rotating bracket with 3/8" stand fitting; can be wall, ceiling, or floor mounted |
| Connectors | 4-pin terminal block for input and link through; optional speakON plate (CVS102) |
| Color Options | White (RAL9003) or Black (RAL9004) |
| Optional Accessories | Transformer module (TRV106), speakON plate (CVS102), ground pin (MBK523/G), pole mount (MBK530), drop safety wire (STG601) |
| Safety Features | M6 drop safety bushing for safety wire; drainage holes; minimum 5° downward tilt recommended |
Frequently Asked Questions - VIRO5 Audac
User questions about VIRO5 Audac
0 question about this device. Answer the ones you know or ask your own.
Ask a new question about this device
Download the instructions for your Loudspeaker in PDF format for free! Find your manual VIRO5 - Audac and take your electronic device back in hand. On this page are published all the documents necessary for the use of your device. VIRO5 by Audac.
USER MANUAL VIRO5 Audac
natural_image
Line drawing of a rectangular electronic device with a side panel and a small logo on the front face (no text or symbols on the device itself)ADDITIONAL INFORMATION
This manual is put together with much care, and is as complete as could be on the publication date. However, updates on the specifications, functionality or software may have occurred since publication. To obtain the latest version of both manual and software, please visit the Audac website @ www.audac.eu.

Introduction 05
A sound that lasts 05
Precautions 06
Chapter 1 07
Connections and connectors 07
Chapter 2 08
Overview VIRO: Back 08
Chapter 3 010
Bracket 010
Chapter 4 011
Connecting VIROs 011
Set solutions 011
Chapter 5 012
optional accessories 012
Installing the optional transformer module (TRV106) 012
Optional mounting accessories 013
3/8" stand fitting 013
Ground pin 013
Pole mount 014
Technical specifications
015
A sound that lasts
The VIRO is a powerful 2-way performance speaker which is designed for outdoor and indoor use, ensuring true-to-nature, high fidelity reproduction of music and speech in every environment, ranging from residential applications to the most demanding outdoor applications in parks, hotels and even clubs.
Its stunningly design is made of robust and elegant aluminium. The aluminium construction and grill with hydrophobic cloth provides the necessary protection for all weather conditions. The combination of the cloth, sealing rubbers and drainage holes on the bottom of the speaker make it IP55 compliant. The VRO loudspeaker is available in Black (/B) or White (/W).
READ FOLLOWING INSTRUCTIONS FOR YOUR OWN SAFETY
ALWAYS KEEP THESE INSTRUCTIONS. NEVER THROW THEM AWAY
ALWAYS HANDLE THIS UNIT WITH CARE
HEED ALL WARNINGS
FOLLOW ALL INSTRUCTIONS
NO NAKED FLAME SOURCES, SUCH AS LIGHTED CANDLES, SHOULD BE PLACED ON THE APPARATUS
DO NOT STICK ANY OBJECTS THROUGH THE VENTILATION OPENINGS.
DO NOT INSTALL THIS UNIT NEAR ANY HEAT SOURCES SUCH AS RADIATORS OR OTHER APPARATUS THAT PRODUCE HEAT
PLACE THE UNIT ON A STABLE BASE OR MOUNT IT IN A STABLE RACK
ONLY USE ATTACHMENTS & ACCESSORIES SPECIFIED BY THE MANUFACTURER
UNPLUG THIS APPARATUS DURING LIGHTNING STORMS OR WHEN UNUSED FOR LONG PERIODS OF TIME
USE THE APPARATUS ONLY IN MODERATE CLIMATES

CAUTION - SERVICING
This product contains no user serviceable parts. Refer all servicing to qualified service personnel. Do not perform any servicing (unless you are qualified to)

EC DECLARATION OF CONFORMITY
This product conforms to all the essential requirements and further relevant specifications described in following directives: 2014/30/EU (EMC) & 2014/35/EU (LVD).

WASTE ELECTRICAL AND ELECTRONIC EQUIPMENT (WEEE)
The WEEE marking indicates that this product should not be disposed with regular household waste at the end of its life cycle. This regulation is created to prevent any possible harm to the environment or human health.
This product is developed and manufactured with high quality materials and components which can be recycled and/or reused. Please dispose this product at your local collection point or recycling centre for electrical and electronic waste. This will make sure that it will be recycled in an environmentally friendly manner, and will help to protect the environment in which we all live.
Chapter 1
Connections and connectors
CONNECTION STANDARDS
The in- and output connections for AUDAC audio equipment are performed according to international wiring standards for professional audio equipment.
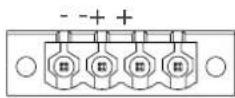
4-Pin Terminal block:
For signal input and output linking connections

natural_image
Technical illustration of a green electrical connector with multiple slots and mounting holes (no text or symbols)Overview VIRO: Back
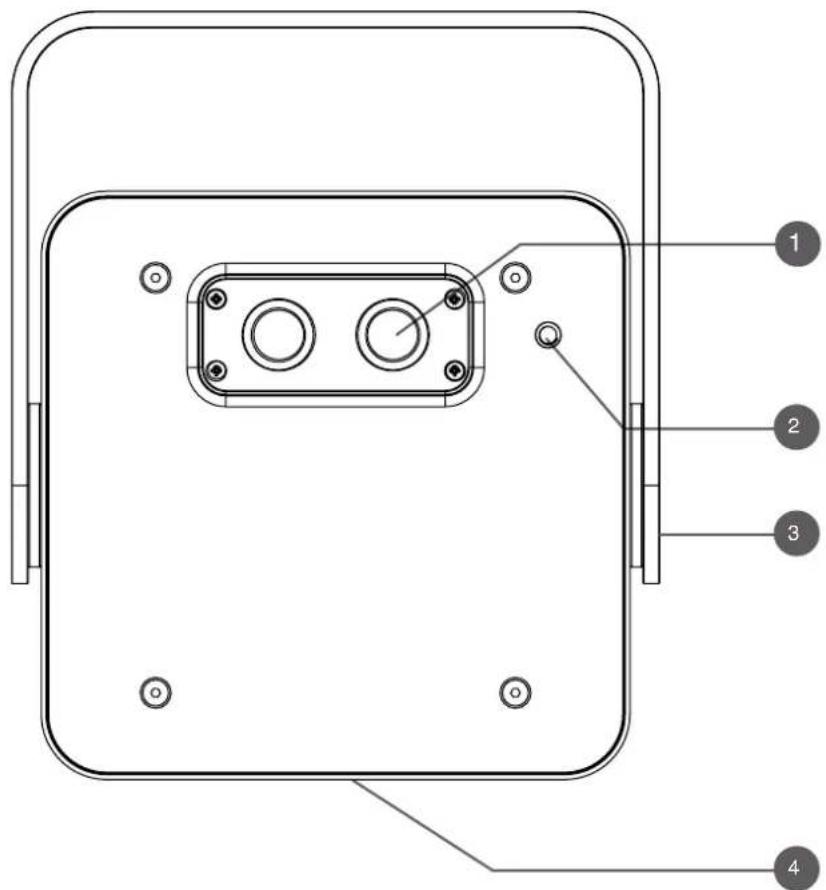
1) Cable entry plate
To connect the VIRO, the cable must pass through the backplate. The VIRO has two standard cable grommets in the provided openings. This grommet provides water tight protection.
An optional speakON connection plate with two speakON compatible connectors (CVS102) is available. It can be installed by loosening the four screws of the cable entry plate. To connect, the back plate must be released.
2) Drop safety bushing
The VIRO5 has a M6 safety bushing. This provides the option of mounting drop safety wires. Please check your local regulations if this is required. A drop safety wire (STC601) is optionally available from our products range as an accessory.
3) Bracket
The bracket of the VIRO is attached to the centre point of the speaker. It is designed in such a way that it can be fully rotated around the centre point. This allows the bracket to be mounted in all directions. More information about the bracket in 'Chapter 3'.
4) Water drainage holes
Two drainage holes are located at the bottom of the VIRO. The loudspeaker has a protection class of IP55 thanks to the sealing rubbers, the water-repellent cloth behind the grill and the drainage holes.
Install VIRO at a minimum down tilt of 5°. Standing water is avoided trough this installation. At the same time, make sure that the drainage holes are located at the bottom.
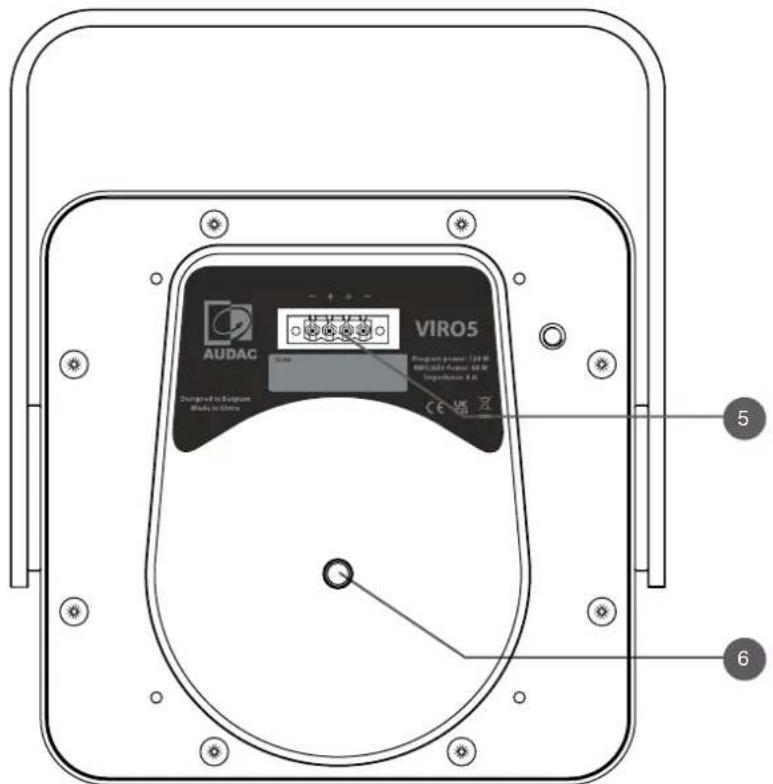
5) Terminal block
The VIRO has the possibility of a link through connection. For this purpose, a 4-pole terminal block is provided. The wires coming from the amplifier must be connected to the left poles of the terminal block via the cable entry plate.
The correct polarity is indicated above the connector. Make sure that the polarity is correct throughout the system.
6) Transformer module point
Mounting point for the optional 70/100V transformer module (TRV106).
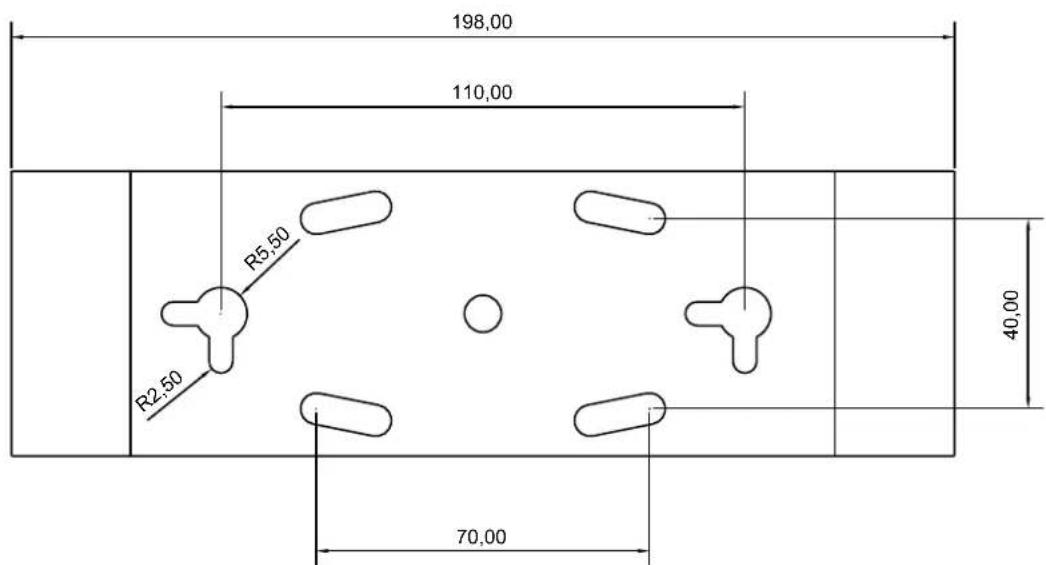
Bracket
The bracket of the VIRO is attached to the centre point of the speaker. It is designed in such a way that it can be fully rotated around the centre point. This allows the bracket to be mounted in all directions, on the ceiling, wall or floor. As a result, VIRO can be attached to various accessories.
For a solid fixation of the loudspeaker, it should always be attached by at least two screws. The position of the fastening holes depends on the surface to be mounted. Always use the proper fasteners depending of the mounting surface. Once the bracket is mounted on the desired location, the loudspeaker can be fixed to the bracket.
Connecting VIROs
Multiple VIROs can be connected in parallel. Mind the minimum load impedance of the amplifier. The number of VIRO's to be connected will depend whether 8 (VIVO5) or 16 (VIVO5D) Ohm variants will be used.. Make sure that all devices are switched off.
Connect the amplifier to the far left +/- of the 4-pin terminal block. The right-hand +/- at the terminal block is the connection to the next VIRO. If the optional transformer module is installed, the linktrough must be done at the primary side of the transformer.
Set solutions
Specifying and combining an audio system does not have to be difficult, and AUDAC proves it with its extensive range of set solutions.
The set solutions are the result of AUDAC's audio engineers helping you choose between AUDAC's most innovative acoustic craftsmanship.
With the set solutions, you immediately have a total package which is perfectly tuned for the right application.
Please visit https://audac.eu/eu/audio-configurator to find the best solution for your application
| FESTA5.5 | 4X VIRO5 | BASO12 | SMQ500 |
| FESTA5.9 | 8X VIRO5 | BASO15 | SMQ750 |
| FESTA5.3 | 2X VIRO5 | NOBA8 | SMAQ350 |
| FESTA5.6 | 4X VIRO5 | 2x BASO12 | SMAQ500 |
These are some examples of our set solutions, but many other combinations are possible. With our ever-growing product range, the number of product combinations grows correspondingly.
optional accessories
Installing the optional transformer module (TRV106)


Optional mounting accessories
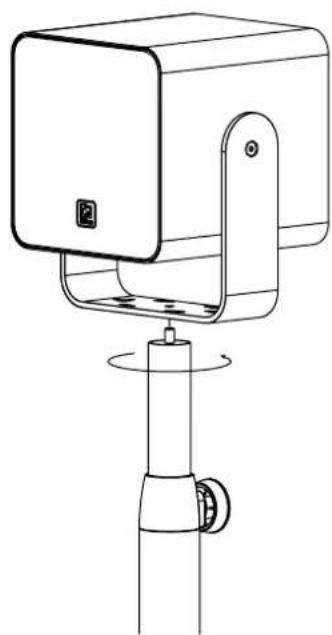
3/8" stand fitting
The bracket of the VIRO has a 3/8" stand fitting. This allows the VIRO to be mounted on microphone stands or any other possible accessory requiring a 3/8" fixation point
Screw on the loudspeaker to secure it.
natural_image
Line drawing of a mechanical device with a rotating base and mounting bracket (no text or symbols)Ground pin

natural_image
Technical line drawing of a mechanical device with a conical base and mounting bracket (no text or symbols)The MBK523/G ground pin is specially designed for mounting loudspeakers. The optional stainless steel ground pin makes it possible to provide all kinds of gardens with the premium sound experience of the outdoor loudspeaker.
Place the ground pin, without a speaker attached, in the desired location.
Check for the presence of large rocks and if the soft soil is deep enough.
Place the ground pin in the ground without the use of any tools.
The use of tools such as hammers, drills etc. may damage the ground pin. Mount the speaker to the ground pin by securing it with the four M6 bolts provided.
The mounting holes on the ground pin are tapped, making the use of nuts unnecessary.
Pole mount
This pole mount adapter allows speakers to be mounted to different poles.
Fix the MBK530 to the desired pole and height without a speaker mounted.
The pole mount can be attached to poles with a diameter ranging from 75 mm to 140 mm.
Tighten by closing the hose clamp.
Mount the loudspeaker to the pole mount by securing it with the four M6 bolts provided.
The mounting holes on the pole mount are tapped, making the use of nuts unnecessary.

natural_image
Technical line drawing of a mechanical device with mounting bracket and side panel (no text or symbols)| Peak Power handling 240 Watt | ||
| Program Power handling 120 Watt | ||
| RMS/AES power handling 60 Watt | ||
| Nominal impedance | VIRO5: 8 OhmVIRO5D: 16 Ohm | |
| Sensitivity 1W/1m 89 dB | ||
| Sound pressure Max W/1m 110 dB | ||
| Frequency response ± 3dB 100 Hz - 20 kHz | ||
| Drivers 2-way coaxial driver | 1" Silk dome tweeter | |
| 5 1/4" outdoor treared paper with rubber surround | ||
| Construction Powder coated aluminium | ||
| Front finish Aluminium with hydrophobic cloth | ||
| Colour White (RAL9003) VIRO5/W & VIRO5D/W | ||
| Black (RAL9004) VIRO5/B & VIRO5D/B | ||
| Dimensions (w x h x d) 198 x 235 x 191 mm | ||
| Weight 4.2 Kg | ||
| Optional accessories 70-100V transformer module | TRV106 | |
| SpeakON connection plate | CVS102 | |
| Ground pin | MBK523/G | |
| Pole mount | MBK530 | |
| Steel drop safety wire (gripple) | STG601 | |


- ADDITIONAL INFORMATION
- Introduction 05
- Precautions 06
- Chapter 1 07
- Chapter 2 08
- Chapter 3 010
- Chapter 4 011
- Chapter 5 012
- Technical specifications
- A sound that lasts
- READ FOLLOWING INSTRUCTIONS FOR YOUR OWN SAFETY
- CAUTION - SERVICING
- EC DECLARATION OF CONFORMITY
- WASTE ELECTRICAL AND ELECTRONIC EQUIPMENT (WEEE)
- Chapter 1
- Connections and connectors
- CONNECTION STANDARDS
- 4-Pin Terminal block:
- Overview VIRO: Back
- 1) Cable entry plate
- 2) Drop safety bushing
- 3) Bracket
- 4) Water drainage holes
- 5) Terminal block
- 6) Transformer module point
- Bracket
- Connecting VIROs
- Set solutions
- optional accessories
- Installing the optional transformer module (TRV106)
- Optional mounting accessories
- 3/8" stand fitting
- Ground pin
- Pole mount
Brand : Audac
Model : VIRO5
Category : Loudspeaker