
PVTT2UOR - Turntable Pyle - Free user manual and instructions
Find the device manual for free PVTT2UOR Pyle in PDF.

| Product Type | Retro Belt-Drive Turntable |
| Model | PVTT2UWD / PVTT2UBK |
| Drive Type | Belt-drive |
| Speeds | 33, 45, 78 RPM |
| 45 RPM Adapter | Included |
| Tonearm | With lift lever and rest |
| Stylus (Needle) | Replaceable |
| Auto Stop Control | ON/OFF switch |
| Built-in Speaker | Yes |
| Outputs | RCA, USB to PC |
| Input | Line-in jack |
| Power Source | USB power cord (120V-60Hz) or rechargeable battery |
| Battery Indicator | Yes |
| Recording Software | Compatible with Audacity (free) |
| Construction | Suitcase-style with dust cover |
| Cleaning | Use soft cloth, mild detergent |
| Safety Features | Overload protection, grounding, safety instructions |
Frequently Asked Questions - PVTT2UOR Pyle
User questions about PVTT2UOR Pyle
0 question about this device. Answer the ones you know or ask your own.
Ask a new question about this device
Download the instructions for your Turntable in PDF format for free! Find your manual PVTT2UOR - Pyle and take your electronic device back in hand. On this page are published all the documents necessary for the use of your device. PVTT2UOR by Pyle.
USER MANUAL PVTT2UOR Pyle
Model: PVTT2UWD/PVTT2UBK
Retro Belt-Drive Turntable With USB-to-PC Connection
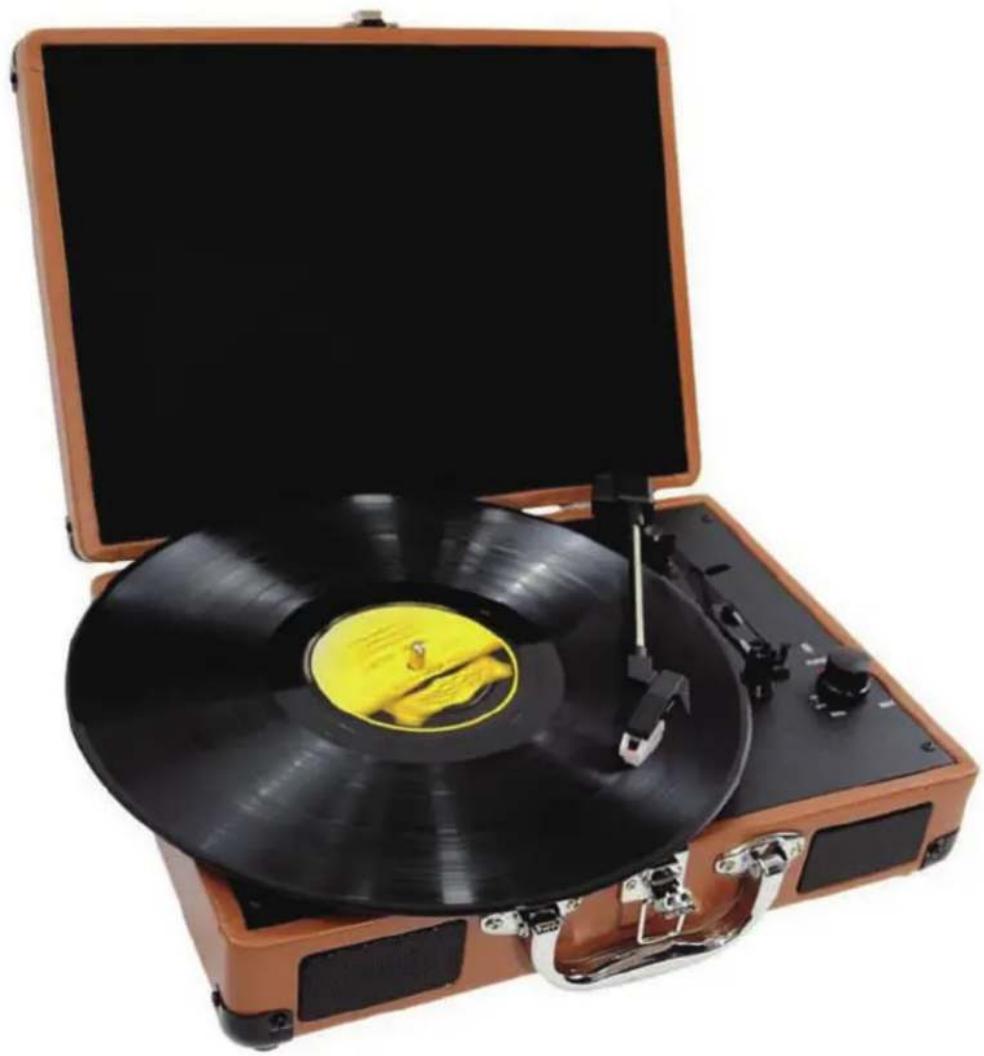
natural_image
Vintage open-top radio with black vinyl record and yellow cover, no visible text or symbols1600 63 ^rd Street
Brooklyn, NY 11204
Toll Free: (800) 444-5671 / Tel: (718) 236-8000 / Fax: (718) 236-2400
http://www.pyleaudio.com
IMPORTANT SAFETY INSTRUCTIONS
When using electrical products, always follow basic precautions:
- Read Instructions-All safety and operating instructions should be read before operated.
- Retain Instructions-Safety and operating instructions should be retained for future reference.
- Follow warnings-All warnings on the product and in the manual should be adhered to.
-
Follow instructions-All operating and user instructions should be followed.
-
Cleaning-Unplug this product from the wall outlet before cleaning. Do not use liquid or aerosol cleaners instead use a damp cloth for cleaning.
-
Attachments-Do not use attachments not recommended by the product manufacturer as they may cause hazards.
-
Water and moisture-Avoid exposing the product to water and moisture.
-
Accessories-Securely place this unit before use. The product may fall if not properly a stand, bracket, or table recommended by the manufacturer if the product needs to be mounted, you should follow the manufacturer's instructions and should use a mounting accessory recommended by them.
-
Transporting-This product should be moved with care to avoid damage or injury.
-
Ventilation-Slots and openings in the cabinet are provided for ventilation. This is to ensure reliable operation of the product and to protect it from overheating. Openings must not be blocked or covered. This product should not be placed in a built-in installation. such as bookcase or rack unless proper ventilation is provided or the manufacturer's instructions have been adhered to.
-
Power Sources-This product should be operated only from the type of power source indicated on the marking label. If you are not sure of the type of power supply to your home, consult your product dealer or local power company. For products intended to operate from battery power, or other sources, refer to the instruction manual.
-
Power-Cord protection-Power-supply cords should be properly secured so that they are not likely to be entangled in any way.
-
Lighting-For added protection for this product during a lighting storm, or when it is left unattended for long periods of time, unplug it from the wall outlet and disconnect the antenna or cable system. This will prevent damage to the product due to lighting and power-line surges.
-
Overloading-Do not overloads wall outlets and extension cords, as this can result in a risk of fire or electric shock.
-
Object and liquid entry-Never push objects of any kind into this product through openings as they may touch dangerous voltage points or short-out parts that could result in a fire or electric shock.
-
Servicing-Do not attempt to repair this product yourself as opening or removing covers may expose you to dangerous voltage or other hazards. Refer all servicing to qualified service personnel.
-
Damage requiring service-Unplug this product from the wall outlet and refer servicing to

natural_image
Silhouette of a person pushing a large mechanical device inside a circular frame (no text or symbols)qualified service personnel under the following conditions:
a. If the power-supply cord or plug is damaged.
b. If liquid or objects have fallen into the product
c. If the product has been exposed to rain or water.
d. If the product does not operate and you have followed the manual for troubleshooting.
e. If the product has been dropped or damaged in any way, and the product exhibits a distinct change in performance may indicate a need for service and/or repair.
18. Replacement parts-If a part needs to be replaced, be sure the service technician has used replacement parts specified by the manufacturer or have the same characteristics as the original part. Unauthorized substitutions may result in fire, electric shock, or other hazards.
19. Safety check-Upon completion of any service or repairs to this product, ask the service technician to perform safety checks to determine that the product is in proper operating condition.
20. Wall of ceiling mounting-The product should be mounted to a wall or ceiling only as recommended by the manufacturer.
21. Heat-The product should be situated away from heat sources such as radiators, heat registers, stoves or other products(including amplifiers)that produce heat.
PRECAUTIONS
- In order to shut off the unit completely, unplug the power cord from the wall outlet, be sure to unplug the unit if you do not intend to use it for a long period of time.
- Incorrect use of controls, adjustments and performance other than those specified herein may result in hazardous radiation exposure.
- Should this product malfunction, discontinue use and contact a qualified service center.
| WARNINGTo reduce the risk of fire or electric shock, do not expose this appliance to rain or moisture | |
| CAUTIONRISKS OF ELECTRIC SHOCK-DO NOT OPEN!To reduce the risk of electric shock, do not remove casing.No user serviceable parts inside. Refer servicing to qualified service personnel. | |
| The light flash with arrowhead symbol, within an equilateral triangle ,is intended to alert User to the presence of “dangerous voltage” which may be ofSufficient magnitude to cause electric shock to persons. | |
 The exclamation point inside an equilateral triangle is intended to alert User To the The exclamation point inside an equilateral triangle is intended to alert User To the | |
 Presence of important operating and maintenance(servicing)instructions in The literature that may accompany the appliance. Presence of important operating and maintenance(servicing)instructions in The literature that may accompany the appliance. | |
CAUTION: To prevent shock, match wide blade of plug to wide slot, fully inserted
UL Warning: Do not expose the apparatus to dripping or splashing and that no objects filled with liquids, such as vases, shall be placed on the apparatus.
BEFORE USE
- Choose a safe location and avoid placing the unit in direct sunlight or near heat source.
- Avoid locations subject to vibrations, excessive dust, cold or moisture.
- Do not open the cabinet as this may result in electrical shock. If a foreign object is inserted accidentally contact your dealer.
- When removing the power plug from a wall outlet, pull the plug directly, Not the cord.
- Do not attempt to clean the unit with chemical solvents as this might damage the finishing. A clean, dry cloth is recommended for cleaning.
- In order to completely turn off the unit, unplug the power cord from the wall outlet.
- Keep this manual for future reference.
TURNTABLE PARTS
- 45RPM adapter
- Lift lever
- Speed selection
- Tone(Needle) arm
- Auto stop control
- Battery indicator light
- USB power cord
- Tone Arm rest
- Rotary volume control with Power ON/OFF function
- Platter/Turntable
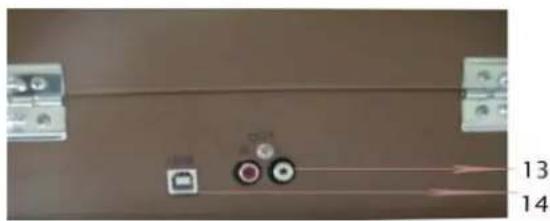
- Line in Jack
- Stylus(Needle)cartridge
- RCA Output
- USB jack to PC for recording
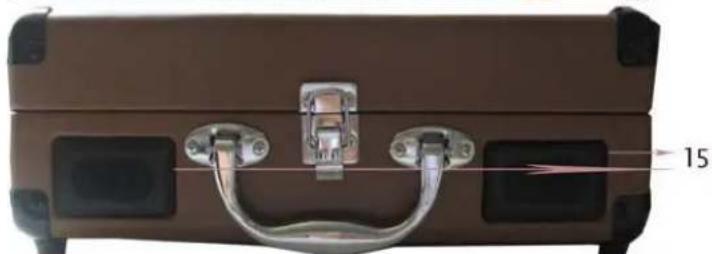
- Built in speaker

natural_image
Close-up of a brown leather suitcase with metal latch and handle, no visible text or symbolsPLAY A RECORD
- Open the suitcase
- Connect the USB line with Adapter then to an electrical outlet (120V-60Hz); Or make the rechargeable battery has been full recharge.
- Place a record on the turntable and set the player speed to match the record speed (33/45/78). NOTE: when playing a single (a 45 rpm record) and/or records with large centre holes, use the 45 rpm adapter.
- Remove the tone arm from the rest, push lift lever backward to raise the tone arm and gently move the tone arm to the desired position over the record. The tu rntable will begin to spin when the tone arm slowly onto the desired position on the record to begin playing the record.
- Turn the manual stop control to right, the turntable platter will stop at once, turn it to left the turntable platter will start again.
- If the Auto Stop Control is turned ON, record will stop automatically when finished. If the Auto Stop Control is turned OFF, record will NOT stop automatically when the finished.
- For best performance and product maintenance, unplug the turntable when not in use.
PLAY LINE-IN
Once you connect the external audio source with the USB cable, the turntable player will stop and automatically change to Line-in playback.
HOW TO REPLACE THE STYLUS(NEEDLE)
To replace the turntable stylus (needle), please refer on the instructions below.
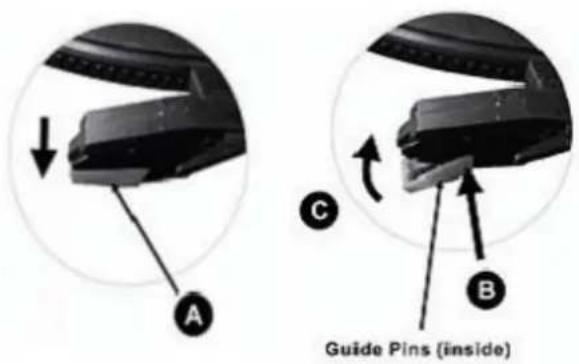
Removing the TURNTABLE STYLUS(needle) from the cartridge
- Place a screwdriver at the stylus tip and push downward as shown in diagram "A".
- Remove the stylus by pulling the stylus forward and pushing downward.
Inserting the stylus(needle)
-
Hold the tip of the stylus and insert the stylus forward and pushing downward.
-
Push the stylus upward and direction "C" until the stylus locks into the tip position
RECORD YOUR VINYL TO YOUR WINDOWS PC
Audacity Recording Software
Your USB turntable is compatible with any recording software that supports USB Audio devices. We have included Audacity, which is free software, distributed under the General Public License(GPL), However you may prefer to use a variety of 3rd party software packages.
BEFORE STARTING THE SOFTWARE
Make sure that your USB turntable is plugged into the computer with the supplied USB cable, and both the computer and the turntable are plugged in and on. Refer to the USB turntable quick start instruction manual included before proceeding with software installation.
TO INSTALL SOFTWARE ( BOTH PC AND MAC)
RECORDING INTO A COMPUTER
-
Press the Record Button
-
Start playback on the USB turntable. You will see the waveform of the audio on the screen as it is recording. You will hear the audio coming from the output of your computers soundcard.
No Audio? - go back to the preference menu (Figure 1) and make sure you have “Software Play through” selected and the speaker volume up on your computer.

Figure 1: Select USB Audio Device from Preferences
- Play through the entire track/album you desire to record.
4. Press Stop
- SAVE YOUR FILE NOW by clicking on 'File' -> 'Save Project'. Select the destination and file name for the project and click 'Save'.
- You have completed the recording process. (See Figure 2)

Figure 2: Recording Sample
Adjusting Your Audio Level (Optional)
- Select your entire recording by selecting "Edit", then "Select...", then click "All". You can also use Ctrl+A on a PC or APPLE+A on a Macintosh to quickly select all.
Figure 3:

Figure 3: Select All
- Select the "Effect" menu and choose the desired effect. There are various types of effects which are described further in the software's help section as well as on the web (See Figure 4).
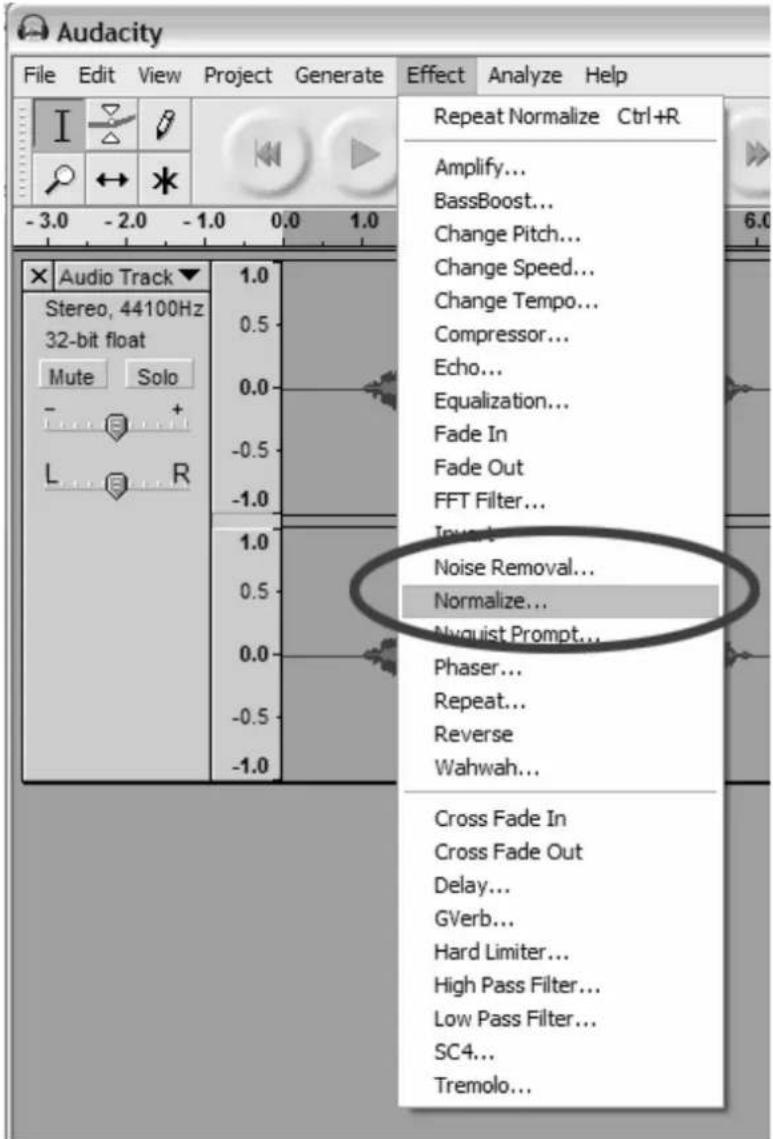
b. Normalize should be used to have the correct volume on the recording. (See Figure 5)
Figure 4: Effect Drop Down List
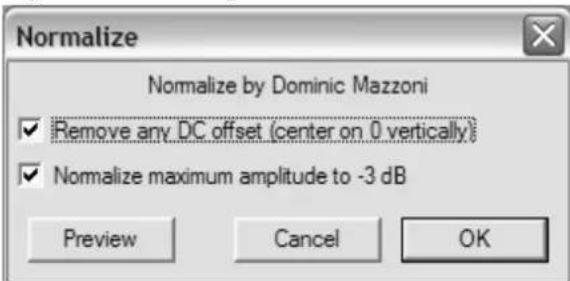
Figure 5: Normalize
Cleaning Your Audio (Optional)
-
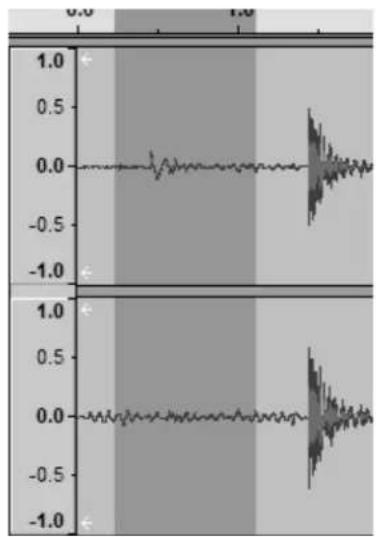
Drag the cursor over a portion of the audio track which contains noise. We recommend using the beginning or the end of a track where there is no music and only noise. (See Figure 6)
-
Select "Noise Removal" from the "Effect" drop down menu to bring up the "Noise Removal" window. (See Figure 7)
-
Click "Get Noise Profile". The Noise Removal window will now close automatically.
-
Select the entire track of audio you wish to remove noise from.
If you wish to clean up the entire recording, use "Select All" under the "Edit Menu" (See Figure 3)
-
Repeat Step 2 to bring up the "Noise Removal" Window.
-
Adjust the amount of audio that you would like to filter by moving the slider in the "Noise Removal" window. We recommend using the minimum noise removal for optimum sound. Note: you can preview the audio before removing the noise by clicking on 'Preview'.
-
Click on 'Remove Noise'.
Cleaning Your Audio (Optional)
- Drag the cursor over a portion of the audio track which contains noise. We recommend using the beginning or the end of a track where there is no music and only noise. (See Figure 6)
- Select "Noise Removal" from the "Effect" drop down menu to bring up the "Noise Removal" window. (See Figure 7)
- Click "Get Noise Profile". The Noise Removal window will now close automatically.
- Select the entire track of audio you wish to remove noise from. If you wish to clean up the entire recording, use "Select All" under the "Edit Menu" (See Figure 3)
- Repeat Step 2 to bring up the "Noise Removal" Window.
- Adjust the amount of audio that you would like to filter by moving the slider in the "Noise Removal" window. We recommend using the minimum noise removal for optimum sound. Note: you can preview the audio before removing the noise by clicking on 'Preview'.
- Click on 'Remove Noise'.
line
| Time | Value | |------|-------| | 0.0 | 0.0 | | 0.5 | 0.5 | | 1.0 | 1.0 |Figure 6: Selecting Noise in Track
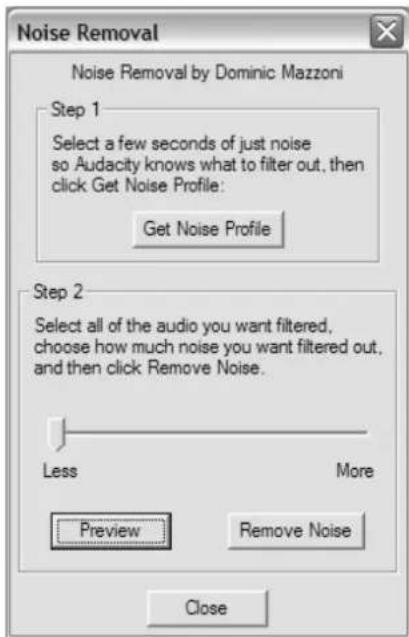
Figure 7: Noise Removal Window
TIPS FOR BETTER TURNTABLE PERFORMANCE
- When opening or closing the turntable cover, handle it gently, gripping it either at the centre or at each side.
- Do not touch the needle tip with your fingers; avoid bumping the needle against the turntable platter or record edge.
- Frequently clean the needle tip-use a soft brush in a "back-to-front" motion only.
- If you must use a needle cleaning fluid, use very sparingly.
- Gently wipe the dust cover and turntable housing with a soft cloth. Use only a small amount of mild detergent to clean the turntable and dust cover.
- Never apply harsh chemicals or solvents to any part of the turntable system.
- Model: PVTT2UWD/PVTT2UBK
- IMPORTANT SAFETY INSTRUCTIONS
- PRECAUTIONS
- BEFORE USE
- TURNTABLE PARTS
- PLAY A RECORD
- PLAY LINE-IN
- HOW TO REPLACE THE STYLUS(NEEDLE)
- Removing the TURNTABLE STYLUS(needle) from the cartridge
- Inserting the stylus(needle)
- RECORD YOUR VINYL TO YOUR WINDOWS PC
- BEFORE STARTING THE SOFTWARE
- TO INSTALL SOFTWARE ( BOTH PC AND MAC)
- RECORDING INTO A COMPUTER
- Press Stop
- Cleaning Your Audio (Optional)
- TIPS FOR BETTER TURNTABLE PERFORMANCE
Brand : Pyle
Model : PVTT2UOR
Category : Turntable