Huayra R Sim Racing Pedals - Pédales de simulation de course Asetek - Free user manual and instructions
Find the device manual for free Huayra R Sim Racing Pedals Asetek in PDF.

User questions about Huayra R Sim Racing Pedals Asetek
0 question about this device. Answer the ones you know or ask your own.
Ask a new question about this device
Download the instructions for your Pédales de simulation de course in PDF format for free! Find your manual Huayra R Sim Racing Pedals - Asetek and take your electronic device back in hand. On this page are published all the documents necessary for the use of your device. Huayra R Sim Racing Pedals by Asetek.
USER MANUAL Huayra R Sim Racing Pedals Asetek
Huayra R Sim Racing Pedals Manual

ASETEK SIM SPORTS

Thank you for purchasing the Asetek SimSports™ Pagani pedals.
You have made an excellent choice! We are sure the Pagani pedals will help you improve your sim racing career.
The closest you'll get to a real Pagani experience.
Table of contents
Foreword 2
About This Document 2
Other Relevant Documents....2
Symbols Used 3
Copyright....3
- Introduction 3
1.1 Asetek SimSports 3
1.2 Pagani 4
1.3 Asetek SimSports Make Pagani Pedals Affordable 4
1.4 Box Contents 5
1.5 Videos 6
1.6 Manual Version 6
1.7 Support & Contact....6
- Product....6
2.1 Intended Use 6
2.2 Compatibility 7
2.3 Reasonably Foreseeable Unintended Use 7
2.4 General Specifications....7
-
Product Overview 8
-
Getting Started 9
4.1 Installing your Pedals....9
4.1.1 Tools Required 9
4.1.2 Optional Tools....9
4.1.3 Mounting to your Rig 9
4.2 Adjusting the Pedals 12
4.2.1 Pedal Face Plates 12
4.2.2 How Does the T.H.O.R.P. ^TM System Function ....13
4.2.3 Adjusting the Brake Pedal Angle 15
4.2.4 Throttle Pedal Angle Adjustment 17
4.2.5 Throttle Preload Adjustment 19
4.2.6 Throttle Spring Replacement 21
4.2.7 Throttle Travel Distance Adjustment 23
4.2.8 Swapping Elastomers....24
4.2.9 Elastomer Types 26
4.2.10 Brake Pedal Preload Adjustment....27
4.3 Connecting to your PC 29
4.4 Start Racing! 30
- RaceHub™ Adjustments....31
5.1 RaceHub™ Download....31
5.1.1 RaceHub™ Installation....31
5.1.2 RaceHub™ Updating 31
5.2 Introduction....31
5.3 Pedal Calibration 32
5.4 Deadzone Adjustments....33
5.5 Maximum Brake Force Adjustment....34
5.6 Custom Pedal Mapping....34
- Compatible Products 36
6.1 Asetek SimSports™ Invicta™ Clutch 36
- Maintenance....37
7.1 Throttle Maintenance....37
7.2 Brake Maintenance 37
7.3 Spare Parts 37
-
Troubleshooting....38
-
Safety 39
-
De-commissioning & Sustainability....40
10.1 Packaging 4C
10.2 Product 40
10.3 Production 41
- Declaration of Conformity 41
Foreword
About This Document
This manual is written for the end-user of the Asetek SimSports™ Pagani Pedals (hereon after: "Pagani pedals") and contains all information required to correctly and safely install, use and maintain the following model:
| Model Name P-BT-3 | |
| Product Name | Asetek SimSports PaganiHuayra R Sim Racing Pedals |
| Product Code 40-090-0000001 | |
This manual was authored in English. All other languages are translations of the original document.
Please make sure that you have thoroughly read and understood all contents of this manual before installing, using, or performing maintenance on the pedal.
If anything in this manual is unclear, please contact Asetek SimSports Support (available on www.asetek.com/simsports/support/).
Please note the serial number on your product before contacting the support. The serial number can be found on the bottom of the base plate and written here for your convenience:

| Serial Number | |
| Asetek Denmark A/SAssensvej 29220 Aalborg EastDenmarkwww.asetek.com | ASETEK SIM SPORTS® |
Other Relevant Documents
These documents may assist you in your quest for faster lap times:
Mounting patterns, software, DoC, and other installation manuals can be found here:
www.asetek.com/simsports/product/pagani-huayra-r-sim-racing-pedals/
Symbols Used
Make sure you pay attention to all warnings and symbols on the product and packaging.
Indicates that minor to moderate injuries may be sustained if the instruction is not followed correctly

CAUTION
This indicates that the product could be damaged if the instruction is not followed correctly

NOTICE
Copyright
The content of this manual is protected by copyright and other international intellectual property laws. The contents of this manual or any parts thereof may only be made public, copied, modified, reproduced, translated with express written permission from Asetek. This manual or any parts thereof may only be published, transmitted, displayed, or made available to a third party with express written permission from Asetek SimSports.
1. Introduction
Thank you for purchasing the Asetek SimSports Pagani Pedals. We strongly encourage you to read through this manual thoroughly in its entirety. The Pagani pedals are a premium product made to fit each user. They have an excellent baseline adjustment out of the box, and we strongly encourage you to drive for 5+ hours with the baseline adjustments before changing anything. After that, your full immersion racing experience is unlocked when they are adjusted to your personal preference.
1.1 Asetek SimSports
Asetek SimSports is a game-changing high-end manufacturer of Simracing equipment based out of Denmark. In 2021, Asetek expanded into the rapidly growing SimSports™ Gaming market, unveiling its initial sim racing products designed to give sim racers full immersion and the feel of a real racecar. We believe our sim racing pedals will excite and immerse sim racers like nothing else on the market.
We believe in offering products that are simple, affordable, high-quality, and aesthetically pleasing.
1.2 Pagani
Pagani Automobili S.p.A. is an Italian Hypercar manufacturer. The company was founded in 1998 by Horacio Pagani and is based in San Cesario sul Panaro, Modena, Italy. The philosophy driving the company embraces a concept borrowed from the Renaissance and embodied by the great Leonardo da Vinci who, over 500 years ago, once stated: "Art and Science are disciplines that must walk together hand in hand." Pagani Automobili creates in accordance with this inspirational creed, combining technique and taste, functionality and aesthetics, handcraft work and technological know-how.
1.3. Asetek SimSports Make Pagani Pedals Affordable
Ideal partners, Pagani and Asetek, bring vision, a passion for innovation and design, hyper focused attention to detail and industry-renowned quality and reliability to their offerings.
Asetek SimSports' vision for product development goes hand in hand with Pagani with exceptional focus on art and craftsmanship. The combination between Asetek SimSports' high sim racing equipment and Pagani's exclusivity, now allows the owner to feel like they possess their own super car, as the
Asetek SimSports Pagani pedals are a 1-to-1 replica of the pedals equipped in a Pagani Huayra R.
The Asetek SimSports Pagani Pedals brings the best of both worlds and is equipped with Asetek SimSports' high-end and best-in-class brake cylinder: T.H.O.R.P.™ combined with detailed pedals arm and pedal face plates from a Pagani Huayra R.
1.4 Box Contents
The box contains the following components and accessories:
• Pagani pedals Brake & Throttle
- Safety brief
- Manual (This document)
- Warranty statement
- Asetek SimSports™ sticker sheet
• USB Type-A to USB Type-C cable (Two (2) meters)
• USB Type-C to USB Type-C cable (Two (2) meters)
- M6x5 Set screw (x2)
• M6x20 screw (x4)
• M6 slot nut (x4)
- Washer (x4)
- Bolt (x4)
• Allen Key, 3mm
- Allen key, 5mm
- Elastomer
- Green or (black w/ text), Soft, Extra
- Yellow or (white w/ text), Medium, Preinstalled
- Orange or (green w/ text), Hard, Extra
- Throttle Spring
- Hard, Preinstalled
- Soft, Extra

text_image
Stickers Safety Statement USB Type-C to USB Type-C USB Type-C to USB Type-A x2 x4 3mm 5mm x2 1 pro-installed x3 1 pro-installed x4 51.5 Videos
On the Asetek SimSports™ YouTube channel
(https://www.youtube.com/aseteksimsports), you will be able to find tutorial videos which, in detail, demonstrates numerous ways the pedals can be set up and used. You will also find additional information about the development and ambition for the Pagani pedals.
1.6 Manual Version
This manual is version 1.0.
You will always be able to find the latest version of the manual at: www.asetek.com/simsports/product/pagani-huayra-r-sim-racing-pedals/
1.7 Support & Contact
Should you stumble upon further questions that are not covered in this manual or any of our detailed instruction videos, we encourage you to contact our friendly support staff at support@aseteksimsports.com

The pedals are intended for indoor use only

Recommended ages 15 and above

2. Product
2.1 Intended Use
Thank you for purchasing the Asetek SimSports™ Pagani pedals; you have made an excellent choice! Asetek SimSports™ Pagani Pedals will bring you to the next level of your Sim Racing career. Whether you are a beginning or experienced racer, you will feel the immersion of being in a real race car while racing the tracks across the globe in the virtual space.
The Pagani Pedals are designed as a replica of the pedal set in a Pagani Huayra R super car. We are sure that your purchase will give you the feel of owning your own super car, while racing your favorite simulator.
The pedals can be directly connected to any PC with a USB port and are intended to be mounted in a sim racing cockpit. The pedals can be combined with the Asetek SimSports Invicta Clutch Pedal.
The clutch pedal can be bought in our webshop https://www.asetek.com/simsports/product/invicta-pedals-clutch/ or at an authorized Asetek SimSports reseller https://www.asetek.com/simsports/authorized-resellers/

2.2 Compatibility
| Platform(s) PC (Windows 10, 11) | |
| Games Assetto Corsa | Assetto Corsa CompetizioneDiRT RallyDiRT Rally 2.0F1 SeriesiRacingProject Cars 2rFactor 2+ many other games that acceptdirect input devices |
2.3 Reasonably Foreseeable Unintended Use
The following is considered misuse and may void the warranty:
- Use of adaptors or extension sets for cables;
- Use of other cables than provided with the product;
- Use in an environment that varies from or exceeds the given environmental conditions;
- Use that varies from or exceeds the given operating conditions;
-
Failure to comply with the instructions in this manual;
-
Failure to eliminate faults, malfunctions, or defects of the product that impose safety risks;
- Unauthorized removal or modification of parts or safety devices of the product;
- Use of spare parts or accessories that Asetek SimSports™ has not approved;
- Mounting and/or use of any parts in a vehicle;
- Adjusting pedal settings during operation;
• Operation in a flammable and/or explosive environment.
2.4 General Specifications
| Dimensions (D x W x H) 457 x 212 x 256 mm | |
| Weight 3 kg | |
| Materials | Pedals: AluminumPCB Housing: Plastic |
| Sensor Types | Throttle: Hall sensorBrake: Liquid Pressure Sensor |
| Power Input 5V 500mA - Max. 2,5W | |
| Operating Temperatures 15°C to 35°C, room temperature | |
3. Product Overview

text_image
Throttle pedal arm Brake pedal arm Locking thumb nut Rod clevis lock pin Rod clevis Lock nut Throttle preload adjustment Throttle spring Throttle rod Throttle pedal end-stop USB Type-C port Throttle pedal face plate Brake pedal face plate Throttle pedal stop Heel rest Brake pedal stop Locking thumb nut RGB LED strip Rod clevis lock pin Lock nut Brake rod Brake preload lock thumb nut Brake preload force adjustment4. Getting Started
This section will teach you how to get your pedals set up and running. Later in the manual, you will learn much more about fine-tuning and software.
4.1 Installing your Pedals
4.1.1 Tools Required
To mount the pedals in your cockpit, you will need the following tools:
• Allen key, 3 mm (included)
- Allen key, 5 mm (included)
• Key wrench (not included)
4.1.2 Optional Tools
Depending on your rig and mounting preference, you may also need the following tools:
- Screwdriver
• Power drill
- Pencil or marker
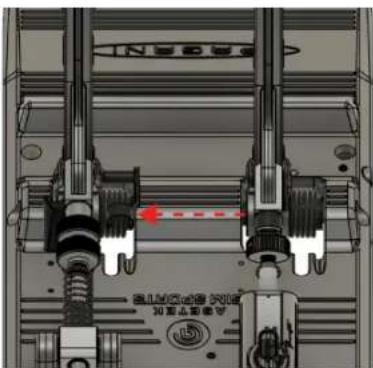
4.1.3 Mounting to your Rig
The pedals are intended to be solely used while mounted to a sim racing rig.

CAUTION
Do not use the pedals without mounting them as they may shift during use and cause injury to you, bystanders, or your cockpit.
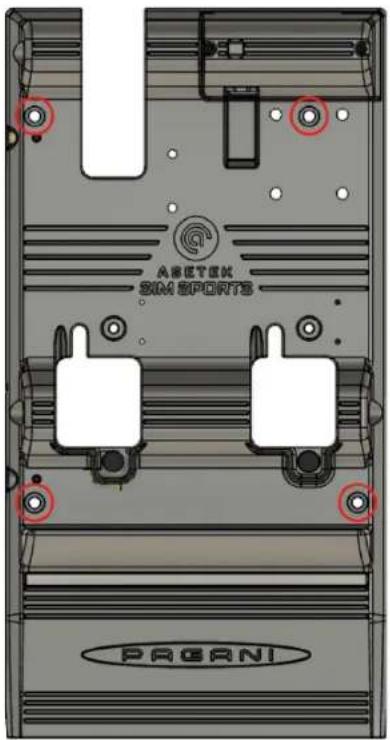
The pedals have four (4) mounting holes in fixed positions. As such, all adjustments to the positioning of the base must be handled by your rig.
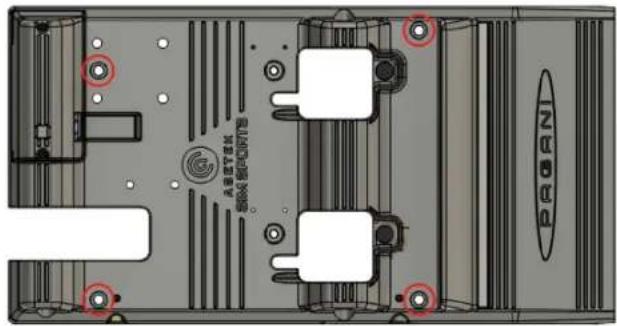
text_image
ARBITON GROSO BOCOPTFE PROBANThe baseplate is designed to be used with M6 screws, and holes in your rig should be with ∅6,4 diameter. It is also compatible with the included M6 slot nuts.
The Asetek SimSports™ Pagani Pedals are designed to withstand an extreme amount of braking force. Therefore, it is paramount that you install them on a very rigid base. Ideal conditions are in, aluminum profile cockpits, or a thick metal baseplate (as a minimum, we recommend: 3 mm, steel).
Mounting your pedals:
- Carefully remove excess dust and debris from the installation location.
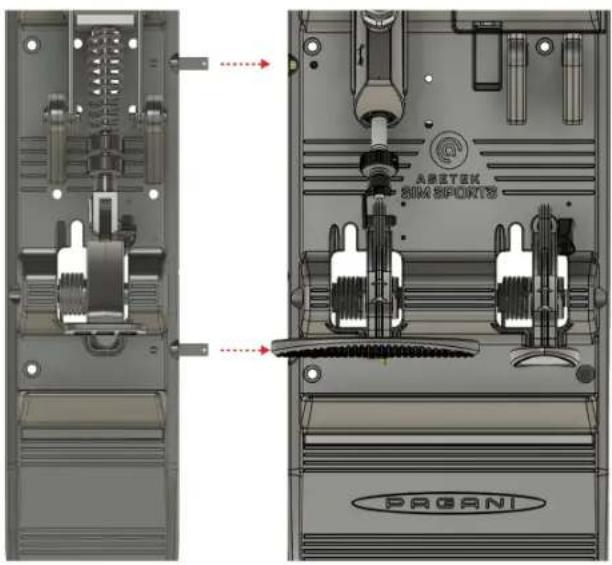
- Place the pedals in their designated spot in your rig.
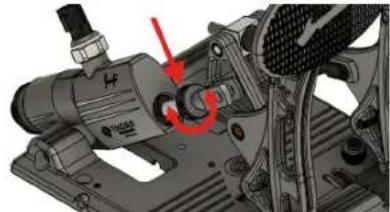
- Align the holes in the pedals to four existing mounting holes in your sim rig, if available. Please note that the throttle assembly can be removed to access the mounting hole underneath easily.

CAUTION
Do not use the pedals without mounting them.
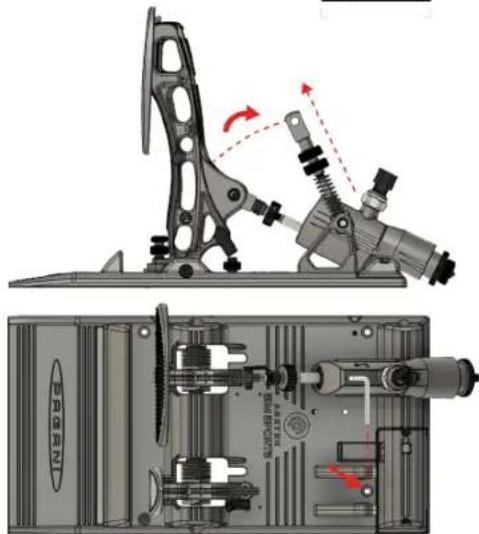
Note: By following the steps in section 4.2.6 – Throttle Spring Replacement, you will gain easy access, in seconds, to the mounting hole below the throttle spring.
text_image
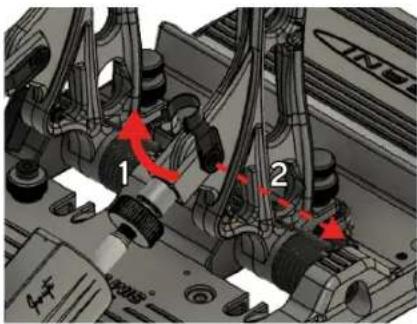
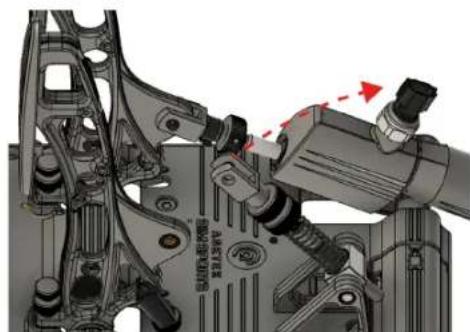
ARETEK SIM SPORTS PAGANIa. Remove the rod clevis lock pin
b. Lift the rod
c. Remove the rod from the pivot bracket
You can now access the mounting hole easily
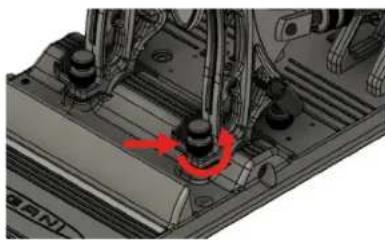
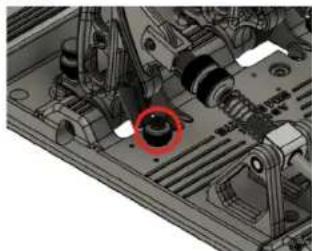
- Mount the pedals to the existing holes using the four (4) provided M6x20 screws, four (4) washers, and four (4) nuts or four (4) M6 slot nuts (depending on your rig).
If there are no holes available or they do not line up, you can use the mounting hole schematics available here: www.asetek.com/simsports/product/pagani-huayra-r-sim-racing-pedals/or continue to step 5:
- Mark the drilling locations.
- Remove the pedals and drill four (4) ∅6.4 mm holes.
- Mount the pedals to the holes using the four (4) provided M6x20 screws, four (4) washers, and four (4) bolts or M6 slot nuts (depending on your rig).
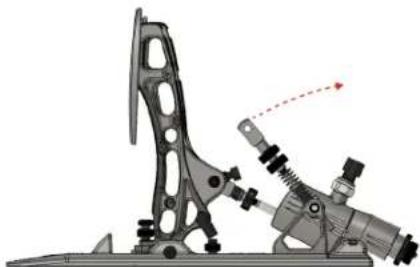
Congratulations. You have successfully mounted your Asetek SimSports™ Pagani Pedals to your rig. Enjoy the ride!
Note: If your rig is placed up against a wall, please make sure that there are minimum 5 cm of air between the rear of the brake cylinder and the wall, to avoid unnecessary friction between the two.

CAUTION
Please be aware that edges on the rod clevis can be sharp

natural_image
Mechanical assembly diagram showing a lever mechanism and internal components (no text or symbols)4.2 Adjusting the Pedals

CAUTION
Avoid eye contact with the lubrication grease and wash hands thoroughly after adjustment.
It is essential to make sure you have the correct pedal angle in any racing style. Setting this correctly will ensure maximum braking efficiency, allow you to use muscle memory to your advantage, and make you go even faster around the track!
The pedals are set up in their default configuration (out of the box) to give you maximum immersion. In other words, they are set up to be focused on realism – like what you would find in a real race car. The brake is at 90° to the base, and the throttle tilted a few degrees forward. This allows for the most efficient braking and will allow you to train your muscle memory to perfection while also maximizing your trail braking potential. The throttle and clutch pedals are further forward to ensure that you will hit the brake pedal as the first thing in an emergency on track.
The above setup is how it works in a real race car. We recommend you drive for several hours first and try to adapt. In a real race car, where you often have different drivers in the car (as well as in many endurance sim races), the pedals are adjusted like the above, and there is no opportunity to change that specifically to any driver. It is just physics that you will have the most efficient braking when the brake pedal is at a 90-degree angle.
4.2.1 Pedal Face Plates

NOTICE
Do not use a power drill, as this may damage the screws.
The Pagani edition's pedal face plates are replicas of the real pedal set in a Pagani Huayra R and are designed in alignment with exclusivity which Pagani also brings in their market space.
The Pagani Huayra R pedal face plates are in a fixed position, which is accurate in comparison to the real deal, and doesn't allow for adjustability. Details are in an exclusive product and in a cooperation with the world's most prominent car manufacturer.
natural_image
Two mechanical devices: a circular dial and a mirror, mounted on a base (no visible text or symbols)4.2.2.How Does the T.H.O.R.P. ^TM System Function
You have chosen to buy the most realistic brake system ever made for sim racing. In any given race car, the brake pedal is always hard. A hard brake pedal is faster (you can brake later) and it is required to proper trail brake and use your muscle memory to do so, as explained later. You can consider a race car braking system as 2 stages:
The "soft stage": When you apply pressure on the pedal, it will move 10-20 mm (measured on the pedal plate), while you build up hydraulic pressure, while the caliper pistons are traveling to and pushing the brake pads against the brake disc, and to compensate for the small amount of play in all the mechanical parts on the pedal system that is required for them not to seize up. At this stage the car is slowing down but it is soft braking.
The "hard stage": When hydraulic pressure is built up, the brake pads are squeezing the discs hard, and all mechanical play is compensated. In this stage, your foot is basically "pressing against a wall", because now your muscles are pressing directly against the hydraulic forces (the brake fluid). Since the fluid cannot be compressed, you will feel the pedal is hard. When a race car driver complains about a "long" or a "soft" pedal, it is typically because there is air in the system, and since air CAN be compressed, the pedal will feel soft and long. The mechanics then bleed the brakes for air, meaning there is only fluid left in the system, and the pedal is once again hard after passing the "soft stage".
In our quest to mimic the perfect race car feel, we also designed a 2-stage system on our Pagani pedals with the T.H.O.R.P.™ brake cylinder:
The "soft stage": Since we do not have a brake disc, caliper and brake pads in a simulator, we made the slave cylinder to mimic this. The slave cylinder is compressing an elastomer, and like in a real race car, it will allow a pedal travel of maximum 20-25 mm measured on the pedal plate. When full pedal travel is obtained, the slave cylinder will hit a mechanical stop, just like in a real race as described above. We supply different elastomers to mimic different feelings of the "soft stage" but the different elastomers will not change the pedal travel, only how much force is needed to fully depress the pedal and engage the "hard stage".
The "hard stage": When the slave system is mechanically locked, you have 100% the same feeling as in a race car, when the brake pads are fully pressed against the brake disc, and your muscles are pressing directly against the hydraulic forces. This is NOT simulated, this IS the same and identical feeling as in a
race car, and you can keep pressing the pedal up to a hydraulic pressure of 100 bar, which corresponds to 185 kg of pressure on the pedal plate – the same as a real F1 car!
Besides from being able to calibrate and measure the pressure in bar, the 2-stage system is exactly the benefit you will get over a mechanical brake system. Most mechanical brakes are relying on the elastomers and a load cell to give you the race car feeling. It will never be the same, because it is NOT the same! A load cell system IS a simulation and at best, you can implement a mechanical stop to simulate the "hard stage", but unlike the T.H.O.R.P. ^TM system, your pressure readings in the simulator will also stop at that point, because your load cell will stop to physical deflect. And without deflection it will not measure. In the T.H.O.R.P. ^TM system, pressure readings will continue despite the slave cylinder has reached its mechanical stop (passed the "soft stage").
That is the Asetek Pagani T.H.O.R.P.™ hydraulic difference!
It may surprise you, but as described above, having a hard brake pedal will help you get around the track faster. It all has to do with muscle memory and efficient trail braking. Having a hard brake pedal will allow your muscle memory to be trained to perfection. Muscle memory is the subconscious telling your muscles just the right amount of pressure, leaving your conscious mind to take care of more important things at that moment – like watching traffic or hitting apex. Your muscle memory system is not wired to remember a position. Try to lift your hand with your eyes closed and reach the same spot within 0,5 mm 10 times in a row, and you will get the point. Conversely, your muscle memory can memorize a pressure extremely accurately, meaning going around a track; your muscle memory can make you brake the same way again and again. This cannot be achieved with a soft pedal – especially when trail braking.
Furthermore, a hard brake pedal will allow you to brake later. Imagine having a brake pedal with 50 mm (common for many sim racers) of travel versus a brake pedal with almost zero travel. You are going 300 km/h down a straight. With the long travel brake, it will physically take you perhaps 1/10 of a second more to reach full braking power. On the stiff brake pedal, you will reach maximum braking power instantly. If you have three hard braking zones on a track, you will lose 3/10 of a second each lap.
The Top 10 in F1 or GT3 is frequently determined in way less than 3/10 of a second. The conclusion is that we at Asetek SimSports™ have developed the Invicta pedals to replicate a real race car. Why? Because it is the fastest but may not be what feels the most comfortable. It is your choice whether to be the quickest or have a brake pedal that feels soft and comfortable.
Using the two thumbnails behind the elastomer, you can adjust the preload of the system closely mimicking the gap you will experience in a real car (between disc and brake pad). We have made this adjustable, so you can have the feeling just the way you like it – and just like your favorite car. For how to adjust this, see section 4.2.10 Brake Pedal Preload Adjustment. Using RaceHub™, you can also adjust your deadzone on the brake pedal. This allows you to rest your foot on the pedal without getting inputs to the game.

NOTICE
Should you wish to change the pedal stops, and thereby the angle of the pedals, it can be done entirely too little. It will require you to recalibrate the pedals and remove the brake cylinder at the pedal arm and adjust the rod length to prevent any preload on the T.H.O.R.P. ^TM hydraulic master brake cylinder. Having a preload on the master cylinder will result in an inconsistent and a fluctuating calibration!
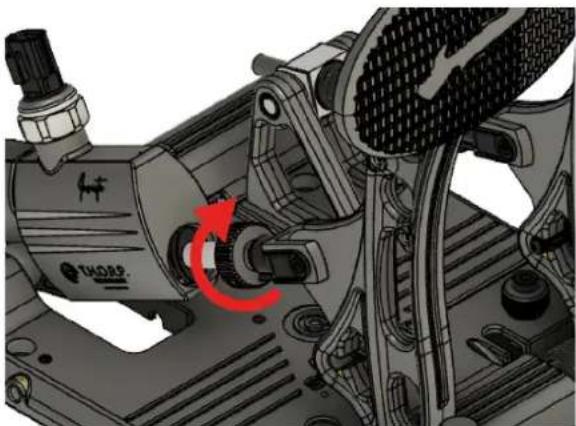
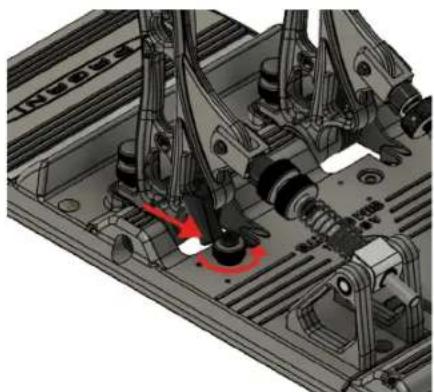
4.2.3 Adjusting the Brake Pedal Angle
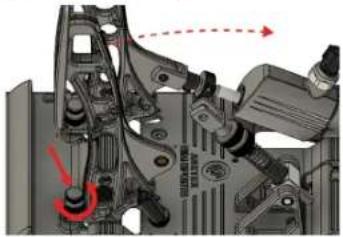
- To adjust the brake pedal angle, you will have to remove the clevis attaching the T.H.O.R.P. ^TM brake cylinder push rod to the pedal arm and swing the cylinder out of the way of the brake pedal. To achieve this, you must first unlock the thumbnut on the rod.

CAUTION
Please be aware that edges on the rod clevis can be sharp

natural_image
Mechanical assembly diagram showing a motor with a red circular arrow indicating rotational motion (no text or symbols present)- Remove the clevis lock pin
text_image
Technical diagram of engine components with numbered parts and red arrows indicating motion or flow direction- Swing the cylinder out of the way
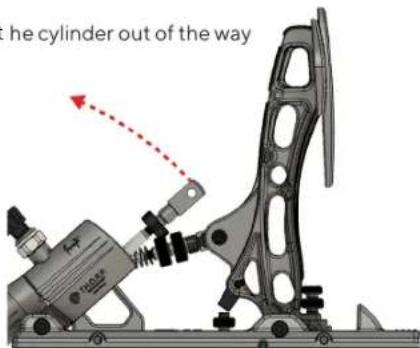
text_image
he cylinder out of the way
NOTICE
Please note that on a flat surface, you will have to unmount the pedals, to achieve this.
- When the cylinder is out of the way, you can adjust the pedal stops by loosening the locking thumbnut
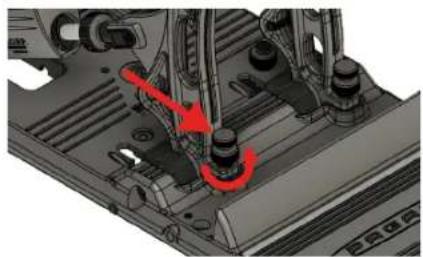
natural_image
Mechanical assembly diagram showing a red-circled component interacting with a vehicle chassis (no text or symbols visible)- Push the pedal slightly forward, and rotate the thumbscrew

natural_image
Mechanical assembly diagram showing a motor and gear assembly with no visible text or symbols- Once you have achieved your desired position, tighten the locking thumbnut

natural_image
Mechanical assembly diagram showing a component with red arrows indicating motion or force direction (no text or symbols present)- Adjust the pushrod length by turning the clevis until it perfectly matches up with the hole in the pedal arm. Re-insert the clevis lock pin.
natural_image
Mechanical assembly diagram showing a motor and gear assembly with no visible text or symbolsThis way, there is no preload on the brake cylinder, which is essential to achieve a 100% stable calibration and not prematurely wear out the brake cylinder. Once these steps are completed, you should recalibrate in RaceHub.
4.2.4 Throttle Pedal Angle Adjustment
- You can adjust the pedal stop on the throttle pedal by loosening the locking thumbnut
natural_image
Mechanical assembly diagram showing a component with a red arrow indicating rotational motion (no text or symbols present)- Remove the rod clevis and lift up the rod
natural_image
Mechanical assembly diagram showing a lever mechanism with no visible text or symbols- Push the pedal slightly forward and rotate the thumbscrew (Clockwise to move the pedal forwards, Counter-Clockwise to move the pedal backwards)
natural_image
Mechanical assembly diagram showing components and motion arrows (no readable text or symbols)- Once you have achieved your desired position, tighten the locking thumbnut and re-insert the rod clevis
natural_image
Mechanical assembly diagram showing a component with a red arrow indicating a specific point (no text or symbols present)- Recalibrate your pedals in the RaceHub™ (see section 6.3 Pedal Calibration)
NOTICE
Always remember that the spring must not act as a stop, instead adjust the throttle pedal stop (see 4.2.7 throttle travel distance adjustment)
natural_image
Mechanical assembly diagram showing mechanical components and a red circle highlighting a specific part (no text or symbols present)4.2.5 Throttle Preload Adjustment

NOTICE
Always remember that the spring must not act as a stop, instead adjust the throttle pedal stop (see 4.2.7 throttle travel distance adjustment)
For the Pagani throttle, you have the option of replacing the spring for a softer feeling (4.2.6 Throttle Spring Replacement). But you can also adjust the preload on both springs.
Adjusting the preload on the throttle spring will shorten the overall spring length, increasing the amount of force needed to activate the throttle initially. Doing so will keep the throttle curves the same but change the initial power required to activate it.
Adjusting the throttle preload can be done in three (3) simple steps:
- Turning clockwise, loosen the uppermost thumbnut, which locks the lowermost thumbnut in place. It is the one closest to the pedal itself.
natural_image
Mechanical assembly diagram showing a gear mechanism with red arrows indicating rotational motion (no text or symbols present)- Adjust preload on the spring by turning the bottom thumbnut (in contact with the spring):
a. Counterclockwise to tighten the preload, making the throttle require more force to engage.
b. Clockwise to reduce the preload, making the throttle require less force to engage.
natural_image
Mechanical assembly diagram showing a motor with red annotation arrows indicating rotational motion (no text or symbols present)- Turn the uppermost thumbnut counterclockwise to re-tighten it, locking the bottom thumbnut in its position.

natural_image
Mechanical assembly diagram showing a gear mechanism with red motion arrows (no text or symbols)- Recalibrate your pedals in RaceHub™.

NOTICE
Remember to adjust the pedal stop, to make sure the pedal arm rests on the pedal stop and not the spring, when fully activated.
natural_image
Mechanical assembly diagram showing internal components with a red circle highlighting a specific part (no text or labels visible)4.2.6 Throttle Spring Replacement
To give you a variety of different customization options, that allow you to bridge the gap between sim racing and real-world racing with precision, we include two (2) springs with the Pagani pedals. One, the stiffer option, is preinstalled in the throttle. The other, is in the supplied box of accessories.
Replacing the throttle spring is a quick and easy process. Simply follow these seven (7) steps:
- Remove the rod clevis lock pin.

natural_image
Technical diagram of a mechanical assembly with no visible text or symbols
CAUTION
Please be aware that edges on the rod clevis can be sharp

- Lift the rod free of the pedal arm.
natural_image
Mechanical assembly diagram showing motor components and wiring (no text or symbols)- Remove the rod with spring from the pivot bracket.
a. At this point you can also access the installation point beneath, easily.

natural_image
Technical diagram of an internal mechanical assembly with no visible text or symbols- Remove the spring from the rod.
- Install your new spring on the rod.
- Reinsert the rod with spring, into the pivot bracket
- Reinsert the rod clevis lock pin, and make sure it is locked firmly into place.
natural_image
Technical diagram of a mechanical assembly with no visible text or symbols
CAUTION
Make sure the mounting of the pedal is set and all parts are secured tightly before use
4.2.7 Throttle Travel Distance Adjustment
The throttle can have its travel distance adjusted. This allows you to set a new pedal stop of your throttle pedal – essentially reducing the distance of activation and the feeling of resistance as you move through less of the available spring distance.
The process can be done in three (3) simple steps:
- Loosen the thumbnut on the pedal stop, behind the pedal arm, by rotating it counterclockwise
natural_image
Mechanical assembly diagram showing a motor with rotating components and a red arrow indicating motion direction (no text or symbols present)- Use an Allen key to adjust the height of the Allen screw.
natural_image
Mechanical assembly diagram showing internal components and a red arrow indicating a specific part (no text or symbols present)- Re-tighten the thumbnut by rotating it clockwise.
natural_image
Mechanical assembly diagram showing internal components and a red circular annotation (no text or symbols)4.2.8 Swapping Elastomers
Swapping the included elastomers will allow you to customize the resistance on your brake pedal.
Be aware that by adjusting which elastomer you use, you effectively change the amount of travel you get with a certain amount of applied force. For example, applying 50 kg of force to the pedal may give you 12mm of travel with the white elastomer, but only 6mm with the green elastomer (note: not actual numbers!).
You can adjust the pressure (bar) you want to be 100% brake force in RaceHub.
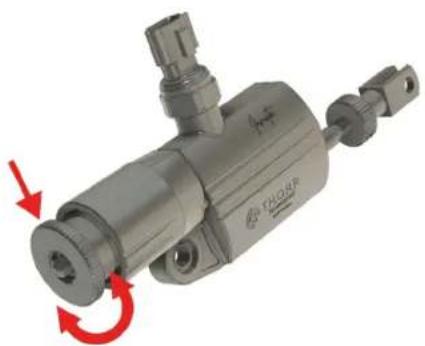
Changing the elastomers is quick. Just follow these seven (7) simple steps:
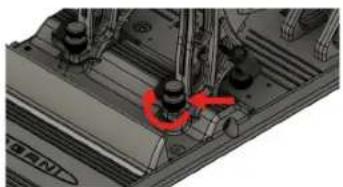
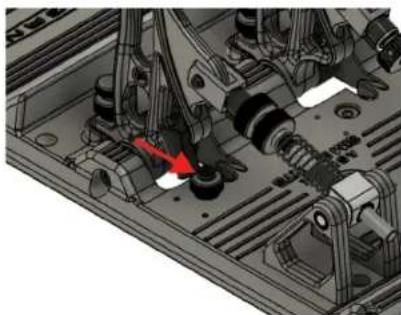
- Turn the outermost thumbnut counterclockwise until it comes off the shaft.
natural_image
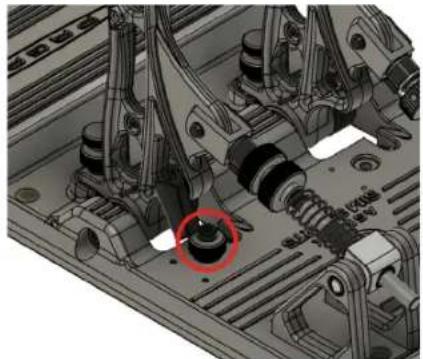
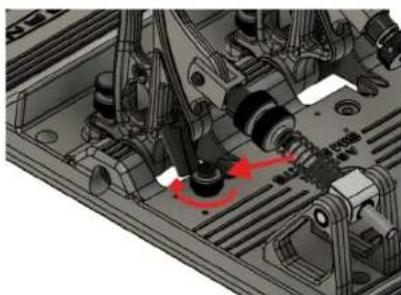
Mechanical component with red arrows indicating rotational motion (no text or symbols)- Turn the innermost, large thumbnut counterclockwise until it comes off the shaft.
natural_image
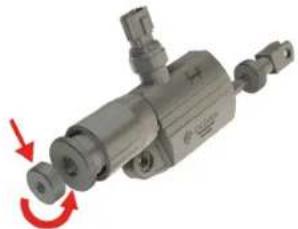
Mechanical component with red arrows indicating rotation or assembly (no visible text or symbols)- The elastomer will now drop out, if not, simply pull it gently until removed from the shaft.
a. If you are experiencing difficulties with clearance, we suggest unmounting the pedals.

natural_image
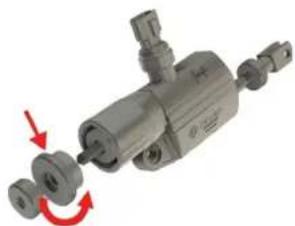
Mechanical component with multiple cylindrical parts and a red arrow indicating a specific part (no visible text or symbols)- Insert your preferred elastomer - see section 4.2.9 for hardness.

natural_image
Mechanical component with a red arrow pointing to a cylindrical assembly (no visible text or symbols)-
Grab the larger thumbnut and turn it onto the shaft clockwise until you reach your preferred setting (see 4.2.10 brake pedal preload adjustment).
-
Grab the small thumbnut and turn it onto the shaft clockwise until it locks the larger thumbnut in place.

natural_image
Mechanical component with red directional arrows indicating rotational motion (no text or symbols)- Recalibrate the pedals in RaceHub™

natural_image
Mechanical component with red arrow indicating rotation, no visible text or symbols4.2.9 Elastomer Types
We include three (3) different elastomers from the factory that provides different sensations.
- The green (black w/ text) elastomer is the softest and provides easier travel on your brake pedal.
- The yellow (white w/ text) elastomer is the medium and provides a more realistic breaking experience. It is close to the real deal, but not quite there. However, it is a happy medium for most sim racers. The yellow (white w/ text) elastomer is preinstalled, by default, in the Pagani pedals.
- The orange (green w/ text) elastomer is the hardest. It provides an ultra-realistic brake feeling like you would experience in a Formula car. It is very hard, and to most people, it will, instinctively, feel like kicking a wall. This gives you the ultimate ability to train your muscle memory and shave those all-important last hundreds of a second off your lap time.
These are our recommendations if you want to adapt your pedal to something that will feel close to the real deal:
• Formula, LMP, and similar cars: Orange (green w/ text)
• Rally, Nascar, and GT: Yellow (white w/ text)
• Road cars: Green (black w/ text)
Note: Please be aware that only the included elastomer lengths, hardness's and types, or those sold on the Asetek SimSports™ Webshop, are officially supported by Asetek SimSports™. Failure as a result of using different elastomer hardness's, types, or lengths will void your warranty.

CAUTION
Make sure the mounting of the pedal is set and all parts are secured tightly before use.
Elastomer Comparison Chart:
| New colors Old colors Firmness | |
| Red (not included) Yellow (not included) Hard | |
| Orange Green Medium-Hard | |
| Yellow White Medium | |
| Green Black Medium-Soft | |
| Light Green (not included) - Soft |
4.2.10 Brake Pedal Preload Adjustment
To simulate the caliper/pad to disc gap that exists in any real car – we have implemented a solution that easily lets you adjust just how much gap you want to use. To change the brake preload, follow these steps:
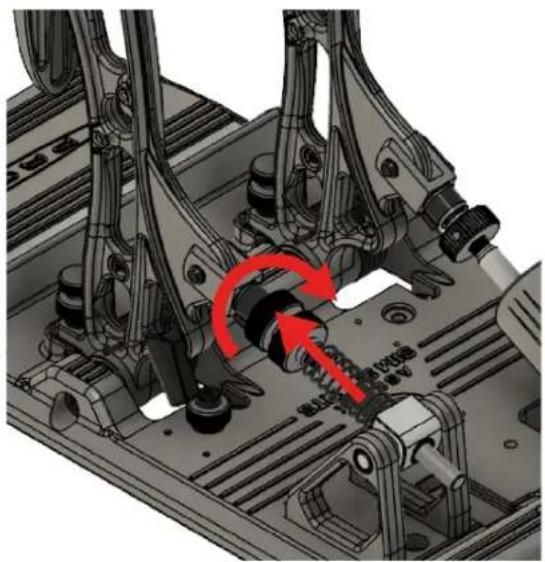
- Loosen the outermost, smaller thumbnut by rotating it counterclockwise until it comes off the shaft.
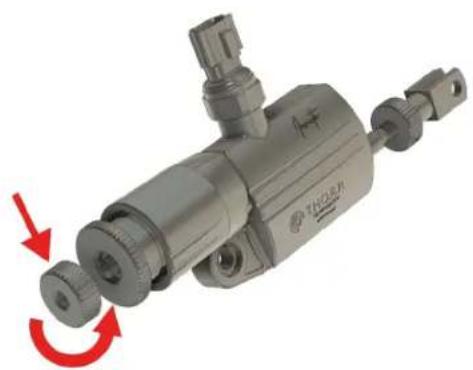
natural_image
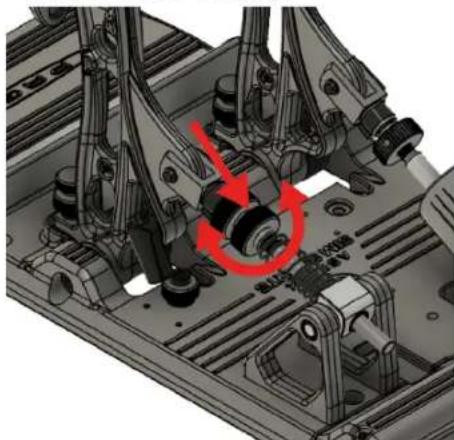
Mechanical component with red arrows indicating rotational motion (no text or symbols visible)- Rotate the innermost, larger thumbnut to adjust the amount of preload on your brake:
a. Clockwise to decrease the simulated distance between disc and caliper/pad. This will immediately engage the brake when you put your foot on it.
b. Counterclockwise to increase the simulated distance between the disc and caliper/pad. This will give you some play in the brake pedal before you actively engage the brake.
natural_image
Mechanical component with red arrows indicating rotational motion (no text or symbols)- Re-tighten the outermost thumbnut by placing it on the shaft and rotating clockwise until it locks the innermost, larger thumbnut in place.
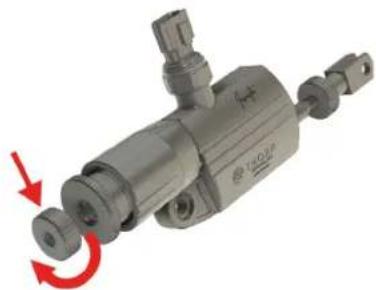
natural_image
Mechanical component with red arrow indicating rotational motion (no text or symbols)- Recalibrate your pedals in RaceHub™.

CAUTION
Make sure the mounting of the pedal is set and all parts are secured tightly before use
4.3 Connecting to your PC
In our relentless quest to make your experience as seamless and immersive as possible, we have gone to great lengths to simplify this process, too.
You will find a little dark-tinted plastic cover behind the throttle on your Pagani pedals. This houses the PCB for your entire pedal set (and your clutch, too, should you decide to add one). We have opted for a single USB Type-C interface to make things simple to connect and maintain.
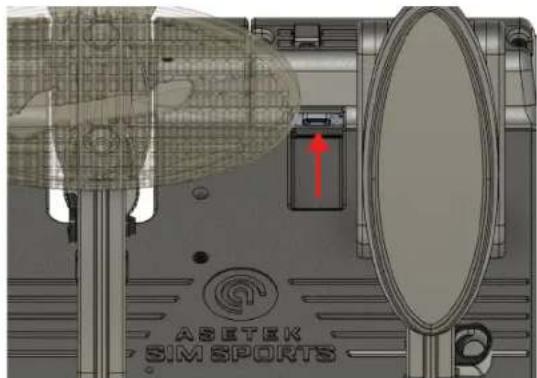
text_image
ASETEK SIM SPORTSWhen installing your pedals, you will find that the USB Type-C female connector is pointing towards the throttle, not towards the pedal set's rear. This was a very intentional choice on our side to make sure you will not accidentally break the connector.
Note also the small cable clip on the top of the cover. We want to make sure that your cable is not strained and suggest you use the provided clip to alleviate any potential strain on the cable.

natural_image
Technical diagram of a mechanical assembly with internal components and a highlighted circular component (no visible text or labels)Connecting is now a simple task.
If you connect directly to your PC, we recommend using the USB Type-C to USB Type-A cable.
Plug the Type-C end into your pedals and the Type-A end into your PC. Your PC will recognize the Asetek SimSports Pagani Pedals. Proceed to install the RaceHub and configure your pedals to your liking (See section 6 for instructions).
If you connect an Asetek SimSports Direct-Drive wheelbase, we suggest using the USB Type-C to USB Type-C cable, to connect your pedals directly to your wheelbase.
Plug one end into your pedals and the other into your wheelbase. Open the RaceHub and configure your pedals to your liking (See section 6 for instructions).
4.4 Start Racing!
Your pedals are ready for racing – even without adjusting them in the software. From our factory, they are calibrated with a maximum pressure of 100 bar, which is equivalent of 185 kilos of pressure on the brake. The stock elastomer can be switched as you desire – our recommended is the standard medium elastomer (see section 4.2.9 for hardness.). Again – before changing anything, try to drive for several hours and adapt to the feeling of a real race car.
Assign the pedals in your favorite simulator game, and you are ready to go.
5. RaceHub™ Adjustments
All Asetek SimSports™ products come with an extremely powerful yet easy-to-use piece of software that we have developed from the ground up. It is called RaceHub™ and will take care of your every need. RaceHub™ unlocks things you would not dare to dream and is continuously updated.
5.1 RaceHub™ Download
RaceHub™ is available for download, in its newest version, on our website: https://www.asetek.com/simsports/racehub/.
5.1.1 RaceHub™ Installation
After completing the download from our website, double-click the downloaded file to initiate the installation. Follow the on-screen instructions and install them in your desired directory. Once installed, open RaceHub™ using the shortcut on your desktop or in your programs folder.
5.1.2 RaceHub™ Updating
RaceHub™ will automatically notify you if there are available updates for the software. If you want to double-check, please go to www.asetek.com/simsports/racehub and download the newest version.
RaceHub™ has a built-in feature that allows you to update the firmware on your devices automatically.
5.2 Introduction
Asetek SimSports™ RaceHub™ allows you to make a plethora of adjustments to your Asetek SimSports™ products. On the Pagani pedals, it will allow you to adjust pedal maps, calibrate your pedals, adjust the aRGB lighting, and much more.
Everything is available in a highly user-friendly interface that allows for quick and easy customization that not only gives you complete control but does it in a manner where you are constantly in focus – teaching you everything you need to know to become a power user and expert sim racer.
The settings that you choose in RaceHub™ will be applied to all the supported games found in section 2.2, "Compatibility"—ensuring maximum performance and precision!
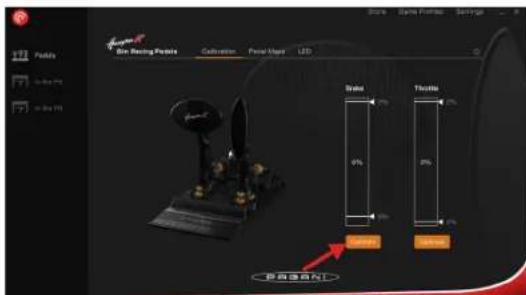
5.3 Pedal Calibration
To ensure your pedals are as precise as they can be, you should run the pedal calibration wizard in RaceHub™. It is a quick and straightforward process that takes you through a series of activations that calibrate your pedals.
- Navigate to the pane in RaceHub™ called Calibration
- Push the calibrate button
text_image
Soda Soda Position Savage File Setting Feature Cathulation Focal Maps LTD Data 0% Toula 0% 9% 5% 6% Soda Soda Position 使用器自动- Follow the on-screen instructions
- Done! Your calibration will carry over into all the supported games.
Once your pedals are calibrated, only a few unique scenarios will cause a need for recalibration:
a. If so desired, you have adjusted the mechanical pedal stop of your throttle
b. If so desired, you have adjusted the mechanical pedal stop of the brake pedal
5.4 Deadzone Adjustments
In RaceHub™, you will be able to set both top and bottom deadzones on all your pedals.
A bottom deadzone allows you to slightly activate your pedal without engaging the brake. For example, if you rest your foot on the pedal.
A top deadzone allows you to modify the point of full activation. In the case of a throttle pedal, this would allow you to reach 100% throttle before your throttle pedal reaches full activation and the mechanical pedal stop. This preference is individual and generally done by a race engineer before the car goes on track. RaceHub™ allows you to customize it fully, and we strongly encourage you to do it as well, to not lose potential speed and lap time
The top and bottom deadzones can be adjusted using these sliders marked here:

text_image
Sino Racing Policy Calibration Postal Hoge LED Balance 3% Balance 2% Balance 10% Balance 10% Balance 10% Balance 10%We suggest the following settings for deadzone when using the Asetek SimSports™ Pagani Pedals, which is how it is calibrated from our factory.
Throttle:
- Top: 2%
- Bottom: 2%
Brake:
- Top: 2%
- Bottom: 5%
5.5 Maximum Brake Force Adjustment
RaceHub allows you to calibrate your brake with accurate hydraulic measurements like in a real race car, giving you the ultimate immersion and precision, you would get in a real car. The calibration of your Pagani pedals is measured in a numerical value of bar pressure.
The maximum pressure supported is 100 bar, which directly corresponds to 185 kilos of pressure.
However, should you require less pressure to reach what the simulator is recognizing to be 100% brake application, you can calibrate whichever pressure you want to equal 100%.
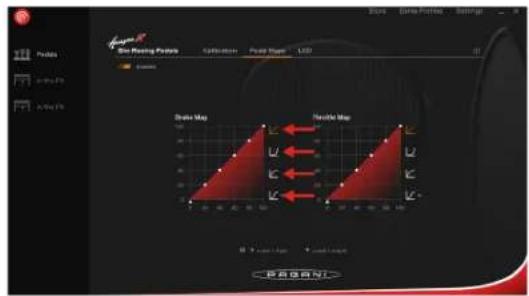
5.6 Custom Pedal Mapping
One of the great features of RaceHub™ is the ability to map the curves of your pedals precisely to your liking. In most racing simulator pedals, you will find a 1:1 relation between the amount pressed on the pedal and the response in-game. This is not how things work in real racing – so why should it be this way in your sim rig? The answer is, it should not, and our pedal maps help you avoid just that.
We have made a few preset curves that mimic typical scenarios, but the RaceHub™ also allows complete customization of your pedal curves. Click, drag and drop – it is that simple!
text_image
GKKA On Roaming Player Collation Pound Stage LCD Duke Map Nucleic Map 0 1 2 3 4 5 6 7 8 9 10 11 12 13 14 15 16 17 18 19 20 21 22 23 24 25 26 27 28 29 30 31 32 33 34 35 36 37 38 39 40 41 42 43 44 45 46 47 48 49 50 51 52 53 54 55 56 57 58 59 60 61 62 63 64 65 66 67 68 69 70 71 72 73 74 75 76 77 78 79 80 81 82 83 84 85 86 87 88 89 90 91 92 93 94 95 96 97 98 99 100As we briefly mentioned, a real race car will not have a linear throttle response. An example will be an Audi R8 LMS GT3, which has less activation of the throttle at the beginning of the pedal activation, increasing as you progress through the travel. Similarly, you can adjust your curves based on your driving conditions—all in search of ultimate performance.

text_image
Sar Racing Poids Celeration Pricetage LSD Brake Map Thrble Map SARANIPlease note that RaceHub™ custom pedal maps work best when they are used exclusively and without the use of potential in-game settings. If your preferred simulator game offers a pedal mapping feature, we highly suggest you leave it as linear and instead use the functionality in RaceHub™.
6. Compatible products
Asetek SimSports offers compatible products to increase your experience driving with the Pagani pedals even further. These can be purchased at Asetek SimSports' webshop or at Asetek SimSports authorized dealer.
6.1 Asetek SimSports™ Invicta™ Clutch
For racers who enters Rally or Thrift races, it essential with a proper clutch. Asetek SimSports™ Invicta™ Clutch was designed and tested rigorously during development to ensure that the racer will feel a realistic bite point when shifting gears in the racing simulator. The fierce spring load gives you a realistic and slamming rebound, and a feeling of true engagement exactly like you will feel from the slave cylinder and clutch release bearing in a real race car.
The intuitive design allows for easy adjustment of force and a mechanical change of pedal curves. Mapping out the curve to your needs gives you the engagement that ensures the best clutch performance for your needs. The Invicta™ clutch will help you gain all-important milliseconds while shifting.
Information on the manual and guidance in how to attach the clutch to the Pagani pedals can be found here: www.asetek.com/simsports/product/invicta-pedals-clutch/
text_image
A座区T单元 8004 SPOUNTS PAGANI7. Maintenance
Owning a set of Pagani pedals means a minimum of maintenance needed. However, we do have a few suggestions that will help you keep your pedals feeling supreme.
7.1 Throttle Maintenance
We suggest you clean the throttle with regular intervals (6 months) with a soft, dry, clean cloth.
If unwanted rubbing sounds occur, we suggest using mineral oil.

NOTICE
Do not use water or cleaning agents to clean the product.
7.2 Brake Maintenance
We suggest you clean the brake with regular intervals (3 months or 100 hours of use) with a soft, dry, clean cloth. Likewise, with regular intervals, we suggest lubricating the rods of the hydraulic cylinder with mineral oil.

NOTICE
Do not use water or cleaning agents to clean the product.
7.3 Spare Parts
We strongly advise you only you original Asetek SimSports™ spare parts. Failure to do so will void your warranty.
If you have questions, or do not know if you have an original part, please refer to https://www.asetek.com/simsports/ or consult the Asetek SimSports™ support via: www.asetek.com/simsports/support.
8. Troubleshooting
Sometimes unforeseen issues occur. But do not worry, we are here to help.
If you are having issues we suggest consulting the FAQ on www.asetek.com/simsports/product/pagani-huayra-r-sim-racing-pedals/
If you are not able to find a solution on the FAQ please consult our friendly and knowledgeable support staff via: www.asetek.com/simsports/support or through our social channels.
9. Safety
- The device must not be exposed to rain or humidity to avoid the risk of fire and electric shock.
• We strongly advise you not to drive a vehicle immediately after racing simulation games. - This product is not intended for children under the age of 15 years.
- Contains small pieces. Danger of swallowing!
- Extended periods of gaming may cause health risks. Take a break of 5 minutes every 20 minutes, and do not play for more than 2 hours per day.
- Keep hands, fingers, hair, clothing, and jewelry away from the product when in use.
- Only one person may use the product at any given time. Keep other persons away from the product when in use.
-
Keep the product and the power cord away from children and pets.
-
This product contains components that the user cannot repair. Opening parts of the product may compromise the safe use of the product and will void the warranty.
- Do not disassemble this product beyond what is described in the product manual.
- Avoid eye contact with the lubrication grease and wash hands thoroughly after adjustment.
- Make sure the mounting of the pedal set and all parts are secured tightly before use.
- Check frequently that the pedals are mounted properly
- Be aware that the rod clevis has sharp edges
- In the unlikely event of hydraulic oil leakage, avoid contact with skin. In case of exposure, wash the contaminated area thoroughly with soap and water. Do not ingest.
10. De-commissioning & Sustainability
At Asetek we are fiercely committed to making the world a sustainable place. You can read more about Asetek's sustainability efforts, including our sustainability reports, here: www.asetek.com/company/sustainability

This symbol indicates that this product should not be thrown away with other household waste throughout the EU. To prevent possible harm to the environment or human health by uncontrolled waste disposal, you are responsible for recycling it so that it can promote the sustainable reuse of raw materials. To return your used product, you can use the regular return and collection systems.
10.1 Packaging
All packaging is made out of paper and cardboard. All our cardboard and paper products are labeled with the FSC mark, ensuring maximum reusability and that the forests are sustainably forested. Furthermore, we regularly check our vendors to make sure they are upholding their commitments.
About FSC: www.fsc.org/en/fsc-labels
If you need to dispose of your packaging, please use the appropriate paper waste stream in your country, to dispose of the packaging. Naturally, we hope you want to keep it around – we are quite proud of it.
10.2 Product
Asetek SimSports™ is committed to making products that will last. However, we also know that sometimes things break, and that should not result in a scrap and forget, producing even more e-waste to our planet. That is why we are dedicated to supporting you and all other users with spare parts where possible, and in case of parts of the product defuncting, we offer return shipping of the part along with a new service part. We will then make sure the original part is de-commissioned in an environmentally sound manner.
If you feel uncertain about how to recycle any Asetek SimSports™ product, we suggest getting in touch with our dedicated customer support team, who will happily help you. Contact them here: www.asetek.com/simsports/support
10.3 Production
The Asetek SimSports™ Pagani Pedals are produced using primarily aluminum die-casting and forging techniques. As such, any waste aluminum is re-used minimizing waste.

11. Declaration of Conformity
We, Asetek, as manufacturer, declare that the Pagani products from the brand Asetek, produced in Denmark are tested according to all relevant CE standards/regulations and passed all tests.
The complete Declaration of Conformity can be found and downloaded via www.asetek.com/simsports/product/pagani-huayra-r-sim-racing-pedals/

text_image
(Generic screenshot) Forter® Slim Racing Pedals Brake and Throttle ( Generic screenshot )
ASETEK
SIM SPORTS