CG762DTGGB4 - Cooker Fisher & Paykel - Free user manual and instructions
Find the device manual for free CG762DTGGB4 Fisher & Paykel in PDF.

User questions about CG762DTGGB4 Fisher & Paykel
0 question about this device. Answer the ones you know or ask your own.
Ask a new question about this device
Download the instructions for your Cooker in PDF format for free! Find your manual CG762DTGGB4 - Fisher & Paykel and take your electronic device back in hand. On this page are published all the documents necessary for the use of your device. CG762DTGGB4 by Fisher & Paykel.
USER MANUAL CG762DTGGB4 Fisher & Paykel
CG301D, CG302D, CG451D, CG603D, CG604D, CG762D, CG903D & CG905D models
USER GUIDE
NZ AU UK IE SG
CONTENTS
Introduction 5
Safety and warnings 6
Before you begin 9
Cooktop use 10
Dual wok burner use 12
Cooking guide 13
Care and cleaning 15
Troubleshooting 18
Energy guidelines 20
Energy guidelines (GB & IE only) 21
Warranty and service 23
SAVE THESE INSTRUCTIONS
The models shown in this User guide may not be available in all markets and are subject to change at any time. For current details about model and specification availability in your country, go to our website fisherpaykel.com or contact your local Fisher & Paykel dealer.
Registration
Register your product with us so we can provide you with the best service possible.
To register your product visit our website: fisherpaykel.com
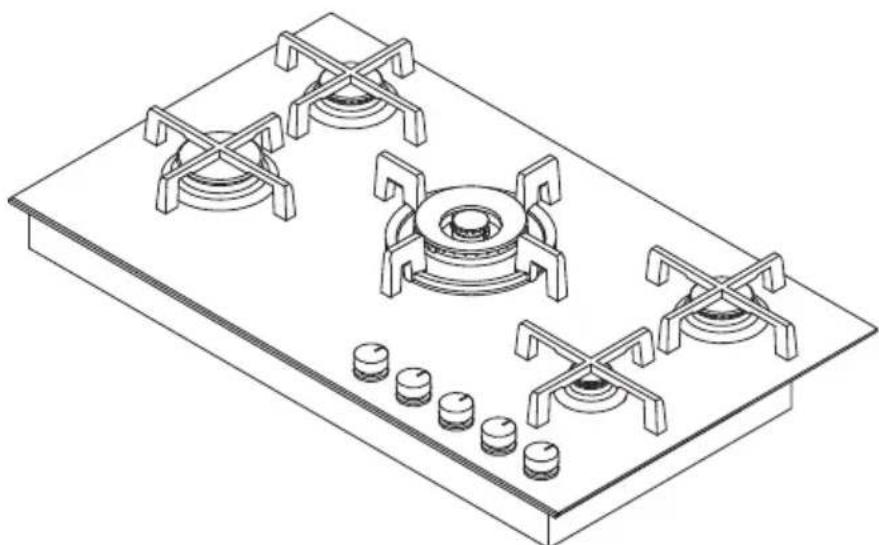
Congratulations on your new purchase. Your Fisher & Paykel gas cooktop gives the ultimate experience in gas cooking with speed and precision. You cooktop delivers powerful modern functionality with a singular aesthetic treatment. Matte black detailing separates the control panel from the black glass cooking surface, while black burners with anodised black dials and trim complete the look for a cohesive, beautiful hob.
natural_image
Isometric line drawing of a gas stove with four fans and three wheels (no text or symbols)WARNING!

Electrical Shock Hazard
Failure to follow this advice may result in electrical shock or death.
- Switch the power to the cooktop off at the wall before cleaning or maintenance.
- Do not cook on a broken or cracked cooktop. If the glass should break or crack, turn off the gas supply and switch the appliance off immediately at the mains power supply (wall switch) and contact a qualified technician.
WARNING!

Fire Hazard
Failure to follow this advice may result in serious injury.
- Never leave the appliance unattended when in use. Boilover causes smoking and greasy spillovers that may ignite.
WARNING!

Poisoning Hazard
Failure to follow this advice may result in poisoning or death.
- Never use this appliance as a space heater to heat or warm the room. Doing so may result in carbon monoxide poisoning and overheating of the appliance.
WARNING!

Explosion Hazard
Failure to follow this advice may result in death or serious injury.
- Do not use or store flammable materials such as gasoline near this appliance.
- Do not spray aerosols in the vicinity of this appliance while it is in operation.
WARNING!

Hot Surface Hazard
Failure to follow this advice may result in serious injury.
- This appliance becomes hot during use. Do not touch the cooktop components, burners, pan supports or the glass when hot.
- Before cleaning, turn the burners off and make sure the whole cooktop is cool.
WARNING!
To reduce the risk of fire, injury to persons or damage when using the appliance, follow the important safety instructions listed below. Read all the guidance before using the appliance.
General Use
- CAUTION: This appliance is for cooking purposes only. It shall not be used for other purposes, for example, room heating.
- Keep children away from the cooktop when it is in use.
• Household appliances are not intended to be played with by children. -
Children of less than 8 years old must be kept away from the appliance unless continuously supervised. This appliance can be used by children aged from 8 years and above, and persons with reduced physical, sensory or mental capabilities or lack of experience and knowledge, if they have been given supervision or instruction concerning the use of the appliance in a safe way and they understand the hazards involved. Cleaning and user maintenance shall not be done by children without supervision.
-
If the electrical supply cord is damaged, it must only be replaced by an authorised person.
- If the appliance is connected to the gas supply with a flexible hose, make sure that the hose cannot come in contact with the bottom of the appliance or any sharp edges.
- Ensure that the electrical connection plug is accessible after installation.
- This appliance should be connected to a circuit that incorporates an isolating switch providing full disconnection from the electricity supply.
- Do not use an asbestos mat or decorative covers between the flame and the saucepan as this may cause serious damage to your cooktop.
- Do not place aluminium foil or plastic dishes on the cooktop burners.
- Do not let large saucepans, frying pans or woks push any other pans aside. This could make them unstable or deflect heat onto your benchtop and damage the surface.
- Do not use a steam cleaner for cleaning this cooktop.
- Saucepan handles may be hot to touch. Ensure saucepan handles do not overhang other gas burners that are on. Keep handles out of reach of children.
- Do not stand or place heavy objects on this appliance.
- After use, ensure that the burner dials are in the 'OFF' (o) position.
- Where this appliance is installed in marine craft or in caravans, it shall not be used as a space heater.
- CAUTION: In case the glass surface breaks:
- Immediately shut off all burners and any electrical heating element, and disconnect the appliance from the power supply.
- Do not touch the appliance surface.
- Do not use the appliance.
• Take care not to drop any heavy or sharp objects on the cooktop. The glass is tough, but sharp or heavy objects falling on it (e.g. pepper mill, heavy-based frying pan) may crack or chip it. - CAUTION: The use of a gas cooking appliance results in the production of heat and moisture in the room in which it is installed. Ensure the kitchen is well ventilated. Keep natural ventilation holes open or install a mechanical ventilation device (mechanical extractor hood). Prolonged intensive use of the appliance may call for additional ventilation, for example opening of a window, or more effective ventilation, for example increasing the level of mechanical ventilation where present. Consult a professional before installation of the additional ventilation.
• After having unpacked the appliance, check to ensure that it is not damaged. In case of doubt, do not use it and consult your supplier or a professionally qualified technician. - Packing elements (eg plastic bags, polystyrene foam, nails, packing straps, etc.) should not be left around within easy reach of children, as these may cause serious injuries.
- Do not modify this appliance.
- This appliance is to be serviced only by Fisher & Paykel trained and supported service technician or qualified electrician in order to avoid a hazard.
- Some products are supplied with protective film on steel and aluminium parts. This film must be removed before using the appliance.
- Never leave the cooktop unattended when in use. Boil-over causes smoking and greasy spills that may ignite.
- Never allow flames to extend beyond cookware or curl up its sides. This could discolor and damage the utensil and you may get burned touching a hot handle.
- Keep handles out of the way. Turn handles so that they don't extend over the edge of the cooktop or another burner that is on.
• Take care when deep-frying. Oil or fat can overheat quickly, particularly on a high.
- Read this guide, taking special note of the 'Safety and warnings' section.
- Remove all packaging from the cooktop. Recycle responsibly.
- Remove any adhesive residue using dishwashing liquid on a soft cloth. Do not use any harsh or abrasive cleaners.
text_image
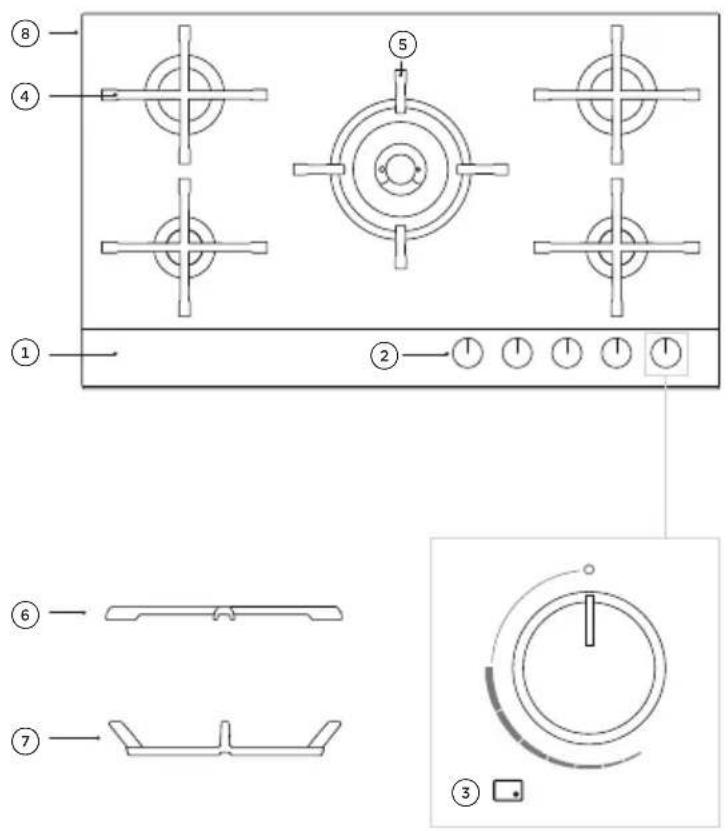
Technical diagram of a mechanical component with numbered parts and labeled featuresCooktop features and accessories
① Control panel
② Burner dials
③ Burner indicators
④ Pan supports
⑤ Dual Wok pan support*
⑥ Small pan support*
⑦ Wok stand*
⑧ Serial label (cooktop base)
CG604D models only: Mini wok pan support (not illustrated)
CG905D model illustrated
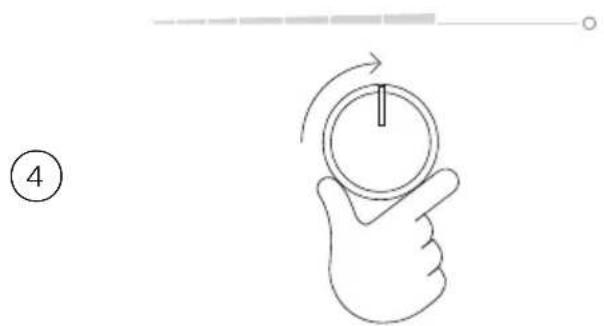
Selecting and using the burners

natural_image
Simple line drawing of a building facade with windows and doors, no text or symbols presentIdentify the desired burner and the corresponding dial.

text_image
LOW HIGH OFF ②Push the dial down and turn counterclockwise to the highest heat setting. Once the burner is lit, hold the dial down for a further 3 seconds.
Note: a clicking sound should be present when igniting the burner. If no clicking is present, turn the dial clockwise back to O (OFF) and refer to 'Troubleshooting'.

natural_image
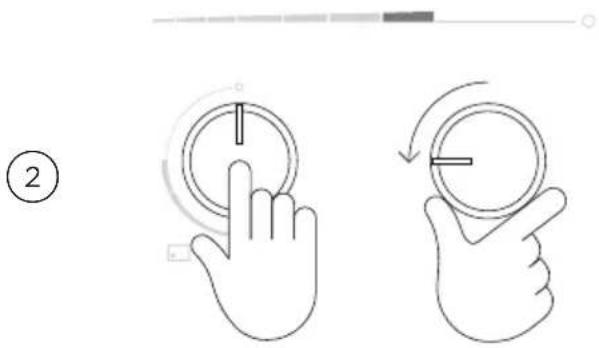
Hand holding a circular object with a pointer, no text or symbols presentTurn the dial to any heat setting between HIGH and LOW before releasing.
Do not set or leave the dial between HIGH and O (OFF).
text_image
④When you have finished cooking, turn the dial clockwise back to O (OFF).
Manual lighting
If the burner will not light after several attempts, the burner can be manually lit. If you have attempted to light the burner with the ignition, allow 1 minute for any accumulated gas to dissipate before manually lighting.

natural_image
Simple line drawing of a building with a bird flying overhead (no text or symbols)Carefully hold a lit match near the desired burner.
text_image
②Push the dial down and turn counterclockwise to the highest heat setting. Once the burner is lit continue to hold the dial down for a further 3 seconds.
natural_image
Hand gesture with a circular object and arrow, no text or symbols presentWait until the flame is burning evenly before turning the dial to any heat setting between HIGH and LOW before releasing.
text_image
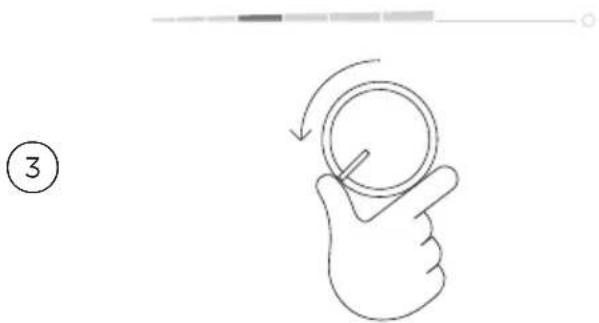
④Do not set or leave the dial between HIGH and O (OFF).
When you have finished cooking, turn the dial clockwise back to O (OFF).
When using a dual wok burner, you can choose to use the inner burner only or both the inner and outer burners as desired.
Inner and outer burners Inner burner only
Adjusting the dual wok burner*

text_image
MEDIUM HIGH ①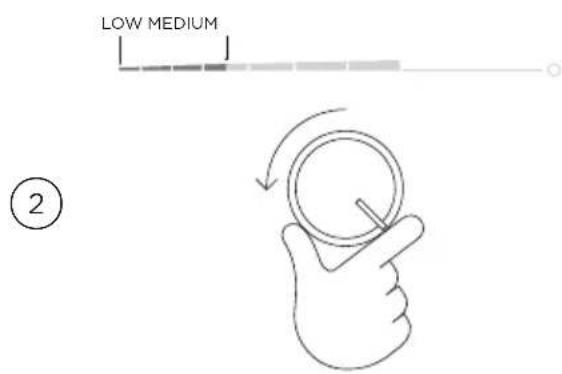
text_image
LOW MEDIUM ②
text_image
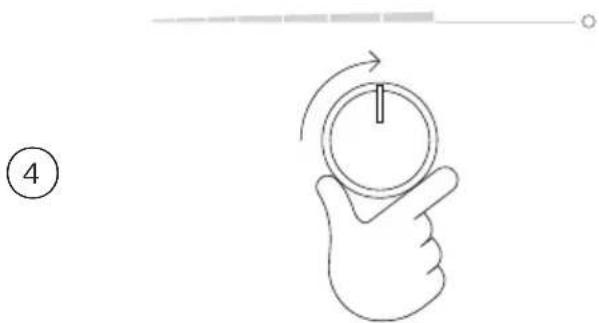
③Setting both the inner and outer rings
Turn the dial to any heat setting between MEDIUM and HIGH before releasing.
If the flame on the outer ring appears to flutter, turn the dial slightly towards HIGH to stabilise.
Setting the inner ring
Turn the dial to any heat setting between MEDIUM and LOW before releasing.
When you have finished cooking, turn the dial clockwise back to O (OFF).
Cookware
For optimal performance, ensure the size of the cookware is suitable for the burner in use.
text_image
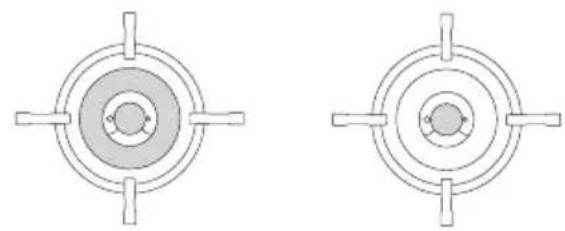
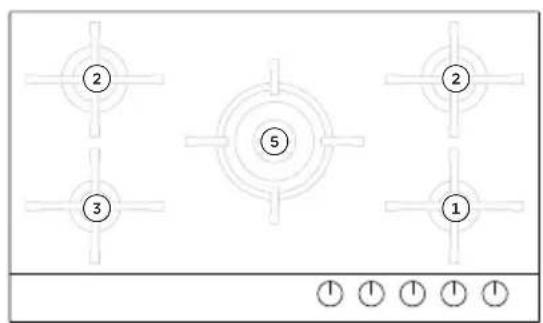
② ③ ⑤ ① ②CG905D models

text_image
⑤ ② ⑤ ① ① ①CG903D models

text_image
⑤ ⑤ ① ①CG762D models

text_image
② ② ④ ①CG604D models
natural_image
Simple line drawing of a two-way electrical cabinet with numbered ports (no text or symbols)CG302D models

text_image
② ② ⑤CG603D models
natural_image
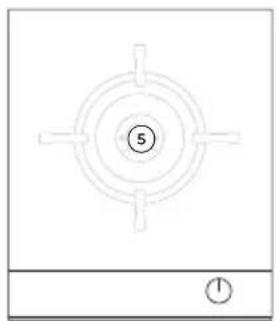
Simple diagram with concentric circles and crosshairs, no text or symbols presentCG451D models
natural_image
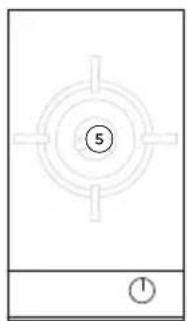
Simple diagram with concentric circles and crosshairs, no text or symbols presentCG301D models
Burner Min. diameter (mm) Max. diameter (mm)
| 1 | Auxiliary no minimum 220 | ||
| 2 | Semi-rapid no minimum 220 | ||
| 3 | Rapid no minimum 220 | ||
| 4 | Mini wok | without small pan support 150 220 | |
| with wok stand no minimum 360 | |||
| 5 | Dual wok | without small pan support 200 340 | |
| with wok stand no minimum 400 |
Burner supports

text_image
Technical diagram illustrating three stages of a mechanical assembly: cross-section, ring opening, and final assembly with dashed lines indicating internal components.Small pan support
The small pan support has been designed for use with dual wok burners for supporting cookware with a base diameter smaller than 200mm.
Using the small pan support
Ensure cooktop is cool before slotting the small pan support onto the centre of the dual wok burner as shown. Ensure all notches rest securely on the burner pan supports before use.
Wok stand
The wok stand has been designed for use with either dual wok and mini wok burners (depending on your model) to allow the safe use of a wok. This accessory must be used when cooking with a wok.
Using the wok stand
Ensure cooktop is cool before slotting the wok stand onto the centre of the dual wok or mini wok burner as shown. Ensure all notches rest securely on the burner pan supports before use.
Replacing burner parts
Ensure that all burner parts are correctly fitted. Incorrectly assembled burners may produce dangerous flames. Flames should be blue with no yellow tipping, and burn without fluttering around the burner cap.
Semi-rapid, rapid and auxiliary burners
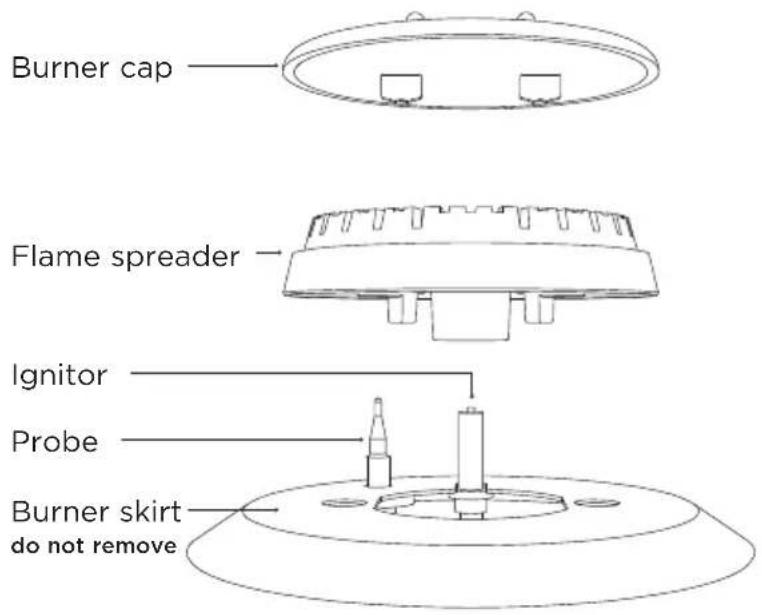
text_image
Burner cap Flame spreader Ignitor Probe Burner skirt do not remove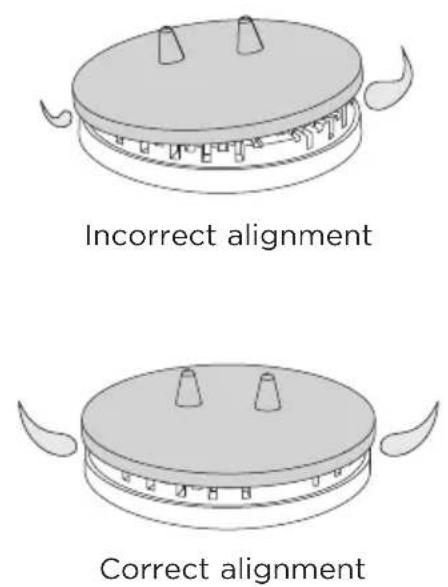
text_image
Incorrect alignment Correct alignmentDual wok and mini wok burners

text_image
Burner cap Burner ring Flame spreader Ignitor Probe Burner skirt do not remove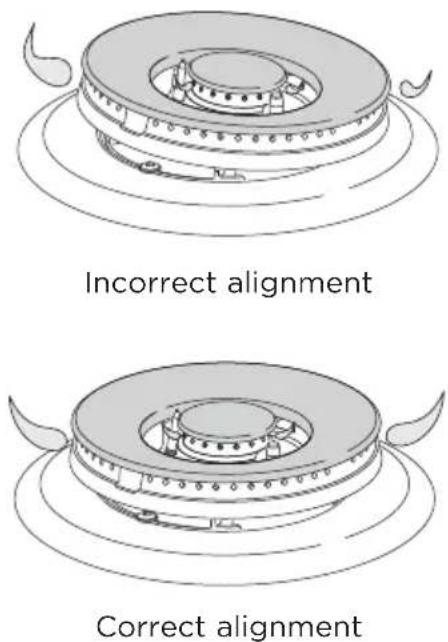
text_image
Incorrect alignment Correct alignmentBurners
Burners should be cleaned regularly. Food residue may obstruct the ignitor and the notches of the flame spreader, preventing the burner from functioning correctly. Refer to ‘Replacing burner parts’ for details on safely removing and refitting burner parts.

natural_image
Simple line drawing of a cleaning or cleaning tool with a brush and a circular base (no text or symbols)Burner caps, rings, flame spreaders and accessories
① Remove the parts that you wish to clean.
② Clean in hot soapy water with a stiff nylon brush, stubborn stains can be soaked in powdered dishwasher or laundry detergent. A straight end paperclip can also be used to clear any obstructions from the flame ports.
③ Rinse in warm water and dry thoroughly. Ensure all parts are completely dry before refitting as wet burner parts may result in an irregular flame.
④ Ensure all parts are replaced correctly.

natural_image
Technical line drawing of a mechanical assembly with a tool and two cylindrical components on a circular base (no text or symbols)Ignitor and probe
① Remove the parts required to access the ignitor and probe.
② Clean carefully with a stiff nylon brush dipped in methylated spirits ensuring any build up is removed.
③ Ensure all parts are replaced correctly.
All gas components
All checking and maintenance must be performed by a suitably qualified person. If the gas is connected with a flexible hose, checking should include inspecting the entire length of the flexible hose assembly for any sign of wear or damage.
Pan supports
Ensure the correct pan support are used for each burner. Pan supports should be installed in the correct orientation.
Semi-rapid, rapid and auxiliary burners
Locate the pan support to the two nodules on the burner cap to secure.

text_image
nodules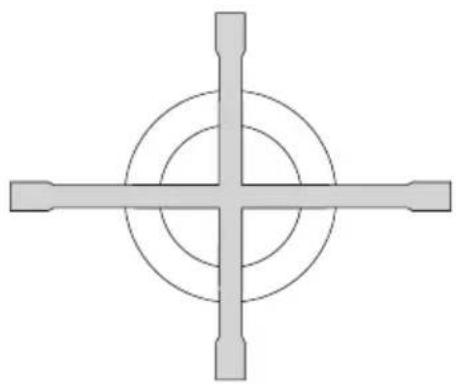
natural_image
Symmetrical cross-shaped diagram with concentric circles and two horizontal bars at the bottom (no text or symbols)Plan view
Dual wok and mini wok burners
Locate the pan support to the three recesses on the burner skirt to secure.
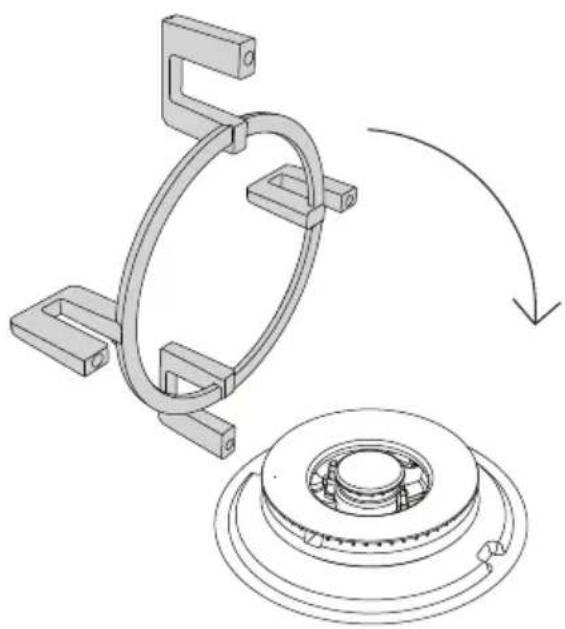
natural_image
Technical line drawing of a mechanical assembly with a rotating component and a circular base (no text or symbols)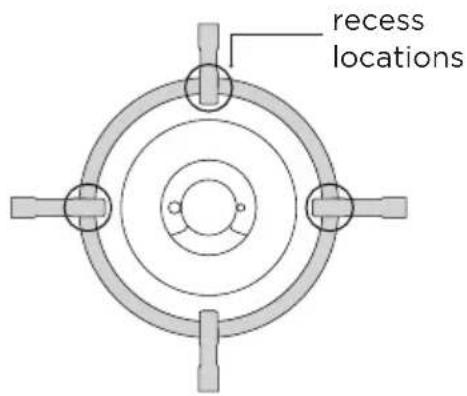
text_image
recess locationsPlan view
| PROBLEM POSSIBLE CAUSES WHAT TO DO | ||
| There is a strong gas smell | The gas connection could be leaking. | Open a window and refer to your installation guide for details on checking for leaks. Do not use the until leak has been repaired. |
| There is a slight rubbery or metallic smell when I use the cooktop for the first time | This is normal for first use and is caused by manufacturing residues burning off. | The smell will disappear with use. |
| There is no clicking/ sparking | There is a power failure. You can still use your cooktop, but will need to match-light the burners. Refer to ‘Manual lighting’ for details. | |
| The ignitor may be dirty or wet. | Clean following guidance in ‘Care and cleaning’. | |
| There is clicking/sparking, but a burner or burners won’t light easily or at all | The gas supply may not be turned on at the valve or gas bottle. | Turn all the burners off, and check whether the gas supply to the cooktop is turned on. Wait 1 minute, then try relighting the burner, holding the dial down for a few more seconds. If the burner still doesn’t light, check other possible causes below. |
| The gas supply to the house may not be working. | You should hear the gas when you turn a burner on. If you use bottled gas, this may indicate you are getting near the end of the bottle and need to replace it. | |
| Burner parts may be clogged or wet. | Ensure parts are clean and dry. See ‘Care and cleaning’ for guidance. | |
| Burner parts may not have been replaced correctly. | Check the assembly and ensure the burner cap is sitting flat. See ‘Replacing the burner parts correctly’ for details. | |
| The burner goes out after lighting | Dial not held down long enough | Wait 1 minute, then try relighting the burner, holding the dial down for a few more seconds. |
| The flame has been extinguished | Blown out by draught The flame failure protection will automatically cut the gas supply to the burner off, stopping gas from escaping. | |
| Extinguished by a spill Turn the affected burner off, then wait for at least 1 minute before attempting to relight. This is to allow for any accumulated gas to disperse. | ||
| The flame goes out at low settings | The gas supply pressure may be low. | Check this with your service person or installer. |
| The flames are yellow or yellow-tipped rather than blue | Burner parts (especially the flame ports) may be clogged or wet. | Check that they are clean and dry, refer to ‘Care and cleaning’ for advice. |
| The cooktop may have been connected to the wrong type of gas or the gas pressure is not correct. | Contact Customer Care and do not use your cooktop until it has been checked by a trained and supported service technician. | |
| The flame pattern is uneven around the burner. | Burner parts (especially the flame ports) may be clogged or wet. | Check that they are clean and dry. Refer to ‘Care and cleaning’ for advice. |
| Burner parts may not have been replaced correctly. | Check the assembly and ensure the burner cap and/or ring is sitting flat on the flame spreader. See ‘Care and cleaning’ details. | |
| The flames are too large, or too small. | The cooktop may have been connected to the wrong type of gas. | Contact Customer Care and do not use your cooktop until it has been checked by a qualified technician. |
| The flames are noisy. | ||
| The flames lift away from the burner. | ||
| The glass surface of the cooktop has chipped or cracked. | Contact Customer Care and do not use your cooktop until it has been repaired. | |
In the United Kingdom:
Safety requirements of EEC regulation 2016/426
• EN 30-1-1
- EN 30-2-1
• EN 437
Safety requirements of EEC Directive "Low voltage" 2006/95:
• EN 60335-1 General Requirements for Domestic electrical appliances
• EN 60335-2-6 Particular Requirements for Domestic electrical cooking appliances
Safety requirements of EEC Directive "EMC" 2004/108:
- EN 55014-1, EN 55014-2, EN 61000-3-2, EN 61000-3-3 Electromagnetic Compatibility Requirements
Requirements of EEC Directive 93/68/EEC and 2011/65/EU
European directive 2012/16/EU on Waste Electrical and Electronic Equipment (WEEE) (for European Union countries only)

GB This appliance is marked according to the European directive 2012/19/EU on Waste Electrical and Electronic Equipment (WEEE). By ensuring this product is disposed of correctly, you will help prevent potential negative consequences for the environment and human health, which could otherwise be caused by inappropriate waste handling of this product.
The symbol 📄 on the product, or on the documents accompanying the product, indicates that this appliance may not be treated as household waste. Instead it shall be handed over to the applicable collection point for the recycling of electrical and electronic equipment. Disposal must be carried out in accordance with local environmental regulations for waste disposal. For more detailed information about treatment, recovery and recycling of this product, please contact your local city office, your household waste disposal service or the shop where you purchased the product.
ULPG Gas Energy Efficiency (%)* of burners with a power of greater than 1.15kW
| Burner | CG905DLPGB Efficiency/(no. of burners) | CG604DLPGB1 Efficiency/(no. of burners) | CG603DLPPGB Efficiency/(no. of burners) | CG302DLPGB1 Efficiency/(no. of burners) | CG301DLPGB1 Efficiency/(no. of burners) | CG451DLPGB1 Efficiency/(no. of burners) | CG752DLPGB1 Efficiency/(no. of burners) | CG903DLPGB1 Efficiency/(no. of burners) |
| Dual Wok/Mini wok | 53.8% (1) | 53.8% (1) | 53.8% (1) | 53.8% (2) | 53.8% (2) | |||
| Semi-rapid | 59.4% (2) | 59.4%(2) | 59.4% (2) | 59.4% (1) | 59.4% (1) | |||
| Rapid 55.1% (1) | ||||||||
| Auxiliary | 57.9% (1) | 57.9% (1) | 57.9% (1) | 59.4% (1) | ||||
| Energy efficiency (%) of cooktop | 57.1% | 57.6% | 57.5% | 58.7% | 57.4% | 53.8% | 53.8% | 55.7% |
| NG Gas Energy Efficiency (%)* of burners with a power of greater than 1.15kW. | ||||||||
| Burner | CG905DNGGB Efficiency/(no. of burners) | CG604DNGGB1 Efficiency/(no. of burners) | CG603DNGPGB Efficiency/(no. of burners) | CG302DNGGB1 Efficiency/(no. of burners) | CG301DNGGB1 Efficiency/(no. of burners) | CG451DNGGB1 Efficiency/(no. of burners) | CG752DNGGB1 Efficiency/(no. of burners) | CG903DNGGB1 Efficiency/(no. of burners) |
| Dual Wok/Mini wok | 56.3% (1) | 56.8% (1) | 56.3% (1) | 54.6% (1) | 56.3% (1) | 56.3% (2) | 56.3% (2) | |
| Semi-rapid | 54.3% (2) | 54.3% (2) | 54.3% (2) | 54.3% (1) | 54.3% (1) | |||
| Rapid | 57.3% (1) | |||||||
| Auxiliary | na | na | na | |||||
| Energy efficiency (%) of cooktop | 55.6% | 55% | 55% | 54.3% | 54.6% | 56.3% | 56.3% | 55.6% |
Energy consumption for gas cooking appliances are calculated using the following Standards: BS EN 30-2-1 - Rational use of energy - Domestic cooking appliances burning gas
Reducing the environmental impact of cooking
Reducing energy consumption will reduce the impact of cooking on the environment. You can reduce energy consumption by:
- Thawing frozen foods in the refrigerator first
• Using a moderate setting to conserve gas
• Having your burners adjusted by a qualified technician if the flame is yellow - Ensuring burner parts are clean and dry, as clogged ports will reduce efficiency.
• Using the correct sized pot - Adjusting the flame correctly – the flame should not extend beyond the edge of the pot
• Using a pressure cooker - Cutting food into smaller pieces - this will reduce cooking time
- Use a steamer or a pan with a divider to cook different vegetables at the same time
- Using a cover when boiling water to reduce the time it takes to get to the boil.
- Simmering liquid cooked foods instead of boiling vigorously
- Keeping pot lids on to reduce heat loss
Before you call for service or assistance
Refer to the installation instructions and your user guide and check that:
- Your product is correctly installed.
- You are familiar with its normal operation.
If after checking these points you still need assistance or parts, please refer to the Service & Warranty book for warranty details and your nearest Service Center, Customer Care, or contact us through our website www.fisherpaykel.com
This cooktop has been designed and constructed in accordance with the following codes and specifications:
In New Zealand and Australia:
• Domestic AS/NZS 5263.1.1- 2016 Gas cooking appliances
- AS/NZS 60335.1 General Requirements for Safety of household and similar electrical appliances
- AS/NZS 60335.2.102 Particular Requirements for gas, oil and solid-burning appliances having electrical connections
Complete and keep for safe reference:
Model
Serial No.
Purchase Date
Purchaser
Dealer
Suburb
Town
Country
FISHERPAYKEL.COM
© Fisher & Paykel Appliances 2023. All rights reserved.
The models shown in this guide may not be available in all markets and are subject to change at any time.
The product specifications in this guide apply to the specific products and models described at the date of issue. Under our policy of continuous product improvement, these specifications may change at any time.
For current details about model and specification availability in your country, please go to our website or contact your local Fisher & Paykel dealer.