
ACH935B - Range hood Artusi - Free user manual and instructions
Find the device manual for free ACH935B Artusi in PDF.

| Product Type | Range Hood (Chimney Hood) |
| Brand | Artusi |
| Model | ACH935B |
| Voltage | 220-240 V / 50 Hz |
| Control Type | Digital touch controls with display |
| Number of Speeds | 3 (Low, Medium, High) |
| Lighting | LED or Halogen bulb (replaceable) |
| Filter Type | Aluminum grease filter (washable) + optional charcoal filter for recirculation |
| Duct Diameter | 120 mm or 150 mm |
| Max Duct Length | 5 m (with optional inline motor for longer lengths) |
| Installation Type | Wall-mounted, ducted or recirculating |
| Width | 596 mm (60 cm) or 896 mm (90 cm) depending on chimney cover |
| Depth | 170 mm |
| Height | 700 mm (adjustable with chimney) |
| Material | Stainless steel (inox) |
| Warranty | 24 months |
| Safety Features | Grounded plug, automatic shut-off timer, filter cleaning indicator |
| Filter Cleaning Indicator | Yes (display shows "C" when filters need cleaning) |
| Timer | 15 minutes automatic shut-off |
| Suitable for | Domestic use only |
Frequently Asked Questions - ACH935B Artusi
User questions about ACH935B Artusi
0 question about this device. Answer the ones you know or ask your own.
Ask a new question about this device
Download the instructions for your Range hood in PDF format for free! Find your manual ACH935B - Artusi and take your electronic device back in hand. On this page are published all the documents necessary for the use of your device. ACH935B by Artusi.
USER MANUAL ACH935B Artusi
Congratulations, you are now the proud owner of an ARTUSI cooking appliance. Thank you for purchasing ARTUSI and welcome to the ARTUSI Family.
This instruction manual has been specially created to inform you of the full range of features your ARTUSI appliance has to offer and serves as an introduction to getting the very best out of your ARTUSI appliance.
We present detailed information on each of the features your ARTUSI appliance consists of. Once you have read this section you will be able to choose the most appropriate settings for your appliance when cooking different types of food.
We ask you to read the instructions in this booklet very carefully as this will allow you to get the best results from using your appliance. KEEP THE DOCUMENTATION OF THIS PRODUCT FOR FUTURE REFERENCE.
TO REGISTER YOUR PRODUCT WITH ARTUSI, PLEASE FILL OUT THE WARRANTY CARD AT THE END OF THIS BOOKLET AND POST IT TO: REPLY PAID 83617
LEICHHARDT NSW 2040
Dear Artusi Customer, please read this user manual carefully before using the product and, keep it permanently at your disposal.
Note: This user manual is prepared for more than one model. Some of the features specified in this Manual may not be available on your appliance.
All our appliances are only for domestic use, not for commercial use. Products marked with (*) are optional.
"THIS APPLIANCE SHALL BE INSTALLED IN ACCORDANCE WITH THE REGULA TIONS FORCE AND ONLY USED IN A WELL VENTILATED SPACE. READ THE INSTRUCTIONS BEFORE INSTALLING OR USING THIS APPLIANCE"
"Conforms with the WEEE Regulations."
Here are some important points to consider when choosing and/or installing a range hood:
• An externally ducted range hood will generally outperform a recirculating range hood.
• We discourage the use of flexible ducting as this has a significant negative impact on airflow and noise due to turbulence
• caused by the ribs. Instead consider using semi-rigid or rigid duct.
- Avoid using a narrower duct than specified as this will reduce airflow; the best performance is obtained when the range hood is installed with a short duct with minimal bends.
- To determine the required clearance between the cooktop and the range hood always consult the installation manual for both the range hood and cooktop. The required clearance is the greater of the distance specified in either manual (and a minimum of 600mm between the highest point of the highest burner for gas cooktops).
- Five metres is the recommended maximum length for ducting (see diagram 1.). When the ducting exceeds five metres in length the installation of a TD500 or TD350 in-line motor is required, which must be placed one metre from the external vent (see diagram 2.).

Dear Customer,
Thank you very much for your preference for products. Our objective is to ensure that you enjoy this product, manufactured environmentally-friendly with a total sense of quality in a precise working environment at our modern facilities, most efficiently.
We recommend you to read the instruction manual carefully and keep it handy before you use this chimney hood so that it maintains its quality just like the first day you bought it and serves you most efficiently.
NOTE:
This Instruction Manual has been prepared for a variety of models. Some of the features specified in the Manual may not exist in your device.
These features are marked with *.
Our devices are designed for domestic use. They are not for professional use.
“PLEASE READ THE INSTRUCTIONS BEFORE YOU INSTALL OR USE THIS DEVICE.”
This product has been manufactured in an environmentally-friendly and modern plants without harming the nature.
"Conforms with the AEEE Regulations."
CONTENTS
- Safety Instructions 4
- Introduction And Technical Drawing Of The Chimney Hood
- Installation Of Chimney Hood
3.1. Location Of The Chimney Hood 7
3.2. Mounting Chimney Hood On The Wall 7
3.3. Mounting The Aluminum Pipe 7
3.4. Installation Of Outer Duct 8
3.5. Installation of Inner Duct Mounting Bracket 8 - Functions Of The Chimney Hood 8
4.1. Control Panel
4.2. Symbols Functions 9 - Operating The Chimney Hood
5.1. In Ducted Use
5.2. Round Charcoal Filter 9
5.3. Use Of Charcoal Filter 10
5.4. Installation Of Charcoal Filter 10
5.5. Use Of Aluminum Cartridge Filter 10 - Replacing The Bulb 10
- Maintenance Of The Chimney Hood 11
- If Chimney Hood Does Not Work 12
- Environmentally-Friendly Disposal & 10. Package Information 13
- Warranty 14
SAFETY INSTRUCTIONS
- This product is designed for domestic use.
2.Product Voltage is 220-240 Volts 50Hz. - Power cord of your product is fitted with grounded plug. This cord must be plugged into a grounding socket.
- All electrical installation must be done by a qualified electrician.
- Installation by unqualified persons may lead the product run with lower performance, be damaged or cause accidents.
- Power supply cord should not be jammed or crushed. Power cord should not be close to hobs, etc, otherwise it may melt and cause fire.
- Do not plug in the product into a socket before the installation is complete.
- Make sure the mains switch is easily accessible in order to cut the power of the product in case of any danger.
9.Do not touch the bulbs of your product if used for a long period of time. The bulbs will be hot and may burn your hand. - Kitchen chimneys are designed for domestic use. If used for other purposes, it may lead to a failure and not be covered under the warranty.
- Follow the authorized agencies' rules and regulations regarding letting out the air. (This warning does not apply to usage with non ducted chimney hoods.)
- Food that may burst into flames should not be cooked under the device.
- Turn on the product after you place pots, pans, etc on the hobs. Otherwise excess heat may cause deformation of some parts of your product.
14.Do not leave hot oil on the hobs. Pans with hot oil inside may cause self-ignition. - When cooking i.e. deep frying, hot oil may burst into flames. Be careful on your curtains and cloths.
- Make sure you replace the filters at the recommended intervals. Filters not replaced on time carry fire risk due to increase of grease on them.
17.Do not use non-fire-resistant materials instead of filters.
18. Keep the potentially dangerous packaging materials away from children.
19.Do not use your product without a filter, do not remove filters when the product is operating.
20. In case of start of flames, cut off the power of the chimney fan and cooker. (Cut off the power by unplugging the device).
21.Turn off the hobs before you remove pots, pans, etc.
22. If the cleaning is not done periodically, your product may carry fire risk.
23. Cut off the power supply before any maintenance work. (Cut off the power by unplugging the device.)
24.For duct-out chimney hoods, use pipes with a diameter of
150 mm or 120 mm. You should minimize the ducting distance with minimum bends.
25. Make sure your children do not play with the product. Do not let young children operate the product.
26. If the power cord is damaged, the damaged cord should be replaced by the manufacturer or its service agent or similarly specialised personnel in order to avoid a dangerous situation.
27. In case of start of flames, cut off the power of the chimney fan and cooker and cover the flame. Do not use water to extinguish the fire.
28.WARNING: Install "MAX. 6 A" fuse for the extractor fan.
2. INTRODUCTION AND TECHNICAL DRAWING OF THE CHIMNEY HOOD

- Duct
- Control panel
- Filter
- Lighting
| A 170 mm |
| B 200 mm |
| C 700 mm |
| D 25 mm |
| E 450 mm |
| F 596 mm / 896 mm |

- INSTALLATION OF CHIMNEY HOOD
3.1. Location Of The Chimney Hood

3.2. Mounting Chimney Hood On The Wall
two drywall (8mm) anchors are nailed into the holes drilled according to installation template (A,B). They are fixed into the wall through two key holes by screws as shown in Figure 1.


natural_image
Technical line drawing of a mechanical component with labeled parts, showing a base plate and housing (no text or symbols on the diagram itself)3.3. Mounting The Aluminum Pipe
Place the aluminum pipe on the plastic duct. Place the other end of the pipe into the air outlet in the kitchen. (Figure 2)
Twists and bends on the aluminum pipe may cause minimsing the air suction so avoid unnecessary bends and twists as much as possible.
(Figure 3-4) Place the inner duct and outer duct carefully on the product. Fix the inner duct to inner duct connection plate with 2 screws.

3.4. Installation Of Outer Duct
Put the outer duct on the chimney hood and fix to it by two screws (Figure 5)
3.5. Installation of Inner Duct Mounting Bracket
two fixing holes are drilled on the wall with 6 mm electric drill at a suitable height and place to fix the inner duct hanger plate onto the wall. 6mm drywall anchors are nailed into those holes and inner duct mounting brackets are pinned down. (Figure 6)
At the last step of chimney hood installation, the inner duct is screwed on the inner duct mounting brackets.

natural_image
Line drawing of a kitchen chimney with a handle and angle marker (no text or symbols on the diagram itself)
natural_image
Diagram of a hand pulling a tool into a container with mesh patterns (no text or symbols)Note: Packaging may not include inner duct according to model.
- FUNCTIONS OF THE CHIMNEY HOOD
4.1. Control Panel
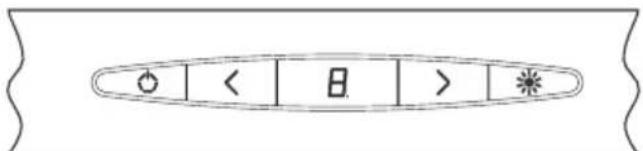
Digital Control: Touch the symbols on the keys. (On/Off function and timer are on the same key; if
pressed for 1 second on-off function will operate.
If pressed for 3 seconds, 15 minutes timer will operate.
4.2. Symbols Functions
 | Switches on and off the motor. (Except for the lighting) |  | Increases the speed when the motor is running. |
 | Decreases the speed when the motor is running. |  | If pressed this symbol, the motor turns itself off 15 minutes later. |
 | Display |  | Only switches on and off the lighting system. |
Note: When the product operates for a certain time, the aluminum filters get dirty and the digital display shows “C” Clean sign. This means the filters should be cleaned. Press the speed reduction key for 5 secs in order to delete “C” sign from the display.
Push Button: Pressing the buttons will enable different functions. In order to disable them, press only the button Off.
 | MID | Medium speed | |
| OFF | Stops the motor, except for the light | MAX | Intense speed |
| MIN | Low speed | It turns on and off the lighting system only. | |
Chimney hood is used in ducted and non-ducted kitchens.
5.1. In Ducted Use
In ducted use, extractor fan should be connected to an air outlet to send the air out. In order to use your chimney hood efficiently, make sure length of the pipe system between the chimney hood and the air outlet should be short. Your product has been manufactured suitable for ducted and non-ducted use.
5.2. Round Charcoal Filter
In kitchens with no duct, a round charcoal filter should be reintroduced the clean air into the kitchen. You can obtain the round filter from your service or dealer.
5.3. Use Of Charcoal Filter
- Our products allow the installation of charcoal filter.
- Regardless of use of charcoal filters or not, grease filters should be installed on the product. Do not use your product without grease filter.
• Use of charcoal filter is as follows. - Cut off the device power before replacing charcoal filter.
- Charcoal filter is used in the kitchens with no duct therefore should be replaced in every 3-5 months depending on the frequency of use.
• Charcoal filter should never be washed.
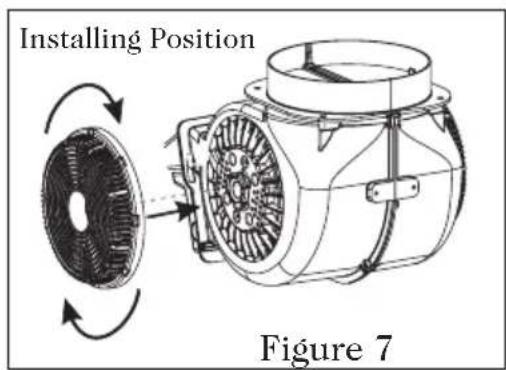
5.4. Installation Of Charcoal Filter
- Charcoal filters are used in the kitchens with no duct.
- Charcoal filters are installed onto both sides of the fan as shown in Figure 7 by turning 10 degrees clock-wise.
- When uninstalling, reverse the same procedure.
5.5. Use Of Aluminum Cartridge Filter
Aluminum cartridge filter holds dust and grease in the air. Chimney hood should never be used without aluminum cartridge filter.
(Figure 8)

natural_image
Diagram showing a hand pressing a component into a device, with an arrow indicating rotation (no text or symbols present)6. REPLACING THE BULB
Always switch off the electrical supply before carrying out any operation.
6.1. Led
- LED bulb does not operate is possible to remove as shown in Figure 9
- A new bulb to be supplied from service points is replaced with the same re-operation.
- Cables are designed with sockets. The plug in should be made according to previous connection.
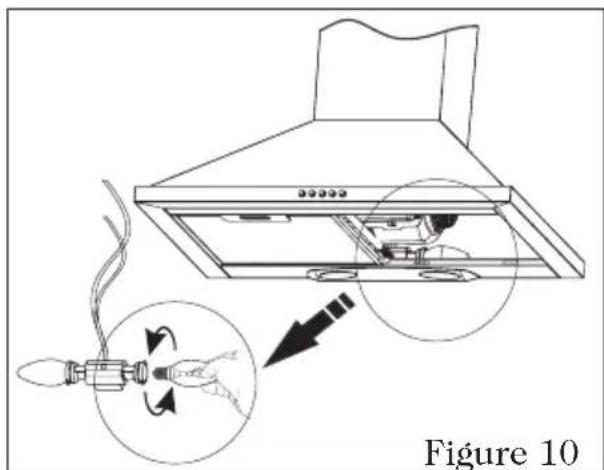
6.2. Candle Type Halogen Bulb
- Bulb does not operate is possible to remove as shown in. (Figure 9)
- A new bulb with the same features is replaced with removed bulb.
- Remove the holder on the LED bulb. Put the new LED bulb on the holder housing of the LED bulb you removed as shown in Figure 10.

7. MAINTENANCE OF THE CHIMNEY HOOD
- Device should be unplugged or switch should be turned off before cleaning and maintenance procedures.
- Metal filter should be cleaned once a month with hot soapy water or in the dishwasher, if possible. (60°C)
- Remove the aluminum cartridge filter by pressing on the spring catches on the side. Do not r-efit before drying after wash.
- Outer surface of the extractor hood should be wiped with a damp cloth soaked with soapy water.
- Make sure electronic parts do not contact with water or similar materials.
- For inox products, using inox cleaning and maintenance products available in the market will provide longer usage life for your device.
- Aluminum filters can be washed in dishwasher. After several washes, aluminum filters may change colour. This is normal and filters do not need to be replaced.
WARNING: When used with devices which use fuel (heaters working with gas, diesel fuel, coal or fire wood, water heaters, etc) and the air in the environment; should be used cautiously. The chimney hood sending the air out in the environment may affect the burning adversely.
This warning is not applicable to non-ducted use.
Efficient Use Of Chimney Hood;
- When installing the chimney hood to the air duct, use 150/120 mm diameter pipes and use bends as minimum as possible.
- Be ware of cleaning periods of metal filters and replacing times of charcoal filters.
- When dense suction power is not required, use the product in medium setting.
-
For right ventilation, the windows in the kitchen leading to the outside should be kept closed.
-
IF CHIMNEY HOOD DOES NOT WORK;
Before contacting the service, make sure the product is plugged and the fuse in the electrical installation is working. Do not do anything that may harm the product.
Service And Spare Parts
Have one of our authorized services install your device free of charge. You can supply spare parts of your device from your dealer or authorised services. The package includes a list of authorized services with the product.
When you contact your service or dealer to ask for any spare parts, notify them of product model name shown in the product label.
When you remove the aluminum cartridge filter, you will see the product label.
Before contacting your service, check your chimney hood against the table below. If problem persists, contact your dealer or authorised service point.
| Check electricity connection (mains voltage should be 220-240 V, Chimney hood should be connected to grounding socket.) | Check motor switch (Motor switch should be on.) | Check bulb switch (Bulb switch should be on.) | Check aluminum filter (Aluminum cartridge filter should be washed once a month in normal use.) | Check bulbs (Bulbs should be in working condition.) | Check air outlet shaft (Air outlet shaft should be unblocked.) | Check charcoal filter (Charcoal filters should be replaced quarterly in normal use. | |
| Chimney Hood does not work |  |  | |||||
| Light bulb is not working | √ |  |  | ||||
| Chimney hood air suction is poor | √ | √ | √ | ||||
| Do not send air out (in non-ducted cases) | √ | √ |
9. ENVIRONMENTALLY-FRIENDLY DISPOSAL

natural_image
Symbol of a trash bin crossed with no text or numbers, representing environmental restriction (no text present)Dispose of packaging in an environmentally-friendly manner.
This appliance is labeled in accordance with European Directive 2012/19/EU concerning used electrical and electronic appliances (waste electrical and electronic equipment - WEEE). The guideline determines the framework for the return and recycling of used appliances as applicable throughout to the EU.
10. PACKAGE INFORMATION
Packaging materials of the product are manufactured from recyclable materials in accordance with our National Environment Regulations. Do not dispose of the packaging materials together with the domestic or other wastes. Take them to the packaging material collection points designated by the local authorities.
ARTUSI THE ART OF LIVING
Worldwide Appliances Pty Limited
A.B.N. 45868077422
Office:
48-50 Moore Street, Leichhardt N.S.W 2040 Post:
Locked Bag 3000, Annandale, N.S.W 2038
P: 1300 694 583
WARRANTY REGISTRATION
Your ongoing satisfaction with your artusi product is important to us. We ask that you complete the enclosed Warranty Registration Card and return it to us so that we have a record of the artusi product purchased by you.
PRIVACY
Worldwide Appliances respects your privacy and is committed to handling your personal information in accordance with the National Privacy Principles and the Privacy Act 1988 (Cth). A copy of the Worldwide Appliances Privacy Policy is available at www.artusi.com.au. Worldwide Appliances will not disclose any personal information set out in the Warranty Registration Card (“Personal Information”) without your consent unless required by:
- law;
- any Worldwide Appliances related company;
- any service provider which provide services to artusi or assist artusi in providing services (including repair and warranty services) to customers. Our purpose in collecting the Personal Information is
to keep a record of the artusi product purchased by you, in order to provide a better warranty service to you in the unlikely event that there is a problem with your artusi product. Worldwide Appliances may contact you at any one or more of the address, email address or telephone numbers set out in the Warranty Registration Card. Please contact artusi on 1300 694 583 should you not wish to be contacted by Worldwide Appliances.
WARRANTY
1. Warranty
Worldwide Appliances warrants that each artusi product will remain, for a period of either 12 months or 24 months of warranty. All Warranties are valid from the original date of purchase, And warranty claims must be accompanied by the proof of purchase.
24 months warranty products: All Built-in Appliances – Limited to Ovens, Gas, Induction and Electric Cooktops, and All Rangehoods
Freestanding Cookers - Gas and Electric Models (900mm Width)
Dishwashers - Freestanding, Fully Integrated, Semi Integrated and built-in
12 months warranty products: Freestanding Cookers - Gas and Electric Models in 50cm, 54cm and 60cm Widths Portable Appliances* – Benchtop Models and Portable Gas Models
2. What is not Covered by the Warranty.
The Warranty does not apply if an artusi product is defective by a factor other than a defect arising in the manufacture of the artusi product, including but not limited to:
(a) damage through misuse (including failure to maintain, service or use with proper care), neglect, accident or ordinary wear and tear (including deterioration of parts and accessories and glass breakage);
(b) use for purpose for which the artusi product was not sold or designed;
(c) use or installation which is not in accordance with any specified instructions for use or installation;
(d) use or operation after a defect has occurred or been discovered;
(e) damage through freight, transportation or handling in transit (other than when Worldwide Appliances is responsible);
(f) damage through exposure to chemicals, dusts, residues, excessive voltage, heat, atmospheric conditions or other forces or environmental factors outside the control or Worldwide Appliances;
(g) repair, modification or tampering by the purchaser or any person other than Worldwide Appliances, an employee of Worldwide Appliances or an authorised artusi service contractor ^* ;
(h) use of parts, components or accessories which have not been supplied or specifically approved by artusi.
(i) damage to surface coatings caused by cleaning or maintenance using products not recommended in the artusi product handbook provided to the purchaser upon purchase of the artusi product;
(j) damage to the base of an electric oven due to items having been placed on the base of the oven cavity or covering the base, such as aluminium foil (this impedes the transfer of heat from the element to the oven cavity and can result in irreparable damage); or
(k) damages, dents or other cosmetic imperfections not affecting the performance of the artusi in respect of an artusi product purchased as a “factory second” or from display
The Warranty does not extend to light globes used in artusi products.
3. Domestic Use
Each artusi product is made for domestic use. This Warranty may not extend to artusi products used for commercial purposes.
4. Time for Claim under the Warranty
You must make any claim under this Warranty within twenty eight (28) days after the occurrence of an event which gives rise to a claim pursuant to the Warranty, by booking a service call on the telephone number below.
5. Proof of Purchase
Customers must retain proof of purchase in order to be eligible to make a warranty claim in respect of an artusi product.
6. Claiming under the Warranty
Customers will bear the cost of claiming under this Warranty unless Worldwide Appliances determines the expenses are reasonable, in which case the customer must claim those expenses by providing written evidence of each expense to Worldwide Appliances at the address on the Warranty Registration Card.
7. Statutory Rights
(a) These terms and conditions do not affect your statutory rights.
(b) The limitations on the Warranty set out in this document do not exclude or limit the application of the consumer guarantees set out in the Act or any other equivalent or corresponding legislation in the relevant jurisdiction where to do so would:
(i) contravene the law of the relevant jurisdiction; or
(ii) cause any part of the Warranty to be void.
(c) Worldwide Appliances excludes indirect or consequential loss of any kind (including, without limitation, loss of use of the artusi product) and (other than expressly provided for in these terms and conditions) subject to all terms,
conditions and warranties implied by custom, the general law, the Act or other statute.
(d) The liability of Worldwide Appliances to you
Warranty Card tear off
for a breach of any express or non-excludable implied term, condition or warranty is limited at the option of Worldwide Appliances to:
(i) replacing or repairing the defective part of the artusi product;
(ii) paying the cost of replacing or repairing the defective part of the artusi product;
(iii) replacing the artusi product; or
(iv) paying the cost of replacing the artusi product.
(e) Our goods come with guarantees that cannot be excluded under the Australian Consumer Law. You are entitled to a replacement or refund for a major failure and for compensation for any other reasonably foreseeable loss or damage. You are also entitled to have the goods repaired or replaced if the goods fail to be of acceptable quality and the failure does not amount to a major failure.
8. Defects
Any part of an artusi product deemed to be defective and replaced by Worldwide Appliances is the property of Worldwide Appliances.
Worldwide Appliances reserves the right to inspect and test artusi products in order to determine the extent of any defect and the validity of a claim under the Warranty.
*To locate your closest artusi authorised service agent please contact us on 1300 652 100 or visit www.artusi.com.au
ALL SERVICE CALLS MUST BE BOOKED
THROUGH AN AUTHORISED DEALER OR
WARRANTY DEPARTMENT ON 1300 652 100
OR stokesaps.com.au/artusi-service
0 1 0 3 2

ARTUSI
THE ART OF LIVING
WARRANTY REGISTRATION CARD 01052013
Please complete and send to ARTUSI at:
REPLY PAID 83617
LEICHHARDT NSW 2040
| Last Name: First Name: | ||
| Address: | ||
| State: Postcode: Email: | ||
| Home Phone: Mobile: | ||
| Purchase Date: / / (Please attach proof of purchase to validate warranty) | ||
| MODEL NUMBER | SERIAL NUMBER(if you cannot locate the serial number please call ARTUSI on 1300 694 583) |
| 1 | |
| 2 | |
| 3 | |
| 4 |

ARTUSI
THE ART OF COOKING
DISCLAIMER
Worldwide Appliancees PTY LTD, trading as ARTUSI, is continually seeking ways to improve the design specifications, aesthetics and production techniques of its products. As a result alterations to our products and designs take place continually. Whilst every effort is made to produce information and literature that is up to date, this brochure should not be regarded as an infallible guide to the current specifications, nor does it constitute an offer for the sale of any particular product. Product dimensions indicated in our literature is indicative only. Actual product only should be used to define dimension cutouts. Distributors, and retailers are not agents of ARTUSI and are not authorised to bind ARTUSI by any express or implied undertaking or representation.
ARTUSIOFFICES ARE OPEN DAILY FROM 9AM-5PM AND SATURDAYS 10AM-4PM
NSW & ACT (HEAD OFFICE)
48-50 MOORE STREET
LEICHHARDT
FO285694699
VIC. TAS & SA
1211 TOORAK ROAD
CAMBERWELL
FO398092155
QLD
1/42 CAVENDISH ROAD
COOPAROO
F0733970850
WA&NT
UNIT 10/55 HOWE STREET
OSBORNE PARK
F0892019188
NZ
PO BOX 11.160
SOCKBURN CHRISTCHURCH
FO33445906


- CONTENTS
- SAFETY INSTRUCTIONS
- INTRODUCTION AND TECHNICAL DRAWING OF THE CHIMNEY HOOD
- Symbols Functions
- In Ducted Use
- Round Charcoal Filter
- Use Of Charcoal Filter
- Installation Of Charcoal Filter
- Use Of Aluminum Cartridge Filter
- REPLACING THE BULB
- Led
- Candle Type Halogen Bulb
- MAINTENANCE OF THE CHIMNEY HOOD
- ENVIRONMENTALLY-FRIENDLY DISPOSAL
- PACKAGE INFORMATION
- ARTUSI THE ART OF LIVING
- PRIVACY
- WARRANTY
- Warranty
- What is not Covered by the Warranty.
- Domestic Use
- Time for Claim under the Warranty
- Proof of Purchase
- Claiming under the Warranty
- Statutory Rights
- Warranty Card tear off
- Defects
- ARTUSI
- THE ART OF LIVING
- THE ART OF COOKING
- DISCLAIMER
Brand : Artusi
Model : ACH935B
Category : Range hood