MW2064 - Microwaves Salton - Free user manual and instructions
Find the device manual for free MW2064 Salton in PDF.

User questions about MW2064 Salton
0 question about this device. Answer the ones you know or ask your own.
Ask a new question about this device
Download the instructions for your Microwaves in PDF format for free! Find your manual MW2064 - Salton and take your electronic device back in hand. On this page are published all the documents necessary for the use of your device. MW2064 by Salton.
USER MANUAL MW2064 Salton
natural_image
Abstract gray background with a partial circular design and curved lines (no text or symbols)salton®
microwave oven
0.9 cu. ft. capacity

natural_image
Black salton microwave oven with digital display and control buttons (no visible text or symbols on main body)Instruction Booklet
Model MW2064
IMPORTANT SAFEGUARDS
When using electrical appliances, basic safety precautions should be followed, including the following:
WARNING! – To reduce the risk of burns, electric shock, fire, injury to persons, or exposure to excessive microwave energy:
- Read all instructions before using the appliance.
- Read and follow the specific "PRECAUTIONS TO AVOID POSSIBLE EXPOSURE TO EXCESSIVE MICROWAVE ENERGY" in the section below.
- This appliance must be grounded. Connect only to a properly grounded outlet. See the "GROUNDING INSTRUCTIONS" section.
- Install or locate this appliance only in accordance with the provided installation instructions in the "INSTALLATION" section.
- DO NOT cover or block any openings on this appliance.
- DO NOT store or use this appliance outdoors. DO NOT use this product near water, for example, near a kitchen sink, in a wet basement, or near a swimming pool or similar locations.
- Use this appliance only for its intended use as described in this manual. DO NOT use corrosive chemicals or vapors in this appliance. This type of oven is specifically designed to heat, cook or dry food. It is not designed for industrial or laboratory use. The use of corrosive chemicals in heating or cleaning will damage the appliance and may result in radiation leaks.
- When cleaning surfaces of door and oven that come together when closing the door, use only mild, nonabrasive soaps or detergents applied with a sponge or soft cloth.
- DO NOT allow children to use this appliance, unless closely supervised by an adult.
- DO NOT operate this appliance if it has a damaged cord or plug, if it is not working properly, or if it has been damaged or dropped.
- DO NOT immerse cord or plug in water.
- Keep cord away from heated surfaces.
- DO NOT let cord hang over edge of table or counter.
-
This appliance should only be serviced by qualified service personnel. See the Warranty section or contact the your nearest service facility for examination, repair or adjustment.
-
Some products such as whole eggs and sealed containers, for example, closed glass jars, may explode and should not be heated in this oven.
- To reduce the risk of fire in the oven cavity:
a. DO NOT overcook food.
b. DO NOT leave the microwave unattended if paper, plastic or other combustible materials are placed inside the oven to facilitate cooking.
c. Remove wire twist-ties from paper or plastic bags before placing bag in oven.
- If materials inside the oven should ignite,
a. Keep oven door CLOSED
b. Turn oven off
c. Disconnect the power cord or shut off power at the fuse or circuit breaker panel
- Liquids, such as water, coffee, or tea are able to be overheated beyond the boiling point without appearing to be boiling due to surface tension of the liquid. Visible bubbling or boiling when the container is removed from the microwave oven is not always present. THIS COULD RESULT IN VERY HOT LIQUIDS SUDDENLY BOILING OVER WHEN A SPOON OR OTHER UTENSIL IS INSERTED INTO THE LIQUID. To reduce the risk of injury to persons:
a. DO NOT overheat the liquid.
b. Stir the liquid both before and halfway through heating it.
c. DO NOT use straight-sided containers with narrow necks.
d. After heating, allow the container to stand in the microwave oven for a short time before removing the container.
e. Use extreme care when inserting a spoon or other utensil into the container.
SAVE THESE INSTRUCTIONS
WARNING! TO AVOID THE RISK OF FIRE
- DO NOT operate the oven empty. The microwave energy will reflect continuously throughout the oven causing overheating and damage if food or water is not present to absorb energy.
- DO NOT store flammable materials next to, on top of, or in the oven.
- DO NOT dry clothes, newspapers or other materials in the oven. Or use newspaper or paper bags for cooking.
-
DO NOT hot or strike the Control Panel. Damage to the controls may occur
-
DO NOT use recycled paper products unless the paper product is labeled as safe for microwave oven use. Recycled paper product may contain impurities which may cause sparking.
- DO NOT use the cavity for storage purposes. Do not leave paper products, cooking utensils or food in the cavity when not in use.
- DO NOT use this microwave oven to heat corrosive chemicals (for example, sulfides and chlorides). Vapors from such corrosive chemicals may interact with the contact and springs of the safety interlock switches thereby rendering them inoperable.
- DO NOT leave the microwave unattended when paper, plastic or other combustible materials are placed inside the oven to facilitate cooking.
- Some Styrofoam trays (like those that meat is packaged on) have a thin strip of metal embedded on the bottom. When microwaved, the metal can burn the floor of the oven or ignite a paper towel.
- Keep the waveguide cover (Mica Sheet) clean at all times. Wipe the oven interior with a soft damp cloth after each use. If you leave grease or fat anywhere in the cavity it may overheat, smoke or even catch fire when the oven is used again.
- Never heat oil or fat for deep frying as you cannot control the temperature and doing so may lead to overheating and fire.
- This appliance is intended for HOUSEHOLD USE ONLY.
GLASS TURNTABLE
- DO NOT cook directly on the turntable. It can crack, cause injury or damage to the oven. Always place food in a microwave safe dish.
- DO NOT operate the oven without the Glass Turntable in place. Improper cooking or damage to the oven could result. Verify that the Glass Turntable is properly engage and rotating by observing its rotation when you press Start.
- Use the Glass Turntable specifically designed for this oven. DO NOT substitute any other glass tray.
- If the Glass Tray is hot, allow to cool before cleaning or placing in water.
PRECAUTIONS TO AVOID POSSIBLE EXPOSURE TO EXCESSIVE MICROWAVE ENERGY
- DO NOT attempt to operate this oven with the door open as open-door operation can result in harmful exposure to microwave energy. It is important not to defeat or tamper with the safety interlocks.
- DO NOT place any object between the oven front face and the door or allow soil or cleaner residue to accumulate on sealing surfaces.
- DO NOT operate the oven if it is damaged. It is particularly important that the oven door closes properly and that there is no damage to the following:
a. door (bent)
b. hinges and latches (broken or loosened)
c. door seals and sealing surfaces.
- The oven should not be adjusted or repaired by anyone except properly qualified service personnel.
HOUSEHOLD USE ONLY
GROUNDING INSTRUCTIONS
This appliance must be grounded. In the event of an electrical short circuit, the grounding plug reduces the risk of electric shock by providing an escape wire for electric current. This appliance is equipped with a cord having a grounding wire with a grounding plug. The plug must be plugged into an outlet that is properly installed and grounded. It is recommended that a separate circuit serving only the oven be provided.
WARNING – Improper use of grounding can result in a risk of electric shock. DO NOT cut or remove the third (ground) prong from the power cord under any circumstances.
Consult a qualified electrician or serviceman if the grounding instructions are not completely understood or if doubt exists as to whether the appliance is properly grounded.
A short power cord is provided to reduce the risk of the user becoming entangled in or tripping over a longer cord. If it is necessary to use an extension cord, use only a 3-wire extension cord that has a 3-blade grounding plug and a 3-slot receptacle that will accept the plug on the appliance. The marked electrical rating of the extension cord shall be equal to or greater than the rating of the appliance. The longer cord should be arranged so it does not drape over the table top or counter when children can pull on it or trip over it.
Alternately, do not use an extension cord. If the power supply cord is too short, have a qualified electrician or serviceman install an outlet near the appliance.
Using an Adapter
Due to potential safety hazards, we strongly recommend against the use of an adapter plug. However, if you choose to use an adapter, where local codes may permit, a temporary connection may be made to a properly grounded two prong wall outlet by the use of a cUL/CSA listed adapter, which is available at most hardware stores.
GENERAL USE
Arcing
Arcing is the microwave term for sparks in the oven. If you see arcing, press the Stop/Clear pad immediately and correct the problem. Arcing is caused by the following:
- Metal or foil touching the side of the microwave
- Upturned edges of foil not wrapped around the food
- Metals in the microwave such as twist ties, meat pins or metal rimmed dishes
- Recycled paper towels
Guidelines and safety tips for microwave cooking:
- DO NOT use sealed jars or narrow neck bottles for cooking or reheating. They may shatter.
- Remove plastic store wrap before cooking or defrosting foods in the oven.
- Avoid inserting nails, wire, etc. through any holes in the unit during operation. Never insert a wire, nail or any other metal objects through the holes on the cavity or any other holes or gaps, because such objects may cause electric shock and microwave leakage.
- Remove the wire twist-ties and metal handles from paper or plastic containers/bags before placing them in the oven.
- The contents of feeding bottles and baby food jars should be stirred or shaken and the temperature should be checked before serving in order to avoid burns.
- Cooking utensils may become hot because of heat transferred from the heated food. Potholders may be needed to handle the utensil.
- Use only thermometers that are specifically designed for use in microwave ovens.
- DO NOT operate any heating or cooking appliances beneath this appliance.
- The glass tray and roller ring must be in place when you operate the oven.
- NEVER use your microwave oven for HOME CANNING. The oven is not designed to permit proper canning. Improperly canned food may spoil and be dangerous to consume.
- Cooking times given in the cooking guide are approximate. Factors that may affect cooking are starting temperature, altitude, volume, size and shape of food and utensils used. As you become familiar with the oven, you will be able to adjust for these factors.
- DO NOT overcook food. If food is undercooked, it can always be returned to the oven for further cooking. If food is overcooked, nothing can be done. Always start with minimum cooking times.
- Small quantities of food or foods with low moisture content can burn, dry out or catch on fire if cooked too long.
-
DO NOT boil eggs in their shell. Pressure may build up and the eggs may explode.
-
Potatoes, apples, egg yolks, whole acorn squash and sausage are some examples of food with NONPOROUS SKINS. These must be pierced before cooking to prevent bursting.
- POPCORN must be popped in a microwave corn popper. Microwave popped corn produces a lower yield than conventional popping. DO NOT use oven for popcorn unless popped in a microwave approved popcorn utensil or unless it's commercially packaged and recommended especially for microwave ovens. DO NOT use oil unless specified by the manufacturer.
- HEATED LIQUIDS can ERUPT if not mixed with air. DO NOT heat liquids in your microwave oven without first stirring.
- DO NOT attempt to tamper with or make any adjustments or repairs to oven door, control panel or any other part of the oven. DO NOT remove outer casing from oven.
- Pot Holders should always be used when removing items from the oven. Heat is transferred from hot food to the cooking container and from the container to the Glass Tray. The Glass Tray can also be very hot after removing the cooking container from the oven.
UTENSILS
CAUTION:
Personal Injury Hazard
Tightly closed utensils could explode. Closed containers should be opened and plastic pouches should be pierced before cooking.
See the instructions below on 'Utensils for Use in the Microwave' and 'Utensils to AVOID in the microwave'. When in doubt if a utensil is safe for microwave use, you can test the utensil in question by following using the procedure below.
Utensil Test:
Fill a microwave-safe container with 1 cup (250 ml) of cold water along with the utensil in question. Cook on maximum power for 1 minute. Carefully feel the utensil. If the empty utensil is warm, do not use it for microwave cooking.
Do not exceed 1 minute cooking time.
To avoid arcing (see the General Use section) and other hazards, use the recommended utensils in the 'Utensils for Use in the Microwave' section below:
Utensils for Use in the Microwave
| Aluminum foil Use | for shielding only. Small smooth pieces can be used to cover thin parts of meat or poultry to prevent overcooking. Arcing* can occur if foil is too close to oven walls. The foil should be at least 1 inch (2.5 cm) away from oven walls. |
| Browning dish Use | to brown the exterior of small items such as steaks, chops or pancakes. Follow the directions provided with your browning dish. |
| Ceramic, porcelain, stoneware dishes. | Use microwave safe only.DO NOT use cracked or chipped Never use dishes with metal trim. |
| Glassware Microwave | ve safe only. Follow manufacturer's instructions.DO NOT use cracked or chipped dishes. |
| Oven cooking bags | Follow manufacturer's instructions.DO NOT close with metal tie. Make slits to allow steam to escape. |
| Paper plates/cups | Use for short-term cooking/warming only.DO NOT leave oven unattended while cooking.DO NOT use recycled paper as them may contain metal and can catch fire. |
| Paper towels Use to | cover food for reheating and absorbing fat. Use with supervision for short-term cooking only.DO NOT use recycled paper towels as they may contain metal and can catch fire. |
| Parchment paper Use | as a cover to prevent splattering or a wrap for steaming. |
| Plastic Only use plastic | marked microwave-safe. Other plastics may soften as the food inside gets hot. "Boiling bags" and tightly closed plastic bags should be slit, pierced or vented. |
| Plastic wrap Microwave | ave-safe only. Use to cover food during cooking to retain moisture. Leave a small opening for steam to escape.DO NOT allow plastic wrap to touch food. |
| Thermometers Microwave | safe only. (meat and candy thermometers) |
| Wax paper Use to cover food | to prevent splattering and retain moisture. |
Utensils to AVOID in the microwave
DO NOT use the following materials in the microwave:
• Metal or aluminum pans/bakeware, utensils
• Recycled paper products
• Non-heat resistant glass
- Food storage bags
- Dishes with metallic trim
- Brown paper bags
• Non-microwave-safe plastics, such as margarine tubs
- Metal twist-ties
- Glass jars and bottles
• Styrofoam plates and cups
- Wood
INSTALLATION
- Remove all packing materials and accessories. Remove any protective film found on the microwave oven cabinet surface and on the Control Panel.
IMPORTANT: DO NOT remove the Waveguide (Mica Cover) on the inside of the oven cavity, this is to protect the magnetron.
-
Examine the oven for any damage after unpacking. Check for damage such as a misaligned door, broken door or dents in the cavity. DO NOT install if there is any damage.
-
Install the microwave oven on a flat, level surface that provides at least 4" (10 cm) of space around the sides and back of the microwave oven and at least 12" (30 cm) above the oven. Never remove the legs from the bottom of the microwave oven. Blocking the intake and/or outlet openings can damage the oven.
-
Place the microwave as far away as possible from radios and televisions. The microwave oven may cause interference with these products.
-
DO NOT install the oven over a range cook-top or other heat-producing appliances or near water taps. Heat and water can damage the microwave and void the warranty.
-
Plug the microwave oven into a standard household grounded outlet. Check the rating label of the microwave to ensure the voltage and frequency are compatible with the rating of the outlet. See the "Grounding Instructions" section on page 5.
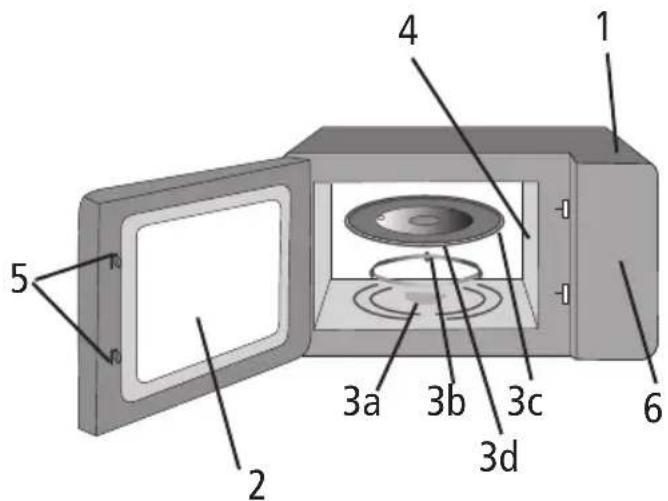
DESCRIPTION OF PARTS
- Cabinet
- Oven Window
- Turntable Assembly
a. Turntable Drive Shaft
b. Roller Ring
c. Glass Tray
d. Hub (under Glass Tray)
- Waveguide/Mica Cover
- Door Safety Lock System
- Control Panel
a. Display
Shows cooking time, power and present time
b. Cook
c. Defrost by Time
d. Power
e. Clock
f. Pre-programmed One-Touch cook pads Instant settings to cook 6 popular foods
g. Number Buttons
Touch to set times
h. 1 – 6 Express Cook touch pads
Clears all previous settings pressed before cooking starts. During cooking press once to stop the oven and twice to stop and clear all entries
i. Stop/Clear
j. Memory
k. Start/+30sec
1. Kitchen Timer
m. Defrost by Weight
text_image
1 2 3a 3b 3c 3d 4 5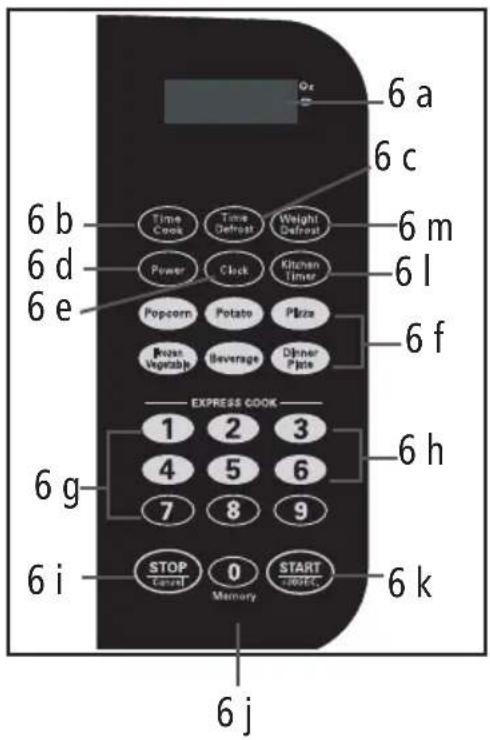
text_image
6 a 6 c 6 b 6 m 6 d 6 l 6 e 6 f 6 g 6 h 6 i 6 k 6 j STOP Cavel 0 Memory START MUSTECTurntable Assembly
- Turntable drive shaft
- Roller Ring
- Glass Tray
- Hub (underside of glass tray)

text_image
3 4 2 1III. 2
Center the Roller Ring over the Turntable Shaft on the floor of the microwave oven. Install the Glass Tray, centering the Hub over the Turntable Shaft. Turn the Glass Tray slowly until the Hub engages on the Turntable Shaft.
- Never place the glass tray upside down. The glass tray should never be restricted.
- Both the Glass Tray and Roller Ring must be used during cooking.
- Place all food and containers with food on the Glass Tray for cooking.
- Verify that the Glass Tray is properly engaged and rotating by observing its rotation when you press Start. NOTE: The Glass Tray can turn in either direction.
NOTE: If the Glass Tray or Roller Ring cracks or breaks, contact SWG Canada See Warranty section.
OPERATING INSTRUCTIONS
Setting the Clock
- When the microwave oven is plugged into the outlet, the oven will display "0.00"
- Press CLOCK keypad, and the LED will display 00:00.
- Press the number keypads and enter the correct time (always use 4 digits). For example, to set the time of 5 hours and 9 minutes, press the numbers 0, 5, 0, 9, one at a time. The time range should be between 1:00 – 12:59.
- Press the Clock Button to confirm the setting.
NOTE:
- If the numbers you are inputting are not within the time range then the numbers will not show in the display.
- In the process of setting the clock, if the STOP/CLEAR pad is pressed or if there is no operation for 1 minute, the oven will go back to the former setting automatically.
Setting the Kitchen Timer
- Press KITCHEN TIMER keypad and 00:00 will light up in the display window.
- Press the number keys and enter the amount of time for the timer. The maximum time is 99 minutes and 99 seconds. NOTE: To set less than a 4 digit time (Ex. 1 minute 30 seconds) the first digit should be a '0' (0130).
- Press the START/+30 SEC pad to confirm the setting and start the timer. The time will countdown in the display window.
- When the preset time has expired the buzzer will sound 5 times.
Note: If the kitchen timer is set, you cannot set any other programs.
Setting the Child Lock
-
Press STOP/CLEAR and hold for 3 seconds. The microwave will beep and the time will no longer be displayed in the Display Window. You will not be able to enter any information on the Control Panel or use the Microwave.
-
To unlock the Control Panel, press STOP/CLEAR for 3 seconds. The microwave will beep and the time will be shown in the Display Window. You can now use the Microwave.
Selecting Power Level and Cook Time
10 power levels are available. Level 0 is fan only.
| Level 10 | 9 8 7 6 | 5 4 3 2 | 1 0 | ||||||||
| Power 10 | 0 % 90 | % 80 % | 70 % | 60 % 50 | % 40 % | 30 % | 20 % 10 | % 0 % | |||
| Display | PL10 | PL9 | PL8 | PL7 | PL6 | PL5 | PL4 | PL3 | PL2 | PL1 | PL0 |
Single Stage Cooking
- Press the TIME COOK keypad and the display window will show "00.00"
- Press the number pads to input the cooking time. NOTE: The maximum cooking time is 99 minutes and 99 seconds.
- Press POWER once, the LED will display "PL10". The default power level is 100% power. Press the number keys to adjust the power level (See the chart above).
- Press START/+30SEC to start cooking. The remaining cooking time will be shown in the Display Window. To increase the cooking time in 30 second intervals press START/+30 SEC.
- To stop the cooking cycle press STOP/CLEAR. To restart, press START/+30 SEC. To clear the previous cooking time press STOP/CLEAR twice and the current time will be shown in the Display Window.
NOTE:
- During microwave cooking, POWER can be pressed to change the power level you need. After pressing POWER, the current power level will flash for 3 seconds, now you can press the number button to change the power level. The oven will continue on the new power level for the remaining time.
- If 'PL0' is selected, the oven will work with the fan only, no power.
Multi-Stage Cooking
You can set the microwave to defrost then cook or cook at one power level then switch to a different power level.
NOTE:
- The 6 Pre-programmed cooking buttons cannot be used as part of the multi-stage cooking.
- Defrost can be set as the first stage cooking only.
Example 1 – Defrost by Weight then Cook:
To defrost food weighing 40 oz. (1.1 kg) and then cook with full power for 20 minutes.
- Press DEFROST BY WEIGHT once.
- Press '4', '0' (weight) in sequence.
- Then to set the cooking time, press POWER once, to choose full power, or use the number keys that correspond to the power level you want.
- Press TIME COOK once, then the NUMBER BUTTONS 2, 0, 0, 0 in sequence to set the cooking time.
- Press START/+30 SEC to start Multi-Stage cooking.
- You will hear a 'beep' when stage 1 finishes and stage 2 begins. At the end of stage 2 you will hear 5 'beeps'.
Example 2:
To cook at 5 minutes on power level 9, then 2:30 minutes on power level 6:
- Press TIME COOK the press the NUMBER KEYPADS 0, 5, 0, 0.
- Press POWER then press the 9 keypad (PL9).
- Press TIMECOOK keypad use the NUMBER keypads to enter the time 0, 2, 3, 0.
- Press POWER once then press the NUMBER keypad 6 for PL6.
- Press START/+30SEC to start the cooking process.
- You will hear a 'beep' when stage 1 finishes and stage 2 begins. At the end of stage 2 you will hear 5 'beeps'.
Express Cook
To Express Cook from 1 to 6 minutes on 100% power:
- Press any number from 1 to 6 (1 for 1 minute, 2 for 2 minutes, etc.) The microwave will start automatically.
- To increase the time by 30 second intervals press START/+30 SEC any time during the cooking time.
NOTE: The maximum cooking time is 99 minutes and 99 seconds
DEFROSTING
Defrost by Weight
- Press the DEFROST BY WEIGHT keypad. The LED will display 'dEF1'.
- Enter the weight between 4 and 100 ozs. (100 g – 2.8 kgs) by pressing the Number Keypads. To enter the information, grams or kilograms must be converted to ounces.
- Press START/+30 SEC.
- The amount of defrosting time required will be shown in the Display Window.
NOTE: If the weight input is not within 4 – 100 oz. (100 g – 2.8 kgs) then the input will be invalid. The microwave will not beep and will not start until valid numbers are input.
Time Defrost
- Press TIME DEFROST 'dEF2" will be shown in the Display Window.
- Press the number keypads to input the defrosting time. NOTE: The time range is between 00:01 and 99:99.
- The default microwave power is level 3. If you want to change the power level, press POWER once and the display window will show PL3. Press the number keypad of the Power Level you would like to select.
- Press START/+30SEC to start defrosting. The time will be counted down in the Display Window.
NOTE: If the time input is not within 00:01 to 99:99 then the input will be invalid. The microwave will not beep and will not start until valid numbers are input.
ONE TOUCH COOKING
Popcorn
IMPORTANT:
- Do not use this setting if the size of the popcorn bag is less than 1.75 ozs (50 gr).
- Always follow manufacturer's instructions for popcorn. If the time on the preset popcorn button differs from the manufacturers recommended cooking time, do not use the pre-set popcorn button.
-
Never leave popcorn cooking unattended.
-
If the popcorn bag weight is 1.75 ozs (50 g), press POPCORN once. If the bag is 3 ozs (85 g) press POPCORN twice. If the popcorn bag size is 3.5 ozs (100 g) press POPCORN 3 times.
-
Press START/+30SEC and the required time will be shown in the Display Window and the time will countdown. The buzzer will sound 5 times when the time has expired.
Potato
- You can cook 1 to 3 – 8 ozs (230 g) potatoes at a time.
- Press POTATO once for 1 potato (8 ozs/230 g), twice for 2 potatoes (1 lb./460 g) and 3 times for 3 potatoes (24 ozs/690 g).
- Press START/+30SEC. The time will appear in the Display Window and start to countdown. The buzzer will sound 5 times when the time has expired.
Pizza
- You can reheat 4 ozs, 8 ozs or 14 ozs (113, 230, 400 g) of Pizza at a time.
- Press PIZZA once for 4 ozs (113 g), twice for 8 ozs (230 g) and 3 times for 14 ozs (400 g).
- Press START/+30 SEC. The time will appear in the Display Window and start to countdown. The buzzer will sound 5 times when the time has expired.
Frozen Vegetables
- You can cook up to 16 ozs (454 g) of frozen vegetables at one time.
- Press FROZEN VEGETABLE once for 4 ozs (112 g), twice for 8 ozs (225 g) and 3 times for 16 ozs (454 g).
- Press START/+30 SEC. The time will appear in the Display Window and start to countdown. The buzzer will sound 5 times when the time has expired.
Beverage
- You can reheat 1 to 3 – 5 ozs (120 ml) mugs of beverage at a time.
- Press BEVERAGE once for 1 cup, twice for 2 cups and 3 times for 3 cups.
- Press START/+30 SEC. The time will appear in the Display Window and start to countdown. The buzzer will sound 5 times when the time has expired.
Dinner Plate
- Press DINNER PLATE once for 9 ozs (250 g), twice for 12 ozs (340 g) and 3 times for 18 ozs (500 g).
- Press START/+30 SEC. The time will appear in the Display Window and start to countdown. The buzzer will sound 5 times when the time has expired.
MEMORY FUNCTION
You can set up to 3 cooking programs in the microwave MEMORY. Each program can have 1 or 2 stage cooking.
Setting the Memory Program
To Program Single Stage Cooking:
- Press 0/ MEMORY once to set program 1. The number 1 will appear in the display. (Press twice for the program 2 and three times for program 3).
- Press TIME COOK then the NUMBER KEYS to input the cooking time. (Ex. 3 minutes and 25 seconds press 0 - 3 - 2 - 5.)
- Press POWER to set the power level. Press the number keys to adjust the power level.
- Press START/+30 SEC to save the setting.
To Program Multi-Stage Cooking:
- Press MEMORY once to set program 1. The number 1 will appear in the display. (Press twice for the program 2 and three times for program 3.)
- Follow the instructions in the Multi-Stage Cooking section.
- Press START/+30 SEC to save the setting.
IMPORTANT NOTES:
- To check the Power Level while the microwave is on, press the POWER button and the current microwave power level will be shown in the Display Window for 3 seconds.
- The buzzer will 'beep' 5 times to indicate that the cooking is complete.
- The buzzer will 'beep' once in multi stage cooking when the first stage is complete and the second stage is starting. The buzzer will 'beep' 5 times when the cooking is complete.
- If the oven door is opened during cooking press the START+30 button to resume cooking.
HELPFUL HINTS
Stirring
Stir foods such as casseroles and vegetables while cooking to distribute heat evenly. Food at the outside of the dish absorbs more energy and heats more quickly.
Arranging Food
Arrange unevenly shaped foods, such as chicken pieces or chops, with the thicker meatier parts toward the outside of the Turntable where they receive more microwave energy. To prevent overcooking, place delicate areas of food toward the center of the Turntable.
Shielding
Shield food with narrow strips of aluminum foil to prevent overcooking. Areas that need shielding include poultry wing-tips, the ends of poultry legs and corners of square baking dishes. Use only small amounts of aluminum foil. Larger amounts can damage your oven.
Turning
Turn foods over midway through cooking to expose all parts to microwave energy. This is especially important with large foods such as roasts.
Standing
Foods cooked in the microwave build up internal heat and continue to cook for a few minutes after heating stops. Let foods stand to complete cooking, especially foods such as cakes and whole vegetables. Roasts need this time to complete cooking in the centre without overcooking the outer areas. Let all liquids, such as soup, water or hot chocolate stand for one minute then stir before serving. When heating baby food, stir after warming then test the temperature before serving. 20
Moisture
Microwave energy is attracted to water molecules. Food that is uneven in moisture content should be covered or allowed to stand so that the heat disperses evenly. Add a small amount of water to dry food to help in cooking.
CARE AND CLEANING
- Allow the Turntable to cool, remove and wash in warm, soapy water or in the dishwasher. NOTE: Do not put the hot Turntable directly in water immediately after cooking as it may crack.
- Remove the Roller Ring and wash in warm soapy water. Let dry before reinstalling in the oven.
- Food splatters or spilled liquids in the oven cavity should be cleaned after each use. Wipe with a damp cloth. Do not use any sprays or other harsh cleaners. If food has adhered to the oven walls, heat up to two cups of water with lemon juice at high power for 4 minutes or until boiling. Let stand in the microwave for 3 minutes. Remove. Wipe out the oven cavity with a damp cloth.
- The outside surfaces should be cleaned with a damp cloth. To prevent damage to the operating parts inside the oven, water should not be allowed to seep into the ventilation openings.
- Wipe the glass door on both sides with a damp cloth to remove any splatters.
- Wipe the Control Panel with a soft damp cloth. Do not allow the Control Panel to become wet. NOTE: When cleaning the Control Panel leave the oven door open to prevent oven from accidentally turning on or activate the Child Lock.
TROUBLESHOOTING
| PROBLEM POSSIBLE CAUSE SOLUTION | ||
| Oven will not start a) Electrical cord for a) Plug into the outlet oven is not plugged inb) Door is open b) Close the door and try againc) Wrong operation is set c) Check instructions | ||
| Arcing or sparking a) 'Utensils to AVOID a) Use microwave-safe in the microwave' cookware only were usedb) The oven is operated b) Do not operate with oven when emptyc) Spilled food remains in the cavity | ||
| Unevenly cooked foods | a) 'Utensils to AVOID a) Use microwave in the microwave' were usedb) Food is not defrosted completelyc) Cooking time, power level is not suitabled) Food is not turned or stirred | wave-safe cookware onlyb) Completely defrost food before cookingc) Use correct cooking time, power leveld) Turn or stir food |
| Overcooked foods | Cooking time, power Use correct cooking level is not suitable | time, power level |
| Undercooked foods | a) 'Utensils to AVOID a) Use microwave in the microwave' cookware only were usedb) Food is not defrosted completelyc) Oven ventilation ports are restrictedd) Cooking time, power level is not suitable | wave-safeb) Completely defrost foodc) Check to see that the oven ventilation ports are not restrictedd) Use correct cooking time, power level |
| Improper defrosting | a) 'Utensils to AVOID in the microwave' were usedb) Cooking time, power level is not suitablec) Food is not turned or stirred | a) Use microwave-safe cookware onlyb) Use correct cooking time, power levelc) Turn or stir food |
LIMITED WARRANTY
SWG Canada warrants that this appliance shall be free from defects in material and workmanship for:
- one year on parts and labour with proof of purchase
- 7 years on the Magnetron, labour not included after the initial one year.
During the ‘in-warranty’ period, defective products will be repaired or replaced at the discretion of the retailer and/or SWG Canada. This warranty covers normal domestic usage and does not cover damage which occurs in shipment or failure which results from alteration, accident, misuse, abuse, glass breakage, neglect, commercial use or improper maintenance.
A defective product should be returned to the original place of purchase within the retailer's stipulated return/exchange period*. If you are unable to have a defective product replaced under warranty by the retailer, please check our website at "www.salton.com" for the service centre nearest you. You may contact us for assistance by mail, e-mail, fax or telephone as listed below.
To ensure prompt 'in-warranty' service, securely package and return the product to us prepaid. Be sure to include the original proof of purchase and a description of the defect, along with your address and postal code.
For repairs not covered by the warranty, please contact us for assistance.
SWG CANADA
Division of Salton Appliances (1985) Corp.
Customer Service Department
81A Brunswick,
Dollard-des-Ormeaux,
Quebec, Canada H9B 2J5
website: www.salton.com
E-mail: service@salton.com
Fax: 514-685-8300
Tel: 514-685-3660 Ext. 226
* Return/exchange policies at each retailer vary and may differ from the SWG Canada 1 year limited warranty period.