WC-2059 - Wine cellar Salton - Free user manual and instructions
Find the device manual for free WC-2059 Salton in PDF.

User questions about WC-2059 Salton
0 question about this device. Answer the ones you know or ask your own.
Ask a new question about this device
Download the instructions for your Wine cellar in PDF format for free! Find your manual WC-2059 - Salton and take your electronic device back in hand. On this page are published all the documents necessary for the use of your device. WC-2059 by Salton.
USER MANUAL WC-2059 Salton
natural_image
Exterior view of a stainless steel refrigerator with open door and internal shelves (no visible text or symbols)Instruction Booklet
Model: WC-2059
IMPORTANT SAFEGUARDS
When using an electrical appliance, basic precautions should always be followed to reduce the risk of fire, electric shock and injury to persons, including the following:
- Read all instructions. Use this appliance only as described in this manual.
Other uses not recommended may cause fire, electric shock or personal injury. - To protect against electrical hazards, do not immerse cord, plugs, or the appliance in water or other liquid.
- This unit is designed to be freestanding only. Do not recess into cabinets.
Follow the instruction in the Installation section. - It is recommended that a separate circuit, serving only this unit be provided.
Use receptacles that cannot be turned off by a switch or pull chain. - Unplug from outlet when not in use, before moving, servicing or cleaning.
- To unplug from the outlet, grip the plug and pull it from the wall outlet. Never pull by the cord.
- Do not operate any appliance with a damaged cord or plug or after the appliance malfunctions, or has been damaged in any manner. Return appliance to SWG Canada for examination, repair or adjustment. See Warranty.
- The use of attachments not recommended by the manufacturer may be hazardous.
- Close supervision is necessary when any appliance is used by or near children.
- Do not operate the appliance in the presence of explosives and/or flammable fumes.
- Do not place the appliance or any of its parts near an open flame, cooking or other heating appliance.
- Place the unit on a dry level surface. Follow the instructions in the Installation section.
- Do not place heavy objects on top of the unit.
- Empty contents before moving the unit.
- Never clean appliance parts with flammable fluids. The fumes can create a fire hazard or explosion. Do not store or use gasoline or other flammable vapors and liquids in the vicinity of this or any other appliance. The fumes can create a fire hazard or explosion.
16. CAUTION: Risk of child entrapment:
Before disposing take off the doors. Leave the shelves so children may not easily climb inside. Never allow children to operate, play with or crawl inside the wine cellar.
SAVE THESE INSTRUCTIONS
HOUSEHOLD USE ONLY
GROUNDED PLUG
To reduce the risk of electric shock this appliance has a grounded plug (2 blades and 1 pin). If the plug does not fit fully into the electrical outlet contact a qualified electrician. DO NOT modify the plug in any way or use an adaptor.
INTRODUCTION
Your new wine cellar has no compressor and as such is environmentally friendly, needing no special disposal precautions other than those listed in the Safeguards section of this manual.
Cooling is done using thermoelectric circuits. This uses the ambient air around the unit which is cooled when drawn in. The warm air is exhausted through the vents. Thermoelectric wine cellars create less noise and vibration than compressor units. The minimized vibration will prevent bubbles from forming in stored wine, which helps to maintain its quality. These units offer a high level of reliability, lower maintenance, more accurate temperature control and an environmentally friendly operation as no CFC's or HCFC type refrigerants are used in the cooling process.
BOTTLE STORAGE
Many bottles may differ in size and dimensions. As such the actual number of bottles you may be able to store may vary.
DESCRIPTION OF PARTS
- Removable Shelves
- Leveling Legs (4)
- Water Tray (not shown)
- Wine Racks
- Control Panel
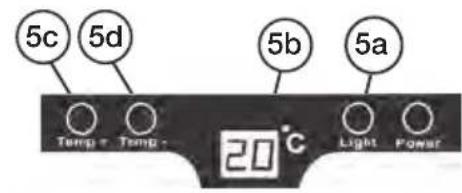
a. Interior Light Button
b. LED Display
c. Raise Temperature Button
d. Lower Temperature Button
text_image
5c 5d 5b 5a Temp - Temp - 20°C Light Power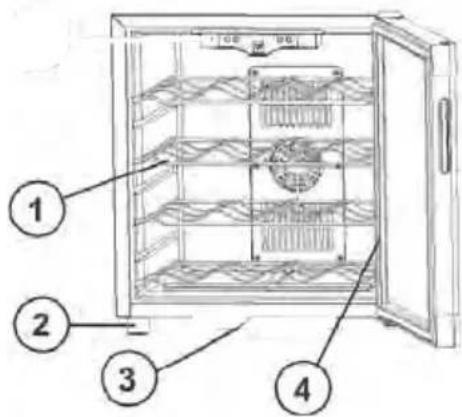
text_image
Diagram of an oven with numbered parts for identificationINSTALLATION
- The unit is designed to be free standing only, it should not be recessed or built-in.
-
Ensure that your wine cooler works at the maximum efficiency, follow the recommended clearances below:
-
sides 2" (50 mm)
- top 2" (50 mm)
-
back 2" (50 mm)
-
Place the Wine Cellar on a flat level surface that is strong enough to support it when fully loaded. Do no place the unit in direct sunlight and sources of heat (stove, heater, radiator, etc.).
- DO NOT place next to any appliance that emits large amount of heat, such as a dishwasher, microwave, oven, toaster, etc. or in direct sunlight. Direct sunlight may affect the acrylic coating and heat sources may increase electrical consumption.
- Extreme cold ambient temperatures may also cause the appliance not to perform properly.
- To help with door closure, position leveling legs with a 1/8" (3 mm) tilt to the back. Adjust the leveling legs by turning clockwise to raise and counterclockwise to lower.
- Install the legs by screwing in the legs into the preset screw holes. (Please note that the leg which stands on the hinge is the shorter leg.)
- Gently slide the racks into the unit.
HOW TO USE
- The Wine Cellar has an electronic Temperature Control and can be set from 4^ C to 22^ C. The default setting is 10^ C.
- Plug the unit into the wall outlet. The LED will display the internal cavity temperature.
- To increase the temperature, press the (Temp+) Temperature Button. To lower the temperature, press the (Temp-) Temperature Button. The display will increase or decrease in 1° increments when pressing the 'Temp-' or 'Temp+' buttons.
- The actual internal temperature in a thermoelectric unit is dependant on the ambient room temperature. If the ambient temperature is below the set temperature of the unit, it will not operate until the ambient temperature increases to that above the set temperature.
- For this model when the ambient temperature is 25^ C, the lowest temperature that can be reached is 10^ C. When ambient temperature is 18^ C, the cabinet temperature can reach approximately 4^ C.
- Your wine cellar also has a light. The Light Switch on the control panel will activate the light manually. Under normal operation it is best for the light to remain off.
INSTALLING THE WATER TRAY
The purpose of the water tray is to receive the condensed water drained from the Wine Cooler cavity. The collected water will evaporate so there is no need to remove the water manually.
To install the Water Tray, simply slide the water tray along the track which is located beneath the Wine Cooler Cavity. The Water Tray should slide in and out from the back of the Wine Cooler.
CARE AND CLEANING
- Always unplug the unit from the wall outlet before cleaning.
- Empty the cavity.
- Wash the Wine Racks in mild soap and water. Rinse and dry.
- Wash the inside cavity with a warm water and baking soda solution. Mix approximately 2 tbsp. (30 ml) of baking soda with 1 quart (litre) of water.
- The outside of the Wine Cellar can be wiped with a damp cloth. Dry.
NOTE: Use caution when wiping over the Control Panel area so that water does not enter the controls. - DO NOT use any abrasive cleaning products on the inside or outside of the Wine Cellar.
CAUTION: Failure to unplug the appliance could result in electrical shock or personal injury.
POWER INTERRUPTIONS
Occasionally there may be power interruptions due to thunderstorms or other causes. Remove the power cord from AC outlet when a power outage occurs. When power has been restored, replug power cord to AC outlet.
Vacations
- Short vacations: Leave the appliance operating during vacations of less than three weeks.
- Long vacations: If the appliance will not be used for over 3 weeks, remove all items and unplug the power cord. Clean and dry the interior thoroughly. To prevent odor and mold growth, leave the door open slightly: blocking it open if necessary.
Moving your Wine Cellar
- Remove all contents and store properly.
- If anything is left inside the unit, securely tape down all loose items.
- Turn the leveling screws up to the base to avoid damage.
- Tape the doors shut.
- Be sure the appliance stays secure in the upright position during transportation. Also protect the outside of appliance with a blanket, or similar item.
TROUBLESHOOTING GUIDE
| PROBLEM POSSIBLE CAUSE | |
| Wine Cellar does not operate | Check if Wine Cellar is plugged in.Check if there is power at the AC outlet by checking the circuit breakerEnsure that the outlet is not controlled by a wall switch. |
| Vibrations • Check to assure that the appliance is level. | |
| The door will not close properly • The appliance is not level.The gasket is dirty.The shelves are out of position. | |
| Fan always runs • The lower the temperature setting the longer the fan will run.This is normal to maintain constant temperature during high temperature and humid days.Doors may have been opened frequently or for an extended period of time.Check gasket for proper seal. | |
| Appliance is too warm. • Check the temperature control setting.External environment temperature is to high. The Wine Cellar may require a higher setting.The door is opened too often.The door is not closed completely.The door gasket does not seal properly. | |
| Appliance is too cold • Adjust the temperature to a warmer setting. | |
| Turns on and off frequently • The room temperature is hotter than normal.The door is opened too often.The door is not closed completely.The temperature control is not set correctly.The door gasket does not seal properly. | |
| The light does not work | Not plugged in.The circuit breaker tripped or a blown fuse.The bulb has burned out.The switch is in the “OFF” position. |
Use an exclusive wall outlet. Do not connect your refrigerator to extension cords or together with any other appliance in the same wall outlet. If the power cord is too short, have a qualified electrician or service technician install an outlet near the appliance.
LIMITED WARRANTY
SWG Canada warrants that this appliance shall be free from defects in material and workmanship for a period of one year from the date of purchase. During this 'in-warranty' period, defective products will be repaired or replaced at the discretion of the retailer and/or SWG Canada. This warranty covers normal domestic usage and does not cover damage which occurs in shipment or failure which results from alteration, accident, misuse, abuse, glass breakage, neglect, commercial use or improper maintenance.
A defective product should be returned to the original place of purchase within the retailer's stipulated return/exchange period*. If you are unable to have a defective product replaced under warranty by the retailer, please check our website at "www.salton.com" for the service centre nearest you. You may also contact us for assistance by mail, e-mail, fax or telephone as listed below.
To ensure prompt 'in-warranty' service securely package and return the product to us prepaid. Be sure to include the original proof of purchase and a description of the defect along with your address and postal code.
For repairs not covered by the warranty, please contact us for assistance.
salton®
SWG CANADA
Customer Service Department
81A Brunswick
Dollard-des-Ormeaux
Quebec, Canada H9B 2J5
Website: www.salton.com
E-mail: service@salton.com
Fax: 514-685-8300
Tel: 514-685-3660
* Return/exchange policies at each retailer vary and may differ from the SWG Canada 1 year limited warranty period.