HG28AB670BW - TV SAMSUNG - Free user manual and instructions
Find the device manual for free HG28AB670BW SAMSUNG in PDF.

User questions about HG28AB670BW SAMSUNG
0 question about this device. Answer the ones you know or ask your own.
Ask a new question about this device
Download the instructions for your TV in PDF format for free! Find your manual HG28AB670BW - SAMSUNG and take your electronic device back in hand. On this page are published all the documents necessary for the use of your device. HG28AB670BW by SAMSUNG.
USER MANUAL HG28AB670BW SAMSUNG
Thank you for purchasing this Samsung product. To receive more complete service, please register your product at
www.samsung.com/register
Model ____ Serial No. ____
Figures and illustrations in this User Manual are provided for reference only and may differ from actual product appearance. Product design and specifications may be changed without notice.
Instruction
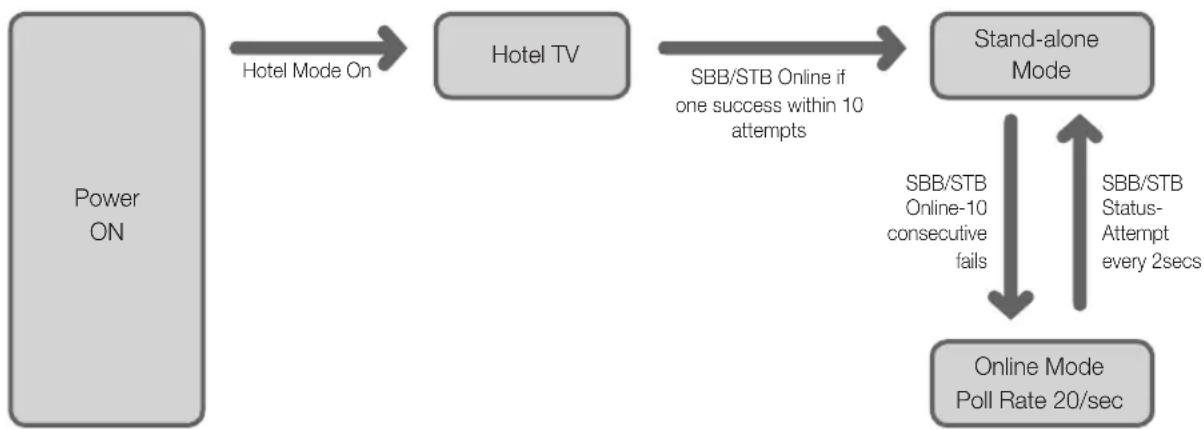
This TV is provided with interactive functionality through a set-back box (SBB/STB) connected to the TV, and with other TVs in a computer-controlled system for hotels and other hospitality businesses.
Interactive : When the TV is powered-up initially, it sends a command to identify the SBB/STB; if identified, theTV switches to ONLINE mode and full control is through the SBB/STB.
If the TV is in ONLINE mode, it stops receiving IR(Samsung remote) commands and acts according to interface protocol.
Stand-Alone: If SBB/STB is not identified, the TV should be switched to STAND-ALONE mode with restricted operation.
Operational Modes
When this TV (in Hotel mode) is operated with a SBB/STB, it is in one of two states:
- ONLINE or STAND-ALONE. In the STAND-ALONE state, the TV will act as a Hotel TV, but without active communication. This is to prevent guests from trying to cheat the system by disconnecting the SBB/STB.
flowchart
graph TD
    A["Power ON"] -->|Hotel Mode On| B["Hotel TV"]
    B -->|SBB/STB Online if one success within 10 attempts| C["Stand-alone Mode"]
    C -->|SBB/STB Online-10 consecutive fails| D["Online Mode Poll Rate 20/sec"]
    C -->|SBB/STB Status-Attempt every 2secs| D
To set the details for Stand-alone or interactive mode, refer to pages 19-22 (Setting the hotel option data: Stand-alone mode and Interactive mode)
• Some operations may be restricted to prevents guests from "cheating" the TV system.
• No main menu (Interactive mode) or Channel Menu, Plug & Play in Main Menu (Stand-Alone mode)
• Limited Volume and Panel key lock or unlock
Still image warning
Avoid displaying still images (like jpeg picture files) or still image element (like TV Program logo, panorama or 4:3 image format, stock or news bar at screen bottom etc.) on the screen. Constant displaying of still picture can cause uneven wear of screen phosphor, which will affect image quality. To reduce risk of this effect, please follow below recommendations:
- Avoid displaying the same TV channel for long periods.
• Always try do display any image on full screen, use TV set picture format menu for best possible match. - Reduce brightness and contrast values to minimum required to achieve desired picture quality, exceeded values may speed up the burnout process.
• Frequently use all TV features designed to reduce image retention and screen burnout Refer to the relevant user manual section for details.
Securing the Installation Space
Keep the required distances between the product and other objects (e.g. walls) to ensure proper ventilation.
Failing to do so may result in fire or a problem with the product due to an increase in the internal temperature.
When using a stand or wall-mount, use parts provided by Samsung Electronics only.
Using parts provided by another manufacturer, it may result in a problem with the product or injuries due to the product falling.
The appearance may differ, depending on the product.
Installation with a stand. Installation with a wall-mount.

text_image
10 cm 10 cm10 cm 10 cm 10 cm10 cmContents
- Instruction....2
- Operational Modes ...... 2
- Still image warning....2
• Securing the Installation Space .... 2 - Accessories .... 4
- Viewing the Connection Panel....8
• TV Controller 12
• Viewing the Remote Control....13 - Connecting the TV with SBB....14
- Connecting the Bathroom Speakers .... 15
- Connecting the MediaHub HD 17
- Connecting the RJP (Remote Jack Pack)....18
- Setting the Hotel Option Data ....20
- Installing the Wall Mount .... 54
• Securing the TV to the Wall....55 - Anti-theft Kensington Lock....55
- Specifications .... 56
Accessories
The provided accessories may vary depending on the model.
• Remote Control & Batteries (AAA x 2)
• Power Cord / Data Cable
- Quick Set up Guide
• Safety Guide (Not available in all locations)
The stand and stand screw may not be included, depending on the model.
The Data Cable may not be included, depending on the SI Vendor.
 | Correct Disposal of This Product (Waste Electrical & Electronic Equipment)(Applicable in the European Union and other European countries with separate collection systems)This marking on the product, accessories or literature indicates that the product and its electronic accessories (e.g. charger, headset, USB cable) should not be disposed of with other household waste at the end of their working life. To prevent possible harm to the environment or human health from uncontrolled waste disposal, please separate these items from other types of waste and recycle them responsibly to promote the sustainable reuse of material resources. Household users should contact either the retailer where they purchased this product, or their local government office, for details of where and how they can take these items for environmentally safe recycling. Business users should contact their supplier and check the terms and conditions of the purchase contract. This product and its electronic accessories should not be mixed with other commercial wastes for disposal. |
 | Correct disposal of batteries in this product(Applicable in the European Union and other European countries with separate battery return systems.)This marking on the battery, manual or packaging indicates that the batteries in this product should not be disposed of with other household waste at the end of their working life. Where marked, the chemical symbols Hg, Cd or Pb indicate that the battery contains mercury, cadmium or lead above the reference levels in EC Directive 2006/66. If batteries are not properly disposed of, these substances can cause harm to human health or the environment. To protect natural resources and to promote material reuse, please separate batteries from other types of waste and recycle them through your local, free battery return system. |
Installing the LED TV Stand
Stand Components
When installing the stand, use the provided components and parts.
Depending on the model.
A

or

B

or

C

(M4 X L12)
28 - 32inches : x7
39 \~ 46inches : x8
1
2

text_image
C x4 (M4 x L12) A B Front Rear Top View ATTENTION DO NOT USE CHEMICALS DO NOT USE GREASE DO NOT USE OIL
natural_image
Technical diagram showing mechanical assembly with no visible text or symbols3

natural_image
Pure mechanical diagram showing a shaft and housing assembly without any text, numbers, or symbols
natural_image
Pure technical line drawing of a mechanical joint or bracket (no text or symbols)HG28AB670 HG32AB670

text_image
(M4 X L12) x3HG32AB460 HG39AB460 HG40AB670 HG46AB670

text_image
C x4 (M4 X L12)Make sure to distinguish between the front and back of the Stand and the Stand Guide when assembling them.
Make sure that at least two people lift and move the TV.
Assembling the swivel
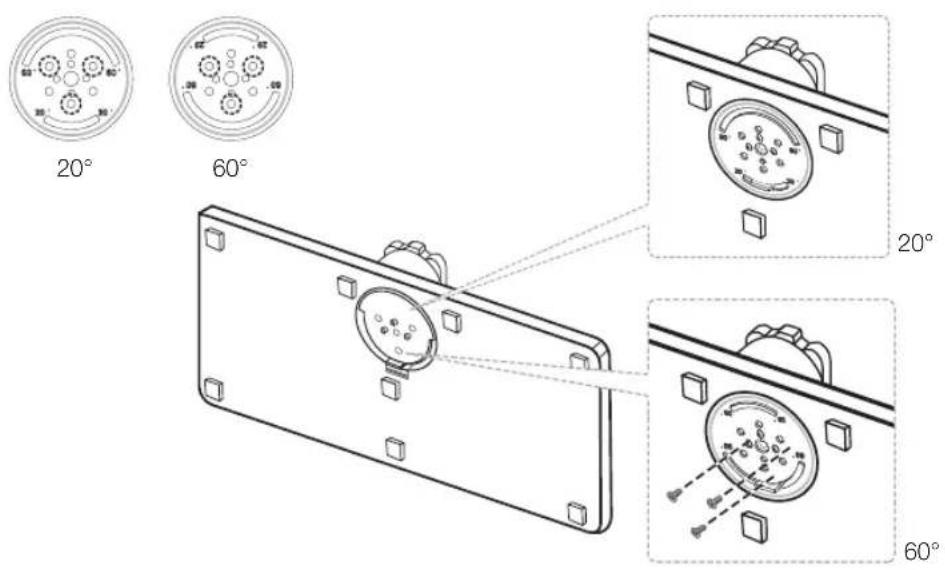
⚠ WARNING: To assemble the swivel, this apparatus must be securely attached to the floor/table in accordance with the installation instructions.
The TV stand more than 32inch supports the swivel function. The swivel angle support all of 20^ , 60^ and 90^ and you can change the swivel angle by using BRACKET HOLDER SWIVEL. Support the swivel models : HG32AB670, HG40AB670, HG46AB670
20^ 60^ swivel
If you assemble the wedge on the bottom of the stand to the hole of BRACKET HOLDER SWIVEL where 20^ or 60^ is marked, the swivel angle becomes each 20^ 60^ in the left and right side.
text_image
20° 60° 20° 60°90° swivel
If you assemble only screws after you remove BRACKET HOLDER SWIVEL, the swivel angle becomes each 90° in the left and right side.

natural_image
Technical line drawing of two mechanical components with circular features and mounting holes, shown from different angles (no text or symbols)Viewing the Connection Panel
HG32AB670**
HG40AB670**
HG46AB670**

text_image
Power Input 1 2 3 4 5 6 7 8 9 10 11 12 COMPUTER USB/USB USB/USB USB/USB USB/USB USB/USB USB/USB USB/USB USB/USB USB/USB USB/USB USB/USB USB/USB USB/USB USB/USBHG32AB670BJXXZ
HG40AB670FJXXZ
HG46AB670FJXXZ

text_image
Power Input 1 2 3 4 5 6 7 8 9 10 11 12 13 14 15 16 17 18 19 20 21 22 23 24 25 26 27 28 29 30 31 32 33 34 35 36 37 38 39 40 41 42 43 44 45 46 47 48 49 50 51 52 53 54 55 56 57 58 59 60 61 62 63 64 65 66 67 68 69 70 71 72 73 74 75 76 77 78 79 80HG28AB670**
HG32AB670**
HG40AB670**
HG46AB670**
text_image
Power Input 1 2 3 4 5 6 Control Panel Control Control Control Control Control Control Control Control Control Control Control Control Control Control Control Control Control Control Control Control Control Control Control Control Control Control Control Control Control Control Control Control Control Control Control Control Control Control Control Control Control Control Control Control Control Control Control Control Control Control Power InputHG32AB460**
HG39AB460**
text_image
Power Input ④ ③ ⑤ ⑬ COMPENSER DATA ⑮ ⑯Whenever you connect an external device to your TV, make sure that power on the unit is turned off.
When connecting an external device, match the colour of the connection terminal to the cable.
① HDMI IN 1, 2(DVI), 3(ARC): Connects to the HDMI jack of a device with an HDMI output.
No sound connection is needed for an HDMI - HDMI connection.
Use the HDMI IN 2(DVI) jack for DVI connection to an external device. Use a DVI to HDMI cable or DVI-HDMI adapter (DVI to HDMI) for video connection and the PC/DVI AUDIO IN jacks for audio.
② HEADPHONE JACK
- Headphones may be connected to the headphone jack on your TV. While the headphones are connected, the sound from the built-in speakers is disabled.
3 HP-ID
- Connect the cable to HP-ID and Headphone Jack simultaneously and connect it to separated Headphone Box. When connecting Headphone to Headphone Box, it works same as Headphone function.
4 RJP: This port is an RJP (Remote Jack Pack) communication port that enables connecting different devices to additional modules to improve device use convenience.
5 DOOR-EYE
6 COMPONENT IN / AV IN / AV IN 1, AV IN 2
- Connects Component video / audio.
- Connect component video cables (optional) to the component jacks ("P_H", "P_B", "Y") on the rear of your TV and the other ends to corresponding component video out jacks on the DVD.
- If you wish to connect both the Set-Top Box and DVD, you should connect the Set-Top Box to the DVD and connect the DVD to the component jacks ("P\_R\", "P\_B\", "Y") on your TV.
- The P_R , P_B and Y jacks on your component devices (DVD) are sometimes labeled Y, B-Y and R-Y or Y, Cb and Cr.
- Connect RCA audio cables (optional) to [R - AUDIO - L] on the rear of the TV set and the other ends to corresponding audio out jacks on the DVD.
Display Modes
Both screen position and size vary depending on the type of monitor and its resolution.
The resolutions in the table are recommended. The supported resolution may differ depending on the model.
Optimal resolution is 1366 X 768 @ 60 Hz. (HD Model)
| Mode Resolution | Horizontal Frequency (KHz) | Vertical Frequency (Hz) | Pixel Clock Frequency (MHz) | Sync Polarity (H / V) | |
| IBM 720 x 400 | 31,469 70,087 28,322 -/+ | ||||
| MAC | 640 x 480 | 35,000 | 66,667 | 30,240 | -/- |
| 832 x 624 | 49,726 | 74,551 | 57,284 | -/- | |
| 1152 x 870 | 68,681 | 75,062 | 100,000 | -/- | |
| VESA CVT | 640 x 480 | 31,469 | 59,940 | 25,175 | -/- |
| 640 x 480 | 37,861 | 72,809 | 31,500 | -/- | |
| 640 x 480 | 37,500 | 75,000 | 31,500 | -/- | |
| 800 x 600 | 37,879 | 60,317 | 40,000 | +/+ | |
| 800 x 600 | 48,077 | 72,188 | 50,000 | +/+ | |
| 800 x 600 | 46,875 | 75,000 | 49,500 | +/+ | |
| 1024 x 768 | 48,363 | 60,004 | 65,000 | -/- | |
| 1024 x 768 | 56,476 | 70,069 | 75,000 | -/- | |
| 1024 x 768 | 60,023 | 75,029 | 78,750 | +/+ | |
| 1152 x 864 | 67,500 | 75,000 | 108,000 | +/+ | |
| 1280 x 720 | 45,000 | 60,000 | 74,250 | +/+ | |
| 1280 x 800 | 49,702 | 59,810 | 83,500 | -/+ | |
| 1280 x 1024 | 63,981 | 60,020 | 108,000 | +/+ | |
| 1280 x 1024 | 79,976 | 75,025 | 135,000 | +/+ | |
| 1366 x 768 | 47,712 | 59,790 | 85,500 | +/+ | |
Optimal resolution is 1920 X 1080 @ 60 Hz. (FHD Model)
| Mode Resolution | Horizontal Frequency (KHz) | Vertical Frequency (Hz) | Pixel Clock Frequency (MHz) | Sync Polarity (H / V) | |
| IBM 720 x 400 31,469 70,087 28,322 -/+ | |||||
| MAC | 640 x 480 | 35,000 | 66,667 | 30,240 | -/- |
| 832 x 624 | 49,726 | 74,551 | 57,284 | -/- | |
| 1152 x 870 | 68,681 | 75,062 | 100,000 | -/- | |
| VESA CVT | 720 x 576 | 35,910 | 59,950 | 32,750 | -/+ |
| 1152 x 864 | 53,783 | 59,959 | 81,750 | -/+ | |
| 1280 x 720 | 56,456 | 74,777 | 95,750 | -/+ | |
| 1280 x 960 | 75,231 | 74,857 | 130,000 | -/+ | |
| VESA DMT | 640 x 480 | 31,469 | 59,940 | 25,175 | -/- |
| 640 x 480 | 37,861 | 72,809 | 31,500 | -/- | |
| 640 x 480 | 37,500 | 75,000 | 31,500 | -/- | |
| 800 x 600 | 37,879 | 60,317 | 40,000 | +/+ | |
| 800 x 600 | 48,077 | 72,188 | 50,000 | +/+ | |
| 800 x 600 | 46,875 | 75,000 | 49,500 | +/+ | |
| 1024 x 768 | 48,353 | 60,004 | 65,000 | -/- | |
| 1024 x 768 | 56,476 | 70,069 | 75,000 | -/- | |
| 1024 x 768 | 60,023 | 75,029 | 78,750 | +/+ | |
| 1152 x 864 | 67,500 | 75,000 | 108,000 | +/+ | |
| 1280 x 1024 | 63,981 | 60,020 | 108,000 | +/+ | |
| 1280 x 1024 | 79,976 | 75,025 | 135,000 | +/+ | |
| 1280 x 720 | 45,000 | 60,000 | 74,250 | +/+ | |
| 1280 x 800 | 49,702 | 59,810 | 83,500 | -/+ | |
| 1280 x 800 | 62,795 | 74,934 | 106,500 | -/+ | |
| 1280 x 960 | 90,000 | 60,000 | 108,000 | +/+ | |
| 1366 x 768 | 47,712 | 60,015 | 85,500 | +/+ | |
| 1440 x 900 | 55,935 | 59,887 | 106,500 | -/+ | |
| 1440 x 900 | 70,635 | 74,984 | 136,750 | -/+ | |
| 1680 x 1050 | 65,290 | 59,954 | 146,250 | -/+ | |
| VESA GTF | 1280 x 720 | 52,500 | 70,000 | 89,040 | -/+ |
| 1280 x 1024 | 74,620 | 70,000 | 128,943 | -/- | |
| VESA DMT / DTV CEA 1920 x 1080p 67,500 60,000 148,500 +/+ | |||||
When using an HDMI/DVI cable connection, you must use the HDMI IN (DVI) jack.
The interlace mode is not supported.
The set might operate abnormally if a non-standard video format is selected.
Separate and Composite modes are supported. SOG is not supported.
7 VOL-CTRL: Used to control the volume of the Bathroom speaker. Connect the Bathroom Wall Box and the VOL-CTRL port.
8 VARIABLE AUDIO OUT: Used for the audio output to the Bathroom speaker. Connect the Bathroom Wall Box and the Variable port.
9 PC IN: Connect to the video output jack on your computer.
10 PC/DVI AUDIO IN: Connect to the audio output jack on your computer. (4 series does not support the DVI Audio in)
f1 DIGITAL AUDIO OUT (OPTICAL): Connects to a Digital Audio component.
12 DATA
– Used to support data communication between the TV and the SBB.
- The TV jack type is RJ-12.
13 CLOCK
- Set the time after connecting the cable of External Clock to Clock jack. You can use the External Clock Display function.
14 USB (5V 0.5A) / CLONING
- Connector for software upgrades and Media Play, etc.
- Service connection.
15 ANT IN (AIR/CABLE): To view television channels correctly, a signal must be received by the set from one of the following sources: An outdoor antenna; A cable television network;
Caution of the cover-jack
CAUTION
The cover-jack is for use by qualified service personnel only.
To reduce the risk of electric shock or fire hazard, do not use the cover jack, unless you are qualified to do so.
text_image
TV Rear Panel Cover-jackThe rear panel may differ depending on the model.
TV Controller
TV Controller is a multi directional button that helps navigate without using the remote control.

e functions which require a PIN code may not be available.

product colour and shape may vary, depending on the model.

the menu when pressing the controller for more than 1 second.

In selecting the function by moving the controller to the up/down/left/right directions, do not to press the controller. If the controller is first, you cannot operate it to move the up/down/left/right directions.
flowchart
graph TD
    A["Left"] --> B["Down (Front)"]
    B --> C["Right"]
    C --> D["Up (Rear)"]
    D --> E["TV Controller"]
    E --> F["Function menu"]
    F --> G["Selecting the Media Play"]
    G --> H["Selecting a Source"]
    H --> I["Power off"]
    I --> J["Return"]
    J --> K["Remote control sensor"]
    K --> L["TV Controller"]
    L --> M["The image is drawn by facing the front side of the TV."]
Power on Turns the TV on by pressing the controller in standby mode.
Adjusting the volume
Adjusts the volume by moving the controller from side to side when the power is on.
Selecting a channel
Selects a channel by moving the controller up and down when the power is on.
Using the function menu
Press the controller when the power is on and the function menu appears. If you press it again, the function menu screen disappears.
Using the Menu
Selects the MENU(☐) by moving the controller in the function menu screen. The OSD(On Screen Display) of your TV's feature appears.
Selecting the Source Selects the Source(
☐) by moving the controller in the function menu screen. The Source list
screen appears.
Power Off
Selects the Power Off(⏻) to turn the TV off by moving the controller in the function menu screen.
Standby mode
Do not leave your TV in standby mode for long periods of time such as when on holiday. A small amount of electric power is still consumed even when the power button is turned off. It is best to unplug the power cord.
Viewing the Remote Control
This is a special remote control for the visually impaired and has Braille points on the Power, Channel and Volume buttons.
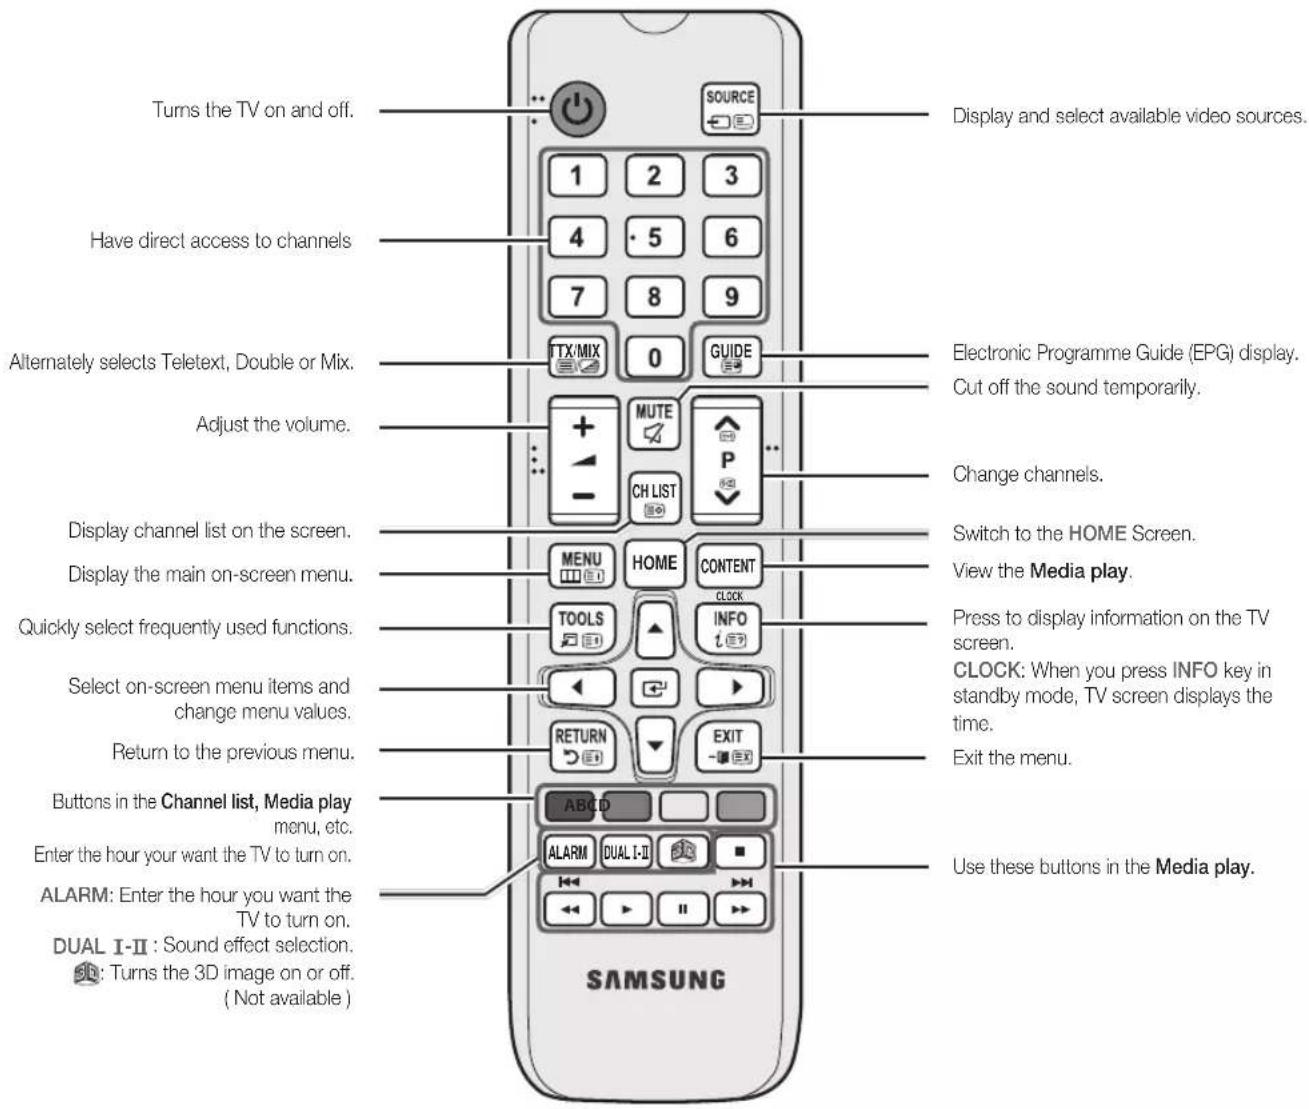
text_image
Turns the TV on and off. Have direct access to channels Alternately selects Teletext, Double or Mix. Adjust the volume. Display channel list on the screen. Display the main on-screen menu. Quickly select frequently used functions. Select on-screen menu items and change menu values. Return to the previous menu. Buttons in the Channel list, Media play menu, etc. Enter the hour your want the TV to turn on. ALARM: Enter the hour you want the TV to turn on. DUAL I-II : Sound effect selection. Turns the 3D image on or off. (Not available ) SOURCE 1 2 3 4 5 6 7 8 9 TX/MIX 0 GUIDE + - MUTE CH LIST P Switch to the HOME Screen. View the Media play. Press to display information on the TV screen. CLOCK: When you press INFO key in standby mode, TV screen displays the time. Exit the menu. ALARM DUAL I-II ABICD SAMSUNG Electronic Programme Guide (EPG) display. Cut off the sound temporarily. Change channels. Switch to the HOME Screen. View the Media play. Use these buttons in the Media play.Installing batteries (Battery size: AAA)
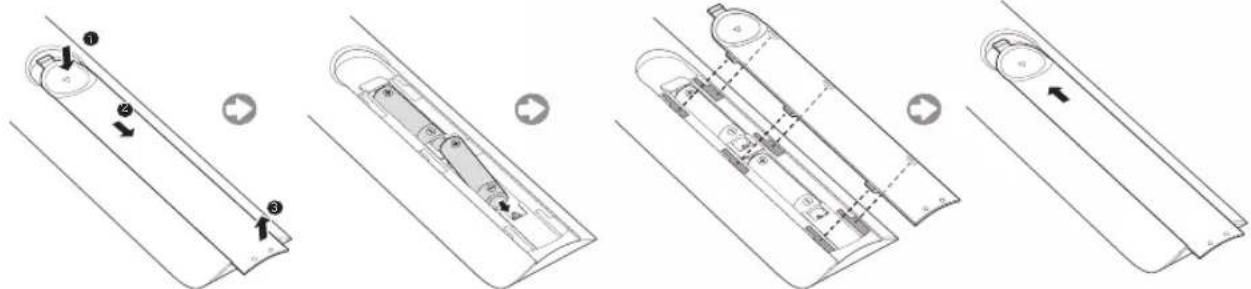
text_image
Technical diagram showing five-step assembly of a remote control panel with labeled components and directional arrowsNOTE
Use the remote control within 23 feet of the TV.
Bright light may affect the performance of the remote control. Avoid using nearby special fluorescent light or neon signs.
The colour and shape may vary depending on the model.
Remote control button 'HOME' & '3D' are not supported. When pressing these buttons, the TV does not respond. TV unit do not give ANY respond.
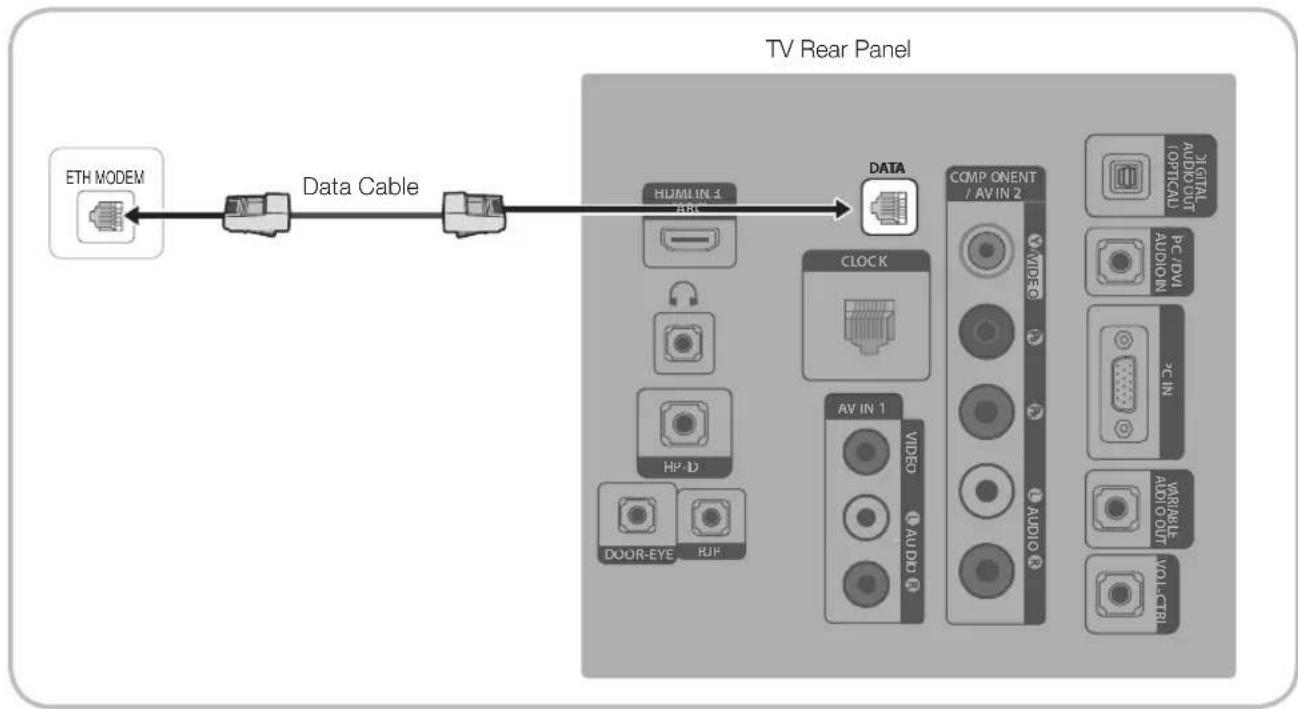
Connecting the TV with SBB
flowchart
graph LR
    A["ETH MODEM"] --> B["Data Cable"]
    B --> C["TV Rear Panel"]
    C --> D["DATA"]
    D --> E["CLOCK"]
    E --> F["AV IN 1"]
    E --> G["VIDEO"]
    E --> H["AUDIO"]
    E --> I["VIDEO"]
    E --> J["VIDEO"]
    E --> K["VIDEO"]
    E --> L["VIDEO"]
    E --> M["VIDEO"]
    E --> N["VIDEO"]
    E --> O["VIDEO"]
    E --> P["VIDEO"]
    E --> Q["VIDEO"]
    E --> R["VIDEO"]
    E --> S["VIDEO"]
    E --> T["VIDEO"]
    E --> U["VIDEO"]
    E --> V["VIDEO"]
    E --> W["VIDEO"]
    E --> X["VIDEO"]
    E --> Y["VIDEO"]
    E --> Z["VIDEO"]
    E --> AA["VIDEO"]
    E --> AB["VIDEO"]
    E --> AC["VIDEO"]
    E --> AD["VIDEO"]
    E --> AE["VIDEO"]
    E --> AF["VIDEO"]
    E --> AG["VIDEO"]
    E --> AH["VIDEO"]
    E --> AI["VIDEO"]
    E --> AJ["VIDEO"]
    E --> AK["VIDEO"]
    E --> AL["VIDEO"]
    E --> AM["VIDEO"]
    E --> AN["VIDEO"]
    E --> AO["VIDEO"]
    E --> AP["VIDEO"]
    E --> AQ["VIDEO"]
    E --> AR["VIDEO"]
    E --> AS["VIDEO"]
    E --> AT["VIDEO"]
    E --> AU["VIDEO"]
    E --> AV["VIDEO"]
    E --> AW["VIDEO"]
    E --> AX["VIDEO"]
    E --> AY["VIDEO"]
    E --> AZ["VIDEO"]
    E --> BA["VIDEO"]
    E --> BB["VIDEO"]
    E --> BC["VIDEO"]
    E --> BD["VIDEO"]
    E --> BE["VIDEO"]
    E --> BF["VIDEO"]
    E --> BG["VIDEO"]
    E --> BH["VIDEO"]
    E --> BI["VIDEO"]
    E --> BJ["VIDEO"]
    E --> BK["VIDEO"]
    E --> BL["VIDEO"]
    E --> BM["VIDEO"]
    E --> BN["VIDEO"]
    E --> BO["VIDEO"]
    E --> BP["VIDEO"]
    E --> BQ["VIDEO"]
    E --> BR["VIDEO"]
    E --> BS["VIDEO"]
    E --> BT["VIDEO"]
    E --> BU["VIDEO"]
    E --> BV["VIDEO"]
    E --> BW["VIDEO"]
    E --> BX["VIDEO"]
    E --> BY["VIDEO"]
    E --> BZ["VIDEO"]
- Connect the DATA jack of the TV to the [ETH MODEM] jack of the STB (SBB) with the Data cable.
Use data communication.
List of Vendors and Compatible Data Cables Supplied with the TV
- Confirm you are using the correct data cable for your vendor. Refer to the code label on the data cables.

text_image
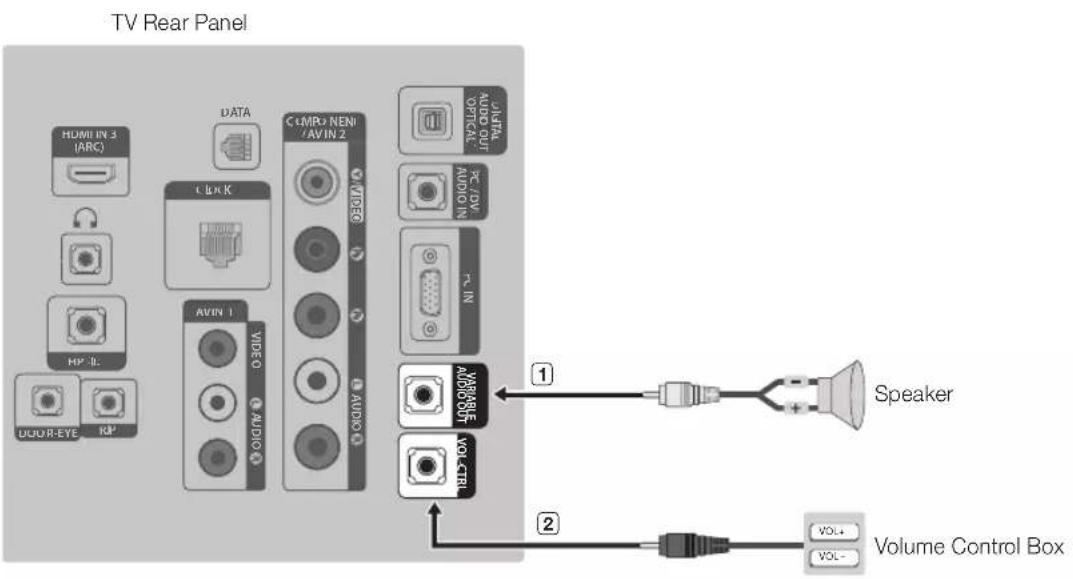
6 1 CON A TV SIDE STB SIDE 1 6 CON BConnecting the Bathroom Speakers
You can connect the Bathroom Speakers using the following method.
Connecting through the Variable Output (available without an external amplifier)
text_image
TV Rear Panel HOMI IN 3 (ARC) DATA C LNK C LMP2 NEN /AVIN 2 AUDIO AVIN 1 VIDEO AUDIO AUDIO AUDIO OUT PC /DV AUDIO IN TV IN WABABLE AUDIO VOL-Ctrl Speaker VOL+ VOL- Volume Control Box- Connect the VARIABLE AUDIO OUT port of the TV to the Bathroom Wall Speakers of the hotel.
text_image
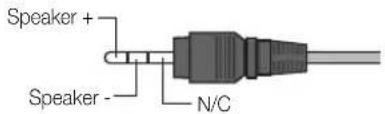
Speaker + Speaker - N/C- Connect the VOL-CTRL jack of the TV to the Volume Control Box Switch port on the Bathroom Wall of the hotel.
The maximum speaker output is 4W, 8Ω.
The VARIABLE AUDIO OUT port supports MONO sound out only.
• Installing the Volume Control
- If you configure the Volume Control Box as shown in the figure, you can control the volume of the bathroom speakers.
- The jack that connects the Volume Control Box to the TV is a 3.5mm normal Phone jack.
- Volume Control Box switch is a Tact switch.
Setting the Sub AMP Mode
- 0: Turns the Sub AMP function off (PWM off).
- 1: Determines the Sub volume according to the main volume control. the sub volume is determined according to the Power On Volume, the Min Volume, and the Max Volume values of Hotel Mode.
- 2: Determines the volume according to the bathroom control panel setting.
• Variable Output Port Specifications
- Speaker Wire: Use speaker cable no more than 82 feet (25m) in length.

text_image
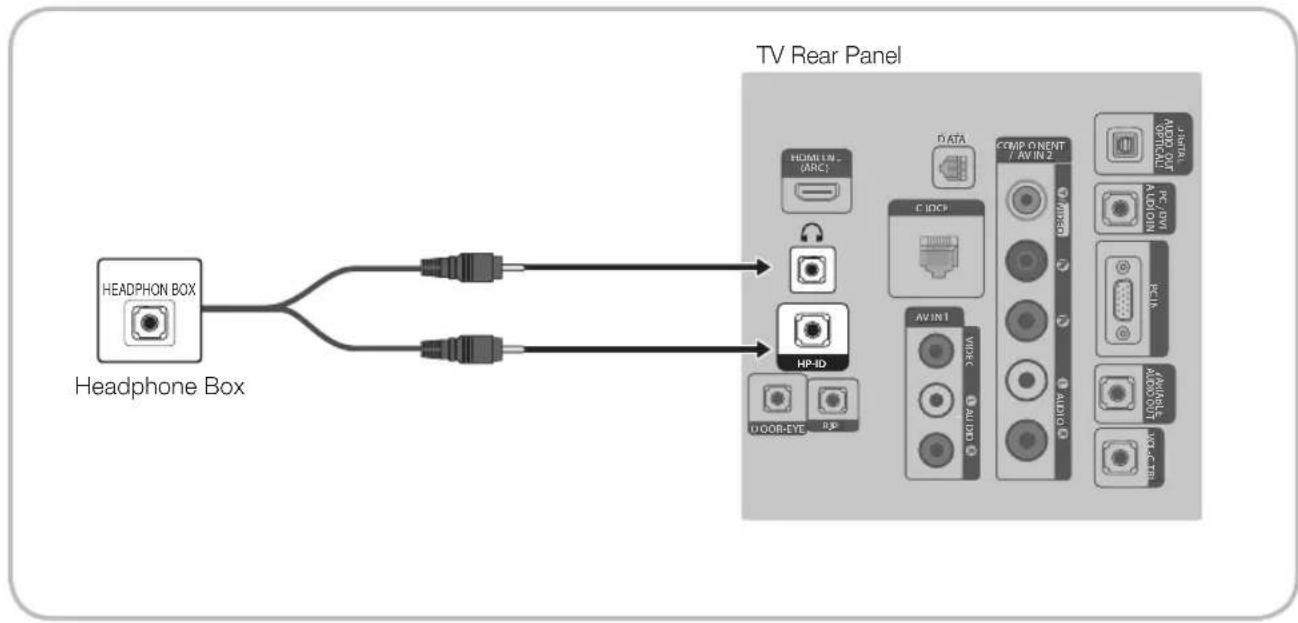
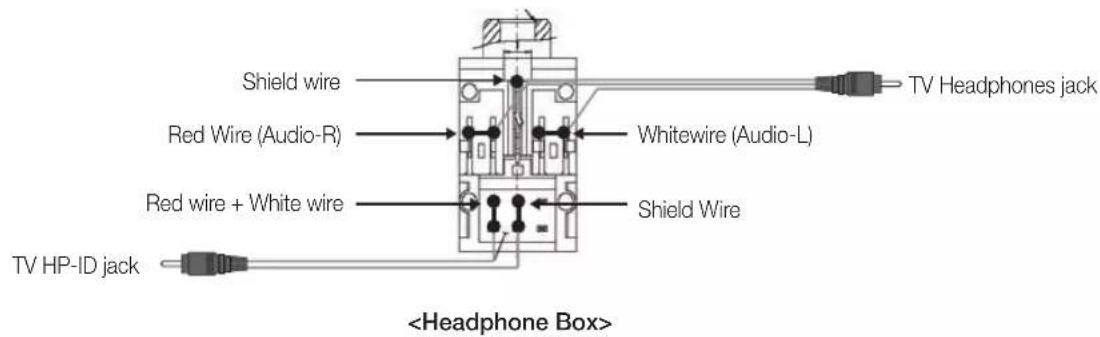
VOL - DOWN ( White ① ) ( Black /Red ② ) ( Shield Wire ③ ) VOL - UP GND Volume Control Box ① ② ③ VOL - VOL +An addition Headphone Box can be installed on a bed or business desk for added convenience. The installation procedures are given below.
• Detailed Drawing of the Headphone Box.
flowchart
graph LR
    A["Headphone Box"] --> B["Headphones"]
    B --> C["HP-ID"]
    B --> D["Door-Eye"]
    C --> E["TV Rear Panel"]
    D --> E
    E --> F["DATA"]
    E --> G["C:DCP"]
    E --> H["AV:IN1"]
    E --> I["VIDE"]
    E --> J["AUDI OUT"]
    E --> K["Audio"]
    E --> L["AV:IN2"]
    E --> M["Audio"]
    E --> N["AV:OUT"]
    E --> O["AV:IN3"]
    E --> P["AV:OUT"]
text_image
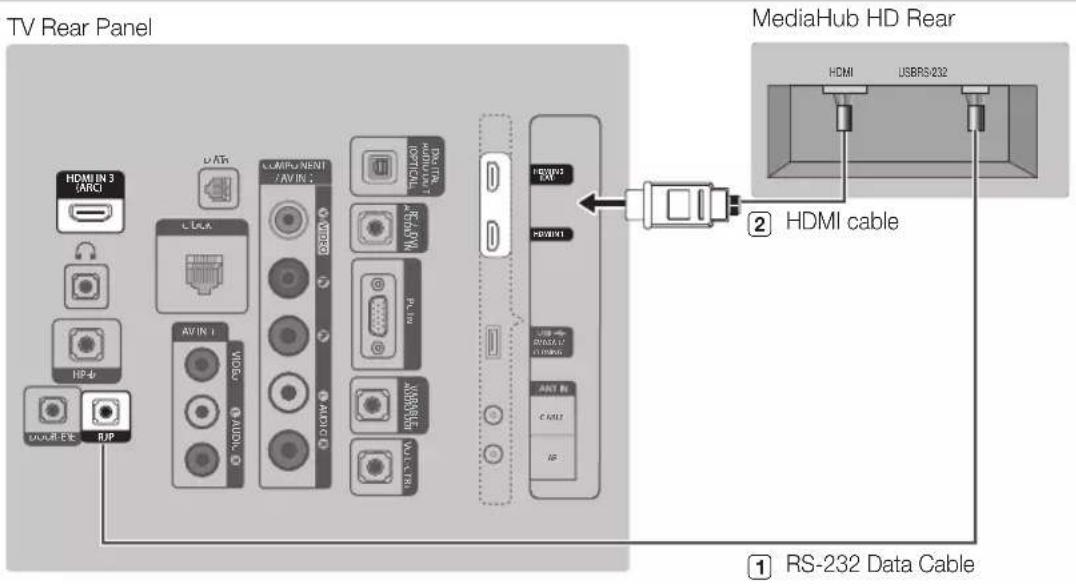
Shield wire Red Wire (Audio-R) Red wire + White wire Shield Wire TV Headphones jack Whitewire (Audio-L) TV HP-ID jackConnecting the MediaHub HD
Output to any external source connected to MediaHub HD on the hotel desk.
text_image
TV Rear Panel HDMI IN 3 (ARC) L LCA AVIN I COMPONENT /AVIN AVIN MAX MAX MAX MAX MAX MAX MAX MAX MAX MAX MAX MediaHub HD Rear HDMI USBRS/232 ② HDMI cable ① RS-232 Data Cable- Connect the RJP port of the TV and the RS/232 port of the MediaHub HD.
- Connect the HDMI IN (1, 2(DVI) or 3 (ARC)) port of the TV and the HDMI port of the MediaHub HD.
- MediaHub HD
- The MediaHub HD is a hardware module that has different Audio Video inputs (A/V, Audio, PC, HDMI and USB) and corresponding outputs. The corresponding output sources connect from MediaHub to the TV. MediaHub communicates with the TV via RS232. Hot Plug & Play is a function that allows hotel guests to connect an external source to the MediaHub. MediaHub communicates with the TV by sending messages regarding Active/Inactive sources. The TV switches to the Active external source.
- You have to connect the HDMI of the MediaHub to the HDMI IN port of the TV.
- When the TV is on, connect the TV and the RJP within 10 seconds.
- Special features
- PIP
- Auto Detection
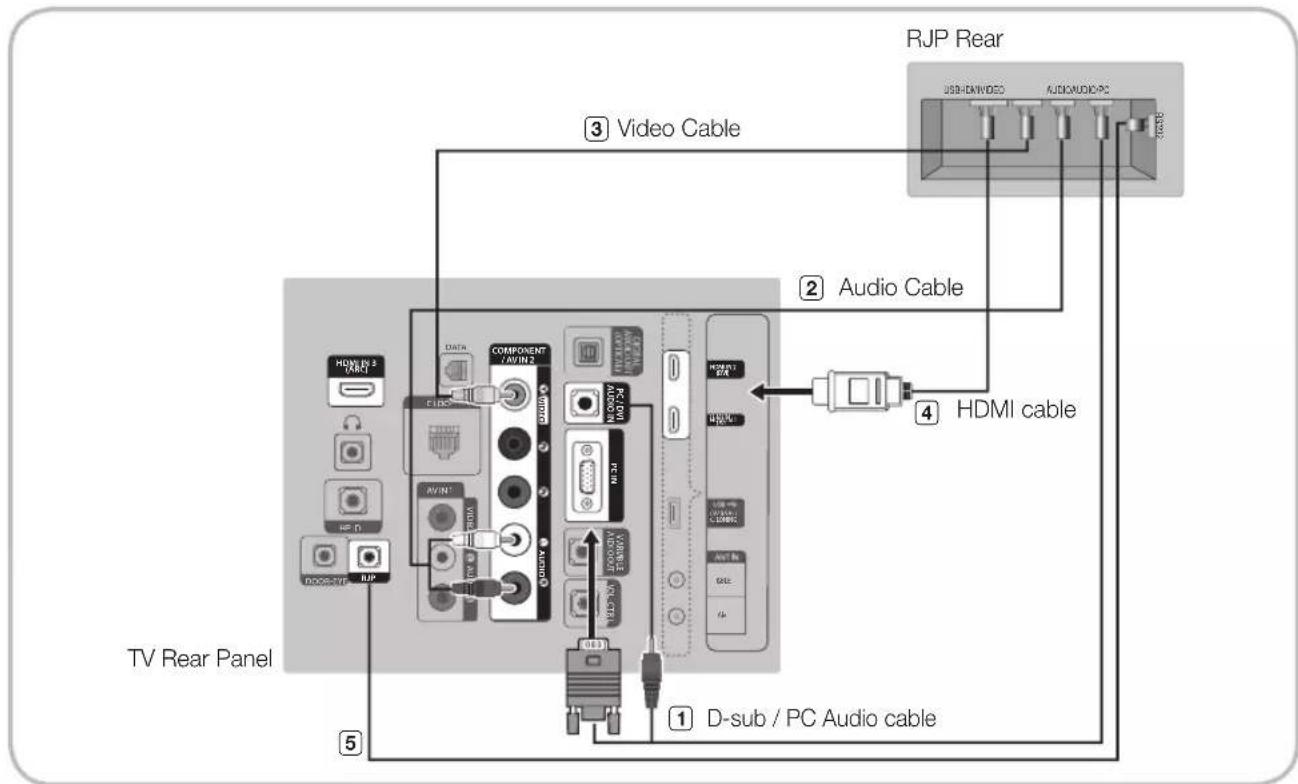
Connecting the RJP (Remote Jack Pack)
Output to any external source connected to RJP on the hotel desk.
text_image
RJP Rear USB-RJWVIDEO AUDIOAUDIO-PC ③ Video Cable ② Audio Cable 4 HDMI cable ① D-sub / PC Audio cable TV Rear Panel ⑤ HDMI 23 (A/R) COMPONENT / AVIN 2 AUDIO AVIN AUDIO AVIN AUDIO AVIN AUDIO AVIN AUDIO AVIN AUDIO AVIN AUDIO AVIN AUDIO AVIN AUDIO AVIN AUDIO AVIN AUDIO AVIN AUDIO AVIN AUDIO AVIN AUDIO AVIN AUDIO AVIN AUDIO AVIN AUDIO AVIN AUDIO AVIN AUDIO AVIN AUDIO AVIN AUDIO AVINA AUDIO AVINA AUDIO AVINA AUDIO AVINA AUDIO AVINA AUDIO AVINA AUDIO AVINA AUDIO AVINA AUDIO AVINA AUDIO AVINA AUDIO AVINA AUDIO AVINA AUDIO AVINA AUDIO AVINA AUDIO AVINA AUDIO AVINA AUDIO AVINA AUDIO AVINA AUDIO AVINA AUDIO AVINA AUDIO AVIN AUDIO AVIN AUDIO AVIN AUDIO AVIN AUDIO AVIN AUDIO AVIN AUDIO AVIN AUDIO AVIN- Connect the PC IN / PC/DVI AUDIO IN port of the TV to the PC/AUDIO port of the RJP.
- Connect the AV IN [VIDEO]/[L-AUDIO-R] port of the TV to the VIDEO port of the RJP.
- Connect the AV IN [VIDEO] port of the TV to the VIDEO port of the RJP.
- Connect the HDMI IN (1, 2(DVI) or 3(ARC)) port of the TV and the HDMI port of the RJP.
- Connect the RJP port of the TV and the RS/232 port of the RJP.
The RJP (Remote Jack Pack) compatible with this Samsung TV is TeleAdapt TA-7610, TA-7650 (HD) and TA-7660 (HD Plus).
- RJP (Remote Jack Pack): RJP stands for Remote Jack Pack. The RJP is a hardware module that has different Audio Video inputs (A/V, Audio, PC and HDMI) and corresponding outputs. The corresponding output sources are connected from RJP to TV. The RJP communicates with the TV via RS232. Hot Plug & Play is a function that allows hotel guests to connect an external source to the RJP. The RJP communicates with the TV by sending messages regarding Active/Inactive sources. The TV will switch to the Active external source according to the priority set by the User.
You can select HDMI IN (1, 2 (DVI) or 3(ARC)) and AV IN for connecting RJP.
When the TV is on, connect the TV and the RJP within 10 seconds.
- The RJP can be returned to the factory default settings by pressing the A/V and HDMI buttons simultaneously for 10 seconds. All LEDs blink 5 times to acknowledge that this has been finished.
- The RJP will automatically turn off any LEDs after 5 minutes to avoid unnecessary light pollution in the hotel room. The LEDs that were turned off will turn on again if the guest touches any of the buttons and the 5 minute timer will restart. If the guest then touches another source button, the TV will change to the selected source and the corresponding LED will be lit.
- After an RJP Reset or a TV Power OFF/ON, it takes approx. 10 seconds to establish communications between the TV and the RJP.
- The following table shows the approximate time in seconds to switch from the TV to the input source, based on the priority.
Scenario 1: When no inputs are connected.
| Source To Connect | |
| AV 2 Sec | |
| PC 0.7 Sec | |
| HDMI 3.9 Sec | |
Scenario 2: When two or more inputs are connected and an input source is disconnected and then reconnected.
| Source Disconnect To Connect Total | ||
| AV 4.5 Sec 2 Sec 6.5 Sec | ||
| PC 0.7 Sec | 0.7 Sec | 1.4 Sec |
| HDMI 3.9 Sec | 3.9 Sec | 7.8 Sec |
E.g. If the RJP has all its live sources AV, PC and HDMI connected, AV is viewed as the highest priority. If the RJP is in HDMI mode, and a guest removes and reconnects the AV, the minimum time required to switch to the AV is 6.5 seconds.
• To connect audio (Ipod or Mp3), Music mode should be ON and Jack Ident detect should be OFF.
• A/V, PC and HDMI input sources are supported.
Setting the Hotel Option Data
To Enter: Press the MUTE → 1 → 1 → 9 → ENTER ↩ buttons in order. (From the Hospitality mode, the Standalone mode is set.)
To Exit from this menu: power off and turn on again.

ending on Model and Region, some menus do not exist on the TV set.
| No | Hotel TV Function | Description | ||
| Category initial value | ||||
| 1 Hospitality Mode Standalone Select the Hotel TV mode. (Standalone / Interactive) | ||||
| 2 SI Vendor OFF Select the SI Vendor | ||||
| 3 | Power On | Power On Channel EN Last Saved | Set the default values, which will be applied when the TV is turned on.- User Defined : Refers to the settings configured for Power On Channel, Channel Type.- Last Saved : Refers to the last saved settings. | |
| Power On Channel 1 TV will turn on to this particular Channel. | ||||
| Channel Type | ATV | Provides channel Type description for Power On channel selected.i.e.Selected channel analog or Digital & Antenna selection(Air or Cable). | ||
| Power On Volume EN | Last Saved | Set the default volume values which will be applied when the TV is turned on.- User Defined : Uses the settings configured for Power On Volume.- Last Saved : Uses the last saved settings. | ||
| Power On Volume | 10 | TV will turn on with this Volume Level. | ||
| Min Volume | 0 | Minimum Volume Level setting user can set | ||
| Max Volume | 100 | Maximum Volume Level setting user can set | ||
| Power On Source | TV | Select the Input source when TV is turned on initially. | ||
| Power On Option | Last Option | Power On(AC Power On) Option-Standby : Stand-By Mode-Power On : Power On- Last Option : Last Power On State | ||
| 4 | Channel | Channel Setup | User can set channel option.Such as Auto Tunning, Manual Tunning, Antenna setting. | |
| Channel Editor | Provided option for editing the Channel Name ,Number and video Mute settings for channels in the channel List. | |||
| Mixed Channel Map | ON | Mix Air and Cable Channels (only for China & Hong Kong model) | ||
| Dynamic SI | OFF | OFF: No Check of the DTV Program channel information .(DTV channel editor accessible, but additional channel Program number auto update not supported)ON: Check the DTV Program channel information. (DTV channel editor inaccessible) | ||
| Channel Rescan Message ON | This is a display option for the OSD text that appears when a user configures the country specifications in hotel models. This option determines whether to activate the items that are only executed after a manual user confirmation when the notification message is displayed while the country specifications are being configured.ON - When TV has an event for setting change because of country spec, It will be shown on the screen.OFF - Even TV has an event for setting change, because of country spec, it will not be shown on the screen. | |||
| 5 | MyChannel | Mychannel En | OFF Set the | My channel function ON/OFF. |
| Genre editor | - | User can set the genre for searched channel. | ||
| 6 | Menu OSD | Picture Menu Lock | OFF Enable | or disable the Picture Menu. |
| Menu Display | ON | ON: Main Menu displayOFF: Main Menu No display | ||
| Channel Menu Display OFF | ON: Channel menu displayOFF: Channel menu no display | |||
| 7 Operation | Panel Button lock | Unlock | Front panel(Local key) operation on/off.- Unlock: Unlock All panel key.- Lock: Lock All panel key.- OnlyPower : Lock All panel key except Power panel key.- Menu/Source : Lock Menu and Source panel keys. | |
| 8 Clock | Clock | Clock Type OFF | Off: No clock option of Factory menu shall work. Only Main menu.SW Clock:SW clock shall work only.Ext. Clock: LED Clock related item tow work as Dimming/Clock test/Time Format | |
| Local Time Manual | Selection of the way to update clock data-Manual: Use clock data from DVB channel or manual clock settingWhen the TV is in the stand-alone mode-TTX: manual clock setting (with updating from TTX data). | |||
| Time Format 24 Hour | 12 Hour: Time Format is 12Hour type24 Hour: Time Format is 24Hour typeEnable when Clock Type is "Ext. Clock". | |||
| Clock Test Failure Test Ext. Clock work or not | ||||
| Clock Normal Dim. 4 | Clock Normal Dim level 0~4Enable when Clock Type is "Ext. Clock". | |||
| Clock Standby Dim. 1 | Clock Standby Dim level 0~4Enable when Clock Type is "Ext. Clock". | |||
| Timer Type WakeUp | WakeUp:Timer type is wakeup mode.Set specific time for the TV to turn on automaticallyOnOff: Timer type is On and Off mode.Set TV to turn itself on or off automatically at a specified time | |||
| 9 | Music Mode | Music mode AV OFF | To get music output from an mp3/audio player through an AV Input Source. When on, you can hear sound from the player through the TV even there is no video signal. The TV's backlight, however, remains on. And add a video signal,it works normally. | |
| Music Mode PC OFF | To get music output from an mp3/audio player through a PC Input Source. When on, you can hear sound from the player through the TV even there is no video signal. The TV's backlight, however, remains on. And add a video signal,it works normally. | |||
| Music Mode Comp | OFF | To get music output from an mp3/audio player through a Component Input Source. When on, you can hear sound from the player through the TV even there is no video signal. The TV's backlight, however, remains on. And add a video signal,it works normally. | ||
| Music Mode Backlight | OFF | Backlight On/Off option in Music mode to save energy | ||
| 10 | External Device | 7610 Priority AV | 1 | If the jack priority is set, the corresponding source is automatically set when a jack is inserted according to the jack priority |
| 7610 Priority PC | 2 | If the jack priority is set, the corresponding source is automatically set when a jack is inserted according to the jack priority. | ||
| 7610 Priority HDMI 3 | If the jack priority is set, the corresponding source is automatically set when a jack is inserted according to the jack priority. | |||
| 7610 AV option | AV1 | Select RJP AV Source (Source selection depends on Model). | ||
| RJP HDMI Option | HDMI1 | Select RJP HDMI Source (Source selection depends on Model). | ||
| Sound Bar Out OFF | ON: TV speaker sound will be mute. Sound will come out through HDMI. You must connect the Sound Bar to hear the sound(HB670 model: HDMI3). OFF: Sound will come out through TV speakers normally. | |||
| 11 | External Source | USB Media Mode | Default | When USB is connected to the TV,- Default: Popup window appears.- Automatic: Enters the USB contents menu automatically.- Disable: Neither the pop-up window nor the menu appears. |
| External Source Banner | ON | Users can set External Source Banner to On or Off.ON: When TV power On or Mode changed, TV will display the external source banner.OFF: When TV power On or Mode changed, TV will not display the external source banner. | ||
| Auto source | OFF | ON: When an external source is connected to the TV, the TV will auto ident and switch to the input source.PC: Auto Ident PC Input only.OFF: Auto Source is Off. | ||
| Anynet+Return Source | Power On Src | Set the return source after closing Anynet+. | ||
| 12 | Bathroom Speaker | Sub Amp Mode 2 | Determines the Sub AMP operation mode.- 0: Turns the Sub AMP function off (PWM off).- 1: Determines the Sub volume according to the main volume control. That is, the sub volume is determined according to the Power On Volume, the Min Volume, and the Max- 2: Determines the volume according to the bathroom control panel setting. | |
| Sub Amp Volume 6 Sub AMP Volume level at power on initial condition. | ||||
| 13 | Eco Solution | Energy saving OFF | This feature adjusts the brightness of the TV in order to reduce power consumption.- Off: Tums off the energy saving function.- Low: Sets the TV to low energy saving mode.- Medium: Sets the TV to medium energy saving mode.- High: Sets the TV to high energy saving mode. | |
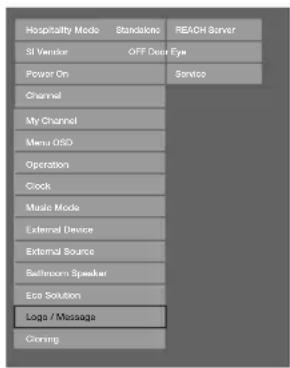
| 14 | Logo /Message | Welcome Message OFF | Display Welcome Message. | |
| Edit Welcome Message - Edit Welcome Message. | ||||
| Hospitality Logo OFF User can set the logo display Off or the type of logo file (BMP/AVI). | ||||
| Hospitality Logo DL - Download the logo file from USB toTV. | ||||
| Logo Display Time 5 second Set the logo display time (3/5/7 Seconds). | ||||
| 15 | Cloning | Clone TV to USB | - | USB Clone: TV → USB |
| Clone USB to TV | - | USB Clone: USB → TV | ||
| Setting Auto Initialize OFF | When Setting Auto Initialize is set to On, and the power is turned off and on or the Master Power is turned off and on, the data is restored to the cloned values. If there is no cloned value, even when the Setting Auto Initialize is set to On, it will be ignored and the operation will be the same as that when Setting Auto Initialize is set to Off | |||
| 16 | REACH Server | REACH Server update Time | 1hour | Standby REACH Server will be operated, according to time setting |
| REACH Update Immediate | OFF | Make TV operate REACH Server after 1 minute in Stand-by mode. | ||
| REACH Server Channel | 87 | Set the default channel for REACH Server- None : After Auto Scan, Operate REACH Server- Channel value : Operate REACH Server at the channel selected | ||
| REACH Server Version 0000 Display REACH Server version of TV | ||||
| REACH Server Group ID | ALL | Provided REACH Server ID for operating SIRCH on a specific set. | ||
| S-LYNK REACH OFF Set whether to use REACH function. | ||||
| S-LYNK REACH Volume ON S-LYNK REACH Volume On and Off | ||||
| TICKER | OFF Ticker On and Off | |||
| 17 | Door Eye | Door Eye Mode | OFF Door Eye function ON and OFF | |
| Door Eye Source | AV1 | Select the source that will display the door image | ||
| Prompt OSD | ON | Prompt OSD mode ON and OFFOn: The OSD which is asking if you want the output will be displayed.-If the user press 'Yes', door image will be displayed in PIP or Full screen.- If the user press 'No', Door Eye function will not work.Off: OSD will not be displayed and automatically changed to PIP or Full size screen | ||
| Source Return Time | 7s | Setting the time that decide how long will be displayed the door image.(3S~20S) | ||
| 18 Service | Self Diagnosis for TV - | Enter Self Diagnosis Menu.- Picture Test: Use to check for picture problems. If the problem appears in the test picture, select Yes and follow the directions on the screen.- Sound Test: Use the built-in melody sound to check for sound problems. If the problem occurs during the test, select Yes and follow the directions on the screen. | ||
| Self Diagnosis for HTV - | HD Function Check Menu On Executing Item Below OSD is displayed-Proldiom DTV Channel Key Loss : Ok/Failure (Hotel US) STB SI Vendor Setting : SI Name Ok/FailureBathroom AMP : Ok/Failure (Hotel EU)RTC : Ok/Failure (Hotel EU)PC Audio Test : Ok/FailurePC Self Test : Ok/Failure | |||
| SW UPGRADE SW US$B Update function | ||||
| Service Pattern OFF Same function with SVC Service Pattern | ||||
| TV Reset - Factory reset | ||||
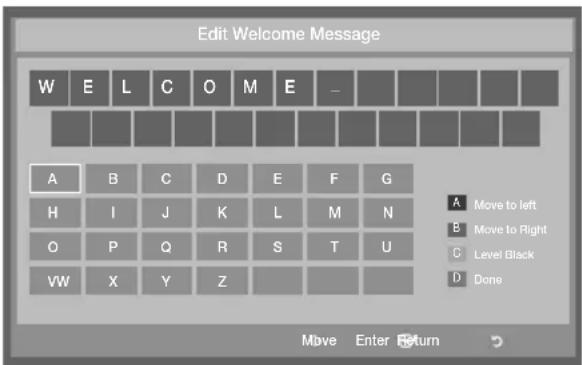
The welcome message is used to display custom messages on the TV every time it is turned on by a Guest in Hotel room.
- Welcome message settings are found in the Hotel Option Menu.
- Welcome message should be ON in order to display the message on power on.

text_image
Hospitality Mode Standalone REACH Server SI Vascular OFF Door Eye Power On Service Channel My Channel Menu OSD Operation Clock Music Mode External Device External Source Bathroom Speaker Eco Solution Logo / Message Cleaning Welcome Message OFF Edit Welcome Message Hospitality Logo OFF Hospitality Logo DL ... Logo Display Time ...– message can be up to 25 characters and can be edited by changing the text in the Hotel Service menu.
– The following is the list of characters supported by Welcome message:
In Capital letters, from A-Z
– The welcome message can be edited by using the navigation, colour & enter key on the Remote in the “Edit Welcome Message” OSD.
text_image
Edit Welcome Message W E L C O M E - A B C D E F G H I J K L M N O P Q R S T U VW X Y Z Move Enter Return- Welcome message and hotel logo cannot be active at the same time.
The Hospitality Logo function displays the Hotel's picture image when the TV is initially powered on.
– Hospitality Logo settings are in the Hospitality mode menus.
- The Logo Download and Logo Display Menu items are enabled when you turn the Hospitality Logo option on.
- If there is a logo image stored in memory and the Hospitality Logo option is on, the Hospitality logo is displayed when the TV is turned on.
- The Hospitality logo is not displayed when the Hospitality Logo option is off, even if the logo image has been loaded into the TV.
text_image
Hospitality Mode Standalone REACH Server SI Varistor OFF Deer Eye Power On Service Channel My Channel Menu OSD Operation Clock Music Mode External Device External Source Bathroom Speaker Ecp Solution Loga / Massage Cloning

text_image
Welcome Message OFF Edit Welcome Message Hospitality Logo OFF Hospitality Logo DL ... Logo Display Time ...- Hospitality Logo
- This option lets you choose whether the Hospitality Logo image is displayed or not.
– The Initial value is OFF. - This can be set to OFF or ON.
- When set to ON, the Logo Download and Logo Time Display menu items become accessible.
- Hospitality Logo DL
- This option lets you download the logo image to the TV's memory from a USB device.
- A wait message appears while the image is being copied to the TV.
- A "completed" message appears when the copy operation finishes successfully.
- The word "failed" appears if the copy operation was unsuccessful.
- No USB appears if no USB device is connected.
- No File appears if there is no file to copy on the USB device or or the file is in the wrong format (must be a BMP file). If No File appears and you have a logo file on the USB device, check the file format.
- Logo File Format
– The TV supports only the BMP and AVI format.
- The file name must be samsung.bmp or samsung.avi.
- The maximum resolution of the BMP format is 1280 × 720 .
– The maximum file size for AVI format is under 30MB.
– The TV does not change the size or scale of the image.
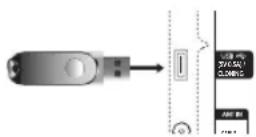
USB Cloning is used to download user-configured settings (Picture, Sound, Input, Channel, Setup, and Hotel Setup) from one TV set and upload them to other TV sets.
All the user-defined settings from the TV (Master Set) can be copied to the USB device.
- Cloning from TV to USB: It is an operation to copy the stored data from the specific area on the EEPROM from the TV set to the USB device.
- Insert a USB drive into the USB port on the rear of the TV.
- Enter Hotel Option by pressing buttons in order.
MUTE → 1 → 1 → 9 → ENTER
- Press the ▲ or ▼ button to select "Clone TV to USB", then press the ENTER button.
- The message "Clone TV to USB" is displayed, then press the ENTER button.
- You can Make sure USB cloning behavior.
In Progress: during copying data to USB.
Completed: copy operation was finished successfully.
Failed: copy operation was not finished successfully.
No USB: any USB is not connected.

- Cloning from USB to TV: It is an operation to download the stored data in USB device to TV set.
- Insert a USB drive into the USB port on the rear of the TV.
- Enter Hotel Option by pressing buttons in order: MUTE → 1 → 1 → 9 → ENTER
- Press the ▲ or ▼ button to select "Clone USB to TV", and then press the ENTER button.
-
The message "Clone USB to TV" is displayed, then press the ENTER button.
-
You can Make sure USB cloning behavior.
In Progress: during copying data to TV.
Completed: copy operation was finished successfully.
Failed: copy operation was not finished successfully.
No USB: any USB is not connected.
No File: there is no file to copy on the USB.

▼

The operation to copy from USB to TV can be executed by pressing ENTER key for 5 seconds.
The CLONE function only supports the same model series. (It does not work properly for different model series.)
For fast instant cloning during installation!
Insert USB key with master settings from first TV and press Enter key for 5 seconds.
Pre-condition for cloning (check point)
- Cloning should be done between same model (same version).
- Before cloning, all displays should be updated at the latest version (same version).
Hotel Plug & Play automatically performs Hotel mode selection, Local Set and Picture mode Setup.
– Hotel Plug & Play is available only one time when power is first turned ON.
- This is available after first setting up the TV and transferring Clone TV data to a USB drive.
- To use Next TV, you only need to exit Hotel Plug & Play, connect the USB, then Clone the USB to TV.
– Depending on model and region, some menus may not exist.

flowchart
graph TD
    A["Local Set"] --> B["Easy Set Up"]
    B --> C{If Standalone Setup is selected}
    C -->|Yes| D["Standalone Mode is set"]
    C -->|No| E["Power off"]
    D --> F["TV will enter the RF mode."]
    E --> G["TV Setup Complete!"]
    G --> H["Clock"]
    H --> I["Set Clock"]

    subgraph Local Set
        J["Change Local Set if Localised in North America, Latin America and Europe. In other regions, please press SKIP button move to the next step."]
        K["Current Localset : HKG_DTV"]
        L["Change Skip"]
    end

    subgraph Easy Set Up
        M["Interactive (Home/Box)"]
        N["Standalone Setup (Continue Setup)"]
        O["Standalone Only (End Setup)"]
    end

    subgraph Select Language
        P["Configure your TV"]
        Q["Set Picture Mode"]
        R["Auto Tuning"]
        S["Auto Tuning is finding channels for you..."]
        T["Stop"]
    end

    subgraph Power off
        U["Main: Optran, MODE: DTV, REIS: NOTSUPPORT, Standalone Menu"]
        V["Display Mode: Standard"]
        W["Smartphone: CS"]
        X["Phone ID: 21"]
        Y["Device: SmartBox"]
        Z["Media: Voice"]
        AA["Video: Audio"]
        AB["Battery: Sound"]
        AC["Radio/Video"]
        AD["Lips/Video"]
        AE["Oscillator"]
        AF["Onset"]
        AG["Max: Max"]
        AH["Lifetime Device"]
        AI["Battery Source"]
        AJ["Bathroom/Stroke"]
        AK["GPS/Message"]
        AL["Oscillator"]
        AM["Onset"]
    end

    subgraph Clock
        N["You can adjust your time to set DST, Time Zone and clock mode"]
        O["Clock Mode: Auto"]
        P["Date: 1 - 2 - 3 - 4 - 5 - 6 - 7 - 8 - 9 - 10 - 11 - 12 - 13 - 14 - 15 - 16 - 17 - 18 - 19 - 20 - 21 - 22 - 23 - 24 - 25 - 26 - 27 - 28 - 29 - 30 - 31 - 32 - 33 - 34 - 35 - 36 - 37 - 38 - 39 - 40 - 41 - 42 - 43 - 44 - 45 - 46 - 47 - 48 - 49 - 50 - 51 - 52 - 53 - 54 - 55 - 56 - 57 - 58 - 59 - 60 - 61 - 62 - 63 - 64 - 65 - 66 - 67 - 68 - 69 - 70 - 71 - 72 - 73 - 74 - 75 - 76 - 77 - 78 - 79 - 80 - 81 - 82 - 83 - 84 - 85 - 86 - 87 - 88 - 89 - 90 - 91 - 92 - 93 - 94 - 95 - 96 - 97 - 98 - 99 - 100"]
    end
The SW Clock shows the current time on the screen when the user presses the Info remote control key in standby mode.
– If a user presses the Info key when the TV is in standby mode, the TV is turned on and shows the current time on the screen for 10 seconds and then returns to standby mode.
- The time is displayed as a digital clock at the normal banner size. The 12 or 24 hour time format of is determined
– according to the format of the Information.
- f the user presses the Info key when the TV is on, the original Info key function is executed.
• Detailed Descriptions
- The SW clock works depending on the On/Off setting in the Factory install menu.
- If the SW clock is turned on, the Fast logo is automatically turned off. (In this case, even if you turn the Fast logo on again, it is automatically turned off when the TV is turned on again.)
- If the master power is turned off, the time setting is only maintained in models with a backup condenser and an RTC.
- When a TV in standby mode shows the current time, the video mute and audio mute settings are maintained.
- In this case, even if the Hotel logo is set to on, the Hotel Logo display is skipped.
- This feature only works in StandAlone mode.
- Other key function specifications when the SW clock is running
– The Info key works like the power key.
- Pressing the Power or Info key while the SW clock is running, puts the TV into Standby mode.
- Pressing keys other than the Power and Info keys is ignored while the SW clock is running.
– In this case, the on timer does not work.
– The off timer and sleep timer work.
- When clock mode in the Time menu is set to manual, the time of the sub micom is maintained by the RTC circuit.
- Even if the current time is not configured, it is displayed in the same way as the menu. (--:--)

natural_image
Simple geometric diagram with a central dot and two horizontal lines on a gray background (no text or symbols)Multi Code Remocon is a special transmitter which is designed to control each TV with one remote.
This is useful where there is more than one TV in a location, such as in a hospital The set ID Set ID number is displayed in source osd. It is possible to support up to 9 different remote key transmissions for multiple codes.
Each TV has an initial code of "0".
- The ID code can be set and reset in Analog TV mode or PC mode. (not available in TTX channel or DTV channel)
– ID code can be from 0 to 9.
- Press the RETURN + MUTE Key for over 7 seconds and then select the number button to set the code.
- Set ID OSD will be displayed in central position.
- The following words appear: "Remote control code is set to x. If you want to change Remote control code, enter the digit you want to change." X is the digit number This OSD displays until Exit is pressed.

Remote control code is set to 0. If you want to change Remote control code, enter the digit you want to change.
- For example, TV and Remote will be set to ID code #1 if the user presses #1.
- The following words appear: "Remote control code is changed to 1" Then TV can be controlled only by the remote with the same ID code as the TV.
- If ID code does not match between remote and TV, TV unit do not give ANY respond
- To reset ID code, press EXIT + MUTE key for over 7 seconds. ID code of both TV and Remote will be reset to "0". "Remote control code is set to 0." will be displayed
Channel Bank Editor edits the channels, with 3 different Bank Options.
Depending on the Bank card, there are specific channels Hotel customers can enjoy.
Setting the CH Bank Editor under Stand-alone Mode
- Enter the Hotel Standalone menu by "MUTE+1+1+9+Enter"
- Please select SI vendor: "Smoovie"
- find the new menu option, "CH Bank Editor"
- Enter the "CH Bank Editor"

flowchart
graph TD
    A["Hospitality Mode"] --> B["Standalone"]
    B --> C["REACH Server"]
    D["SI Vendor"] --> E["OFF Service"]
    F["SI Vendor"] --> G["Senspace"]
    H["Channel"] --> I["Channel"]
    J["Channel Bank Editor"] --> K["Channel"]
- Edit the channel bank as below.
a.BANK1 (Free channel): Select the channel that will be used when remote doesn't have any card.
b.BANK2 (Family Card - Green): Select the channel that will be used when remote has a GREEN CARD.
c.BANK3 (Adult Card - Red): Select the channel that will be used when remote has a RED CARD.
text_image
Channel Bank Edit Registered Bank1(0) Bank2(0) Bank3(0) A 1 C1 A 2 C2 A 3 C3 A 4 C4 □ □ □ □ □ □ □ □ □ □ □ □ □ Select All Items on Column □ Deselect All Items on Column □ Select/Deselect ReturnReferences of using SMOOVIE Remote Controller
- If you select SMOOVIE as the SI vendor, you should use the SMOOVIE Remote Controller.
- With the Numeric keys of the remote controller, users can select only the Bank1 channel. To change the channel using the Green or Red Card, please use the channel up/down keys.
- For the Channel guide or the Channel list, users can see only Bank1 channel list.
Channel Editor is a function to edit channel number and name.
- Use Channel Editor to sort the channels as user-desired channel numbers.

text_image
Hospitality Mode St Vendor Power On Channel My Channel Menu 202 Operation Clock Music Music External Device External Source Bathroom Speaker Log Solution Logo Message Cloning Welcome Message OFF Edit Welcome Message Hospitality Logo OFF Hospitality Logo Dt. Logo Display TimeSimple Steps for channel Editor under Stand-alone Mode
| Step Broad | Outline |
| 1 Operate | ‘Channel Auto Store’ in Hotel Option Menu |
| 2 Enter | ‘Channel Editor’ in Hotel Option Menu |
| 3 Compile | a table related to the final channel lists you want to have |
| 4 Rearrange channels with the TOOLS Button based on the table you compiled | |
| 5 Press the EXIT or RETURN Button to exit. | |
My Channel
Determine the country and genre for the channels provided by the hotel, and if the user selects a country and genre, shows the corresponding channels.
- You must select the country first, or you can not set a genre.
- If you select the genre without adding any channels, the channel list displays all of the available channels.
• My Channel works in Standalone mode only. - SI Vendor in Standalone mode: This does not work if Smoovie is selected.
- This is in the Hotel Options in Hotel Menu > Service Mode and can be turned on or off.
• The option only works when it is set to On.
Channel Composition [Genre Mode]
| Standard Category | Ch. Mode | Antenna Mode Activation | Description | ||
| Air Cable | |||||
| Hotel Genre | All (Default) | O | O | Provide genre channel mode by each country that master has managed in factory mode. | |
| News O O | |||||
| Radio O O | |||||
| Entertainment O O | |||||
| Sports O O | |||||
| Hotel O O | |||||

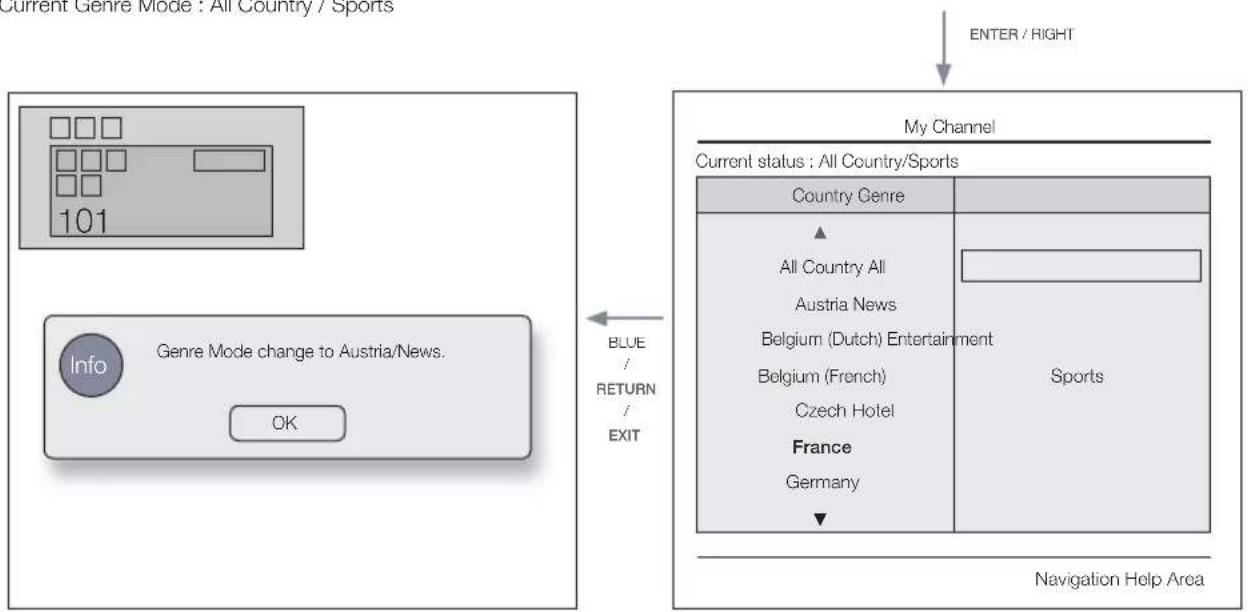
text_image
My Channel Current status : Austria/Sports Country Genre All Country Austria Belgium (Dutch) Belgium (French) Czech France Germany All News Radio Entertainment Sports Hotel (Blue)Keep Previous (U/D/L/R)Move (En)Enter* For the number of items to be displayed in the list, refer to the design document.
Key Guide
| Button | Action | Nav. Help |
| BLUE | Returns to the screen. (Genre setup: Last Country & Genre) | Keep Previous |
| ENTER | Selects an item. | Enter |
| √ CH ∧ | Move the highlight by page. | (No Guide) |
| ▲/▼ | Navigates the each country, genre list. (in a circular manner.) | Move |
| ▶ | Selects the highlighted item, and then move the highlight to Genre section. | |
| RETURN | Returns to the screen. (Genre setup: Last Country & Genre) | (No Guide) |
| EXIT | Returns to the screen. (Genre setup: Last Country & Genre) | (No Guide) |
Notes
This section describes the layout of the Front UI that appears when the TV is turned on. (Factory Mode > Genre Mode: Enable)
The genre is a sub-list for each country.
The broadcast screen that was being displayed the last memorial channel.
- If user want to keep the previous country & genre channel map, press the 'BLUE', RETURN, and EXIT remote-control key to close the Front UI.
[NO TEXT]
Default Highlight : Last Memory items (Country, Genre)
Timeout (60 sec)
Elements
| No Name Description | |
| 1 Background Screen | Displays the last memorized channel that appears when TV is turned on. |
| 2 Function Title • | This is name of the function. |
| 3 Current Status • | Display current settings the Country/Genre. |
| 4 Country Items | The item for the country list is displayed.Displays the last selected country. |
| 5 Genre Items | The item for the genre list is displayed.Displays available genre items by each country that master managed in factory mode.(always provide ‘All’ item)Displays the last selected genre. |
| 6 Highlight • | If the item title is too long to be displayed within the area, Auto Text Sliding works. |
| 7 Indicator • | This is displayed when there is a previous or next page. |
| 8 Nav. Help • | The key guide is right-aligned. |
Highlight Interaction [Country Items]
- This page is only to indicate possible interactions. It may not be exactly identical to actual screens.
Notes
Users can navigate the items in each country & genre list by pressing the up or down remote control keys.
Circular navigation is supported.
1
![SAMSUNG HG28AB670BW - Highlight Interaction [Country Items] - 1](/content/2026/06/1223637/images/a80364f9070f01f21f8f96b6928b7b9c591d88baae3cf03ca0ae2e04fffe7e96.jpg)
flowchart
graph TD
    A["Current status : All Country/Sports"] -->|DOWN x 4| B["Current status : All Country/Sports"]
    A -->|UP x 4| C["Current status : All Country/Sports"]
    B -->|DOWN x 4| D["Current status : All Country/Sports"]
    B -->|UP x 4| E["Current status : All Country/Sports"]
    C -->|DOWN x 4| F["Current status : All Country/Sports"]
    C -->|UP x 4| G["Current status : All Country/Sports"]
    C -->|DOWN x 4| H["Current status : All Country/Sports"]
    D --> I["Country Genre"]
    D --> J["All Country All"]
    D --> K["Austria News"]
    D --> L["Belgium (Dutch) Radio"]
    D --> M["Belgium (French) Entertainment"]
    D --> N["Czech"]
    D --> O["France"]
    D --> P["Germany"]
    D --> Q["Sports"]
    D --> R["Hotel"]
    E --> S["Country Genre"]
    E --> T["All Country All"]
    E --> U["Austria News"]
    E --> V["Belgium (Dutch) Radio"]
    E --> W["Belgium (French) Entertainment"]
    E --> X["Czech"]
    E --> Y["France"]
    E --> Z["Germany"]
    E --> AA["Sports"]
    E --> AB["Hotel"]
    F --> AC["Country Genre"]
    F --> AD["All Country All"]
    F --> AE["Austria News"]
    F --> AF["Belgium (Dutch) Radio"]
    F --> AG["Belgium (French) Entertainment"]
    F --> AH["Czech"]
    F --> AI["France"]
    F --> AJ["Germany"]
    F --> AK["Sports"]
    F --> AL["Hotel"]
    G --> AM["Country Genre"]
    G --> AN["All Country All"]
    G --> AO["Austria News"]
    G --> AP["Belgium (Dutch) Radio"]
    G --> AQ["Belgium (French) Entertainment"]
    G --> AR["Czech"]
    G --> AS["France"]
    G --> AT["Germany"]
    G --> AU["Sports"]
    G --> AV["Hotel"]
    H --> AW["Country Genre"]
    H --> AX["All Country All"]
    H --> AY["Austria News"]
    H --> AZ["Belgium (Dutch) Radio"]
    H --> BA["Belgium (French) Entertainment"]
    H --> BB["Czech"]
    H --> BC["France"]
    H --> BD["Sports"]
    H --> BE["Hotel"]
    I --> BF["Country Genre"]
    I --> BG["All Country All"]
    I --> BH["Austria News"]
    I --> BI["Belgium (Dutch) Radio"]
    I --> BJ["Belgium (French) Entertainment"]
    I --> BK["Czech"]
    I --> BL["France"]
    I --> BM["Sports"]
    I --> BN["Hotel"]
    K --> BO["Country Genre"]
    K --> BP["All Country All"]
    K --> BQ["Austria News"]
    K --> BR["Belgium (Dutch) Radio"]
    K --> BS["Belgium (French) Entertainment"]
    K --> BT["Czech"]
    K --> BU["France"]
    K --> BV["Sports"]
    K --> BW["Sports"]
    L --> BX["Country Genre"]
    L --> BY["All Country All"]
    L --> BZ["Austria News"]
    L --> CA["Belgium (Dutch) Radio"]
    L --> CB["Belgium (French) Entertainment"]
    L --> CC["Czech"]
    L --> CD["France"]
    L --> CE["Sports"]
    L --> CF["Sports"]
    M --> CG["Country Genre"]
    M --> CH["All Country All"]
    M --> CI["Austria News"]
    M --> CJ["Belgium (Dutch) Radio"]
    M --> CK["Belgium (French) Entertainment"]
    M --> CL["Czech"]
    M --> CM["France"]
    M --> CN["Sports"]
    M --> CO["Sports"]
Highlight Interaction [Default Genre]
- This page is only to indicate possible interactions. It may not be exactly identical to actual screens.
![SAMSUNG HG28AB670BW - Highlight Interaction [Default Genre] - 1](/content/2026/06/1223637/images/530a1643dcde101e99159a42c1cc169c52cbbe961db426bd9e10f75d38bdfa51.jpg)
flowchart
graph LR
    subgraph "My Channel"
        A["Current status : All Country/Sports"] --> B["Country Genre"]
        B --> C["All Country All"]
        C --> D["Austria News"]
        D --> E["Belgium (Dutch) Radio"]
        E --> F["Belgium (French) Entertainment"]
        F --> G["Czech"]
        G --> H["France"]
        H --> I["Germany"]
        I --> J["▼"]
        J --> K["Navigation Help Area"]
    end

    subgraph "Navigation Help Area"
        L["Current status : All Country/Sports"] --> M["Country Genre"]
        M --> N["All Country All"]
        N --> O["Austria News"]
        O --> P["Belgium (Dutch) Radio"]
        P --> Q["Belgium (French) Entertainment"]
        Q --> R["Czech"]
        R --> S["France"]
        S --> T["Germany"]
        T --> U["▼"]
        U --> V["Navigation Help Area"]
    end

    A -->|ENTER / RIGHT| L
    L -->|LEFT| A
    M -->|Sports| L
    M -->|Hotel| L
- The current selection of the country is highlighted.
- Default Highlight: The current selection of the genre.
![SAMSUNG HG28AB670BW - Highlight Interaction [Default Genre] - 2](/content/2026/06/1223637/images/398ee47658cb99f32eb80be12a3998a3d5ee8065792553288a9b3f2c0ec6178f.jpg)
flowchart
graph LR
    A["My Channel"] -->|ENTER / RIGHT| B["Navigation Help Area"]
    B -->|LEFT| A
    A --> C["Current status: All Country/Sports"]
    C --> D["Country Genre"]
    D --> E["Austria All"]
    D --> F["Belgium (Dutch) News"]
    D --> G["Belgium (French) Hotel"]
    D --> H["Czech"]
    D --> I["France"]
    D --> J["Germany"]
    D --> K["Hungary"]
    A --> L["Current status: All Country/Sports"]
    L --> M["Country Genre"]
    M --> N["Austria All"]
    M --> O["Belgium (Dutch) News"]
    M --> P["Belgium (French) Hotel"]
    M --> Q["Czech"]
    M --> R["France"]
    M --> S["Germany"]
    M --> T["Hungary"]
    A --> U["Navigation Help Area"]
    U --> V["Current status: All Country/Sports"]
    V --> W["Country Genre"]
    W --> X["Austria All"]
    W --> Y["Belgium (Dutch) News"]
    W --> Z["Belgium (French) Hotel"]
    W --> AA["Czech"]
    W --> AB["France"]
    W --> AC["Germany"]
    W --> AD["Hungary"]
- Seems source error, it should be read as "The other item of the county is highlighted.". Please verify. (ex. France)
- Default Highlight : All
Mode Change Interaction 1 (1/2)
- This page is only to indicate possible interactions. It may not be exactly identical to actual screens.
1

flowchart
graph TD
    A["My Channel\nCurrent status: All Country/Sports"] -->|DOWN| B["My Channel\nCurrent status: All Country/Sports"]
    A -->|LEFT| C["Navigation Help Area"]
    C -->|ENTER / RIGHT| D["My Channel\nCurrent status: All Country/Sports"]
    D -->|UP| E["Navigation Help Area"]
    E -->|DOWN| D
    D --> F["6"]
    style A fill:#f9f,stroke:#333
    style B fill:#ccf,stroke:#333
    style C fill:#cfc,stroke:#333
    style D fill:#fcc,stroke:#333
    style E fill:#cff,stroke:#333
    style F fill:#ffc,stroke:#333
Mode Change Interaction 1 (2/2)
- This page is only to indicate possible interactions. It may not be exactly identical to actual screens.
5

text_image
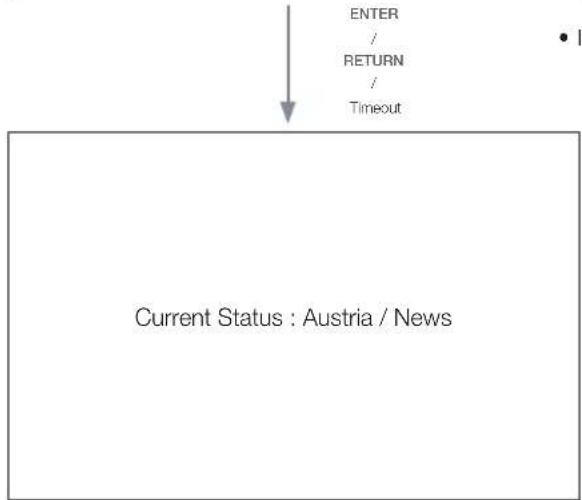
ENTER Info Genre Mode change to Austria/News. OK- The genre mode change complete message is displayed.
- Timeout(5 sec.)

flowchart
graph TD
    A["ENTER / RETURN / Timeout"] --> B(Current Status : Austria / News)
6
text_image
My Channel Current status : All Country/Sports Country Genre All Country All Austria News Belgium (Dutch) Entertainment Belgium (French) Hotel Czech France Germany Navigation Help Area- Pressing the left key from the genre to country menu, highlights an existing selected country item.
Mode Change Interaction 2 (1/2)
- This page is only to indicate possible interactions. It may not be exactly identical to actual screens.
1
flowchart
graph LR
    A["My Channel"] -->|DOWN| B["Navigation Help Area"]
    B -->|UP x 5| A
    A --> C["Current status: All Country/Sports"]
    C --> D["Country Genre"]
    D --> E["All Country All"]
    E --> F["Austria News"]
    F --> G["Belgium (Dutch) Entertainment"]
    G --> H["Belgium (French) Sports"]
    H --> I["Czech Hotel"]
    I --> J["France"]
    J --> K["Germany"]
    K --> L["Navigation Help Area"]
    L --> M["Current status: All Country/Sports"]
    M --> N["Country Genre"]
    N --> O["All Country All"]
    O --> P["Austria News"]
    P --> Q["Belgium (Dutch) Entertainment"]
    Q --> R["Belgium (French)"]
    R --> S["Czech Hotel"]
    S --> T["France"]
    T --> U["Germany"]
    U --> V["Navigation Help Area"]
• Current Genre Mode : All Country / Sports
flowchart
graph TD
    A["Current Genre Mode: All Country / Sports"] --> B["ENTER / RIGHT"]
    B --> C["My Channel"]
    C --> D["Current status: All Country/Sports"]
    D --> E["Country Genre"]
    E --> F["All Country All"]
    F --> G["Austria News"]
    G --> H["Belgium (Dutch) Entertainment"]
    H --> I["Belgium (French)"]
    I --> J["Czech Hotel"]
    J --> K["France"]
    K --> L["Germany"]
    L --> M["▼"]
    M --> N["Navigation Help Area"]
    O["Info"] --> P["Genre Mode change to Austria/News."]
    P --> Q["OK"]
    Q --> R["Blue / RETURN / EXIT"]
- If the country is selected, highlight moves to genre menu automatically.
5
flowchart
graph TD
    A["ENTER"] --> B["RETURN"]
    B --> C["Timeout"]
    D["Current Status : Austria / News"] --> A
• Current Genre Mode : All Country / Sports
Power On Scenario [Last Memory]
- This page is only to indicate possible interactions. It may not be exactly identical to actual screens.
1
![SAMSUNG HG28AB670BW - Power On Scenario [Last Memory] - 1](/content/2026/06/1223637/images/ec7a120192e60774a6b5c263c403d07ce4618810d1c57b97a9939980f090ad22.jpg)
flowchart
graph TD
    A["Current Status: Austria / News"] -->|POWER| B["Main Channel"]
    C["• Current Genre Mode: Austria / News"] --> B
    B -->|POWER| D["Navigation Help Area"]
    E["Current status: All Country/Sports"] --> F["Country-Genre"]
    F --> G["All Country All"]
    F --> H["Austria News"]
    H --> I["Belgium (Dutch) Entertainment"]
    H --> J["Belgium (French)"]
    H --> K["Czech"]
    H --> L["France"]
    H --> M["Germany"]
    F --> N["Hotel"]
• Current Genre Mode : Austria / News
Genre Editor: This configures the genres of each of the hotel TV channels.
• This can be used through the Hotel Menu (Factory).
• Supported genres include News, Radio, Entertainment, Sports and Hotel.
• More than one genre can be selected for each channel at the same time.
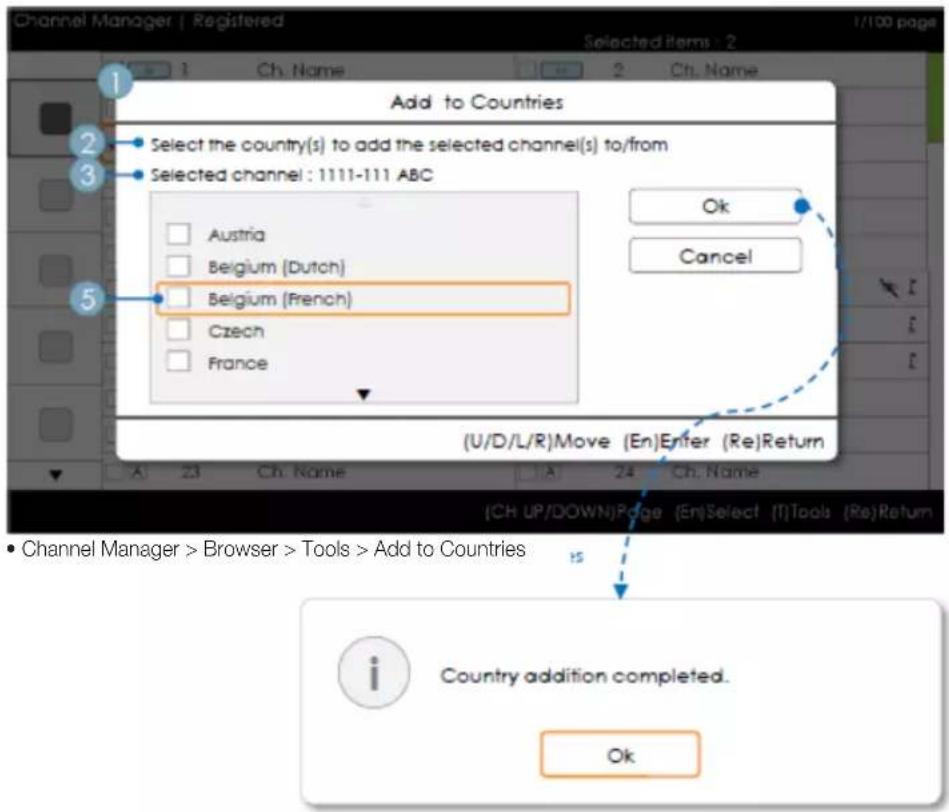
Country Editor (Channel Editor): This is the editor that configures the country for each of the hotel TV channels.
- Supported countries (20 countries): Austria, Belgium, China, Denmark, Finland, France, Germany, Greece, Italy, Japan, Netherlands, Norway, Portugal, Russia, Korea, Spain, Sweden, Turkey, USA
- If more than one channel is set to a country, the country is registered as a category and users can view the channels by country.
- More than one country can be set to a channel. If the user selects a category, only the channels corresponding to the country are displayed in the channel list.
- If any channel for which the country is set is selected from the channel list, the Edit Countries item is added to the Tools. Otherwise, the Add to Countries item is added to the Tools.
• * If the corresponding function is executed, a country for the selected channel can be set or canceled.
- Front UI
- Provides the screen where the user can select a country or genre when the user turns the power on.
Left Frame Layout
![SAMSUNG HG28AB670BW - Power On Scenario [Last Memory] - 2](/content/2026/06/1223637/images/ecdf5d0bd1c673de4980047653e8ac4bfcea0a3522bcd4c1fb28c82b728912e5.jpg)
text_image
Channel Manager | Registered 1/100 page Registered Ch. Name Ch. Name Ch. Name Ch. Name Ch. Name Ch. Name Ch. Name 2 Ch. Name Ch. Name Ch. Name Ch. Name Ch. Name Ch. Name Ch. Name Ch. Name Ch. Name Ch. Name Ch. Name Ch. Name Ch. Name Ch. Name Ch. Name Ch. Name Ch. Name Ch. Name Ch. Name Ch. Name Ch. Name Ch. Name Ch. Name Ch. Name Ch. Name Ch. None 2 Ch. Name Ch. None 4 Ch. Name Ch. None 6 Ch. Name Ch. None 8 HDMI 1 Ch. None 10 HDMI 3 Ch. None 12 Ch. Name Ch. None 14 Ch. Name Ch. None 16 Ch. Name Ch. None 18 Ch. Name Ch. None 20 Ch. Name Ch. None 22 Ch. Name Ch. None 24 Ch. Name Czech (T)Tools (Re)ReturnKey Guide
| Button Action Nav. | Help | |
| ENTER Selects or enters the corresponding Channel Browser area. (No Guide) | ||
| RETURN Selects or enters the corresponding Channel Browser area. Return | ||
| UP/DOWN Moves the highlight up or down. (No Guide) | ||
| RIGHT Moves the highlight to the Channel Browser area. (No Guide) | ||
| INFO Shows the Category Info. (No Guide) | ||
| TOOLS | Shows the utility function menus. Tools | |
| EXIT | Cancels and returns to the previous step (Factory Mode). (No Guide) | |
![SAMSUNG HG28AB670BW - Power On Scenario [Last Memory] - 3](/content/2026/06/1223637/images/96738be28530db4546879e1277f37750d9d7f3590f163e7560f66c2f105d4643.jpg)
• This is a component of the Left Frame (Country Categories).
![SAMSUNG HG28AB670BW - Power On Scenario [Last Memory] - 4](/content/2026/06/1223637/images/b6cfe725fb7aa8e4a981d146c077993b54831258ea0868827772842d6b6d0a50.jpg)
- Default Highlight: 'The currently selected country'
Elements
| No Name Description | ||
| 1 | When the user enters this screen, the currently selected default item is highlighted.The Country Icon + Category Name are provided. (If the highlight is in the Main Frame, only the icon is displayed.)Moving the highlight- Pressing the up or down button moves the highlight.If the items cannot be displayed on one page, up and down indicators are provided.Once the highlight is moved to a category, the channel list corresponding to the corresponding category is loaded to the Main Frame. |
Left Frame [Country Categories]
| Standard Category Ch. Mode | Antenna Mode Activation | Description | ||
| Air/Cable Satellite | ||||
| Hotel | Original Tuned Registered O O | Lists all the channels registered by the Auto Tune operation. | ||
| Country | All Country O O | Provides the list of channels and sources specified in the Registered Channels list.All Country is the sum of all channels registered to each country. (This is only provided to end users.) | ||
| Country 1 O O | ||||
| Country 2 O O | ||||
| .O O | ||||
Tools [Registered/Countries Categories]
![SAMSUNG HG28AB670BW - Power On Scenario [Last Memory] - 5](/content/2026/06/1223637/images/6d66755bc571f2641c67f8ff45f5ab9e6284af78bd3adba9f139e980b1a84e14.jpg)
text_image
Channel Manager | Registered Registered Austria Safiaum (Dutch) Belgium (Ferich) Czech Channel Manager > Channel Category > Tools > Info Channel Manager > Channel Category > Tools > Info Tools Information [En]Enter (Re)Return (Tools) [Re]Return Registered : 3210 Austria : 400 Belgium(Dutch) : 700 Belgium(Pranon) : 0 Czeon : 60 ... : 70 ... : 00 C#• The items are displayed without 'Channel'.
- If the Registered/Country item in the Left Frame is highlighted, you can enable the corresponding window by pressing the 'INFO' remote control key.
• All countries are displayed.
- navigate country items by pressing the up or down key. Indicators are provided.
Notes
This is a definition of the Tools menu in the Left Frame Category.
Only the Info item for each Register/Country is provided.
Elements
| Category Tools menu Descriptions | |
| Registered, Country Information | Registered Channels. The number of channels of each country. |
• The items are displayed without 'Channel'.
Error Cases
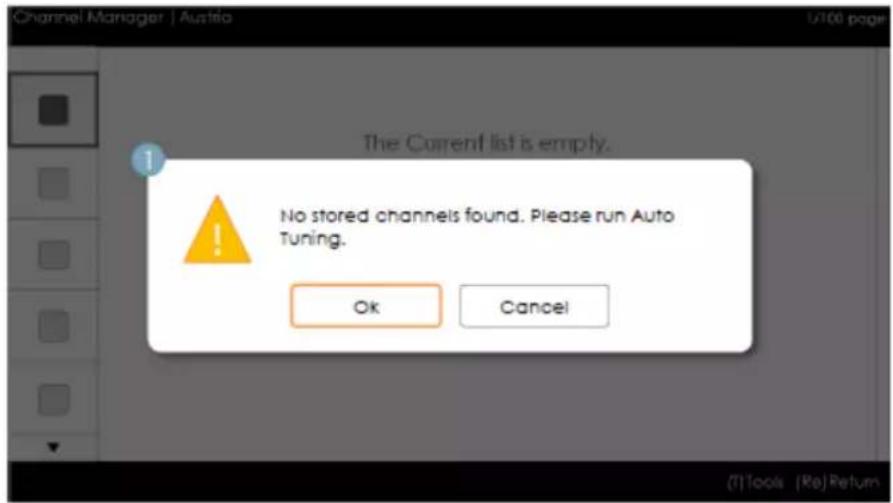
text_image
Channel Manager | Austria The Current list is empty. No stored channels found. Please run Auto Tuning. Ok Cancel (T)Tools | Re|ReturnNotes
This is the message for when there are no saved channels in the Registered Channels list.
Elements
| No Name Description | |
| 1 Message | When entering the browser, if the Registered channels item is empty, a popup message is displayed which enables users to switch to the Auto Store (Program) menu.When both the time and the channel are not configured, and a user enters the Channel Manager, a message that allows the user to switch to the Auto Tuning (Auto Program) operation is displayed in the same way as above. |

Set the current time and date first.
Ok
Cancel
This is the message when the time is not configured.
- If the time is not configured, the message is displayed in Factory Mode before entering the Channel Manager.
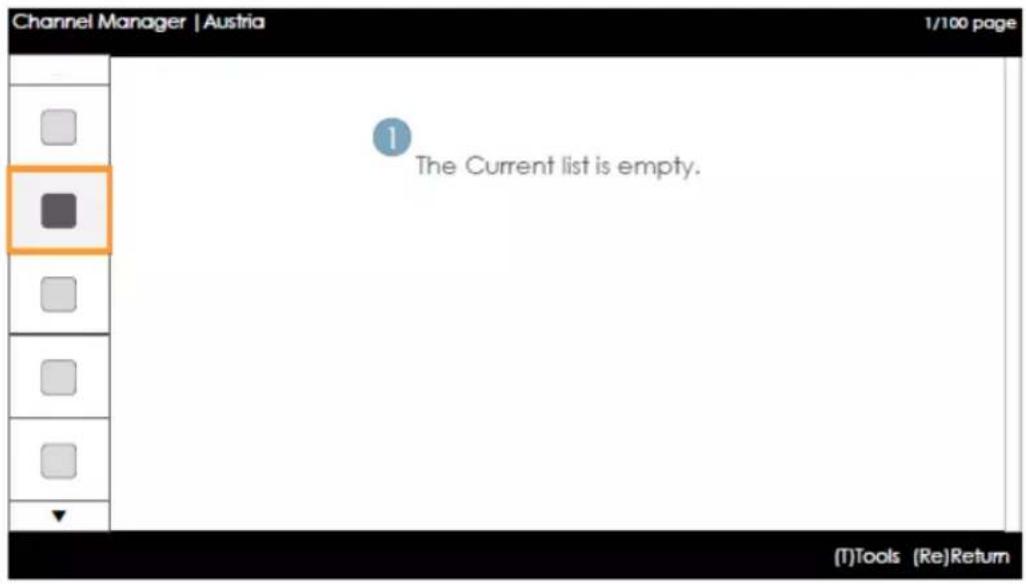
text_image
Channel Manager | Austria 1/100 page The Current list is empty. (T)Tools (Re)ReturnNotes
This is the component for when there are no channels registered to the country category.
Elements
| No Description Description | ||
| • The message is displayed when the currently selected country does not contain any items. |
Main Frame [Channel Browser]
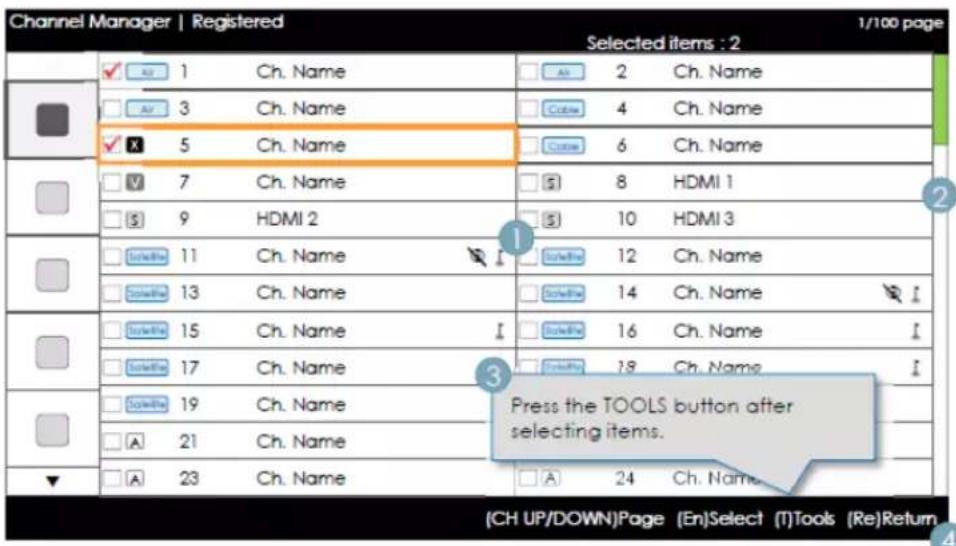
text_image
Channel Manager | Registered Selected items : 2 1/100 page ✓ AI 1 Ch. Name □ AI 3 Ch. Name ✓ X 5 Ch. Name □ V 7 Ch. Name □ S 9 HDMI 2 □ Satellite 11 Ch. Name □ Satellite 13 Ch. Name □ Satellite 15 Ch. Name □ Satellite 17 Ch. Name □ Satellite 19 Ch. Name □ A 21 Ch. Name □ A 23 Ch. Name Ch. Name Ch. Name Ch. Name Ch. Name Ch. Name Ch. Name Ch. Name Ch. Name Ch. Name Ch. Name Ch. Name Ch. Name Ch. Name Ch. Name Ch. Name Ch. Name Ch. Name Ch. Name Ch. Name Ch. Name Ch. Name Ch. Name Ch. Name Ch. Name Ch. Name Press the TOOLS button after selecting items. CH UP/DOWN)Page (En)Select (I)Tools (Re)ReturnKey Guide
| Button Action Nav. Help | ||
| √ CH ^ | Moves the page. Page | |
| ENTER Selects or enters the corresponding Channel Browser area. Select | ||
| RETURN Returns to the previous step (Factory Mode). Return | ||
| ▲/▼ | Moves the highlight up or down. | (No Guide) |
| ▶ Moves the highlight to the Channel Browser area. (No Guide) | ||
| INFO Shows the Category Info. (No Guide) | ||
| TOOLS Shows the utility function menus. Tools | ||
| EXIT | Cancels and returns to the previous step (Factory Mode). | (No Guide) |

Notes
• This is a component of the Main Frame (Channel Browser).
- The initial highlight is on the channel before entering Factory Mode or the external input.
Elements
| No | Name | Description |
| 1 | Main Frame | Shows the channel or the source list of the currently selected category. |
| 2 | Scroll Bar | Shows the position of the current page amongst the total amount of pages. |
| 3 | Navigation Help Area | This is displayed whenever a user enters the Channel Manager. (If a user exits and then reenters the Channel Manager, it is displayed again.)This disappears when the timeout (5 sec.) is reached or a user presses a key. |
| 4 | Navigation Help Area | The currently configured country information and the RED buttons are left-aligned. They are displayed and navigated by group graphically.) The key guide is right-aligned. |
Add to Countries / Edit Countries (1/2)
text_image
Channel Manager | Registered Selected Items : 2 1 Ch. Name 2 Ch. Name Add to Countries Select the country(s) to add the selected channel(s) to/from Selected channel : 1111-111 ABC Austria Belgium (Dutch) Belgium (French) Czech France Ok Cancel (U/D/L/R)Move (En)Enter (Re)Return A 23 Ch. Name A 24 Ch. Name (CH UP/DOWN)Page (En)Select (T)Tools (Re)Return Channel Manager > Browser > Tools > Add to Countries is Country addition completed. OkKey Guide
| Button Action | Nav. Help | |
| ENTER Selects | the highlighted item. Enter | |
| RETURN Cancels and returns to the previous screen (Tools). Return | ||
| ▲/▼ | Moves the highlight over country items. Move | |
| ◄/► | Moves the highlight. Move | |
| INFO N/R N/R | ||
| TOOLS Closes | the current window and displays the 'Tools' menu. (No Guide) | |
| EXIT Cancels and returns to the previous step (Factory Mode). (No Guide) | ||

Note.
• This is the definition of Add to Countries.
- The highlighted channel or more than one selected channel is added to the Country category.

Etc.
- Timeout (60 sec)
Elements
| No Name Description | ||
| 1 | Add to CountriesWindow | If there are no channels that have been registered to the country list in the selected channels, “Add to Countries” is displayed as the title.A check box is displayed depending on whether the country that was selected when entering the screen is registered or not. |
| 2 Guide | ||
| 3 Selection | Info | The number of the selected channel or the channel name.- The channel name is displayed when one channel has been selected: Selected channel: NNNN-NNN ABC- The number of selected channels is displayed when more than one channel has been selected: Selected Channels : N |
| 4 Complete | Message | The message is displayed after the completion of the operation.(This message is always displayed if the OK button is selected.) |
| 5 Selection | Mark | How to identify the meaning of multiple channel selection marksWhen all of the items have been registered.When only part of the items have been registered.When none of the items have been registered. |
Add to Countries / Edit Countries (2/2)

text_image
Channel Manager | Registered Selected Items: 2 1 Ch. Name 2 Ch. Name Edit Countries Select the country(s) to add or delete the selected channel(s) to/from Selected channel : 1111-111 ABC Austria Belgium (Dutch) Belgium (French) Czech France Ok Cancel (U/D/L/R)Move (En)Enter (Re)Return CH UP/DOWN(Page En)Select (T)Tools (Re)Return • Channel Manager > Browser > Tools > Add to Countries Country editing completed. OkKey Guide
| Button Action | Nav. Help | |
| ENTER Selects | the highlighted item. Enter | |
| RETURN Cancels and returns to the previous screen (Tools). Return | ||
| ▲/▼ | Moves the highlight over country items. Move | |
| ◄/► | Moves the highlight. Move | |
| INFO N/R N/R | ||
| TOOLS | Closes the current window and displays the ‘Tools’ menu. | (No Guide) |
| EXIT | Cancels and returns to the previous step (Factory Mode). | (No Guide) |
Notes
This is the definition for Edit Countries.
The highlighted channel item or more than one selected channel item is added or deleted from the Country category.
Timeout (60 sec)
Elements
| No Name Description | |
| 1 Add to Countries | ·If there is a registered channel among the selected channels, Edit Countries is displayed as the title.·A check box is displayed depending on whether the selected country is registered or not. |
| 2 Guide | |
| 3 Complete Message | ·The message is displayed after the completion of the operation. (This message is always displayed if the OK button is selected.) |
Edit Channel Number [Swap Type]
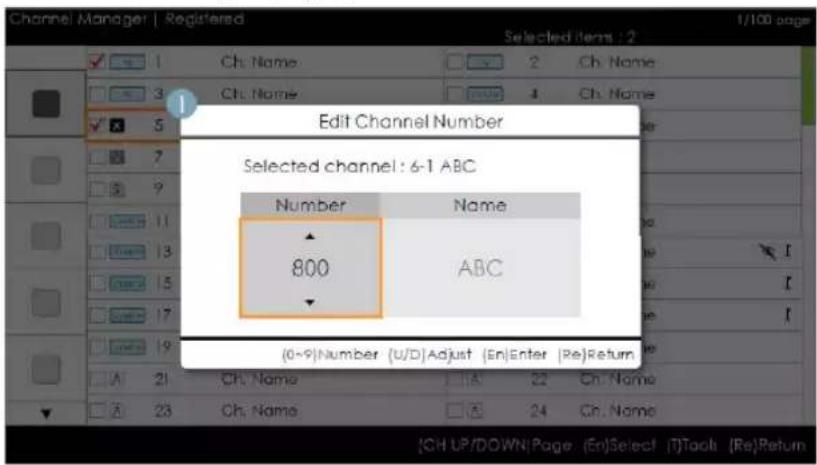
text_image
Channel Manager | Registered Selected Items : 2 Edit Channel Number Selected channel : 6-1 ABC Number Name 800 ABC (0-9)Number (U/D)Adjust (En)Enter (Re)Return Ch. Name 22 Ch. Name Ch. Name 24 Ch. Name CH UP/DOWN Page (En)Select (I)Tool (Re)Return- Channel Manager > Browser > Tools > Edit Channel Number
Key Guide
| Button Action | Nav. Help | |
| ENTER Applies | the changes and closes the window. Enter | |
| RETURN Cancels and returns to the previous screen (Tools). Return | ||
| ▲/▼ | Changes the channel number of the selected channel. | Adjust |
| 0~9 | Enters a digit. | Number |
| INFO | N/R | N/R |
| TOOLS | Closes the current window and displays the ‘Tools’ menu. | (No Guide) |
| EXIT | Cancels and returns to the previous step (Factory Mode). | (No Guide) |
Notes
This is the function that changes the channel number. (Swap Type)
Channel numbers can be changed in all the channel lists and changes are applied to all the channels.
If the new channel number has not been allocated to another channel, the channel number is updated to the new channel number and the list is sorted again in ascending order of channel number.
If the new channel number has already been allocated to another channel, follow the Hotel specifications.
Ete
Vertical circulation is supported.
Elements
| No Name Description | ||
| 1 | Edit ChannelNumber Window | Both the numeric keys and the Up/Down keys are supported.- Selected Channel: Shows the currently selected channel name.- Number: Shows the new channel number.(The currently allocated channel name is also displayed.)- Name: Shows the currently allocated channel name. (If there are no channels, it is displayed as “(Empty)”.): If there is a channel but it does not have a name, the name is represented as “----”. |
| 2 | WarningMessage | If an already allocated channel is selected- If the new channel number has already been allocated to another channel, the confirmation message pops up. (Refer to the figure below.)- If the user wants to change the channel number to one that has already been allocated to another channel, the channel numbers are swapped and saved. |
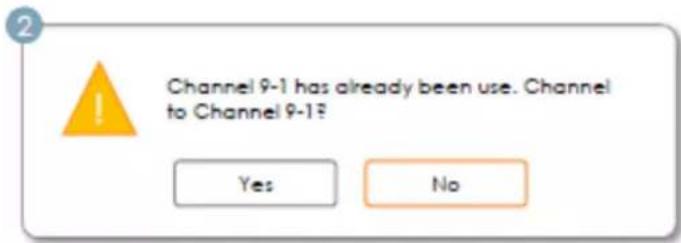
text_image
Channel 9-1 has already been use. Channel to Channel 9-1? Yes NoEdit the Channel Number [External Input] (3/3)
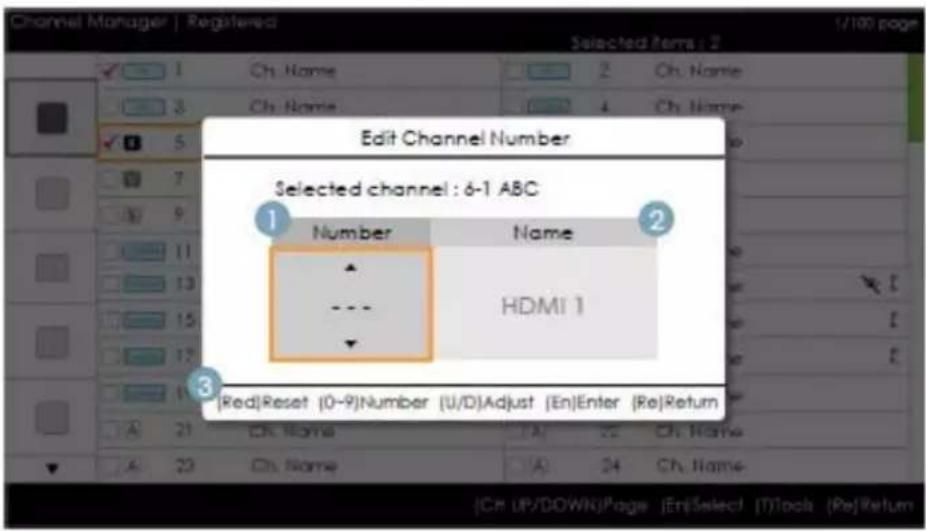
text_image
Channel Manager | Registered Selected Items: 2 1 Ch. Name 2 Ch. Name 3 Ch. Name 4 Ch. Name Edit Channel Number Selected channel : 6-1 ABC 1 Number Name 2 HDMI 1 3 [Red]Reset (0-9)Number (U/D)Adjust (En)Enter (Re)Return Ch. Name 1A 22 Ch. Name Ch. Name 1B 24 Ch. Name [Ch UP/DOWN]Page [En]Select [T]Tools [Re]Return- Channel Manager > Browser > Tools > Edit Channel Number
Key Guide
| Button Action | Nav. Help | |
| RED If a user | presses the button, the channel number is initialized. Reset | |
| ENTER Applies | the changes and closes the window. Enter | |
| RETURN Cancels or returns to the previous screen (Tools). Return | ||
| ▲/▼ | Changes the channel number of the selected channel. Adjust | |
| 0~9 Enters a digit. Number | ||
| INFO N/R N/R | ||
| TOOLS | Closes the current window and displays the ‘Tools’ menu. | (No Guide) |
| EXIT | Cancels and returns to the previous step (Factory Mode). | (No Guide) |

Notes
- This function allocates an external input source to a channel number. (The changes are applied to all the channels.)
- If the new channel number has already been allocated to another channel, follow the Hotel specifications.

Etc.
- Default Highlight: Channel number area.
• Vertical circulation is supported. - Time out (60 sec)
Elements
| No | Name | Description |
| 1 | Channel Number Area | The channel number area.Both the numeric keys and the Up/Down keys are supported.If no value is allocated, as many '-' are displayed as the number of digits. → →  → →  |
| 2 | Source Name | External input nameItems that cannot be configured are disabled. |
| 3 | Nav. Help Area | If a user presses the red button, the channel number is initialized. |
Edit Channel Name
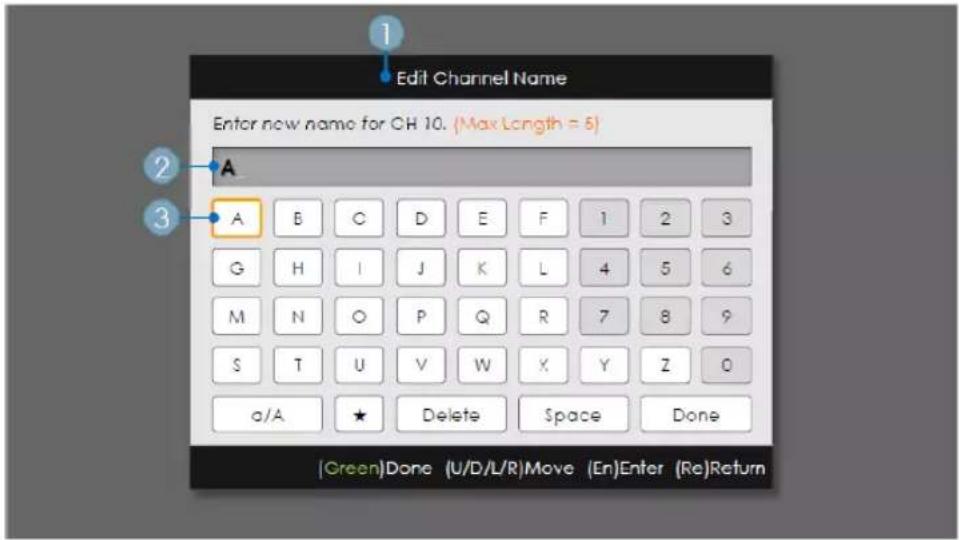
text_image
Edit Channel Name Enter new name for CH 10. (Max Length = 5) A A B C D E F 1 2 3 G H I J K L 4 5 6 M N O P Q R 7 8 9 S T U V W X Y Z 0 a/A ★ Delete Space Done (Green)Done (U/D/L/R)Move (En)Enter (Re)Return- Channel Manager > Browser > Tools > Edit Channel Name
Key Guide
| Button Action | Nav. Help | |
| GREEN Saves | the changes and returns to the Channel Manager. Done | |
| ENTER Saves | the channel name and moves the cursor to the next field. Enter | |
| RETURN Cancels and returns to the previous screen (Tools). Return | ||
| ▲/▼/▶/◀ | Navigates on the keyboard. | Move |
| 0~9 Enters a digit. (No Guide) | ||
| INFO N/R | N/R | |
| TOOLS | Closes the current window and displays the ‘Tools’ menu. | (No Guide) |
| EXIT | Cancels and returns to the previous step (Factory Mode). | (No Guide) |

Notes
- This is the definition of the keypad that is used for the Edit Channel Name function.

Etc.
- Timeout (60 sec)
Elements
| No | Name | Description |
| 1 | Channel Name Edit Window | |
| 2 | Channel Name | The cursor and the character that are currently being entered are in the smae colour as the highlight.When the maximum number of characters is reached, the cursor disappears. |
| 3 | Keyboard | For a detailed scenario, refer to the keypad design document. |
Tools [Edit Mode]
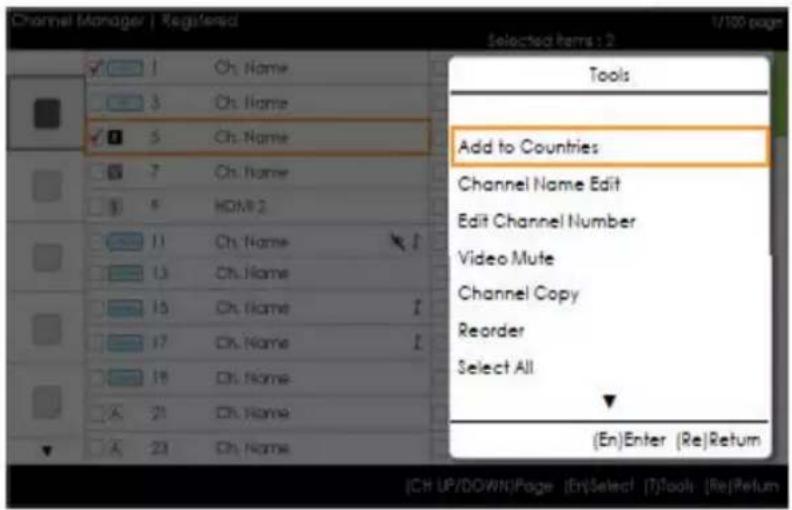
text_image
Channel Manager | Registered Selected Items 2 Tools Add to Countries Channel Name Edit Edit Channel Number Video Mute Channel Copy Reorder Select All (En)Enter (Re)Return [CH UP/DOWN]Page [En]Select [T]Tools [Re]Return| Edit Mode | |
| Content Highlight (when the number of the checked item is 0 or 1) When there is more than one checked item. | |
| Add to CountriesEdit Countries (when an already-registered item is checked.)Channel Name EditEdit Channel NumberVideo MuteChannel Copy (Astra HD +)Reorder (Satellite)Select AllDeselect All (this is only displayed when 1 or more items are selected)Delete | Add to CountriesEdit Countries (when an already-registered item is checked.)Video MuteReorder (Satellite)Select AllDeselect AllDelete |
Notes
This is the definition of the Tools menu.
The position of the popup menu: The Tools menu for an item in the left column of the Channel List → This is displayed on the right. The Tools menu for an item in the right column of the Channel List → This is displayed on the left.
If a user presses the Tools button when the highlighted item is not selected, the item is automatically marked as selected.
For detailed specifications of each function, refer to the NEO Channel Manager.
CH Banner [when a channel number is allocated to an external input]
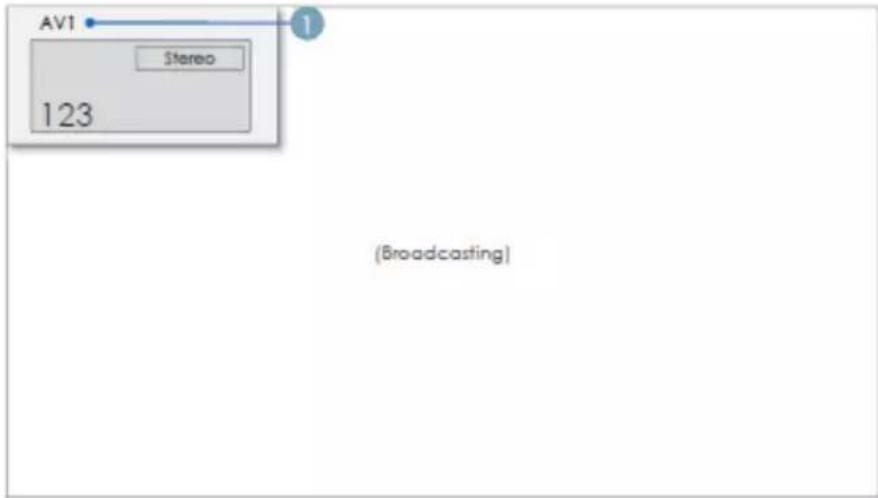
text_image
AV1 Stereo 123 (Broadcasting)
The TV channel banner specifications are applied.
When there is an unsupported item or there is no corresponding information, the item values are not displayed
The channel name is represented as the 'external input name'.
Elements
| No Name Description | |
| 1 External Input Name |
The Channel List provides access to functions related to GenreTV.
- Country Mode
• Changes the genre mode.
Mixed Channel Map
Mixed Channel Map is a function to mix Air, Cable and Setellite channels.
[ Except for Aus, Singapore, NZ models ]
- Mixed channel Map should be ON in order to mix Air, Cable channels.
- Use Channel Editor to sort the channels after turning on 'Mixed channel Map' in Hotel Option Menu.
• Samsung Sound-Bar & Hospitality TV
– Samsung Sound-Bar & hospitality TV support HDMI 1.4 to listen to TV sound on the Sound-Bar by using a single HDMI cable.
- Supporting model.
• Sound-Bar : HW-E350/E450/E550
• Operation of "Hotel mode" in Sound Bar
- The following items for the TV's hotel option menus should be set in advance.
- Hotel option → Power On → Power ON Volume = "Enable" / Power ON Vol / Max Vol
- Hotel option → External Device → Sound Bar Out = "On"
- Connect an HDMI cable from the HDMI OUT port of Sound-BAR to the HDMI3 port of hospitality TV.
- After being connected to the 2013 hospitality TV via HDMI Cable, when the TV turns on, the Sound-Bar automatically detects the TV and then converts to "hotel mode" by itself.
- The change with power-on volume & max volume on TV is applied to the connected sound-bar since TV boots twice.
- Features of "Hotel MODE" in Sound-BAR
– Synchronized power on/off with TV.
- HDMI_CEC enabled.
- Accessible "HDMI OUT" port only. (Other inputs are disabled)
- Synchronizing "power-on" & "max" volume with the TV (the Sound-Bar's volume is set at half of the TV)
- Adjustable "power-on"&"max" volume acquired from the TV's hotel option menu. Sound-Bar volume=TV volume/2 Example. If the volume settings in TV are "power-on volume=20 and max volume=90", the Sound bar will operates at volume=10, max volume=45.
*This function may differ depending on the model.
Installing the Wall Mount
The wall mount kit (sold separately) allows you to mount the TV on the wall. For detailed information on installing the wall mount, see the instructions provided with the wall mount. Contact a technician for assistance when installing the wall mount bracket. We do not advise you to do it yourself.
Samsung Electronics is not responsible for any damage to the product or injury to yourself or others if you elect to install the TV on your own.
Wall Mount Kit Specifications (VESA)

Wall mount kit is not supplied but sold separately.
Install your wall mount on a solid wall, perpendicular to the floor. When attaching to other building materials, please contact your nearest dealer. If installing on a ceiling or slanted wall, it may fall and result in severe personal injury.

Standard dimensions for wall mount kits are shown in the table below.
When purchasing our wall mount kit, a detailed installation manual and all parts necessary for assembly are provided.
Do not use screws that do not comply with VESA standard screw specifications.
Do not use screws longer than the standard dimensions, as they may cause damage to the inside of the TV set.
For wall mounts that do not comply with the VESA standard screw specifications, the length of the screws may differ depending on their specifications.
Do not fasten the screws too tightly. This may... damage the product or cause the product to fall, leading to personal injury. Samsung is not liable for these kinds of accidents.
Samsung is not liable for product damage or personal injury when a non-VESA or non-specified wall mount is used or the consumer fails to follow the product installation instructions.
Do not exceed a 15 degrees tilt when mounting this TV.
| Model | Product Family | TV size in inch(cm) | VESA screw hole specs (A * B) in millimeters | Standard Screw (Length* Pitch in mm) | Quantity |
| HG**AB670 | LED-TV | 28 inches (71.12cm) | 100 X 100 M4 | 4 | |
| 32 inches (81.28cm) | 200 X 200 | M8 | |||
| 40 inches (101.6cm) | |||||
| 46 inches (116.84cm) | 400 X 400 | ||||
| HG**AB460 | 32 inches (81.28cm) | 200 X 200 M6 | |||
| 39 inches (99.06cm) |
text_image
A B R10201023
Do not install your Wall Mount Kit while your TV is turned on. It may result in personal injury due to electric shock.
Securing the TV to the Wall

Caution: Pulling, pushing, or climbing onto the TV may cause the TV to fall. In particular, ensure that your children do not hang over or destabilize the TV; doing so may cause the TV to tip over, resulting in serious injuries or death. Follow all safety precautions provided on the included Safety Flyer. For added stability, install the anti-fall device for safety purposes, as follows.
To avoid the TV from falling
- Put the screws into the clamps and firmly fasten them onto the wall. Confirm that the screws have been firmly installed onto the wall.
You may need additional material, such as an anchor, depending on the type of wall.
Since the necessary clamps, screws, and string are not supplied, please purchase these additionally.
- Remove the screws from the centre back of the TV, put the screws into the clamps, and then fasten the screws onto the TV again.
Screws may not be supplied with the product. In this case, please purchase the screws of the following specifications.
- Connect the clamps fixed onto the TV and the clamps fixed onto the wall with a strong string and then tie the string tightly.
NOTE
• Install the TV near to the wall so that it does not fall backwards.
- It is safe to connect the string so that the clamps fixed on the wall are equal to or lower than the clamps fixed on the TV.
• Untie the string before moving the TV.
- Verify that all connections are properly secured. Periodically check connections for any sign of fatigue for failure. If you have any doubt about the security of your connections, contact a professional installer.
Anti-theft Kensington Lock
The Kensington Lock is not supplied by Samsung. It is a device used to physically fix the system when using it in a public place. The appearance and locking method may differ from the illustration, depending on the manufacturer. Refer to the manual provided with the Kensington Lock for additional information on proper use.
To lock the product, follow these steps:
Please find the “☑” icon on the rear of the TV. A kensington slot is beside the “☑” icon.
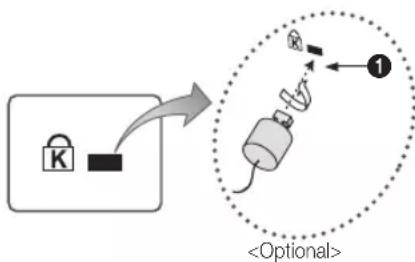
flowchart
graph TD
    A["Lock"] --> B["Switch"]
    B --> C["Output Step 1"]
    C --> D["Optional"]
-
Wrap the Kensington lock cable around a large, stationary object such as desk or chair.
-
Slide the end of the cable with the lock attached through the looped end of the Kensington lock cable.
-
Insert the locking device into the Kensington slot on the product (1).
-
Lock the lock.
These are general instructions. For exact instructions, see the User manual supplied with the locking device.
The locking device has to be purchased separately.
The location of the Kensington Lock may be different depending on the model.
Specifications
| Display Resolution 1920 x 1080 | |||
| Environmental Considerations | |||
| Operating Temperature | 50°F to 104°F(10°C to 40°C) | ||
| Operating Humidity | 10% to 80%, non-condensing | ||
| Storage Temperature | -4°F to 113°F(-20°C to 45°C) | ||
| Storage Humidity | 5% to 95%, non-condensing | ||
| Model Name HG40AB670 HG46AB670 HG39AB460 | |||
| Stand Swivel (Left / Right) 90° 0° | |||
| Screen Size | 40 inches(101.6 cm) | 46 inches(116.84 cm) | 39 inches(99.06 cm) |
| Power Consumption | |||
| Normal operation | 106W | 112W | 92W |
| Standby | 0.5W | 0.5W | 0.5W |
| Sound (Output) 10W x 2 | |||
| Dimensions (WxDxH) | |||
| Body | 928.2 x 49.4 x 552.3 mm | 1059.6 x 49.4 x 626.2 mm | 895.9 x 93.1 x 532.5 mm |
| With stand | 928.2 x 227.7 x 610.1 mm | 1059.6 x 227.7 x 684.0 mm | 895.9 x 227.7 x 589.2 mm |
| Weight | |||
| Without Stand | 8.5 Kg | 10.8 Kg | 7.8 Kg |
| With Stand | 11.3 Kg | 13.7 Kg | 9.8 Kg |
| Display Resolution 1366 x 768 | |||
| Environmental Considerations | |||
| Operating Temperature | 50°F to 104°F(10°C to 40°C) | ||
| Operating Humidity | 10% to 80%, non-condensing | ||
| Storage Temperature | -4°F to 113°F(-20°C to 45°C) | ||
| Storage Humidity | 5% to 95%,non-condensing | ||
| Model Name HG28AB670 HG32AB670 HG32AB460 | |||
| Stand Swivel (Left / Right) 0° 90° 0° | |||
| Screen Size | 28 inches(71.12 cm) | 32 inches(81.28 cm) | 32 inches(81.28 cm) |
| Power Consumption | |||
| Normal operation | 47W | 58W | 50W |
| Standby | 0.5W | 0.5W | 0.5W |
| Sound (Output) 5W x 2 10W x 2 5W x 2 | |||
| Dimensions (WxDxH) | |||
| Body | 645.0 x 49.5 x 384.9 mm | 737.9 x 49.5 x 435.8 mm | 738.4 x 93.2 x 441.7 mm |
| With stand | 645.0 x 252.6 x 435.6 mm | 737.9 x 191.7 x 504.9 mm | 738.4 x 191.7 x 497.7 mm |
| Weight | |||
| Without Stand | 4.3 Kg | 5.3 Kg | 5.4 Kg |
| With Stand | 4.7 Kg | 7.3 Kg | 6.0 Kg |

ign and specifications are subject to change without prior notice.

information about power supply, and more about power consumption, refer to the label attached to the product.

above specifications may differ depending on the model.
HDMI
The terms HDMI and HDMI High-Definition Multimedia Interface, and the HDMI Logo are trademarks or registered trademarks of HDMI Licensing LLC in the United States and other countries.
SAMSUNG
Contact SAMSUNG WORLDWIDE
If you have any questions or comments relating to Samsung products, please contact the SAMSUNG customer care center.
| Country | Customer Care Centre |
| AUSTRIA 800-112233 | |
| FINLAND 0771-400002 | |
| FRANCE 0825-022062 | |
| GERMANY 01805-471101 | |
| HUNGARY 0640-985985 | |
| ITALIA 800-194194 | |
| NETHERLANDS 015-2197000 | |
| POLAND 0-801-B2BSAM (222726) | |
| PORTUGAL 808-B2BSAM | |
| SPAIN 0902024-010 | |
| UNITED KINGDOM +44 (0) 845 8414141 | |
| SOUTH AFRICA 0860-SAMSUNG (726-7864) | |
| U.A.E | 800-SAMSUNG (726-7864)8000-4726 |
| Country | Customer Care Centre | Web Site |
| AUSTRALIA 1300 362 603 www.samsung.com | ||
| NEW ZEALAND 0800 SAMSUNG (0800 726 786) www.samsung.com | ||
| CHINA | 400-610-5858(Business) | www.samsung.com |
| HONG KONG | (852) 3698 4698 | www.samsung.com/hkwww.samsung.com/hk_en/ |
| INDIA | 1800 1100 113030 82821800 3000 82821800 266 8282 | www.samsung.com |
| INDONESIA | 0800-112-8888021-5699-7777 | www.samsung.com |
| JAPAN | 0120-327-527 | www.samsung.com |
| MALAYSIA 1800-88-9999 | www.samsung.com | |
| PHILIPPINES | 1-800-10-SAMSUNG(726-7864) for PLDT1-800-3-SAMSUNG(726-7864) for Digitel1-800-8-SAMSUNG(726-7864) for Globe02-5805777 | www.samsung.com |
| SINGAPORE | 1800-SAMSUNG(726-7864) | www.samsung.com |
| THAILAND 1800-29-3232 | 02-689-3232 | www.samsung.com |
| TAIWAN | 0800-329-9990266-026-066 | www.samsung.com |
| VIETNAM | 1 800 588 889 | www.samsung.com |
| GEORGIA | 8-800-555-555 | - |
| ARMENIA | 0-800-05-555 | - |
| AZERBAIJAN | 088-55-55-555 | - |
| UZBEKISTAN | 8-10-800-500-55-500 | www.samsung.com |
| KYRGYZSTAN | 00-800-500-55-500 | www.samsung.com |
| TADJIKISTAN | 8-10-800-500-55-500 | www.samsung.com |
| MONGOLIA | www.samsung.com | |
| BELARUS | 810-800-500-55-500 | - |
| MOLDOVA 00-800-500-55-500 | - | |