Swami GT 1211 - Golf accessory Izzo Golf - Free user manual and instructions
Find the device manual for free Swami GT 1211 Izzo Golf in PDF.

User questions about Swami GT 1211 Izzo Golf
0 question about this device. Answer the ones you know or ask your own.
Ask a new question about this device
Download the instructions for your Golf accessory in PDF format for free! Find your manual Swami GT 1211 - Izzo Golf and take your electronic device back in hand. On this page are published all the documents necessary for the use of your device. Swami GT 1211 by Izzo Golf.
USER MANUAL Swami GT 1211 Izzo Golf
MACEDON, NY 14502-9191
[ PLEASE PLACE INSIDE ENVELOPE ]


SWAMI
GOLF GPS
IZZO
GOLF

text_image
SCORE 47 STROCKS 3 HOLE/PAP 9/5 170 245 230 | 260 3-WOOD E-CABLE SWAMIGTUser Manual
TABLE OF CONTENTS
Thank You for Choosing Swami GT 2
Warranty/Video....2-3
- General......4
1.1 Screen Display/Button Description 4
1.2 Basic Specifications ....5
1.3 Accessories List ....6
1.4 Charging Instructions ....7
- Getting Started ....8
2.1 Set Up 8
2.2 Main Menu 8
2.3 Pairing Clubs 9
- On the Golf Course ....10
3.1 Course/Mode Selection 10
3.2 Game Tracker Mode 10-11
3.3 Advancing Holes....11
3.4 E-Caddie 11-12
3.5 Hazard Screen 12
3.6 Play Menu 12-13
3.7 SpecialScenarios....13-14
3.8 End Round 14
-
Settings....15-16
-
Online Portal 16-23
5.1 Uploading Rounds....22-23
5.2 Reviewing Rounds....23
5.3 Deleting Rounds....23
- Caution/About GPS....24-26
1 Table of Contents

SWAMI
GOLF GPS
IZZO
GOLF
REGISTER YOUR SWAMI GT
FILL OUT THE INFORMATION BELOW OR GO TO
WWW.SWAMIGPS.COM/REGISTRATION
NAME:
ADDRESS:
EMAIL:
PHONE: ( ) ____
DATE PURCHASED: ____ / ____ / ____

Thank You for Choosing Swami GT
Utilizing NFC technology the Swami GT communicates with your clubs, tracking club data from every shot and statistics from round to round. In order to ensure the best performance of the product and extend its service life, please read this manual before using your Swami GT.
Warranty / Return Policy
SWAMI is warranted to be free from defects for up to (1) year from your purchase date. Software updates are free of charge. IZZO cannot refund your purchase. IZZO will replace any defective unit within the warranty period. Please call Swami Support at 800-777-7899 to request a Return Authorization. All defective product must be returned to:
IZZO Golf
1635 Commons Parkway
Macedon, NY 14502
RA:
Please include a note with your Name, Address, Phone # and the Return Authorization #.
Recommended: Prior to using your SWAMI GT, please watch the instructional video by visiting www.swamiGPS.com/swami-gt
1. General
1.1 Screen Display/Button Description

text_image
Micro USB Port for Charging/Data Transfer Time Battery Level Satellite Signal [Up] Button Total Score SCORE 47 245 YDS STROKES 3 230 | 260 HOLE/PAR 9/5 3-WOOD E-CADDIE Hole Score Hole Number/Par [Enter] Button/ Sensor [Down] Button [Power] ButtonButton Description:
• [Power] Button: Hold for a few seconds to power on/off.
• [Enter] Button: Press to select options.
Press to toggle between distances to Green or Hazards in Play Mode.
Hold for a few seconds to access Play Menu.
- Sensor: Hold club tags near sensor to register each shot.
• [Up] Key: Scroll Up
• [Down] Key: Scroll Down
1.2 Basic Specifications
| Number of courses stored 30,000 Worldwide | |
| Battery Type Rechargeable Lithium-Ion Battery | |
| Battery Life About 6-8 hours | |
| Charging Time About 3-5 hours | |
| Dimensions Length 4” x width 2.2” x thickness .6” | |
| Weight 3.52 oz | |
| Display Size 2.5 inches | |
| Water Resistant Yes |
1.3 Accessories List
Thank you for purchasing the SWAMI GT. Please confirm whether your Swami GT contains the following items:

natural_image
Close-up of a black cable with a small USB port (no text or symbols visible)Micro USB Cord

14 Club Tags
* Should any item above be missing, please contact IZZO Golf.
IZZO Golf
1635 Commons Parkway
Macedon, NY 14502
www.izzo.com
1-800-777-7899
1.4 Charging Instructions
- A rechargeable lithium battery is built in the body of Swami GT.
- Insert one end of the USB cord into the connection port located on the top of the device. Plug the other end of the USB cord into a PC or AC adapter (not included).
- The Swami GT can be used for about 6-8 hours after a full charge.
- Battery can be charged before being completely drained, but please do not charge it excessively.
- The best and fastest charging method is to charge the battery after the device is powered off.
- While unit is turned off the charging screen will show a battery with bars repeatedly blinking. When the bars stop blinking, unit is fully charged.
2. Getting Started
2.1 Set Up

text_image
pressing down- Attach Club Tags to the end of the grip for each club by firmly and twisting to tighten.
- Hold Power button for 3 seconds to power device on and then proceed to Pair Clubs (see page 9).
2.2 Main Menu
- Use [Up/Down] buttons to scroll through the menu choices. Press [OK] to select any choice.

text_image
12:35 PM START ROUND PAIR CLUBS REVIEW ROUNDS SETTINGS- Start Round: Initiates satellite fix to begin your round of golf.
• Pair Clubs: Synchronize your golf clubs with the device (using the - Review Rounds: View the data from your previous rounds.
Settings: Adjust the settings on the device.
2.3 Pairing Clubs
NOTE: This step is necessary prior to your first use and NOT prior to each subsequent round.
- Use [Up/Down] buttons to scroll to Pair Clubs. Press [OK] button to select.
- The screen will display a "spinning arrow"
- While holding golf club, hold attached Club Tag near the Sensor (located in the middle of the gray button panel).
- Once Club Tag is recognized, device will vibrate.
- Use [Up/Down] buttons to select New (for first time registration) or Existing club (for re-registering a club) then press [OK] button.
- Use [Up/Down] buttons to select Club Type then press [OK] button.
- Use [Up/Down] buttons to scroll to the specific club, then press [OK] button to assign the Club Tag to that club.
- Club is now paired with device.
- To pair another club, use [Up/Down] buttons to select Yes, then press [OK] button to confirm.
- Repeat steps 1-9 until each club as been paired with the device.
- To re-assign a Club Tag to a different club, repeat steps 1-4 using the same Club Tag. You will be asked if you wish to re-assign the Club Tag. Select Yes, then proceed with steps 5-7.
3. On the Golf Course
3.1 Course/Mode Selection
- Hold [Power] button for 3 seconds to power the device on.
- Use [Up/Down] buttons to scroll to Start Round. Press [OK] button to select.
- Device will begin searching for satellite fix. Once satellite connection is established the 5 nearest golf courses will be listed.
- Use [Up/Down] buttons to scroll to desired golf course then press [OK] button to select.
- Use [Up/Down] buttons to select mode, then press [OK] button to confirm:
- Game Tracker Mode: GPS mode with Game Tracking data.
- GPS Mode: Standard GPS distances without Game Tracking data.
3.2 Game Tracker Mode
Note: To ensure Game Tracking accuracy, we recommend playing 1-3 rounds using GT Mode to become familiar with the Game Tracking process. Then delete those rounds and start tracking your game once you are accustomed to the process.
- Hold Club Tag near Sensor while on tee box of 1st hole until the device provides feedback. (depending on which Feedback option is selected in Settings See section 4.6 on page 15).
- Hit shot and travel to ball.
-
Hold Club Tag for upcoming shot near Sensor before hitting each shot, until reaching green.
-
Hold Club Tag near Sensor before each putt.
- Travel to next tee box.
- Repeat steps 1-5 for remainder of round.
3.3 Advancing Holes
- Once a putt is registered, or Add Putt is selected in the Play Menu, the device will advance to the next hole after registering your club for the next tee shot.
- If you need to see the yardage on your tee shot prior to selecting a club (such as on a par 3 tee box), simply press the [Up] button once to view the yardage, then select and register your club.
- In the event no putts are registered (you chip in, or you are 'given' a putt), Pressing the [Up] button and then the [OK] button will also advance the device to the next hole.
- In GPS ONLY Mode, in most cases, the device will auto-advance to the next hole while traveling from the green to the next tee box. If the unit does not auto advance (in GPS ONLY mode) then press the [Up] button.
3.4 E-Caddie
- After playing three rounds in Game Tracker Mode, the E-Caddie will become available and make club recommendations based on your previous club distance data stored over time.
- Club recommendations will be made if you are 50-250 yards away from the green.
-
If, after three rounds logged, a shot does not travel at least 75% of your avg. distance for that particular club, it will not be used in calculating your avg. distance for that club.
-
E-Caddie can also be used in GPS ONLY Mode and can be turned off in Settings.
Note: It might take some time to build up accurate distance averages for each club. The more rounds that are stored on the device, the more accurate the E-Caddie will become.
3.5 Hazard Screen
- Press and release the [OK] button quickly to view distances to the front and back of hazards & doglegs. Press and release the [OK] button quickly again to return to the Play Screen (distances to green).

Bunker

Water

Dogleg
122/129
Distance to Layup/Carry
3.6 Play Menu (for Game Tracker mode only)
-
Hold the [OK] button for 3 seconds to access Play Menu.
-
Resume Round: Select to return to your round.
- End Round: Select to end your round and view round data.
- Add Putt: Use if you forgot to register a putt or if you were “given” a putt (see Special Scenarios, page 13).
12 Using Swami on the Course
- Add/Delete Stroke: Use to manually edit the score on any given hole. The score can only be adjusted on the hole you are currently playing (see Special Scenarios below).
- Last Yardage Removal: Select to disregard the shot yardage data from your previous shot.
- Change Hole Par: Use to edit the par for a particular hole (if ever necessary).
- Switch to Next 9 Holes: Use if playing a course with only 9 holes to create an 18 hole round.
- Pair Clubs: Use to pair clubs during your round if needed (see Pairing Clubs, page 9).
- Settings: Select to change settings on the device (see Settings, page 15 for more details).
Note: To exit the Play Menu, select Resume Round, or wait 3 seconds and the device will automatically return to the Play Screen if no options are selected.
3.7 Special Scenarios
- Adding putts: If you forget to register a putt or you are "given" a putt, hold [OK] button for 3 seconds to access the Play Menu. Use [Up/Down] buttons to scroll to Add Putt then press [OK] button. This adds one put at a time.
- Penalty Strokes: Hold [OK] button for 3 seconds to access the Play Menu. Use [Up/Down] buttons to scroll to Add/Delete Stroke, then press [OK] button. Use [Up/Down] buttons until the correct number of total strokes --including the penalty strokes-- is displayed, then press [OK] button to confirm.
-
Chip in, hole out, or hole-in-one: Any time that a putt is not registered (or added). The device must be manually advanced to the next hole (see Advancing Holes, page 11).
-
Changing club selection: If you decide to change your club prior to your shot but already registered that club, hold [OK] button for 3 seconds to access the Play Menu. Use [Up/Down] buttons to scroll to Add/Delete Stroke then press [OK] button. Use [Down] button to remove the registered stroke, then press [OK] button to confirm. Proceed to register your newly selected club.
-
Putting off the green: If you putt off the green then have to chip back onto the green, do not register your chip shot. Instead, Hold [OK] button for 3 seconds to access the Play Menu. Use the [Up/Down] buttons to scroll to Add/Delete Stroke, then press [OK] button. Use the [Up/Down] buttons until the correct number of total strokes --including the chip-- is displayed, then press [OK] button to confirm. Then proceed to register each subsequent putt until you hole out.
-
Lost Club Tag: If you lose a Club Tag, select Pair Clubs from the Main Menu or the Play Menu (if during a round). Register an extra Club Tag and select Exisiting Club. Use [Down] button to scroll to the club that the missing Club Tag was assigned to and then press [OK] button.
3.8 End Round
-
Once your round is finished, hold the [OK] button for 3 seconds to access the Play Menu. Use the [Up/Down] buttons to scroll to End Round, then press [OK] button to confirm.
-
Use the [Up/Down] buttons to scroll and view the data from your round.
-
Hold the [OK] button to exit and return to the Main Menu.
14 Using Swami on the Course
4. Settings
- To return to the Main Menu, hold the [OK] button for 3 seconds, or use the [Down] button to scroll down and select Back.
- Score Display: Choose if you want your total score to be displayed numerically or relative to par (+1, E, -1).
- Recommend Clubs: Turn club recommendations on/off (E-Caddie).
- Clear Stats: Deletes all saved round data.
- Sleep Time: This is the amount of idle time before the screen turns dark to conserve battery life. Select from 30 sec, 1 min, 2 min, off.
- Auto Power Down: This is the amount of idle time before the device powers off. Select from 30 min, 1 hr, 2 hr, off.
- Feedback: Select the notification type when registering a shot.
- Audio & Vibration- After registering a shot, device will vibrate then make a "beeping" sound.
- Audio Only- After registering a shot, device will only "beep."
- Vibration Only- After registering a shot, device will only vibrate.
- Brightness: Adjust the brightness of the screen display.
- Daylight Saving: Turn Daylight Saving Time on/off.
-
Time Adjustment: The time will set automatically once connected to satellites. Use this option to manually adjust the time by hour (if needed).
-
Meter/Yard: Select unit of measure, Yards or Meters.
- Factory Reset: Returns device to factory settings and deletes all saved data.
- About: View device information.
- Back: Return to Main Menu.
5. Online Portal
PC requirements
- 1-gigahertz (GHz) or faster 32-bit (x86) or 64-bit (x64) processor
- 1-gigabyte (GB) RAM (32-bit) or 2 GB RAM (64-bit)
- 16 GB available hard disk space (32-bit) or 20 GB (64-bit)
- Internet access
- Windows .NET Framework 4.0 or above installed
- Minimum of 1024x768 screen resolution
Note: If using Windows 8, please visit www.swamigps.com/swami-gt and complete the required steps prior to uploading round data for the first time.
-
Plug Swami GT into PC via USB cable. Device must be powered on and on the Main Menu Screen.
-
Go to www.swamigps.com and click GT Portal at the top of the page.
-
Register a new account or Log-In with your existing account.

text_image
SWAMI GT ENTER YOUR USERNAME ENTER YOUR PASSWORD LOG IN REGISTER REMEMBER ME Forgot Password?Installation
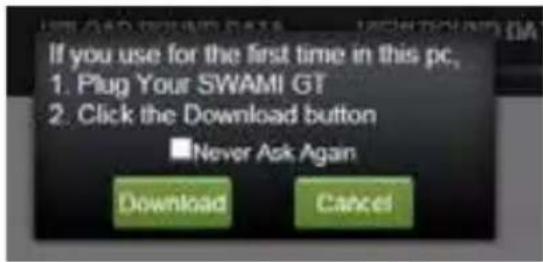
- When using the online portal for the first time, you will have to install the Swami Helper Application to allow the portal to communicate with your Swami GT.
text_image
If you use for the first time in this pc, 1. Plug Your SWAMI GT 2. Click the Download button ■Never Ask Again Download Cancel- Click Download
- Click Run
For Internet Explorer:
• A window will pop up at the bottom of the page click Run to install.

text_image
Do you want to run all cases setup and (0.25 M/B) from golftracker data.com! This type of file could have your computer.- Click Run again to continue

text_image
The publisher of setup.mai couldn't be verified. Are you sure you want to run the program? Listen more Pass View downloadsFor Firefox:
- Click Save File.
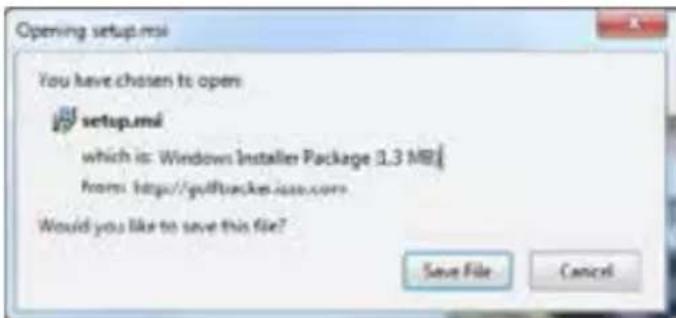
text_image
Opening setup.msi You have chosen to open setup.msi which is: Windows Installer Package (1.3 MB) from: http://gulfbuckes.issc.com Would you like to save this file? Save File Cancel- Then go to Downloads (top right corner of Browser Window)
- Click Run.
For Chrome:
- Click on the downloaded program (lower left corner of Browser window).
-
Click Run.
-
The setup screen will pop up and then click Next.
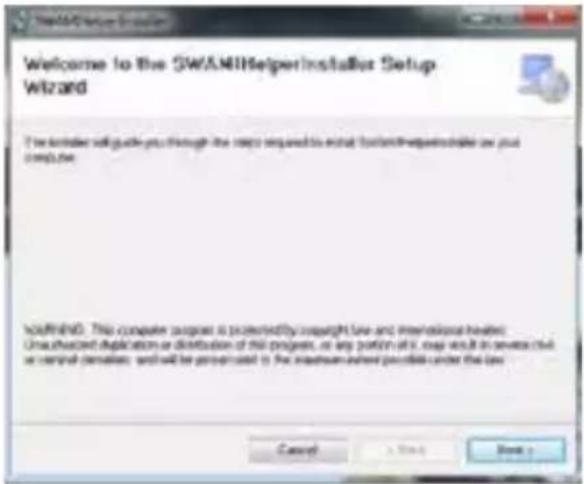
text_image
Welcome to the SWAM Helper Installer Setup Wizard I'm better to guide you through the steps required to install software requirements or your computer. WARNING: This computer program is powered by copyright law and intended to be: Unadjusted duplication or distribution of the project, as any portion of it may result in several results or similar permission, we will be provided to the system where possible under the law.- Click Next again to continue.
- Click Next to confirm installation.

text_image
Confirm Installation The install is ready to install SimAtiff helpcomputer on your computer. Click "Next" to start the installation.- Then, the Swami Helper Application will start to install.
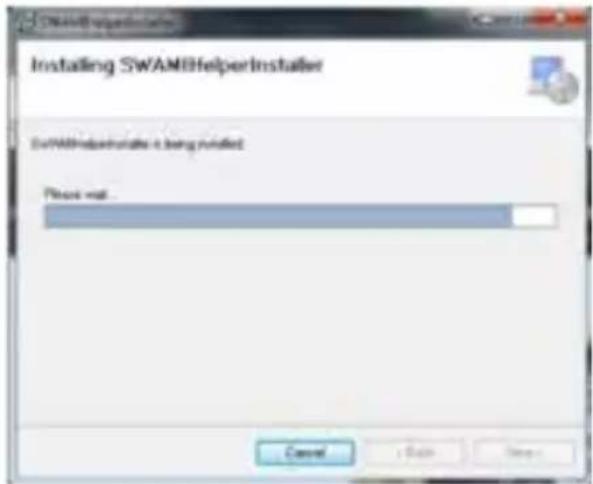
text_image
Installing SWAMB helper Installer SWAMB helper installer is being installed Please wait... Cancel Apply Cancel- After the installation is complete, click Close.

text_image
Installation Complete You are needed to install your own software installed. Click "Check" to exit Please use Windows Updates to check for any clinical updates by the ART Framework. Cancel Cancel Close- During this process the driver installation window will pop up to install the driver and then disappear once the driver has been installed.

text_image
Screenshot of a software interface window with Chinese text, showing two blank panels.5.1 Uploading Rounds
- Click on the Upload Round Data tab at the top of the web page.
- Click on UPLOAD
- Give permission for the program to run.
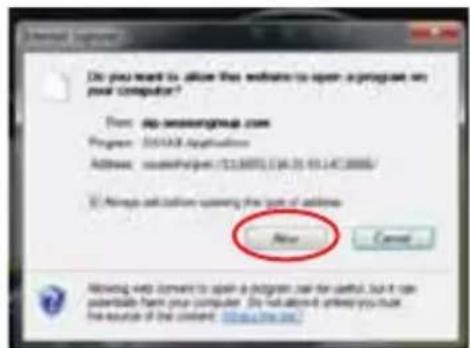
text_image
Do you want to allow this website to open a program on your computer? From: db-wwseongroup.com Progress: 051328 Applications Address: www.dsgp.cn/12130001/124.01.01.147.0000/ © Always call down upon this type of address New Cancel Allowing web content to open a dsgp.cn for useful, but it can potentially have your computer. Do not allow the privacy you trust the default of the content. https://www.dsgp.cn/Internet Explorer
Firefox

text_image
Service Application This file needs to be opened with any applications needed by: SERVICE Application Device as Application online Cancel Generated: My cloud by instant step this OK... CancelChrome
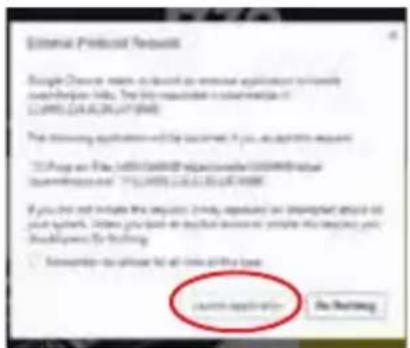
text_image
External Protocol Request Google Devices name is displayed as external application serverily userpower info. The file requested is configuration of 12.0000 (24.0000, 24.07.2008) The remaining applications are considered if you are appropriate request. "3.2 Programs and 4.5.1000/10000/10000/10000/10000/10000/10000/10000/10000/10000/10000/10000/10000/10000/10000/10000/10000/10000 If you do not include the requests, please request an important request to your system. Address your phone to this device or maybe the request your should power by clicking. □ Assignee to access for all links to the load Search Application Do Nexting- Then Click UPLOAD again.
- The round data on your Swami GT will begin to upload to the Portal.

text_image
ROUND DATA BEGIN UPLOAD 16% Close- After the upload has completed, close the upload window.
5.2 Reviewing Round Data
- Click the View Round Data tab at the top of the web page.
- Click on the Select Round drop down box located on the left side menu of the web page. Then click on the round you want to view.
- View your round hole by hole and shot by shot by clicking on each hole number. Below the aerial view of your round, view your statistics for that round.
- You can view and track your average statistics from your last 5 rounds or last 10 rounds by clicking Summary or Detail on the left side menu of the web page.
5.3 Deleting Rounds
- To delete a round, click Delete Round on the left side menu of the web page.
- Click the checkbox next to the round you want to delete.
- Click DELETE and the round will be deleted.
CAUTION
Global Position System (GPS) was developed and is managed by the United States Department of Defense (DOD,) which is responsible for its normal operation and position precision control; the U.S. is entitled to affect function or position precision of the whole system without prior notification or announcement based on its political considerations or safety of national defense.
In order to use the SWAMI GT correctly and safely, you must be aware of some specific knowledge; please read the following attentions in the manual prior to operating the device:
- SWAMI GT was only designed for the purpose of leisure and recreation and it isn't applicable for industrial or special measurement.
- SWAMI GT is only an auxiliary device, so we will not accept any legal liability for accidents due to mistaken operation or poor judgment by using SWAMI GT for measurement.
- Please do not try to dissemble SWAMI GT or repair any part of the device.
- Please do not place SWAMI GT in a place exposing to direct sunlight or high temperature.
About GPS
Global Position System (GPS) is a satellite system developed by the Department of Defense of US. GPS consists of 32 satellites that circle the earth and are 11,000 miles away from the ground. These satellites make two circles of the earth per day and emit signals of extremely low power which will be received and recorded by 5 ground stations. These ground stations will use precise time signals to confirm accurate position of each satellite. Your GPS receiver can “pick” signals sent out by the satellites. An accurate latitude, longitude and height can be determined through calculation on positions and distances of at least 4 satellites.
WAAS (Wide Area Augmentation System) can enhance the precision of GPS. It was designed by the Federal Aviation Administration and is mainly used to enhance precision of GPS on planes. WAAS is combined with extra ground station groups that are set up in precisely located places. These ground stations work together with a master console to improve accuracy of satellite signals and reduce errors to about 3 meters.
Using Conditions
As Swami GT uses GPS, it is available only in the places that can receive satellite signals, excluding places indoor or in water.
QUESTIONS & ANSWERS
| Situations Possible | Problems Solutions | |
| The device cannot be started | A. Battery voltage is too low.B. You didn’t press and hold the [Power] key for 3 seconds. | A. Charge the battery.B. Press and hold the [Power] key until the power is on. |
| The device cannot detect satellites | A. Time for accessing satellite signal is not enough.B. The device is being started indoors. | A. Check whether the satellite icon keeps blinking; if it stops blinking, the satellite location has been fixed.B. Keep the device in an open outdoor space. |
For U.S. customers, if you have any other questions or concerns, please call 1-800-777-7899 or go to www.swamigps.com
For U.K. customers, If you have any other questions or concerns, please call 01342 836376 or email richard@skymaxsport.co.uk.