51561 - Water pump WilTec - Free user manual and instructions
Find the device manual for free 51561 WilTec in PDF.

User questions about 51561 WilTec
0 question about this device. Answer the ones you know or ask your own.
Ask a new question about this device
Download the instructions for your Water pump in PDF format for free! Find your manual 51561 - WilTec and take your electronic device back in hand. On this page are published all the documents necessary for the use of your device. 51561 by WilTec.
USER MANUAL 51561 WilTec
text_image
the XPO tool experts
natural_image
Industrial pump with black and blue components, no visible text or symbolsIllustration similar, may vary depending on model
Read and follow the operating instructions and safety information before using for the first time.
Technical changes reserved!
Due to further developments, illustrations, functioning steps, and technical data can differ insignificantly.
Updating the documentation
If you have suggestions for improvement or have found any irregularities, please contact us.
The information contained in this document may alter at any time without previous notice. It is prohibited to copy or spread any parts of this document in any way without prior written allowance. All rights reserved.
The WilTec Wildanger Technik GmbH cannot be held accountable for any possible mistakes in this operating manual, nor in the diagrams and figures shown.
Even though, the WilTec Wildanger Technik GmbH has undergone biggest possible efforts to ensure that the operating manual is complete, faultless, and up to date, mistakes cannot be entirely avoided.
If you should find a mistake or wish to make a suggestion for improvement, we look forward to hearing from you.
Send an e-mail to:
service@wiltec.info
or use our contact form:
https://www.wiltec.de/contacts/
The most recent version of this manual in various languages can be found in our online shop via:
https://www.wiltec.de/docsearch
Our postal address is:
To return orders for exchange, repair, or other purposes, please use the following address. Attention! To allow for a smooth execution of your complaint or return, it is important to contact our customer service team before returning the goods.
Returns Department
Thank you for purchasing this quality product. To minimise the risk of injury we urge that our clients take some basic safety precautions when using this device. Please read the operation instructions carefully and make sure you have understood its content.
Keep these operation instructions safe.
Features
- Pump casing, lid and impeller made of high-quality plastic
• Big outlet, high discharge head and quiet operation
• Good mechanical gasket with long lifespan - Includes overload protection to allow continuous operation
- With simple suction and pressure line connections
Notes on application
- The swimming pool pumps are designed for small pools (family use), whirlpools and sauna swimming pools. We recommend the use of a pre-filter.
- Caution! Near swimming pools and garden ponds and in their protection area, the use of the pump is only allowed with a fault-current circuit breaker (30 mA) according to DIN VDE 100 part 702 06.92. If you have any questions, please ask a qualified technician.
- Keep an adequate safety distance to the swimming pool and mount the pump to a stable ground panel. According to the VDE a safety distance of 2 m should be kept.
- We do not bear liability for the consequences of improper installation, commissioning, and electrical installations, which are not according to regulations.
- The electricity cable needs to comply with the EG norm (2) or type Ho7 RN-F according to VDE 0620.
- The device is not meant to be operated by people (including children) with limited physical, sensory, or mental abilities or lack of knowledge and/or experience, unless they are supervised by a person responsible for their safety or are being instructed on how to operate the device.
• Children should be supervised, when around the device to ensure they do not play with it.
Safety instructions
- Visually examine the device before every use. Do not use the device if safety precautions are damaged or worn-out. Never override safety measurements.
- Only use the device for the purpose described in this operating manual.
- Do not connect the device to the electricity supply before all parts have been installed.
- You are responsible for the safety in the working/ operating area.
- If the cable or socket should be damaged due to external influences, it must not be repaired! The electricity cable needs to be exchanged for a new one by a qualified technician only.
- The voltage of 230 V AC (as stated on the type label) needs to match the mains voltage available.
- Never lift, transport, or attach the device by its cable.
- Make sure that all electrical connections are in an area, which is flood-proof and protected from moisture.
• Before carrying any work out on the device, pull the plug from the electricity socket.
• The device must not be subjected to rain or a direct stream of water. - The operator is responsible to comply with all regional and national safety and installation regulations and laws. If necessary, ask a qualified electrician.
- If the device should be malfunctioning in any way, any repair work needing to be carried out is only allowed to be done by a qualified technician.
- The device must never run dry or with an entirely closed suction line. The manufacturer is not liable for any damages caused to the device when operated dry, thus the warranty is voided.
Control measures before the first commissioning
• Make sure that the voltage and frequency of the mains current is matching with the technical specifications of the pump (see type label).
• The pump shaft needs to turn freely.
• Fill the system with water, to find any potential leakages and be able to repair them.
- Open all spool valves, which might be present in the pressure and suction line and ensure that all lines are connected.
- Let the water run into the pump via the overflow/ the suction inlet of the pool or fill the suction line and the body of the pump entirely with water.
- Never run the pump dry.
- The pumps are designed for clean water with a max. temperature of 35^ C; any other use should be avoided.
Mains connection
The electrical connection of the pump needs to be made with a properly installed earthed socket with a mains voltage of 230 V / 50 Hz.
Assembly
- To avoid long suction lines and loss of performance resulting from it, the pump should be installed at water level or beneath it.
- If a fixed pump unit is used, the electrical pump can be fixed to the floor directly. In this case, use the holes located in the base plate.
- The pumps need to be positioned in a well ventilated and dry area, which additionally is safe from being flooded.
Installing the pipes
- The suction line needs to be vacuum resistant and installed approx. 30 cm beneath water level. This disables the formation of vortexes and thus the inevitable connection of air inflow.
- The pipe connections need to be 100 % air tight. Pipe bends and a wavy layout should be avoided if possible. The suction line should have a minimum gradient of 2 % stretched across the entire length, to ensure no air being trapped in the system.
- The diameter of the pipe being selected for the pressure line, needs to have the same size as the pressure joint of the pump or needs to be even bigger than it.
- The suction and pressure line must under no circumstances be supported by the pump. Make sure that all connections are sealed, so that the pump will not get into contact with moisture and be damaged.
Commissioning
• Fill the system with water, to find any potential leakages, to be able to repair them.
- Open all spool valves, which might be present in the pressure and suction line and ensure that all lines are connected.
- Let the water run into the pump via the overflow/the suction inlet of the pool or fill the suction line and the body of the pump entirely with water.
- Connect the pump to the socket and ensure that the pump allows the water to circulate.
- If the pump is used above water level of the pool, the beginning of the suction hose requires a foot valve, so that the water cannot run out of the suction inlet back into the pool after switching the pump off.
- If the motor does not want to turn on or the water is not being delivered, switch the pump off and disconnect it from the electricity supply and check if there are any blockages in the pipes or in the pump.
- Please do not run the pump without water inside the pump body, as this can damage the mechanical seals between the pump's body and motor, allowing the pump to leak.
- Do not carry any work out on the pump or the pipes of the pool system when the pump is operating.
- If any problems occur when commissioning the pump, which you are not able to explain or which do not fit the description, please contact a qualified technician.
Maintenance
Our electrical pumps do not require any special maintenance care. Please empty the sediment basket regularly. During colder temperatures and when not being used for longer periods of time, the pump should be emptied out. If the unit will not be used at all for longer durations, it should be cleaned and thoroughly swilled out with clean tap water, then dried and stored in a well ventilated area. Remains of chlorine and other pool supplements can damage the gaskets and cause leakage when operating the pump again.
Technical drawing and data

text_image
Intake Outlet base plate clockwise rotation| Model | Item No | Energy supply | Power (W) | Discharge head (m) | Suction head (m) | Max. flow rate ( ) |
| HCP180 | 51554 | 230 V/50 Hz | 180 | 8 | 6 | 10,800 |
| HCP250 | 51555 | 250 | 9 | 6.5 | 11,700 | |
| HCP370 | 51556 | 370 | 11 | 7 | 13,200 | |
| HCP550 | 51557 | 550 | 12 | 13,800 | ||
| HCP750 | 51558 | 750 | 13 | 15,000 | ||
| HCP1100 | 51559 | 1,100 | 15 | 17,700 | ||
| HCP1500 | 51560 | 1,500 | 17 | 22,500 | ||
| HCP2200 | 51561 | 2,200 | 18 | 26,400 | ||
| HCP3000 | 51562 | 3,000 | 19 | 34,800 |
Exploded views and parts lists
51554-51556
text_image
Exploded view diagram of an electric motor assembly with numbered parts for identification| No | Name | No | Name |
| 1 | Plug | 26 | Rear cover |
| 2 | O-ring | 27 | Flat washer |
| 3 | Pump body | 28 | Spring washer |
| 4 | Nut | 29 | Screw |
| 5 | Flat washer | 30 | Fan |
| 6 | O-ring | 31 | Circlip |
| 7 | Diffusor | 32 | Fan cover |
| 8 | Impeller | 33 | Mains cable |
| 9 | Floating ring seal | 34 | Nut |
| 10 | O-ring | 35 | Through-nozzle |
| 11 | Holder cover | 36 | Terminal clamp |
| 12 | Shaft seal | 37 | Terminal block |
| 13 | Front cover | 38 | Screw |
| 14 | Flat washer | 39 | Screw |
| 15 | Spring washer | 40 | Terminal cover |
| 16 | Screw | 41 | Screw |
| 17 | Bearing | 42 | Fan-shaped washer |
| 18 | Shaft | 43 | Screw |
| 19 | Rotor | 44 | Capacitor |
| 20 | Bearing | 45 | Holder |
| 21 | Spring washer | 46 | Plug |
| 22 | Stator | 47 | Filter |
| 23 | Housing | 48 | O-ring |
| 24 | Footrest | 49 | Plastic cover |
| 25 | Screw | 50 | Lid screwing |
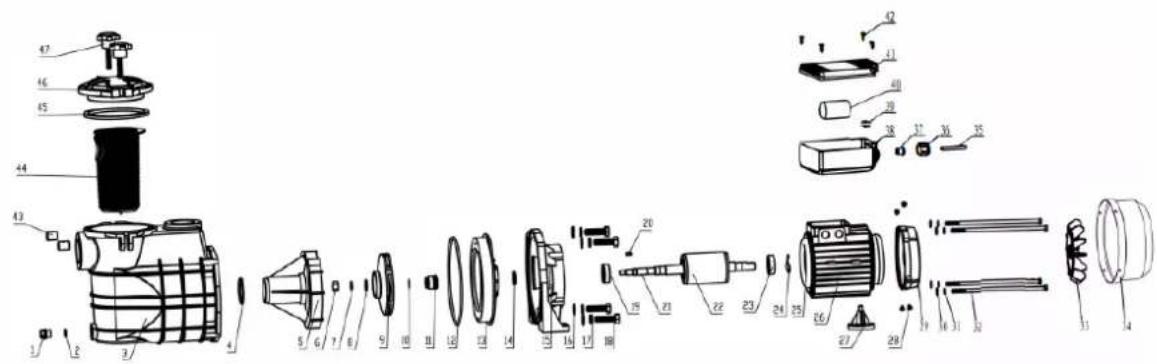
51557-51559

text_image
Exploded view diagram of a mechanical assembly with numbered parts for identification| No | Name | No | Name |
| 1 | Plug | 27 | Footrest |
| 2 | O-ring | 28 | Screw |
| 3 | Pump body | 29 | End cover |
| 4 | O-ring | 30 | Flat washer |
| 5 | Diffusor | 31 | Spring washer |
| 6 | Nut | 32 | Screw |
| 7 | Spring washer | 33 | Fan |
| 8 | Flat washer | 34 | Fan cover |
| 9 | Impeller | 35 | Screw |
| 10 | Shaft with sleeve | 36 | Terminal clamp |
| 11 | Floating ring seal | 37 | Screw |
| 12 | O-ring | 38 | Capacitor |
| 13 | Holder cover | 39 | Terminal cover |
| 14 | Shaft seal | 40 | Screw |
| 15 | Front cover | 41 | Mains cable |
| 16 | Flat washer | 42 | Nut |
| 17 | Spring washer | 43 | Through-nozzle |
| 18 | Screw | 44 | Terminal block |
| 19 | Bearing | 45 | Screw |
| 20 | Feather key | 46 | Plug |
| 21 | Shaft | 47 | Holder |
| 22 | Rotor | 48 | Filter |
| 23 | Bearing | 49 | O-ring |
| 24 | Circlip | 50 | Plastic cover |
| 25 | Stator | 51 | Screw |
| 26 | Housing |
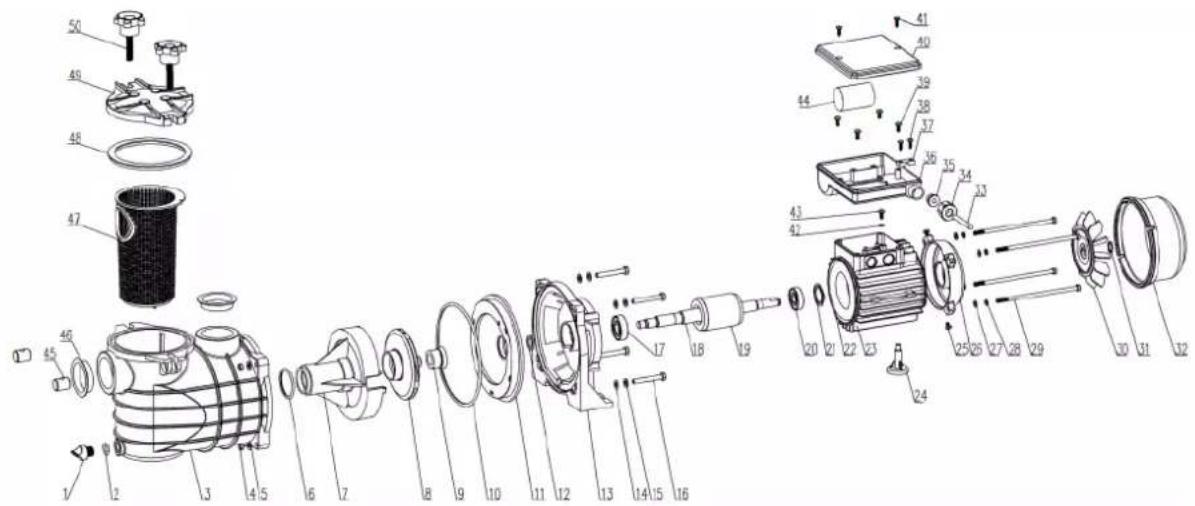
51560-51562
text_image
Exploded view diagram of a mechanical assembly with numbered parts for identification| No | Name | No | Name |
| 1 | Plug | 25 | Stator |
| 2 | O-ring | 26 | Housing |
| 3 | Pump body | 27 | Footrest |
| 4 | O-ring | 28 | Screw |
| 5 | Diffusor | 29 | End cover |
| 6 | Nut | 30 | Flat washer |
| 7 | Spring washer | 31 | Spring washer |
| 8 | Flat washer | 32 | Screw |
| 9 | Impeller | 33 | Fan |
| 10 | Shaft with sleeve | 34 | Fan cover |
| 11 | Floating ring seal | 35 | Mains cable |
| 12 | O-ring | 36 | Nut |
| 13 | Holder cover | 37 | Through-nozzle |
| 14 | Shaft seal | 38 | Terminal clamp |
| 15 | Front cover | 39 | Terminal block |
| 16 | Flat washer | 40 | Capacitor |
| 17 | Spring washer | 41 | Terminal cover |
| 18 | Screw | 42 | Screw |
| 19 | Bearing | 43 | Holder |
| 20 | Feather key | 44 | Filter |
| 21 | Shaft | 45 | O-ring |
| 22 | Rotor | 46 | Plastic cover |
| 23 | Bearing | 47 | Screw |
| 24 | Circlip |
Disposal regulations
EU guidelines regarding the disposal of scrap electric appliances (WEEE, 2012/19/EU) were implemented in the law related to electrical and electronic equipment and appliances.
All WilTec electric devices that fall under the WEEE regulations are labelled with the crossed-out wheeled waste bin logo. This logo indicates that this electric equipment must not be disposed with the domestic waste.
The company WilTec Technik GmbH has been registered in the German registry EAR under the WEEE-registration number DE45283704.
Disposal of used electrical and electronic appliances (intended for use in the countries of the European Union and other European countries with a separate collection system for these appliances).
The logo on the article or on its packaging points out that this article must not be treated as normal household waste but must be disposed to a recycling collection point for electronic and electrical waste equipment. By contributing to the correct disposal of this article you protect the environment and the health of your fellow men. Environment and health are threatened by inappropriate disposal.

Material recycling helps reduce the consumption of raw materials.
Additional information on recycling this article can be provided by your local community, municipal waste disposal facilities, or the store where you purchased the article.
Address:
The reprint or reproduction, even of excerpts, and any commercial use, even in part, of this instruction manual require the written permission of WilTec Wildanger Technik GmbH.