64-145 - Smart Home Satco - Free user manual and instructions
Find the device manual for free 64-145 Satco in PDF.

User questions about 64-145 Satco
0 question about this device. Answer the ones you know or ask your own.
Ask a new question about this device
Download the instructions for your Smart Home in PDF format for free! Find your manual 64-145 - Satco and take your electronic device back in hand. On this page are published all the documents necessary for the use of your device. 64-145 by Satco.
USER MANUAL 64-145 Satco
LED RGBTW INDOOR/OUTDOOR TAPE LIGHTS
Models: 64-100, 64-110, 64-111, 64-120, 64-121, 64-130, 64-131, 64-132, 64-133, 64-134, 64-135, 64-140, 64-141, 64-142, 64-143, 64-144, 64-145
SATCO | NUVO
INSTALLATION AND SAFETY INSTRUCTIONS IMPORTANT: Read before installing fixture. Retain for future reference.
WARNING: Risk of Fire or Electric Shock
- This tape lighting is only intended to be used with the products provided in the kit.
- Installation requires knowledge of luminaries electrical systems. If not qualified, do not attempt installation. Contact a qualified electrician.
• To reduce risk of fire and over-heating, secure all connections.
• TURN OFF the electrical power before proceeding.
• The electrical rating of this product is 120V/60Hz. - The grounding and banding of the system shall be done in accordance with National Electric Code (NEC) Article 600 and local codes.
• To prevent wiring damage or abrasion, do not expose wiring to edges of sheet metal or other sharp objects. - Do not damage any PCB conductive parts, squeeze or fold the LED tape light when installing.
- Pay attention to positive and negative polarities before installation, otherwise the LED tape light may be damaged.
- Prevent static electricity when installing. Avoid damp or wet exposure.
• This device is not intended for use with emergency exits.
CUTTING
Applies to indoor models only 64-100, 64-110, 64-111, 64-120, 64-121, 64-130, 64-131, 64-132, 64-133, 64-134, 64-135.
- Always disconnect the power supply before cutting. LED strips can be cut as indicated in diagram.

text_image
Diagram showing a mechanical or electrical system with labeled components and a magnified circular inset highlighting a component with dimensions.Indoor Installation
Applies to models 64-100, 64-110, 64-111, 64-120, 64-121, 64-130, 64-131, 64-132, 64-133, 64-134, 64-135.
natural_image
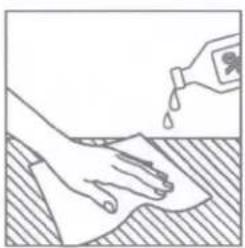
Illustration of a hand cleaning a surface with a water bottle pouring liquid (no text or symbols)STEP 1: Clean surfaces carefully (free from grease and dust) before installing to ensure that the double sided tape or adhesive sticks properly to the surface. Wood, powder-coated, structured surfaces, glass, stainless steel etc. are not recommended locations.

natural_image
Illustration of a hand pressing down on a surface with downward arrows indicating force or damage (no text or symbols)STEP 3: Wearing an anti-static ring, gently press PCB areas. Do not press down on the actual LEDs.

natural_image
Line drawing of hands holding a ruler measuring a strip of material (no text or symbols)STEP 2: Gently peel off the tape, the adhesive tape may tear by over stretching.
natural_image
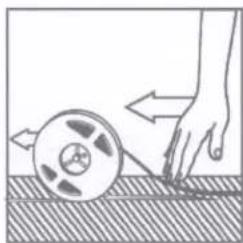
Illustration of a hand pulling a film reel on a textured surface (no text or symbols)STEP 4: Be careful to not step on the reel if you unreel the entire strip before installation.
Outdoor Installation
Applies to models 64-140, 64-141, 64-142, 64-143, 64-144, 64-145. Use included brackets to install the tape. There is no double-sided adhesive with these models.
CONNECTIONS
text_image
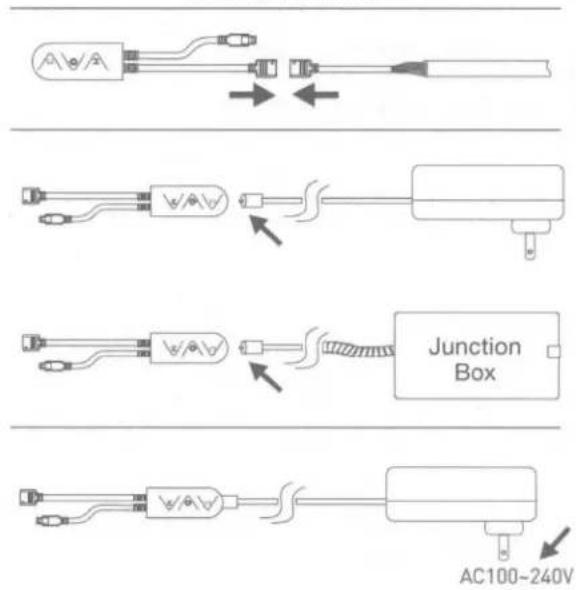
Junction Box AC100-240VSTEP 1: Align white arrow on the controller's cable to [←] symbol on LED strip.
STEP 2: Connect controller to the power supply or Junction Box. NOTE: Actual controller appearance may vary.

text_image
Wiring Diagram BLACK WHITE GREEN BLACK WHITE GREEN FixtureSTEP 3A: Plug the power supply into a power outlet.
STEP 3B: For Junction Box, shut OFF power at the circuit breaker. Connect wires as shown in wiring diagram above. Make sure all wire connectors are secure. After wires are connected, tuck them carefully inside the Junction Box and turn ON power.
Operation
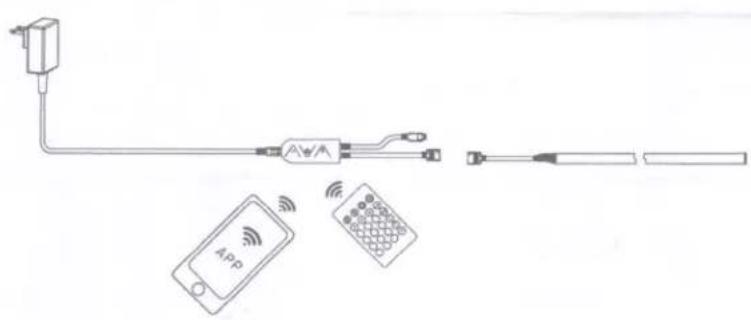
Use the remote control or Starfish APP to control the light strip; such as to turn on and off, brightness and color change.

flowchart
graph TD
    A["Router"] <--> B["Cloud"]
    C["Mobile Device"] <--> D["App"]
    E["Remote Control"] <--> F["Mobile Device"]
    style A fill:#f9f,stroke:#333
    style B fill:#ccf,stroke:#333
    style C fill:#cfc,stroke:#333
    style D fill:#fcc,stroke:#333
    style E fill:#cff,stroke:#333
    style F fill:#ffc,stroke:#333
text_image
Diagram showing wireless signal transmission from a device to a mobile phone and a remote control unit, with labeled components.Manual Control by 3 Buttons & IR Remote Control
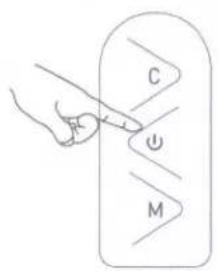
text_image
C MC Adjust Brightness/Speed.
Press one time ON/OFF. To reset and put into network pairing mode, press and hold for 5 seconds.
M Change mode type (8 mode options).
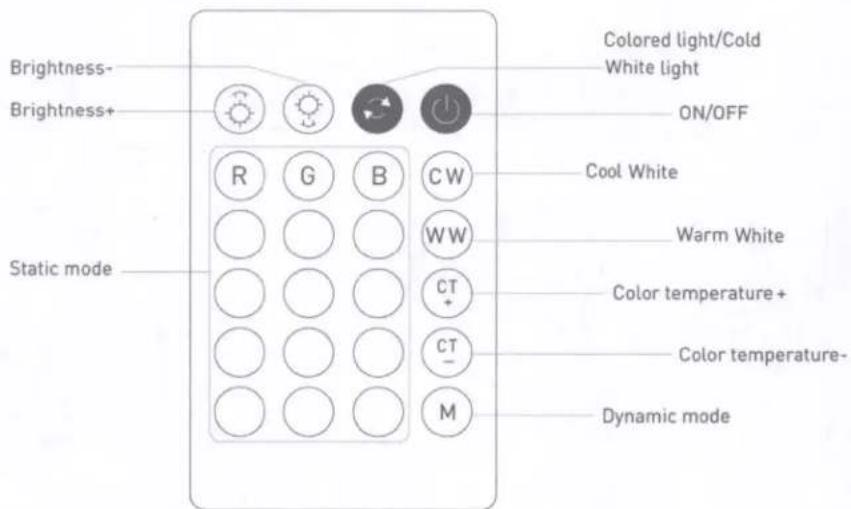
text_image
Brightness- Brightness+ Static mode Colored light/Cold White light ON/OFF Cool White Warm White Color temperature+ Color temperature- Dynamic modeSTARFISH™
live life enlightened
USER GUIDE
SYSTEM REQUIREMENTS
• Minimum iOS 9.3 or Wi-Fi 4.4
• Dedicated 2.4GHz Wi-Fi Network
TECHINCAL SUPPORT
support@satcostarfish.com
1 DOWNLOAD THE STARFISH APP
text_image
QR code image with a central logo, likely linking to a digital resource or website.
text_image
GET IT ON Google Play
text_image
Download on the App Store(App design is subject to change without notice.)
REGISTER YOUR ACCOUNT
Verify you're connected to a 2.4GHz Wi-Fi Network.
2
Launch the STARFISH app and tap "Sign-up" to create a new account or "Login" to your existing account.
3
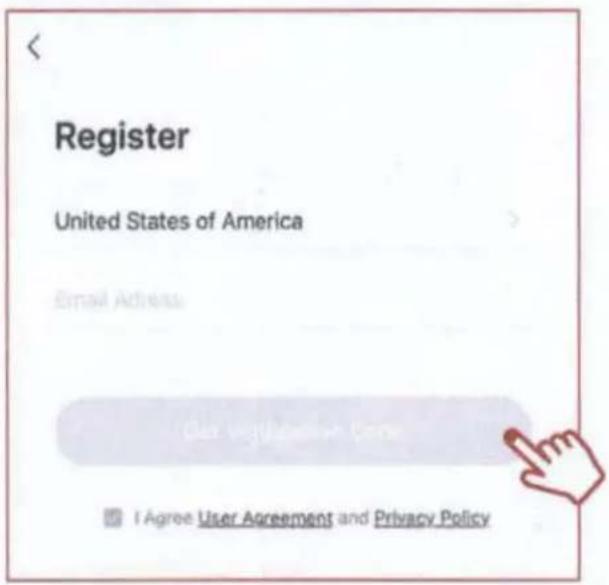
Enter email address, then select "Get verification code".
text_image
Register United States of America Email Address Use Official Account to Use I Agree User Agreement and Privacy Policy4
Enter verification code that was sent to your email.
Enter Verification Code
卜
CREATE A HOME
5
Tap the "Me" button at the bottom of the screen, and then "Home Management".
Select the "Create a home" button to set up your home.

text_image
More Services Settings Home Smart Me
text_image
Cancel Create a home Save Home Name SATCO Home Location Edgewood 110 Heartland Blvd Rooms: Living Room Master Bedroom Second BedroomADD A DEVICE
6
Tap the (+) button on the top right corner to access the action menu, then select "Add Device".

text_image
Add Device Tap + and select Add Device Got It Create Family Add Device7
Select device type from the listed categories.

text_image
Add Manually Auto Scan Light Bulbs Downlights Strips Outlets Controls Plug-in Sensor (Wi-Fi)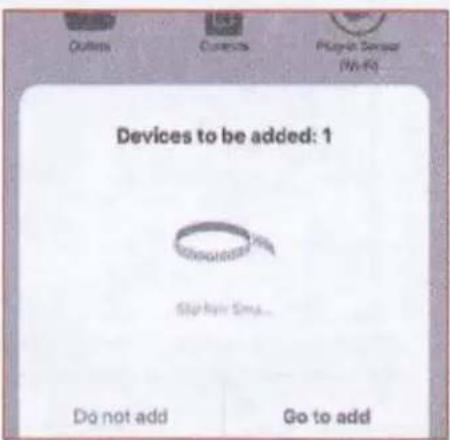
text_image
Outlets Currents Play-in Sensor (Wi-Fi) Devices to be added: 1 Stop Hair Sma... Do not add Go to addPAIR A DEVICE WITH WI-FI
8A
To put the device into pairing mode, press and hold the power button for approximately 5 seconds until the tape light starts flashing, then release the button. The device is now ready to be paired.
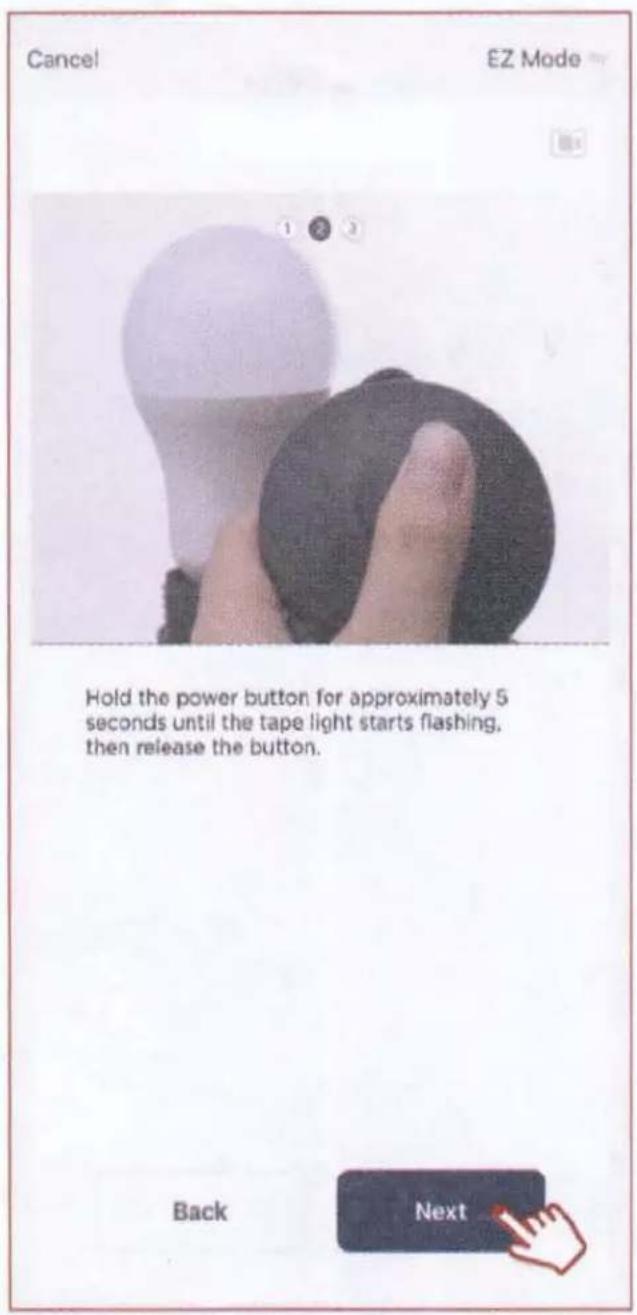
text_image
Cancel EZ Mode Hold the power button for approximately 5 seconds until the tape light starts flashing, then release the button. Back Next9A
Select your 2.4GHz Wi-Fi Network name and enter password then click "Next."

text_image
Cancel Select 2.4 GHz Wi-Fi Network and enter password. If your Wi-Fi is 5GHz, please set it to be 2.4GHz. Common router setting method × Wi-Fi - 5GHz ✓ Wi-Fi - 2.4GhzThe pairing status screen will appear.

text_image
Cancel Adding device... Ensure that the device is positive on. 01:40 OK Cancel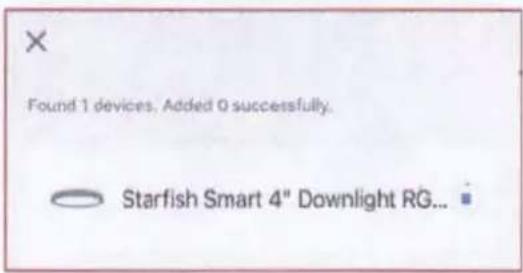
text_image
Found 1 devices, Added 0 successfully. Starfish Smart 4" Downlight RG...
text_image
Once device is successfully paired, continue to step 10.PAIR A DEVICE WITH
WI-FI/BLUETOOTH
Note: Verify your mobile device is connected to a 2.4GHz Wi-Fi Network and that you have Bluetooth turned ON for connection.
8B
For Wi-Fi/Bluetooth enabled devices, you will see a pop-up indicating that there are unpaired devices in the area. The device does not need to be in pairing mode.
Tap "Add" and select the devices you would like to connect.
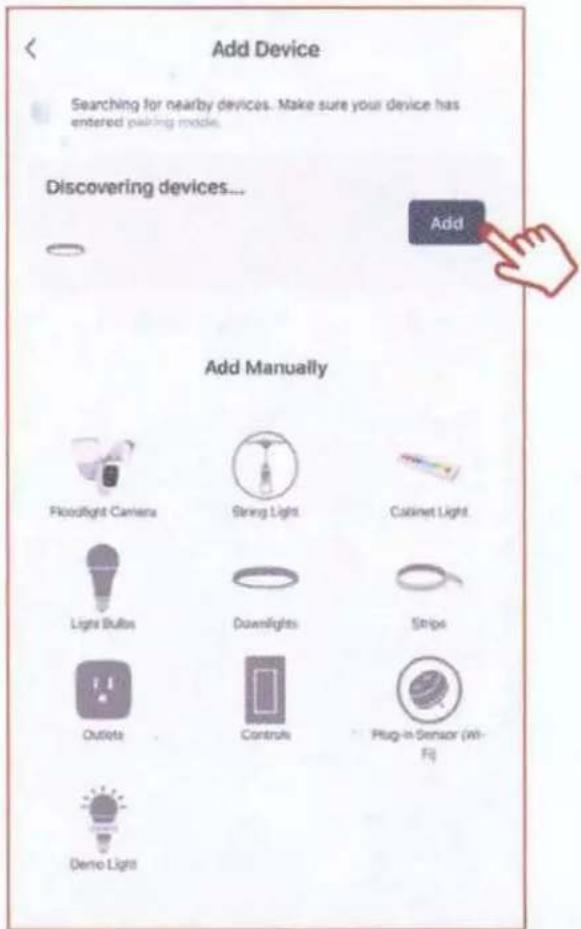
text_image
Add Device Searching for nearby devices. Make sure your device has entered pairing mode. Discovering devices... Add Add Manually Floodlight Camera String Light Cabinet Light Lights Bulbs Downlights Strips Outlets Controls Plug-in Sensor (in- Fi) Demo Light9B
Once all the devices have connected, tap "Next".
Found 1 devices. Added 1 successfully.

Starfish Smart 4" Downlight RG...
Next

Once device is successfully paired, continue to step 10.
10
When successfully connected, you may rename the device. Tap the "Pen" icon, enter the new name and select "Done". The device is now ready to be controlled with the STARFISH app.
Added.

Starfish Smart 4" Downlight TW 8.7W
Device added successfully
Living Room
Master Bedroom
Second Bedroom
Dining Room
Kitchen
Study Room
Note: If pairing is unsuccessful, please refer to the FAQs on Satco.com/Starfish
Bluetooth is strictly used to pair and connect the device. A 2.4GHz Wi-Fi Network is required to operate all STARFISH products.
Done

SHARE A HOME
11
From the Home Management screen, select the Home that you would like to share.
Tap "Add Member" and select the way that you would like to send the invitation

Home Management
Home
SATCO

Home Member
johnsmith
johnsmith@gmail.com
Home Owner
Add Member

12
Enter the user information and select if the new member will be an "Administrator" or a "Common Member" in the Home.
Tap "Save" to send the invitation.
| Cancel | Add Member | Save |
| Name | Please enter a home member name | |
| Region | United States of America | |
| Account | Please enter your account | |
| Only after accepting the invitation will the account owner become a family member and be able to use relevant functions. | ||
| Family Role | Common Member | |
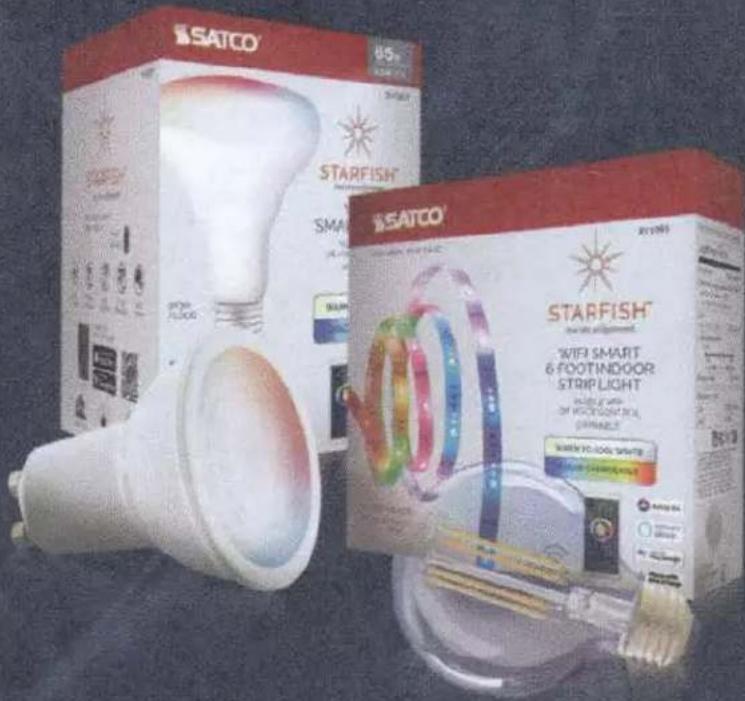
To view the entire STARFISH product line visit Satco.com/STARFISH
text_image
SATCO® 45g SARFISH® SMART & FOOTINDOOR STRIP LIGHT WIFI SMART 6 FOOTINDOOR STRIP LIGHT WIFI SMART 6 FOOTINDOOR STRIP LIGHT WIFI SMART 6 FOOTINDOOR STRIP LIGHT SATCO® WIFI SMART 6 FOOTINDOOR STRIP LIGHT WIFI SMART 6 FOOTINDOOR STRIP LIGHT
text_image
QR code image containing encoded data, no visible human-readable textScan QR Code to learn more
SATCO | NUVO
Project Name
Location Prepared By

text_image
ISATCO/NUVO DIMENSION·PRO Customize LED Smart Tape Light Kit 84/143 ISATCO/NUVO DIMINABLE NETWORKS & INTEGRATED RGB/TW COLOR & TOLERANCEDNUVO 64-143
TAPE/RGBTW-HO/IP65/JBOX/SF/16'
Notes
General
| Status Active | |
| Fixture Type Tape Light | |
| Finish White | |
| Wattage 20W | |
| Lumen Output 1920L | |
| IP Rating IP65 | |
| Indoor or Outdoor Fixture Indoor; Outdoor | |
Smart Product Info
| IOT Enabled Yes | |
| Voice Assistants Supported | Google Home; Alexa; Siri; SmartThings |
Specifications
| Technology LED | |
| Color Temperature RGB and Tunable | White |
| CRI 80+ | |
| Voltage 24V | |
| Rated Hours | 50000 |
| Operating Temperature | -20C (-4F) to +40C (+104F) |
| Dimmable | Yes-Dimmable |
| Dimming Note | Only with Starfish App or Remote Control |
| Weight (lb.) | 4.4 |
| Material | Plastic |
Dimensions
| Width (in.) | 0.55 |
| Length (in.) | 196.85 |
Compliance
| Safety Listing | cETLus - Listed |
| Location Rating | Wet |
| Energy Star | No |
| DLC Approved | No |
| CA T20 / T24 Rationale | T20 Exempt - Fixtures Not Regulated |
| California Status | Lawful for sale in California |
| Title 20 / 24 Status | Lawful for sale |
| California Prop 65 | Lead |
| RoHS Compliant | Yes |
| FCC Compliant | Yes |
| SDS Sheet | LED_Fixture |
Additional Information
| Additional Information | Driver Wattage is 30W; Driver Voltage is 120V-277V |
| Specification Note | Cuttable: No; Outdoor tape is not recommended to be cut as IP65 rating and warranty become invalidated; High Brightness; Sync to Music |
| Installation Notes | 1 reel of 16 feet (5M); Mounting Clips for outdoor installation |
| Kit includes: Outdoor Rated |
Warranty 1 Year Limited - Fixtures
Copyright 2020 Satco Products, Inc.
All Rights Reserved
For More Information Visit:
http://www.satco.com/


SUPPORT CENTER >> 1 Year Limited - Fixtures
This Satco Products, Inc. product is warranted to be free from defects in materials and workmanship for a period of 1 year from date of original purchase. The warranty does not cover damage caused by abuse, misuse, improper environmental conditions, wrong installation or shipping damage. If this does not last, return with proof or purchase, register receipt with your name & address, For replacement. This replacement is the sole remedy available and liability for incidental or consequential damages is hereby expressly excluded. This warranty shall not apply to any product that is found to have been improperly installed, set-up, or used in any way not in accordance with the instructions supplied with the product.
Satco does not warrant and specially disclaims any warranty, whether expressed or implied, of fitness for a particular purpose, other than the warranty contained herein. Satco specifically disclaims any liability and shall not be liable for any consequential or incidental loss or damage, including any labor / expense costs involved in the replacement or repair of said product.