TH-22H400Z - TV PANASONIC - Free user manual and instructions
Find the device manual for free TH-22H400Z PANASONIC in PDF.

User questions about TH-22H400Z PANASONIC
0 question about this device. Answer the ones you know or ask your own.
Ask a new question about this device
Download the instructions for your TV in PDF format for free! Find your manual TH-22H400Z - PANASONIC and take your electronic device back in hand. On this page are published all the documents necessary for the use of your device. TH-22H400Z by PANASONIC.
USER MANUAL TH-22H400Z PANASONIC
Operating Instructions LED TV
22-inch model 32-inch model
natural_image
Front view of a blank rectangular monitor with hover buttons at the bottom (no text or symbols visible)
natural_image
Front view of a blank flat-screen monitor with stand supports (no text or symbols visible)40-inch model
natural_image
Front view of a blank flat-screen monitor with stand (no text or symbols visible)English
Thank you for purchasing this Panasonic product. Please read these instructions carefully before operating this product and retain them for future reference.
The images shown in this manual are for illustrative purposes only. Some illustrations are presented as conceptual images and may be different from the actual products. Illustrations shown may be different between models and countries. The illustrations for 22-inch model is used in this manual unless otherwise mentioned.
Transport only in upright position
Important Notice
Panasonic does not guarantee operation and performance of peripheral devices made by other manufacturers; and we disclaim any liability or damage arising from operation and/or performance from usage of such other maker's peripheral devices.
Handling of customer information
The recording and playback of content on this or any other device may require permission from the owner of the copyright or other such rights in that content. Panasonic has no authority to and does not grant you that permission and explicitly disclaims any right, ability or intention to obtain such permission on your behalf. It is your responsibility to ensure that your use of this or any other device complies with applicable copyright legislation in your country. Please refer to that legislation for more information on the relevant laws and regulations involved or contact the owner of the rights in the content you wish to record or playback.
This product is licensed under the AVC patent portfolio license for the personal and non-commercial use of a consumer to (i) encode video in compliance with the AVC Standard ("AVC Video") and/or (ii) decode AVC Video that was encoded by a consumer engaged in a personal and non-commercial activity and/or was obtained from a video provider licensed to provide AVC Video. No license is granted or shall be implied for any other use.
Additional information may be obtained from MPEG LA, LLC.
See http://www.mpegla.com.
Panasonic and its affiliates make no representations or warranties of any kind with respect to the USB devices and the performance of communication between the USB devices and the USB port of Panasonic products, and expressly disclaims any and all warranties, whether express or implied or otherwise, including without limitation any implied warranty of fitness for a particular purpose, any loss of data, and any implied warranties arising from course of dealing or course of performance of data communication between the USB devices and the USB port of Panasonic products.
Transport only in upright position.

This mark indicates the product operates on AC voltage.

This mark indicates a Class II or double insulated electrical appliance wherein the product does not require a safety connection to electrical earth (ground).
Contents
Safety Precautions 3
Setting Up the TV 4
Connecting the TV 6
Initial Setup 8
Operating the TV 9
Watching External Inputs 10
Using Media Player 11
Using the Menu Functions ......13
Additional Information 18
Troubleshooting 22
Maintenance 23
Specifications 24
Safety Precautions
To help avoid risk of electrical shock, fire, damage or injury, please follow the warnings and cautions below:
Mains plug and lead
(Warning)
If you detect anything unusual, immediately remove the mains plug.
Mains plug types vary between countries.

This TV is designed to operate on AC 100 - 240 V, 50/60 Hz.
Insert the mains plug fully into the socket outlet.
Ensure that the mains plug is easily accessible.
Disconnect the mains plug when cleaning the TV.
Do not touch the mains plug with wet hands.

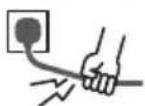
Do not damage the mains lead.
- Do not place a heavy object on the lead.


- Do not place the lead near a high temperature object.


- Do not pull on the lead. Hold onto the mains plug body when disconnecting the plug.

- Do not move the TV with the lead plugged into a socket outlet.
- Do not twist the lead, bend it excessively or stretch it.
- Do not use a damaged mains plug or socket outlet.
- Ensure the TV does not crush the mains lead.
Do not use any mains lead other than that provided with this TV.
Take care
(Warning)
Do not remove covers and never modify the TV yourself as live parts are accessible when they are removed. There are no user serviceable parts inside.

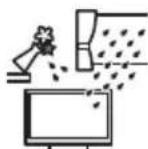
Do not expose the TV to rain or excessive moisture. This TV must not be exposed to dripping or splashing water and objects filled with liquid, such as vases, must not be placed on top of or above the TV.

Do not insert foreign objects into the TV through the air vents.
Do not use an unapproved pedestal / mounting equipment. Be sure to ask your local Panasonic dealer to perform the setup or installation of approved wall-hanging brackets.
Do not apply strong force or impact to the display panel.
Do not place the TV on sloped or unstable surfaces, and ensure that the TV does not hang over the edge of the base.

This TV is designed for table-top use.
Do not expose the TV to direct sunlight and other sources of heat.


To prevent the spread of fire, keep candles or other open flames away from this product at all times

Dangerous part / Small object
Warning
This product contains possibly dangerous parts such as plastic bags, that can be breathed in or swallowed by young children accidentally. Keep these parts out of reach of young children.
Pedestal
(Warning)
Do not disassemble or modify the pedestal.
Caution
Do not use any pedestal other than the one provided with this TV.
Do not use the pedestal if it becomes warped or physically damaged. If this occurs, contact your nearest Panasonic dealer immediately.
During setup, make sure that all screws are securely tightened.
Ensure that the TV does not suffer any impact during installation of the pedestal.
Ensure that children do not climb onto the pedestal. Install or remove the TV from the pedestal with at least two people.
Install or remove the TV by the specified procedure.
Ventilation
Caution
Allow sufficient space around the TV in order to help prevent excessive heat, which could lead to early failure of some electronic components.
Minimum distance (cm)

text_image
10 10 10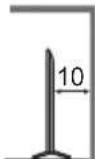
Ventilation should not be impeded by covering the ventilation openings with items such as newspapers, tablecloths and curtains.


Whether you are using a pedestal or not, always ensure the vents at the bottom of the TV are not blocked and there is sufficient space to enable adequate ventilation.
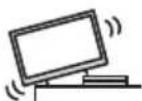
■ Moving the TV
Caution
Before moving the TV, disconnect all cables.
Move the TV with at least two people. Support as shown to avoid injury by the TV tipping or falling.

natural_image
Illustration of two workers exchanging a package with a magnified view of the hand (no text or symbols)When not in use for a long time
Caution
This TV will still consume some power even in the Off mode, as long as the mains plug is still connected to a live socket outlet.
Remove the mains plug from the wall socket when the TV is not in use for a prolonged period of time.
Use conditions
Caution
This appliance is intended for use in tropical climates.
Battery for the Remote Control
Caution
Incorrect installation may cause battery leakage, corrosion and explosion.
Replace only with the same or equivalent type.
Do not mix old and new batteries.
Do not mix different battery types (such as alkaline and manganese batteries).
Do not use rechargeable batteries (Ni-Cd, etc.).
Do not burn or break up batteries.
Do not expose batteries to excessive heat such as sunshine, fire or the like.
Make sure you dispose of batteries correctly.
Setting Up the TV
Supplied accessories
Accessories may not be placed all together. Take care not to throw them away unintentionally.
Operating Instructions
Remote Control
- RC818PT
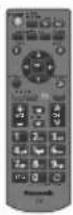
Batteries (AA) × 2
→(p.5)

Pedestal
22-inch model
Assembly screws


(ST3 × 12) × 4
Base

32-inch model
Assembly screws


(ST4 × 15) × 4
Base
40-inch model
Assembly screws


(ST4 × 20) × 4
Base

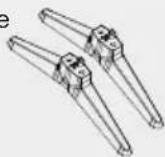
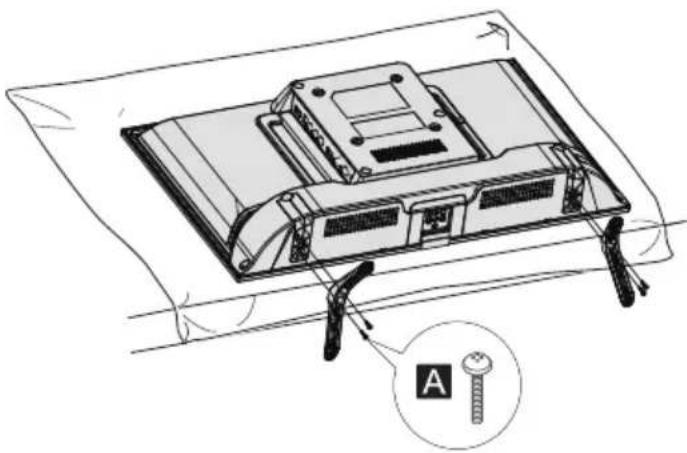
Attaching the pedestal
1 Assemble the pedestal
natural_image
Technical line drawing of a device chassis with screw and pliers, no text or symbols presentRemoving the pedestal from the TV
Be sure to remove the pedestal in the following way when using the wall-hanging bracket or repacking the TV.
1 Lay the TV on a foam mat or thick soft cloth on a table.
2 Remove the assembly screws Atom the TV.
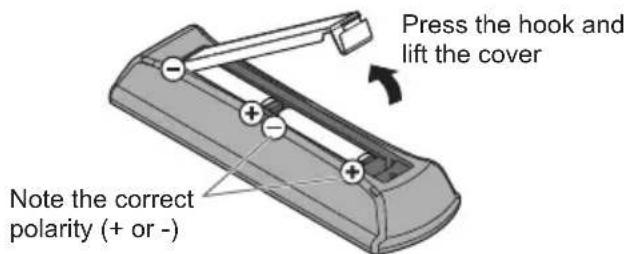
Inserting remote's batteries
text_image
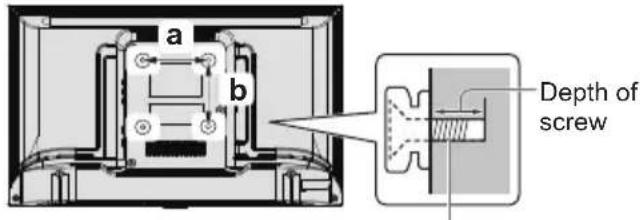
Press the hook and lift the cover Note the correct polarity (+ or -)Wall mounting the TV (optional)
Please contact your local Panasonic dealer to purchase the recommended wall-hanging bracket.
Rear of the TV (View from the side)
text_image
a b Depth of screwScrew for fixing the TV onto the wall-hanging bracket(not supplied)
■ Holes for wall-hanging bracket installation
| Model | a | b |
| 22-inch | 100 mm | 100 mm |
| 32-inch | 100 mm | 100 mm |
| 40-inch | 200 mm | 100 mm |
Screw specification
| Model | Type | Depth of screw | |
| Minimum | Maximum | ||
| 22-inch | M4 | 8 mm | 8 mm |
| 32-inch | M4 | 8 mm | 8 mm |
| 40-inch | M6 | 12 mm | 12 mm |
Warning
- When optional accessories such as wall brackets etc. are used, always read and follow the manufacturer installation and usage instructions.
- Do not mount the unit directly below ceiling lights (such as spotlights or halogen lights) which typically give off high heat. Doing so may warp or damage plastic cabinet parts.
- When installing wall brackets you must ensure the wall bracket is not electrically grounded to metal wall studs. Always ensure that there are no electrical cables, pipes etc. in the wall before you begin the wall bracket installation.
- To prevent fall and injury, remove the TV from its fixed wall position when it is no longer in use.
Connecting the TV
- Please ensure the TV is disconnected from the mains socket/ power point before attaching or disconnecting any RF/ AV leads.
- External equipment and cables are for illustrative purposes only and not supplied with this TV.
- Check the type of terminals and cable plugs are correct when connecting.
- When using an HDMI cable, use the fully wired one.
- Keep the TV away from electronic equipment (video equipment, etc.) or equipment with an infrared sensor. Otherwise, distortion of image/ sound may occur or operation of other equipment may be interfered.
- Also read the manual of the equipment being connected.
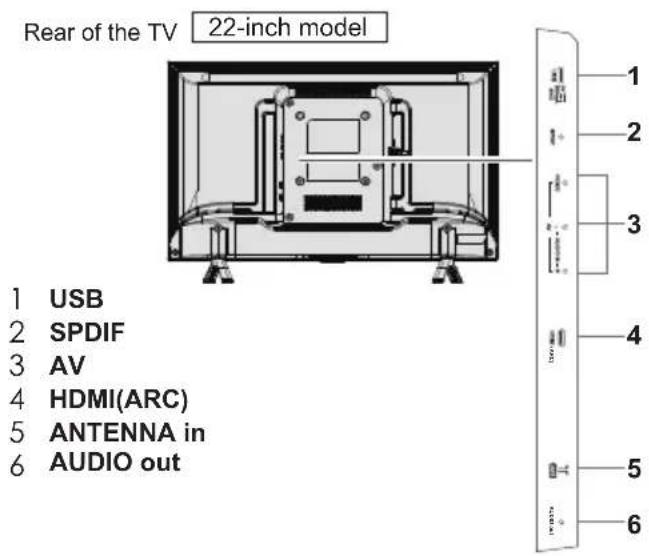
Terminals
text_image
Rear of the TV 22-inch model 1 USB 2 SPDIF 3 AV 4 HDMI(ARC) 5 ANTENNA in 6 AUDIO out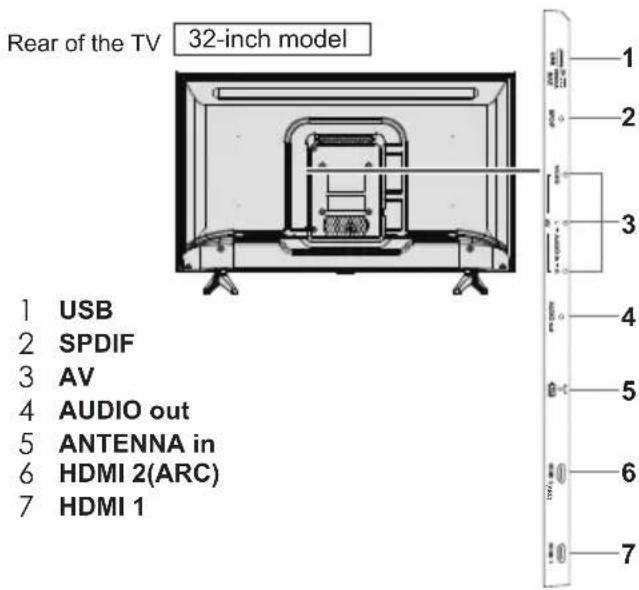
text_image
Rear of the TV 32-inch model 1 USB 2 SPDIF 3 AV 4 AUDIO out 5 ANTENNA in 6 HDMI 2(ARC) 7 HDMI 1Rear of the TV | 40-inch model
natural_image
Technical line drawing of a rectangular electronic device with mounting base (no text or symbols)
text_image
1 2 3 4 5 6 71 SPDIF
2 USB
3 AV
4 HDMI 1(ARC)
5 HDMI 2
6 AUDIO out
7 ANTENNA in
Connections
Aerial
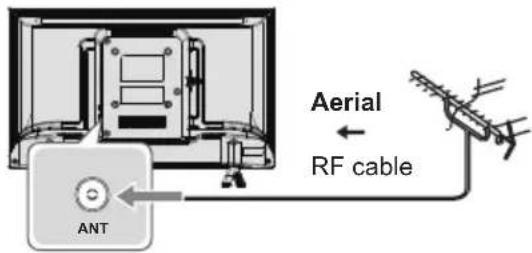
text_image
Aerial RF cable ANTKeep RF (aerial) cable away from the mains lead to avoid and minimise mains interference pickup.
Do not place the RF cable under the TV.
An aerial, correct cable (75 Ω coaxial) and correct terminating plug are required to obtain optimum quality picture and sound.
If a communal aerial system is used, you may require the correct connection cable and plug between the wall aerial socket and the TV.
Your local Television Service Centre or dealer may be able to assist you in obtaining the correct aerial system for your particular area and the accessories required.
Any matters regarding aerial installation, upgrading of existing systems or accessories required, and the costs incurred, are the responsibility of you, the customer.
If the aerial is placed in the wrong location, interference might happen.
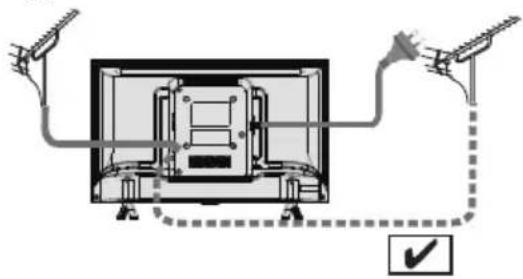
natural_image
Diagram of a device with two cables connected to a screen, showing internal components and a checkmark icon (no text or symbols)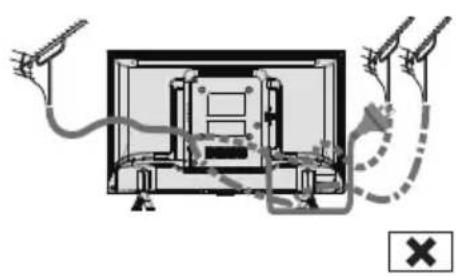
natural_image
Diagram of a mechanical or electrical assembly with two hands holding probes and a dashed line indicating a path (no text or symbols present)AV / Game equipment(For 22inch model)
Using HDMI terminal

flowchart
graph LR
    TV["TV"] --> HDMI1["HDMI"]
    HDMI1 <--> HDMI_Cable["HDMI cable"]
    Equipment["Equipment"] --> HDMI Cable
Using AV terminals

flowchart
graph TD
    TV["TV"] -->|AV IN| Audio1["Audio cable"]
    Audio1 -->|Video cable| Audio2["Audio cable"]
    Audio2 -->|Audio cable| Equipment["Equipment"]
    Audio1 -->|Video L R-Audio -| Audio3["Video L R-Audio -"]
AV / Game equipment(For 32/40inch model)
Using HDMI terminal

flowchart
graph LR
    TV["TV"] -->|HDMI 1/2| A["HDMI cable"]
    A --> B["Equipment"]
Using AV terminals

flowchart
graph TD
    TV["TV"] -->|AV IN| Audio1["Audio cable"]
    Audio1 --> Audio2["Audio cable"]
    Audio2 --> Audio3["Audio cable"]
    Audio3 --> Equipment["Equipment"]
    Audio1 --> VideoL["VIDEO L R- Audio -"]
    Audio2 --> VideoL
    Audio3 --> VideoL
Speaker system

flowchart
graph LR
    TV["TV"] -->|AUDIO out| A["or"]
    TV -->|SPDIF| B["Coaxial cable"]
    A --> C["Audio cable"]
    B --> D["Coaxial cable"]
    C --> E["Amplifier with speaker system"]
    D --> E
To enjoy the sound from the external equipment in multi-channel sound (e.g. Dolby Digital 5.1ch), connect the equipment to the amplifier. For the connections, read the manuals of the equipment and amplifier.
Initial Setup
When you first turn on the TV, a series of steps will pop-up to guide you to setup your TV.
These steps are not necessary if the setup has been completed by your local dealer.
1 Plug the mains plug into the socket outlet and turn on the TV.
It may take a few seconds before the screen is displayed.

text_image
① AC 100 - 240 V, 50/60 Hz2 Select your language.

text_image
OSD Language. English Store OK Select3 Select [Home].
![PANASONIC TH-22H400Z - Select [Home]. - 1](/content/2026/06/1222423/images/8d9e0b8251addfb24aeb2829c7da75d8e16d9ff5df405ce21c38cc2058660599.jpg)
text_image
Please select your viewing environment. Home Shop Confirm OK Select[Shop] is for shop display.
Setup is now complete and your TV is ready for viewing.
4 Select your country.

text_image
Country New Zealand Confirm OK Select5 Select channel type.

text_image
ANT in ATV ATV/DTV Start Auto Tuning OK Select6 Scanning starts.
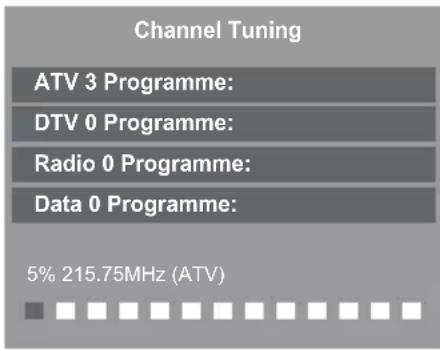
text_image
Channel Tuning ATV 3 Programme: DTV 0 Programme: Radio 0 Programme: Data 0 Programme: 5% 215.75MHz (ATV)
This function searches and stores TV channels. The stored channels and sorted channel order vary depending on the area, broadcasting system and conditions of signal reception.
Note
If tuning has failed, check the connection of the RF cable, then follow the on-screen instructions.
Operating the TV
Using the remote control
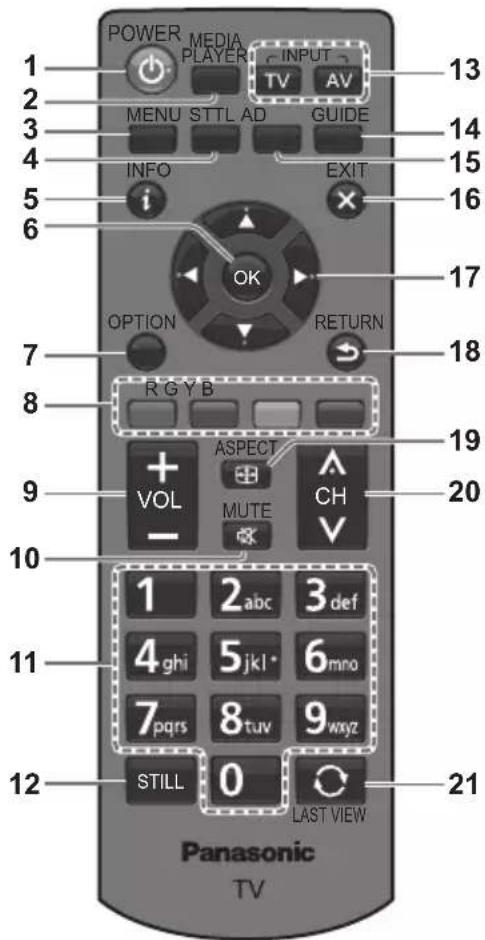
text_image
POWER MEDIA INPUT 1 2 3 4 5 6 MENU STTL AD GUIDE INFO EXIT OPTION RETURN R G Y B ASPECT VOL MUTE CH 1 2 abc 3 def 4 ghi 5 jkl 6 mno 7 pqrs 8 tuv 9 wxyz STILL 0 LAST VIEW Panasonic TV1 Switches the TV On / Standby
2 MEDIA PLAYER (p. 11)
3 Displays [Main Menu] (p. 13)
4 Displays subtitles
5 Displays Information banner
6 OK
Confirms selections.
Press after selecting channel positions to quickly change channel.
Displays the [Channel List].
7 Displays [Option Menu]
Quick to access Picture preset and Sound preset.
- Follow the operation guide to select / change the settings.
8 Colored buttons
Performs multiple operations which correspond to the operation guide displayed on the menu screen.
9 Volume Up / Down
10 Sound Mute On / Off
11 Numeric buttons
Changes channel.
Sets characters.
12 Freezes / unfreezes picture
13 Input mode selection
TV - switches to TV input mode.
AV - displays [Input Selection] screen (p. 11).
14 TV Guide (p. 10)
15 AD switch
16 Exits to the TV viewing screen
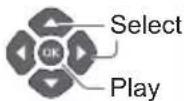
17 Cursor buttons
Makes selections or adjustments.
18 Returns to the previous menu / page
19 ASPECT
Displays the [Aspect Selection] screen. Follow the operation guide to select the mode. [4:3]/ [16:9] / [Zoom1] / [Zoom2] / [Auto]. → (p. 18)
20 Channel Up / Down
21 Returns to the last viewed channel
[Color Buttons]
Lists out channels based on Analogue / Digital
![PANASONIC TH-22H400Z - [Color Buttons] - 1](/content/2026/06/1222423/images/095c79fd6f9c7ec04885da7af96acfb0c2d1fca272af57cdbe8a02d4a3a6a1f1.jpg)
In Programme Edit, delete channels. Or delete file in Media Player.
![PANASONIC TH-22H400Z - [Color Buttons] - 2](/content/2026/06/1222423/images/131e4512dbf783418696af3f7604b3ef545ce4c24b8fa98cbd7e0d043a34456a.jpg)
In Programme Edit, rename channels. (only appear in ATV source)
![PANASONIC TH-22H400Z - [Color Buttons] - 3](/content/2026/06/1222423/images/d0618747a3a6666ebfa49c8293c31cf65df12796f7d962887492822c6bd0e224.jpg)
In Programme Edit, move channels. (only appear in DTV source)
![PANASONIC TH-22H400Z - [Color Buttons] - 4](/content/2026/06/1222423/images/419d068ff91d731f2921f20828e25c088c58ffa89bb59faa63d457630af1f6e0.jpg)
In Programme Edit, skip channels. Displays the Audio Language menu for selection of audio tracks. (appear in DTV source)
In Programme Edit, skip channels.
Change audio type between stereo and mono while watching program (appear in ATV source)
When using the TV Guide, color buttons can also work as the menu displayed.
About operation guide
When operating the TV with the remote control, follow the operation guide available at the bottom of the screen to perform the operation you want.
Referring to the operation guide:
To select the mode
To change to the selected mode

To return to the previous menu
RETURN


To exit from the menu
EXIT

Using the TV controls
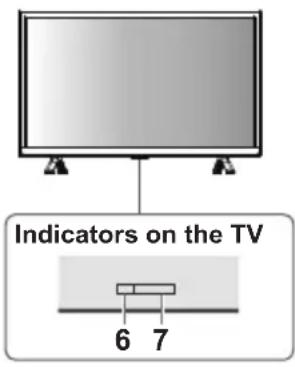
text_image
Indicators on the TV 6 7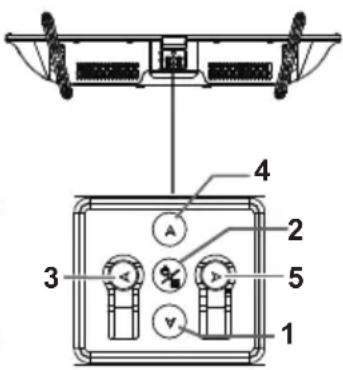
text_image
Technical diagram of a mechanical or electrical component with numbered parts and labeled parts A, 2, 3, 4, 5, and 1.1 Channel Up
Cursor Up
Makes selections in the menu system.
2 Displays [Menu] / Source Select / Mains power On / Off switch
• Turns the TV on or standby.
The TV is on, press it, bring up the main menu or confirm selections in submenu.
Before enter menu, long press it for 3 seconds to display Source Select. Long press it for 5 seconds to go to Standby.
3 Volume Down Cursor Left
Makes selections and / or adjustments when in the menu system.
4 Channel Down Cursor Down
Makes selections in the menu system.
5 Volume Up Cursor Right
Makes selections and / or adjustments when in the menu system.
6 Power LED Red: Standby
Green: On
7 Remote control signal receiver
Using TV Guide
The TV Guide - Electronic Programme Guide (EPG), shows a list of broadcasts for several days (depending on the broadcasters).
When this TV is turned on for the first time, or switched off for more than a week, it may take some time before the TV Guide is completely shown.
This function varies depending on the country.
Channels are displayed on the same TV Guide screen. There will be no programme listings for Analogue channels.
- DTV mode only.
Display the TV Guide.
GUIDE
Example:
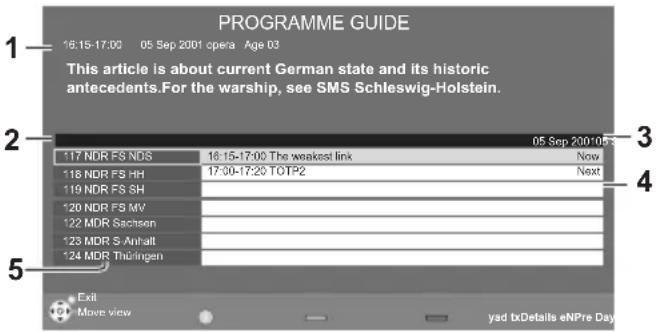
text_image
PROGRAMME GUIDE 16:15-17:00 05 Sep 2001 opera Age 03 This article is about current German state and its historic antecedents. For the warship, see SMS Schleswig-Holstein. 117 NDR FS NDS 18:15-17:00 The weakest link Now 118 NDR FS HH 17:00-17:20 TOTP2 Next 119 NDR FS SH 120 NDR FS MV 122 MDR Sachsen 123 MDR S Anhalt 124 MDR Thüringen Exit Move view yad txDetails eNPre Day1 TV Guide date and time
2 Current date and time
3 TV Guide time
4 Programme
5 Channel position and name
Follow the operation guide to operate the TV Guide.
Note
It may be slow to response when pressing the UP / DOWN / LEFT / RIGHT cursor button for TV program guide. This is due to program data downloading.
Watching External Inputs
1 Connect the external equipment.
→ (p. 6 - 7)
2 Display the [Input Source] menu, then select the input of the connected equipment.
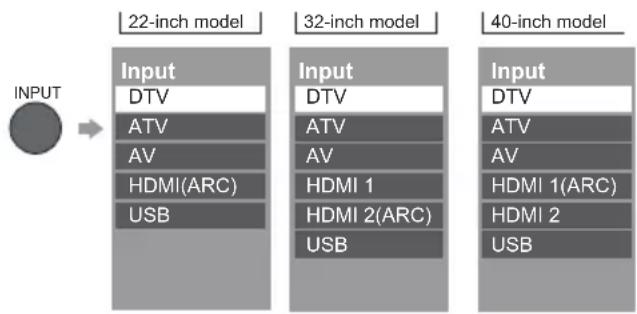
flowchart
graph LR
    A["INPUT"] --> B["22-inch model"]
    B --> C["32-inch model"]
    C --> D["40-inch model"]
    subgraph Input
        E["Input DTV"]
        F["ATV"]
        G["AV"]
        H["HDMI(ARC)"]
        I["USB"]
    end
    subgraph Output
        J["Input DTV"]
        K["ATV"]
        L["AV"]
        M["HDMI 1"]
        N["HDMI 2(ARC)"]
        O["USB"]
    end
Press OK to access.
Note
If the external equipment has an aspect adjustment function, set it to "16:9".
Using Media Player
Media Player allows you to enjoy photo, music or video recorded on a USB Flash Memory.
The picture may not appear correctly on this TV depending on the digital cameras used.
Display may take some time when there are many files and folders in the USB Flash Memory.
Partly degraded files might be displayed at a reduced resolution.
The folder and file names may be different depending on the digital camera used.
Inserting / Removing the USB Flash Memory

text_image
© Insert or remove SV = 500+A MAX TV- Insert or remove straight and completely.
Starting Media Player
1 Insert the USB Flash Memory.
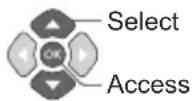
2 Select the mode.

-Select Access
[PHOTO]: Displays the thumbnail of all photos in the USB Flash Memory.
[MOVIE]: Displays the thumbnail of video titles in the USB Flash Memory.
[MUSIC]: Displays the thumbnail of music folders in the USB Flash Memory.
[Contents Display]
Follow the operation guide to perform available operations.
When the cursor stays on the icon, it displays the information of the highlighted content.
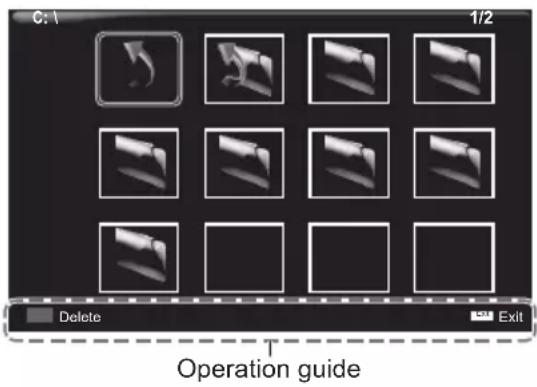
Photo mode
text_image
C:\ 1/2 Delete Exit Operation guide[Play Folder]
■ To play the selected file
Playbacks all photo in the selected folder.
Select the folder. Select the file.
![PANASONIC TH-22H400Z - [Play Folder] - 1](/content/2026/06/1222423/images/20d0dd736478011b2fbc69f4f1fe2b0f08ddab5f048de6367e5e2fd341eebf71.jpg)
flowchart
graph LR
    A["OK"] --> B["Select"]
    A --> C["Enter"]
    D["OK"] --> E["Select"]
    D --> F["Play"]
[Menu]
[Photo show Settings]
▶/II Play or pause the showing.
Play previous photo.
Play Next photo.
- Stop photo show.
Slideshow repeat. [Repeat 1] / [Repeat All] / [Repeat None].
♪ Background music during photo viewing.
Show all the photo list.
i Show the details of the chosen photo.
/Rotate the direction of photo in the direction of arrow.
Zoom in the photo.
Zoom out the photo.
Adjust the positon when zoom in.
Note
- Picture quality may become lower depending on the slideshow settings.
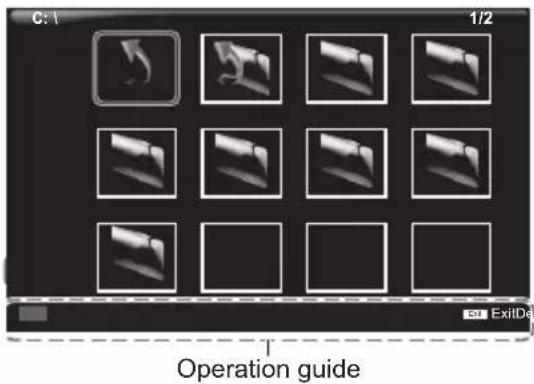
MOVIE mode
text_image
C: 1 1/2 Operation guide ExitDe[Play Folder]
Playbacks all movies in the selected folder.
■ To playback the selected file only
Select the folder. Select the file.
![PANASONIC TH-22H400Z - [Play Folder] - 1](/content/2026/06/1222423/images/5e5aa8f81fb88f94df3061072a9289326e4d81b349996e41fce4f4b87ccaca5c.jpg)
flowchart
graph LR
    A["OK"] --> B["Select"]
    C["Enter"] --> D["Play"]
[Option Menu]
[Movie Setup Menu]
▶/II Play or pause the playing.
Fast backward.
Fast forward.
Play previous video.
Play Next video.
■ Stop video show.
Aa Choose Charset.
Repeat mode.
[Repeat 1] / [Repeat All] / [Repeat None].
Set the repeat time from A to B.
Show all the video list.
i Show the details of the chosen file.
Play the video in slow speed.
Play the video by frames.
Set the time point to play.
Zoom in the viewing.
Zoom out the viewing.
Adjust the ratio.
Adjust the positon when zoom in.
MUSIC mode

text_image
C: 1 1/2 Operation guide[Play Folder]
Playbacks all music in the selected folder.
To playback the selected file only
Select the folder. Select the file.
![PANASONIC TH-22H400Z - [Play Folder] - 1](/content/2026/06/1222423/images/bc518b1aef649bc5bfd3794d9e2629dc4143524301045c12fbbd2b01ab8f490b.jpg)
flowchart
graph LR
    A["OK"] --> B["Select"]
    A --> C["Enter"]
    D["OK"] --> E["Select"]
    D --> F["Play"]
[Option Menu]
[ Music Setup Menu]
▶/II Play or pause the playing.
Fast backward.
Fast forward.
Play previous music.
Play Next music.
■ Stop music playing.
Repeat mode.
[Repeat 1] / [Repeat All] / [Repeat None].
Mute.
Show all the music list.
i Show the details of the chosen file.
Set the time point to play.
Using the Menu Functions
1 Display the menu.

Example:
Menu Item Setting

text_image
Main Menu Picture Sound Time Setup Channel Picture mode Contrast 50 Brightness 50 Colour 50 Tint 0 Sharpness 50 Colour Temp Normal Noise Reduction Middle Reset to Defaults Select Access Return Operation guide2 Select the menu.
3 Select the item.

Select
Change / Adjust / Access
4 Change the setting.
Example:
Adjust the intensity bar

text_image
Contrast 50 Adjust Change the setting option Colour Temp Cool Normal Warm Select OK OKNote
Only available items can be selected.
Picture
[Picture Mode]
Sets the picture mode for each input. [Dynamic] / [Standard] / [Mild] / [Personal]
[Dynamic]: Improves contrast and sharpness for viewing in a bright room.
[Standard]: For viewing in a normal lighting condition.
[Mild]: For viewing in a soft way for eyes.
[Personal]: adjust the picture according to your preference.
Setting for picture mode [Contrast], [Brightness], [Colour], [Sharpness] only can adjust in Personalmode. Setting for tint cannot be adjusted in any picture mode.
[Contrast], [Brightness], [Colour], [Tint], [Sharpness]
Increases or decreases the levels of these options according to your personal preference.
These options only available in Personal mode.
Tint only available in NTSC signal.
[Colour Temp]
Selects the colour temperature of the picture.
[Cool] / [Normal] / [Warm]
[Noise reduction]
Reduces picture "static" or any type of interference.
This feature is especially useful for providing a clearer picture in weak analog signal conditions. [Off] / [Low] / [Middle] / [High]
[Reset to Defaults]
Resets the current picture settings to defaults.
Sound
[Sound Mode]
Select a sound type from the list. [Standard] / [Music] / [Movie] / [Sports] / [Personal].
[Treble]
Adjusts level to enhance or minimise sharper, higher sound output. (Only available in Personal mode.)
[Bass]
Adjusts level to enhance or minimise lower, deeper sound output. (Only available in Personal mode.)
[Balance]
Adjusts volume level of right and left speakers.
[Auto Volume]
Select [On] mode to reduce the annoying blasts in volume during commercial breaks and also amplifies softer sounds in program material. Eliminates the need to constantly adjust the volume.
The options offered depend on the programme you are watching.
[AD Switch]
Audio Description Function. Choose on for visually impaired person.
[SPDIF mode]
Connect to an audio device through the SPDIF output. Select a proper sound type from the list for digital programmes. [Off] / [Auto] / [PCM]
[MPX]
Changes multiplex sound mode (if available).
[Reset to Defaults]
Resets the current sound settings to defaults.
Time
[Clock]
Auto synchronization the time, TV will get the time automatically from TV signals.
[Summer Time]
Camp time is set forward one hour.
[Auto] / [On] / [Off]
[Sleep Timer]
Sets the duration until the TV automatically goes to Standby mode.
[Off] / [15 / 30 / 45 / 60 / 120 / 180 min]
[Auto Standby]
Enables the TV to turn into Standby mode automatically if no operation is performed after the 4 hours.
Automatic input switching with the connected equipment affects this function and time-count will be reset.
[Time Zone]
Adjusts the time data based on GMT.
[OSD Timer]
Sets the duration when main menu disappear if there is no operation.
[5 S] / [15 S] / [30 S]
Setup
[OSD Language]
Changes language for on-screen displays.
[English]]
[Audio Languages]
Set the primary language of audio language of current TV. [Primary] / [Secondary]
Default setting is English.
[Subtitle Language]
Set the primary language of subtitle language appear on the screen. [Primary] / [Secondary]
Default setting is English.
[Hearing Impaired]
Provides aids in understanding and enjoyment with Digital TV subtitles (depending on the broadcaster).
[Aspect Ratio]
Displays the [Aspect Ratio] screen. Follow the operation guide to select the mode. [4:3]/ [16:9] /
[Zoom 1] / [Zoom 2] / [Auto]
[Blue Screen]
If [on] selected, when there is no input, the background will be blue screen. (only available on some source)
[Lock]
You can lock specific channels. When the locked channel is selected, a message appears. Enter the Password to watch.
If Lock System is on, password will be needed when tuning.
Enter the number (4 digits).
Please enter password

Make a note of the Password in case you forget it.
(The initial password is 0000)
Set Password (4 digits).
Please enter old password

Please enter new password

Comfirm new password

Block Program
| 1 | BBC ONE | DTV |
| 2 | BBC TWO | DTV |
| 3 | BBC CHOICE | DTV |
| 4 | BBC NEWS | DTV |
Choose channels you want to lock.
[Parental Rating]
This option allows you to set a rating to a programme.
[Reset]
Choose it to enter Initial Setup.
[HDMI CEC]
When set to [On], the TV will automatically switch to the appropriate HDMI input whenever an HDMI connected equipment is initially turned on and play mode is selected. [Off] / [On]
Note: When set to [On], the ARC can be used.
[Input]
Select input source of connected equipment.
Channel
Use the [Channel Menu] to retune the TV automatically or manually.
[Auto Tuning]
Automatically searches and adds available channels to the memory.
Example: DVB-T
Choose tune type.
Tune Type
ATV
DTV
DTV+ATV

Choose your country.
Tune Type
DVB-T
NewZealand

Start tuning.
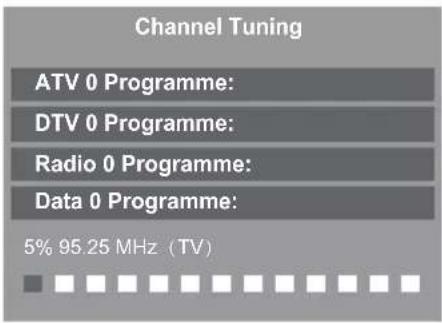
text_image
Channel Tuning ATV 0 Programme: DTV 0 Programme: Radio 0 Programme: Data 0 Programme: 5% 95.25 MHz (TV)
[DTV Manual Tuning]
Choose frequency to install channels. Press OK to search.
![PANASONIC TH-22H400Z - [DTV Manual Tuning] - 1](/content/2026/06/1222423/images/19b920ae9be2b2cc22ea9b9d52779f0f2b9ca52f0234c0281f1ff1fa10f88004.jpg)
text_image
DTV Manual Tuning UHF CH 21 Searching, Please wait... Bad Freq 474.00 MHz GoodSelect
![PANASONIC TH-22H400Z - [DTV Manual Tuning] - 2](/content/2026/06/1222423/images/14daf5f76f20212e77b2bb6f843b310b3ec5c8e342e5124b51ffd3510665c4be.jpg)
Exit
AdjustAdjust
- Return
[ATV Manual Tuning]
Set correct options to install channels.
![PANASONIC TH-22H400Z - [ATV Manual Tuning] - 1](/content/2026/06/1222423/images/1bf6b7f1c1f344587b0624a5b878d58eea64d17492b145eba27cf549713d13ca.jpg)
text_image
ATV Manual Tuning Current CH 2 Color System AUTO Sound System BG Fine-Tune 420.00 MHz AFC on SearchSelect
![PANASONIC TH-22H400Z - [ATV Manual Tuning] - 2](/content/2026/06/1222423/images/cc1b7322eb97106be1909c7520937fda75b5cacca64f3845bbdbd1bb2028c2bf.jpg)
Exit
AdjustAdjust
- Return
[Programme Edit]
Edits channel settings.
Use colour key to delete, rename, remove and skip programme.
![PANASONIC TH-22H400Z - [Programme Edit] - 1](/content/2026/06/1222423/images/e9957fc4187874e4d3c75a09a2702247fe7fdd93eaeb1a25604fcfa08ce9fbe6.jpg)
In Programme Edit, delete channels.
![PANASONIC TH-22H400Z - [Programme Edit] - 2](/content/2026/06/1222423/images/bff7bd0a8ff24863659182ab36e850dfa0a21ca11aa39334338cfa8847583798.jpg)
In Programme Edit, rename channels. (only appear in ATV source)
![PANASONIC TH-22H400Z - [Programme Edit] - 3](/content/2026/06/1222423/images/991d035f1f95bfa825557cb27958321ee55c4f0e74555a6a7b892d0bf4bc4917.jpg)
In Programme Edit, move channels. (only appear in DTV source)
![PANASONIC TH-22H400Z - [Programme Edit] - 4](/content/2026/06/1222423/images/f76be59bc73e350dcb378f7aa570369067232fef3995c11caf603d7fc57ddf06.jpg)
In Programme Edit, skip channels. Change audio type between stereo and mono while watching program
[Signal information]
Show signal information of the current channel.
(Only available in DTV source.)
| Signal Information | |
| Channel:24 (562.00 MHz) | |
| Quality 100 | (Good) |
| Strength 42 | (Average) |
| Network | |
Additional Information
Auto power standby function
The TV will automatically go into Standby mode in the following conditions:
No signal is received and no operation is performed for 15 minutes in all signal source(except USB media).
[Sleep timer] is active in the [Time] menu (p. 14).
No operation is performed for the period selected in [Auto Standby] (p. 14).
Information banner
■ To display information banner (Digital TV)
INFO
i (Press again to hide the banner.)
Example : Digital TV
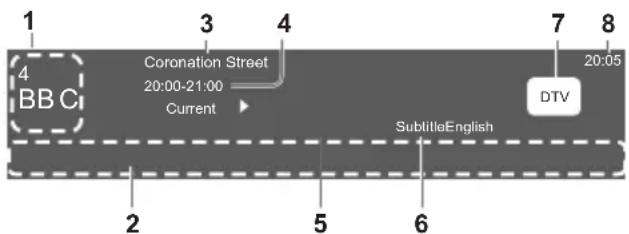
text_image
1 3 4 7 8 4 Coronation Street 20:00-21:00 Current 20:05 BBC SubtitleEnglish DTV 2 5 61 Channel number and name
2 Programme details
3 Programme name
4 Programme Start / Finish time (Digital TV)
5 Audio language (Choose Primary in [Setup])
6 Subtitle (If available)
7 Input signal
8 Current time
Aspect
[4:3]
Displays the image at the standard 4:3 without distortion.
[16:9]
Directly displays the image at 16:9 without distortion (anamorphic).
[Zoom1]
Displays the image with amplification that greater than original ratio.
[Zoom2]
Displays the image with amplification that greater than zoom1 ratio.
[Auto]
Displays the image based on the TS stream.
Input signal that can be displayed
Signal name COMPONENT HDMI
| 525 (480) / 60i, 60p | ○ | |
| 625 (576) / 50i, 50p | ○ | |
| 750 (720) / 60p, 50p | ○ | |
| 1,125 (1,080) / 60i, 50i | ○ | |
| 1,125 (1,080) / 60p, 50p | ○ |
○ Mark : Applicable input signal
Signals other than above may not be displayed properly.
The above signals are reformatted for optimal viewing on your display.
Read this information before playing media content.
Limitations on use of photo, video, and music files
The TV supports MSC(Mass Strong Class) USB devices only. MSC is a class designation for mass storage devices. Types of MSC devices include external hard drives, flash card readers, and digital cameras. (USB hubs are not supported.) These kinds of devices must be connected directly to the USB port. The TV may not be able to recognise a USB device or read the files on the device if it is connected with a USB extension cable. Do not disconnect USB devices while they are transferring files.
When connecting an external hard drive, use the USB(HDD) port. We recommend that you use an external hard drive with its own power adapter.
Certain digital cameras and audio devices may not be compatible with the TV.
The TV supports the FAT and NTFS file systems.
After sorting files in the Folder view mode, the TV can display up to 1,000 files per folder. If the USB device contains more than 8,000 files and folders, however, some files and folders might not be accessible.
Certain files, depending on how they are encoded, may not play on the TV.
Certain files are not supported on all models.
DivX and DTS codecs are not supported by the Panasonic.
Supported file format in Media Player
Licenses involved in specifications following are supposed to be obtained by customers.
*Need the specific chip and Hash Key to support.
1.Video
| P/N | Video Decoder | Resolution | Max fps | Maxbitrate (Mbps) | Bit depth |
| MPEG 1/2/4 | MPEG1 | 1920x1080 | 30 40M | 8 | |
| 1920x1080 | 8M04 | ||||
| MPEG-4 SP@HL 3.0 | 1920x1080 | 30 40M | 8 | ||
| MPEG-4 ASP@HL 4.0 | 1920x1080 | 30 | 40M | 8 | |
| Xvi | XviD | 1920x1080 | 30 | 40M | 8 |
| H.264 | H.264 BP LV 4.0 | 1920x1080 | 60 | 50M | 8 |
| H.264 MP LV 4.0 | 1920x1080 | 60 | 50M | 8 | |
| H.264 HP LV 4.0 | 1920x1080 | 60 | 50M | 8 | |
| H.264 MVC (version 11) | 1920x1080 | 60 | 50M | 8 | |
| H.265 | H.265 Main profile @ Level 4.1 | 1920x1080 | 06 | 50M | 8 |
| H.265 Main10 profile @ Level 4.1 | 1920x1080 | 60 | 50M | 8/9/10 | |
| neGc* | Motion JPEG | 640x480 | 30 | 10M | 8 |
| WMV | Window Media Video v9 | 1920x1080 | 30 | 40M | 8 |
| VC1 | VC-1 (SP/MP/AP) | 1920x1080 | 30 | 40M | 8 |
| RM* | RV 8 (rv30) | 1920x1080 | 30 | 40M | 8 |
| RV 9 (rv40) | 1920x1080 | 30 | 40M | 8 | |
| RV 10 (rv40) | 1920x1080 | 30 | 40M | 8 | |
| AVS* | AVS Jizhun Profile LV 6.0 | 1920x1080 | 30 | 40M | 8 |
| AVS Plus | 1920x1080 | 30 | 40M | 8 | |
| Sorenson* | Sorenson H.263 | 1920x1080 | 30 | 40M | 8 |
| Motion JPEG* | M-JPEG | 1920x1080 | 30 | 40M | 8 |
| H.263* | H.263 | 1920x1080 | 30 40M | 8 |
- Audio 3. Video / Audio Container
| PN | Audio Decoder(For MM Video) |
| PCM | wav: PCM / ADPCM / A-law PCM / u-law PCM |
| ADPCM IMA4 | |
| AMR | AMR-NB, AMR-WB/AMR-WB+ |
| LPCM DVD | LPCM |
| RA cook: | COOK (RealAudio6) |
| MPEG 1/2/4 | MPEG1 Layer1/2 |
| MPEG1 Layer1/2 (MPEG2) | |
| MP3 (MPEG1 Layer3) | |
| AAC | MPEG2 AAC (AAC-LC) |
| MPEG4 AAC-LC | |
| MPEG4 HE-AAC v1/v2 | |
| raac: MPEG4 AAC-LC | |
| racp: MPEG4 HE-AAC v2(RealAudio10) | |
| WMA* | WMA v7 |
| WMA v8 | |
| WMA v9 | |
| WMA Pro | |
| Dolby AC3 (DD)* | AC3 |
| Dolby Digital EX, DolbyDigital Plus | |
| dnet: AC3 (RealAudio3) | |
| Dolby EAC3*(DDCO) | Dolby Digital Plus |
| Dolby Digital Plus | |
| Dolby TrueHD* | Dolby lossless |
| Dolby MS11 No | -HEAAC |
| Dolby MS12 v1.3* | Config-D |
| FLAC | FLAC |
| FLAC (96hz) | |
| VORBIS VORBIS | |
| Container | File extension |
| TS .ts, .tsv, .tsa | |
| MP4 .mp4, .m4a | .m4p, .m4b, .m4r |
| 3GP .3gp | |
| MKV,MKA .mkv | .mk3d .mka .mks |
| FLV* | .flv, .f4v, .f4p, .f4a, .f4b |
| ASF,WMV,WMA | .wmv, .wma |
| RM*, RMVB* | .rm, .rmvb |
| AVI .avi | |
| MPG, MPEG .dat | .vob, .mpg, .mpeg, .m4a |
| OGG .ogg, .ogv, .pga, .ogx, .ogm, .spx, .opus | |
| MP3 .mp3 | |
| WAV .wav, .wave |
- Image Decoder
| File Extension | Container | Data Type |
| .jpg | JPEG | baseline |
| progressive | ||
| .bmp BMP | ||
| .png PNG | ||
| .gif* | GIF | static |
| animation |
Troubleshooting
Before requesting service or assistance, please follow these simple guides to resolve the problem.
If an error message appears, follow the message's instructions.
If the problem still persists, please contact your local Panasonic dealer for assistance.
Screen
Red, blue, green or black spots on the screen.
This is the characteristic of liquid crystal panels. The liquid crystal panel is built with very high precision technology. Occasionally, a few non-active pixels may appear on the screen as points of red, green, blue or black. This does not affect the performance of your TV and it is not a quality problem.
Chaotic image, noisy.
Set [Noise reduction] in the [Picture] menu to remove noise (p. 13).
Check nearby electrical products (car, motorcycle, fluorescent lamp).
No image is displayed.
Check the settings of [Contrast] or [Brightness] in the [Picture] menu (p. 13).
Check the TV is in AV mode. If the TV is in AV mode, check the selected input mode match the output of the external equipment (p. 10).
Unusual image is displayed.
Turn the TV off with Mains power On / Off switch (p. 10), then turn it on again.
Pictures from equipment connected via HDMI are unusual.
Check the HDMI cable is connected properly.
Turn the TV and equipment off, then turn them on again.
Check an input signal from the equipment (p. 18).
Use equipment compliant with EIA/CEA-861/861D.
Sound
No sound is produced.
Check the sound mute setting (p. 9) and volume.
Low level or distorted sound.
Sound signal reception may be deteriorated.
Sound output via HDMI connection is unusual.
Set the sound setting of the connected equipment to "2ch L.PCM".
General
The TV goes into Standby mode.
This TV is equipped with auto power standby function (p. 18).
The remote control does not work or is intermittent.
Replace the batteries (p. 5).
Point the remote control directly at the remote control signal receiver of the TV (within about 7 m and 30 degree angle).
Situate the TV away from sunshine or block sources of bright light from shining on the remote control signal receiver of the TV.
Parts of the TV become hot.
Even if the temperature of parts of the front, top and rear panels has risen, these temperature rises do not cause any problems in terms of performance or quality.
The TV panel moves slightly when it is pushed with a finger.
Clattered sound might be heard.
There is some flexibility around the panel to prevent damage. This is not a malfunction.
Overcurrent error message appears.
The connected USB device might cause this error. Remove the device and turn the TV off with Mains power On / Off switch, then turn it on again.
Check foreign objects are not inside the USB port.
Maintenance
First, remove the mains plug from the socket outlet.
Regular care
Gently wipe the surface of the display panel, cabinet and pedestal by using a soft cloth.
Wipe the mains plug with a dry cloth at regular intervals. Moisture and dust may lead to fire or electrical shock.
For stubborn dirt
First clean the dust on the surface. Dampen a soft cloth with clean water or diluted neutral detergent (1 part detergent to 100 parts water). Wring the cloth and wipe the surface. Finally, wipe away all the moisture.
Caution
Do not use a hard cloth or rub the surface too hard as this could scratch the surface.
Do not subject the TV's surfaces to water or detergent. Liquid inside the TV could lead to product failure.
Do not subject the surfaces to insect repellent, solvent, thinner or other volatile substances. This may degrade surface quality or cause peeling of the paint.
The surface of the display panel is specially treated and may be easily damaged. Take care not to tap or scratch the surface with your fingernail or other hard objects.
Do not allow the cabinet and pedestal to make contact with a rubber or PVC substance for a long time. This may degrade surface quality.
Specifications
Model no.
22-inch model TH-22H400Z
32-inch model TH-32H400Z
40-inch model TH-40H400Z
Power source
AC 100 - 240 V, 50/60 Hz
Power consumption
(Rated power / Standby power)
22-inch model 35 W / 0.5W
32-inch model 50 W / 0.5W
40-inch model 75 W / 0.5W
Display panel
Panel
LCD panel (LED backlight)
Visible screen size (diagonal)
22-inch model: 55 cm
32-inch model: 80 cm
40-inch model: 101 cm
Display resolution
22-inch model: 1,920 (W) × 1080 (H) 32-inch model: 1,366 (W) × 768 (H) 40-inch model: 1,920 (W) × 1080 (H)
Dimensions (W × H × D)
22-inch model
505 x 338.6 x 131.1 mm (With Pedestal) 505 x 303 x 80 mm (TV only)
32-inch model
732.1 x 479.3 x 178.6 mm (With Pedestal) 732.1 x 431.7 x 76 mm (TV only)
40-inch model
905.6 x 568 x 214.5 mm (With Pedestal) 905.6 x 523.4 x 85.3 mm (TV only)
Mass
22-inch model
2.2 kg (With Pedestal) 2.15 kg (TV only)
32-inch model
4.1 kg (With Pedestal) 4.0 kg (TV only)
40-inch model
6.7 kg (With Pedestal) 6.5 kg (TV only)
Connection terminals
AV IN (VIDEO)
VIDEO
1.0 V[p-p] (75 Ω)
AUDIO L - R 0.5 V[rms]
HDMI 1 / 2
TYPE A Connectors
USB
USB 2.0 TYPE A Connectors DC 5 V, Max. 500 mA
AUDIO out
0.2\~0.8V RMS (10K)
Speaker Output
Audio output
22-inch model 6 W (3 W + 3 W)
32-inch model 10 W (5 W + 5 W)
40-inch model 16 W (8 W + 8 W)
Receiving systems / Band name
9 Systems
| Systems Function | ||
| 1 | PAL B, G | |
| 2 | PAL I | |
| 3 | PAL D, K | Reception of broadcast |
| 4 | SECAM B, G | |
| 5 | SECAM D, K | |
| 6 | PAL | Playback from Special VCR's or DVD |
| 7 | PAL 60 Hz/5.5 MHz | Playback from Special |
| 8 | PAL 60 Hz/6.0 MHz | Disc Players and Special |
| 9 | PAL 60 Hz/6.5 MHz | VCR's or DVD |
Receiving channels (Analogue TV)
VHF BAND
2-12 (PAL/SECAM B, K1)
0-12 (PAL B AUST.)
1-9 (PAL B N.Z.)
1-12 (PAL/SECAM D)
UHF BAND
21-69 (PAL G, H, I/SECAM G, K, K1)
28-69 (PAL B AUST.)
13-57 (PAL D, K)
Aerial input
VHF / UHF
Operating conditions
Temperature
0^-45^
Humidity
20 % - 80 % RH (non-condensing)
Note
Design and Specifications are subject to change without notice. Mass and Dimensions shown are approximate.
WARRANTY - New Zealand only
WE WARRANT that the Panasonic Television that you have purchased is free from defects in material and workmanship under normal home use and service.
Accordingly, we undertake to repair, or at our option, replace without cost to the owner, either for material or labour, any part which within 12 months from the date of delivery is found to be defective, provided that the appliance has been used for domestic purposes only and in accordance with the instructions given in the Instruction Book and not been subjected to misuse, neglect or installed, dismantled, repaired or serviced by any other than an authorised Panasonic New Zealand Dealer or Panasonic New Zealand Authorised Service Centre.
NOTE
- Before reporting a fault, please ensure that you read the item "Troubleshooting" in the information section of your Panasonic Instruction Book. - It is important to retain your proof of purchase as this will be required by the serviceman or retailer as proof of purchase date, should service be required.
- In the event of service being required, contact your Panasonic New Zealand retailer or Panasonic New Zealand Authorised Service Centre. IMPORTANT
Any request for warranty service must be through an Authorised Panasonic New Zealand Service Centre who during the period of the warranty, undertakes to make any necessary adjustment and fit any replacement part supplied by the manufacturer, during normal working hours, or alternatively will arrange for such service to be provided by some other Panasonic New Zealand Authorised Service Centre.
NEW ZEALAND
Distributed in New Zealand by Panasonic New Zealand Limited
18 Sir Woolf Fisher Drive, Highbrook, East Tamaki, Private Bag 14911, Panmure, Auckland Tel. 09 272 0100
Customer Care Center
Email: Customerservice@nz.panasonic.com
www.panasonic.co.nz
Information on Disposal in other Countries outside the European Union

This symbol is only valid in the European Union. If you wish to discard this product, please contact your local authorities or dealer and ask for the correct method of disposal.
Customer's Record
The model number and serial number of this product may be found on its rear panel. You should note this serial number in the space provided below and retain this book, plus your purchase receipt, as a permanent record of your purchase to aid in identification in the event of theft or loss, and for Warranty Service purposes.
Model Number
Serial Number