SpotWash CDSW-MPXSRB - Vacuum Cleaner VAX - Free user manual and instructions
Find the device manual for free SpotWash CDSW-MPXSRB VAX in PDF.

User questions about SpotWash CDSW-MPXSRB VAX
0 question about this device. Answer the ones you know or ask your own.
Ask a new question about this device
Download the instructions for your Vacuum Cleaner in PDF format for free! Find your manual SpotWash CDSW-MPXSRB - VAX and take your electronic device back in hand. On this page are published all the documents necessary for the use of your device. SpotWash CDSW-MPXSRB by VAX.
USER MANUAL SpotWash CDSW-MPXSRB VAX
natural_image
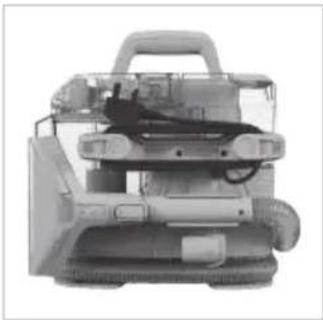
Black-and-white photo of a Vax vacuum cleaner with attached hose and hood, no visible text or symbols on the device itself.CDSW-MPXSRB
1 year warranty
SAFETY GUIDE
BASIC SAFETY PRECAUTIONS
This machine is intended for household use only and NOT for commercial or industrial use.
PLEASE KEEP INSTRUCTIONS FOR FURTHER USE AND USE ONLY AS INSTRUCTED IN THIS GUIDE.
- This machine is intended for indoor cleaning and vehicle interiors during dry weather conditions.
- Keep fingers, hair and loose clothing away from moving parts and openings whilst using the machine.
- Before using the machine test your carpets/rugs/upholstery for colourfastness and pile distortion.
- This machine is not intended to be used or cleaned by persons with reduced physical, sensory or mental capabilities, or lack of experience or knowledge, unless they have been given instructions concerning the safe use of the appliance by a person legally responsible for their safety. They should be supervised whilst using the appliance. Children shall not use, clean or play with this appliance, which when not in use should be secured out of their reach.
- Only VAX recommended tools and solution should be used with this machine. Using other solutions may invalidate the guarantee.
DON'TS
- Don't leave the machine plugged in when unattended.
- Don't use the machine if it has been dropped, damaged or left outdoors.
- Don't use the machine if the power cord or plug is damaged. If the power cord is damaged, it must be replaced by a qualified person in order to avoid a hazard.
- Don't vacuum up any flammable or combustible materials (lighter fluid, petrol, kerosene etc.) or use the machine in an area with explosive vapours or liquid.
- Don't use the machine outside during wet weather conditions.
- Don't handle the plug or use the machine with wet hands.
- Don't pull or carry the machine by the power cord.
- Don't use the machine to pick up hot coals, cigarette butts, matches or smoking hot burning items or use in an area where there may be harmful fluids (chlorine, bleach, and ammonia drain cleaner).
- Don't use the power cord as a handle, pull the power cord around corners, sharp edges or close a door over the power cord.
- Don't unplug the machine by pulling on the power cord.
- Don't carry the machine while it's switched on.
-
Don't attempt to remove blockages with sharp objects as this may cause damage to the machine. Remove blockages only as instructed in this guide.
-
Don't use the machine with incorrect voltage as this may result in damage or injury to the user. The correct voltage is listed on the ratings label.
- Don't over saturate your flooring/surface. Always finish on a dry stroke.
- Don't use on a surface that is damaged, uneven or incorrectly fitted.
DO'S
Refer to the floor/surface manufacturer's care recommendations before use. Test your flooring/surface - run the machine over a small hidden area, if no damage or discolouration occurs continue cleaning. Not suitable for use on water sensitive flooring/surfaces.
- The clean water tank should be filled with warm water (max 40°C) only. Filling the clean water tank with hot or boiling water will damage the machine and invalidate the guarantee. Always use the machine with all water tanks and filters in place.
- Always keep the area you're cleaning well lit.
• Always replace the fuse in the plug with a British 13amp fuse.
- Always unplug the machine before carrying out any maintenance and before connecting or disconnecting the accessories.
• Take extra care when cleaning on the stairs.
- Turn off all controls on the machine before disconnecting or connecting the power cord. After use always wrap the power cord around the cord clips provided.
• Always protect the power cord from heated surfaces and open flames.
- Use only CE approved 13amp extension cords, non-approved extension cords may overheat. Care should be taken to arrange the extension cord as it can be a trip hazard.
- Keep all openings clear and free from debris as this may affect the airflow/suction/water pick up.
- Always use the machine in an upright position. To prevent motor damage from dirty water, never hold the machine upside down or on its side.
- Keep the machine away from direct sunlight and store in a cool, dry area. Before storing the machine please ensure all water/solutions tanks are empty and filters are thoroughly clean and dry.
WARRANTY & TECHNICAL
WARRANTY
If a VAX machine is used in the way it is intended and it breaks down within the guarantee period, it's our responsibility to repair or replace it.
Here's what isn't covered:
- Functional parts, tools and accessories after 12 months that may suffer premature failure due to every day wear and tear.
- Consumables after 3 months such as belts, filters, brushbars, fuses etc.
- Accidental damage.
- Cosmetic damage that does not affect the functioning of the product.
- Damage as a result of use not in accordance with the user guide.
- Damage caused by not carrying out regular maintenance.
- Damage to the cord.
- Blockages; please refer to the user guide.
- Poor product performance caused by:
- Negligent use, misuse or careless operation of the machine.
- Failure to clean or maintain the product in accordance with the user guide.
- Use of the machine which is not in accordance with the user guide.
- Use of a VAX product for anything other than normal domestic household purposes in the country in which it was purchased.
- Use of parts, accessories and consumables, which are not genuine VAX components.
- Faulty installation or repairs - unless carried out by a qualified electrician or engineer.
TECHNICAL
Statement of Compliance: Manufacturer/EU importer: VAX Limited, hereby on our own responsibility, declare that the VAX SpotWash Home Duo is manufactured in compliance with the following Legislation:
Safety: 2014/35/EU Low Voltage Directive/Electrical Equipment (Safety)
Regulations 2016. EMC: 2014/30/EU Electromagnetic Compatibility Directive/Electromagnetic Compatibility Regulations 2016.

Waste electrical products should not be disposed of with household waste. Please recycle where facilities exist. Check with your Local Authority or retailer for recycling advice.
VAX is a trade mark of Techtronic Cordless GP.
© 2021 Techtronic Cordless GP. All rights reserved.
4 VAX Ltd, Artillery House, Heritage Way, Droitwich, WR9 8YB, UK.
CONTENTS
Safety guide 2 - 3
Warranty & technical 4
Getting in touch 6
Getting to know your machine 7
Getting started 8
Using your machine 8 - 10
Maintenance & cleaning 11 - 13
Accessories
14
What to do if it goes wrong 15
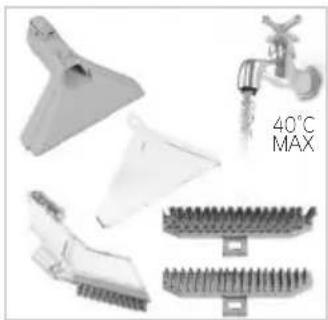
Included with your machine
CDSW-MPXP

natural_image
Technical illustration of a Y-shaped tool and its three views (top: threaded, middle: flat, bottom: rectangular) with no visible text or symbols.Extra wide 2-in-1 wash tool
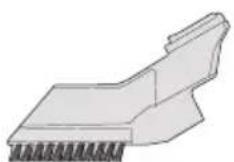
Crevice tool

Messy clean up tool

Accessory bag
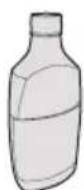
x1 250ml
Spot Washer
Antibacterial Solution
GETTING IN TOUCH
Thank you for buying this VAX SpotWash Home Duo.
The VAX SpotWash Home Duo is designed to help you quickly tackle spills and stains on multiple surfaces all around your home.
This user guide gives instruction on operation and maintenance, and will help you get the most out of your new machine, so that it's always ready when you are to tackle those unexpected spills and stains.
Your product comes with a standard one year warranty
Register your product at:
vax.co.uk
We're here if you need us
Visit our online support:
support.vax.co.uk
Still need to get in touch?
Our UK based Customer Care Team are here to support you.
For help with assembly, operational or performance problems, or buying and fitting new accessories, you can find all our contact details at vax.co.uk/contact
This user guide can be found online at: support.vax.co.uk
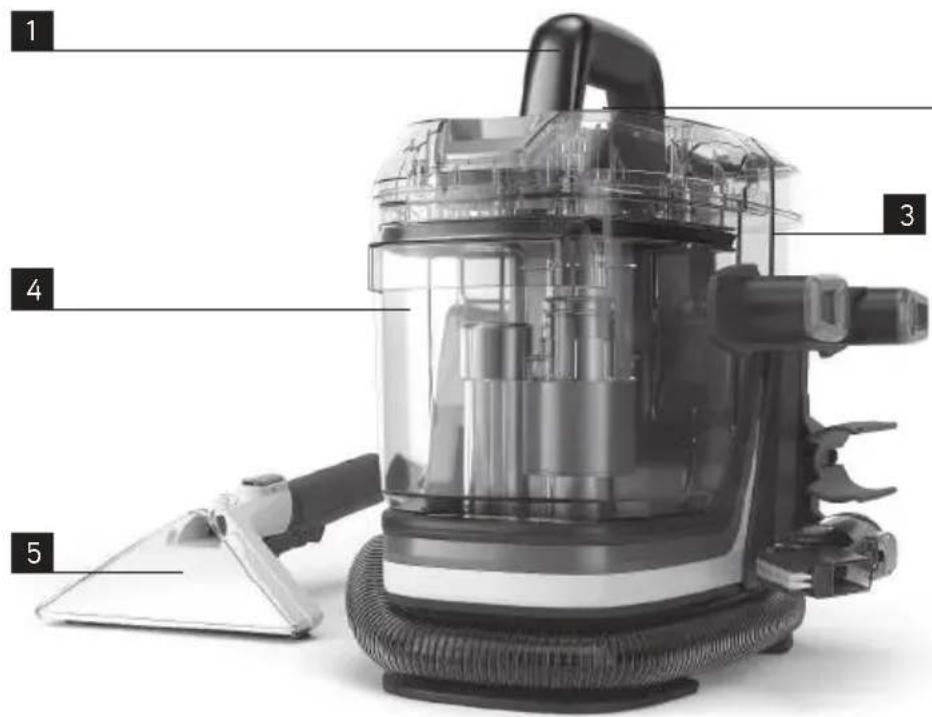
GETTING TO KNOW YOUR MACHINE
text_image
1 3 4 5
natural_image
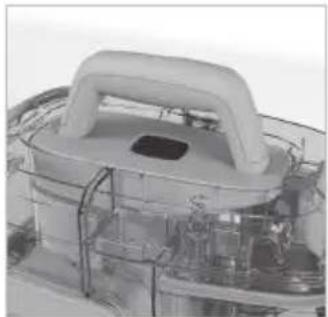
Top-down view of a white ergonomic device with a black vent and a small rectangular base (no visible text or symbols)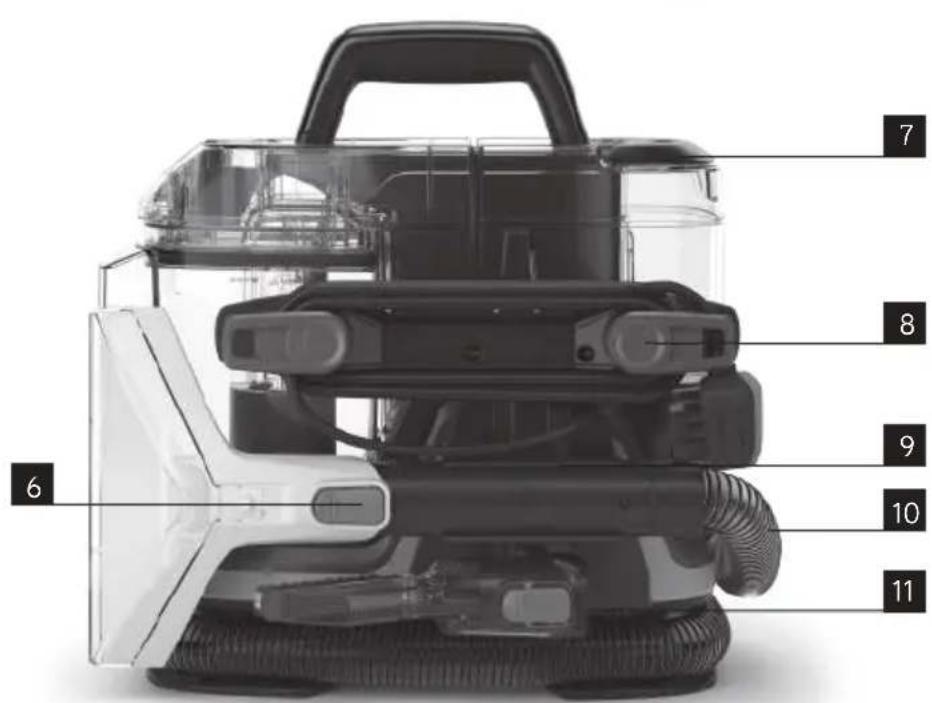
text_image
7 8 9 10 11 61 Carry handle
2 On/Off button (located under handle)
3 Clean water/solution tank
4 Dirty water tank
5 Wash tool
6 Wash tool release button
7 Clean water/solution tank handle
8 Quick cord release hooks
9 Hose storage clip
10 Hose
11 Crevice tool storage
TECHNICAL SPECIFICATION
Name VAX SpotWash Home Duo
Code CDSW-MPXP
Voltage: 220-240V
Wattage: 400W
Cord length 5.5m
Weight 4.6kg
To purchase accessories and consumables visit: vax.co.uk
Subject to technical change without notice. Images are illustrative only.
GETTING STARTED
PLEASE READ THE SAFETY PRECAUTIONS ON PAGES 2 & 3 BEFORE USE.
IMPORTANT: Test all carpets/rugs/upholstery/hard floors before use. Before using the machine to clean dried on stains and dirt, the surface should be vacuumed thoroughly.
Test for colourfastness - Wet a white absorbent cloth with the solution. In a small hidden area of the surfaces to be cleaned, gently rub with the dampened cloth. Wait ten minutes and check for colour removal or bleed with a white paper towel or cloth. Check all surfaces to be cleaned and if the surface has more than one colour, check all colours.
Test the spot washer on a small hidden area - If no damage or pile distortion occurs continue cleaning.
When using the spot washer, basic safety precautions should always be observed and don't over saturate your carpets/rugs/upholstery/hard floors. Not suitable for use on water sensitive flooring/surfaces. Only use with VAX Spot Washer Cleaning Solution or VAX Spot Washer Antibacterial Cleaning Solution. Using other solutions may cause excess foaming and will invalidate your guarantee. The clean water/solution tank should only be filled with warm water (max 40°C). Filling the clean water/solution tank with hot/boiling water will damage your spot washer and invalidate the guarantee.
Assembly
natural_image
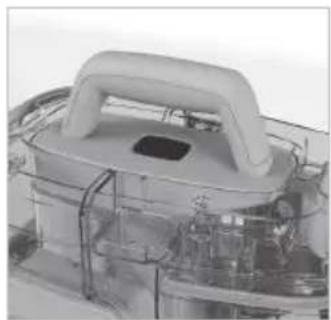
Exterior view of a mechanical device with visible internal components and wiring (no text or symbols)Wrap the cord around the quick cord release hooks.
Filling the clean water/solution tank
natural_image
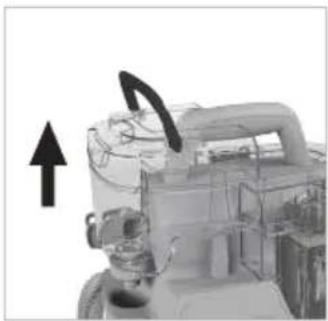
Mechanical component with attached gear and mounting bracket, no visible text or symbolsLift the clean water/ solution tank handle and pull to remove the tank.

natural_image
Mechanical component diagram showing a gear and housing assembly with an upward arrow (no text or symbols)Unscrew the cap off the base of the clean water/solution tank.

text_image
40°C MAXFill the tank with warm water (max 40^ C) and solution to the desired clean level, indicated by the lines on the tank.
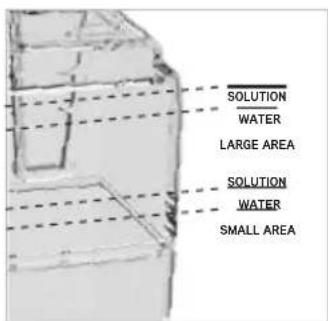
text_image
SOLUTION WATER LARGE AREA SOLUTION WATER SMALL AREA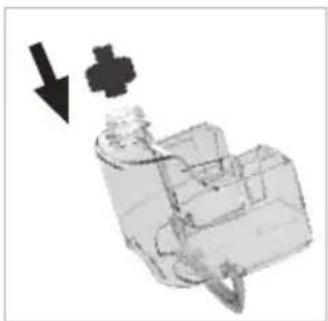
natural_image
Mechanical component diagram showing a valve or actuator with a downward arrow indicating motion (no text or symbols present)Screw the cap back tightly onto the clean water/solution tank.
natural_image
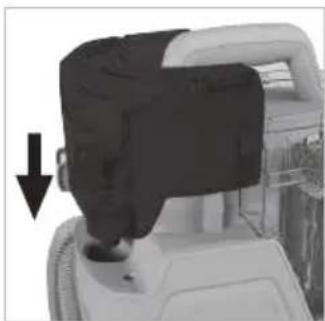
Close-up of a mechanical device with a black component and arrow indicating downward motion (no visible text or symbols)Refit the clean water/solution tank onto the machine so it clicks into place.
USING YOUR MACHINE
Operation

natural_image
Top-down view of a mechanical device with arrows indicating motion or flow direction (no visible text or symbols)Turn the quick release hooks and remove the cord from the clips.
natural_image
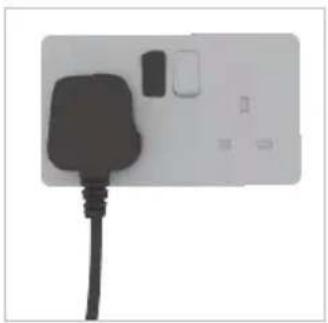
White electrical outlet with black plug and switch (no text or symbols visible)Plug the machine into the mains and switch on.

natural_image
Exterior view of a mechanical device with visible components and wiring (no text or symbols)Pull to remove the wash tool and hose from the storage clip.
natural_image
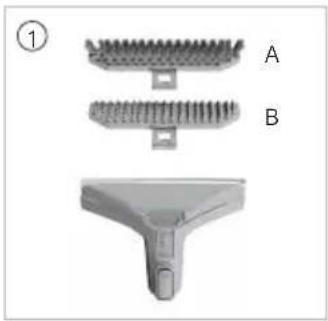
Three views of a mechanical component: top view with threaded grooves, middle view with flanged grooves, and bottom view with a T-shaped handle (no text or symbols)Select a tool/attachment.
natural_image
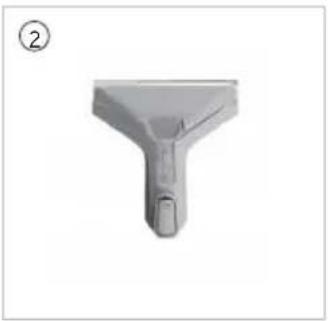
3D rendered image of a mechanical component with a Y-shaped handle and a small protrusion, labeled with number ② in the top-left corner.
natural_image
Close-up of a mechanical component with wires and connectors (no visible text or symbols)- Extra wide 2-in-1 wash tool for cleaning carpets, rugs, sofas and upholstery
A) multi purpose brush for cleaning carpets, rugs, sofas and upholstery.
B) hard floor scrub attachment for cleaning tiles and sealed wooden floors.
- Messy clean up tool
A smaller, spare cleaning tool to keep messy clean ups separate from every day cleaning.
- Crevice tool
For edge and tight spot/crevice cleaning.
natural_image
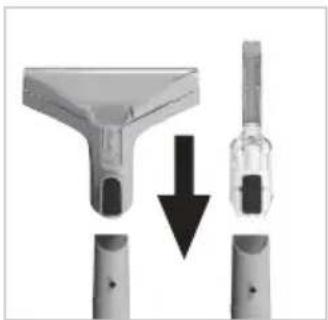
Close-up of a medical or laboratory procedure showing a tool interacting with a device, with no visible text or symbols.Press the tool lock button and slide the tool onto the end of the hose, over the nib. Release the button when in place.

natural_image
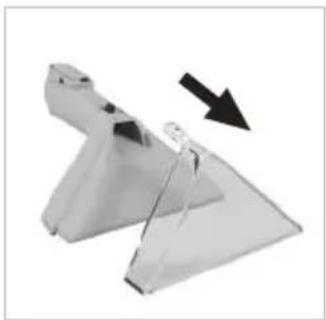
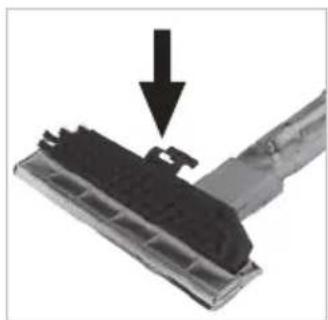
Close-up of a mechanical component with a black arrow pointing to a textured surface (no visible text or symbols)To fit an attachment to the wash tool, fit the front of the selected attachment into the front of the wash tool and push the clip down to click into place.
natural_image
Close-up of a white plastic industrial component with a curved handle and internal wiring (no visible text or symbols)Press the on/off button to switch the machine on.
USING YOUR MACHINE
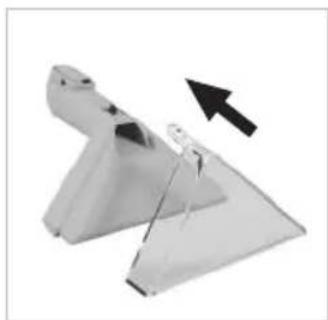
Using the Extra wide 2-in-1 wash tool / Messy clean up tool
natural_image
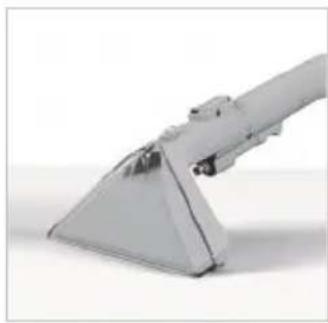
Close-up of a metallic mechanical component with a triangular base and protruding joints (no visible text or symbols)For spills, always pick up the excess liquid before using water/solution. Tilt the tool forward onto the spill and pull back.

natural_image
3D rendering of a futuristic vehicle or aircraft in motion, no visible text or symbolsPress the trigger on the wash tool to release water and solution.

natural_image
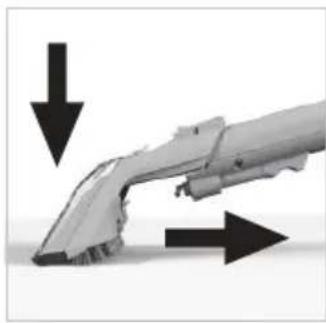
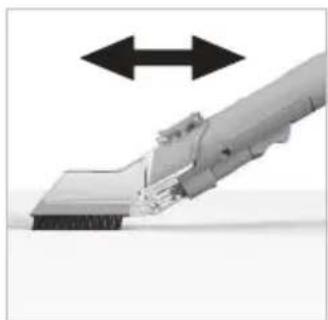
3D rendered mechanical component with double-headed arrows indicating vertical alignment (no text or symbols)Use the brush to agitate any stubborn stains, scrubbing back and forth.
natural_image
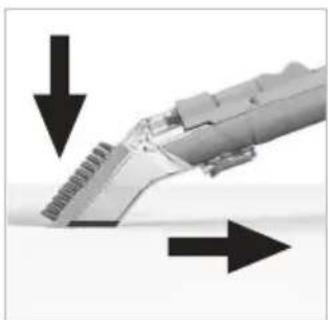
3D rendering of a mechanical component with directional arrows indicating flow or movement (no text or symbols)Tilt the nozzle forward so the nozzle is in contact with the surface. Pull back to recover the water and solution.
IMPORTANT: Over or under tilting the hand tool may result in poor water pick up.

natural_image
3D rendered mechanical component with a black checkmark overlay (no text or symbols on the part itself)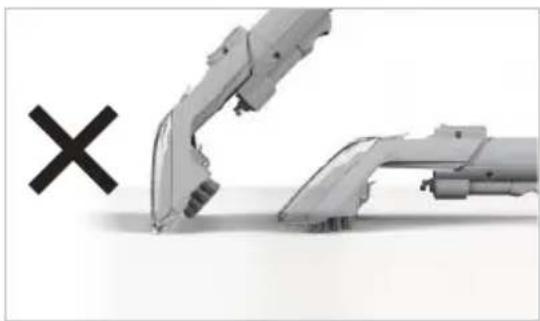
natural_image
Illustration of a robotic arm with a cross mark symbol (no text or labels)Using the crevice tool

natural_image
Close-up of a mechanical component with fins and a handle, no visible text or symbolsPress the trigger on the crevice tool to release water and solution.
natural_image
Close-up of a mechanical component with bidirectional arrows indicating movement or force (no text or symbols visible)Use the brush to agitate any stubborn stains, scrubbing back and forth.
natural_image
Close-up of a mechanical component with directional arrows indicating movement or force (no text or symbols visible)Turn the tool over and tilt the nozzle forwards so the nozzle is in contact with the surface. Pull back to recover the water and solution.
MAINTENANCE & CLEANING
IMPORTANT: Unplug and switch off the machine before performing maintenance or troubleshooting checks.
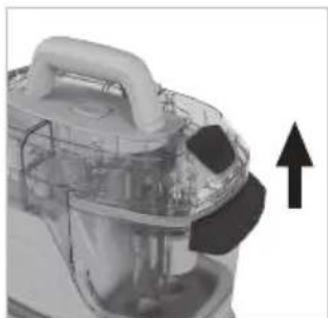
Emptying and cleaning the dirty water tank
IMPORTANT: The dirty water tank is fitted with a float. When the dirty water tank is full, the float will shut off the suction on the machine. You will be able to hear if this has happened as the motor noise on the machine will increase. Once the float is activated, empty the dirty water tank if full. If the dirty water tank is not full then turn off your machine at the power switch and wait for the float to settle.
IMPORTANT: Empty and rinse out the clean water/solution tank and dirty water tank and leave to air dry before refitting to store.

natural_image
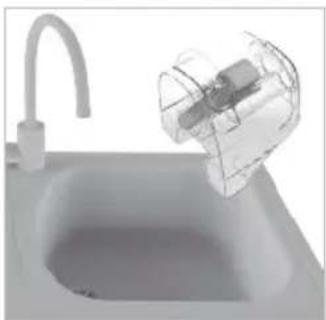
Close-up of a hand holding a transparent device with a black clip and upward arrow indicator (no text or symbols)Press the dirty water tank release button. Pull to release the tank and lift by the carry handle to remove.
natural_image
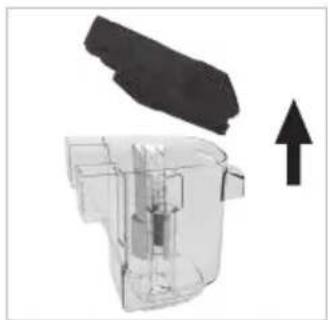
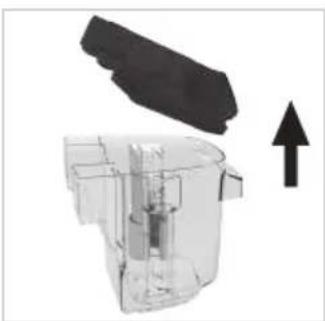
Diagram of a mechanical component with an upward arrow indicating motion or force (no text or symbols present)Pull and lift the lid to remove from the dirty water tank.
natural_image
3D rendered image of a modern kitchen sink with a hand mixer in the background (no text or symbols visible)Empty the dirty water into the sink or toilet.
text_image
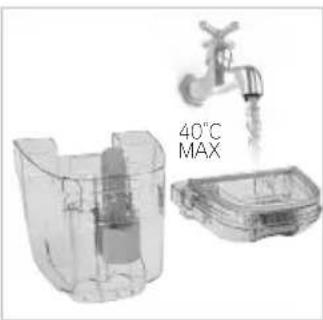
40°C MAXRinse the dirty water tank and lid under water (max 40°C) to remove dirt/debris.

natural_image
Diagram of a mechanical component with a downward arrow indicating direction (no text or symbols present)To refit the lid align the lid to the tank and firmly push into place.

natural_image
Close-up of a mechanical component with a black arrow pointing to a section (no visible text or symbols)Refit the dirty water tank onto the machine so it clicks into place.
MAINTENANCE & CLEANING
Cleaning the hose
IMPORTANT: Clean the hose after each use to remove any debris or water left in the hose.

natural_image
3D rendering of a modern kitchen sink with a transparent container and faucet (no text or symbols visible)Empty the dirty water into the sink or toilet.
natural_image
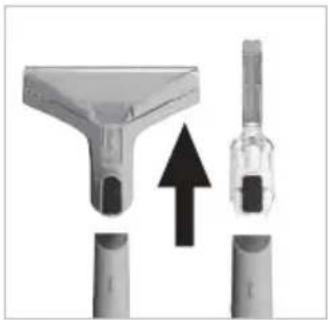
Diagram showing a mechanical component with an upward arrow, no text or symbols presentPress the tool lock button and pull to remove the tool from the hose.

natural_image
Simple 3D-rendered gray circular object with a smooth, hollow center (no text or symbols)Fill a bowl with 500ml of warm water (no solution).

natural_image
White electrical outlet with black plug and switches (no text or symbols visible)Plug the machine into the mains and switch on.

natural_image
Close-up of a white plastic appliance with a handle and internal components (no visible text or symbols)Press the on/off button to switch the machine on.

natural_image
Close-up of a white bowl containing liquid with a pipette inserted, no visible text or symbolsSubmerge the end of the hose into the bowl of water. Do not squeeze the trigger.
natural_image
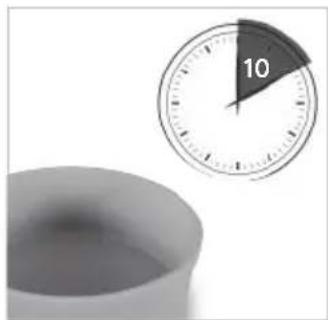
Close-up of a white ceramic cup and a wall clock showing 10 o'clock (no text or symbols on the cup or clock)Once the bowl is empty, let the machine run for 10 seconds to remove residual water and dirt left in the hose. Repeat the process again if needed.
natural_image
Close-up of a mechanical device with a central handle and internal components (no visible text or symbols)Press the on/off button to switch the machine off. Unplug the machine from the mains.

natural_image
Close-up of a white industrial vacuum cleaner with a black upward arrow indicating motion (no text or symbols visible)Press the dirty water tank release button. Pull to release the tank and lift by the carry handle to remove.
natural_image
Diagram of a device with a black component and an upward arrow, no visible text or symbolsPull and Lift the lid to remove from the dirty water tank.

natural_image
3D rendered image of a modern kitchen sink with a plastic container and faucet (no text or symbols visible)Empty the dirty water into the sink or toilet.
MAINTENANCE & CLEANING
Removing and cleaning the wash tool and attachments

natural_image
Close-up of a medical or laboratory device with a T-shaped component and a magnified view showing internal components (no text or symbols visible)Press the tool lock button and pull to remove the tool from the hose.
natural_image
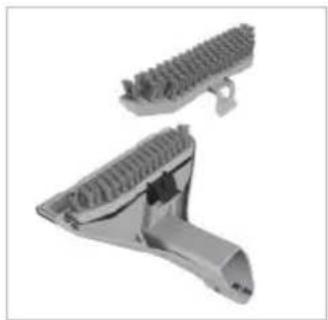
3D rendered mechanical component with threaded end and flange (no text or symbols)Pull and lift the clip to remove the attachment from the wash tool.
natural_image
Metallic mechanical component with a black arrow indicating direction (no text or symbols)To remove the nozzle on the wash tool, push and lift the clear plastic clip up over the button on the end of the hose.
natural_image
Product images of kitchen utensils including a faucet, water drop, and threaded base (no text or symbols)Rinse the tools, attachments and the nozzle under warm water (max 40°C) to remove dirt/debris.
natural_image
Metallic mechanical component with a black arrow indicating direction (no text or symbols)To refit the nozzle, slide the nozzle into the wash tool until it clicks into place.
natural_image
Close-up of a mechanical component with a black arrow pointing to a specific part (no text or symbols visible)To refit, fit the front of the attachment into the front of the wash tool and push the clip down to click into place.
Cleaning the filter grill
natural_image
Close-up of a white industrial vacuum cleaner with black adjustment knobs and an upward arrow indicator (no text or symbols)Press the dirty water tank release button. Pull and lift to remove the tank.

natural_image
Close-up of a small industrial cleaning or cleaning device with two circular components and a coiled hose (no visible text or symbols)Remove any dirt and debris from the filter grill located underneath the dirty water tank.
Don't forget your solution!
Order at: www.vax.co.uk/spares-and-solutions
VAX Spot Washer Antibacterial Solution (11)
1-9-142409


text_image
SWEET WAFERS VAXPerfect for cleaning rugs, carpets and upholstery around the home. Specifically formulated for use with Vax SpotWash Home Duo to target spills and stains.
WARNING: Always switch off and unplug the machine before performing any maintenance or troubleshooting checks.
There is an accessory missing
- Check the contents on the box.
Why does the machine have no power?
- The plug may not be fully pushed into the electrical socket.
- The fuse in the plug may need replacing. Always replace with a British 13amp fuse.
- The motor thermostat may have tripped. If this has happened, unplug the machine. Check the machine for blockages and clean the filter grill
Why won't the water/solution dispense?
- Squeeze the trigger on the hose to release solution and water mix. See OPERATION page 11.
- Make sure the clean water/solution tank is fitted securely. See FILLING THE CLEAN WATER/SOLUTION TANK PAGE 9.
- The clean water/solution tank is empty. Refill the tank. See FILLING THE CLEAN WATER/SOLUTION TANK PAGE 9.
- The clean water/solution tank valve may be stuck, hold the tank over the sink and press the valve underneath to release.
- Air is trapped in the pump and hose. Switch on the machine, prime the pump by lowering the hose down to the floor and hold the trigger for up to 1 minute.
Why won't the machine pick up?
- The float in the dirty water tank may have been activated. Empty the dirty water tank and wait for the float to settle before restarting your machine.
- The tool nozzle may not be in contact with the surface, tilt the nozzle forwards. See OPERATION page 11.
- Check the wash tool for blockages and clear. See REMOVING AND CLEANING THE WASH TOOL AND ATTACHMENTS page 14.
- The dirty water tank may not be assembled correctly or the lid may not be fitted securely. See EMPTYING AND CLEANING THE DIRTY WATER TANK page 12.
- Check the wash tool nozzle is correctly fitted. See ASSEMBLY page 8.
- Check the filter grill located under the dirty water tank for dirt and debris. See CLEANING THE FILTER GRILL page 14.
GET IN TOUCH
@ info@vax.co.uk vax.co.uk