4-Band Dist - Speaker DPW Design - Free user manual and instructions
Find the device manual for free 4-Band Dist DPW Design in PDF.

User questions about 4-Band Dist DPW Design
0 question about this device. Answer the ones you know or ask your own.
Ask a new question about this device
Download the instructions for your Speaker in PDF format for free! Find your manual 4-Band Dist - DPW Design and take your electronic device back in hand. On this page are published all the documents necessary for the use of your device. 4-Band Dist by DPW Design.
USER MANUAL 4-Band Dist DPW Design
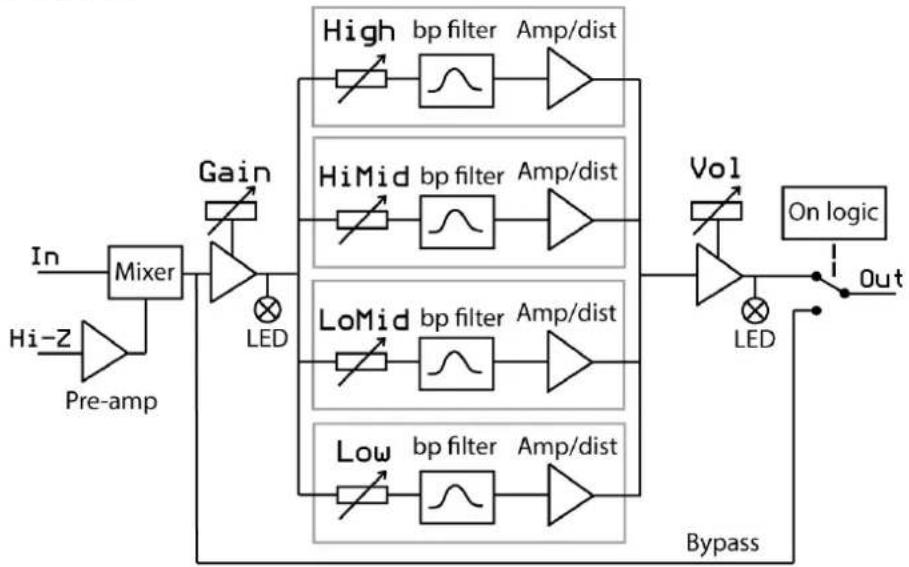
4-Band Distortion Mög D-2 Pre-amp, overdrive and distortion
The D-2 is a four band pre-amp, overdrive and distortion module in Eurorack format with manual or CV control over the on and off.
You should see the D-2 as a four band vintage type equalizer that can be set to be as clean or overdriven/distorted as you like. It is designed to be very dynamically playable.
Each frequency band has its own gain so it can be set to work as everything from a fairly clean boost, overdrive or distortion. Each band can also be completely turned off.
It is a pure analog module built on JFET technology to get a sound similar to a tube amp design, or like 4 parallel tube amps. Only transistors, capacitors and resistors in the distortion part of the module. No clipping OP-Amps or diodes. Old school design.
The benefits of the multi band approach is that you don't get a sound that just clogges up the lower mid range when you turn up the distortion. You can still control the low end and not lose the fat bottom of your sound. You could also decide to let through some of the high end relatively unaffected to still have the snappy transients that heavy distortion otherwise would compress away.
It has a CV or manual controllable on/off that is equipped with a super fast switch and an evaluating circuit that waits until it can do a glitch free switch. This means that it waits from instantaious switching to max 50ms, sometime during that time it will be the perfect time to switch.
This built in evaluating circuit switch control opens up for some unique types of sounds when controlled at audio rate.

text_image
4-Band Dist On Gain Vol MOG LoMid HiMid Low High Hi-Z IN On OUT DPW DesignControls
In
Erurorack level input.
If the Gain LED lights up with just something connected to In, don't bother. It can take 10V signals without internal clipping in the wrong part of the module. The use of the Gain LED is described under Hi-Z.
In and Hi-Z are mixed in the module and can be used at the same time.
Hi-Z
High impedance input for guitar, bass and other low level signals.
Can also be used to bring line level signals like normal synths to eurorack level.
To check the aproptiate level of a line device in to Hi-Z. Set the Gain knob to max. If the Gain LED lights up turn down the output of your line level device till the LED isn't lit. This is to check that you don't get distortion in the Hi-Z pre-amp and theirby loose the benefits of having a multiband distortion.
The Hi-Z input behaves like a tube pre-amp and will color the sound a bit if you drive it hard. This means that a bit of compression will happen here. So if you connect a guitar then the sound will be nice and useful even in clean bypass mode as you get some compression of the transients and that way the sound will appear natural.
Gain
The overall gain in to the multiband distortion section.
You can set the balance of the distorted bands and just set how hard you drive all of them with the Gain knob.
Vol
The overall volume out from the multiband distortion section. The Vol LED lights up when you set the volume to more than 6V. Nothing bad happens when it is lit, it is just a visual indication and a mixing help.
Low
This band is made to be able to let the really low frequencies through without too much distortion if you like to keep the bottom end.
LoMid
This band has the most gain. This is where the growl is. Turn it up till you have right amount of low mid dirt.
HiMid
This band is there for coloration of the higher mid band if you like.
High
The center frequency of this band has been selected to specifically let through the metallic string sound of a bass and the high frequency content of transients. It is designed to be high enough to give your sound some vivid life but also cuts the really high frequencies a bit so it doesn't sound harsh.
If you play bass through the module and it doesn't cut through the mix turning this up could do the trick.
On
There are a switch and a CV input for turning the distortion on. The switch takes presence over the CV in.
The module will always switch on in a glitch free way as described in the introduction.
Anything above 1V on the CV On input will turn the module on. From DC to high audio rate.
Out
Eurorack level out.
Block diagram
flowchart
graph LR
    A["In"] --> B["Mixer"]
    C["Hi-Z"] --> D["Pre-amp"]
    D --> B
    B --> E["Gain"]
    E --> F["LED"]
    F --> G["High bp filter Amp/dist"]
    G --> H["Amplifier"]
    I["HiMid"] --> J["Amplifier"]
    J --> K["Amplifier"]
    L["LoMid"] --> M["Amplifier"]
    M --> N["Amplifier"]
    O["Low"] --> P["Amplifier"]
    P --> Q["Amplifier"]
    R["Vol"] --> S["Amplifier"]
    S --> T["On logic"]
    T --> U["Out"]
    U --> V["Bypass"]
    V --> W["LED"]
    W --> X["High"]
    W --> Y["Mid"]
    W --> Z["Low"]
Device specs
Module size: 10 hp wide, 29 mm deep with power connector.
Input impedance: 100 kohm on In and 3 Mohm on High-Z.
Out impedance: 1 kohm
Power requirements: +12V. Max power consumption 25 mA
-12V. Max power consumption 15 mA
Connect the power cable with the red stripe towards the marking -12V on the board.
The unit is protected for reverse power.
A few examples, just to get your imagination going.
Normal distortion
If connected after a VCA you get a dynamic signal going in to the D-2. Then you can get the full range of tones it can produce, depending on the envelope for the VCA.
Guitar/bass pre-amp
A tip is to not always set the gain too high. There are a lot of nice tones to be found with lower settings in to the distortion and compensating by turning up the Vol out. This way you will get the full benefit of how dynamically playable it is.
PWM dirty fade on
Connect the PWM output from a VCO to the On input and set the manual On switch to off.
By controlling the pulse with on your VCO from completely off to completely on you can fade in your distortion by chopping it in increasingly larger pieces.
This is in no way a traditional fade, it is a chopped one.
It will not sound too harsh due to the built in evaluating switching but may sound very un-even and broken if your PWM isn't in sync with the sound going through the distortion. That can be a nice broken sound.
Chopper
By adding a CV signal to On and turning the Vol completely off the module will behave like a chopper for the clean bypassed signal.
It will in this case switch at zero crossings of the audio in and be glitch free.
Reverb
Using the D-2 as a pre-amp for reverb tanks can give you everything from big lush open reverbs to gritty low-fi ones. You can even get gritty ones by turning up the LoMid and still preserve some of the lush by turning up the High.

flowchart
graph LR
    A["AV-I"] -->|IN| B["Reverb tank IN OUT"]
    B --> C["4-Band Dist"]
    C --> D["Mixer"]
    D --> E["DPW Design"]
    style A fill:#f9f,stroke:#333
    style B fill:#bbf,stroke:#333
    style C fill:#dfd,stroke:#333
    style D fill:#dfd,stroke:#333
    style E fill:#dfd,stroke:#333
This is a patch definitely worth exploring!
If you have two reverb tanks and two D-2 modules you can get some wonderful stereo reverbs.
If you don't have two and am in a studio situation just re-amp your track twice through this.
Maybe then do some minimal adjustments to the bands to make left and right reverb just a little bit different for even wider stereo image.
In this patch the AV-1 is used both as a two times amplifier and a reverb tank driver. To get the 5V audio to 10V both A and B are fed with the same signal giving 10V on SUM.
This is an ugly but effective trick as A and B are matched channels.
Delay feedback
Try it in feedback loops on delay to get dirty saturated feedback.
Could get a clean digital delay to start behaving almost like a tape delay with a worse out tape in it.
Please check www.dpw.se for updates to the manual.