Mäander - Synthesizer Flame - Free user manual and instructions
Find the device manual for free Mäander Flame in PDF.

User questions about Mäander Flame
0 question about this device. Answer the ones you know or ask your own.
Ask a new question about this device
Download the instructions for your Synthesizer in PDF format for free! Find your manual Mäander - Flame and take your electronic device back in hand. On this page are published all the documents necessary for the use of your device. Mäander by Flame.
USER MANUAL Mäander Flame
(from firmware version 1.08)
Index
1. Short description
- Overview 5
- Hardware 5
- Internal structure (Block diagram) 6
- Sequencer overview 7
2. Device connections
- The device connections at a glance 8
- Making the connections:
- Connect power adapter 8
- Connect audio outputs and phones 9
- USB connection with your computer 9
- Connect MIDI keyboard 10
- Connect MIDI sound expander 11
- Connect foot switches and expression pedal 11
3. Front panel overview
- The front panel at a glance 12
- Track buttons / keyboard 13
- Menu buttons 1 13
- MUTE 13
- HOLD 14
- LASTSTEP 14
- TRANSPOSE 14
- SCALE 14
- Menu buttons 2 15
- SWING 15
- CLEAR (clear sequences, clear patch) 15
4. Patch (Sound- and sequence memory)
- Load and save a PATCH 16
- Patch dump (save a PATCH on your computer) 16
- Send a PATCH via MIDI 17
- Receive a PATCH via MIDI 17
5. Sound generator
- Oscillator: 18
- FINETUNE (finetune of the oscillator) 18
- WAVE (load wavetable or digitalsound) 18
- COLOUR (modulate the wavetable) 19
- UNISONO and DETUNE 19
- GLIDE 19
- NOISE (White noise source) 19
- ADSR amplitude envelope generator (AMP EG) 20
6. LFO 1+2
- General 21
- RATE (speed) 21
- SHAPE (waveforms) 21
- RETRIGGER 21
- ONESHOT 21
- SYNC 22
7. LFO AMOUNT
- COLOUR Amount 22
- PITCH Amount 22
- CUTOFF Amount 22
- Description of the AMOUNT ruler 22
8. The 12 channel filter bank
- The structure of the filter bank 23
- Audio circuit (Audio flow schemes) 24
- Control of the filter bank 25
- BANDLEVEL (Mix of filter modulations) 25
- FILTERTYPE (Lowpass, Bandpass, Highpass, Filter combinations) 25
- Examples of filter modulations:
1) Manually control Low Pass Cutoff Frequency 26
2) Low Pass Cutoff Frequency modulated by LFO and AMP EG 26
3) Modulation of the individual filter channels by a sequence 26
- Envelope of trigger channels (AR types) 27
- RANDOM 28
9. SHOTS sequenzer (Generator for note repeats)
- Description 28
- VELOCITY 29
- RESOLUTION and BEAT 29
- GATETIME 29
- REPEATS (Loop echo) 29
- Practice: Recording SHOTS 30
10. EDIT step sequenceer for OSC track
- Activate EDIT mode 31
- Change step position 31
- Program notes (chord) 32
- Set or change the octave of notes 32
- Set VELOCITY 32
- Set HOLD of notes 32
- Exit EDIT mode 32
- SAVE a sequenz (save PATCH) 32
11. Arpeggiator
- ARP menu 33
- Play chords 33
- HOLD arpeggio notes 33
- Set BEAT and RESOLUTION 33
- Set GATETIME 33
- Set VELOCITY 33
- Set arpeggio mode 33
12. MIDI setup
- Overview 34
- Which data can be received? 35
- Which data can be sent? 35
- MIDI menu 36
- Setting MIDI Channels 36
- Setting the note numbers of the 14 trigger tracks 36
- Setting MIDI Transmit data 37
- Setting MIDI Receive data 37
- Quantization on / off 38
- MIDI synchronization 38
- MIDI controllers (List of MIDI control change numbers) 39
13. Updates
- Firmware update (Description of the procedure) 40
- Load wavetables 40
14. Appendix
- Warranty 41
- Terms of production 41
- Disposal 41
- Support 41
- Thanks to 41
- Imprint 41
1.1 Overview
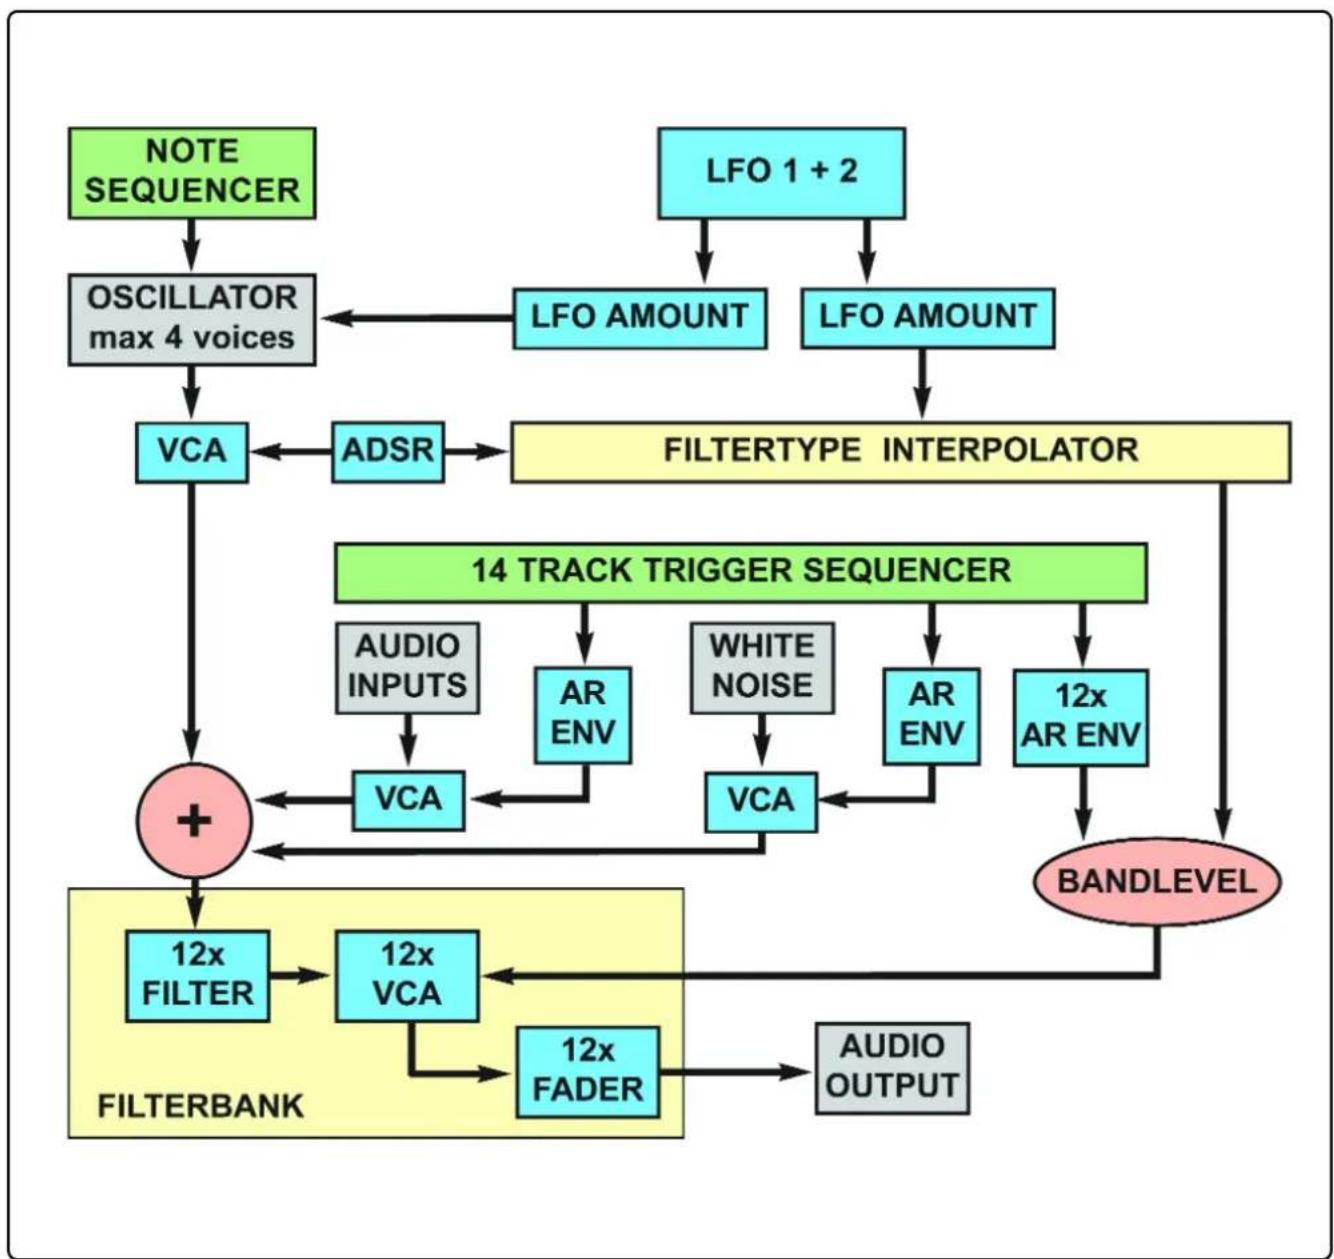
The FLAME MÄANDER is an analog-digital synthesizer with integrated live sequencer. The sequencer has a polyphonic note track for the oscillator and 14 monophonic trigger tracks for the filter channels, audio input and noise. The pattern can be up to 4 bars long. The sound generation is realized by a four polyphonic wavetable oscillator.
The heart of this is an extensively controllable analog filter bank with 12 channels. This is controllable by 12 VCAs (with 8 simulated filter types and with 12 sequencer tracks). There are the following filter types: LP, 3x BP, HP, NOTCH and combinations: LP/HP, LP+BP.
The wavetable oscillator, an analog white noise channel and an external audio input are routed through the analogue filter bank. The oscillator track has its own ADSR envelope with 4 direct access controls, which can also affect the filter.
Each of the two other audio sources, as well as each filter channel, also has its own sequencer track with VCA and separate AR envelopes. This allows you to create interesting rhythmic filter sequences or spectral morphing with this filter bank. Two independent LFOs allow additional modulation of the filter and the oscillator.
There are 2 LFOs each with Rate and Waveform controls available. The LFO Waveforms are faded in softly (therefore mixed forms are possible). The LFOs are MIDI-synchronizable, retriggerable (by OSC notes) and can also run as a "ONE SHOT" triggered once.
Various controls via MIDI are possible. The MÄANDER can also be used as a pure MIDI sequencer / controller. An arpeggiator is also available.
Software updates, the loading of alternative wavetables and saving and loading of patches can be easily realized via MIDI sysex dump.
1.2 Hardware
- robust console metal case, size: 300x195x30(60)mm, weight approx 2,5kg
- 15 analog sliders (Volume attenuators)
- 25 Alps potentiometers (for digitale values)
- 2 Alps stereo potentiometers (for MAIN output and PHONES)
- Audio input channel with separate LINE and Hi-Z inputs (internally mixed together)
- Audio outputs left/mono, right
- Expression pedal input (stereo jack) for CUTOFF control
- Foot pedal input (stereo jack for two foot pedals) for PATCH switching
- 2x MIDI IN, 1x MIDI THRU from MIDI IN 2, 1x MIDI OUT
- 1x USB (MIDI, firmware update)
- 1x power supply adaptor +12v/1A
1.3 Structure
The filter bank consists of the 12 analog filters and is digitally controllable by 12 VCAs, on the one hand by 8 simulated filter types (filter type simulator) and on the other hand by the 12 filter channel sequencer tracks).
Each filter channel has its own sequencer track with its own envelope (AR types). There is the mixer control BANDLEVEL for mixing between the modulation of the filter sequencer and that of the oscillator (Envelope Amount, Cutoff, LFO Amount).
There are 2 LFOs each with Rate and Waveform Modulation controls. With the AMOUNT controls you routed the LFOs to PITCH, COLOR (wavetable), CUTOFF( Filtertype cutoff), filter AMP EG.
Both LFOs are on the AMOUNT controllers! (left LFO 1, right LFO 2), in the middle both are mixed.
flowchart
graph TD
    A["NOTE SEQUENCER"] --> B["OSCILLATOR max 4 voices"]
    C["LFO 1 + 2"] --> D["LFO AMOUNT"]
    C --> E["LFO AMOUNT"]
    B --> F["VCA"]
    E --> F
    F --> G["ADSR"]
    G --> H["FILTERTYPE INTERPOLATOR"]
    H --> I["14 TRACK TRIGGER SEQUENCER"]
    I --> J["AUDIO INPUTS"]
    I --> K["AR ENV"]
    I --> L["WHITE NOISE"]
    I --> M["AR ENV"]
    I --> N["12x AR ENV"]
    J --> O["VCA"]
    K --> P["VCA"]
    L --> Q["VCA"]
    M --> R["VCA"]
    N --> S["BANDLEVEL"]
    O --> T["+"]
    P --> T
    Q --> T
    R --> T
    T --> U["12x FILTER"]
    U --> V["12x VCA"]
    V --> W["12x FADER"]
    W --> X["AUDIO OUTPUT"]
    T --> Y["FILTERBANK"]
1.4 Sequencer overview
The MÄANDER has a sequencer with 15 tracks and a maximum of 4 bars pattern lengths. One of the tracks, the oscillator track OSC is polyphonic. This allows rhythmical chords to be played. This OSC track differs in some ways from the other 14 monophonic trigger tracks.
The oscillator track OSC
is polyphonic in four voices (notes and chords can be recorded). For the OSC track there is a polyphonic step sequencer (also programmable during playback). Likewise, you can use the transposable one-octave keyboard to play notes directly unquantized (or quantized to 16th) or use the SHOT section to rhythmically create notes / chord loops via noterepeat.
Also, notes / chords played from an external keyboard can be recorded unquantized (or quantized to 16th) (but no SHOTS).
There is also an arpeggiator. You can switch between the running arpeggiator and the playing OSC track. A SCALER can limit the keyboard (also external MIDI keyboard) to defined scales (storable by patch).
14 monophonic trigger tracks:
- one for the external audio input
- one for the White Noise
- and 12 for the filter channels
These monophonic tracks can be triggered via MIDI note (as with a DRUM module). At the MÄANDER itself you can either play the tracks with the track buttons directly (also with 16th quantization) or create rhythmic rhythms via noterepeat loops with active SHOT section. There are the controls VELOCITY (volume), GATETIME (percentage length of the note) and RESOLUTION (beat pattern). With the control REPEATS you can run the LOOP recorded endlessly (end stop) or like an echo getting quieter. So you can jam endlessly and loops change live again and again.
Recorded tracks can be frozen with HOLD or muted with MUTE. Each track has its own load step and AR envelope (shifting morphing tracks). The controls ENVELOPE and RANDOM can be separately activated for each track.
The playing order of the 4 bars is easily changeable while playing.
A 16ths swing function for shuffle is also available.
The OSC track, on the one hand, and the 14 mono tracks, on the other hand, have separate midi channels.
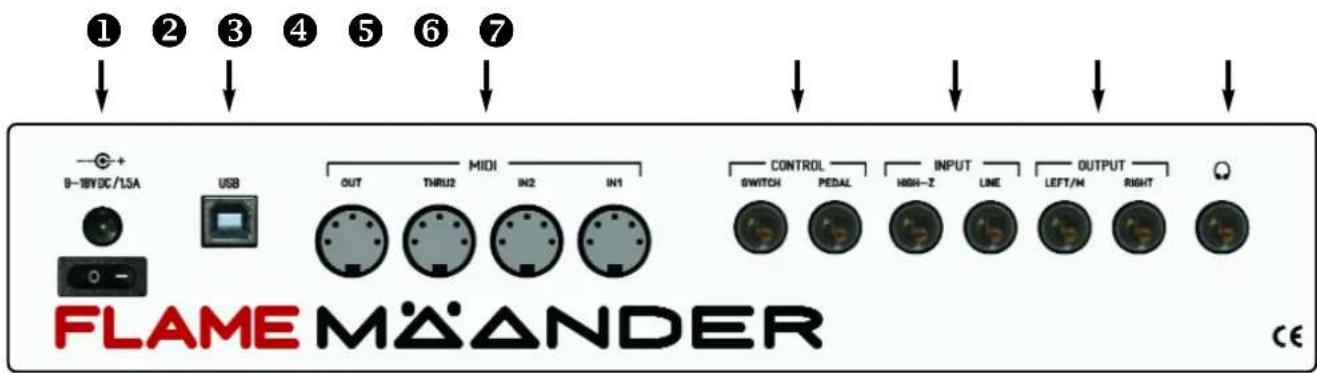
2.1 The device connections at a glance
On the back you will find all input and output sockets, as well as the power switch:
text_image
FLAME MÄANDER CE① Socket for the power adapter and the power switch
② USB jack (class-compliant)
③ MIDI-DIN jacks: MIDI Inputs IN1 and IN2, MIDI THRU2 (from IN2), MIDI OUT
4 CONTROL inputs: SWITCH (2x Foot switches), PEDAL (1x Expression pedal)
5 INPUT: mono audio inputs for LINE level and for guitar (HIGH-Z)
⑥ OUTPUT: mono audio outputs LEFT/mono and RIGHT
⑦ PHONES: Stereo output for low impedance headphones
2.2 Making the connections
Here are some simple instructions on how to quickly plug in and try out your MÄANDER synthesizer:
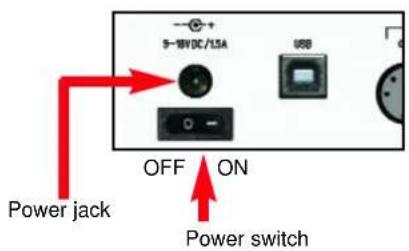
Unpack your MÄANDER, place it on a table while you become familiar with its features. Plug the 12v power adaptor's cord into the power jack. Then plug the power adaptor itself into a power outlet.
text_image
5-10WDC/LSA USB Power jack OFF ON Power switchCONNECT AUDIO OUTPUTS AND HEADPHONES
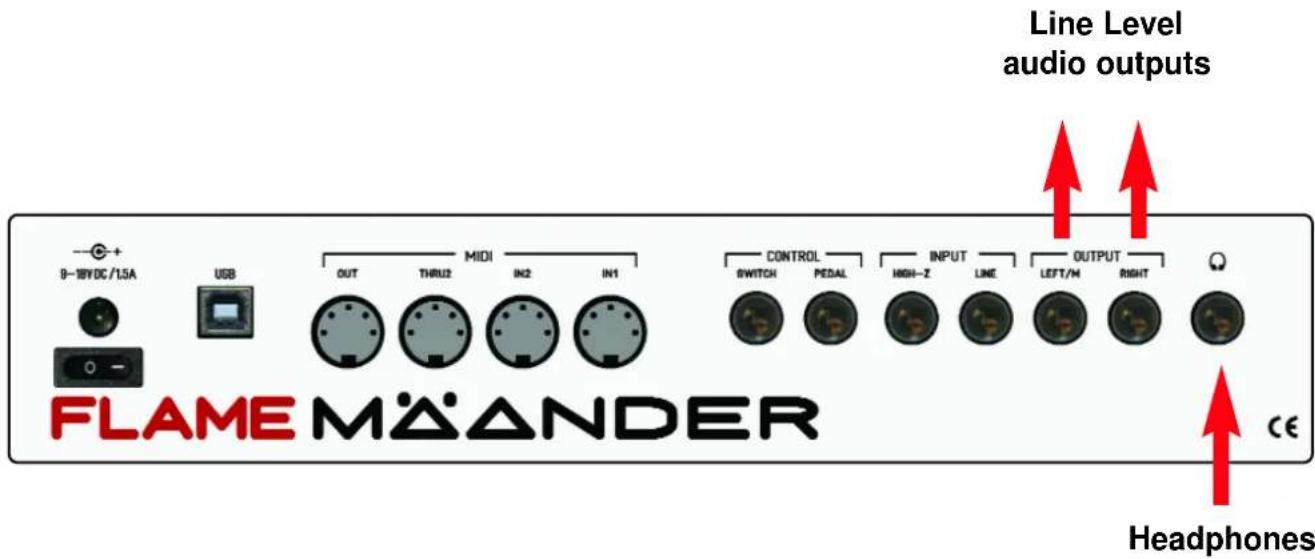
Connect the LEFT / M and RIGHT connectors to your mixer or amplifier with line level inputs using two standard jack cables. First set the volume on the amplifier to a low level. Use the MAINOUT control for the output levels of the MÄANDER.
text_image
Line Level audio outputs FLAME MÄANDER Headphones 0-18VDC/15A USB OUT THRU2 IN2 IN1 CONTROL SWITCH PEDAL INPUT HIGH-Z LINE OUTPUT LEFT/M RIGHT CEYou can also connect your headphones directly to the MÄANDER. In this case, use the PHONES volume knob.
USB connection with your omputer
The MÄANDER is a USB class-compliant controller and can be connected to just about any computer with a USB port. The MIDI data is exchanged between the MÄANDER and the computer via USB.

text_image
USB (Standard B) FLAME&ANDER USB (Standard A)MIDI connection to a MIDI keyboard (MÄANDER as Sound Expander)

text_image
Standard MIDI cabel MIDI IN MIDI OUT FLAREMgANDERPLAY THE MÄANDER AS A SOUND EXPANDER WITH AN EXTERNAL MIDI KEYBOARD: Connect the MIDI OUT of the keyboard to MIDI IN (1 or 2) of the MÄANDER. Set the MIDI OUT channel of the keyboard to the same value as the OSC note track of the MÄANDER.
SET THE OSC TRACK MIDI CHANNEL as follows: Press the MIDI button once (the button will light). The display now shows "CHn". Then press the OSC key once (to select the note track). The display shows the MIDI channel number. Now use the VALUE knob to set the MIDI channel (1..16). Turn the BANDLEVEL knob to SYNTH!
Note: The selected MIDI channel of the track is always the same for MIDI IN and MIDI OUT.
PLAY THE FILTER CHANNELS, INPUT + NOISE WITH AN EXTERNAL MIDI KEYBOARD:
In addition, you can trigger the 14 tracks (INPUT, NOISE, FILTER 1-12) on a separate MIDI channel with adjustable notes. Each track has its own note number (like a drum module).
SET THE MIDI CHANNEL of the 14 trigger tracks like this:
Press the MIDI button once (the button will light). The display now shows "CHn". Now press one of the track buttons (to select a track). The display shows the MIDI channel. Then turn the VALUE knob to change the MIDI channel.
SET THE NOTE NUMBERS of the 14 trigger tracks like this:
Press the MIDI button repeatedly until the display shows "not". Now press one of the 14 track buttons (to select a track). The display will show the note number of the track. Now use the VALUE knob to set the note number. Repeat this with the other tracks in the same way. Turn the BANDLEVEL knob to SEQU position (left position).
MIDI connection with a MIDI Sound Expander:

text_image
Standard MIDI cable MIDI OUT MIDI IN FLANEMGANDERPLAY A SOUND EXPANDER WITH THE MÄANDER SEQUENZER:
Connect the MIDI OUT of the MÄANDER to the MIDI IN of a Sound Expander. Set the MIDI OUT channel of the Sound Expander to the same channel as the OSC note track of the MÄANDER.
SET THE MIDI CHANNEL of the OSC Note Track as follows: Press the MIDI button once (the button will light). The display now shows "CHn". Then press the OSC key once (to select the note track). The display shows the MIDI channel number. Now use the VALUE knob to set the MIDI channel (1..16). The set MIDI channel is the receiving and transmitting channel at the same time.
You can also send the notes of the filter tracks to the expander. To do this, set the appropriate MIDI channel.
Connections for foot switches and expression pedal
On the back there are two stereo sockets for a foot pedal and two footswitches (for the latter you need a Y-adaptor, for splitting 1x stereo jack into 2x mono jacks left / right).
CONTROL SWITCH
Connect two footswitches to this jack via a Y-adaptor cable. The Y-adaptor splits the stereo jack SWITCH into two mono jacks. With the two footswitches you switch then the PATCH numbers further or back.
CONTROL PEDAL
Connect a expression pedal to this stereo jack. Use it to control the CUTOFF of the filter bank (BANDLEVEL pot is in the direction SYNTH).

flowchart
graph TD
    A["MIDI KEYBOARD"] --> B["OUT"]
    B --> C["Z"]
    D["PATCH + FOOT SWITCH"] --> E["Y-Adaptor"]
    F["CUTOFF PEDAL"] --> E
    E --> G["FLAMEMAANDER"]
    G --> H["FLAMEMAANDER"]
3. Front panel overview
3.1 Front panel at a glance
text_image
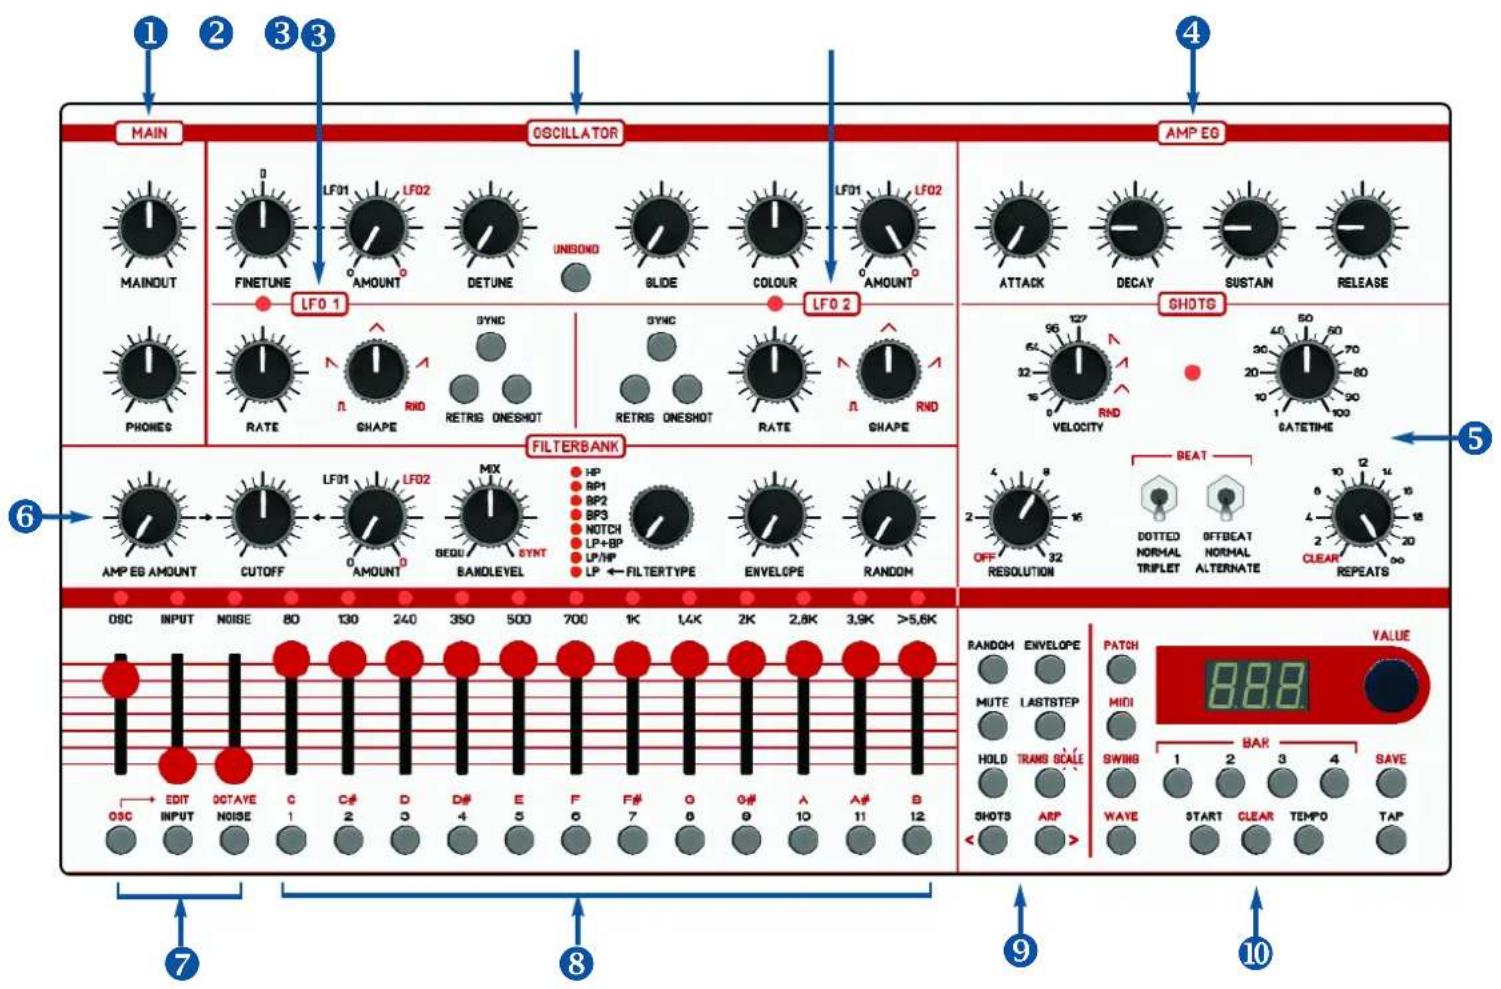
MAIN OSCILLATOR AMP EG MAIN FINETUNE LF01 LF02 LMINDUT AMOUNT DETUNE UNISOND GLIDE COLOUR LF01 LF02 LMINDUT LMINDUT LMINDUT LMINDUT LMINDUT LMINDUT LMINDUT LMINDUT LMINDUT LMINDUT LMINDUT LMINDUT LMINDUT LMINDUT LMINDUT LMINDUT LMINDUT LMINDUT LMINDUT LMINDUT LMINDUT LMINDUT LMINDUT LMINDUT LMINDUT LMINDU LMINDU LMINDU LMINDU LMINDU LMINDU LMINDU LMINDU LMINDU LMINDU LMINDU LMINDU LMINDU LMINDU LMINDU LMINDU LMINDU LMINDU LMINDU LMINDU LMINDU LMINDU LMINDU LMINDU LMINDU LMINDUU LMINDUU LMINDUU LMINDUU LMINDUU LMINDUU LMINDUU LMINDUU LMINDUU LMINDUU LMINDUU LMINDUU LMINDUU LMINDUU LMINDUU LMINDUU LMINDUU LMINDUU LMINDUU LMINDUU LMINDUU LMINDUU LMINDUU LMINDUU LMINDUU LMINDU LMINDU LMINDU LMINDU LMINDU LMINDU LMINDU LMINDU LMINDU LMINDU LMINDU LMINDU LMINDU LMINDU LMINDU LMINDU LMINDU LMINDU LMINDU LMINDU LMINDU LMINDU LMINDU LMINDU LMINDUIA LMINDUIA LMINDUIA LMINDUIA LMINDUIA LMINDUIA LMINDUIA LMINDUIA LMINDUIA LMINDUIA LMINDUIA LMINDUIA LMINDUIA LMINDUIA① MAIN Output volume controls for MAINOUT and headphones
② OSCILLATOR Settings of the wavetable oscillator
③ LFO 1+2 Settings of the LFOs
④ AMP EG Volume and Filter Envelope of the Oscillator (ADSR Generator)
⑤ SHOTS "Note Repeat" Live sequencer settings
⑥ FILTERBANK Modulation settings for the filter bank
7 AUDIO tracks Slider for Oscillator, Input, White noise and the track buttons
⑧ FILTER tracks Slider of the filter bands and the track buttons (keyboard)
⑨ MENUS 1 Function buttons for menus -> See page 13
⑩ MENUS 2 Function buttons for menus, sequencer, data controller -> See page 15
3.2 Track buttons / Keyboard

text_image
OSC EDIT INPUT OCTAVE NOISE C 1 C# 2 D 3 D# 4 E 5 F 6 F# 7 G 8 G# 9 A 10 A# 11 B 12 SHOTS ARPThe track buttons below the sliders have a double function in the SHOTS menu. When the OSC button is on (button lights up red), the functions printed in red letters apply.
-> See above picture!
When the OSC button is off, the functions printed in black apply.
When OSC is turned on, the 12-band filter buttons 1-12 serve as a one-octave keyboard for inputting notes to the oscillator track. This also applies to the EDIT mode (step sequencer), which you call in OSC mode by pressing EDIT.
If OSC is switched off, the INPUT, NOISE and 12 FILTERBAND buttons are used to play these trigger tracks, or to select the respective tracks, for example to set parameters (such as MUTE, HOLD, RANDOM, LASTSTEP, etc).
3.3 Menu buttons 1
text_image
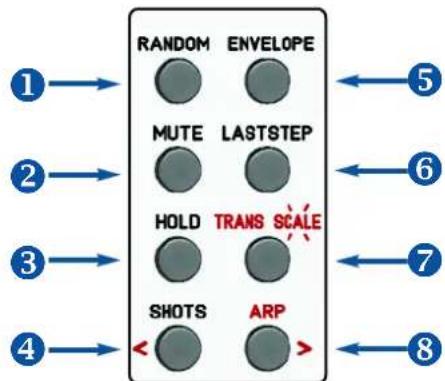
RANDOM ENVELOPE MUTE LASTSTEP HOLD TRANS SCALE SHOTS ARP 1 → ← 5 2 → ← 6 3 → ← 7 4 → ← 81 RANDOM Menu for random settings of the trigger tracks
② MUTE Menu for muting the selected tracks
③ HOLD Menu for blocking selected tracks, or for HOLD in the EDIT menu
4 SHOTS Activate menu SHOTS (or in EDIT mode: Steps navigate back "<")
⑤ ENVELOPE Menu for setting the AR envelopes of the selected trigger tracks
⑥ LASTSTEP Menu for setting the laststeps of the selected tracks
⑦ TRANSPOSE / SCALE Transpose the OSC track / or set a keyboard scale
⑧ ARP Arpeggiator on/off (or in EDIT mode: Steps navigate ahead “>”
MUTE
Press the MUTE button to enter the Mute menu. Here all tracks of the sequencer can be muted. With the OSC, INPUT, NOISE and FILTERBAND buttons you mute the corresponding track. Mute is stored in the PATCH!
HOLD
Press the HOLD key to activate the Hold Menu. Each channel which is now switched on with the OSC, INPUT, NOISE and FILTERBAND buttons is excluded from recording and deleting (HOLD active). Although shots are played on these channels, they are not recorded. Also, these tracks are exempt from deletion.
So if the REPEATS knob is turned to CLEAR (left stop), these tracks will be preserved. Use the HOLD function to protect the tracks from being deleted and to exclude them from REPEATS. Hold is stored in the PATCH!
Note: If the OSC track HOLD is active, you can not use the step sequencer of the oscillator track (EDIT)!
LAST STEP
The number of steps per bar can be set in 16th. Go to the LASTSTEP menu. Press the LAST-STEP button and use the OSC, INPUT, NOISE and the 12 FILTERBAND buttons to select the sequencer tracks to be set. With the encoder you can now choose between one and 16 steps.
Important:
The OSC track determines the switching time of loaded patches. Patches are always loaded to the next 1. That is, if the OSC track has a load step of 12, then the clocks are always switched at that count time. This can cause triggers to be truncated earlier. If the clock is running alone, all tracks will run to the end and shift accordingly.
TRANSPOSE
Recorded OSC sequences can be transposed in real time. To do this, press the TRANS button, the LED lights up permanently. With the encoder you can in octave steps of Transpose -1 to +2 octaves. With the keys you can transpose up to 12 semitone steps. The value is saved in the PATCH!
SCALE
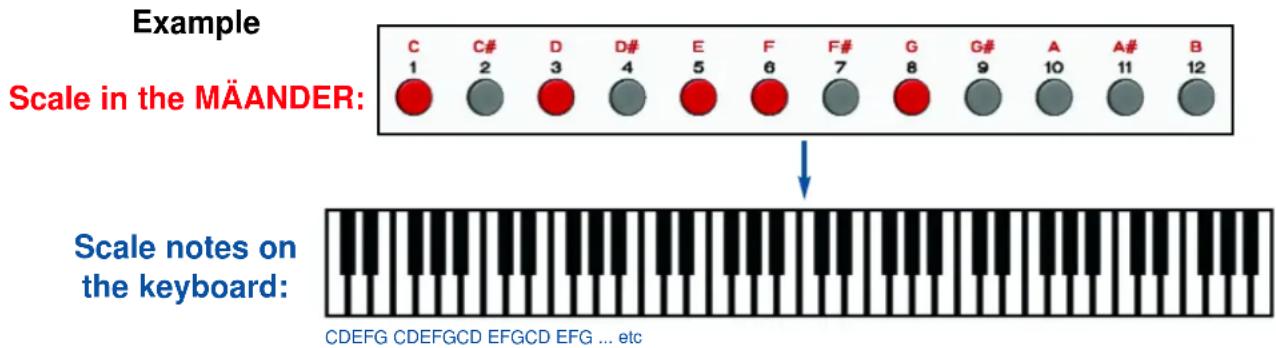
Incoming MIDI notes and notes played with the note keys on the MÄANDER can be "bent" to a scale. To do this, press the TRANS / SCALE button twice, the LED will flash. Now use the note keys (1-octave keyboard) to turn on all notes that should be in the scale. Note that on the keyboard keys, the scale tones are arranged consecutively starting from the bottom (on the keyboard then only the scale tones!). The set scale will be saved in the PATCH!
Important:
The SCALE affects only incoming notes and not when playing a sequence!
text_image
Example Scale in the MÄANDER: Scale notes on the keyboard: CDEFG CDEFGCD EFGCD EFG ... etc
text_image
3.4 Menu buttons 2 Display PATCH MIDI 8.8.8 VALUE SWING 1 2 BAR 3 4 SAVE WAVE START CLEAR TEMPO TAP Data ruler (Dial) 10 5 6 7 8 9① PATCH For loading patches
② MIDI Stepping through the MIDI menus (Midi channels, Note numbers etc)
③ SWING Shuffel setting
④ WAVE Menu for selecting a wavetable or a digital sound
5 BAR Four BAR buttons for switching on and off and setting the order
⑥ START Start/Stop button of the sequencer
7 CLEAR Delete key only effective in conjunction with other keys
⑧ TEMPO Menu for setting the tempo
⑨ TAP Tap button for tapping the tempo
10 SAVE Save the current patch
SWING
Press the SWING button to "shuffle" the sequence. Set a value up to 15 with the data controller. Every second 16th note is temporally advanced by a small percentage in milliseconds. The swing setting adjusts to the changed tempo percentage. With NULL the swing function is switched off. The value for SWING is saved in the PATCH.
CLEAR (Deleting sequencer tracks, patch initialization)
To delete a track (in the SHOTS menu), hold down the CLEAR button and then press the button of the sequencer track you want to delete. Examples: If you want to delete the OSC music track, press CLEAR and the OSC button, if you want to delete the filter track 12, press CLEAR and the filter band button 12.
Note: The HOLD of the track must be switched off before!
You can also clear the entire PATCH (patch initialization): press and hold the CLEAR key, then press the PATCH key. All sequences are deleted and the patch is set to default values (patch initialization).
4.1 Patches loading and saving
A PATCH is a storage space for your sound and sequencer data. Currently there are 100 patches. All sequencer tracks and all slider positions (except the sliders, MAIN and PHONES) are stored in a PATCH. A patch can also be saved or loaded while the sequencer is running.
Each PATCH can be stored at different speeds. Since the stored tempo is only loaded when the sequencer is stopped, you can always jam at the same tempo while the sequencer is running. Patches can also be selected via the MIDI program change command or switched with attached footswitches.
LOAD PATCH
Press the PATCH key once (the key will blink), turn the VALUE knob and select a PATCH (1..100), then press the PATCH key again to load that patch. The patch is loaded with all stored controller positions.
Note:
The next time you power on, the last loaded or saved patch is loaded.
SAVE PATCH
Press the SAVE button once (the button will blink), turn the VALUE knob, and select a patch number (1..100) to which you want to save the current patch. Then press the SAVE button again to save this patch.
Attention: The patch data of the selected number will be replaced. So before you can secure these patches via ssex dump on your computer.
Note:
The next time you power on, the last loaded or saved patch is loaded.
4.2 Patch Dump (Save patches via MIDI on the computer and load)
The PATCHes in the MÄANDER can be stored and archived on a computer. You can save the PATCHs individually or all together in one file. If necessary, you can later reload these files into the MÄANDER.
First, connect your computer to the MÄANDER via MIDI (USB MIDI or a MIDI interface). You will need any sysex send / receive program on your computer (such as MIDI-OX or electron C6) that will allow you to receive, save and send the SYSEX files.
SEND PATCHES VIA MIDI
How to open the menu:
While holding down the MIDI key, press the PATCH key, both keys will flash!
Use the Data slider to select "ALL" if you want to save all patches together (ALL PATCH DUMP). If you only want to send a specific PATCH, use the Data knob to select the number of the patch (SINGLE PATCH DUMP).
Switch your SYSEX program on your computer (eg MIDI-OX or electron C6) to Sysex data reception. Then start the dump on the MÄANDER by briefly pressing the Data Controller. In your SYSEX program you may see the status of the transfer. When the transmission is finished, the flashing LEDs on the MÄANDER switch off again.
Now save in your SYSEX program the received data as SYSEX file (with eg name as "AllPatches01.syx", or MyPatch05.syx).
The ALL PATCH DUMP preserves the order of all PATCHES of the MANDATE. If you dump only individual PATCHES, you can save them later to any other PATCH number in the MÄANDER.
RECEIVING PATCHES VIA MIDI
How to open the menu:
While holding down the MIDI key, press the PATCH key, both keys will flash! First select with the Data Controller, where to save:
ALL:
Receive now an ALL PATCH file for all patches (the PATCH memory in the MÄANDER will be overwritten with the patch numbers in the ALL file).
A PATCH NUMBER:
A received PATCH file is saved to this set PATCH number.
- Now the MÄANDER waits for a SYSEX file.
- Now start sending the file with your SSYSEX program.
- The dot on the right side of the display flashes while receiving the file in the MÄANDER.
- After receiving the file in the MÄANDER, the PATCHES will be placed on the corresponding PATCH numbers stored permanently.
- The menu stays on (flashing LEDs) even if the Sysex program with the Send finished, so you can now set another PATCH number and one can receive another file.
- Exit the menu again (zBsp by pressing key WAVE).
- Now download the newly transferred PATCH from memory to hear it.
Note:
If you mistakenly send an ALL DUMP file to a single PATCH number, it will always be overwritten, leaving only the last patch from the ALL DUMP file there.
Note:
The transfer of patches is much faster with USB-MIDI than with the classic MIDI-DIN connection.
5.1 Oscillator
text_image
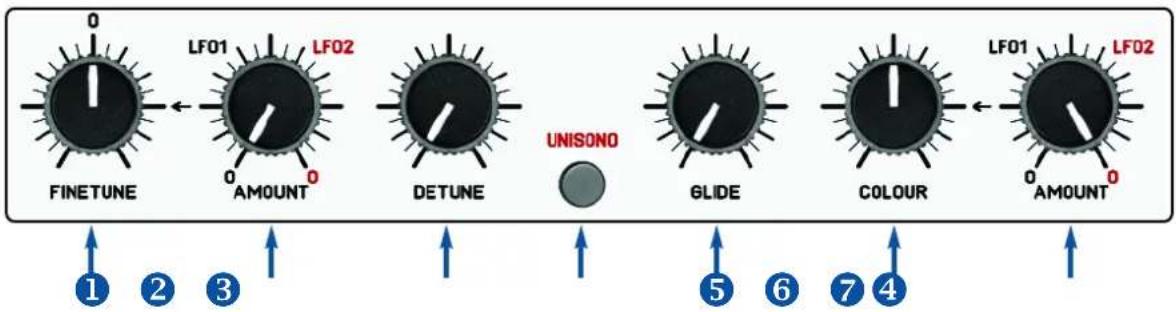
FINETUNE LF01 LF02 AMOUNT DETUNE UNISONO GLIDE COLOUR LF01 LF02 AMOUNT ① ② ③ ⑤ ⑥ ⑦ ④① FINETUNE Fine tune the oscillator (+/- one semitone, center = 0)
② AMOUNT LFO Amount on oscillator TUNE (detuning over entire range)
③ DETUNE Fine detuning of 4 equal voices in mode UNISONO
4 UNISONO Switch between polyphonic and monophonic (UNISONO) style of playback
⑤ GLIDE Portamento between different high notes
⑥ COLOUR Soft movement through the various 64 Wavetable waveforms
⑦ AMOUNT LFO Amount on COLOUR for automatic modulation of the wavetable
FINETUNE:
The FINETUNE knob allows you to fine-tune the overall pitch of the oscillator to other instruments. In the middle position, the oscillator is calibrated to 440Hz basic tuning. You can lower or raise in both directions by one half tone (50 cents). This setting is saved in the patch.
LOAD WAVETABLE (or DIGITAL SOUND):
The MÄANDER has an four voice polyphonic wavetable oscillator (wavetables compatible with FLAME 4VOX euro module). There are memory slots for 39 wavetables (own can be uploaded). In addition, there are 2 digitally calculated waveforms: Pulse with PWM and Sawtooth available.
So you load a WAVETABLE (or a DIGITAL SOUND):
Press the WAVE button once (the button lights, the display shows the current wavetable number), then turn the VALUE knob to load another wavetable (00-39) or a digital sound (39 = pwm square, 40 = saw).
The note range of the oscillator ranges from note number 24 to 103 (6.5 octaves).
COLOUR:
With the COLOUR control you can softly drive through the 64 waveforms of the WAVETABLE, or achieve a pulse width modulation of the digital sound 39 = PWM SQARE. With digital sound 40 = SAW, this controller has no effect!
With the slider AMOUNT right next to it you can let the LFOs work on COLOUR. The LFO always controls around the center of the knob position of COLOR. For even modulation, select the mid-position (up-down wave) on the LFO and set COLOUR to mid-position.
Try other settings, such as RATE and AMOUNT intensity. This will produce interesting spectral sound curves.
UNISONO / DETUNE:
The oscillator in the MÄANDER is polyphonic with a maximum of four voices, but can also be played monophonic with only one voice, or monophonic with four voices of the same pitch (UNI-SONO Mode).
With only one key pressed on the keyboard, up to 4 unison voices can be heard simultaneously. You can detune these voices from slight to strong with the DETUNE control.
Switch on the UNISONO button (button lights up). Turn the DETUNE knob (to the left) to the left. Now the keyboard is switched monophonic and the oscillator only sounds with one voice. This creates a very clear tone.
When you turn up the DETUNE knob, the keyboard stays monophonically, but at the same time there are four voices with the same pitch that are slightly out of tune with each other. The further you turn the DETUNE knob, the bigger the detuning becomes. This allows you to create beats, as well as fat chorus-like, analog-sounding sounds.
Note: The keyboard is only monophonic in this mode.
GLIDE:
With GLIDE you control the speed of Portamento between two consecutively played notes of different pitch (smooth sliding to the pitch). In position zero of the controller, the function is switched off. The value of the controller is stored in the patch.
Note: All oscillator settings are saved in the patch.
5.2 White Noise channel
Another sound source is an analog noise generator with white noise. The noise has its own VCA-controlled sequencer track with AR envelopes, which go into the filter bank in mono mixed with the other audio sources (oscillator and audio input).
To hear the noise, you must first generate a trigger sequence on the NOISE track. This can be played directly or you can use SHOTs for rhythmic phrases. The ENVELOPE and RANDOM controls can also be applied to the NOISE channel.
See also the sections SHOTS / FILTERBANK!
The slider can be used to attenuate the noise level.
Note: Since this slider is an analogue attenuator, its position is not saved in the patch!
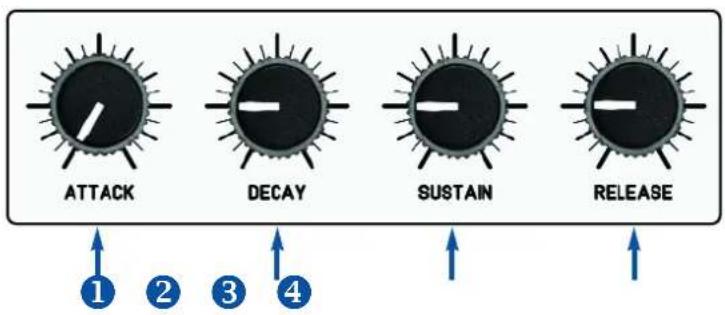
5.3 ADSR Envelope (AMP EG)
The oscillator has an ADSR envelope with 4 controls for attack, decay, sustain and release. This envelope works primarily on the volume history of the played notes, but it can also act on the filter cutoff as a filter envelope. Turn on the AMP EG AMOUNT control on the filter.
The values of the ADSR envelope are stored in the patch.
flowchart
graph TD
    A["ATTACK"] --> B["DECAY"]
    B --> C["SUSTAIN"]
    C --> D["RELEASE"]
    style A fill:#000,stroke:#fff,color:#fff
    style B fill:#000,stroke:#fff,color:#fff
    style C fill:#000,stroke:#fff,color:#fff
    style D fill:#000,stroke:#fff,color:#fff
    note1["1"] --> A
    note2["2"] --> B
    note3["3"] --> C
    note4["4"] --> D
① ATTACK Settling phase at note on
② DECAY Decay phase down to the sustain level as long as the button remains pressed
③ SUSTAIN Hold level (sustain level) as long as the button is pressed
4 RELEASE Decay phase from sustain level to zero when the button is released
line
| Stage | Value | | ------------- | ----- | | Key released | 0 | | Attack | Peak | | Decay | Mid | | Sustainlevel | Mid | | Release | 0 |GENERAL
There are two LFOs installed for modulating parameters. Both LFOs are identical, but independently adjustable. The settings of the LFOs are saved in the patch.
flowchart
graph TD
    A["5"] --> B["LFO 1"]
    C["6"] --> D["SYNC"]
    E["1"] --> F["RND"]
    G["2"] --> H["SHAPE"]
    I["3"] --> J["RETRIG ONESHOT"]
    K["4"] --> L["SHAPE"]
    M["5"] --> N["LFO 2"]
    O["6"] --> P["SYNC"]
    Q["1"] --> R["RND"]
    S["2"] --> T["SHAPE"]
    U["3"] --> V["RETRIG ONESHOT"]
    W["4"] --> X["SHAPE"]
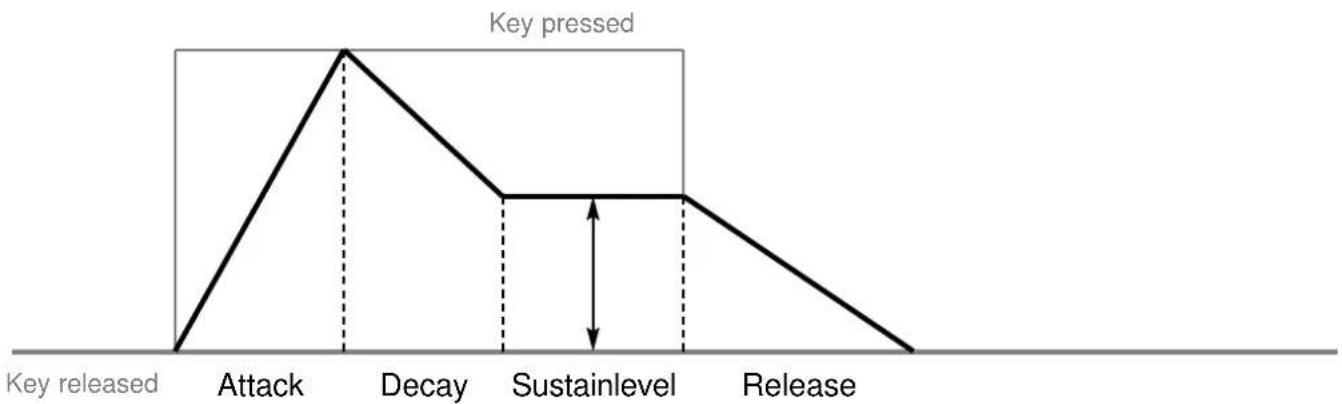
① RATE speed from very slow to fast (lower audio range)
② SHAPE waveforms with crossfade between down, updown, up
③ RETRIGGER LFO runs in the loop and is reseted at a new note
④ ONESHOT Waveform of LFO starts at new note and runs only once
⑤ LED Flashing LED for RATE indicator
⑥ SYNC LFO is synchronized to MIDI Clock
RATE (Speed)
Use the RATE knob to set how fast the LFO should run. Look at the flashing LED for control. If the SYNC is switched off (SYNC button LED off), then the LFO runs free. The speed can be adjusted fluently in a wide range from very slow to the audible audio range.
SHAPE
Select the waveform of the LFO here. The three waveforms up, updown and down can be set to be suppressed. In addition, there is still a PULS wave and RND=RANDOM.
RETRIGGER
If the LFO is set to RETRIGGER (button lit), then the LFO is running freely at the set speed (RATE), but will be reset at each new played note.
ONESHOT
If the LFO is set to ONESHOT (button lit), then the LFO is only started when a note is played and then runs only once at the set speed (RATE).
SYNC
With the SYNC key you can synchronize the RATE to the MIDI clock. In this case, fixed intervals are set on the controller in stages, starting at 96 ticks length = 1 bar (slowest rate) to the fastest with only 2 ticks length = 32th triole.
List of time intervals for SYNC on the RATE controller from left to right:
96 - one bar
72 - dotted half note
64 - half triplet
48 - half note
36 - dotted 4th note
32 - 4th triplet
24 - 4th note
18 - dotted 8th note
16 - 8th triplet
12 - 8th note
9 - dotted 16th note
8 - 16th triplet
6 - 16th note
4 - 32th triplet
3 - 32th note
2 - 64th triplet
7. LFO AMOUNT
In MÄANDER there are two independent, identical LFOs for modulations. With the help of the AMOUNT controls you will route the LFOs to given parameters.
COLOUR
Driving through the wavetable (timbres change).
Use the AMOUNT knob to the right of the COLOUR knob.
PITCH
The oscillator detuning (pitch changes).
Use the AMOUNT knob to the right of the FINETUNE knob.
CUTOFF
The filter cutoff of the 8 filter types in BANDLEVEL mode SYNTH. Use the AMOUNT knob to the right of the CUTOFF knob.

text_image
COLOUR LF01 LF02 0 0 AMOUNT
text_image
FINETUNE LF01 LF02 AMOUNT
text_image
CUTOFF LF01 LF02 0 AMOUNTWith just one AMOUNT knob, you can route both LFOs to the parameter. This also allows you to route both LFOs to the parameter at the same time. In the left third of the AMOUNT knob you only control LFO 1. In the middle third (upper part) of the AMOUNT knob both LFOs are mixed. In the right third third of the AMOUNT controller you only control LFO 2.
In both end positions the LFOs do not work. In the middle position, both LFOs have the same effect on the parameter.

text_image
LFO1 LFO2 AMOUNT
LFO 1 = Maximum
LFO 2 = OFF

LFO 1 = OFF
LFO 2 = Maximum
8.1 Structure
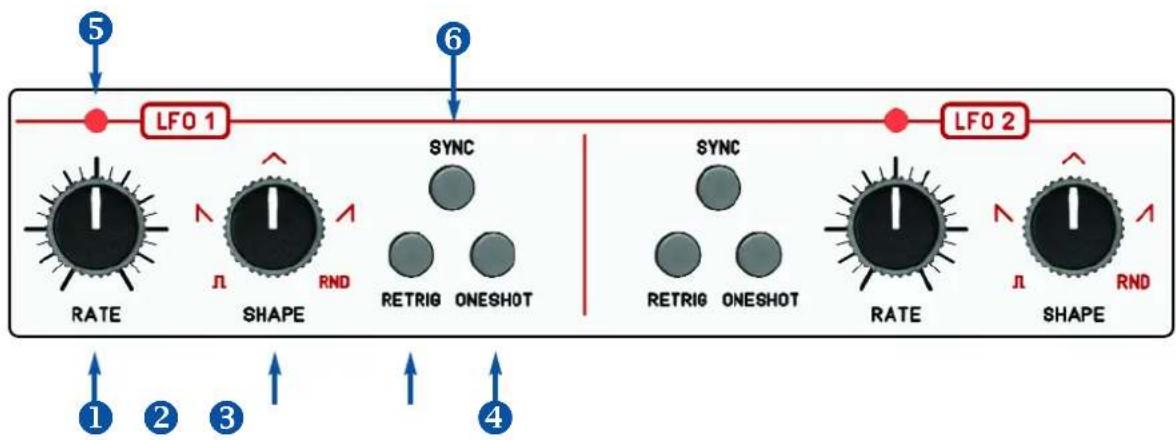
The MÄANDER has an analog filter bank consisting of 12 filter bands. The first 11 filter bands are 24db bandpasses (resonant filters) with fixed frequencies and medium resonance, except channel 12, a 24dB highpass filter that lets through all higher frequencies from about 5Khz.
The frequencies are:
80Hz, 130Hz, 240Hz, 350Hz, 500Hz, 700Hz, 1KHz, 1,4KHz, 2KHz, 3,9KHz, >5,6KHz
bar
| Category | Value | |---|---| | 1 | 80 | | 2 | 130 | | 3 | 240 | | 4 | 350 | | 5 | 500 | | 6 | 700 | | 7 | 1K | | 8 | 1.4K | | 9 | 2K | | 10 | 2.8K | | 11 | 3.9K | | 12 | >5.6K | | C | 1 | | C# | 2 | | D | 3 | | D# | 4 | | E | 5 | | F | 6 | | F# | 7 | | G | 8 | | G# | 9 | | A | 10 | | A# | 11 | | B | 12 |① BAND LEDs LED display for the volume of the filter channels
② BAND SLIDER Volume attenuator of the filter channels
③ BAND TASTER Sequence input buttons for the respective filter band
Each filter band has a slider for the output volume. So you can lower these frequencies in the overall sound or take out completely. So far, the filter bank is similar to a graphic equalizer. But the filters in the MÄANDER have other features that clearly distinguish them from an equalizer. On the one hand, it is the resonant filters that particularly enhance the range around the respective center frequencies. On the other hand, the individual frequency bands do not overlap. Therefore, the timbre is noticeably affected because it adds resonances to important parts of the sound spectrum.
Note:
The sliders are pure analogue attenuators at the output of the filter bands and are not stored in the PATCH!
8.2 Audio interconnection
The audio inputs of the filter channels are all connected, therefore all incoming audio signals (oscillator, input signals, white noise) are monophonic in the filter bank.
The MÄANDER has two audio outputs: LEFT / mono and RIGHT. If only one cable is connected to the LEFT / mono output alone, all filter bands will run together via this connector (mono operation). If you also insert a second cable into the RIGHT output, the filter bands are distributed in a stereo panorama. For stereo operation, insert the two cables into two channels of your mixing console and turn the channel panorama to the left and to the right.
The two BASS channels lie on the left and on the right channel, ie in the middle. The other channels are alternately routed to the left and right channels (odd-even). This gives a balanced stereo sound image with the bass in the middle and even distribution of the other higher frequencies. You can animate the stereo sound image, for example, through the modulations (sequences) of each channel.
For the MAINOUT and the headphones there is a separate volume control.

flowchart
graph TD
    A["Audio Inputs"] --> B["OSCILLATOR"]
    C["White Noise"] --> B
    B --> D["12 CHANNEL ANALOG FILTERBANK"]
    D --> E["LEFT"]
    D --> F["RIGHT"]
    E --> G["1"]
    E --> H["2"]
    E --> I["3"]
    E --> J["4"]
    E --> K["5"]
    E --> L["6"]
    E --> M["7"]
    E --> N["8"]
    E --> O["9"]
    E --> P["10"]
    E --> Q["11"]
    E --> R["12"]
    F --> S["PHONES OUT"]
    F --> T["OUT"]
    F --> U["MAIN"]
8.3 Control of the filter bank
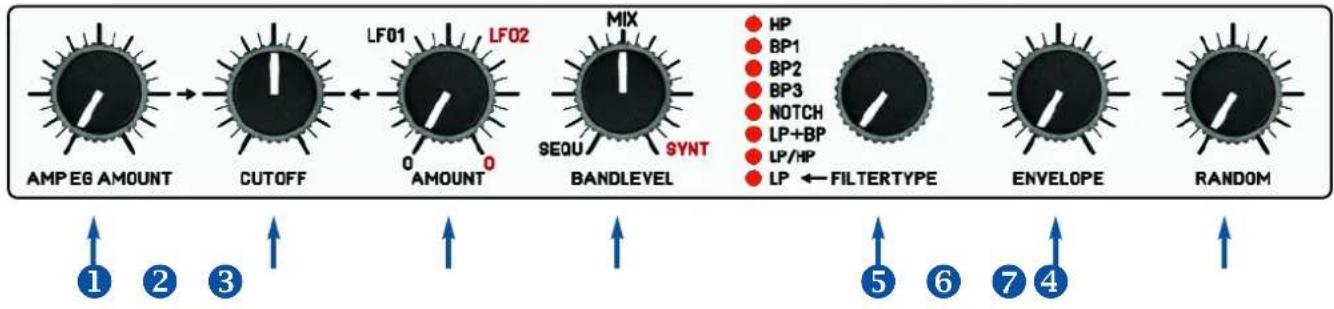
flowchart
graph LR
    A["AMPEG AMOUNT"] --> B["CUTOFF"]
    B --> C["LF01"]
    C --> D["LF02"]
    D --> E["AMOUNT"]
    E --> F["MIX"]
    F --> G["SEQU"]
    G --> H["SYNT"]
    H --> I["BANDLEVEL"]
    I --> J["FILTERTYPE"]
    J --> K["LP + BP"]
    J --> L["LP/HP"]
    J --> M["LP ← FILTERTYPE"]
    K --> N["ENVELOPE"]
    L --> N
    M --> N
    N --> O["RANDOM"]
① AMP EG AMOUNT Routing the OSC Volume Envelope (AMP EG) to Filter Cutoff
② CUTOFF Control pot of the center frequency (cutoff) of the 8 filter types
③ LFO AMOUNT Routing the LFOs to Filter Cutoff
④ BANDLEVEL Mix controls between modulations of the oscillator and the filter sequences
⑤ FILTERTYPE Selection of filter types for mode SYNTH
⑥ ENVELOPE Length of the filter channel envelopes of the filter sequences
7 RANDOM Random on the filter envelopes and velocity of the filter sequences
BANDLEVEL (Mix of filtermodulation)
The MÄANDER offers two fundamentally different ways to modulate the filter bank, on the one hand triggers per sequencer (one track for each filter band), on the other classical control by the oscillator (AMP EG), by the LFOs or manually by the CUTOFF control with the help of a Filter type simulation.
You mix with the controller BANDLEVEL between these two different controls:
When the BANDLEVEL knob is in position SEQU, the filter bands are controlled by an internal sequencer with 12 tracks (each filter band with a separate sequencer channel). See also below Example 3!
FILTERTYPE
If the BANDLEVEL control is in position SYNTH different filter types are created with the filter bands. Eight different algorithms simulate with the filter bands so eg classic filter types like low-pass, bandpass, highpass and other types. This is possible because each filter band has its own VCA (Voltage Controlled Amplifier) that controls this volume separately in volume. For example, if you slowly increase and decrease the volume of the channels starting with the lowest frequency band, you will get a classic low pass. See also below Examples 1 + 2!
Choose or mix between the two types of control with the BANDLEVEL control, creating a wide variety of filter modulation.
EXAMPLES OF FILTER MODULATIONS
Example 1: Manually adjust low pass cutoff
- Loading a PATCH with a note sequence (eg preset preset PATCH 1):
- Start the sequencer
- Turn the BANDLEVEL control to the end position (SYNTH position).
- Set FILTERTYPE to LP (lowpass).
- Turn both filter AMOUNT controls (AMP EG AMOUNT and AMOUNT) to zero.
Now you can drive with the CUTOFF controller softly through the individual filter bands as with a low-pass filter. You can see that in the glowing LEDs of the filter channels. The filter type algorithm adjusts the volume of the individual filter bands automatically, so that the effect of a low-pass filter is created. The same way the other filter types work.
Try it out and listen to the different effects.
Example 2: Low pass cutoff modulated by LFO and AMP EG
- Loading a PATCH with a note sequence (eg preset preset PATCH 1):
- Start the sequencer
- Turn the BANDLEVEL control to the end position (SYNTH position).
- Set FILTERTYPE to LP (lowpass).
- Turn CUTOFF to zero.
- Turn the AMP EG AMOUNT control for modulation through the note envelope
- Turn the LFO AMOUNT control on for modulation through the LFO
- Also change the waveform and rate of the modulating LFO
Now the notes and the LFOs modulate the cutoff frequency. You can see that in the glowing LEDs of the filter channels. The filter type algorithm adjusts the volume of the individual filter bands automatically, so that the effect of a modulated low-pass filter arises. The same way the other filter types work. Try it once and listen to the different effects.
Example 3: Modulation of the Individual Filter Channels by a Sequence
Load a PATCH with a filter sequence (eg, preset PATCH 1):
- Start the sequencer
- Turn the BANDLEVEL control to the initial position (SEQU position).
Now you only hear the filter sequence of the filter bands (the LEDs of the filter bands flash in the rhythm of the sequence). The VCAs of the individual filter bands are controlled by the velocity of the notes in the volume. The set Envelope of the filter channels makes these soft or hard fade in and out. Turn the knob ENVELOPE on the filter. For example, you can create soft and rhythmic filter curves or percussive beats.
Note: For a more detailed description, see the chapter "SHOTS"!
ENVELOPE
Each of the 14 trigger tracks has its own AR envelope setting. Together with the ENVELOPE control and the ENVELOPE menu key, you can individually set the envelopes of the 14 trigger tracks.
Press the ENVELOPE key to enter the Envelope Menu (the ENVELOPE button lights up). Use the channel buttons (INPUT, NOISE, 12 FILTERBANDS) to toggle each channel on and off. You look at the LEDs of the channel buttons, which channel one resp. is off. For all tuned channels, you can adjust the length of the envelope with the ENVELOPE knob. You can also go through the tracks one by one while the sequencer is running and set to a desired value. With the encoder you choose between the following three different types:
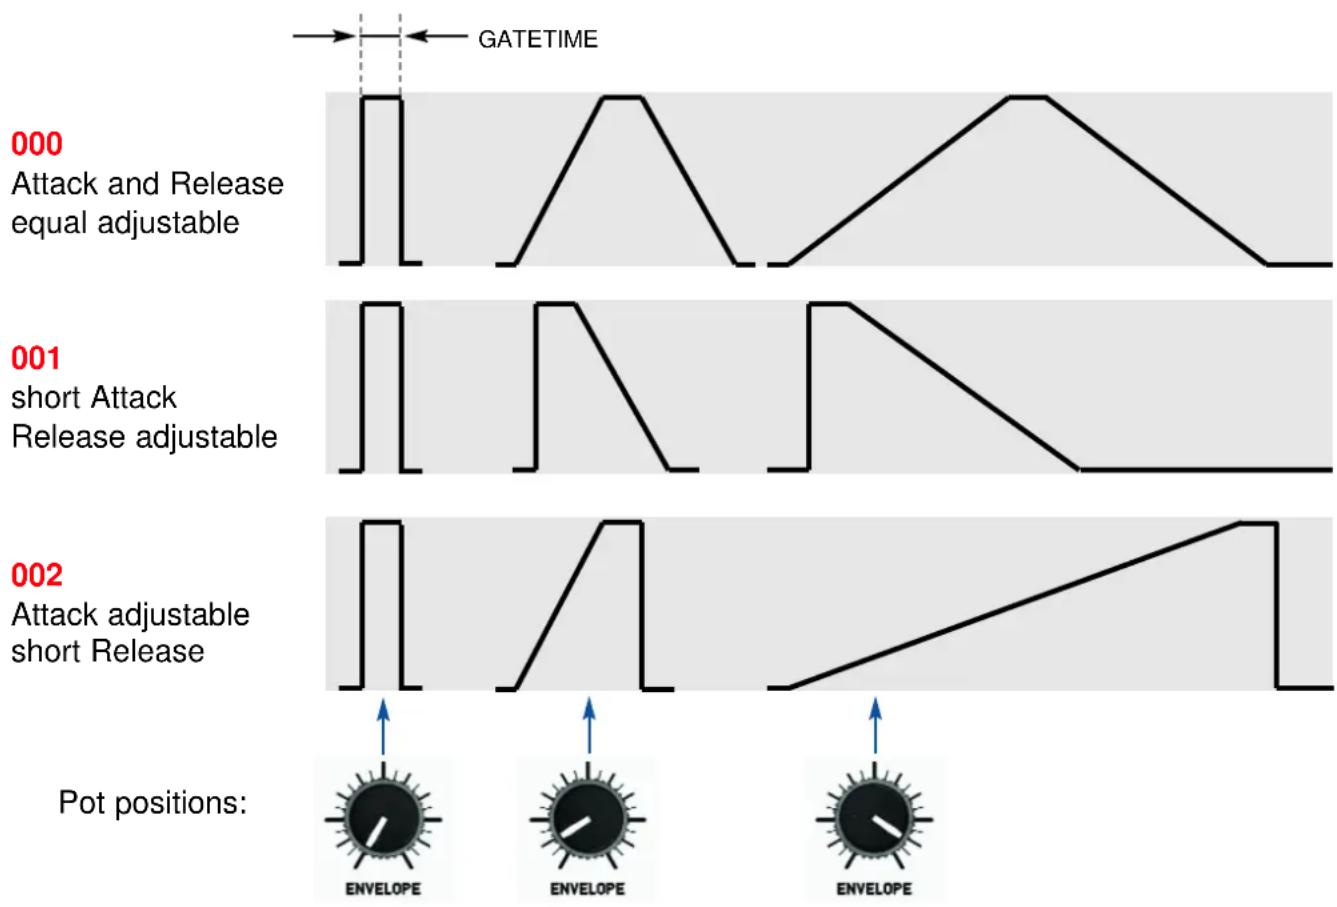
line
| Event | Position Type | Envelope | |-------|---------------|----------| | 000 | Attack and Release equal adjustable | - | | 001 | short Attack Release adjustable | - | | 002 | Attack adjustable short Release | - |All settings are retained when a track is turned off. So it is possible to set each channel individually. All channels that are turned on will continue to be affected by the ENVELOPE knob, even if the menu has been left. So you can fix some bands, but later change the sequence live with other bands.
Envelope settings are saved in the patch.
RANDOM
The SHOTS section is a generator for generating rhythmic patterns (Note Repeat Generator). With it you can record short or up to 4 bar rhythmic phrases. It generates trigger notes that are triggered with the keys OSC, INPUT, NOISE and the 12 FILTERBAND keys.
As long as one (or more) of these buttons is pressed, the triggers are added to this track (or tracks) using the knob and switch settings of the SHOTS section. Existing notes of the track are deleted.
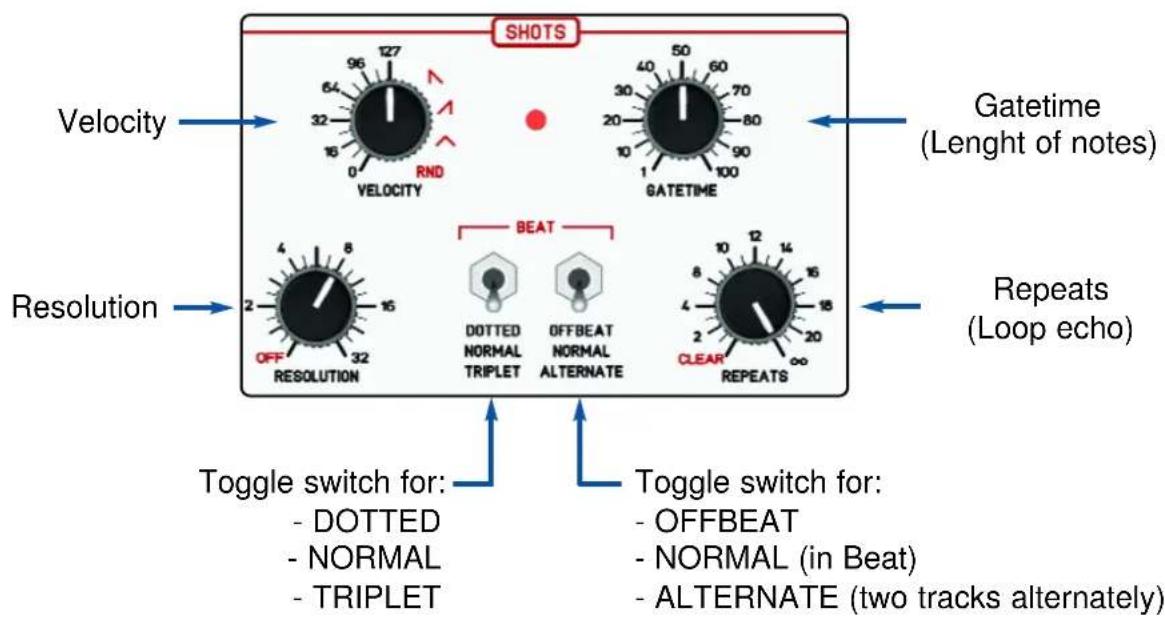
text_image
SHOTS Velocity RND VELOCITY GATETIME Gatetime (Length of notes) Resolution BEAT 2 4 8 16 OFF RESOLUTION DOTTED NORMAL TRIPLET OFFBEAT NORMAL ALTERNATE CLEAR REPEATS Repeats (Loop echo) Toggle switch for: - DOTTED - NORMAL - TRIPLET Toggle switch for: - OFFBEAT - NORMAL (in Beat) - ALTERNATE (two tracks alternately)Use the knobs and buttons of the SHOTS section to set the following parameters:
VELOCITY
The volume of each trigger note is adjusted with the VELOCITY knob. From 0 to 127 a constant volume can be set, in addition there are descending and ascending curve, triangle and random functions available.
The descending function e.g. generates triggers with this volume history: 127, 64, 32, 16
RESOLUTION AND BEAT
Together with the controller RESOLUTION and the two BEAT toggle switches the basic beat is set.
Use the RESOLUTION knob to select the following grids:
2 - half note
4 - 4th note
8 - 8th note
16 - 16th note
32 - 32th note
OFF - Shots are off (notes are played in real time without Note Repeat)
The left toggle switch determines whether the beat is punctured, normal or triplet. Another toggle switch to the right places the triggers either in the OFFBEAT, in the beat (NORMAL) or when two track buttons are pressed simultaneously, alternately in the offbeat and in the normal beat (ALTERNATE). So you can record two tracks at the same time in push-pull.
GATETIME (Length of the note)
The gate length (duration of the note) can be adjusted with the GATETIME control. The gate time of the 14 trigger tracks is calculated as a percentage so that it adapts when the tempo changes. The gate time of the oscillator track OSC is quantized to tick length. Therefore, it may happen that the notes played during recording sound shorter than in the playing loop. Because the shortest gate time of the oscillator notes is a MIDI tick.
REPEATS (Loop Echo)
The shot generator is part of the live sequencer. With the REPEATS control you can set how often the recorded trigger sequence repeats. If the knob is on the right, the sequencer behaves like a looper, the sequence is repeated indefinitely. The farther the knob is turned to the left, the faster the sequence will sound. On the left position CLEAR you delete the sequence.
Note: The OSC track is not affected by the REPEATS knob. The OSC track can also be cleared only by holding down the CLEAR key plus pressing OSC.
Note: The REPEAT function can be turned off for each track using the HOLD function. This protects the track from being changed (frozen).
PRACTICE "RECORDING SHOTS"
Now an example:
Press START to start the sequencer.
First turn the BANDLEVEL knob to SYNT, as we will play some notes first so we can hear something. Use the BAR buttons to select how many measures the sequence should have. In our case we press and hold BAR 1 and press BAR 2, now both buttons light up.
Connect a Midikeyboard to one of the Midi inputs and play some notes. Now a two-bar sequence should be heard. (If the OSC LED does not flash to the rhythm of the notes, the midi channel is set incorrectly: see also chapter MIDI)
Now press the SHOTS button, make sure the OSC button is off, if it does, turn it off by pressing it. Now turn the BANDLEVEL control to MIX (middle position).
Set the Velocity control to 127.
Set the RESOLUTION knob to 8.
Set the two BEAT switches to center position.
Set the GATETIME to 20.
Set the REPEATS knob to infinity (right position).
Now play with the 12 BAND buttons and listen to what happens. All controls of the shot generator can be changed in real time. If you do not like the sequence, you can delete it with the REPE-ATS control (left stop) or end it.
With the BANDLEVEL control you can crossfade between the cutoff modulation and the filter trigger sequence.
The oscillator track can also be played via shots. If the SHOTS button does not yet light up, press the SHOTS button, then press the OSC button so that it lights up. Now you can use the note keys to play the individual notes in the rhythm of the set SHOTS.
Note:
The OSC track is not affected by the REPEATS knob. The OSC track can only be cleared by holding down the CLEAR key plus pressing OSC.
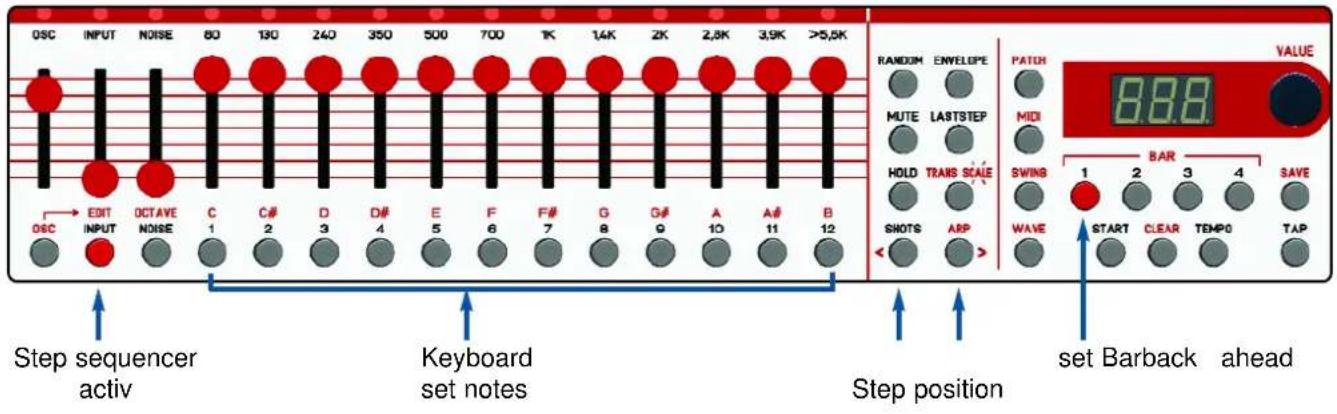
text_image
OSC INPUT NOISE 80 130 240 350 500 700 1K 1.4K 2K 2.8K 3.9K >5.5K OSC EDIT OCTAVE C C# D D# E F F# G G# A A# B INPUT NOISE 1 2 3 4 5 6 7 8 9 10 11 12 Step sequencer activ Keyboard set notes Step position set Barback ahead RANDOM ENVELOPE PATCH MUTE LASTSTEP MIDI HOLD TRANS SCALE SWING 1 BAR SAVE SKOTS ARP WAVE START CLEAR TEMPO TAP VALUE 88.8Sequences of the OSCILLATOR track can either be recorded in real time via MIDI or the note keys or programmed in EDIT mode while the sequencer is running. The step sequencer is 4-beat and has up to 32 steps per measure. You set this grid with the RESOLUTION control of the SHOT section.
ACTIVATE EDIT MODE
To activate the EDIT mode, first set the RESOLUTION control to the desired quantization (number of steps) eg 16 for 16 steps and the setting of 16th notes.
Note: Deactivate any previously set HOLD of the OSC track, otherwise the track is protected against recording and the Edit mode can not be called up.
Go to the SHOTS menu (press the SHOTS button, it will light up). Select the OSC track by pressing the OSC button (this and the OCTAVE button will light up). Then press the EDIT button. The EDIT button is now lit and the OSC + OCTAVE buttons are off.
Now the display shows "1.01." While the "1" before the comma indicates the current measure, the number after the comma informs about the current step. In the case of 16th notes, that is from 01 to 16. The quarter notes of the measure are marked with a dot at the end for better orientation.
for example: "1.05." = 1st bar, fifth sixteenth, the point at the end a 1/4 position or: "2.12" = 2nd bar, twelfth sixteenths, no point at the end (no 1/4 position)
CHANGE STEP POSITION
You move through the sequence in the step raster with the two arrow keys (< back, > next) or you turn the encoder.
With the BAR buttons you can switch between the bars.
SET NOTES (CHORD)
To set a note simply press one of the 12 note keys. Per Step Position up to 4 notes can be set at the same time. These then give a chord.
SET / CHANGE THE OCTAVE OF NOTES
By holding down the note key, you can use the encoder to select the octave (-1 to +4).
DELETE NOTES
Notes that have been set in a step can be deleted again by pressing the corresponding note button again. If you want to delete the entire sequence, press the OSC key while holding down the CLEAR key.
VELOCITY
The velocity of the programmed steps corresponds to the controller setting of the VELOCITY controller at the time of setting.
NOTE LENGTH
If a step should take longer than one count, press HOLD. The step will be heard until a later step is paused with the MUTE button. Should e.g. the first step is held until the 4th step, set in Step 1 e.g. a note "C" and the HOLD button, now set the MUTE button in step 4. HOLD affects all notes of the step equally.
EXIT EDIT MODE
To exit edit mode, either press the EDIT button again and you will get back to OSC SHOTS. Or change to any menu like eg. WAVE by pressing this button.
SAVE THE SEQUENCE
To save the sequence in the patch, just save the patch again by pressing the SAVE button (button flashes) and then SAVE again. If you want to save the patch with the new sequence in another patch, press SAVE (key flashes), then use the data knob to select the desired patch number and press SAVE again to save (the button LED goes off again).
The Arpeggiator is an additional game aid to play chords or successively set notes rhythmically in succession with different playback patterns.
Call ARP Menu (start arpeggiator)
To activate the arpeggiator, press the ARP button. When the internal clock or midiclock is started, the arpeggiator will already respond to incoming midi notes. For example, press a chord on a connected MIDI keyboard. Now, the notes of the chord are played one after another in the set beat of the SHOTS section as long as the chord is pressed. The arpeggiator receives the notes on the MIDI channel of the OSC track.
MODE (playing pattern)
To edit the Arpeggiator first press the SHOTS button and then the OSC button.
Now the display shows the current arpeggiator mode (playing pattern).
You can choose between the following play patterns with the encoder:
„UP“ upward
„dO“ down
„UdE“ up / down each without playing the lowest and highest tone twice
„Udl“ up / down the lowest and highest pitch twice
„OrG“ original order of the notes
„rnd“ random order of notes
As an alternative to the MIDI input you can also use the note keys of the MÄANDER to play. The velocity currently set with the VELOCITY control will be used. If you play the arpeggiator via MIDI INPUT, the velocity of the received notes will be used.
You can set the beat of the arpeggiator with the RESOLUTION control and the left BEAT switch (eg to play triplets). The length of the played note can be adjusted with the GATETIME control.
HOLD (hold chord or enter notes one after the other)
With the HOLD button the hold mode of the arpeggiator is activated.
To hold notes, proceed as follows: Press and hold the first note. As long as the first note is held, you can press any other notes and release them again. You can press any notes with the restriction that the first must be held down. After releasing the first note, the arpeggio is repeated until a note is pressed again.
When the arpeggiator is in HOLD mode, you can toggle between the OSC track and the Arpeggio (switch with the ARP button). Only when the HOLD button is switched off in ARP mode will the arpeggio be deleted.
Note: The notes of the arpeggio are not saved in the patch!
12.1 Overview
The MÄANDER is equipped with extensive MIDI functions.
The internal sequencer not only sends its data to the internal tone generator and filter, but all sequencer tracks send and receive MIDI notes (the polyphonic OSC track and the 14 monophonic tracks, each on separate MIDI channels).
Each of the 14 monophonic tracks is triggered with an adjustable MIDI note, and can also send them. The channels also understand velocity for the intensity of the channel (volume).
Almost all controllers (with digital functions) can send / receive midi controllers. Sending and receiving can be switched off separately. Synchronize the MÄANDER via MIDI START, STOP and CLOCK, external clock will be detected automatically.
There are two functionally identical MIDI inputs that are merged internally. In addition, MIDI Input 2 has a THRU socket (where the incoming data via MIDI 2 is forwarded). Via USB (class compliant) you can connect directly to a computer via MIDI.
Firmware updates can be downloaded via sysexfile via USB-MIDI.
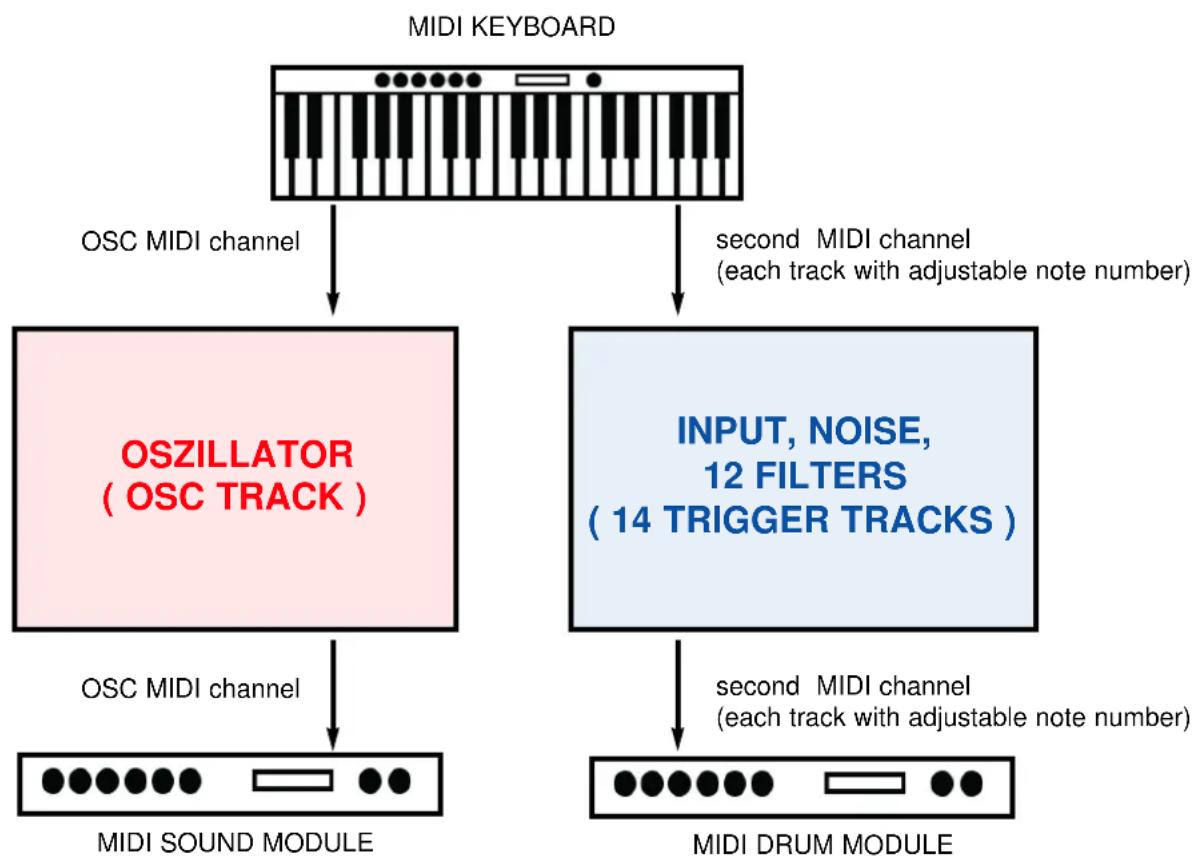
flowchart
graph TD
    A["MIDI KEYBOARD"] --> B["OSC MIDI channel"]
    A --> C["second MIDI channel (each track with adjustable note number)"]
    B --> D["OSZILLATOR (OSC TRACK)"]
    C --> E["INPUT, NOISE, 12 FILTERS (14 TRIGGER TRACKS)"]
    D --> F["OSC MIDI channel"]
    E --> G["MIDI DRUM MODULE"]
    F --> H["MIDI SOUND MODULE"]
    G --> I["MIDI DRUM MODULE"]
12.2 MIDI receive data
The MÄANDER can receive MIDI data on two separate MIDI channels (1..16):
OSC TRACK (oscillator and OSC sequencer track)
NOTE ON / NOTE OFF (note numbers between 24 and 103)
VELOCITY (for all received notes)
PITCHBEND (routed to internal wavetable oscillator)
PROGRAM CHANGE (to switch patches)
CONTROL CHANGE (parameter control with specified controller numbers)
14 TRIGGER (Input, Noise and 12 filter channels)
NOTE ON / NOTE OFF (each channel with adjustable note number)
VELOCITY
GLOBAL
MIDI CLOCK, START, STOP
SYSEX DATEN ( Firmware, Wavetables, Patches)
12.3 MIDI transmission data
The MÄANDER can send MIDI data on two separate MIDI channels (1..16):
OSC TRACK (OSC sequencer track)
NOTE ON / NOTE OFF (note numbers between 24 and 107)
VELOCITY (for all received notes)
CONTROL CHANGE (parameter control with specified controller numbers)
14 TRIGGER (Input, Noise and 12 Filterbänder)
NOTE ON / NOTE OFF (each channel with adjustable note number)
VELOCITY
GLOBAL
MIDI CLOCK, START, STOP
SYSEX DATEN (Patch Dump)
Note: The MIDI send (transmit) channel is the same as the MIDI receive channel!
12.4 MIDI Menu
In the MIDI menu you can set the MIDI channels and the note numbers of the trigger tracks for the MÄANDER. In addition, you determine whether certain data should be sent or received. In the MIDI menu also the 16th quantization of recorded notes in SHOTS mode is switched on or off.
To set the MIDI parameters: First, enter the MIDI menu by pressing the MIDI button, it will light up. By repeatedly pressing several times you will step through the parameters to be set, in the following order:
CHn - MIDI channel
not - Note numbers
trt - Transmit (send data)
rCE - Receive (receive data)
O.nt - Quantization (16th quantization of recorded notes)
SETTING MIDI CHANNELS:
Press the MIDI button so that the display shows CHn (CHANNEL).
Set the MIDI channel for the OSC track:
Then press the OSC button for the MIDI channel of the oscillator track. The display flashes alternately between the set MIDI channel number and the menu name, for example:
CHn 002 CHn 002 ...
Now turn the data knob to set the desired channel (001..016)
Set MIDI channel for the 14 trigger tracks:
Then press one of the filter channel keys for the MIDI channel of the 14 trigger tracks. The display flashes alternately between the set MIDI channel number and the menu name, for example:
CHn 001 CHn 001 ...
Now turn the data knob to set the desired channel (001..016).
Exit the menu again (eg by pressing WAVE) or adjust the next MIDI parameter. The new values are immediately stored permanently.
SETTING NOTE NUMBERS OF THE 14 TRIGGER TRACKS:
Press the MIDI button twice so that the display shows not (NOTE).
Set note numbers for the 14 trigger tracks:
Then press the corresponding channel button (eg INPUT) to set the note. The display flashes alternately between the set note number and the menu name, for example:
not 036 not 036 ...
Now turn the data knob to change the note number.
Do the same with the other trigger channels as well, press the corresponding channel key and turn the data knob.
Exit the menu again (eg by pressing WAVE) or adjust the next MIDI parameter. The new values are immediately stored permanently.
SETTING MIDI TRANSMIT DATA:
Press the MIDI button three times so that the display shows trt (TRANSMIT).
Send of the OSC track on / off:
Press the OSC button. The display flashes alternately between on or oFF and the menu name eg:
trt oFF trt oFF ...
Turn the data knob to the right for on or left for oFF.
Send of the the 14 Trigger tracks on / off:
Press one of the trigger track buttons. The display flashes alternately between on or oFF and the menu name eg:
trt oFF trt oFF ...
Turn the data knob to the right for on or left for oFF.
Send of MIDI Control Change data on / off::
Turn one of the digital knobs (eg RESOLUTION). The display flashes alternately between on or oFF and the menu name eg:
trt oFF trt oFF ...
Turn the data knob to the right for on or left for oFF.
Send of MIDI Clock on / off:
Press the TEMPO button. The display flashes alternately between on or oFF and the menu name eg:
trt oFF trt oFF ...
Turn the data knob to the right for on or left for oFF.
Exit the menu again (eg by pressing WAVE) or adjust the next MIDI parameter. The new values are immediately stored permanently.
SETTING MIDI RECEIVE DATA:
Press the MIDI button three times so that the display shows rCE (RECEIVE).
Receive of notes of the OSC track on / off:
Press the OSC button. The display flashes alternately between on or oFF and the menu name eg:
rCE oFF rCE oFF ...
Turn the data knob to the right for on or left for oFF.
Receive of notes of the 14 Trigger tracks on / off:
Press one of the trigger track buttons. The display flashes alternately between on or oFF and the menu name eg:
rCE oFF rCE oFF ...
Turn the data knob to the right for on or left for oFF.
Receive of MIDI Control Change data on / off:
Turn one of the digital knobs (eg RESOLUTION). The display flashes alternately between on or oFF and the menu name eg:
rCE oFF rCE oFF ...
Turn the data knob to the right for on or left for oFF.
Receive of MIDI Clock on / off:
Press the TEMPO button. The display flashes alternately between on or oFF and the menu name eg:
rCE oFF rCE oFF ...
Turn the data knob to the right for on or left for oFF.
Exit the menu again (eg by pressing WAVE) or adjust the next MIDI parameter. The new values are immediately stored permanently.
SET 16th QUANTIZATION OF RECORDET NOTES ON / OFF:
Press the MIDI button five times so that the display shows O.nt (Quantization).
Quantization on / off:
Press the OSC button. The display flashes alternately between on or oFF and the menu name eg:
O.nt oFF O.nt oFF ...
Turn the data knob to the right for on or left for oFF.
Exit the menu again (eg by pressing WAVE) or adjust the next MIDI parameter. The new values are immediately stored permanently.
MIDI SYNC
The MÄANDER can be synchronized with MIDI SYNC (MIDI CLOCK, START, STOP). Sending and receiving MIDI Clock data can be specified in the MIDI Menu. The MÄANDER automatically detects MIDI Clock when stopped (when the reception is set to ON).
See chapter "Setting MIDI Receive Data" and "Setting MIDI Transmit Data".
LIST OF CONTROL CHANGE NUMBERS
(The MIDI transmit and receive channel is the same as the OSC track)
PARAMETER CC number
OSCILLATOR
FINETUNE 32
PITCH AMOUNT 36
DETUNE 41
UNISONO 58
GLIDE 39
COLOR 40
COLOR AMOUNT 38
ADSR
ATTACK 51
DECAY 52
SUSTAIN 45
RELEASE 42
SHOTS
VELOCITY 50
GATETIME 43
RESOLUTION 54
REPEATS 44
FILTERBANK
AMP EG AMOUNT 33
CUTOFF 1
CUTOFF AMOUNT 37
BANDLEVEL 46
FILTERTYPE 48
ENVELOPE 49
RANDOM 47
EXPRESSION PEDAL 35
LFO
LFO1 RATE 56
LFO1 SHAPE 57
LFO1 SYNC 59
LFO1 RETRIG 60
LFO1 ONESHOT 61
LFO2 RATE 55
LFO2 SHAPE 53
LFO2 SYNC 62
LFO2 RETRIG 63
LFO2 ONESHOT 64
13.1 Firmware Update
For a firmware update you need on your computer a SYSEX program to send SYSEX files via MIDI (for example: MIDI-OX or Electron C6).
A firmware update can consist of one or sometimes two SYSEX files.
Download the new firmware file (or files) from our website.
- Connect the MÄANDER to your computer via USB Midi.
- Hold both WAVE + TEMPO buttons pressed simultaneously while switching on.
- The display shows UPd (UPDATE), the MÄANDER is now waiting to receive the syx file.
- Set the MIDI OUT PORT in your SYSEX program to "Mäander".
- Load the SYSEX firmware file into the computer program and send it to the MÄANDER.
- During transmission, a counter will scroll up in the display.
- When the file is finished loading, the MÄANDER restarts automatically.
- The new version number appears briefly on the display during startup.
- Turn off the MÄANDER and turn it on again.
- Now the update is finished.
Note: If the update consists of two files, transfer first one file as described above and then the other file.
13.2 Wavetable Update
For a wavetable update, you need a SYSEX program on your computer to send SYSEX files via MIDI (zBsp MIDI-OX or electron C6).
You can download compatible wavetables from our website. The MÄANDER uses the same data file format as the FLAME 4VOX eurorack module.
- Establish a MIDI connection with your computer (via USB or MIDI-DIN).
- Load the SYSEX wavetable file into the computer program and send it to the MÄANDER.
The wavetables have a fixed location number (SLOT number). The wavetable is automatically saved to this memory location. You can change the memory number (SLOT) with the freeware program "Wavetable Creator".
Warrenty
Beginning from the date of purchase a 2-year warranty is guaranteed for this device in case of any manufacturing errors or other functional deficiencies during runtime. The warranty does not apply in case of:
- damage caused by misuse
- mechanical damage arising from careless treatment (dropping, vigorous shaking, mishandling, etc)
- damage caused by liquids penetrating the device
- heat damage caused by overexposure to sunlight or heating
- electric damage caused by improper connecting
(wrong power supply/ jacks/ MIDI connections/ voltage problems).
If you have any complaints please contact your dealer or send an e-mail to:
service@flame-instruments.de
Terms of production
conformity: CE, RoHS, UL
Disposal
The device is produced with RoHS-conformity (subject to the regulations of the European Union) and is free of hazardous substances (like mercury, plumb, cadmium and hexavalent chrome). But electronical scrap is hazardous waste. Please don't add this to consumer waste. For an environment friendly disposal of waste please contact your distributor or specialist dealer.
Support
More informations, updates, downloads, tips and tricks, videos and links can be found on the website at any time: www.flame-instruments.de
Thanks to
For help and assistance big thanks to: Alex4 Berlin, Shawn Cleary (Analogue haven), Anne-Kathrin Metzler, Lena Bünger, Thomas Wagner, Alex Wolter, Robert Junge.
Imprint
Hardware + Concept: Per Salzwedel, Sebastian Preller, Thomas Wagner
Software: Sebastian Preller
Manual: Per Salzwedel, Sebastian Preller, Anne-Kathrin Metzler
Beta test: Thomas Wagner, Alex Wolter
Changes reserved!
(c)2019