
Aero A1 - Unknown KODAK - Free user manual and instructions
Find the device manual for free Aero A1 KODAK in PDF.

| Product Type | Hand-held aerial camera |
| Model | A-1 |
| Brand | Kodak |
| Image Format | 4 x 5 inches (plates or cut film) |
| Lens | 10-inch Hawk Eye Aerial Lens, fixed aperture f/4.5 |
| Shutter Type | Focal plane shutter with adjustable tension (1/120 to 1/435 sec) |
| Shutter Speeds | Approximately 1/120 to 1/435 sec (tension numbers 1-10) |
| Safety Shutter | Front lens safety shutter, automatically opens when thumb lever is pressed |
| Viewfinder | Direct vision tubular finder with intersecting vertical and horizontal wires |
| Film/Plate Holder | Graflex Plate Magazine Holder, capacity 12 plates or cut film in metal septums |
| Body Material | Cast aluminum body, sheet aluminum cone |
| Weight | Approximately 3.5 lbs (1.6 kg) without magazine |
| Dimensions | Approx. 7 x 7 x 9 inches (18 x 18 x 23 cm) |
| Power Source | Manual (no batteries required) |
| Mounting | Two side hand grips, lugs for shoulder straps |
| Exposure Counter | Located on underside of magazine, registers plate number |
| Care & Cleaning | Remove safety shutter to clean front lens element; access rear element via screw cover on hand hole |
| Spare Parts | Replacement plates, septums, and safety shutter available from Eastman Kodak |
Frequently Asked Questions - Aero A1 KODAK
User questions about Aero A1 KODAK
0 question about this device. Answer the ones you know or ask your own.
Ask a new question about this device
Download the instructions for your Unknown in PDF format for free! Find your manual Aero A1 - KODAK and take your electronic device back in hand. On this page are published all the documents necessary for the use of your device. Aero A1 by KODAK.
USER MANUAL Aero A1 KODAK
DIRECTIONS FOR OPERATING
AERO CAMERA
MODEL A-1
EASTMAN KODAK COMPANY
ROCHESTER, N. Y., U. S. A.
DIRECTIONS FOR OPERATING
AERO CAMERA
MODEL A-1
EASTMAN KODAK COMPANY
ROCHESTER, N. Y., U. S. A.
AERO CAMERA
MODEL A-1
7-20-P1
MODEL A-1 HAND HELD AERO CAMERA
Size: 4 x 5. For Plates.
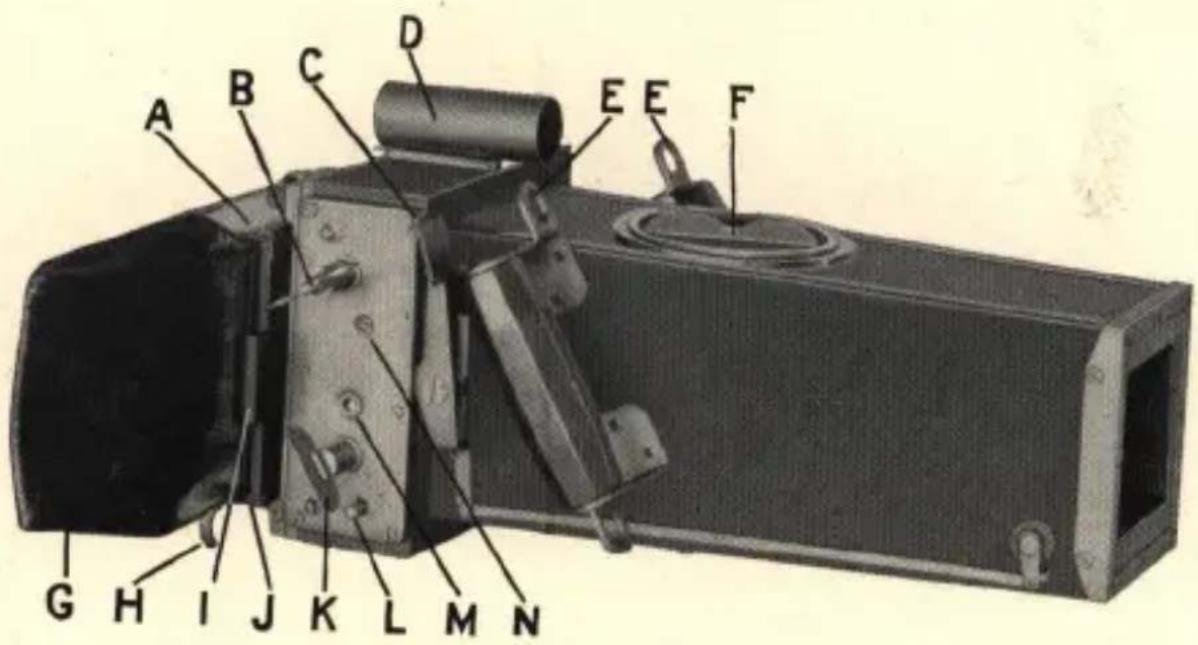
This camera was designed for use in two passenger aircraft, and has proven very efficient because of its light weight, compactness, simplicity of operation and adaptability to either oblique or vertical exposures.
Excellent control over the camera is provided by the two side grips and the position of the thumb lever shutter release. Three movements only are required in making exposures; set the shutter B; press the thumb lever release C; shift exposed plate.
The body of the A-1 Aero Camera is made of cast aluminum, and the cone of sheet aluminum. Two lugs EE, for attaching the shoulder straps, when the conditions require it, are located adjacent to the side hand grips.
Exposures varying from 1120 to 1435 of a second may be made by adjusting the tension of the Focal Plane Shutter, which has but one fixed aperture.
The 10'' Hawk Eye Aerial Lens fitted to the camera has a fixed aperture of f.4.5. The standard aerial mount has a running thread and set screw permitting accurate adjustment at infinity focus.
As a protection against exposure of the lens to fog, mist or dirt, often resulting in impairment of the photographic record or against fogging of the plate or film when the shutter is reset, a safety shutter is located in front of the lens. Pressure upon the thumb lever release causes this safety shutter to open just before the exposure is made. This safety shutter may be readily removed to permit refocusing or cleaning of the front element of the lens. Removal of the screw cover of the hand hole F permits easy access to the rear element of the lens. A direct vision tubular finder D having intersecting vertical and horizontal wires, provides for proper sighting of the camera. (The finder may also be located on the underside of the instrument when occasion requires.) The 4 x 5 Graflex Plate Magazine Holder with a capacity of 12 plates or Eastman Cut Film loaded in metal septums is used with the instrument.

SHUTTER SPEED PLATE
A Shutter Speed Plate, attached to the camera, gives the approximate shutter speeds, in fractional parts of seconds, obtainable with the various tension numbers 1 to 10.
SETTING THE SHUTTER The shutter is set by turning key B to the left until the letter S is indicated at N.
REGULATING THE SHUTTER SPEED Tension is regulated by turning key K to the right until the required tension number appears at M. The numbers run from 1 to 10—the highest number indicating the greatest speed.
To decrease speed of shutter, release tension of spring by pushing escapement L up and down until the required lower tension number is registered at M.
INSTANTANEOUS EXPOSURE
When the shutter has been set in accordance with the above directions, the exposure is made by pressing thumb lever release C, which also automatically opens the safety shutter located in front of the lens.
Before making exposures, pull out dark slide I and slip it into holding rack on under side of camera.
After making exposure, eject exposed plate into shifting bag G by pulling out lever H to limit of motion and returning it to its original position. After plate has been ejected, shift to back of magazine, by grasping the septum holding the plate, and swinging the inner end towards back of magazine, pushing it—all the way—into the groove between the back pressure springs and the other septums.
REMOVING MAGAZINE FROM CAMERA
It is not necessary to expose all the plates before the removal
of one, or more plates for development. With the protective slide in position, the magazine holder can be removed from the camera at any time, and taken to a dark room where any number of exposed plates can be removed.
EXPOSURE COUNTER
On the underpart of the magazine will be found the exposure counter J, which registers the number of the plate exposed.
EASTMAN KODAK CO.
ROCHESTER, N. Y.

Brand : KODAK
Model : Aero A1
Category : Unknown