
BPRZRD - Car Radio BOSS - Free user manual and instructions
Find the device manual for free BPRZRD BOSS in PDF.

| Product Type | Receiver Installation Kit |
| Model | BPRZRD |
| Brand | BOSS Audio Systems |
| Compatible Radios | BOSS Audio Systems marine gauge radios with 3"-3.5" opening (MGV550B, MGV520B, MGR450B, MGR350B, MGR250B, MRG150B) |
| Vehicle Compatibility | Polaris RZR 900, 1000, Turbo and 4-seat models (2014-current, excluding Pro XP) |
| Mounting Location | Upper dash (2019+ RZR XP1000) or lower dash (2014-2018 RZR) |
| Materials | ABS plastic (except metal brace plate) |
| Package Contents | Upper dash mount panel, metal brace plate, lower dash mount panel, adaptable mount panel, screw bag, rubber feet (2) for MGR450B |
| Installation Type | Replaces factory dash pocket |
| Primary Function | Securely mount BOSS gauge radio in RZR dash |
| Drilling Required | Yes (for mounting panel customization) |
| Tools Needed | Drill, screwdriver, push pin removal tool |
| Special Features | Adaptable mount panel for multiple radio models; metal brace for reinforcement |
| Durability | Designed for off-road use |
| Warranty | Not specified; refer to BOSS Audio Systems |
| Cleaning | Wipe with damp cloth; avoid abrasive cleaners |
| Safety | Ensure secure installation to prevent detachment during vehicle operation |
| Repairability | Replacement parts available through BOSS or dealer |
Frequently Asked Questions - BPRZRD BOSS
User questions about BPRZRD BOSS
0 question about this device. Answer the ones you know or ask your own.
Ask a new question about this device
Download the instructions for your Car Radio in PDF format for free! Find your manual BPRZRD - BOSS and take your electronic device back in hand. On this page are published all the documents necessary for the use of your device. BPRZRD by BOSS.
USER MANUAL BPRZRD BOSS
natural_image
Abstract pattern of white diagonal stripes on black background (no text or symbols)BPRZRD
INSTALLATION MANUAL
POLARIS RZR RECEIVER INSTALLATION KIT
FITS GAUGE RADIO
(3"-3.5")
natural_image
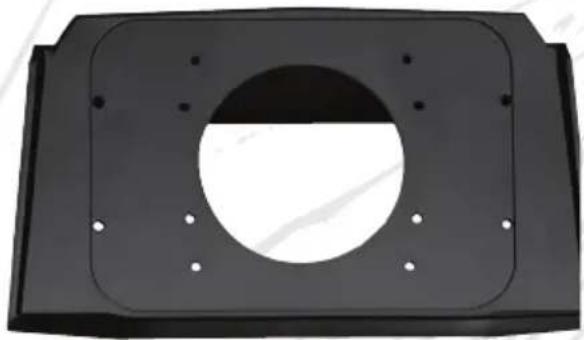
Black rectangular metal bracket with a circular cutout and mounting holes (no text or symbols)RECEIVER INSTALLATION KIT 2019+ RZR MODELS

natural_image
Black rectangular object with a circular hole, resembling a mechanical or electronic component (no text or symbols visible)RECEIVER INSTALLATION KIT 2014 - 2018 RZR MODELS

natural_image
Black industrial control panel with visible buttons and a mesh cover (no text or symbols)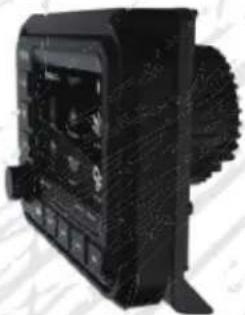
natural_image
Black industrial machine component with visible internal components and mesh texture (no text or symbols)COMPATIBLE WITH MOST 3"-3.5" GAUGE RADIOS
DESIGNED FOR BOSS AUDIO SYSTEMS MGV550B, MGV520B, MGR450B, & MGR150B
(SOLD SEPARATELY)
Congratulations on your purchase of a 300M RSPORTS product.
Table of Contents
Introduction....1
Package Contents ....1
Specifications 2
2019+ RZR XP1000 Upper Dash Mount Installation....2
a) Before you start (upper dash mount)....2
b) Upper install kit assembly 2
c) Final assembly (upper dash mount)....5
2014-2018 RZR Lower Dash Mount Installation....5
a) Before you start (lower dash mount)....5
b) Lower install kit assembly 6
c) Final assembly (lower dash mount)....8
Introduction
This Polaris RZR receiver installation kit is designed to replace the factory upper or lower dash pocket, and thus make possible the installation of a BOSS Audio Systems gauge radio on your Polaris RZR vehicle. This installation kit fits all Polaris RZR 900, 1000, Turbo and 4-seat models from 2014 to current year (excluding Pro XP).
It is compatible with most BOSS Audio Systems marine gauge receivers with 3" \~ 3.5" (e.g. MGV550B, MGV520B, MGR450B, MGR350B, MGR250B and MRG150B)
Please read this manual carefully so you will know how to install your product properly. After you have finished reading this manual, store it in a safe place for future reference.
Package Contents
natural_image
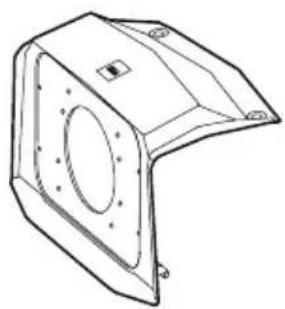
Technical line drawing of a mechanical bracket or housing component (no text or symbols)(1)(2)(3)(4)
natural_image
Simple line drawing of a rectangular frame with mounting holes and a small square cutout on the side (no text or symbols)
natural_image
Simple line drawing of a rectangular plate with a circular cutout on top (no text or symbols)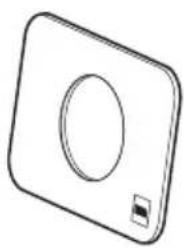
natural_image
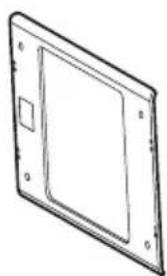
Simple line drawing of a square-shaped object with a circular hole and a small square on the side (no text or symbols)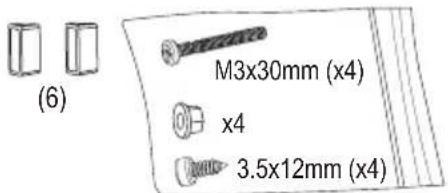
(5)
- Upper dash mount panel (x1)
- Metal brace plate (x1)
- Lower dash mount panel (x1)
- Adaptable mount panel (x1)
-
Screw bag (x1)
-
Rubber foot (x2) (for MGR450B use only)
Specifications
Compatibility
- Source unit: Most BOSS Audio System marine gauge radios with 3"-3.5"
• Vehicle: all Polaris RZR 900, 1000, Turbo and 4-seat models from 2014 to current year (excluding Pro XP)
Materials
• ABS plastic (except the metal brace plate)
Specifications are subject to change without notice.
2019+ RZR XP1000 Upper Dash Mount Installation
The upper dash mount is applicable to the 2019+ Polaris RZR XP1000 models (excluding Pro XP).
The installation kit is compatible with the following marine gauge source units:
MGV550B, MGV520B, MGR450B, MGR350B, MGR250B and MRG150B.
a) Before you start (upper dash mount)
- Remove the upper dash pocket from your RZR as follows:
Remove the push pins that secure the upper dash pocket (set aside the push pins for the final assembly), then remove the upper dash pocket by tilting it away from the dash.
The upper dash pocket will not be installed. Your source unit attached to the installation kit will take its place. - The installation kit has an adaptable mount panel which is required for the upper dash mount of the following source units: MGV520B, MGR450B, MGR250B and MGR150B. MGV550B does not require the adaptable mount panel.
For MGV520B and MGR450B, use a proper tool to drill four screw bit size holes on the adaptable mount panel.
To drill holes, locate the four hole marks indicated as "MGV520B" or "MGR450B" on the back side of the adaptable mount panel.

For MGR450B source unit, drill four holes indicated as "MGR450B" for screw fastening.
For MGV520B source unit, drill four holes indicated as "MGV520B" for screw fastening.
Adaptable mount panel
b) Upper install kit assembly
Depending on a BOSS Audio Systems source unit you have, installation method and kit may vary. Follow the guideline below that applies to your source unit.
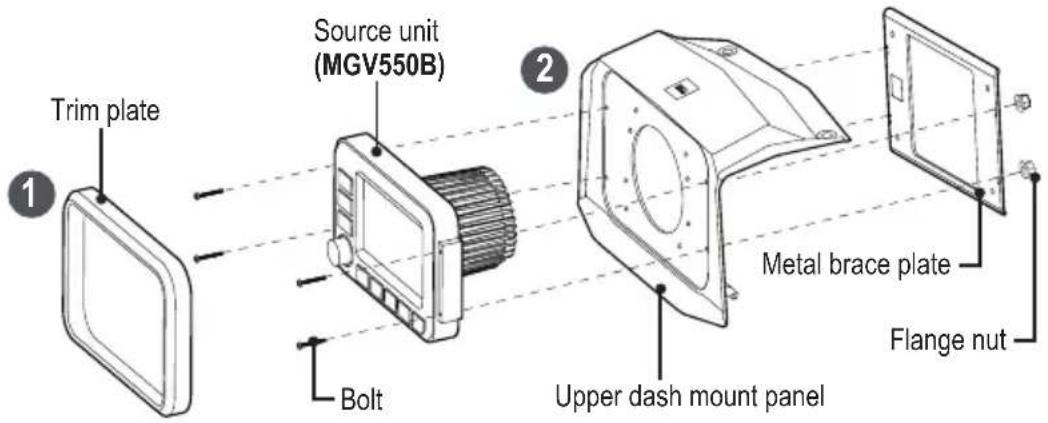
MGV550B source unit installation (upper dash mount)
- Remove the trim plate from the front panel of the source unit, to access the four screw mounting holes.
- Fix the source unit by using the supplied upper dash mount panel, metal brace plate, and four supplied bolts and flange threading nuts.
IMPORTANT! When threading the flange nut on the bolt, make sure the wide flat face of the nut points inward (toward the metal plate) to allow locking function.
For the MGV550B installation, the supplied adaptable mount panel, lower dash mount panel and screws / rubber feet are no need.
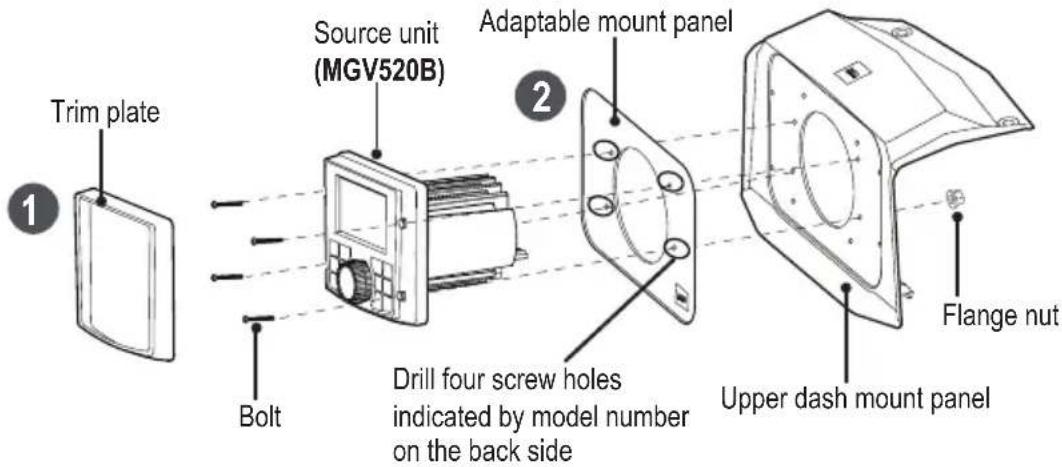
MGV520B source unit installation (upper dash mount)
- Remove the trim plate from the front panel of the source unit, to access the four screw mounting holes.
- Drill four screw holes on the back side of the adaptable mount panel for fastening of MGV520B source unit. Refer to the "Adaptable Mount Panel" image on page 2.
- Fix the source unit by using the supplied upper dash mount panel, adaptable mount panel and four supplied bolts and flang threading nuts.
IMPORTANT! When threading the flange nut on the bolt, make sure the wide flat face of the nut points inward (toward the metal plate) to allow locking function.
For the MGV520B installation, the supplied metal brace plate, lower dash mount panel and screws / rubber feet are no need.
MGR450B source unit installation (upper dash mount)
- Remove the trim plate from the front panel of the source unit, to access the four screw mounting holes.
-
Drill four screw holes on the back side of the adaptable mount panel for fastening of MGR450B source unit. Refer to the "Adaptable Mount Panel" image on page 2.
-
Fix the source unit by using the supplied upper dash mount panel, adaptable mount panel and four supplied bolts and flange threading nuts, finally fixing with the U-shaped bracket of MGR450B source unit and two supplied rubber feet.
IMPORTANT! When threading the flange nut on the bolt, make sure the wide flat face of the nut points inward (toward the metal plate) to allow locking function.
For the MGR450B installation, the supplied metal brace plate, lower dash mount panel and screws are no need.

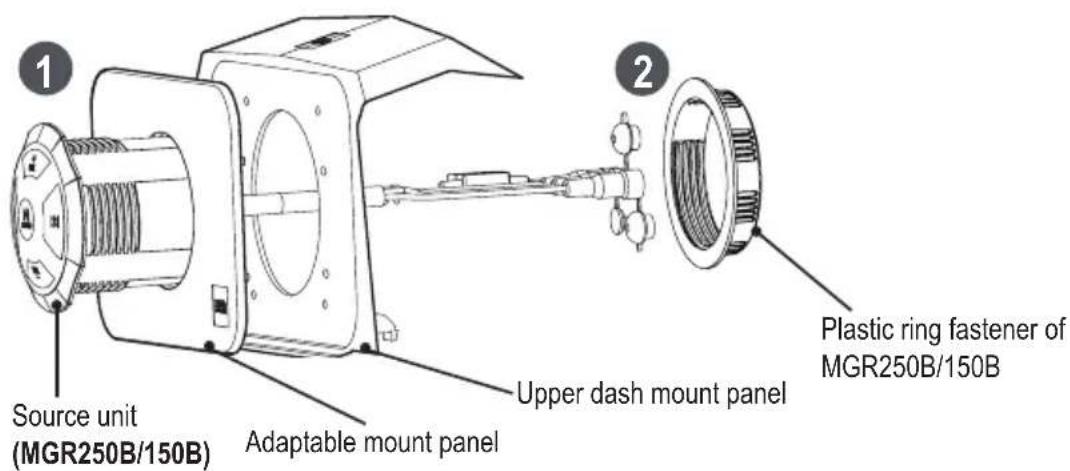
MGR250B/150B source unit installation (upper dash mount)
- Fix the source unit by using the supplied upper dash mount, adaptable mount panel, and the plastic ring fastener of MGR250B/150B source unit.
For this source unit installation, the supplied metal brace plate, lower dash mount panel and bolts/nuts/screws/rubber feet are no need.
c) Final assembly (upper dash mount)
After your source unit is fastened to the upper dash mount panel, secure the upper dash mount panel in the place where the previous upper dash pocket sits by using the push pins, and replace the trim plate.
2014-2018 RZR Lower Dash Mount Installation
The lower dash mount is applicable to the 2014-2018 Polaris RZR models.
The installation kit is compatible with the following marine gauge source units:
MGV550B, MGV520B, MGR450B, MGR350B, MGR250B and MRG150B.
a) Before you start (lower dash mount)
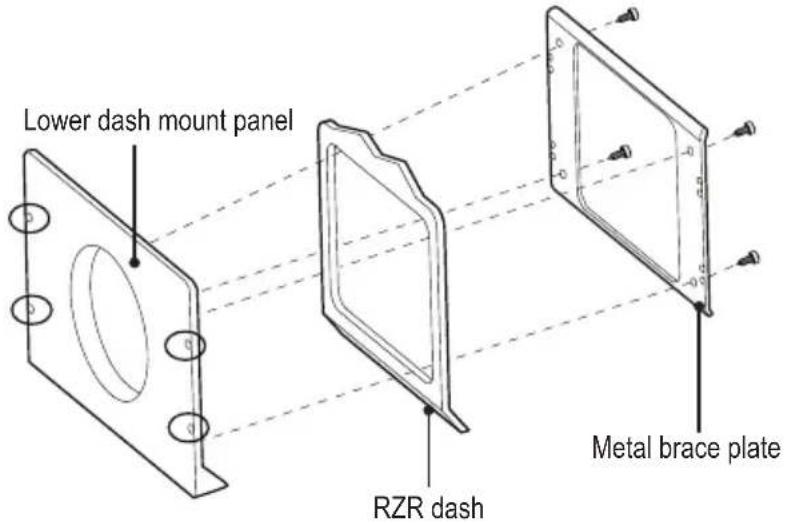
- Locate the lower dash pocket and remove the lower dash pocket panel from your RZR. Some dash disassembly may be required.
- Find the lower dash mount panel from the supplied mounting kit. You need to drill four screw holes through the lower dash mount panel. To drill holes, locate the four hole marks indicated for your source unit model number on the back side of the lower dash mount panel.

Drill four holes indicated for the corresponding source units. The drilled holes are used to fasten your source unit.
MGV550B
MGV520B
MGR450B,
MGR250B/150B.
Lower dash mount panel
- Fasten both the lower dash mount panel and the metal brace plate to the lower dash pocket panel of your RZR, using the supplied four screws. Make sure the three pieces are correctly orientated before fastening.
Tip:
The drilled holes on the lower dash mount panel shown in the illustration is for reference.
The location of the drilled holes varies according to different source units.
The drilled holes are used to fasten the source unit only.
b) Lower install kit assembly
Depending on a BOSS Audio Systems source unit you have, installation method and kit may vary. Follow the guideline below that applies to your source unit.
MGV550B source unit installation (lower dash mount)
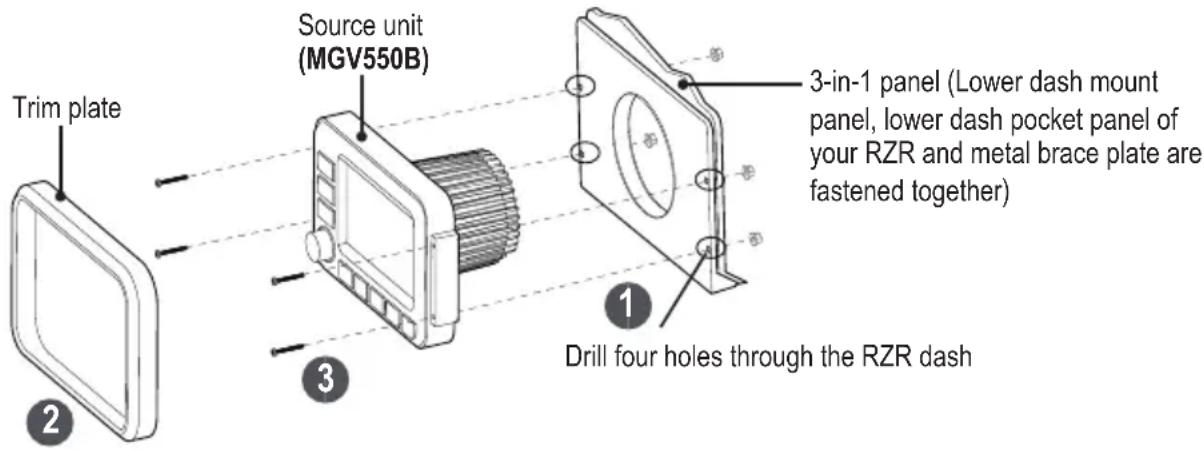
- Fasten both the lower dash mount panel and the metal brace plate to the lower dash pocket panel of your RZR as 3-in-1 panel. Refer to "Before you start (lower dash mount)" on page 5.
Then use a proper tool to drill four holes through the lower dash pocket panel of your RZR, by using the four drilled holes which are previously drilled on the lower dash mount panel (Refer to the "Lower dash mount panel" image on page 5). The holes are used for screwing fastening.
- Remove the trim plate from the front panel of the source unit, to access the four screw mounting holes.
- Fix MGV550B source unit to the 3-in-1 panel by using four supplied bolts and flange threading nuts. IMPORTANT! When threading the flange nut on the bolt, make sure the wide flat face of the nut points inward (toward the metal plate) to allow locking function.
For the MGV550B installation, the supplied adaptable mount panel and upper dash mount panel / rubber feet are no need.
MGV520B source unit installation (lower dash mount)
- Fasten both the lower dash mount panel and the metal brace plate to the lower dash pocket panel of your RZR as 3-in-1 panel. Refer to "Before you start (lower dash mount)" on page 5.
Then use a proper tool to drill four holes through the lower dash pocket panel of your RZR, by using the four drilled holes which are previously drilled on the lower dash mount panel (Refer to the "Lower dash mount panel" image on page 5). The holes are used for screw fastening.
- Remove the trim plate from the front panel of the source unit, to access the four screw mounting holes.
- Fix MGV520B source unit to the 3-in-1 panel by using four supplied bolts and flange threading nuts.
IMPORTANT! When threading the flange nut on the bolt, make sure the wide flat face of the nut points inward (toward the metal plate) to allow locking function.
For this source unit installation, the supplied adaptable mount panel and upper dash mount panel/rubber feet are no need.

MGR450B source unit installation (lower dash mount)
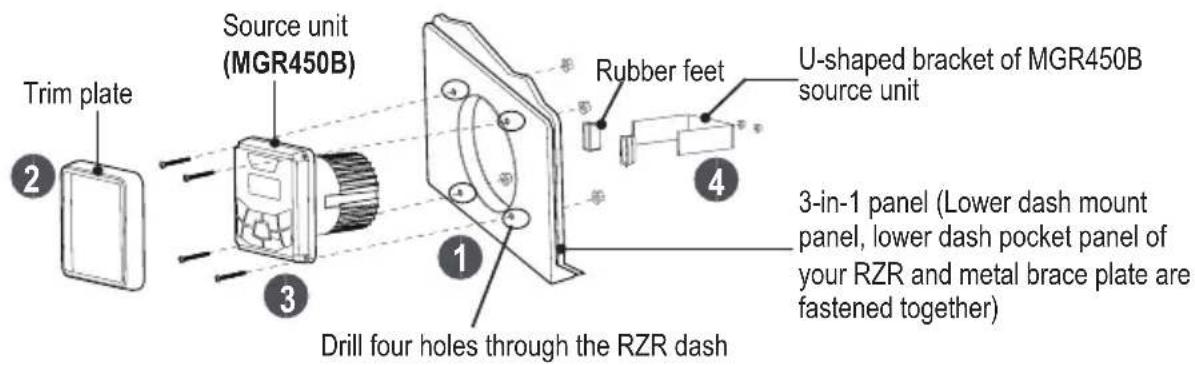
- Fasten both the lower dash mount panel and the metal brace plate to the lower dash pocket panel of your RZR as 3-in-1 panel. Refer to "Before you start (lower dash mount)" on page 5.
Then use a proper tool to drill four holes through the lower dash pocket panel of your RZR, by using the four drilled holes which are previously drilled on the lower dash mount panel (Refer to the "Lower dash mount panel" image on page 5). The holes are used for screwing fastening. - Remove the trim plate from the front panel of the source unit, to access the four screw mounting holes.
- Attach MGR450B source unit to the 3-in-1 panel by using four supplied bolts, flange threading nuts, finally fix with the U-shaped bracket of MGR450B source unit and two supplied rubber feet.
IMPORTANT! When threading the flange nut on the bolt, make sure the wide flat face of the nut points inward (toward the metal plate) to allow locking function.
For the MGR450B installation, the supplied adaptable mount panel and upper dash mount panel are no need.
MGR250B/150B source unit installation (lower dash mount)
- Make sure the four holes on the lower dash mount panel have been drilled (Refer to the "Lower dash mount panel" image on page 5).
Then fasten both the lower dash mount panel and the metal brace plate to the lower dash pocket panel of your RZR as 3-in-1 panel. Refer to "Before you start (lower dash mount)" on page 5.
- Fix MGR250B/150B source unit to the 3-in-1 panel by using the supplied adaptable mount panel, and the plastic ring fastener of MGR250B/150B source unit.
Make sure the adaptable mount panel correctly fits by aligning its tabs (on the back side) with the four drilled holes on the lower dash mount panel.
For the MGR250B/150B installation, the supplied upper dash mount panel and bolts and nuts/rubber feet are no need.

c) Final assembly (lower dash mount)
After your source unit is fixed, secure it in the place where the lower dash pocket sits and replace the trim plate.
BOSS®
AUDIO SYSTEMS

natural_image
Abstract black and white striped pattern with no text or symbolsBOSS Audio Systems
3451 Lunar Court · Oxnard, CA 93030
www.bossaudio.com
805-751-4853 Customer Service
Tech Support: www.bossaudio.com/support


- BPRZRD
- INSTALLATION MANUAL
- POLARIS RZR RECEIVER INSTALLATION KIT
- FITS GAUGE RADIO
- Congratulations on your purchase of a 300M RSPORTS product.
- Table of Contents
- Introduction
- Package Contents
- Specifications
- Compatibility
- Materials
- 2019+ RZR XP1000 Upper Dash Mount Installation
- a) Before you start (upper dash mount)
- b) Upper install kit assembly
- MGV550B source unit installation (upper dash mount)
- MGV520B source unit installation (upper dash mount)
- MGR450B source unit installation (upper dash mount)
- MGR250B/150B source unit installation (upper dash mount)
- c) Final assembly (upper dash mount)
- 2014-2018 RZR Lower Dash Mount Installation
- a) Before you start (lower dash mount)
- Lower dash mount panel
- Tip:
- b) Lower install kit assembly
- MGV550B source unit installation (lower dash mount)
- MGV520B source unit installation (lower dash mount)
- MGR450B source unit installation (lower dash mount)
- MGR250B/150B source unit installation (lower dash mount)
- c) Final assembly (lower dash mount)
- BOSS®
- AUDIO SYSTEMS
Brand : BOSS
Model : BPRZRD
Category : Car Radio