MX6 - Camera Curve - Free user manual and instructions
Find the device manual for free MX6 Curve in PDF.

User questions about MX6 Curve
0 question about this device. Answer the ones you know or ask your own.
Ask a new question about this device
Download the instructions for your Camera in PDF format for free! Find your manual MX6 - Curve and take your electronic device back in hand. On this page are published all the documents necessary for the use of your device. MX6 by Curve.
USER MANUAL MX6 Curve
© 2012 - 2015 Maka GPS Technologies Group including Maka Corporation USA Inc. and its subsidiaries. All rights reserved. Curve is a trademark of Maka GPS Technologies Group including Maka Corporation USA Inc. in one or more countries. All trademarks mentioned belong to their owners, third party brands, product names, trade names, corporate names. And company names mentioned may be trademarks of their respective owners or registered trademarks of other companies and are used for purpose of explanation and to owner's benefit, without implying a violation of copyright law. The information in this manual is subject to change without notice.
Getting Started
Overview of your MX6 HD Digital Video Roadcorder™
Annex A
MX6 HD Digital Video Roadcorder™
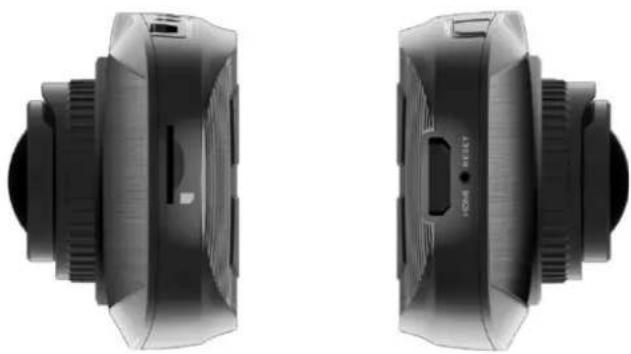
SIDE VIEW
text_image
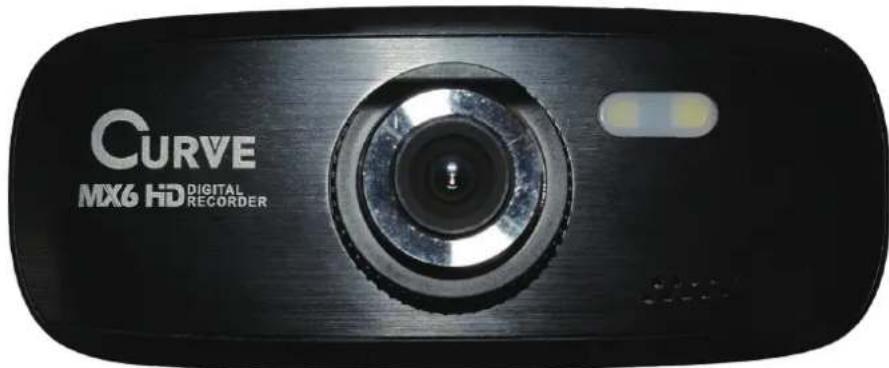
CURVE MX6 HD DIGITAL RECORDERMX6 HD Digital Video Roadcorder™ FRONT VIEW
natural_image
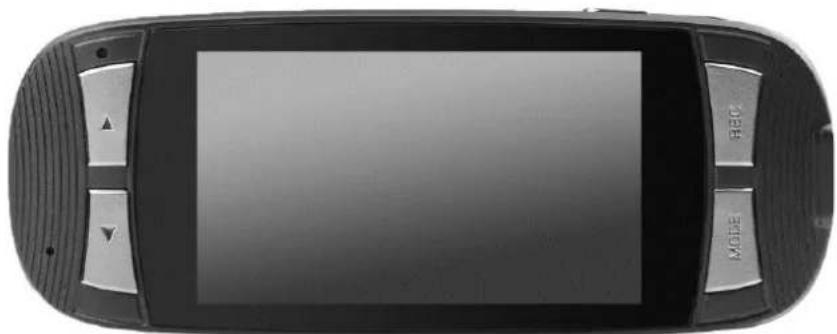
Top-down view of a black handheld device with a screen and control buttons (no visible text or symbols)MX6 HD Digital Video Roadcorder™ BACK VIEW
Getting Started
Understanding Roadcorder™ and Buttons
Annex B
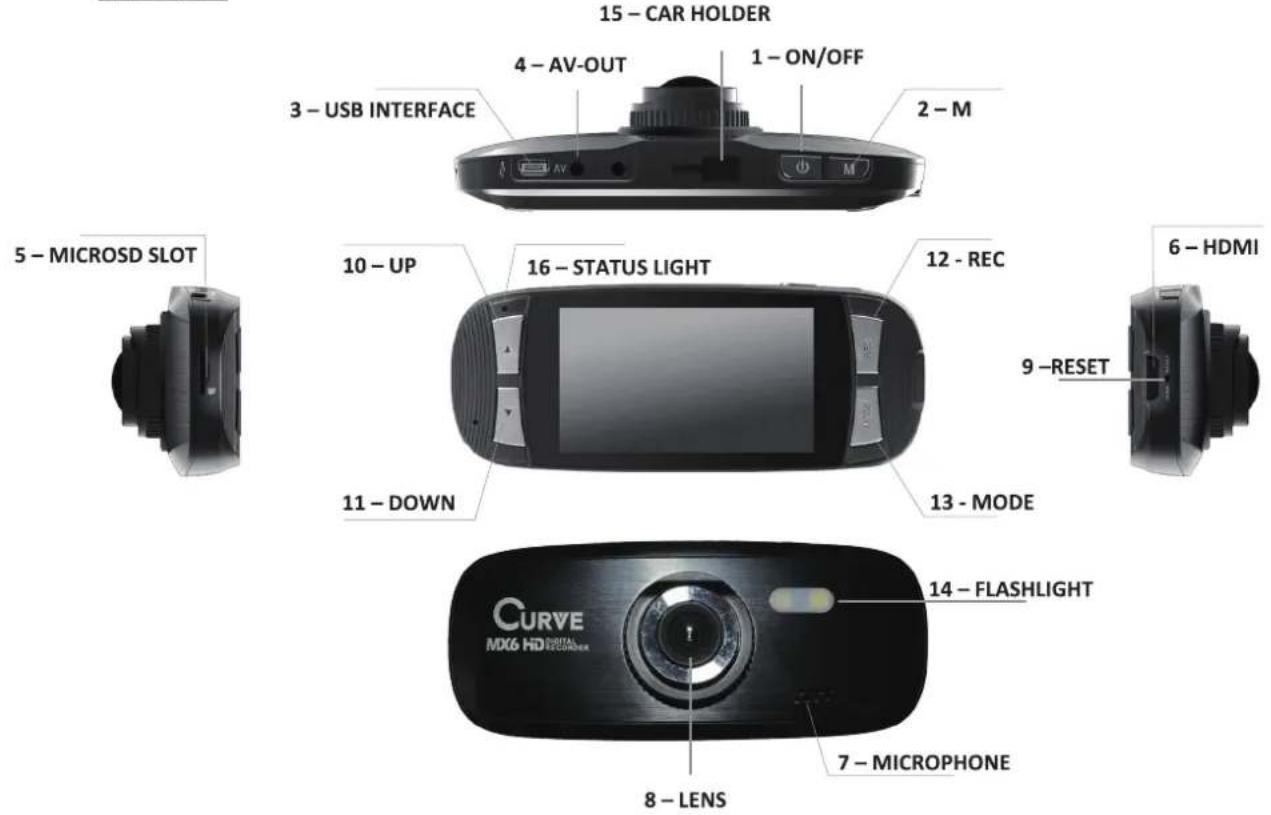
text_image
15 - CAR HOLDER 4 - AV-OUT 1 - ON/OFF 3 - USB INTERFACE 2 - M AV M 5 - MICROSD SLOT 10 - UP 16 - STATUS LIGHT 12 - REC 6 - HDMI 9 -RESET 13 - MODE 11 - DOWN 14 - FLASHLIGHT 8 - LENS 7 - MICROPHONE CURVE MD6 HD DIGITAL EXTERIORNumbered objects in Annex B described in the following table
| # | MX6 HD DigitalRoadcorderTM Feature | Description |
| 1 | ON/OFF Button | Hold on to the button for 3 seconds to turn on or off the device. |
| 2 | Menu Button | Press to access a menu to configure features and Preferences.Under Video Mode - such as Resolution, Loop Recording, WDR, Exposure, Motion Detection, Record Audio, Date Stamp, G-sensor.Under Camera Mode – such as Capture Mode, Resolution, Sequence, Quality, Sharpness, White Balance, Colour, ISO, Exposure, Anti-Shaking, Quick Review, Date Stamp |
Getting Started
Understanding Roadcorder™ and Buttons
| # | MX6 HD Digital RoadcorderTM Feature | Description |
| 3 USB Interface | Charge or connect your device to your PC for file transfer. | |
| 4 AV-Output | Allow you to connect your DVR to another device that supports AV-Input. For instance, you will be able to view your video footages on a TV (supports AV-Input). | |
| 5 MicroSD/ TF Slot | Slot in your microSD card here. Support up to max. 32GB microSD card. | |
| 6 HDMI Port | Allow you to connect your device to a TV that has a HDMI port. You will be able to display High definition video footages on the TV. | |
| 7 Microphone | Record and play sound. | |
| 8 Camera Lens | CMOS Sensor Lens | |
| 9 Reset Button | Insert the end of a small paper clip or stylus into the hole. This will allow you to restart the system when device has no response. | |
| 10 & 11 | Navigation Buttons – Up & Down arrows | Press any arrow keys to go up or down through the items shown on the device screen.Under Video Mode – allow you to zoom in and out during/ before recordingUnder Camera Mode – allow you to zoom in and out before taking a photoUnder Playback Mode – scroll up and down for your respective photos or videos |
| 12 Record Button | With MX6 HD Digital RoadcorderTM, you can take both still photos and videos. It also works as a “OK” button in setting menu.Under Video Mode – press button to record videoUnder Camera Mode – press button one time to take a still pictureUnder Playback Mode – use this button to select the video you wish to view | |
Getting Started
Understanding Roadcorder™ and Buttons
| # | MX6 HD DigitalRoadcorderTM Feature | Description |
| 13 | Mode Button | Toggle between Video Mode/Camera Mode/Playback Mode.It is also a shortcut key to mute your microphone. Hold on to Mode button for 3 seconds to mute or unmute feature.Note: When the device is muted, the microphone icon will be crossed out with a red line. |
| 14 | Flashlight | An LED flash on the back gives you extra light when you need it. |
| 15 | Car Holder | Connect your window suction to MX6 HD Digital RoadcorderTM. |
| 16 | Status Light | Indicate power status.When lit:Blue: Power OFF while battery is charging.Note: Once battery is fully charged, status light will disappear.Red (steady): Power ON while battery is not charging.Pink (steady): Power ON while battery is charging.Note: Pink status light will be lit when you sync your files to your computer via USB. Please be reminded that charging of battery via computer is not possible.Red (flashing): Recording Mode ON while battery is not charging.Red & Blue (flashing): Recording Mode ON while battery is charging. |
Getting Started
Understanding Status Icons
Status icon
Icons display on the screen give information about MX6 Roadcorder™
 | Video Recording Mode |
 | Camera Mode |
 | Playback Mode |
 | Motion Detector Mode |
 | Loop Recording: 2 minutes time frame |
 | Loop Recording: 3 minutes time frame |
 | Loop Recording: 5 minutes time frame |
 | Battery Status: Charging |
 | Battery Status: Fully Charged |
 | Battery Status: Low |
 | MicroSD Card/ TF Card: Card has been inserted |
 | G sensor |
 | Microphone: On |
 | Microphone: Mute |
 | Playback Mode: Rewind |
 | Playback Mode: Play |
 | Playback Mode: Fast Forward |
 | Playback Mode: Pause |
 | File locked: Click on [M] to activate lock file during recording |
 | Video Resolution available in 1080FHD/ 720P/ WVGA/ VGA |
 | Exposure status: +0.0 |
 | Photo Quality: Fine/ Normal/ Economy |
Getting Started
Installation of your Roadcorder™
Install the window mount
- Place the window mount into the car holder.
- Slide the window mount to the left to tighten the grip.
- Once window mount is fixed onto the car holder, rotate the window suction according to your display preference.
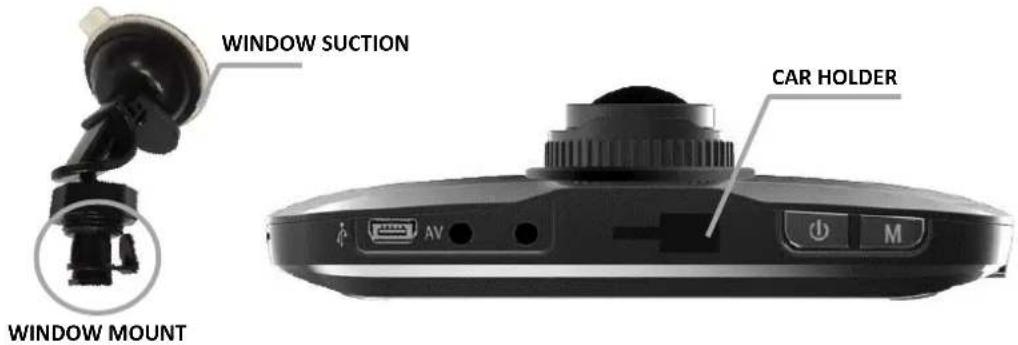
text_image
WINDOW SUCTION WINDOW MOUNT CAR HOLDERBattery
MX6 Roadcorder™ has an internal, lithium-ion rechargeable battery.
Charge the battery: Connect MX6 Roadcorder™ to cigarette lighter jack in your car using the included car charger. It is recommended to plug in the car charger at all times to prevent any missed of recording opportunity during the accident or any fatal incident.
Replace the battery: The battery isn't user replaceable; it can be replaced only by Maka Corporation USA Inc.
※ CAUTION: To protect your device against sudden surges in current, we highly recommend you to connect the car charger only after the car engine has been started.
Insert MicroSD Card or TF card
Load the Micro SD/TF card to start recording your video or take still images. We recommend a minimum capacity of 4GB to maximum up to 32GB. Use of MicroSDHC is compatible and recommended.
Please see Annex B, point 5 on page 3 for reference.
Getting Started
Operation of your Roadcorder™
Power On/ Off
In power off status, press the power switch once to turn on the device, a welcome message will be displayed on screen.
In power on status, press the power switch once to turn off the device, a goodbye message will be displayed on screen.
MX6 Roadcorder™ will be switch on and off automatically if you have permanently connected it to the car charger.

text_image
CURVE Good Bye Have a nice day! Screen Shutting Down
text_image
CURVE MX Series HD Digital Recorder DRIVE SAFE WITH EYEWITNESSGetting Started
Operation of your Roadcorder™ - Camera Setup
Camera
With MX6 Roadcorder™, you can take both still photos and videos.
Camera Setup
Date/ Time
Set your date and time of your Roadcorder™ here.
- Click on [M] twice
- Use [Up] and [Down] button to scroll for Date/Time function Select [Date/Time] by clicking on [REC] button
- Under Year - Click on [Up] and [Down] button to adjust the year of your choice
- Click on [REC] button to confirm your choice
- Under Month - Click on [Up] and [Down] button to adjust the year of your choice
- Click on [REC] button to confirm your choice
- Under Day - Click on [Up] and [Down] button to adjust the year of your choice
- Click on [REC] button to confirm your choice
- Under Hour - Click on [Up] and [Down] button to adjust the year of your choice
- Click on [REC] button to confirm your choice
- Under Minute - Click on [Up] and [Down] button to adjust the year of your choice
- Click on [REC] button to confirm your choice
- Under Second - Click on [Up] and [Down] button to adjust the year of your choice
- Click on [REC] button to confirm your choice
- Under display format - Click on [Up] and [Down] button to choose [DD/MM/YY], [MM/DD/YY], or [YY/MM/DD]
- Click on [REC] button to confirm your choice
Beep Sounds
You may disable the sounds your Roadcorder™ here.
- Click on [M] twice
- Use [Up] and [Down] button to scroll for Beep Sounds function
- Select [Beep Sounds] by clicking on [REC] button
- Select [On] or [Off]
- Click on [REC] button to confirm your choice
Getting Started
Operation of your Roadcorder™ - Camera Setup
Language
Choose your prefer language.
- Click on [M] twice
- Use [Up] and [Down] button to scroll for Language function
- Select [Language] by clicking on [REC] button
- Click on [Up] and [Down] button to select your preference
- Click on [REC] button to confirm your choice
TV Mode
The two most common TV broadcast standards used are NTSC and PAL. Choose your output format when you hook your MX6 Roadcorder™ to your local TV.
- Click on [M] twice
- Use [Up] and [Down] button to scroll for TV Mode function
- Select [TV Mode] by clicking on [REC] button
- Click on [Up] and [Down] button to select your preference
- Click on [REC] button to confirm your choice
Frequency
Please set according to the local power supply respectively; 50Hz or 60Hz.
- Click on [M] twice
- Use [Up] and [Down] button to scroll for Frequency function
- Select [Frequency] by clicking on [REC] button
- Click on [Up] and [Down] button to select your preference
- Click on [REC] button to confirm your choice
Screen Saver
You may set your Roadcorder™ Screen Display to automatically shut off within certain timing set.
- Click on [M] twice
- Use [Up] and [Down] button to scroll for Screen Saver function
- Select [Screen Saver] by clicking on [REC] button
- Click on [Up] and [Down] button to select your preference
- Click on [REC] button to confirm your choice
Getting Started
Operation of your Roadcorder™ - Camera Setup
IR LED
An LED flash option is available on the back, gives you extra light when you need it.
- Click on [M] twice
- Use [Up] and [Down] button to scroll for IR LED function
- Select [IR LED] by clicking on [REC] button
- Click on [Up] and [Down] button to select your preference
- Click on [REC] button to confirm your choice
Format
This is a shortcut to delete all your video and photo in your SD card without having the trouble to delete one by one.
- Click on [M] twice
- Use [Up] and [Down] button to scroll for Format function
- Select [Format] by clicking on [REC] button
- Click on [REC] again when you see [SD Card]
- Use [Up] and [Down] button to scroll [OK] or [Cancel] when you see "All data will be deleted"
- Click on [REC] again to confirm your selection
Note: You will not be able to recover your video or photo once you format the SD card.
Default Setting
Setting will be change to factory setting once you have selected this option.
- Click on [M] twice
- Use [Up] and [Down] button to scroll for Default Setting function
- Select [Default Setting] by clicking on [REC] button
- Use [Up] and [Down] button to select [OK] or [Cancel]
- Click on [REC] again to confirm your selection
Getting Started
Operation of your Roadcorder™ - Take A Video
Take a Video
Enter Video Mode
- Click on [MODE] button till you see icon is displayed on the left hand side of the screen.
- Click on [Up] and [Down] button to zoom in or out
- Click on [REC] button to start recording. There will be a red dot blinking on the display
- Click on [REC] button again to stop recording.
Emergency File Lock
This function allows you to lock your file on your microSD card immediately. This will prevent the file from overwriting by the new files.
During Recording,
- Click on [M] button when video is recording
- A locked key icon will be showed on your screen.
Shortcut button to Mute/ Unmute Microphone
During Recording,
- Hold on [MODE] button for 2 seconds to mute
- Hold on [MODE] button for 2 seconds again to unmute
Video Settings
Resolution
For the best recording results, always set resolution to 1080FHD
- Click on [M]
- Select [Resolution] by clicking on [REC] button
- Click on [Up] and [Down] button to select [1080FHD]
- Click on [REC] button to confirm
Getting Started
Operation of your Roadcorder™ - Take A Video
Loop Recording
This is a recording process that continues to record at the beginning, erasing the previously recorded video and replacing it with the new ones.
- Click on [M]
- Select [Loop Recording] by clicking on [REC] button
- Click on [Up] and [Down] button to select [1080FHD]
- Click on [REC] button to confirm
Note: We strongly advise you not to off this function. Loop recording is a very useful function when microSD card's memory space is full. This will allows your MX6 Roadcorder™ to continue with the recording by overwriting the old videos even when memory space is full. Highly recommend user to set to a minimum of 3 minutes loop recording.
WDR (Wide dynamic range)
This feature provides clear images even under backlighting, where the intensity of illumination varies a lot—namely when there are very bright and very dark areas simultaneously in the camera's field of view. WDR allows an imaging system to correct for the intense back light surrounding a subject and thus enhances the ability to distinguish features and shapes on the subject.
Exposure
It is the amount of light allowed to fall on each area unit of a photographic medium (photographic film or image sensor) during the process of taking a photograph.
- Click on [M]
- Use [Up] and [Down] button to scroll for Exposure function
- Select [Exposure] by clicking on [REC] button
- Click on [Up] and [Down] button to select your preference
- Click on [REC] button to confirm your choice
Getting Started
Operation of your Roadcorder™ - Take A Video
Motion Detection
This function enables you to use your MX6 Roadcorder™ as a remote surveillance camera with motion detection functionality. It uses the built-in camera to detect movements in the surrounding area using an advanced motion detection algorithm. Camera will auto record If it detects any movement.
- Click on [M]
- Use [Up] and [Down] button to scroll for Motion Detection function
- Select [Motion Detection] by clicking on [REC] button
- Click on [Up] and [Down] button to select your preference
- Click on [REC] button to confirm your choice
Record Audio
- Click on [M]
- Use [Up] and [Down] button to scroll for Record Audio function
- Select [Record Audio] by clicking on [REC] button
- Click on [Up] and [Down] button to select your preference
- Click on [REC] button to confirm your choice
Date Stamp
You may choose to add date/time stamps to your pictures. However, the date/time stamp is not removable. So if you later decide to get rid of it, you can't since the original image is altered.
- Click on [M]
- Use [Up] and [Down] button to scroll for Date Stamp function
- Select [Date Stamp] by clicking on [REC] button
- Click on [Up] and [Down] button to select your [On]
- Click on [REC] button to confirm your choice
Gsensor
This function acts like an accelerometer. It measures the acceleration and gravity forces detected on the camera. At such case during recording, the device will auto do a file lock. We recommend you to set [Low]
- Click on [M]
- Use [Up] and [Down] button to scroll for Gsensor function
- Select [Gsensor] by clicking on [REC] button
- Click on [Up] and [Down] button to select your [Low]
- Click on [REC] button to confirm your choice
Getting Started
Operation of your Roadcorder™ - Take A Photo
Take a Photo
Enter Camera Mode
- Click on [MODE] button till you see 📷 icon is displayed on the left hand side of the screen.
- Click on [Up] and [Down] button to zoom in or out
- Click on [REC] button to take a still image.
Photo Settings
Capture Mode
You may have the options to take a single shot or to activate self-timer function with time frames of 2 seconds, 5 seconds, and 10 seconds.
- Click on [M]
- Select [Capture Mode] by clicking on [REC] button
- Click on [Up] and [Down] button to select your preference
- Click on [REC] button to confirm your choice
Resolution
This combines four different types of resolution for a photo. They are 12M, 10M, 8M, and 5M. For best results, MX6 Roadcorder™ and the subject should be stationary.
- Click on [M]
- Use [Up] and [Down] button to scroll for Resolution function
- Select [Resolution] by clicking on [REC] button
- Click on [Up] and [Down] button to select your preference
- Click on [REC] button to confirm your choice
Here are some good resolution guidelines to consider:
- 5 M: A resolution that offers better image quality for use with craft projects. Also suitable for printing and framing an 11-by-14-inch photo to hang at home
- 8 M: A resolution that's capable of providing attractive 16-by-20-inch prints
• 10 M: Optimal for printing larger (20-by-30-inch) projects, including posters and panoramas
The more you increase photo resolution, the more you'll improve image clarity and detail.
Getting Started
Operation of your Roadcorder™ - Take A Photo
Sequence (Take multiple shots)
- At camera mode, click on [M] button
- Use [Up] and [Down] button to scroll for Sequence function
- Click on [REC] to confirm selection
- Use [Up] and [Down] button to select [On]
- Click on [REC] button to confirm
Note: Once this option is selected, sequence shots of 3 images will be taken when you click on [REC] button. To off this function, select [Off] for Sequence.
Quality
There are 3 types of quality for a photo. They are Fine, Normal and Economy. For best results, MX6 Roadcorder™ and the subject should be stationary.
- Click on [M]
- Use [Up] and [Down] button to scroll for Quality function
- Select [Quality] by clicking on [REC] button
- Click on [Up] and [Down] button to select your preference
- Click on [REC] button to confirm your choice
Here are some guidelines to consider:
• Fine: Give you the best photos, with sharper details at a larger file size.
- Normal: Has the medium quality, with a matching reduction in the file size.
- Economy: Only good for emailing, not printing, and uses the smallest file size.
Sharpness
There are 3 types of sharpness for a photo. They are Strong, Normal and Soft.
- Click on [M]
- Use [Up] and [Down] button to scroll for Sharpness function
- Select [Sharpness] by clicking on [REC] button
- Click on [Up] and [Down] button to select your preference
- Click on [REC] button to confirm your choice
Getting Started
Operation of your Roadcorder™ - Take A Photo
White Balance
This is a camera setting that adjusts for lighting in order to make white objects appear white in photos. There are 5 types of white balance setting preloaded in the camera. You may choose Auto, Daylight, Cloudy, Tungsten and Fluorescent.
- Click on [M]
- Use [Up] and [Down] button to scroll for White Balance function
- Select [White Balance] by clicking on [REC] button
- Click on [Up] and [Down] button to select your preference
- Click on [REC] button to confirm your choice
Colour
This function has the ability to take pictures in colour, black and white, as well as sepia.
- Click on [M]
- Use [Up] and [Down] button to scroll for Colour function
- Select [Colour] by clicking on [REC] button
- Click on [Up] and [Down] button to select your preference
- Click on [REC] button to confirm your choice
ISO
This function measures the sensitivity of the image sensor. The same principles apply as in film photography – the lower the number the less sensitive your camera is to light and the finer the grain. Higher ISO settings are generally used in darker situations to get faster shutter speeds (for example an indoor sports event when you want to freeze the action in lower light) – however the cost is noisier shots.
- Click on [M]
- Use [Up] and [Down] button to scroll for ISO function
- Select [ISO] by clicking on [REC] button
- Click on [Up] and [Down] button to select your preference
- Click on [REC] button to confirm your choice
Getting Started
Operation of your Roadcorder™ - Take A Photo
Exposure
It is the amount of light allowed to fall on each area unit of a photographic medium (photographic film or image sensor) during the process of taking a photograph.
- Click on [M]
- Use [Up] and [Down] button to scroll for Exposure function
- Select [Exposure] by clicking on [REC] button
- Click on [Up] and [Down] button to select your preference
- Click on [REC] button to confirm your choice
Anti-Shaking
It is a feature that allows users to shoot images at slow shutter speeds without causing blurring when shooting hand held. You are advised to turn this option on at all times to capture the best quality photo.
- Click on [M]
- Use [Up] and [Down] button to scroll for Anti-Shaking function
- Select [Anti-Shaking] by clicking on [REC] button
- Click on [Up] and [Down] button to select your [On]
- Click on [REC] button to confirm your choice
Quick Review
This will allow you to have a preview of your photo taken. You can set timer from 2 to 5 seconds.
- Click on [M]
- Use [Up] and [Down] button to scroll for Quick Review function
- Select [Quick Review] by clicking on [REC] button
- Click on [Up] and [Down] button to select your [Off], [2seconds] or [5seconds]
- Click on [REC] button to confirm your choice
Date Stamp
You may choose to add date/time stamps to your pictures. However, the date/time stamp is not removable. So if you later decide to get rid of it, you can't since the original image is altered.
- Click on [M]
- Use [Up] and [Down] button to scroll for Date Stamp function
- Select [Date Stamp] by clicking on [REC] button
- Click on [Up] and [Down] button to select your [On]
- Click on [REC] button to confirm your choice
Getting Started
Operation of your Roadcorder™ - Playback
Video Playback
Enter Playback Mode
- Click on [MODE] button till you see icon is displayed on the left hand side of the screen.
- Click on [Up] and [Down] button to scroll for next photo/video
- Click on [REC] button to take a still image.
Playback a Video
- Click on [MODE] button till you see icon is displayed on the left hand side of the screen.
- Click on [Up] and [Down] button to scroll for preferred video
- Click on [REC] button to confirm playback
Rewind/ Fast forward Video during a Playback
During the playback
To rewind
Click on [Up] button one time, you will see [-2X] on the screen
To fast forward
Click on [Down] button one time, you will see [2X] on the screen
Delete Files
During the playback
- Click on [M] twice
- Use [Up] and [Down] button to scroll for Delete function
- Select [Delete] by clicking on [REC] button
- Click on [Up] and [Down] button to select your [Delete Current] or [Delete All]
- Click on [REC] button to confirm your choice
- Click on [Up] and [Down] button to select your [Cancel] or [Ok]
- Click on [REC] button to confirm your choice
Protect (File Lock)
During the playback
- Click on [M] twice
- Use [Up] and [Down] button to scroll for Protect function
- Select [Protect] by clicking on [REC] button
- Click on [Up] and [Down] button to select your [Lock Current]/ [Unlock Current]/ [Lock All]/ [Unlock All]
- Click on [REC] button to confirm your choice
Getting Started
Operation of your Roadcorder™ - Playback
Slide Show
During the playback
- Click on [M] twice
- Use [Up] and [Down] button to scroll for Slide Show function
- Select [Slide Show] by clicking on [REC] button
- Click on [Up] and [Down] button to select your [2 Seconds]/[5 Seconds]/[8 Seconds]
- Click on [REC] button to confirm your choice
Specifications
| Chipset | NT96650 |
| Storage | DDR3 128M |
| Video Resolution | 1080HFD 1920×1080 /1080P 1440×1080 /720P 1280×720/ WVGA 848×480/VGA 640×480/QVGA 320×240 |
| File Format | Image: JPGVideo : MOV |
| Power-off File Recovery Function | Support |
| Motion Detection Support | |
| Date time mark Support | |
| Memory Card | Support up to 32G MicroSD/ TF Card |
| Language System | English/French/ Spanish/ Portuguese/ German/Italian/ Simplified Chinese/ Traditional Chinese/Russian/ Japanese |
| HDMI | Support |
| AV-OUT Support | |
| TV Standard | NTSC/PAL |
| USB | Support |
| Audio Recording | Support |
General Troubleshooting
| Question Reason Solution | ||
| The captured image is not stored | 1. MicroSD card might be full.2. Image is not saved before the power outage. | Make sure to stop recording before shutting down. |
| All buttons are invalid | Procedural error or faulty operation | Press RESET button to restart the DVR. |
| Device cannot be turn on | Device might be low in battery. | Charge the Battery. |
| Screen Auto power-off | 1. Screen Saver function is enabled.2. Low Battery. | 1. Click on [M] twice to the setup page and change [Screen Saver] to off.2. Charge the battery |
| Unable to take pictures or record videos | MicroSD card might be full. | Check your microSD card's memory space. Delete files if required. |
| Auto stop recording in video mode | Use a compatible SDHC microSD card for HD video recording. | Get a microSD card that has minimum of Class 10 speed. |
| Encounter "file error" when trying to playback pictures or videos | MicroSD card might be corrupted. There bad sectors in the card. | Reformat the microSD card. |
| No image is displayed on a high-definition TV screen | 1. Cable plug might not be plugged in properly.2. Wrong TV Input mode | 1. Ensure AV/ HDMI cable is plug into the TV properly.2. Refer to the back panel of your TV to track the correct TV input. Make sure you have selected the correct input. |
| Hazy Images | Lens might be dirty. | Check if there are fingerprints or dust on the lens. Clean it with a micro fabric cloth if necessary. |
| Supply light cannot be turn on | Device might be low in battery. Supply light will not be able to on when power is insufficient. | Charge the Battery. |
| There are horizontal stripes interference on the image | This could be due to wrong light frequency setting. | Please set according to the local power supply respectively; 50Hz or 60Hz. For SG/MY: 50hz |