351PCH19 - Cooker Cooking Performance Group - Free user manual and instructions
Find the device manual for free 351PCH19 Cooking Performance Group in PDF.

User questions about 351PCH19 Cooking Performance Group
0 question about this device. Answer the ones you know or ask your own.
Ask a new question about this device
Download the instructions for your Cooker in PDF format for free! Find your manual 351PCH19 - Cooking Performance Group and take your electronic device back in hand. On this page are published all the documents necessary for the use of your device. 351PCH19 by Cooking Performance Group.
USER MANUAL 351PCH19 Cooking Performance Group
natural_image
Exterior view of a stainless steel industrial machine (no visible text or symbols)351CHSP1, 351CHSP2, 351CHCT1A, 351CHUC1A, 351CHUC1B
REVISED 1/2023
User Manual
Congratulations on your purchase of Cooking Performance Group commercial cooking equipment! At Cooking Performance Group, we take pride in the design, innovation, and quality of our products. To ensure optimal performance, we have outlined the following instructions and guidelines in this manual carefully for your review. Cooking Performance Group declines any responsibility in the event users do not follow the instructions or guidelines stated here.
Contents
Product Overview....2
Safety Precautions....3
Specifications 3
Stacking Instructions....4
Startup 5-9
Operating Instructions....10-13
Cleaning & Maintenance 14
Troubleshooting 15
Product Overview
CPG SlowPro Cook & Hold Ovens are designed and perfected for cooking at a lower temperature. The principles of Low Temperature Cooking and Holding can be summarized into several objectives:
- Increased product yields
- Increased profits from increased yields
- Increased moisture retention
- Increased tenderization
• Consistency of doneness
When the CPG SlowPro Cook & Hold Oven finishes the cooking cycle, it automatically switches to the hold cycle. Throughout this manual we recommend holding temperatures such as 140 degrees Fahrenheit (60 degrees Celsius). This temperature refers to the oven's hold temperature setting and not to the internal temperature of the food being roasted. The internal product temperature will run below the hold temperature. (For example: roast beef held at 140 degrees Fahrenheit will be about 130 degrees Fahrenheit internally or medium rare.) All meat products contain enzymes. These enzymes perform the important function of tenderizing the meat when they reach temperatures of 100 degrees Fahrenheit (38 degrees Celsius) to 140 degrees Fahrenheit (60 degrees Celsius). As these enzymes are heated, they break down the connective tissue that is inherent in all red meat products. The hold cycle allows this natural tenderization process to proceed in an orderly manner. As long as the internal temperature of the meat does not exceed 140 degrees Fahrenheit, the process will continue. Once the temperature reaches 140 degrees Fahrenheit the process will stop, because the enzymes will be deactivated. This tenderization process makes the meat more flavorful. It is similar to aging meat before it is sold.
The longer the hold, the higher degree of tenderization.
NOTE: Each hour of holding is equal to one day of aging.

User Manual
Safety Precautions
CAUTION:
- Failure to comply with the following operation instructions could lead to potential hazards and/or unsafe practice and could result in injury and damage to product and property.
NOTICE:
- Local codes regarding installation vary greatly from one area to another. The National Fire Protection Association, Inc. states in its NFPA96 latest edition that local codes are "Authority Having Jurisdiction" when it comes to requirement for installation of equipment. Therefore, installation should comply with all local codes.
- This product is intended for commercial use only. Not for residential use.
WARNING:
- Do not store or use gasoline or other flammable vapors and liquids in the vicinity of this or any other equipment.
- Improper installation, adjustment, alteration, service, or maintenance could lead to property damage, injury, or death. Read the installation, operating, and maintenance instructions thoroughly before installing or servicing CPG equipment. This manual must be retained for future reference.
- A factory authorized agent must handle all maintenance and repair.
Specifications
| Specs per Oven | CHSP1 351CHP2 351CHCT1A 351CHUC1A 351CHUC1B | ||||
| # of Ovens | 1 2 1 | 1 | 1 | ||
| Exterior Dimensions | 34\frac{5}{8}" \times 27\frac{5}{8}" \times 43" | 18\frac{3}{8}" \times 28\frac{1}{2}" \times 26" | 26\frac{7}{16}" \times 33\frac{7}{8}" \times 31\frac{3}{4}" | ||
| Packing Dimensions | 35\frac{1}{2}" \times 30\frac{3}{4}" \times 49" | 20\frac{5}{8}" \times 30\frac{1}{2}" \times 28\frac{3}{8} | 29" \times 36" \times 37\frac{5}{8}" | ||
| Net Weight | 253.5 lb. | 120.2 lb. | 175.4 lb. | ||
| Shipping Weight | 330.7 lb. | 125.8 lb. | 226.1 lb. | ||
| Plug Type | 60-30P | 5-15P | 5-15P | 6-15P | |
| Phase | 1 | 1 | 1 | ||
| Hertz | 60HZ | 60hz | 60hz | ||
| Voltage | 208V/240V | 120V | 120V | 208V | |
| Wattage | 2250W/3000W | 1200W | 1700W | ||
| Amperage | 10.8A/12.5A | 10A | 14.A | 8.5A | |
| Pan Capacity | 4 | 4 | 8 | ||
| Back Clearance | \frac{3}{8}" | 2\frac{1}{4}" | 2\frac{3}{8}" | ||
| Side Clearance | 2" | \frac{5}{8}" | \frac{5}{8}" | ||
| Top Clearance | 2" | 2" | 2\frac{5}{8}"$ | ||
| # of Cooling Fans | 2 | 1 | 2 | ||
NOTE: Each oven must have its own electrical connection.
User Manual
Stacking Instructions
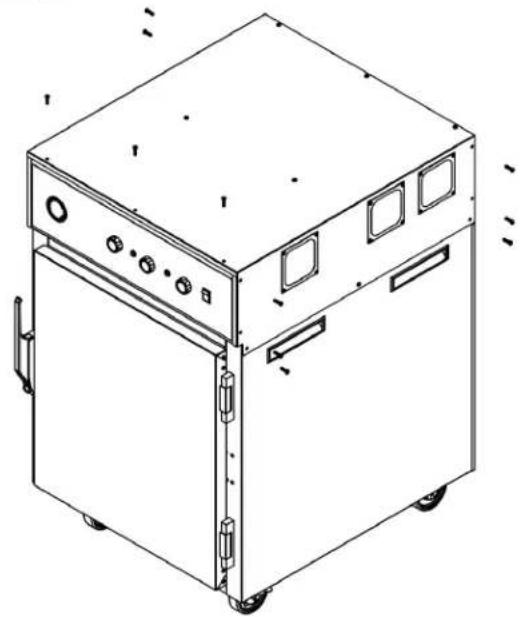
Fig. 1
natural_image
Line drawing of a laboratory or industrial machine with control panel and wheels (no text or symbols)- Remove all (15) Srews as shown on the top, right, and left sides of the bottom unit. (Fig. 1)
Fig. 1
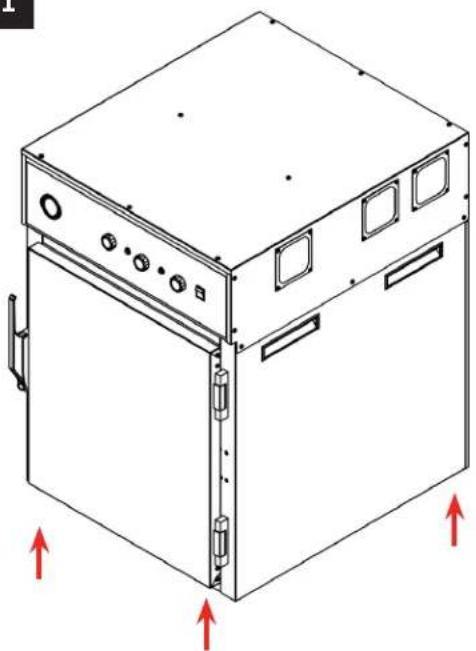
natural_image
Isometric line drawing of a multi-tiered oven or chamber with mounting holes and control panel (no text or symbols)- Remove Casters from the cabinet that will stack on top. (Fig. 2)

text_image
Fig. 3 Front Connector Rear Connector- Install (2) Brackets to bottom of the cabinet that will stack on top with (6) screws. (Fig. 3) NOTE: Pay attention to the direction of the bracket.
Fig. 4
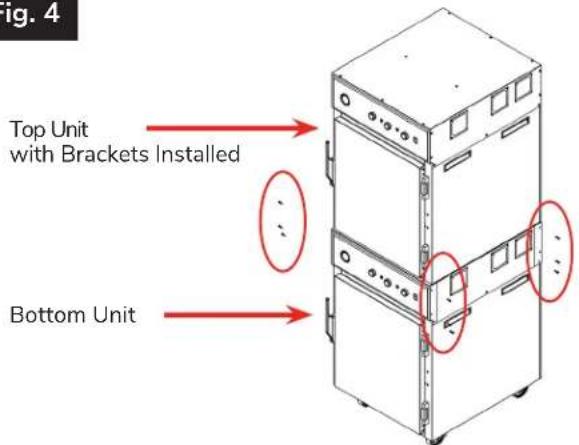
text_image
Fig. 4 Top Unit with Brackets Installed Bottom Unit- Place the Upper Cabinet on top of the Lower Cabinet. (Fig. 4a)
- Secure the stacking brackets onto the bottom unit with the original screws taken from the bottom unit in step 1. (Fig. 4b)
Startup
Installation
- Remove packing materials.
- Peel off vinyl protective film from oven.
- Before installation, please read instructions completely and carefully.
- Prior to use wipe down the unit with a dish soap and water solution. See Cleaning and Maintenance on page 14 for our recommended cleaning agents and further cleaning instructions.
- For 351CHSP2: See Stacking Instructions on page 4.
- Final installation location must be level and maintain the required clearances as seen in the spec table on page 3.
Electrical Connection
- Verify that the electrical connection agrees with the specifications on the rating plate located on the lower back corner of the oven.
- If the supply and equipment requirements do not agree, do not proceed with installation. Contact your Cooking Performance Group Service Department immediately.
- All ovens are equipped with a 6 foot cord and NEMA 6-30P, 5-15P, or 6-15P plug. Please see the spec table on pg. 3 to find the specific plug type for your unit.

text_image
CPG COOKING PERFORMANCE GROUP SlowPro Cook & Hold Oven Intended for commercial use only. ITEM: 351CHSP1 VOLTAGE: 208/240V 60 Hz WATTAGE: 2250/3000W SERIAL #: LISTED C47W833PDT MADE IN CHINAElectrical Codes & Standards
The oven must be installed in accordance with:
• In the United States of America:
1. State & local codes.
2. National Electrical Code, ANSI/NFPA-70 (latest edition).
- In Canada:
- Local codes.
- Canadian Electrical Code, CSA C22.1 (latest edition).
Exhaust System
The unit must be installed in accordance with state and local codes, or in the absence of state and local codes, with the National Electrical Code ANSI/NFPA-70 (latest edition) and Standard for Ventilation Control and Fire Protection of Commercial Cooking Operations NFPA 96 (latest edition). Both are available from The National Fire Protection Association, Batterymarch Park, Quincy, MA 02269. In Canada refer to the Canadian Electrical Code C22.1 Part 1 (latest addition).
User Manual
Startup
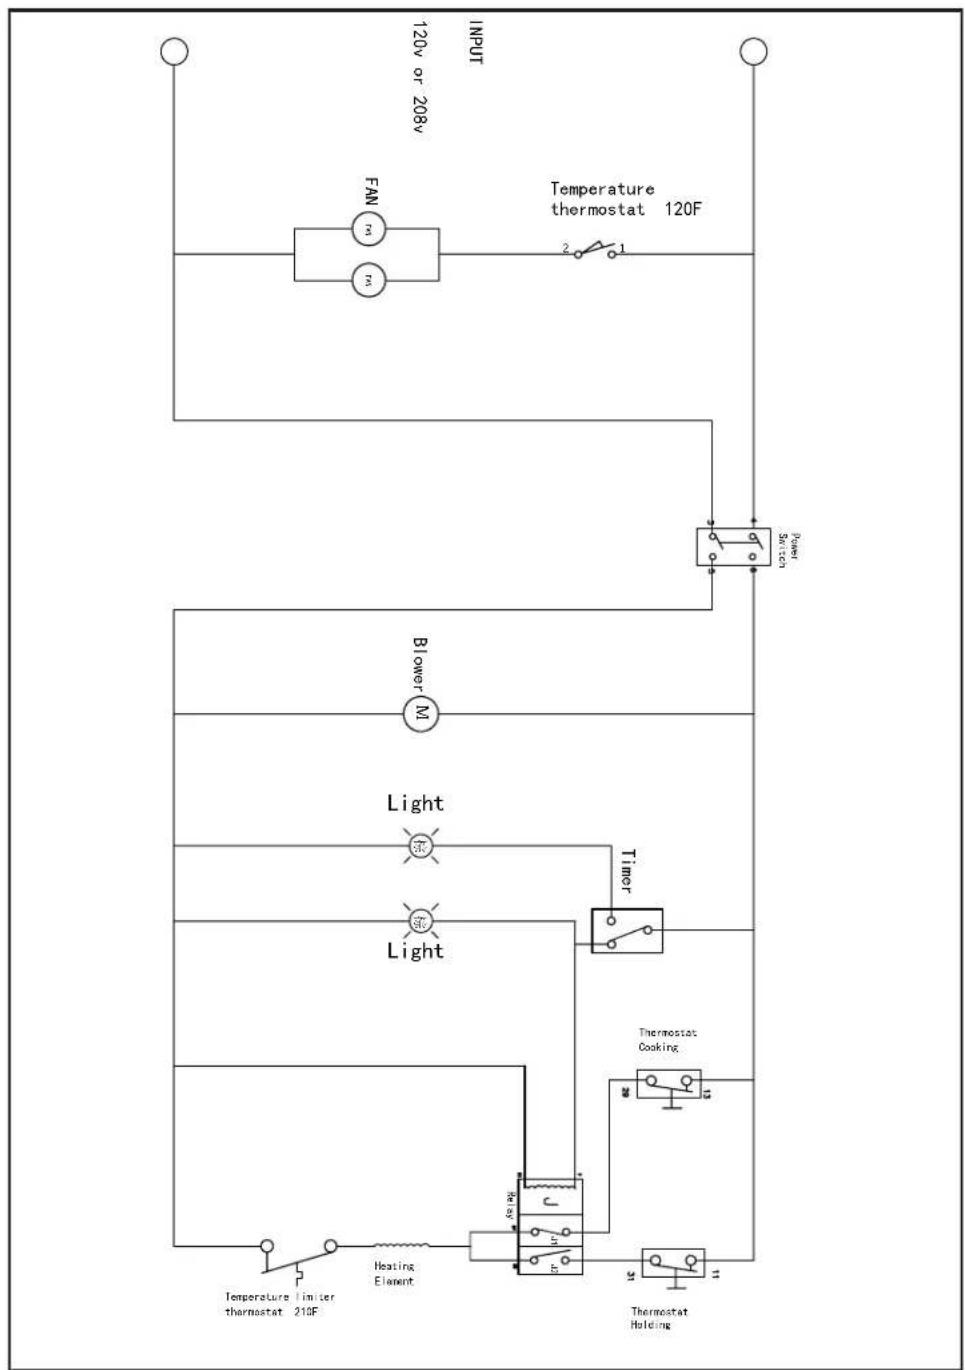
Wiring Diagrams
351CHCT1A
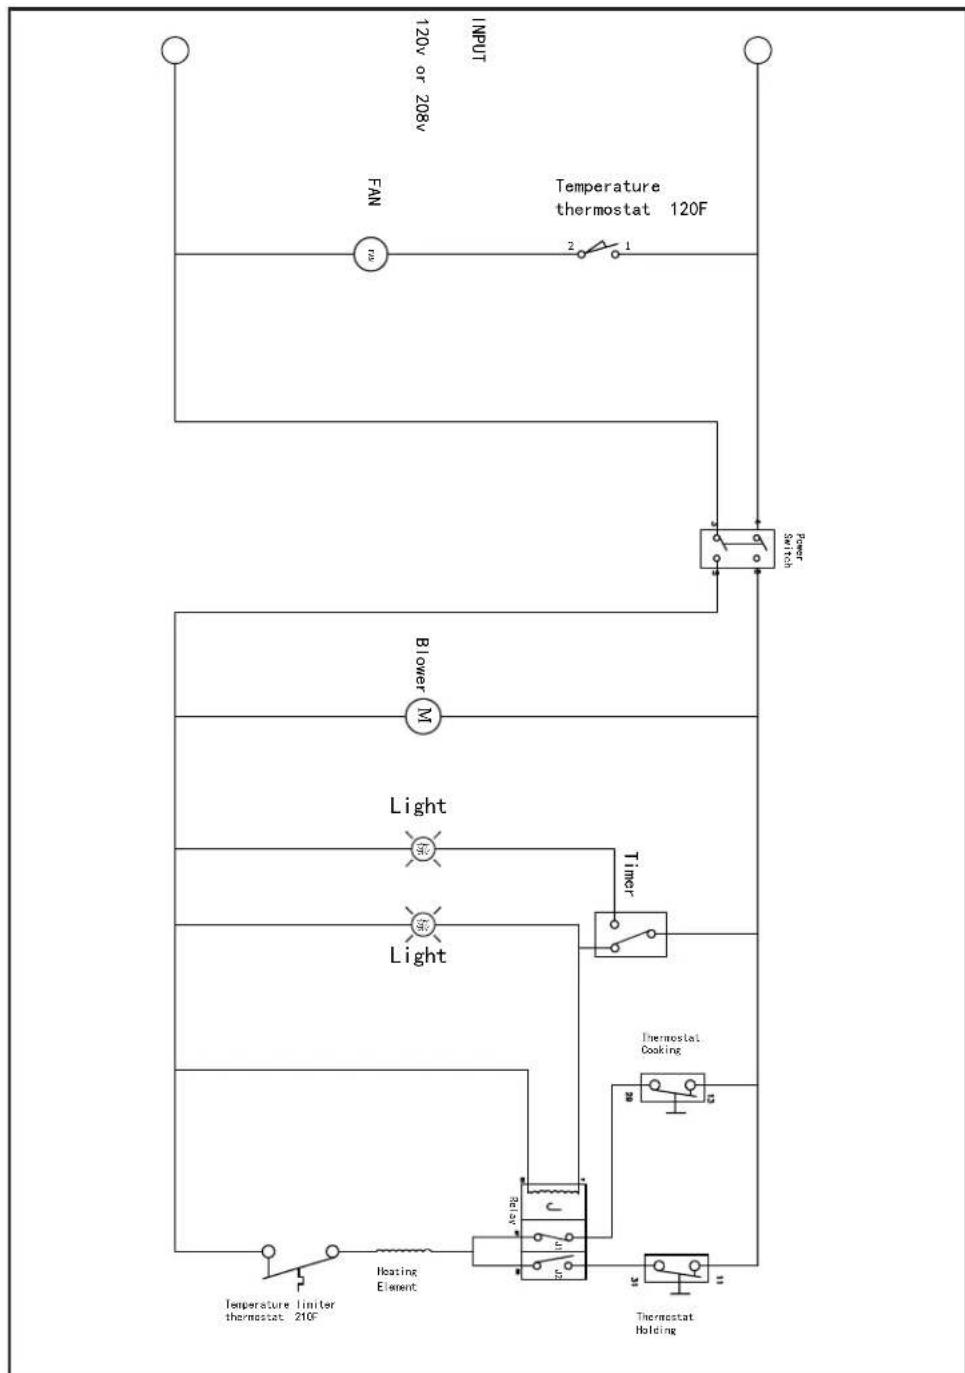
flowchart
graph TD
    A["INPUT"] --> B["FAN"]
    B --> C["120V or 208V"]
    C --> D["Temperature thermostat 120F"]
    D --> E["Power Switch"]
    E --> F["Blower M"]
    F --> G["Light"]
    G --> H["Timer"]
    H --> I["Light"]
    I --> J["Thermostat Cooking"]
    J --> K["Thermostat Holding"]
    K --> L["Heating Element"]
    L --> M["Temperature limiter thermostat 210F"]
    M --> N["Power Switch"]
User Manual
Startup
Wiring Diagrams
351CHSP1
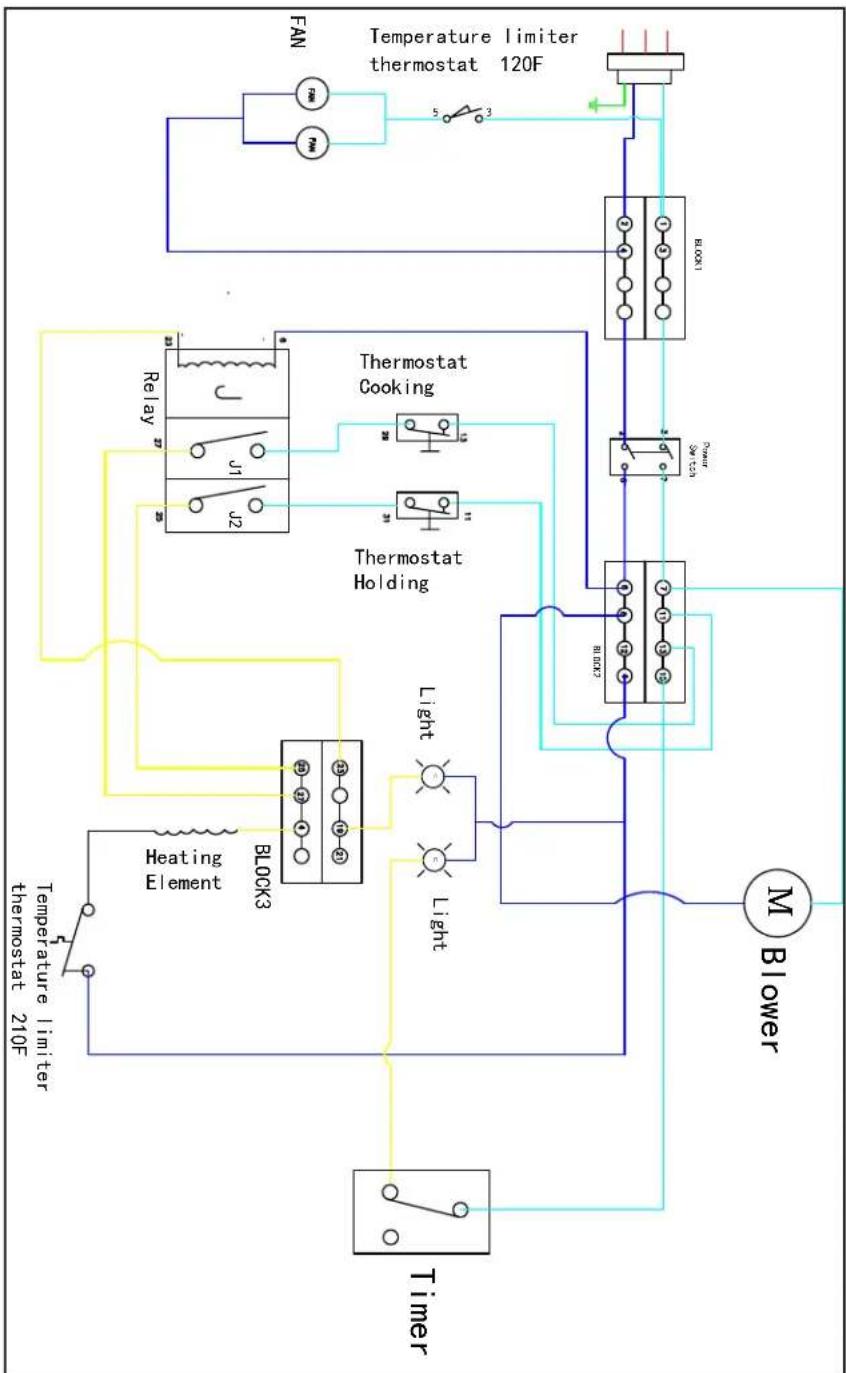
flowchart
graph TD
    A["Temperature limiter thermostat 210F"] --> B["FAN"]
    B --> C["Refrigerator"]
    C --> D["Thermostat Cooking"]
    C --> E["Thermostat Holding"]
    D --> F["Block1"]
    E --> G["Block2"]
    F --> H["Blower"]
    G --> I["Timer"]
    I --> J["Heating Element"]
    J --> K["Relay"]
    K --> L["J1"]
    K --> M["J2"]
    L --> N["Block3"]
    M --> O["Block4"]
    N --> P["Light"]
    O --> Q["Light"]
    P --> R["M Blower"]
    Q --> S["Timer"]
Startup
Wiring Diagrams
351CHUC1A & 351CHUC1B
flowchart
graph TD
    A["INPUT"] --> B["FAN"]
    B --> C["3"]
    B --> D["3"]
    C --> E["Temperature thermostat 120F"]
    D --> E
    E --> F["Power Fan 120F"]
    G["Blower"] --> H["M"]
    I["Light"] --> J["Timer"]
    K["Light"] --> L["Heating Element"]
    M["Thermostat Cooking"] --> N["Reasy"]
    O["Thermostat Holding"] --> P["Reasy"]
    Q["Temperature Limiter thermostat 210F"] --> R["Heating Element"]
    S["Power"] --> T["Power"]
User Manual
Startup
Testing the Oven
NOTE: To ensure proper function please test your oven(s) prior to first use.
NOTE: Each oven is equipped with cooling fans. The cooling fans may not operate when the oven is first turned on. The cooling fans operate only when the thermostat, to which they are connected, requires it.
- Check that the oven is connected to the correct power source (See electrical connection section above).
- Set the Cooking Time Knob to 0 (See "Cooking Controls" on page 7).
- Turn the Holding Temperature Knob to 140 degrees Fahrenheit.
- Set the Power Switch to ON position.
- Check that the Oven Circulating Fan(s) are running (see note above).
- Check that the Holding Temperature Indicator Light is illuminated.
- Set the Cooking Time Knob to 2 Hours. The Holding Temperature Indicator Light will go out and the Cooking Temperature Indicator Light will illuminate.
- Turn the Cooking Temperature Knob to 300 degrees Fahrenheit. Check the interior rear of the oven cavity to determine that the oven is heating.
- Turn the Cooking Time Knob to 0 and set the Holding Temperature Knob to 300 degrees Fahrenheit.
- Check that the Cooking Temperature Indicator Light has gone out and the Holding Temperature Indicator Light has illuminated.
- Check the interior rear of the oven to ensure that the oven is heating. If all the functions perform satisfactorily, the oven is ready for operation.
Operating Instructions
Cooking Controls
- All operating controls are located on the front Control Panel(s). The oven is supplied with individual operating controls for each oven cavity.
- WARNING: THE OVEN AND ITS PARTS ARE HOT. Be very careful when operating, cleaning, or servicing the oven.
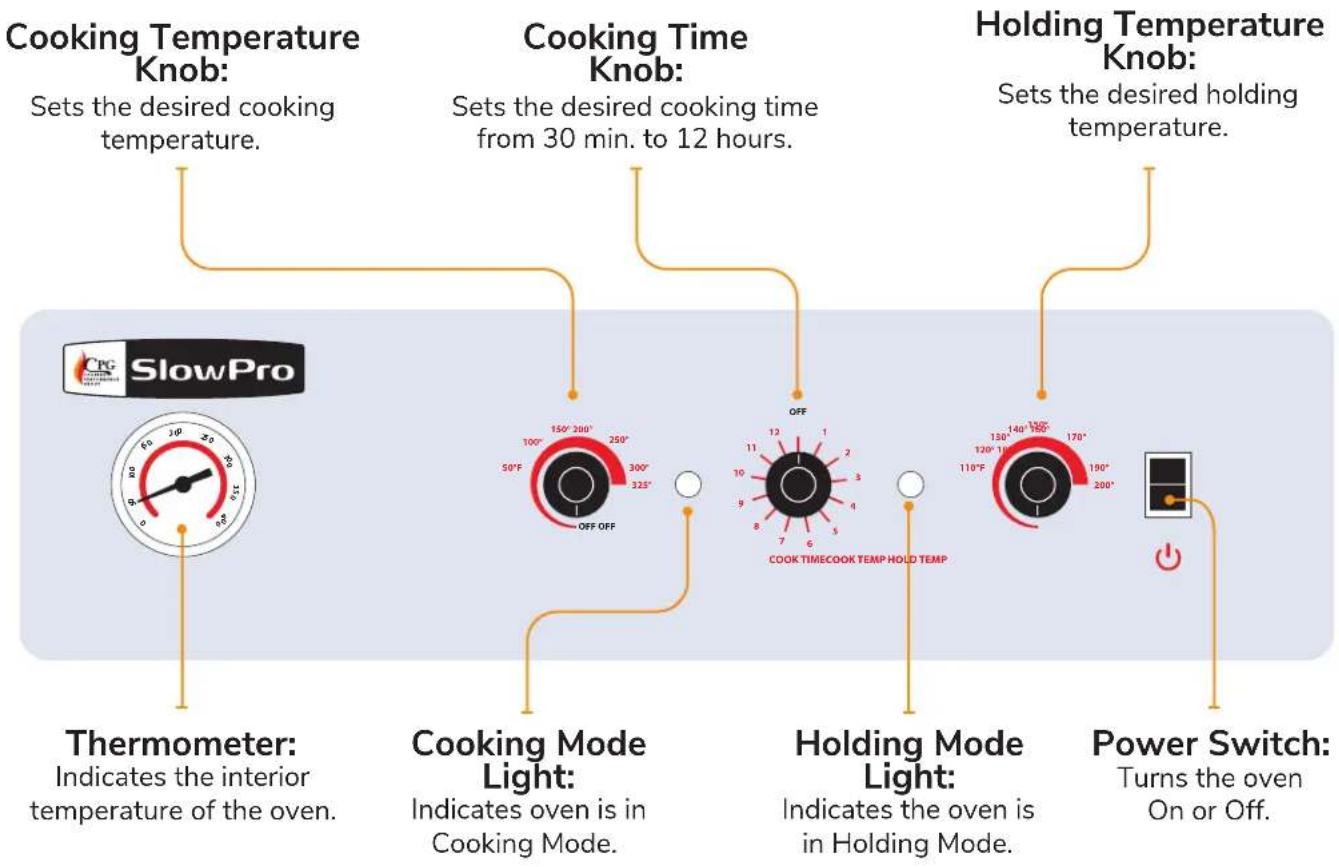
flowchart
graph TD
    A["Coping Temperature Knob: Sets the desired cooking temperature."] --> B["Thermometer: Indicates the interior temperature of the oven."]
    C["Cooking Time Knob: Sets the desired cooking time from 30 min. to 12 hours."] --> D["Cooking Mode Light: Indicates oven is in Cooking Mode."]
    E["Holding Mode Light: Indicates the oven is in Holding Mode."] --> F["Power Switch: Turns the oven On or Off."]
    B --> G["OFF OFF"]
    D --> H["COOK TIME COOK TEMP HOLD TEMP"]
    F --> I["110°F"]
    H --> J["110°F"]
    I --> K["110°F"]
Operating Instructions
Cooking Instructions
- This cooking guide has been produced for your CPG SlowPro Cook & Hold Oven System. It should be used as a handy reference when using your oven. When using your oven, experiment with your own house specialties. The degree of doneness varies based upon individual preferences.
- Please note that as products vary, as well as other elements such as altitude, so shall actual cooking times and temperatures. These should be adjusted as needed based upon your actual experience. Finished product temperatures should be verified manually, prior to serving, in order to insure food safety.
Cooking & Holding Guide
| PRODUCT WEIGHT | COOK TIME | COOK TEMP | HOLD TIME | HOLD TEMP | MAX INTERNAL TEMP | LOADING GUIDELINES | |
| BEEF | |||||||
| Beef Back Ribs | 30 lb. | 6 hrs. | 225°F | 4 hrs. | 160°F | 160°F | 4 per shelf |
| Beef Short Ribs | 10 lb. | 4 hrs. | 225°F | 4 hrs. min. | 155°F | 165°F | 1 per shelf |
| Boneless Rib Eye | 12 lb. | 3 hrs. | 225°F | 4 hrs. min. | 140°F | 135°F | 3 per shelf |
| Boneless Strip Loin | 12 lb. | 3 hrs. | 225°F | 4 hrs. min. | 140°F | 130°F | 3 per shelf |
| Bottom Round | 20 lb. | 5 hrs. | 225°F | 8 hrs. min. | 140°F | 130°F | 2 per shelf |
| Corned Beef | 12 lb. 4 hrs. | 250°F 4 hrs. | min. 150°F | 165°F 2 per shelf | |||
| Cubed Steaks | 10 lb. | 4 hrs. | 225°F | 3 hrs. min. | 160°F | 160°F | 1 tray per shelf |
| Prime Rib | 20 lb. | 5 hrs. | 225°F | 4 hrs. min. | 140°F | 135°F | 2 per shelf |
| Steamship Round | 60 lb. | 10 hrs. | 225°F | 4 hrs. min. | 140°F | 130°F | 1 per shelf |
| Top Round | 18-20 lb. | 41⁄2-5 hrs. | 225°F | 4 hrs. min. | 140°F | 130°F | 2 per shelf |
| Top Sirloin Butt | 12-14 lb. | 3 hrs. | 225°F | 4 hrs. min. | 140°F | 135°F | 3 per shelf |
| Whole Tenderloin | 10 lb. | 21⁄2 hrs. | 225°F | 2 hrs. min. | 140°F | 130°F | 4 per shelf |
| PORK | |||||||
| Cooked Cured Ham | 12 lb. | 4 hrs. | 250°F | 4 hrs. | 160°F | 135°F | 2 per shelf |
| Fresh Ham | 12 lb. | 6 hrs. | 250°F | 4 hrs. | 160°F | 165°F | 2 per shelf |
| Fresh Sausages | 10 lb. | 2 hrs. | 225°F | 5 hrs. max. | 160°F | 175°F | 10 lb. per shelf |
| Pork Back Ribs | 10 lb. | 4 hrs. | 250°F | 3 hrs. max. | 160°F | 175°F | 6 slabs per shelf |
| Pork Spare Ribs | 30 lb. | 4 hrs. | 250°F | 4 hrs. | 160°F | 175°F | 5 slabs per shelf |
| Roast Pig | 30 lb. | 6 hrs. | 250°F | 3 hrs. min. | 160°F | 170°F | 1 per shelf |
| POULTRY | |||||||
| Whole Chickens | 20 lb. | 21⁄2 hrs. | 250°F | 5 hrs. max. | 150°F | 170°F | 6 per shelf |
| Whole Turkeys | 20 lb. | 41⁄2 hrs. | 250°F | 5 hrs. max. | 170°F | 170°F | 2 per shelf |
| Turkey Breast | 10 lb. | 4 hrs. | 250°F | 1 hr. | 160°F | 160°F | 3 per shelf |
| LAMB | |||||||
| Braised Lamb Shanks | 10-12 lb. | 4 hrs. | 250°F | 4 hrs. min. | 160°F | 180°F | 1 tray per shelf |
| Rack of Lamb | 18 lb. | 31⁄2 hrs. | 250°F | 3 hrs. max. | 140°F | 140°F | 15 racks per shelf |
NOTE: Each hour of holding is equal to one day of aging.
Operating Instructions
Rethermalization Guide
| PRODUCT OVEN TEMP REHEAT TIME HOLD TEMP MIN. HOLD TIME | ||||
| BREAKFAST ITEMS | ||||
| French Toast & Sausage Links 225°F 42 min. 160°F 15 min. | ||||
| Pancakes & Sausage Links 225°F 42 min. 160°F 15 min. | ||||
| PASTA | ||||
| Baked Pasta 225°F 60 min. 160°F 20 min. | ||||
| Beef Stroganoff 225°F 54 min. 160°F 20 min. | ||||
| Italian Spaghetti 250°F 54 min. 160°F 20 min. | ||||
| Macaroni & Cheese 225°F 48 min. 155°F 20 min. | ||||
| Ravioli | 250°F 60 min. 165°F 20 min. | |||
| Turkey & Noodles | 225°F 54 min. 160°F 20 min. | |||
| CHICKEN | ||||
| Chicken & Noodles | 225°F 54 min. 160°F 20 min. | |||
| Chicken & Rice | 225°F 54 min. 160°F 20 min. | |||
| Chicken Legs | 225°F 60 min. 155°F 20 min. | |||
| Chicken Nuggets | 225°F 60 min. 160°F 20 min. | |||
| Fried Chicken Sandwich | 225°F | 60 min. | 165°F | 20 min. |
| Fried Chicken Strips | 225°F 48 min. 160°F 20 min. | |||
| SANDWICHES & SNACKS | ||||
| Burrito | 250°F 48 min. 160°F 20 min. | |||
| Cheese Pizza | 200°F 42 min. 160°F 20 min. | |||
| Cheesy Bread with Marinara Sauce | 225°F | 54 min. | 155°F | 15 min. |
| Chili | 225°F 54 min. 160°F 15 min. | |||
| Grilled Cheese Sandwiches | 200°F 42 min. 155°F 15 min. | |||
| Grilled Chicken on Bun | 225°F | 60 min. | 165°F | 20 min. |
| Hamburger on Bun | 250°F | 60 min. | 165°F | 20 min. |
| Hot Dog on Bun | 225°F 54 min. 160°F 20 min. | |||
| Meat Pizza | 200°F 54 min. 160°F 20 min. | |||
| Mini Corndogs | 225°F 54 min. 160°F 15 min. | |||
| Nacho Cheese Sauce | 200°F 42 min. 155°F 20 min. | |||
| Pizza Bites | 225°F 54 min. 160°F 20 min. | |||
| Sausage Bites | 225°F 54 min. 160°F 15 min. | |||
| Steak Nuggets | 225°F 60 min. 160°F 20 min. | |||
| Tacos | 225°F 42 min. 160°F 20 min. | |||
Operating Instructions
Shutdown Instructions
- WARNING: THE OVEN AND ITS PARTS ARE HOT.
Be very careful when operating, cleaning, or servicing the oven.
- Turn the Holding Temperature and Cooking Temperature Knobs counterclockwise until they stop at the OFF position.
- Open door slightly to allow ventilation and a further cooldown period. This is to allow oven to properly cooldown so components are not damaged.
NOTE: Wait at least 15 minutes before turning Power Switch to OFF. The cooling fans need to operate during the cooldown period. The cooling fans will automatically turn off when the proper temperature is reached.
- Turn Power Switch to OFF position.
For expanded shutdown, continue with these last 3 steps:
- Unplug the oven.
- Thoroughly clean the oven (see Cleaning & Maintenance on page 11).
- Leave the door(s) slightly open to allow ventilation and preservation of the gasket(s).
Warnings
• Always ensure proper supervision while the equipment is in use.
- Simple adjustments to knobs, leg height, etc. do not require assistance from specialized personnel. For more technical adjustments, please consult a qualified technician.
- Use only parts and accessories recommended by Cooking Performance Group.
- Burnoff instructions if applicable.
- The equipment will remain hot for a short time after use (residual heat). Avoid all physical contact with the unit during this time to prevent injury.
- This equipment is strictly for professional use and must be used by qualified personnel.
- The installation, startup, and maintenance of this equipment must be carried out by a qualified technician.
- All installation must be carried out according to the law. Cooking Performance Group is not responsible for damages due to incorrect installation, improper maintenance, or incorrect use.
- These are very important regulations; if they are neglected, the equipment may not perform properly or the user may be placed at risk and void manufacturer warranty.
User Manual
Cleaning & Maintenance
- WARNING: THE OVEN AND ITS PARTS ARE HOT. Be very careful when operating, cleaning, or servicing the oven. Always shut down and unplug the oven(s) prior to cleaning (shutdown instructions on page 10).
- NOTICE: Avoid splashing water into upper areas of the oven to prevent damage to electrical components or connections. Never spray the unit with a hose. Never use harsh chemicals or abrasive pads.
Daily Maintenance
- Follow shutdown instructions found on page 10. Be sure to allow the oven(s) time to cool down prior to cleaning.
- Unplug electrical power supply.
- Remove the Interior Side Racks.
- Take the Interior Side Racks to a sink or dishwasher for a thorough cleaning. Use a mild soap and water solution to clean these items. Allow to air dry or use a soft dry cloth. We recommend you use Noble Chemical Sunbright Dishsoap or Noble Chemical Blast Liquid Oven & Grill Cleaner.
- If necessary, clean the interior of the oven with a damp cloth. Wipe dry with a soft dry cloth.
- Reassemble oven.
- Clean the exterior of the oven with a damp cloth, or with the cleaning agents below if necessary.
Weekly Maintenance
At least once a week, thoroughly check the door gasket for damage/wear. A damaged gasket can cause inefficient and unsatisfactory operation of the oven.
- Gently wash the gasket using a damp cloth, a mild detergent solution, and warm water.
- Rinse with a fresh cloth moistened in warm water to remove all traces of detergent.
- Gently wipe dry with a clean dry cloth.
NOTE: Never apply food oils or petroleum lubricants directly to the gasket(s). Petroleum-based solvents and lubricants will reduce the gasket's life.
Recommended Cleaning Agents

text_image
NOBLE sunbright KNOCKOUT KNOBLE CHEMICAL ELAST999SUNBRIGHT
Sunbright
Lemon Dish Soap
999KNOCKOUT
Knockout
Heavy Duty Oven/Grill Degreaser
& Carbon Remover
147BLASTQT
Blast
Liquid Oven & Grill Cleaner
Troubleshooting
| Issue Possible Causes Remedies | ||
| Oven not operating | Oven not connected to power source | Connect oven to power source |
| ON/OFF switch not ON Press | Power ON/OFF switch to ON | |
| No power to unit Check circuit breaker | ||
| Indicator Lights are lit, but Cooking Fan(s) are not operating | Oven is below 150°F | This is normal when unit is cold. If unit is above 150°F and fans are NOT operating, contact an authorized service provider |
| Defective connection, wiring, fan, or thermostat | Contact an authorized service provider | |
| Oven Compartment IS heating, but Blower Motor IS NOT operating with Power Switch ON | Defective connection or wiring to motor | Contact an authorized service provider |
| Oven Compartment IS NOT heating and Blower Motor IS operating with Power Switch ON | Defective Cooking Temperature Thermostat | Set Cooking Temperature to 250°F. Wait several minutes and check the rear of the oven for heating. Both the Power Switch and Cooking Temperature Indicator Lights will be lit. If oven cavity does not heat, contact authorized service provider. |
| Defective Holding Temperature Thermostat | Set Holding Temperature to 250°F. Wait several minutes and check the rear of the oven for heating. Both the Power Switch and Cooking Temperature Indicator Lights will be lit. If oven cavity does not heat, contact authorized service provider. | |
| Defective High-Limit Thermostat or Heating Element | Contact an authorized service provider | |
| Incorrect oven temperature Thermostat(s) require calibration | Contact an authorized service provider | |
- NOTE: All these examples are provided for your reference. If any failure occurs, please stop using, and consult a qualified service technician. All maintenance should be done after the power supply is shut down.