
FTFHP1130 - USB Drive Halifax - Free user manual and instructions
Find the device manual for free FTFHP1130 Halifax in PDF.


| Type de produit | Kitchen Exhaust Hood |
| Marque | Halifax |
| Modèle | FTFHP1130 |
| Utilisation | Commercial kitchen ventilation |
| Normes | ANSI UL710, CAN/ULC S646-10, NFPA 96 |
| Garantie | 24 months from date of shipment |
| Matériau | Stainless steel |
| Type de graisse | Type 1 (grease rated) |
| Filtres | Removable grease filters |
| Éclairage | Light fixtures (wiring required) |
| Installation | Professional installation required |
| Dégagements | Minimum 18 inches from combustible materials (typical) |
| Débit d'air | Designed for specified CFM based on hood size |
| Kit de montage | Concession Hood Bolt Kit included |
| Dimensions (approx.) | Varies by model; refer to plans |
| Poids (approx.) | 150-300 lbs depending on size |
| Alimentation | 120V, 60Hz (typical) |
| Entretien | Clean filters regularly; inspect for damage |
| Nettoyage | Remove grease buildup with non-abrasive cleaners |
| Sécurité | UL listed; follow NFPA 96 clearances |
| Pièces détachées | Filters, bolt kit, light fixtures |
| Réparabilité | Filter replacement; professional repair for electrical/structural |
Frequently Asked Questions - FTFHP1130 Halifax
User questions about FTFHP1130 Halifax
0 question about this device. Answer the ones you know or ask your own.
Ask a new question about this device
Download the instructions for your USB Drive in PDF format for free! Find your manual FTFHP1130 - Halifax and take your electronic device back in hand. On this page are published all the documents necessary for the use of your device. FTFHP1130 by Halifax.
USER MANUAL FTFHP1130 Halifax
natural_image
Exterior view of a Halifax Hoods stainless steel kitchen air duct (no signage or text beyond branding)HalifaxHoods
Receiving and Storage
Once equipment is received, check for both obvious and hidden damage. If damage is found, record all necessary information on the bill of lading and file a claim with the final carrier. Check to be sure that all parts of the shipment, including accessories, are accounted for.
UNPACKING
Verify that all required parts and the correct quantity of each item have been received. If any items are missing, report shortages to your representative to obtaining missing parts. Sometimes it is not possible that all items for the unit be shipped together due to availability of transportation and truck space. Confirmation of shipment(s) must be limited to only items on the bill of lading. Filters are typically shipped in the hood, but sometimes are shipped on a separate skid in their original packaging. Do not remove factory packaging or install filters until just prior to commissioning. Remove all other shipping/packing materials.
WARNING!!
Installation of this unit should only be performed by a qualified professional. Please read the instructions thoroughly before installing or servicing this equipment.
LISTING
This hood is listed to ANSI UL710 and CAN/ULC S646-10 and built to the "NFPA 96" National Fire Protection Association Standard
WARRANTY
This equipment is warranted to be free from defects in materials and workmanship, under normal use and service, for a period of 24 months from date of shipment – See full Installation Instructions for Details.
INSTALLATION
It is necessary to install and operate this unit with the airflow (CFM) designed for the size of hood, filters and installation based on the information provided.
HalifaxHoods
SITE PREPERATION
-
To safely lift equipment into the final installed position you must make sure the area of installation is clear. Make sure you have enough room after installation to service unit easily.
-
Verify the location that the hood will be installed so there is nothing to interfere when installing the unit.
-
Review your plans and specifications for your project.
-
Confirm and verify the supports will support the weight of the hood and fan mounted on top of the truck.
-
If installing light fixtures a. Have electrician following wiring diagram as noted in full Installation Manual
-
Weld Duct connection on top of Hood at area which does not interfere with bracing inside truck
-
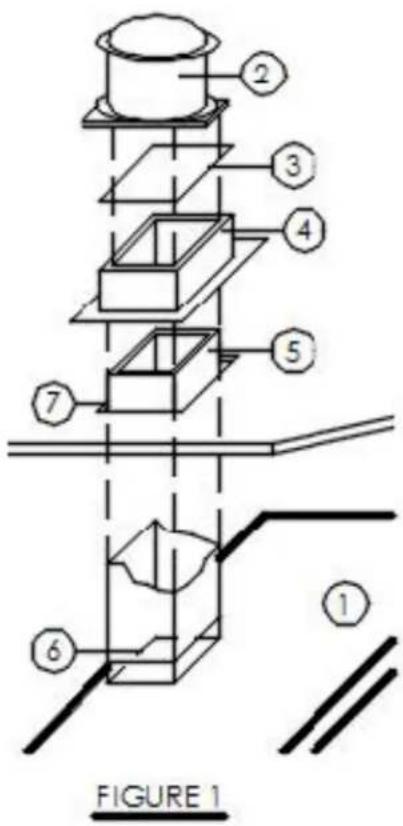
Cut hole in Hood at duct connection - See Figure #1, Item #7
-
To cut the hole properly in the roof of truck - See Figure #1 a. Lift hood in the location where it will be mounted, ensuring there is adequate room available to install the hood and all ductwork to comply with proper clearances from combustible material (Item # 1) b. Bring duct in contact with top of truck (Item # 5) c. Mark location of duct on truck roof d. Lower hood back down e. Cut hole in roof of truck (Item # 7)
-
Mount Roof Curb with Curb plate on top of truck (Items # 3 & 4)
-
See attached instructions for using Concession Hood Bolt Kit to complete hood attachment
-
Curb Plate securing a. Cut Curb Plate hole where duct meets plate to ensure tight fit b. Secure Curb Plate to top of Roof Curb
-
Install and secure fan on top of Roof Curb (Item # 2)
-
Wire power to Fan
-
Use Sealant around roof curb and any holes which were made during the installation process IMC, NFPA96 and local authorities having jurisdiction may call for a minimum clearance (typically 18 inches for type 1, grease rated hoods) between the cooking hood(s), exhaust ducts, and building materials which are combustible. However, IMC and NFPA96 do outline acceptable clearance reduction methods; most local jurisdictioning authorities will accept the clearance reduction methods approved in the manufacturer's UL listing for Type 1, grease rated hoods.
HalifaxHoods
Bolt Kit
- Use the "Concession Hood Bolt Kit" when installing the hood. The kit includes the following:
| Hardware Description Quantity (Pcs) | |
| 8" Long SS hex head screw 1⁄2"-13 TPI 4 | |
| 1⁄2" SS washers 16 | |
| 1⁄2"-13 TPI SS Nuts 16 | |
| Ring Gasket .531"ID, 1.250"OD, .063"THK 4 |
-
Mark pilot holes, 12 inches in, at each end 4" from the front and rear of the Hood
-
Drill Pilot Holes
-
Align and raise the Hood in the location where it will be mounted
-
Drill the holes through the hood and exterior roof line were the hood will be mounted
-
Lower Hood back down
-
Remove any burrs and/or metal fragments around holes
-
See Figure 1 on back side of the sheet for installation
-
Torque all hardware to 75 in-lbs, unless the Garlock washer begins to deform
-
You may remove excess screw threads. There must be at least 1/16" of threads extending past the outward face of the properly torqued nut.

FIGURE 1


Brand : Halifax
Model : FTFHP1130
Category : USB Drive