Cyclone M2004 - Printer ZEBRA - Free user manual and instructions
Find the device manual for free Cyclone M2004 ZEBRA in PDF.

User questions about Cyclone M2004 ZEBRA
0 question about this device. Answer the ones you know or ask your own.
Ask a new question about this device
Download the instructions for your Printer in PDF format for free! Find your manual Cyclone M2004 - ZEBRA and take your electronic device back in hand. On this page are published all the documents necessary for the use of your device. Cyclone M2004 by ZEBRA.
USER MANUAL Cyclone M2004 ZEBRA
Cyclone™ M2000 Series
Product Reference Guide

natural_image
3D rendered image of a white handheld device with a curved handle and circular opening (no text or symbols)Cyclone™ M2000 Series Product Reference Guide
72E-39696-06
Revision A
January 2007
© 2000 - 2007 by Symbol Technologies, Inc. All rights reserved.
No part of this publication may be reproduced or used in any form, or by any electrical or mechanical means, without permission in writing from Symbol. This includes electronic or mechanical means, such as photocopying, recording, or information storage and retrieval systems. The material in this manual is subject to change without notice.
The software is provided strictly on an “as is” basis. All software, including firmware, furnished to the user is on a licensed basis. Symbol grants to the user a non-transferable and non-exclusive license to use each software or firmware program delivered hereunder (licensed program). Except as noted below, such license may not be assigned, sublicensed, or otherwise transferred by the user without prior written consent of Symbol. No right to copy a licensed program in whole or in part is granted, except as permitted under copyright law. The user shall not modify, merge, or incorporate any form or portion of a licensed program with other program material, create a derivative work from a licensed program, or use a licensed program in a network without written permission from Symbol. The user agrees to maintain Symbol’s copyright notice on the licensed programs delivered hereunder, and to include the same on any authorized copies it makes, in whole or in part. The user agrees not to decompile, disassemble, decode, or reverse engineer any licensed program delivered to the user or any portion thereof.
Symbol reserves the right to make changes to any software or product to improve reliability, function, or design.
Symbol does not assume any product liability arising out of, or in connection with, the application or use of any product, circuit, or application described herein.
No license is granted, either expressly or by implication, estoppel, or otherwise under any Symbol Technologies, Inc., intellectual property rights. An implied license only exists for equipment, circuits, and subsystems contained in Symbol products.
Symbol, Spectrum One, and Spectrum24 are registered trademarks of Symbol Technologies, Inc. Other product names mentioned in this manual may be trademarks or registered trademarks of their respective companies and are hereby acknowledged.
Symbol Technologies, Inc.
One Symbol Plaza
Holtsville, New York 11742-1300
http://www.symbol.com
Revision History
Changes to the original manual are listed below:
| Change Date | Description | |
| 72E-39696-01 6/2000 | Initial release | |
| 72E-39696-02 11/2000 | Add M2007 | USB information |
| 72E-39696-03 12/2001 | Update engi | neering and regulatory information |
| 72E-39696-04 1/2005 | Add Symbol | Comm Port Emulation bar code |
| 72E-39696-05 1/2005 | Add informati | on for avoiding scanner startup problems |
| 72E-39696-06 11/2006 | Update serv | ice information, add parameter bar codes for Bookland ISBN, Code 11, new UPC supplemental decode options, and security level |

natural_image
Simple line drawing of a closed book with visible pages and spine (no text or symbols)Contents
About This Guide
Chapter Descriptions....xi
Notational Conventions ..... xii
Service Information ..... xii
Chapter 1. Setting Up Your Scanner
Introduction 1-1
Unpacking 1-2
Connecting your Scanner to a Host.... 1-3
Setting Up the M2007 (USB) Scanner 1-4
Switching Cables 1-5
Wall Mounting the Scanner 1-6
Accessories 1-7
Required Accessories.... 1-7
Optional Accessories 1-7
Electronic Article Surveillance (EAS) (Optional) 1-7
Chapter 2. Scanning
Introduction 2-1
Scanning Modes 2-1
Laser Patterns 2-1
Smart Raster 2-3
Scanning 1D (and RSS) or 2D Bar Codes.... 2-3
Scanning Composite Bar Codes 2-5
Specular Reflection 2-7
Beeper Definitions 2-8
Macro PDF 2-9
LED Indications 2-10
Maintenance 2-10
Troubleshooting 2-11
Chapter 3. Parameter Menus
Introduction 3-1
Scanning Sequence Examples 3-2
Errors While Scanning....3-2
Default Table....3-3
Set Default Parameter....3-11
Host Type 3-12
IBM 46XX Host Types ....3-12
RS-232C Host Types....3-13
Scanning Options 3-16
Hand-Held Scan Pattern Mode 3-16
Scan Pattern Mode Selector 3-17
Counter-top Scan Pattern Mode 3-18
Programmable Raster Height And Raster Expansion Speed 3-19
Aiming Mode 3-20
Triggering Modes....3-21
Timeout Between Decodes 3-22
Laser On Time....3-23
Beep After Good Decode....3-23
Beeper Volume 3-24
Beeper Tone 3-25
Transmit "No Read" Message 3-25
Linear Code Type Security Level....3-26
Bi-directional Redundancy 3-28
Autodiscriminate Response Time 3-28
Composite Codes 3-29
Composite CC-C 3-29
Composite CC-A/B. 3-30
TLC39 3-31
Composite Beep Mode 3-32
UPC/EAN 3-33
Enable/DisableUPCA 3-33
Enable/Disable UPCE 3-33
Enable/Disable UPCE1 3-34
Enable/Disable EAN-8....3-34
Enable/Disable EAN-13....3-35
Enable/Disable Bookland EAN 3-35
UPC/EAN Coupon Code 3-36
Decode UPC/EAN Supplementals....3-37
Decode UPC/EAN Supplemental Redundancy 3-43
TransmitUPCACheckDigit. 3-43
Transmit UPCE Check Digit 3-44
Transmit UPCE1 Check Digit 3-44
UPCA Preamble 3-45
UPCE Preamble 3-46
UPCE1 Preamble 3-47
Convert UPCE to UPCA 3-48
Convert UPCE1 to UPCA 3-49
EAN Zero Extend 3-50
Bookland ISBN Format.... 3-51
Linear UPC/EAN Decode 3-52
UPC/EAN Decode Performance.... 3-52
UPC Composite Mode 3-53
Code 128 3-54
Enable/Disable Code 128. 3-54
Enable/Disable UCC/EAN-128 3-54
Enable/Disable ISBT 128 3-55
Lengths for Code 128....3-55
Code 128 Decode Performance.... 3-56
Code 39 3-57
Enable/Disable Code 39. 3-57
Enable/Disable Trioptic Code 39 3-57
Convert Code 39 to Code 32 3-58
Code 32 Prefix 3-59
Set Lengths for Code 39.... 3-60
Code 39 Check Digit Verification 3-62
Transmit Code 39 Check Digit 3-62
Enable/Disable Code 39 Full ASCII 3-63
Code 39 Decode Performance.... 3-64
Code 93 3-65
Enable/Disable Code 93. 3-65
Set Lengths for Code 93. 3-66
Code 11 3-68
Code 11 3-68
Set Lengths for Code 11....3-69
Code 11 Check Digit Verification .... 3-71
Transmit Code 11 Check Digits 3-72
Interleaved 2 of 5. 3-73
Enable/Disable Interleaved 2 of 5. 3-73
Set Lengths for Interleaved 2 of 5 3-74
I 2 of 5 Check Digit Verification. 3-76
Transmit 12 of 5 Check Digit 3-77
Convert I 2 of 5 to EAN-13 3-78
Discrete 2 of 5 3-79
Enable/Disable Discrete 2 of 5 3-79

Cyclone™ M2000 Series Product Reference Guide
Set Lengths for Discrete 2 of 5 ..... 3-80
Codabar 3-82
Enable/Disable Codabar 3-82
Set Lengths for Codabar 3-83
CLSI Editing....3-85
NOTIS Editing 3-85
MSI Plessey 3-86
Enable/Disable MSI Plessey 3-86
Set Lengths for MSI Plessey 3-87
MSI Plessey Check Digits 3-89
Transmit MSI Plessey Check Digit. 3-89
MSI Plessey Check Digit Algorithm 3-90
PDF-417/MicroPDF-417 3-91
Enable/Disable PDF-417 3-91
Enable/Disable MicroPDF-417....3-91
MicroPDF Performance 3-92
Code 128 Emulation 3-93
RSS Codes 3-94
RSS-14 3-94
RSS-Limited 3-94
RSS-Expanded 3-95
Security Level 3-95
Data Options....3-97
Transmit Code ID Character 3-97
Prefix/Suffix Values 3-99
Scan Data Transmission Format 3-100
Decode Buffering....3-102
RS-232 Options....3-103
Baud Rate 3-103
Parity 3-105
Check Parity 3-107
Hardware Handshaking 3-108
Other RTS/CTS Options 3-109
Software Handshaking....3-111
Stop Bit Select 3-113
Intercharacter Delay....3-113
Host Serial Response Time-out....3-114
Host Serial RTS Line State 3-114
Beep On
Data Transmission - 7 or 8-Bit ASCII Data Format .... 3-115
USB Parameters (M2007)....3-116
Set USB Defaults....3-116
USB Device Type. 3-117
Country Selection 3-119
Contents
Keyboard Emulation 3-123
Macro PDF Features 3-126
Macro PDF Transmit / Decode Mode Symbols 3-127
Transmit Symbols in Codeword Format 3-129
Transmit Unknown Codewords. 3-130
Escape Characters 3-131
Delete Character Set ECIs 3-132
ECI Decoder 3-133
Transmit Macro PDF User-Selected Fields 3-134
Transmit File Name 3-134
Transmit Block Count 3-135
Transmit Time Stamp 3-135
Transmit Sender 3-136
Transmit Addressee 3-136
Transmit Checksum 3-137
Transmit File Size 3-137
Transmit Macro PDF Control Header 3-138
Last Blocker Marker 3-138
Flush Macro Buffer 3-139
Abort Macro PDF Entry. 3-139
Numeric Bar Codes 3-140
Cancel 3-142
Chapter 4. Advanced Data Formatting (ADF)
Introduction 4-1
Rules: Criteria Linked to Actions 4-1
Using ADF Bar Codes 4-2
ADF Bar Code Menu Example. 4-3
Alternate Rule Sets. 4-5
Rules Hierarchy (in Bar Codes) 4-6
Default Rules 4-7
Beeper Definitions for ADF 4-8
ADF Bar Codes 4-9
Special Commands 4-11
Begin New Rule 4-11
Save Rule 4-11
Erase 4-12
Quit Entering Rules 4-12
Disable Rule Set. 4-13
Criteria 4-14
Code Types 4-14
Code Lengths 4-17
Message Containing A Specific Data String 4-23

Cyclone™ M2000 Series Product Reference Guide
Numeric Keypad 4-25
Rule Belongs To Set 4-27
Actions 4-28
Send Data 4-28
Send Pause 4-32
Setup Field(s) 4-32
Send Preset Value....4-40
Modify Data 4-40
Beeps. 4-53
Send Keystroke (Control Characters and Keyboard Characters) 4-54
Turn On/Off Rule Sets 4-88
Alphanumeric Keyboard 4-89
Appendix A. Programming Reference
AIM Code Identifiers....A-1
Prefix / Suffix Values....A-7
Appendix B. Specifications
M2000 Scanner Specifications ....B-1
Decode Zones. B-3
Cable Pinouts B-5
RS-232 Cable Pinouts....B-5
IBM 46XX Cable Pinouts....B-7
Synapse Cable Pinouts B-8
Index
Feedback

natural_image
Simple line drawing of a closed book with visible pages and spine (no text or symbols)About This Guide
The Cyclone ^TM M2000 Series Product Reference Guide provides general information about setting up, programming, and operating the M2000 Scanner.
Chapter Descriptions
Following are brief descriptions of each chapter in this guide.
- Chapter 1, Setting Up Your Scanner provides information on connecting the scanner to the host.
• Chapter 2, Scanning describes how to use the scanner, defines operator feedback, and provides maintenance and troubleshooting tips. - Chapter 3, Parameter Menus provides all the bar codes necessary to program your scanner.
- Chapter 4, Advanced Data Formatting (ADF) explains how to customize scanned data before transmission to your host.
- Appendix A, Programming Reference contains useful reference material such as ASCII tables and AIM code identifiers.
- Appendix B, Specifications provides the technical specifications, decode zones, and cable pinouts for the scanner.
Notational Conventions
The following conventions are used in this document:
• M2000 refers to all models of the M2000 Series scanners (M2004, M2005, and M2007).
- Italics are used to highlight specific items in the general text, and to identify chapters and sections in this and related documents.
- B u l l e t s ( ◆) indicate:
- action items
- lists of alternatives
- lists of required steps that are not necessarily sequential
- Sequential lists (e.g., those that describe step-by-step procedures) appear as numbered lists.
Service Information
If there is a problem with the equipment, contact the regional Global Customer Interaction Center. For contact number information, visit: www.symbol.com/contactsupport for a Customer Interaction Center in your area. Before calling, have the model number, serial number and several bar code symbols at hand.
Call the Global Customer Interaction Center from a phone near the scanning equipment so that the service person can try to troubleshoot the problem. If the equipment is found to be working properly and the problem is reading bar codes, the Support Center will request samples of the bar codes for analysis at our plant.
If the problem cannot be solved over the phone, it may be necessary to return the equipment for servicing. If that is necessary, the Global Customer Interaction Center will provide specific directions.
Note: Symbol Technologies is not responsible for any damages incurred during shipment if the approved shipping container is not used. Shipping the units improperly can possibly void the warranty. If the original shipping container was not kept, contact Symbol to have another sent.
If the Symbol product was purchased from a Symbol Business Partner, contact that Business Partner for service.
For the latest version of this guide go to: http://www.symbol.com/manuals.

natural_image
Simple line drawing of a closed book with visible pages and spine (no text or symbols)Chapter 1 Setting Up Your Scanner
Introduction
The Cyclone™ M2000 Series scanner combines the benefits of multiple scan patterns (omnidirectional, semi-omnidirectional, 2D raster, and single scan line) with a light-weight, hands-free/hand-held design. The scanner's built-in stand seamlessly accommodates both counter-top and hand-held use. The scanner can be programmed to emit the preferred scan pattern for both counter-top and hand-held use.
The M2000 successfully reads most bar code symbologies, densities, and colors, produced by a wide range of printing techniques.

natural_image
Line drawing of a stylized 3D object resembling a device with a black handle and circular opening (no text or symbols)Figure 1-1. Cyclone M2000 Series Scanner
The M2000 scanner supports the following interfaces:
- M2004-I200 (RS-232C) contains on-board discrete RS-232C communications for connecting to RS-232C asynchronous terminals and host systems. It also accommodates Synapse™ “Smart Cables” which allow you to connect to a wide variety of host systems.
• M2004-I290 (RS-232C with EAS) also supports Checkpoint VII Electronic Article Surveillance (EAS). - M2005-I200 (IBM 468X/469X) is fully compatible with the entire line of IBM 468X/469X terminals. It also accommodates Synapse Smart Cables.
- M2005-I290 (IBM 468X/469X with EAS) provides additional signal lines for EAS deactivation (Checkpoint VII).
• M2007-I200 (USB) connects to USB-capable host systems, including: - Desktop PCs and Notebooks
- Apple™ iMac, G4, iBooks
• IBM SurePOS terminals
• Network computers.
It also accommodates Synapse Smart Cables. - M2007-I290 (USB with EAS) provides additional signal lines for EAS deactivation (Checkpoint VII).
Unpacking
Remove the scanner from its packing and inspect it for damage. If the scanner was damaged in transit, contact the Symbol Global Customer Interaction Center. See page xii for contact information. KEEP THE PACKING. It is the approved shipping container and should be used if you ever need to return your equipment for servicing.
Connecting your Scanner to a Host
To connect the M2000 to your host:
- Power down the host.
- Connect the interface cable to the receptacle in the back of the M2000 base. Listen for a click.
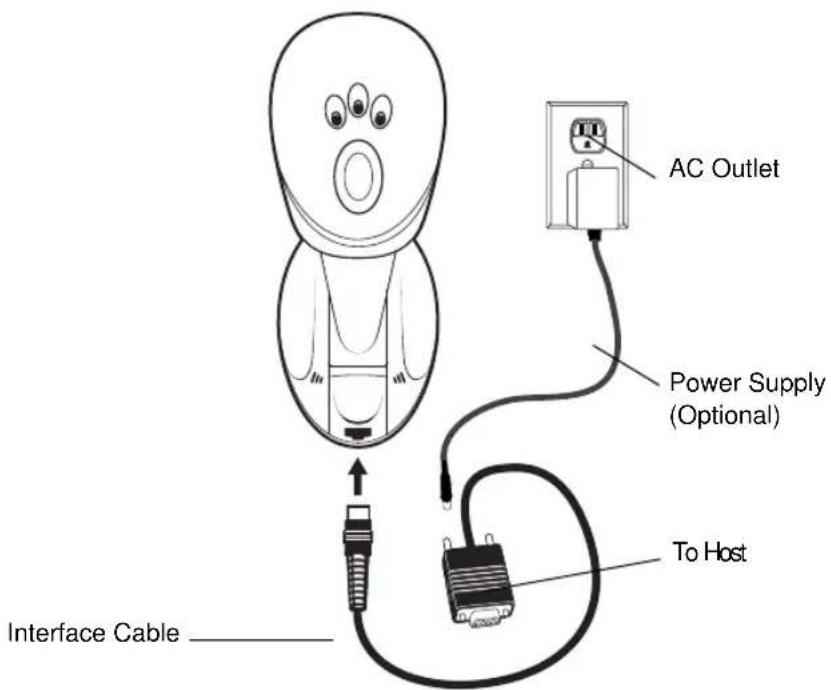
text_image
AC Outlet Power Supply (Optional) To Host Interface CableFigure 1-2. Plugging Connector into Scanner
- Gently tug the cable to ensure the connector is properly secured.
- Place the scanner on a flat surface. To initialize correctly, the scanner must be in counter-top (hands-free) mode during power up. (See the Caution statement on page 1-4.)
- Connect the other end of the interface cable to the host (refer to your host manual to locate the correct port).
- If necessary, plug the power supply into the power jack on the interface cable. Plug the other end of the power supply into an AC outlet.
- If you are using a Synapse cable, the scanner autodetects your host. If you are using another cable, set the M2000 to communicate with your particular POS host by scanning the appropriate bar code(s) in Chapter 3, Parameter Menus.

Cyclone™ M2000 Series Product Reference Guide
-
Power up the host.
-
Three power-up beeps sound and all three LEDs light, indicating the scanner is operational.
-
Verify that the scanner is successfully reading bar codes and transmitting their content to the host.
Caution
This scanner is designed to self calibrate whenever power is applied. It must be standing upright on its base (so the bottom switch is depressed) each time the scanner is powered on. Failure to do so may cause erratic behavior of the scanner and/or a buzzing sound.
See Troubleshooting on page 2-11 if you are having problems after completing these steps.
Setting Up the M2007 (USB) Scanner
The M2007 connects through the USB and operates with USB capable hosts including:
• Desktop PCs and Notebooks
• Apple™ iMac, G4, iBooks
• IBM SurePOS terminals
• Network computers.
The following operating systems support the M2007 through USB:
• Windows 98, 2000, ME, NT 5.0
• MacOS 8.0 and above
• 4690 OS v2.3 and above.
Ask your vendor if your host supports USB, and if your version of the operating system supports USB. For more information on USB technology, hosts, and peripheral devices, visit www.usb.org.
Bus Power
An additional power supply is not required to operate the M2007 since the USB host or self-powered hub provides enough power.
To set up your M2007:
- Connect the cable to the scanner.
- Plug the series A connector in the USB host or hub, or plug the power+ connector in the IBM SurePOS terminal.
- Select the USB device type. See USB Device Type on page 3-118.
- On first installation when using Windows, the software prompts you to select or install the USB device driver. Follow the installation instructions on the screen. The scanner powers up during this installation.
- If you are not using a North American keyboard, scan the appropriate country bar code under Country Selection on page 3-120.
If you are having any problems with your system, see Troubleshooting on page 2-11.
Switching Cables
Different cables are required for different hosts. To change the scanner cable:
- Unplug the installed cable's modular connector by depressing the connector clip through the access hole on the bottom of the scanner with a paper clip.
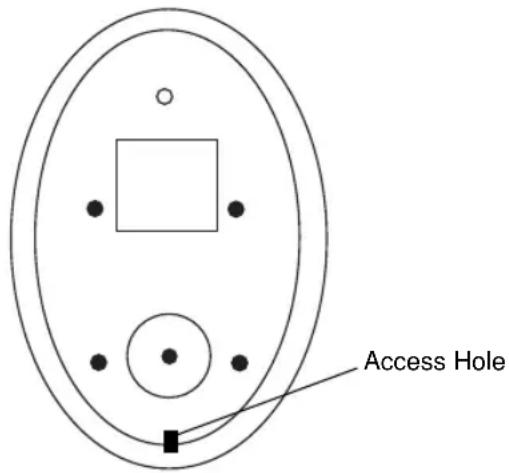
text_image
Access HoleFigure 1-3. Bottom of M2000 Scanner
-
Carefully slide out the cable.
-
Follow the previous steps to connect a new cable.
Caution
Be sure you are using the correct cable for your host. Using a cable incompatible with the host may cause damage to your scanner or host.
Wall Mounting the Scanner
An optional wall-mount bracket is available for using the M2000 in "scanning from above" applications. To wall-mount the M2000:
- Place the bracket in its desired location on the wall, and place a pencil mark on the wall through each keyhole in the bracket.
- Remove the bracket, and insert three #6 screws into the pencil marks on the wall. Do not tighten them all the way; leave enough space for the bracket's keyholes to slide onto.
- Insert the bracket's keyholes over the screws, and slide the bracket down to secure. If necessary, tighten the screws.
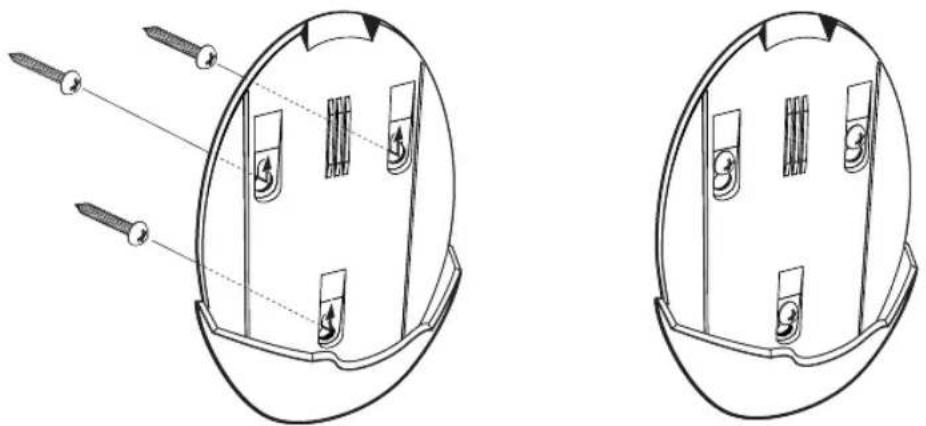
natural_image
Technical line drawing of a mechanical component with screw fasteners, shown from two views (no text or symbols)Figure 1-4. Installing the Wall Mount Bracket
- Slide the base of the scanner into the bracket, oriented so the scan window faces down.
Accessories
Required Accessories
These items must be included to complete the system, and are available through contacting your local Symbol representative or business partner.
- Host interface cables for RS-232 operation (available in 6-foot and 8.5-foot lengths.)
• 25-Pin Male D Connector (TxD on Pin 3)
• 25-Pin Male D Connector (TxD on Pin 2)
• 25-Pin Female D Connector (TxD on Pin 3)
• 25-Pin Female D Connector (TxD on Pin 2)
• 9-Pin Female D Connector (PC AT: TxD on Pin 3)
• 16-foot Synapse cable
- Synapse adapter cable
• Power supply (select one):
• 115 VAC Power Supply
• 220/240 VAC Power Supply (Europe)
• 100 VAC Power Supply (Japan)
- User documentation (Cyclone ^TM M2000 Series Product Reference Guide).
Optional Accessories
An optional Wall Mount Bracket is not included in the standard configuration, and is available through contacting your local Symbol representative or business partner.
Electronic Article Surveillance (EAS) (Optional)
Because there are several Checkpoint EAS systems available, your local Checkpoint representative should install the EAS cable. To contact your local Checkpoint representative inside the U.S. call 800-257-5540, ext. 4300. Outside the U.S., call (609) 848-1800, ext. 4300.
If you are using an EAS cable, refer to the Universal Cable EAS Installation Sheet (Symbol p/n 70-32824-xx).

Cyclone™ M2000 Series Product Reference Guide

natural_image
Simple line drawing of a closed book with visible pages and spine (no text or symbols)Chapter 2 Scanning
Introduction
This chapter describes the various laser patterns and scanning modes available in the M2000 scanner, provides instructions and tips for scanning, and lists beeper and LED indications.
Scanning Modes
The M2000 may be used on the counter-top or in a hand-held orientation. In hand-held use, the scanner operates in triggered mode where you pull the trigger to activate the scan pattern and decode the bar code. In counter-top use, the scanner operates in continuous (constant-on) mode, where it automatically decodes a bar code presented in its field of view.
Laser Patterns
The scanner emits one of four laser patterns:
- Cyclone Omnidirectional Scan Pattern is a highly efficient scan pattern which decodes 1D and EAN/UCC reduced space symbologies in any orientation.

natural_image
Abstract geometric pattern composed of interconnected lines forming a spherical structure (no text or symbols)
- Cyclone Semi-omnidirectional Scan Pattern, an alternative to the full omnidirectional pattern, scans highly truncated 1D and RSS bar codes. The bar code must be presented horizontally with no more than 20^ tilt.
- Raster Scan Pattern directly opens the laser to a full sized raster pattern. Decodes 1D, PDF-417, RSS, and Composite Codes.
- Single Scan Line Pattern (Smart Raster)
creates a single scan line which opens vertically
for PDF-417 symbols using the Smart Raster feature. This feature autodetects the type of bar code being scanned and adjusts its pattern accordingly. This provides optimal performance on 1D, PDF-417, EAN/UCC, RSS and Composite Codes.

natural_image
Pure geometric pattern of intersecting diagonal lines forming a mesh (no text or symbols)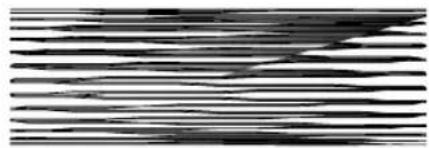
natural_image
Abstract black-and-white striped pattern with no discernible text or symbolsOne pattern can be selected for counter-top mode and another for hand-held mode via programming bar code in Chapter 3, Parameter Menus. For hand-held mode, you may alternatively select a pattern by pressing the Scan Pattern Mode Selector button when the scanner is lifted off the counter.

text_image
Raster Scan Pattern Indicator Omni/Semi-omni Scan Pattern Indicator Single Scan Line (Smart Raster) Pattern Indicator Scan Pattern Mode SelectorFigure 2-1. Top of M2000 Scanner
To scan in hand-held mode, pick up the scanner and hold it within the scanning range for the bar code. A sensor on the bottom of the scanner's stand detects when the scanner is lifted off the counter, and automatically switches to the programmed hand-held laser pattern.
Smart Raster
In Smart Raster operation, a trigger pull causes a single scan line pattern to appear. If the target is a 1-D bar code, the scanner decodes the symbol. If the target bar code is a 2-D bar code, the scanning patterns open up to a full, optimized raster pattern as soon as the scanner is properly aligned over the bar code.

text_image
Single Scan Line Pattern Open Raster Pattern Y-Axis Y-Axis Horizontal Displacement (X - Axis)Figure 2-2. M2000 Scanning Patterns
Scanning 1D (and RSS) or 2D Bar Codes
When scanning a bar code:
- Keep the scan pattern parallel to the symbol's rows.
- Hold the scanner as still as possible.
- Hold the scanner at an angle which does not cause specular reflection (see Specular Reflection on page 2-7).
- Hold the scanner close for small symbols, and farther away for large symbols. Practice shows what works.
- When using the raster pattern, if the pattern does not cover the top and bottom of a 2D symbol, pull the scanner back until it does. Make sure the scan pattern extends at least three quarters of an inch beyond the edges of the bar code.
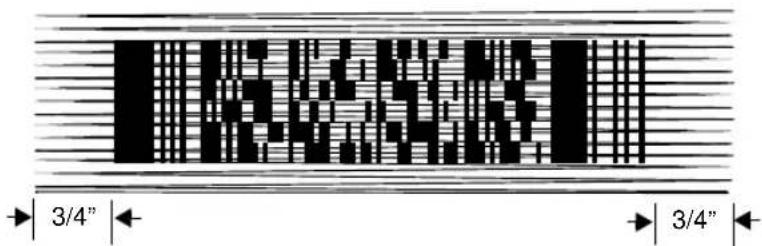
text_image
3/4" 3/4"Figure 2-3. Raster Pattern Expanded Over PDF-417 Symbol
- If the vertical scan pattern is not high enough to cover a “tall” PDF-417 symbol, move the scanner slowly down toward the bottom of the symbol, keeping the beam horizontal to the rows, and then slowly back upward to the top. Alternatively, move the scanner further away from the bar code until the scan pattern covers a larger portion of the bar code in the vertical direction.
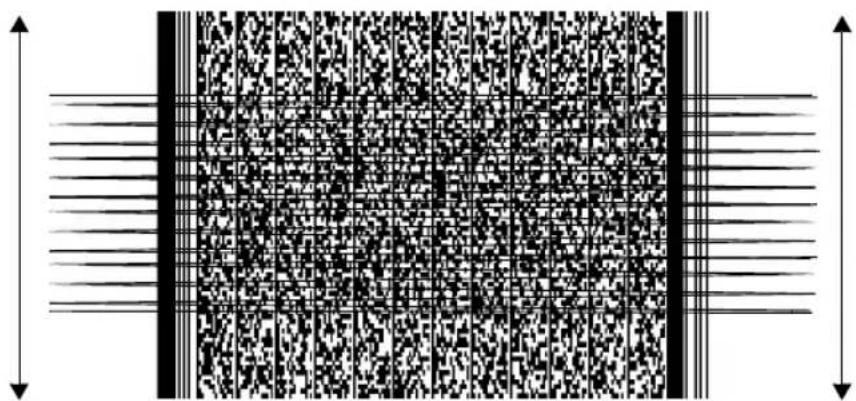
natural_image
Abstract black-and-white pattern with vertical lines and a grid of dots, no text or symbols presentFigure 2-4. Moving Scan Pattern Upward and Downward on "Tall" PDF Symbol
- The scan beam does not have to be perfectly parallel with the top and bottom of the symbol (up to a 4^ tilt is permitted).
- Be sure the symbol is in good condition.
The scanner emits a short, high-tone beep and lights the three green LEDs to indicate a successful decode. Decoded data is transmitted to the host device. Be sure that the RS-232C or IBM 4683 parameters (e.g., baud rate, parity) are set properly. Communication parameters are described in Chapter 3, Parameter Menus.
Scanning Composite Bar Codes
Composite Code is a combination of a 1D symbol (RSS, UPC/EAN or UPC/EAN-128) and a 2D symbol (CC-A, CC-B or CC-C).
When scanning a barcode:
- Keep the scan pattern parallel to the 2D symbol's rows.
- Hold the scanner as still as possible.
- Hold the scanner at an angle which does not cause specular reflection (see Specular Reflection on page 2-7).
- Hold the scanner close for small symbols, and farther away for large symbols. Practice shows what works.
- When using the single scan line pattern, aim the scan line at the middle of the 2D portion. The scan pattern will open up to an optimized raster pattern and decode both the 2D and 1D portion of the Composite Code.

text_image
Barcode image with standard barcode and adjacent text 'POSTERATE'Aim the single scan line at the center of the 2D portion

text_image
Barcode image with faint vertical lines and machine-readable text above and below the barsRaster pattern will expand to decode both portions
Note: It is not recommended to scan Composite Codes in the hands-free (on-counter) mode with a single scan line pattern. This will produce multiple reads of the bar code. To avoid this, scan the Composite Code in handheld mode. Composite Codes cannot be read with the Cyclone, Omnidirectional, or Semi-omnidirectional scan patterns.
The scanner allows the user to choose the beep mode to indicate a successful decode. Three options are available:
- Single Beep after both 1D and 2D symbols are decoded; the scanner emits a short, high-tone beep.
- Beep as each code type is decoded; the first decode beep is a short high tone beep if the 2D portion is scanned first, or a short low tone beep if the 1D portion is

Cyclone™ M2000 Series Product Reference Guide
scanned first.
The second decode beep is a short high tone.
- Double Beep after both 1D and 2D symbols are decoded; the scanner emits two short, high tone beeps.
Note: Refer to Composite Beep Mode on page 3-32 for parameters.
The scanner also lights the three green LEDs to indicate a successful decode.
Specular Reflection
When laser beams reflect directly back into the scanner from the bar code, they can "blind" the scanner and make decoding difficult. This is specular reflection.
To avoid this, scan the bar code so that the beam does not bounce directly back. But don't scan at too oblique an angle; the scanner needs to collect scattered reflections from the scan to make a successful decode. Practice quickly shows what tolerances to work within.

text_image
Specular reflection: reflected beam interferes. Bar Code Tilt Back At Slight Angle (Up to 30°) No specular reflection. Decode can occur. 30° Bar CodeFigure 2-5. Avoiding Specular Reflection
When scanning a 1D bar code, there is only a small specular dead zone to avoid ( ±2^ from the direct laser beam). The specular dead zone is larger for scanning PDF-417 ( ±9^ from the direct laser beam). However, the scanner is not effective if its beams hit the bar code's surface at an angle greater than 30^ from the normal to that surface.
Beeper Definitions
Table 2-1 provides standard beeper definitions.
Table 2-1. Standard Beeper Definitions
| Beeper Sequence Indication | |
| Standard Use | |
| Short high tone A non-composite bar code was decoded (if decode beeper is enabled). | |
| 3 short high tones Power-on or reset. Occurs immediately after the scanner is turned on, indicating that the system software is working properly. If three beeps occur during normal operation, it is due to a reset and any work in progress is lost. If this occurs often, contact the Symbol Services Division. | |
| Parameter Menu Scanning | |
| 2 short high tones Correct entry scanned or correct menu sequence performed. | |
| High/low tone Keyboard parameter selected. Enter value using numeric bar codes. | |
| High/low/high/low tone Successful program exit with change in the parameter setting. | |
| Low/high tone Input error, incorrect bar code, or “Cancel” scanned, wrong entry, incorrect bar code programming sequence; remain in program mode. | |
| Communication | |
| 4 short low tones Communication error. | |
| High/high/high/low tone Receive error. | |
| Low/high/low tone ADF transmit error. | |
| Composite Codes (default settings) | |
| Short high tone Both portions of the barcode have been successfully decoded (if “Single Beep after both are decoded” mode is enabled). | |
| 2 short high tones Scanner decoded 2D portion first and 1D portion second (if “Beep as each code type is decoded” mode is enabled). | |
| 1 short low tone and 1 short high tone Scanner decoded 1D portion first and 2D portion second (if “Beep as each code type is decoded” mode is enabled). | |
| 2 short high tones Both portions of the barcode have been successfully decoded (if “Double Beep after both are decoded” mode is enabled). |
Macro PDF
Table 2-2 provides beeper definitions for Macro PDF mode. See Macro PDF Features on page 3-127 for an explanation of Macro PDF.
Table 2-2. Macro PDF Beeper Indications
| Beeper Sequence Indication | |
| Error | |
| Long low tone Hi-level decode error caused by incorrect symbol. | |
| 2 long low tones File ID error. A bar code not in the current MPDF sequence was scanned. | |
| 3 long low tones Out of memory. There is not enough buffer space to store the current MPDF symbol. | |
| 4 long low tones Bad symbology. You scanned a 1-D or 2-D bar code in an MPDF sequence, a duplicate MPDF label, an incorrect sequence, or are trying to transmit an empty or illegal MPDF field. | |
| 5 long low tones Flushing buffer. | |
| Fast warble tone Successful parameter scanned. | |
| Decode Beep Sequence | |
| Short tone Standard decode and transmit beep for all symbols. | |
| Short low tone 1D portion of composite code was decoded. Decode beep follows when entire composite code is decoded. | |
| Short high tone 2D portion of composite code was decoded. Decode beep follows when entire composite code is decoded. | |
| Double short tone MPDF symbol is buffered. A single beep indicates transmission of the buffered data. |
LED Indications
The lit LED indicates the selected scan pattern for hand-held and counter-top mode. In hand-held mode, pressing the Scan Pattern Mode Selector button selects the next pattern, and lights the corresponding LED. (The counter-top laser pattern is selectable only via programming bar code.) When a bar code is successfully decoded, all three LEDs light momentarily.
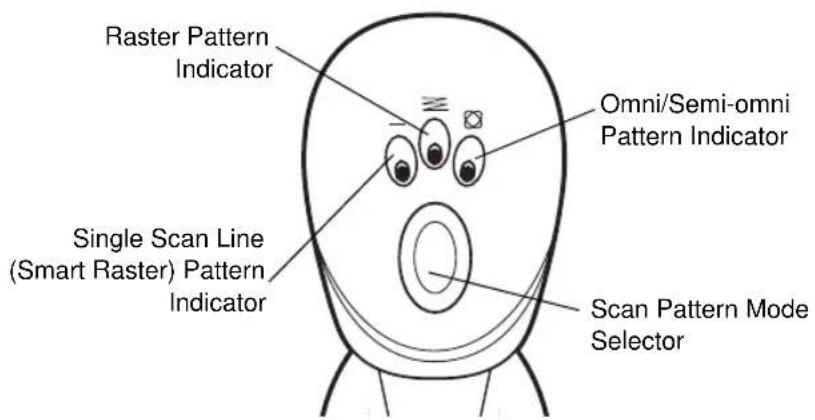
text_image
Raster Pattern Indicator Omni/Semi-omni Pattern Indicator Single Scan Line (Smart Raster) Pattern Indicator Scan Pattern Mode SelectorFigure 2-6. Laser Pattern Indicators
Maintenance
The M2000 scanner is designed to provide reliable service over an extended period of time. The only maintenance required is cleaning the exit window.
- Do not allow any abrasive material to touch the window.
- Remove any dirt particles with a damp cloth.
- Wipe the window using a tissue moistened with ammonia/water.
- Do not spray water or other cleaning liquids directly into the window.
Troubleshooting
Table 2-3. Troubleshooting
| Problem Possible Solution | |
| Nothing happens when you follow the operating instructions. | Check the system power.Make sure you are using the correct interface cable for the host device.Check for loose cable connections.Make sure the scanner is programmed to read the symbology you are trying to read. See Chapter 3, Parameter Menus.Check the label to make sure it is not defaced; if damaged beyond its error correction capability, it will not decode.Try scanning a test symbol of the symbology you are trying to read. |
| Your scanner operates but scanned data is not displayed correctly. | Check the system power.Check for loose cable connections.Check that the communication parameters (baud rate, parity, stop bits, etc.) are set properly for the host device.If you're working with a Synapse cable, refer to your Interface Guide. |
| The laser does not activate, which is followed by a beep sequence. | You may be scanning in an inappropriately hot environment.Remove the scanner from the environment, or allow the laser to cool down. |
| Transmitting PDF bar code data through a scanner/wand emulation Synapse cable causes transmit errors. | The scanner/wand emulation Synapse cable has a transmission limit of approximately 46 characters. This does not apply to other Synapse cables. |
| For the M2007 (USB), no data transmits, or incorrect data transmits, or a low/low/low/low tone sounds. | Check cable connection to scanner and host.Make sure the correct device options and country code parameters are set for the currently attached scanner.Increase Intercharacter Delay. |
| USB parameters are not working. | Make sure you've selected the correct parameter set.If you scanned a Set Defaults bar code, re-enter your parameters. |

Cyclone™ M2000 Series Product Reference Guide

natural_image
Simple line drawing of a closed book with visible pages and spine (no text or symbols)Chapter 3 Parameter Menus
Introduction
The M2000 Series Scanner can be programmed to perform various functions, or activate different features. This chapter describes each feature and provides the programming bar codes necessary for selecting these features for your scanner. Before programming, follow the setup instructions in Chapter 1, Setting Up Your Scanner.
The M2000 Series Scanner is shipped with the default settings shown in Table 3-1 on page 3-3. These default values are stored in non-volatile memory and are preserved even when the scanner is powered down.
You can change the default values by scanning single bar codes or short bar code sequences in this chapter. These new values replace the standard default values in memory. The default parameter values can be recalled by scanning the Set All Defaults bar code on page 3-11.
Scanning Sequence Examples
In most cases you need to only scan one bar code to set a specific parameter. For example, if you want to set the baud rate to 9600, simply scan the 9600 bar code listed under Baud Rate on page 3-104. The scanner issues a warble tone, signifying a successful parameter entry.
If you want to set specific code lengths or specify Serial Response Time-Out, you have to scan several bar codes. This procedure is described later in this chapter.
Errors While Scanning
If you make an error during a scanning sequence, just rescan the correct parameter.
Default Table
Table 3-1 lists the defaults for all parameters, and the page number each parameter appears on. If you wish to change any option, scan the appropriate bar code(s).
Table 3-1. Default Table
| Parameter Default Page # | ||
| Set Default Parameter All Defaults 3-11 | ||
| Host Type See page 3-12 3-12 | ||
| Scanning Options | ||
| Hand-Held Scan Pattern Mode Smart Raster 3-16 | ||
| Hand-Held Scan Pattern Mode Selector Enable 3-17 | ||
| Counter-top Scan Pattern Mode Cyclone 3-18 | ||
| Raster Height 15 3-19 | ||
| Raster Expansion Rate | 11 | 3-19 |
| Aiming Mode | Single Scan Line Raster | 3-20 |
| Trigger Mode | Level | 3-21 |
| Time-out Between Same Symbol | 0.6 sec | 3-22 |
| Time-out Between Different Symbols | 0.0 sec | 3-22 |
| Laser On Time | 5.0 sec | 3-23 |
| Beep After Good Decode | Enable 3-23 | |
| Beeper Volume | High Volume | 3-24 |
| Beeper Tone | High Frequency | 3-25 |
| Transmit “No Decode” Message | Disable | 3-25 |
| Parameter | Default | Page # |
| Linear Code Type Security Levels: | 3-26 | |
| Hand-held | 2 | |
| Counter-top | 1 | |
| Bi-directional Redundancy Disable 3-28 | ||
| Autodiscriminate Response Time 1.0 second 3-28 | ||
| Composite Codes | ||
| Composite Codes CC-C Disable 3-29 | ||
| Composite Codes CC-A/B Disable 3-30 | ||
| TLC39 Disable 3-31 | ||
| Composite Beep Mode Double Beep 3-32 | ||
| UPC/EAN | ||
| UPCA Enable 3-33 | ||
| UPCE Enable 3-33 | ||
| UPCE1 Disable 3-34 | ||
| EAN-8 Enable 3-34 | ||
| EAN-13 Enable 3-35 | ||
| Bookland EAN | Disable 3-36 | |
| UPC/EAN Coupon Code | Disable 3-37 | |
| Decode UPC/EAN Supplementals | Ignore | 3-38 |
| Decode UPC/EAN Supplemental Redundancy | 12 | 3-44 |
| Transmit UPCA Check Digit | Enable 3-44 | |
| Transmit UPCE Check Digit | Enable 3-45 | |
| Transmit UPCE1 Check Digit Enable 3-45 | ||
| UPCA Preamble System Character 3-46 | ||
| UPCE Preamble System Character 3-47 | ||
| UPCE1 Preamble System Character 3-48 | ||
| Convert UPCE to A Disable 3-49 | ||
| Convert UPCE1 to A Disable 3-50 | ||
| EAN-8 Zero Extend Disable 3-51 | ||
| Bookland ISBN Format 10 3-52 | ||
| Linear UPC/EAN Decode Disable 3-53 | ||
| UPC/EAN Decode Performance Enable 3-53 | ||
| UPC Composite Mode Never Linked 3-54 | ||
| Code 128 | ||
| Code 128 Enable 3-55 | ||
| UCC/EAN-128 | Enable 3-55 | |
| ISBT 128 | Disable 3-56 | |
| Code 128 Decode Performance | Enable 3-57 | |
| Code 39 | ||
| Code 39 | Enable 3-58 | |
| Trioptic Code 39 | Disable 3-58 | |
| Convert Code 39 to Code 32 | Disable 3-59 | |
| Code 32 Prefix | Enable 3-60 | |
| Parameter Default | Page # | |
| Set Length(s) for Code 39 Length within Range: | 01-55 | 3-61 |
| Code 39 Check Digit Verification Disable 3-63 | ||
| Transmit Code 39 Check Digit Disable 3-63 | ||
| Code 39 Full ASCII Conversion Disable 3-64 | ||
| Code 39 Decode Performance Enable 3-65 | ||
| Code 93 | ||
| Code 93 Disable 3-66 | ||
| Set Length(s) for Code 93 Length within Range: | 04-55 | 3-67 |
| Code 11 | ||
| Code 11 Disable 3-69 | ||
| Set Lengths for Code 11 4 to 55 3-70 | ||
| Code 11 Check Digit Verification Disable 3-72 | ||
| Transmit Code 11 Check Digit(s) Disable 3-73 | ||
| Interleaved 2 of 5 | ||
| Interleaved 2 of 5 Disable 3-74 | ||
| Set Length(s) for I 2 of 5 1 Discrete Length: 14 3-75 | ||
| I 2 of 5 Check Digit Verification | Disable 3-77 | |
| Transmit I 2 of 5 Check Digit | Disable 3-78 | |
| Convert I 2 of 5 to EAN 13 | Disable 3-79 | |
| Parameter | Default | Page # |
| Discrete 2 of 5 | ||
| Discrete 2 of 5 Disable 3-80 | ||
| Set Length(s) for D 2 of 5 1 Discrete Length: 12 3-81 | ||
| Codabar | ||
| Codabar Disable 3-83 | ||
| Set Lengths for Codabar Length within Range: | 05-55 | 3-84 |
| CLSI Editing Disable 3-86 | ||
| NOTIS Editing Disable 3-86 | ||
| MSI Plessey | ||
| MSI Plessey Disable 3-87 | ||
| Set Length(s) for MSI Plessey Length Within Range: | 06 - 55 | 3-88 |
| MSI Plessey Check Digits One 3-90 | ||
| Transmit MSI Plessey Check Digit Disable 3-90 | ||
| MSI Plessey Check Digit Algorithm Mod 10/Mod 10 | 3-91 | |
| PDF-417/MicroPDF-417 | ||
| PDF-417 | Enable | 3-92 |
| MicroPDF-417 Disable 3-92 | ||
| MicroPDF Performance | Standard | 3-93 |
| Code 128 Emulation | Disable 3-94 | |
| RSS Codes | ||
| RSS-14 | Disable | |
| RSS-Limited Disable 3-95 | ||
| RSS-Expanded Disable 3-96 | ||
| Security Level 0 3-96 | ||
| Data Options | ||
| Transmit Code ID Character None 3-98 | ||
| Prefix/Suffix Values Prefix Suffix | Enter Enter | 3-100 |
| Scan Data Transmission Format Data as is 3-101 | ||
| Decode Buffering Single Scan Line/Raster: | Disable Omni: Disable | 3-103 |
| RS-232 Options | ||
| Baud Rate 9600 3-104 | ||
| Parity None 3-106 | ||
| Check Parity | Enable | 3-108 |
| Hardware Handshaking | None | 3-109 |
| Software Handshaking | None | 3-112 |
| Stop Bit Select | 1 | 3-114 |
| Intercharacter Delay | 0 | 3-114 |
| Host Serial Response Time-out | 2 sec | 3-115 |
| Parameter | Default Page # | |
| Host Serial RTS Line State Low RTS 3-115 | ||
| Beep onDisable 3-116 | ||
| Data Transmission Format 8-bit 3-116 | ||
| USB (M2007 only) | ||
| Set USB Defaults -- 3-117 | ||
| USB Device Type IBM Hand-Held USB 3-118 | ||
| Country Selection North American, Standard 3-120 | ||
| Keystroke Delay No Delay (0 ms) 3-124 | ||
| CAPS LOCK Disable 3-125 | ||
| Ignore Unknown Characters | Send Bar Codes with Unknown Characters | 3-126 |
| Macro PDF | ||
| Macro PDF Transmit/Decode Mode | Buffer All Symbols/Transmit Macro PDF when Complete | 3-128 |
| Transmit Each Symbol in Codeword Format | Disable | 3-130 |
| Transmit Unknown Codewords | Disable | 3-131 |
| Escape Character | None | 3-132 |
| ECI | ||
| Delete Character Set ECIs | Enable | 3-133 |
| ECI Decoder | Enable | 3-134 |
| Parameter Default | Page # | |
| Transmit Macro PDF User-Selected Field | ||
| Transmit File Name Disable 3-135 | ||
| Transmit Block Count Disable 3-136 | ||
| Transmit Time Stamp Disable 3-136 | ||
| Transmit Sender Disable 3-137 | ||
| Transmit Addressee Disable 3-137 | ||
| Transmit Checksum Disable 3-138 | ||
| Transmit File Size Disable 3-138 | ||
| Transmit Macro PDF Control Header Disable 3-139 | ||
| Last Block Marker Disable 3-139 | ||
| Flush Macro Buffer N/A 3-140 | ||
| Abort Macro PDF Entry N/A 3-140 | ||
Set Default Parameter
Scanning this bar code returns all parameters to the values listed in Table 3-1 on page 3-3.

Set All Defaults
Host Type
If you're using a Synapse cable, your host is autodetected, so you don't have to scan a host bar code. If not, select an IBM 46XX or RS-232 host from the following bar code menus.
IBM 46XX Host Types
To select one of the following as a POS Interface, scan the appropriate bar code below.
Note: To properly communicate with 468X/9X terminals, the driver corresponding to the port being used must be loaded and enabled when you are configuring your terminal system. See your terminal's operating manual for details.

text_image
Black and white barcode image with vertical lines and a central dotPort 5B
text_image
Black and white barcode image with vertical lines and a small number 'n' in the center.Port 9B

text_image
Black and white barcode image with vertical lines and a small number 'n' in the center.Port 17/9E
RS-232C Host Types
Three RS-232C hosts are set up with their own parameter default settings (Table 3-2). Selecting the ICL, Fujitsu, or Nixdorf RS-232C terminal sets the defaults listed below. These defaults take precedence over standard defaults. So if you select Fujitsu RS-232C, then select the standard defaults, the Fujitsu defaults still apply.
Table 3-2. Terminal Specific RS-232C
| Parameter ICL Fujitsu Nixdorf | Mode A/Mode B | ||
| Transmit Code ID Yes Yes Yes | |||
| Data Transmission Format Data/Suffix | Data/Suffix Data/Suffix | ||
| Suffix CR (1013) CR (1013) CR (1013) | |||
| Baud Rate 9600 9600 9600 | |||
| Parity Even None Odd | |||
| Hardware Handshaking | RTS/CTS Option 3 | None | RTS/CTS Option 3 |
| Software Handshaking | None | None | None |
| Serial Response Time-out | 9.9 Sec. | 2 Sec. | 9.9 Sec. |
| Stop Bit Select | One | One | One |
| ASCII Format | 8-Bit | 8-Bit | 8-Bit |
| Beep On | Disabled | Disabled | Disabled |
| RTS Line State | High | Low *Low = | No data to send |
*In the Nixdorf Mode B, if CTS is Low, scanning is disabled. When CTS is High, the user can scan bar codes.
RS-232C Host Types (continued)
Selecting the ICL, Fujitsu, or Nixdorf RS-232C terminal enables the transmission of Code ID characters as listed in Table 3-3. These Code ID characters are not programmable and are separate from the Transmit Code ID feature. The Transmit Code ID feature should not be enabled for these terminals.
Note: These Code IDs do not apply when Standard RS-232C is selected.
Table 3-3. Terminal-Specific Code ID Characters
| Code Type ICL Fu | Fujitsu Nixdorf | ||
| UPCA | A | A | |
| UPCE | E | E | |
| EAN-8 | FF | FF | |
| EAN-13 F F A | |||
| Code 39 CNone M | |||
| Codabar NNone | N | ||
| Code 128 | LNoneK | None | K |
| I 2 of 5 | INoneI | None | I |
| UCC/EAN 128 | LNoneP | None | P |
| Bookland EAN | F F A | ||
RS-232C Host Types (continued)
To select an RS-232C host interface, scan one of the following bar codes.

text_image
Black and white barcode image with vertical lines and a central dotStandard RS-232C

text_image
Black and white barcode image with vertical lines on both sidesICL RS-232C

text_image
Black and white barcode image with vertical lines and a central dotOPOS
text_image
Black and white barcode image with vertical lines and a horizontal bar at the bottomNixdorf RS-232C Mode A
text_image
Black and white barcode image with vertical lines and a small number '1' at the bottomNixdorf RS-232C Mode B

text_image
Barcode image containing encoded digital informationFujitsu RS-232C
Scanning Options
Hand-Held Scan Pattern Mode
Select one of the following scan pattern options to use when the scanner is in hand-held use (see Scanning Modes on page 2-1 for descriptions):
text_image
Black and white barcode image with vertical lines on both sidesSingle Scan Line (Smart Raster) Pattern

text_image
Black and white barcode image with vertical linesAlways Raster
text_image
Black and white barcode image with vertical lines on both sidesProgrammable Raster
text_image
Black and white barcode image with vertical lines forming a pattern of repeating patternsSlab Pattern
text_image
Black and white barcode image with vertical lines and a central dotOmnidirectional Pattern Semi-omnidirectional Pattern
text_image
Black and white barcode image with vertical lines and a small number 'n' in the center.Scan Pattern Mode Selector
Select whether the user can select the hand-held laser pattern via the Scan Pattern Mode Selector button.
text_image
Black and white barcode image with vertical lines and a central dotEnable Mode Selector Button
text_image
Black and white barcode image with vertical lines and a central dotDisable Mode Selector Button
Counter-top Scan Pattern Mode
Select one of the following scan pattern options to remain on when the scanner is in counter-top (hands-free) use (see Scanning Modes on page 2-1 for descriptions).

text_image
Black and white barcode image with vertical lines and a central dotSmart Raster
text_image
Black and white barcode image with vertical lines on both sidesAlways Raster

text_image
Black and white barcode image with vertical lines and a small number '1' at the bottom left.Omnidirectional Pattern
text_image
Black and white barcode image with vertical lines and a small number 'n' in the center.Semi-omnidirectional Pattern
Programmable Raster Height And Raster Expansion Speed
This parameter selects the laser pattern's height and rate of expansion, and is only used when Programmable Raster or Always Raster is enabled. This parameter is intended for very specific applications, and is usually not necessary.
Select the laser pattern's height and/or rate of expansion.
- Scan the bar code for either Raster Height or Raster Expansion Speed below.
- Scan two numeric bar codes beginning on page 3-141 that represent a two-digit value. Valid values are between 01 and 15.
- If you make an error, or wish to change your selection, scan Cancel on page 143.

text_image
Barcode image containing encoded digital informationRaster Height (Default 15)

text_image
Black and white barcode image with vertical lines and dots, no readable text or symbolsRaster Expansion Speed (Default 11)
Aiming Mode
For hand-held mode only, select either single scan line raster for aiming, or an aiming dot to appear for a normal or extended period of time.

text_image
Barcode image containing machine-readable data, no human-readable text visibleSingle scan line Raster (No Aiming Dot)
text_image
Barcode image with black and white vertical bars, no visible text or symbolsAiming Dot Normal (200 ms) Timeout

text_image
Black and white barcode image with vertical lines and dotsAiming Dot Extended (400 ms) Timeout
Triggering Modes
Choose one of the options below to set the operation of the trigger.
- Level - A trigger pull activates the laser and decode processing. The laser remains on, and decode processing continues until a trigger release, a valid decode, or the Laser On Time-out is reached.
- Pulse - A trigger pull activates the laser and decode processing. The laser remains on and decode processing continues until a valid decode, or the Laser On Time-out is reached.
- Continuous - The laser is always on and decoding. Refer to the Hand-Held Scan Pattern Mode on page 3-16 and the Counter-top Scan Pattern Mode on page 3-18.

text_image
Level
text_image
Pulse
text_image
ContinuousTimeout Between Decodes
Timeout Between Decodes, Same Symbol
This option is used in continuous-on mode to prevent the beeper from continuously beeping when a symbol is left in the scanner's field of view. It is programmable in 0.1 second increments from 0.0 to 9.9 seconds. The recommended interval is 0.6 seconds.
Timeout Between Decodes, Different Symbol
Timeout Between Decodes, Different Symbol is used in continuous-on mode to prevent the beeper from beeping when a different symbol appears in the scanner's field of view before the timeout period between decodes expires. This is programmable in 0.1 second increments from 0.0 to 9.9 seconds. The recommended value is 0.0 seconds.
Select the timeouts between decodes for the same or different symbols.
- Scan the option bar code you wish to set.
- Scan two numeric bar codes beginning on page 3-141 which correspond to the desired interval, in 0.1 second increments.
- If you make an error, or wish to change your selection, scan Cancel on page 143.

text_image
Timeout Between Decodes - Same Symbol
text_image
Black and white barcode image with vertical lines and a central dotTimeout Between Decodes - Different Symbols
Laser On Time
This parameter sets the maximum time decode processing continues during a scan attempt. It is programmable in 0.1 second increments from 0.5 to 9.9 seconds.
To set a Laser On Time, scan the bar code below. Next scan two numeric bar codes beginning on page 3-141 that correspond to the desired on time. Times less than 1.0 second must have a leading zero. For example, to set an on time of 0.5 seconds, scan the bar code below, then scan the "0" and "5" bar codes. If you make an error, or wish to change your selection, scan the Cancel bar code on page 3-143.

text_image
Barcode image containing encoded digital informationLaser On Time
Beep After Good Decode
Scan this symbol if you want the scanner to beep after a good decode.

text_image
Barcode image with black and white vertical bars, no visible text or symbols beyond the patternBeep After Good Decode
Scan this symbol if you do not want the scanner to beep after a good decode. The beeper still operates during parameter menu scanning and indicates error conditions.

text_image
Black and white barcode image with vertical lines above and below the barsDo Not Beep After Good Decode
Beeper Volume
To select a decode beep volume, scan the Low Volume, Medium Volume, or High Volume bar code.
text_image
Black and white barcode image with vertical lines forming a pattern of repeating patternsLow Volume

text_image
Barcode image containing encoded digital informationMedium Volume
text_image
Black and white barcode image with vertical lines on both sidesHigh Volume
Beeper Tone
To select a decode beep frequency (tone), scan the appropriate bar code.

text_image
Barcode image with black and white vertical bars, no visible text or symbolsLow Frequency

text_image
Barcode image with black and white vertical bars, no visible text or symbolsMedium Frequency

text_image
Black and white barcode image with vertical lines and a horizontal bar at the bottomHigh Frequency
Transmit "No Read" Message
When enabled, if a symbol does not decode, "NR" is transmitted. Any enabled prefix or suffixes are appended around this message.
When disabled, if a symbol does not read, nothing is sent to the host.

text_image
Barcode image containing machine-readable data, with vertical black and white lines representing the pattern of data.Enable No Read
text_image
Black and white barcode image with vertical lines and a central dotDisable No Read
Linear Code Type Security Level
Note: Does not apply to Code 128.
The M2000 offers four levels of decode security for linear code types (e.g., Code 39, Interleaved 2 of 5). Select a higher security level for poor quality bar codes. As security levels increase, the scanner's aggressiveness decreases.
Select the security level appropriate for your bar code quality.
Linear Security Level 1
The following code types must be successfully read twice before being decoded:
| Code Type Length | |
| Codabar All | |
| MSI Plessey 4 or less | |
| D 2 of 5 8 or less | |
| I 2 of 5 8 or less |

text_image
Black and white barcode image with vertical lines and a small number '1' at the bottom right.Linear Security Level 1
Linear Security Level 2
All code types must be successfully read twice before being decoded.

text_image
Black and white barcode image with vertical bars on both sidesLinear Security Level 2
Linear Security Level 3
Code types other than the following must be successfully read twice before being decoded. The following codes must be read three times:
| Code Type Length | |
| MSI Plessey 4 or less | |
| D 2 of 5 8 or less | |
| I 2 of 5 8 or less |

text_image
Black and white barcode image with vertical lines and a horizontal bar at the bottomLinear Security Level 3
Linear Security Level 4
All code types must be successfully read three times before being decoded.

text_image
Black and white barcode image with vertical lines and a small number '1' at the bottomLinear Security Level 4
Bi-directional Redundancy
This parameter is only valid when a Linear Code Type Security Level is enabled (see page 3-26). When this parameter is enabled, a bar code must be successfully scanned in both directions (forward and reverse) before being decoded.

Enable Bi-directional Redundancy

Disable Bi-directional Redundancy
Autodiscriminate Response Time
This parameter extends the length of time during which the scanner tries to detect which host it is connected to on power up.
text_image
Black and white barcode image with vertical lines and dots1 second

5 seconds
Composite Codes
Composite CC-C
Scan a bar code below to enable or disable composite bar codes of type CC-C. If you select Enable, EAN-128 (the associated 1D symbology) must also be enabled.

text_image
Black and white barcode image with vertical lines and a small number 'n' in the center.Enable CC-C
text_image
Black and white barcode image with vertical lines and a small number '1' at the bottom right.Disable CC-C
Composite CC-A/B
Scan a bar code below to enable or disable composite bar codes of type CC-A/B. To specify which CC-A/B composites are decoded, you may enable or disable the associated 1D symbology. For example, to allow all CC-A/B types, enable UPCA, UPCE, EAN-8, EAN-13, EAN-128, RSS-14, RSS-14 Limited and RSS-14 Expanded. Disabling any of these prevents that type of CC-A symbol from being decoded.
text_image
Black and white barcode image with vertical lines and a small number 'n' in the bottom right corner.Enable CC-A/B

text_image
Black and white barcode image with vertical lines and a small number 'n' in the center.Disable CC-A/B
TLC39
Scan a bar code below to enable or disable Composite bar codes of type TLC-39.
Note: Code39 must be enabled to scan TLC39 symbols.

text_image
Black and white barcode image with vertical lines and a horizontal bar at the bottomEnable TLC39

text_image
Black and white barcode image with vertical lines and a small number '1' at the bottom right.Disable TLC39
Composite Beep Mode
To select the number of decode beeps when a composite bar code is decoded, scan the appropriate bar code.

text_image
Black and white barcode image with vertical lines and a small number '1' at the bottomSingle Beep after both are decoded
text_image
Black and white barcode image with vertical lines and dots, no readable text or symbolsBeep as each code type is decoded
text_image
Black and white barcode image with vertical lines and dots, no readable text or symbolsDouble Beep after both are decoded
Enable/Disable UPCA

text_image
Black and white barcode image with vertical lines on both sidesEnable UPCA

text_image
Black and white barcode image with vertical lines and a central dotDisable UPCA
Enable/Disable UPCE

text_image
Black and white barcode image with vertical lines and a central dotEnable UPCE

text_image
Black and white barcode image with vertical lines on both sidesDisable UPCE

Cyclone™ M2000 Series Product Reference Guide
Enable/Disable UPCE1

text_image
Black and white barcode image with vertical lines and a central dotEnable UPCE1
text_image
Barcode image with black and white vertical bars, no visible text or symbolsDisable UPCE1
Enable/Disable EAN-8

text_image
Barcode image with vertical black and white bars, no visible text or symbols beyond the patternEnable EAN-8

text_image
Black and white barcode image with vertical lines and a central dotDisable EAN-8
Enable/Disable EAN-13

text_image
Black and white barcode image with vertical lines and a central dotEnable EAN-13

text_image
Black and white barcode image with vertical lines and a small number '1' at the bottom right.Disable EAN-13
Enable/Disable Bookland EAN

text_image
Black and white barcode image with vertical lines and a small number '1' at the bottom right.Enable Bookland EAN

text_image
Black and white barcode image with vertical lines and a small number '1' at the bottomDisable Bookland EAN
Note: If you enable Bookland EAN, select a Bookland ISBN Format on page 3-52. Also select either Decode UPC/EAN Supplementals, Autodiscriminate UPC/EAN Supplementals, or Enable 978/979 Supplemental Mode in Decode UPC/EAN Supplementals on page 3-38.
UPC/EAN Coupon Code
When enabled, this parameter decodes UPCA barcodes starting with digit '5', EAN-13 barcodes starting with digit '99', and UPCA/EAN-128 Coupon Codes. UPCA, EAN-13 and EAN-128 must be enabled to scan all types of Coupon Codes.

text_image
Black and white barcode image with vertical lines and a central dotEnable UPC/EAN Coupon Code
text_image
Barcode image containing encoded digital informationDisable UPC/EAN Coupon Code
Note: Autodiscrimination of the EAN128 (right half) of a coupon code is controlled by the Decode UPC/EAN Supplemental Redundancy parameter.
Decode UPC/EAN Supplementals
Supplementals are additionally appended characters (2 or 5) according to specific code format conventions (e.g., UPC A+2, UPC E+2, EAN 8+2). The following options are available:
- If you select Ignore UPC/EAN with Supplementals, and the scanner is presented with a UPC/EAN plus supplemental symbol, the scanner decodes UPC/EAN and ignores the supplemental characters.
- If you select Decode UPC/EAN with Supplementals, the scanner only decodes UPC/EAN symbols with supplemental characters, and ignores symbols without supplementals.
- If you select Autodiscriminate UPC/EAN Supplementals, the scanner decodes UPC/EAN symbols with supplemental characters immediately. If the symbol does not have a supplemental, the scanner must decode the bar code the number of times set via Decode UPC/EAN Supplemental Redundancy on page 3-44 before transmitting its data to confirm that there is no supplemental.
-
If you select one of the following Supplemental Mode options, the scanner immediately transmits EAN-13 bar codes starting with that prefix that have supplemental characters. If the symbol does not have a supplemental, the scanner must decode the bar code the number of times set via Decode UPC/EAN Supplemental Redundancy on page 3-44 before transmitting its data to confirm that there is no supplemental. The scanner transmits UPC/EAN bar codes that do not have that prefix immediately.
-
Enable 378/379 Supplemental Mode
- Enable 978/979 Supplemental Mode
Note: If you select 978/979 Supplemental Mode and are scanning Bookland EAN bar codes, see Enable/Disable Bookland EAN on page 3-36 to enable Bookland EAN, and select a format using Bookland ISBN Format on page 3-52.
- Enable 977 Supplemental Mode
- Enable 414/419/434/439 Supplemental Mode
- Enable 491 Supplemental Mode
- Enable Smart Supplemental Mode - applies to EAN-13 bar codes starting with any prefix listed previously.
- Supplemental User-Programmable Type 1 - applies to EAN-13 bar codes starting with a 3-digit user-defined prefix. Set this 3-digit prefix using Supplemental User-Programmable 1.
- Supplemental User-Programmable Type 1 and 2 - applies to EAN-13 bar codes starting with either of two 3-digit user-defined prefixes. Set the 3-digit prefixes using Supplemental User-Programmable 1 and Supplemental User-Programmable 2.
- Smart Supplemental Plus User-Programmable 1 - applies to EAN-13 bar codes starting with any prefix listed previously or the user-defined prefix set using Supplemental User-Programmable 1.
- Smart Supplemental Plus User-Programmable 1 and 2 - applies to EAN-13 bar codes starting with any prefix listed previously or one of the two user-defined prefixes set using Supplemental User-Programmable 1 and Supplemental User-Programmable 2.
- Select Supplemental User-Programmable 1 to set a 3-digit prefix. Then select the 3 digits using the numeric bar codes beginning on page 3-141.
- Select Supplemental User-Programmable 2 to set a second 3-digit prefix. Then select the 3 digits using the numeric bar codes beginning on page 3-141.
Note: To minimize the risk of invalid data transmission, select whether to read or ignore supplemental characters.
Select an option by scanning one of the following bar codes.

text_image
Barcode image containing encoded digital informationIgnore UPC/EAN With Supplementals
Decode UPC/EAN Supplementals (continued)

text_image
Black and white barcode image with vertical lines and dots, no readable text or symbolsDecode UPC/EAN With Supplementals

text_image
Black and white barcode image with vertical lines and a small number '1' at the bottomAutodiscriminate UPC/EAN Supplementals

text_image
Black and white barcode image with vertical lines and dotsEnable 378/379 Supplemental Mode

text_image
Black and white barcode image with vertical lines and dotsEnable 978/979 Supplemental Mode
Decode UPC/EAN Supplementals (continued)

text_image
Barcode image containing encoded digital informationEnable 977 Supplemental Mode

text_image
Black and white barcode image with vertical lines and dotsEnable 414/419/434/439 Supplemental Mode

text_image
Barcode image containing encoded digital informationEnable 491 Supplemental Mode

text_image
Black and white barcode image with vertical lines and dots, no readable text or symbolsSmart Supplemental Mode (All of the Above)
Decode UPC/EAN Supplementals (continued)
text_image
Black and white barcode image with vertical bars of varying widthsSupplemental User-Programmable Type 1

text_image
Barcode image with black and white vertical bars, no visible text or symbolsSupplemental User-Programmable Type 1 and 2
text_image
Black and white barcode image with vertical lines and dots, no readable text or symbolsSmart Supplemental Plus User-Programmable 1
text_image
Black and white barcode image with vertical lines and dots, no readable text or symbolsSmart Supplemental Plus User-Programmable 1 and 2
Decode UPC/EAN Supplementals (continued)

text_image
Black and white barcode image with vertical lines on both sidesSupplemental User-Programmable 1

text_image
Black and white barcode image with vertical lines and a central dotSupplemental User-Programmable 2
Decode UPC/EAN Supplemental Redundancy
With Autodiscriminate UPC/EAN Supplementals or one of the supplemental modes selected, this option adjusts the number of times a symbol without supplementals is decoded before transmission. The range is from 2 to 99 times. Twelve or above is recommended when decoding a mix of UPC/EAN symbols with and without supplementals.
Scan the bar code below to select a decode redundancy value. Next scan two numeric bar codes beginning on page 3-141. Single digit numbers must have a leading zero. If you make an error, or wish to change your selection, scan the Cancelbar code on page 3-143.
text_image
Black and white barcode image with vertical lines and a central dotDecode UPC/EAN Supplemental Redundancy
Transmit UPCA Check Digit
Scan the appropriate bar code below to transmit the symbol with or without the UPCA check digit.

text_image
Black and white barcode image with vertical lines and a small number '1' at the bottom right.Transmit UPCA Check Digit

text_image
Barcode image containing encoded digital informationDo Not Transmit UPCA Check Digit
Transmit UPCE Check Digit
Scan the appropriate bar code below to transmit the symbol with or without the UPCE check digit.

text_image
Black and white barcode image with vertical lines and a central dotTransmit UPCE Check Digit

text_image
Barcode image with black and white vertical bars, no visible text or symbolsDo Not Transmit UPCE Check Digit
Transmit UPCE1 Check Digit
Scan the appropriate bar code below to transmit the symbol with or without the UPCE1 check digit.
text_image
Barcode image containing encoded digital informationTransmit UPCE1 Check Digit

text_image
Black and white barcode image with vertical lines and a central dotDo Not Transmit UPCE1 Check Digit
UPCA Preamble
Three options are given for lead-in characters for UPCA symbols transmitted to the host device: transmit system character only, transmit system character and country code ("0" for USA), and no preamble transmitted. The lead-in characters are considered part of the symbol.

text_image
Black and white barcode image with vertical lines and a central dotNo Preamble ()

text_image
Black and white barcode image with vertical lines and a small number '1' at the bottom right.System Character (

text_image
Black and white barcode image with vertical bars of varying widthsSystem Character & Country Code (
UPCE Preamble
Three options are given for lead-in characters for UPCE symbols transmitted to the host device: transmit system character only, transmit system character and country code ("0" for USA), and no preamble transmitted. The lead-in characters are considered part of the symbol.

text_image
Black and white barcode image with vertical lines and a central dotNo Preamble ()

text_image
Black and white barcode image with vertical lines and a small number '1' at the bottom right.System Character (

text_image
Black and white barcode image with vertical lines and a small number '1' at the bottom right.System Character & Country Code (
UPCE1 Preamble
Three options are given for lead-in characters for UPCE1 symbols transmitted to the host device: transmit system character only, transmit system character and country code ("0" for USA), and no preamble transmitted. The lead-in characters are considered part of the symbol.

text_image
Black and white barcode image with vertical lines and a central dotNo Preamble ()

text_image
Barcode image containing encoded digital informationSystem Character (

text_image
Barcode image containing encoded digital informationSystem Character & Country Code (
Convert UPCE to UPCA
This parameter converts UPCE (zero suppressed) decoded data to UPCA format before transmission. After conversion, data follows UPCA format and is affected by UPCA programming selections (e.g., Preamble, Check Digit).
Scanning DO NOT CONVERT UPCE TO UPCA allows you to transmit UPCE (zero suppressed) decoded data.

text_image
Black and white barcode image with vertical lines and a central dotConvert UPCE To UPCA (Enable)

text_image
Black and white barcode image with vertical lines and a small number '1' at the bottomDo Not Convert UPCE To UPCA (Disable)
Convert UPCE1 to UPCA
This parameter converts UPCE1 (zero suppressed) decoded data to UPCA format before transmission. After conversion, data follows UPCA format and is affected by UPCA programming selections (e.g., Preamble, Check Digit).
Scanning DO NOT CONVERT UPCE1 TO UPCA allows you to transmit UPCE1 (zero suppressed) decoded data.

text_image
Black and white barcode image with vertical lines and a central dotConvert UPCE1 To UPCA (Enable)

text_image
Black and white barcode image with vertical lines and a central dotDo Not Convert UPCE1 To UPCA (Disable)
EAN Zero Extend
When this parameter is enabled, five leading zeros are added to decoded EAN-8 symbols to make them compatible in format to EAN-13 symbols.
Disabling this parameter returns EAN-8 symbols to their normal format.

text_image
Black and white barcode image with vertical lines and a small number '1' at the bottomEnable EAN Zero Extend

text_image
Black and white barcode image with vertical lines and dotsDisable EAN Zero Extend
Bookland ISBN Format
If you enabled Bookland EAN using Enable/Disable Bookland EAN on page 3-36, select one of the following formats for Bookland data:
- Bookland ISBN-10 (default) - The scanner reports Bookland data starting with 978 in traditional 10-digit format with the special Bookland check digit for backward-compatibility. Data starting with 979 is not considered Bookland in this mode.
- Bookland ISBN-13 - The scanner reports Bookland data (starting with either 978 or 979) as EAN-13 in 13-digit format to meet the 2007 ISBN-13 protocol.
text_image
Black and white barcode image with vertical lines and a small number '1' at the bottomBookland ISBN-10

text_image
Black and white barcode image with vertical lines and a small number 'n' in the bottom right corner.Bookland ISBN-13
Note: For Bookland EAN to function properly, first enable Bookland EAN using Enable/Disable Bookland EAN on page 3-36, then select either Decode UPC/EAN Supplementals, Autodiscriminate UPC/EAN Supplementals, or Enable 978/979 Supplemental Mode in Decode UPC/EAN Supplementals on page 3-38.
Linear UPC/EAN Decode
This option applies to code types containing two adjacent blocks (e.g., UPCA, EAN-8, EAN-13). When enabled, a bar code is transmitted only when both the left and right blocks are successfully decoded within one laser scan. Enable this option when bar codes are in proximity to each other.

text_image
Black and white barcode image with vertical lines resembling a simplified number 3 or adjacent to the digit '3'Enable Linear UPC/EAN Decode

text_image
Black and white barcode image with vertical lines and dots, no readable text or symbolsDisable Linear UPC/EAN Decode
UPC/EAN Decode Performance
Enabling this feature improves decoding of height-truncated UPC/EAN symbols.

text_image
Black and white barcode image with vertical lines and a small number '1' at the bottom right.Enable UPC/EAN Decode Performance

text_image
Black and white barcode image with vertical lines and dotsDisable UPC/EAN Decode Performance
UPC Composite Mode
UPC symbols can be "linked" with a 2D symbol during transmission as if they were one symbol. Three options are offered for these symbols:
- If UPC Never Linked is selected, UPC bar codes are transmitted regardless of whether a 2D symbol is detected.
- If UPC Always Linked is selected, UPC bar codes are only transmitted when the 2D portion is detected.
- If Autodiscriminate UPC Composites is selected, the scanner determines if there is a 2D portion, then transmits the UPC portion only.

text_image
Black and white barcode image with vertical lines and a central dotUPC Never Linked

text_image
Black and white barcode image with vertical lines and patternsUPC Always Linked

text_image
Black and white barcode image with vertical lines and a small number 'n' in the bottom right corner.Autodiscriminate UPC Composites
Enable/Disable Code 128

text_image
Black and white barcode image with vertical lines and a central dotEnable Code 128

text_image
Black and white barcode image with vertical lines and a central dotDisable Code 128
Enable/Disable UCC/EAN-128

text_image
Black and white barcode image with vertical lines and a small number '1' at the bottom right.Enable UCC/EAN-128

text_image
Black and white barcode image with vertical lines and a central '1' markDisable UCC/EAN-128
Enable/Disable ISBT 128

text_image
Black and white barcode image with vertical lines and a central dotEnable ISBT 128

Disable ISBT 128
Lengths for Code 128
No length setting is required for Code 128. The default setting is Any Length.
Code 128 Decode Performance
Enabling this feature may improve decoding of wide or height-truncated symbols.
Enable Code 128 Decode Performance

Disable Code 128 Decode Performance
Enable/Disable Code 39

text_image
Black and white barcode image with vertical lines and a small number '1' at the bottomEnable Code 39

text_image
Black and white barcode image with vertical lines and a small number '1' at the bottomDisable Code 39
Enable/Disable Trioptic Code 39
Trioptic Code 39 symbols always contain six characters. Trioptic Code 39 and Code 39 Full ASCII should not be enabled simultaneously.

text_image
Black and white barcode image with vertical lines and a central dotEnable Trioptic Code 39

text_image
Barcode image containing encoded digital informationDisable Trioptic Code 39
Convert Code 39 to Code 32
Scan a symbol below to select whether or not to convert Code 39 to Code 32.
Note: Code 39 must be enabled in order for this parameter to function.

text_image
Barcode image with black and white vertical bars, no visible text or symbolsConvert Code 39 To Code 32 (Enable)

text_image
Black and white barcode image with vertical lines and a central dotDo Not Convert Code 39 To Code 32 (Disable)

Cyclone ^TM M2000 Series Product Reference Guide
Code 32 Prefix
Enable this parameter to add the prefix character "A" to all Code 32 bar codes. Convert Code 39 to Code 32 must be enabled for this parameter to function.

Enable Code 32 Prefix

Disable Code 32 Prefix
Set Lengths for Code 39
Lengths for Code 39 may be set for any length, one or two discrete lengths, or lengths within a specific range. The length of a code refers to the number of characters (i.e., human readable characters), including check digit(s) the code contains. If Code 39 Full ASCII is enabled, Length Within a Range or Any Length are the preferred options. See Table A-4 on page A-9 for ASCII equivalents.
- One Discrete Length - Only codes containing a selected length are decoded. For example, if you select Code 39 One Discrete Length, then scan 1, 4, only Code 39 symbols containing 14 characters are decoded.
- Two Discrete Lengths - Only codes containing two selected lengths are decoded. For example, if you select Code 39 Two Discrete Lengths, then scan 0, 2, 1, 4, only Code 39 symbols containing 2 or 14 characters are decoded.
- Length Within Range - A code type within a specified range is decoded. For example, to decode Code 39 symbols containing between 4 and 12 characters, first scan Code 39 Length Within Range. Then scan 0, 4, 1 and 2 (single digit numbers must always be preceded by a leading zero).
- Any Length - Code 39 symbols containing any number of characters can be decoded.
Numeric bar codes begin on page 3-141. If you make an error, or wish to change your selection, scan the Cancel bar code on page 3-143.
Set Lengths for Code 39 (continued)

text_image
Black and white barcode image with vertical lines and a central bar patternCode 39 - One Discrete Length

text_image
Black and white barcode image with vertical lines and a central dotCode 39 - Two Discrete Lengths

text_image
Barcode image containing encoded digital informationCode 39 - Length Within Range
text_image
Barcode image containing encoded digital informationCode 39 - Any Length
Code 39 Check Digit Verification
When enabled, this parameter checks the integrity of a Code 39 symbol to ensure it complies with specified algorithms.
Only those Code 39 symbols which include a modulo 43 check digit are decoded when this parameter is enabled.
text_image
Barcode image containing machine-readable data, with vertical lines representing data points in the matrix.Enable Code 39 Check Digit

text_image
Black and white barcode image with vertical lines and a small number '1' at the bottomDisable Code 39 Check Digit
Transmit Code 39 Check Digit
Scan a symbol below to select whether to transmit the data with or without the check digit.

Transmit Code 39 Check Digit (Enable)
When enabled, the ASCII character set assigns a code to letters, punctuation marks, numerals, and most control keystrokes on the keyboard.
The first 32 codes are non-printable and are assigned to keyboard control characters such as BACKSPACE and RETURN. The other 96 are called printable codes because all but SPACE and DELETE produce visible characters.
Code 39 Full ASCII interprets the bar code special character (( + \% /) preceding a Code 39 character and assigns an ASCII character value to the pair. For example, when Code 39 Full ASCII is enabled and a +B is scanned, it is interpreted as b, %J as ?, and \H emulates the keystroke BACKSPACE. Scanning ABC\M outputs the keystroke equivalent of ABC ENTER. Refer to the Table A-4 on page A-9.
Code 39 Full ASCII and Trioptic Code 39 should not be enabled simultaneously.
The scanner does not autodiscriminate between Code 39 and Code 39 Full ASCII.

text_image
Black and white barcode image with vertical lines and a central barEnable Code 39 Full ASCII

text_image
Black and white barcode image with vertical lines and a horizontal bar at the bottomDisable Code 39 Full ASCII
Code 39 Decode Performance
Note: This option only applies when Code 39 One Discrete Length is selected.
Enabling this feature may improve decoding of wide or height-truncated symbols.

text_image
Black and white barcode image with vertical lines and a horizontal bar at the bottomEnable Code 39 Decode Performance

text_image
Black and white barcode image with vertical lines and a small number '1' at the bottomDisable Code 39 Decode Performance
text_image
Black and white barcode image with vertical lines and a small number 'n' in the center.Enable Code 93
text_image
Black and white barcode image with vertical lines and a central dotDisable Code 93
Set Lengths for Code 93
Lengths for Code 93 may be set for any length, one or two discrete lengths, or lengths within a specific range. The length of a code refers to the number of characters (i.e., human readable characters), including check digit(s) the code contains. See Table A-4 on page A-9 for ASCII equivalents.
- One Discrete Length - This option allows you to decode only those codes containing a selected length. For example, if you select Code 93 One Discrete Length, then scan 1, 4, only Code 93 symbols containing 14 characters are decoded.
- Two Discrete Lengths - This option allows you to decode only those codes containing two selected lengths. For example, if you select Code 93 Two Discrete Lengths, then scan 0, 2, 1, 4, only Code 93 symbols containing 2 or 14 characters are decoded.
- Length Within Range - This option allows you to decode a code type within a specified range. For example, to decode Code 93 symbols containing between 4 and 12 characters, first scan Code 93 Length Within Range. Then scan 0, 4, 1 and 2 (single digit numbers must always be preceded by a leading zero).
- Any Length - Scanning this option allows you to decode Code 93 symbols containing any number of characters.
Numeric bar codes begin on page 3-141. If you make an error, or wish to change your selection, scan the Cancel bar code on page 3-143.
Set Lengths for Code 93 (continued)

text_image
Black and white barcode image with vertical lines and a central dotCode 93 - One Discrete Length

text_image
Barcode image containing encoded digital informationCode 93 - Two Discrete Lengths

text_image
Barcode image containing encoded digital informationCode 93 - Length Within Range

text_image
Barcode image with black and white vertical bars, no visible text or symbols beyond the patternCode 93 - Any Length
Code 11
Code 11
To enable or disable Code 11, scan the appropriate bar code below.
text_image
Black and white barcode image with vertical lines above and below the barsEnable Code 11

text_image
Black and white barcode image with vertical lines and a small number '1' at the bottom right.Disable Code 11
Set Lengths for Code 11
The length of a code refers to the number of characters (i.e., human readable characters), including check digit(s) the code contains. Set lengths for Code 11 to any length, one or two discrete lengths, or lengths within a specific range.
- One Discrete Length - Select this option to decode only Code 11 symbols containing a selected length. For example, if you select Code 11 One Discrete Length, then scan 1, 4, only Code 11 symbols containing 14 characters are decoded.
- Two Discrete Lengths - Select this option to decode only Code 11 symbols containing either of two selected lengths. For example, to decode only those Code 11 symbols containing either 2 or 14 characters, select Code 11 - Two Discrete Lengths, then scan 0, 2, 1, and then 4.
- Length Within Range - Select this option to decode a Code 11 symbol with a specific length range. For example, to decode Code 11 symbols containing between 4 and 12 characters, first scan Code 11 - Length Within Range. Then scan 0, 4, 1, and 2 (single digit numbers must always be preceded by a leading zero).
- Any Length - Scan this option to decode Code 11 symbols containing any number of characters within the scanner capability.
Numeric bar codes begin on page 3-141. If you make an error, or wish to change your selection, scan the Cancel bar code on page 3-143.

text_image
Black and white barcode image with vertical lines and a small number '1' at the bottomCode 11 - One Discrete Length
Set Lengths for Code 11 (continued)

text_image
Black and white barcode image with vertical lines and a central dotCode 11 - Two Discrete Lengths

text_image
Black and white barcode image with vertical lines and a small number 'n' in the center.Code 11 - Length Within Range
text_image
Black and white barcode image with vertical lines and a central dotCode 11 - Any Length
Code 11 Check Digit Verification
This feature allows the scanner to check the integrity of all Code 11 symbols to verify that the data complies with the specified check digit algorithm. This selects the check digit mechanism for the decoded Code 11 bar code. The options are to check for one check digit, check for two check digits, or disable the feature.
To enable this feature, scan the bar code below corresponding to the number of check digits encoded in your Code 11 symbols.
text_image
Black and white barcode image with vertical lines and a small number '1' at the bottomDisable Code 11 Check Digit Verification

text_image
Black and white barcode image with vertical lines and dots, no readable text or symbolsOne Check Digit

text_image
Black and white barcode image with vertical lines and dots, no readable text or symbolsTwo Check Digits
Transmit Code 11 Check Digits
This feature selects whether or not to transmit the Code 11 check digit(s).
text_image
Black and white barcode image with vertical lines and a small number '1' at the bottomTransmit Code 11 Check Digits (Enable)

text_image
Black and white barcode image with vertical lines on both sidesDo Not Transmit Code 11 Check Digits (Disable)
Note: Code 11 Check Digit Verification must be enabled for this parameter to function.
Interleaved 2 of 5
Enable/Disable Interleaved 2 of 5
text_image
Black and white barcode image with vertical lines and a small number '1' at the bottom center.Enable Interleaved 2 Of 5

text_image
Black and white barcode image with vertical lines and a central dotDisable Interleaved 2 Of 5
Set Lengths for Interleaved 2 of 5
Lengths for 12 of 5 may be set for any length, one or two discrete lengths, or lengths within a specific range. The length of a code refers to the number of characters (i.e., human readable characters) the code contains, and includes check digits. See Table A-4 on page A-9 for ASCII equivalents.
- One Discrete Length - This option allows you to decode only those codes containing a selected length. For example, if you select I 2 of 5 One Discrete Length, then scan 1, 4, the only I 2 of 5 symbols decoded are those containing 14 characters.
- Two Discrete Lengths - This option allows you to decode only those codes containing two selected lengths. For example, if you select I 2 of 5 Two Discrete Lengths, then scan 0, 2, 1, 4, the only I 2 of 5 symbols decoded are those containing 2 or 14 characters.
- Length Within Range - This option allows you to decode a code type within a specified range. For example, to decode I 2 of 5 symbols containing between 4 and 12 characters, first scan I 2 of 5 Length Within Range. Then scan 0, 4, 1 and 2 (single digit numbers must always be preceded by a leading zero).
- Any Length - Scanning this option allows you to decode 12 of 5 symbols containing any number of characters.
Numeric bar codes begin on page 3-141. If you make an error, or wish to change your selection, scan the Cancel bar code on page 3-143.
Set Lengths for Interleaved 2 of 5 (continued)
text_image
Barcode image with black and white vertical bars, no visible text or symbols beyond the patternI 2 of 5 - One Discrete Length
text_image
Black and white barcode image with vertical lines on both sidesI 2 of 5 - Two Discrete Lengths
text_image
Black and white barcode image with vertical lines and a central dot12 of 5 - Length Within Range
Note: Selecting this option may lead to misdecodes.
text_image
Barcode image containing encoded digital information12 of 5 - Any Length
I 2 of 5 Check Digit Verification
When enabled, this parameter checks the integrity of an I 2 of 5 symbol to ensure it complies with a specified algorithm, either USS (Uniform Symbology Specification), or OPCC (Optical Product Code Council).

text_image
Barcode image containing encoded digital informationDisable

text_image
Barcode image with black and white vertical bars, no visible text or symbolsUSS Check Digit
text_image
Barcode image with black and white vertical bars, no visible text or symbolsOPCC Check Digit
Transmit 12 of 5 Check Digit
Scan a symbol below to transmit the data with or without the check digit.

Transmit I 2 of 5 Check Digit (Enable)
text_image
Black and white barcode image with vertical lines and a small number 'n' in the center.Do Not Transmit I 2 of 5 Check Digit (Disable)
Convert I 2 of 5 to EAN-13
This parameter converts a 14 character I 2 of 5 code into EAN-13, and transmits to the host as EAN-13. To accomplish this, the I 2 of 5 code must be enabled, lengths must be set to decode 14-character symbols, and the code must have a leading zero and a valid EAN-13 check digit.

text_image
Black and white barcode image with vertical lines and a central dotConvert I 2 of 5 to EAN-13 (Enable)

text_image
Black and white barcode image with vertical lines and a central dotDo Not Convert I 2 of 5 to EAN-13 (Disable)
Enable/Disable Discrete 2 of 5

Enable Discrete 2 Of 5

Disable Discrete 2 Of 5
Set Lengths for Discrete 2 of 5
Lengths for D 2 of 5 may be set for any length, one or two discrete lengths, or lengths within a specific range. The length of a code refers to the number of characters (i.e., human readable characters) the code contains, and includes check digits. See Table A-4 on page A-9 for ASCII equivalents.
- One Discrete Length - This option allows you to decode only those codes containing a selected length. For example, if you select D 2 of 5 One Discrete Length, then scan 1, 4, the only D 2 of 5 symbols decoded are those containing 14 characters.
- Two Discrete Lengths - This option allows you to decode only those codes containing two selected lengths. For example, if you select D 2 of 5 Two Discrete Lengths, then scan 0, 2, 1, 4, the only D 2 of 5 symbols decoded are those containing 2 or 14 characters.
- Length Within Range - This option allows you to decode a code type within a specified range. For example, to decode D 2 of 5 symbols containing between 4 and 12 characters, first scan D 2 of 5 Length Within Range. Then scan 0, 4, 1 and 2 (single digit numbers must always be preceded by a leading zero).
- Any Length - Scanning this option allows you to decode D 2 of 5 symbols containing any number of characters.
Numeric bar codes begin on page 3-141. If you make an error, or wish to change your selection, scan the Cancel bar code on page 3-143.
Set Lengths for Discrete 2 of 5 (continued)

text_image
Black and white barcode image with vertical lines and a small number '1' at the bottomD 2 of 5 - One Discrete Length

text_image
Black and white barcode image with vertical lines and a central dotD 2 of 5 - Two Discrete Lengths
text_image
Black and white barcode image with vertical lines and a central barD 2 of 5 - Length Within Range
Note: Selecting this option may lead to misdecodes.

text_image
Barcode image containing encoded digital informationD 2 of 5 - Any Length
Enable/Disable Codabar

text_image
Barcode image with black and white vertical bars, no visible text or symbolsEnable Codabar
text_image
Black and white barcode image with vertical lines and a central dotDisable Codabar
Set Lengths for Codabar
Lengths for Codabar may be set for any length, one or two discrete lengths, or lengths within a specific range. The length of a code refers to the number of characters (i.e., human readable characters) the code contains. It also includes any start or stop characters. See Table A-4 on page A-9 for ASCII equivalents.
- One Discrete Length - This option allows you to decode only those codes containing a selected length. For example, if you select Codabar One Discrete Length, then scan 1, 4, the only Codabar symbols decoded are those containing 14 characters.
- Two Discrete Lengths - This option allows you to decode only those codes containing two selected lengths. For example, if you select Codabar Two Discrete Lengths, then scan 0, 2, 1, 4, the only Codabar symbols decoded are those containing 2 or 14 characters.
- Length Within Range - This option allows you to decode a code type within a specified range. For example, to decode Codabar symbols containing between 4 and 12 characters, first scan Codabar Length Within Range. Then scan 0, 4, 1 and 2 (single digit numbers must always be preceded by a leading zero).
- Any Length - Scanning this option allows you to decode Codabar symbols containing any number of characters.
Numeric bar codes begin on page 3-141. If you make an error, or wish to change your selection, scan the Cancel bar code on page 3-143.
Set Lengths for Codabar (continued)

text_image
Black and white barcode image with vertical lines and a horizontal bar at the bottomCodabar - One Discrete Length

text_image
Black and white barcode image with vertical lines on both sidesCodabar - Two Discrete Lengths

text_image
Black and white barcode image with vertical lines and a horizontal bar at the bottomCodabar - Length Within Range

text_image
Black and white barcode image with vertical lines and a small number '1' at the bottom right.Codabar - Any Length
CLSI Editing
When enabled, this parameter strips the start and stop characters and inserts a space after the first, fifth, and tenth characters of a 14-character Codabar symbol.
Note: Symbol length does not include start and stop characters.

text_image
Black and white barcode image with vertical lines and a central dotEnable CLSI Editing

text_image
Black and white barcode image with vertical bars of varying widthsDisable CLSI Editing
NOTIS Editing
When enabled, this parameter strips the start and stop characters from decoded Codabar symbol.

text_image
Black and white barcode image with vertical lines and dots, no readable text or symbolsEnable NOTIS Editing
text_image
Black and white barcode image with vertical lines and a small number '1' at the bottom right.Disable NOTIS Editing
Enable/Disable MSI Plessey

text_image
Barcode image containing machine-readable data, with vertical black and white lines representing the distribution of a barcode.Enable MSI Plessey

text_image
Barcode image containing encoded digital informationDisable MSI Plessey
Set Lengths for MSI Plessey
Lengths for MSI Plessey may be set for any length, one or two discrete lengths, or lengths within a specific range. The length of a code refers to the number of characters (i.e., human readable characters) the code contains, and includes check digits. See Table A-4 on page A-9 for ASCII equivalents.
- One Discrete Length - This option allows you to decode only those codes containing a selected length. For example, if you select MSI Plessey One Discrete Length, then scan 1, 4, the only MSI Plessey symbols decoded are those containing 14 characters.
- Two Discrete Lengths - This option allows you to decode only those codes containing two selected lengths. For example, if you select MSI Plessey Two Discrete Lengths, then scan 0, 2, 1, 4, the only MSI Plessey symbols decoded are those containing 2 or 14 characters.
- Length Within Range - This option allows you to decode a code type within a specified range. For example, to decode MSI Plessey symbols containing between 4 and 12 characters, first scan MSI Plessey Length Within Range. Then scan 0, 4, 1 and 2 (single digit numbers must always be preceded by a leading zero).
- Any Length - Scanning this option allows you to decode MSI Plessey symbols containing any number of characters.
Numeric bar codes begin on page 3-141. If you make an error, or wish to change your selection, scan the Cancel bar code on page 3-143.
Set Lengths for MSI Plessey

Note: Selecting this option may lead to misdecodes.

text_image
Black and white barcode image with vertical lines and a central dotMSI Plessey - Any Length
MSI Plessey Check Digits
These check digits at the end of the bar code verify the integrity of the data. At least one check digit is always required. Check digits are not automatically transmitted with the data.
If two check digits is selected, an MSI Plessey Check Digit Algorithm must also be selected. See page 3-91.

text_image
Black and white barcode image with vertical lines and a central dotOne MSI Plessey Check Digit

text_image
Black and white barcode image with vertical lines and a central dotTwo MSI Plessey Check Digit
Transmit MSI Plessey Check Digit
Scan a symbol below to transmit the data with or without the check digit.
text_image
Black and white barcode image with vertical lines and a central dotTransmit MSI Plessey Check Digit (Enable)

text_image
Black and white barcode image with vertical lines and a horizontal bar at the bottomDo Not Transmit MSI Plessey Check Digit (Disable)
MSI Plessey Check Digit Algorithm
When the Two MSI Plessey Check Digits option is selected, an additional verification is required to ensure integrity. Either of the two following algorithms may be selected.

text_image
Black and white barcode image with vertical lines and a central dotMOD 10/ MOD 11

MOD 10/ MOD 10
Enable/Disable PDF-417
Enable PDF-417
Disable PDF-417
Enable/Disable MicroPDF-417
text_image
Black and white barcode image with vertical lines and a central patternEnable MicroPDF-417

text_image
Black and white barcode image with vertical lines and a central dotDisable MicroPDF-417
MicroPDF Performance
If your scanner is having trouble decoding MicroPDF symbols, select Selective Performance. Note that this may decrease decoding aggressiveness on some symbols.

text_image
Black and white barcode image with vertical lines on both sidesStandard Performance for MicroPDF

text_image
Black and white barcode image with vertical lines and a central dotSelective Performance for MicroPDF
Code 128 Emulation
When this parameter is enabled, the scanner transmits data from certain MicroPDF-417 symbols as if it was encoded in Code 128 symbols. Transmit AIM Symbology Identifiers must be enabled for this parameter to work.
If Code 128 Emulation is enabled, these MicroPDF-417 symbols are transmitted with one of the following prefixes:
]C1 if the first codeword is 903-907, 912, 914, 915
]C2 if the first codeword is 908 or 909
]C0 if the first codeword is 910 or 911
If disabled, they are transmitted with one of the following prefixes:
]L3 if the first codeword is 903-907, 912, 914, 915
]L4 if the first codeword is 908 or 909
]L5 if the first codeword is 910 or 911
Scan a bar code below to enable or disable Code 128 Emulation.
text_image
Barcode image containing machine-readable data, with vertical black and white lines representing the pattern of a barcode.Enable Code 128 Emulation

text_image
Black and white barcode image with vertical lines and dotsDisable Code 128 Emulation
RSS Codes
RSS-14

text_image
Black and white barcode image with vertical lines and a small number 'n' in the bottom right corner.Enable RSS-14

text_image
Black and white barcode image with vertical lines and a central dotDisable RSS-14
RSS-Limited

text_image
Black and white barcode image with vertical lines and a small number '1' at the bottom right.Enable RSS-Limited

text_image
Black and white barcode image with vertical lines and a small number 'n' in the bottom right corner.Disable RSS-Limited
RSS-Expanded
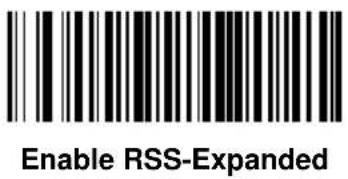
text_image
Enable RSS-Expanded
text_image
Disable RSS-ExpandedSecurity Level
The scanner offers four levels of decode security for delta bar codes, which include the Code 128 family, UPC/EAN, and Code 93. Select increasing levels of security for decreasing levels of bar code quality. There is an inverse relationship between security and scanner aggressiveness, so choose only that level of security necessary for any given application.
- Security Level 0: This default setting allows the scanner to operate in its most aggressive state, while providing sufficient security in decoding most "in-spec" bar codes.
• Security Level 1: Select this option if misdecodes occur. This security level should eliminate most misdecodes.
• Security Level 2: Select this option if Security level 1 fails to eliminate misdecodes.
• Security Level 3: If Security Level 2 was selected and misdecodes still occur, select this security level. Be advised, selecting this option is an extreme measure against mis-decoding severely out of spec bar codes. Selecting this level of security significantly impairs the decoding ability of the scanner. If this level of security is necessary, try to improve the quality of the bar codes.
Security Level (continued)

text_image
Black and white barcode image with vertical lines and a small number 'n' in the center.Security Level 0
text_image
Black and white barcode image with vertical lines on both sidesSecurity Level 1

text_image
Black and white barcode image with vertical lines above and below the barsSecurity Level 2

text_image
Black and white barcode image with vertical lines and a small number '1' at the bottom right.Security Level 3
Data Options
Transmit Code ID Character
A code ID character identifies the code type of a scanned bar code. This may be useful when the scanner is decoding more than one code type. In addition to any single character prefix already selected, the code ID character is inserted between the prefix and the decoded symbol.
The user may select no code ID character, a Symbol Code ID character, or an AIM Code ID character. The Symbol Code ID characters are listed below; see AIM Code Identifiers on page A-1.
Table 3-4. Symbol Code ID Characters
| Code Type Symbol Identifier | |
| UPCA, UPCE, UPCE1, EAN-13, EAN-8 A | |
| Code 39, Code 32 B | |
| Codabar C | |
| Code 128 (all variants) D | |
| Code 93 E | |
| Interleaved 2 of 5 F | |
| Discrete 2 of 5, D 2of 5 IATA G | |
| Code 11 H | |
| MSI Plessey J | |
| UCC/EAN 128 K | |
| Bookland EAN L | |
| Trioptic Code 39 M | |
| Coupon Code N | |
| RSS (all variants) R | |
| Composite* | T |
| PDF-417, Micro PDF-417, Macro PDF-417, Micro MacroPDF-417 | X |
| *Note: UPC/EAN Composite is transmitted in two portions, each with a "T" prefix. | |
Transmit Code ID Character (continued)

text_image
Black and white barcode image with vertical bars of varying widthsSymbol Code ID Character

text_image
Black and white barcode image with vertical lines and a small number '1' at the bottom right.AIM Code ID Character

text_image
Black and white barcode image with vertical lines and dots, no readable text or symbolsNone
Prefix/Suffix Values
A prefix and/or one or two suffixes may be appended to scan data for use in data editing. These values are set by scanning a four digit number (i.e., four bar codes) that corresponds to key codes for various terminals. See the Table A-4 on page A-9 for ASCII values.
Note: If a keyboard interface is being used, refer to the Synapse "Smart Cable" Interface Guide for keystroke values to be used as prefix/ suffix values.
To set a PREFIX/SUFFIX value:
- Scan the option bar code you wish to set.
- Scan four Numeric Bar Codes beginning on page 3-141 which correspond to the ASCII value or keystroke value you wish to assign. The ENTER key is the default for all options.
- If you make an error, or wish to change your selection, scan the Cancel bar code on page 3-143.

text_image
Barcode image with black and white vertical bars, no visible text or symbolsScan Suffix (Value 1)

text_image
Black and white barcode image with vertical lines and a horizontal bar at the bottomScan Prefix (Value 2)
Note: In order to use Prefix/Suffix values, the Scan Data Transmission Format must be set. See page 3-101.
Scan Data Transmission Format
You may select one of the following options for scan data formats:
Standard:
Option 1:
Option 2:
Option 3:
= scanned bar code data
To select a data transmission format:
- Scan the Scan Options bar code.
- Scan the bar code corresponding to the desired converted data format.
- Scan Enter.
- If you make a mistake, scan Cancel on the next page.
Note: RS-232C hosts treat the extended keypad default suffix (7013) as ASCII data.
text_image
Black and white barcode image with vertical lines and a central dotScan Options

text_image
Black and white barcode image with vertical lines and a central dotData As Is
text_image
Barcode image containing encoded digital information
Scan Data Transmission Format (continued)

text_image
Black and white barcode image with vertical lines and a central dot
text_image
Barcode image containing encoded digital information
Enter
Cancel
Decode Buffering
This option permits the scanner to store decoded data until the host device is ready to receive them. If the scanner reaches its capacity to store decoded symbols before the host is ready, subsequent trigger pulls have no effect until space is available.

Enable Decode Buffering

Disable Decode Buffering
RS-232 Options
Baud Rate
Baud rate is the number of bits of data transmitted per second. The scanner's baud rate setting should match the data rate setting of the host device. If not, data may not reach the host device or may reach it in distorted form.

text_image
Black and white barcode image with vertical lines and a small number '1' at the bottomBaud Rate 300

text_image
Black and white barcode image with vertical lines and a small number '1' at the bottomBaud Rate 600

text_image
Black and white barcode image with vertical lines and a central dotBaud Rate 1200

text_image
Black and white barcode image with vertical lines and a central dotBaud Rate 2400
Baud Rate (continued)

text_image
Black and white barcode image with vertical lines and a horizontal bar at the bottomBaud Rate 4800

text_image
Black and white barcode image with vertical lines and a horizontal bar at the bottomBaud Rate 9600

text_image
Black and white barcode image with vertical lines and a small number 'n' in the bottom right corner.Baud Rate 19,200

Baud Rate 38,400
Parity
A parity check bit is the most significant bit of each ASCII coded character. Select the parity type according to host device requirements.
- Odd parity - the parity bit has a value 0 or 1, based on data, to ensure that an odd number of 1 bits is contained in the coded character.
• Even parity - the parity bit has a value 0 or 1, based on data, to ensure that an even number of 1 bits is contained in the coded character.
- Mark parity - the parity bit is always 1.
• Space parity - the parity bit is always 0.
• None - no parity is required.
text_image
Black and white barcode image with vertical lines on both sidesOdd

text_image
Black and white barcode image with vertical lines on both sidesEven
Parity (continued)

text_image
Black and white barcode image with vertical lines and dotsMark

text_image
Black and white barcode image with vertical lines on both sidesSpace

text_image
Black and white barcode image with vertical lines on both sidesNone

Cyclone ^TM M2000 Series Product Reference Guide
Check Parity
Select whether or not the parity of received characters is checked. The type of parity used is selectable through the Parity parameter.

text_image
Black and white barcode image with vertical linesCheck Parity

Do Not Check Parity
Hardware Handshaking
The host exchanges data with the scanner via a serial port, either with or without the hardware handshaking lines, Request to Send (RTS), and Clear to Send (CTS).
Standard RTS/CTS
If Standard RTS/CTS handshaking is selected, scanned data is transmitted according to the following sequence:
- The CTS line must initially be deasserted by the host. If the scanner detects that CTS is asserted (indicating that the host may still be receiving a previous transmission), the scanner waits up to 2 seconds for the host to deassert the CTS line. If, after 2 seconds (default), the CTS line is still asserted, the scanner sounds a transmit error and any scanned data is lost.
- When the CTS line is deasserted, the scanner asserts the RTS line and waits up to 2 seconds for the host to assert CTS. When the host asserts CTS, the scanner transmits the data. If, after 2 seconds (default), the CTS line is not asserted, the scanner sounds a transmit error and discards the data.
- When data transmission is complete, the scanner deasserts RTS 10 msec after sending the last character.
- The host responds by deasserting CTS. The scanner checks for a deasserted CTS upon the next transmission of data.
If CTS is deasserted for more than 50 ms between characters, the transmission is aborted, the scanner sounds a transmission error, and the data is discarded.
If the previous communications sequence fails, the scanner issues an error beep. In this case, the data is lost and must be rescanned.
Note: The DTR signal is jumpered active.
Other RTS/CTS Options
The following options offer alternatives to Standard RTS/CTS Handshaking.
- RTS/CTS Option 1: The scanner asserts RTS before transmitting and ignores the state of CTS. The scanner deasserts RTS when the transmission is complete.
- RTS/CTS Option 2: RTS is always high or low (user-programmed logic level). However, the scanner waits for CTS to be asserted before transmitting data. If CTS is not asserted within two seconds, the scanner issues an error beep and discards the data.
- RTS/CTS Option 3: The scanner asserts RTS before transmitting, regardless of the state of CTS. The scanner waits up to two seconds for CTS to be asserted. If CTS is not asserted during this time, the scanner issues an error beep and discards the data. The scanner deasserts RTS when transmission is complete.
- RTS/CTS PC: Standard RTS/CTS hardware handshaking used by the PC. The host can deassert CTS to prevent the scanner from transmitting, and the scanner can deassert RTS to prevent the host from transmitting.
Hardware Handshaking (continued)

text_image
Black and white barcode image with vertical lines and a central dot*None

text_image
Black and white barcode image with vertical lines forming a pattern of repeating patternsStandard RTS/CTS

RTS/CTS Option 1

RTS/CTS Option 2

RTS/CTS Option 3

text_image
Black and white barcode image with vertical lines on both sidesRTS/CTS PC
Software Handshaking
This parameter offers control of the data transmission process. It may be used instead of, but not in conjunction with, hardware handshaking. ACK/NAK handshaking may be combined with ENQ handshaking.
• No Software Handshaking: Data is transmitted immediately.
- ACK/NAK Only: When this option is selected, after transmitting data, the scanner expects either an ACK or NAK response from the host. When a NAK is received, the scanner transmits the same data again and waits for either an ACK or NAK. After three unsuccessful attempts to send data when NAKs are received, the scanner issues an error indication and discards the data.
- ENQ Only: When this option is selected, the scanner waits for an ENQ character from the host before transmitting data. If an ENQ is not received within 2 seconds, the scanner issues an error indication and discards the data. The host must transmit an ENQ character at least every 2 seconds to prevent transmission errors.
- ACK/NAK with ENQ: This combines the two previous handshaking options.
• XON/XOFF: An XOFF character turns the scanner transmission off until the scanner receives an XON character. There are two situations for XON/XOFF:
- XOFF is received before the scanner has data to send. When the scanner has data to send, it then waits for an XON character before transmission. The scanner waits up to 2 seconds to receive the XON. If the XON is not received within this time, the scanner issues an error indication and discards the data.
- XOFF is received during a transmission. Data transmission then stops after sending the current byte. When the scanner receives an XON character, it sends the rest of the data message. The scanner waits indefinitely for the XON.
Select the type of RS-232C software handshaking protocol.
Software Handshaking (Continued)

text_image
Black and white barcode image with vertical lines and a horizontal bar at the bottomNone

text_image
Black and white barcode image with vertical lines and a central dotACK/NAK

text_image
Black and white barcode image with vertical lines on both sidesACK/NAK with ENQ ENQ Only

text_image
Barcode image with black and white vertical bars, no visible text or symbols
text_image
Black and white barcode image with vertical lines and a central dotXON/XOFF
Stop Bit Select
The stop bit(s) at the end of each transmitted character marks the end of transmission of one character and prepares the receiving device for the next character in the serial data stream. The number of stop bits selected (one or two) depends on the number the receiving terminal is programmed to accommodate. Set the number of stop bits to match host device requirements.

text_image
Black and white barcode image with vertical bars of varying widths1 Stop Bit

text_image
Black and white barcode image with vertical lines and a small number '1' at the bottom2 Stop Bits
Intercharacter Delay
Select the intercharacter delay option matching host requirements. The intercharacter delay gives the host system time to service its receiver and perform other tasks between characters. The delay period can range from no delay to 99 msec in 1 msec increments. After scanning the bar code below, scan two bar codes beginning on page 3-141 to set the desired time-out. If you make an error, or wish to change your selection, scan the Cancel bar code on page 3-143.

text_image
Black and white barcode image with vertical lines and dots, no readable text or symbolsIntercharacter Delay
Host Serial Response Time-out
This parameter specifies how long the scanner waits for an ACK or NAK before resending. Also, if the scanner wants to send, and the host has already been granted permission to send, the scanner waits for the designated time-out before declaring an error.
The delay period can range from 0.0 to 9.9 seconds in 0.1 second increments. After scanning the bar code below, scan two numeric bar codes beginning on page 3-141. Time durations of less than 1.0 second require a leading zero. If you make an error, or wish to change your selection, scan the Cancel bar code on page 3-143.

text_image
Black and white barcode image with vertical lines above and below the barsHost Serial Response Time-out
Host Serial RTS Line State
This parameter sets the default host serial RTS line state to either high or low.
Host: Low RTS

Host: High RTS
Beep On
When this parameter is enabled, the scanner issues a beep when a
Select whether to enable or disable this parameter.

text_image
Black and white barcode image with vertical lines and a central dotBeep On

text_image
Black and white barcode image with vertical bars on both sidesDo Not Beep On
Data Transmission - 7 or 8-Bit ASCII Data Format
This parameter determines whether data transmissions occur in the 7-bit or 8-bit ASCII format. Select this parameter according to the requirement of the receiving device. The default value is 8-bit ASCII. Select either 7-bit or 8-bit ASCII format for RS-232C communications.

text_image
Black and white barcode image with vertical lines7-Bit

text_image
Black and white barcode image with vertical lines and a small number '1' at the bottom8-Bit
USB Parameters (M2007)
The following USB parameters apply to the M2007 (with or without Synapse) only.
Set USB Defaults
Scan the bar code below to set USB defaults for the parameters on the following pages.
text_image
Black and white barcode image with vertical lines above and below the barsSet USB Defaults
USB Device Type
The M2007 attaches to a USB host or hub and supports the USB device options below, depending on the host type and desired mode of operation.
The mode of operation can be dynamically changed. However, the scanner resets and re-enumerates each time a new mode is selected. The re-enumeration process can take a few seconds to complete, during which the scanner turns off, disconnects, and reconnects to the host.
HID Keyboard Emulation
In this mode, the scanned data is presented to the system as if coming from a USB HID (Human Interface Device) keyboard. Most operating systems have native support for this device, so no additional driver installation is required.
IBM SurePOS Hand-Held Bar Code Reader
This mode is supported by an IBM hand-held bar code reader driver on IBM SurePOS terminals.
IBM SurePOS Tabletop Bar Code Reader
This mode is supported by an IBM tabletop bar code reader driver on IBM SurePOS terminals.
Symbol Native Bar Code Reader
This mode is supported by a Symbol bar code reader driver and provides maximal flexibility and control over the scanner. The software will prompt you to select or install the driver. Follow the instructions on the screen.
Symbol COM Port Emulation
In this mode, scanned data is presented to the host as if it originated in a COM port. A Symbol driver is required to support this mode, but it provides compatibility for an application which supports a bar code reader attached to a COM port. The software will prompt you to select or install the driver. Follow the instructions on the screen.
Select the desired type of USB device. The default is IBM Hand-Held USB.
Note: When changing USB Device Types, the M2007 turns off briefly and re-enumerates to properly communicate with the host.

text_image
Barcode image containing encoded digital informationDefault USB Type

text_image
Black and white barcode image with vertical lines and a central dotIBM Hand-Held USB (Default)

text_image
Barcode image containing encoded digital informationIBM Table Top USB

text_image
Black and white barcode image with vertical lines and dots, no readable text or symbolsHID Keyboard Emulation
text_image
Black and white barcode image with vertical lines and a small number 'n' in the center.Symbol Native USB

text_image
Black and white barcode image with vertical lines and a central 'R' markSymbol COM Port Emulation
Country Selection
This setting applies only to the HID Keyboard Emulation device. The MacOS and Windows implement international keyboards differently. Select the desired country according to the USB host device. If your host platform does not appear here, select the Windows settings.
Note: When changing the Country Selection, the M2007 turns off briefly and re-enumerates to properly communicate with the host.

text_image
Black and white barcode image with vertical lines and a small number 'n' in the bottom right corner.North American, Standard USB Keyboard

text_image
Black and white barcode image with vertical lines and dots, no readable text or symbolsFrench, Windows

text_image
Black and white barcode image with vertical lines and a horizontal bar at the bottomGerman, Windows

text_image
Black and white barcode image with vertical lines and dots, no readable text or symbolsGerman, MacOS

text_image
Black and white barcode image with vertical lines and a small number '1' at the bottomFrench Canadian, Windows

text_image
Barcode image containing encoded digital informationFrench Canadian, MacOS
text_image
Black and white barcode image with vertical lines and a small number '1' at the bottomSpanish (Traditional), Windows
text_image
Black and white barcode image with vertical lines and a central dotSpanish ISO, MacOS

text_image
Black and white barcode image with vertical lines above and below the barsItalian, Windows
text_image
Barcode image containing encoded digital informationItalian, MacOS
text_image
Black and white barcode image with vertical lines above and below the barsSwedish, Windows

text_image
Barcode image containing encoded digital informationSwedish, MacOS
text_image
Black and white barcode image with vertical lines above and below the barsUK English, Windows
text_image
Black and white barcode image with vertical lines and a small number 'n' in the center.UK English, MacOS

text_image
Black and white barcode image with vertical lines and a small number 'n' in the center.French, MacOS
text_image
Black and white barcode image with vertical lines and a small number 'n' in the center.Japanese, Windows

text_image
Black and white barcode image with vertical lines and a small number '1' at the bottomJapanese, MacOS
Keyboard Emulation
Keystroke Delay
This option applies only to the HID Keyboard Emulation device. Select the desired delay between transmitted keystrokes. Only change this setting for slower host PCs that cannot accommodate the speed of data transmitted.

text_image
Black and white barcode image with vertical lines and a small number 'n' in the center.No Delay (0 ms)

text_image
Black and white barcode image with vertical lines and a small number 'n' in the center.Medium Delay (20 ms)
text_image
Black and white barcode image with vertical lines and a small number 'n' in the bottom right corner.Long Delay (40 ms)
Keyboard Emulation - CAPS LOCK
This option applies only to the HID Keyboard Emulation device. By default, if a bar code is scanned, Caps Lock Override is disabled and the case of the bar code data is not preserved. For example, if the CAPS LOCK is off and an uppercase character is transmitted, the host reads this as a lowercase character. By selecting “Enable Caps Lock Override”, the caps lock is turned off during transmission to preserve the case of the bar code data, then restored after transmission.

text_image
Black and white barcode image with vertical lines and a central dotDisable Caps Lock Override

text_image
Black and white barcode image with vertical lines and a central dotEnable Caps Lock Override
Keyboard Emulation and IBM - Ignore Unknown Characters
This option applies only to the HID Keyboard Emulation device and IBM device. Unknown characters are characters the host does not recognize. When “Send Bar Codes With Unknown Characters” is selected, all bar code data is sent except for unknown characters, and no error beeps sound. When “Do Not Send Bar Codes With Unknown Characters” is selected, bar codes containing at least one unknown character are not sent to the host, and an error beep sounds.
text_image
Black and white barcode image with vertical lines and a small number '1' at the bottom left.Send Bar Codes With Unknown Characters

text_image
Barcode image containing encoded digital informationDo Not Send Bar Codes With Unknown Characters
Macro PDF Features
This section discusses programmable Macro PDF features fully supported by the M2000. Macro PDF is a special feature for concatenating multiple PDF symbols into one file. The M2000 can decode symbols that are encoded with this feature, however, the 64K version cannot buffer large sets of macro PDF symbols.
Caution
When printing, keep each Macro PDF sequence separate, as each sequence has unique identifiers. Do not mix bar codes from several Macro PDF sequences, even if they encode the same data. When scanning Macro PDF sequences, scan the entire sequence without interruption. If you scan a mixed sequence, you get two long low beeps for inconsistent file ID or inconsistent symbology error.
Program the required generic decode and data transmission parameters using the bar codes on the following pages. Use the same programming method for setting Macro PDF features as used for standard features.
Note that all parameter settings are stored in non-volatile memory and so are retained after powerdown.
Macro PDF Transmit / Decode Mode Symbols
Select only one of the four options below for handling the decoding of Macro PDF. The scanner can handle up to 64K bytes of decoded data, including any optional field information, except in the mode Transmit Each Macro PDF Symbol Decoded in Sequential Order, where there is no limit to the size of the Macro PDF set.
- Buffer All Symbols / Transmit Macro PDF When Complete activates transmission of all decode data from an entire Macro PDF sequence. Transmission does not occur until the entire Macro PDF sequence is scanned and decoded. This is the default option.
If the decode data exceeds the limit of 64 symbols or 64K bytes, there is no transmission because the entire sequence has not been scanned. Use the parameter Flush Macro PDF Buffer to purge the buffer.
- Transmit Any Symbol in Set / No Particular Order causes transmission of data from up to 1024 Macro symbols as decoded, whether it is in sequential order or not.
- Scan in Sequence Only / Transmit in Sequence Without Buffering causes transmission of data from up to 1024 symbols within the Macro PDF sequence as decoded, provided the Macro PDF symbols are scanned in order. If you do not scan the symbols in order, an error occurs.
- When Buffer Scans Out of Order / Transmit Scans in Order is enabled, decode data from each symbol within the Macro PDF sequence is transmitted when decoded, provided that the Macro PDF symbols are scanned in order. Decode data from symbols out of order in the Macro PDF sequence is buffered. The scanner can buffer up to 64 symbols or 64K bytes.
Macro PDF Transmit / Decode Mode Symbols (Continued)

text_image
Barcode image with black and white vertical bars, no visible text or symbolsBuffer All Symbols / Transmit When Complete

text_image
Black and white barcode image with vertical lines and a central dotTransmit Any Symbol In Set / No Particular Order
text_image
Black and white barcode image with vertical lines and a small number '1' at the bottomScan In Sequence Only / Transmit In Sequence Without Buffering

text_image
Barcode image containing encoded digital informationBuffer Scans Out Of Order/Transmit Scans In Order
Transmit Symbols in Codeword Format
Enabling this activates transmission of each PDF symbol as directly decoded data codewords, whether that symbol is part of a macro PDF sequence or not. Note that data is output as codeword values — not as interpreted data.
"Codeword values" is an ASCII representation of a number from 000 to 928 for each codeword, preceded by an escape character. This escape character is a backslash. For example, the codeword value 005 is sent to the host in the form of \005 for GLIs, and \C005C for ECIs. This output format is based on the AIM USA Uniform Symbology Specification for PDF-417 (1994).
All output codewords take up exactly 4 characters for GLIs and 6 characters for ECIs. However, there may be nondecodable characters in the PDF symbol, such as a GLI sequence. This special codeword sequence activates a certain kind of interpretation to the encoded data. Non-decodable codewords like GLIs are embedded in the output stream just like any other codeword, e.g., \927\001.
Because GLIs are indistinguishable from other codewords in the output data stream, the host must intelligently recognize them as GLIs and process their interpretations.
Note that when a macro PDF sequence is transmitted, the last character in the last block of data transmitted is always \922 (if selected). This indicates the end of that macro PDF transmission.
text_image
Black and white barcode image with vertical lines and dots, no readable text or symbolsEnable Transmit In Codeword Format

text_image
Black and white barcode image with vertical bars of varying widthsDisable Transmit In Codeword Format
Transmit Unknown Codewords
This enables using the output codeword format for transmitting any non-GLI or non-macro PDF codeword. If this is not enabled and an unknown codeword is found, a decode error beep sounds.

text_image
Black and white barcode image with vertical lines and a central patternTransmit Unknown Codewords

text_image
Barcode image containing machine-readable data, with vertical black and white lines representing the number 10Do Not Transmit Unknown Codewords
Escape Characters
This enables the backslash () character as an Escape character for systems that can process transmissions containing special data sequences. Scan a bar code below to either format special data (e.g., GLI escapes, MacroPDF-417 Control Block optional fields) according to the GLI (Global Label Identifier) protocol or the ECI (Extended Channel Interpretation) protocol, or to disable this parameter.
When ECI or GLI protocol is selected, backslashes encoded in the data will be doubled upon transmission. If 'None' is selected and a barcode containing an escape sequence is scanned, the scanner will emit an error beep.

text_image
Black and white barcode image with vertical lines and a central dotECI Protocol
text_image
Black and white barcode image with vertical lines and a small number '1' at the bottomGLI Protocol
text_image
Black and white barcode image with vertical lines and a small number '1' at the bottomNone
Delete Character Set ECIs
This parameter enables the scanner to delete any escape sequences representing Character Set ECIs (also known as GLIs) from its buffer before transmission. In many receiving systems, Character Set ECIs can be removed without affecting the way data is displayed or processed.
When deletion is selected, the scanner transmits data from PDF-417 and MicroPDF-417 bar codes containing Character Set ECIs, even when the ECI Protocol is disabled.
Scan a bar code to delete or transmit character set ECIs.

text_image
Black and white barcode image with vertical lines and a small number '1' at the bottomDelete Character Set ECIs

text_image
Black and white barcode image with vertical lines and a small number '1' at the bottomTransmit Character Set ECIs
ECI Decoder
This parameter enables the scanner to interpret any Extended Channel Interpretations (ECIs) that are supported by the scanner firmware. This parameter has no effect on symbols that were not encoded using ECIs. This version of the product supports ECIs 000900 through 000913, used for efficient encoding of Common Data Syntax Format 00-99. If this parameter is disabled, and a symbol is scanned that was encoded using an ECI escape, the scanner transmits the ECI escape followed by the uninterpreted data.
Scan a bar code to enable or disable this option.

text_image
Black and white barcode image with vertical lines and a small number 'n' in the center.Enable ECI Decoder

text_image
Black and white barcode image with vertical lines above and below the barsDisable ECI Decoder
Transmit Macro PDF User-Selected Fields
When enabled, the following parameters cause transmission of the specified field in subsequently scanned Macro PDF-417 symbols. Unless transmission of a specific field is enabled, it is not transmitted. The options cannot be changed in the middle of a Macro PDF set entry. All user-selected fields are prefixed by \923 for GLIs, and \MO for ECIs. Tags and examples in the following parameters demonstrate GLI protocol, but the ECI tag can be used instead if ECI protocol is enabled.
Note: Either ECI or GLI protocol must be enabled to transmit fields.
Transmit File Name
Transmit File Name activates transmission of the file name field. The field character tag is \923\000. For example, the filename MANHOURS.WK1 is sent as: \923\000MANHOURS.WK1.

text_image
Black and white barcode image with vertical lines and a small number '1' at the bottomEnable File Name Transmit

text_image
Black and white barcode image with vertical lines and a central dotDisable File Name Transmit
Transmit Block Count
Transmit Block Count activates transmission of the block count field. The field character tag is \923\001. For example, the field may be: \923\0011856.
text_image
Barcode image containing encoded digital informationEnable Transmit Block Count

text_image
Barcode image containing machine-readable data, with vertical black and white bars representing the number 10Disable Transmit Block Count
Transmit Time Stamp
Transmit Time Stamp activates transmission of the time stamp field. The field character tag is \923\002. For example, the field may be: \923\0022123443243234.
text_image
Black and white barcode image with vertical lines above and below the barsEnable Transmit Time Stamp

text_image
Black and white barcode image with vertical lines and dots, no readable text or symbolsDisable Transmit Time Stamp
Transmit Sender
Transmit Sender activates transmission of the sender field. The field character tag is \923\003. For example, the field may be: \923\003Symbol TechnologiesHoltsville, NY.
text_image
Black and white barcode image with vertical lines on both sidesEnable Sender Transmit

text_image
Black and white barcode image with vertical lines and a central dotTransmit Addressee activates transmission of the addressee field. The field character tag is \923\004. For example, the field may be: \923\004AIM USA.

text_image
Black and white barcode image with vertical lines and dots, no readable text or symbolsEnable Addressee Transmit
text_image
Barcode image containing machine-readable data with vertical lines and tick marksDisable Addressee Transmit
Transmit Checksum
Transmit Checksum activates transmission of the checksum field. The field character tag is \923\006. For example, the field may be: \923\00663823.

text_image
Barcode image containing encoded digital informationEnable Checksum Transmit
text_image
Black and white barcode image with vertical lines and a central dotDisable Checksum Transmit
Transmit File Size
Transmit File Size activates transmission of the file size field. The field character tag is \923\005. For example, the field may be: \923\005179234.

text_image
Barcode image containing machine-readable data, with vertical black and white bars representing the number 10Enable File Size Transmit

text_image
Black and white barcode image with vertical lines on both sidesDisable File Size Transmit
Transmit Macro PDF Control Header
Transmit Macro PDF Control Header activates transmission of the control header, which contains the segment index and the file ID. For example, the field may be: \92800000\725\120\343. The five digits after the \928 are the segment index (or block index), and \725\120\343 is the file ID.

text_image
Black and white barcode image with vertical lines and a small number '1' at the bottomEnable Macro PDF Control Header Transmit

text_image
Barcode image containing encoded digital informationDisable Macro PDF Control Header Transmit
Last Blocker Marker
Enable / Disable Last Block Marker enables marking the last block in the set by the codeword \922.

text_image
Black and white barcode image with vertical lines and dots, no readable text or symbolsEnable Last Block Marker
text_image
Barcode image containing machine-readable data, with vertical black and white bars representing the distribution of a machine named 'box'.Disable Last Block Marker
Flush Macro Buffer
This flushes the buffer of all decoded Macro PDF data stored to that point, transmits it to the host device, and aborts from Macro PDF mode.

Flush Macro PDF Buffer
Abort Macro PDF Entry
This clears all currently-stored Macro PDF data in the buffer without transmission and aborts from Macro PDF mode.
Abort Macro PDF Entry
Numeric Bar Codes
For parameters requiring specific numeric values, scan the appropriately numbered bar code(s).

0

1

2

3
Numeric Bar Codes (continued)

4

5
6

7
Numeric Bar Codes (continued)

8

9
Cancel
If you make an error, or wish to change your selection, scan the bar code below.

Cancel

Cyclone ^TM M2000 Series Product Reference Guide

natural_image
Simple line drawing of a closed book with visible pages and spine (no text or symbols)Chapter 4 Advanced Data Formatting (ADF)
Introduction
Advanced Data Formatting (ADF) is a means of customizing, or editing, the data scanned by the scanner before transmitting the data to your host device. Scanned data can be edited to suit your particular requirements.
ADF is implemented by scanning a related series of bar codes to create rules to apply to the scanned data. These bar codes appear later in this chapter.
Rules: Criteria Linked to Actions
In ADF, data is customized through rules. These rules perform specific actions when the data meets certain criteria. One rule may consist of single or multiple actions applied to single or multiple criteria.
For instance, a data formatting rule could be the following:
Criteria: When scan data is Code 39, length 12, and data at the start position is the string "129",
Actions: pad all sends with zeros to length 8, send all data up to X, send a space.
In this example, if a Code 39 bar code of 1299X1559828 is scanned, the following is transmitted: 00001299
The rule specifies the editing conditions and requirements before data transmission occurs.
Using ADF Bar Codes
When you program a rule, make sure the rule is logically correct. Plan ahead before you start scanning.
To program each data formatting rule:
- Start the Rule. Scan the Begin New Rule bar code on page 4-11.
- Criteria. Scan the bar codes for all pertinent criteria. Criteria can include code type (e.g., Code 128), code length, or data that contains a specific character string (e.g., the digits "129"). These options are described in Criteria on page 4-14.
- Actions. Scan all actions related to, or affecting, these criteria. The actions of a rule specify how to format the data for transmission. These options are described in Actions on page 4-28.
- Save the Rule. Scan the Save Rule bar code on page 4-11. This places the rule in the "top" position in the rule buffer.
If you make errors during this process, some special-purpose bar codes may be useful: Erase Criteria and Start Again, Erase Actions and Start Again, Erase Previously Saved Rule, and Erase All Rules. See Erase on page 4-12.
Beeper Definitions for ADF on page 4-8 help guide you through the programming steps.
ADF Bar Code Menu Example
This section provides an example of how to enter an ADF rule to apply to scanned data.
An auto parts distribution center wants to encode manufacturer ID, part number, and destination code into their own Code 128 bar codes. The distribution center also has products that carry UPC bar codes, placed there by the manufacturer. The Code 128 bar codes have the following format:
MMMMPPPPPDD
Where: M = Manufacturer ID
P = Part Number
D = Destination Code
The distribution center uses a PC with dedicated control characters for manufacturer ID
The following rules need to be entered:
When scanning data of code type Code 128, send the next 5 characters, send the manufacturer ID key
When scanning data of code type UPC/EAN, send all data, send the manufacturer ID key
To enter these rules, follow these steps:
Rule 1: The Code 128 Scanning Rule
Table 4-1. Code 128 Scanning Rule
| Step | Bar Code On Page Beep Indication | ||
| 1 | Begin New Rule 4-11 High High | ||
| 2 | Code 128 4-14 High High | ||
| 3 | Send next 5 characters 4-29 High High | ||
| 4 | Send4-56 High High | ||
| 5 | Send next 5 characters 4-29 High High | ||
| 6 | Send4-56 High High | ||
| 7 | Send next 2 characters 4-28 High High | ||
| 8 | Send4-54 High High | ||
| 9 | Save Rule 4-11 High Low High Low |
Rule 2: The UPC Scanning Rule
Table 4-2. UPC Scanning Rule
| Step | Bar Code On Page Beep Indication | ||
| 1 Begin | New Rule 4-11 High High | ||
| 2 | UPC/EAN | 4-15 High High | |
| 3 | Send all remaining data | 4-28 | High High |
| 4 | Send4-56 High High | ||
| 5 | Save Rule 4-11 High Low High Low | ||
If you made any mistakes while entering this rule, scan the Quit Entering Rules bar code on page 4-12. If you already saved the rule, scan the Erase Previously Saved Rule bar code on page 4-12.
Alternate Rule Sets
ADF rules may be grouped into one of five alternate sets that can be turned on and off when needed. This is useful when you want to format the same message in different ways. For example, a Code 128 bar code contains the following information:
Class (2 digits), Stock Number (8) digits, Price (5 digits)
This bar code might look like this:
245671243701500
where:
Class = 24
Stock Number = 56712437
Price = 01500
Ordinarily you would send this data as follows:
24 (class key)
56712437 (stock key)
01500 (enter key)
But, when there is a sale, you may want to send only the following:
24 (class key)
56712437 (stock key)
and the cashier keys the price manually.
To implement this, first enter an ADF rule that applies in the normal situation. This rule may look like this:
When scanning a bar code of length 15, send the next 2 characters, send the class key, send the next 8 characters, send the stock key, send the data that remains, send the Enter key.
The "sale" rule may look like this:
When scanning a bar code of length 15, send the next 2 characters, send the class key, send the next 8 characters, send the stock key.
To switch between the two sets of rules, a “switching rule” must be programmed. This rule specifies what type of bar code must be scanned to switch between the rule sets. For example, in the case of the “sale” rule above, the rule programmer wants the cashier to scan the bar code “M” before a sale. To do this, a rule can be entered as follows:
When scanning a bar code of length 1 that begins with “M”, select rule set number 1.
Another rule could be programmed to switch back.
When scanning a bar code of length 1 that begins with "N", turn off rule set number 1.
The switching back to normal rules can also be done in the "sale" rule. For example, the rule may look like this:
When scanning a bar code of length 15, send the next 2 characters, send the class key, send the next 8 characters, send the stock key, turn off rule set 1. It is recommended that you scan the Disable All Rule Sets bar code after programming a rule belonging to an alternate rule set.
In addition to enabling and disabling rule sets within the rules, you can disable them by scanning the appropriate bar codes in Disable Rule Set on page 4-13.
Rules Hierarchy (in Bar Codes)
The order of programming individual rules is important. The most general rule should be programmed first.
All programmed rules are stored in a buffer. As they are programmed, they are stored at the "top" of a rules list. If three rules have been created, the list would be configured as follows:
Third Rule
Second Rule
First Rule
When data is scanned, the rules list is checked from top to bottom to determine if the criteria matches (and therefore, if the actions should occur). Input is modified into the data format specified by the first matching set of criteria it finds. Be sure that your most general rule is the first one programmed.
For example, if the THIRD rule states:
When scanning a bar code of any length, send all data, then send the ENTER key.
And the SECOND rule states:
When scanning a Code 128 bar code of length 12, send the first four characters, then send the ENTER key, then send all remaining data.
If a Code 128 bar code of length 12 were scanned, the THIRD rule would be in effect. The SECOND rule would appear to not function.
Note also that ADF rules are actually created when you use the standard data editing functions. Scan options are entered as ADF rules, and the hierarchy mentioned above also applies to them. For the M2000, this applies to prefix/ suffix programming in the parameter Scan Data Transmission Format.
These rules reside in the same “rule list” as ADF Rules, so the order of their creation is also important.
Default Rules
Every unit has a default rule to send all scan data. Units with custom software may have one or more default rules burned in. The rules hierarchy checks user programmable rules first, then the default rules. Default rules can be disabled by entering the following general rule in the user programmable buffer:
When receiving scan data, send all data.
Since this rule always applies, ADF will never go into the default rules.
Beeper Definitions for ADF
The following table defines beep sequences that occur during rule entry.
Table 4-3. Beeper Definitions
| Beeper Sequence Indication | |
| Normal Data Entry. Duration of tones are short. | |
| High-Low Entry of a number is | expected. Enter another digit. Add leading zeros to the front if necessary. |
| Low-Low Entry of an alphabetic | character is expected. Enter another character or scan the End of Message bar code. |
| High-High Entry of Criterion/Action is expected. Enter another criterion or action, or scan the Save Rule bar code. | |
| High-Low-High-Low Rule saved. | Rule entry mode exited. |
| High-Low-Low All criteria or actions were cleared for rule currently being entered; continue entry of rule. | |
| Low Last saved rule was successfully deleted. The rule presently being entered is left intact. | |
| Low-High-High All rules are now deleted. The rule presently being entered is left intact. (This beep sequence has a different meaning outside of ADF.) | |
| Error Indications. Duration of tones are very long. | |
| Low-High-Low-High Out of rule | memory. Erase some existing rules, then try to save rule again. (The current rule need not be re-entered.) |
| Low-High-Low Cancel rule entry | Rule entry mode exited because of an error or the user asked to exit rule entry. |
| Low-High Entry error, wrong bar code scanned. Re-enter criterion or action. All previously entered criteria and actions are retained. Criteria or action list is too long for a rule. | |
ADF Bar Codes
The following table helps you locate the bar codes you need to create an ADF rule.
Table 4-4. ADF Bar Codes
| Bar Code Description Page | ||
| Special Commands | ||
| Begin New Rule Starts data | formatting rule. 4-11 | |
| Save Rule Completes and saves rule. 4-11 | ||
| Erase Erases criteria, actions, or rules. 4-12 | ||
| Quit Entering Rules Quits entering rules. 4-12 | ||
| Disable Rule Set Disables rule sets. 4-13 | ||
| Criteria | ||
| Code Types | Selects code types to be affected by rule. | 4-14 |
| Code Lengths | Defines the number of characters each code type must contain. | 4-17 |
| Message Containing A Specific Data String | Select whether formatting affects data that begins with or contains a specific character or data string. | 4-23 |
| Numeric Keypad | Used for specifying a data string. | 4-25 |
| Rule Belongs To Set | Selects which set a rule belongs to. | 4-27 |
| Actions | ||
| Send Data | Sends all data that remains, sends all data up to a specific character, or sends N characters. | 4-28 |
| Send Pause | Inserts a pause. | 4-32 |
| Setup Field(s) | Moves the cursor in relation to a specified character. | 4-32 |
| Send Preset Value | Sends prefix and suffix values. | 4-40 |
Table 4-4. ADF Bar Codes
| Bar Code Description Page | ||
| Modify Data◆ Remove All Spaces◆ Crunch All Spaces◆ Stop Space Removal◆ Remove Leading Zeros◆ Stop Zero Removal◆ Pad Data With Spaces◆ Pad Data With Zeros | Modifies data as follows:◆ Removes all spaces in the send commands.◆ Leaves one space between words.◆ Stops space removal.◆ Removes all leading zeros.◆ Stops removal of zeros.◆ Pads data to the left with spaces.◆ Pads data to the left with zeros. | 4-404-404-404-414-414-414-424-47 |
| Beeps Selects beep sequence for each rule. 4-53 | ||
| Send Keystroke◆ Control Characters◆ Keyboard Characters◆ Send ALT Characters◆ Send Command Characters◆ Send Special Characters◆ Send Keypad Characters◆ Send Function Keys | Specifies control and keyboard characters to send.◆ Sends control characters.◆ Sends keyboard characters.◆ Sends ALT characters.◆ Sends command characters.◆ Sends special characters.◆ Sends keypad characters.◆ Sends function keys. | 4-544-544-594-714-754-774-784-82 |
| Turn On/Off Rule Sets | Turns rule sets on and off. | 4-88 |
| Alphanumeric Keyboard | Used to specify characters and strings when creating a rule. | 4-89 |
Special Commands
Bar codes and explanations of the following special commands are provided on the next few pages.
- Begin New Rule
- Save Rule
- Erase
- Quit Entering Rules
- Disable Rule Set
Begin New Rule
Scan this bar code to start entering a new data formatting rule.

text_image
Black and white barcode image with vertical lines and dots, no readable text or symbolsBegin New Rule
Save Rule
Scan this bar code to complete and save the rule you entered.

Save Rule

Cyclone™ M2000 Series Product Reference Guide
Erase
Use these bar codes to erase criteria, actions, or rules.
Erase Criteria And Start Again
Erase Actions And Start Again
Erase Previously
Saved Rule

Erase All Rules
Quit Entering Rules
Scan this bar code to quit entering rules.

Quit Entering Rules
Disable Rule Set
Use these bar codes to disable rule sets.

Disable Rule Set 1

Disable Rule Set 2

Disable Rule Set 3

Disable Rule Set 4

Disable All Rule Sets
Criteria
Code Types
Select any number of code types to be affected. All selected codes must be scanned in succession, prior to selecting other criteria. If you don't select a code type, all code types are affected.
Code 39
Codabar
Code 128
Code 93
12 Of 5
D 2 Of 5
Code Types (continued)
text_image
Barcode image containing machine-readable data, no human-readable text visibleUPCA UPCE

text_image
Black and white barcode image with vertical lines on both sides
text_image
Barcode image with black and white vertical bars, no visible text or symbols beyond the patternUPCE1

text_image
Barcode image containing machine-readable data, with vertical black and white lines representing the number 10EAN-8

text_image
Black and white barcode image with vertical lines and a small number '1' at the bottomEAN-13

text_image
Black and white barcode image with vertical lines and a small number '1' at the bottomEAN 128
Code Types (continued)

text_image
Black and white barcode image with vertical lines on both sidesIATA 2 Of 5

text_image
Black and white barcode image with vertical lines and a central dotMSI Plessey

text_image
Barcode image with black and white vertical bars, no visible text or symbolsBookland EAN
text_image
Black and white barcode image with vertical lines and a small number 'n' in the center.Trioptic Code 39

text_image
Barcode image with black and white vertical bars, no visible text or symbolsPDF-417

text_image
Barcode image containing encoded digital informationADF for Macro PDF-417
(Applies rule to each block in MPDF set.)
Code Lengths
Define the number of characters the selected code type must contain. Select one length per rule only. If you don't select a code length, selected code types of any length are affected.
Note: These codes are used to set the code length only; this is not a keypad.
text_image
Black and white barcode image with vertical lines forming a pattern of repeating patterns1
text_image
Black and white barcode image with vertical lines and a small number '1' at the bottom2
text_image
Black and white barcode image with vertical lines and patterns3
text_image
Black and white barcode image with vertical lines on both sides4

text_image
Black and white barcode image with vertical lines on both sides5

text_image
Black and white barcode image with vertical lines above and below the bars6
Code Lengths (continued)

text_image
7
text_image
8
text_image
9
text_image
10
text_image
11
text_image
12Code Lengths (continued)

text_image
Barcode image with black and white vertical bars, no visible text or symbols13

text_image
Black and white barcode image with vertical lines and a small number 'n' in the center.14
text_image
Black and white barcode image with vertical lines and a small number 'n' in the center.15 16

text_image
Black and white barcode image with vertical lines above and below the bars
text_image
Black and white barcode image with vertical lines and a small number 'n' in the center.17

text_image
Black and white barcode image with vertical lines and a central dot18
Code Lengths (continued)

text_image
Barcode image with black and white vertical bars on both sides19

text_image
Barcode image containing machine-readable data, with vertical black and white lines representing the number 10.20

text_image
Barcode image containing encoded digital information21

text_image
Black and white barcode image with vertical lines and a small number 'n' in the center.22

text_image
Black and white barcode image with vertical lines on both sides23 24

text_image
Black and white barcode image with vertical lines and a small number '1' at the bottom right.
Cyclone™ M2000 Series Product Reference Guide
Code Lengths (continued)

Message Containing A Specific Data String
Select whether the formatting affects data that begins with a specific character or data string, or contains a specific character or data string.
Specific String at Start
To apply formatting to data that begins with a specific character or data string:
- Scan the bar code below.
- Enter a string representing the desired character or characters (up to a total of 8) using the Alphanumeric Keyboard beginning on page 4-89.
- Scan End Of Message on page 4-100.

Specific String At Start
Specific String, Any Location
To apply formatting to data that contains a specific character or data string:
- Scan the bar code below.
- Scan a two-digit number representing the position (include a leading "zero" if necessary) using the Numeric Keypad on page 4-25.
- Enter the desired character or characters (up to a total of 8) using the Alphanumeric Keyboard beginning on page 4-89.
- Scan End Of Message on page 4-100.

Specific String Any Location

Cyclone™ M2000 Series Product Reference Guide
Any Message OK
By not scanning any bar code, all selected code types are formatted, regardless of information contained.
Numeric Keypad
Bar codes on this page should not be confused with those on the alphanumeric

Cyclone™ M2000 Series Product Reference Guide
keyboard.


text_image
CancelRule Belongs To Set
Scan a bar code below to select which set a rule belongs to.

text_image
Black and white barcode image with vertical lines and dots, no readable text or symbolsRule Belongs To Set 1

text_image
Black and white barcode image with vertical lines on both sidesRule Belongs To Set 2
text_image
Black and white barcode image with vertical lines and dots, no readable text or symbolsRule Belongs To Set 3
text_image
Black and white barcode image with vertical lines and dots, no readable text or symbolsRule Belongs To Set 4
Actions
Select how to format the data meeting the defined criteria before transmission.
Send Data
Use the following bar codes to send all data that remains, send all data up to a specific character selected from the Alphanumeric Keyboard on page 4-89, or send the next N characters. N = any number from 1 to 254, selected from the Alphanumeric Keyboard on page 4-89.

text_image
Black and white barcode image with vertical lines on both sidesSend Data Up To Character

text_image
Black and white barcode image with vertical lines and a small number 'n' in the bottom right corner.Send All Data That Remains

text_image
Barcode image containing encoded digital informationSend Next Character
text_image
Black and white barcode image with vertical lines above and below the barsSend Next 2 Characters

text_image
Black and white barcode image with vertical lines and a small number '1' at the bottomSend Next 3 Characters
Send Data (continued)

text_image
Barcode image with black and white vertical bars, no visible text or symbolsSend Next 4 Characters
text_image
Black and white barcode image with vertical lines on both sidesSend Next 5 Characters

text_image
Barcode image with black and white vertical bars, no visible text or symbols
text_image
Black and white barcode image with vertical lines and a small number '1' at the bottomSend Next 7 CharactersSend Next

text_image
Black and white barcode image with vertical lines above and below the barsSend Next 8 Characters

text_image
Black and white barcode image with vertical lines on both sidesSend Next 9 Characters

text_image
Barcode image containing encoded digital informationSend Next 10 Characters

text_image
Barcode image containing encoded digital informationSend Next 11 Characters

Cyclone™ M2000 Series Product Reference Guide
Send Data (continued)

text_image
Barcode image with black and white vertical bars, no visible text or symbolsSend Next 12 Characters
text_image
Barcode image with black and white vertical bars on both sidesSend Next 13 Characters

text_image
Barcode image containing encoded digital informationSend Next 14 Characters
text_image
Barcode image containing encoded digital informationSend Next 15 Characters
text_image
Black and white barcode image with vertical lines and a small number 'n' in the center.Send Next 16 Characters

text_image
Black and white barcode image with vertical lines and a central dotSend Next 17 Characters
Send Data (continued)

text_image
Black and white barcode image with vertical lines and a horizontal bar at the bottomSend Next 18 Characters

text_image
Black and white barcode image with vertical lines and a small number '1' at the bottomSend Next 19 Characters

text_image
Black and white barcode image with vertical lines above and below the barsSend Next 20 Characters

text_image
Black and white barcode image with vertical lines above and below the barsSend Next 50 Characters

text_image
Black and white barcode image with vertical lines and a central dotSend Next 100 Characters

text_image
Black and white barcode image with vertical lines above and below the barsSend Next 150 Characters

text_image
Black and white barcode image with vertical lines on both sidesSend Next 200 Characters

text_image
Barcode image containing encoded digital informationSend Next 250 Characters
Send Pause

text_image
Send PauseSetup Field(s)
Use the following bar codes to move the cursor in relation to a specified character.
Note: If there is no match when the rule is interpreted and the rule fails, the next rule is checked.
Move Cursor To a Character
Scan the Move Cursor To Character bar code, then any printable ASCII character from the Alphanumeric Keyboard on page 4-89. This moves the cursor to the position after the matching character. If the character is not there, the rule fails and ADF tries the next rule.

text_image
Barcode image containing encoded digital informationMove Cursor To Character
Move Cursor to Start of Data
Scan this bar code to move cursor to the beginning of the data.

text_image
Black and white barcode image with vertical lines and dotsMove Cursor To Start
Move Cursor Past a Character
This parameter moves the cursor past all sequential occurrences of a selected character. Scan the Move Cursor Past Character bar code on page 4-33, then select a character from the Alphanumeric Keyboard on page 4-89. If the character is not there, the cursor does not move (i.e., has no effect).

text_image
Black and white barcode image with vertical lines and a horizontal bar at the bottomMove Cursor Past Character
Skip Ahead "N" Characters
Scan one of these bar codes to select the number of positions ahead you wish to move the cursor.
text_image
Black and white barcode image with vertical lines and a horizontal bar at the bottomSkip Ahead 1 Character
text_image
Black and white barcode image with vertical lines and a central dotSkip Ahead 2 Characters
text_image
Black and white barcode image with vertical lines above and below the barsSkip Ahead 3 Characters

text_image
Black and white barcode image with vertical lines and a central dotSkip Ahead 4 Characters
Skip Ahead (continued)

text_image
Black and white barcode image with vertical lines on both sidesSkip Ahead 5 Characters

text_image
Black and white barcode image with vertical lines above and below the barsSkip Ahead 6 Characters

text_image
Black and white barcode image with vertical lines and a central dotSkip Ahead 7 Characters

text_image
Black and white barcode image with vertical lines and a central dotSkip Ahead 8 Characters

text_image
Black and white barcode image with vertical lines above and below the barsSkip Ahead 9 Characters

text_image
Barcode image containing encoded digital informationSkip Ahead 10 Characters
Skip Ahead (continued)

text_image
Black and white barcode image with vertical lines and a horizontal bar at the bottomSkip Ahead 50 Characters

text_image
Black and white barcode image with vertical lines above and below the barsSkip Ahead 100 Characters
text_image
Black and white barcode image with vertical lines above and below the barsSkip Ahead 150 Characters
text_image
Black and white barcode image with vertical lines and dotsSkip Ahead 200 Characters

text_image
Black and white barcode image with vertical lines and a small number 'n' in the center.Skip Ahead 250 Characters
Skip Back "N" Characters
Scan one of these bar codes to select the number of positions back you wish to move the cursor.

text_image
Barcode image containing machine-readable data, no human-readable text visibleSkip Back 1 Characters

text_image
Black and white barcode image with vertical lines on both sidesSkip Back 2 Characters

text_image
Black and white barcode image with vertical lines on both sidesSkip Back 3 Characters

text_image
Black and white barcode image with vertical lines and a central dotSkip Back 4 Characters

Cyclone™ M2000 Series Product Reference Guide
Skip Back (continued)

text_image
Black and white barcode image with vertical lines and dotsSkip Back 5 Characters

text_image
Black and white barcode image with vertical lines and dots, no readable text or symbolsSkip Back 6 Characters

text_image
Black and white barcode image with vertical lines and dots, no readable text or symbolsSkip Back 7 Character
text_image
Black and white barcode image with vertical lines on both sidesSkip Back 8 Characters

text_image
Black and white barcode image with vertical lines and a small number '1' at the bottomSkip Back 9 Characters
text_image
Barcode image containing encoded digital informationSkip Back 10 Characters
Skip Back (continued)

text_image
Black and white barcode image with vertical lines and a horizontal bar at the bottomSkip Back 50 Characters

text_image
Black and white barcode image with vertical lines and a central dotSkip Back 100 Characters
text_image
Black and white barcode image with vertical lines and dots, no readable text or symbolsSkip Back 150 Characters
text_image
Barcode image containing encoded digital informationSkip Back 200 Characters

text_image
Black and white barcode image with vertical lines and a central dotSkip Back 250 Characters
Send Preset Value
Use these bar codes to send preset values.
text_image
Barcode image with black and white vertical bars, no visible text or symbolsSend Value 1

text_image
Black and white barcode image with vertical lines and patternsSend Value 2
Modify Data
Modify data in the ways listed. The following actions work for all send commands that follow it within a rule. If you program pad zeros to length 6, send next 3 characters, stop padding, send next 5 characters, three zeros are added to the first send, and the next send is unaffected by the padding. These options do not apply to the Send Keystroke or Send Preset Value options.
Remove All Spaces
To remove all spaces in the send commands that follow, scan this bar code.

text_image
Black and white barcode image with vertical lines and a central dotRemove All Spaces
Crunch All Spaces
To leave one space between words, scan this bar code. This also removes all leading and trailing spaces.

text_image
Black and white barcode image with vertical lines and dotsCrunch All Spaces
Stop Space Removal
Scan this bar code to disable space removal.

text_image
Black and white barcode image with vertical lines and a horizontal bar at the bottomStop Space Removal
Remove Leading Zeros
Scan this bar code to remove all leading zeros.
text_image
Black and white barcode image with vertical lines and dotsRemove Leading Zeros
Stop Zero Removal
Scan this bar code to disable the removal of zeros.

text_image
Black and white barcode image with vertical lines and a small number '1' at the bottom right.Stop Zero Removal
Pad Data With Spaces
To pad data to the left, scan the bar code containing the desired number of spaces. This parameter is activated by Send commands.

text_image
Barcode image containing encoded digital informationPad Spaces To Length 1

text_image
Black and white barcode image with vertical lines and a small number '1' at the bottom right.Pad Spaces To Length 2

text_image
Black and white barcode image with vertical lines and dots, no readable text or symbolsPad Spaces To Length 3

text_image
Black and white barcode image with vertical lines and a horizontal bar at the bottomPad Spaces To Length 4
text_image
Black and white barcode image with vertical lines and a central dotPad Spaces To Length 5

text_image
Black and white barcode image with vertical lines on both sidesPad Spaces To Length 6
Pad Data with Spaces (continued)
text_image
Barcode image containing machine-readable data, no human-readable text visiblePad Spaces To Length 7

text_image
Black and white barcode image with vertical lines on both sidesPad Spaces To Length 8

text_image
Black and white barcode image with vertical lines on both sidesPad Spaces To Length 9

text_image
Barcode image with black and white vertical bars, no visible text or symbols beyond the patternPad Spaces To Length 10

text_image
Barcode image containing encoded digital informationPad Spaces To Length 11

text_image
Barcode image containing encoded digital informationPad Spaces To Length 12
Pad Data with Spaces (continued)

text_image
Barcode image containing encoded digital informationPad Spaces To Length 13
text_image
Barcode image containing encoded digital informationPad Spaces To Length 14

text_image
Barcode image with black and white vertical bars, no visible text or symbolsPad Spaces To Length 15

text_image
Black and white barcode image with vertical lines above and below the barsPad Spaces To Length 16

text_image
Black and white barcode image with vertical lines and a central dotPad Spaces To Length 17

text_image
Barcode image containing encoded digital informationPad Spaces To Length 18
Pad Data with Spaces (continued)

text_image
Black and white barcode image with vertical lines and a central dotPad Spaces To Length 19

text_image
Barcode image containing machine-readable data, with vertical black and white bars representing the distribution of a machine named 'box'.Pad Spaces To Length 20

text_image
Barcode image containing encoded digital informationPad Spaces To Length 21

text_image
Black and white barcode image with vertical lines and a small number '1' at the bottomPad Spaces To Length 22
text_image
Barcode image with black and white vertical bars, no visible text or symbolsPad Spaces To Length 23

text_image
Barcode image containing machine-readable data, no human-readable text visiblePad Spaces To Length 24

Cyclone™ M2000 Series Product Reference Guide
Pad Data with Spaces (continued)

text_image
Barcode image containing machine-readable data, with vertical black and white lines on both sides.Pad Spaces To Length 25
text_image
Black and white barcode image with vertical lines and a central dotPad Spaces To Length 26
text_image
Barcode image containing encoded digital informationPad Spaces To Length 27
text_image
Barcode image containing encoded digital informationPad Spaces To Length 28

text_image
Black and white barcode image with vertical lines and a central dotPad Spaces To Length 29

text_image
Black and white barcode image with vertical lines and a small number 'n' in the center.Pad Spaces To Length 30
text_image
Black and white barcode image with vertical lines and a central dotStop Pad Spaces
Pad Data With Zeros
To pad data to the left, scan the bar code containing the desired number of zeros. This parameter is activated by Send commands. Use these bar codes to

Cyclone™ M2000 Series Product Reference Guide
pad data with zeros.
text_image
Black and white barcode image with vertical lines and dotsPad Zeros To Length 1
text_image
Black and white barcode image with vertical lines and a central dotPad Zeros To Length 2

text_image
Black and white barcode image with vertical lines above and below the barsPad Zeros To Length 3

text_image
Black and white barcode image with vertical lines and a small number 'n' in the center.Pad Zeros To Length 4

text_image
Barcode image containing encoded digital informationPad Zeros To Length 5

text_image
Black and white barcode image with vertical lines and a small number '1' at the bottomPad Zeros To Length 6
Pad Data With Zeros (continued)

text_image
Barcode image with black and white vertical bars, no visible text or symbolsPad Zeros To
Length 7

text_image
Black and white barcode image with vertical lines and a central patternPad Zeros To
Length 8

text_image
Barcode image containing encoded digital informationPad Zeros To
Length 9

text_image
Barcode image containing encoded digital informationPad Zeros To
Length 10
text_image
Barcode image containing encoded digital informationPad Zeros To
Length 11

text_image
Barcode image containing encoded digital informationPad Zeros To
Length 12
Pad Data With Zeros (continued)
text_image
Barcode image containing encoded digital informationPad Zeros To
Length 13

text_image
Barcode image containing encoded digital informationPad Zeros To
Length 14

text_image
Barcode image containing encoded digital informationPad Zeros To
Length 15
text_image
Barcode image containing machine-readable data, no human-readable text visiblePad Zeros To
Length 16
text_image
Black and white barcode image with vertical lines and a central dotPad Zeros To
Length 17
text_image
Barcode image containing encoded digital informationPad Zeros To
Length 18
Pad Data With Zeros (continued)

text_image
Barcode image with black and white vertical bars, no visible text or symbolsPad Zeros To Length 19
text_image
Barcode image with black and white vertical bars, no visible text or symbolsPad Zeros To Length 20

text_image
Barcode image containing encoded digital informationPad Zeros To Length 21

text_image
Barcode image containing machine-readable data, no human-readable text visiblePad Zeros To Length 22

text_image
Barcode image containing encoded digital informationPad Zeros To Length 23

text_image
Black and white barcode image with vertical lines and a small number 'n' in the bottom right corner.Pad Zeros To Length 24

Cyclone™ M2000 Series Product Reference Guide
Pad Data With Zeros (continued)

text_image
Black and white barcode image with vertical lines and a small number 'n' in the center.Pad Zeros To Length 25

text_image
Black and white barcode image with vertical lines above and below the barsPad Zeros To Length 26
text_image
Barcode image containing machine-readable data, no human-readable text visiblePad Zeros To Length 27

text_image
Barcode image containing machine-readable data, no human-readable text visiblePad Zeros To Length 28
text_image
Barcode image containing machine-readable data, with vertical black and white lines representing the number 10.Pad Zeros To Length 29

text_image
Barcode image containing machine-readable data, with vertical black and white lines representing the number 10Pad Zeros To Length 30

text_image
Barcode image containing encoded digital informationStop Pad Zeros
Beeps
Select a beep sequence for each ADF rule.

text_image
Black and white barcode image with vertical lines and a central dotBeep Once
text_image
Barcode image containing encoded digital informationBeep Twice

text_image
Barcode image containing encoded digital informationBeep Three Times
Send Keystroke (Control Characters and Keyboard Characters)
Scan the "Send _" bar code for the keystroke you wish to send.
Control Characters
Scan these bar codes to send control characters.

text_image
Barcode image containing machine-readable data, with vertical black and white bars representing the number 10Send Control 2

text_image
Black and white barcode image with vertical lines above and below the barsSend Control A

text_image
Black and white barcode image with vertical lines and dots, no readable text or symbols
text_image
Black and white barcode image with vertical lines and a small number '1' at the bottomSend Control CSend Control B

text_image
Black and white barcode image with vertical lines above and below the barsSend Control D

text_image
Black and white barcode image with vertical lines and a small number 'n' in the center.Send Control E
Advanced Data Formatting (ADF)
Control Characters (continued)

text_image
Barcode image with black and white vertical bars, no visible text or symbolsSend Control F

text_image
Black and white barcode image with vertical lines on both sidesSend Control G

text_image
Black and white barcode image with vertical lines and dotsSend Control H Send Control I
text_image
Barcode image containing encoded digital information
text_image
Black and white barcode image with vertical lines above and below the bars
text_image
Black and white barcode image with vertical lines above and below the barsSend Control KSend Control J

Cyclone™ M2000 Series Product Reference Guide
Control Characters (continued)
text_image
Black and white barcode image with vertical lines and a central dotSend Control L
text_image
Barcode image with black and white vertical bars, no visible text or symbols beyond the patternSend Control M

text_image
Barcode image with black and white vertical bars on both sides
text_image
Barcode image containing encoded digital informationSend Control OSend Control N

text_image
Barcode image with black and white vertical bars, no visible text or symbolsSend Control P

text_image
Barcode image containing encoded digital informationSend Control Q
Control Characters (continued)

text_image
Barcode image containing encoded digital informationSend Control R
text_image
Barcode image containing encoded digital informationSend Control S

text_image
Black and white barcode image with vertical lines and a central dotSend Control T Send Control U

text_image
Black and white barcode image with vertical lines on both sides
text_image
Black and white barcode image with vertical lines above and below the barsSend Control V
text_image
Black and white barcode image with vertical lines on both sidesSend Control W

text_image
Black and white barcode image with vertical lines and dots, no readable text or symbolsSend Control X

Cyclone™ M2000 Series Product Reference Guide
Control Characters (continued)

text_image
Black and white barcode image with vertical lines and a small number 'n' in the center.Send Control Y

text_image
Barcode image containing encoded digital informationSend Control Z

text_image
Barcode image containing encoded digital informationSend Control [

text_image
Barcode image containing encoded digital informationSend Control \

text_image
Barcode image containing machine-readable data, no human-readable text visibleSend Control ]
text_image
Barcode image containing encoded digital informationSend Control 6

text_image
Barcode image with black and white vertical bars on both sides
Send Control -
Keyboard Characters
Use these bar codes to send keyboard characters.

text_image
Black and white barcode image with vertical lines and a central dotSend Space

text_image
Black and white barcode image with vertical lines above and below the barsSend!

text_image
Barcode image with black and white vertical bars, no visible text or symbolsSend "

text_image
Black and white barcode image with vertical lines above and below the barsSend #

text_image
Barcode image with black and white vertical bars, no visible text or symbolsSend \$

text_image
Barcode image containing encoded digital informationSend %
text_image
Black and white barcode image with vertical lines above and below the barsSend &

text_image
Black and white barcode image with vertical lines and a small number 'n' in the center.Send '

Cyclone™ M2000 Series Product Reference Guide
Keyboard Characters (continued)
text_image
Barcode image with black and white vertical bars, no visible text or symbolsSend (

text_image
Black and white barcode image with vertical lines and a small number '1' at the bottomSend)
text_image
Barcode image containing encoded digital informationSend *
text_image
Barcode image containing encoded digital informationSend +

text_image
Barcode image with black and white vertical bars, no visible text or symbols beyond the patternSend,
text_image
Barcode image containing encoded digital informationSend -

text_image
Barcode image containing encoded digital informationSend.

text_image
Barcode image containing encoded digital informationSend /
Keyboard Characters (continued)

text_image
Barcode image containing encoded digital informationSend 0

text_image
Barcode image containing machine-readable data, no human-readable text visibleSend 1
text_image
Black and white barcode image with vertical lines and dots, no readable text or symbolsSend 2

text_image
Black and white barcode image with vertical lines and dots, no readable text or symbolsSend 3

text_image
Black and white barcode image with vertical lines and dots, no readable text or symbolsSend 4
text_image
Black and white barcode image with vertical lines above and below the barsSend 5

text_image
Black and white barcode image with vertical lines on both sidesSend 6

text_image
Black and white barcode image with vertical lines resembling a simplified number 3 or adjacent to the digit '3'Send 7

Cyclone™ M2000 Series Product Reference Guide
Keyboard Characters (continued)

text_image
Black and white barcode image with vertical lines and dotsSend 8

text_image
Black and white barcode image with vertical lines and dotsSend 9
text_image
Black and white barcode image with vertical lines and a central dotSend :

text_image
Barcode image containing encoded digital informationSend ;
text_image
Barcode image containing encoded digital informationSend <
text_image
Barcode image containing encoded digital informationSend =

text_image
Barcode image with black and white vertical bars, no visible text or symbolsSend >

text_image
Barcode image containing encoded digital informationSend?
Keyboard Characters (continued)

text_image
Black and white barcode image with vertical lines above and below the barsSend @ Send A

text_image
Black and white barcode image with vertical lines on both sides
text_image
Barcode image containing encoded digital information
text_image
Black and white barcode image with vertical lines above and below the barsSend CSend B

text_image
Barcode image containing encoded digital informationSend D

text_image
Barcode image containing encoded digital informationSend E

text_image
Barcode image containing encoded digital information
text_image
Black and white barcode image with vertical lines and dots, no readable text or symbolsSend GSend F

Cyclone™ M2000 Series Product Reference Guide
Keyboard Characters (continued)

text_image
Barcode image with black and white vertical bars, no visible text or symbolsSend H

text_image
Black and white barcode image with vertical lines and a central dotSend I
text_image
Barcode image containing encoded digital informationSend J

text_image
Barcode image containing encoded digital informationSend K

text_image
Barcode image with black and white vertical bars on both sidesSend L Send M

text_image
Barcode image containing machine-readable data, with vertical black and white lines representing the pattern of a barcode.
text_image
Barcode image with black and white vertical bars, no visible text or symbolsSend N

text_image
Barcode image with black and white vertical bars on both sidesSend O
Keyboard Characters (continued)
text_image
Black and white barcode image with vertical lines and repeating patternsSend P

text_image
Barcode image containing encoded digital informationSend Q

text_image
Black and white barcode image with vertical lines above and below the barsSend R

text_image
Black and white barcode image with vertical lines above and below the barsSend S

text_image
Black and white barcode image with vertical lines and dots, no readable text or symbolsSend T
text_image
Black and white barcode image with vertical lines on both sidesSend U

text_image
Barcode image containing machine-readable data, with vertical black and white lines representing the pattern of a barcode.Send V

text_image
Black and white barcode image with vertical lines above and below the barsSend W

Cyclone™ M2000 Series Product Reference Guide
Keyboard Characters (continued)
text_image
Barcode image containing encoded digital informationSend X
text_image
Barcode image containing encoded digital informationSend Y

text_image
Barcode image containing encoded digital informationSend Z

text_image
Barcode image containing encoded digital informationSend [

text_image
Barcode image with black and white vertical bars, no visible text or symbols beyond the patternSend \

text_image
Barcode image containing encoded digital informationSend ]
text_image
Barcode image with black and white vertical bars on both sidesSend ^

text_image
Barcode image containing encoded digital informationSend _
Keyboard Characters (continued)
text_image
Barcode image containing encoded digital informationSend '
text_image
Barcode image containing encoded digital informationSend a
text_image
Black and white barcode image with vertical lines and a central dotSend b
text_image
Black and white barcode image with vertical lines above and below the barsSend c
text_image
Barcode image containing machine-readable data, with vertical black and white lines representing the pattern of a barcode.Send d
text_image
Black and white barcode image with vertical lines above and below the barsSend e

text_image
Black and white barcode image with vertical lines on both sidesSend f

text_image
Black and white barcode image with vertical lines on both sidesSend g

Cyclone™ M2000 Series Product Reference Guide
Keyboard Characters (continued)

text_image
Barcode image containing machine-readable data, with vertical black and white lines representing the pattern of a barcode.Send h Send i
text_image
Barcode image containing machine-readable data, with vertical black and white lines representing the pattern of data.
text_image
Barcode image containing encoded digital information
text_image
Barcode image with black and white vertical bars on both sidesSend kSend j
text_image
Barcode image containing machine-readable data, with vertical black and white lines representing the number 10.Send I

text_image
Barcode image containing encoded digital informationSend m

text_image
Barcode image containing encoded digital information
text_image
Barcode image with black and white vertical bars, no visible text or symbols beyond the patternSend oSend n
Keyboard Characters (continued)

text_image
Barcode image containing encoded digital informationSend p

text_image
Black and white barcode image with vertical lines above and below the barsSend q

text_image
Black and white barcode image with vertical lines and patternsSend r

text_image
Barcode image with black and white vertical bars, no visible text or symbolsSend s
text_image
Black and white barcode image with vertical lines and a central dotSend t

text_image
Black and white barcode image with vertical lines and dots, no readable text or symbolsSend u

text_image
Black and white barcode image with vertical lines and dots, no readable text or symbolsSend v

text_image
Black and white barcode image with vertical lines and dots, no readable text or symbolsSend w

Cyclone™ M2000 Series Product Reference Guide
Keyboard Characters (continued)
text_image
Barcode image containing machine-readable data, with vertical black and white lines representing the number 10Send x
text_image
Barcode image with black and white vertical bars, no visible text or symbolsSend y
text_image
Barcode image containing encoded digital informationSend z

text_image
Barcode image containing encoded digital informationSend {

text_image
Barcode image containing encoded digital informationSend |
text_image
Barcode image containing encoded digital informationSend }

text_image
Barcode image containing encoded digital informationSend \~
Send ALT Characters
Use these bar codes to send ALT characters

text_image
Black and white barcode image with vertical lines on both sidesSend ALT 2
text_image
Barcode image containing encoded digital informationSend ALT A

text_image
Barcode image containing encoded digital informationSend ALT B
text_image
Barcode image containing encoded digital informationSend ALT C

text_image
Barcode image containing machine-readable data, no human-readable text visibleSend ALT D
text_image
Black and white barcode image with vertical lines above and below the barsSend ALT E

text_image
Black and white barcode image with vertical lines and a small number '1' at the bottomSend ALT F

text_image
Barcode image containing machine-readable data, no human-readable text visibleSend ALT G
Send ALT Characters (continued)

text_image
Black and white barcode image with vertical lines on both sidesSend ALT H

text_image
Black and white barcode image with vertical lines above the barsSend ALTI

text_image
Barcode image containing encoded digital informationSend ALT J
text_image
Barcode image with black and white vertical bars, no visible text or symbolsSend ALT K

text_image
Barcode image with black and white vertical bars on white backgroundSend ALT L Send ALT M

text_image
Barcode image containing encoded digital information
text_image
Barcode image containing encoded digital informationSend ALT N

text_image
Black and white barcode image with vertical lines above and below the barsSend ALT O
Send ALT Characters (continued)

text_image
Black and white barcode image with vertical lines and a small number '1' at the bottom right.Send ALT P

text_image
Barcode image containing encoded digital informationSend ALT Q

text_image
Black and white barcode image with vertical lines forming a pattern of repeating patternsSend ALT R

text_image
Black and white barcode image with vertical lines and repeating patternsSend ALT S
text_image
Black and white barcode image with vertical lines above and below the barsSend ALT T

text_image
Black and white barcode image with vertical lines and a central dotSend ALT U

text_image
Black and white barcode image with vertical lines on both sidesSend ALT V

text_image
Black and white barcode image with vertical lines and a central dotend ALT W
Send ALT Characters (continued)

text_image
Barcode image with black and white vertical bars, no visible text or symbolsSend ALT X

text_image
Black and white barcode image with vertical lines and dots, no readable text or symbolsSend ALT Y
text_image
Barcode image containing encoded digital informationSend ALT Z

text_image
Barcode image containing encoded digital informationSend ALT [
text_image
Barcode image containing encoded digital informationtext_image
Barcode image containing encoded digital information
text_image
Barcode image containing encoded digital informationSend ALT 6

text_image
Black and white barcode image with vertical lines on both sidesSend ALT -
Send Command Characters

text_image
Barcode image containing encoded digital informationSend PA 1 Send PA 2
text_image
Black and white barcode image with vertical lines and dots, no readable text or symbols
text_image
Black and white barcode image with vertical lines and a central dotSend CMD 1

text_image
Barcode image containing encoded digital informationSend CMD 2

text_image
Black and white barcode image with vertical lines and a central patternSend CMD 3

text_image
Black and white barcode image with vertical lines above and below the barsSend CMD 4
Send Command Characters (continued)

text_image
Black and white barcode image with vertical lines on both sidesSend CMD 5

text_image
Barcode image containing encoded digital informationSend CMD 6

text_image
Black and white barcode image with vertical lines and a horizontal bar at the bottomSend CMD 7

text_image
Barcode image containing encoded digital informationSend CMD 8

text_image
Barcode image containing encoded digital informationSend CMD 9
text_image
Barcode image with black and white vertical bars on both sidesSend CMD 10
Send Special Characters

text_image
Black and white barcode image with vertical lines on both sidesSend Yen Character
text_image
Black and white barcode image with vertical lines above and below the barsSend Pound Sterling Character

text_image
Barcode image with black and white vertical bars, no visible text or symbols beyond the patternSend Bomb Character
text_image
Black and white barcode image with vertical lines and a central dotSend Hook Character

text_image
Barcode image with black and white vertical bars on white backgroundSend Bullet Character

text_image
Barcode image containing encoded digital informationSend 1/2 Character

text_image
Black and white barcode image with vertical lines and dots, no readable text or symbolsSend Paragraph Character

text_image
Black and white barcode image with vertical lines and a small number '1' at the bottomSend Section Character

text_image
Barcode image containing encoded digital informationSend Vertical Character
Send Keypad Characters

Send Keypad Characters (continued)

text_image
Send Keypad 5 Send Keypad 6
text_image
Barcode image with black and white vertical bars, no visible text or symbols
text_image
Black and white barcode image with vertical lines and a central dot
text_image
Send Keypad 8Send Keypad 7
text_image
Send Keypad 9
text_image
Send Keypad ENTER
text_image
Send Keypad NUM LOCKSend Keypad Characters (continued)

text_image
Black and white barcode image with vertical lines and a central dotSend Break Key

text_image
Barcode image with black and white vertical bars, no visible text or symbolsSend Delete Key

text_image
Black and white barcode image with vertical lines and a central dotSend Page Up Key

text_image
Black and white barcode image with vertical lines and a horizontal bar at the bottomSend End Key
text_image
Barcode image with black and white vertical bars, no visible text or symbolsSend Page Down Key

text_image
Black and white barcode image with vertical lines and a horizontal bar at the bottomSend Pause Key

text_image
Barcode image with black and white vertical bars on both sidesSend Scroll Lock Key
text_image
Black and white barcode image with vertical lines and a horizontal bar at the bottomSend Backspace Key

text_image
Barcode image with black and white vertical bars, no visible text or symbolsSend Tab Key

text_image
Barcode image containing encoded digital informationSend Print Screen Key
Send Keypad Characters (continued)

text_image
Barcode image containing encoded digital informationSend Insert Key

text_image
Barcode image containing machine-readable data, no human-readable text visibleSend Home Key

text_image
Barcode image containing encoded digital informationSend Enter Key

text_image
Barcode image containing encoded digital informationSend Escape Key

text_image
Barcode image containing encoded digital informationSend Up Arrow Key

text_image
Black and white barcode image with vertical lines and a central dotSend Down Arrow Key

text_image
Barcode image with black and white vertical bars, no visible text or symbolsSend Left Arrow Key

text_image
Barcode image containing machine-readable data, no human-readable text visibleSend Right Arrow Key

text_image
Black and white barcode image with vertical lines and a small number '1' at the bottom right.Send Back Tab Character
Send Function Keys

Send Function Keys (continued)

text_image
Barcode image containing encoded digital informationSend F11 Key
text_image
Barcode image containing encoded digital informationSend F12 Key
text_image
Barcode image containing encoded digital informationSend F13 Key

text_image
Barcode image containing encoded digital informationSend F14 Key

text_image
Barcode image containing encoded digital informationSend F15 Key

text_image
Black and white barcode image with vertical lines and a small number '1' at the bottomSend F16 Key

text_image
Barcode image containing encoded digital informationSend F17 Key

text_image
Barcode image containing encoded digital informationSend F18 Key

text_image
Barcode image with black and white vertical bars on white backgroundSend F19 Key

text_image
Barcode image containing encoded digital informationSend F20 Key
Send Function Keys (continued)
text_image
Black and white barcode image with vertical linesSend F21 Key

text_image
Black and white barcode image with vertical lines and a small number '1' at the bottomSend F22 Key

text_image
Black and white barcode image with vertical lines forming a pattern of repeating patternsSend F23 Key
text_image
Barcode image with black and white vertical bars, no visible text or symbolsSend F24 Key

text_image
Black and white barcode image with vertical lines and a central dotSend F25 Key

text_image
Barcode image containing encoded digital informationSend F26 Key

text_image
Barcode image containing encoded digital informationSend F27 Key
text_image
Barcode image with black and white vertical bars, no visible text or symbols beyond the patternSend F28 Key

text_image
Barcode image containing encoded digital informationSend F29 Key

text_image
Barcode image with black and white vertical bars, no visible text or symbolsSend F30 Key
Send Function Keys (continued)

text_image
Barcode image containing machine-readable data, with vertical black and white lines representing the number 10Send PF1 Key Send PF2 Key

text_image
Black and white barcode image with vertical lines above and below the bars
text_image
Black and white barcode image with vertical lines and a small number '1' at the bottom
text_image
Black and white barcode image with vertical lines and a central dotSend PF4 KeySend PF3 Key
text_image
Black and white barcode image with vertical lines and a horizontal bar at the bottomSend PF5 Key
text_image
Black and white barcode image with vertical lines on both sidesSend PF6 Key

text_image
Barcode image containing encoded digital information
text_image
Black and white barcode image with vertical lines on both sidesSend PF8 KeySend PF7 Key
text_image
Black and white barcode image with vertical lines and a central dot
text_image
Barcode image containing encoded digital informationSend PF10 KeySend PF9 Key
Send Function Keys (continued)
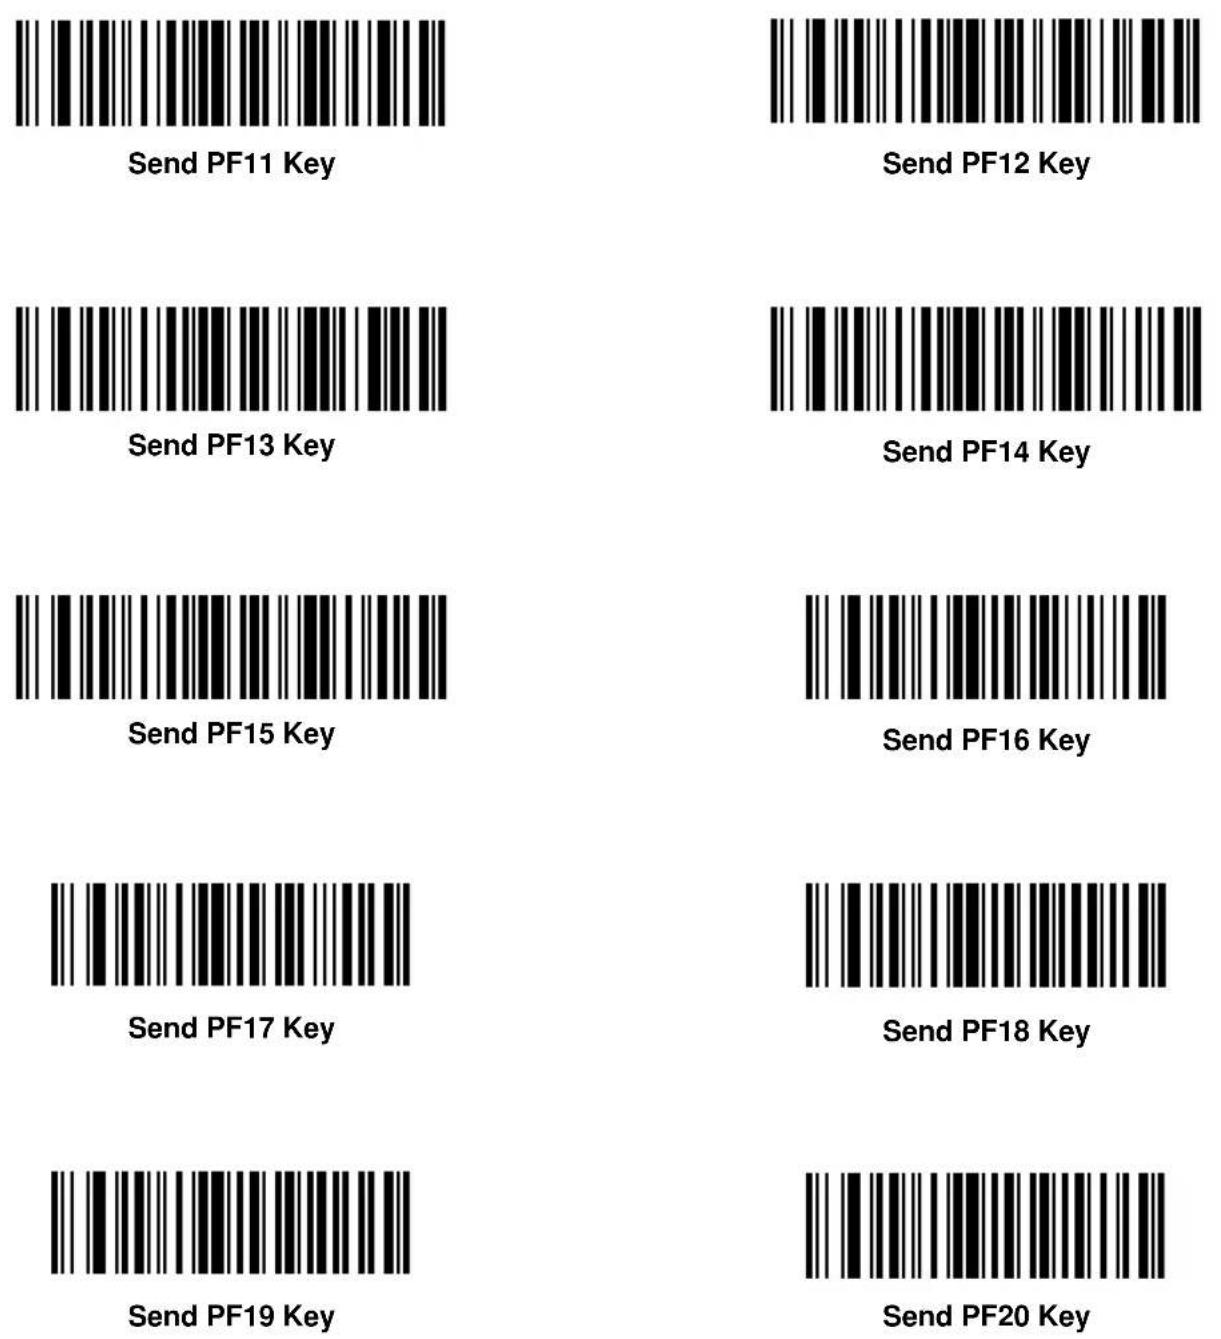
Send Function Keys (continued)

text_image
Barcode image with black and white vertical bars, no visible text or symbolsSend PF21 Key

text_image
Barcode image containing encoded digital informationSend PF22 Key
text_image
Barcode image containing machine-readable data, with vertical black and white lines representing the number 10Send PF23 Key
text_image
Black and white barcode image with vertical lines and dots, no readable text or symbolsSend PF24 Key

text_image
Barcode image containing encoded digital informationSend PF25 Key

text_image
Barcode image containing encoded digital informationSend PF26 Key

text_image
Black and white barcode image with vertical lines and a central dotSend PF27 Key
text_image
Barcode image containing encoded digital informationSend PF28 Key
text_image
Barcode image containing encoded digital informationSend PF29 Key

text_image
Barcode image with black and white vertical bars on both sidesSend PF30 Key
Turn On/Off Rule Sets
Use these bar codes to turn rule sets on and off within a rule.

text_image
Black and white barcode image with vertical lines forming a pattern of repeating patternsTurn On Rule Set 1 Turn On Rule Set 2
text_image
Barcode image containing encoded digital information
text_image
Black and white barcode image with vertical lines and a central dot
text_image
Black and white barcode image with vertical lines and dotsTurn On Rule Set 4Turn On Rule Set

text_image
Black and white barcode image with vertical lines and a horizontal bar at the bottomTurn Off Rule Set 1

text_image
Black and white barcode image with vertical lines and a small number '1' at the bottomTurn Off Rule Set 2

text_image
Barcode image with black and white vertical bars, no visible text or symbolsTurn Off Rule Set 3

text_image
Black and white barcode image with vertical lines on both sidesTurn Off Rule Set 4
Alphanumeric Keyboard
Space


\$
%

*
+


■
Alphanumeric Keyboard (continued)

Alphanumeric Keyboard (continued)
text_image
;
text_image
Barcode image with a single asterisk below it
text_image
=
text_image
Barcode image with a large '>} symbol below it
text_image
?
text_image
@Alphanumeric Keyboard (continued)

[
1
]

^

1
Alphanumeric Keyboard (continued)
Bar codes on this page should not be confused with those on the numeric

Cyclone™ M2000 Series Product Reference Guide
keypad.

text_image
0
text_image
1
text_image
2
text_image
3
text_image
4
text_image
5Alphanumeric Keyboard (continued)
Bar codes on this page should not be confused with those on the numeric

Cyclone™ M2000 Series Product Reference Guide
keypad.

text_image
6
text_image
7
text_image
8
text_image
9Alphanumeric Keyboard (continued)

A

B

C

D

E

F

G
H
Alphanumeric Keyboard (continued)
text_image
Barcode image with black and white vertical bars and a small '1' below it
text_image
J
text_image
K
text_image
L
text_image
M
text_image
N
text_image
Barcode image with a small circle below it, likely for digital scanning or linking to online content.
text_image
PAlphanumeric Keyboard (continued)

text_image
Q
text_image
R
text_image
S
text_image
T
text_image
U
text_image
VAlphanumeric Keyboard (continued)

text_image
W
text_image
X
text_image
Y
text_image
z

Alphanumeric Keyboard (continued)
a

b
C

d
e

f

g

h
Alphanumeric Keyboard (continued)
text_image
i
text_image
j
text_image
k
text_image
Barcode image with a single vertical line beneath it, likely for digital scanning and labeling.
text_image
m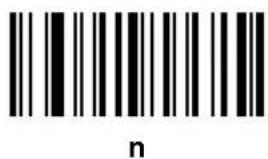
text_image
n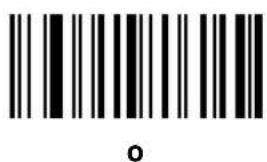
text_image
Barcode image with a small 'o' below it, likely for digital scanning or information retrieval.
text_image
pAlphanumeric Keyboard (continued)

text_image
q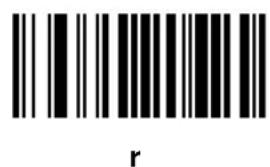
text_image
r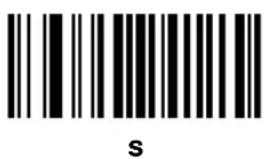
text_image
s
text_image
t
text_image
u
text_image
v
text_image
W
text_image
XAlphanumeric Keyboard (continued)

natural_image
Simple line drawing of a closed book with visible pages and spine (no text or symbols)Appendix A Programming Reference
AIM Code Identifiers
Each AIM Code Identifier contains the three-character string ]cm where:
] = Flag Character (ASCII 93)
c = Code Character
m = Modifier Character
Table A-1. AIM Code Identifiers
| Code Character Code Type | |
| A Code 39, | Code 39 Full ASCII, Code 32 |
| C Code 128 (all variants), Coupon (Code 128 portion) | |
| E UPC/EAN, Coupon (UPC portion) | |
| F Codabar | |
| G Code 93 | |
| H Code 11 | |
| I Interleaved 2 of 5 | |
| L PDF-417, | Macro PDF-417, Micro PDF-417 |
| M MSI Plessey | |
| S | Discrete 2 of 5, IATA |
| X | Bookland EAN, Code 39 Trioptic |
See Table A-2 for information on RSS and Composite Codes.
Table A-2. Composite Code Data Formats (with AIM ID enabled)
| 1-D Component | Data Format | |
| Standard Mode EAN-128 Emulation Mode | ||
| EAN-13,UPCA,UPCE | 1D: ]E02D: ]e0See note 5 | 1D: ]E02D: ]C1 before each EAN-128 split transmissionSee notes 3 -5 |
| EAN-8 1D: ]E4 | 2D: ]e0See note 5 | 1D: ]E42D: ]C1 before each EAN-128 split transmissionSee notes 3 -5 |
| RSS-14RSS Limited | 1D: ]e02D: ]e1See note 2 | ]C1 before each EAN-128 split transmissionSee notes 3 -5 |
| EAN-128RSS Expanded | If the last AI in the EAN-128 is a predefined, fixed length:]e0Otherwise, ]e0 GSSee note 2 | ]C1 before each EAN-128 split transmissionSee notes 3 and 4 |
| Code 39 (TLC39) ANSI MH10.8.3M syntax:06 Format: ]L2[)> ^R_S 06 ^G_S 6P 1D data ^G_S S 2D data ^R_S ^E_T 05 Format: ]L2[)> ^R_S 05 ^G_S 906P 1D data ^G_S 8004 2D data ^R_S ^E_T See note 6 | ||
| Notes:All Function 1 characters in the 1D and 2D are sent as ^G_S (ASCII character 29); the first Function 1 in EAN-128 is not transmitted.In standard mode, data following the Composite Symbol Separator is prefixed with "]e1".In EAN-128 emulation mode, each packet is split on an AI boundary and is never greater that 48 characters in length.In EAN-128 emulation mode, data after the firth Composite Symbol Separator is discarded.If the UPC/EAN component has a supplemental, ]E1 precedes a 2-digit supplemental and ]E2 precedes the 5-digit supplemental. ^R_S is ASCII character 30 and ^E_T is ASCII character 4. The transmitted format (5 or 6) is data dependent. | ||
The modifier character is the sum of the applicable option values based on Table A-3.
Table A-3. Modifier Characters
| Code Type | Option Value Option | |
| Code 39 | ||
| 0 No Check character. | ||
| 1 Reader has checked one check character. | ||
| 3 Reader has checked and stripped check character. | ||
| 4 Reader has performed Full ASCII character conversion. | ||
| 5 Reader has performed Full ASCII character conversion and checked one check character. | ||
| 7 Reader has performed Full ASCII character conversion and checked and stripped check character. | ||
| Example: A Full ASCII bar code with check character W, A+I+MI+DW, is transmitted as ]A7AimId where 7 = (3+4). | ||
| Trioptic Code 39 | ||
| 0 No option specified at this time. Always transmit 0. | ||
| Example: A Trioptic bar code 412356 is transmitted as ]X0412356 | ||
| Code 128 | ||
| 0 Standard data packet, No Function code 1 in first symbol position. | ||
| 1 Function code 1 in first symbol character position. | ||
| 2 Function code 1 in second symbol character position. | ||
| Example: A Code (EAN) 128 bar code with Function 1 character in the first position, FNC1 Aim Id is transmitted as ]C1AimId | ||
Table A-3. Modifier Characters
| Code Type | Option Value Option | |
| I 2 of 5 | ||
| 0 No check digit processing. | ||
| 1 Reader has validated check digit. | ||
| 3 Reader has validated and stripped check digit. | ||
| Example: An I 2 of 5 bar code without check digit, 4123, is transmitted as ]I04123 | ||
| Codabar | ||
| 0 Standard Codabar | ||
| 1 ABC Codabar | ||
| Example: A standard Codabar bar code, 4123, is transmitted as ]F04123 | ||
| Code 93 | ||
| 0 No options specified at this time. Always transmit 0. | ||
| Example: A Code 93 bar code 012345678905 is transmitted as ]G0012345678905 | ||
| MSI Plessey | ||
| 0 Mod 10 check digit validated and transmitted. | ||
| 1 Mod 10 check digit validated but not transmitted. | ||
| Example: An MSI Plessey bar code 4123, with Mod 10 check digit validated, is transmitted as ]M04123 | ||
| D 2 of 5 | ||
| 0 No options specified at this time. Always transmit 0. | ||
| Example: A D 2 of 5 bar code 4123, is transmitted as ]S04123 | ||
Table A-3. Modifier Characters
| Code Type | Option Value Option | |
| UPC/EAN | ||
| 0 Standard packet in full EAN country code format, which is 13 digits for UPCA and UPCE (not including supplemental data). | ||
| 1 Two digit supplement data only. | ||
| 2 Five digit supplement data only. | ||
| 4 EAN-8 data packet. | ||
| Example: A UPCA bar code 012345678905 is transmitted as ]E00012345678905 | ||
| Bookland EAN | ||
| 0 No options specified at this time. Always transmit 0. | ||
| Example: A Bookland EAN bar code 123456789X is transmitted as ]X0123456789X | ||
| PDF-417, Micro PDF-417 | ||
| 0 Reader set to conform to protocol defined in 1994 PDF-417 symbology specifications. Note: When this option is transmitted, the receiver cannot reliably determine whether ECIs have been invoked or whether data byte 92_DEC has been doubled in transmission. | ||
| 1 Reader set to follow the ECI protocol (Extended Channel Interpretation). All data characters 92_DEC are doubled. | ||
| 2 Reader set for Basic Channel operation (no escape character transmission protocol). Data characters 92_DEC are not doubled. Note: When decoders are set to this mode, unbuffered Macro symbols and symbols requiring the decoder to convey ECI escape sequences cannot be transmitted. | ||
| 3 The bar code contains a UCC/EAN-128 symbol, and the first codeword is 903-907, 912, 914, 915. | ||
| 4 The bar code contains a UCC/EAN-128 symbol, and the first codeword is in the range 908-909. | ||
| 5 The bar code contains a UCC/EAN-128 symbol, and the first codeword is in the range 910-911. | ||
| Example: A PDF-417 bar code ABCD, with no transmission protocol enabled, is transmitted as ]L2ABCD. | ||
Table A-3. Modifier Characters
| Code Type | Option Value Option | |
| RSS Family | ||
| No option specified at this time. Always transmit 0. RSS-14 and RSS-Limited transmit with an Application Identifier “01”.Note: In UCC/EAN-128 emulation mode, RSS is transmitted using Code 128 rules (i.e., ]C1). | ||
| Example: An RSS-14 bar code 100123456788902 is transmitted as]e001100123456788902. | ||
| EAN.UCC Composites (RSS, UCC/EAN-128, 2D portion of UPC composite) | ||
| Native mode transmission.Note: UPC portion of composite is transmitted using UPC rules. | ||
| 0 Standard data | packet. | |
| 1 Data packet containing the data following an encoded symbol separator character. | ||
| 2 Data packet containing the data following an escape mechanism character. The data packet does not support the ECI protocol. | ||
| 3 Data packet containing the data following an escape mechanism character. The data packet supports the ECI protocol. | ||
| EAN.UCC Composites (RSS, UCC/EAN-128, 2D portion of UPC composite) | ||
| UCC/EAN-128 emulationNote: UPC portion of composite is transmitted using UPC rules. | ||
| 1 Data packet is | a UCC/EAN-128 symbol (i.e., data is preceded with ]JC1). | |
According to AIM standards, a UPC with supplemental bar code is transmitted in one of the following formats:
JE0 (UPC chars) (terminator) JE2 (supplemental) (terminator) or
JE2 (supplemental) (terminator) JE0 (UPC chars) (terminator)
In the M2000, however, the format is changed to:
]E0 (UPC chars) ]E2 (supplemental)
Therefore, a UPC with two supplemental characters, 01234567890510, is transmitted to the host as a 21-character string, ]E00012345678905]E210.
Prefix / Suffix Values
The values in Table A-4 can be assigned as prefixes or suffixes to scanned data. If you're using a keyboard interface, refer to the Synapse "Smart Cable" Interface Guide for keystroke prefix/suffix values.
Table A-4. Prefix/Suffix Values
| Prefix/Suffix Value | Full ASCII Code 39 Encode Char. | ASCII Character | Prefix/Suffix Value | Full ASCII Code 39 Encode Char. | ASCII Character |
| 1000 | %U | NUL | 1032 | Space | Space |
| 1001 | A | SOH | 1033 | /A | ! |
| 1002 | B | STX | 1034 | /B | “ |
| 1003 | C | ETX | 1035 | /C | # |
| 1004 | D | EOT | 1036 | /D | |
| 1005 | E | ENQ | 1037 | /E | % |
| 1006 | F | ACK | 1038 | /F | & |
| 1007 | G | BELL | 1039 | /G | ‘ |
| 1008 | H | BCKSPC | 1040 | /H | ( |
| 1009 | I | HORIZ TAB | 1041 | /I | ) |
| 1010 | J | LF/NW LN | 1042 | /J | * |
| 1011 | K | VT | 1043 | /K | + |
| 1012 | L | FF | 1044 | /L | ‘ |
| 1013 | M | CR/ENTER | 1045 | - | - |
| 1014 | N | SO | 1046 | . | . |
| 1015 | O | SI | 1047 | / | / |
| 1016 | P | DLE | 1048 | 0 | 0 |
| 1017 | Q | DC1 | 1049 | 1 | 1 |
| 1018 | R | DC2 | 1050 | 2 | 2 |
| 1019 | S | DC3 | 1051 | 3 | 3 |
| 1020 | T | DC4 | 1052 | 4 | 4 |
| 1021 | U | NAK | 1053 | 5 | 5 |
| 1022 | V | SYN | 1054 | 6 | 6 |
| 1023 | W | ETB | 1055 | 7 | 7 |
| 1024 | X | CAN | 1056 | 8 | 8 |
| 1025 | Y | EM | 1057 | 9 | 9 |
| 1026 | $Z | SUB | 1058 | /Z | : |
| 1027 | %A | ESC | 1059 | %F | ; |
| 1028 | %B | FS | 1060 | %G | < |
| 1029 | %C | GS | 1061 | %H | = |
| 1030 | %D | RS | 1062 | %I | > |
| 1031 | %E | US | 1063 | %J | ? |
Table A-4. Prefix/Suffix Values
| Prefix/Suffix Value | Full ASCII Code 39 Encode Char. | ASCII Character | Prefix/Suffix Value | Full ASCII Code 39 Encode Char. | ASCII Character |
| 1064 | %V | @ | 1097 | +A | a |
| 1065 | A | A | 1098 | +B | b |
| 1066 | B | B | 1099 | +C | c |
| 1067 | C | C | 1100 | +D | d |
| 1068 | D | D | 1101 | +E | e |
| 1069 | E | E | 1102 | +F | f |
| 1070 | F | F | 1103 | +G | g |
| 1071 | G | G | 1104 | +H | h |
| 1072 | H | H | 1105 | +I | i |
| 1073 | I | I | 1106 | +J | j |
| 1074 | J | J | 1107 | +K | k |
| 1075 | K | K | 1108 | +L | l |
| 1076 | L | L | 1109 | +M | m |
| 1077 | M | M | 1110 | +N | n |
| 1078 | N | N | 1111 | +O | o |
| 1079 | O | O | 1112 | +P | p |
| 1080 | P | P | 1113 | +Q | q |
| 1081 | Q | Q | 1114 | +R | r |
| 1082 | R | R | 1115 | +S | s |
| 1083 | S | S | 1116 | +T | t |
| 1084 | T | T | 1117 | +U | u |
| 1085 | U | U | 1118 | +V | v |
| 1086 | V | V | 1119 | +W | w |
| 1087 | W | W | 1120 | +X | x |
| 1088 | X | X | 1121 | +Y | y |
| 1089 | Y | Y | 1122 | +Z | z |
| 1090 | Z | Z | 1123 | %P | { |
| 1091 | %K | [ | 1124 | %Q | | |
| 1092 | %L | \ | 1125 | %R | } |
| 1093 | %M | ] | 1126 | %S | ~ |
| 1094 | %N | ^ | 1127 | Undefined | |
| 1095 | %O | - | |||
| 1096 | %W | ' | 7013 | ENTER |

Cyclone™ M2000 Series Product Reference Guide

natural_image
Simple line drawing of a closed book with visible pages and spine (no text or symbols)Appendix B Specifications
M2000 Scanner Specifications
Table B-1 lists the specifications for the M2000 scanner.
Table B-1. Scanner Specifications
| Item Description | |
| Power Requirements 5.2 VDC ± 5% @ 300 mA nominal | |
| Laser Diode Power 0.7 mW, max. | |
| Scan Pattern | |
| Start Time | 0.065 sec. to 75% of steady state horizontal amplitude;0.50 sec. to 90% of steady state vertical amplitude |
| Scan Amplitude Horizontal: 34 | ^ ± 1.5^ Vertical (Omni): 34^ ± 1.5^ Vertical (Raster): 12.5^ ± 1.5^ |
| Scan Frequency Horizontal: 320 Hz ±5 HzVertical (Omni): 295 Hz ±5 HzVertical (Raster): 10 Hz ±1 Hz | |
| Frame Rate 25 frames/sec. 12.5 Hz ±1 Hz (vertical) | |
| Optical Resolution Can decode a | 6.0 mil (minimum X-dimension) symbol (PDF-417); Y-dimension must be 2X or greater. |
| Angular Orientation Tolerances | |
| Pitch Tolerance ± 30 | ^ (“front to back”) |
| Skew ± 15 | ^ from plane parallel to symbol (“side-to-side”) |
| Item | Description |
| Rotational Tolerance (Raster) ± 4 | ° (for scanning PDF benchmark label, assuming 3:1 codeword aspect ratio). 1D code types depend on height of symbol. |
| Rotational Tolerance (Omnidirectional) | 360° for 1D symbol |
| Rotational Tolerance (Semi-omni) | ± 20° from horizontal |
| Dead Zone/Optical Throw ± 2 | ° (1-D symbologies) or ± 9°(PDF-417) from beam direction |
| Print Contrast Resolution | 35% (1-D symbologies) or 45% (PDF-417) absolute dark/light reflectance differential, measured at 650 nm. |
| Ambient Light Immunity Up to 800 ft.-candles of sunlight | |
| Humidity 5 - 95% (non-condensing) | |
| Shock Multiple 4-ft./1.2m drops to concrete | |
| Operating Temperature 0 | ° to 40°C; 32° to 104°F |
| Storage Temperature -40 | ° to 60°C; -40° to 140°F |
| Scanner Connector (see Cable Pinouts on page B-5 for host-end connector of cables) | 10-pin modular connector at base of handle:Pin # RS-232/IBM/Synapse USB/Synapse1 Synapse clock/Flash Synapse download RxD (4683)2 + 5V + 5V3 Ground Ground4 Transmit (TxD)/RS-485A VDD5 Receive (RxD) D+6 Ready to Send (RTS)/RS-485B/ Synapse Data Synapse Data/Flash Download TxD (4683)7 Clear to Send (CTS) D-8 Download Download9 EAS EASE10 EAS EAS |
| Coil Cable Length | 6 ft.; 183 cm |
| Weight | 12 oz.; 340 gm |
| Height | 7.8 in.; 198 mm |
clock
Table B-1. Scanner Specifications (continued)
| Item Description | |
| Depth 5.4 in.; 137 mm | |
| Width 3.4 in.; 86 mm | |
| Decode Capability 1-D Symbologies: UPC/EAN, Bookland EAN, Code 39, Code 39 Full ASCII, Code 93, Code 128, Codabar, Interleaved 2 of 5, Discrete 2 of 5, MSI Plessey. Cannot autodiscriminate between Code 39 and Code 39 Full ASCII.2-D Symbology: PDF-417, MicroPDFComposite Codes: UCC/EAN, RSS Code | |
| Memory 64K x 16 RAM, 256K x 16 Flash | |
Decode Zones
Following are the decode distances for the M2000 scanner raster and omnidirectional patterns.
Note: Typical performance at 68°F (20°C) on high quality symbols in normal room light.
$$ \mathrm{Vcc} = 5 \mathrm{V} $$

text_image
Front of Scanner 0.0 6.6 mil PDF417 4.0
other
| Category | ln. (cm) | W | |---|---|---| | In. | 5 | 12.7 | | | 2.5 | 6.35 | | | 0 | 0 | | | 2.5 | 6.35 | | | 5 | 12.7 | W i d t h o f F i e l d

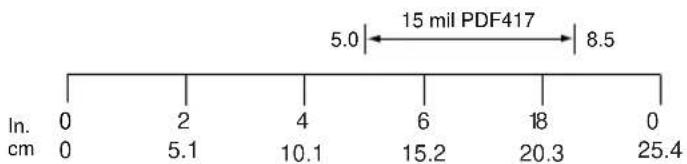
line
| Position | Value | |---|---| | Top | 5.0 | | Bottom | 8.5 | | Left (In. cm) | 0 | | Left (2 cm) | 0 | | Right (2 cm) | 5.1 | | Right (4 cm) | 10.1 | | Right (6 cm) | 15.2 | | Right (8 cm) | 20.3 | | Right (0 cm) | 25.4 |Depth of Field
Figure B-1. M2000 Raster Pattern Decode Zone
Note: Typical performance at 68^ F ( 20^ C) on high quality symbols in normal room light.
other
| Aperture Size | Value (arcsec.) | Approximate Width (arcsec.) | | ------------ | --------------- | ---------------------------- | | 6.0 mil Code 39 | 2.0 | 0.0 | | 80% UPC | 5.3 | 0.0 | | 100% UPC | 11.0 | 0.3 | | 20 mil Code 39 | 12.0 | 0.5 | | Depth of Field (in. cm) | 0 | 0 | | Depth of Field (in. cm) | 2 | 2 | | Depth of Field (in. cm) | 4 | 4 | | Depth of Field (in. cm) | 6 | 6 | | Depth of Field (in. cm) | 8 | 8 | | Depth of Field (in. cm) | 10 | 10 | | Depth of Field (in. cm) | 12 | 12 | | Depth of Field (in. cm) | 14 | 14 | | Depth of Field (in. cm) | 35.6 | 35.6 | | Depth of Field (in. cm) | 12.7 | 12.7 | | Depth of Field (in. cm) | 6.35 | 6.35 | | Depth of Field (in. cm) | 0 | 0 | | Depth of Field (in. cm) | 6.35 | 6.35 | | Depth of Field (in. cm) | 12.7 | 12.7 | Vcc = 5VFigure B-2. M2000 Omnidirectional Pattern Decode Zone
Cable Pinouts
The following tables describe the pinouts for connector cables.
RS-232 Cable Pinouts
Table B-2. Single-Port RS-232C, 9-Pin Female D-Type Connector P/N 25-32465-01, -02
| Pin Signal Function | ||
| 2 RxD Serial data | receive input. Driven by the serial data transmit output on the device communicating with the scanner. | |
| 3 TxD Serial data | transmit output. Drives the serial data receive input on the device communicating with the scanner. | |
| 5 Ground Power | supply input ground pin and reference for both output signals. Must be capable of sinking all return current. | |
| 6 DTR Data Terminal Ready. This signal is hardwired active. | ||
| 7 RTS Request-to-send handshaking output line. May be used optionally by the scanner to signal another device that data is available to send. Used only in conjunction with CTS line. | ||
| 8 CTS Clear-to-send handshaking input line. Used optionally by another device to signal the scanner that it may commence transmitting data. Used only in conjunction with RTS line. | ||
Table B-3. Single-Port RS-232C, 8-Pin Female Siemens Nixdorf P/N 25-32469-01, -02
| Pin Signal Function | ||
| SHELL DRAIN | ||
| 1 +12V Converted to +5V. | ||
| 2 RxD Serial data receive input. Driven by the serial data transmit output on the device communicating with the scanner. | ||
| 3 TxD Serial data transmit output. Drives the serial data receive input on the device communicating with the scanner. | ||
| 5 Ground Power supply input ground pin and reference for both output signals. Must be capable of sinking all return current. | ||
| 6 DTR Data Terminal Ready. This signal is hardwired active. | ||
| 7 RTS Request-to-send handshaking output line. Used optionally by the scanner to signal another device that data is available to send. Used only in conjunction with the CTS line. | ||
| 8 CTS Clear-to-send handshaking input line. Used optionally by another device to signal the scanner that it may commence transmitting data. Used only in conjunction with RTS line. | ||
IBM 46XX Cable Pinouts
Table B-4. IBM 46XX Port 5B 8-Pin SDL Connector P/N 25-32466-01, -02
| Pin Signal Function | ||
| 3 GND Power supply ground pin and reference for both output signals. Must be capable of sinking all return current. | ||
| 4 Serial I/O A Differential driver output/receiver input. | ||
| 5 Serial I/O B Differential driver output/receiver input. | ||
| 6 | + | 5 V P o |
Table B-5. IBM 46XX Port 9B 4-Pin SDL Connector P/N 25-32467-01, -02
| Pin Signal Function | |
| 1 GND Power supply ground pin and reference for both output signals. Must be capable of sinking all return current. | |
| 2 Serial I/O A Differential driver output/receiver input. | |
| 3 Serial I/O B Differential driver output/receiver input. | |
| 4 +12V Power. | |
Table B-6. IBM 46XX Port 17 16-Pin SDL Connector P/N 25-32468-01, -02
| Pin Signal Function | ||
| 2 GND Power supply ground pin and reference for both output signals. Must be capable of sinking all return current. | ||
| 5 | + | 5 V P o |
| 7 RS485 A Differential driver output/receiver input. | ||
| 8 RS485 B Differential driver output/receiver input. | ||
| SHELL DRAIN | ||
Table B-7. IBM Sure One, 8-Pin Connector P/N 25-32470-01, -02
| Pin Signal Function | ||
| 2 RxD Serial data receive input. Driven by the serial data transmit output on the device communicating with the scanner. | ||
| 3 TxD Serial data transmit output. Drives the serial data receive input on the device communicating with the scanner. | ||
| 5, 6, 11 Ground Power supply input ground pin and reference for both output signals. Must be capable of sinking all return current. | ||
| 7, 10 +5V / +12V Power. | ||
| 12 DTR Data Terminal Ready. This signal is hardwired active. | ||
| 13 RTS Request-to-send handshaking output line. Used optionally by the scanner to signal another device that data is available to send. Used only in conjunction with CTS line. | ||
| 14 CTS Clear-to-send handshaking input line. Used optionally by another device to signal the scanner that it may commence transmitting data. Used only in conjunction with RTS line. | ||
| FERRULE | DRAIN | |
Synapse Cable Pinouts
Table B-8. 6-Pin Male Modular Connector for Synapse Cable P/N 25-32463-01, -02
| Pin Signal | Function | |
| 1 SYNDATA | Synapse-compatible data line. Bi-directional. | |
| 2 SYNCLK | Synapse-compatible clock line. Bi-directional. | |
| 3 VCC | Power. | |
| 4 GND Power supply ground pin and reference for both output signals. Must be capable of sinking all return current. | ||

natural_image
Simple line drawing of a closed book with visible pages and spine (no text or symbols)Index
Numerics
1-D bar codes 2-3
A
accessories 1-7
host interface cables 1-7
optional 1-7
power supply 1-7
Synapse adapter cable 1-7
actions 4-28
ADF 4-1
actions 4-1, 4-28
alphanumeric keyboard 4-89
alternate rule sets 4-5
bar code menu example ..... 4-3
beeper definitions 4-8
code length 4-17
code types 4-14
criteria 4-1
default rules 4-7
numeric keypad 4-25
rule belongs to set 4-27
rules 4-1
rules hierarchy 4-6
send ALT characters ..... 4-71
send command characters ..... 4-75
send control characters 4-54
send function keys 4-82
send keyboard characters ..... 4-59
send keypad characters 4-78
send special characters ..... 4-77
advanced data formatting ..... 4-1
actions 4-1, 4-28
alphanumeric keyboard 4-89
alternate rule sets 4-5
bar code menu example 4-3
beeper definitions 4-8
code length 4-17
code types 4-14
criteria 4-1
default rules 4-7
numeric keypad 4-25
rule belongs to set 4-27
rules 4-1
rules hierarchy 4-6
send ALT characters ..... 4-71
send command characters ..... 4-75
send control characters 4-54
send function keys 4-82
send keyboard characters 4-59
send keypad characters ..... 4-78
send special characters 4-77
AIM code identifiers ..... A-1
aiming modes 3-20
autodiscriminate response time ..... 3-4, 3-28
B
bar codes 3-11
beeper
ADF definitions 4-8
definitions 2-8
macro PDF definitions 2-9
beeper definitions 2-8
bullets xii

Cyclone™ M2000 Series Product Reference Guide
C
cable pinouts ....B-5 cables
host interface 1-7
interface 1-3
modular connector 1-5
switching 1-5
Synapse adapter cable 1-7
code ID characters AIM ....A-1
code types B-3
codewords 3-129 transmit unknown 3-130
connecting to host 1-3
conventions notational ..... xii
criteria 4-14
customer interaction center ..... xii
D
data transmission (7 or 8-bit ASCII format)....3-115
decode buffering 3-102
decode capability B-3
decode zones B-3
decoded data 2-4
default table 3-3
E
ECI decoder 3-133
delete character set ECIs ..... 3-132
escape characters 3-131
G
green LED 2-4
H
hardware handshaking 3-108 host
IBM 46XX 3-12
RS-232C 3-13
host serial RTS line state .....3-114
|
IBM 468X/9X EAS support....1-2 overview....1-2
L
laser patterns omnidirectional ..... 2-1, 2-2 raster ..... 2-2 single-line ..... 2-2
LED indicators ..... 2-4, 2-10
M
macro PDF 3-126
beeper definitions 2-9
buffer all symbols 3-127
buffer/transmit scans .....3-127
delete character set ECIs ..... 3-132
ECI decoder 3-133
escape characters 3-131
flush buffer/abort PDF entry ..... 3-139
last blocker marker 3-138
scan in sequence ..... 3-127
transmit addressee 3-136
transmit any symbol in set 3-127
transmit block count ..... 3-135
transmit checksum 3-137
transmit file name 3-134
transmit filesize 3-137
transmit macro PDF control header . 3-138
transmit sender 3-136
transmit symbols in codeword format .... 3-129
transmit time stamp 3-135
transmit unknown codewords ..... 3-130
transmit user-selected fields ..... 3-134
transmit/decode mode symbols .... 3-127
maintenance 2-10
memory B-3
N
notational conventions ..... xii
O
omnidirectional pattern 2-1, 2-2
orientation tolerances ....B-1
P
PDF-417 2-3
tall symbol 2-4
power options 1-3
power requirements ...... B-1
power supply 1-7
connecting 1-3
prefix values .....A-7
prefix/suffix values .....A-7
product overview 1-1
programming 3-1
programming bar codes
aiming mode 3-20
autodiscriminate response time ..... 3-28
beep after good decode ..... 3-23
beeper tone 3-25
beeper volume 3-24
bi-directional redundancy 3-28
cancel 3-142
Codabar 3-82
CLSI editing 3-85
length 3-83
NOTIS editing 3-85
Code 11 3-68
Code 11 check digit verification ..... 3-71
Code 11 lengths 3-69
Code 11 transmit check digits ..... 3-72
Code 128....3-54
decode performance 3-56
lengths 3-55
UCC/EAN-128 3-54
Code 128 emulation 3-93
Code 32 prefix 3-59
Code 39 3-57
check digit verification ..... 3-62
Code 39 full ASCII ..... 3-63
convert Code 39 to Code 32 ... 3-58
decode performance ..... 3-64
lengths 3-60
transmit check digit 3-62
Trioptic Code 39 3-57
Code 93 3-65
lengths 3-66
composite CC-A/B 3-30
composite CC-C 3-29
decode buffering 3-102
delete character set ECIs ..... 3-132
Discrete 2 of 5 3-79
lengths 3-80
ECI decoder 3-133
escape characters 3-131
flush macro buffer/abort macro PDF entry 3-139
host serial RTS line state ..... 3-114
host types 3-12, 3-15
Interleaved 2 of 5 3-73
check digit verification ..... 3-76
convert I 2 of 5 to EAN-13 ..... 3-78
lengths 3-74
transmit check digit 3-77
ISBT 128 3-55
laser on time 3-23
last blocker marker 3-138
linear code type security ..... 3-26-3-27
linear UPC/EAN decode 3-52
macro PDF transmit/decode mode symbols 3-127
MicroPDF-417 3-91
performance 3-92
MSI plessey 3-86
check digit algorithm ..... 3-90
check digits 3-89
lengths 3-87
transmit check digit 3-89
numeric bar codes 3-140-3-142
PDF-417 3-91
prefix/suffix values 3-99
programmable raster size/expansion 3-19
RS-232 options 3-103
baud rate 3-103
beep on BEL 3-115
check parity 3-107
data transmission format ..... 3-115
hardware handshaking ..... 3-108
host serial response time-out . . 3-114
intercharacter delay ..... 3-113
parity 3-105
software handshaking ..... 3-111
stop bit select 3-113
RSS-14 3-94
RSS-Expanded 3-95
RSS-Limited 3-94
scan data transmission format .... 3-100
scan pattern selector 3-17
scanning mode .....3-16, 3-18
security levels 3-95, 3-96
set defaults 3-11
timeout between decodes ..... 3-22
transmit addressee 3-136
transmit block count 3-135
transmit checksum 3-137
transmit code ID character ..... 3-97
transmit file name 3-134
transmit filesize 3-137
transmit macro PDF control header 3-138
transmit macro PDF user-selected fields 3-134
transmit no read message 3-25
transmit sender 3-136
transmit symbols in codeword format 3-129
transmit time stamp 3-135
transmit unknown codewords ..... 3-130
trigger modes 3-21
UPC composite mode ..... 3-53
UPC/EAN 3-33
bookland EAN 3-35
bookland ISBN 3-51
convert UPCE to UPCA ..... 3-48
convert UPCE1 to UPCA ..... 3-49
coupon code 3-36
decode performance ..... 3-52
decode supplementals ..... 3-37
EAN zero extend 3-50
EAN-13 3-35
EAN-8 3-34
supplemental redundancy ..... 3-43
UPCA 3-33
UPCA check digit .....3-43
UPCA preamble 3-45
UPCE 3-33
UPCE check digit .....3-44
UPCE preamble 3-46
UPCE1 3-34
UPCE1 check digit 3-44
UPCE1 preamble .....3-47
USB parameters 3-116
CAPS LOCK 3-124
country selection .....3-119
ignore unknown characters . . . 3-125
keystroke delay 3-123
set defaults 3-116
USB device type 3-117
programming scanner 1-3
R
raster pattern 2-2, 2-3
slab 2-3
RS-232
data transmission format ..... 3-115
EAS support 1-2
host serial RTS line state ..... 3-114
hosts 3-13
overview 1-2
S
scan beam 2-4
scan pattern B-1
scanning 2-3
errors 3-2
sequence examples 3-2
scanning modes 3-16, 3-18
omnidirectional pattern ..... 2-1, 2-2
raster pattern 2-2
single-line pattern 2-2
smart raster 2-3
security levels 3-95, 3-96
selecting scanning mode .... 3-16, 3-17, 3-18
service information ..... xii
setup
connecting interface cable ..... 1-3
connecting power supply 1-3
connecting to host 1-3
programming the scanner ..... 1-3
switching cables 1-5
single-line pattern 2-2
slab raster 2-3
smart raster 2-3
software handshaking 3-111
specifications B-1
specular reflection 2-7
suffix values ...... A-7
Synapse "Smart Cables" 1-2
T
temperature
operating B-2
storage B-2
trigger modes 3-21
troubleshooting 2-11
U
unpacking 1-2

Cyclone™ M2000 Series Product Reference Guide
Tell Us What You Think...
We'd like to know what you think about this Manual. Please take a moment to fill out this questionnaire and fax this form to: (631) 738-4618, or mail to:
Symbol Technologies, Inc.
One Symbol Plaza M/S B-10
Holtsville, NY 11742-1300
Attention: Technical Publications Manager
Advanced Data Capture
IMPORTANT: If you need product support, please call the appropriate customer support number provided. Unfortunately, we cannot provide customer support at the fax number above.
User's Manual Title:
(please include revision level)
How familiar were you with this product before using this manual?
□ Very familiar Slightly familiar Not at all familiar
Did this manual meet your needs? If not, please explain.
What topics need to be added to the index, if applicable?
What topics do you feel need to be better discussed? Please be specific.
What can we do to further improve our manuals?
Thank you for your input—We value your comments.
Symbol Technologies, Inc.
One Symbol Plaza
Holtsville, New York 11742-1300
http://www.symbol.com

text_image
Barcode image with black and white vertical bars, no visible text or symbols beyond the pattern72E-39696-06
Revision A - January 2007