Atlas - Armoire de projection EluneVision - Free user manual and instructions
Find the device manual for free Atlas EluneVision in PDF.

User questions about Atlas EluneVision
0 question about this device. Answer the ones you know or ask your own.
Ask a new question about this device
Download the instructions for your Armoire de projection in PDF format for free! Find your manual Atlas - EluneVision and take your electronic device back in hand. On this page are published all the documents necessary for the use of your device. Atlas by EluneVision.
USER MANUAL Atlas EluneVision
natural_image
Two large rectangular panels with black and white borders, each mounted on a silver frame (no text or symbols visible)

To the purchaser:
Thank you for purchasing our Atlas manual projection screen with CSR. This screen is design to give you years of trouble free enjoyment. Please take a moment to read this manual before installing.

Safety guide:
When assembling, please DO NOT stand directly under the screen to avoid personal injury. Ensure the Expansive bolts and hanging hardware are firmly attached and fixed to the wall or ceiling.
Specification:
- Our exclusive patented CSR buffer slows the projection screens return into the housing
- Patented self locking mechanism with advance bearing design. Stops the screen in any position.
- Easily mountable to both wall and ceiling.
- Flat screen surface with flame retardant and mildew resistant material.
1.Assemble:
①. Please open the packaging and check you have all the listed accessories.
②. Refer to the following assembly instructions.
③. Keep the screen in a horizontal and level position while mounting.
---- ceiling mounting

text_image
wall mounting front side front side2. Adjustment & Operation:
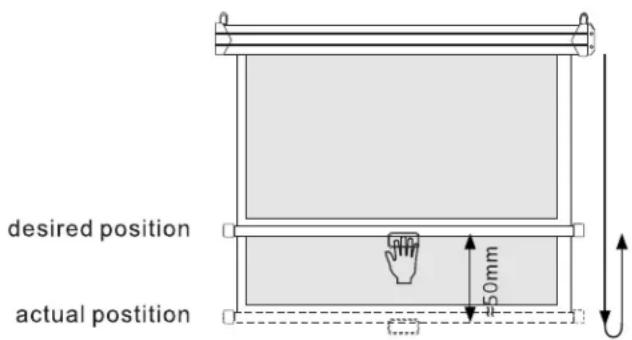
Opening the screen
Pull down the screen slowly stopping (50mm) just past the desired position and then hold and release.
The screen will self lock.
*When the standard amount of black drop appears. DO NOT over extend the fabric to avoid damaging your screen.
text_image
desired position actual position 450mmRetracting the screen
Unlocking
After usage, pull down the screen about 50mm, the screen will unlock automatically.

text_image
desired position Unlock position 50mmConstant Speed Motion: CSR
After unlocking the screen, pull down about 100mm then release, the screen will slowly return to the Housing

text_image
Return Position Unlock position ±100mm3. Screen care
Clean with a soft moistened cloth with water or water and mild liquid soap only. Don't use alcohol or abrasive detergents as this will damage the screen surface.
| Parts | Ash | Impurity |
| Casing | Clean with feather duster | Clean with mild soap solution then dry with soft cloth. Be careful not to scratch the casing |
| Fabric | Clean material with feather duster | Brush with cotton cloth |
Remark:
- Do not scratch or fold up the fabric.
- After usage, please check again there are no other foreign objectives on the screen surface and then draw back the fabric into the case.
4.Accessories
| Name | Picture | Quantity |
| Self Tapping Screw |  | 5 |
| Pastic Wall Anchor |  | 5 |