50EL6KA - TV SHARP - Free user manual and instructions
Find the device manual for free 50EL6KA SHARP in PDF.

User questions about 50EL6KA SHARP
0 question about this device. Answer the ones you know or ask your own.
Ask a new question about this device
Download the instructions for your TV in PDF format for free! Find your manual 50EL6KA - SHARP and take your electronic device back in hand. On this page are published all the documents necessary for the use of your device. 50EL6KA by SHARP.
USER MANUAL 50EL6KA SHARP
natural_image
Pencil sketch of a flat-screen TV with a blank screen and diagonal shading (no text or symbols)Operating Instructions
Android TV Operation Manual
BN Series
Image for illustration purposes only. Actual product may vary.
IMPORTANT GUARANTEE INFORMATION
Thank you for purchasing this television. We hope you have many years of trouble free enjoyment from your purchase.
Your product is covered under the manufacturers' guarantee for 12 months from the date of purchase.
If you experience any difficulties with your TV, please refer to the 'Frequently asked questions' section at the rear of these Operating Instructions.
If you are still unable to remedy the issue, try resetting the TV to factory settings - details can be found in the 'Settings' menu section of these Operating Instructions - alternatively, please contact the helpline.
In the event that a fault is diagnosed, the helpline will arrange to collect the TV from your home or work address, return it to our service centre, repair the item and then return it to you.
If we believe we cannot offer a permanent repair, we will replace the item.
Technical Support Information
Telephone UK 0330 024 0803, ROI 01443 3323
Web support: www.umc-uk.co.uk
Email: service@umc-uk.co.uk
Calls to 0330 numbers are charged at standard call rates and are included as part
of any bundled minutes with your phone provider.
The telephone opening hours are Monday to Friday 8.30am to 6pm, Saturday 9am – 5pm.
UK: Calls are charged at your normal telephone call rate.
ROI: Calls are charged at a local rate.
Please retain all packaging materials, in addition to your proof of purchase/receipt, as you will need these in the event of warranty/service support.
This guarantee is in addition to and does not affect your statutory rights.
If you need to call the helpline, you will need the following information.
1) Model No ____ (You can find this on the rear of the TV)
2) Date of purchase ____ (You can find this on your sales receipt)
3) Serial Number ____ (You can find this on the rear of the TV)

text_image
EXAMPLE OF LABEL ON REAR OF TV Model No USB-COLAR TV MODEL: L5-ACR3X3X3 CE Hg SINCH: 2014 SERIAL NO. Serial No. HDMI HDMI: 10.00000000000000000000000000000000000000000000000000000000000000000000000000000000000000000000This TV set is for domestic use only
Important Safety Instructions


To prevent spread of fi re, keep candles or other open fl ames away from this product at all times
Please read these instructions. All of the safety and operating instructions should be read before the appliance is operated.
Warnings
- Television sets with 40" screens or larger must be lifted and carried by at least 2 people.
- This television does not contain any parts that are serviceable by the user. In the event of a fault, contact the manufacturer or authorised service department.
- Exposing the internal parts of the TV may endanger your life. The manufacturers guarantee does not extend to faults caused by repairs carried out by unauthorised third parties.
- Do not use the TV set immediately after unpacking. Wait until the TV warms up to room temperature before using it.
• To reduce the risk of fire, electric shock or damage to the TV, do not expose it to dust, rain or moisture. Never expose the TV to dripping or splashing and do not place objects filled with liquids on or near the TV.
- Do not connect any external devices (DVD player, games console etc.) when the TV is switched on. Disconnect both the TV and device from the mains before connecting. Only switch appliances on when the connection process is complete.
- Do not place the television in a confined space and do not obstruct the ventilation openings at the rear of the television.
- When installing on a wall, ensure the TV is at least 5cm from the wall for ventilation.
- Always ensure that the TV's ventilation openings are not covered with items such as newspapers, tablecloths, curtains, etc.
- Dispose of this television and any components including batteries in an environmentally friendly manner. If in doubt, please contact your local authority for details of recycling.
- Ensure this TV is used in moderate climates only.
- In cases of electrostatic discharge (ESD) the TV may operate incorrectly. If this happens, turn the set off at the mains and then turn back on again after 30 seconds. The set should now work normally.
WARNING: Never place a television set on an unstable surface. The TV set may fall causing serious personal injury or death. Many injuries, particularly to children, can be avoided by taking simple precautions such as:
- Use cabinets or stands recommended by the manufacturer of the television set.
- Only use furniture that can safely support the television set.
- Ensure the television set is not overhanging the edge of the supporting furniture.
- Do not place the television set on tall furniture (for example, cupboards or bookcases) without anchoring both the furniture and the television set to a suitable support.
- Do not place the television set on cloth or other materials that may be located between the television set and supporting furniture.
- For maximum safety while using your set, it is recommended to fi t anti-tip straps. These are designed to be attached between the wall/secure surface and the VESA mounts on the television. These are available from major retailers and websites and are an easy and inexpensive way of ensuring that your set stays safely upright.
- Please educate children about the dangers of climbing on furniture to reach the television set or its controls.
- If your existing television set is being retained and relocated, the same considerations as above should be applied.
Safety
- For your safety, this appliance is fitted with a fused 3 pin mains plug. Should the fuse need to be replaced, ensure that any replacement is of the same amperage and approved with the BSI mark.
- Never try and replace the mains plug unless you have adequate qualifications and are legally authorised to do so. In the event that a replacement mains cable is required, contact the manufacturer for a suitable replacement.
- Never use the television if it is damaged in any way.
• Always place the television on a fl at level surface avoiding anywhere which may be subject to strong vibration. - The ideal distance to watch the television is from approximately 2.5-3 times the length of the diagonal measurements of the TV screen away.
- Ensure the television is not placed on top of the power cable as the weight of the television may damage the cable and cause a safety hazard.
- Never place mobile phones, speakers or any other device which may cause magnetic or radio interference, near the television. If interference is apparent, move the device causing the interference away from the television.
- To disconnect the set from the mains, remove the mains plug from the socket.
- Ensure that the mains plug is always easily accessible.
- When handling the set do not grip the LCD screen/glass.
- Do not pull the set when mounted on a bracket. If using a moveable bracket, adjust via the bracket and not the TV set.
- Do not place this set above a heat source.
WARNING: Excessive volume when using earphones and headphones can cause damage to hearing.
Important Safety Instructions

text_image
CAUTION RISK OF ELECTRIC SHOCK DO NOT OPENMaintenance
- To clean your TV, wipe with a soft, dry cloth. If the surfaces are extremely dirty, use a soft cloth dampened with a weak detergent solution.
- Never use alcohol, paint thinner or benzene to clean this unit.
- Before using a chemically treated cloth, read the instructions that came with the cloth carefully.
CAUTION: If water or other liquid enters the television through the display panel surface, a malfunction may occur.

text_image
Mild detergentPackaging
- The safest way to transport your item is in the original box/packaging - please save your packaging for this.
- You will need the original box/packaging in the event of warranty/service repair or support. We are unable to carry out warranty/service if you are unable to package the item correctly.
Important information regarding use of video games, computers, captions or other fixed image displays
The extended use of fi xed image program material can cause a permanent "shadow image" on the LCD/LED panel, also known as "screen burn".
This "shadow image" can appear in the background during normal viewing. This type of irreversible LCD/LED panel deterioration can be limited by observing the following steps:
- Reduce the brightness/contrast setting to a minimum suitable viewing level.
- Do not display the fixed image for extended periods of time.
- Turn the power off when not in use.
Examples of images that are more likely to cause "screen burn" are as follows (this is not an exhaustive list):
- TV channel logos: e.g. shopping channel logos and pricing displays - especially if they are bright and stationary. Moving or low-contrast graphics are less likely to cause ageing of the screen.
- Time displays.
- Teletext: Do not view a static page for a long period of time
• TV/DVD menus: e.g. listings of DVD disc content. - Pause mode: Do not leave the TV in pause mode
for long periods of time, e.g. when watching DVDs or videos.
Important: Once 'shadow image/screen burn' occurs, it will never disappear and is not repairable under warranty.
How do I dispose of this product?
UK: Waste electrical products should not be disposed of with household waste. Please dispose of the product at a designated collection point for recycling of WEEE. For your nearest facilities, please see www.recycle-more.co.uk or ask store for details.

ROI: Waste electrical products should not be disposed of with household waste. Separate disposal facilities exist. Check with your local authority or retailer for recycling advice.

Cd
Batteries
- Do not expose batteries to high temperatures, excessive heat, prolonged sunshine or fire as this may cause leakage, explosion or ignition.
Observe the correct polarity when inserting batteries. - Do not use different types of batteries together or mix old and new batteries.
- Dispose of batteries in an environmentally friendly way.
- Certain regions may regulate the disposal of batteries. Please consult your local authority.
CE Statement:
Hereby, UMC Poland sp. z o.o. declares that this LED TV is in compliance with the essential requirements and other relevant provisions of RED Directive 2014/53/EU.
The full text of the EU declaration of conformity is available by following the link: www.umc-poland.com/declaration-of-conformity/
This equipment may be operated in all EU countries
Wi-Fi max transmitter power: 100 mW at 2.412 GHz - 2.472 GHz
Trademarks

The Ultra HD Display logo is registered trademark of DIGITAL-EUROPE

The DVB logo is the registered trademark of the Digital Video Broadcasting (DVB) project.

Freeview

FreeviewPlay
The FREEVIEW text and logos are trademarks of DTV Services LTD. © DTV Services Ltd
SAORVIEW
SAORVIEW is a registered trademark owned by RTÉ.

Dolby Audio
Manufactured under license from Dolby Laboratories. Dolby, Dolby Audio and the double-D symbol are trademarks of Dolby Laboratories.

Dolby Vision·Atmos
Manufactured under license from Dolby Laboratories. Dolby, Dolby Vision, Dolby Atmos, and the double-D symbol are registered trademarks of Dolby Laboratories Licensing Corporation.

dts-HD
For DTS patents, see http://patents.dts.com. Manufactured under license from DTS Licensing Limited. DTS, the Symbol, DTS and the Symbol together, Virtual:X, and the DTS Virtual:X logo are registered trademarks and/or trademarks of DTS, Inc. in the United States and/or other countries. © DTS, Inc. All Rights Reserved.


For DTS patents, see http://patents.dts.com. Manufactured under license from DTS Licensing Limited. DTS, the Symbol, DTS and the Symbol together, DTS-HD, and the DTS-HD logo are registered trademarks and/or trademarks of DTS, Inc. in the United States and/or other countries. © DTS, Inc. All Rights Reserved.

The "CI plus" Logo is a trademark of CI Plus LLP.

The Wi-Fi CERTIFIED Logo and Miracast® are registered trademarks of Wi-Fi Alliance. Wi-Fi CERTIFIED Miracast™ is a trademark of Wi-Fi Alliance.
androidtv

YouTube
YouTube and the YouTube logo are trademarks of Google Inc.

Chromecast built-in

Google Assistant

Bluetooth®
The Bluetooth® word mark and logos are registered trademarks owned by bluetooth SIG, Inc.
Microsoft PlayReady™
This product contains technology subject to certain intellectual property rights of Microsoft. Use or distribution of this technology outside of this product is prohibited without the appropriate license(s) from Microsoft.
Content owners use Microsoft PlayReady™ content access technology to protect their intellectual property, including copyrighted content. This device uses PlayReady technology to access PlayReady-protected content and/or WMDRM-protected content. If the device fails to properly enforce restrictions on content usage, content owners may require Microsoft to revoke the device's ability to consume PlayReady-protected content. Revocation should not affect unprotected content or content protected by other content access technologies. Content owners may require you to upgrade PlayReady to access their content. If you decline an upgrade, you will not be able to access content that requires the upgrade.
CONTENTS
Guarantee Information ....3
Safety Instructions 4-5
Trademarks 6
Wall Mounting and Set Security 8
GETTING STARTED 9
Introduction 9
Set Functionality....10
Operation Manual Navigation Hints ....10
Connecting External Device - Wired & non wired ...11-19
Connecting Headphones - Wired & non wired .....19
Playing Content stored on a USB Device .....20
Inputting Text 21
Remote Control 22
First Time Installation .....23-27
ANDROID FUNCTIONALITY .....28
introduction 28
The Google Assistant .....29-30
Home Page 31-38
Inputs, Google Assistant, Network, notifi cations and settings .....31
Apps 32-34
Memory Device 35
Play Next....36
Channels....37-38
Television Menu ....39-67
Source 40
Picture Mode ....40
Display Mode 41
Speakers 42
Power 42
CI Card 43
Advanced Options....43
Settings 44
Network & Internet 45-46
Channel 47-50
Parental Controls....51
Accounts & Sign-in....52
Apps 53
Device Preferences....54
About TV 55
Date & Time ....56
Timer 56
Language 57
Keyboard....57
Inputs 58
Power 59
Picture Settings 60-61
Sound Settings 62
Storage 63
Home Screen....63
Store Mode....64
Google Assistant....64
Chromecast Android Shell 64
Screensaver 65
Location 65
Usage & Diagnostics ....65
Accessibility....66
Reset to Factory Settings....66
Remotes & Accessories....67
DIGITAL TELEVISION, FREEVIEW & FREEVIEW PLAY . . . .68
Tuning in Digital Channels....68-69
Using Freeview Play ....70-74
Freeview Play App....75
Channel List....76
Information Bar....77
MENU STRUCTURE....78
UPDATING SOFTWARE 79
SPECIFICATIONS....80-85
Video Formats 80-81
Audio Formats....82-84
Image Formats 85
TROUBLESHOOTING GUIDE....86-90
SECURING THE TV TO A WALL
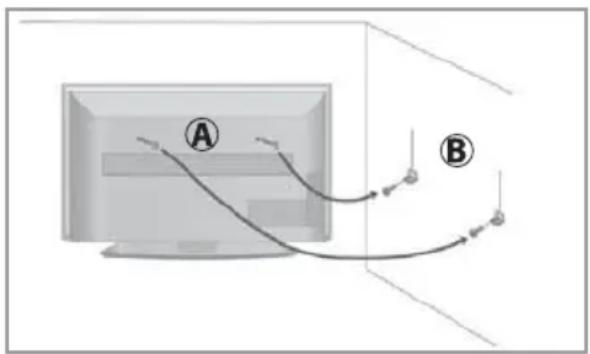
Securing the TV to a wall with anti-tip straps
For maximum safety in the home, when using a TV with its stand, anti-tip straps should be fitted. These are available from major retailers & websites and are an easy, inexpensive and effective way of ensuring your TV stays safely upright. Straps are designed to be attached to the rear of the TV and then tethered to the wall or furniture the TV is stood on, these are fitted as follows.
A) Using one or both of the top wall-mounting holes and screws fasten one end of the fastening cord/s to the TV. (the screws are already supplied in the wall mounting holes)
B) Secure the other end of the fastening cord/s to your wall. (you will need screws/fi xings suitable for your wall type - available separately from most DIY stores).
flowchart
graph TD
    A["Monitor"] --> B["Path 1"]
    A --> C["Path 2"]
    B --> D["Line"]
    C --> E["Line"]

natural_image
Simple line drawing of a vertical pole with a horizontal support bar, no text or symbols presentNote: Please ensure that children do not climb on the TV set.
Note: When handling the set do not grip the LCD Panel.
Note: Do not pull the set when mounted on a bracket. If using a moveable bracket, adjust via the bracket and not the set.
The Royal Society for the Prevention of Accidents is urging people to take care with flat-screen televisions. RoSPA stated in 2010 that “Toddlers are particularly at risk of pulling fl at-screen televisions on to themselves. They are unsteady on their feet and are attracted by colourful television images.”
The risk is increased as televisions become lighter.
Wall mounting
IMPORTANT - Before drilling any holes in the wall ensure you are not drilling where there could be any electrical wires, water or gas pipes.

natural_image
Simple line drawing of a rectangular device with a red circle highlighting the top section (no text or symbols)1) Remove the four screws located at the back of the TV set.
2) The wall mount can now be easily attached to the mounting holes, located on the back of the TV, using the same four screws removed.
Note:
This diagram to the left is an example of screw positions. Due to model variations, please ensure you check your TV for the exact location of the wall mounting screw positions.
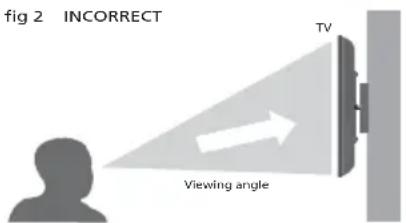
fig 1 fig 2 INCORRECT
text_image
fig 2 INCORRECT TV Viewing angle
text_image
CORRECT TV Viewing angleImportant: If wall mounting this TV, only use the screws already provided in the wall mounting holes. Using other screws which are longer could cause irreparable damage to the internal parts. When using a wall bracket, please ensure the screws in the back of the TV set are not over tightened.
INTRODUCTION
Your new Android television set is able to run applications, stream video, connect to various sources and allows you to watch Freeview and benefit from various catch up services. It features all of the usual applications you are used to such as Netflix, Amazon Prime and YouTube in addition to many more apps available in the Google Play Store.
When the set is first powered on, you will be presented with the First Time Installation screens. Follow the on screen instructions for guidance. You can also use the Quick Start Guide supplied for additional guidance. Once completed the set is ready to be used. It is important that the correct language and country is selected during this stage of the set-up process as this will determine the basic functionality of the set.
To make full use of your Android set, you will require an aerial and internet connection.
Use these Operating Instructions for guidance on how to use your Sharp Android television.
Unless otherwise stated, the remote control is used to operate the set, i.e., it will be noted when to use the buttons or control stick on the set itself.
On page 10, the chapter "Operational Instruction Navigation Hints" details how to use this instruction manual.
SET FUNCTIONALITY
Your set can be used in several ways. If you wish to use the Android functionality, this can be done via the Home Page. Should you want to watch television, or access the various source inputs, then use the television mode.
The functionality of the set will vary depending upon which mode you are in. To assist you, please refer to the Operation Manual Navigation Hints section below.
Note: The functionality and appearance of the screens and advice shown in the following pages may vary depending upon the version of software installed in your set. It is recommended that your set is kept up to date with the latest version of software applicable to your set to ensure smooth running and continued enjoyment of your Android based product.
When navigating though the menus, selection will be accompanied by a soft tone coming though the sets speakers, or headphones/sound device if connected.
When reference is made to pressing a button on the remote control, this will be in square brackets such as:
[OK] or [MUTE]
Alternatively, there may be an image of the button. For example:


When advising to select a menu the text will be in bold as in the example below:
Settings > Remotes & Accessories
When referring to other sections of this Operation Manual, the text will be highlighted in green and italics:
Operation Manual Navigation Hints
When reference is made to selecting an icon on the screen, there will be an image of the icon within the text such as:
- APPS ICON
3.
GOOGL


- COGGED WHEEL ICON

Important information will be highlighted like this:
Note: Important information will be placed inside a text box such like this one.
CONNECTING EXTERNAL DEVICES - WIRED
Before turning your set on, it is recommended that your external devices are connected before continuing with the first-time installation process. Depending on the source connectivity on your television, follow the guidance below when connecting external devices.
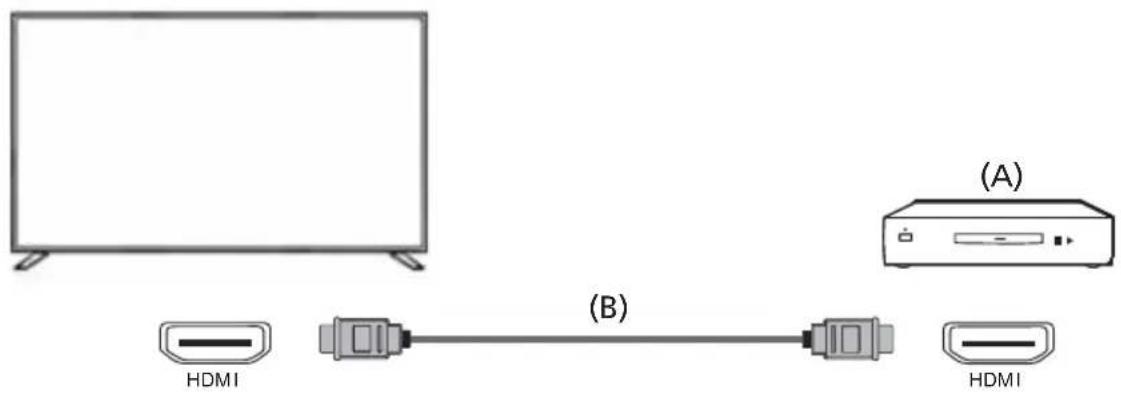
HDMI Connection
For optimum picture quality, we recommend connecting your device to the television using an HDMI cable.
text_image
(A) (B) HDMI HDMI(A) External Device
(B) HDMI cable (not supplied) *
*Be sure to use an authorised HIGH-SPEED HDMI cable bearing the HDMI logo.
HDMI CEC-Compatible Devices
If an HDMI CEC-compatible device (e.g., Blu-ray player, AV receiver) is connected with an HDMI cable, you can operate the device with the televisions remote control. We recommend using the HDMI (ARC) connection when used with an AV receiver – please refer to the ARC section of this Operation Manual.
Adjusting HDMI CEC Settings
- Turn on the connected device.
- To enable HDMI control, press the [HOME] button, then select Settings > Device Preferences > Inputs.
- Activate HDMI control on the connected device.
Available options
| HDMI control Allow the | TV to control HDMI devices |
| Device auto power off | If disabled, the connected device does not turn off automatically when the television is turned off. |
| Television auto power on | If disabled, the television does not turn on automatically when the connected device is turned on. |
| CEC Device list Displays | the HDMI CEC device list. |
Features Available to Compatible CEC Devices
Blu-ray/DVD player
- Automatically turns the television on and switches the input to the connected Blu-ray/DVD player when the Blu-ray/DVD player starts to play.
- Automatically turns the connected Blu-ray/DVD player off when you turn the television off.
- Controls menu operation [ARROW] buttons, playback and track selection of the connected Blu-ray/DVD player through the TV's remote control.
AV Receiver
- Automatically turns the connected AV receiver on and switches the sound output from the TV speaker to the audio system when you turn the TV on. This function is only available if you have previously used the AV receiver to output the TV's sound.
- Automatically switches the sound output to the AV receiver by turning the AV receiver on when the TV is turned on.
• Automatically turns the connected AV receiver off when you turn the TV off. - Adjust the volume and mute functions via the [VOL+/-] and [MUTE] buttons on your television remote control
Video Camera
- Automatically turns the TV on and switches the input to the connected video camera when the camera is turned on.
• Automatically turns the connected video camera off when you turn the TV off. - Controls menu operation [ARROW] buttons, playback, e.g. [PLAY] button of the connected video camera through the TV's remote control.
Note: Not all devices with HDMI input/output are HDMI CEC compatible. For information about CEC compatibility, refer to the instruction manual of the device. Refer to "HDMI connection (ARC supported)" section of this manual for information relating to connecting an HDMI (ARC) enabled device.
Component video Connection
If your external device has component video jacks/sockets, connect them to the television using a component video cable and an audio cable. There are two ways of doing this:
RCA (phono) Cables

flowchart
graph TD
    A["Monitor"] --> B["(A)"]
    B --> C["Audio Device"]
    subgraph (A)
        L1["L"] --> R1["R"]
        R1 --> B
        B --> L2["L"]
        B --> R2["R"]
    end
    subgraph (C)
        Video["Y"] --> Pb["Pb"]
        Video --> Pr["Pr"]
        Pb --> Video2["Y"]
        Pb --> Pr2["Pr"]
        Pr --> Video3["Y"]
        Pr --> Pr3["Pr"]
    end
    L1 --> R1
    R1 --> B
    L2 --> R2
    R2 --> B
    Video["Y"] --> Pb
    Video["Y"] --> Pr
    Pb --> Y["Y"]
    Pb --> Pb2["Pb"]
    Pr --> Y2["Pr"]
(A) External Device
(B) Audio cable (not supplied)
(C) Component video cable (not supplied)
Mini YPbPr and AV Source

flowchart
graph TD
    A["Device"] --> B["(A)"]
    A --> C["(B)"]
    A --> D["(C)"]
    A --> E["(D)"]
    A --> F["(E)"]
(A) External Device
(B) Composite video/audio adapter cable (not supplied)
(C) Audio Cable (not supplied)
(D) Component video adapter cable (not supplied)
(E) Component video cable (not supplied)
Component video Connection
If your external device has composite jacks/sockets, connect them to the television using a composite video/audio cable. There are two ways of doing this.
RCA (phono) Cables

flowchart
graph LR
    A["Monitor"] --> B["Audio Device"]
    B --> C["L"]
    B --> D["R"]
    B --> E["Video / Y"]
    B --> F["Pb"]
    B --> G["Pr"]
    C --> H["Audio Cable"]
    D --> I["Audio Cable"]
    E --> J["Audio Cable"]
    F --> K["Audio Cable"]
    G --> L["Audio Cable"]
    H --> M["Video CVBS"]
    I --> M
    J --> M
    K --> M
    L --> M
(A) External Device
(B) Composite video/audio cable (not supplied)
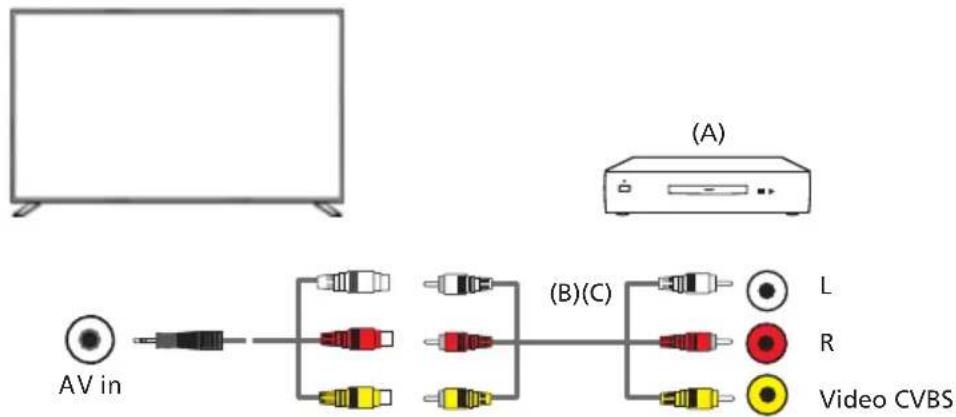
Mini AV Source
text_image
AV in (A) (B)(C) L R Video CVBS(A) External Device
(B) Composite video/audio cable (not supplied)
(C) Composite video/audio adapter cable (not supplied)
USB Devices (wired)
You can connect wired USB devices such a mouse and keyboard via the USB sockets on the rear of the set.
Note: We are unable to guarantee connection of a wired USB device. Use of USB hubs is not recommended
Connecting an External Audio Device
You can connect audio systems such as AV receivers or sound bars to the television. Select a connection method below according to the specifications of the audio system you want to connect.
- Connecting with an HDMI cable. for Details, carefully read HDMI Connection (ARC supported).
- Connecting with a digital optical cable.
- Connecting with an audio cable
For connection methods, refer to the Connecting an Audio System section
Note: Refer to the instruction manual of the device to be connected.
HDMI Connection (ARC Supported)
Connecting the television and audio system with an HDMI cable. This is the recommended method of connecting an external audio device
Connect to the television's HDMI input terminal bearing the text "ARC"

text_image
(A) (B) HDMI (ARC) HDMI (ARC)(A) AV Receiver or Soundbar
(B) HDMI cable (not supplied)*
Note: We recommend authorised Premium High-Speed HDMI Cable(s) bearing the HDMI logo.
Ensure that the connected audio device is HDMI ARC compatible.
The ARC output on your television may vary depending on the model.
HDMI CEC must be enabled on your set for this connection to work. To do this press the [HOME] button, then select Settings > Device Preferences > Inputs and then enable the HDMI control option.
Control of volume can be achieved via the television remote control (CEC must be turned on).
When ARC is working, the sound from the television speakers will be muted.
You need to confi gure the Digital Output settings according to your audio system. Press the [HOME] button, then select Settings > Device Preferences > Sound > Digital Output.
If the audio system is not compatible with Dolby Digital or DTS, set Settings > Device Preferences > Sound > Digital Output to PCM.
HDMI Connection (ARC Supported)
Connecting your television and audio system with a digital optical cable.
Connect to the audio system digital optical input terminal.

text_image
(A) Digital Audio Out Optical (B) Digital Audio In Optical(A) AV Receiver or Soundbar
(B) Audio Optical cable (not supplied)
Note: When connected via the digital optical output, it is necessary to turn off the sets internal speakers to prevent any echo effects. To do this go to Speakers >- External Audio System and turn this on. This will disable the sets internal speakers.
If there is no output on the digital optical output, ensure that the digital output is set to PCM. set Settings > Device Preferences > Sound > Digital Output to PCM.
The digital optical output is always present whatever source is selected.
RCA Analogue Audio Cable
Connect to the audio system's audio input terminal.
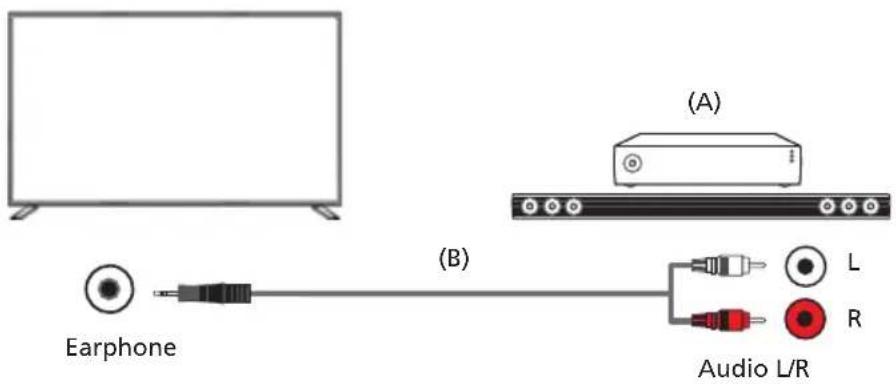
text_image
Earphone (B) Audio L/R (A)(A) AV Receiver or Soundbar
(B) Audio cable (not supplied)*
Note: The output audio level is dependent upon the headphone level. The volume level on the connected audio system must be turned up.
CONNECTING EXTERNAL DEVICES - NON WIRED
It is possible to connect external non-wired devices such as Bluetooth headphones, keyboard, mouse, etc.
Chromecast built-in
Chromecast built-in allows you to wirelessly cast content from your favourite websites and apps to your television, directly from your computer or mobile device.
- Connect a mobile device such as a smartphone or table to the same home network that the television is connected to
- Launch a Chromecast supported app on the mobile device.
- Select the (cast) icon in the app
The screen of the mobile device is displayed on the television.
Note: An Internet connection is required to use Chromecast built-in. Both your television and device need to be connected to the same network for the casting function to operate.
There are many Chromecast apps available for mobile and other devices.
Bluetooth Devices
The Bluetooth function can be used to pair the television with various devices. You can pair audio output devices such as Bluetooth soundbars, speakers or headphones. Supported input devices are Bluetooth remote controls, gamepads, computer mouse etc.
To pair the television with a Bluetooth device, follow the instructions below:
- Turn the Bluetooth device on and put it in pairing mode.
- To put your Bluetooth device in pairing mode, refer to the instruction manual of the device.
- Press the [HOME] button, then select Settings > Remotes & Accessories > Add Accessory to put the television in pairing mode
- A list of available Bluetooth devices will be displayed.
- Select the desired device from the list, then follow the on-screen instructions.
- If you are prompted to enter a passcode, refer to the instruction manual of the device.
- After pairing is completed, your device will be connected to the television.
To unpair your remote control, follow the instructions below:
- Go to Settings > Remotes & Accessories.
- Select the remote control to be unpaired and press [OK].
- Now select "Unpair" and press [OK].
- Select "OK" and press [OK] on the remote control.
- Your remote control will now unpair from the set.
Connecting Headphones
You can connect wired or Bluetooth headphones to this set.

text_image
EarphoneWhen wired headphones are connected to the 3.5mm jack socket on the rear of the set, the internal speakers will cut out. The volume of the sound which comes from the headphones is controlled via the remote control using the [VOL+] and [VOL-] buttons.
When a Bluetooth device is paired with the set, the internal speakers will cut out. The volume of the sound that which comes from the Bluetooth device is adjusted via the remote control using the [VOL+] and [VOL-] buttons. If headphones are connected to the 3.5mm jack on the rear of the set, the Bluetooth device takes over the sound output, i.e. if both wired and Bluetooth headphones are connected, there will only be sound from the Bluetooth headphones.
Volume bar display
When the volume is changed on your television set, the volume bar will come up at the bottom of the screen. If Bluetooth is being used, the bluetooth icon will be displayed.
When the audio is muted, the volume bar will display the last set volume and also the mute icon.
Note: When using headphones, a warning will appear advising not to use excessive volume for long periods of time as this may damage your hearing.
Turning up the headphone volume too high may result in distortion.
PLAYING CONTENT STORED ON A USB DEVICE
Chromecast built-in
Connect a USB storage device to the USB port of the television to enjoy photo, music, and video files stored on the device.
Connect the USB device to your television and turn it on.
- Press the [HOME] button, select from the Home Page, and select the DigitalMediaPlayer from the app list.
- If the supplied remote control has an APPS button, you can press the APPS button to display the app list.
- Browse the list of folders and files and select the desired file.
- Press [OK] and playback will start.
Notes: Depending on the image dimension, file size, and number of files in a folder, some photo images or folders take time to display.
Displaying the contents of the USB device may take some time depending on the content.
While accessing the USB device, do not disconnect power from the television or USB device as the data may be corrupted.
Depending on the file, playback may not be possible, refer to USB and DNLA Specifications.
Some photos and movies may be magnifi ed, resulting in low picture quality. Depending on the size and aspect ratio, images may not be displayed in full screen.
It may take a long time to display a photo, depending on the file or settings.
If DigitalMediaPlayer cannot be found in the favourite's apps, you can add it from the apps listing.
The USB ports on the television support FAT32 and NTFS fi le systems.
If your digital still camera does not work with your television, try the following:
- Set the USB connection settings on your camera to Mass Storage.
- Copy the fi les from the camera to a USB fl ash drive, then connect the drive to the television.
INPUTTING TEXT
On -Screen Keyboard
There is a preinstalled on-screen keyboard app in your set which will appear whenever text is expected to be entered by the user, e.g. Wi-Fi password or website address in the web browser. To navigate the on-screen keyboard, use the [ARROW] buttons on the remote control, enter the character selected by pressing [OK].
If you press and hold the [OK] button for 2 seconds while on a selected symbol, this will display the associated national character(s) with accents or diacritical marks.

text_image
abc123 1 2 3 a b c d e f g * * 4 5 6 h i j k l m n ! ? 7 8 9 o p q r s t _ - / , 0 . u v w x y z ◀ < | >Note: When entering the Wi-Fi password this keyboard is extended to show all characters at once.
Using the Remote Control
You can operate many of the televisions features by using the [UP], [DOWN], [LEFT], [RIGHT] and [OK] buttons on the remote control.
The following remote control buttons are used to navigate the menus:
• [EXIT] : Exits from the menu and returns to the source or Home Page.
• [BACK] : Takes you one step back in the menu.
• [ARROW BUTTONS] : Navigate around the options on the screen.
• [OK] : Selects the option highlighted or selected.
Your set can also be voice controlled using Google Assist.
REMOTE CONTROL

STANDBY - Switch on the TV when in standby or vice versa. By long pressing of this button, the set will display a menu offering power down option to energy saving standby mode SOURCE - To display the input/source menu.

NUMBER BUTTONS - 0-9 to select a TV channel directly. MUTE - Mute the sound or vice versa. TV GUIDE - Opens the 7 day TV guide (digital TV mode).

VOL (+/-) - To increase/decrease the sound level. The Google Assistant - Use your voice to access entertainment, control smart devices, obtain answers on screen, and more. HOME - Display the TV Home Menu. CH (+/-) - To increase or decrease the channel being watched. MENU - Display LIVE TV menu. This button works only in sources (TV, HDMI, Component, etc.). It will not work in the Home Menu. INFO - Press once for now/next channel information. (▲/▼/◄/▼/ OK) - Allows you to navigate the on-screen menus and adjust the system settings to your preference. BACK - To go back a previous step. EXIT - To exit all menus.

NETFLIX - Access the Netflix App. Prime video - Access the Prime video App. YouTube - Access the YouTube App. Freeview Play* - Access the Freeview Play app. MTS - Opens audio track menu. TEXT - To enter/exit teletext. SUB - To switch the dialogue at the bottom of the screen (on/off). TV - To switch to Live TV.

- To play/pause media - To play in fast rewind mode - To play in fast forward mode - To stop the playback
COLOUR BUTTONS - Execute corresponding function at that time
* For Ireland models, this button will display Google Play Movies
Note: When the remote control is in IR (infra-red) mode, the LED indicator will flash red whenever a button is pressed. While in bluetooth mode it will flash green
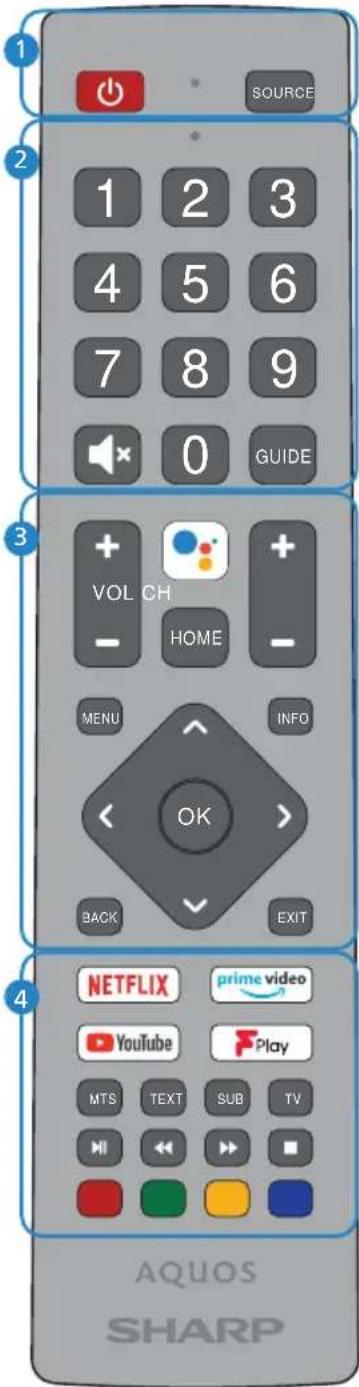
text_image
SOURCE 1 2 3 4 5 6 7 8 9 0 GUIDE VOL CH HOME MENU INFO OK > BACK EXIT NETFLIX prime video YouTube Play MTS TEXT SUB TV AQUOS SHARPFIRST TIME INSTALLATION
When the set starts up for the first time, it will do so in the first-time installation mode. This enables you to set up various Android functions, log into your Google account (you will be able to set up a Google account if you do not have one) and for the set to be tuned into digital television if required.
Note: The basic installation steps may vary slightly depending on your model and/or country of use. Due to Android software updates, the look and feel of the television start up procedure and subsequent menus may be subject to change.
To navigate through the options when in the first-time installation mode, use the buttons on your remote control as shown here:
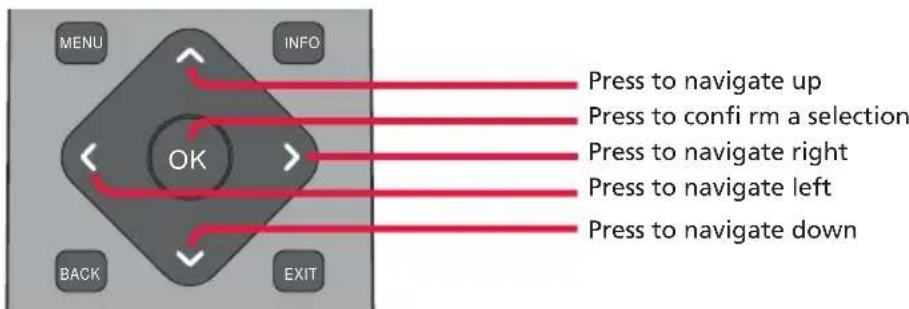
text_image
MENU INFO OK BACK EXIT Press to navigate up Press to confi rm a selection Press to navigate right Press to navigate left Press to navigate downUsing the Remote Control
During the set-up process you will be prompted to sign into your Google account via the pre-installed Google app. This set up process will depend upon the model of television being configured. Please ensure that you have your account details to hand. If not, you will be prompted to set up an account. If you do not wish to set up an account, this can be done later.
TV Control Stick
The TV control stick is located on the back of the TV, on the right hand side. The control stick can be used to control a variety of TV functions. The shape of the TV's control stick may vary by model.

natural_image
Front view of a black rectangular TV with a circular logo on the right side (no visible text or symbols)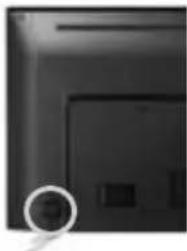
natural_image
Close-up of a black electronic device with a circular mark and a small rectangular button, no visible text or symbols.While the TV is in standby mode:
- Pressing the centre of the control stick once powers on the TV set.
While watching TV:
- RIGHT/LEFT - volume up/volume down
- UP/DOWN - changes channel up/down
- Press the centre of the control stick once - displays the menu
- Press and hold the centre of the control stick – Standby/Power Off
While in menu:
- RIGHT/LEFT/UP/DOWN - navigation of cursor in on-screen menus
- Press the centre of the control stick once - OK/Confirm selected item
- Press and hold the centre of the control stick-back to previous menu
Full First Time Installation
When the set is turned on for the first time it will enter the installation mode as shown here. It is recommended that all steps are completed as shown in the process to ensure correct operation. Use the back button on your remote control to return to the previous screen.
- When the set first turns on, you will be requested to select your preferred on-screen display language. This will set the language in which the menus and associated information is displayed in. Should you wish to do so, this can be changed later in the Device Preferences menu.
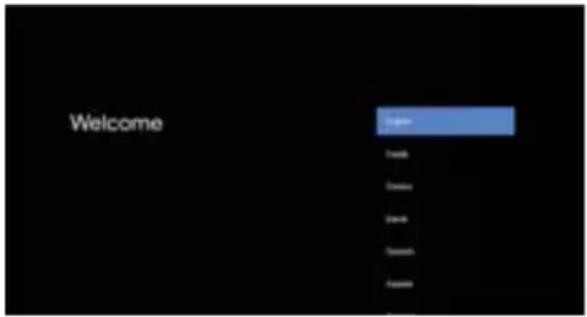
text_image
Welcome-
Next you will be requested to set up your set with an Android phone. If you do not have an Android phone, proceed to the next step. If chosen, the set will request you to log into your Android phone and connect the set to your network automatically.
-
If your set is not connected via an Ethernet cable, it will request that a Wi-Fi network is selected and logged into. Choose your network and then follow the on-screen display to enter your password. When correctly entered, the set will log into your network and connect to the internet if this is available.
-
Now you can sign in using your Google account. If you do not have a Google account, this can be set up at this stage if required. Should you not want to sign in or create a Google account, then this stage can be skipped.
-
If signing in, there are two options. You can either sign in using a device by choosing "Use your phone or computer", this will bring up further options to follow. If using the remote control to sign in, you will be asked for your Google account name and password; follow the prompts to sign in.
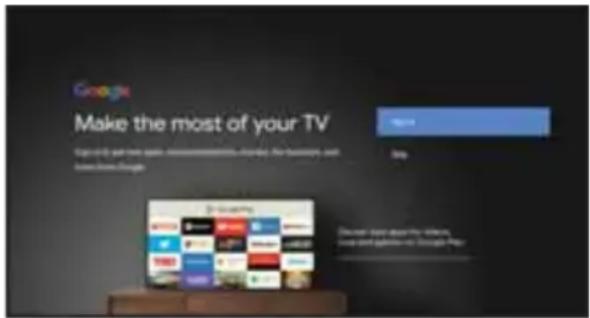
text_image
Google Make the most of your TV Specialty gain new updates, recommendations, changes, for better apps and https://www.google.com/ Google Download from Google's website, http://www.google.com/Google-Pay- Once logged into your Google account you will be asked to confirm that the Terms of Service are accepted. Then asked to accept the following:

text_image
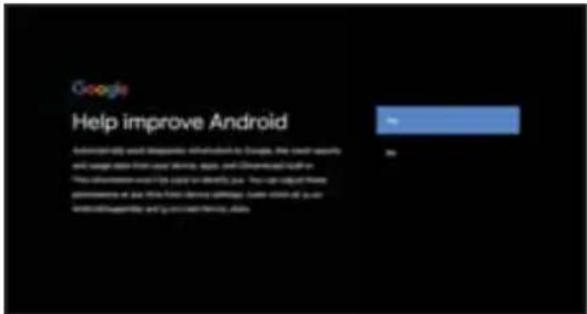
Google Terms of Service By the following: encourage to the Google Terms of Service. For further Preview Policy, and the Google Play "Service of Service This device may have services and services available are open from Google's your service's recommendations or your options. Some of these applicable please provide in any particular. You can receive fees to adjust their permissions at any time from the device adding. Google Data (2001) and bandwidths stored for user and deliver Additional from promotional and to reduce the product parameters.- Help Improve Android - When enabled, the set will automatically send diagnostic information to Google.
Location: Let Google use your device location to improve your Android device. Some apps may require this to be turned on to perform correctly. This setting can be turned on or off at any time in the Settings menu.
Get Personal Results: Turn this on so that you can use your voice to get your email, calendar, help with payments and more on this device. This can be turned on or off in Assistants settings.
text_image
Google Help improve Android Additionally, we also discuss Android in Google, the next search and update data from user service, apps, and downloads page in This information was by clicking to identify you. You can adjust these preferences for your first-time device (e.g., users who did not use and do not change or go on next-time, data)-
After setting up your Google functionality, some of the benefits and advantages of the set are displayed.
-
Enter the country of use for the set. This will determin the functionality of the television, for example Freeview Play in the UK or Saorview in ROI.
-
When this prompt appears, press the [OK] button on the remote control to enter a four digit PIN code. You will be asked to confirm the PIN before progressing to the next step. This PIN is used when accessing various functions on the set and during the lock or parental control usage.

text_image
Your AQUOS_TVE19A is powered by androidtv let's walk through the lessons of your desktop
text_image
Google Password New PasswordNote: When setting the password, you can only set four numbers. The letters on the displayed keyboard are not active.
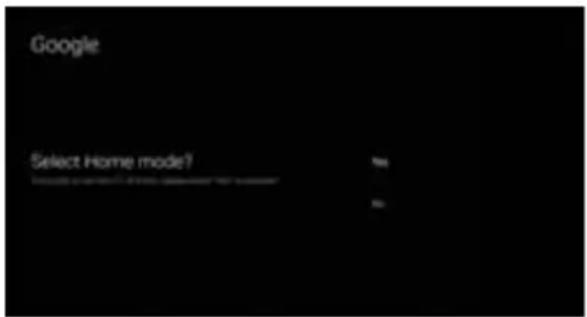
- Set up your television to be in Home or Store mode. Home mode is the default setting for normal use. This can be changed later in the Settings menu if necessary.
Note: If the store mode is turned on, the set will go into the demonstration mode after a few minutes and display banners advising of the sets specification on the screen. - To enable your set to receive television channels, it needs to be tuned into your local transmitter. There are three tuning modes available, for Freeview Play functionality choose Antenna and then the Scan option. While your set is tuning in, the display will advise progress and the number of digital channels received.
- Tuning of the set is now complete.
- Agree to the Freeview Play Terms and Conditions if the set is located in the UK and tuned in.
text_image
Google Select Home mode? Yes No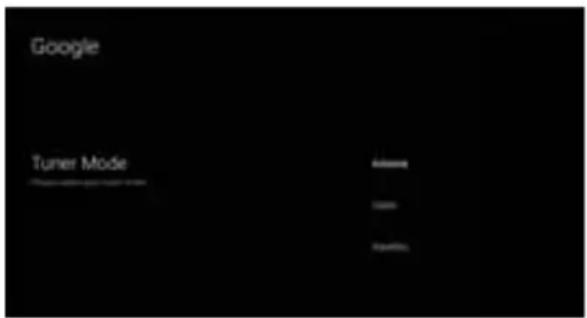
text_image
Google Tuner Mode Google
text_image
Scanning This is a version of the key to play a game to complete Digital Channels 1 Scanning you can understand the key's experience and how you can get your play, or take your help
text_image
Google Setup is completed: Enjoy! Status: 1. 2. 3. 4. 5. 6. 7. 8. 9. 10. 11. 12. 13. 14. 15. 16. 17. 18. 19. 20. 21. 22. 23. 24. 25. 26. 27. 28. 29. 30. 31. 32. 33. 34. 35. 36. 37. 38. 39. 40. 41. 42. 43. 44. 45. 46. 47. 48. 49. 50. 51. 52. 53. 54. 55. 56. 57. 58. 59. 60. 61. 62. 63. 64. 65. 66. 67. 68. 69. 70. 71. 72. 73. 74. 75. 76. 77. 78. 79. 80. 81. 82. 83. 84. 85. 86. 87. 88. 89. 90. 91. 92. 93. 94. 95. 96. 97. 98. 99. 100.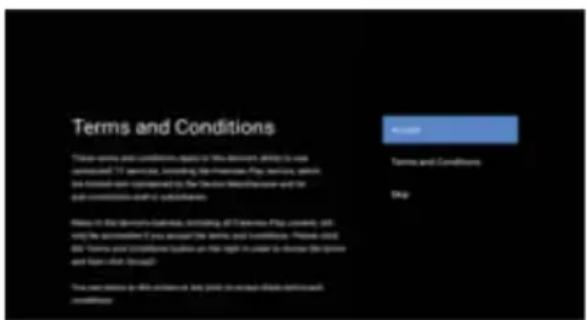
text_image
Terms and Conditions Three terms and conditions described in this document, likely to be construed by 12 agencies, including the following: Play services, which are not known as or equivalent to the Decker-Machisonware and/or contract conditions and is substituted: Please be in the German-Chadres, including all terms: Play services, etc. and the conditions that you should be the terms and conditions. Please note that they have a certain condition on this link. Please note that the terms and conditions are subject to change. This case also includes this information on this link to an important state-of-state condition.-
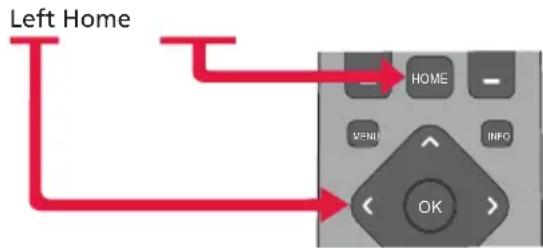
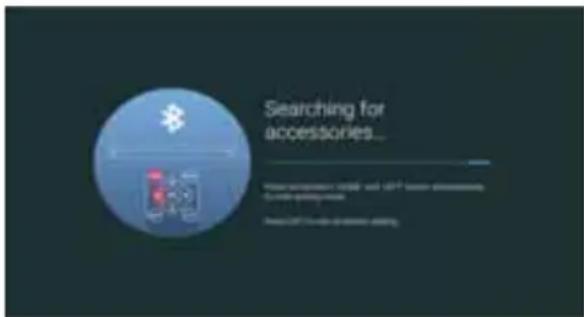
Connect your remote control using Bluetooth:
-
Press and hold the [LEFT ARROW] and [HOME] buttons on the remote control at the same time.
- The LED indicator on the remote control will start to flash.
- Select your remote control from the list shown on the television screen and press [OK] on the remote control.
- Once paired, the pairing screen will disappear.
Note: If your set is not supplied with a bluetooth remote, then it will not pair with the set. If this is the case, this step has to be skipped.
- You will be greeted by a Freeview Play confirmation screen, when this closes, you are ready to use your Android set. Your set will start at the Android Home Page.

text_image
Searching for accessories... Please follow the order to access your download button.
text_image
Left Home HOME MENU INFO OK
text_image
Nearly things... Just finishing the setup of your Freeview Play TV Spont you can enjoy all your favourite shows live and on-highest all for freeANDROID FUNCTIONALITY
Your Android set is able to provide many functions and the usage of some of these are shown below.
Viewing internet Media
You can use video streaming services such as YouTube and Netflix to watch content via your internet service. The services available will vary depending on your country and region. You can launch these services by selecting their titles on the Home Page.
Note: An Internet connection is required to watch content.
Some streaming services may require an account or subscription.
Enjoying Safe Apps and Video Streaming Services (Security & Restrictions)
You can ensure safe use of the television by setting installation restrictions on apps that are downloaded from unknown sources, or age restrictions on programmes and videos. You can access parental controls by pressing the [HOME] button, then select Settings > then options such as Apps > Security & restrictions or Settings > Channel > Parental Controls.
If you change the Security & Restrictions settings, your device and personal data are more vulnerable to attack by unknown apps from sources other than Play Store. Any third party apps are downloaded at the risk of the user, any damage to your device or loss of data that may result from using these apps is not covered by the manufacturer.
Note: Other separate restrictions may be available depending on the app. For details, refer to the app's help pages. It is possible to download a large number of applications to the set and as these are not part of the software installed on the television, instructions on their usage will have to be provided by the app producer in most cases.
THE GOOGLE ASSISTANT
The Google Assistant allows voice commands to quickly find and play your favourite shows, obtain answers and control your home via connected devices. If you experience issues with third party devices, it is suggested that you contact the provider of the device for support.
Using the Google Assistant with Voice
Remote controls with Google Assistant functionality have a Google Assistant button and a built-in microphone to allow voice communication with the set. To enable Google Assistant, follow the instructions below:
- Press the button on your remote control.
- The light on the remote control will illuminate.
- Wait for the on-screen message from the Google Assistant, then speak into the microphone.

text_image
VOL CH HOME
text_image
LED indicator SOURCE Microphone 1 2 3By speaking into the microphone, you can search for various content or control your connected smart home devices.
Note: Helpful phrases may be displayed on the television screen depending on your model. If you are unable to access the Google Assistant, ensure that the remote control which has the button is paired to the television.
To do this, press the button on the remote and follow the on screen instructions.
Ensure that when speaking into the microphone that the microphone is positioned about 15 to 30cm away from your mouth.
Do not speak too loudly or softly. Ensure words are spoken clearly.
Using the Google Assistant with the On-Screen Keyboard
Press the [HOME] button, then select the 📋 icon from the Home Page and press [OK]. The on-screen keyboard will be displayed, you can now enter your question or command by typing this in.
Note:
- The Google Assistant requires an internet connection.
- The Google Assistant is not available in certain languages and countries.
The type of remote control supplied with the television, and the availability of a remote control with a built-in microphone varies depending on your model/region/country. An optional remote control is available.
Using the Google Assistant with the On-Screen Keyboard
If during the first-time installation process the remote was not paired or skipped, then follow the process below to pair your remote with the television:
- Turn the set on.
- Go to Settings > Remotes and Accessories.
- Now press and hold the [LEFT ARROW] and [HOME] buttons on the remote control at the same time.
- The LED indicator on the remote control will start to flash
- Select your remote control from the list shown on the television screen and press [OK] on the remote control.
- Once paired, the pairing screen will disappear.
Note: If the button is pressed on the remote control and it is not paired, the pairing screen will appear.
flowchart
graph TD
    A["Left Home"] --> B["HOME"]
    B --> C["MENU"]
    C --> D["OK"]
    D --> E["INFO"]
text_image
Searching for accessories... Power browser: 100% and 50% server optimization - On-line shipping mode Please check the order to access your system.HOME PAGE
To enter the Home Page screen, press the [HOME] button on your remote control. From the Home Page, you can search for content and select recommendations, apps, and go into settings.
The Home Page is the default viewing screen for your television and it will appear after the first-time installation process has been completed.
Inputs, Google Assistant, Network, Notifications and Settings
The picture below shows a typical Home Page, here we look at section A as shown inside the dotted line.

text_image
A Try searching for "Likes about You"! 2:24 App YouTube SHARP YouTube LUCOS OPK IT SHUTTER Play Movies & TV
The Google Assistant - Use the button on on the remote control or the on-screen keyboard displayed on the television to input keywords and search for various content.

Notifi cations Displayed when there are notifi cations such as when there is a connection issue or software update. The number within the circle indicates the number of notifi cations.

Network - Configure network and internet. This symbol changes depending on the connection type – Wi-Fi or Ethernet.

Settings- Configure various television related settings.
Apps and Favourite Apps
Apps are programs and functions which expand the functionality and usage of your television. These can include video stream viewers, on demand players, games, health monitors and many more types. These can be added to the set via stores such as the Google Play Store. Apps are shown in section B of the Home Page.
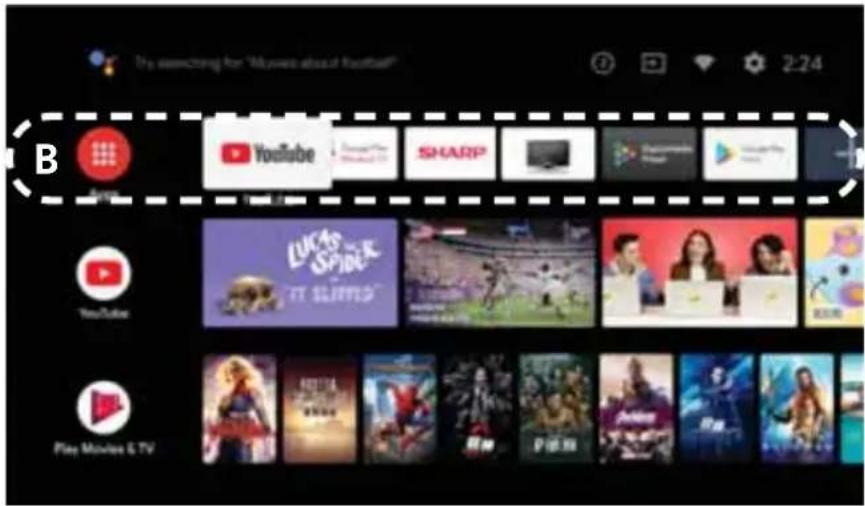
text_image
The searching for "Movies about football" 2:24 B YouTube SHARP Play Movies & TVMoving or Removing an App on the Favourite Bar
Follow the instructions below:
- Select the app you would like to move or remove from the favourites section.
- Press the [OK] button on the remote control for more than two seconds.
- The menu shown on the right will be displayed.
- Select the desired function by using the [UP/DOWN] buttons on the remote control, then press [OK].
- If moving the icon, select [LEFT/RIGHT] on the remote control until the app icon is in the desired position.
Note: Some apps cannot be removed from the favourites bar as they are fundamental to the operation of the set.
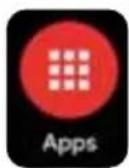
Adding More Apps to the Favourites Bar

To add more apps, use the remote control [ARROW] buttons to select the soon and then press [OK]. This will show apps which are available and have been previously downloaded to the set.
You can now select the app which you would like to add to the favourites bar from the ones which now appear on the screen.
Adding More Apps to the Favourites Bar
To enter the App Management screen, select the Apps icon on the left-hand side and press [OK] on the remote control. The screen shown below will appear.
Note: The apps shown here may differ to your set. These will depend upon apps installed and downloaded.
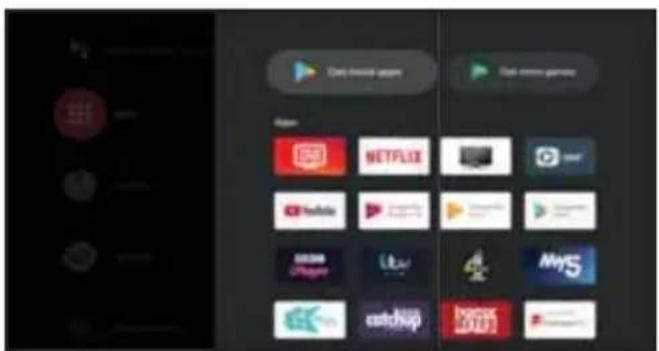
text_image
Dad video game Get online games Player NETFLIXE YouTube My5 eatchupIt is also possible to move, open and uninstall an app from this menu. Follow the instructions below to carry out these functions:
- Select the app you would like to open, move, add to favourites, or uninstall from this section.
- Press the [OK] button on the remote control for more than two seconds.
- The menu shown on the right will be displayed.
- Select the desired function by using the [UP/DOWN] buttons on the remote control, then press [OK].
Notes: If an app has been uninstalled, you will have to download it again.
Some apps which are fundamental to the operation of the set cannot be uninstalled.
Installing apps from the Google Play Store
You can install apps from the Google Play Store to your television, just like you do with smartphones and tablets. You can only install apps that are compatible with this television. They may differ from the apps shown on smartphones/tablets.

An Internet connection and Google account are required to install apps from the Google Play Store. If you do not have a Google account or wish to create a shared account, this can be achieved during the first time installation or by accessing the following website on any device:
https://accounts.google.com/signup
The website above may vary depending on your region/country. It is also subject to change without notice. For details, refer to the Google homepage.
To install an app on your set, press the [HOME] button and select Google Play Store from the apps list. If the supplied remote control has an [APPS] button, you can press the this to display the apps list. Select an app to install. After downloading, the app is automatically installed and added. Its icon appears in the list of installed apps, allowing you to launch it.
To add an app from the Play Store, select and enter the Play Store from the apps section of the Home Page. When the Play Store opens, you can then select an app to load onto the set from the ones which appear, or search for a desired app.
Notes: There are free apps and paid apps in the Google Play Store. To purchase a paid app, a prepaid Google Play gift card code or credit card information is required. You can purchase a Google Play gift card from various retailers.
Free space on internal storage of the television is limited. When storage is full, it will not be possible to install more apps. To check how much free space is available go to:
Settings > Device Preferences > Storage.
If internal storage is full and you wish to install additional apps, you will have to delete some currently installed apps or move apps to USB memory device or SD card. Please refer to the chapter Moving apps to a USB memory device or SD card.
Installing apps from the Google Play Store
You can move downloaded apps to a USB memory device or SD card to increase the space available in the television.
Note: When you format a USB memory device/SD card, all data saved in the device will be deleted. Back up your important data before formatting. Performing this procedure formats the USB memory device/SD card for exclusive use with the television. Therefore, you may be unable to use the USB memory device/SD card with a computer, etc.
Some apps cannot be moved to a USB memory device/SD card.
Some apps cannot be moved to a USB memory device as they are fundamental to the operation of the set.
Formatting Memory Device
Insert SD card or USB memory device to the television, then press the [HOME] button, select :
Settings > Device Preferences > Storage > the desired USB memory device or SD card. Format the selected memory device as an internal storage device.
Moving an App to Your Memory Device
Press the [HOME] button, then select Settings > Apps, then select the app that you want to move to the USB memory device or SD card. Now choose the USB memory device/SD card from the used storage. The app is moved to the USB memory device/SD card.
Hint: Repeat steps above to move additional apps to the USB memory device.
Note: Your Android TV formats the USB memory desivce/SD card into a proprietary format. When inserting the USB memory device/SD card into a personal computer after adding apps to it, you will not be able to view the contents of the USB memory device/SD card.
To use the USB memory device/SD card on a personal computer, you will need to reformat the devices which will erase any data stored on the USB memory device/SD card.
Removing a USB Memory Device
Press the [HOME] button, select Settings > Device Preferences > Storage > the desired USB memory device, then select the option to remove it.
Note: The USB memory device is used only for saving apps. To use the USB memory device for other purposes, you must format it again.
If you delete an app in the USB memory device using a computer, you will be unable to launch it from the television.
If you remove a USB memory device from the television, you will be unable to use the apps that were moved to the USB memory device.
You cannot specify a USB memory device as the installation location of an app. First install the app on the television as normal, and then move it to the USB memory device.
Depending on the television model, your set will be equipped with either an SD card slot or a Micro SD card slot. Please ensure you use the correct type of SD card, corresponding to the available slot.
Play Next
Play Next functionality is shown in section C. This option is only displayed when the Play Next option is active and there is content in the Play Next list.

text_image
Play Next Smallfoot Resume debugging Play Next Add user and the users will automatically return home up you can ready to start according to this help you want to try using streaming Web content before you have friends.Play Next option can be selected when in a streaming app such as YouTube. To do this:
- Select the item in the Channels list on the Home Page to be added to the Play Next list.
- Press and hold the [OK] button on the remote control for more than two seconds.
- The Play Next option appears.
- Select "Add to Play Next".
- Stream will now appear in the Play Next list.
Note: Once a stream has been played back, it will disappear from the Play Next list.
If there are no streams in the Play Next list, the list will not be seen on the Home Page.
The Play Next option can be turned on and off in the Customize channels option on the Home Page. In addition, the services which can be used on Play Next can also be turned on and off. In the case of the Freeview on demand players it is also possible to restrict channels and genre.

text_image
Customize channels Play Next Customize your Play Next channel Home screen channels Select audio chartmite app on the home screen, Shaping chartmite x8F are 3x more. AS A Recommended BRC iPlayer Recommended CDS Catchup Channels UK Recommended Explore Interview Play 10 channelsChannels
Channels are services which have been added to your Home Page which enable you to view streaming services, see section D. You can add, remove and modify channels via the "Customise channels" option.
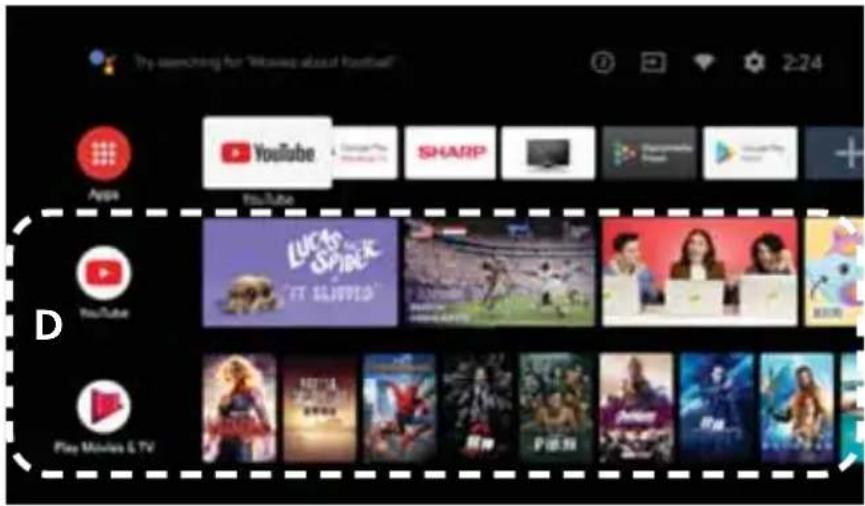
text_image
Try searching for "Movies about Football" Apple YouTube SHARP Play Movies & TVMoving a Channel
It is possible to move a channel up and down in the list, the position of a channel is your preference.
- Select the channel icon.
- Press the [LEFT] button.
- Select the move button.
- Press [OK].
- Use the [UP/DOWN] buttons to move to the desired position.
- Use the [RIGHT] button to exit from the operation.
Note: The position of some channel cannot be moved.

text_image
Two circular buttons with icons and labels, one displaying a minus sign and the other displaying a logo with 'F' and 'P'.Deleting a Channel
- Select the channel icon.
- Press the [LEFT] button.
- Select the delete button.
- Press [OK].
- Channel is removed from the Home Page list.
Note: Some channels cannot be removed from the channel list.

text_image
Image showing two circular icons with text labels, one containing a minus sign and the other with a logo and Chinese characters.Customise Channels
In section E you can customise your channels.
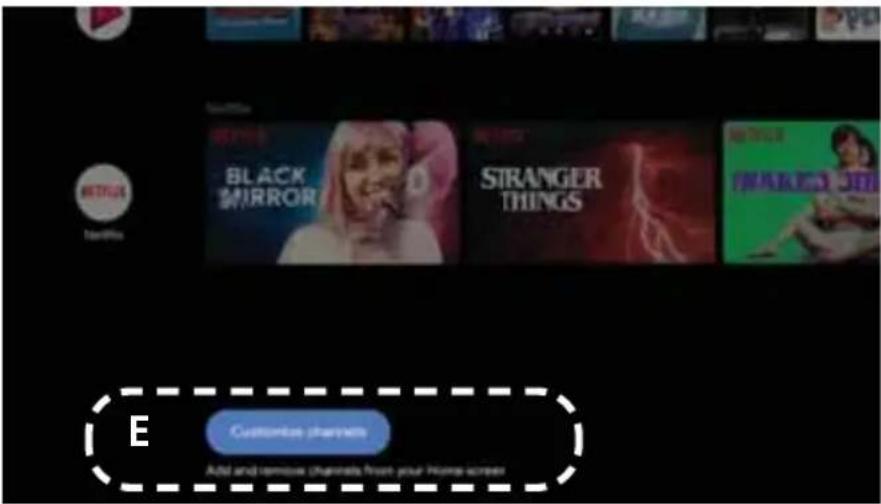
text_image
BLACK MIRROR STRANGER THINGS E Customize phones Add and remove channels from your Home screenThe Customise channels function is used to display or hide the selected channels on the Home Page. This allows for the Home Page to be less densely populated making it easier to access the apps and functions most used.

text_image
Customize channels Play Next Customize your Play Next channel Manage account channels Include which channel app or the these screens. Empty channels will not be shown AS A Recommended BBC iPlayset Recommended CBS Catchup Channels UK Recommended Explore Freebox Play 10 channelsTELEVISION MENU
While in the television menu, you can adjust and change the settings applicable to the various input sources related to the television mode.

text_image
TV options Source Picture Music Display Music Audio Power Di Card Manual GAD Advanced Security SettingsOptions are:
Source Change the picture (input) on your television.
Picture Mode Change the picture mode.
Display Mode Change the display mode (aspect ratio) of the picture.
Speakers Control the speaker output when used with audio devices.
Power Control the power settings on your television.
CI Card Activate and set up a connected Conditional Access Module (not supplied).
Advanced Options Set up various live TV options.
Settings Control other televisions settings.
Note: For a more detailed explanation of these options, refer to the sections in the next pages.
When on one of the menu options and the [UP] arrow button is pressed on the remote control, a further menu option appears as below.
Add to My Favourites Add current channel to favourites.
Program ShoGuideto the program guide.
New Channels This will appear if new channels are available. Available

text_image
Channels Add to My Favorites Program Guide New Channels Available TV optionsNote: The Programme Guide will only appear if the set is tuned into a digital television signal which supports a program guide function.
Source
You can select your desired source from this menu. It is also possible to do this by pressing the [SOURCE] button on the remote control. The number and type of inputs will depend upon the model and specifications of your set.
Note: You can go directly to the DTV source (if tuned in), but pressing the numbered buttons on the remote control, i.e. pressing the number [1] will switch the set to channel 1. Alternatively, you can press the [TV] button.

text_image
Inputs TV Composite Component HDMI 1 HDMI 2 HDMI 3 HDMI 4Picture Mode
To enter the Picture Mode menu, press the [SOURCE] button and select TV. Then press the [MENU] button and select Picture Mode using the [LEFT/RIGHT ARROW] buttons and pressing [OK] when selected.
This menu provides options to modify picture quality and the following modes are available:
User Allows you to change the picture settings to your personal preference. These settings are saved automatically.
Standard Standard settings.
Vivid Enhances picture saturation and sharpness.
Sport Optimises picture quality for viewing sports. Movie Picture has less colour and is darker.
Game Recommended settings for gaming. The television will turn off all picture post processing functions to achieve minimal input delay.
Energy Power Saving mode, which reduces the energy used by up Saving 20% (by reducing the power to the LED/LCD panel). In this mode, the brightness of the picture may be reduced. This is the default setting on your television.
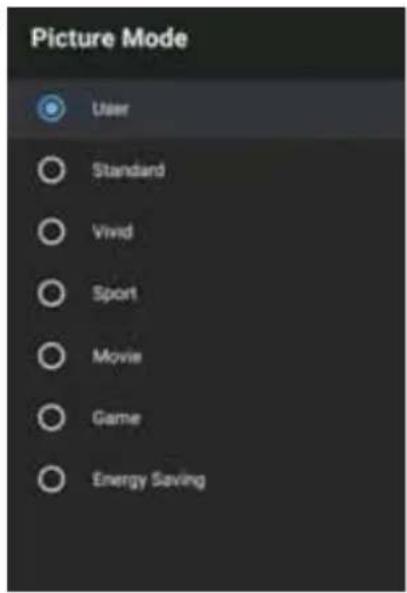
text_image
Picture Mode User Standard Vivid Sport Movie Game Energy SavingNote: Depending on television model, some picture mode options may not be available.
Settings will only be stored in the User mode.
Display Mode
To enter the Display Mode menu, press the [SOURCE] button and select TV. Then press the [MENU] button and select Display Mode using the [LEFT/RIGHT ARROW] buttons and pressing [OK] when selected.
This menu provides options to modify the picture aspect ratio and the following modes are available:
Automatic Automatically displays the best picture format so the picture is in the correct position. Black lines may appear at the top/bottom and/or sides.
Full Displays a picture in the full screen mode. 16:9 signal will be displayed in original proportion. Other picture formats will be stretched to fill the screen.
Wide Screen Displays a 16:9 picture that is stretched horizontally and vertically.
Super Zoom Displays a 4:3 picture at a 16:9 size; the picture is stretched horizontally and vertically and its left and right edges are enlarged. This crops out some of the top and bottom of the picture.
Unscaled Displays a picture in its original resolution in the middle of screen. If the picture has lower resolution than the television, there will be black bars on all four sides of the picture.
4:3 Displays a 16:9 picture at a 4:3 size; the picture is shortened horizontally. Sidebars appear on both edges of the screen.
Movie Expand 14:9 Displays a 4:3 picture at a 14:9 size; the picture is stretched horizontally and vertically. This crops out some of the top and bottom of the picture. Sidebars appear on both edges of the screen.
Movie Expand 16:9 Displays a 4:3 picture at a 16:9 size; the picture is stretched horizontally and vertically. This crops out some of the top and bottom of the picture.
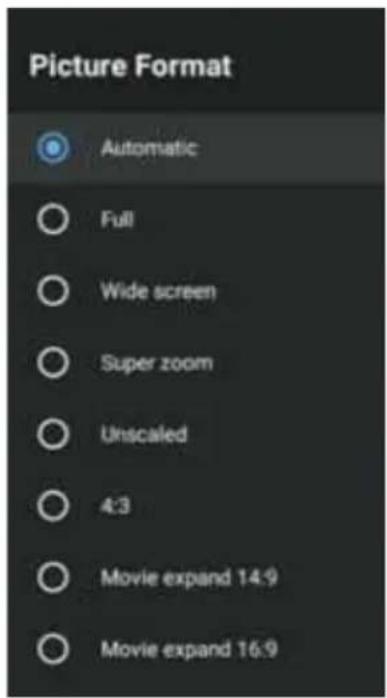
text_image
Picture Format Automatic Full Wide screen Super zoom Unscaled 4:3 Movie expand 14:9 Movie expand 16:9Note: Depending on the source selected, the aspect ratio offered may differ.
Speakers
To enter the Speakers menu, press the [SOURCE] button and select TV. Then press the [MENU] button and select Speakers using the [LEFT/RIGHT ARROW] buttons and pressing [OK] when selected.
Switch between speakers.
TV speakers Audio will come from the television.
External Audio Audio will come from the external
System audio device (e.g. soundbar, AV receiver) when connected via one of the digital audio outputs.
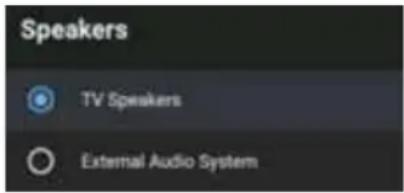
text_image
Speakers TV Speakers External Audio SystemNote: The volume level at which your set comes on at is the same level it was when turned off.
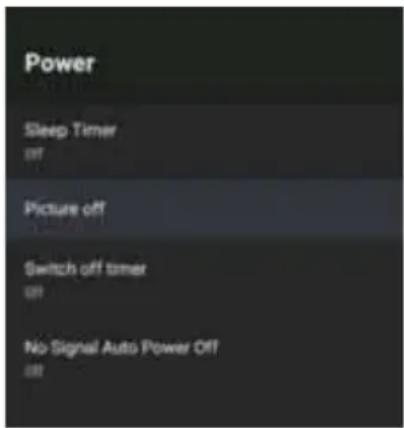
Power
To enter the Power menu, press the [SOURCE] button and select TV. Then press the [MENU] button and select Power using the [LEFT/RIGHT ARROW] buttons and pressing [OK] when selected.
To enter the Power menu, press the [SOURCE] button and select TV. Then press the [MENU] button and select Power using the [LEFT/RIGHT ARROW] buttons and pressing [OK] when selected.
In this menu you can change the settings related to power consumption and the following modes are available:
Sleep Lets you set the sleep timer so the television Timer automatically switches off after a set amount of time. Off / 10 / 20 / 30 / 40 / 50 / 60 / 90 / 120 minutes can be selected.
Picture Off Allows you to turn off the display so that there is no picture, sound still comes from the speakers. To turn display back on, press the [STANDBY] button on the remote control.
text_image
Power Sleep Timer Off Picture off Switch off timer Off No Signal Auto Power Off OffSwitch Controls the amount of time the set will continue Off Timer without any buttons being pressed on the set or remote control before going into standby. Off/ 30 / 60 / 90 / 120 / 150 / 180 / 210 / 240 minutes can be selected. Default is off.
No Signal Controls the amount of time the set will continue to operate auto- without a signal being received. power off Off / 5 / 10 / 15 / 30 / 60 minutes can be selected. 15 minutes is default.
CI Card
To enter the CI Card menu, press the [SOURCE] button and select TV. Then press the [MENU] button and select CI Card using the [LEFT/RIGHT ARROW] buttons and pressing [OK] when selected.
Pay per view services require a "smartcard" to be inserted into the television. If you subscribe to a pay per view service the provider will issue you with a 'CAM' and a "smartcard".
The CAM can then be inserted into the COMMON INTERFACE PORT (CI Card In).
This menu allows you to view information and change settings of CAM.

text_image
Close Info Close Info Close Pro Guide Save ProfessionalNote: This function is not currently used in the UK and ROI.
Advanced Options
To enter the Advanced Options menu, press the [SOURCE] button and select TV. Then press the [MENU] button and select Advanced Options using the [LEFT/RIGHT ARROW] buttons and pressing [OK] when selected.
In this menu you can change various settings and the following modes are available:
Blue Mute Changes the background colour to blue when there is no input signal.
Default Channel Allows you to choose default Digital television channel, which will be displayed after television is powered on.
Freeview Play View the Freeview Play Terms and Conditions.
Settings
Subtitle Select your preferred subtitle language and type.
Auto Sleep Controls the amount of time the set will continue to operate without any buttons being pressed on the set or remote control before going into standby.
Options are: Never / 4 / 6 / 8 hours. The default setting is 4 hours.
System Information Shows system information.
Version Info Software version of the set.
Note: In the case of poor signal reception, the quality and strength of the signal can be checked here.
Both of these must be at least 90% to ensure reliable reception.
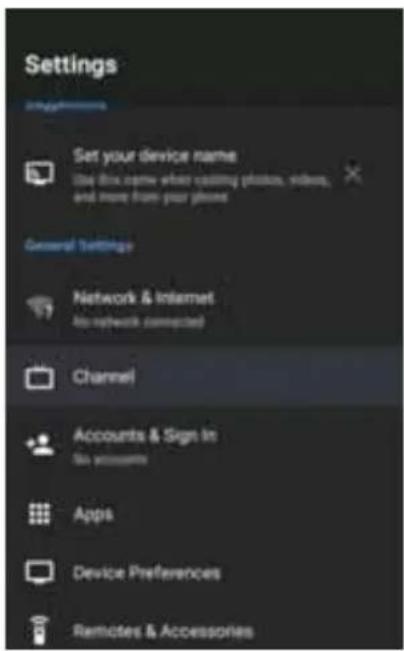
Settings
To enter the Settings menu, press the [SOURCE] button and select TV. Then press the [MENU] button and select Settings using the [LEFT/RIGHT ARROW] buttons and pressing [OK] when selected.
Within the settings menu it is possible to control a large number of the set functions, including those listed below:
• Device Name
- Set up your network and internet connections
- Tune in your set
- Change or update your accounts and sign-in details
• Control the apps
- Set device preferences
- Set up remotes and accessories
Note: These settings are the same as those in the Home Page Settings menu.
text_image
Settings Set your device name Use this name when casting photos, videos, and more from your phones General Settings Network & Internet to network connected Channel Accounts & Sign in Six accounts Apps Device Preferences Remotes & AccessoriesNetwork & Internet
Network & Internet control and access is located in the Settings menu. To enter this menu option, select the icon while on the Home Page or press the [MENU] button on the remote control when in television mode, then go to Settings > Network & Internet. When selected, the options shown below are available:
Wi-Fi Allows you to enable/disable the built-in Wi-Fi receiver.
See All Shows the full list of available Wi-Fi networks.
Add new network Allows you to add Wi-Fi network manually. This is needed in case you set up on your router or are using an invisible/hidden Wi-Fi network.
Scanning always Some location apps need to periodically scan other Wi-Fi devices in the area. This Available function allows to scan Wi-Fi devices even in case Wi-Fi is turned off.
Wow Wake on Wi-Fi network. Allows the set to turn on via network control wirelessly.
Wol Wake on LAN. Allows the set to turn on via network control over LAN connection.
Proxy Settings Confi gure proxy server for web browser.
IP settings Configure a wired network.
Connecting to a Network
Connecting to a Network Using a LAN Cable
A wired LAN connection allows you to access the Internet and your home network, this is the recommended method of connection as it allows for reliable and fast connection to your network. This is also known as an Ethernet cable connection or RJ45.
When connecting your router to the set via a cable, use the ethernet port on the rear of the television. After connecting the LAN cable, your set should connect to the internet automatically if DHCP is activated on your router. To set up your router you will have to refer to the instruction manual that was supplied with the device or talk to your broadband supplier.
If you need to set up a static IP address for the television, you will need to follow these steps:
- Press the [HOME] button, then select Settings > Network & Internet > IP settings > Static.
- Now follow the on-screen instructions and fill in correct IP Address, Gateway, Network prefix length and DNS.
Connecting to a Network Using a LAN Cable
The built-in Wi-Fi device allows you to access the Network and enjoy the benefits of networking in a cable-free environment.
- Set up your Wi-Fi router. For details, refer to the instruction manual of your Wi-Fi router.
- Press the [HOME] button, then select Settings > Network & Internet.
- From the list of available networks choose your network. If you do not see your Wi-Fi network, select "See all" option to show the complete list of all available networks.
- On the virtual keyboard enter password of your network and select [OK].
- Your set will now automatically connect to the selected Wi-Fi network.
Channel
This option allows you to tune in your set to the incoming RF or Satellite signal. You can configure the settings related to the type of broadcast being received. To enter this menu option, select the 📷 icon while on the Home Page or press the [MENU] button on the remote control when in television mode, then go to Settings > Channel. When selected, the options shown below are available:
There are three types of signal which can be tuned into, reception of these are dependent upon the signals being received by your set and the country you are located in:
- Digal Terrestrial Television – Also known as DVB-T1 and/or DVB-T2.
- Cable Television – Also known as DVB-C.
- Satellite Television – Also know as DVB-S1 and/or DVB-S2.
Options in the channel menu are:
Channels Tune and control channels.
Channel Installation Terrestrial, cable or satellite. Mode
Auto Channel Update channels automatically, on/off. Update
Channel Update Advise when channel update is available, on/off. Message
Parental Controls Set parental levels.
Audio Language Set the audio language track.
2nd Audio Set the secondary language track. Language
Open Source View the licences online. Licences
Version
Software
version.
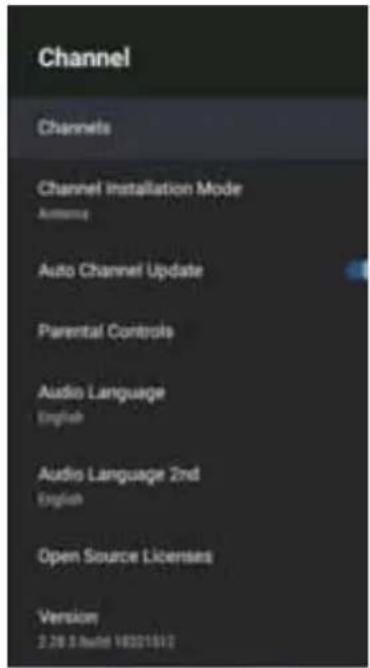
text_image
Channel Channels Channel Installation Mode Antenna Auto Channel Update Parental Controls Audio Language English Audio Language 2nd English Open Source Licensees Version 2.28.5 build 19301612Before tuning in your set, you will need to select the type of signal being received to enable tuning to operate correctly. Enter the Channel Installation Mode to choose Antenna (terrestrial digital television), Cable or Satellite.
Depending upon which option is selected will change the options available in the Channels menu as shown in the following pages.

text_image
Channel Installation Mode Antenna Cable Preferred Satellite General SatelliteDTV (Digital Television)
DTV mode relates to Freeview (UK) and Saorview (in ROI). You can only tune into one type of service and this depends upon the country which you are in. All models for the UK have Freeview Play built-in and this will be available once the set has been tuned in and an internet connection is made.
While in the DTV mode, the following options will be available:
Channel Scan Allows you to retune the television for all digital and analogue channels.
Update Scan Tunes all frequencies, on which channels are not currently tuned. This is recommended when searching new channels which were added recently, without retuning all channels.
Analogue Manual Scan Direct tuning of analogue stations.
Single RF Scan Allows you to manually tune your digital signal by selecting the channel number.
Manual Service Channel positions, names and frequencies Update will be updated by the provider.
LCN Logical Channel Number. When turned on, digital stations will be ordered according to provider preferences.
Channel Scan Type Settings for Channel Scan. You can select what type of channels should be tuned: Only encrypted channels, only free channels, or all channels.
Channel Store Type Settings for Channel Scan. You can select what type of channels should be stored after tuning fi nish: Only digital television channels, only radio channels, or all channels.
Favourite Network In some countries/areas more networks may be Select available. Channels will be ordered differently according to selected network.
Channel Skip Allows you to choose channels, which will be skipped when pressing [CH+ / CH-] buttons on the remote.
Channel Sort Allows you to swap position of two channels between each other.
Channel Move Allows you to move selected channel to new position.
Channel Edit Allows you to delete channels from the channel list.
Analogue Channel Allows you to fi ne-tune analogue Fine-tune channels to adjust picture quality.
Clear Channel List Removes the channel list data.
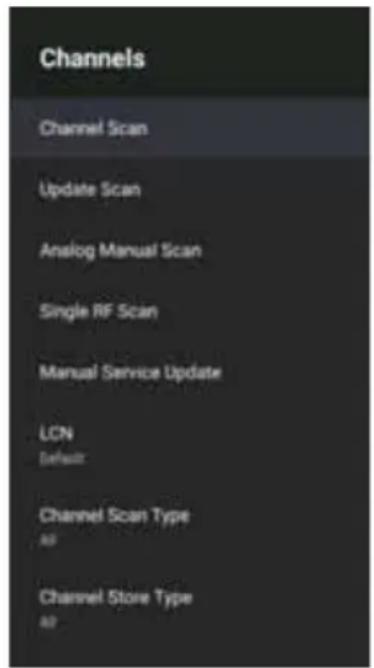
text_image
Channels Channel Scan Update Scan Analog Manual Scan Single RF Scan Manual Service Update LCN Default Channel Scan Type A0 Channel Store Type A0Cable
While in the cable mode, the following options will be available:
Channel Scan Allows you to retune the television for all digital and analogue channels.
Single RF Scan Allows you to manually tune your digital signal by selecting the channel number.
LCN Logical Channel Number. When turned on, digital stations will be ordered according to provider preferences.
Channel Scan Type Settings for Channel Scan. You can select what type of channels should be tuned: Only encrypted channels, only free channels, or all channels.
Channel Store Type Settings for Channel Scan. You can select what type of channels should be stored after tuning fi nish: Only digital television channels, only radio channels, or all channels.
Channel Skip Allows you to choose channels, which will be skipped when pressing [CH+/CH-] buttons on the remote.
Channel Sort Allows you to swap position of two channels between each other.
Channel Move Allows you to move selected channel to new position.
Channel Edit Allows you to delete channels from the channel list.
Analogue Channel Allows you to fi ne-tune analogue Fine-tune channels to adjust picture quality.
Clear Channel List Removes the channel list data.
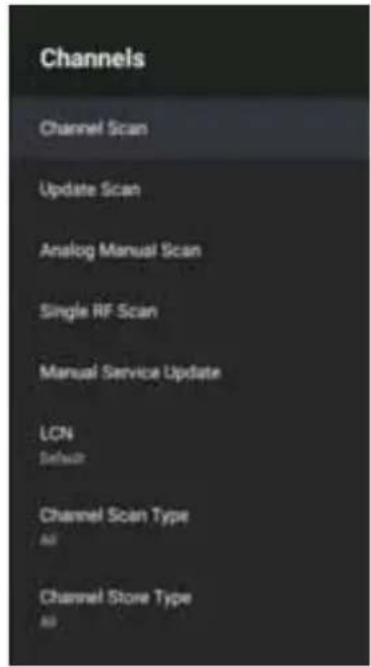
text_image
Channels Channel Scan Update Scan Analog Manual Scan Single RF Scan Manual Service Update LCN Default Channel Scan Type All Channel Store Type AllSatellite
While in the satellite mode, the following options will be available:
Satellite Re-Scan Allows you to scan selected satellite.
Satellite Add Allows you to add new satellite transponder into the list of satellites.
Satellite Update Tunes all frequencies, on which channels are not currently tuned. This is recommended when searching new channels which were added recently, without retuning all channels.
Satellite Manual Allows you to scan selected satellite transponders. Tuning
Channel Skip Allows you to choose channels, which will be skipped when pressing [CH+ / CH-] buttons on the remote.
Channel Sort Allows you to swap position of two channels between each other.
Channel Move Allows you to move selected channel to new position.
Channel Edit Allows you to delete channels from the channel list.
Clear Channel List Allows you to delete all tuned channels.
Channel Installation Set the type of Digital television signal you receive. Mode This setting affects content of Channels menu.
Auto Channel If this option is set to ON, channel positions, names Update and frequencies will be periodically updated by the provider. This may cause issues if you ordered channels in the list of channels by yourself. In such case we recommend to keep this option off.
Channel Update Notifi cations about changes carried out by Auto Message Channel Update function.
Parental Controls Set the parental guidance level, and block channels or inputs.
Channels Blocked Set manually, which channels will be blocked, independent of age restrictions.
Program Restrictions Set the channels blocking based on age/rating.
Inputs Blocked Allows you to block specifi ed inputs.
Change PIN Allows you to change the PIN, needed to access blocked content.
Audio Channel Allows you to change preferred audio track of the current analogue channel, in case more than one audio track is available.
Note: While in satellite mode, channels will be stored as they are tuned in. There is no logical channel numbering in the satellite tuning mode.
Parental Controls
In this menu you can control the level of parental supervision on your television set when watching digital television transmissions. To enter and control the options in this menu, you will need to remember your
PIN number, this was set during the first-time installation.
Channels Blocked Allows you to block DTV channels.
Program Restrictions When turned on it is possible to set the Rating System and Ratings. Options available are as below:
- None
• High Restrictions Content suitable for children
• Medium Restrictions Content suitable for older children - Low Restrictions Content suitable for teens
- Custom Manual Restrictions
Inputs Blocked Block one or several inputs.
Change PIN Change your PIN number.
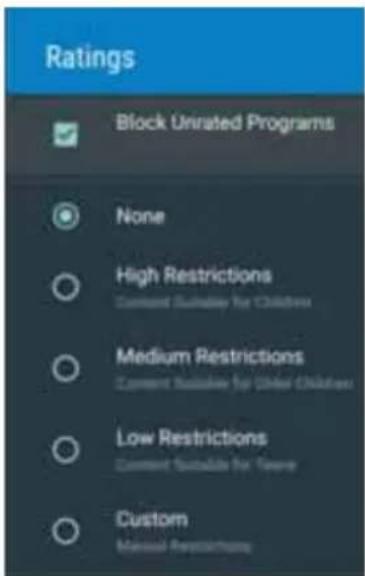
text_image
Ratings Block Unrated Programs None High Restrictions Content Suitable for Children Medium Restrictions Content Suitable for Other Children Low Restrictions Content Suitable for Severe Custom Manual RecommendationsNote: The setting of parental controls relating to digital television transmissions rely on the transmitted channel and programme containing age restriction information. If this is not present, your television will not be able to block the content.
Accounts & Sign-in
In this menu you can add, synchronize or remove your Google account. To enter this menu option, select the 📷 icon while on the Home Page or press the [MENU] button on the remote control when in television mode, then go to Settings > Accounts & Sign-In. When selected, the options shown below are available:
You can use your account for:
- Google Play Store.
- Google Play Movies & Television.
- Google Play Games.
- YouTube.
- Adding a new account.
Note: You can have one or more Google Accounts on your device at a time.
Sign in via Android phone
- Select "Add account".
- Select "Sign In".
- Select "Use your phone or computer".
- To sign in, follow the on-screen instructions.
- Your phone account will be added to the television.
Sign in manually
You can do this by entering account address/password via on-screen keyboard.
- Select "Add account."
- Select "Sign In".
- Enter your password using the remote control.
- To sign in, enter your email address and password.
- After you add your account, you'll see "Success" on the television screen.
Manage your account
You can sync devices, apps, and remove accounts from your Android television.
- Choose one of the following:
- Sync now.
- Remove account.
-
Choose apps to sync.
-
Select an account you wish to manage.
Note: The television must be connected to the internet. To sign in with your Android phone television and phone must be connected to the same network.
Apps
Control and view apps here. To enter this menu option, select the 🎨icon while on the Home Page or press the [MENU] button on the remote control when in television mode, then go to Settings > Apps. When selected, the options shown below are available:
Recently opened Shows apps which have been recently opened. apps
App permissions Allows or disallows access to apps.
Special app access Allows special access to be controlled:
Energy optimization
Usage access
Notification access
Display over other apps
Modify system settings
Directory access

text_image
Apps Security approved apps Live TV 1 minute app DigitalMediaPlayer 80 minutes app See all apps Permissions App permissions Special app accessSecurity & restrictions Allows control of security and restrictions:
Unknown sources Allow installation of apps from sources other than Play Store.
Verify apps Disallow or warn before installation of apps that may cause harm.
Note: Applications can be installed onto your set. These will be dedicated to your set and its functionality and/or specification. Not all apps may load onto your set.
Device Preferences
Device preferences allows you to set up your television to your choice. To enter this menu option, select the icon while on the Home Page or press the [MENU] button on the remote control when in television mode, then go to Settings > Device Preferences. When selected, the options shown below are available:
About Information about TV and software.
Date & Adjust system time & date. Time
Timer Setup timers for automatic TV start or power off.
Language Selects the menu language. The selected menu language will also set by the voice recognition language.
Keyboard Configures the on-screen keyboard.
Inputs Conf i gure Source menu and HDMI CEC.
Power Changes the settings related to power consumption.
Picture Adjusts the picture and screen display settings such as screen brightness.
Sound Adjusts the sound settings and speaker related options.
Storage Changes the settings related to data storage.
Home Customises channels displayed in the Home screen and sorts Screen apps.
Store Activates store demonstration mode. Mode
Google Configures the settings related to the search function.
Chromecast Displays information about the Chromecast feature. Built-in
Screen saver Configures the settings of the screen saver.
Location Configures the location settings to acquire the user location.
Usage & When turned on, automatically sends diagnostic information Diagnostics to Google.
Security & Configures the security settings such as passwords. Restrictions
Accessibility Configures the settings of accessibility features and services for helping users navigate their devices more easily.
Reset Resets TV to factory settings. All accounts will be removed from TV, all apps will be deleted as well as all Wi-Fi/LAN settings, and all system settings will return to default values.

text_image
Device Preferences About Date & time Timer Language Keyboard Guard Inputs Power Picture Sound Storage Home screen Store mode Google Chromecast built-in Screen saver Developer options Location Usage & DiagnosticsAbout
This menu option tells you about your television. To enter this menu option, select the 📷 icon while on the Home Page or press the [MENU] button on the remote control when in television mode, then go to Settings > Device Preferences > About.
System Checks for an update and allows this to be Update downloaded if available.
Device The name which has been given/chosen for your name television. It is possible to change the name of your television here by selecting an option from the drop-down menu or make your own custom name.
Production Name – Production name of the set.
Restart Restarts your set.
Status Shows the IP address, MAC address, Bluetooth address, serial number and operation time of the television.
Legal Shows the licences applicable to the television. It is also information possible to opt out of advertising here.
Model Shows the model number of your Android television.
Version Shows the Android software version.
Software Shows the television software version. Version
Netflix iX ESN Shows the Netflix iX Electronic Serial Number.
Android Shows the Android security level.
Security
Patch Level
Kernel Shows the internal operating system version.
Version
Build Shows the current build version.

text_image
About System update Device name ADDOL_TWE154 Restart Status Network, serial number and other information Legal information Model ADDOL_TWE154 Version # Software version Wed Jun 19 13:06:20 CST 2018 Netflix ESN NANDROID: PRV-MEDUATS/AT/VEFPLUSTES SHARP OS-TWE154-4A43-7B5A/TIF/SDTEC16AAC13K75RA EFS.HRORCARCESTXCA8865172A4C75AD Android security patch level April 5, 2019 Kernel version 4.9.1104 44 Wed Jun 19 13:30:54 CET 2018 Build Inflow, a crowdfunding, 9 Pf-eng intb192.20190419.13000 and infoDate & Time
To enter this menu option, select the 🎨 icon while on the Home Page or press the [MENU] button on the remote control when in television mode, then go to Settings > Device Preferences > Date & Time.
Available options:
Automatic Turn on to synchronise the time to the incoming digital & Time television signal. If connected to the internet, the clock will be updated from here. Turn off to set the clock manually.
Set date Allows you to set date manually. This option is only available if Automatic date & time is turned off.
Set time Allows you to set time manually. This option is available only if option Automatic date & time is off.
Set Time Adjustment of the time offset. This will default to your Zone Zone country setting.
Use 24-hour You can choose between 12-hour and 24-hour format for Format displaying time.
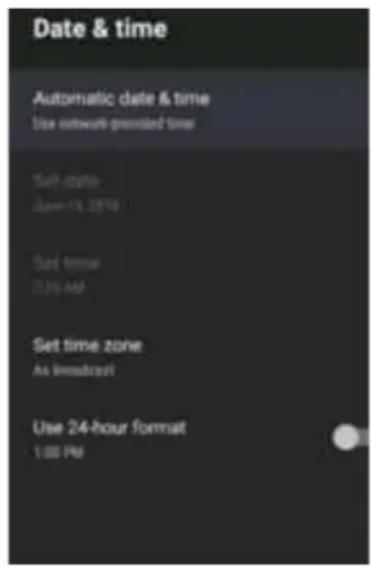
text_image
Date & time Automatic date & time Use network preview time Set-time June 14, 2018 Set time 2:30 AM Set time zone As broadcast Use 24-hour format 1:00 PMNote: Ensure you have set correct date and time. Some apps will not work if you have incorrect date and/or time.
Timer
To enter this menu option, select the 🎯icon while on the Home Page or press the [MENU] button on the remote control when in television mode, then go to Settings > Device Preferences > Timer.
Within this menu you will be able to set the various timer related operations on your set:
Power On Off/on/once.
timer Type
Auto Power Time at which your set will turn on. This will only be active if On Time the Power On Timer Type is set to on or once.
Power Off Off / on / once.
Time Type
Auto Power Time at which your set will turn off. This will only be active if Off Time the Power Off time Type is set to on or once.

text_image
Timer Power On Timer Type Off Power On Timer Off-Off Power Off Timer Type Off
Language
To enter this menu option, select the 🎨 icon while on the Home Page or press the [MENU] button on the remote control when in television mode, then go to Settings > Language.
Here you can select the language of the on-screen display. There are many languages which can be selected here.
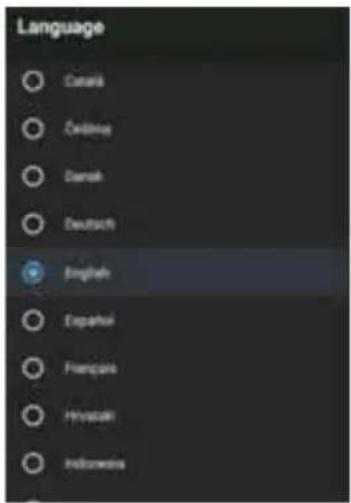
text_image
Language Danish Denish Danish Deutsch English Españal Français Hyrisaki IndonesiaKeyboard
To enter this menu option, select the icon while on the Home Page or press the [MENU] button on the remote control when in television mode, then go to Settings > Device Preferences > Keyboard.
This option allows you to set up and control your keyboard. While in this menu, you can select/view the following options:
Current Shows which keyboard is currently selected. Keyboard
Gboard Settings
Current version Software version of the installed keyboard.
Languages
Keyboard
language.

text_image
Keyboard Current keyboard Board Gboard Settings Manage keyboardsTerms of Displays the terms of service for the Service keyboard software as a web page.
Privacy policy Displays the privacy policy as a web page.
Open source Shows the open source licenses. Licenses
Share usage Automatically sends keyboard usage Statistics statistics to Google if turned on.
Manage Shows available virtual keyboards and allows them to be Keyboards turned on and off.
Note: It is not normally possible to turn off Gboard.
Inputs
To enter this menu option, select the 🎨 icon while on the Home Page or press the [MENU] button on the remote control when in television mode, then go to Settings > Device Preferences > Inputs.
You can select your desired source from this menu. It is also possible to do this by pressing the [SOURCE] button on the remote control. The number and type of inputs will depend upon the model and specifications of your set.
HDMI Turn HDMI CEC on and off. Control
Device auto If disabled, the connected device does not turn off power off automatically when the television is turned off.
TV auto If disabled, the television does not turn on automatically power on when the connected device is turned on.
HDMI EDID Shows the currently installed HDMI EDID version number. Version
CEC Device Displays the HDMI CEC device list. list
Note: You can go directly to the DTV source (if tuned in), by pressing the numbered buttons on the remote control, i.e. pressing the number [1] will switch the set to channel 1. Alternatively, you can press the [TV] button on the remote control.
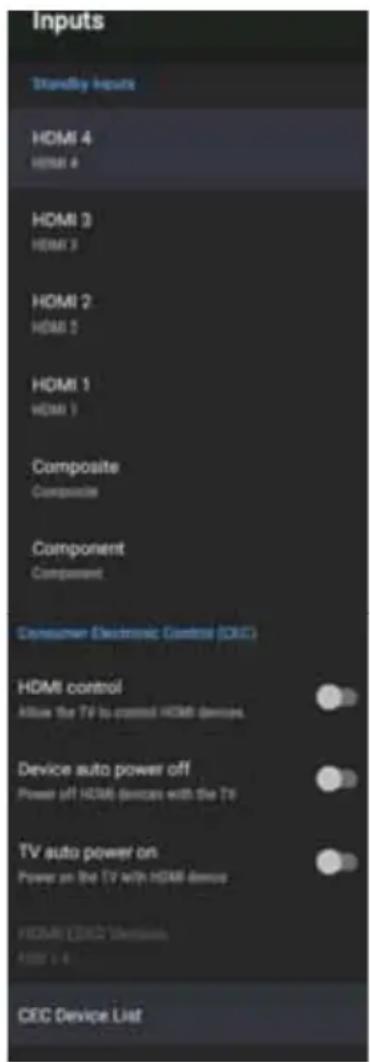
text_image
Inputs Standby Inputs HDMI 4 HDMI 4 HDMI 3 HDMI 3 HDMI 2 HDMI 2 HDMI 1 HDMI 1 Composite Composite Component Component Consumer Electronic Control (CEC) HDMI control Allow the TV to control HDMI devices Device auto power off Power off HDMI devices with the TV TV auto power on Power on the TV with HDMI devices HDMI CEC Device HDMI 4 CEC Device ListPower
To enter this menu option, select the 📄icon while on the Home Page or press the [MENU] button on the remote control when in television mode, then go to Settings > Device Preferences > Power.
In this menu you can change the settings related to power consumption and the following modes are available:
Sleep Timer Lets you set the sleep timer so the television automatically switches off after a set amount of time. Off / 10 / 20 / 30 / 40 / 50 / 60 / 90 / 120 minutes can be selected.
Picture off Allows you to turn off the display so that there is no picture, sound still comes from the speakers. To turn display back on, press the [STANDBY] button on the remote control.
Switch Off Controls the amount of time the set will continue to operate Timer without any buttons being pressed on the set or remote control before going into standby. Off / 30 / 60 / 90 / 120 / 150 / 180 / 210 / 240 minutes. Default is off.
No Signal Controls the amount of time the set will continue to operate Auto Power without a signal being received. Off Off / 5 / 10 / 15 / 30 / 60 minutes can be selected. 15 minutes is default.
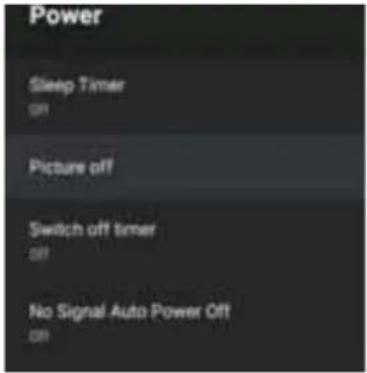
text_image
Power Sleep Timer Off Picture off Switch off timer Off No Signal Auto Power Off OffPicture
To enter this menu option, select the 🎨 icon while on the Home Page or press the [MENU] button on the remote control when in television mode, then go to Settings > Device Preferences > Picture.
In this menu you can adjust the various picture settings of your television. Adjustments are possible in the User mode only as this will allow you to change the picture settings to your personal preference. These settings are saved automatically. In other modes, the set will default to the predetermined levels if adjusted.
Option in the picture menu are:
Picture mode User For you to set your own preferences.
Standard For standard use.
Vivid Enhances the contrast and brightness.
SpSuitable for viewing sports events.
Movie Set for watching movies.
Game For gamers.
Energy Best energy performance.
Saving (on by default)
Backlight Controls the intensity of the LED backlight.
Brightness Changes the brightness of the picture.
Contrast Changes the range between the brightest and darkest parts of the picture.
Saturation Controls the amount of colour in the picture.
Hue Varies the tint of the picture.
Sharpness Allows for the sharpness of the picture to be adjusted.
Gamma Changes the gamma response of the picture.
Dark Enhances colours in dark areas.
Middle Improves mid-range colours.
Bright Increases brightness of colours.
Colour Changes the colour temperature of the picture.
Temperature
Colour Temperature User / Cool / Standard / Warm
Red Gain
Controls red content.
Green Gain
Controls green content.
Blue Gain
Controls blue content.

text_image
Picture Picture Mode User Dolby Vision Notification Backlight Brightness Contrast Saturation HUE Sharpness Gamma White Color Temperature Picture Format Automatics Advanced Video Color Tuner 11 Point White Balance Correction Reset to DefaultAdvanced Video
DNR Off / low / medium / strong / Auto
MPEG NR Off / low / medium / strong
Adaptive Luma Off / low / medium / strong
Control
DI Film Mode Off / auto
Blue Stretch On / off
Game Mode On / off
PC Mode On / off
HDMI RGB Range auto / 15-235 / 0-255
Colour Tuner Enable
On/off
Hue Red / green / blue / cyan/ magenta / yellow / flesh tone
Saturation Red / green / blue / cyan/ Magenta / yellow / flesh tone
Brightness Red / green / blue / cyan / magenta / yellow / flesh tone.
Offset Red / green / blue
Gain Red / green / blue
11 Point White Balance Correction:
Enable On / off
Gain 5 / 10 / 20 / 30 / 40 / 50 / 60 / 70 / 80 / 90 / 100%
Red Control red channel.
Green Control green channel.
Blue Control blue channel.
Reset to Default
Allows you to reset the picture conditions back to their default levels (factory shipping).
Note: While using apps, it may not be possible to adjust the picture settings as the app may control these for you to give the best possible picture.
Sound
To enter this menu option, select the 🎨 icon while on the Home Page or press the [MENU] button on the remote control when in television mode, then go to Settings > Device Preferences > Sound.
In this menu you can adjust the various sound settings of your television. Adjustments are possible in the User mode only as this will allow you to change the sound settings to your personal preference. These settings are saved automatically. In other modes, the set will default to the predetermined levels if adjusted.
Sound Style Sets the sound mode.
User (default) Defi ned sound response by the user.
Standard Standard settings.
Vivid Brighter sounding audio.
Sports Ideal for sports events.
Movie Enhanced for movie experience.
Music/News Tailored for speech.
Balance Left to right balance control.
Surround Enables surround sound, on/off.
Sound
Equalizer Fine control of the frequency response.
Detail 120 / 500 / 1500 / 5000 / 10000Hz can be selected.
Speakers Internal or external speaker control.
TV Speakers TV speakers on.
External Audio TV speakers off.
System
Digital Type of encoding for optical digital output.
Output
Auto Automatically selects from input source.
Bypass Audio directly comes from connected device.
PCM (default) PCM encodes stream only.
Dolby Digital Plus ^® Dolby Digital Plus only.
Dolby Digital ^® Dolby Digital only.
SPDIF Delay Audio delay for the digital optical output. 0 to 250ms.
Auto Automatic volume control on/off.
Volume
Control
Downmix Set the downmix mode to Stereo / Surround.
Mode
DTS DRC Turns Digital True Sound Dynamic Range Control on/off.
DTS Virtual-X ^® Turns Digital True Sound on/off. Options are:
Virtual:X / TBJDX / Limiter
Reset to Default Allows you to reset the sound conditions back to their default (factory) levels.
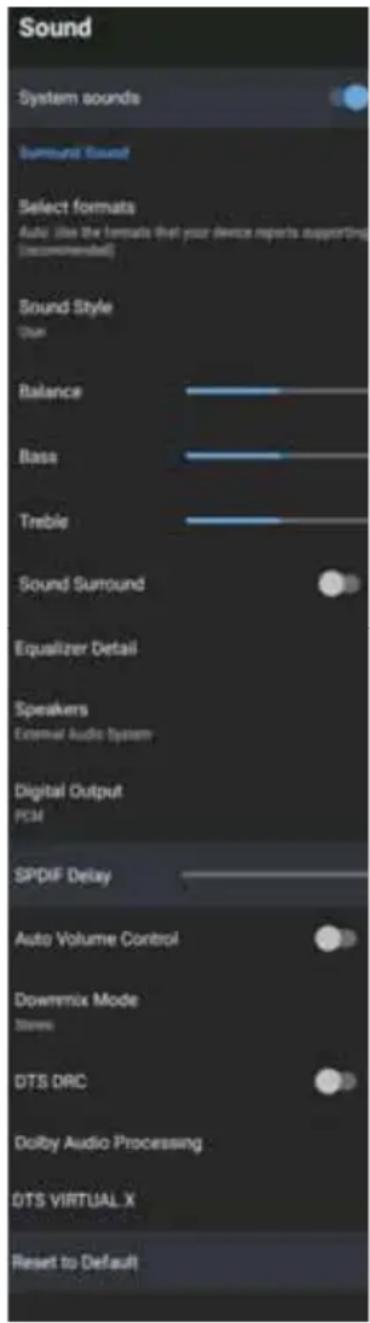
text_image
Sound System sounds Summunt Sound Select formats Auto (like the format that your device reports supporting (recommended) Sound Style Dut Balance Bass Treble Sound Surround Equalizer Detail Speakers External Audio System Digital Output PCM SPDXF Delay Auto Volume Control Downmix Mode Stereo DTS DRC Dolby Audio Processing DTS VIRTUAL X Reset to DefaultStorage
To enter this menu option, select the 🎨 icon while on the Home Page or press the [MENU] button on the remote control when in television mode, then go to Settings > Device Preferences > Storage.
Controls and shows the storage available on your television.
Internal shared Storage space available on the television. Storage
Removable storage Type and space available on connected media.
Note: By selecting each storage device you can view the storage taken by each app.
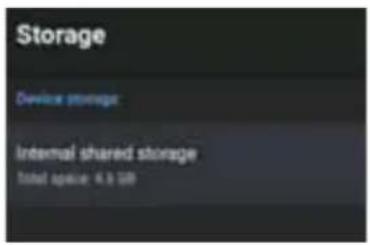
text_image
Storage Device storage: Internal shared storage Total space: 4.3 GBHome Screen
To enter this menu option, select the 📄 icon while on the Home Page or press the [MENU] button on the remote control when in television mode, then go to Settings > Device Preferences > Home screen.
Allows for the home screen parameters to be changed and viewed.
Customise Select channels which will appear on the home screen. Channel
Enable video Turn home page video previews on/off. Previews
Enable Turn home page audio previews on/off. audio Previews
Reorder Change the order of the home page apps. Apps
Reorder Change the order of the home page games. Games
Android Shows licence agreement. TV home
Android TV Shows licence agreement. Core Services
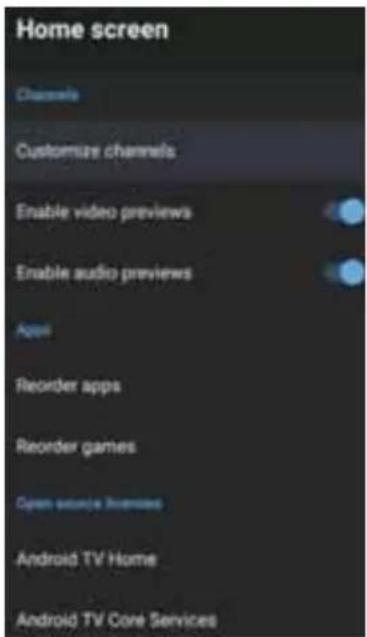
text_image
Home screen Channels Customize channels Enable video previews Enable audio previews App1 Recorder apps Recorder games Open source licenses Android TV Home Android TV Core ServicesStore Mode
To enter this menu option, select the 🎨 icon while on the Home Page or press the [MENU] button on the remote control when in television mode, then go to Settings > Device Preferences > Store Mode.
Turns the store mode on or off.
Note: If the store mode is turned on, the set will go into the demonstration mode after a few minutes and display banners advising of the set specification on the screen.

text_image
Store mode Store modeGoogle Assistant
To enter this menu option, select the 📷 icon while on the Home Page or press the [MENU] button on the remote control when in television mode, then go to Settings > Device Preferences > Google Assistant.
Allows control of the Google Assistant.
Accounts Shows the current account name.
View Sign into your Google account to view permissions. Permissions
Searchable Choose which apps to include in search results. Apps
SafeSearch Turn SafeSearch on/off. Filter
Block Turn offensive word blocker on/off. offensive words
Open Shows open source licences. source licences

text_image
Google View permissions Searchable apps Select which apps to include or search results SafeSearch filter Block offensive words Open source licensesChromecast Android Shell
To enter this menu option, select the 📷 icon while on the Home Page or press the [MENU] button on the remote control when in television mode, then go to Settings > Device Preferences > Chromecast Android Shell.
Gives information about Chromecast:
Open source licenses Shows licence agreement.
Version number Chromecast version.

text_image
Chromecast built-in Open source licenses Version number 1.26.1-40876Screensaver
To enter this menu option, select the 🎨icon while on the Home Page or press the [MENU] button on the remote control when in television mode, then go to Settings > Device Preferences > Screen Saver.
Allows control of the built-in screen saver.
Screen saver Activates the following:
Turn screen off
Backdrop
Colours
When to Delay to start screen saver. start Options are: 5 / 15 / 30 / 60 / 120 minutes.
Put device Time before television turns off to sleep Options are: 0.5 / 1 / 3 / 6 / 12 hours or never.
Start now Start the screen saver now.
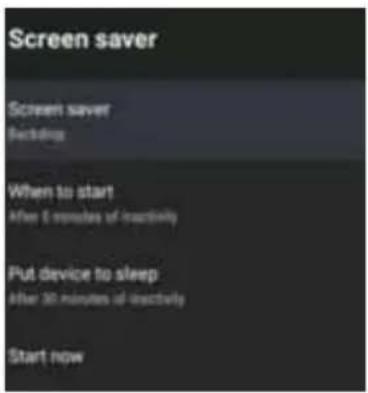
text_image
Screen saver Screen saver Avoiding When to start After 5 minutes of inactivity Put device to sleep After 30 minutes of inactivity Start nowLocation
Set the location services of your television. To enter this menu option, select the icon while on the Home Page or press the [MENU] button on the remote control when in television mode, then go to Settings > Device Preferences > Location.
Location status Use Wi-Fi to estimate location, on/off.
Recent location Shows recent requests for location services. request
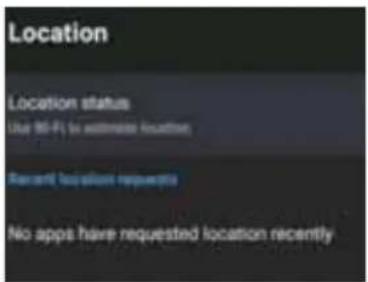
text_image
Location Location status Use 90-F1 to estimate location Recent location requests No apps have requested location recentlyUsage & Diagnostics
To enter this menu option, select the 📷 icon while on the Home Page or press the [MENU] button on the remote control when in television mode, then go to Settings > Device Preferences > Usage & Diagnostics.
When activated, the set will automatically send diagnostic information to Google. This could include data from apps, Chromecast and usage data. The information will not be used to identify you. Permissions can be changed in device settings if required.

text_image
Usage & Diagnostics On Automatically send diagnostic information to Google, like create reports and usage data from your device, apps, and Chromacell tools. The information won't be used to identify you. You can adjust these permissions at any time from device settings. Learn more at: g.cs/Android/pageHelp and g.cs/Get/Device.stats.Accessibility
To enter this menu option, select the 🎨 icon while on the Home Page or press the [MENU] button on the remote control when in television mode, then go to Settings > Device Preferences > Accessibility.
Accessibility has a shortcut function so you can turn it on or off by pressing and holding the [BACK] and [DOWN] buttons on the remote control for 3 seconds.
Allows various accessibility options to be changed and controlled:
Audio Turn audio description on/off.
Description
Visually Only appears when Audio Description is enabled. Impaired
Hearing Turn hearing impaired on/off. impaired
Spoken Turn spoken subtitles on/off. Subtitle
AC4 Options are, Off / Low / Medium / High.
Dialogue
Enhancement
Captions Control captions:
Display options:
Display – On/off
Language – Select language
Text size – Very small / Small / Normal / Large / Very Large
Caption Various options.
Style
High Changes the contrast of the text.
Contrat Text

text_image
Accessibility Audio Description Visually Impaired Hearing Impaired Captions High contrast text (Experimental) Text to speech Accessibility shortcut Services TalkBack allReset
To enter this menu option, select the 🎨 icon while on the Home Page or press the [MENU] button on the remote control when in television mode, then go to Settings > Device Preferences > Reset.
Reset the set to its factory conditions. This will erase all data and passwords. The set will start in the first-time installation mode when the reset is completed.
Remotes & Accessories
Should you wish to add another remote or an accessory, use this option. To enter this menu option, select the 📷icon while on the Home Page or press the [MENU] button on the remote control when in television mode, then go to Settings > Remotes & accessories. When selected, the options shown below are available:
To pair your Sharp Bluetooth remote with Voice Control
- Press the [HOME] button, then select Settings > Remotes & Accessories.
- To pair remote with television, follow on-screen instructions.
- The name of your remote control will appear on the television screen.
- Press [OK] to confirm pairing.
To pair other Bluetooth devices
- Press the [HOME] button, then select Settings > Remotes & Accessories.
- Put Bluetooth device into pairing mode. For details, refer to the instruction manual of your device.
- The name of your remote control will appear on the television screen.
- Press [OK] to confirm pairing.
Notes: Your remote control supplied with your set has both IR (Infra-Red) and RF (Bluetooth connectivity. For normal television operation it is not necessary to pair your remote control. When using voice commands while in the Google Assist mode, the remote control must be linked to the set using the RF connection.
Bluetooth enabled items such as remote controls, keyboards, pointing devices, etc. can be added to enhance the functionality of your set.
DIGITAL TELEVISION, FREEVIEW AND FREEVIEW PLAY

To watch television programmes via Antenna, Cable or Satellite, press the [HOME] button, select from the Home Page, and select Live television from the apps list. You can also enter the digital television mode by pressing the [TV] button on the remote control.
Should your set not be tuned into a digital signal, follow the instructions as below:
Tuning in Digital Channels
It is possible to tune into terrestrial, cable and satellite digital television signals on your television set. To do this, follow the instructions given below for each type of signal input.
Terrestrial
Before tuning terrestrial channels, ensure the television is in TV mode:
- Press the [HOME] button, then select Settings > Channel > Channel installation mode.
- Select option Antenna.
- To start automatic channel scan press the [HOME] button, then select Settings > Channel > Channels > Channel scan.
After tuning into Freeview, you may be presented with a choice of regions; this is dependent upon your location and the number of transmissions received. Normally there will only be one transmitter:
• Region 1 Country
• Region 2 Transmitter Location
• Region 3 Local News variation
Cable
Receiving cable digital broadcast;
- Before tuning cable channels, ensure the television is in cable mode:
- Press the [HOME] button, then select Settings > Channel > Channel installation mode.
- Select option Cable.
- To start automatic channel scan, press the [HOME] button, then select Settings > Channel > Channels > Channel scan.
Sattelite
Before tuning satellite channels, ensure the television is in satellite mode:
- Press the [HOME] button, then select Settings > Channel > Channel installation mode.
- Select option Preferred Satellite if you want to tune one of satellites preferred in your country.
- Select option General Satellite to get possibility to tune any satellite.
-
To start automatic channel scan, press the [HOME] button, then select Settings > Channel > Channels > Satellite Re-scan.
-
Choose the Satellite you wish to tune.
- Select Scan and press [OK].
Note: You can only tune into one type of digital television signal.
Using Freeiew Play
Freeview Play enables you to watch live television as well as having access to catch up television services and playback from the start of a live programme.
Notes: To use Freeview Play your set needs to be connected to the internet and tuned into a reliable and consistent Freeview signal.
Freeview Play is only available in the United Kingdom.
To tune in your set, refer to the Tuning in Digital Channels section.
Channel Guide
While using Freeview Play, the Electronic Programme Guide (EPG) is available while in the Live Television mode. It provides information about forthcoming programmes. You can view the start and end time of all programmes and on all channels for the next 7 days. To enter the EPG, press the [GUIDE] button on your remote control. Press the [EXIT] button to leave programme guide.
When the EPG is entered, a screen like the one below will appear. This will show a live preview of the programme being received in the top left-hand corner and a synopsis this on the right. This synopsis will change as you navigate around the guide with the [ARROW] buttons on the remote control.

text_image
Abused by the Police? 1:15 - 2:05 50 mins 8 AD 9 Mickey Tall Ellie Flynn investigates the scale of sexual assault perpetrated by American police officers against women in their custody. 9:02 Fri 8 Nov Fri 8 Nov 0:30 1:00 1:30 2:00 2:30 Question T. Browness Joans BBC News TWO 2 BBC TWO A Dangerous Dynamic Women of Assault Abused by the Police? Home is Where the HOLIP 4 BBC FOUR Storyville Top of the Stars Advance Great C... 4E February No information Available BBC ONE HS Quintero T. Brownish, John BBC News TWO Hot BBC TWO HD S Dampenski Family House of Assault Abused by the Police? Home is Where the LEx® HBD Uly vdc Exptom The Daily Memory Plate of Schedule Recommendations Catch up Search InfoIn the middle of the display is the programme listing, which is shown in time order, half hour segments being shown at the top and channel name on the left. If you would like to quickly scan through the channels, press the [CH+] or [CH-] buttons to quickly move up or down through the listings. Using the [RIGHT] button will move forward in time, using the [LEFT] button will move back in time.
Back EPG
When moving backwards through the EPG, the display will change to show the programmes which have been previously recorded on the on-demand players for the channel shown. Recorded and available programmes will be indicated by the Freeview Play logo appearing next to them as shown in the picture below. Greyed out programmes are not available on catch up.
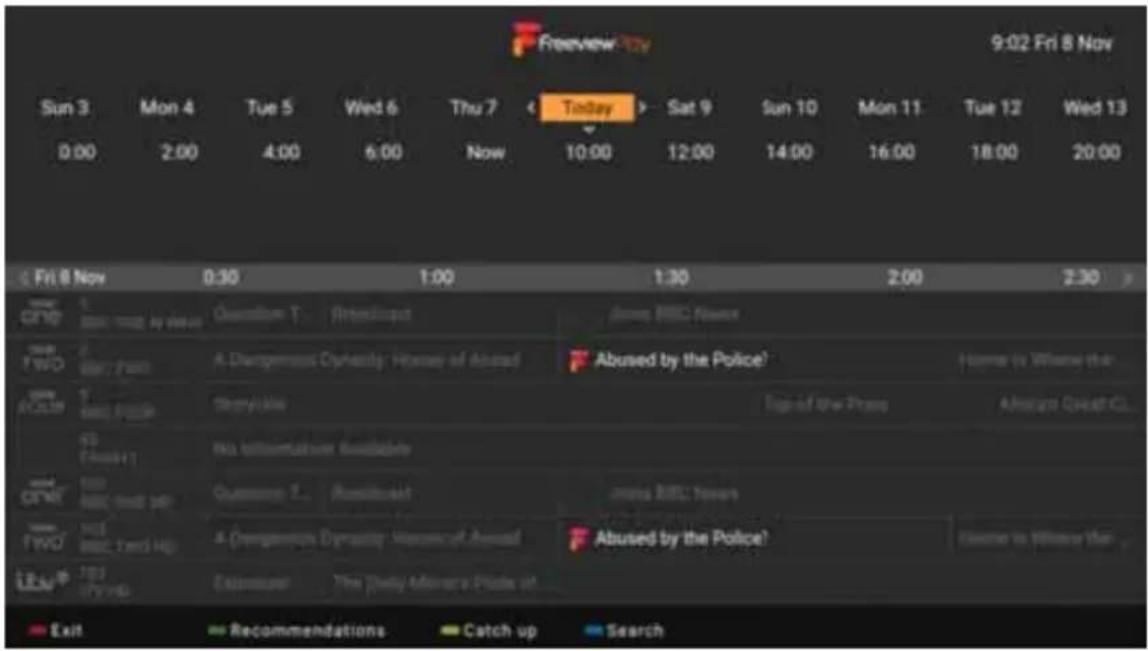
text_image
Sun 3 Mon 4 Tue 5 Wed 6 Thu 7 Today Sat 9 Sun 10 Mon 11 Tue 12 Wed 13 0:00 2:00 4:00 6:00 Now 10:00 12:00 14:00 16:00 18:00 20:00 Fri 8 Nov 0:30 1:00 1:30 2:00 2:30 CNO TWO ACOL CPWR TYWO LPA Exit Recommendations Catch up Search A. Dangerous Cybercity House of Abuse! Abused by the Police? Home is Where the Chronic No information available Question 1. Reviewed About BBC Towers A. Dangerous Cybercity House of Abuse! Abused by the Police? Home is Where For Extrainer The Party Meeting Plots atWhen a programme has been selected, the preview window and synopsis change to show the programme details. The date is below the preview window.
Notes: For full functionality of the EPG, a reliable and consistent connection to the internet is required.
Without internet, back EPG will not work, channel preview will not appear, programme synopsis will change to a basic view, channel icons will not be present and catch up services will not be available.
Quick Buttons
While in the EPG, various functions can be accessed quickly by pressing the coloured buttons at the bottom of the remote control. These are detailed as described below.
[RED] - Goes to the Schedule List
While in the schedule list you can go backwards and forwards in time (7 days forwards and 7 days backwards) to select the programme which you would like to watch. If the Freeview Play logo is present, the programme can be played back when selected using the [ARROW] buttons and [OK] is pressed.
![SHARP 50EL6KA - [RED] - Goes to the Schedule List - 1](/content/2026/06/1219486/images/bee713c2c482f51a4bd67e85923d4741736dbbd680e4350e0c781fd70c91fd62.jpg)
text_image
Thu 7 Today Sat 9 Now 10:00 12:00You can also select the day and time of the schedule list view by entering the rows at the top of the screen and selecting the day and time range.
[GREEN] – Recommendations
Freeview Play recommendations can be viewed by pressing the [GREEN] button on the remote control. This screen allows you to choose the programme to watch directly or select from a number of genres. Select the programme to watch using the [ARROW] keys on the remote control and then press [OK] to start playback.
![SHARP 50EL6KA - [GREEN] – Recommendations - 1](/content/2026/06/1219486/images/eefcc5deaed67810e4f18c66599f6a573de8ced7dcdb54e20aa9865d13b479b5.jpg)
text_image
Live Island: Australia Guest ID: 2175 Saturday 4th November 2019 ISS ID: 361-888-0000 International changes are called to a list. The platform can add all this page.[YELLOW] – Go to Catch Up TV (also known as On Demand Players)
When the [YELLOW] button is pressed on the remote control while in the EPG or in recommendations, the set will allow access to the back EPG and the various Freeview Play on-demand applications. The 'Catch Up' menu allows you to access available programmes, from the last 7 days, that you may have missed. The 'Catch Up' menu will show programmes, by day, in the order that they were broadcast (descending in time order).
![SHARP 50EL6KA - [YELLOW] – Go to Catch Up TV (also known as On Demand Players) - 1](/content/2026/06/1219486/images/13d8227e39fb6192971f3b8935a8cc8462a0d5b2400b6206ddf6f84b0f30baa4.jpg)
text_image
BBC iPlayer itv 41 My5 Status: 0.00 Status: 0.00 Status: 0.00 Status: 0.00 Status: 0.00 Status: 0.00 Status: 0.00 Status: 0.00 Status: 0.00 Status: 0.00 Status: 0.00 Status: 0.00 Status: 0.00 Status: No. Status: No. Status: No. Status: No. Status: No. Status: No.To navigate through this page, use the [ARROW] buttons on the remote control and then press [OK] to either play back the selected programme or go into the chosen on-demand player.
While playing back a programme, or in one of the on-demand players, pressing [BACK] or [EXIT] on the remote control will take you back to the 'Catch Up' menu. Pressing [BACK] or [EXIT] again takes you out of the programme guide and back to standard television.
Note: Catch Up is only available on Freeview Play. On-demand players may require you to log in.
[BLUE] - Search
You can use the powerful search function to look for a recorded programme by its name. Use the on-screen keyboard to enter the name, or part of the name of the programme which you would like to view and then select from the list which appears to the right of the keyboard.
![SHARP 50EL6KA - [BLUE] - Search - 1](/content/2026/06/1219486/images/e42614074ea6d420a5f6620d69e76782be339a9e9864d3a7260e391a5d1a9348.jpg)
text_image
A B C D E F G H I J K L M N O P G R S 1 U V W X Y Z D 1 2 3 4 S 6 7 8 9 CLEAR ALL SPACE DELWhen the required name is shown on the right-hand side, it can be selected to bring up the list of programmes with that title. Select one of the streams to playback using the [ARROW] buttons on the remote control and [OK] to start the playback.
![SHARP 50EL6KA - [BLUE] - Search - 2](/content/2026/06/1219486/images/4f0916470c797e5a6886f97f10ffc751dba39b6902e064189b575f32170927f6.jpg)
text_image
Screenshot of a software interface with a grid-based control panel and menu options in ChineseFreeview Play Button
If the [FREEVIEW PLAY] button is pressed on the remote control, the set will display the Freeview Mini Guide.

text_image
ON NOW Breakfast 7:00 - 08:15 On BBC TWO 2000 Saromond' Wounds (£40.000) BBC FOUR This is BBC Final 6:00 - 09:00 The Hungen Games 18:15 - 12:30 DreecFoss 7:00 - 12:15 @ MillaProgrammes on now are displayed for all channels. Select one of these using the [ARROW] buttons on the remote control and [OK] to change to this channel and view the programme.
While on the selected channel, you can also press one of the coloured buttons on the remote control.
Should there be a "swirl" symbol next to the programme name, this means that you can playback the program form the start.

text_image
Live 'Gardeners' World 05-10:00 On Demand Players Search[RED] - View Programme List
Press the [RED] button to enter the view programme list for the channel you are on. This will show both future and past programmes which can be selected by pressing the [LEFT] or [RIGHT] arrow buttons on the remote control and the [OK] button to view.
If the [INFO] button is pressed while on the selected programme, then an information screen is displayed.
![SHARP 50EL6KA - [RED] - View Programme List - 1](/content/2026/06/1219486/images/1db248df259cba4743354103927ac71673c94afec25fca6501c474ff6218f565.jpg)
text_image
Fox News/Play 9:57 Fri 8 Nov Breakfast 08/11/2019 7:00 - 10:15. 195 more (1) The latest news, sport, business and weather from the BBC's Breakfast team. Genre: News and FestivalWhile in the view programme list, the [RED] button can be pressed to return to the On TV Now option.
[GREEN] - Recommendations
Press the [GREEN] button to view recommendations for the channel that you have selected.
![SHARP 50EL6KA - [RED] - View Programme List - 2](/content/2026/06/1219486/images/d80ba9c7d602f8fb584a4c91011088f5b0b24629d0bd7b911c0d967e613439e8.jpg)
text_image
All Recommendations The CWL? MARRON & The CWL? MARRON The ONLY Way is Escared since 25 Episodes 9, 10% The Great British Bake Off... 10, 24% Practress: Why Are Our Puff... Series 1: Plasman, Wtg. : 10% Taskermanian Series 8: Episode 15, 40% @ Or TV NowBBC ONE AI Meet Recommends
DA Demand Players
Reason!
@ InflsIf the [GREEN] button is pressed here, all recommendations for all channels will be shown.
[YELLOW] – On Demand Players
Press the [YELLOW] button to enter the on-demand players.

text_image
ON DEMAND PLAYERS BBC iPlayer itv HVB All All My5 stv On TV Near BBC iPlayer Recommendations Search[BLUE]-Search
Press the [BLUE] button to search for a television programme. This is the same as the search function on the main EPG page.
Freeview Play App
The Freeview Play app can be accessed a number of ways on your television set:
- From the Programme Guide press the [YELLOW] button and then select the Explore Freeview Play app.
• From the Home Page, select the Explore Freeview Play app. - While in Freeview, select channel 100.
- Press the [FREEVIEW PLAY] button followed by the [YELLOW] button. Select the Freeview Play app from the on-demand players.
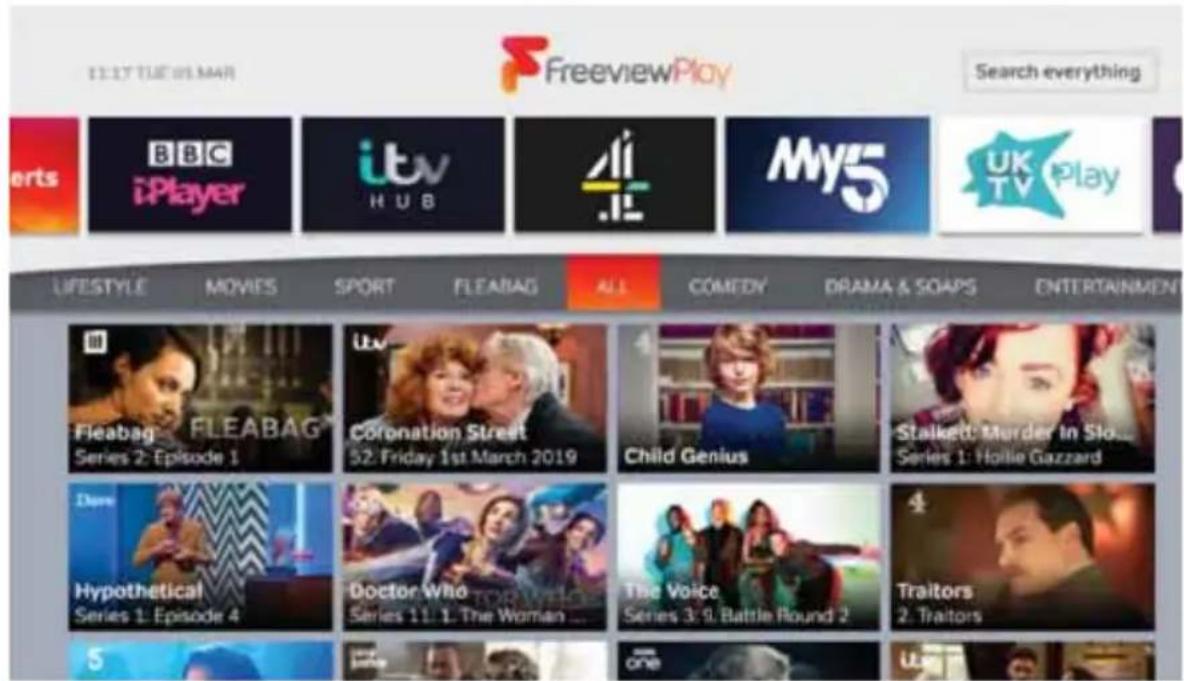
text_image
13:17 TUE 05 MAR FreeviewPlay Search everything erts BBC iPlayer itv HUB Ali My5 UK TV Play LIFESTYLE MOVIES SPORT FLEABAG ALL COMEDY DRAMA & SOAPS ENTERTAINMENT Fleabag FLEABAG Series 2: Episode 1 Coronation Street 52: Friday 1st March 2019 Child Genius Stalked: Murder In Slou... Series 1: Hollie Gazzard Dave Hypothetical Series 1: Episode 4 Doctor Who Series 11: 1. The Woman ... The Voice Series 3: 9. Battle Round 2 Traitors 2. Traitors 5 oneWhen in the Freeview Play application, it is possible to search for a programme by name. Choose the "Search everything" option and then use the on-screen keyboard to type in the programme name. As you type, selections will appear. Select one of these options and press the [OK] button to start playback.
Freeview Play brings together live television viewing with “catch up” television services from broadcasters such as BBC, ITV, Channel 4 and Channel 5. The Freeview Play Explore app features a carousel of genres to select from when searching for programmes, such as sport, comedy, dramas and soaps, etc. Content is made up from recommendations of the major broadcasters and offers an alternative means of searching.
Notes: To use the full functionality of Freeview Play your set must be connected to the internet.
Some apps require additional registration, this is a simple process and it will inform you of the correct website to visit to complete the registration.
Areas receiving Saorview transmissions will not support Freeview Play or Freeview Play services.
Channel List
Use the channel list to quickly go to the channel you want to watch. Use the [GREEN] and [RED] buttons to navigate up and down the list.
Filter List
Press the [YELLOW] button to get options to sort or fi iter channels and search channel by its number or name. When you select Type, it is possible to restrict the Channel list to various types of channels such as Radio, Free, Analogue, etc.
When selecting Find, you can search for a channel name by its name by entering the name you are looking for via the on-screen keyboard.
Favourites List
Press the [BLUE] button to open Favourites list. A list of your favourite channels will be shown here. No channels will appear unless you have added them to the list.
Adding a Favourite Channel
To add a favourite channel, go to the live digital television channel you would like to add to your favourites list, press the [MENU] button and then the [UP ARROW] button. The "Add to Favourites" icon should be highlighted, press [OK]. The channel is now added to your favourites list.
Adding a Favourite Channel
To modify your list of channels:
- Press the SOURCE button and select television.
- Press the MENU button and go to Settings > Channel > Channels.
Here choose one of menu items related to editing of channel list:
Channel Allows you to choose channels, which will be skipped when pressing [CH+ / CH-] buttons on the skip remote.
Channel Allows you to swap position of two channels between each other. Sort
Channel Allows you to move selected channel to new position. move
Channel Allows you to delete channels from the channel list. Edit
Note: Depending on your country settings, Channel Sort and Channel Move may be unavailable. This is caused by LCN (Logical channel number). When LCN is ON, channels are sorted by preferences of your broadcaster. To make channel sorting/moving available set LCN to OFF in
Settings > Channel > Channels > LCN.
We do not recommend turning LCN off, as when a future re-tune is carried out your channels will not be in order.
Information Bar
When the [INFO] button is pressed on the remote control, the information bar will appear at the top of the screen.
If the [INFO] button is pressed again, the information bar will change to show further detail.
This shows a large amount of information on the channel currently being received, this includes the following:
• Channel selected
• Program being transmitted
- Time progress bar
• Program start and end time
- Time of day
• Description of the program
- Subtitles available
• Audio description available
- Program genre
MENU STRUCTURE
| HOME MODE | IN TELEVISION MODE | ||
| First Level Second Level | First Level Second Level | ||
| Network & Internet | Wi Fi on/off | Source | Source selection dependant on model |
| See all | |||
| Add new network | Picture Mode | User | |
| Scanning always available | Standard | ||
| Wow | Vivid | ||
| Wol | Sport | ||
| Ethernet | Movie | ||
| Connected | Game | ||
| Proxy Setting | Energy Saving | ||
| IP Setting | Display Mode | Automatic | |
| Channel | Channels | Full | |
| Channel Installation Mode | Wide Screen | ||
| Auto Channel Update | Unscaled | ||
| Channel Update message | 4:3 | ||
| Parental Controls | Movie Expand 14:9 | ||
| Audio Language | Movie Expand 16:9 | ||
| 2nd Audio Language | Speakers | TV Speakers | |
| Open Source Licences | External Audio System | ||
| Version | Power | Sleep Timer | |
| Accounts & sign-in | Current account | Power Off | |
| Add account | Switch Off Timer | ||
| Apps | Various apps | No signal Auto power off | |
| App permissions | CI Card Apps | Cam Menu | |
| Special app access | User Preference | ||
| Security & restrictions | Advanced Options | Setup | |
| Device Preferences | About | Default channel | |
| Date & Time | Freeview Play Settings | ||
| Timer | Subtitle | ||
| Language | Auto Sleep | ||
| Keyboard | System Information | ||
| Inputs | Version info | ||
| Power | Settings | Network & Internet | |
| Picture | Channel | ||
| Sound | Accounts & Sign-in | ||
| Storage | Apps | ||
| Home Screen | Device Prefences | ||
| Store mode | Remotes & Accessories | ||
| Chromecast Android Shell | Add accessory | ||
| Screen saver | Connected accessories | ||
| Location | |||
| Useage & Diagnostics | |||
| Accessibility | |||
| Reset | |||
| Remote & accessories | Add accessory | ||
| Connected accessories | |||
UPDATING SOFTWARE
There are a number of ways in which the software on your set can be updated. When your set is produced, the software installed will ensure the correct operation of the set, this may need to be updated should improvements be made and this is normally carried out automatically if the set is connected to the internet.
Note: For further support with software updates, contact our technical support team or refer to the 'Product Support' section of the website. If the television is using the newest software available it will not attempt to update the software.
If your set is outside of guarantee and the installation of the software causes a different issue you may be liable for a chargeable repair service. The reason for this is because you may have a fault which can cause corruption on one of the boards when installing the software. This could result in your unit locking into SAFE mode whereby it is stuck in standby. This is not a fault with the software, this would be caused by an existing faulty board that would have required a repair.
SPECIFICATIONS
USB and DNLA
Supported Video Formats
| Video Codec Container Data Rate Profi le Resolution | ||||
| XviD | MP4 (.mp4, .mov) | 40Mbps N/A | 1080P @ 60fps | |
| AVI (.avi) | ||||
| MKV (.mkv) | ||||
| ASF (.asf) | ||||
| OGM (ogm) | ||||
| Sorenson H.263 | FLV (.fl v) | 40Mbps N/A | 1080P @ 60fps | |
| AVI (.avi) | ||||
| SWF (.swf) | ||||
| MPEG transport stream (.ts, .trp, .tp) | ||||
| OGM (.ogm) | ||||
| H.263 | MP4 (.mp4, .mov) | 40Mbps N/A | 1080P @ 60fps | |
| 3GPP (.3gpp, .3gp) | ||||
| AVI (.avi) | ||||
| MKV (.mkv) | ||||
| OGM (.ogm) | ||||
| H.264 | FLV (.fl v) | 135Mbps | . Main Profi le. High Profi le @Level 5.0 | 4096*2160@60fps1080P@60fps |
| MP4 (.mp4, .mov) | ||||
| 3GPP (.3gpp, .3gp) | ||||
| MPEG transport stream (.ts, .trp, .tp) | ||||
| ASF (.asf) | ||||
| WMV (.wmv) | ||||
| AVI (.avi) | ||||
| MKV (.mkv) | ||||
| OGM (.ogm) | ||||
| MPEG4 | MPEG program stream (.MPG, .MPEG) | 40Mbps | . Simple Profi le. Advanced Simple. Profi le@Level 5.GMC is not supported | 1080P @ 60fps |
| MP4 (.mp4, .mov) | ||||
| 3GPP (.3gpp, .3gp) | ||||
| AVI (.avi) | ||||
| MKV (.mkv) | ||||
| ASF (.asf) | ||||
| OGM(.ogm) | ||||
| HEVC/H.265 | MP4(.mp4,.mov) | 100Mbps | . Main(8bits)/. Main10(10bits)Profi le, High Tier@Level 5.1 | 4096*2160@60fps |
| 3GPP(.3gpp, .3gp) | ||||
| MPEG transport stream(.ts, .trp, .tp) | ||||
| MKV(.mkv) | ||||
Continued Next Page
Supported Video Formats (continued)
| Video Codec Container Data Rate Profi le Resolution | ||||
| MVC | MPEG transport stream (.ts, .trp, .tp) | 80Mbps N/A | 1080P @ 30fps | |
| AVS | MPEG transport stream (.ts, .trp, .tp) | 40Mbps | . Jizhun profi le @ Level 6.0 | 1080P @ 60fps |
| MPEG program stream(.MPG,.MPEG) | ||||
| AVS+ | MPEG transport stream (.ts, .trp, .tp) | 50Mbps | . Broadcasting profi le@Level 6.0.1.08.60 | 1080P @ 60fps |
| MPEG1/2 | MPEG program stream (.DAT, .VOB, .MPG, .MPEG) | 80Mbps N/A | 1080P @ 60fps | |
| MPEG transport stream (.ts, .trp, .tp) | ||||
| MP4 (.mp4, .mov) | ||||
| 3GPP (.3gpp, .3gp) | ||||
| AVI (.avi) | ||||
| MKV (.mkv) | ||||
| ASF (.asf) | ||||
| OGM(.ogm) | ||||
| Motion JPEG | AVI (.avi) | 10Mbps N/A | 1080P @ 30fps | |
| 3GPP (.3gpp, .3gp) | ||||
| MP4 (.mp4, .mov) | ||||
| MKV (.mkv) | ||||
| ASF (.asf) | ||||
| VP8 | MKV (.mkv) | 20Mbps N/A | 1080P @ 60fps | |
| WebM (.webm) | ||||
| VP9 | MKV (.mkv) | 100Mbps . Profi le0/2 N/A | ||
| WebM (.webm) | ||||
| FLV | MPEG program stream(.MPG, .MPEG) | 45Mbps | . Advanced Profi le@Level 3. Simple Profi le. Main Profi le | 1080P @ 60fps |
| MPEG transport stream (.ts, .trp, .tp) | ||||
| ASF (.asf) | ||||
| WMV (.wmv) | ||||
| AVI (.avi) | ||||
| MKV (.mkv) | ||||
| OGM(.ogm) | ||||
Supported Audio Formats
| Audio Codec Container Sample Rate Bit Rate Channel | ||||
| MPEG1/2 Layer1 | MOVIE: | 16KHz ~ 48KHz 32Kbps ~ 448Kbps Up to 2 | ||
| AVI (.avi) | ||||
| ASF (.asf) | ||||
| DivX (.divx) | ||||
| Matroska (.mkv) | ||||
| MPEG transport stream (.ts, .trp, .tp) | ||||
| MPEG program stream (.DAT, .VOB, .MPG, .MPEG) | ||||
| MUSIC: | ||||
| WAV (.wav) | ||||
| MP3 (.mp3) | ||||
| MPEG1/2 Layer2 | MOVIE: | 16KHz ~ 48KHz 8Kbps ~ 384Kbps Up to 2 | ||
| AVI (.avi) | ||||
| ASF (.asf) | ||||
| DivX (.divx) | ||||
| Matroska (.mkv) | ||||
| MPEG transport stream (.ts, .trp, .tp) | ||||
| MPEG program stream (.DAT, .VOB, .MPG, ,MPEG) | ||||
| MUSIC | ||||
| WAV (.wav) | ||||
| MP3 (.mp3) | ||||
| MPEG1/2/2.5 Layer3 | MOVIE: | 8KHz~48KHz 8Kbps ~ 320Kbps | Up to 2 | |
| AVI (.avi) | ||||
| ASF (.asf) | ||||
| DivX (.divx) | ||||
| Matroska (.mkv) | ||||
| 3GPP (.3gpp, .3gp) | ||||
| MP4 (. mp4, .mov) | ||||
| MPEG transport stream (.ts, .trp, .tp) | ||||
| MPEG program stream (.DAT, .VOB, .MPG, .MPEG) | ||||
| FLV (.fl v) | ||||
| SWF (.swf) | ||||
| MUSIC: | ||||
| WAV (.wav) | ||||
| MP3 (.mp3) | ||||
| MP4 (. m4a) | ||||
| Audio Codec Container Sample Rate Bit Rate Channel | ||||
| AC3 | MOVIE: | 32KHz, 44.1KHz, 48KHz | 32Kbps ~ 640Kbps Up to 5.1 | |
| AVI (.avi) | ||||
| Matroska (.mkv) | ||||
| DivX (.divx) | ||||
| 3GPP (.3gpp, .3gp) | ||||
| MP4 (.mp4, .mov) | ||||
| MPEG transport stream (.ts, .trp, .tp) | ||||
| MPEG program stream (.DAT, .VOB, .MPG, .MPEG) | ||||
| RM (.rm, .rmvb) | ||||
| MUSIC: | ||||
| AC3 (.ac3) | ||||
| MP4 (.m4a) | ||||
| EAC3 | MOVIE: | 32KHz, 44.1KHz, 48KHz | 32Kbps ~ 6Mbps | Up to 5.1 |
| 3GPP (.3gpp, .3gp) | ||||
| MP4 (.mp4, .mov, .m4a) | ||||
| MPEG transport stream (.ts, .trp, .tp) | ||||
| MPEG program stream (.DAT, .VOB, .MPG, .MPEG) | ||||
| MUSIC: | ||||
| EAC3 (.ec3) | ||||
| VORBIS | MOVIE: | Up to 48KHz N/A | Up to 2 | |
| Matroska (.mkv) | ||||
| WebM (.webm) | ||||
| 3GPP (.3gpp, .3gp) | ||||
| MP4 (.mp4, .mov) | ||||
| MUSIC: | ||||
| MP4 (.m4a) | ||||
| LPCM | MOVIE: | 8KHz ~ 48KHz 64Kbps ~ 1.5Mbps | Mono, Stereo, 5.1 | |
| AVI (.avi) | ||||
| Matroska (.mkv) | ||||
| 3GPP (.3gpp, .3gp) | ||||
| MP4 (.mp4, .mov) | ||||
| LPCM | MPEG transport stream (.ts, .trp, .tp) | 8KHz ~ 48KHz 64Kbps ~ 1.5Mbps | Mono, Stereo, 5.1 | |
| MPEG program stream (.DAT, .VOB, .MPG, .MP EG) | ||||
| MUSIC: | ||||
| WAV (.wav) | ||||
| MP4 (.m4a) | ||||
Continued Next Page
Supported Audio Formats (continued)
| Audio Codec Container Sample Rate Bit Rate Channel | ||||
| IMA-ADPCMMS-ADPCM | MOVIE: | 8KHz ~ 48KHz 32Kbps~384Kbps | Up to 2 | |
| AVI (.avi) | ||||
| Matroska(.mkv) | ||||
| 3GPP (.3gpp, .3gp) | ||||
| MP4 (.mp4, .mov) | ||||
| MUSIC: | ||||
| WAV (.wav) | ||||
| G711 A/ MP4(.m4a)mu-law | MOVIE: | 8KHz 64Kbps | 1 | |
| AVI (.avi) | ||||
| Matroska (.mkv) | ||||
| 3GPP (.3gpp, .3gp) | ||||
| MP4 (.mp4, .mov) | ||||
| MUSIC: | ||||
| WAV (.wav) | ||||
| LBR (cook) | RM (.rm, .rmvb) | 8KHz11.025KHz,22.05KHz,44.1KHz | 6Kbps ~ 128Kbps | Up to 5.1 |
| FLAC | Matroska (.mkv, .mka) | 8KHz~96KHz < 1.6Mbps | Up to 7.1 | |
| FLAC (.fl ac) | ||||
| DTS LBR | MOVIE: | 12khz, 22khz,24khz, 44.1khz48khz | Up to 2Mbps | Up to 5.1 |
| MP4(.mp4,.mov) | ||||
| DTS XLL | MOVIE: | Up to 96khz N/A | Up to 6 | |
| MPEG transport stream(.ts,trp,.tp) | ||||
| MP4(.mp4,.mov) | ||||
| DRA | MOVIE: | 8KHz~96KHz < 6Mbps | Up to 7.1 | |
| MPEG transport stream(.ts, .trp) | ||||
| DTS | MOVIE: | Up to 48KHz < 1.5Mbps | Up to 5.1 | |
| MPEG transport stream (.ts,trp, .tp) | ||||
| MPEG program stream(.DAT, .VOB, .MPG, .MPEG) | ||||
| Matroska (.mkv) | ||||
| MUSIC: | ||||
| WAV(.wav) | ||||
Supported Image Formats
| Image Photo | Resolution Recommended(width x height) | |
| JPEG | Base-line 15360x8 | 640 (1920x8 x 1080x8) |
| Progressive | 1024x768 | |
| PNG | Non-interlace | 9600x6400 |
| Interlaced | 1200x800 | |
| BMP | 9600x6400 | |
| MPO | Base-line 15360x8 | 640 (1920x8 x 1080x8) |
| Progressive 1024x768 | ||
| GIF 6400X4800 | ||
TROUBLESHOOTING GUIDE
If a full restart of the TV is required
If you have trouble, such as the picture not displaying on the screen or the remote control not working, reset the television with the following procedure.
If an external USB device is connected to the TV, disconnect the USB device from the TV before resetting.
Power Reset
Restart the TV with the remote control.
Press and hold the power button on the remote control for about 5 seconds until the [Power off] message is displayed. Confi rm this by pressing OK button and the TV will turn off.
Unplug the AC power cord (mains lead).
If the problem persists after step 1, unplug the TV power cord (mains lead) from the electrical outlet and wait for 2 minutes. Then plug the power cord (mains lead) back into the electrical outlet.
Note: Your personal settings and data will not be lost after the TV restarts.
Factory Data Reset
If the problem persists after a power reset, try a factory data reset.
Note: Performing a factory reset will delete all of the TV's data and settings (such as Wi-Fi and wired network setting information, Google account and other login information, Google Play and other installed apps).
Press the [HOME] button, then select Settings > Device Preferences > Reset > Erase everything.
After the factory reset process completes successfully, your television will proceed into the first time installation mode. You must agree to the Google Terms of Service and Google Privacy Policy.
What type of storage device do I require for Apps
Should you wish to store your Apps on an external memory device, this can either be in the form of a SD card or a USB connected storage device (USB memory stick).
It is recommended that the memory device does not exceed 256Gb and has read speeds of at least 15MB per second write speeds greater than 4MB per second.
Note: If using a powered memory device, ensure that the power is applied before turning on the set.
No colour/Dark picture/Colour is not correct/Picture is too bright
You can adjust colour tone, brightness and picture quality on your TV from the Picture menu in Settings.
Press the [HOME] button, then select Settings > Device Preferences > Picture.
In this menu you can make manual picture adjustments.
If you want to reset the picture settings, select Reset to Default option.
Distorted picture/The screen fl ickers
You can check the connection and position of the antenna (aerial) and external devices.
Check the antenna aerial/cable connection.
Keep the antenna aerial/cable away from other connecting cables.
When installing an optional device, leave some space between the device and the TV.
Make sure that the antenna (aerial) is connected using a high quality 75-ohm coaxial cable.
Check the troubleshooting guide for the connected device.
There are icons and text on the edges of the screen
In this case, the TV might be in store demo mode. Try exiting store mode.
Press the [HOME] button on the remote control and select Settings > Device Preferences > Store Mode > Disable Store Mode.
Cannot operate the current screen after the on-screen keyboard is displayed
To return to operation of the screen behind the on-screen keyboard, press the [BACK] button on the remote control.
Some channels are blank
The channel is for scrambled/subscription service only. Subscribe to a pay TV service.
The channel is used only for data (no picture or sound).
Contact the broadcaster for transmission details.
No sound but good picture
Check the volume control.
Press or [VOL+] button to cancel muting.
While in Television mode, press the [MENU] button, then select Speakers > TV speakers.
Remove any headphones.
The TV cannot connect to the Internet/Network
If the Wi-Fi network does not connect or disconnects, try the following.
Press the [HOME] button and check that the following setting is enabled. Settings > Network & Internet > Wi Fi.
Check the installation location of the TV and Wi-Fi router. Signal condition may be affected by the following:
Other Wi-Fi devices, microwaves, fluorescent lights, etc. that may be located nearby.
There are floors or walls between the Wi-Fi router and television.
Turn the Wi-Fi router off and then on again.
If the network name (SSID) of the Wi-Fi router to which you want to connect is not displayed, select Add new network to enter a network name (SSID).
If the problem is not resolved even after the procedures above or if you cannot connect even with a wired network, check the status of the network connection.
TV can connect to the Internet, but not to certain apps and services
The date and time settings of this TV may be incorrect. Depending on certain apps and services, you may not be able to connect to these if the time is incorrect.
Press the [HOME] button, then select Settings > Device Preferences > Date & time > Automatic date & time > Use network-provided time to automatically adjust the time through the network.
Check that the LAN cable or AC power cord (mains lead) of the router/modem has been connected properly.
Try using apps later. The app content provider server may be out of service.
The remote control does not operate.
Check if the TV is working properly
Press the power button on the television to determine if the problem is with the remote control or not.
Check if the remote control is working properly
Point the remote control at the remote control sensor located at the front of the television.
Keep the remote control sensor area clear from obstacles.
Fluorescent light can interfere with remote control operation; try turning off any fluorescent light.
Check that the orientation of each battery matches the positive (+) and negative (-) symbols in the battery compartment.
Battery power may be low. Remove the remote control cover and replace the batteries with new ones.
It is not possible to control the Google Assistant with voice
To use your voice to control the Google Assistant, you need a remote control which has a button, in addition the television must be paired to this remote control.
If your remote is not paired with the TV yet, please follow the steps below:
Press the button on the remote control.
Follow the on-screen instructions to pair the remote control with the television.
Select the detected remote control shown on the screen and press [OK].
Once paired, the pairing screen will disappear.
Pairing the remote
If during the first-time installation process the remote was not paired or skipped, then follow the process below to pair your remote with the television:
-
Turn the set on.
-
Go to Settings > Remotes and Accessories or press
the button on the remote control.
-
Now press and hold the [LEFT ARROW] and [HOME] buttons on the remote control at the same time.
-
The LED indicator on the remote control will start to flash.
-
Select your remote control from the list shown on the television screen and press [OK] on the remote control.
-
Once paired, the pairing screen will disappear.

text_image
Left Home HOME MENU OKNote: This process will only have to be completed if the remote control has not been paired.
Once paired, when the button is pressed, it will open the Google Assistant screen on the television and activate voice functionality.
When your remote control is paired, it uses Bluetooth to transmit information. This means that the remote does not need to be pointed towards the set to work.
I cannot set the picture levels while on apps
This is because the application sets the picture levels.
I cannot access Freeview Play
To enable Freeview Play to operate correctly, you must have the set tuned in and set up in the UK and installed as country setting UK. In addition, it needs to be connected to the internet.
Why am I not able to use letters in my PIN?
Your PIN is a quick code used for accessing some of the higher functions of your set. This only contains numbers so that they can be entered using your remote control keypad.
Can I log in to multiple Google accounts?
It is possible to enter more than one Google account on your set.
How do I add and remove Apps from the favourite bar?
To remove an App from the favourite bar, select the app to be deleted, press and hold [OK] button until pop-up menu appears. Choose option "Uninstall" and confi rm with [OK].
Can I set parental controls?
Parental controls are possible when receiving digital television channels (should this service be provided by the broadcaster).
Parental control within apps is determined by the functionality of the app. For details on this you will need to go into the app settings. It is possible to prevent apps from being downloaded to the set to view options go to Settings > Apps.
What do I do if my apps do not work?
First check that your set is connected to the internet, if it is, ensure that the internet connection is consistent and reliable. If this does not resolve the issue, remove the mains supply from the set and turn back on a few minutes later.
If this does not work, reset the set via Settings > Device Preferences > Reset.
Do I need an aerial signal?
For full functionality of your Android set equipped with Freeview Play you will require an aerial connected to the set with an adequate and reliable signal.
Personal Data
To remove personal data from this set, carry out a reset on your set:
Settings > Device Preferences > Reset > Erase everything.
Why does my set turn on from standby so quickly?
During standby your set will be in a higher power state to enable it to turn on quickly. Should you want to put the set into low power standby, press and hold down the [STANDBY] button on the remote control for more than two seconds. This will bring up an option to put the set into low power standby. While in low power standby, the set will take longer to come on when the [STANDBY] button is pressed.
How do I use Chromecast?
Chromecast built-in allows you to wirelessly cast content from your favourite websites and apps to your television, directly from your computer or mobile device.
- Connect a mobile device such as a smartphone or tablet to the same home network that the television is connected to.
- Launch a Chromecast supported app on the mobile device.
- Select the (cast) icon in the app.
The screen of the mobile device is displayed on the television.
Note: Casting may be limited by the device you are using, additional apps for your device may be required.
If you are experiencing problems with video casting from mobile device to your television, make sure that Chromecast built-in was enabled during the First Time Installation process.
If you do not wish to reset TV to repeat First Time Installation, Chromecast built-in can be activated by enabling options [WoW] and [WoL] in the menu [Settings] — [Network & Internet]. After enabling these 2 options, unplug the set from the mains and plug back in order to make enable these changes.
SHARP

UMC Poland sp. z o.o
Ostaszewo 57B, 87-148 Lysomice, Poland
Assembled in Poland
www.sharp.eu/av


SHA'MAN'0500