OS60SDLX1 - Oven Fisher & Paykel - Free user manual and instructions
Find the device manual for free OS60SDLX1 Fisher & Paykel in PDF.

User questions about OS60SDLX1 Fisher & Paykel
0 question about this device. Answer the ones you know or ask your own.
Ask a new question about this device
Download the instructions for your Oven in PDF format for free! Find your manual OS60SDLX1 - Fisher & Paykel and take your electronic device back in hand. On this page are published all the documents necessary for the use of your device. OS60SDLX1 by Fisher & Paykel.
USER MANUAL OS60SDLX1 Fisher & Paykel
Safety and warnings 5
First use 10
Menu 12
Steam functions 13
Convection + steam functions 14
Convection functions 15
Setting a function 17
Conditioning the oven 20
Setting the water hardness 21
Wi-Fi connection and remote mode 22
Cooking options 24
Wired Temperature sensor 26
Wireless Temperature sensor 28
Sabbath Mode 30
Oven shelves 32
Oven lights 38
Cleaning the oven door 39
Steam clean 45
Descaling 46
Dry cycle 47
Troubleshooting 49
Fault codes 51
European Directive 2012/19/EU on Waste
Electrical and Electronic Equipment (WEEE) 52
Energy guidelines (UK IE) 53
Manufacturer's Warranty and Service guide 54
Customer care 55
Registration
To register your product visit our website: fisherpaykel.com/register
WARNING!

Electric Shock Hazard
Failure to follow this advice may result in electrical shock or death.
- Turn the oven off at the wall before replacing the oven lamp.
- Before carrying out any work on the electrical section of the appliance, it must be disconnected from the mains electricity supply.
- Connection to a good earth wiring system is absolutely essential and mandatory.
- Alterations to the domestic wiring system must only be made by a qualified electrician.
WARNING!

Fire Hazard
Failure to follow this advice may result in overheating, burning, and injury.
- Carefully follow the instructions for starting a self-clean cycle.
- Do not place aluminium foil, dishes, trays, water or ice on the oven floor during cooking, this will irreversibly damage the enamel. Lining the oven with aluminium foil may cause fire.
- Never use your appliance for warming or heating the room. Persons could be burned or injured or a fire could start.
- Flammable materials should not be stored in an oven or near its surface.
- Do not use adapters, reducers, or branching devices to connect this appliance to the mains power supply.
WARNING!

Cut Hazard
Failure to use caution could result in injury.
• Take care: some edges are sharp.
WARNING!

Hot Surface Hazard
Failure to follow this advice could result in burns and scalds.
- To avoid burns and scalds, keep children away from this appliance.
- Surfaces of the appliance may become hot enough to cause burns. Examples include the oven vent, the surface near the oven vent, and the oven door.
- Do not touch heating elements or interior surfaces of the oven. Heating elements may be hot, even when they are dark in colour.
- Use protection when handling hot surfaces, such as oven shelves or dishes, or when using steam functions.
- Be careful when opening the oven door as hot air and steam can be emitted. Allow hot air and steam to dissipate before removing or replacing food.
- During and after use, do not touch or let clothing or other flammable materials contact heating elements or interior surfaces of the oven until they have had sufficient time to cool.
READ AND SAVE THIS GUIDE
WARNING!
To reduce the risk of fire, electrical shock, injury to persons or damage when using the oven, follow the important safety instructions listed below. Read all the instructions before installing or using the oven. Use the oven only for its intended purpose as described in these instructions.
Installation
- Ensure your appliance is properly installed and earthed by a qualified technician.
- Ensure this oven is connected to a circuit which incorporates an isolating switch providing full disconnection from the power supply.
- Do not install or operate the appliance if it is damaged or not working properly. If you receive a damaged product, contact your dealer or installer immediately.
- Please make this information available to the person installing the appliance—doing so could reduce your installation costs.
- This appliance must be installed and connected to the mains power supply only by a suitably qualified person according to these installation instructions and in compliance with any applicable local building and electricity regulations. Failure to install the appliance correctly could invalidate any warranty or liability claims.
- If the power supply cable is damaged, it must be replaced by the manufacturer, its service agent or similarly qualified person in order to avoid a hazard.
- Isolating switch: make sure this oven is connected to a circuit which incorporates an isolating switch providing full disconnection from the power supply in accordance with the wiring rules.
• The oven must be earthed. - Do not use adaptors, reducers or branching devices to connect the oven to the mains electricity supply, as they can cause overheating and burning.
- The appliance must not be installed behind a decorative door in order to avoid overheating.
- Please take extra care not to damage the lower trim of the oven during installation. The trim is important for correct air circulation and allows the door to open and close without obstruction. The manufacturer does not accept any responsibility for damage resulting from incorrect installation.
Servicing
- Do not repair or replace any part of the appliance unless specifically recommended in the user guide. All other servicing should be undertaken by a Fisher & Paykel trained and supported service technician or qualified person.
Fire Hazard
- Do not use water on grease fires. Smother the fire or flame or use a dry chemical or foam type extinguisher.
- Use only dry oven mitts or potholders. Moist or damp potholders on hot surfaces could result in burns from steam. Do not let potholders touch hot areas or heating elements. Do not use a towel or a bulky cloth for a potholder. It could catch fire.
- Do not heat unopened food containers. They can build up pressure that may cause the container to burst and result in injury.
Food Safety
- Leave food in the oven for as short a time as possible before and after cooking. This is to avoid contamination by organisms which may cause food poisoning. Take particular care during warm weather.
General Use
- This product has been designed for use in a domestic (residential) environment. This product is not designed for any commercial use. Any commercial use by the customer will affect this product's manufacturer's warranty.
• Household appliances are not intended to be played with by children.
- Children should not be left alone or unattended in the area where the appliance is in use. They should never be allowed to sit or stand on any part of the appliance.
- Children of less than 8 years old must be kept away from the appliance unless continuously supervised.
- Cleaning and user maintenance shall not be carried out by children without supervision.
- Do not store things children might want above the oven. Children could be burned or injured while climbing on the oven to retrieve items.
- Do not place heavy objects on the oven door.
- Always keep oven vents unobstructed. Do not wear loose fitting or hanging garments when using the appliance. They could ignite or melt if they touch an element or hot surface and you could be burned.
- Caution: Hot air can blow from the vent at the top of the oven as part of the oven's cooling system.
- Always position shelves in the desired location while the oven is cool (before preheating). If a shelf must be removed while the oven is hot, do not let the oven mitts or potholder contact hot heating elements in the oven or the base of the oven.
- Use only bakeware approved for ovens. Follow the bakeware manufacturer's guidance.
- Always place oven racks in desired location while oven is cool. If rack must be moved while oven is hot, do not let potholder contact hot heating element.
- Do not touch heating elements or interior surfaces of your oven. Heating elements and interior surfaces may be hot even though they are dark in colour and could cause burns. The oven door, vent openings and surfaces near these openings may also become hot.
- This appliance is configurable to allow remote operation at any time. Do not store flammable materials or temperature sensitive items inside, on top or near the appliance.
- Do not change or modify the wireless communication device in any way. Changes or modifications not expressly approved by Fisher & Paykel could void the user's authority to operate the equipment.
- Neither the food probe or aluminium foil must come in contact with the oven elements.
- Only use the temperature probe recommended for this oven.
- WARNING: Accessible parts may become hot during use. Young children should be kept away.
Cleaning
- Do not clean the oven seal or use any oven-cleaning products on it. It is essential for a good seal, which ensures that the oven operates efficiently. Care should be taken not to rub, damage, move or remove the oven seal.
- Do not use oven cleaners, harsh/abrasive cleaning agents, waxes, or polishes. No commercial oven cleaner, oven liner, or protective coating of any kind should be used in or around any part of the oven.
-
Do not use harsh/abrasive cleaners, scourers or sharp metal scrapers to clean the oven door glass since they scratch the surface, which may result in the glass shattering.
-
Clean only the parts listed in this manual.
- Do not use a steam cleaner to clean any part of the oven.
- The door gasket is essential for a good seal. Care should be taken not to rub, damage or move the gasket.
Light source information
- This product contains a light source of energy efficiency class G. The light source used in this appliance is not suitable for room illumination.

text_image
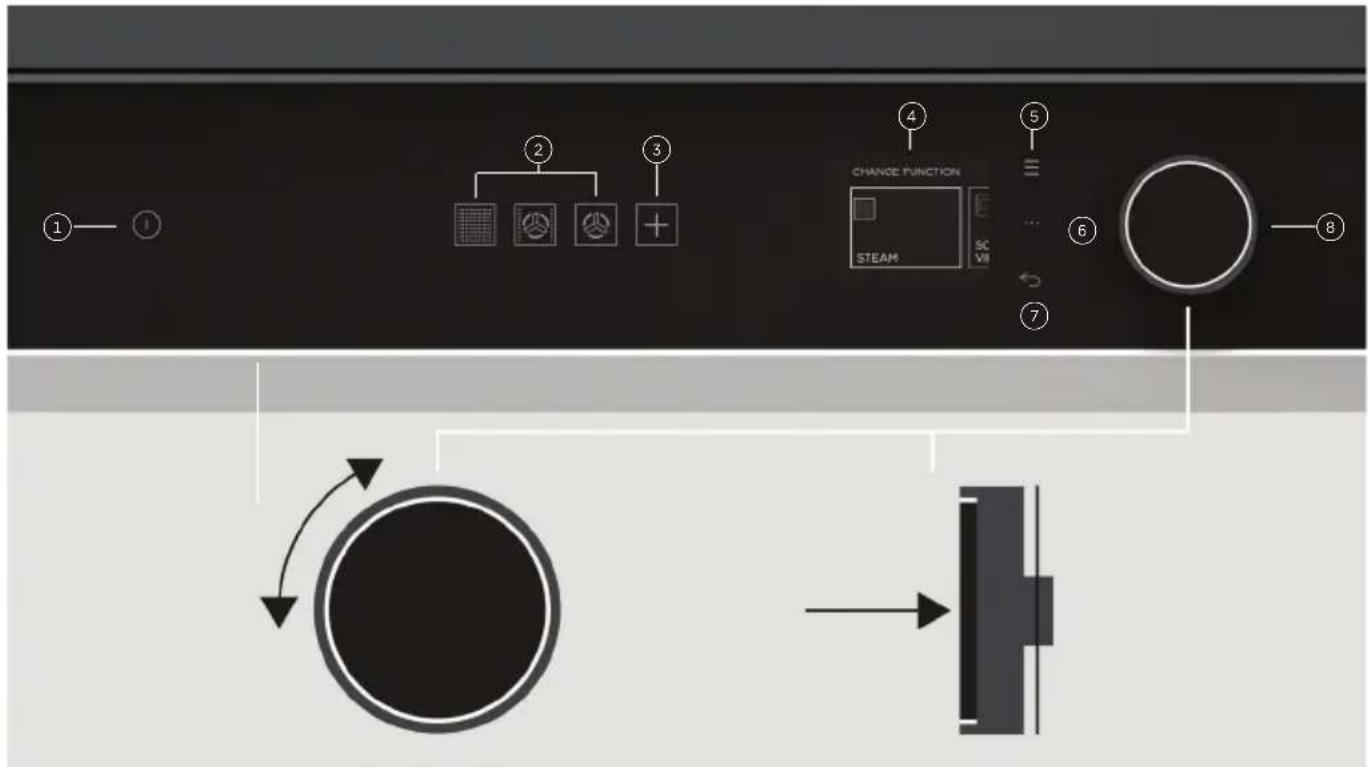
Diagram of an oven with numbered parts and exploded view showing internal compartments and a labeled thermal conductivity device.Features and accessories
① Oven controls
② Water tank compartment (behind controls)
③ Oven light
④ Shelves
⑤ Side racks
⑥ Temperature sensor
⑦ Grill rack
⑧ Grill tray
⑨ Roast dish
⑩ Large solid dish*
⑪ Large perforated dish*
⑫ Small perforated dish*
*Not intended for use over 100°C
text_image
① ② ③ ④ CHANGE FUNCTION STEAM SC VII ⑤ ⑥ ⑦ ⑧| Control panel | ||
| 1 | Power button Press and hold to turn the oven | ON.* |
| Press to turn the display OFF or to cancel cooking. | ||
| 2 | Functions | Everyday cooking and specialised functions to suit your cooking requirements. |
| Press to select a function type then select a function using the dial. | ||
| 3 | Cook by Food Type | Guided cooking to help you get optimal results. |
| 4 | Display Displays functions, features and settings. | |
| 5 | Menu Press to access additional oven features and settings. | |
| 6 | Cooking options Press to access automatic cooking features. | |
| 7 | Back Press to cancel cooking or exit. | |
| 8 | Control dial | Use to navigate cooking functions, features and settings. |
| Turn the dial to scroll. | ||
| Press to select or confirm. | ||
| Press and hold to cancel or exit. | ||
*Low Power mode: If the product is inactive for 20 minutes after use, it will switch to standby mode. To turn Low Power mode ON/OFF, go to settings.

text_image
MENU FILL TANKPress to open the water tank compartment.
| Menu | ||
| FILL TANK |  | Press to open the water tank compartment. |
| TIMER |  | Use the timer to keep track of cooking times. You can use it at any time, even if you are not using the oven.The timer does not turn the oven off. Refer to ‘Cooking options’ for automatic cooking options. |
| LOCK | [HAOX] | Lock the oven controls to prevent accidental use. When locked, the controls will be unresponsive and the oven will not turn on. Press and hold the dial to unlock. |
| LIGHT |  | Turn the oven lights ON/OFF. |
| CLEAN | [1YTDK] | Set a steam clean cycle to clean the inside of the oven.Refer to ‘Steam clean’ for full instructions. |
| SETTINGS | [6028] | Adjust the oven settings to suit your preferences or set up a Wi-Fi connection. Refer to ‘Wi-Fi connection & Remote mode’. |
| REMOTE |  | Enable or disable REMOTE.Your oven may be connected to your wireless network and operated using the app. Refer to ‘Wi-Fi connection & Remote mode’. |
| DRY | [90WT] | Run a dry cycle after steam cooking. |

natural_image
Four abstract geometric icons on a dark background: a grid, three fan-like shapes, and a plus sign (no text or symbols)| FUNCTION DESCRIPTION | ||
| STEAM |  | Retains nutrients, colour and texture using steam to cook a wide variety of foods such as rice, vegetables, fish and creamy set desserts. |
| SOUS VIDE |  | Enables specific temperature adjustments, guaranteeing even and precise cooking. Especially good for proteins, such as eggs, meats, poultry, seafood, as well as a wide range of fruit and vegetables. Can be used with or without vacuum sealing. |
| STEAM REGENERATE |  | Steam is generated from the rear of the oven and distributed evenly throughout by the fan. Ideal for reheating precooked foods without drying. |
| STEAM PROOF |  | Provides the ideal environment for the activation of yeast. Perfect for speeding up yeast dough recipes |
| STEAM DEFROST |  | Gently defrosts without drying out food, helping to retain colour and moisture. Ideal for frozen meat, fruits and vegetables, as well as frozen, store-bought meals. |


FUNCTION DESCRIPTIONS
| FAN FORCED + LOW STEAM |  | Assists surface browning on baked dishes, such as lasagne, promotes a thin crust and even colour when baking bread, and a crisp exterior when roasting vegetables. |
| FAN FORCED + MEDIUM STEAM |  | Promotes even browning and enhances textures in everyday baking and roasting, such as brownies, scones, vegetable gratins, poultry or fish. |
| FAN FORCED + HIGH STEAM |  | Ensures optimal cooking for dishes that do not require a crisp crust, such as mud cake, fruit cake and seafood. |
| CRISP REGENERATE |  | Heat and steam create perfect conditions to regenerate pastries, breads, pizza and pies as if they were just freshly baked. |

natural_image
Four abstract geometric icons on a dark background: grid, fan, fan with three blades, and plus sign (no text or symbols)| FUNCTION DESCRIPTION | |
| BAKE |  Heat radiates from the top and bottom of the oven and is evenly distributed by natural convection. Moisture is retained to provide light, succulent dishes. For best results, bake on only one shelf. Heat radiates from the top and bottom of the oven and is evenly distributed by natural convection. Moisture is retained to provide light, succulent dishes. For best results, bake on only one shelf. |
| FAN FORCED |  Heat generated at the rear of the oven is distributed evenly by the fan, creating a consistent temperature that's ideal for multi-shelf cooking. For best results, leave a gap between shelves to allow an even airflow. Heat generated at the rear of the oven is distributed evenly by the fan, creating a consistent temperature that's ideal for multi-shelf cooking. For best results, leave a gap between shelves to allow an even airflow. |
| GRILL |  Intense heat from the inner top element focussed on the centre of the oven. Ideal for quick surface browning of smaller dishes such as potato gratin. For best results, preheat for 5 minutes before placing food in the oven. Intense heat from the inner top element focussed on the centre of the oven. Ideal for quick surface browning of smaller dishes such as potato gratin. For best results, preheat for 5 minutes before placing food in the oven. |
| ROAST |  Combines the power of Grill with the long, slow heating ability of Vent Bake. Intense searing followed by baking at a lower temperature ensures food has a crisp exterior and a succulent interior. No preheating needed. Combines the power of Grill with the long, slow heating ability of Vent Bake. Intense searing followed by baking at a lower temperature ensures food has a crisp exterior and a succulent interior. No preheating needed. |
| FAN GRILL |  The fan circulates intense heat from the top elements ensuring even browning. Ideal for cooking large cuts of meats so they are moist inside and crisp on the outside. No preheating needed. The fan circulates intense heat from the top elements ensuring even browning. Ideal for cooking large cuts of meats so they are moist inside and crisp on the outside. No preheating needed. |
| FAN BAKE |  Heat from the top and bottom of the oven is evenly circulated by the fan. Increased airflow speeds up cooking so oven temperatures can be lowered by 20°C for most recipes. Heat from the top and bottom of the oven is evenly circulated by the fan. Increased airflow speeds up cooking so oven temperatures can be lowered by 20°C for most recipes. |
VENT BAKE  | Ideal for slow roasting meat. Vents remove excess moisture from the oven, promoting the gradual development of delicious, savoury flavours. Heat from upper and lower elements gently cooks to give a succulent and tender result. |
PIZZA BAKE  | The oven fan circulates heat from the lower element. Ideal for cooking pizza as it crisps the base without overcooking the topping. For best results, cook on a pizza stone preheated for at least 1 hour. |
PASTRY BAKE  | Oven fan circulates heat from the lower element. Ideal for sweet and savoury pastry foods and delicate foods that require a crisp base and some top-browning such as frittata and quiche. |
SLOW COOK  | The fan circulates heat from the rear element. Ideal for slow-cooked dishes such as casseroles, stews and braised meat. No preheating needed. |
CLASSIC BAKE  | Provides heat from lower element only. Ideal for dishes that require delicate baking and have a pastry base, such as custard tarts, pies, quiches and cheesecake. |
AIR FRY  | A healthier way to cook delicious, crispy food using less oil. Ideal for food cooked from frozen or that would usually be deep fried. |
WARM  | Provides a constant low heat of less than 90°C. Use this function for keeping food hot, or to warm plates and serving dishes. |
Before you begin
- Ensure all cable ties and packaging have been removed.
- Set the time. To change the time at any point go to SETTINGS and select CLOCK: SET TIME.
- Condition your oven according to the instructions under 'Conditioning the oven'.
- Set the water hardness according to the instructions under 'Setting the water hardness'.
- Connect your oven to Wi-Fi to ensure it stays up to date with the latest software and features. For more information refer to 'Wi-Fi Connection & Remote mode'.
①

natural_image
Interior view of an oven with a grid rack open, showing no text or symbols on the rack itself.Position the shelves at the required height. Refer to 'Oven shelves' for guidance.
②

natural_image
Four abstract geometric icons on dark background: grid, wind turbine, wind turbine blade, and plus sign (no text or symbols)Select a function type.
For everyday cooking and specialised functions select from:
- STEAM
• CONVECTION + STEAM - CONVECTION
For guided cooking features select + and follow the instructions onscreen.
③

text_image
CHANGE FUNCTION BAKE FASelect a function.
④

text_image
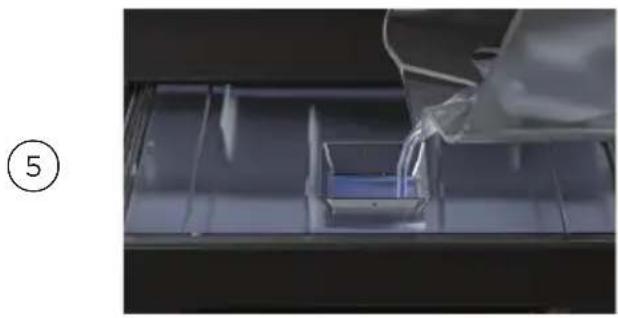
We recommend filling the tank with fresh water before cooking. Skip PILLSteam functions:
When prompted, open the water tank compartment and remove the water tank.
natural_image
Close-up of a transparent container with liquid being poured into it, no visible text or symbolsSteam functions:
Fill to the MAX fill line with fresh water then replace the tank.
For best results, we recommend filling the tank with fresh water each time you cook.

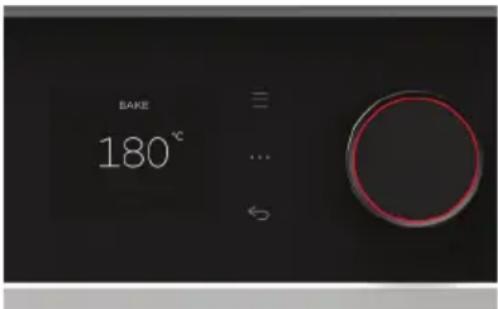
text_image
BAKE 180°C PREHEAT 90°CTurn the dial to adjust the temperature if needed.

text_image
BAKE 180 °C PREHEAT 50°C ⑦Press • to set automatic cooking if required. For more information refer to 'Cooking options.'
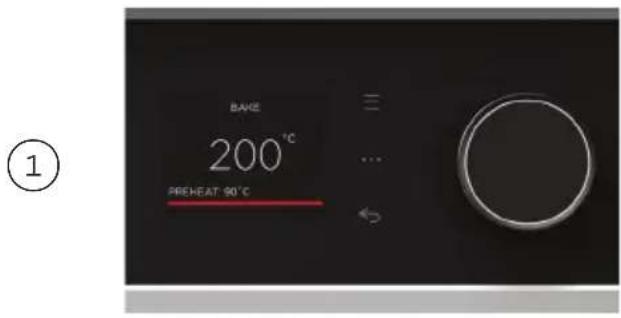
Preheating
A progress bar will show on the screen while the oven is heating. To prevent burning, wait until the oven has reached temperature before placing food inside.
Some functions do not need to preheat and will not show a progress bar. Place food in the oven when ready to start cooking.
To reach the set temperature quickly, some functions have a rapid preheat stage that uses all elements.
Soft close door
The soft close door has a slow and smooth movement when opening or closing the door. Soft close creates a perfect seal and prevents steam leaking when using steam functions.
Turning the oven off
text_image
BAKE 180°C ...Press and hold the dial or press back to stop heating the oven.
Press the power button to turn the oven off completely.
Drying the oven
After running a steam function, there may be some moisture left in the oven.
Wait for the oven to cool, then wipe out the base of the cavity with a sponge or soft cloth.
We recommend running a dry cycle after you have wiped out the base of the cavity to help remove any remaining moisture. Refer to 'Dry cycle' for more information.
Maximum steam cooking times
The below maximum cooking times apply when using steam functions.
We recommend staying within these cooking times to avoid a build up of condensation inside the oven.
TEMPERATURE (°C) MAX COOKING TIME (MIN)
| 100 120 | |
| 90 120 | |
| 80 120 | |
| 70 280 | |
| 60 320 | |
| 50 360 |
We recommend conditioning your oven for 1 hour before initial use to eliminate any manufacturing residue. A small amount of smoke may be present, ensure kitchen is well ventilated.
text_image
BAKE 200°C PREHEAT 90°CSet the oven to BAKE at 200^ C and heat for 30 minutes.

text_image
FAN GRILL 200 °CAfter 30 minutes change the function to FAN GRILL and heat for 5 minutes.
text_image
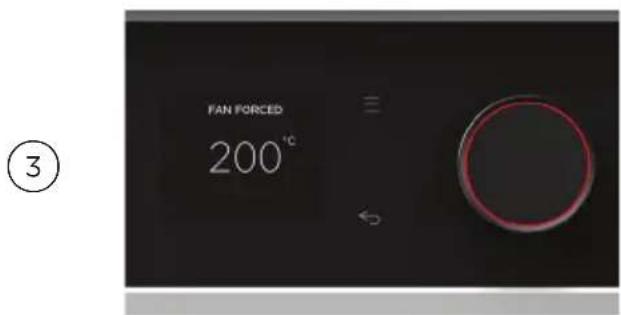
FAN FORCED 200°C ③After 5 minutes, change to FAN FORCED and heat for a further 20 minutes. When you have finished, turn the oven off.
After conditioning:
- Wait for the oven to cool completely.
- Wipe oven with a damp cloth and mild detergent.
• Dry with a clean, lint-free cloth.
We recommend setting the water hardness level before using any steam functions for the first time. If you are unsure of the water hardness level in your area, contact your local water supplier.
We do not recommend using this product with water hardness above 450ppm.

text_image
10:45Go to the menu.

text_image
MENU SETTINGS RE ②Select SETTINGS.

text_image
SETTINGS DESCALE: WATER HARDNESS Level 2 FA DE ③Select DESCALE: WATER HARDNESS.

text_image
WATER HARDNESS ZERO OTSelect the required water hardness level:
| WATER HARDNESS (PPM) LEVEL | |
| 0 - 100 ZERO | |
| 100 - 250 ONE | |
| 250 - 350 TWO | |
| 350 - 450 THREE | |
Your oven may be connected to your home wireless network and operated remotely using the app.
Connect your oven to ensure it stays up to date with the latest software and features.
Getting started
- Ensure your home Wi-Fi network is turned on.
- You will be given step by step guidance on both your appliance and mobile device.
- It may take up to 10 minutes to connect your oven.
- For further guidance and troubleshooting, please refer to the app.
On your mobile device:
① Download the app. Scan the QR code or go to www.fisherpaykel.com/connect
② Register and create an account.
③ Add your appliance and set up the Wi-Fi connection.
Connecting to your home Wi-Fi
①

text_image
10:45Go to the menu.
②
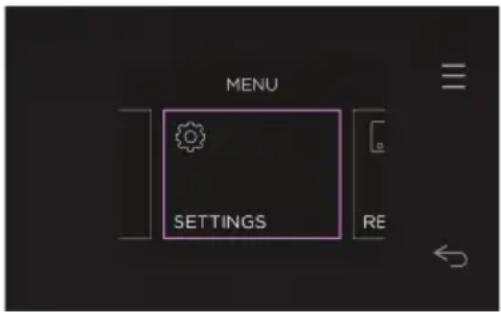
text_image
MENU SETTINGS RESelect SETTINGS.
③

text_image
SETTINGS WIFI: CONNECT Off DI. SC InvSelect WI-FI CONNECT and follow the instructions onscreen.
Enabling Remote Mode
①

text_image
10:45Go to the menu.
②

text_image
MENU REMOTE DFSelect REMOTE.
③

text_image
REMOTE ONSelect ON then press CONFIRM. Remote Mode is now enabled.

text_image
OPTIONS DELAYED COOKDelayed start
Set the oven to turn on later, cook for a set length of time and turn off automatically.

text_image
OPTIONS AUTO OFF TE SEAuto off
Set the oven to turn off after a set length of time.

text_image
OPTIONS TEMPERATURE SENSORTemperature sensor
Use a sensor to monitor cooking and automatically turn the oven off when food is done.
Accessing options
①

text_image
BAKE 180°C PREHEAT: 90°CSelect a function then press ••to access.
②
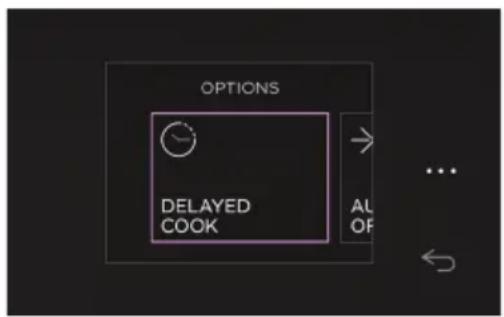
text_image
OPTIONS DELAYED COOK AL OFSelect a cooking option and follow the instructions onscreen.
Food safety
- Leave food in the oven for as short a time as possible before and after cooking.
- Ensure meat is fully defrosted before cooking.
- Rest meat after cooking to allow the internal temperature to continue to rise. High risk foods such as fish should reach a minimum internal temperature of 63 - 70°C and poultry and minced meat should reach 75 - 85°C.
Preheating
The grill element may come on while the oven is heating up. Position food on a lower shelf or cover to prevent burning as the oven heats up.
When using DELAYED COOK we do not recommend using GRILL, FAN GRILL or AIR FRY.
When using a TEMPERATURE SENSOR we recommend preheating before adding your food to the oven. Use caution when plugging a wired sensor in to a hot oven.
①

text_image
OPTIONS TEMPERATURE SENSORSelect a cook function.
Go to OPTIONS and select TEMPERATURE SENSOR.
②

text_image
TEMPERATURE SENSOR WIRED SENSOR ...Select the WIRED SENSOR
③

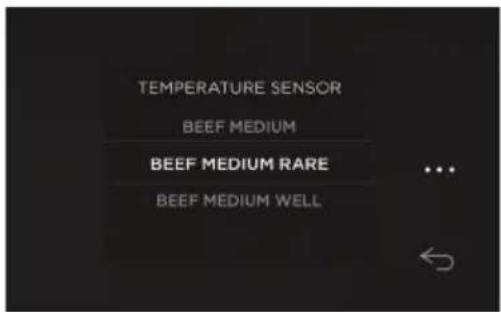
text_image
TEMPERATURE SENSOR BEEF MEDIUM BEEF MEDIUM RARE BEEF MEDIUM WELLSelect a food type and doneness level.
④
text_image
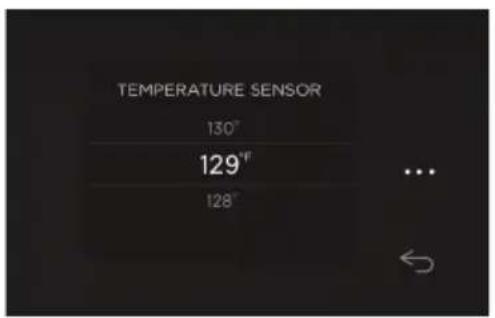
TEMPERATURE SENSOR 130° 129° 128° ...Select a temperature and press the dial to confirm.
Allow your oven time to preheat if necessary.
5

natural_image
Simple line drawing of a symmetrical object with a central dot and a diagonal line, no text or symbols present.Insert the sensor into your food.
Position the sensor in the thickest part of the dish, avoiding fat and bone in meat.
Ensure the tip of the sensor doesn't protrude out the other side of food or touch cookware.
⑥
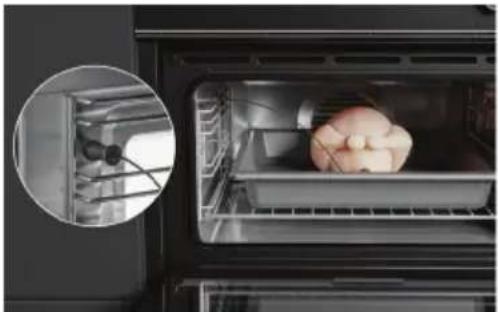
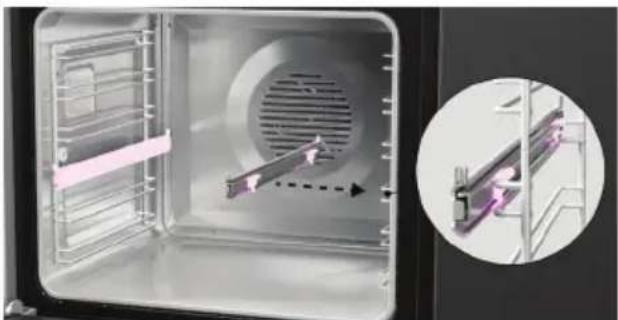
natural_image
Interior view of an oven with a small airplane emerging from the tray, showing a close-up inset (no text or symbols visible)Place food in the oven and plug in the sensor.
The socket is located inside the oven, on the left hand side.
Your oven may be connected to a compatible wireless temperature sensor.
Compatible sensors are available to purchase at fisherpaykel.com/sensor.
Ensure your sensor is fully charged before use.
Do not use your wireless sensor to heat food above 100^ C or place in an oven above 300^ C.
①

text_image
OPTIONS TEMPERATURE SENSORSelect a cook function.
Go to OPTIONS and select TEMPERATURE SENSOR.
②

text_image
TEMPERATURE SENSOR WIRELESS SENSORSelect the WIRELESS SENSOR.
3

text_image
WIRELESS SENSOR CONNECT SENSORFollow the instructions onscreen to connect the sensor.
④
text_image
TEMPERATURE SENSOR BEEF MEDIUM BEEF MEDIUM RARE BEEF MEDIUM WELLSelect a food type and doneness level.
5
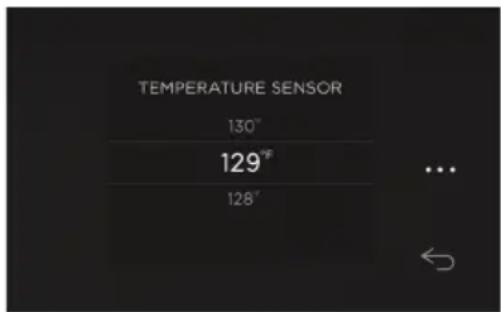
text_image
TEMPERATURE SENSOR 130" 129" 128"Select a temperature and press the dial to confirm.
Allow your oven time to preheat if necessary.
⑥

natural_image
Simple line drawing of a symmetrical abstract shape with a central dot and dashed line (no text or symbols)Insert the sensor into your food.
Position the sensor in the thickest part of the dish, avoiding fat and bone in meat.
Ensure the tip of the sensor doesn't protrude out the other side of food or touch cookware.
Ensure the sensor is inserted past the minimum line.
Place your food in the oven.
For the Sabbath observant. Sabbath Mode sets your oven to heat continuously for as long as required. The display will be unresponsive and no tones or alerts will sound.
While your oven is in Sabbath Mode it can operate at the following temperature levels:
HEAT LEVEL APPROXIMATE TEMP (°C) APPLICATION
Low 75-100 Keep hot food warm
Moderate 155-180 Reheat cooked food from cold
High 185-210 Cooking raw food
During Sabbath Mode
- The display will be unresponsive.
- No tones or alerts will sound.
• Wi-Fi will be disconnected. - The oven light will remain either on or off, depending on your preference.
- Lights, fans and display will not respond to the door opening.
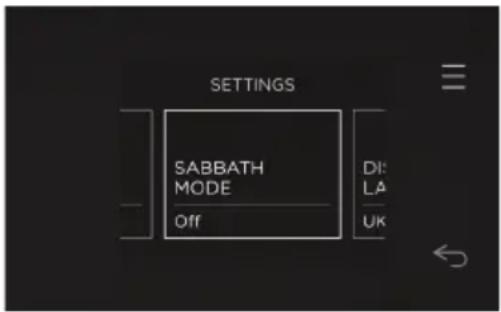
Setting Sabbath Mode

text_image
SETTINGS SABBATH MODE Off DI: LA UKIn the settings menu, select SABBATH MODE and follow the instructions onscreen.
The oven may take some time to get to temperature. If you want to cook immediately after setting Sabbath Mode we recommend preheating the oven before setting. Opening the door frequently or for too long may result in heat loss.
Cancelling Sabbath Mode
The oven will heat for the set length of time and then turn off. At the end of the cook time, the oven will remain in Sabbath Mode until cancelled.

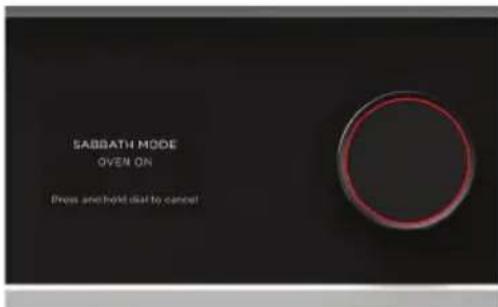
text_image
SABBATH MODE OVEN ON Press an/Hold dial to cancelPress and hold the dial to cancel.
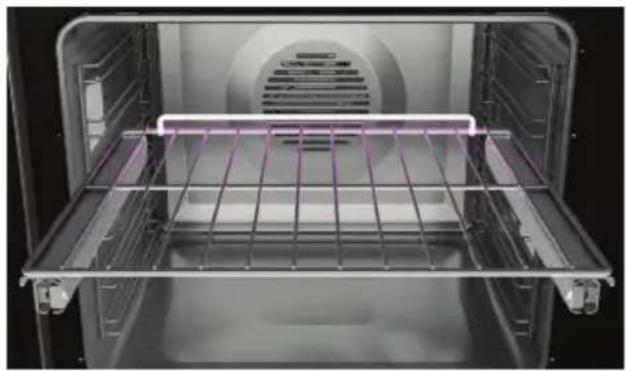
Positioning the oven shelves
Place shelves in the oven at the required level before heating the oven.
natural_image
Interior view of a stainless steel oven with metal grating and ventilation duct (no text or symbols visible)Ensure shelves are level and correctly positioned with the guard rail at the back
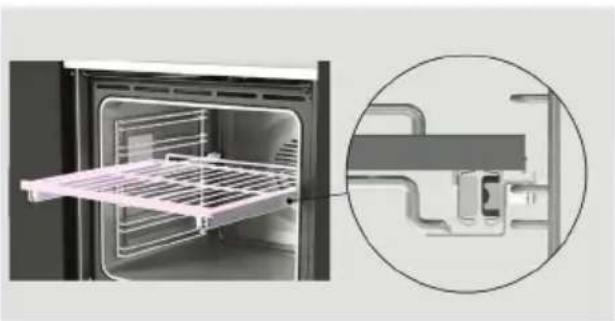
Sliding shelves (some models only)
natural_image
Interior view of an oven with a rack unit and a close-up inset showing internal components (no text or symbols)Grip shelves at the front, holding the wire shelf and frame together.
Place the shelf on top of the side racks, and push into the oven.
natural_image
Diagram showing a mechanical assembly with a magnified inset of a bracket detail (no text or symbols)Ensure the rear tags are hooked over the side racks on both sides.
Wire shelves

natural_image
Interior view of an oven with a grid of shelves open, showing no text or symbols on the shelves.Slide shelves into the cavity.
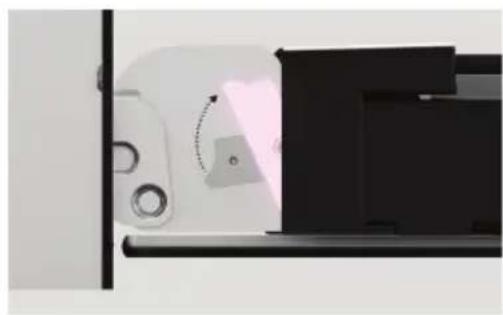
Clip on sliding shelf supports (some models only)
natural_image
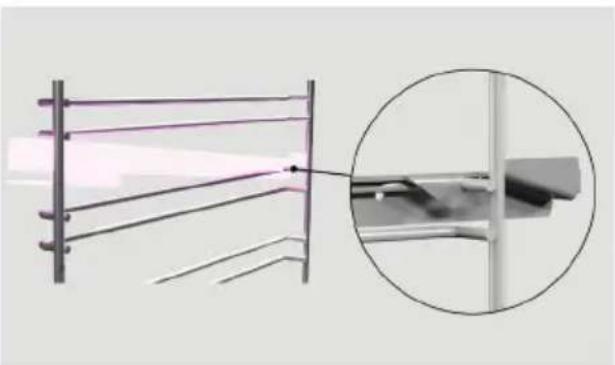
Interior view of a stainless steel oven with a circular vent and internal cooling mechanism, shown with an inset close-up of the mechanism (no text or symbols visible)To position
① Ensure the slides are positioned the correct way around, with the triangular tab at the front.
② Fit the top clips over the side rack. The front clip should be fitted as close to the front of the side rack as possible. Make sure the rear clip has engaged.
③ Rotate the slides down and click the bottom clips into place.
Turn the oven off at the wall and allow it to cool before doing any cleaning or maintenance.
Cleaning surfaces
Wipe with a damp cloth and mild detergent, then dry with a clean, lint-free cloth. We do not recommend using the following cleaning products as they may damage the surfaces:
- Plastic or stainless steel scouring pads
- Abrasive, solvent, household cleaners
- Acid or alkaline cleaners
- Hand washing liquids or soap
• Stainless steel cleaners or polishes - Laundry detergents or disinfectants
General
We recommend cleaning any easy-to-reach spills or splatters from the oven after every use, to prevent them becoming baked on.
Oven door glass
Clean the oven door glass after every use and before running a clean cycle, to prevent stains from becoming baked on.
WHAT? HOW? IMPORTANT!
| Control Panel | Take particular care when cleaning the control panel glass and screen. Only use a damp cloth with detergent. | Do not use any oven cleaners, harsh or abrasive cleaners, scouring pads, steel wool or sharp metal scrapers on the glass. These may scratch and damage the surface. |
| Dial | Clean with hot water and mild detergent, then wipe dry. | Do not use stainless steel or oven cleaner on the dial. |
| Stainless steel trim/door handle | Clean with hot water and mild detergent, then wipe dry. If necessary, use a suitable stainless steel cleaner and polish. | Ensure stainless steel cleaner does not contain chlorine compounds as these may damage the appearance of your oven. Always rub the stainless steel in the direction of the grain. |
| Oven door frame and plastic corner clips | Clean with hot water and mild detergent, then wipe dry. | |
| Oven seal | Do not clean this part. | |
| Oven cavity | For light soiling: Clean with hot water and mild detergent or an ammonia-based cleaner, then wipe dry. For stubborn/baked on soiling: Run a clean cycle. Refer to ‘Self Clean’. | Clean any easy-to-reach spills, food or grease stains from the oven after each use to prevent stubborn soiling. |
| WHAT? HOW? IMPORTANT! | ||
| Oven door glass(after every use) | Clean with hot water and mild detergent.For stubborn stains, try a mixture of baking soda and warm water with a non-abrasive scrubbing pad. | Do not use oven cleaners or any other harsh/abrasive cleaners, cloths, scouring pads, steel wool or sharp metal scrapers to clean the oven door glass. These scratch the glass, which in turn could result in the glass cracking and shattering.Do not allow grease to build up on the glass or become baked on as this reduces visibility into the oven. |
| Temperature sensor | Clean with hot water and mild detergent, then wipe dry.Wireless temperature sensor only:Dry thoroughly with a clean cloth before storing in its case in a cool, dry place. | Do not wash in the dishwasher, immerse in soapy water, use oven cleaner on or leave in the oven during a clean cycle.Do not submerge in cold water immediately after cooking. |
| Sliding shelves | Wipe with a damp cloth and mild detergent. Do not wipe off or wash away the white lubricating grease (visible when the shelf is extended). | Do not wash in the dishwasher, immerse in soapy water, use oven cleaner on or leave in the oven during a clean cycle. Doing so will prevent the slides from running smoothly. |
| GridBroil rackBroil panWire shelves | Clean with hot water and mild detergent.Soak stubborn stains in a solution of dishwasher powder and hot water. These parts are dishwasher safe. | Do not leave in the oven during a clean cycle. They will become discoloured or damaged. |
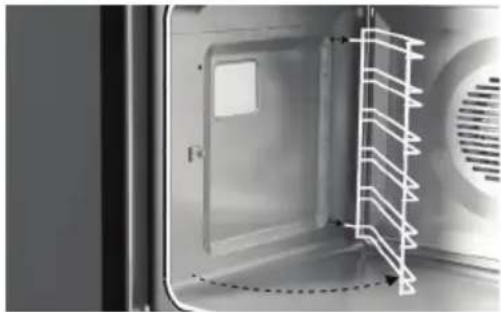
Removing the side racks
Remove the side racks to access the oven lights or to make cleaning easier.
①
natural_image
Interior view of a microwave oven with a rack-mounted shelf and open door (no text or symbols visible)Remove all shelves.
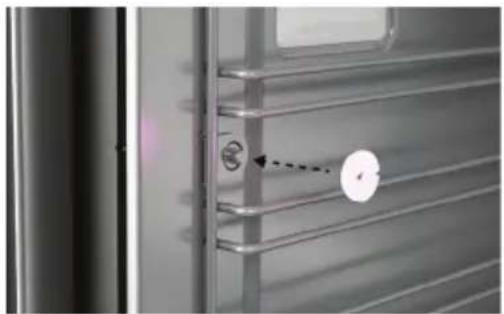
②
natural_image
Close-up of a metallic door with metal railings and a circular dial indicator (no text or symbols visible)Unscrew the nut holding the rack in position. Use a coin to loosen if required.
③
natural_image
Interior view of a microwave oven with a white rack structure on the right side (no text or symbols visible)Pull the front of the rack clear of the screw and slide forward to remove.
Refitting the side racks
①

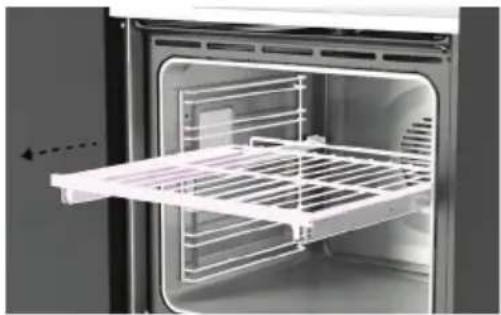
natural_image
Interior view of a microwave oven with a white rack structure and ventilation grille (no text or symbols visible)Slide the prongs into the holes.
Ensure the rack sits flush against the side of the oven.
②
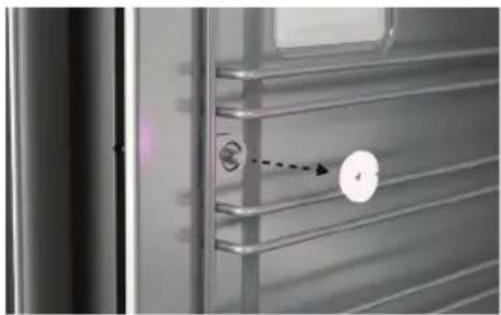
natural_image
Close-up of a metallic door with horizontal bars and a circular mark, showing a dashed arrow pointing to a white circle (no text or symbols visible)Align the tab with the screw and secure with the nut.
Use a coin to tighten if required.
Oven light specifications

natural_image
3D rendering of a white cylindrical electronic component with two pins at the bottom (no text or symbols visible)G9 220 - 240V/25W halogen bulbs.
To replace the oven light bulbs, contact Customer Care or go to our website www.fisherpaykel.com
Replacement bulbs are available via www.fisherpaykel.com. Oven light replacement is not covered by your warranty.
- The oven door can be removed and taken apart for cleaning.
• Make sure the oven and all its parts have cooled down before removing the door. - The oven door is heavy, take care while removing and refitting.
- Once the door is removed, place it on a soft, clean, flat surface.
Removing the oven door
①

natural_image
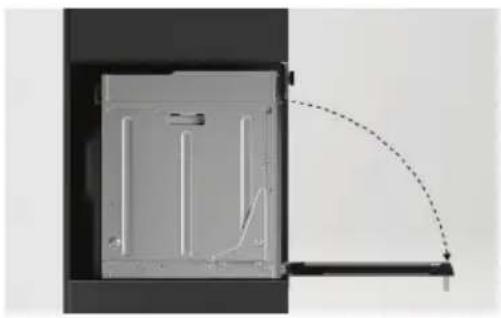
Diagram of a device interior with internal components and a curved dashed line indicating motion or alignment (no text or symbols)Open the door fully.
②
natural_image
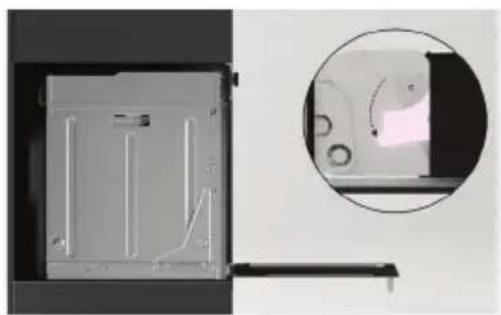
Diagram of a device with a rotating component and a rectangular block, no visible text or symbolsLocate the hinge locks on either side of the door.
Push the locks upwards to release.
③
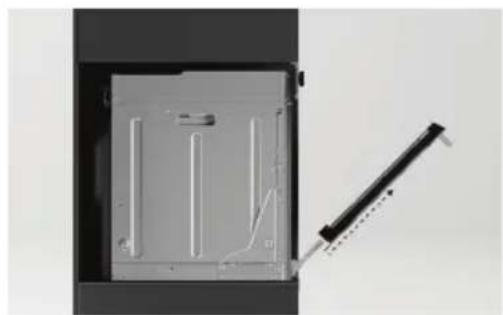
natural_image
Close-up of a mechanical component with a tool inserted, no visible text or symbolsHolding the door on both sides, partially close the door and carefully pull the door away from the hinges.
Refitting the oven door
①

natural_image
Cross-sectional view of a mechanical assembly showing internal components (no text or symbols visible)Holding the door on both sides, carefully lift door back onto the hinges.
②
natural_image
Diagram of a device casing with internal components and a curved dashed line indicating motion or alignment (no text or symbols)Open the door fully.
③
natural_image
Interior view of a device showing a transparent panel with internal components and a magnified inset of a circular detail (no text or symbols visible)Push each locking lever down and lock into place.
Ensure both hinges are fully locked before closing the door.
Taking the door apart
The oven door is made up of multiple glass panes. The number of panes may vary depending on your model.
Contemporary models Minimal models

text_image
inner middle outerBefore you begin
- Follow the instructions carefully. Refitting the glass incorrectly may result in damage to the oven and could void your warranty.
- Do not use the oven without all glass correctly in place.
• Take care when handling the glass. Avoid bumping the corners or edges against any surface. This may result in the glass shattering.
- Do not use oven cleaners or any other harsh/abrasive cleaners, cloths, scouring pads, steel wool or sharp metal scrapers to clean the glass surfaces. These scratch the glass and may damage the coating, which could result in the glass cracking or shattering.
- If you notice any sign of damage on any of the glass panes (such as chipping or cracks), do not use the oven. Contact a Fisher & Paykel trained and supported service technician or Customer Care.
- If the glass feels difficult to remove or replace, do not force it. Contact a Fisher & Paykel trained and supported service technician or Customer Care.
Removing the inner pane
①

natural_image
Architectural detail showing a building corner with structural elements and two side-view views (no text or symbols)Push tabs in on both sides of the glass retainer. Pull the retainer up until the tabs relocate in the uppermost hole.
②
natural_image
Close-up of a printer's front panel with paper and black cover, showing no text or symbolsPull the pane toward the top of the door until clear of the brackets, then lift out.
Do not angle the pane too much as this may damage the glass.
Removing the middle pane(s)
①
natural_image
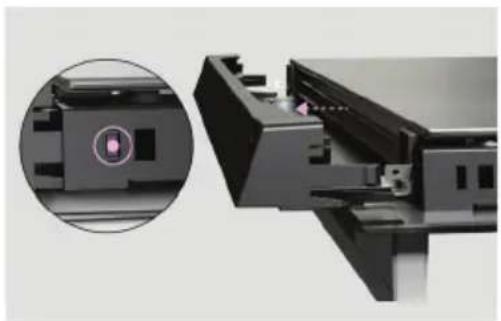
Close-up of a mechanical device with a magnified inset showing internal components (no visible text or symbols)Push tabs in on both sides of the glass retainer again and remove the retainer.
②
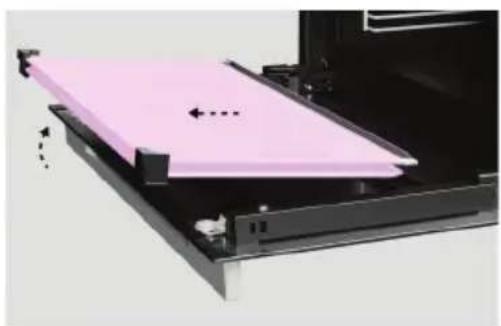
natural_image
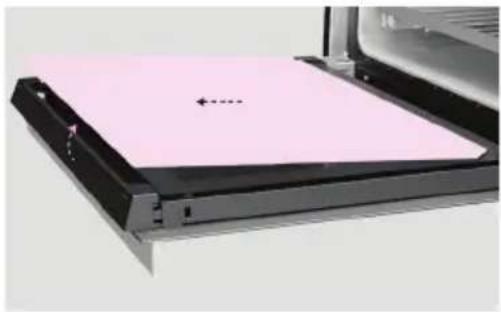
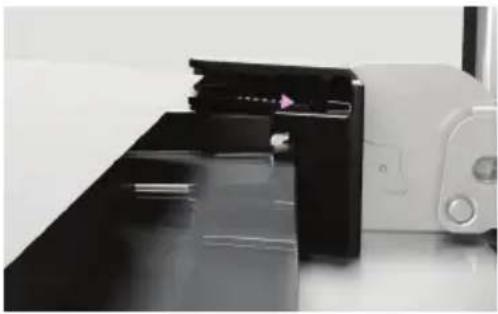
Close-up of a printer's internal structure with pink paper sheet and black base (no visible text or symbols)Pull the pane toward the top of the door until clear of the brackets, then lift out.
The rubber stoppers should remain attached to the glass.
Refitting the middle pane(s)
①

natural_image
3D rendering of a rectangular electronic component with a circular arrow symbol on its surface (no text or labels)Ensure the glass is the right way up before refitting.
The warning text at the bottom of the glass should face towards the front of the door.
②
natural_image
3D mechanical component with internal structure and dashed arrows indicating direction (no text or symbols)Ensure the rubber stoppers are attached to the glass and positioned correctly.
The longer side should be running down the side of the pane.
③

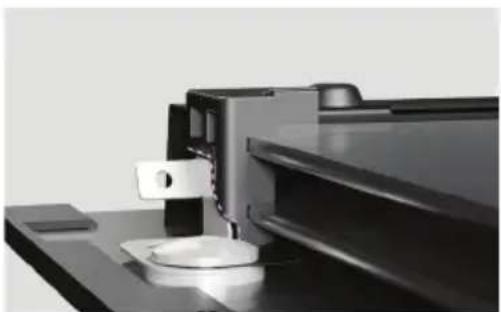
natural_image
Close-up of a mechanical assembly with metallic components and a transparent housing (no visible text or symbols)Slide the bottom of the glass into the lower brackets at the bottom of the door.
④
natural_image
Close-up of a mechanical device with a metallic tool inserted, showing no visible text or symbols.Lower the glass into place, with the rubber stoppers resting on the outer pane of glass.
5

natural_image
Pure mechanical component diagram without any text, numbers, or symbolsMinimal models only
When replacing the second middle pane, ensure the metal bracket is still in place and correctly positioned at the bottom of the glass.
Refitting the inner pane(s)
①
natural_image
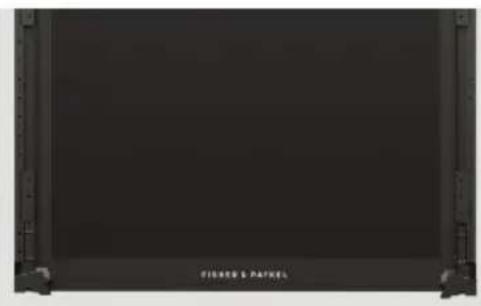
Front view of a black rectangular electronic device with 'FISHERS & PARKES' text on the front panel (no other visible text or symbols)Ensure the glass is the right way up before refitting.
The logo should be readable at the bottom of the door.
②
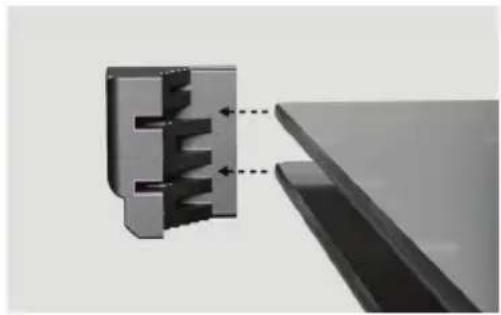
natural_image
Close-up of a black plastic electronic device with a white base and control panel, no visible text or symbolsSlide the bottom of the pane into the upper brackets at the bottom of the door.
Lower the pane into place, resting on the brackets at the top of the door.
③

natural_image
Architectural detail showing a building corner with structural elements and two side-view views (no text or symbols)Replace the glass retainer, ensuring it clicks securely into place.
To help lift stubborn spills, run the steam clean cycle before wiping out the oven. For best results, the oven should be around room temperature before beginning.
①

text_image
10:45Go to the menu.
②
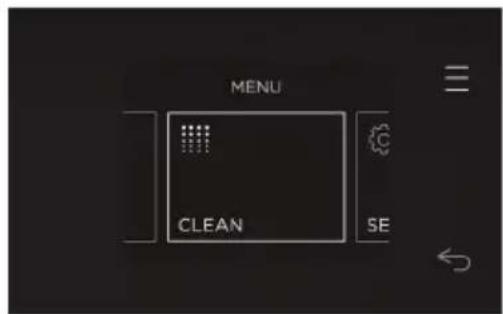
text_image
MENU CLEAN SESelect CLEAN.
③
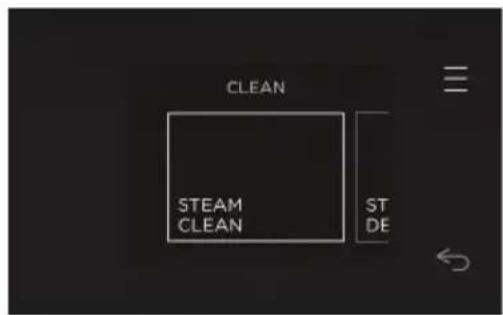
text_image
CLEAN STEAM CLEAN ST DESelect STEAM CLEAN.
④

text_image
STEAM CLEAN Fill your tank with water. PRESS DIAL to open tank.Follow the instructions on screen to start the clean cycle.
After the clean cycle is complete, wipe the base of the cavity to remove any excess moisture.
Descale your oven as soon as possible after the descale alert is shown to maintain optimum performance.
- Dissolve 80 grams (1/3 cup) of citric acid powder to 1L of warm water to make up the descaling solution.
- Take care when handling citric acid and ensure you read and follow the manufacturer's instructions carefully.
①

text_image
10:45Go to the menu.
②
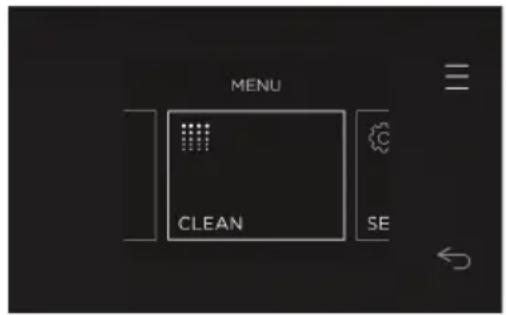
text_image
MENU CLEAN SESelect CLEAN.
③

text_image
CLEAN STEAM DESCALESelect STEAM DESCALE.
④

text_image
DESCALE Create Solution Dissolve 80g or 1/3c of citric acid powder in 1L of water.Follow the instructions on screen to start descaling the oven.
After the Descale cycle is complete, wipe the base of the cavity to remove any excess moisture.
After running a steam function, there may be some moisture left in the oven. You can run a dry cycle to help remove the remaining moisture:
- Remove any food from the oven before starting a dry cycle.
- If the dry cycle is not run regularly, excess moisture may build up in the cavity and cause damage. Damage caused by not running the dry cycle may void your warranty.
①

natural_image
Interior view of a refrigerator with a small green and yellow object on the tray (no text or symbols visible)Wait for the oven to cool, then wipe out the base of the cavity with a sponge or soft cloth before starting a dry cycle.
②

text_image
10:45Go to the menu.
③

text_image
MENU DRYSelect DRY.
④

text_image
DRYING The dry cycle will take 10 minutes.Follow the instructions on screen to start the dry cycle.
After running the dry cycle
①

natural_image
Close-up of a mechanical device with a green circular component inserted, showing a chain of black rods (no visible text or symbols)Check the drip tray and wipe dry if required.
| PROBLEM POSSIBLE CAUSES WHAT TO DO | ||
| The oven does not work | No power. Check that the mains power supply (wall switch) is turned on, the fuse has not tripped and there is no power outage in your area. | |
| The oven controls are unresponsive | The controls are locked. Press and hold the dial to unlock. | |
| The controls work but the oven does not heat up | The oven is in Demo mode. Call Customer Care. | |
| The door is not properly closed or it is opened too frequently during cooking. | The heating elements are disabled while the door is open.Make sure the door is properly closed and avoid opening it frequently during cooking. | |
| The door is not sealing correctly. Refit the door. Refer to ‘Cleaning the oven door’. | ||
| The temperature cannot be set below a certain point | This is normal. For food safety reasons, the oven functions have factory-set minimum temperature settings. | Select a higher temperature or try a different function that is designed for low temperatures. |
| The oven has reached the set temperature but the dial is still red | The oven is set to a function that doesn’t require preheating. | This is normal. The dial will stay red throughout cooking. |
| The oven fan comes on with a function that does not use the fan (eg bake) | This is normal. The fan comes on while the oven is preheating and will turn off when the oven has reached the set temperature. | Wait until the progress bar on the screen disappears. The oven will then be ready to use. |
| The lights do not come on when I open the oven door | The oven light bulb(s) have blown. Replace the light bulb(s). Refer to ‘Oven lights’. | |
| The door is not correctly fitted. Refit the door. Refer to ‘Cleaning the oven door’. | ||
| The oven light has been turned off. | Go to the menu and select LIGHT. | |
| The oven settings cannot be adjusted | The oven was on or set for automatic cooking when you tried to adjust the settings. | This is normal. You can only adjust the settings while there is no cooking underway. |
| There is hot air blowing out of the vents after the oven is turned off | For safety reasons the cooling fans will continue to run even when you have turned the oven off. | This is normal. The fans will switch off automatically when the oven has cooled. |
| The oven door does not align with the control panel or surrounding cabinetry | The oven door has been fitted incorrectly and the hinges are misaligned within the slots. | Refit the door.Refer to ‘Cleaning the oven door’ for instructions. |
| A glass pane in the oven door has cracked, chipped or shattered | Incorrect cleaning or the edge of the glass hitting against something. | You must NOT use the oven.Contact a Fisher & Paykel trained and supported service technician or Customer Care |
| The oven is beeping and showing an alert | There may be a fault. Follow the guidance on the screen. Refer to ‘Fault codes’ for more information. | |
How do I know if there is a problem?
Your oven will beep and an alert will show in the display.
What to do
First try to fix the issue and clear the alert according to the instructions onscreen or the steps in the following table.
Do not turn the oven off at the wall unless it is completely cool. Turning off the power while the oven is too hot may damage the oven and its surrounding cabinetry.
If the problem persists
① Note down the fault code.
② Contact Customer Care or a Fisher & Paykel trained and supported service technician. Refer to the Service and Warranty booklet for contact details.
If the fault code has disappeared, the fault has been reset and you can continue to use your oven.
FAULT CODE POSSIBLE CAUSE WHAT TO DO
| A1 | The oven has overheated. | Allow the oven to cool down.Once the oven has cooled down and the door has unlocked, the alert code will disappear. You can now use the oven. |
| F+ number | Technical fault. | Note down the alert code.Wait until the cooling fans have stopped and the oven has completely cooled down.Turn the power to the oven off at the wall.Contact a Fisher & Paykel trained and supported service technician or Customer Care. |
EU This appliance is marked according to the European Directive 2012/19/EU on Waste Electrical and Electronic Equipment (WEEE). By ensuring this product is disposed of correctly, you will help prevent potential negative consequences for the environment and human health, which could otherwise be caused by inappropriate handling of this product.
The symbol 📁 marked on the serial plate, or on the documents accompanying the product, indicates that this appliance cannot be treated as household waste. It shall be handed over to the applicable collection point for the recycling of electrical and electronic equipment. Disposal of the appliance shall be carried out in accordance with the local environment regulations for waste disposal and ensure the refrigerant circuit is not damaged.
For more detailed information about treatment, recovery and recycling of this product, please contact your local city office, your household waste disposal service or your Fisher & Paykel retailer/dealer from whom you purchased this product.
OS60SDL models
| WEIGHT (KG) | OVEN CAVITIES | CAVITY VOLUME (LITRES) | ENERGY CONSUMPTION* (CONVENTIONAL) KWH/CYCLE | ENERGY CONSUMPTION* (FAN FORCED) KWH/CYCLE | ENERGY EFFICIENCY INDEX (CONVENTIONAL) | ENERGY EFFICIENCY INDEX (FAN FORCED) |
| 50 | 1 | 72 | 0.81 | 0.67 | 95 | 79 |
| STANDBY POWER** (WATTAGE) | TIME TO STANDBY*** (MINUTES) | |||||
| < 1.0 W 15 | ||||||
*Energy consumption for electric cooking appliances is calculated using the following Standard: BS EN 60350 Part 1- Ranges, ovens, steam ovens and grills — Methods for measuring performance.
**Standby power for electric cooking appliances is calculated using the following Standard: EN 50564 - Electrical and electronic household and office equipment - Measurement of low power consumption.
***Time to standby for electric cooking appliances is calculated using the following Standard: EN 50643 - Electrical and electronic household and office equipment - Measurement of networked standby power consumption of edge equipment.
UK

text_image
QR code image containing encoded data, no visible human-readable textTo access your Warranty and Service Guide
Scan the QR code with your smartphone to access your warranty and book a service, or view online at https://www.fisherpaykel.com/uk/help-and-support/warranty-information
IE

text_image
QR code image containing encoded data, no visible human-readable textTo access your Warranty and Service Guide
Scan the QR code with your smartphone to access your warranty and book a service, or view online at https://www.fisherpaykel.com/ie/help-and-support/warranty-information
This product has been designed for use in a domestic (residential) environment. This product is not designed for any commercial use. Any commercial use by the customer will affect this product's Manufacturer's Warranty.
For spare parts, please contact Fisher & Paykel Customer Care. Spare parts are available for all Fisher & Paykel products for a minimum period of 10 years from the date of manufacture.
Complete and keep for safe reference:
Model
Serial No.
Purchase Date
Purchaser
Dealer
Suburb
Town
Country
Before you call for service or assistance
Check the things you can do yourself. Refer to your User guide and check:
① Your product is correctly installed.
② You are familiar with its normal operation.
③ You have read the 'Before you call for service or assistance', 'Fault codes' and 'Troubleshooting' sections.
If after checking these points you still need assistance or parts, please refer to your nearest Fisher & Paykel trained and supported service technician, Customer Care, or contact us through our website fisherpaykel.com.
In UK if you need assistance
Call the Fisher & Paykel Customer Care Centre and talk to one of our Customer Care Consultants.
Toll Free: 08000 886 605
Website: fisherpaykel.com
Postal address:
Fisher & Paykel Appliances Ltd,
Turing House, Ortensia Drive,
Milton Keynes MK17 8LX
In Ireland if you need assistance
Call the Fisher & Paykel Customer Care Centre and talk to one of our Customer Care Consultants.
Toll Free: 1800 625174 or 01 807 7960
Website: fisherpaykel.com
Postal address:
Fisher & Paykel Appliances Ltd,
Unit 2D Corporate Park,
Swords Dublin
If you need service
Fisher & Paykel has a network of Fisher & Paykel trained and supported service technicians that can carry out any service necessary on your appliance. Our Customer Care Centre can recommend a Fisher & Paykel trained and supported service technician in your area. Or you can book one online at fisherpaykel.com/uk/help-and-support or fisherpaykel.com/ie/help-and-support
If you call, write or contact us via our website please provide:
your name and address, model number, serial number, date of purchase and a complete description of the problem. This information is needed in order to better respond to your request for assistance.
Product details can be found inside the oven below the control panel.
FISHERPAYKEL.COM
© Fisher & Paykel Appliances 2023. All rights reserved.
The models shown in this guide may not be available in all markets and are subject to change at any time.
The product specifications in this guide apply to the specific products and models described at the date of issue. Under our policy of continuous product improvement, these specifications may change at any time.
For current details about model and specification availability in your country, please go to our website or contact your local Fisher & Paykel dealer.